

Acura TSX 2014 User Manual

31 TL 1Q 50 20 14 A cura TS X Se dan Adva nced Te ch no logy Gui de
00 X3 1- TL1- Q500 ©2 01 3 Amer ican Ho nd a Moto r Co ., I nc. — A ll R ight s Re ser ve d P ri nt ed in J apan
o w n e r s . a c u r a . c o m
2014 ADVANCED TECHNOLOGY GUIDE
A D V A N C E D T E C H N O L O G Y G U I D E
This Advanced Technology Guide is designed to help you get
V O I C E
R E C O G N I T I O N
p. 12
N A V I G A T I O N p. 16
acquainted with your 2014 Acura TSX Sedan and provide basic
instructions on some of its technology and convenience
features.
This guide is not intended to be a substitute for the Owner’s
Manual. For more detailed information on vehicle controls and
operation, please refer to the respective sections in the Owner’s
Manual or Navigation Manual.
As with the Owner’s Manual, this guide covers all trim levels of
the Acura TSX Sedan. Therefore, you may find descriptions of
equipment and features that are not on your particular vehicle.
B L U E TOOT H
®
H A N D S F R E E L I N K ®
M U L T I - I N F O R M A T I O N
D I S P L A Y p. 4
p. 21
A U D I O p. 28
Instrument Panel Indicators............................................................................2
Multi-Information Display (MID) .....................................................................4
Driving Position Memory System (DPMS) ......................................................8
Reverse Tilt Door Mirror....................................................................................9
Rearview Camera* .........................................................................................9
Fuel Fill Door ...................................................................................................10
®
HomeLink
Voice Recognition ........................................................................................12
Navigation*....................................................................................................16
......................................................................................................11
Technology Package shown
AcuraLink®Messages* ..................................................................................20
®
Bluetooth
iPod
Hard Disc Drive (HDD) Audio*......................................................................29
Song By Voice
Bluetooth
Acura Owners................................................................................................33
Safety Reminder ............................................................................................33
Fuel Recommendation.................................................................................33
HandsFreeLink®...........................................................................21
®
or USB Flash Drive ................................................................................28
TM
(SBV)* .................................................................................30
®
Audio...........................................................................................32
*if equipped
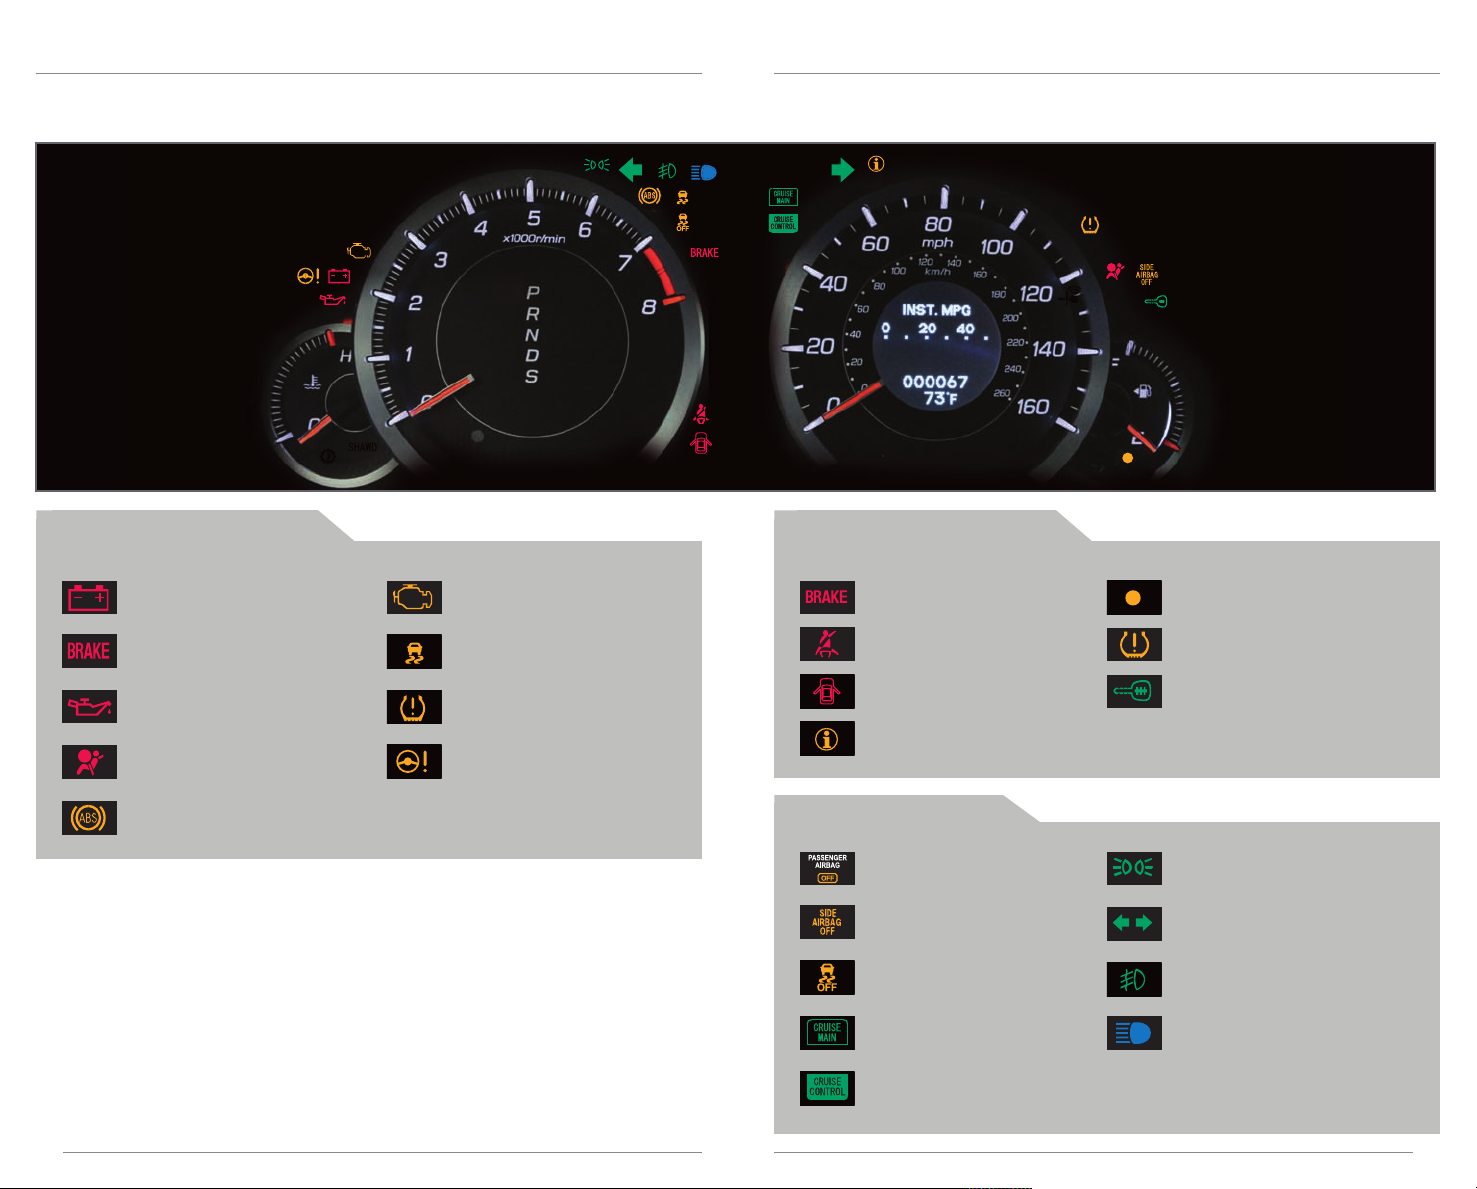
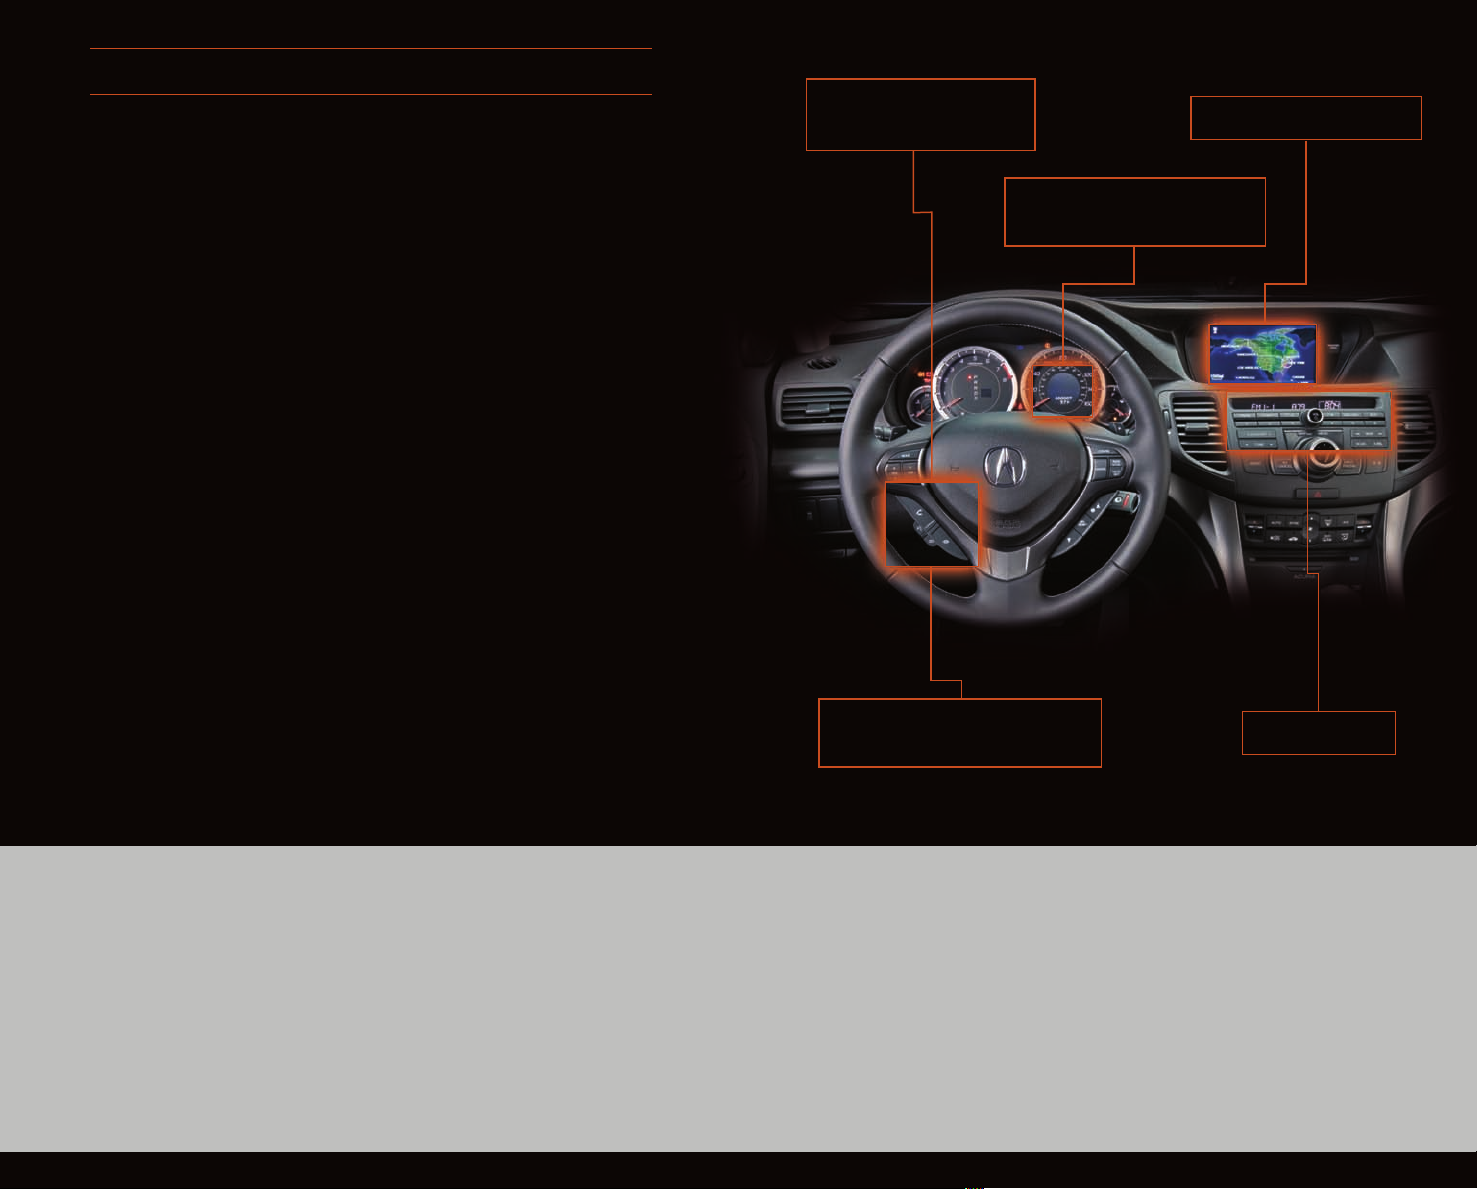
I N S T R U M E N T P A N E L I N D I C A T O R S
Briefly appear with each engine start. Red and amber indicators are most critical.
Blue and green indicators are used for general information. See your Owner’s Manual
for more information.
Automatic transmission vehicle shown
M a l f u n c t i o n I n d i c a t o r s
If an indicator remains on, there may be a problem; see your dealer.
Charging system
Low brake fluid, Brake system
Low oil pressure
Supplemental Restraint System
(SRS)
Anti-lock Brake System (ABS)
Malfunction indicator lamp
(check engine light)
Vehicle Stability Assist®(VSA)
Tire Pressure Monitoring System
(TPMS) (blinks and stays on)
Electric Power Steering (EPS)
C o n d i t i o n I n d i c a t o r s
Action is needed by driver.
Parking brake on:
Release
Seat belt reminder:
Fasten seat belt(s)
Door/trunk open:
Close door or trunk
Message indicator:
See MID
O n / O f f I n d i c a t o r s
PASSENGER AIRBAG OFF
(above audio panel)
SIDE AIRBAG OFF
VSA OFF
CRUISE MAIN on
CRUISE CONTROL on
Low fuel:
Refill
Low tire pressure (stays on):
Add air
Immobilizer (blinks):
Use other vehicle key and see
your dealer
Exterior lights on
Turn signals/hazards on
Fog lights on
High beams on
32
M U L T I - I N F O R M A T I O N D I S P L A Y ( M I D )
Consists of several displays that provide you with useful information.
A c c e s s i n g t h e M I D M a i n D i s p l a y s
When you start the engine, the MID
shows the last active lower display
from the previous drive cycle.
To toggle between the different
displays:
• Press either Info button (▲/▼)
for the main displays.
• Press SEL/RESET for the lower
displays.
SEL/RESET
button
INFO
buttons
Main display
Instant fuel economy
Average fuel economy
Range
Bluetooth®HandsFreeLink®(HFL)*
Tire pressure monitor
Average speed
Elapsed time
*if a call is active (Base model only)
L o w e r D i s p l a y s
Odometer,
Outside
temperature
Trip A,
Outside
temperature
Trip B,
Outside
temperature
Oil life
54
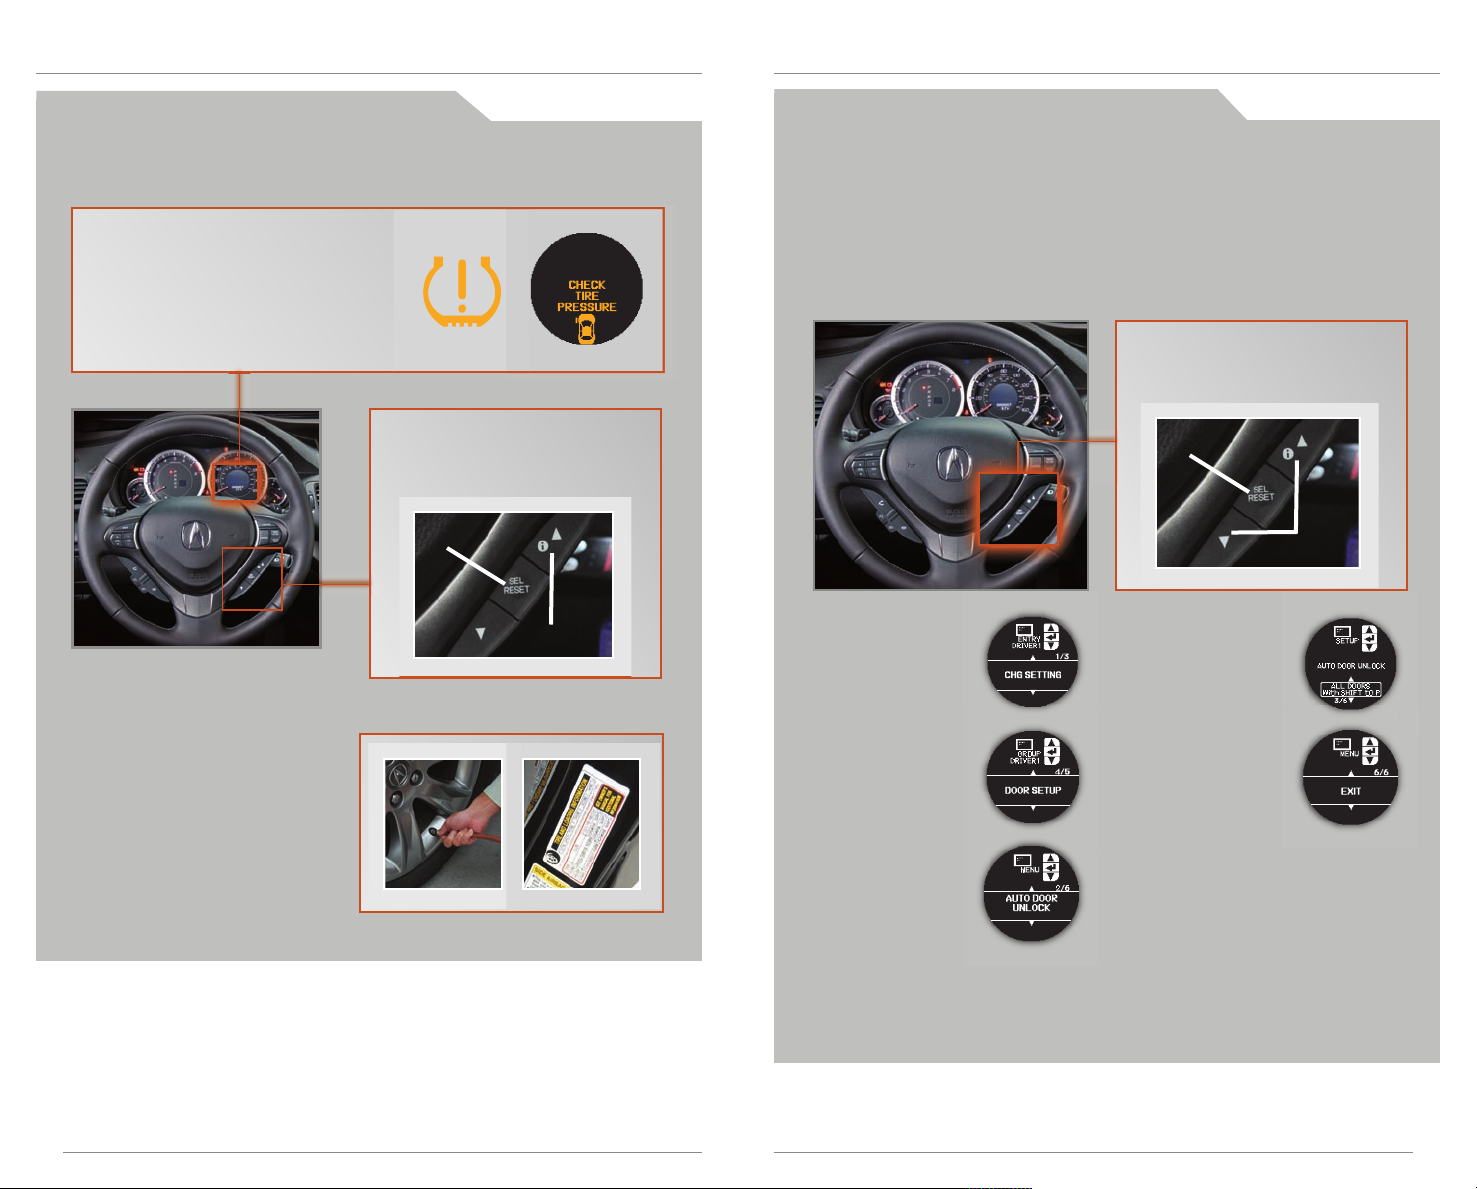
T i r e P r e s s u r e M o n i t o r i n g S y s t e m
Alerts you when one or more of your tires have significantly low pressure.
H o w I t W o r k s
If the tire pressure drops significantly
below recommended levels:
• The low tire pressure indicator
comes on.
• CHECK TIRE PRESSURE appears on
the MID, along with an indicator
of the tire(s) with low pressure.
C u s t o m i z i n g S e t t i n g s U s i n g t h e M I D
Four groups of settings can be programmed using the MID: Meter Setup, Position
Setup, Lighting Setup, and Door Setup. See your Owner’s Manual for a complete
list of programmable settings.
M o d i f y in g t h e A u to D o o r U n l o c k S e t t i n g
As the default setting, only the driver's door unlocks when you shift to Park (or
turn the ignition off for manual transmission vehicles). Follow the steps below
to change the setting. Make sure you are using the key you want to change
settings for (Driver 1 or Driver 2).
Press and hold either INFO
button (▲/▼) to enter
customization mode, then press
SEL/RESET to enter the menu.
W h a t t o D o
1. Visually inspect the tires for
damage.
2. Use a tire air pressure gauge
(or check the MID) to check
which tire(s) have low
pressure.
3. Inflate the tire(s), if necessary,
to the recommended
pressures listed on the label on
the driver’s doorjamb.
Press either INFO button (▲/▼)
to scroll to the tire pressure
monitor display, then press
SEL/RESET to view readings.
SEL/RESET
button
INFO
buttons
SEL/RESET
button
INFO
buttons
1. Select CHG
SETTING.
2. Select DOOR
SETUP.
3. Select AUTO
DOOR
UNLOCK.
Note: The driver’s and front passenger’s doors can be opened by pulling the
inner front door handle, regardless of the settings. Changing the setting to
“All Doors” is useful for rear passengers.
4. Select one of the
options.
5. Once the setting
has been saved,
select EXIT.
76
D RIV I N G PO S ITI ON MEM OR Y SY S T EM ( D PMS )
Store driver’s seat positions into memory for each corresponding remote transmitter
(1 or 2).
P r o g r a m m i n g t h e D P M S
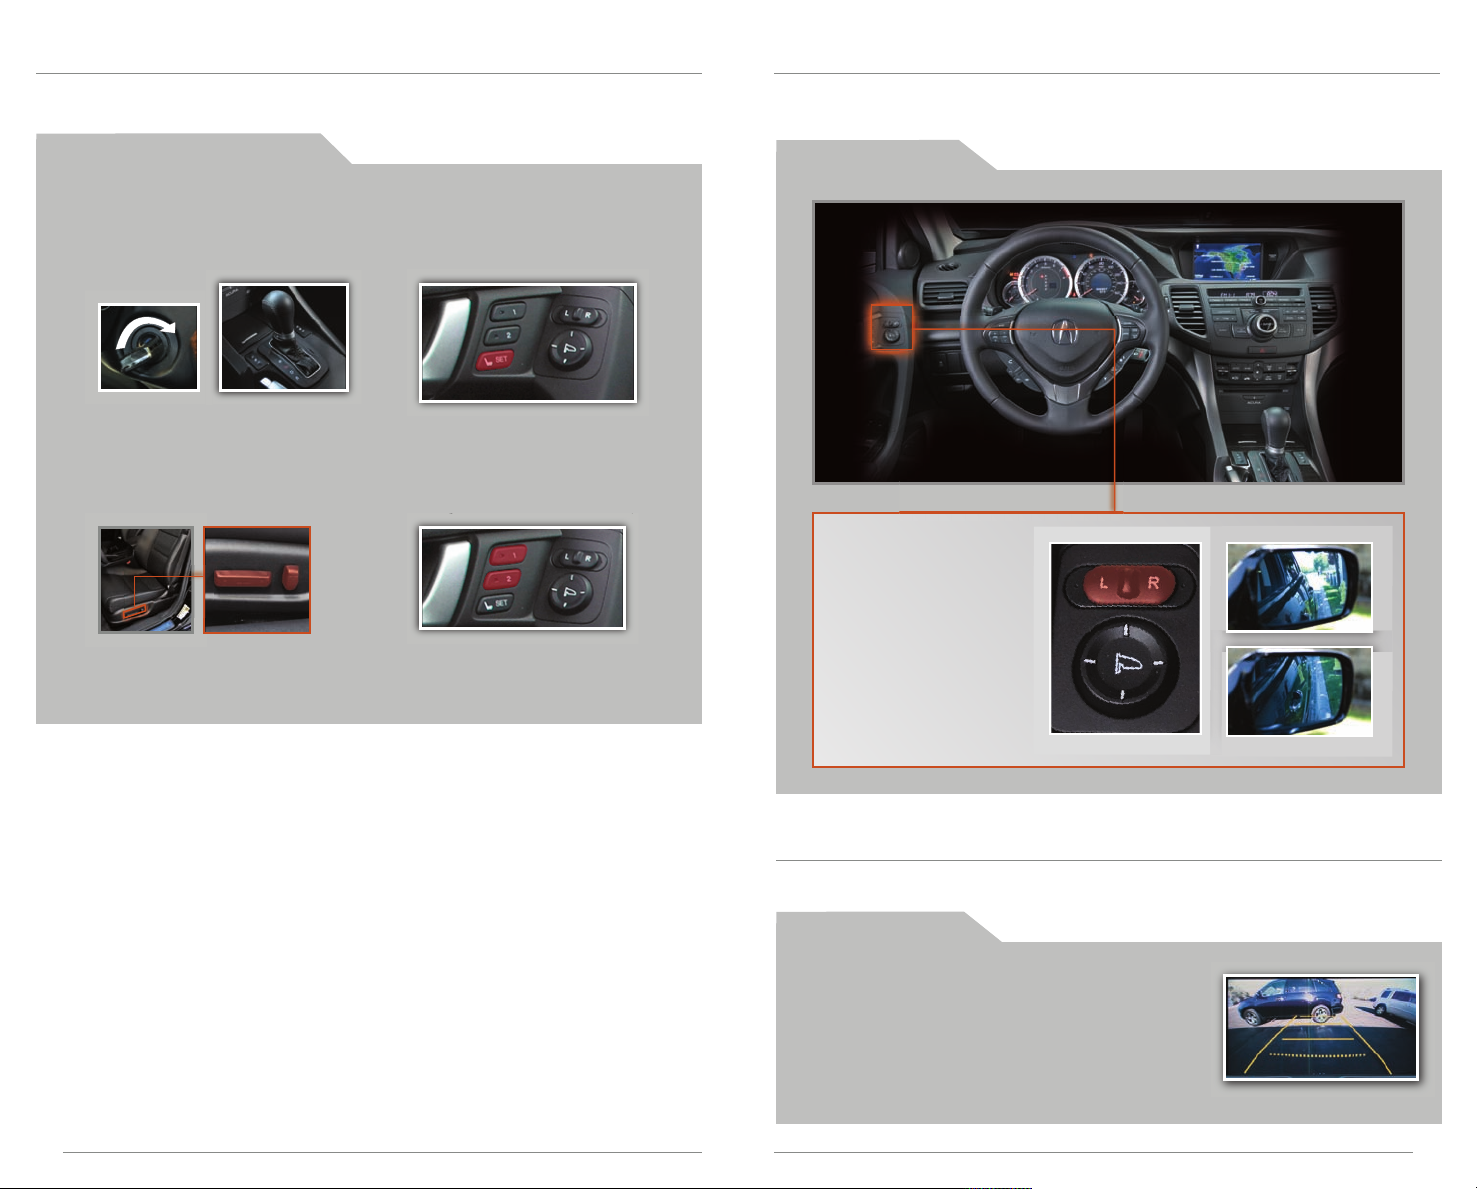
R E V E R S E T I L T D O O R M I R R O R
When you shift into Reverse (R), the passenger’s outside door mirror tilts down slightly
to improve your view as you parallel park. Shifting out of Reverse returns the tilted
mirror to its original position.
H o w I t W o r k s
1. Turn the ignition switch to ON (II).
Shift into Park (P) or apply the
parking brake for manual
transmission vehicles.
2. Adjust the seat to your preferred
position.
Note: Once set, stored positions can be recalled by pressing
one of the memory buttons (1 or 2) on the door.
3. Press SET. You will hear a beep.
4. Within 5 seconds, press the
memory button corresponding
to the remote (1 or 2) you are
using. You will hear two beeps.
• To tilt the passenger’s
door mirror, move the
mirror selector switch
to the right (R) position
when in Reverse.
• To turn the feature off,
move the switch to
the middle or left (L)
position.
R E A R V I E W C A M E R A ( T e c h n o l o g y P a c k a g e )
For added convenience, the area behind your vehicle is displayed to help you
navigate while backing up.
H o w I t W o r k s
• When you shift into Reverse, a real-time image of
the area behind your vehicle is shown in the
navigation display.
• Yellow parking guidelines also appear to help you
judge distance.
• Adjust the screen brightness by turning the
Interface Dial.
• The display turns off when you shift out of Reverse.
98
 Loading...