

Page 1

3 1T K4 A5 0 2 01 4 Ac ur a T L Ad va nc ed Te ch no lo gy Gu id e
0 0X 31 -T K4 -A 5 00 ©2 01 3 Ho nd a Mo to r Co ., L td . — Al l R ig ht s Re s er ve d Pr in te d in U .S .A .
o w n e r s . a c u r a . c o m
2014 ADVANCED TECHNOLOGY GUIDE
Page 2

A D V A N C E D T E C H N O L O G Y G U I D E
This Advanced Technology Guide is designed to help you get
acquainted with your 2014 Acura TL or TL Special Edition and
provide basic instructions on technology and convenience
features.
This guide is not intended to be a substitute for the Owner’s
Manual. For more detailed information on vehicle controls and
operation, please refer to the respective sections in the
Owner’s Manual.
M U L T I - I N F O R M A T I O N
D I S P L A Y
p. 6
Keyless Access System* ......................................................................2
Instrument Panel Indicators................................................................4
Multi-Information Display (MID) .........................................................6
Tire Pressure Monitoring System (TPMS).............................................9
Driving Position Memory System (DPMS).........................................10
Reverse Tilt Door Mirrors ....................................................................11
Bluetooth
®
HandsFreeLink®(HFL) .....................................................12
B L U E T O O T H
®
A U D I O
p. 14
H A N D S F R E E L I N K ® p. 12
®
Bluetooth
iPod®or USB Flash Drive ....................................................................15
HomeLink®..........................................................................................16
Acura Owners....................................................................................17
Safety Reminder ................................................................................17
Fuel Requirement ..............................................................................17
Audio...............................................................................14
*if equipped
Page 3
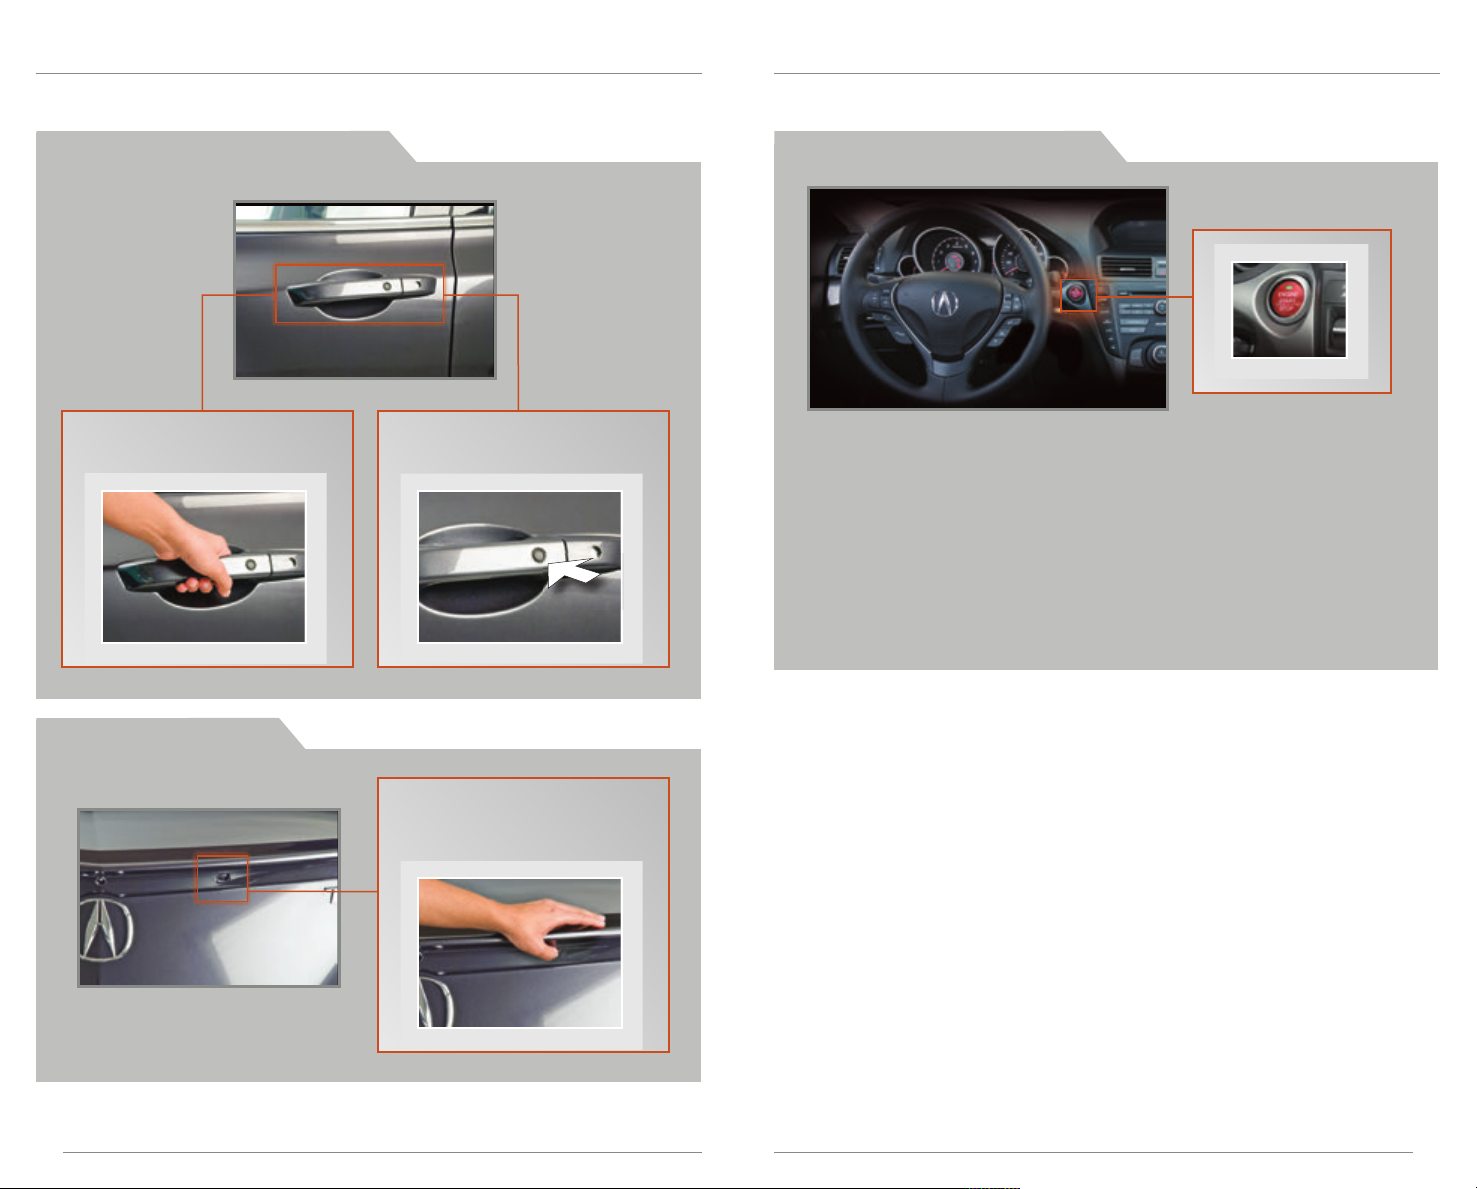
K E Y L E S S A C C E S S S Y S T E M
Operate certain functions of your vehicle by simply having the remote transmitter
within operating range. Available on Special Edition.
U n l o c k i n g / L o c k i n g t h e D o o r s
To unlock, grab either one of the
front door handles when the
vehicle is off.
To lock, press the door lock
button on either front door
handle when the vehicle is off.
E n g i n e S t a r t / S t o p B u t t o n
A c c e s s o r y o r O n M od e
Press ENGINE START/STOP once without pressing the brake pedal for
Accessory mode. Press it again for On mode.
S t a r t i n g t h e E n g i ne
Press and hold the brake pedal, then press ENGINE START/STOP.
T u r n i n g t h e Ve h i c le O f f
Shift to Park, then press ENGINE START/STOP.
Note: If you press the button and the shift lever is not in Park, the vehicle goes into
Accessory mode.
O p e n i n g t h e T r u n k
2
6
Press the trunk release button
under the spoiler when all doors
are unlocked. The vehicle can
be on or off.
3
Page 4

I N S T R U M E N T P A N E L I N D I C A T O R S
PASSENGER
AIRBAG
OFF
Briefly appear with each engine start. Red and amber indicators are most critical.
Blue and green indicators are used for general information. See your Owner’s Manual
for more information.
M a l f u n c t i o n I n d i c a t o r s
If an indicator remains on, there may be a problem; see your dealer.
Charging system
Low brake fluid, Brake system
Low oil pressure
Supplemental Restraint
System (SRS)
Anti-Lock Brake System (ABS)
Keyless Access System*
Super Handling-All Wheel Drive
(SH-AWD)*
Malfunction indicator lamp
(check engine light)
Vehicle Stability Assist®(VSA)
Tire Pressure Monitoring System
(TPMS) (blinks and stays on)
Electric Power Steering (EPS)
*if equipped
C o n d i t i o n I n d i c a t o r s
Action is needed by driver.
Parking brake on:
Release
Seat belt reminder:
Fasten seat belt(s)
Door/trunk open:
Close door or trunk
Immobilizer (blinks):
Use other vehicle key and
see dealer
O n / O f f I n d i c a t o r s
PASSENGER AIRBAG OFF
(above audio panel)
SIDE AIRBAG OFF
VSA OFF
CRUISE MAIN on
CRUISE CONTROL on
Message indicator:
See MID
Low fuel:
Refill
Low tire pressure:
Add air
Fog lights on
Exterior lights on
Turn signals/hazards on
High beams on
54
Page 5

M U L T I - I N F O R M A T I O N D I S P L A Y ( M I D )
AVG. SPEED
mph
CUSTOMIZE
SETTINGS
1234567890
IN USE
Consists of several displays that provide you with useful information.
A c c e s s i n g t h e M I D M a i n D i s p l a y s
When you start the engine, the MID
shows the last active display from
the previous drive cycle.
To toggle between the MID
main displays, press either Info
(p/q) button.
To toggle between the lower
displays, press SEL/RESET.
SEL/RESET
button
INFO
button
Odometer,
trip meter
Average and instant
fuel economy
SH-AWD torque
distribution monitor* Elapsed time
Tire pressure monitor Customize settings
Average speed
HandsFreeLink
(if a call is active)
L o w e r D i s p l a y s
Odometer,
Outside temperature
Trip A,
Outside temperature
Range
Bluetooth
*if equipped
®
®
6
6
Oil life,
Outside temperature
Trip B,
Outside temperature
7
Page 6

C u s t o m i z i n g S e t t i n g s U s i n g t h e M I D
Program various vehicle settings using the MID. One example is shown below. See
your Owner’s Manual for other customizable settings.
P r o g r a m m i n g t h e A u t o D o o r U n l o c k S e t t i n g
Only the driver’s door is preset to unlock when you shift into Park (P). Follow
the steps below to change this setting.
Press either Info ( p/q) button to
toggle to the Customize Settings
display, then press SEL/RESET to
enter the menu. Use these
buttons to make menu selections.
SEL/RESET
button
T I R E P R E S S U R E M O N I T O R I N G S Y S T E M ( T P M S )
Alerts you when one or more of your tires has significantly low pressure.
H o w I t W o r k s
If the tire pressure drops significantly
below recommended levels:
• The low tire pressure indicator
comes on.
• A CHECK TIRE PRESSURE message
appears on the MID, showing
which tire(s) have low pressure.
Info
buttons
1. Select CHANGE SETTINGS.
2. Select DOOR SETUP.
3. Select AUTO DOOR UNLOCK.
4. Select one of the available options.
5. Once the setting has been saved, select EXIT.
Note: The driver’s and front passenger’s doors can be opened by pulling the inner
door handle, regardless of the setting. Changing the setting to “All Doors” is useful for
unlocking the rear doors when a front door handle is pulled.
W h a t t o D o
1. Visually inspect the tires for
damage.
2. Check the MID to check which
tire(s) have low pressure.
3. Inflate the tire(s), if necessary,
to the recommended pressures
listed on the label on the
driver’s doorjamb.
Press either Info ( p/q) button to
scroll to the tire pressure monitor
to view readings.
SEL/RESET
button
Info
buttons
8
9
Page 7

D RI V I NG P O S IT I O N ME MO RY S YS TE M (D P M S)
Store driver’s seat and side mirror positions into memory for each corresponding
keyless remote transmitter (1 or 2).
P r o g r a m m i n g t h e D P M S
1. Turn the vehicle on. Shift into
Park (P), or set the parking brake
for manual transmission vehicles.
3. Press SET. You will hear a beep.
R E V E R S E T I L T D O O R M I R R O R S
When you shift into Reverse (R), you can tilt either outside door mirror down slightly to
improve your view as you park. Shifting out of Reverse returns the tilted mirror to its
original position.
H o w I t W o r k s
2. Adjust the seat and outside
mirrors to your preferred positions.
Note: Once set, stored positions can be recalled by pressing one of the memory
buttons (1 or 2) on the door.
4. Press the memory button
corresponding to the remote
(1 or 2) you are using within 5
seconds. You will hear two beeps.
• To tilt the driver’s door
mirror, move the mirror
selector switch to the
left (L) position.
• To tilt the passenger’s
side door mirror, move
the mirror selector
switch to the right (R)
position.
• To turn the feature off,
move the switch to
the middle position.
10
11
9
Page 8

BL U ETO O TH
1234567890
1
INCOMING
CALL
1234567890
STORE
123-456-7890
Make and receive phone calls through your vehicle’s audio system. Visit
www.acura.com/handsfreelink to this feature is compatible with your phone.
®
H A N D S F R E E L I N K ® ( H F L )
U s i n g H F L
M a k i n g a C a l l
Make a call using a 10-digit phone number.
Press and release the HFL Talk button before you give a command.
1. Say “Call” and the phone number.
2. Say “Call” or “Dial” to begin the call.
3. The call is connected and heard
through the speakers.
HFL Talk button: Give HFL
commands and answer
incoming calls.
HFL Back button: Cancel a
command and end or decline
an incoming call.
P a i r i n g Y o u r P h o n e
Press and release the HFL Talk button before you give a command.
1. Enable discovery mode on your
compatible phone.
2. If no phone has been paired
before, the system gives you
instructions.
If you are pairing an additional
phone, say “Phone setup,” then
say “Pair.”
3. HFL gives you a four-digit code
(that also appears on the MID) and
begins to search for your phone.
4. Search for HandsFreeLink from your
phone, and connect to HFL.
5. Enter the four-digit code on your
phone when prompted.
6. HFL asks you to name the phone.
For example, say “Mary's phone.”
H F L P h o n e b o o k
Store up to 50 names and their phone numbers, which can be used as
speed dial entries.
Press and release the HFL Talk button before you give a command.
1. Say “Phonebook.”
2. Say “Store.”
3. Say the name of the contact and then
the phone number.
4. To call a contact once an entry is
stored, say “Call” and the stored name.
R e c e i v i n g a C a l l
A notification is heard, and the following screen appears on the MID:
Press the HFL Talk button
to accept the call.
Press the HFL Back button
to decline or end the call.
12
10 11
13
Page 9

®
BL U ETO O TH
Play stored or streaming audio from your phone through the vehicle’s audio system. Visit
www.acura.com/handsfreelink to check if this feature is compatible with your phone.
A U D I O
i P o d ® o r U S B F L A S H D R I V E
Play audio files from your compatible iPod or USB flash drive through your vehicle’s
audio system. See your Owner’s Manual for a list of compatible devices.
P l a y i n g Bluetooth A u d i o
1. Make sure your phone is on and
paired to Bluetooth
(see page 12).
2. Press AUX until Bluetooth Audio
appears.
3. From your phone, open the desired
audio player or app and begin
playback. Sound is redirected to the
audio system.
Make sure the volume on your phone
is properly adjusted.
Notes:
• You may need to enable additional settings on your phone for playback.
• The play/pause function and remote audio controls may not be supported on all phones.
• Operate your phone only when your vehicle is stopped.
®
HandsFreeLink
®
4. Press (9)(:) or (+)(-) to
change tracks.
C o n n e c t i n g a n d P l a y i n g A u d i o
1. Open the center console, and
pull out the USB adapter cable.
Connect the USB connector to your
iPod cable or flash drive.
2. Press AUX until iPod or USB appears.
Note: Connect your device only when your vehicle is stopped.
3. Press (9)(:) or (+)(-) to change
tracks.
iPod is a trademark of Apple, Inc.
24
14
15
Page 10

H O M E L I N K ®
Press and hold the button on the
remote and the HomeLink button at
the same time. Then, while
continuing to hold the HomeLink
button, press and release the button
on the remote every 2 seconds.
Does the LED blink at a faster rate within 20
seconds?
Press and hold the
HomeLink button
again.
Training
complete
YESNO
HomeLink indicator
flashes for 2 seconds,
then remains on.
HomeLink LED
remains on.
YESNO
YESNO
Position the remote transmitter you
wish to link 1–3 inches from the
HomeLink button you want to program.
1
Press and hold the desired HomeLink
button and the button on the remote
transmitter.
Does the HomeLink indicator (LED) blink at a
faster rate after about 10 seconds?
2
a
The remote has a rolling code.
Press the “learn” button on the
remote-controlled device (e.g.,
garage door opener).
Press the programmed HomeLink
button again; the remote-controlled
device should operate.
Within 30 seconds, press and hold
the programmed HomeLink button
for 2 seconds.
a
Press and hold the programmed
HomeLink button for about a
second.
Does the device (garage door opener) work?
3
b
4
5
Program your vehicle to operate up to three remote-controlled devices around your
home, such as garage doors, lighting, or home security systems.
T r a i n i n g a B u t t o n
If you have any problems programming HomeLink, see the owner’s manual
included with the device you are trying to program, call HomeLink at
(800) 355-3515, or visit www.homelink.com.
A C U R A O W N E R S
Visit owners.acura.com and register to explore features and technologies specific to
your vehicle, schedule service appointments, obtain and update maintenance and
service records, manage your financial services account, and access other useful
information.
S A F E T Y R E M I N D E R
Your vehicle is equipped with airbags. Airbags do not replace seat belts; they add to
the protection offered by seat belts. Airbags can help protect you in some types of
collisions, but they do not provide protection in all collisions.
Always make sure you and your passengers wear seat belts, and that young children
are properly secured in a child seat or booster in the rear seat. Never place an infant
seat in the front passenger’s seat, as the force of a deploying airbag can seriously
injure an infant.
F U E L R E Q U I R E M E N T
Only use unleaded gasoline of 91 octane or higher.
• Acura recommends TOP TIER Detergent Gasoline where available.
• Do NOT use gasoline containing more than 10% ethanol.
• Do NOT use gasoline containing methanol.
• Do NOT use gasoline containing MMT.
• See your Owner’s Manual for more information.
Some gasoline in North America contains MMT, a manganese-based fuel additive.
Prolonged and consistent use of gasoline containing MMT can deteriorate your
vehicle’s performance, fuel economy, and the emission control system. Always
use MMT-free gasoline if available. Failures caused by use of gasoline containing
MMT may not be covered under your new vehicle warranty.
TOP TIER Detergent Gasoline (recommended) never contains MMT and has
detergent additives to keep your engine clean. For further information on fuel and
lubricants for your car and information on gasoline that does not contain MMT,
contact your dealer or visit owners.acura.com.
16
17
28 29
 Loading...