

Page 1
2013 RDX Navigation Online Reference Manual
QRG
2013 RDX Navigation
The information and specifications included in this publication were in effect at the time of approval for printing. Honda Motor Co., Ltd., reserves the right,
however, to discontinue or change specifications or design at any time without notice and without incurring any obligation.
Accessories Precautions
The GPS antenna is located in the dashboard. Metallic front or side window tinting can seriously degrade or obstruct GPS reception.
Signal noise from devices such as radar detectors, vehicle tracking devices, remote starters, and additional amplifiers can disrupt the navigation system. If you
install any such item, install it away from the navigation display and antenna.
Important Safety Information
WARNING
Using the navigation system while driving can take your
attention away from the road, causing a crash in which you
could be seriously injured or killed.
Only operate system controls when the conditions permit you
to safely do so.
Avoid focusing on the screen or manually operating the system controls while driving.
Enter information before you begin driving or when stopped. As you drive, listen to the audible instructions and use voice commands when possible. Pull to the
side of the road if you need more time to look at the screen or operate the controls.
Route guidance may conflict with street closures, road construction, detours, and out-of-date map data.
The system itself may also have limitations. Verify route information by carefully observing roads, signs, and signals. Always use your own judgment and obey
traffic laws.
System Limitations P. 232
2
NOTICE
This vehicle’s navigation display, if so equipped, includes mercury-containing components. Upon removal, please reuse, recycle, or dispose of as hazardous waste.
Clean the screen with a soft, damp cloth. You may use a mild cleaner intended for use on navigation screens.
Navigation Key
QRG
Quick Reference Guide
TOC
Chapter Table of Contents
Index
Index
Book Table of Contents
Voice
Commands
Page 2
QRG
2013 Online Reference ManualRDX Navigation
2013 RDX Navigation
00X31-TX4-8001
© 2012 American Honda Motor Co., Inc. - All Rights Reserved
2 System Setup P. 19
Start-up 20 Voice Control System 22 Interface Settings 24 Personal Information 36
Music Search Setup 44 Routing & Guidance 48 Clock Adjustment 57 Vehicle 59
AcuraLink® 62 Traffic and Weather Status 63 Data Reset 64
2 Navigation P. 67
Entering a Destination 68 Calculating the Route 91 Driving to Your Destination 94 Map Menu 99
Changing Your Route 122 Changing Your Destination 129 Resuming Your Trip 133
2 Audio P. 135
Audio System 136 Playing FM/AM Radio 138 Playing XM® Radio 142 Playing a Disc 147
Playing Hard Disc Drive (HDD)
Audio 151
Playing a USB Flash Drive 170 Playing Bluetoo th® Audio 174 Adjusting the Sound 176 Audio Remote Controls 177
2 Bluetooth® HandsFreeLink® P. 179
Bluetooth®
HandsFreeLink® 180
Phone Setup 190 Making a Call 192 Receiving a Call 195 HFL Menus 196
Text Messages 199
Playing an iPod® 161 Searching for Music Using
Song By Voice™ (SBV) 165
Pairing a Phone 182 Setting Up Speed Dialing 187 Editing User Name and
Playing Pandora® 166
PIN 189
Contents
Quick Reference Guide
System Setup
Navigation
Bluetooth
® HandsFreeLink®
AcuraLink® Messages
Audio
P.2
P.19
P.67
P.135
P.179
P.201
2 AcuraLink® Messages P. 201
AcuraLink® Messages 202 Reading Messages 202 Message Categories 203 Message Options 204
Dealer Appointments 205
2 Other Features P. 207
Calendar 208 Calculator 210 Information Functions 212 Multi-View Rear Camera 216
2 Troubleshooting P. 217
Troubleshooting 218 Error Messages 225
2 Reference Information P. 229
System Initialization 230 System Limitations 232 Client Assistance 234 Legal Information 237
2 Voice Commands P. 243
Voice Commands 244
Other Features
Troubleshooting
Reference Information
Voice Commands
Index
P.207
P.217
P.229
P.243
P.255
Page 3
Subscription service
QRG
2013 RDX Navigation
Overview—Functions at a Glance
Quick Reference Guide
Navigation
You can select any place/landmark as a destination by using voice control or the Interface Dial. The navigation
system gives you turn-by-turn driving directions to your destination.
Store home addresses (P41)
Register
2 home addresses.
Store contacts (P37)
Store up to
200 contacts in 2 address books.
Enter destination (P68)
Select your destination using
12 methods.
Select route (P92)
Set route preferences and select one of
3 routes.
Track route (P94)
Follow your route in real-time with voice guidance.
AcuraLink Real-Time Traffic™ (P120)
Bypass congestion and traffic incidents.
AcuraLink Real-Time Weather™ (P115)
Access weather information.
Avoid certain areas (P123)
Set streets and areas to detour around.
2
Add waypoints (P124)
Add up to
4 “pit stops” along your route.
Page 4
Audio
2013 RDX Navigation
The advanced audio system provides clear, well-defined sound and makes the most of your music.
Enjoy listening to a variety of audio sources, such as:
QRG
Quick Reference Guide
FM/AM Radio (P138)
XM® Radio (P142)
Compact Disc (P147)
Hard Disk Drive (HDD) (P151)
iPod® (P161)
Pandora® (P166)
USB Flash Drive (P170)
Bluetooth® Audio (P174)
AcuraLink®
AcuraLink® provides you with important information and messages between your vehicle and Acura.
AcuraLink Messages (P202)
Display messages from Acura, tips, and other information.
Voice Control (P22)
Use voice commands to control the system while driving. You can operate all key functions of the
navigation, audio, Bluetooth® HandsFreeLink® and climate control systems.
Bluetooth® HandsFreeLink® (P180)
Pair a compatible cell phone to receive incoming and make outgoing calls. You can operate the
phone features without ever taking your hands off the wheel.
Text Messages (P199)
Receive text messages on the navigation screen from a compatible device and hear them read
aloud. Reply to them using preloaded messages.
Other Features
Multi-View Rear Camera (P216)
Helps you check for obstacles around the rear of your vehicle on the navigation screen when reversing.
3
Page 5
9 VOL 9 (Volume/Power)
Knob
(P6)
Display
la 8 (Sound) Button
(P176)
lc HDD/AUX Button (P151)
3 FM/AM Button (P138)
1 E (Eject) Button
4 Preset Buttons
(P6)
6 TUNE Bar (P6)
ld AUDIO Button (P7)
7 XM Button (P142)
lb DISC Button (P147)
lg MAP/GUIDE Button
(P104)
lh CANCEL Button
mc Interface Dial/ENTER
Button
(P8)
2 Disc Slot (P6)
Navigation Screen
Audio
Navigation
Voice Control
Bluetooth® HandsFreeLink®
8 TITLE Button (P6)
5 CATEGORY Bar (P6)
lf SCAN/A.SEL Bar (P6)
lj INFO Button
ma DEST/ROUTE Button
(P68)
li a (Display Mode)
Button
(P29)
mb PHONE Button (P180)
le SKIP Bar (P6)
QRG
2013 RDX Navigation
System Controls
Quick Reference Guide
4
Page 6
md Microphone
(P22)
me MODE Button
(P177)
mf VOL (Volume)
Button
(P177)
mg CH (Channel)
Button
(P178)
na K (Back) Button
mj d (Talk) Button
(P5)
mi j (Hang-Up) Button (P195)
mh h (Pick-Up) Button (P195)
d (Talk Button)
2013 RDX Navigation
Voice Control Operation
a Press and release the d (Talk) button.
A helpful prompt asks what you
would like to do. Press and release the
d (Talk) button again to bypass this
prompt.
The icon is displayed and the
system beeps when ready for a
command. Press the K (Back) button
to cancel.
Available voice commands are
highlighted on the screen.
b Say a voice command.
Voice Comand Index (P243)
The audio system is muted during voice
control mode.
Carefully read the usage note for the voice
control. Voice Control System (P22)
Voice Help
This navigation system comes with voice
help information, which tells you how to
use the voice command functions.
Go to Voice Info for tips when using the
voice command functions.
a Press the INFO button.
b Rotate i to select Voice Info.
Press u.
QRG
Quick Reference Guide
5
Page 7
TITLE
Displays track title, artist, and other text
information, if available.
8
Bass, treble, and balance settings.
1 to 6
Preset stations (FM/AM) and channels (XM).
SKIP
Finds stations with strong signal (FM/AM).
Skip to start/end of tracks, or press and hold
to fast reverse/forward (Disc).
SCAN
Plays 10-second sample of each station (FM/
AM), channel (XM), or track (Disc).
Press again to play the current selection.
TUNE
Tunes to next frequency
(FM/AM) or channel (XM).
Fast-reverse/forward.
CATEGORY
Selects next category (XM), next
folder (WMA, MP3, AAC), or station
(Pandora®)
A. SEL
Scans and automatically stores the strongest
FM/AM station in each preset.
QRG
2013 RDX Navigation
Audio System
Quick Reference Guide
You can play music from a wide array of media sources. You can also control the audio system using voice commands.
Basic Operation
a Press the VOL 9
(Volume/Power) knob
to turn the audio
system on or off.
Audio Buttons
6
b Select the audio source. c Rotate the VOL 9
(Volume/Power)
knob to adjust the
volume.
Loading a Disc
a Press the DISC button.
b Insert a disc into the disc slot.
The disc automatically starts playing.
c Press the AUDIO button to display
the audio screen.
Select an audio source (e.g., FM/AM)
to stop the disc.
Press the E (Eject) button to remove
the disc. If you eject but do not
remove the disc, the disc
automatically reloads after a few
seconds.
Page 8
Audio Control Display
Band
Stereo indicator
Presets
Tune, scan, and
other functions
iPod® mode
(HDD mode, USB
mode, Pandora®
mode)
Search menu
Track list
Repeat, shuffle, and other functions
Disc mode
Play mode
Recorded
icon
Recording icon
Recording
ready icon
Repeat, random, scan, and
other functions
Track list
Bluetooth®
Audio mode
Stop/Start
control
Sound preferences
2013 RDX Navigation
Press the AUDIO button to display the audio system on the navigation screen.
QRG
Quick Reference Guide
FM/AM Radio (P138), XM® Radio (P142)
Hard Disk Drive (HDD) (P151), iPod®
(P161), Pandora® (P166), USB Flash Drive
(P170)
Compact Disc (P147)
Bluetooth® Audio (P174)
7
Page 9
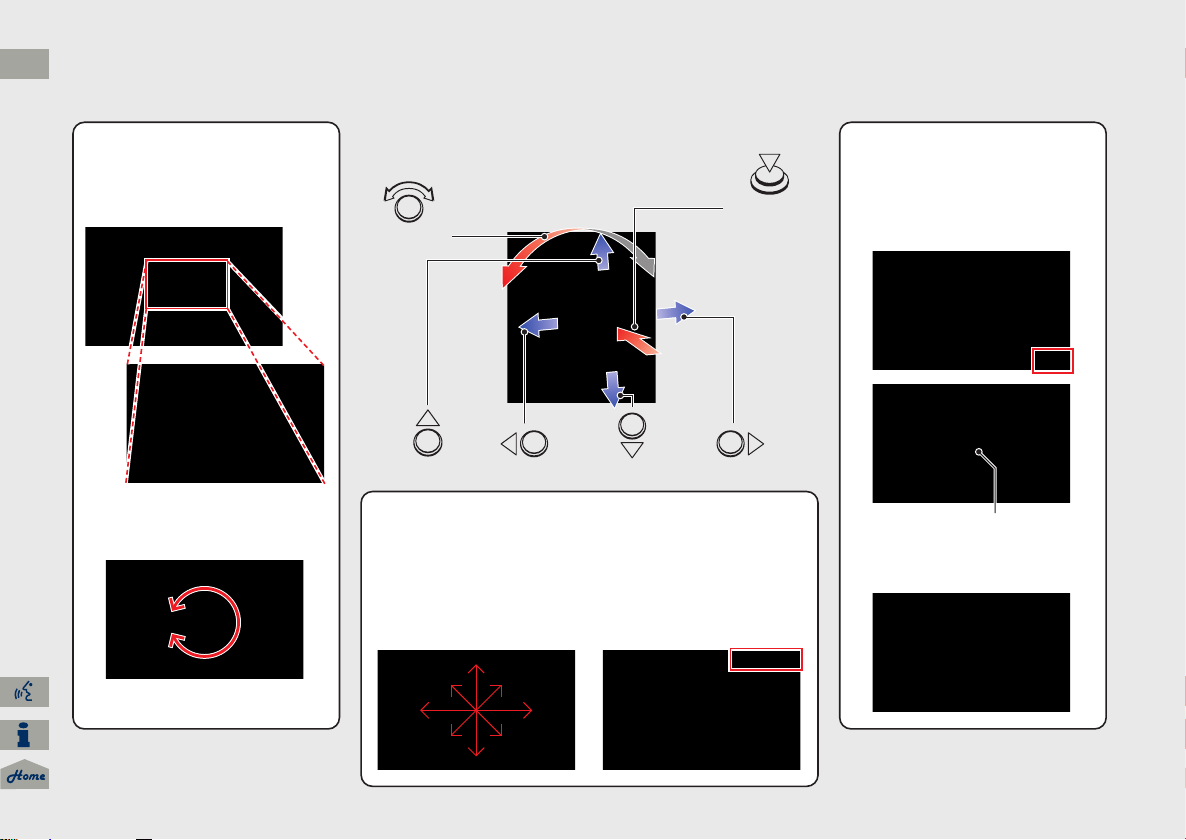
You will see these icons in each chapter.
They represent how you can operate the Interface Dial.
Changes scale
Map screens
Highlights menu options
Menu screens
Rotate dial
Press ENTER
Move up Move left Move down Move right
Scrolls map
(8 directions)
Map screens
Selects labeled
function
Menu screens
Selects function
Selects map icon
Map screens
Selecting Icon
Selects highlighted option
Menu screens
Rotate dial i Press ENTER u
Move
e up r down w left y right
QRG
2013 RDX Navigation
Interface Dial/ENTER Button Operation
Quick Reference Guide
8
Page 10
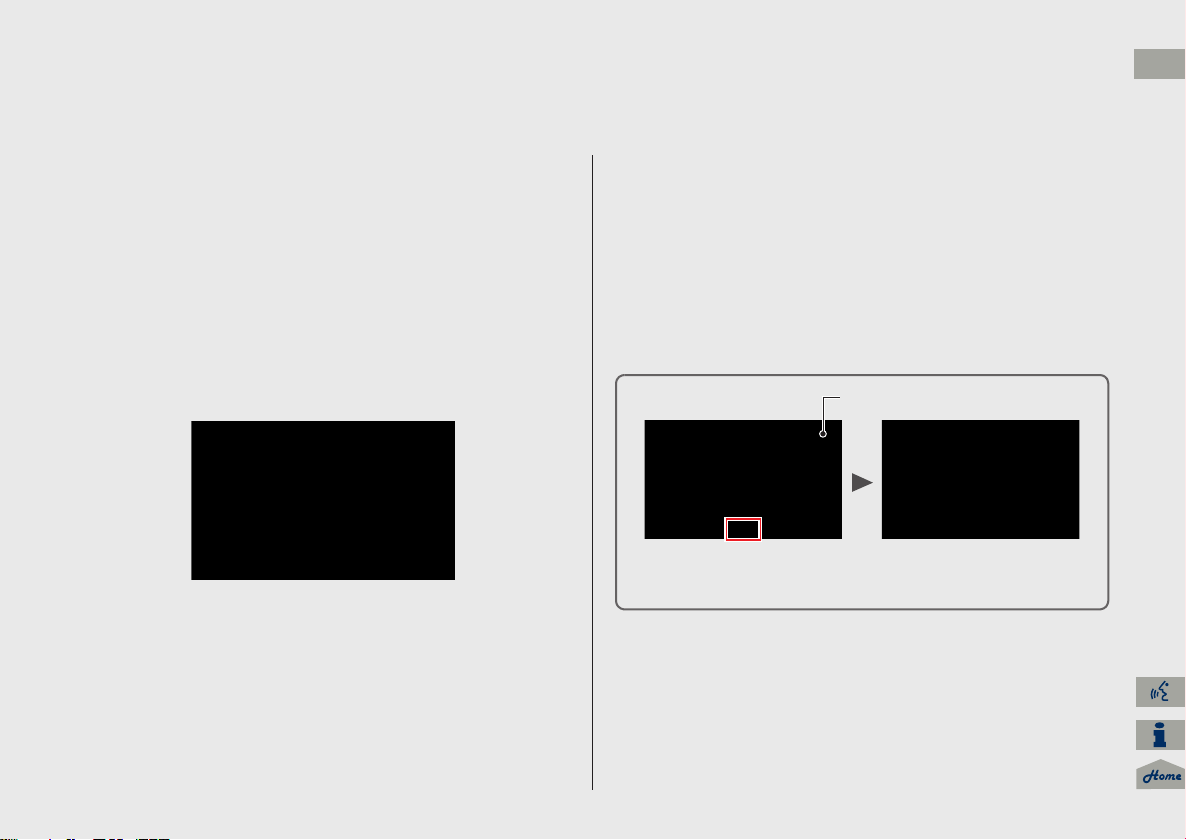
How to Enter Information
Number of Hits
On input search screens, the number of hits in the map database is
displayed. Move r to select LIST to display a list of possible entries.
2013 RDX Navigation
You can enter information (e.g., city names, street names, personal names, and business names comprising letters, numbers, and symbols)
when prompted on input screens by two different methods.
QRG
Quick Reference Guide
Using Voice Control
When you see d in this manual, voice commands are available for
that feature.
Say the letter, number, or symbol (e.g., say d “A”).
Use spelling assist (e.g., say d “Alpha” to enter the letter “A” or
d “Hyphen” to enter a hyphen).
The system beeps if you say an unavailable (grayed out) letter or
number.
If a voice command is not recognized, a list is displayed with
possible options.
On list screens:
Say the number of the list item (e.g., say d “Five” to select item
5).
Say d “Up” or d “Previous” to scroll up one page.
Say d “Down” or d “Next” to scroll down one page.
Using the Interface Dial
Rotate i to highlight a character.
The # (pound symbol) or @ (at symbol) displays symbols.
Move e to select OPTION to display accented and upper/lower
case characters.
Press to enter the highlighted character.
Move y to select SPACE to enter a space character.
Move w to select DELETE to remove the last entered character.
On list screens:
Scrolling through lists or tabs is limited while the vehicle is moving.
Certain screen functions are limited or inoperable while the vehicle
is moving. For these functions, use available voice commands or
pull over to proceed.
9
Page 11
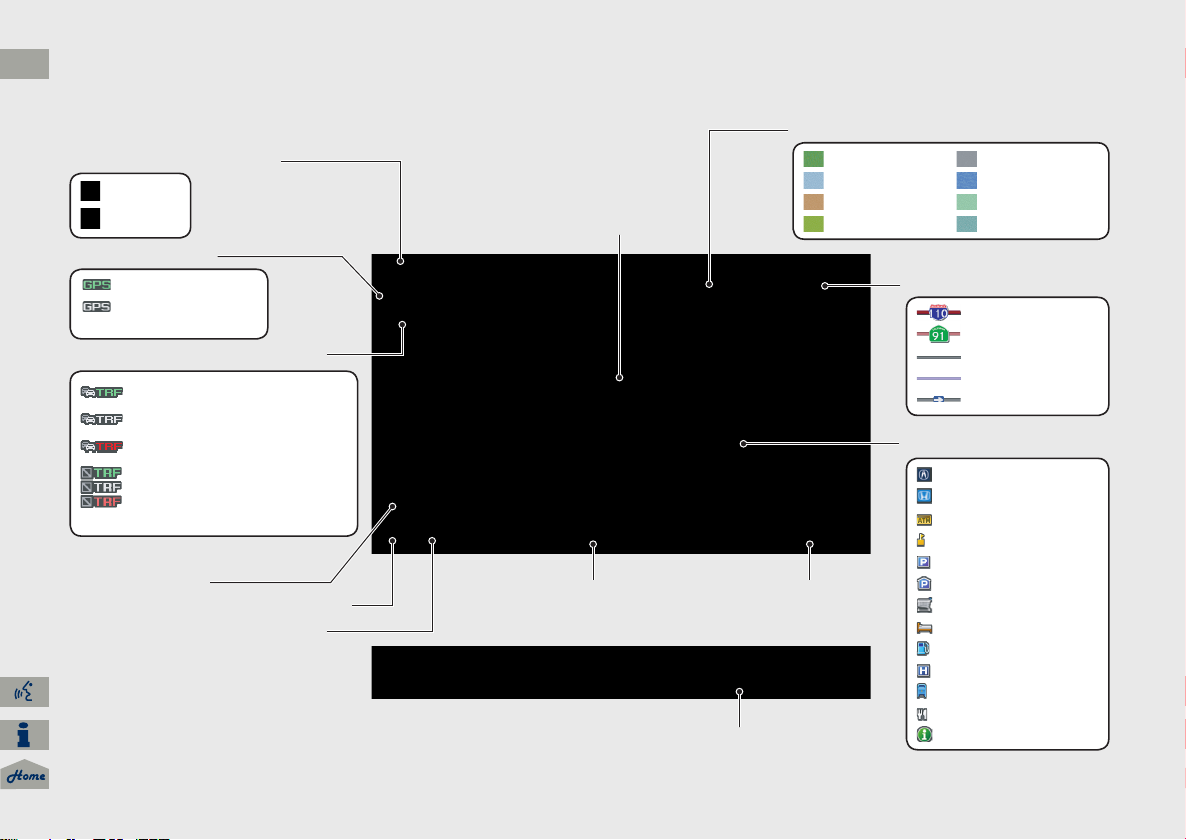
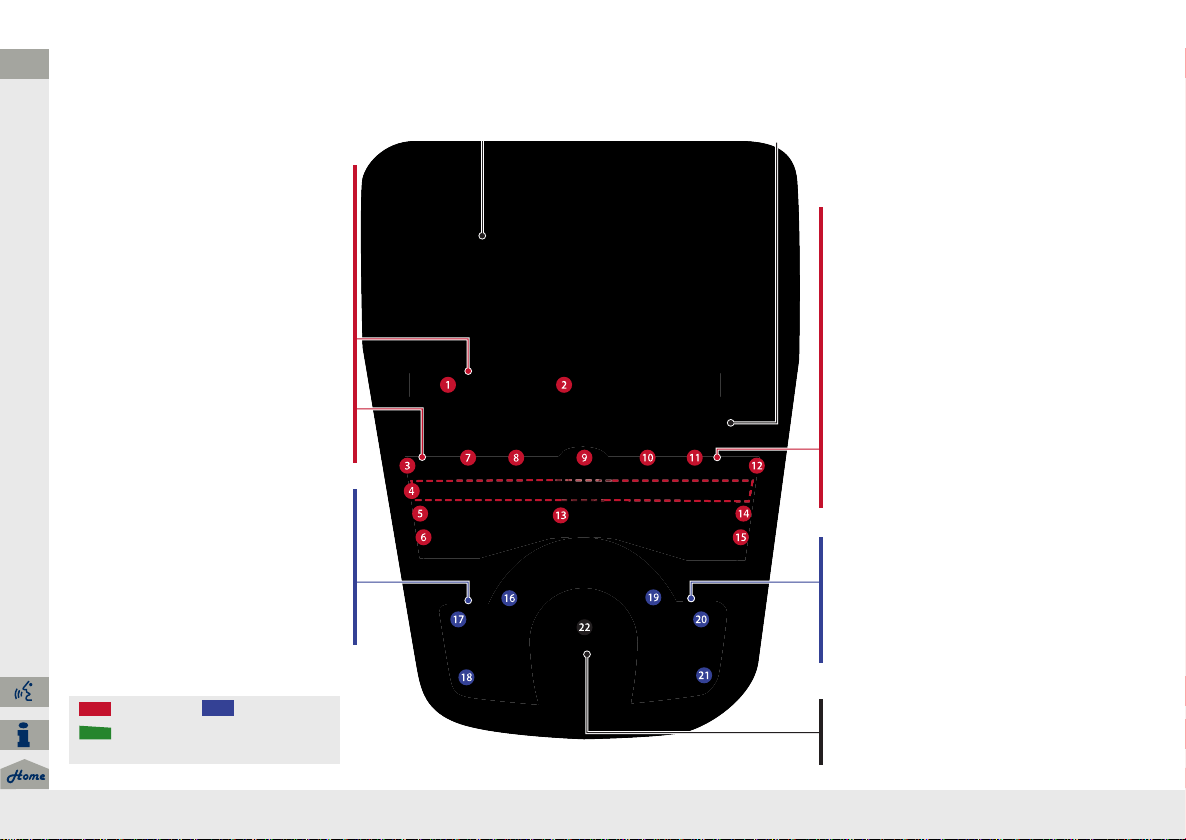
Map orientation (P109)
GPS signal strength
North up
Heading up
Best reception
Good reception
No icon: Poor/No reception
Traffic status indicator (P120)
Traffic information available
Flow or incident data not available
Traffic information not available
Traffic information off or map
scale too large
No icon: Out of coverage area
Current map scale
AcuraLink® Message icon (P202)
Weather warning icon (P117)
Current street name
Map menu (P99)
Map scale (P112)
Current vehicle position(P110)
Feature areas
Streets
Landmark icons (P107)
Park
Hospital
Shopping Mall
Golf Course
Airport/Business
Water Area
Cemetery
University
Freeways
State routes
Verified streets
Unverified streets
One-way streets
Acura dealer
Honda dealer
ATM
School
Parking lot
Parking garage
Grocery store
Hotel/Lodging
Gas station
Hospital
Post office
Restaurant
Freeway exit information
QRG
2013 RDX Navigation
Map Screen Legend
Quick Reference Guide
10
Page 12
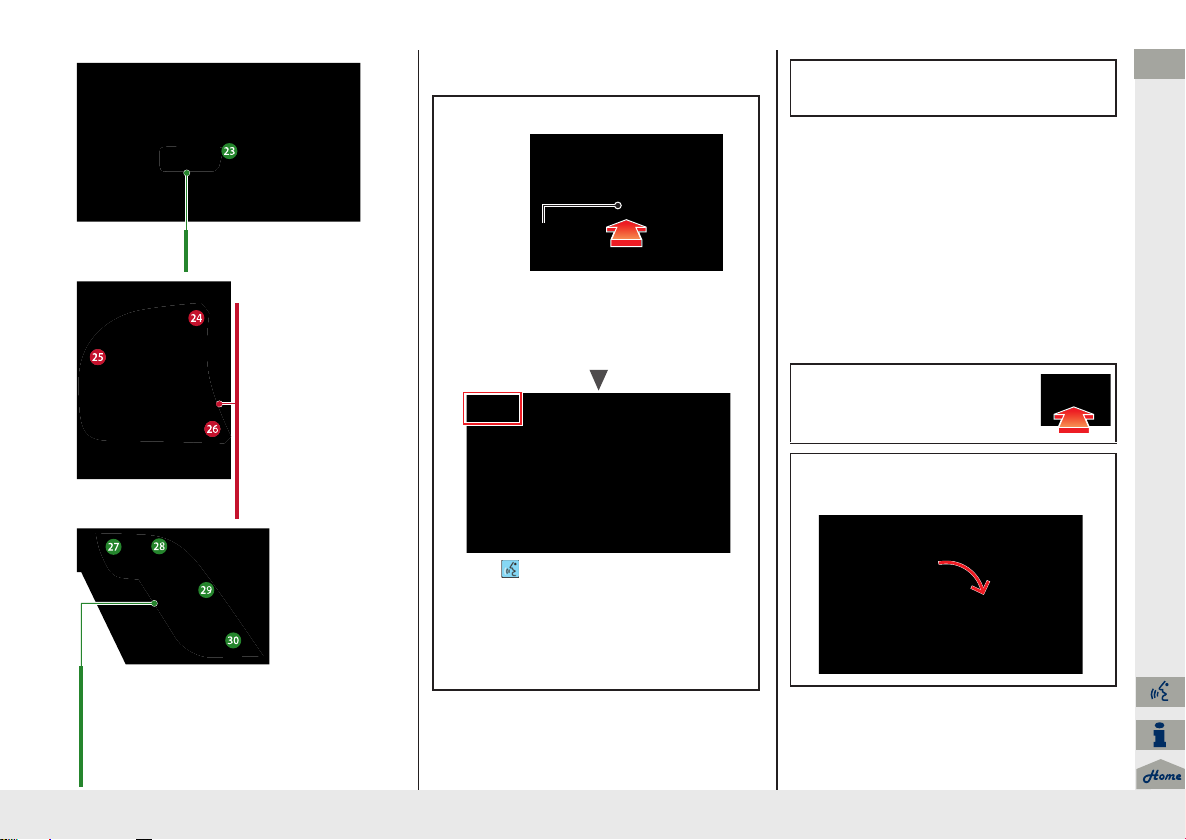
During Route Guidance
Calculated route
(P94)
Destination direction
indicator
Direction “as the crow flies”
Next guidance
indicator
Distance to the next
guidance point.
Distance to destination
Distance of the actual
route.
Estimated time to
destination
Waypoint (P124)
Destination icon
(P93)
Calculated route
(unverified roads)
(P95)
Off-road tracking
(P97)
Street name of
guidance point
Route guidance list scroll bar
Rotate i to scroll the list of
guidance points.
Route progress bar
Distance to
guidance point
No entry icon
Destination direction
indicator
Distance to destination
Estimated time to
destination
Day mode Night mode
2013 RDX Navigation
During route guidance, route information is displayed on the map screen and guidance screen.
Press the MAP/GUIDE button to toggle between the map and guidance screen.
QRG
Quick Reference Guide
Map Screen
Guidance Screen
Map Menu
Contains map or routing options.
Day or Night Mode
Press the a (Display mode) button
to manually switch between day and
night mode.
11
Page 13
QRG
2013 RDX Navigation
Quick Reference Guide
Navigation—Home Addresses and Going Home
The “Home” feature automatically routes you to your home address from any location simply by selecting Go Home 1 or 2, or saying d “Go
Home.” You can store two home addresses as Home Address 1 and Home Address 2. (P41)
Storing Your Home Address
a Press the INFO button.
b Rotate i to select Set up. Press u.
c Rotate i to select Personal
Information. Press u.
d Rotate i to select Home Address 1.
Press u.
e Rotate i to select Edit Name. Press
u.
12
f Enter a name.
g Rotate i to select Edit Address.
Press u.
h Rotate i to select Address. Press u.
i Enter an address.
j Rotate i to select Edit Phone No.
Press u.
k Enter a phone number.
l Move r to select OK.
Going Home
a Press the DEST/ROUTE
button.
b Rotate i to select Go Home 1. Press
u.
Alternatively, you can say d “Go
Home” from any screen. Your home
address is displayed on the Calculate
Route screen.
c Rotate i to select OK. Press u.
The following voice commands are
available: say d “Go Home,” d “Go
Home 1,” d “Go Home 2.”
If you have two home addresses stored,
saying d “Go Home” will select Home
Address 1.
Page 14
Navigation—Entering a Destination
2013 RDX Navigation
Enter your destination using one of several methods, then follow route guidance on the map or guidance screen to your destination. You
can also perform these steps using d voice control.
QRG
Quick Reference Guide
a Press the DEST/ROUTE
button.
b Rotate i to select Address. Press u.
c Rotate i to select Street. Press u.
d Enter the name of your destination
street.
e Rotate i to select your destination
street from the list. Press u.
f Enter the street number. Move r to
select OK when finished.
g If there is more than one city with the
specified street, a list of cities is
displayed. Rotate i to select the
desired city from the list. Press u.
h Rotate i to select OK. Press u.
Route guidance to the destination
begins.
View Routes: Choose one of three
routes.
Route Pref.: Choose MAX or MIN for
the three settings.
13
Page 15
QRG
2013 RDX Navigation
Navigation—Changing Route or Destination
Quick Reference Guide
You can alter your route by adding waypoints to visit, adding streets to avoid, or changing your destination during route guidance.
Adding a Waypoint
(“Pit Stop”)
You can add up to four waypoints along
your route. (P124)
a Press the DEST/ROUTE button.
b Rotate i to select Waypoint. Press
u.
c Rotate i to select location and
search method. Press u.
SEARCH AROUND: Search around a
location.
SEARCH ALONG: Search between two
locations.
d Select the icon category and location
to add to the Destination List when
prompted.
e Move r to select OK.
Changing Your
Destination
There are four methods you can use to
specify a new destination during route
guidance.
Say d “Find Nearest…” (P129)
Searches for the nearest place/landmark
on the map screen (e.g., d “Find
nearest gas station”).
Say d “Go Home” (P12)
Routes to your home address.
Selecting an icon on the map (P130)
Scroll the map to position the cursor over
a place/landmark icon or a new area on
the map. Press u twice.
Entering a new destination (P131)
Press the DEST/ROUTE button. Move y
to select Dest.MENU1/2 and enter a new
destination.
Canceling Your Route
a Press the DEST/ROUTE button.
b Rotate i to select Cancel Route.
Press u.
From the map screen:
a Press u to select MAP MENU.
b Rotate i to select Cancel Route.
Press u.
14
Page 16
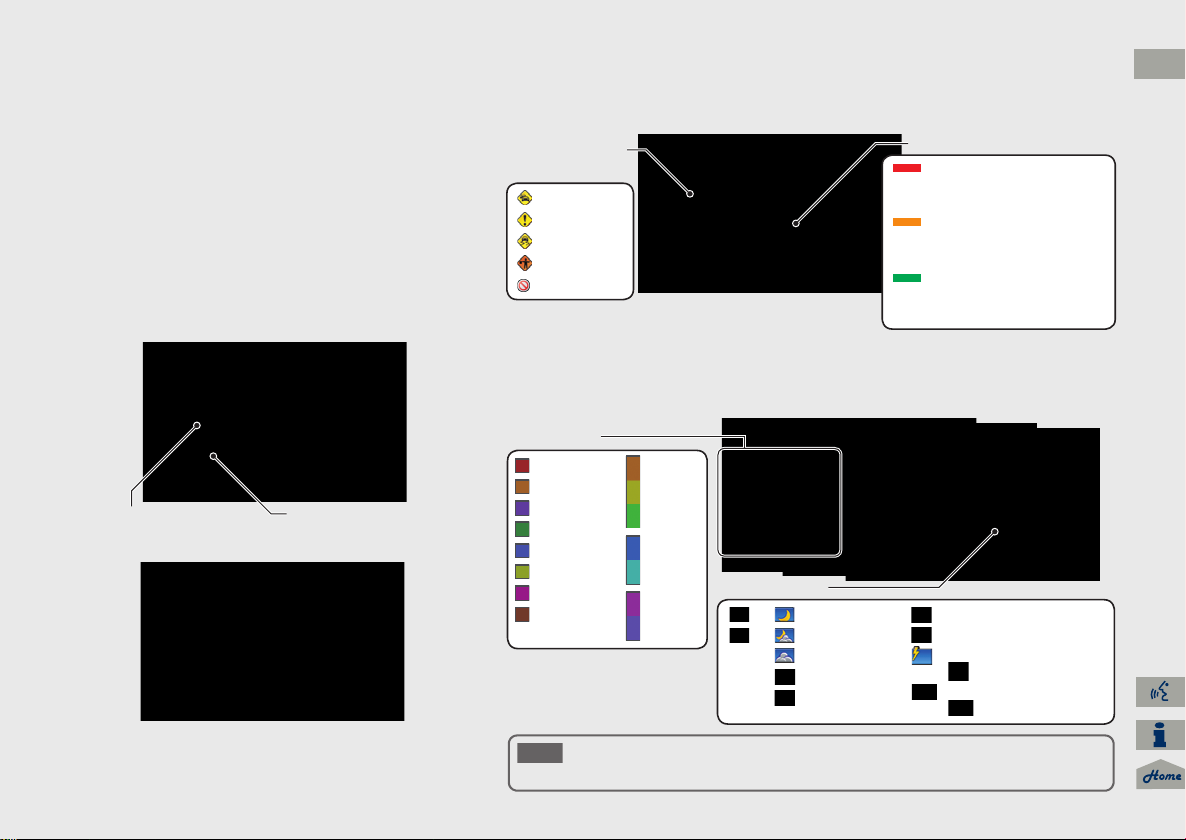
AcuraLink®
Unread message Important message
Traffic incident
icons
Congestion
Incident
Weather
Construction
Road Closed
Traffic flow indicator
Heavy (approx.)
surface: 0 to 20 mph
freeway: 0 to 24 mph
Moderate (approx.)
surface: 21 to 30 mph
freeway: 25 to 52 mph
Free-flow (approx.)
surface: 31+ mph
freeway: 53+ mph
Color index
Tornado
Hurricane
Storm
Flood
Snow/Freeze
Wind
Heat
Other
Rain
Freezing
rain
Snow
Weather icons
or Clear
or Partly cloudy
Cloudy
Possibility of lightning
(e.g., rain and lightning)
Possibility of high winds
(e.g., rain and wind)
Fog
Rain
Freezing rain
Snow
AcuraLink Real-Time Traffic and Weather are fee-based subscription
services, with a complimentary 90-day trial upon first retail purchase.
NOTE
2013 RDX Navigation
AcuraLink® Messages (P201)
AcuraLink® provides a direct communication link
between you and Acura. It sends and receives several
kinds of messages through XM® Radio, including:
Vehicle feature guide
Operating quick tips
Safety and maintenance information
Diagnostic information
Dealer appointment and maintenance reminders
AcuraLink Real-Time Traffic™
Displays continuously updated traffic information and recalculates your route in
response to traffic flow, incidents, or road closures. (P120)
AcuraLink Real-Time Weather™
Displays continuously updated weather information and weather forecasts, and
provides weather warnings along your route. (P115)
QRG
Quick Reference Guide
Example of an AcuraLink® Message
If you have linked your cell phone to the Bluetooth®
HandsFreeLink®, you can contact your Acura dealer
from this screen.
15
Page 17
QRG
2013 RDX Navigation
Troubleshooting For more Information (P217)
Quick Reference Guide
Why does the vehicle position icon on the map “lag” a
short distance behind my actual position, especially at
intersections?
This is normal. The navigation system is unaware of the
width of intersections. Large differences in vehicle position
can indicate a temporary loss of the GPS signal.
Why does the “time to destination” display sometimes
increase even though I am getting closer to my
destination?
The “time to destination” is based on your actual road
speed and traffic conditions to give you a better estimate
of arrival time.
Why does my clock frequently change the time forward
and backward by one hour?
The clock setting is automatically updated based on your
GPS location. If you normally drive between two time
zones, the clock may keep adjusting the time. You can
turn this feature off.
2
Clock Adjustment P. 57
How do I specify a destination when an entered city or
street could not be found?
Try entering the street first. Some cities are lumped in with
a major metro area. In rural “unverified” areas or new
subdivisions, streets may be missing or only partially
numbered.
How do I turn on the navigation system voice guidance?
1. Press the INFO button. Rotate i to select Set up and
press u. Check that Volume is not set to OFF.
2. Move y to select Other, rotate i to select Basic
Settings, and press u. Set Voice Recognition Tutor
to ON if you want the system to provide confirmations
and system prompts.
My battery was disconnected or went dead, and the
navigation system is asking for a code. Where do I find it?
In most cases, you do not need to enter a code. Simply
press and hold the VOL 9 (Volume/Power) button for two
seconds; the system should reactivate.
2
System Initialization P. 230
16
Page 18
How to Use This Manual
Contents
Contents
Searching the Table of Contents
(P1)
Two types of Tables of Contents help
you find your desired information.
First, find the general chapter related to
what you are looking for (e.g., entering
a destination from the Address Book).
Then, go to that chapter to view a more
specific table of contents.
Searching the Index (P255)
Menu items displayed on the
navigation screen (e.g., Address Book)
can be found individually in the Index.
This more detailed table of contents
shows you exactly what information is
listed by section and title.
The Index consists of main
terms and sub-entries. The
sub-entries help you get to
the desired page depending
on what you are looking
for.
Table of Contents Chapter Contents
Navigation Screen Index
2013 RDX Navigation
This section explains different methods on how you can easily find information in this manual.
More Detailed
Contents
QRG
Go to the
Next Page
17
Page 19
Menu Tree
The menu tree helps guide you
through the system’s menu options.
To get to your desired function, follow
the menu tree in order of the steps
shown.
NOTE:
All menu options can also be
activated with voice commands.
Press the hard button on the
system control panel.
Press the DEST/ROUTE button.
Select the menu option with the
Interface Dial.
Rotate i to select Address Book.
Press u.
After following the menu
tree, step-by-step
instructions explain how to
achieve the desired result.
Sample pages and images in this section may differ from the actual ones.
QRG
2013 RDX Navigation
DEST/ROUTE button
18
Page 20

System Setup
2013 RDX Navigation
This section describes the start-up procedure and the navigation and
setup functions.
QRG
Start-up ................................................... 20
Voice Control System ............................. 22
Command Input .................................... 22
Voice Recognition .................................. 23
Interface Settings ................................... 24
Display and Volume Settings .................. 24
Interface Dial Feedback .......................... 25
Basic Settings......................................... 26
Color ..................................................... 27
Language............................................... 31
Wallpapers Setting................................. 32
Personal Information.............................. 36
Address Book......................................... 37
Home Addresses .................................... 41
PIN Numbers...........................................42
Previous Destinations ..............................43
Music Search Setup .................................44
Song By Voice™ (SBV) ............................45
Phonetic Modification .............................46
Routing & Guidance ................................48
Rerouting................................................49
Unverified Area Routing..........................50
Traffic Rerouting .....................................52
Edit Avoid Area.......................................53
Edit Waypoint Search Area......................55
Street Name Guidance ............................56
Clock Adjustment ....................................57
Adjust Time ............................................58
Resetting the Clock Settings................... 58
Vehicle ..................................................... 59
Off-road Tracking................................... 60
Correct Vehicle Position ......................... 61
AcuraLink®.............................................. 62
AcuraLink/Messages............................... 62
Traffic and Weather Status .................... 63
Data Reset ............................................... 64
Reset Factory Default Settings ................ 64
Clear Personal Data................................ 65
19
Page 21
System Setup
Start-up
1 Start-up
If the navigation system loses power at any time,
you may need to press and hold the VOL 9
(Volume/Power) button for more than two
seconds, or you may be prompted for the fivedigit security code.
2 System Initialization P. 230
At start-up, the driver’s fob key is automatically
detected and the address book settings, setup
preferences, wallpapers, and audio settings for
that driver (e.g., Driver 1) are loaded.
AcuraLink® Message Icon
If you have any unread messages, the
(AcuraLink® message) icon is displayed at the
bottom left side of the screen.
2 AcuraLink® Messages P. 202
You can change the system language at any
time.
2 Language P. 31
“OK” on the Confirmation screen cannot be
selected by using a voice command. If you do not
press u within 30 seconds, the screen goes
blank (or displays your wallpaper screen and you
cannot use voice commands). Press any
navigation or voice control button to continue.
2 Wallpapers Setting P. 32
2013 RDX Navigation
QRG
The navigation system starts automatically when you set the power mode to
ACCESSORY or ON. At start-up, the following Confirmation screen is displayed.
20
1. Move y to select CHANGE
LANGUAGE.
If you do not need to change
the system language, proceed to
step 3.
2. Rotate i to change the system
language. Press u.
3. Press u to select OK.
Your current position is
displayed on the map screen.
If you have set any calendar
event reminders, they are
displayed. Proceed to step 4.
Page 22
System Setup
1 Start-up
You can set a calendar event reminder.
2 Calendar P. 208
Remind Later
You can skip the reminder by pressing the
CANCEL button.
Disabled option
2013 RDX Navigation
The following options are available:
• Remind Later: Displays the reminder again next time you start the vehicle.
• OK: Turns the reminder off.
■ Limitations for Manual Operation
4. Rotate i to select an option.
Press u.
Your current position is
displayed on the map screen.
Certain manual functions are disabled
or inoperable while the vehicle is in
motion. You cannot select a grayedout option until the vehicle is stopped.
Voice commands are still operable
while the vehicle is in motion.
Start-up
QRG
21
Page 23

System Setup
Voice Control System
1 d (Talk) Button
When you press the d (Talk) button, a helpful
prompt asks what you would like to do. Press
and release the d (Talk) button again to bypass
this prompt and give a command.
1 Command Input
The audio system is muted while using the voice
control system.
2013 RDX Navigation
QRG
Your vehicle has a voice control system that allows hands-free operation of most of
the navigation system functions. You can also control the audio and climate control
system, and make and receive phone calls using Bluetooth® HandsFreeLink®.
The voice control system uses the d (Talk) and K (Back) buttons on the steering
wheel and a microphone near the map lights on the ceiling.
A “Voice Info” feature provides a tutorial that explains how to use the voice control
system.
2 Voice Help P. 5
Command Input
If the system does not understand a command or you wait too long to give a
command, the system asks you to repeat the command.
When you give a command, the system generally either repeats the command as a
confirmation or asks you for further information. If you do not wish to hear this
feedback, you can turn it off. However, listening to the feedback will help familiarize
you with the way the system expects commands to be phrased.
2 Basic Settings P. 26
If the system cannot perform a command or the command is not appropriate for the
screen you are on, the system beeps.
On character input screens, a list of possible characters is displayed if the system
does not recognize your command.
You can find out which voice commands are available for a particular screen using
the d Help command. The system will display and read the list of available
commands to you.
22
Page 24
System Setup
1 Voice Recognition
The voice control system can only be used from
the driver’s seat because the microphone unit
removes noises from the front passenger’s side.
2013 RDX Navigation
Voice Recognition
To achieve optimum voice recognition when using either the navigation voice
control system or Bluetooth® HandsFreeLink®:
• Make sure the correct screen is displayed for the voice command that you are
using.
2 Voice Commands P. 244
• Close the windows and moonroof.
• Adjust the dashboard and side vents so air does not blow onto the microphone on
the ceiling.
• Speak clearly in a clear, natural speaking voice without pausing between words.
• Reduce any background noise if possible. The system may misinterpret your
command if more than one person is speaking at the same time.
• Refer to the Voice Info tutorial.
2 Voice Help P. 5
Voice Control SystemVoice Recognition
QRG
23
Page 25

System Setup
Interface Settings
1 Display and Volume Settings
You can set separate daytime and nighttime
settings for Brightness, Contrast, and Black
Level. Adjust each setting when the display is in
either daytime or nighttime mode.
You can set the display and volume settings
using voice commands.
2 Main Setup Screen Commands P. 250
Volume
If you set Volume to OFF, you will not hear
route guidance or voice command confirmations.
If you then select Voice in the Map Menu, you
will hear route guidance at the default volume.
2013 RDX Navigation
QRG
Display and Volume Settings
H INFO button Set up
Use the Main Setup screen to adjust the display and volume.
The following items are available:
• Brightness: Adjusts the screen’s brightness.
• Contrast: Adjusts the screen’s contrast.
• Black Level: Adjusts the screen’s black level.
• Volume: Adjusts the navigation system volume level.
24
1. Rotate i to select an item. Press
u.
2. Rotate i to make the
adjustment. Press u.
Page 26

System Setup
1 Interface Dial Feedback
You can use this feature to minimize the need to
look at the screen while operating the Interface
Dial.
You can set the interface dial feedback settings
using voice commands on the Setup screen.
2 Main Setup Screen Commands P. 250
2013 RDX Navigation
Interface Dial Feedback
H INFO button Set up Interface Dial Feedback
Set if and when the system reads aloud a selection made using the Interface Dial.
Rotate i to select an option. Press
u.
The following options are available:
• ON: Always reads the selection.
• AUTO (factory default): Reads the selection only when the vehicle is moving.
• OFF: Disables the feature.
Interface SettingsInterface Dial Feedback
QRG
25
Page 27
System Setup
2013 RDX Navigation
Interface SettingsBasic Settings
QRG
Basic Settings
H INFO button Set up Other Basic Settings
Set the map units to either miles or kilometers, and control the voice feedback from
the navigation system.
Rotate i to select an item. Press u.
The following items are available:
• Units: Sets the map units to either miles (factory default) or kilometers.
• Voice Recognition Tutor: Turns the voice feedback feature on or off.
ON (factory default): Provides voice control system confirmation or prompts.
OFF: Disables the feature.
• Display Voice Command Tips: Alerts you when manual control of the system is
disabled to prevent distraction while driving. Only voice commands are available.
ON (factory default): Displays a message reminding you to use voice commands.
OFF: Disables the message. Inoperable items are still grayed out on the screen.
• Verbal Reminder: Turns the verbal reminders on or off.
ON (factory default): Provides warning voice messages when:
– Driving with the parking brake on.
– Driving without wearing the driver and/or passenger seat belt.
OFF: Disables the feature.
26
Page 28
System Setup
2013 RDX Navigation
Color
H INFO button Set up Other Color
Choose the color of the navigation map and system menus.
Rotate i to select an item. Press u.
The following items are available:
• Map Color: Sets the color of the map screen.
2 Map Color P. 28
• Menu Color: Sets the color of the menu screens.
2 Menu Color P. 28
Interface SettingsColor
QRG
Continued
27
Page 29
System Setup
1 Map Color
For Day mode
Set to WHITE (factory default is BEIGE) to obtain
the best daytime display contrast.
For Night mode
Set to BLACK (factory default) to obtain the best
nighttime display contrast.
1 Menu Color
For Day mode
Set to WHITE (factory default) to obtain the best
daytime display contrast.
For Night mode
Set to BLACK (factory default) to obtain the best
nighttime display contrast.
2013 RDX Navigation
Interface SettingsColor
QRG
■ Map Color
H INFO button Set up Other Color Map Color
Set separate map colors for Day and Night modes.
■ Menu Color
H INFO button Set up Other Color Menu Color
Set separate menu colors for Day and Night modes.
1. Rotate i to select Day or Night.
Press u.
2. Rotate i to select a color for the
map screen. Press u.
1. Rotate i to select Day or Night.
Press u.
2. Rotate i to select a color for the
menu screens. Press u.
28
Page 30
System Setup
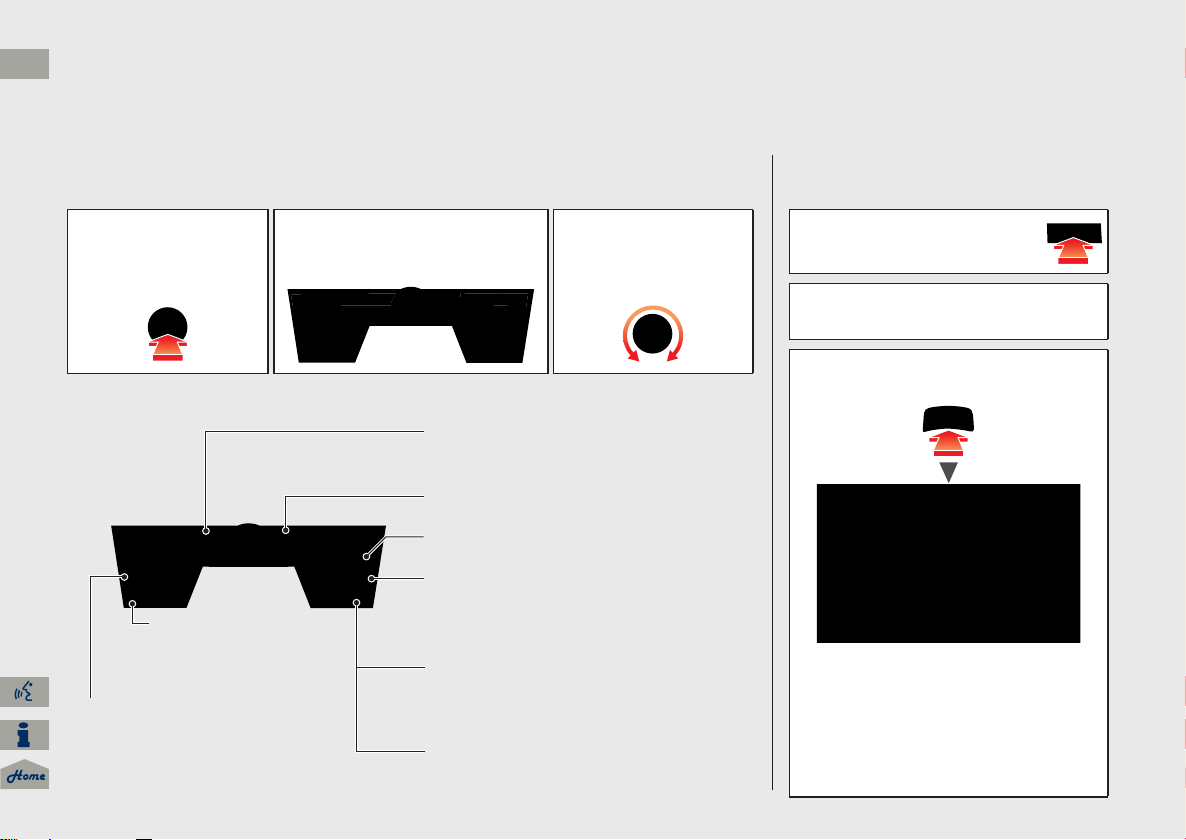
1 Switching Display Mode Manually
A visual guide helps you see the difference
between Day and Night modes.
2 Day or Night Mode P. 11
Recommended Settings
• Select mid-range for the dash illumination.
• Select WHITE for the map Day display and
BLACK for the map Night display.
2013 RDX Navigation
■ Switching Display Mode Manually
Set the screen brightness separately for Day and Night modes. Press the
(Display mode) button to cycle through the display modes (Day to Night to Off).
1. Press the a button.
The Brightness bar is displayed
for a few seconds.
Rotate i to adjust the
brightness. Press u.
2. Press the a button again.
Repeat the procedure to switch
the display modes.
a
Interface SettingsColor
QRG
Continued
29
Page 31

System Setup
QRG
2013 RDX Navigation
Interface SettingsColor
Illumination
control
a button 1 Selects Day, Night, or Off display mode. This button has
Sunlight sensor
(see your
Owner’s Manual
for location)
Dash illumination
adjustment
buttons (see your
Owner’s Manual
for location)
Headlights
(Auto/On/Off)
Screen color
choice
30
Priority Operation
the highest priority and overrides all other display control
adjustments listed below.
Remember: Once you press this button, you assume full
manual control of the display mode until the power mode
is set to VEHICLE OFF (LOCK).
2 If the sunlight sensor detects daylight and the headlights
are turned on, the system automatically overrides the
Night display and displays the Day display mode.
Remember: If desired, use the a button to override
this automatic choice.
3 When headlights are turned on, and you wish to have the
Day display mode, adjust the illumination to the full
brightness setting (beeps).
Remember: Adjust the dash brightness back to mid-range
to allow auto switching by sensing the headlights are on or
off.
4 When turned on, the display changes to Night display
mode. The previous three controls listed above can
“cancel” this function.
Remember: Use the a button, or adjust the dash
illumination to full brightness, to set the display to your
desired choice.
N/A The user can select the color of the screen that will be
displayed for the Day and Night display modes described
above.
Remember: For best contrast, ensure that the map color is
white for Day and black for Night.
Page 32

System Setup
1 Language
Voice confirmation of cities and streets only
occurs when English is the system language.
When Français or Español is selected, some
messages continue to be displayed in English.
2013 RDX Navigation
Language
H INFO button Set up Other Language
Set the system language used on all screens. You can choose from three languages:
English, Français (French), Español (Spanish).
Rotate i to select the system
language. Press u.
Interface SettingsLanguage
QRG
31
Page 33

System Setup
2013 RDX Navigation
Interface SettingsWallpapers Setting
QRG
Wallpapers Setting
H INFO button Set up Other Wallpapers Setting
Select, delete, and import wallpaper pictures for display on the screen.
The following items are available:
• Select wallpaper picture: Sets the desired picture for the wallpaper.
2 Selecting a Wallpaper Picture P. 33
• Delete pictures on HDD: Deletes pictures on the Hard Disc Drive.
2 Deleting Pictures from HDD P. 35
• Import pictures from USB: Stores pictures on the Hard Disc Drive.
2 Importing Pictures from USB P. 34
Rotate i to select an item. Press u.
32
Page 34

System Setup
1 Selecting a Wallpaper Picture
Two images are provided for the HDD as a
factory default.
2013 RDX Navigation
■ Selecting a Wallpaper Picture
H INFO button Set up Other Wallpapers Setting Select wallpaper
picture
1. Rotate i to select a picture.
The picture is displayed on the
screen.
Alternatively, rotate i to
select Blank to disable the
wallpaper picture setting.
2. Press u to set the wallpaper
image.
Interface SettingsWallpapers Setting
QRG
Continued
33
Page 35

System Setup
1 Importing Pictures from USB
You can only import pictures when the vehicle is
in Park.
You can connect a USB flash drive using the USB
adapter cable in the console compartment.
2 Connecting a USB Flash Drive P. 170
You can only import pictures from the root
directory. Pictures in folders cannot be imported.
The display size is a fixed 800 480 pixels.
Smaller pictures are displayed against a black
background. Larger pictures are scaled down
without changing the aspect ratio.
Ten pictures (in BMP or JPEG format) can be
saved to the HDD for Driver 1 and Driver 2 each.
Incompatible data formats or pictures greater
than 6 MB cannot be uploaded.
Pictures with a file name longer than 221
characters cannot be uploaded.
If you attempt to upload a picture with the same
name as an existing picture, a pop-up screen asks
if you want to overwrite the existing picture file.
2013 RDX Navigation
Interface SettingsWallpapers Setting
QRG
■ Importing Pictures from USB
H INFO button Set up Other Wallpapers Setting Import pictures
from USB
34
1. Connect a USB flash drive
containing pictures.
2. Rotate i to select a picture to
upload. Press u.
Repeat the procedure to upload
more pictures.
3. Move r to select OK.
Page 36

System Setup
1 Deleting Pictures from HDD
If there are no pictures on the HDD, “No Entries
Exist” is displayed.
You can only delete pictures when the vehicle is
in Park.
You can only delete pictures that have been fully
uploaded from a USB flash drive.
Trash icon
2013 RDX Navigation
■ Deleting Pictures from HDD
H INFO button Set up Other Wallpapers Setting Delete pictures on
HDD
1. Rotate i to select a picture. Press
u.
The picture is displayed on the
screen.
Repeat the procedure to delete
other pictures.
Items to be deleted are indicated
with a trash icon.
2. Move r to select OK.
3. Rotate i to select Yes. Press u
to delete the picture(s).
Interface SettingsWallpapers Setting
QRG
35
Page 37

System Setup
Personal Information
1 Personal Information
Personal information cannot be backed up or
moved to another navigation system.
2013 RDX Navigation
QRG
H INFO button Set up Personal Information
Use the personal information menu to select and set your address books, home
addresses, and PINs. You can also delete unwanted destinations from the list of
previously routed destinations.
Rotate i to select an item. Press u.
The following items are available:
• Address Book: Stores new addresses or edits your address book.
2 Address Book P. 37
• Home Address 1: Sets or edits your home address.
2 Home Addresses P. 41
• Home Address 2: Sets or edits another home address.
2 Home Addresses P. 41
• PIN Number: Sets or changes your PIN.
2 PIN Numbers P. 42
• Previous Destinations: Deletes the destination history.
2 Previous Destinations P. 43
36
Page 38

System Setup
Address Book
1 Address Book
The number of addresses is shared by the two
address books. For example, if Driver 1 has 150
addresses, Driver 2 can only have 50.
If you have PIN-protected your address book,
enter your PIN when prompted. Move r to
select OK. PINs are optional.
2 PIN Numbers P. 42
Any address book categories you create are also
displayed on the Select an Address screen.
2 Selecting an Address Book Category P. 40
1 Adding an Address Book Entry
If you do not give the address a name, one is
automatically assigned (e.g., Address 001). You
can re-enter, edit, or make changes to any entry.
“Address” is the only required field.
2013 RDX Navigation
H INFO button Set up Personal Information Address Book
Store up to 200 address entries in two address books (Driver 1 and Driver 2). You can
add, edit, and delete information in the address books.
■ Adding an Address Book Entry
H INFO button
This section explains how to enter the name and address.
Set up Personal Information Address Book
Move r to change the user address
book (DRIVER 1 or DRIVER 2).
Move w or y to display only the
addresses in the selected category.
1. Rotate i to select New Address.
Press u.
Continued
Personal InformationAddress Book
QRG
37
Page 39

System Setup
2013 RDX Navigation
Personal InformationAddress Book
QRG
The following items are available:
• Edit Name: Edits the name of the entry.
• Edit Address: Edits the address of the entry.
• Edit Phone No.: Edits the phone number of the entry.
• Edit Category: Specifies the category of the entry.
• Delete: Deletes the entry.
2. Rotate i to select an item. Press
u.
3. Rotate i to select Edit Name.
Press u.
4. Enter a name or title. Move r to
select OK.
38
5. Rotate i to select Edit Address.
Press u.
6. Rotate i to select an item for
specifying the address. Press u
.
Page 40

System Setup
The following items are available:
1 Adding an Address Book Entry
When you use Place Name or Place Category,
the phone number is automatically entered.
You can also add a phone number and category.
1 Editing an Address Book Entry
The entered contents are displayed on the Edit
address screen.
2013 RDX Navigation
• Current Position: Select your current location.
• Address: Enter an address on the character input screen when prompted.
2 Address P. 70
• Previous Destinations: Select a previous destination.
2 Previous Destinations P. 76
• Place Name: Enter the name of a place/landmark.
2 Place Name P. 77
• Place Category: Select a category to search for a place/landmark (e.g., Banking,
Lodging).
2 Place Category P. 80
• Place Phone No.: Enter the phone number of a place/landmark.
2 Place Phone Number P. 84
■ Editing an Address Book Entry
H INFO button
Set up Personal Information Address Book
1. Rotate i to select the address to
edit. Press u.
2. Enter the name, address, phone
number, and category fields.
2 Adding an Address Book Entry
P. 37
3. Move r to select OK.
Personal InformationAddress Book
QRG
Continued
39
Page 41

System Setup
1 Selecting an Address Book Category
You can have up to 100 categories (including
“UNFILED”). These categories can be shared with
Driver 1 and Driver 2. For example, if Driver 1
creates some categories, Driver 2 can also use
them.
If you delete a category that is used by other
addresses, the category type for those addresses
changes to “UNFILED.”
Category Icons
The following icons can be selected for a
category:
2013 RDX Navigation
Personal InformationAddress Book
QRG
■ Selecting an Address Book Category
H INFO button Set up Personal Information Address Book
■ Creating a New Category
1. Rotate i to select New Category. Press u.
2. Enter a name and select an icon when prompted.
The created category is displayed in the list of categories.
■ Deleting or Editing a Category
1. Move y to select Edit.
2. Rotate i to select Delete or Edit Category. Press u.
3. Delete an existing category, or change the name and icon.
The selected category to delete is indicated with a trash icon. Move r to select
OK.
1. Rotate i to select an address.
Press u.
2. Rotate i to select Edit
Category. Press u.
3. Rotate i to select BUSINESS,
PERSONAL, or a category you
created. Press u.
40
Page 42

System Setup
1 Deleting an Address Book Entry
When you transfer the vehicle to a third party,
delete all address book entries.
1 Home Addresses
If you have PIN-protected your home addresses,
enter your PIN when prompted. Move r to
select OK. PINs are optional.
2 PIN Numbers P. 42
If your home street is not in the system database,
park on the nearest verified street to your home.
When entering the “Address” field, rotate i to
select Current Position to use your current
location as the home address and press u.
You can delete a home address if necessary.
Rotate i to select Delete. Press u. Rotate
i to select Yes. Press u.
When you transfer the vehicle to a third party,
delete all home addresses.
The home icon is shown on the map screen on
the 1/20 and 1/8 mile scales.
2013 RDX Navigation
■ Deleting an Address Book Entry
H INFO button Set up Personal Information Address Book
1. Rotate i to select the address to
delete. Press u.
2. Rotate i to select Delete. Press
u.
3. Rotate i to select Yes. Press u
to delete the address.
Personal InformationHome Addresses
QRG
Home Addresses
H INFO button Set up Personal Information Home Address 1 or Home
Address 2
Set two home addresses that you frequently use.
1. Edit the name, address, and phone
number the same way as an
address in the address book.
2 Adding an Address Book Entry
P. 37
2. Move r to select OK.
41
Page 43

System Setup
1 PIN Numbers
PIN
Personal Identification Number (PIN) is a
password used to access personal data.
PINs are optional. If you choose to use a PIN,
keep a note of the number in a secure location. If
you forget your PIN, a dealer will have to reset
the navigation system and all of your stored
information will be erased. The factory default is
no PIN.
Go Home PIN
Go Home PINs are shared with Driver 1 and
Driver 2. If either Driver 1 or Driver 2 sets a Go
Home PIN, both of them need to enter the PIN
when:
• selecting Go Home for a destination
• selecting Home Address for editing
If you want to stop using a PIN, move
r to select
DO NOT USE PIN.
2013 RDX Navigation
Personal InformationPIN Numbers
QRG
PIN Numbers
H INFO button Set up Personal Information PIN Number
Set a four-digit PIN for protecting personal addresses and your home addresses.
Once you set a PIN, you are prompted to enter it whenever you access a personal
address or a home address.
42
1. Rotate i to select the PIN to
create. Press u.
2. Rotate i to select a digit to
enter. Press u. Repeat to enter a
new four-digit PIN.
3. Re-enter the new PIN, when
prompted, to confirm the number
you just entered.
If you have not entered the
same number both times, an
“INCORRECT PIN” message is
displayed. Enter your PIN again.
Page 44

System Setup
Previous Destinations
1 Previous Destinations
Up to 50 destinations can be stored.
The list of previous destinations is shared with
Driver 1 and Driver 2. For example, if Driver 1
deletes some previous destinations, they are
deleted for Driver 2 as well.
To cancel the selection of a previous destination,
rotate i to highlight the destination again.
Press u to de-select it.
Trash icon
2013 RDX Navigation
H INFO button Set up Personal Information Previous Destinations
The navigation system maintains a list of your previously routed destinations as a
shortcut for entering the same destination in the future. You can delete some or all
of your previous destinations from the list.
1. Rotate i to select the destination
to delete. Press u.
Repeat the procedure as
necessary.
Items to be deleted are indicated
with a trash icon.
2. Move r to select OK to delete the
selected destinations.
Personal InformationPrevious Destinations
QRG
43
Page 45

System Setup
Music Search Setup
1 Music Search Setup
You can also display the Music Search Setup
items in the DISC (music CD) or HDD mode.
Select HDD Setup in AUDIO MENU.
This feature is only available when the system
language is set to English.
2013 RDX Navigation
QRG
H AUDIO button (in iPod® mode) AUDIO MENU Music Search Setup
Use this feature to set up the music search abilities when using Song By Voice™
(SBV) commands.
The following items are available:
• Song By Voice: Turns the feature on or off.
2 Song By Voice™ (SBV) P. 45
• Phonetic Modification: Changes the phonetic (song name, artist name, etc.) so
that they are more easily recognized through voice commands.
2 Phonetic Modification P. 46
Rotate i to select an item. Press u.
44
Page 46

System Setup
1 Song By Voice™ (SBV)
You can also display the Music Search Setup
items in the DISC (music CD) or HDD mode.
Select HDD Setup in AUDIO MENU.
This feature is only available when the system
language is set to English.
2013 RDX Navigation
Song By Voice™ (SBV)
H AUDIO button (in iPod® mode) AUDIO MENU Music Search Setup
Song By Voice
Use SBV to search for and play music from your HDD or iPod® using voice
commands. Use this setting to enable SBV.
Rotate i to select an option. Press
u.
The following options are available:
• ON (factory default): Song By Voice commands are available.
2 Searching for Music Using Song By Voice™ (SBV) P. 165
Music Search SetupSong By Voice™ (SBV)
QRG
• OFF: Disable the feature.
45
Page 47

System Setup
1 Phonetic Modification
You can also display the Music Search Setup
items in the DISC (music CD) or HDD mode.
Select HDD Setup in AUDIO MENU.
Phonetic Modification is grayed out when
Song By Voice is set to OFF.
This feature is only available when the system
language is set to English.
You can store up to 2000 phonetic modification
items.
SBV may not be able to recognize languages
other than English. The Phonetic Modification
feature is helpful in the following situations:
• The music information cannot be identified
using Gracenote®.
• The phonetics are in languages other than
English.
2013 RDX Navigation
Music Search SetupPhonetic Modification
QRG
Phonetic Modification
H AUDIO button (in iPod® mode) AUDIO MENU Music Search Setup
Phonetic Modification
Add phonetic modifications of difficult or foreign words so that it is easier for SBV to
recognize artists, songs, albums, and composers in voice commands when searching
for music on the HDD or iPod®.
1. Rotate i to select New
Modification. Press u.
2. Rotate i to select the media
source (HDD or iPod). Press u.
46
Page 48

System Setup
2013 RDX Navigation
3. Rotate i to select the item to
modify (e.g., Artist). Press u.
4. Rotate i to select an entry (e.g.,
“No Name”). Press u.
5. Rotate i to select Edit. Press u.
Rotate i to select Play to
listen to the phonetic
modification. Press u.
Rotate i to select OK and
press u when finished.
6. Enter the phonetic spelling you
wish to use (e.g., “Artist A”) when
prompted.
7. Move r to select OK to exit.
The artist “No Name” is
phonetically modified to “Artist
A.” When in SBV mode, you can
use the voice command d
“Play Artist ‘Artist A’” to play
songs by the artist “No Name.”
Music Search SetupPhonetic Modification
QRG
47
Page 49

System Setup
Routing & Guidance
2013 RDX Navigation
QRG
H INFO button Set up Other Routing & Guidance
Choose various settings that determine the navigation system functionality during
route guidance.
Rotate i to select an item. Press u.
The following items are available:
• Rerouting: Sets the route
recalculation to automatic or
manual mode.
2 Rerouting P. 49
• Unverified Area Routing: Sets whether you use the route guidance in unverified
areas.
2 Unverified Area Routing P. 50
• Traffic Rerouting: Sets whether you use automatic recalculation based on traffic
information.
2 Traffic Rerouting P. 52
• Edit Avoid Area: Specifies areas to avoid when calculating a route.
2 Edit Avoid Area P. 53
• Edit Waypoint Search Area: Sets the distance from the route to find waypoints.
2 Edit Waypoint Search Area P. 55
• Guidance Mode: Sets whether to display only the map screen or a split map-
guidance screen.
2 Guidance Mode P. 104
48
Page 50

System Setup
1 Rerouting
If you live in an area with poor mapping, you
may wish to set Rerouting to MANUAL to avoid
constant recalculation. You will need to select
Recalculation manually to make the system
recalculate your new route.
2013 RDX Navigation
• Street Name Guidance: Sets whether to read out the street names during voice
guidance.
2 Street Name Guidance P. 56
Rerouting
H INFO button Set up Other Routing & Guidance Rerouting
Set whether route recalculation occurs automatically or manually during route
guidance.
Rotate i to select an option. Press
u.
The following options are available:
• AUTOMATIC (factory default): The system calculates a new route automatically
when you deviate from the route. It is strongly recommended that you leave the
system set to Automatic.
Routing & GuidanceRerouting
QRG
• MANUAL: Disables route recalculation. The system beeps and “Off Route” is
displayed when you deviate from the route.
49
Page 51

System Setup
1 Unverified Area Routing
Unverified roads are found in rural areas, and
typically include residential streets away from the
center of a town. They may not be accurate, and
can contain errors in location, naming, and
address range.
Unverified roads are shown only when viewing
the map in the 1/20, 1/8, or 1/4 mile map scales.
Vector line (dotted)
Blue-pink route line
2013 RDX Navigation
Routing & GuidanceUnverified Area Routing
QRG
Unverified Area Routing
H INFO button Set up Other Routing & Guidance Unverified Area
Routing
Receive turn-by-turn map and voice guidance in unverified areas.
Differences OFF (factory default) ON
ON or OFF? The driver wishes to manually
navigate using the navigation map
and choose the streets that lead to
the destination.
Route
calculation
Route line A blue dotted vector line is displayed
Route is usually longer, using
verified roads whenever possible.
on the map that continually points
to your destination.
Cautionary
messages
Cautionary pop-up screens and
voice announcements remind you to
obey all traffic restrictions.
Rotate i to select ON or OFF. Press
u.
The driver chooses to let the
navigation system suggest
possible routing, knowing that the
guidance may not be accurate.
Route is shorter, but uses
unverified (purple) streets that
may not be accurate.
A blue-pink dashed route line
highlights suggested unverified
streets on the map while traveling
to your destination.
Cautionary pop-up screens and
voice announcements remind you
to exercise additional caution and
obey all traffic restrictions.
50
Page 52

System Setup
2013 RDX Navigation
Differences OFF (factory default) ON
Guidance
(map/voice)
There is no turn-by-turn map or
voice guidance.
Voice guidance commands end
with the phrase “if possible” to
remind you to verify all traffic
restrictions.
Directions
list
A direction list is typically not
available. However, depending on
your route, directions are provided
A direction list is provided
showing street names and turn
symbols in pink.
to help you reach the first available
verified road.
Routing & GuidanceUnverified Area Routing
QRG
51
Page 53

System Setup
1 Traffic Rerouting
Traffic Rerouting requires an AcuraLink RealTime Traffic™ subscription.
2 AcuraLink Real-Time Traffic™ P. 15
2 Subscribing to XM® Radio P. 146
Automatic traffic rerouting may not provide a
detour route depending on circumstances.
2013 RDX Navigation
Routing & GuidanceTraffic Rerouting
QRG
Traffic Rerouting
H INFO button Set up Other Routing & Guidance Traffic Rerouting
A faster route can be calculated based on continuously updated traffic information.
2 Traffic Rerouting™ P. 120
Rotate i to select an option. Press
u.
The following options are available:
• ON: The system reroutes automatically based on traffic information.
• OFF (factory default): Disables the feature.
52
Page 54

System Setup
Edit Avoid Area
1 Edit Avoid Area
The avoid areas are shared with Driver 1 and
Driver 2. For example, if Driver 1 specifies some
avoid areas, Driver 2 can also use them for
setting a route.
The maximum size of an “avoid area” is 1/2
square mile.
If your selected area contains a freeway, you are
asked “Do you want to avoid freeways?”
Answering “No” allows you to use a route
through an avoid area on a freeway without any
pop-up messages.
You can select areas to avoid, however you
cannot select roads or areas that you want the
system to use for routing.
You can enter up to 25 characters for the name.
2013 RDX Navigation
H INFO button Set up Other Routing & Guidance Edit Avoid Area
Specify up to five areas to avoid (e.g., road construction, closures), if possible, when
the system calculates routes to your destination.
The following options are available (after an area is set):
• View Area Map: Displays the selected avoid area on the map.
• Delete: Deletes the selected avoid area.
1. Rotate i to select New Area or
an existing area to edit. Press u.
2. Rotate i to select Edit Name to
label the area to avoid. Press u.
3. Enter a name or title. Move r to
select OK.
4. Rotate i to select Edit Area to
define the area to avoid. Press u
Continued
Routing & GuidanceEdit Avoid Area
QRG
.
53
Page 55

System Setup
1 Edit Avoid Area
You can change the map scale to 1/4, 1/8, or
1/20 mile.
Cursor
Avoid area
2013 RDX Navigation
Routing & GuidanceEdit Avoid Area
QRG
The following options are available:
• Address: Specify the general area by entering an address.
2 Address P. 70
• Map Input: Specify the general area by map input.
2 Map Input P. 89
5. Rotate i to select a method for
specifying the area. Press u.
6. If you select Map Input, scroll the
map to position the cursor over
your desired start point, adjusting
the map scale as necessary. Press
u to mark the start point.
To redo the area selection, press
the CANCEL button.
54
7. Scroll the map to “draw” the area.
Press u to mark the end point.
8. Press u to select OK.
The area you specify is displayed
in the list of areas to avoid.
Page 56

System Setup
1 Edit Waypoint Search Area
The search distance does not affect the search
range used for the Find Nearest voice commands
(e.g., say
d “Find nearest gas station”).
2013 RDX Navigation
Edit Waypoint Search Area
H INFO button Set up Other Routing & Guidance Edit Waypoint
Search Area
Select the distance from your highlighted route line (on either side of your route)
that the system will search for a waypoint.
2 Adding Waypoints P. 124
You can specify a different search distance for freeways and surface streets.
1. Rotate i to select an item. Press
u.
2. Rotate i to select a search
distance. Press u.
The following items are available:
• On Freeways: 1, 2, 5, or 10 miles can be set. Factory default is 2 miles.
• On Surface Street: 1/2, 1, 2, or 5 miles can be set. Factory default is 1/2 mile.
Routing & GuidanceEdit Waypoint Search Area
QRG
55
Page 57

System Setup
1 Street Name Guidance
This feature is only available when the system
language is set to English.
This feature is not available when your vehicle is
in Puerto Rico or Mexico.
2013 RDX Navigation
Routing & GuidanceStreet Name Guidance
QRG
Street Name Guidance
H INFO button Set up Other Routing & Guidance Street Name
Guidance
The navigation system includes the street names during voice guidance (e.g., “Turn
right on Main Street”).
The following options are available:
• ON: Voice guidance includes the street names.
• OFF (factory default): Disables the feature.
Rotate i to select an option. Press
u.
56
Page 58

System Setup
Clock Adjustment
1 Clock Adjustment
You can check the time and date from any
screen using voice commands.
2 Global Commands P. 244
Auto Daylight
This function is not activated in areas that have
not adopted daylight saving time, even if you
have set Auto Daylight to ON.
Auto Time Zone
If you live and work in two different time zones,
you may want to turn Auto Time Zone to OFF.
When driving near a time zone boundary, the
displayed time zone may fluctuate between the
two zone times.
2013 RDX Navigation
H INFO button Set up Other Clock Adjustment
Set the automatic adjustment of the system clock for daylight saving and
international time zones.
The following items are available:
• Auto Daylight: The navigation system automatically adjusts the clock (“spring
ahead” or “fall back” by one hour) when a daylight saving time change occurs.
ON (factory default): Adjusts the clock automatically.
OFF: Disables the feature.
• Auto Time Zone: The navigation system automatically adjusts the clock when
driving through different time zones.
ON (factory default): Adjusts the clock automatically.
OFF: Disables the feature.
• ADJUST TIME: Adjust the current time manually.
2 Adjust Time P. 58
• Reset: Reset the clock settings to the factory default.
2 Resetting the Clock Settings P. 58
QRG
Rotate i to select an item. Press u.
57
Page 59

System Setup
2013 RDX Navigation
Clock AdjustmentAdjust Time
QRG
Adjust Time
H INFO button Set up Other Clock Adjustment Adjust Time
Adjust the current time (hours and minutes).
1. Move w or y to select HOUR or
MINUTE.
2. Rotate i to adjust the value.
3. Move r to select OK.
Resetting the Clock Settings
H INFO button Set up Other Clock Adjustment Reset
Reset the Auto Daylight and Auto Time Zone settings to the factory defaults.
58
Page 60

System Setup
2013 RDX Navigation
Vehicle
QRG
H INFO button Set up Other Vehicle
Set the off-road tracking feature and correct the vehicle position displayed on the
map.
Rotate i to select an item. Press u.
The following items are available:
• Off-road Tracking: Set whether to display the tracking dots on the map.
2 Off-road Tracking P. 60
• Correct Vehicle Position: Adjust the position of the vehicle on the map.
2 Correct Vehicle Position P. 61
59
Page 61

System Setup
1 Off-road Tracking
To clear existing breadcrumbs, set Off-road
Tracking to OFF, exit the Setup screen, and then
set Off-road Tracking to ON again.
2013 RDX Navigation
VehicleOff-road Tracking
QRG
Off-road Tracking
H INFO button Set up Other Vehicle Off-road Tracking
The navigation system can be set to display white off-road tracking dots
(“breadcrumbs”) on the map screen whenever you drive into an area approximately
1/2 mile away from a mapped road.
Rotate i to select an option. Press
u.
The following options are available:
• ON (factory default): The system displays the white tracking dots.
2 Driving Off-road P. 97
• OFF: Disables the feature.
60
Page 62

System Setup
1 Correct Vehicle Position
An apparent position error can occur where
buildings, tunnels, and other objects block or
reflect the GPS signals, forcing the system to use
“dead reckoning” to determine your location
and direction.
Using this function to adjust vehicle position is
not recommended. When the system reacquires
a GPS signal, it will automatically place the
vehicle in the correct location.
If you continually have to adjust the vehicle
position, you may have problems with the GPS
reception or there may be database errors.
2 System Limitations P. 232
2013 RDX Navigation
Correct Vehicle Position
H INFO button Set up Other Vehicle Correct Vehicle Position
Manually adjust the current position of the vehicle as displayed on the map screen if
the position appears to be incorrect.
1. Put the vehicle in Park.
2. Rotate i to select Correct
Vehicle Position. Press u.
3. Scroll the map to position the
arrowhead at your correct position.
Press u.
4. Rotate i to position the
arrowhead in the correct direction
the vehicle is facing.
VehicleCorrect Vehicle Position
QRG
5. Press u to select OK.
61
Page 63

System Setup
AcuraLink®
1 AcuraLink/Messages
For information on setting up the services
available through AcuraLink®, visit
www.myacura.com.
AcuraLink® via XM® Radio is available only in
U.S. mainland.
Delete Messages
Only dealer can delete Diagnostic Info and Recall/
Campaign messages.
Phone-Data Connection/Connect to the
Acura Server
These settings apply when you have a phone that
comes with an active data plan and is paired to
HFL.
Connect to the Acura Server
If you do not want to connect to the Acura server
immediately, rotate i to select No at the
prompt.
2013 RDX Navigation
QRG
AcuraLink/Messages
H INFO button Set up Other AcuraLink/Messages
Set the preferences for receiving AcuraLink® messages.
2 AcuraLink® Messages P. 202
Rotate i to select an item. Press u.
The following items are available:
• Delete Messages: Deletes all messages by category except Diagnostic Info and
62
Recalls/Campaigns.
• New Message Notification:
ON (factory default): An envelope icon appears on the navigation screen.
OFF: You will receive no new message notifications.
• Auto Reading:
ON (factory default): The system automatically reads aloud a selected message.
OFF: You can activate the function with the Voice option.
• Phone-Data Connection: Begins the process to connect to the Acura server.
• Connect to the Acura Server: There are two settings to choose from when you
receive a Diagnostic Info message and select Check Now.
Prompt (factory default): The system prompts you and then connects to the
Acura server.
Auto: The system automatically connects to the Acura server.
Page 64

System Setup
Traffic and Weather Status
1 Traffic and Weather Status
This item may be grayed out when your vehicle is
in Alaska, Hawaii, Canada, Puerto Rico, and
Mexico because XM® Radio or traffic/weather
information is not available.
2013 RDX Navigation
H INFO button Set up Other Traffic & Weather Status
Confirm the reception status of XM signal, traffic information data, or weather
information data.
The meaning of the displayed messages is given in the following table:
Message Status
Receiving The system is receiving XM signal, traffic data, or weather data.
No signal • The system cannot receive XM signal.
• XM signal is received, but cannot receive traffic or weather data.
Expired Activation has expired. Call XM at (800) 852-9696 to reactivate your
traffic/weather subscription.
2 XM® Radio Service P. 146
Loading The system is searching for the signal or updating data.
Check Antenna Antenna error
--- The system cannot receive traffic or weather data because XM Signal
Reception status is “No signal” or “Check Antenna.”
QRG
63
Page 65

System Setup
Data Reset
1 Reset Factory Default Settings
When you transfer the vehicle to a third party,
reset all settings to default and delete all
personal data.
The following settings are reset:
• Brightness, Contrast, Black Level, Volume,
Interface Dial Feedback, Brightness (multi-view
rear camera)
• Basic Settings: Units, Voice Recognition Tutor,
Display Voice Command Tips, Verbal Reminder
• Routing & Guidance: Rerouting, Unverified
Area Routing, Traffic Rerouting, Edit Waypoint
Search Area, Guidance Mode, Street Name
Guidance
• Clock Adjustment: Auto Daylight, Auto Time
Zone, Time
• Vehicle: Off-road Tracking
• Color: Map Color, Menu Color
• Route Preference
AcuraLink/Messages settings are not reset to
their factory default settings.
2 AcuraLink® Messages P. 202
2013 RDX Navigation
QRG
Reset Factory Default Settings
H INFO button Set up Other Reset Factory Default
Reset all the settings on the Setup screens and multi-view rear camera brightness
settings to their factory default.
Rotate i to select Yes. Press u to
reset the settings.
64
Page 66

System Setup
Clear Personal Data
1 Clear Personal Data
When you transfer the vehicle to a third party,
reset all settings to default and delete all
personal data.
The following items can be deleted:
• Address book for Driver 1 and 2
• Home address 1 and 2
• Previous destinations
• Calendar entries
• Avoid areas
• Music on HDD
• Music search phonetics
• Cellular phone information (speed dials, voice
tags, and user PIN)
• Wallpapers setting
AcuraLink® messages are not deleted. You can
delete these separately.
2 Message Options P. 204
When the Address Book is deleted, all contents
(except the Categories) are deleted.
To delete all stored personal phone information,
select Clear Cellular Phone Information in the
Phone Setup screen.
2 Phone Setup P. 190
If you have PIN-protected your address books or
home addresses, enter your PIN when prompted.
Move r to select OK. PINs are optional.
2 PIN Numbers P. 42
Trash icon
2013 RDX Navigation
H INFO button Set up Other Clear Personal Data
Delete uploaded data, calendar entries, address books, or stored destinations, or
reset other settings to their factory defaults.
1. Rotate i to select an item. Press
u.
Repeat the procedure to delete
other items.
Items to be deleted are indicated
with a trash icon.
2. Move r to select OK.
3. Rotate i to select Yes. Press u
to delete the data.
Data ResetClear Personal Data
QRG
65
Page 67

QRG
2013 RDX Navigation
66
Page 68

Navigation
2013 RDX Navigation
This section describes how to enter a destination, select a route to take,
and follow the route to your destination. It also describes how to change
your route or destination along the way.
QRG
Entering a Destination ........................... 68
Address ................................................. 70
Address Book......................................... 75
Previous Destinations ............................. 76
Place Name............................................ 77
Place Category....................................... 80
Place Phone Number.............................. 84
ZAGAT................................................... 84
Coordinate ............................................ 87
Intersection............................................ 88
Map Input.............................................. 89
Calculating the Route ..............................91
Changing the Route Preference ..............92
Viewing the Routes.................................92
Calculating the Route on the Destination
Map......................................................93
Driving to Your Destination ...................94
Viewing the Route ..................................94
Listening to Voice Guidance....................98
Map Menu................................................99
Displaying the Map Menu .......................99
Guidance Menu ....................................101
Map Information...................................106
Weather Information ............................115
Traffic Rerouting™................................120
Changing Your Route........................... 122
Canceling the Route............................. 123
Taking a Detour ................................... 123
Avoiding Streets................................... 123
Adding Waypoints ............................... 124
Editing the Destination List................... 128
Changing Your Destination ................. 129
Find Nearest Place ................................ 129
Selecting a Destination on the Map...... 130
Entering a New Destination.................. 131
Resuming Your Trip.............................. 133
67
Page 69

Navigation
Entering a Destination
1 Entering a Destination
d “Display Destination”, d “Display
Navigation”
If you press the DEST/ROUTE button when en
route, the Route Menu screen is displayed.
2 Changing Your Route P. 122
Prior to departure, you can set areas along your
route to avoid.
2 Avoiding Streets P. 123
2013 RDX Navigation
QRG
H DEST/ROUTE button
This section describes how to enter a destination for route guidance.
The following items are available:
• Address: Sets a destination by entering an address.
2 Address P. 70
• Address Book: Sets a destination by selecting an address stored in your Address
Book.
2 Address Book P. 75
Rotate i to select an item. Press u.
Move y to select Dest. MENU 2
to display additional menu entries.
68
Page 70

Navigation
2013 RDX Navigation
• Previous Destinations: Sets a destination by selecting a previous destination.
2 Previous Destinations P. 76
• Place Name: Sets a destination by entering a place name.
2 Place Name P. 77
• Place Category: Sets a destination by selecting a place/landmark.
2 Place Category P. 80
• Place Phone No.: Sets a destination by entering the phone number of a place/
landmark.
2 Place Phone Number P. 84
• ZAGAT: Sets a destination (restaurant) by using ZAGAT® SURVEY Rating
information.
2 ZAGAT P. 84
• Coordinate: Sets a destination by entering latitude and longitude.
2 Coordinate P. 87
• Intersection: Sets a destination (intersection) by entering two streets.
2 Intersection P. 88
• Map Input: Sets a destination by scrolling through the map.
2 Map Input P. 89
Entering a Destination
QRG
• Go Home 1 or 2: Sets your home address as a destination.
2 Going Home P. 12
69
Page 71

Navigation
2013 RDX Navigation
Entering a DestinationAddress
QRG
Address
H DEST/ROUTE button Address
Enter an address to use as the destination. The state or province you are currently in
is displayed (e.g., California).
Rotate i to select an item. Press u.
The following items are available:
• City: Selects your destination city.
2 Selecting a City P. 72
• Street: Selects your destination street.
2 Selecting a Street P. 73
• Change State: Selects the state or province.
2 Selecting the State or Province P. 71
• ZIP Code: Enters the zip code to select the city.
2 Selecting a City by Zip Code P. 71
70
Page 72

Navigation
1 Selecting the State or Province
Move w or y to select the following areas:
• USA for the U.S. mainland, Hawaii, and Puerto
Rico
• Canada/AK for Canada and Alaska
• Mexico
1 Selecting a City by Zip Code
If your city is not listed, it may be part of a larger
metropolitan area. Try entering the street first.
2013 RDX Navigation
■ Selecting the State or Province
H DEST/ROUTE button Address Change State
Rotate i to select a state from the
list. Press u.
■ Selecting a City by Zip Code
H DEST/ROUTE button
Address ZIP Code
1. Enter the zip code of your
destination.
2. Move r to select OK.
Entering a DestinationAddress
QRG
Continued
71
Page 73

Navigation
1 Selecting a City
Vehicle position may not be displayed when:
• The automobile is traveling off-road.
• The vehicle position data cannot be updated.
You do not need to enter spaces or symbols
(e.g., &, -, %). Partial matches are supported
(e.g., “ANGELES” to find “LOS ANGELES”).
Using Voice Command (English only)
Say d “City” on the Find address by screen, and
the following screen is displayed:
• Say d “Current City” to select your current
location, or say the name of a different city.
2 Selecting a Street P. 73
• The Say city name screen is not displayed when
your vehicle is in Puerto Rico or Mexico.
2013 RDX Navigation
Entering a DestinationAddress
QRG
■ Selecting a City
H DEST/ROUTE button Address City
The name of the city where you are currently located is displayed.
3. Rotate i to select the destination
city from the list. Press u.
Next, you are prompted to enter
a street name.
2 Selecting a Street P. 73
1. Enter the name of a different city,
or move r to select OK for the
current city.
Move r to select LIST to display
a list of cities.
72
Page 74

Navigation
1 Selecting a City
If your city is not listed, it may be part of a larger
metropolitan area. Try entering the street first.
Non-detailed area mark: Try entering the
street first and then select the city.
1 Selecting a Street
When entering the names of major freeways,
you can use the following abbreviations. For
interstates, use an “I” (e.g., I-10). For U.S.
freeways, use “US” (e.g., US-18). For state
freeways, use the two-character state
designation (e.g., CA-101). For county roads, use
the appropriate designation (e.g., G-2).
Using Voice Command (English only)
Say d “Street” on the Find address by screen,
and the following screen is displayed:
• Say the name of your destination street, and
say the street number as a string of individual
numbers.
• Set the route to your destination.
2 Calculating the Route P. 91
• The Say street name screen is not displayed
when your vehicle is in Puerto Rico or Mexico.
2013 RDX Navigation
■ Selecting a Street
H DEST/ROUTE button
Address Street
2. Rotate i to select your
destination city from the list. Press
u.
A list of matching hits is
automatically displayed after
you enter several letters, with
the closest match at the top of
the list. Matching letters are in
yellow.
Next, you are prompted to enter
a street name.
2 Selecting a Street P. 73
1. Enter the name of your destination
street.
Do not enter the street type
(e.g., street, road, avenue) or
direction (e.g., north, south,
east, west).
Move r to select LIST to display
a list of streets.
Continued
Entering a DestinationAddress
QRG
73
Page 75

Navigation
1 Selecting a Street
If you did not select a city first and there is more
than one city with the specified street, a list of
cities is displayed.
Rotate i to select the desired city from the list.
Press u.
2013 RDX Navigation
Entering a DestinationAddress
QRG
2. Rotate i to select your
destination street from the list.
Press u.
A list of matching hits is
automatically displayed after
you enter several letters, with
the closest match at the top of
the list. Matching letters are in
yellow.
3. Enter the street number. Move r
to select OK.
Only valid street numbers can be
entered.
4. Set the route to your destination.
2 Calculating the Route P. 91
74
Page 76

Navigation
Address Book
1 Address Book
If you have PIN-protected your address book,
enter your PIN when prompted. Move r to
select OK. PINs are optional.
2 PIN Numbers P. 42
You can select New Address on the Select an
address screen to add an entry to the address
book.
2 Adding an Address Book Entry P. 37
To switch the list between Driver 1 or Driver 2,
move r.
2013 RDX Navigation
H DEST/ROUTE button Address Book
Select an address stored in your address book to use as the destination.
1. Rotate i to select your
destination from the list. Press u.
Entering a DestinationAddress Book
QRG
2. Set the route to your destination.
2 Calculating the Route P. 91
Move w or y to display only
the entries in a category: ALL,
BUSINESS, PERSONAL, or other
categories you have created.
2 Selecting an Address Book
Category
P. 40
75
Page 77

Navigation
1 Previous Destinations
If Previous Destinations is grayed out, there are
no previous destinations entered.
Your home addresses and addresses stored in
your address book are not added to the list of
previous destinations.
You can delete unwanted previous destinations
from the list.
2 Previous Destinations P. 43
2013 RDX Navigation
Entering a DestinationPrevious Destinations
QRG
Previous Destinations
H DEST/ROUTE button Previous Destinations
Select an address from a list of your 50 most recent destinations to use as the
destination. The list is displayed with the most recent destination at the top.
1. Rotate i to select a destination
from the list. Press u.
76
2. Set the route to your destination.
2 Calculating the Route P. 91
Page 78

Navigation
Place Name
1 Place Name
This option is convenient if you know the exact
name of a place.
Move e to select OPTION to enter symbols and
accented letters, move y to select SPACE to
enter a space character, or move w to select
DELETE to remove the last character.
Once a name is entered and selected, move r to
select SORT BY NAME or SORT BY DISTANCE.
Matching letters are in yellow.
Restaurants with a z icon have a ZAGAT®
review. Move y to select z to view the
complete ZAGAT® review.
2 ZAGAT P. 84
2013 RDX Navigation
H DEST/ROUTE button Place Name
Enter the name of a place (e.g., business, hotel, restaurant) stored in the map
database to use as the destination.
1. Enter a place name.
2. Move r to select LIST to display a
list of matching hits.
3. Rotate i to select a place name
from the list. Press u.
If the place name is in multiple
categories, the categories are
displayed when you select it.
2 Place Name in Multiple
Categories
P. 78
4. Set the route to your destination.
2 Calculating the Route P. 91
Continued
Entering a DestinationPlace Name
QRG
77
Page 79

Navigation
1 Place Name in Multiple Categories
Move r to select SORT BY CITY or SORT BY
DISTANCE. Matching letters are in yellow.
2013 RDX Navigation
Entering a DestinationPlace Name
QRG
■ Place Name in Multiple Categories
If the place name is in multiple categories in the map database, the following screen
is displayed.
1. Rotate i to select a place name.
Press u.
2. Rotate i to select a subcategory.
Press u.
78
Page 80

Navigation
2013 RDX Navigation
3. Rotate i to select a place. Press
u.
4. Set the route to your destination.
2 Calculating the Route P. 91
Entering a DestinationPlace Name
QRG
79
Page 81

Navigation
1 Place Category
This option is convenient if you do not know the
exact name of a place or if you want to narrow
down the number of matches returned for places
with a common name.
You can store up to 30 favorite subcategories.
Move y to select My Favorites to access your
favorites.
2 My Favorites P. 82
Advanced helps you to search the subcategory.
When you enter a keyword and select LIST, the
list of appropriate subcategories is displayed.
2013 RDX Navigation
Entering a DestinationPlace Category
QRG
Place Category
H DEST/ROUTE button Place Category
Select the category of a place (e.g., Banking, Lodging, Restaurant) stored in the map
database to search for the destination.
80
1. Rotate i to select a category.
Press u.
2. Rotate i to select a subcategory.
Press u.
Move w or y to change the
main category.
2 List of Categories P. 254
Page 82

Navigation
1 Place Category
Sort by Distance to Travel
For locations sorted by distance to travel, you can
move r to select MORE to increase the scope of
the search. The number of locations increases to
100, 200, and up to 1000. When the number of
locations is 100 or less, you can increase the
scope to 500 miles, 1000 miles, or the entire U.S.
2013 RDX Navigation
3. Rotate i to select an item. Press
u.
The following items are available:
• Place Name: Searches for a place in the subcategory by name. Enter a city name
when prompted.
Entering a DestinationPlace Category
QRG
• City Vicinity: Searches for a place in the subcategory within a 20-mile radius of a
specific city. Enter a city name and then a place name when prompted. Only the
first 1000 matching places/landmarks are displayed.
• Sort by Distance to Travel: Displays all the places in the subcategory sorted by
distance from your current location. The closest place is displayed at the top.
• Search by Keyword: Searches for a place by keyword when you do not know the
exact category. Select Sort by Distance to Travel for locations near your current
location, or select City Vicinity for locations in a specific city. Enter a keyword
when prompted. Move r to select LIST to view a list of possible locations if one is
not found automatically.
• Sort by ZAGAT Rating: Searches for a restaurant by ZAGAT® SURVEY Rating
information.
2 Finding Restaurants by ZAGAT Rating P. 86
Continued
81
Page 83

Navigation
1 Place Category
The straight line distance (as the crow flies, not
driving distance) and direction to the destination
are shown for the highlighted place.
Restaurants with a z icon have a ZAGAT®
review. To display only restaurants with a
ZAGAT® review, select Restaurant > ALL
TYPES (ZAGAT ONLY) or say d “Zagat”.
2 Key to ZAGAT Ratings P. 214
2013 RDX Navigation
Entering a DestinationPlace Category
QRG
■ My Favorites
H DEST/ROUTE button
Store up to 30 favorite subcategories.
4. Rotate i to select a place name
from the list. Press u.
5. Set the route to your destination.
2 Calculating the Route P. 91
Place Category My Favorites
82
Page 84

Navigation
■ To store a subcategory in favorites:
1 My Favorites
Stored categories
A subcategory stored in My Favorites has a star
at the end of the line.
Deleting categories
You can also delete a favorite subcategory on
any Subcategory screen. Rotate i to select a
favorite subcategory (which has a star at the end
of line) and move r to select DELETE FROM
MY FAVORITES.
2013 RDX Navigation
■ To delete a subcategory from favorites:
1. Rotate i to select a subcategory
on any subcategory screen.
2. Move r to select ADD TO MY
FAVORITES.
1. Rotate i to select a favorite
subcategory on the Favorite
Subcategory screen.
2. Move r to select DELETE FROM
MY FAVORITES.
Entering a DestinationPlace Category
QRG
83
Page 85

Navigation
1 Place Phone Number
All 10 digits must be entered.
Phone numbers of private residences entered in
your address book are not stored in the database
and thus cannot be used to search for a
destination.
A list is displayed if there are multiple locations in
the database with the same phone number.
Rotate i to select a place from the list. Press
u.
2013 RDX Navigation
Entering a DestinationPlace Phone Number
QRG
Place Phone Number
H DEST/ROUTE button Dest. MENU 2 Place Phone No.
Select a destination by phone number. Only phone numbers in the database are
recognized.
1. Enter the area code and phone
number. Move r to select OK.
ZAGAT
H DEST/ROUTE button Dest. MENU 2 ZAGAT
Find a restaurant by ZAGAT® SURVEY Rating information.
84
2. Set the route to your destination.
2 Calculating the Route P. 91
1. Rotate i to select an item. Press
u.
Page 86

Navigation
The following items are available:
1 ZAGAT®
Selecting this sorting method will show you
ZAGAT's highest-rated restaurants by the
options, and not necessarily by distance from
your current location.
You can move y to select z (or say d
“ZAGAT List Number X,” where X is the list item
number) to view the complete ZAGAT® review.
• Press u (or say d “Read List”) to have the
system read the ZAGAT® review.
• Move y to select ? (or say d “Key to ZAGAT
Rating”) for details on the ratings and symbols.
2 Key to ZAGAT Ratings P. 214
• Scrolling through the review is disabled while
the vehicle is moving.
• Move r to select SET AS DEST. to set the
route to your destination.
2 Calculating the Route P. 91
Restaurant information for Mexico cannot be
searched with ZAGAT 2011.
2013 RDX Navigation
• Place Name: Searches for a place in the subcategory by name. Enter a city name
when prompted.
• City Vicinity: Searches for a place in the subcategory within a 20-mile radius of a
specific city. Enter a city name and then a place name when prompted. Only the
first 1000 matching places/landmarks are displayed.
• Sort by Distance to Travel: Displays all the places in the subcategory sorted by
distance from your current location. The closest place is displayed at the top.
• Search by Keyword: Searches for a place by keyword when you do not know the
exact category. Select Sort by Distance to Travel for locations near your current
location, or select City Vicinity for locations in a specific city. Enter a keyword
when prompted. Move r to select LIST to view a list of possible locations if one is
not found automatically.
• Sort by ZAGAT Rating: Searches for a restaurant by ZAGAT® SURVEY Rating
information.
2 Finding Restaurants by ZAGAT Rating P. 86
2. Rotate i to select a restaurant.
Press u.
The ZAGAT® ratings are shown
across the top of the screen.
Move y to select z to view
the rating information.
3. Set the route to your destination.
2 Calculating the Route P. 91
Entering a DestinationZAGAT
QRG
Continued
85
Page 87

Navigation
2013 RDX Navigation
Entering a DestinationZAGAT
QRG
■ Finding Restaurants by ZAGAT Rating
H DEST/ROUTE button Dest. MENU 2 ZAGAT Sort by ZAGAT Rating
1. Rotate i to select the sort
method used to list the restaurants.
Press u.
The following options are available:
• Food, Décor, Service: Lists the restaurants by the rating value.
• Cost: Lists the restaurants by the average cost of a meal (including drink and tip).
2. Rotate i to select a restaurant.
Press u.
3. Set the route to your destination.
2 Calculating the Route P. 91
86
Page 88

Navigation
Coordinate
1 Coordinate
Latitude and longitude must be entered up to
the seconds’ value.
A yellow box (shown at scales above 1/4 mile)
denotes the area that can be viewed when you
press u on the current map.
Information icons are displayed at scales from 1
mile to 1/4 mile. Place/landmark icons are
displayed at 1/8 mile or less. Roads are displayed
at 1/4 mile or less.
If you select multiple icons within the cursor
radius, you are prompted to select one of the
items from a list.
2013 RDX Navigation
H DEST/ROUTE button Dest. MENU 2 Coordinate
Specify a location using latitude and longitude map coordinates.
1. Enter the latitude. Move r to
select OK.
2. Enter the longitude. Move r to
select OK.
3. Scroll the map to position the
cursor over your desired
destination, adjusting the map
scale as necessary. Press u.
If the address is not the desired
location, scroll to another
location and try again.
4. Press u again to display the route
calculation menu.
2 Calculating the Route P. 91
5. Rotate i to select Set as Dest.
Press u.
Entering a DestinationCoordinate
QRG
87
Page 89

Navigation
1 Intersection
It is usually easier to select Street to find the
streets first. The city or cities that the streets are
in will be displayed. If you select City and your
city is not listed, it may be part of a larger
metropolitan area. Try entering the street first.
If the intersection is outside the state you are
currently in, rotate
i to select Change State.
2 Selecting the State or Province P. 71
If there is more than one intersection, you are
prompted to select the intersection. If the two
streets that you have selected do not intersect,
no intersection is entered.
2013 RDX Navigation
Entering a DestinationIntersection
QRG
Intersection
H DEST/ROUTE button Dest. MENU 2 Intersection
Select the intersection of two streets as the destination. The state or province for
your current location is displayed at the top of the screen (e.g., California).
1. Rotate i to select the
intersection search method. Press
The following options are available:
• Street: Selects the two intersecting streets. The city or cities that the streets are
located in are displayed.
2 Selecting a Street P. 73
u.
2. Set the route to your destination.
2 Calculating the Route P. 91
• City: Selects the city where the intersection is located. You are prompted to enter
88
the name of the two intersecting streets.
2 Selecting a City P. 72
• Change State: Selects the state or province.
2 Selecting the State or Province P. 71
Page 90

Navigation
2013 RDX Navigation
Map Input
H DEST/ROUTE button Dest. MENU 2 Map Input
Use the Interface Dial to manually select an icon or a location on the map screen as
the destination.
You are prompted to define the map area to display.
1. Rotate i to select an item. Press
u.
The following items are available:
• Current Position: Your current location is centered on the map.
• City: You are prompted to select the city.
2 Selecting a City P. 72
• State: You are prompted to select the state.
2 Selecting the State or Province P. 71
Entering a DestinationMap Input
QRG
• USA, Canada and Mexico: Your current location is displayed on a map of the
country.
Continued
89
Page 91

Navigation
1 Map Input
A yellow box (shown at scales above 1/4 mile)
denotes the area that can be viewed when you
press u on the current map.
Information icons are displayed at scales from 1
mile to 1/4 mile. Place/landmark icons are
displayed at 1/8 mile or less. Roads are displayed
at 1/4 mile or less.
If you select multiple icons within the cursor
radius, you are prompted to select one of the
items from a list.
2 Selecting a Destination on the Map P. 130
2013 RDX Navigation
Entering a DestinationMap Input
QRG
90
2. Scroll the map to position the
cursor over your desired
destination, adjusting the map
scale as necessary. Press u.
If the address is not the desired
location, scroll the map to
another location and try again.
3. Press u again to display the route
calculation menu.
2 Calculating the Route P. 91
4. Rotate i to select Set as Dest.
Press u.
Page 92

Navigation
Calculating the Route
1 Calculating the Route
The current route preferences are displayed as
icons on the top right of the Calculate Route
screen. The straight line distance (as the crow
flies, not driving distance) and direction to the
destination are shown together with weather
information. You must have an AcuraLink RealTime Weather™ subscription to receive weather
information.
2 AcuraLink Real-Time Weather™ P. 15
2 Subscribing to XM® Radio P. 146
You cannot use voice commands while the
system is calculating the route.
Add to Address Book
You can add the destination address to the
address book.
2 Adding an Address Book Entry P. 37
Add to Dest. List
You can add the address to the Destination List.
2 Editing the Destination List P. 128
Call
You can place a telephone call to the destination
phone number.
2 Bluetooth® HandsFreeLink® P. 180
2013 RDX Navigation
This section describes how to calculate your route.
The following options are available:
• Route Pref.: Changes the route preferences (calculating method).
2 Changing the Route Preference P. 92
• View Routes: Displays three different routes.
2 Viewing the Routes P. 92
• DESTINATION MAP: Move r to select DESTINATION MAP to display a map of
the destination.
2 Calculating the Route on the Destination Map P. 93
1. Rotate i to select OK. Press u.
The system calculates and
displays the route line on the
map screen.
2 Route Line P. 95
2. Follow the route guidance to your
destination.
2 Driving to Your Destination P. 94
The system provides you with
pop-up messages if your route
passes through unverified areas,
avoid areas, areas with traffic
restrictions, or weather warning
areas.
QRG
91
Page 93

Navigation
1 Changing the Route Preference
The calculated route may be the shortest route or
the route you would choose. For safety reasons,
the system generally applies the following rules
to your route:
• Shortcuts through residential areas are
avoided.
• Right turns are favored over left turns or U-
turns.
• Time-restricted turns (turns prohibited at
certain times of the day) are not used.
Check the ferry schedule when the calculated
route includes ferry route.
1 Viewing the Routes
It is not unusual for some calculated route
options to be identical.
2013 RDX Navigation
Calculating the RouteChanging the Route Preference
QRG
Changing the Route Preference
Change the route preference by selecting minimum or maximum driving methods.
Viewing the Routes
View three different routes to your destination.
92
1. Rotate i to select an item. Press
u.
2. Rotate i to select MIN or MAX.
Press u.
Repeat step 1 and 2 as
necessary.
3. More r to select OK.
Rotate i to select a route. Press u.
The travel distance and estimated
travel time is displayed for each
route.
The system calculates and displays
the route line on the map screen.
2 Route Line P. 95
Page 94

Navigation
1 Calculating the Route on the Destination Map
d “Display Destination Map” (when en route)
2013 RDX Navigation
Calculating the Route on the Destination Map
Calculate the route from the map of the destination address.
Rotate i to select Calculate Route.
Press u.
The system calculates and displays
the route line on the map screen.
2 Route Line P. 95
Calculating the RouteCalculating the Route on the Destination Map
QRG
93
Page 95

Navigation
Driving to Your Destination
1 Viewing the Route
d “Display Map”
You can change the map scale using voice
commands (e.g., say d “Display 2 mile scale”).
2 Map Scale Commands P. 245
You can also change the map scale by rotating
i.
You can control the icons displayed on the map
screen using voice commands (e.g., say d
“Display post office”).
2 Map Display Commands P. 244
You can obtain information about the route
using voice commands (e.g., say d “How long
to the destination?”).
2 Route Commands P. 246
You can display the next guidance point on the
map screen by saying d “Display Map Guide”
(when en route).
If you scroll the map while en route, the time and
distance to destination indicators are replaced
with an indicator showing distance from the
current vehicle position.
The map screen can be viewed in single-screen or
split-screen mode.
2 Guidance Mode P. 104
2013 RDX Navigation
QRG
This section describes how to follow the route guidance to your destination, receive
traffic and weather information and choose the icons displayed on the map screen.
Viewing the Route
■ Map Screen
94
After calculating the route to your
destination, the route is displayed on
the map screen.
2 Map Screen Legend P. 10
As you drive, the system tracks your
position on the map in real time and
provides guidance as you approach
each guidance point on the route.
Page 96

Navigation
1 Guidance Screen
A visual guide helps you check the guidance
screen.
2 Guidance Screen P. 11
1 Route Line
You can set Unverified Area Routing to OFF to
follow your own route to the destination. If
Unverified Area Routing is ON, be aware that
unverified streets may not be displayed
accurately.
2 Unverified Area Routing P. 50
You can always view the entire route by simply
saying d “Display entire route.”
The route line may also consist of red, orange, or
green segments when traffic information is
displayed.
2 AcuraLink Real-Time Traffic™ P. 15
2 Traffic Rerouting™ P. 120
Vector line (dotted)
2013 RDX Navigation
■ Guidance Screen
The guidance screen offers an alternative way to view your route.
• In single-screen mode, press the
MAP/GUIDE button to switch
between the map and guidance
screens.
• In split-screen mode, press the
MAP/GUIDE button to switch
between the next guidance
direction and a list of guidance
directions.
■ Route Line
Driving to Your DestinationViewing the Route
QRG
changes when driving on unverified streets:
When driving on verified streets, the route line is light blue. The route line display
• If Unverified Area Routing is
OFF, the route line uses verified
streets only (when possible). A
dotted “vector line” pointing
directly towards your destination is
also displayed.
Continued
95
Page 97

Navigation
Blue-pink route line
1 Deviating From the Planned Route
If Rerouting is set to MANUAL and you go off
route, the system waits for you to manually
initiate recalculation. Rotate i to select
Recalculation and press u.
2 Rerouting P. 49
2013 RDX Navigation
Driving to Your DestinationViewing the Route
QRG
• If Unverified Area Routing is ON,
the route line changes to a dashed
blue-pink line to indicate that the
route line uses unverified streets.
■ Deviating From the Planned Route
If you leave the calculated route, the system automatically recalculates a route to the
desired destination based on your current location and direction.
2 Rerouting P. 49
96
Page 98

Navigation
■ Driving Off-road
1 Driving Off-road
A message “Not on a digitized road” may appear
when you drive half a mile away from a mapped
road.
Breadcrumbs may occasionally be displayed in
urban areas, such as large parking lots in
shopping malls, in new subdivisions where the
roads are not yet in the database, or in areas
where a GPS signal is unavailable, such as in a
parking garage.
Off-road tracking breadcrumbs are limited to
approximately 150 miles. Breadcrumbs at the
beginning of the trail are deleted if you exceed
that distance.
Breadcrumbs are displayed only at 1/20, 1/8, 1/4,
and 1/2 mile map scales.
2013 RDX Navigation
If you leave all mapped (digitized) roads, the system automatically starts displaying a
series of dots (breadcrumbs) to track the path you are taking. If needed, you can
follow the dots back to the mapped road you originally left.
2 Off-road Tracking P. 60
Driving to Your DestinationViewing the Route
QRG
97
Page 99

Navigation
1 Listening to Voice Guidance
d “Voice” (on the map screen)
You can turn voice guidance OFF if you prefer.
2 Display and Volume Settings P. 24
When driving in unverified areas, the phrase “if
possible” is inserted before each voice guidance
prompt.
Voice in the Map Menu may be grayed out if:
• The vehicle is approaching the guidance point.
• The vehicle is in an unverified area and
Unverified Area Routing is set to OFF.
The timing of voice guidance varies depending
on the type of road you are on and the distance
to the next guidance point.
2013 RDX Navigation
Driving to Your DestinationListening to Voice Guidance
QRG
Listening to Voice Guidance
H ENTER button (on map) Voice
As you approach each guidance point, a pop-up window is displayed on the map
screen with instructions for you to follow. Voice guidance for each guidance point is
also provided.
Typically, you hear three prompts:
• 1/2 mile from the guidance point (2 miles on freeway)
• 1/4 mile from the guidance point (1 mile on freeway)
• Just before the guidance point
To replay voice guidance, rotate i to select Voice in the Map Menu.
If you select Voice between guidance points, voice guidance for the next guidance
point is provided.
98
Page 100

Navigation
Map Menu
1 Map Menu
If you scroll the map while en route, press the
MAP/GUIDE (or CANCEL) button to return to the
current position map screen, then press u to
select MAP MENU.
Traffic Incidents
You must have an AcuraLink Real-Time Traffic™
subscription to receive traffic information.
2 AcuraLink Real-Time Traffic™ P. 15
2 Subscribing to XM® Radio P. 146
The incident icons are displayed on the 5 mile or
less map scale.
2 Map Scale and Functions P. 112
Weather Info
You must have an AcuraLink Real-Time
Weather™ subscription to receive weather
information.
2 AcuraLink Real-Time Weather™ P. 15
2 Subscribing to XM® Radio P. 146
2013 RDX Navigation
Displaying the Map Menu
Use the Map Menu to control the icons displayed on the screen and to display traffic
information, weather information, and messages. You can also use the Map Menu
to find locations or to cancel the route.
The following items are available:
• Voice: Select to hear the voice guidance when en route.
2 Listening to Voice Guidance P. 98
• New Messages: Indicates, when available, that there are new AcuraLink®
messages.
2 AcuraLink® Messages P. 202
1. On the map screen, press u to
select MAP MENU (if displayed).
The Map Menu is displayed on
the map screen.
2. Rotate i to select an item. Press
u.
Continued
QRG
99
 Loading...