

Page 1

Table of Contents
Note: All Page Nos. referenced in this Manual are hyperlinked.
Index
Introduction ..................................4
Manual Overview ............................4
System Overview ............................4
Accessories Precautions ..................5
Important Safety Information..........5
Map Overview.................................6
Current Street .................................... 6
Verified/Unverified Street.................. 6
User Agreement ............................8
Getting Started ...........................10
System Controls ............................10
Voice Control Basics.....................12
Using the Voice Control System ...... 13
Improving Voice Recognition .......... 13
Selecting an Item (Button) on the
Screen .........................................14
Selecting an Item in a List.............14
Using the On-screen Keyboard .....15
System Start-up .............................16
Bluetooth® HandsFreeLink®........18
Map Screen Legend.......................19
Map Screen Description ................20
Zoom In/Out..................................... 20
Map Scrolling .................................. 20
Displaying Current Location.........20
System Function Diagram.............21
Entering a Destination .............. 22
By Address ....................................23
Selecting the Province or State........ 23
Selecting the City ............................. 23
Selecting the Street .......................... 25
Entering the Street Number ............. 26
By Intersection...............................27
Selecting the Province or State........ 27
Selecting the City ............................. 27
Selecting the Street .......................... 29
By Places .......................................31
Finding the Place by Category ........32
Finding the Place by Name..............35
Finding the Place by Phone
Number ......................................... 36
By Map Input.................................36
Showing the Map of Current
Position......................................... 36
Showing the Map of City.................. 37
Showing the Map of Province.......... 38
Showing the Map of Canada &
Northern USA............................... 39
By Previous Destinations...............40
By Today’s Destinations ...............41
Editing Today’s Destinations List ... 41
Adding Destinations to the List........ 41
By Address Book...........................42
Adding Addresses to the Personal
Address Book................................ 43
By Go Home..................................43
Driving to Your Destination ..... 45
Driving to Your Destination ..........45
Calculate Route to Screen..............45
Changing the Routing Method......... 46
Viewing the Routes........................... 47
Viewing the Destination Map .......... 48
Map Screen ....................................48
Route Line ........................................ 48
Guidance Prompts ...........................49
Map Screen Legend ......................... 50
Guidance Screen ............................51
Guidance Screen Legend ................. 51
Distance and Time to
Destination..................................52
Direction List.................................52
Exit Info.
(Highway Exit Information) .........53
Guidance Mode..............................53
Map Scale ......................................54
Map Orientation.............................55
Destination Icon.............................55
Landmark Icons .............................56
Showing Icons on the Map............... 58
Navigation System 1
Page 2

Table of Contents
Index
Table of Contents
Icon Options .................................... 58
Going Off the Route ......................60
Off-road Tracking..........................60
Viewing/Saving the Current
Location......................................61
Pop-Ups and Disclaimers ..............62
Changing the Route .......................63
Change Route By Screen ................. 63
Waypoints ........................................ 63
Reroute: Avoid Streets ..................... 65
Reroute: Detour............................... 65
Reroute: Change Routing Method... 65
Cancel Current Route...................... 65
Back to Current Route ..................... 65
Changing Your Destination...........66
Find Nearest (Voice command)....... 66
Go Home (Voice command) ............ 66
Using Joystick to Change
Destination ................................... 66
Entering a Destination from the Menu
Screen (while en route) ................ 67
Continue Trip Screen.....................67
Information Features .................68
Information Screen ........................68
Cellular Phonebook .......................68
Voice Command Help ...................68
Map Legend...................................69
Calendar.........................................70
Entering Your Schedule ................... 70
Calculator.......................................71
Unit Conversion............................... 72
System Setup .............................. 73
Setup Mode....................................73
Setup Screen (first) ........................73
Brightness ........................................ 73
Volume ............................................. 73
Display ............................................. 74
Guidance Prompts ........................... 75
Contrast ........................................... 75
Setup Screen (second) ...................76
Personal Information .....................76
Address Book ................................... 76
Home Address .................................. 80
PIN Number..................................... 80
User Name ....................................... 81
Previous Destinations...................... 81
Routing & Guidance......................82
Rerouting ......................................... 82
Unverified Area Routing.................. 83
Edit Avoid Area................................ 87
Edit Waypoint Search Area ............. 89
Guidance Mode................................ 90
Vehicle...........................................90
Off-road Tracking ............................90
Correct Vehicle Position.................. 91
System Information .......................92
Basic Settings.................................92
Keyboard Layout.............................. 92
Units (km or mile) ............................ 92
Voice Recognition Feedback ...........92
Clock Settings................................93
Clock Adjustment ............................. 93
Clock Type ....................................... 94
Colour ............................................94
Map Colour...................................... 95
Menu Colour .................................... 95
Language........................................95
System Initialization .................. 96
System Initialization ......................96
Entering the Security Code............96
GPS Initialization...........................97
Map Matching................................97
System Limitations .................... 98
Database Limitations............... 100
2 Navigation System
Page 3

Table of Contents
Index
Table of Contents
Client Assistance.......................102
Reporting Errors ..........................102
Acura Automobile Client
Services ....................................102
Visiting Your Dealer ...................103
Obtaining a Navigation Update
DVD .........................................103
Changing the DVD......................104
PC Card Operation ......................105
Inserting the PC Card.................... 105
Voice Control of PC Card
Functions.................................... 105
CD/CD-R Operation....................105
Voice Control of CD Functions ..... 106
Coverage Areas.........................107
Map Coverage .............................107
U.S. Detailed Coverage Areas....... 107
Canada Detailed Coverage
Areas .......................................... 112
Frequently Asked Questions....117
Voice Command Index............ 131
Global Commands .......................131
Navigation General
Commands................................131
Navigation Display
Commands................................132
Find Place Commands.................133
Climate Control Commands ........134
Temperature Voice Commands ...135
Radio Voice Commands..............135
CD Voice Commands..................136
PC Card Voice Commands..........136
AUX Voice Commands...............136
Information Screen Voice
Commands................................137
Setup Screen (first) Commands...137
On-Screen Commands.................138
On-Screen Commands Assist......... 138
Index ......................................... 140
Troubleshooting........................126
Glossary.....................................128
Glossary.......................................128
Navigation System 3
Page 4

Introduction
Index
Table of Contents
Manual Overview
The manual is divided into the
following sections:
• Getting Started - A basic introduction
that discusses the controls and how to
communicate with the system.
• Entering a Destination - How to enter
an address or locate a point of interest
(POI).
• Driving to Your Destination - An
explanation of the map features,
guidance, and cautions.
• Information Features - Cellular
Phonebook, Voice Command Help,
Map Legend, Calendar, and
Calculator.
• System Setup - How to set up and
tailor the system for your personal
use and use the Address Book.
The back of this manual contains:
• Map Coverage (page 107)
• Frequently Asked Questions (FAQs)
(page 117)
• Troubleshooting Guide (page 126)
• Glossary of Terms (page 128)
• Voice Command List (page 131)
System Overview
Your navigation system is a highly
sophisticated location system with voice
control that uses satellites and a map
database to show you where you are and to
help guide you to a desired destination.
The navigation system receives signals
from the global positioning system (GPS),
a network of 24 satellites in orbit around
the earth. By receiving signals from several
of these satellites, the navigation system
can determine the latitude, longitude, and
elevation of your vehicle. In addition, a
gyroscopic yaw sensor and a vehicle speed
sensor in your vehicle keep track of the
direction and speed of travel at all times.
NOTICE
This vehicle’s navigation display, if so
equipped, includes mercury-containing
components. Upon removal, please reuse,
recycle, or dispose of as hazardous waste.
Navigation System
4
The navigation system applies this
location, direction, and speed information
to the maps and calculates a route to the
destination you enter. As you drive to that
destination, the system provides map and
voice guidance.
Page 5

Introduction
Index
Table of Contents
The navigation system is easy to use.
The locations of many places of
business and entertainment are already
entered in the system. You can select
any of them as a destination by using the
touch screen, joystick, or voice control.
There are several ways to enter a
destination, such as by point of interest
(POI), by address, by phone number,
and by selecting it from the map. The
last 50 destinations are saved for reuse
at a later date. The system also allows
you to store a home address to simplify
returning home from your destination.
Accessories Precautions
If you have front or side window tinting
installed, be aware that if the tint has
metallic properties, it can seriously
degrade or prevent GPS reception. This
is because the GPS antenna is located
under the dashboard.
If you plan to install electronic
components, such as radar detectors,
vehicle tracking devices, remote
starters, additional amplifiers, or other
audio components, ensure that they are
not located near the navigation control
unit under the dashboard, near the
navigation screen in the dash, or near
the GPS antenna under the dashboard.
Signal noise emanating from these
devices can cause intermittent
disruption of the navigation system.
Important Safety Information
The navigation system can distract your
attention from the road if you focus on
the screen or operate the system’s
controls while driving.
Enter as much information as possible
into the system before you begin
driving, or when the vehicle is stopped.
Then, as you drive, listen to the audio
instructions and use voice commands
when possible.
Navigation System 5
Page 6

Introduction
Index
Table of Contents
WARNING
Using the navigation system
while driving can take your
attention away from the road,
causing a crash in which you
could be seriously injured or
killed.
Only operate system controls
when the conditions permit you
to safely do so.
While driving, do not look at the screen
or operate the system controls for more
than a second or so at a time, and only
after deciding you can do so safely. Pull
to the side of the road if you need more
time to look at the screen or operate the
controls.
The navigation system is designed to
provide route information to help you
reach your destination. However, this
route guidance may sometimes conflict
with current road conditions such as
street closures, road construction,
detours, and out-of-date map data.
Additionally, the system itself has
certain limitations (see page 98).
Therefore, you must verify the audio
and visual route information provided
by the system by carefully observing the
roadway, signs and signals, etc. If you
are unsure, proceed with caution.
Always use your own good judgment,
and obey traffic laws while driving.
Map Overview
Current Street
The current street on which your vehicle
is located appears at the bottom of the
map
screen (see page 19). A message
saying “Not on a digitized road” may
appear instead when you drive 800
metres away from a mapped road. For
more details, see
page 60.
Verified/Unverified Street
Your navigation system has two kinds
of streets: verified (dark coloured) and
unverified (light coloured). The
differences between the two types of
streets are contrasted in the chart on
page 7. Note that the “Unverified” roads
are displayed only on the U.S. areas.
Off-road Tracking
on
Navigation System
6
“Unverified” Road
“Verified” Road
Page 7

Introduction
Index
Table of Contents
Verified streets (dark coloured) Unverified streets (light coloured)
When
displayed
Street colour
Map quality
Routing
differences
Cautions
Guidance
voice
These roads are found within metropolitan areas, and
include interstate highways and major roads
connecting cities.
Shown on daytime map screen as black or red, such as
interstate highways.
The database vendor has verified these streets.
Information like turn restrictions, average speed, and
whether it is a one-way street have been gathered and
used when creating your route to a destination.
While driving to your destination, the displayed route
line is solid blue. The system provides voice and map
guidance to your destination.
There are no pop-up boxes urging extra caution during
a route. However, because roads constantly change,
you are urged to use common sense, and always obey
posted traffic restrictions.
Voice guidance issues instructions such as “In 500 m,
make a right turn.”
These roads are found in rural areas, and typically include
residential streets away from the centre of a town.
Shown on the daytime map screen as light brown.
These streets have not been verified by the database vendor. The
system does not contain information on one-way streets, turn
restrictions, or the road’s average speed. They are shown on the
map for reference and way have errors in map location, naming,
and address range.
Your route line is either a blue dotted “vector line,” or a dashed
pink/blue line. For information on selecting this option, and the
routing differences, see Unverified Area Routing on page 83.
Regardless of whether the user chooses route guidance, there are
cautionary screens before and during the route urging the user to
be extra cautious, and obey all traffic restrictions. See Unverified
Area Routing on page 83.
The phrase “if possible” is added to each guidance instruction.
For example: “In 500 m, make a right turn, if possible.”
Time and
distance
“to go”
The time and distance “to go,” displayed while en
route to a destination, is based on the average speed
and distance for the roads used for your route.
Because the average speed of these roads is not known, the time
and distance “to go” is based on a fixed average speed of 40 km/h
for these roads.
Navigation System 7
Page 8

User Agreement
Index
Table of Contents
In using this DVD “Satellite Linked
Navigation System” (the “DVD”),
which includes HONDA MOTOR CO.,
LTD. software, ALPINE
ELECTRONICS, INC. software,
NAVTEQ database contents, INFO
USA CORPORATION database, and
ZENRIN CO. database contents
(hereinafter referred to as “Licensors”),
you are bound by the terms and
conditions set forth below.
By using your copy of the DVD, you
have expressed your Agreement to the
terms and conditions of this Agreement.
You should, therefore, make sure that
you read and understand the following
provisions. If for any reason you do not
wish to be bound by the terms of this
Agreement, please return the DVD to
your dealer.
• The DVD may not be copied,
duplicated, or otherwise modified, in
whole or in part, without the express
written permission of the Licensors.
• The DVD may not be transferred or
sublicensed to any third party for
profit, rent or loan, or licensed for
reuse in any manner.
• The DVD may not be decompiled,
reverse engineered or otherwise
disassembled, in whole or in part.
• The DVD may not be used in a
network or by any other manner of
simultaneous use in multiple systems.
• The DVD is intended solely for
personal use (or internal use where
the end-user is a business) by the
consumer. The DVD is not to be used
for commercial purposes.
• The Licensors do not guarantee to the
client that the functions included in
the DVD meet the specific objectives
of the user.
• Licensor shall not be responsible for
any damages caused by the use of the
DVD to the actual user or to any third
party.
• The warranty on the DVD shall not
extend to an exchange or refund due
to misspelling, omission of letters, or
any other cosmetic discrepancy in the
contents of the DVD.
• The right to use the DVD shall expire
either when the user destroys the
DVD or software, or when any of the
terms of this Agreement are violated
and the Licensors exercise the option
to revoke the license to use the DVD
or software.
8 Navigation System
Page 9

User Agreement
Index
Table of Contents
• The terms and conditions hereof
apply to all subsequent users and
owners as well as to the original
purchaser.
• The logos of oil companies, hotels,
convenience stores, and other
businesses are displayed for your
information and convenience, and in
no way imply any sponsorship,
approval or endorsement of these
companies, or their products. The
logos are trademarks of their
respective owners.
The user shall indemnify and save
harmless the Licensors, and their
officers, employees and agents, from
and against any claim, demand or
action, irrespective of the nature of the
cause of the claim, demand or action,
alleging loss, costs, expense, damages
or injuries (including injuries resulting
in death) arising out of the use or
possession of the DVD or software.
Use, duplication, or disclosure of this
DVD by or on behalf of the United
States government is subject to
“Restricted Rights” as set forth at FAR
52.227-14, -19 or DFARS 252.2277013, as applicable. Manufacturers are
the Licensors, including HONDA
MOTOR CO., LTD., 2-1-1 Minami
Aoyama Minato-Ku Tokyo 107-8556
JAPAN., Alpine Electronics, Inc., 20-1
Yoshima Kogyodanchi, Iwaki,
Fukushima 970-1192 JAPAN.,
NAVTEQ Corporation, 222
Merchandise Mart, Suite 900, Chicago,
IL, 60654, INFO USA
CORPORATION, 5711 South 86th
Circle, Omaha, NE 68127., and
ZENRIN CO., LTD., 1-1-1 Muromachi,
Kokurakita-ku, Kitakyushu, Fukuoka
803-8630, JAPAN.
Navigation System 9
Page 10
Getting Started
Index
Table of Contents
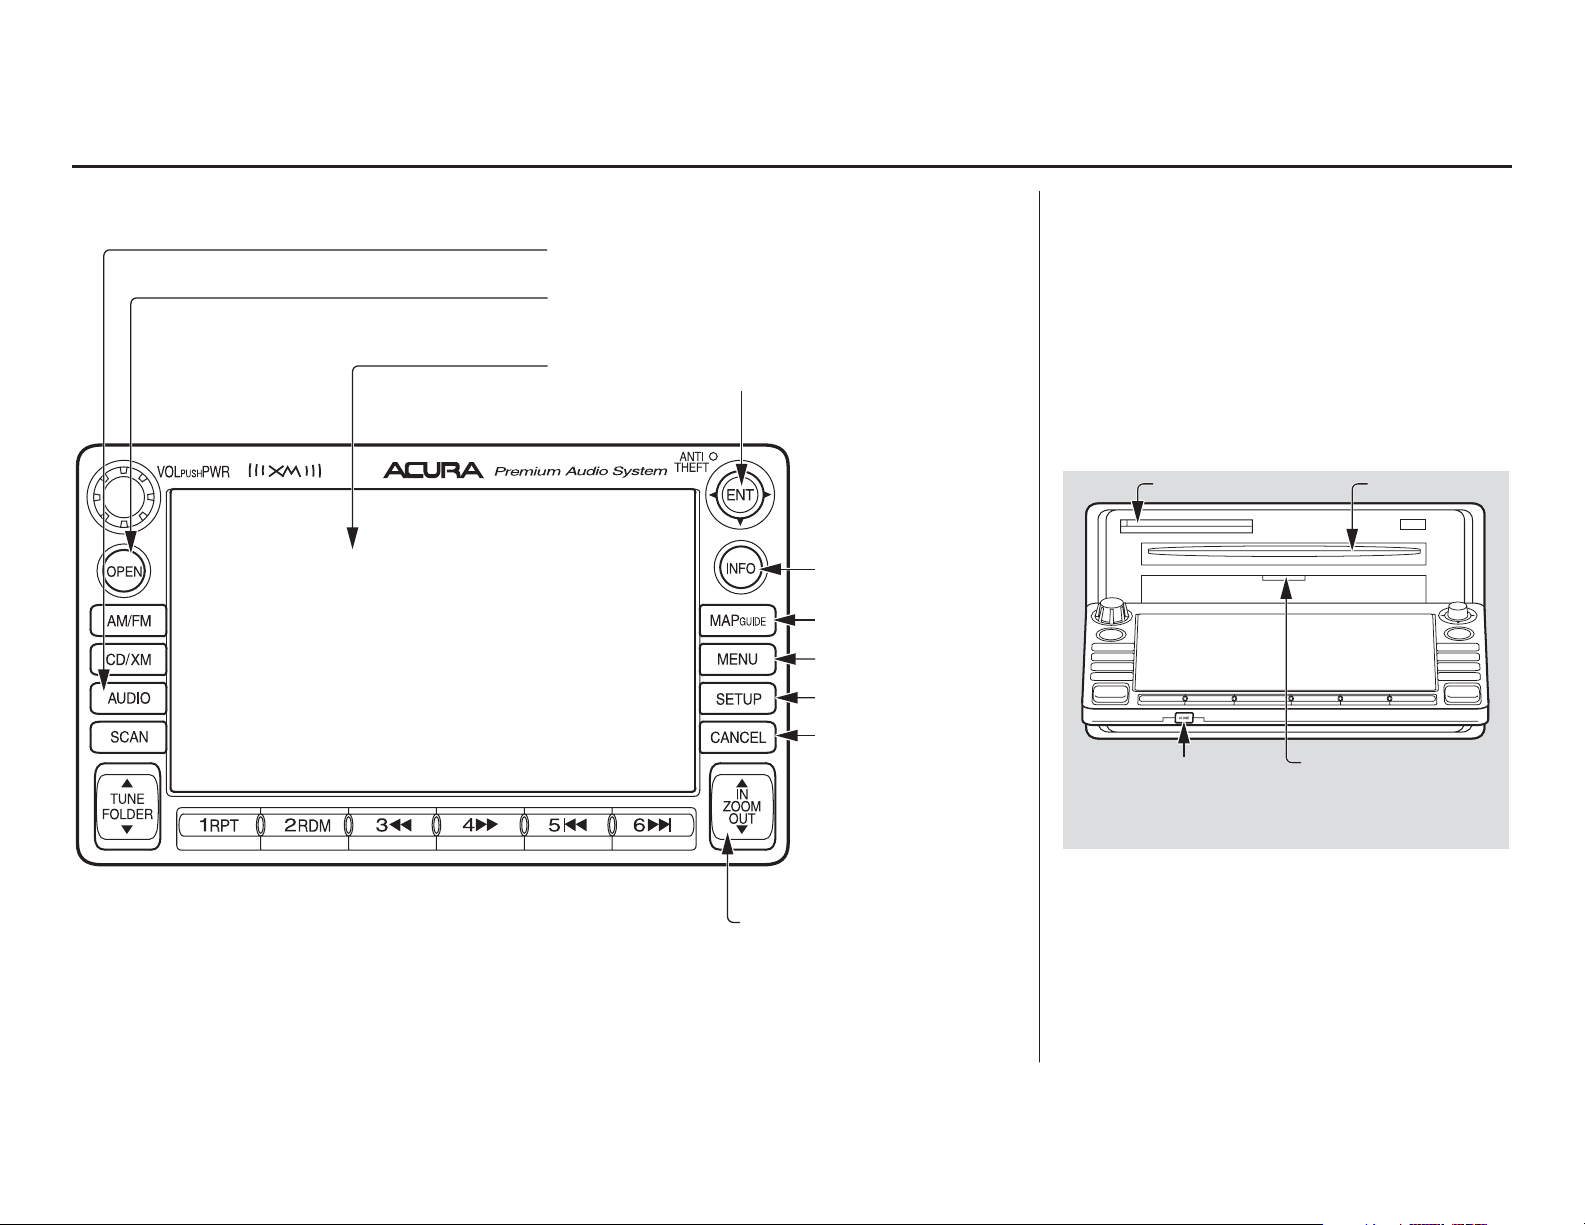
System Controls
AUDIO button
OPEN button
Screen
Joystick/ENT button
INFO button
MAP/GUIDE
button
MENU button
SETUP button
CANCEL button
OPEN button
Tilts the screen down to access the CD,
DVD, and PC Card slots.
CLOSE button
Return the screen to the original
position.
Pressing the OPEN button tilts the
screen down.
PC Card Slot
CLOSE button
Navi DVD Slot
(Located behind
drop-down
cover)
CD Slot
NOTE:
On some grade of the vehicle, Premium Audio System is not available and the system
contorols have no logo of Premium Audio System.
10 Navigation System
ZOOM IN/OUT buttons
NOTE:
• Voice commands are disabled when
the screen is tilted down.
• Press the CLOSE button to return
the screen to the upright position.
Page 11

Getting Started
Index
Table of Contents
Joystick/ENT button
Moves left, right, up, and down to move
the highlighting around the display, to
scroll through lists, or to look around a
displayed map. After making a selection
in a menu or list, push in on the joystick
to enter the selection into the system.
In almost all cases, you can enter a
selection into the system by using the
voice control system, highlighting the
item and pushing in on the joystick, or
by touching the appropriate item you
wish to select.
INFO button
Displays the screen for selecting
Cellular Phonebook, Voice
Command Help, Map Legend,
Calendar, and Calculator. See
page 68.
MAP/GUIDE button
Displays the map. When en route,
switches between the map, guidance,
and Direction list screens. See page 19
or 50.
MENU button
Displays the Enter destination by
screen. When en route, displays the
Change route by screen. See page 22.
SETUP button
Displays the Setup screens where you
can customize information in the
system. See page 73.
CANCEL button
Cancels the current screen and returns to
the previous screen display.
NOTE:
The NAVI BACK button on the steering
wheel performs the same basic function.
ZOOM (IN)/ (OUT) buttons
Press ZOOM to zoom in (to show
more detail), or ZOOM to zoom out
(to show more area and less detail)
while a map screen is displayed.
ZOOM IN reduces the scale (showing
less area with greater detail). ZOOM
OUT increases the scale (showing more
area with less detail). See page 54.
AUDIO button
Press to display the audio screen.
For information on audio system
features, see the Audio section of your
Owner’s Manual.
Other buttons
See the Audio section of your Owner’s
Manual.
Screen
All selections and instructions are
displayed on the screen. In addition, the
display is a “touch screen” – you can
enter information into the system by
touching the images (icons) on the
screen with your finger.
For example, if you need to enter a
street name, a keyboard will be
displayed. You can type in the street
name by saying or selecting the
individual characters on the screen.
Clean the screen with a soft damp cloth.
You may use a mild cleaner intended for
use on liquid crystal displays (LCDs).
Harsher chemicals may damage the
screen.
Navigation System 11
Page 12
Getting Started
Index
Table of Contents
Voice Control Basics
Your vehicle has a voice control system
that allows hands-free operation of most
of the navigation system functions. You
can also control the audio and climate
control system. The voice control
system uses the NAVI TALK and NAVI
BACK buttons on the steering wheel
and a microphone near the map lights on
the ceiling.
HFL TALK
button
NAVI TALK
button
NAVI BACK
button
Microphone
(on the ceiling)
NAVI TALK button
This button activates the voice control
system. Press and release it when you
want to give a voice command. See
Voice Command Index on page 131 for
a list of voice commands.
NAVI BACK button
This button has the same function as the
CANCEL button. When you press and
release it, the display returns to the
previous screen. When the previous
screen appears, the system replays the
last prompt. This button is enabled for
navigation system commands only.
However, it can be used to cancel an
audio or climate control voice command
up to one second after the command
confirmation.
NOTE:
The NAVI TALK and NAVI BACK
buttons are deactivated while using the
Bluetooth® HandsFreeLink® feature.
See your Owner’s Manual for
information on this system.
HFL BACK button
NOTE:
While using the voice control system, all
of the speakers are muted.
12 Navigation System
Page 13

Getting Started
Index
Table of Contents
Using the Voice Control System
You should use the voice control system
as much as possible, and consider
manual entry using the joystick as a
backup method of entry.
Most of the system’s functions can be
controlled by voice commands activated
with the NAVI TALK button. To
control the navigation system by voice:
• Press and release the NAVI TALK
button.
• Wait for the beep.
• Give a voice command.
Once the microphone picks up your
command, the system changes the
display in response to the command and
prompts you for the next command.
Using the NAVI TALK button, answer
the prompts as required.
If the system does not understand a
command or you wait too long to give a
command, it responds with “Pardon,”
“Please repeat,” or “Would you say
again.” If the system cannot perform a
command or the command is not
appropriate for the screen you are on, it
sounds a beep.
Anytime you are unsure of what voice
commands are available on a screen,
you can always say “Help.” The system
will then read the list of available
commands to you.
When you give a command, the system
generally either repeats the command as
a confirmation or asks you for further
information. If you do not wish to hear
this feedback, you can turn it off.
However, hearing the feedback will
familiarize you with the way the system
expects commands to be phrased. See
the Voice Recognition Feedback
setting in Setup.
If you hear a prompt such as “Please use
the touch screen to...” or “Please choose
an area with the joystick,” the system is
asking for input that cannot be
performed using the voice control
system.
Improving Voice Recognition
To achieve optimum voice recognition
when using either the navigation or
Bluetooth® HandsFreeLink® voice
control system, the following guidelines
should be followed:
NOTE:
Make sure the correct screen is
displayed for the voice command that
you are using. See Voice Command
Index on page 131.
• Adjust the dashboard and side vents
so air does not blow against the
microphone on the ceiling.
• Close the windows and the sunroof.
Navigation System 13
Page 14

Getting Started
Index
Table of Contents
• If more than one person is speaking at
the same time, the system may
misinterpret your command.
• After pressing and releasing the
NAVI TALK button, wait for the
beep, then give a voice command.
• Give a voice command in a clear,
natural speaking voice without
pausing between words.
• If the system cannot recognize your
command because of background
noise, speak louder.
• If you are still having trouble with the
voice control system, refer to Voice
Command Help on the
Information screen.
Selecting an Item (Button)
on the Screen
On most screens, there are items that
can be selected (like buttons with titles
such as OK or Return). To select an
item on any screen, do one of the
following:
• Use the voice control system and say
the name of the desired item. Almost
all selectable items on the screen,
including some listed items, are
recognized by the voice control
system.
• Touch the desired item on the screen.
• Move the highlighting to the desired
item with the joystick, then push in
on the joystick.
Tip:
If items are grayed out, this means that
they cannot be selected.
Selecting an Item in a List
To scroll through a list, do one of the
following:
• Use the joystick to scroll through the
list item by item.
• Use the voice control system and say
“Next” or “Previous” or use the “onscreen” scroll up or down buttons, or
the ZOOM buttons to scroll through
the list page by page.
If you cannot find the desired name, or
have made an error, return to the
previous screen by pressing the
CANCEL or the NAVI BACK button
on the steering wheel.
To select the desired item in the list, do
one of the following:
• Use the voice control system, and say
the item number of the desired item.
14 Navigation System
• Touch the item on the screen.
• Use the joystick to move the
highlighting to the item, then push in
on the joystick.
Page 15

Getting Started
Index
Table of Contents
Using the On-screen
Keyboard
When the system needs input from you,
the display changes to a keyboard. Use
the displayed letters to enter the
information. Enter each letter by one of
the following methods:
• Using the voice control system, say
the desired letter on the screen.
• Move the highlighting to the desired
letter using the joystick, then push in
on the joystick.
• Touch the desired letter on the screen.
When speaking the letters, you can
substitute the name that represents each
letter or symbol. This improves
recognition. The system will only
respond to the names shown in the
following graphic. For example:
The names that can be used for each letter are shown below. For additional keyboard
symbols, see page 138.
Alpha
Apple
Kilo
King
Uniform
Uncle
Bravo
Boy
Lima
Larry
Victor
Charlie
Mike
Mary
Whiskey
William
Delta
Dog
November
Nancy
X-ray
Echo
Edward
Oscar
Yankee
Yellow
Foxtrot
Frank
Papa
Paul
Zulu
Zebra
Golf
George
Quebec
Queen
Hotel
Henry
Romeo
Robert
India
Igloo
Sierra
Sam
Slash
Juliet
John
Tango
Tom
Apostrophe
Ampersand
• To select the letter “A”: Say, “A”;
“Alpha”; or “Apple.”
• To select the letter “M”: Say, “M”;
“Mike”; or “Mary.”
Navigation System 15
Page 16

Getting Started
Index
Table of Contents
Each entered letter will appear at the top
of the display. Say or select Space to
enter a space between words. Say or
select Delete to erase a letter entered
incorrectly.
When entering an address, the system
searches the database for words that
match the letters you are entering. As a
result, you will notice that some letters
are no longer available.
When the system finds only one entry
that matches, it completes the entry of
the name for you. If the system finds
more than one entry that matches your
input, the system displays a list.
Tip:
If you are unsure of the spelling of a
name, enter the letters that you are sure
of, and then select List. The system
displays a list of names that most closely
matches your input.
You can choose to have your keyboard
displayed in alphabetized format as
shown below:
Or in a regular keyboard (QWERTY)
format as shown below:
System Start-up
When you turn the ignition to ON (II), it
takes several seconds for the navigation
system to boot up.
The first screen to appear is the
navigation system globe screen. The
screen then changes to the Disclaimer
screen:
NOTE:
The OK button does not appear
immediately. It appears after the
software is loaded.
16 Navigation System
See Keyboard Layout in the Setup
screen (second).
Page 17

Getting Started
Index
Table of Contents
Read this disclaimer carefully so you
understand it before continuing. Push in
on the joystick, or touch OK, and the
map screen will appear on the display.
The “OK” cannot be activated by voice.
Tip:
You can change the language of the
messages displayed on the screen to
French. Select Français, and select
Oui, and then restart the navigation
system. After restarting the system, the
messages will be changed to French,
and Français will be changed to
English.
NOTE:
If you do not select OK, and then enter
the Setup or Information screens, some
items are not available and will show up
as darkened buttons (grayed out). See
System Function Diagram on page 21.
If you do not press the joystick or touch
OK, the screen will display the clock
after 30 seconds.
If you are not planning to use the
navigation system at this time, touch
DISPLAY OFF to turn off the screen.
By touching CLOCK TYPE, you can
change the design of the clock screen.
For details of the clock type, See
page 75.
To return to the Disclaimer screen,
press the MENU or MAP/GUIDE
button.
If you have entered any Calendar
reminders, they are displayed after you
select OK.
The Calendar reminder screen
remains displayed until you select OK
or Remind Later, or press the
CANCEL button.
Tip:
For information on clock adjustment,
see page 93.
Navigation System 17
Page 18

Getting Started
Index
Table of Contents
If you select OK, the reminder will not
show up again. If you wish to have the
reminder show up again later in the day,
touch the Remind Later button.
If you press the CANCEL button, the
message will be displayed the next time
you start the vehicle.
NOTE:
The system will display the current
message and any older or previously
unread messages, with the newest
message listed first.
Bluetooth
®
HandsFreeLink
®
If you have a Bluetooth-compatible cell
phone that is paired, then CALL on the
Calculate route to screen is enabled.
When you select CALL, the system
dials the number shown on the screen. If
CALL is not available (dark gray), and
your phone is paired, then make sure the
phone has service or that HFL is not in
use; press the HFL BACK button.
18 Navigation System
For more information on Bluetooth®
HandsFreeLink®, see your Owner’s
Manual.
Page 19
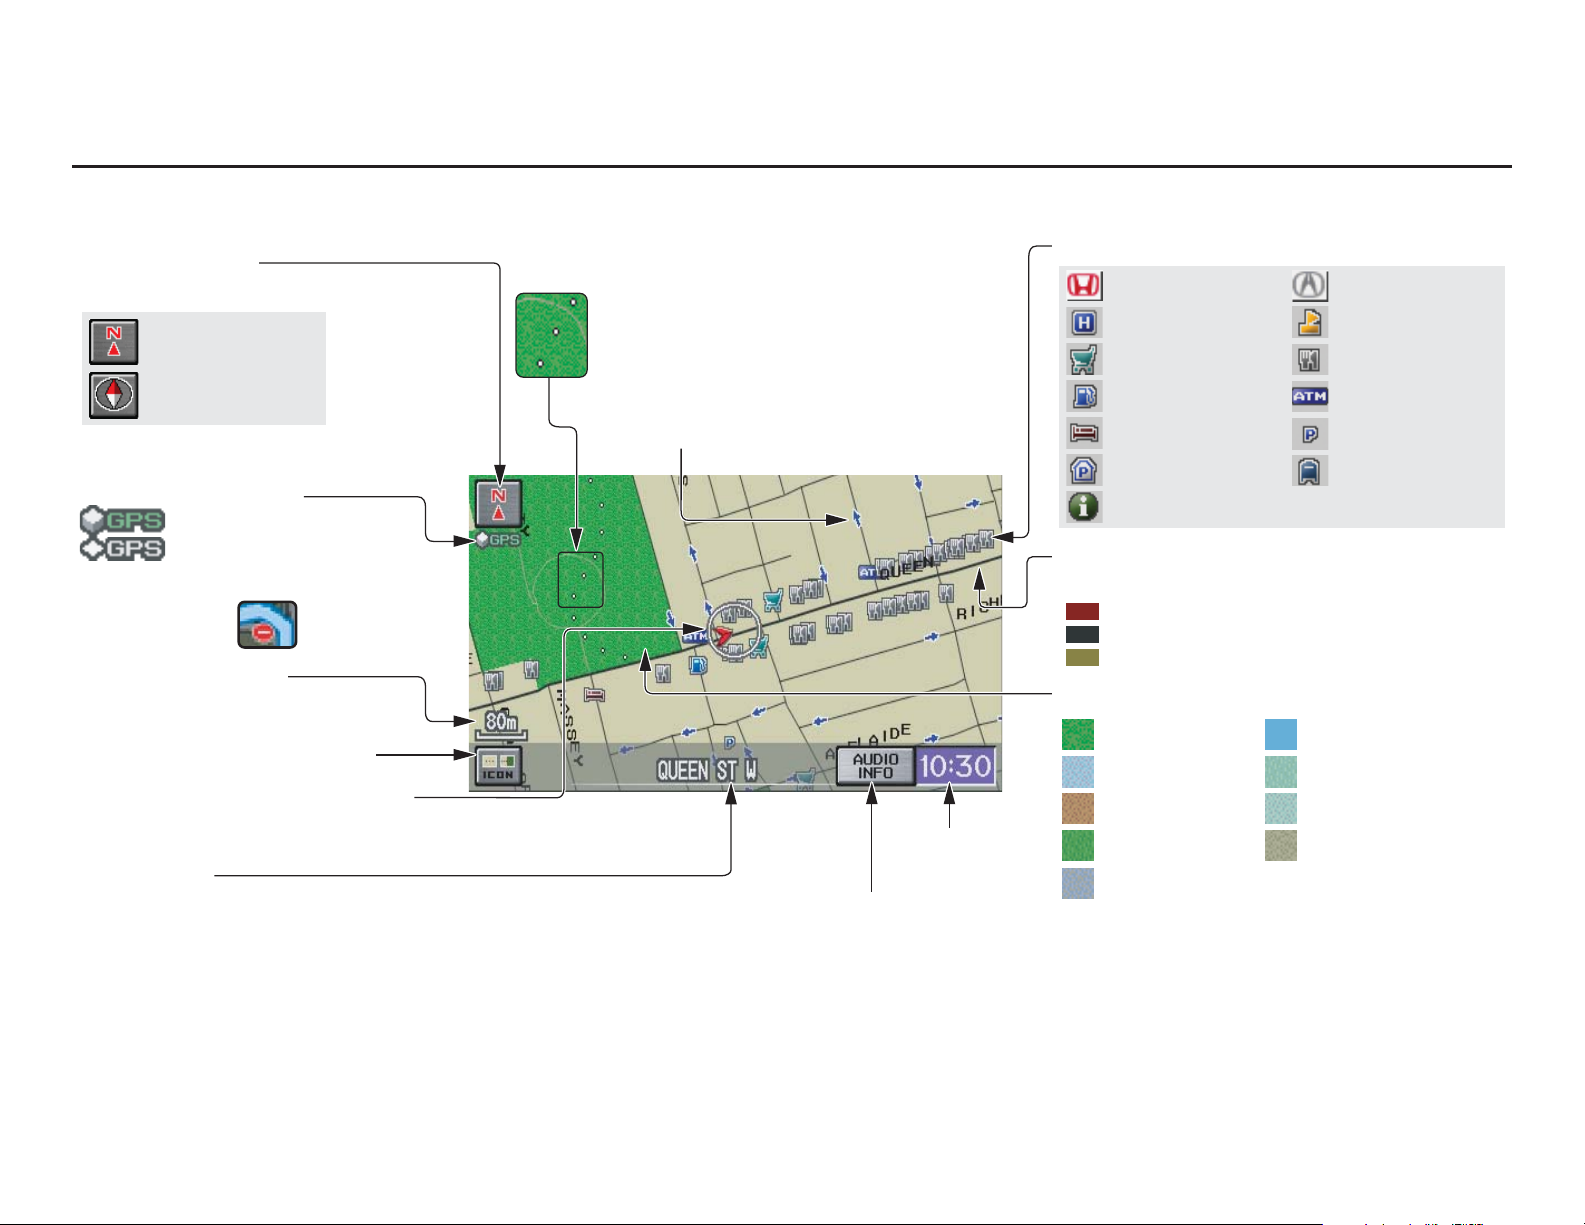
Map Screen Legend
Index
Table of Contents
Getting Started
Map Orientation
(see page 55)
“North Up”
“Heading Up”
GPS Signal Strength
: Best Reception
: Good Reception
Missing: Poor/No Reception
No Entry Icon
Current Map Scale
(see page 54)
ICON Button (see page 58)
Vehicle Position (see page 61)
(Use voice command “Display the current location,”
or touch the icon to show current location.)
Status Bar
Current street name or audio information is displayed.
You can switch this information by touching
CURRENT STREET/AUDIO INFO.
(For information on the Current Street, see page 6)
Breadcrumbs
(see Off-road Tracking
on page 60)
One-Way Traffic Icon (80 m scale only)
(see page 56)
CURRENT STREET/AUDIO INFO
NOTE:
See Map Legend on the Information screen for further explanation.
Clock
(see page 93)
Landmark Icon - Generic (see page 56)
Honda Dealer
Hospital
Grocery Store
Gas Station
Hotel/Lodging
Parking Garage
Highway Exit Information
Streets
(see Map Overview on page 6)
Interstates or Highways
Verified Streets
Unverified Streets
Map Features
: Park
: Hospital
: Shopping Mall
: Golf Course
: Airport/Stadium/Business
Acura Dealer
School
Restaurant
AT M
Parking Lot
Post Office
: Water Area
: Cemetery
: University
: Indian Reservation
NOTE:
If you move the joystick over an area
(map features shown above), the name
is displayed on the screen.
Navigation System 19
Page 20

Getting Started
Index
Table of Contents
Map Screen Description
Zoom In/Out
Use the ZOOM buttons to change the
scale of the map. Zooming in increases
the detail, while zooming out gives you
a wide area view. After changing the
scale, give the system a few moments to
update the display.
Map Scrolling
To view other areas on the map, move
the joystick left, right, up, or down. The
map will shift in that direction. To
return the map to your current location,
press either the MAP/GUIDE,
CANCEL, or NAVI BACK button on
the steering wheel.
Displaying Current Location
You can say “Display current location”
or touch the vehicle position icon at any
time to see the current address, latitude,
longitude, and elevation. The screen
will change to:
NOTE:
The elevation will not appear when the
system is temporarily lacking proper
GPS information. The system elevation
may not agree with elevations shown on
roadside elevation signs, and may
fluctuate plus or minus 30 metres or
more.
You can say “Save current location” or
select Save on the screen to save the
current location in your Address Book.
Select Return to return to the previous
screen.
20 Navigation System
Page 21

Getting Started
Index
Table of Contents
System Function Diagram
This diagram shows the navigation
system features, starting at the centre
and working outward in layers. The
navigation program starts at “Key ON,”
and then displays the globe screen
(blue). If OK is selected on the
Disclaimer screen, the functions in the
yellow segments of the diagram become
available in the Setup and Information
screens. The white segments of the
diagram are available anytime, even if
you do not select OK.
The items above the map screen show
various methods to begin driving to
your destination (orange). You are
provided with map/voice guidance,
routing cautions, and a direction list.
While driving to your destination, use
the voice control system as much as
possible to interact with the navigation,
audio, and climate control systems
(green).
VOICE:
"HELP"
(ALL)
S
D
N
A
M
M
O
AUDIO (pg. 135, 136)
C
E
C
I
CLIMATE CONTROL
O
V
ENTER (pg. 70)
LIST (pg. 70)
MATH (pg. 71)
CONVERT (pg. 72)
LIST (pg. 69)
IMPORT, SEARCH,
DELETE (pg. 68)
VOICE:
SCREEN"
(pg. 68)
"INFORMATION
-
(pg. 131)
INFORMATION
SCREEN (pg. 137)
(pg. 134, 135)
CALENDAR
CALCULATOR
NAVI AUDIO
CLIMATE (pg. 68)
y
VOICE:
"MENU" (to
change route)
(pg. 63)
V
I
R
C
I
D
O
V
/
P
A
M
(
VOICE:
"GO HOME"
MAP LEGEND
PHONEBOOK
VOICE HELP
SELECT
BAND/
F
FREQUE
o
r
o
m
u
o
r
r
O
w
n
e
VOICE:
"HOW FAR TO THE
DESTINATION?"
(pg. 131)
T
G
N
A
I
D
I
U
G
E
SELECT A
DESTINATION
JOYSTICK
(pg. 43)
H
T
-
BUTTON
INFO
(pg. 68)
BUTTON
(pg. 11)
NCY
VOL
CD
BALANCE
e
FUNCTIONS
i
n
f
o
r
m
r
’
a
s
t
M
a
n
u
a
O
C
N
WITH
(pg. 66)
E
PRESSED
AUDIO
OTHER
AUDIO
i
o
n
,
l
"DISPLAY (OR SAVE)
CURRENT LOC
O
Y
U
O
R
,
E
P
A
M
C
M
E
R
R
E
M
I
A
L
C
O
S
I
L
D
G
E
H
T
OK
NOT
s
e
e
VOICE:
(pg. 61)
R
D
U
N
G
I
T
VOICE: "FIND
NEARES
T..."
ATM, E
TC.
(pg. 133)
R
E
C
S
N
D
E
L
A
A
R
S
E
D
(
N
I
E
E
R
N
C
S
S
C
R
E
B
KEY
ON
ATION"
E
S
C
A
U
E
N
R
p
g
.
1
7
)
(
p
g
.
1
6
E
E
N
OK
NOT
PRESSED
VOICE:
"SET W
AYPOIN
(pg. 63
T
I
N
T
I
O
N
S
,
VOICE:
"MENU" FOR
ENTER
DESTINATION
SCREEN
(pg. 22)
(
p
g
.
1
9
)
)
PRESS
OK
SETUP
BUTTON
(pg. 73)
SCREEN
SETUP
(FIRST)
CONTRAST (pg. 75)
DISPLAY (pg. 74)
T"
"WHAT TIME
IS IT?"
(pg. 131)
T
I
O
N
R
E
C
T
I
CONTINUE
DESTINATION
TO THE
(RESUME)
(pg. 67)
VOICE:
O
N
-
L
I
)
A
D
I
AFTER RESTART
-
"ZOOM IN/ZOO
"HIDE/DISPLAY
PERSO
BASIC
ROUTING
GUIDANCE
CLOCK
SETTINGS
VEHICLE
COLOUR
SYSTEM INFO.
MAP COLOUR (pg.
MENU COLOUR (pg. 95)
VERSION (pg. 9
GUIDE. PROMPTS (pg.
VO
BRIGHTNESS (pg. 73)
LUM
E (pg. 73)
VO
"AUDIO/C
(pg. 135, 136)
ICE:
D"
FAN, TEMP
(pg.134, 135)
S
T
)
VOICE:
M OUT"
(pg. 54, 132)
VOICE:
ICONS"
)
57, 132
(pg.
ADD B
NAL
OFF-ROAD TRACKING
CORRECT VEHICLE
POSITION (pg.
75)
PINs (pg. 80)
UNITS KM/MI (pg. 9
UNVERIFIED (pg. 83)
AVOID AREAS (pg. 87)
ADJ. TIME (p
CLOCK TYPE (pg.
(pg. 60,
9
0)
91)
95)
2)
VOICE:
CLIMATE
OOK (
g. 94)
94)
pg. 76
)
2)
Navigation System 21
Page 22

Entering a Destination
Index
Table of Contents
When you press the MENU button, the
display changes to:
Address (see page 23)
This selection requires you to enter the
city (and possibly the province) and the
address that you want to go to.
Intersection (see page 27)
This selection allows you to enter the
names of two intersecting streets in a
city. This is useful if you know the
general location of your destination, but
not the exact address.
Places (see page 31)
The system has been programmed with
the locations of many businesses, parks,
hospitals, etc. This selection lets you
search these by category, name, or
phone number.
Map Input (see page 36)
This selection allows you to point to a
destination on the map using the
joystick. This allows you to enter a
destination or address that may not be
listed in the database.
Previous Destinations (see page 40)
When you enter a destination with any
of the available selections (except
Address Book and Go Home), the
last 50 destinations are saved by the
system. Use this selection to choose a
destination again.
NOTE:
If Previous Destinations is grayed
out, there are no Previous Destinations
entered.
Today’s Destinations (see page 41)
You can enter and sort up to five
destinations and store them in the
Today’s Destinations list. You can then
use the Today’s Destination selection.
NOTE:
If Today’s Destinations is grayed
out, there are no Today’s Destinations
entered.
Address Book (see page 42)
This selection allows you to select a
stored address. The system can store up
to a combined total of 200 User 1 and
User 2 addresses.
Go Home (see page 43)
This selection allows you to select your
home or a common place as a
destination.
NOTE:
If you have no home address entered,
the system prompts you for one.
22 Navigation System
Page 23
Entering a Destination
Index
Table of Contents
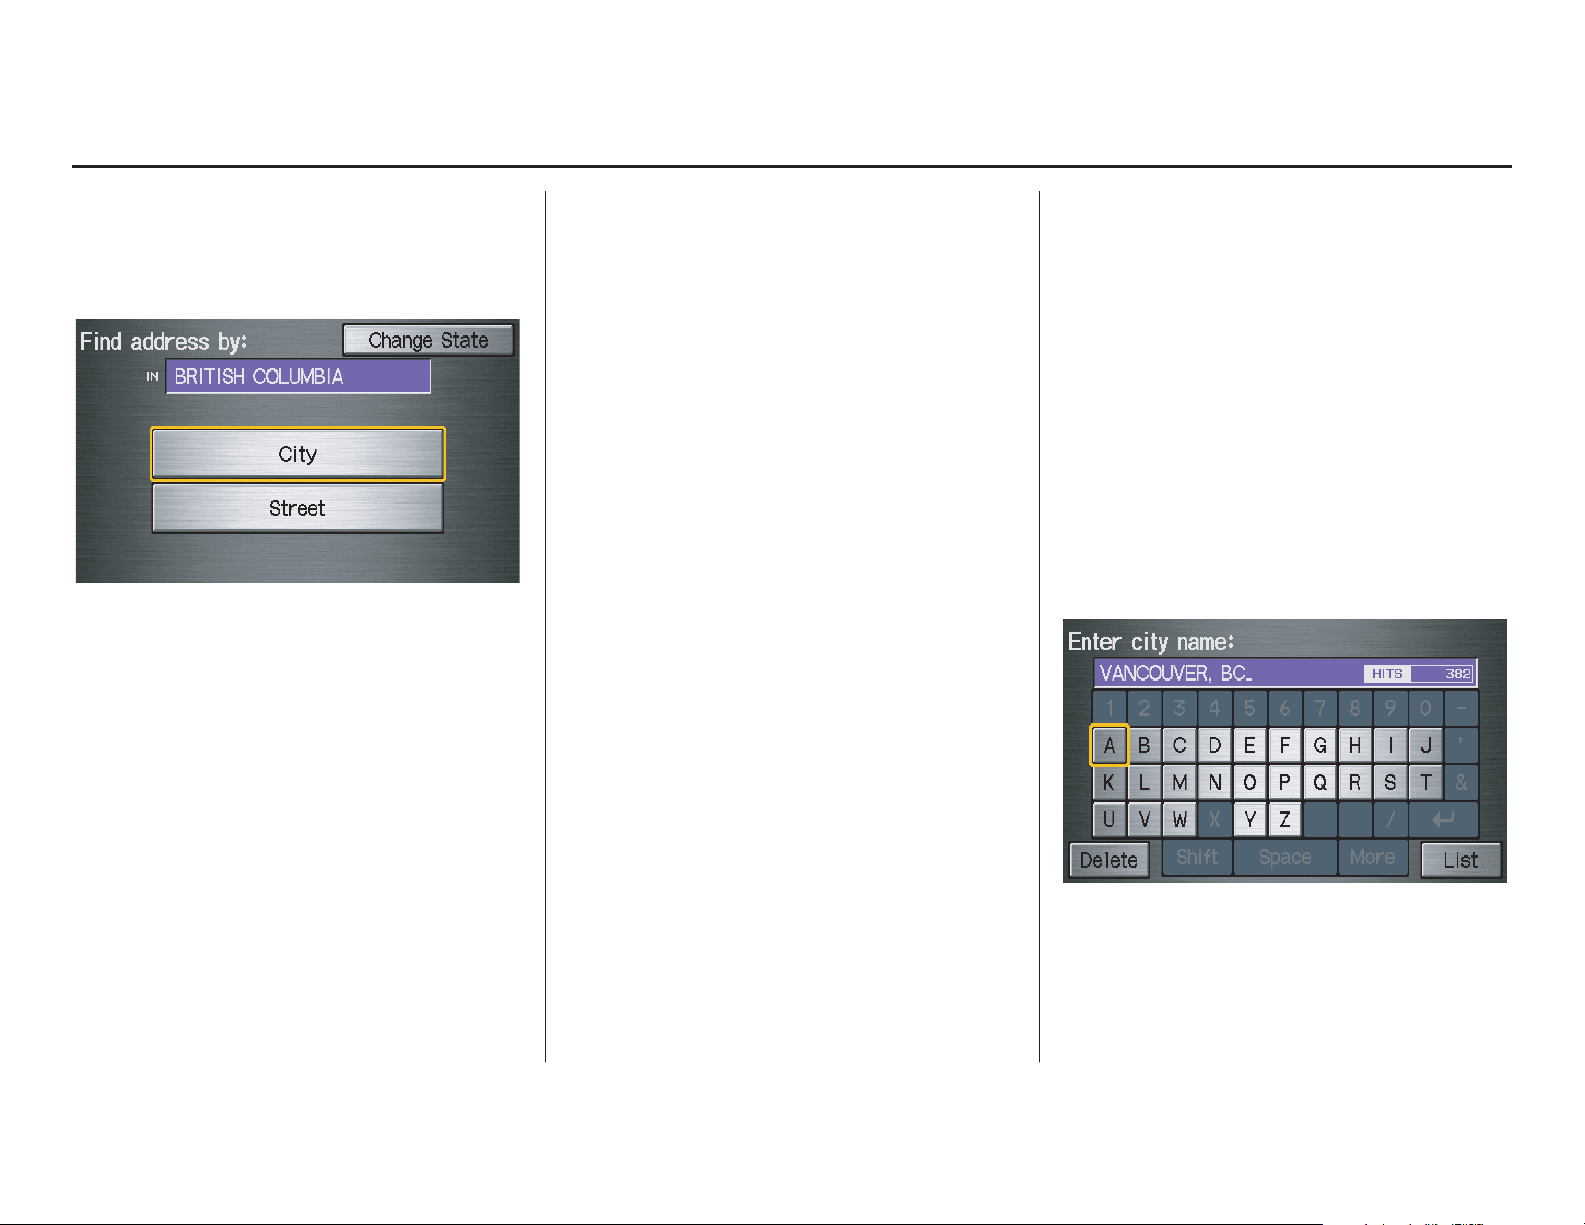
By Address
After you select Address from the
Enter destination by screen, the
display changes to:
Tip:
• When entering an address by voice, it
is more efficient to say the city name
first, then the street name.
• When entering an address by touch, it
is usually easier to enter the street
first. A city or cities that the street
appears in will be displayed. For
your convenience, you do not have to
enter both city and street.
NOTE:
• If you find that your city is not listed,
it may be part of a larger
metropolitan area. Try entering the
street first.
• Prior to departure, you can set areas
to avoid. The system then includes
them in its calculations for the
destination you have entered. See
Edit Avoid Area on page 87.
Selecting the Province or State
The province you are in is displayed at
the top of the screen. If your desired
destination is in another province, select
Change State.
The display then changes to the Enter
state/province name screen. Use the
voice control system and say the name
of the province or use the on-screen
keyboard to enter the name of the
province.
Selecting the City
This is helpful if the street runs through
several cities, and you know what city
includes the street. The city you are in is
displayed on the screen. If your desired
destination is in another city, say or
enter that city.
By Voice Control:
Say “City” on the Find address by
screen, and the display changes to the
Enter city name screen. Say the city
name by saying individual letters, or
words that represent the letters, one at a
time.
Navigation System 23
Page 24

Entering a Destination
Index
Table of Contents
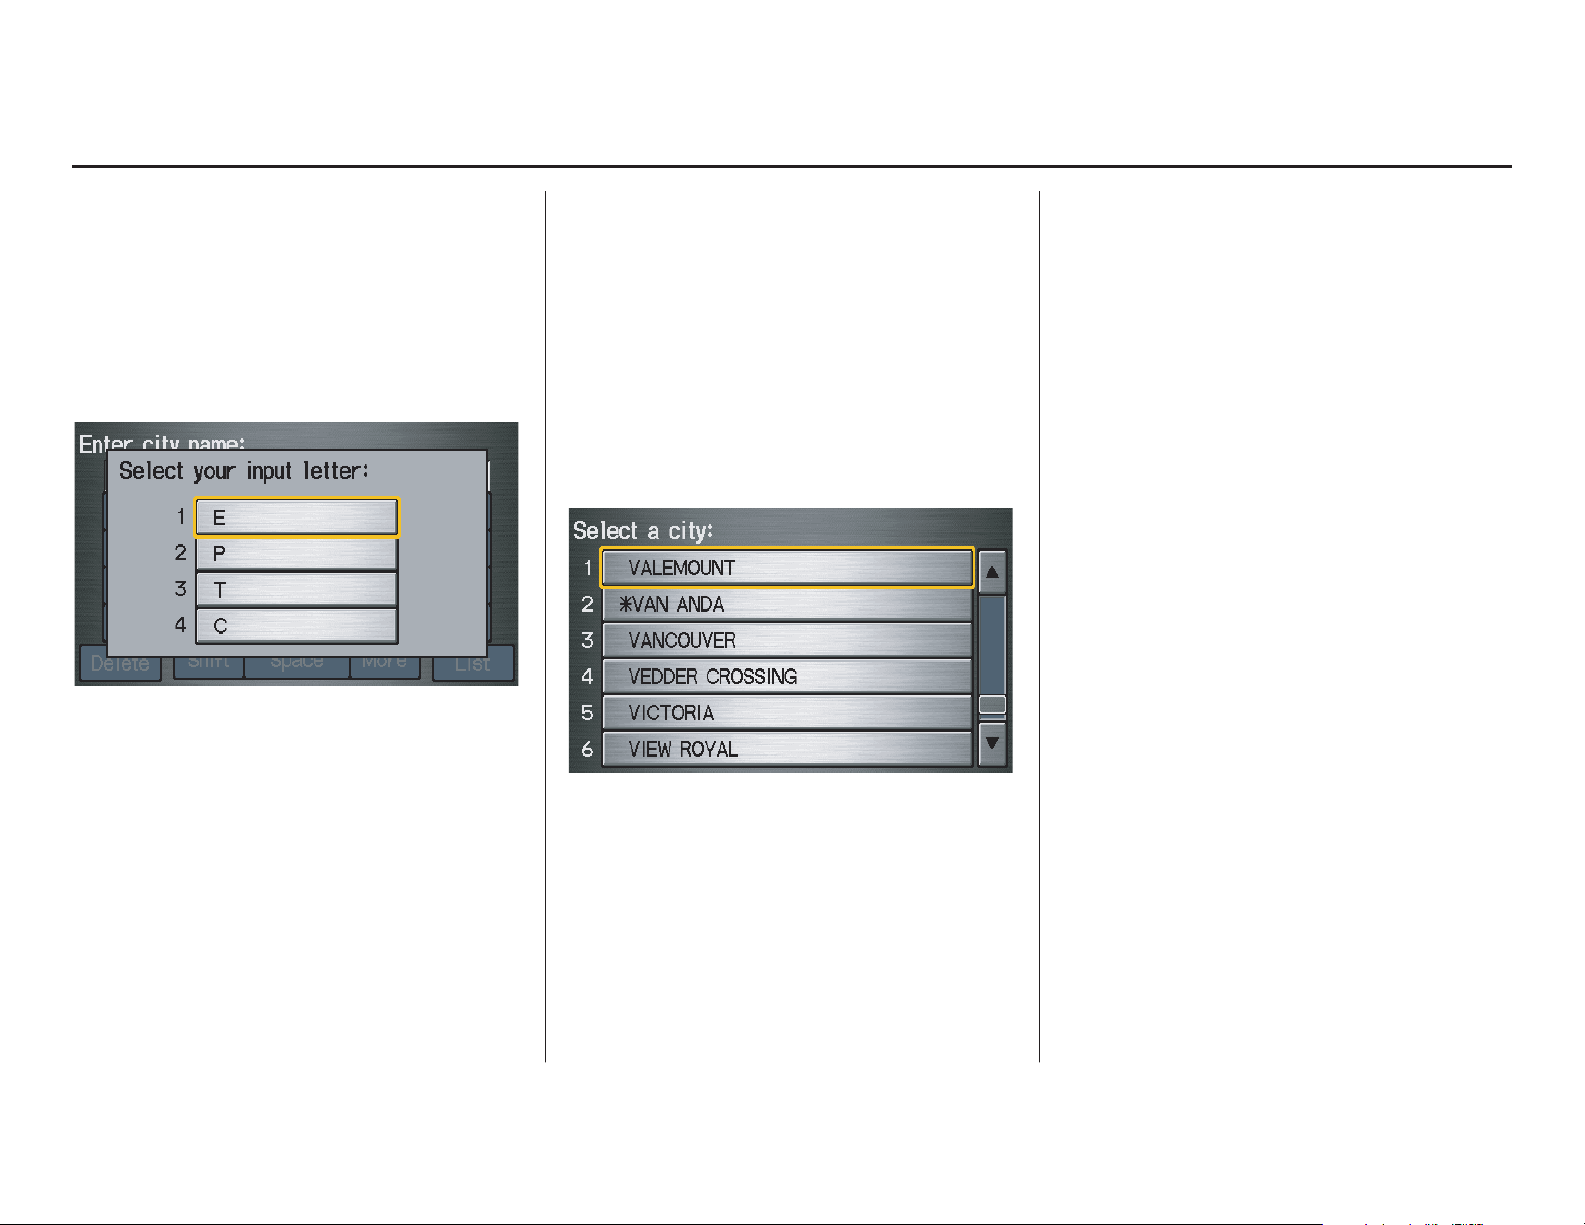
The system has a talk back function. If
your spoken letter is not recognized, the
system will talk back to you. For
example, if you say “E” but the system
does not recognize the command, it will
ask you, “Please select the number of
the input letter from the list,” and the
following pop-up box will appear:
You should select a letter by saying the
number.
Alternatively, to improve voice
recognition, you can say “Echo” or
“Edward” instead of “E.”
See page 15 for a list of available words
for each letter.
By Touch Control:
Select City, and the display then
changes to the Enter city name screen.
Use the on-screen keyboard to enter the
name of the city.
The system will display a list of city
names, with the closest match to the
name you entered at the top of the list.
Select the number (1-6) of the desired
city from the list.
If the system does not find an exact
match, select List when you finish
entering the name of the city. Most of
the cities and towns for that province are
listed.
Listings of cities and towns in the nondetailed coverage area may have an
asterisk “*” next to their names. If you
select one, a pop-up box is displayed
saying, “No detailed street data…”, and
a street address cannot be entered (see
Map Coverage on page 107). Try
entering the street first, and then select
the city if available.
Select View Dest. Map and use the
joystick to select an icon, approximate
area, or street you wish to choose as
your destination. Otherwise, a central
location of the city will be selected. If
you select a point of interest (POI) or
road in an unverified area, you may or
may not have routing in these areas. See
Map Overview on page 6.
24 Navigation System
Page 25

Entering a Destination
Index
Table of Contents
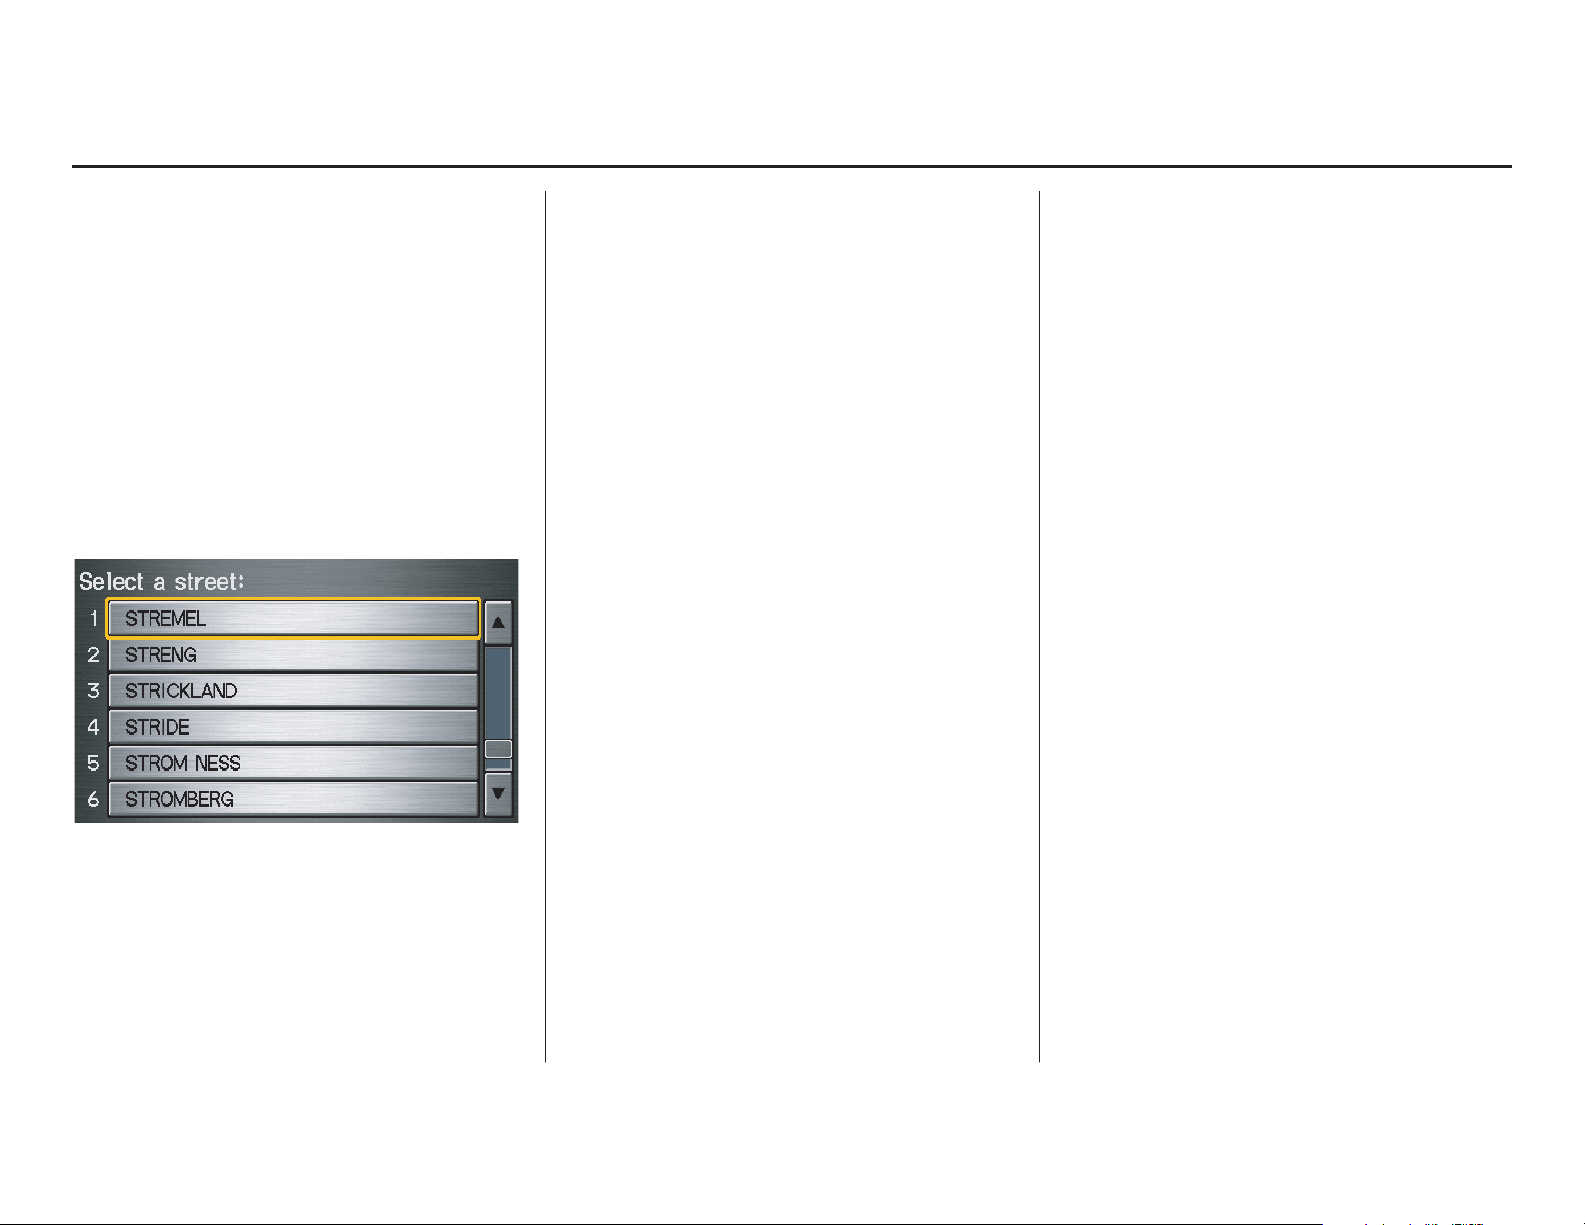
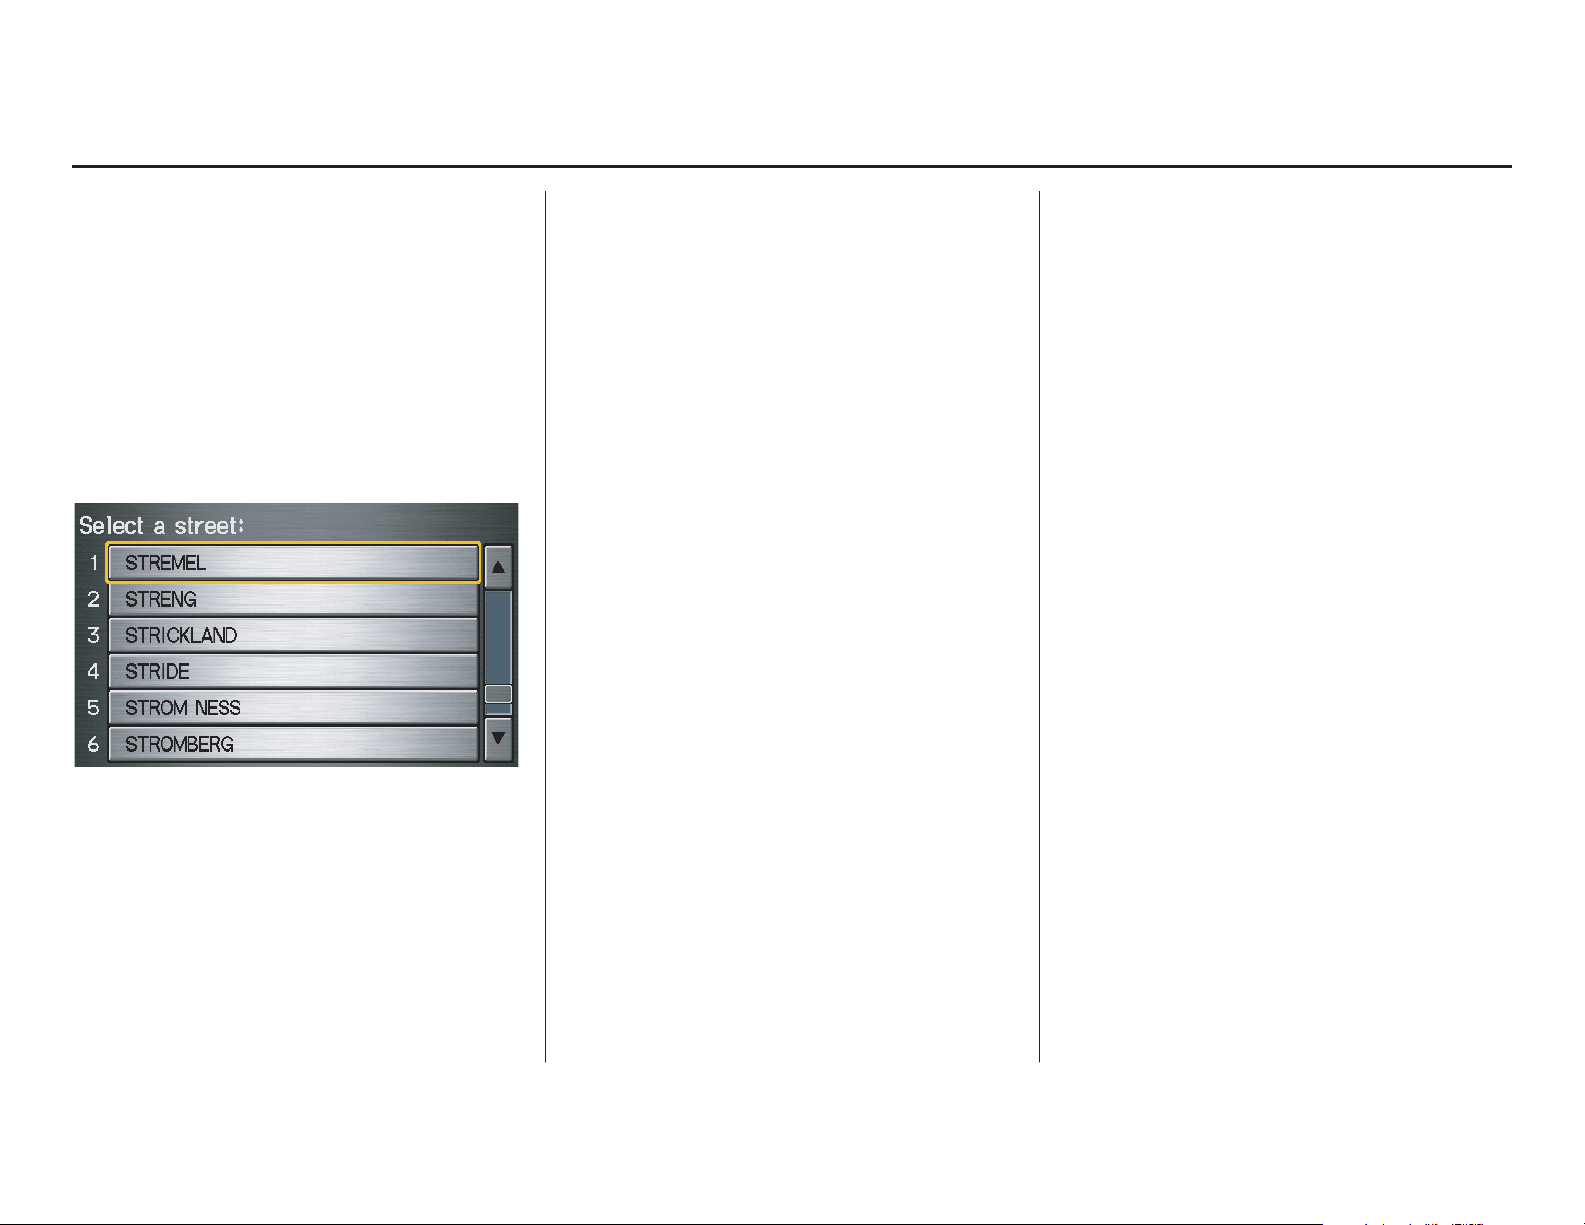
Selecting the Street
By Voice Control:
After you have selected the city, or if
you say “Street” on the Find address
by screen, the display changes to the
Enter street name screen. Say the
street name by saying individual letters
or numbers, or words that represent the
letters, one at a time.
The system has a talk back function. If
your spoken letter is not recognized, the
system will talk back to you. For
example, if you say “E” but the system
does not recognize the command, it will
ask you, “Please select the number of
the input letter from the list,” and the
following pop-up box will appear:
You should select a letter by saying the
number.
By Touch Control:
After you have selected the city, or if
you selected Street in the beginning,
the display changes to the Enter street
name screen. Use the on-screen
keyboard to enter the name of the street
(like ELM or 42ND) that is your
destination.
To enter the name of a major highway,
you must use the full name, including a
hyphen. For Trans-Canada and
Provincial highways, use “Hwy”
(HWY-7). For Country roads, use “CR”
(CR-32). For Regional Roads, “RR”
(RR-5). For interstates, use an “I” (I-
10). For U.S. highways, use “US” (US-
18). For state highways, use the two
character state designation (CA-101).
For county roads, use the appropriate
designation (G-2, for example).
Alternatively, to improve voice
recognition, you can say “Echo” or
“Edward” instead of “E.”
See page 15 for a list of available words
for each letter.
Navigation System 25
Page 26
Entering a Destination
Index
Table of Contents
Tip:
When entering a street, you do not need
to enter the direction (N, S, E, W) or the
type (St, Ave, etc.). The system will
automatically determine that for you,
based on your entered city and street
number.
The system will display a list of street
names, with the closest match to the
name you entered at the top of the list.
Select the number (1-6) of the desired
street from the list.
Entering the Street Number
After you have completed the street
name, the display changes to the Enter
street number screen. Use the voice
control system and say the address
number as a continuous string of
numbers. For example, the address 1527
should be spoken as “One, five, two,
seven.” You can also use the on-screen
keyboard to enter the street number.
Some address numbers may not be
available on the selected street. For
example, let’s say the individual address
ranges for a selected street name are
1 - 20 and 9,000 - 10,000, with an
overall range shown on the display of 1
to 10,000. If you try to enter a number
outside the individual address ranges
such as 500, the system will show this
number as unavailable (grayed out).
• When using the on-screen keyboard,
the system only allows you to choose
available address numbers.
• When using voice control, the system
beeps if you try to select an
unavailable (grayed out) address
number.
If you did not select a city in the
beginning, the street name you selected
might appear in more than one city. The
system will give you a list of cities that
the street appears in. Select the desired
city from the list. The system then
displays the Calculate route to screen
(see Driving to Your Destination on
page 45).
Tip:
If the particular address you want
cannot be found, select Map Input and
use the joystick to select the appropriate
location on the map (see By Map Input
on page 36).
Select View Dest. Map and use the
joystick to select an icon, approximate
area, or street you wish to choose as
your destination. Otherwise, a central
location of the street will be selected. If
you select a point of interest (POI) or
road in an unverified area, you may or
may not have routing in these areas. See
Map Overview on page 6.
26 Navigation System
Page 27

Entering a Destination
Index
Table of Contents
By Intersection
After you select Intersection from the
Enter destination by screen, the
display changes to:
Tip:
When entering an address, it is usually
easier to enter the street first. A city or
cities that the street appears in will be
displayed. For your convenience, you
do not have to enter both city and street.
NOTE:
• If you find that your city is not listed,
it may be part of a larger
metropolitan area. Try entering the
street first.
• Prior to departure, you can set areas
to avoid. The system then includes
them in its calculations for the
destination you have entered. See
Edit Avoid Area on page 87.
Selecting the Province or State
The province you are in is displayed at
the top of the screen. If your desired
destination is in another province, select
Change State.
The display then changes to the Enter
state/province name screen. Use the
voice control system and say the name
of the province or use the on-screen
keyboard to enter the name of the
province.
Selecting the City
This is helpful if the street runs through
several cities, and you know what city
includes the street. The city you are in is
displayed on the screen. If your desired
destination is in another city, say or
enter another city.
By Voice Control:
Say “City” on the Find intersection by
screen, and the display changes to the
Enter city name screen. Say the city
name by saying individual letters, or
words that represent the letters, one at a
time.
Navigation System 27
Page 28
Entering a Destination
Index
Table of Contents
The system has a talk back function. If
your spoken letter is not recognized, the
system will talk back to you. For
example, if you say “E” but the system
does not recognize the command, it will
ask you, “Please select the number of
the input letter from the list,” and the
following pop-up box will appear:
You should select a letter by saying the
number.
Alternatively, to improve voice
recognition, you can say “Echo” or
“Edward” instead of “E.”
See page 15 for a list of available words
for each letter.
By Touch Control:
Select City, and the display then
changes to the Enter city name screen.
Use the on-screen keyboard to enter the
name of the city.
The system will display a list of city
names, with the closest match to the
name you entered at the top of the list.
Select the number (1-6) of the desired
city from the list.
If the system does not find an exact
match, select List when you finish
entering the name of the city. Most of
the cities and towns for that province are
listed.
Listings of cities and towns in the nondetailed coverage area may have an
asterisk “*” next to their names. If you
select one, a pop-up box is displayed;
saying, “No detailed street data…”, and
a street address cannot be entered (see
Map Coverage on page 107).
Select View Dest. Map and use the
joystick to select an icon, approximate
area, or street you wish to choose as
your destination. Otherwise, a central
location of the city will be selected. If
you select a point of interest (POI) or
road in an unverified area, you may or
may not have routing in these areas. See
Map Overview on page 6.
28 Navigation System
Page 29

Entering a Destination
Index
Table of Contents
Selecting the Street
By Voice Control:
After you have selected the city, or if
you say “Street” on the Find
intersection by screen, the display
changes to the Enter street name
screen.
Say the street name by saying individual
letters or numbers, or words that
represent the letters, one at a time.
After you have completed the first
name, the display changes to the Say
intersecting street screen. Say the
name of the other intersecting street.
The system has a talk back function. If
your voice spelling is not recognized,
the system will talk back to you. For
example, if you say “E” but the system
does not recognize the command, it will
ask you, “Please select the number of
the input letter from the list,” and the
following pop-up box will appear:
You should select a letter by saying the
number.
Alternatively, to improve voice
recognition, you can say “Echo” or
“Edward” instead of “E.”
See page 15 for a list of available words
for each letter.
By Touch Control:
After you have selected the city, or if
you select Street in the beginning, the
display changes to the Enter street
name screen. Use the on-screen
keyboard to enter one of the names (like
ELM or 42ND) of the intersecting
streets.
To enter the name of a major highway,
you must use the full name, including a
hyphen. For Trans-Canada and
Provincial highways, use “Hwy”
(HWY-7). For Country roads, use “CR”
(CR-32). For Regional Roads, “RR”
(RR-5). For interstates, use an “I” (I-
10). For U.S. highways, use “US” (US-
18). For state highways, use the two
character state designation (CA-101).
For county roads, use the appropriate
designation (G-2, for example).
Navigation System 29
Page 30
Entering a Destination
Index
Table of Contents
Tip:
When entering a street, you do not need
to enter the direction (N, S, E, W) or the
type (St, Ave, etc.). The system will
automatically determine that for you.
The system will display a list of street
names, with the closest match to the
name you entered at the top of the list.
Select the number (1-6) of the desired
street from the list.
After you have completed the first street
name, the display changes to the Enter
intersecting street screen.
Enter the name of the other intersecting
street using the on-screen keyboard.
If you did not select a city in the
beginning, and the intersection appears
in more than one city, you will see the
Select a city screen. The system will
give you a list of cities that the
intersection appears in. Select the
desired city from the list. If more than
one intersection appears in the city,
select the desired intersection from the
Select an intersection screen. The
system then displays the Calculate
route to screen (see Driving to Your
Destination on page 45).
Tip:
If the particular intersection you want
cannot be found, select Map Input and
use the joystick to select the appropriate
location on the map (see By Map Input
on page 36).
Select View Dest. Map and use the
joystick to select an icon, approximate
area, or street you wish to choose as
your destination. Otherwise, a central
location of the street will be selected. If
you select a point of interest (POI) or
road in an unverified area, you may or
may not have routing in these areas. See
Map Overview on page 6.
30 Navigation System
Page 31

Entering a Destination
Index
Table of Contents
By Places
After you select Places from the Enter
destination by screen, the display
changes to:
There are three ways to find a place or
point of interest (POI), by Category,
Name, or Phone Number.
Let’s assume you want to find a coffee
shop (restaurant) called “Bucks.”
• If you know the phone number of the
coffee shop, select Phone Number,
then enter the 10-digit number with
area code. This is the quickest way to
find it.
The second best method is to select
•
Category, Restaurant
COFFEE SHOP
Place Name by Keyword and
search method, enter the keyword
“Bucks.” The list will include all
restaurants that have the letters
“bucks” anywhere in the name.
• You can try to enter “Bucks” using
Name, but you may have to search
through a list that might include
Bucks Welding, Bucks Surplus, etc.
. After you select
, and
CAFÉ/
NOTE:
• Prior to departure, you can set areas
to avoid. The system then includes
them in its calculations for the
destination you have entered. See
Edit Avoid Area on page 87.
• You can enter the desired destination
using the voice control system. For
information on the available voice
commands, see Voice Command
Index on page 131.
Navigation System 31
Page 32

Entering a Destination
Index
Table of Contents
Finding the Place by Category
The Category option gives you a list of
categories or types of businesses to
select from with the following screen:
Tip:
If you are not sure of the spelling of a
place, the best way to find it is to use the
keyword search. Select Category,
choose a category and subcategory
from the menus, then select Place
Name by Keyword, and enter the
partial name.
After selecting a category and
subcategory, the system will give you
the options of Place Name by
Keyword, Sort by Distance to
Travel, City Vicinity, or Place
Name with the following screen:
32 Navigation System
Page 33

Entering a Destination
Index
Table of Contents
Auto Service Lodging Shopping
Acura Dealers Auto Repair & Maintenance Bed & Breakfast Resort All Shopping*2 Office Supplies/Electronics
Honda Dealers Car Wash & Detailing Hotel/Motel Accessories/Jewelry Pharmacy/Drug Store
Gas Station Motorcycle Dealers
Hydrogen Station Other Car Dealers Amusement Park Museum Books/Music/Video Sewing/Linen
Auto Parts & Electronics Roadside Assistance Golf Course Park/Recreation Area Clothing Shoes/Bags
Banking
ATM Check Cashing/Money Transfer Marina Sports Complex Home Improvement Toys/Arts/Crafts
Bank Currency Exchange Movie Theater Tourist Attraction Mall/Department Store
Historical Monument Performing Arts Groceries Sporting Goods
Leisure
Community Restaurant Travel
Business Higher Education All Types*1 Italian Airport Parking Lot
City Hall Library American Japanese Automobile Club Rental Car Agency
Civic/Community Center Post Office Café/Coffee Shop Korean Bed & Breakfast Resort
Convention/Exhibition Center School Californian Mexican Bus Station Rest Area
Court House Chinese Pizza Camping Ski Area
Emergency
Hospital Roadside Assistance Fast Food Thai Ferry Terminal Tourist Information
Police Station Veterinarian French Vegetarian Hotel/Motel Train Station
Continental Seafood Commuter Rail Station Tourist Attraction
German Vietnamese Named Place Travel Agency
Greek Other Park & Ride Truck Stop/Plaza
Indian Parking Garage/House
*1 When trying to find a specific restaurant, select the category ALL TYPES. Some restaurants may be
miscategorized.
*2 When trying to find a specific store, select the category ALL SHOPPING. Some stores may be
miscategorized.
Auto Parts & Electronics Pet Food/Supplies
Advanced
If the category you want is not listed, you can try to
find it with a keyword. When you select this option,
the display changes to the Enter keyword for
category screen. If the system finds any categories
with the keyword you entered, the display changes to
the Select a category screen. Select the desired
category.
Navigation System 33
Page 34

Entering a Destination
Index
Table of Contents
Place Name by Keyword
If you do not know the exact name of
the destination, you can find the place
with a keyword. When you select this
option, the display changes to:
You can find your destination with a
keyword using the Sort by Distance
to Travel option or City Vicinity
option.
If you select the Sort by Distance to
Travel option, the Enter keyword for
place screen appears. Enter the
keyword using the on-screen keyboard.
If the system does not find an exact
match, select List when you finish
entering the keyword. The system starts
searching for places that match the
entered keyword. If you see your
desired place, select it from the list. If
not, scroll through the list to find the
desired place.
If you select the City Vicinity option,
the Enter city name screen appears.
Enter the name of the city using the onscreen keyboard. The system will
display a list of city names, with the
closest match to the name you entered at
the top of the list. Select your desired
city name from the list.
Once you have selected your desired
city name, the Enter keyword for
place screen appears. Enter the
keyword using the on-screen keyboard
to specify the desired place.
Once you select a place, the system then
displays the Calculate route to screen
(see Driving to Your Destination on
page 45).
34 Navigation System
Page 35

Entering a Destination
Index
Table of Contents
Sort by Distance to Travel
When you select this option, the system
gives you a list of all the places in the
subcategory. This list is arranged by
distance from your current location,
with the closest at the top of the list.
The distance and direction to the
destination at the top of the list are
shown in the screen. The distance
shown is straight line distance (as the
crow flies), not driving distance. Select
the number (1-4) of the desired
destination from the list.
City Vicinity
The system allows you to find points of
interest in the vicinity of the city you
entered. When you select this option,
the display changes to the Enter city
name screen. Enter the name of the city
using the on-screen keyboard. If the
system does not find an exact match,
select List when you finish entering the
name of the city. Select a desired city
from the list.
Once you have selected the city, the
display changes to the Enter a place
name screen. Enter the name of the
place using the on-screen keyboard.
Once you select a place, the system then
displays the Calculate route to screen
(see Driving to Your Destination on
page 45).
Place Name
When you select this option, the display
changes to the Enter a place name
screen. Enter your selection, using the
on-screen keyboard.
Once you select a place, the system then
displays the Calculate route to screen
(see Driving to Your Destination on
page 45).
Finding the Place by Name
The Name option allows you to enter
the name of a business, and then shows
you a list of businesses with the same or
similar names to select from. Use the
name option only if you know the exact
spelling of the place. If unsure, use the
Category option.
Once you select a place, the system then
displays the Calculate route to screen
(see Driving to Your Destination on
page 45).
Navigation System 35
Page 36

Entering a Destination
Index
Table of Contents
Finding the Place by Phone
Number
The Phone Number option allows
you to select a destination by its
telephone number. Only telephone
numbers stored in the system under the
Places (of business) option are
recognized. The system does not contain
residential telephone numbers, or
numbers you may have entered in your
personal Address Book.
Tip:
If you know the phone number of a point
of interest (POI), its uniqueness makes it
the fastest entry method. When using the
voice control system, the entry should be
spoken as a continuous string of
numbers. For example, the telephone
number (310) 555-4000 should be
spoken as “Three, one, zero, five, five,
five, four, zero, zero, zero.”
By Map Input
After you select Map Input from the
Enter destination by screen, the
display changes to:
NOTE:
• Prior to departure, you can set areas
to avoid. The system then includes
them in its calculations for the
destination you have entered. See
Edit Avoid Area on page 87.
• For information on the available
voice commands, see Voice
Command Index on page 131.
Showing the Map of Current
Position
The Current Position selection
assumes that you are looking for a
destination in the immediate area. The
display changes to:
The red arrow indicates your vehicle
position. Find your desired destination
by moving the joystick left, right, up, or
down. The map and crosshairs will
move in the same direction.
The yellow box indicates the area you
will see when you click on the current
map with the joystick. The scale will
decrease each time you push in on the
joystick, until Select a destination
appears at the top of the screen.
36 Navigation System
Page 37

Entering a Destination
Index
Table of Contents
If desired, use the ZOOM buttons to
change the map scale. When you have
the crosshairs on the desired icon, map
feature, or road, push in on the joystick.
The address of the location will appear
at the top of the screen.
NOTE:
The selected icon or road segment is
displayed on the 800 metre (1/2 mile) or
less map scale.
If this is the desired address, push in on
the joystick again. If not, use the
joystick to reposition the crosshairs,
then push in on the joystick again to
display the new address.
If you selected a single icon or road segment
within the target wark, the following screen
appears. Push in on the joystick again.
If you selected multiple icons within the
cursor radius, the following screen
appears. Select an item from the list.
Once you select an address, the system
then displays the Calculate route to
screen (see Driving to Your Destination
on page 45).
Showing the Map of City
With the City selection, the display
changes to the Enter city name screen.
When you have entered the desired city,
the display changes to a map. The
starting location will be the central
position in the selected city.
See Showing the Map of Current
Position on page 36 for instructions on
finding and entering your desired
destination.
Navigation System 37
Page 38

Entering a Destination
Index
Table of Contents
Showing the Map of Province
With the Province selection, the
display changes to the Enter state/
province name screen.
After you select the desired province,
the display changes to a map of the
province, with the crosshairs located
near the middle.
The yellow box indicates the area you
will see when you click on the current
map with the joystick. The scale will
decrease each time you push in on the
joystick, until Select a destination
appears at the top of the screen.
Use the joystick to move the crosshairs
to the area of the province close to your
intended destination. If desired, use the
ZOOM buttons to change the map scale.
When you have the crosshairs in the
desired area, push in on the joystick.
The address of the location you have
selected will appear at the top of the
screen.
NOTE:
The selected icon or road segment is
displayed on the 800 metre (1/2 mile) or
less map scale.
If this is the desired address, push in on
the joystick again. If not, use the
joystick to reposition the crosshairs,
then push in on the joystick again to
display the new address.
If you selected a single icon or road
segment, push in on the joystick again to
select the new address. If you selected
multiple icons within the cursor radius,
select an item from the list on the
screen.
Once you select an address, the system
then displays the Calculate route to
screen (see Driving to Your Destination
on page 45).
38 Navigation System
Page 39

Entering a Destination
Index
Table of Contents
Showing the Map of Canada &
Northern USA
With the Canada & Northern USA
selection, the display changes to:
The yellow box indicates the area you
will see when you click on the current
map with the joystick. The scale will
decrease each time you push in on the
joystick, until Select a destination
appears at the top of the screen.
If desired, use the ZOOM buttons to
change the map scale. When you have
the crosshairs on the desired icon, map
feature, or road, push in on the joystick.
The address of the location you have
selected will appear at the top of the
screen.
NOTE:
The selected icon or road segment is
displayed on the 800 metre (1/2 mile) or
less map scale.
If this is the desired address, push in on
the joystick again. If not, use the
joystick to reposition the crosshairs,
then push in on the joystick again to
display the new address.
If you selected a single icon or road
segment, push in on the joystick again to
select the new address. If you selected
multiple icons within the cursor radius,
select an item from the list on the
screen.
Once you select an address, the system
then displays the Calculate route to
screen (see Driving to Your Destination
on page 45).
Use the joystick to move the crosshairs
to the area of the country for your
intended destination. Then push in on
the joystick.
Navigation System 39
Page 40

Entering a Destination
Index
Table of Contents
By Previous Destinations
Every time you route to a destination,
that destination is saved by the system.
Up to 50 destinations can be stored.
Select Previous Destinations from
the Enter destination by screen to
choose one of those destinations.
After you select Previous
Destinations, the display lists the last
50 destinations entered, with the most
recent appearing first.
NOTE:
•If Previous Destinations is
grayed out, there are no Previous
Destinations entered.
• When finishing a “Today’s
Destinations” trip, the Today’s
Destinations list entries are stored to
this list, beginning with the date (e.g.,
item 1 shown on the previous screen).
• Because both the Home address and
personal Address Book list can be
protected by a PIN, they do not show
up in the Previous Destination list.
Scroll through the list and say the line
number (1-6) of the destination, or touch
the desired destination you want.
Once you select the desired destination,
the system then displays the Calculate
route to screen (see Driving to Your
Destination on page 45).
NOTE:
• Prior to departure, you can set areas
to avoid. The system then includes
them in its calculations for the
destination you have entered. See
Edit Avoid Area on page 87.
• For information on the available
voice commands, see Voice
Command Index on page 131.
40 Navigation System
Page 41

Entering a Destination
Index
Table of Contents
By Today’s Destinations
You can create a “trip” by combining up
to five destinations previously selected
on the Calculate route to screen.
Select Today’s Destinations from
the Enter destination by screen and the
display changes to:
NOTE:
If Today’s Destinations is grayed
out, there are no Today’s Destinations
entered.
Editing Today’s Destinations
List
If you change your plans, you can
modify the Today’s Destinations list
order by distance, or by order of entry.
Say or select Entry to sort the list by the
entry order, and say or select Distance
to sort the list by the distance order. To
delete a destination, say or select
Delete and the display changes to the
Select a destination to delete screen.
Select the destination to delete. Say or
select Done to perform the deletion,
and the display returns to the previous
screen. To cancel the deletion, press the
CANCEL button.
NOTE:
For information on the available voice
commands, see Voice Command Index
on page 131.
Adding Destinations to the List
After you have used any of the other
selections from the Enter destination
by screen to select a destination, the
display changes to:
To add this to the Today’s Destinations
list, select ADD TO Today’s Dest.
NOTE:
If ADD TO Today’s Dest. is grayed
out, the Today’s Destinations list is
already full (five destinations have been
stored).
Navigation System 41
Page 42
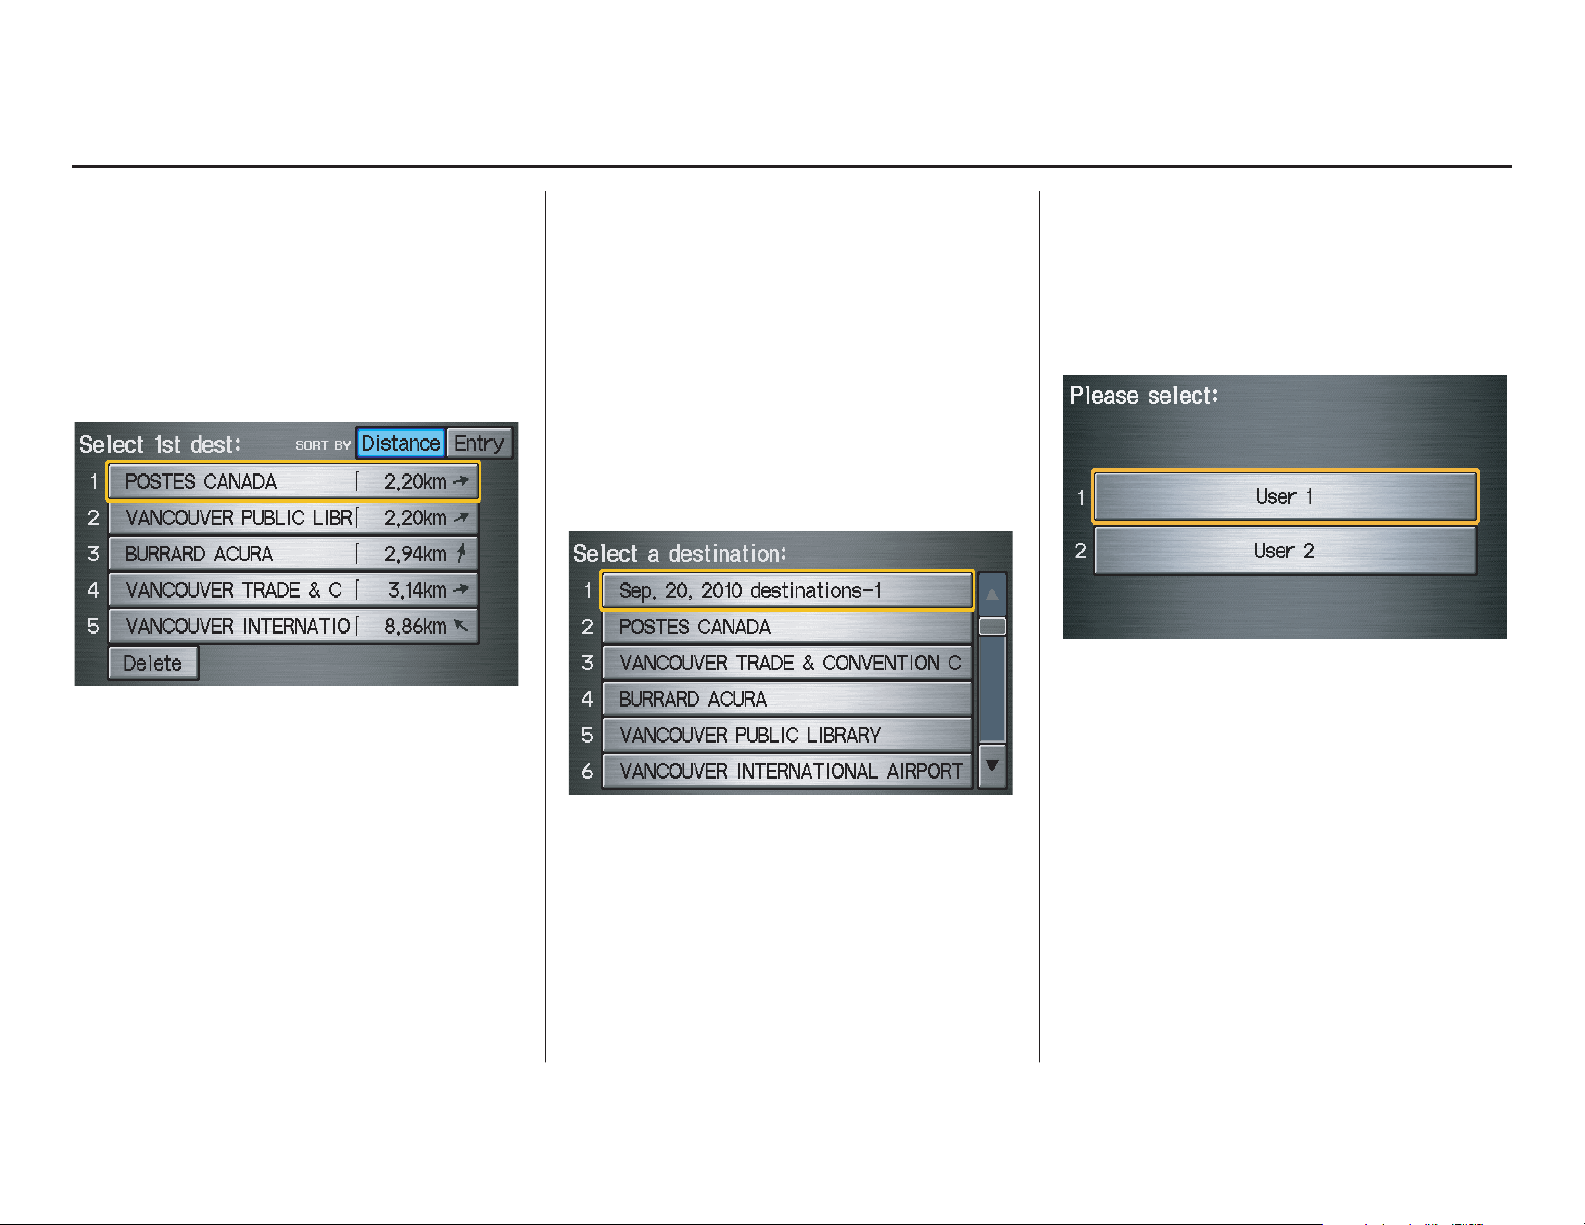
Entering a Destination
Index
Table of Contents
The display then changes to show you
all the current entries on the Today’s
Destinations list. Select Done to return
to the Enter destination by screen.
The system automatically sorts the
destinations stored in the Today’s
Destinations list for the best path.
If the displayed list shows your plans,
select the first destination. The system
will guide you to the destination
according to the order of the list. When
you reach the destination, it will be
automatically removed from the list.
NOTE:
When finishing a “Today’s
Destinations” trip, the Today’s
Destinations list entries are stored to
the Previous Destinations list,
beginning with the date (e.g., item 1
shown below). This entry contains all
the destinations that were included in
the Today’s Destinations itinerary. This
allows you to reselect the entire Today’s
Destinations content at a later date.
By Address Book
This selection allows you to choose a
personal address entry for a destination.
After you select Address Book from
the Enter destination by screen, the
display changes to:
If an Address Book PIN has been set
in Setup, the system prompts you to
enter your PIN after you select User 1
or User 2. Say or enter your PIN, and
say or select Done.
If the PIN has not been entered, the
system displays the list after you select
User 1 or User 2.
42 Navigation System
Page 43

Entering a Destination
Index
Table of Contents
The system then displays a list of the
places entered in your personal Address
Book. Selecting Category, you can
sort the displayed addresses by ALL,
BUSINESS, PERSONAL, or by other
categories you may create.
Scroll through the list to find your
desired destination. After you select it,
the system then displays the Calculate
route to screen (see Driving to Your
Destination on page 45).
Adding Addresses to the
Personal Address Book
There are two ways to enter addresses to
the personal Address Book:
• Entering them in the personal
Address Book feature in Setup (see
page 76).
• Adding them in the Address Book
directly from the Calculate route to
screen (see page 45).
The personal Address Book can be
edited (see Address Book on page 76).
NOTE:
• Destinations chosen from the Address
Book do not show up in Previous
Destinations.
• Prior to departure, you can set areas
to avoid. The system then includes
them in its calculations for the
destination you have entered. See
Edit Avoid Area on page 87.
• For information on the available
voice commands, see Voice
Command Index on page 131.
By Go Home
Selecting Go Home from the Enter
destination by screen takes you home
or to a frequently used address you have
chosen.
If a Go Home PIN has been set in
Setup, the system prompts you to enter
your PIN. Say or enter your PIN, and
say or select Done. The system will
then display the Calculate route to
screen (see Driving to Your Destination
on page 45).
If a Go Home PIN has not been set, the
system displays the Calculate route to
screen after you select Go Home (see
Driving to Your Destination on
page 45).
Navigation System 43
Page 44

Entering a Destination
Index
Table of Contents
NOTE:
• To edit Home Address, see Home
Address in System Setup on page 74.
• Prior to departure, you can set areas
to avoid. The system then includes
them in its calculations for the
destination you have entered. See
Edit Avoid Area on page 87.
• PINs are optional. If you choose to
use a PIN, make sure you remember
it. If you forget your PIN, your dealer
will have to reset it for you.
• If a PIN is desired, enter it using the
Personal preference PIN number
feature in Setup. See page 81 for
information on entering your Go
Home PIN.
44 Navigation System
Page 45
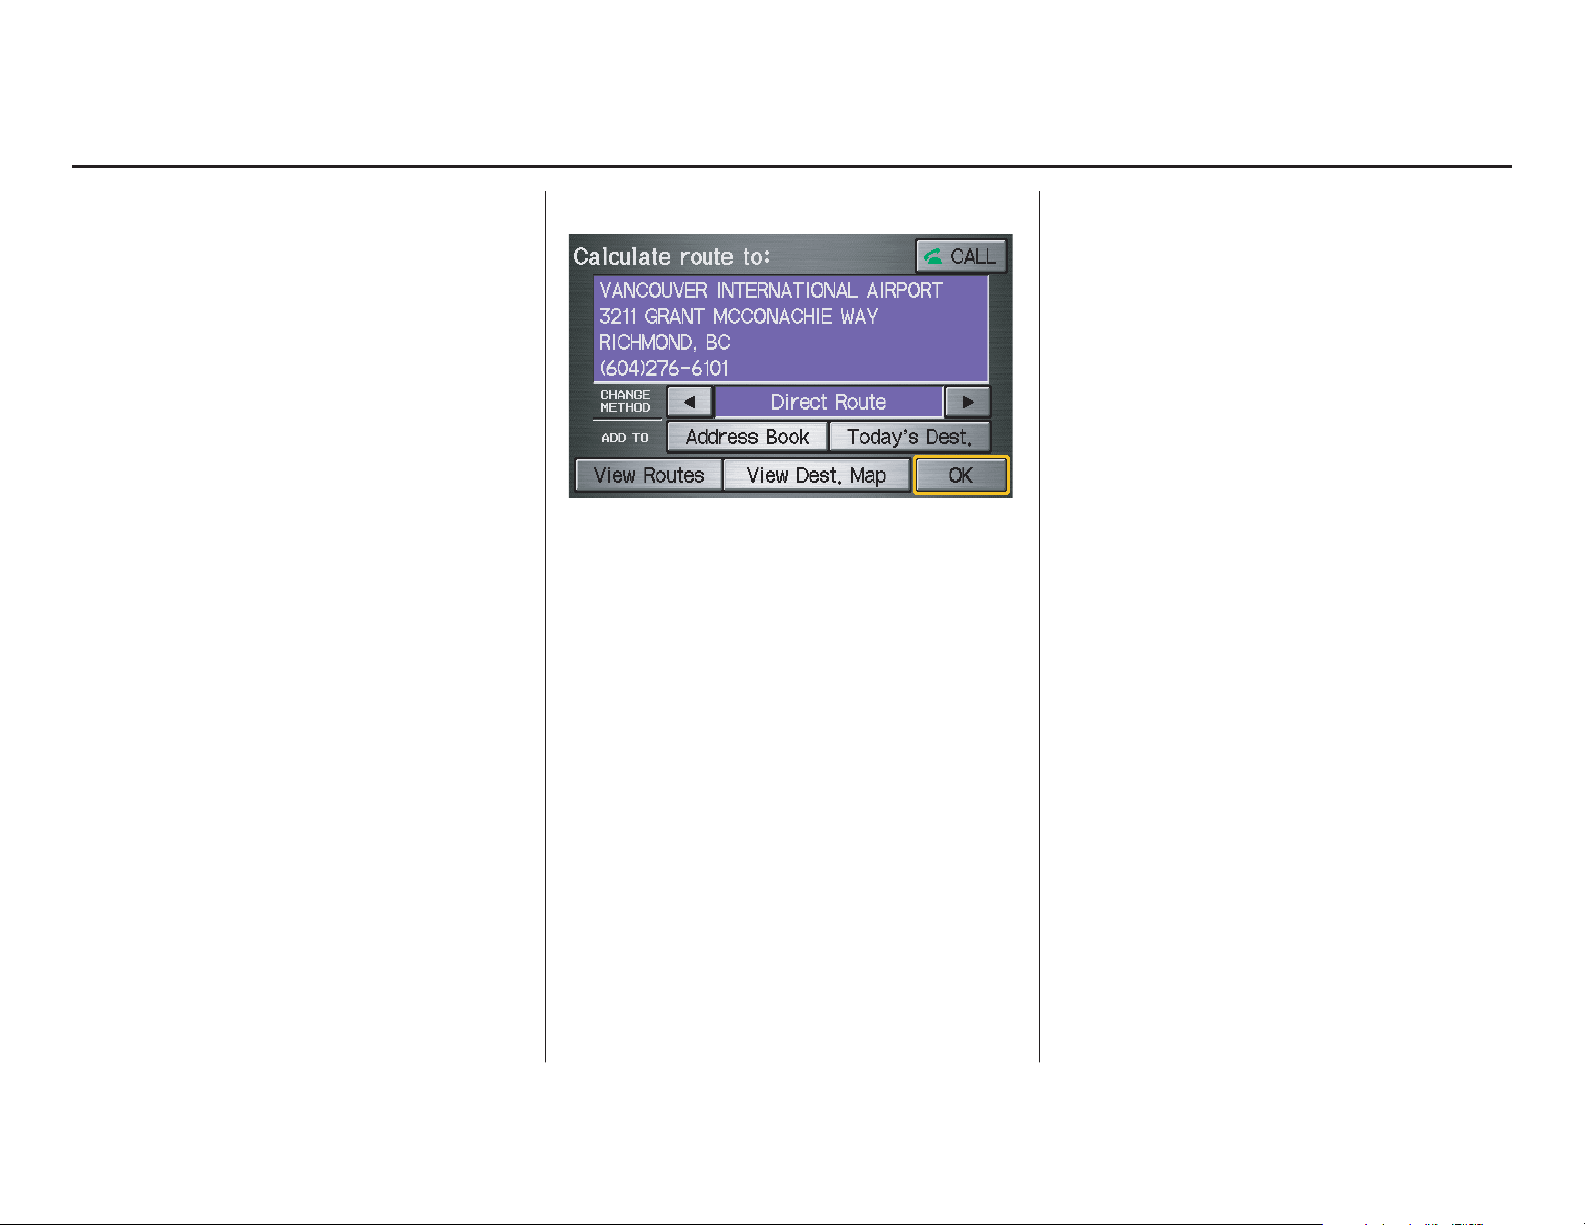
Driving to Your Destination
Index
Table of Contents
Driving to Your Destination
A route typically has three phases.
• Initial route calculation (Calculate
route to screen) (see page 45).
• Change the route while en route (see
page 63).
• Resume the route when restarting the
engine (see Continue Trip Screen on
page 67).
Calculate Route to Screen
Say or select OK. The system calculates
the route using the method shown on the
screen (see Map Screen on page 48).
NOTE:
• Prior to departure, you can set areas
to avoid. The system then includes
them in its calculations for the
destination you have entered. See
Edit Avoid Area on page 87.
• For information on the available
voice commands, see Voice
Command Index on page 131.
Further selections from the Calculate
route to screen include:
ADD TO Address Book
Allows you to add the destination to
your Address Book. See By Address
Book on page 42.
NOTE:
If the button is grayed out, the
destination is already in your Address
Book.
ADD TO Today’s Destinations
Allows you to add the destination to
your Today’s Destinations list. See By
Today’s Destinations on page 41.
NOTE:
If the button is grayed out, the Today’s
Destinations list is already full (five
destinations have been stored).
CALL
Dials the number on the screen when
available. See Bluetooth®
HandsFreeLink® on page 18.
Navigation System 45
Page 46
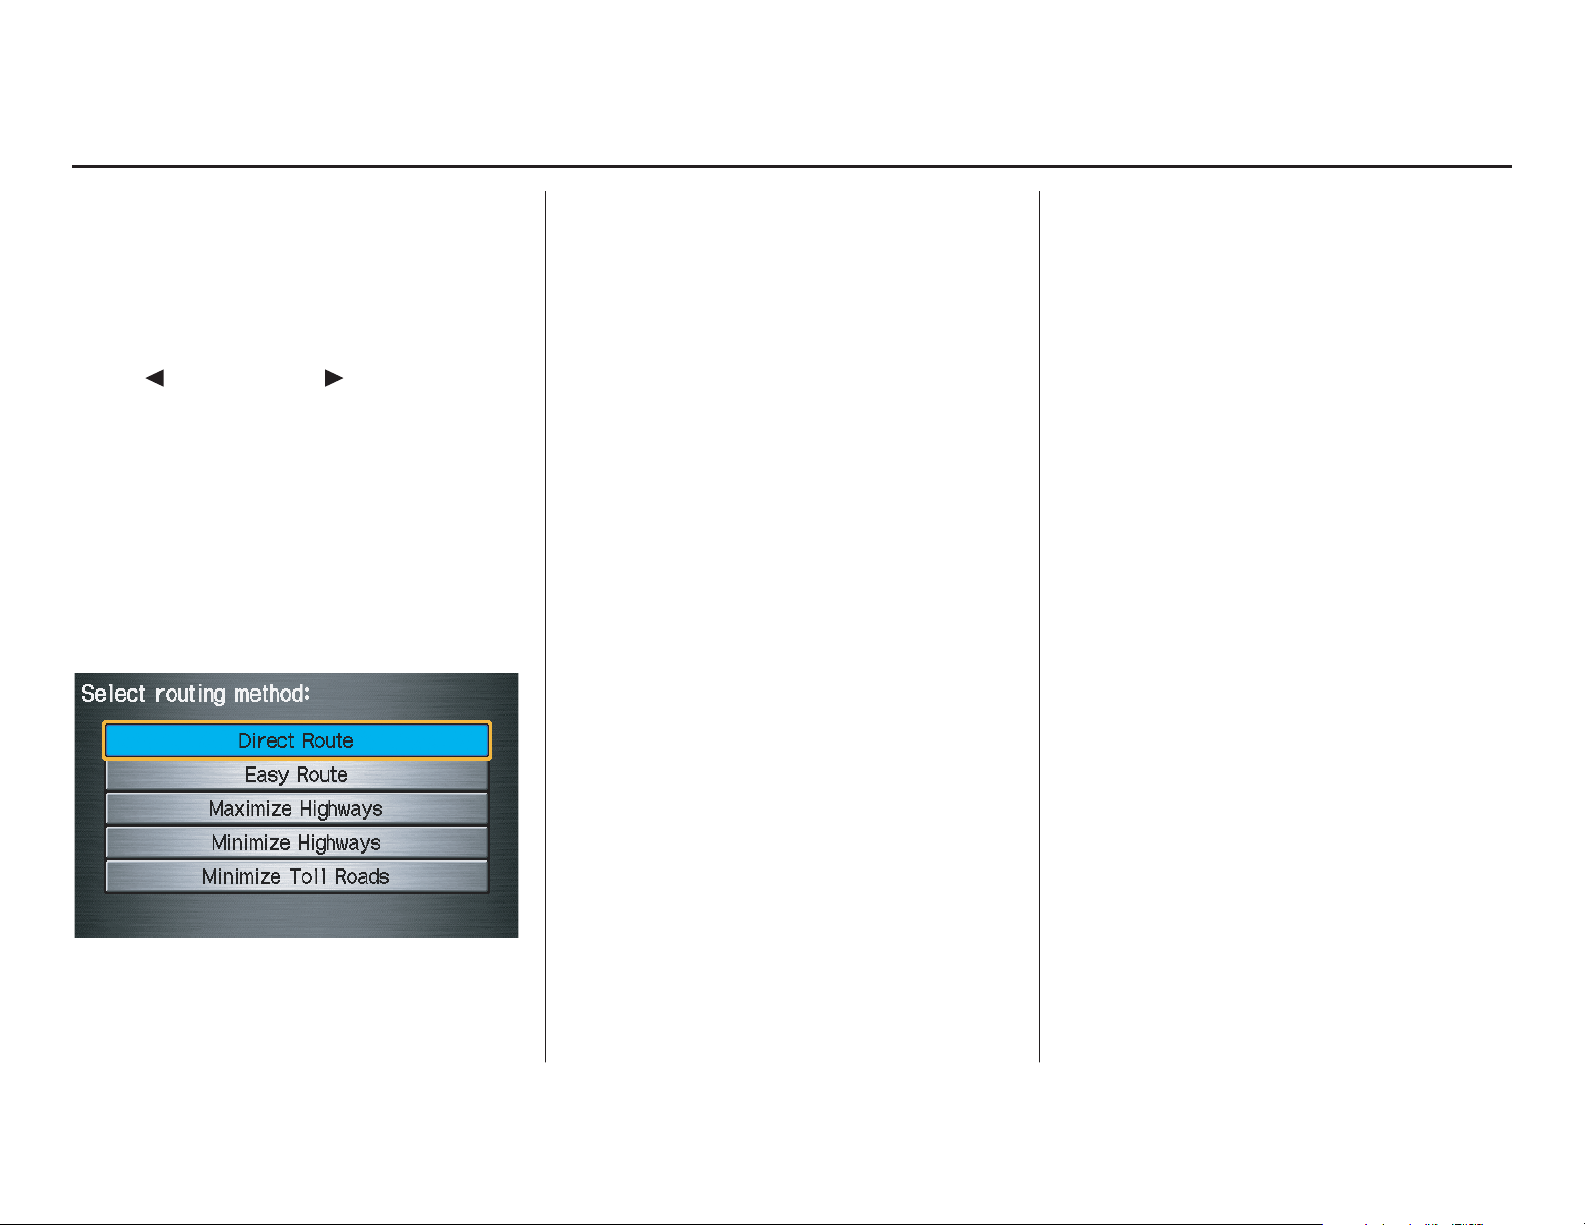
Driving to Your Destination
Index
Table of Contents
Changing the Routing Method
The system lets you select the way you
want to drive to your destination. Before
selecting OK to calculate a route, you
can change the routing method by using
the CHANGE METHOD scroll bar
back ( ) or forward ( ) buttons. The
route choices will appear in the address
box.
NOTE:
When you are en route and want to
change the routing method, press the
MENU button, and select Change
Routing Method on the Change
route by screen.
• “Direct Route” (the factory default) is
the route that is the quickest (least
time) and is usually the best choice. If
you choose any other method, it
becomes the new default for all future
routing. Make sure to check the
routing method if the displayed route
is not what you expected to see.
• “Easy Route” produces a route with
the least turns.
• “Maximize Highways,” “Minimize
Highways,” and “Minimize Toll
Roads” are also available.
NOTE:
If the trip is greater than 160 kilometres,
then “Minimize Highways” and
“Minimize Toll Roads” may be grayed
out. This is normal.
The generated route may not be the
route you would choose. For safety
reasons, the system generally applies the
following rules to your route:
• It tries to avoid shortcuts through
residential areas.
• Right turns are favored over left turns
or U-turns.
• Restricted turns (turns that cannot be
made during certain hours) are not
used for routing.
46 Navigation System
Page 47
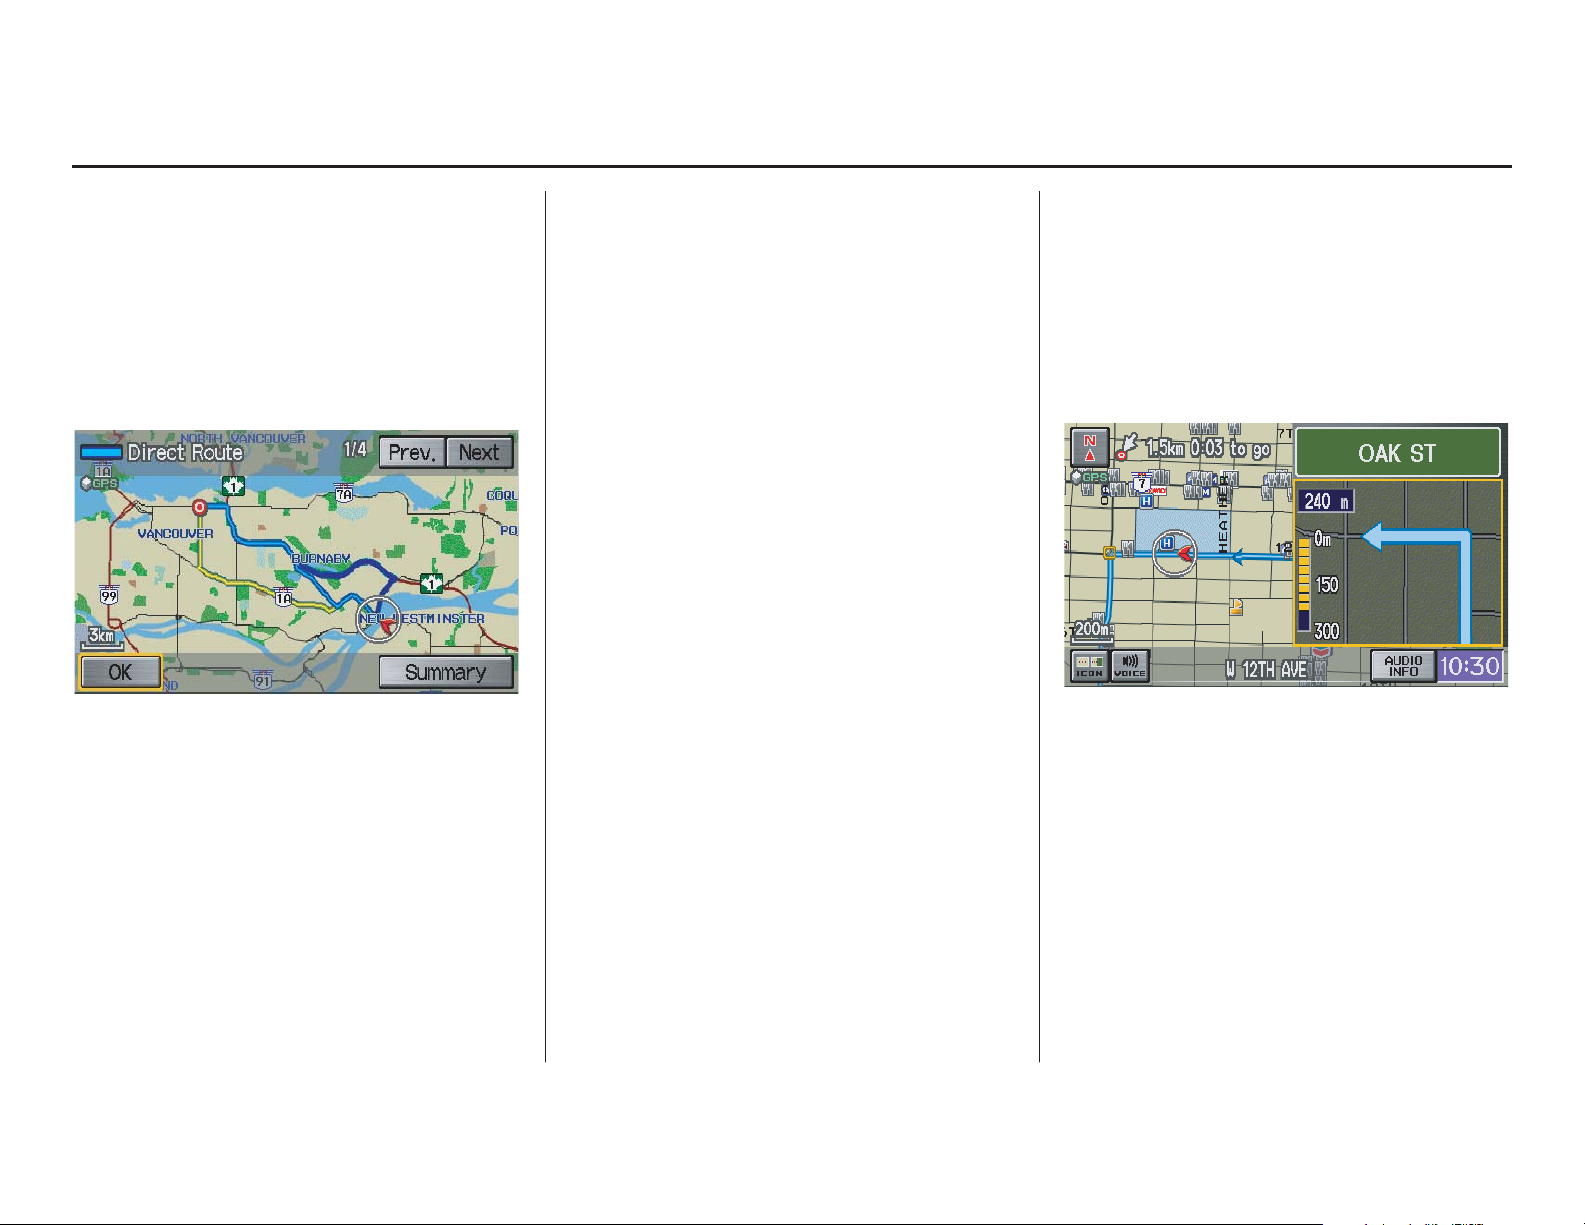
Driving to Your Destination
Index
Table of Contents
Viewing the Routes
Touching View Routes on the
Calculate route to screen allows you to
scroll through and view the various
routes (Direct, Easy, Maximize
Highways, etc.) to your destination. If
you select View Routes, the display
changes to:
NOTE:
• You may only view routes as shown
above from the Calculate route to
screen.
• The selected route method is shown at
the top of the screen.
• It may take several minutes (the
system displays an hourglass while it
is calculating) to show all route
methods, and it is not unusual for the
different methods to pick the same
route. Voice commands cannot be
used while the system is calculating.
• If the trip is greater than
160 kilometres, then “Minimize Toll
Roads” and “Minimize Highways”
may be grayed out. This is normal.
Say or select Summary to display the
distance and time to go for each route.
Based on the route data, you can change
the routing by using the Next and Prev.
buttons. Once you confirm your
selection, say or select OK on the
screen.
NOTE:
Distances and times shown for each
method in the Summary are
approximate.
After calculating the route with the new
method, the system displays a map of
your current location. The calculated
route will be highlighted as a blue line,
and a voice prompt will tell you how to
proceed along the highlighted route.
Touch VOICE to have the guidance
repeated.
Navigation System 47
Page 48

Driving to Your Destination
Index
Table of Contents
Viewing the Destination Map
Touching View Dest. Map displays a
map of the destination vicinity. Press the
CANCEL or NAVI BACK button to
return. You can view the destination
map anytime while en route by saying,
“Display destination map.”
Map Screen
When you select OK on the Calculate
route to screen, the map screen
appears, showing your highlighted route
in real time.
Route Line
When driving to a destination on
verified roads in a metropolitan area, the
route line is displayed as a blue line.
When driving in rural areas on
unverified streets (light brown colour),
the route line changes to either a blue
dotted “vector line” pointing to your
destination, or a blue-pink line. See
Unverified Area Routing on page 83 for
a detailed explanation of how to enable
unverified routing, and the related
cautions and disclaimers.
NOTE:
You can always view the entire route by
simply saying, “Display entire route.”
“Vector line” (unverified routing off)
Blue-pink unverified route line
(unverified routing on)
48 Navigation System
Page 49

Driving to Your Destination
Index
Table of Contents
Guidance Prompts
As you get near the manoeuvre, you will
hear a voice reminder and see a pop-up
window showing you the manoeuvre.
The number of reminders that you will
hear before a manoeuvre is determined
by Guidance Prompts in Setup on
page 75.
With the factory default (Normal),
typically you will hear two prompts:
• The first is about 400 metres from the
manoeuvre.
• The final prompt is close to your
actual turn.
If the distance between the next two
driving manoeuvres is very small, both
manoeuvres are displayed on the screen
in a single window, and the voice will
remind you of both of them at the same
time.
NOTE:
• You can say “Voice” or select
VOICE on the screen at any time to
be reminded of the next manoeuvre.
For information on the available
voice commands, see Voice
Command Index on page 131.
• Typically, a pop-up guidance window
shows your next turn, and a voice
guidance prompt is heard. The timing
of these prompts varies, depending on
the type of road you are on, and the
distance to your next manoeuvre.
When given guidance in unverified
areas, the words “if possible” are
inserted before each guidance prompt.
See Unverified Area Routing on page 83
for more details about unverified
routing.
Navigation System 49
Page 50

Driving to Your Destination
Index
Table of Contents
Map Screen Legend
Time to Destination
(see page 52)
Distance to Destination
(see page 52)
Direction of Destination
(When on route)
Map Orientation
(see page 55)
“North Up”
“Heading Up”
Map Scale Adjustment
(Km or mile per half-inch appears
only when you ZOOM IN or OUT.)
(see page 54)
Current Map Scale
(see page 54)
ICON Button
(see page 58)
VOICE Button
(Announces next driving instruction)
Breadcrumbs
(see Off-road Tracking on page 55)
No Entry Icon
NOTE:
Current Street (see page 6)
(When audio information is displayed,
touch CURRENT STREET/AUDIO INFO
to display the current street name.)
Vehicle Position
(Use voice command, “Display current location,” or
touch the icon to show the current location.)
Map Features
: Park
: Hospital
: Shopping Mall
: Golf Course
: Airport/Stadium/Business
CURRENT STREET/AUDIO INFO
: Water Area
: Cemetery
: University
: Indian Reservation
See Map Legend from the Information screen for further explanation (see page 69).
NOTE:
If you move the joystick over an
area (map features shown
above), the name is displayed
on the screen.
Waypoint
(When en route) (see page 63)
One-Way Traffic Icon (80 m
scale only) (see page 56)
Blue Line
Calculated route (see page 48)
Destination Icon (see page 55)
Streets
(see Map Overview on page 6, or Unverified
Area Routing on page 83)
Interstates or Highways
Verified Streets
Unverified Streets
Landmark Icon - Generic (see page 56)
Honda Dealer
Hospital
Grocery Store
Gas Station
Hotel/Lodging
Parking Garage
Highway Exit Information
Acura Dealer
School
Restaurant
AT M
Parking Lot
Post Office
50 Navigation System
Page 51

Driving to Your Destination
Index
Table of Contents
Guidance Screen
The
guidance
way to view your route information.
Many of the icons and screen features are
similar to those on the
driving to your destination, press the
MAP/GUIDE
the
map
and
guidance
Milestone to Destination – The
position of the small circular icon shows
your trip progress. As you get closer to
your destination, the indicator will
approach “DEST.”
Vehicle Heading – The white portion of
the compass symbol indicates north.
NOTE:
• The map and voice guidance in
unverified areas differ from those in
verified areas.
• Current manoeuvres and those within
300 metres will show on the
Countdown bar, indicating the
distance until the next manoeuvre.
screen offers an alternative
map
screen. While
button to switch between
guidance
screens. The
screen shows you:
Guidance Screen Legend
Highway Exit Information (see page 53)
Vehicle Heading (white indicates north) (see page 51)
Direction of Destination, “as the crow flies” (see page 52)
Scroll: to view guidance manoeuvres
Distance to Next Driving Manoeuvre
Street Name of Next
Driving Manoeuvre
Distance to
Destination
(see page 52)
Time to Destination
(see page 52)
CURRENT STREET/AUDIO INFO
Current Street (see page 6)
(When audio information is displayed, touch CURRENT
STREET/AUDIO INFO to display the current street name.)
VOICE Button (announces next driving instruction)
(see page 49)
Milestone to Destination (see page 51)
Navigation System 51
Page 52

Driving to Your Destination
Index
Table of Contents
Distance and Time to
Destination
When you select a destination, the
distance to the destination is the actual
road distance of the calculated route,
and not “as the crow flies.” When
viewing a list of destinations (points of
interest), such as restaurants, the
distance is “as the crow flies” (see Sort
by Distance to Travel on page 35).
The displayed time to the destination
may differ from the actual travel time
because the time is calculated based on
the posted road speed data and your
current speed. If part of your route
includes unverified roads, the “distance”
and “time to go” for that portion is
estimated using 40 km/h as an average
speed.
Direction List
When you press the MAP/GUIDE
button on the guidance screen, the
display changes to:
NOTE:
• The map and voice guidance in
unverified areas differ from those in
verified areas. See Unverified Area
Routing on page 83.
• Only manoeuvres that occur at
highway exits or contain highway exit
information will show the exit info
icon ( ) on the right end of the
items in the Direction list. If no exit
info icon is shown on the list, the Exit
Info. is grayed out.
You can see the Direction list and the
distance to each manoeuvre. Press the
MAP/GUIDE button to return to the
previous screen.
You can scroll through the Direction
list screen by screen using the scroll bar,
or one instruction at a time using the
joystick.
52 Navigation System
Page 53
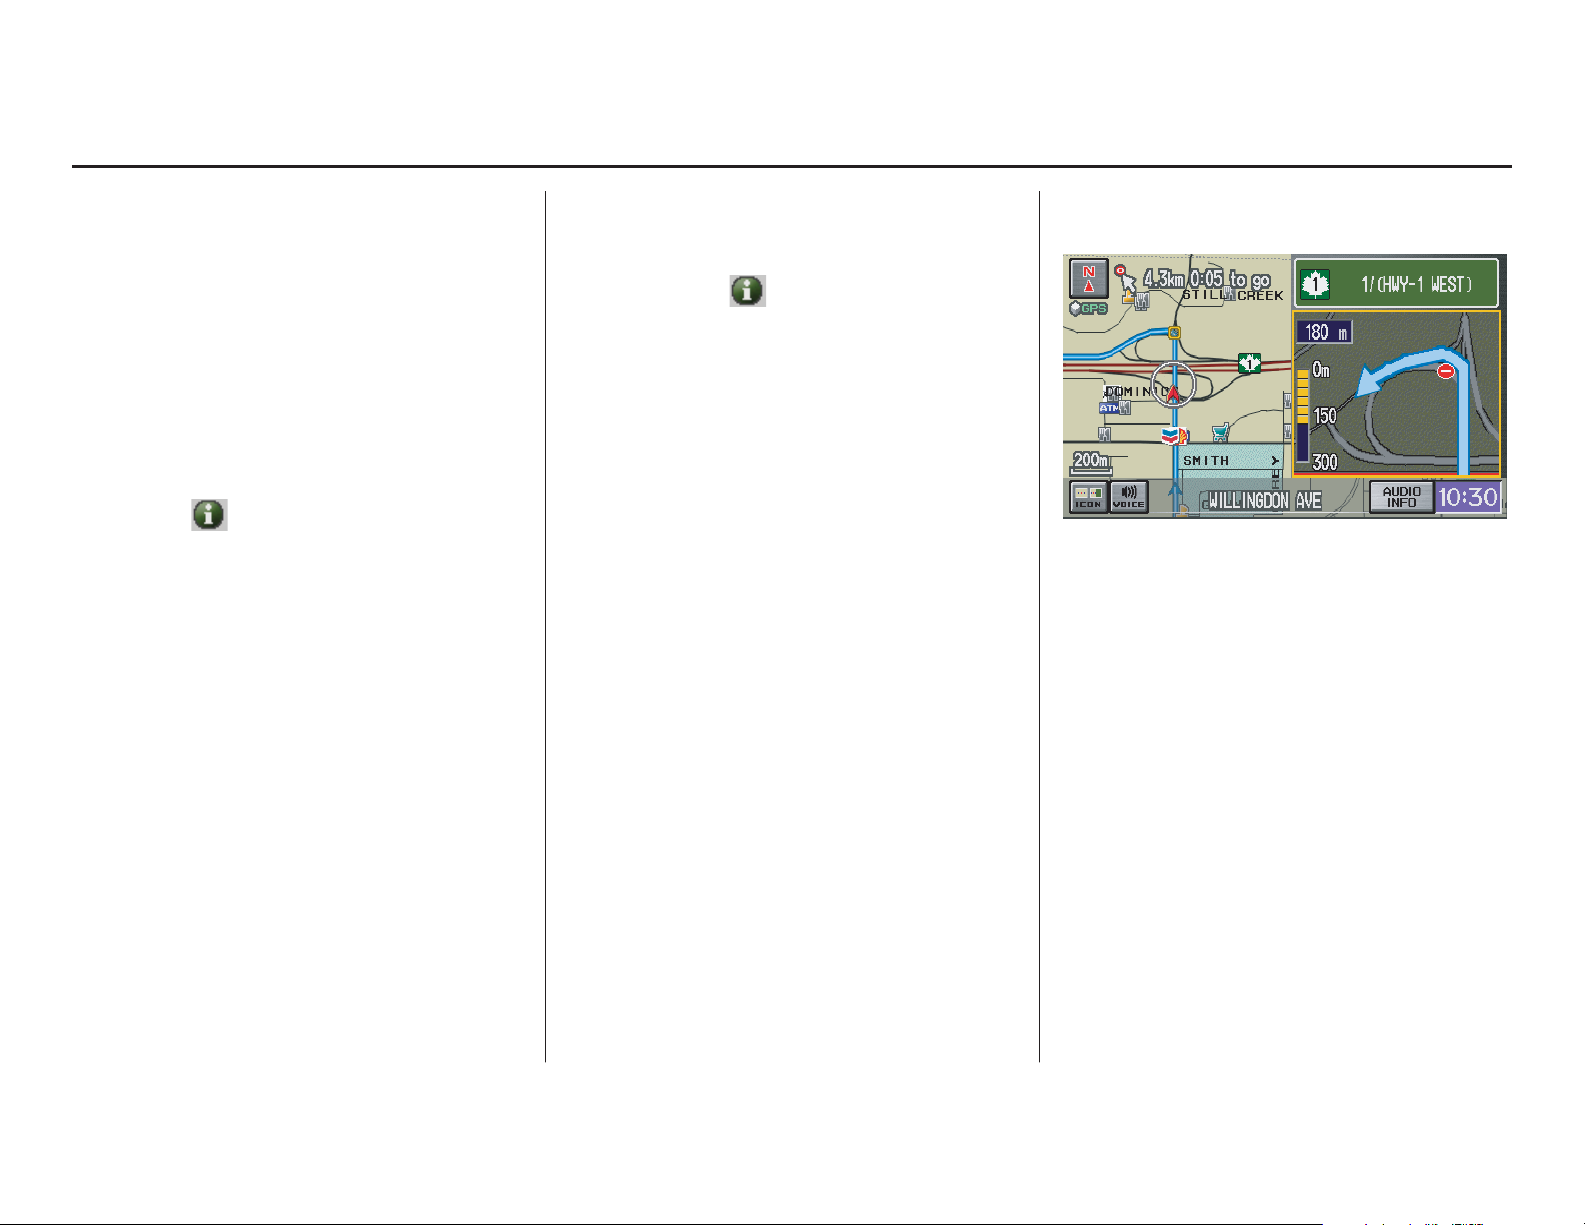
Driving to Your Destination
Index
Table of Contents
Exit Info. (Highway Exit
Information)
NOTE:
Currently, only available when
travelling in the United States.
You can search highway exit
information and add new destinations or
waypoints to the calculated route as a
new destination or waypoint. The exit
info icon ( ) on the right end of the
items in the direction list indicates that
there is highway exit information
available. Say or select Exit Info., and
choose the exit and place to set as a new
destination or waypoint.
On the map screen, you can display
highway exit information using the
joystick. The exit info icon will only be
displayed on the map screen if there is
any highway exit information available.
Choose the 400, 800 metre, or
1.6 kilometre scale, then move the
crosshairs to the desired exit info icon
and click on it. Choose a place from the
list and set it as a new destination or
waypoint.
NOTE:
To turn on “Highway exit information”
on the map screen, display the icon bar
and select the icon (see page 58).
Guidance Mode
When en route to a destination, you
have two display options: single-screen
mode (the factory default) and splitscreen mode.
Single-screen mode – A map is
displayed with occasional guidance
pop-up windows as you approach a
manoeuvre.
Split-screen mode – The map is always
displayed on the left of the screen, and
the manoeuvre or direction list is
displayed on the right-hand side of the
screen.
Guidance mode can be changed in either
Setup (see Guidance Mode on page 90)
or by accessing the icon bar (see
Guidance Mode on page 54) .
When you get near the manoeuvre, the
map screen changes to:
On the map screen, the location of the
manoeuvre is marked with a small
yellow square. The guidance window is
simply an enlargement of the area
indicated by the yellow square. After
you complete the manoeuvre, the
display returns to a full map screen
when the single-screen mode is set, or to
a map and direction list screen when the
split-screen mode is set.
Navigation System 53
Page 54

Driving to Your Destination
Index
Table of Contents
Map Scale
Use the ZOOM buttons or say a voice command such as “Display 800 metre scale” (see page 132) to change the scale of the map.
Zooming in increases the detail, while zooming out gives you a view of a wider area. After changing the scale, give the system a
few moments to update the display.
Functions available at various map scales
Map Scale (Metric and English)
For selecting units, see page 92.
POI icon symbols (like ATM) page 56 X X
Breadcrumbs (off-road tracking dots)page60XXXX
Highway exit information icons page 53 X X X
One-way traffic icon page 56 X
Unverified road display (light brown) page 83 X X X
Map orientation “Heading-up” page55XXXXX
Map orientation “North-up” page55XXXXXXXXXXX
Map features (park, golf course, etc.)page50XXXXXXXXXX
Avoid area shown on map page 87 X X X
Avoid area scales (when creating) page 87 X X X
Waypoint “flag” icons page 63 XXXXXXXXXXX
80 m 200 m 400 m 800 m
1/20 mi. 1/8 mi. 1/4 mi. 1/2 mi. 1 mi. 2 mi. 5 mi. 15 mi. 50 mi. 150 mi. 350 mi.
1.6 km
3 km 8 km 24 km 80 km
240 km 560 km
NOTE:
• You can change between kilometres or miles in Setup (see Units on page 92).
• For information on the available voice commands, see Voice Command Index on page 131.
54 Navigation System
Page 55

Driving to Your Destination
Index
Table of Contents
Map Orientation
The map can be orientated two ways:
• North-up: North pointing up as you
would normally view a paper map.
• Heading-up: The map constantly
rotates so the road you are driving on
always points up (as you see the road
through your front windshield).
“North Up”
“Heading Up”
NOTE:
The red arrow in both heading symbols
always shows the direction north.
Touch the Map Orientation icon on the
map screen to switch between the
available orientation, or say “Display
heading up” or “Display north up.”
In the larger map scales (above 1.6
kilometre or 1 mile), the map is always
oriented with north facing upward. You
cannot change the orientation.
NOTE:
For information on the available voice
commands, see Voice Command Index
on page 131.
Destination Icon
The destination icon only shows the
approximate location of the destination.
This occurs because a city block can
have as many as 100 possible addresses
(for example, the 1400 block is followed
by the 1500 block). Most cities use only
a portion of the 100 possible addresses
(for example, in the 1400 block, the
addresses may only go up to 1425
before the 1500 block starts). Therefore,
the address 1425 will be shown a
quarter of the way down the block by
the system instead of near the end of the
block where the destination is actually
located.
Tip:
When en route, you can view a map
showing your destination. Using voice
control, say “Display destination map.”
Navigation System 55
Page 56

Driving to Your Destination
Index
Table of Contents
The display automatically changes to
the map screen when you reach your
destination. Press the MENU button to
return to the Enter destination by
screen.
NOTE:
• For information on the available
voice commands, see Voice
Command Index on page 131.
• If you are en route and the joystick is
moved, the “Time to Destination”
and “Distance to Destination”
indicators are replaced with an
indicator showing distance from the
current vehicle location.
Landmark Icons
Landmark icons are shown in the map
screen on the 80 and 200 metre scales,
or 1/20 and 1/8 mile scales. The
Highway Exit information is displayed
on the 400, 800 metre, and 1.6 kilometre
scales. The icons are:
Honda Dealer
Hospital
Grocery Store
Gas Station
Hotel/Lodging
Parking Garage
Highway Exit Information
Some icons can be turned on or off;
you can either display them or hide
them from the ICON button on the
lower left corner (see page 50) or using
voice commands (see page 131).
Acura Dealer
School
Restaurant
AT M
Parking Lot
Post Office
You can select most landmark icons
with the joystick to display the icon’s
information. See the table on the
following page for exceptions.
NOTE:
• The same list can be viewed on the
screen by selecting Map Legend
from the Information screen.
• When there are overlapping
landmark icons, a list of the points of
interest (POIs) is displayed.
• For information of the available
voice commands, see Voice
Command Index on page 131.
• The Highway exit information icon is
displayed only on the U.S. areas.
One-Way Traffic Icon
The one-way traffic icons (see Map
Screen Legend on page 50) are only
shown on the 80 metre or 1/20 mile
scale and only when turned on in Icon
Options (see page 58).
56 Navigation System
Page 57

Driving to Your Destination
Index
Table of Contents
For some icons, you can choose either to show or hide them on the map, while others like Acura Dealer are always shown. The
table below shows the features for each icon type. Some Points of Interest (POIs) like Police Stations are not shown as an icon,
but you can still locate the nearest one with the voice command, “Find nearest Police Station.”
Icon can be
POI type
Honda/Acura dealer Yes, always No No Yes Yes
Hospital Yes Yes Yes Yes Yes
School Yes Yes Yes Yes Yes
ATM Yes Yes Yes Yes Yes
Gas station*1 Yes Yes Yes Yes Yes
Restaurants*1 *2 Yes Yes Yes Yes Yes
Post office Yes Yes Yes Yes Yes
Grocery store*1 Yes Yes Yes Yes Yes
Hotel*1/Lodging Yes Yes Yes Yes Yes
Police station No icon No icon No No Yes
Shopping, Tourist attraction, Bank
Parking garage/Parking lot Yes Yes Yes Yes Yes
Highway exit information*3 Yes Yes Yes Yes (choose POI) No
One-way traffic icon Yes Yes Yes No No
manually
displayed
No icon No icon No No Yes
Icon can be
manually
hidden
Icon
selection by
voice
Icon can be selected as a
destination on the map
screen with the joystick
POI can be found on the
map screen using voice
command “Find...”
*1. When these types are selected for view on the map, some icons are shown as “brand icons.”
*2. The Icon Options feature found on the Icon Bar screen allows you to customize your choice of the displayed icons. See
Showing Icons on the Map on page 58. Also see the Voice Command Index on page 132 for the “Display,” “Hide,” and
“Find” commands.
*3. The Highway exit information icon is displayed only on the U.S. areas.
Navigation System 57
Page 58

Driving to Your Destination
Index
Table of Contents
Showing Icons on the Map
Touching the ICON button on the map
screen displays the following screen:
The screen consists of the following
items:
Icon Bar (row of icon symbols)
The icon bar allows you to manually
select the icons that are displayed on the
map (see page 56 for a list of these
icons). In the screen above, both gas
stations and restaurants are selected.
Touch the icons to select (goes blue) or
remove them (goes gray). You can also
display or hide the same icons by using
the “Display” or “Hide” voice
commands (see page 132).
Icon Options
This feature allows you to “fine tune”
some of the icons on the Icon bar (see
Icon Options for more information).
Guidance Mode
When en route, this item allows you to
select between a single-screen (with
occasional pop-up guidance windows),
or a split-screen (containing one-half
map and one-half guidance/directions
list window). See page 53 for an
explanation of this feature, and see
page 90 for Setup.
Exit Screen
Select Return to return to the map
screen.
Icon Options
Selecting Icon Options displays the
following screen:
This feature allows you to “fine tune”
some of the icons on the Icon bar. The
three icon choices – “Parking” (lot or
garage), “Restaurant” (specific type or
types of food), and “Other icons”
(hospitals, schools, etc.) – can each be
tailored to your needs.
58 Navigation System
Page 59

Driving to Your Destination
Index
Table of Contents
For instance, let’s assume that hospital
icons are not displayed on the map. You
would do the following:
• First, you would ensure that the
OTHER ICON button on the Icon
bar is blue (see Icon Bar on page 58).
• Second, you select Icon Options
and verify that hospital option is also
on (blue). This procedure is explained
below.
If you select Other Icons from the
Select category for icon settings
screen, the other icons options are
displayed:
In the previous example, POST
OFFICE and SCHOOL are selected
and will show up on the map. To also
see HOSPITAL on the map, this would
need to be turned on to select it so it
appears as below.
Exit, and save your settings by selecting
Done.
NOTE:
• When viewing the map screen, you
can turn some icons on using voice
control.
• See Voice Command Index on
page 132 for the available “Display”
and “Hide” icon command.
Navigation System 59
Page 60
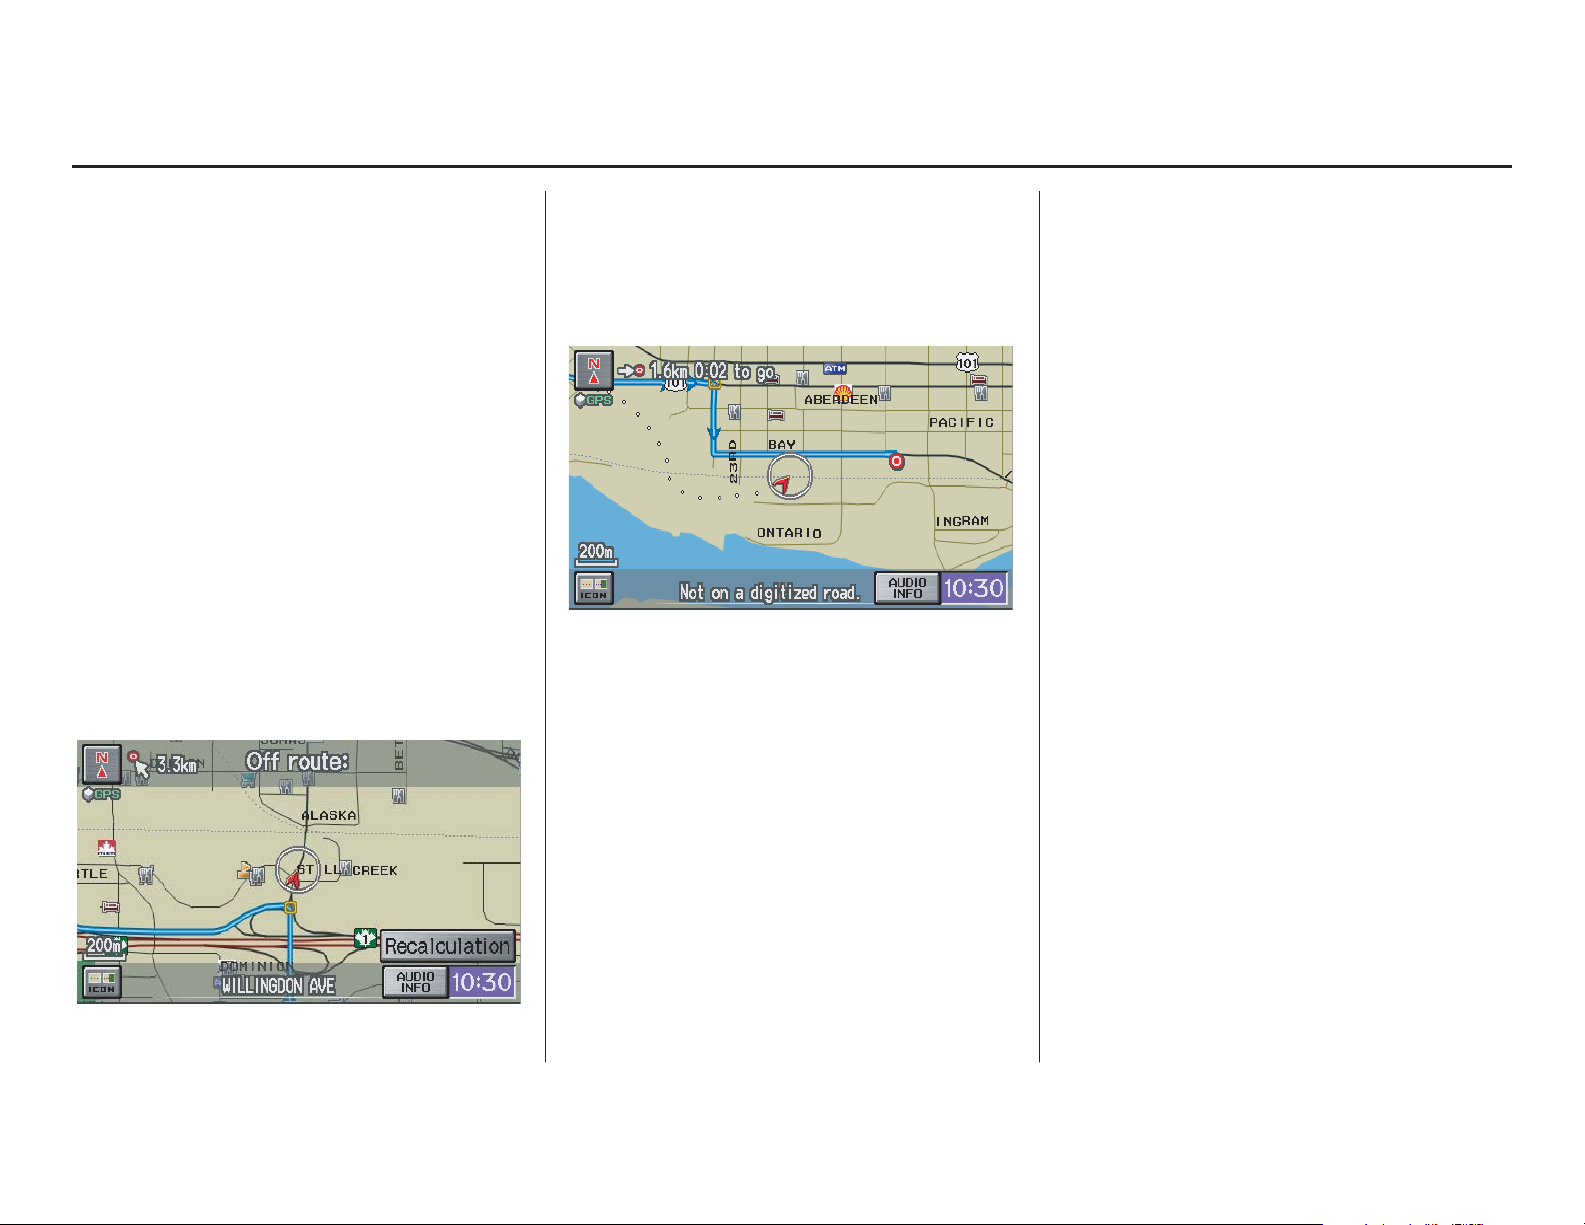
Driving to Your Destination
Index
Table of Contents
Going Off the Route
If you leave the calculated route,
“Recalculating...” is displayed at the top
of the screen. The system will
recalculate the route from your current
location and direction to the desired
destination, and then give you a new
route instruction. This is done
automatically if you have set
Rerouting to Automatic on the
Setup screen (second) (see page 82).
If the Rerouting option in Setup is set
to Manual, “Off route” appears at the
top of the screen when you leave the
calculated route. Say “Recalculate” or
select Recalculation whenever you
wish the system to perform a
recalculation.
Off-road Tracking
If you drive more than 800 metres from
a mapped road, “Not on a digitized
road” appears at the bottom of the
screen.
The map screen starts displaying a
series of dots (breadcrumbs) to show the
path you have taken if Off-road
Tracking on the Setup screen (second)
is set to On (see page 90).
By following the dots, you can
backtrack to the mapped road you
originally left. “Breadcrumbs” may
occasionally be displayed in urban
areas, such as large parking lots in
shopping malls, or in new subdivisions
where the roads are not yet in the
database. In other cases, you may see
dots if the system temporarily goes off
route, like in a parking garage where the
GPS signal is unavailable.
These dots appear only in the 80, 200,
400, and 800 metre (or 1/20, 1/8, 1/4,
and 1/2 mile) map scales. Use the
ZOOM buttons to change scales if
necessary.
Tracking continues for approximately
240 kilometres; dots at the beginning of
the trail will start disappearing when
you exceed that distance. When you
reach a mapped road, the system stops
displaying dots.
60 Navigation System
Page 61

Driving to Your Destination
Index
Table of Contents
Viewing/Saving the Current
Location
Whenever you are on a map screen, you
can always obtain your current location
either by touching the Vehicle Position
icon or by using the voice control
system and saying “Display current
location.” A screen pops up which
shows the address of your current
location, as well as the latitude,
longitude, and elevation.
NOTE:
The elevation will not appear when the
system is temporarily lacking proper
GPS information. The system elevation
may not agree with elevations shown on
roadside elevation signs, and may
fluctuate plus or minus 30 metres or
more.
You can store the current location for
later use. It does not change or cancel
your current route.
For example, you are following the
system’s directions to get to a
destination. While sitting at a stoplight
you notice a store on the corner, but do
not have time to visit it right now. You
can save the location to select as a
destination at a later date.
To save the location, say “Save current
location.” or select Save on the screen.
When you select “User 1” or “User 2,”
the Edit address book screen with the
current location data will appear. You
can edit the name, phone number, or
category name to be saved in your
personal Address Book.
After the location is saved, select
Return to return to the map screen.
You can then use Address Book from
the Enter destination by screen to
select the saved location and return to
the same spot.
Navigation System 61
Page 62

Driving to Your Destination
Index
Table of Contents
Pop-Ups and Disclaimers
When you say “OK” in the Calculate
Route to screen, or if you change your
route, the system checks your route and
provides you with pop-up messages for
the following situations:
• Your route takes you into an area that
you previously set as an “Avoid
Area” (see Edit Avoid Area on
page 87).
• Your route passes near an unverified
area (see Unverified Area Routing on
page 83).
• Your route includes unverified areas
(see Unverified Area Routing on
page 83).
• You are about to enter an unverified
area (see Unverified Area Routing on
page 83).
• You actually entered an unverified
area (see Unverified Area Routing on
page 83).
62 Navigation System
Page 63

Driving to Your Destination
Index
Table of Contents
Changing the Route
While en route, you may wish to alter
your route, add an interim “Waypoint”
(pit stop), choose a different destination,
or cancel your current destination.
To change your present route, you can
do any of the following:
Say “Menu,” or press the MENU button
to view the Change route by screen:
• Search waypoint (page 64)
• Delete waypoint (page 65)
• Avoid streets (page 65)
• Detour (page 65)
• Change routing method (page 65)
• Cancel the current route (page 65)
• Back to the current route (page 65)
Choose a different destination (other
methods) by:
• Saying “Find nearest...” to find a POI
(page 66).
• Saying “Go home” (page 66).
• Using the joystick to select a different
POI or address on the map (page 66).
•Pressing the MENU button twice to
get to the Enter destination by
screen (page 67).
Change Route By Screen
Pressing the MENU button displays the
Change route by screen:
Waypoints
Waypoints allow you to add an interim
“pit stop” while travelling to a
destination. For instance, you may want
to stop for gas or food, and then
continue on to your destination.
Although you can enter up to five
waypoints at a time, typically you may
never use more than one at a time.
Waypoints are routed to in the order
they were entered (number 1 first, etc.),
with your final destination routed to last.
If you wish to create a custom route of
several destinations, and then control
the order of routing, the function
“Today’s Destinations” is probably a
better choice (see By Today’s
Destinations on page 41).
Navigation System 63
Page 64

Driving to Your Destination
Index
Table of Contents
When you enter waypoints, they appear
on the map screen as small red flags
numbered 1-5.
Adding Waypoints
From the Change route by screen, if
you say or select Search Places on
Route, then the Select a search
method screen is displayed. Select
either Places Along the Route or
Places Around the Destination.
Next, select your “Waypoint Category,”
then follow the menu prompts to select a
destination. When the system performs
a search from Places Along the
Route, it displays matches that lie
within a corridor on either side and in
front of you along your route.
From Places Around the
Destination, the system displays
matches in a spiral pattern outward from
the destination. The search “corridor”
distance value can be changed in Edit
Waypoint Search Area in Setup (see
page 89).
To add another waypoint, press the
MENU button and repeat the procedure.
If Search Places on Route is grayed
out, the maximum of five waypoints has
been entered.
NOTE:
The system does not allow you to select
the roads you want to use to get to a
destination. However, after you enter a
destination, you can select intersections
or POI waypoints that the system will
use to tailor your route.
64 Navigation System
Page 65
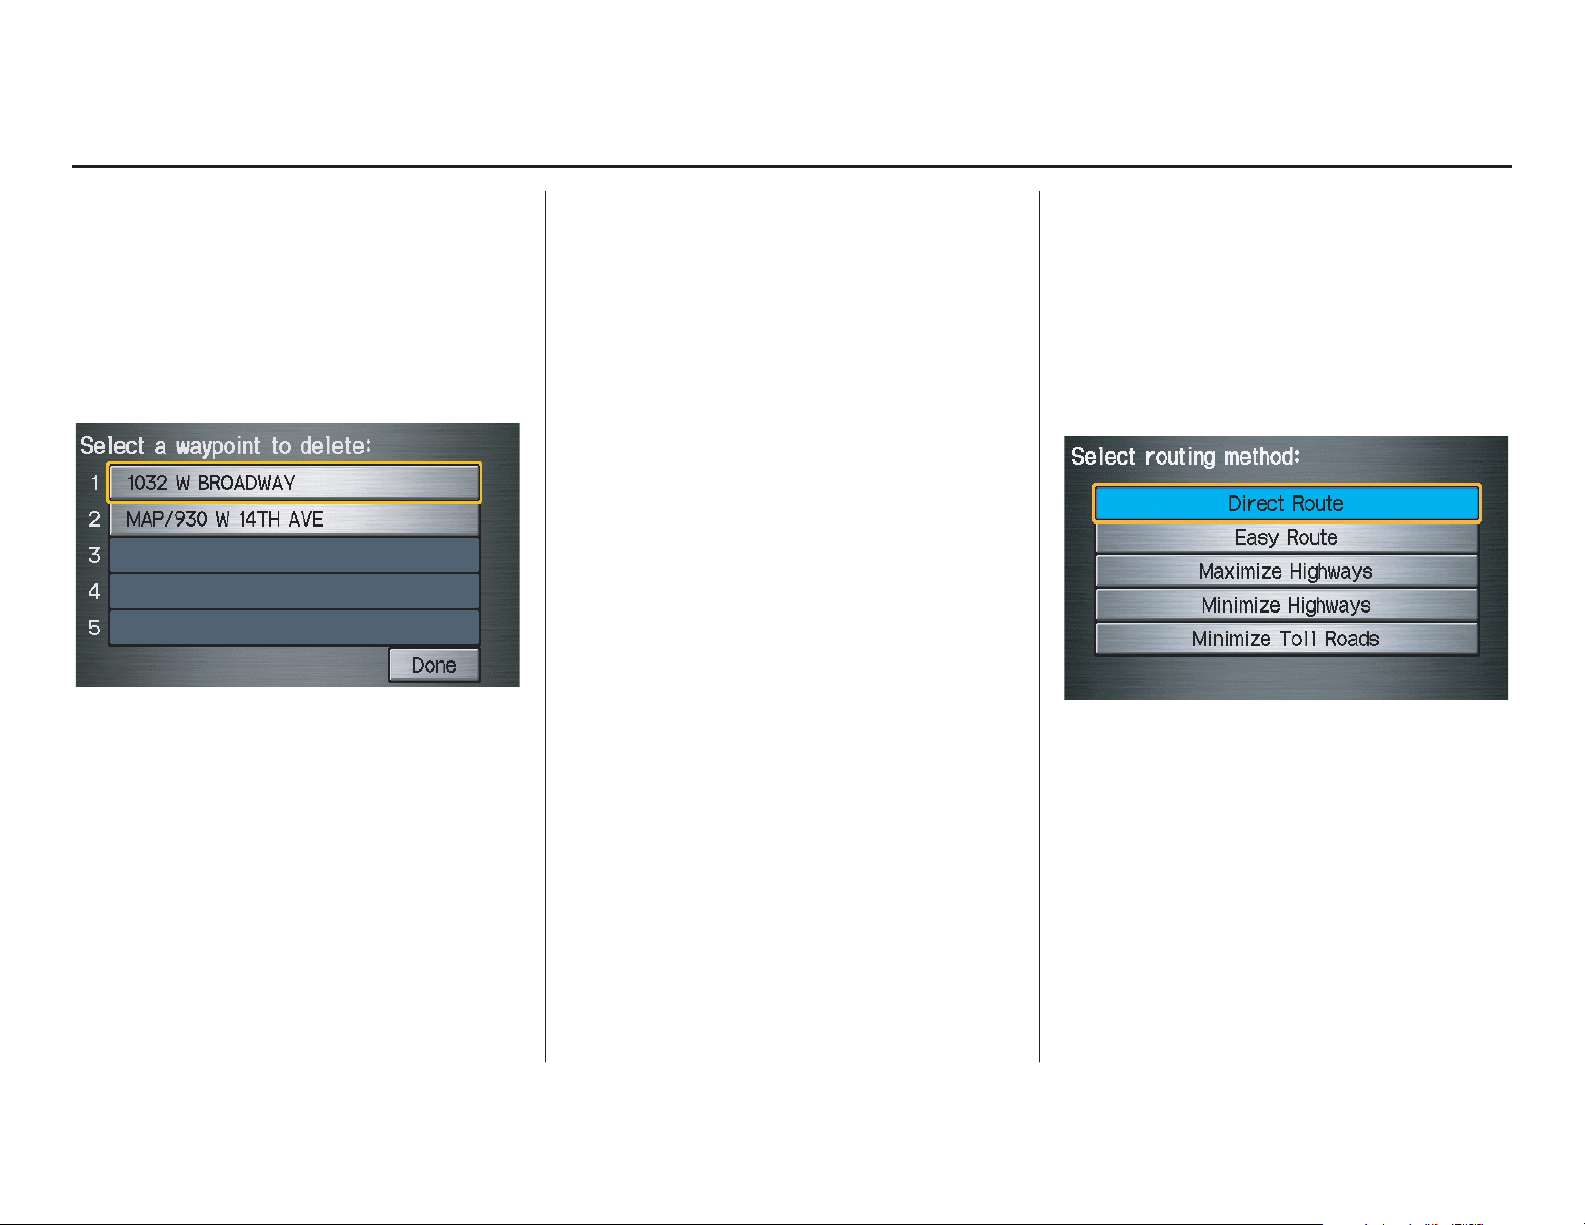
Driving to Your Destination
Index
Table of Contents
Deleting Waypoints
From the Change route by screen, if
you say “Delete” or select Delete, then
the Select a waypoint to delete screen
is displayed. Say the line number of the
waypoint(s) you wish to delete, or select
them by using the joystick. Say or select
Done to return to the map screen.
The route is recalculated to reflect the
changes you made to the waypoint(s).
Reroute: Avoid Streets
From the Change route by screen, if
you say or select Avoid Streets, the
system displays a list of streets that will
get you to your destination. This feature
allows you to avoid a street or streets
along your route. This is helpful if you
know of road construction, closures, or
excessive traffic along the route. Simply
select the street or streets you wish to
avoid. You cannot avoid your current
street, or the streets of your waypoint(s)
or destination (system beeps if selected).
NOTE:
Although you can choose streets to
avoid, you cannot choose specific
streets you want to use.
Reroute: Detour
Calculates a detour route for you if you
encounter an unexpected obstacle such
as a closed road or extremely heavy
traffic congestion. If a detour is
selected, the system will attempt to
recalculate a new route, avoiding the
next 3 kilometres (while on a highway)
or 800 metres (while on a surface
street).
Reroute: Change Routing
Method
From the Change route by screen, if
you say or select Change Routing
Method, then the Select routing
method screen is displayed. See
Changing the Routing Method on
page 46 for details.
Cancel Current Route
Cancels the current route (and any
waypoints) and returns you to the map
screen.
Back to Current Route
Returns you to the original map screen.
Navigation System 65
Page 66

Driving to Your Destination
Index
Table of Contents
Changing Your Destination
There are four methods by which you
can change or add a waypoint to your
route. These are:
Find Nearest (Voice command)
From the map screen, say one of the
“Find Nearest...” voice commands to
locate the nearest gas station, ATM,
restaurant, or other point of interest. See
the “Find Nearest” voice commands
listing on page 133.
Go Home (Voice command)
From the map screen, say “Go home.”
If you have entered a “Go home”
address, then the system will display a
confirmation screen.
Using Joystick to Change
Destination
While following a calculated route, you
can select a new destination with the
map screen and the joystick.
With the map screen displayed, use the
joystick to move the position icon. It
will change to crosshairs. Use the
joystick to position the crosshairs on
your desired new destination, street, or
icon, then push in on the joystick.
Select a place
the location will be displayed.
NOTE:
The
Select a place
displayed when the crosshairs are
positioned near multiple icons or
locations. The address of the location will
be displayed at the top of the screen when
the crosshairs are positioned on a
particular street, icon, or location.
screen or the address of
screen will be
The
If this is not your desired new destination,
press the
BACK
return to the
crosshairs with the joystick, then push in
on the joystick again to see the new
address.
When the Select a place screen is
displayed, select an item from the list,
and the Calculate route to screen is
displayed. After select OK, you can
select either Set as New Destination
or Set as Waypoint for your specified
position.
CANCEL
button on the steering wheel to
map
button or the
screen. Reposition the
NAVI
66 Navigation System
Page 67

Driving to Your Destination
Index
Table of Contents
When the address of the location is
displayed at the top of the screen, push
in on the joystick, and the Calculate
route to screen will be displayed. After
you select OK, you can select either Set
as New Destination or Set as
Waypoint for your specified position.
The system will return to the map
screen and recalculate the route to your
new destination or waypoint.
NOTE:
When you scroll through the map
screen while en route to a destination,
some voice controls will not function.
These include:
• Display “Heading up”
• Display “North up”
Entering a Destination from the
Menu Screen (while en route)
If you say “Menu” or press the MENU
button twice, the system displays the
Enter destination by screen. Follow
the procedure described in Entering a
Destination, which begins on page 22.
After selecting OK to the Calculate
route to screen, your new location can
be used either as a waypoint or as a
replacement destination.
Continue Trip Screen
If you restart the vehicle without having
completed your prior trip, you will see
the following screen:
• To continue to your destination or
other waypoints, say or select OK.
• To cancel your destination, press the
CANCEL button or the NAVI
BACK button on the steering wheel,
or using the voice control system, say
“Cancel” or “Back.”
• If you wish to change the route
method, say or select CHANGE
METHOD.
• For additional information on
changing the routing method, see
Changing the Routing Method on
page 46.
Navigation System 67
Page 68

Information Features
Index
Table of Contents
Information Screen
When you say “Information” or press
the INFO button, the display changes to:
NOTE:
If some items appear to be grayed out,
and cannot be selected, it is because you
did not select OK on the initial
Disclaimer screen (see System Start-up
on page 16), or there is no phone paired
to the system (see Bluetooth®
HandsFreeLink® on page 18).
Cellular Phonebook
The Cellular Phonebook option
allows you to store up to 1,000 names
and 10,000 phone numbers in the
phonebook of Bluetooth®
HandsFreeLink® from your cellular
phonebook. With HFL, you can then
automatically dial any name or number
in the phonebook.
Say or select Cellular Phonebook
from the Information screen, and the
display changes to:
Voice Command Help
When you say or select Voice
Command Help, you will see the
following screen:
NOTE:
You can select an item by saying either
the line number or the item name.
Navigation System
68
NOTE:
• For more information on this feature,
see your Owner’s Manual.
• For questions about the HFL Cellular
Phonebook, call HandsFreeLink
customer support at 1-888-528-7876
or visit www.handsfreelink.ca.
Page 69

Information Features
Index
Table of Contents
There is a tutorial available for the voice
command help. Say or select Getting
started, and the display changes to:
Select the line number of the desired
tutorial you want to view, and the
tutorial will automatically be read. Press
Stop to stop the reading, or press the
CANCEL button.
When you make a command help
selection under any of the help screens,
you will see the help commands that can
be used with the voice control. You can
say or select Read List, and the system
will read the list to you.
For a listing of all voice commands, see
Voice Command Index on page 131.
Map Legend
You can use the Map legend screens to
learn the meaning of map features,
icons, colours, etc. used in this system.
When you say or select Map Legend,
the display changes to:
Say or select the desired item or item
number to view each section of the map
legend.
Navigation System 69
Page 70

Information Features
Index
Table of Contents
Calendar
The Calendar option allows you to
enter events and be reminded of them in
the future. When you say or select
Calendar, the system shows the
calendar with the current calendar day
highlighted.
Dates with an icon indicate there is a
scheduled entry for that date.
You can scroll through the calendar day
by day by moving the joystick, or select
the day by voice. To change the month,
say “Next” or “Previous,” use the
ZOOM buttons, or touch the triangles at
the top of the screen.
If you say or select List, your entries are
listed. Press the CANCEL button to
return to the Calendar screen.
Entering Your Schedule
Set your schedule by selecting the day
on the calendar, and the display changes
to:
Reminder
The default for Reminder is On. This
allows the system to remind you of the
calendar item the next time you start the
vehicle. See System Start-up on page 16.
Edit Date
This allows you to move your calendar
entry to a different date. If you say or
select Edit Date, the Calendar screen
is displayed with existing entries grayed
out. Select a new day and the display
returns to the Edit schedule screen
with a new date.
70 Navigation System
Page 71

Information Features
Index
Table of Contents
Edit Title
Say or select Edit Title, then enter the
name of your title using the on-screen
keyboard. Once you have entered the
title, say or select Done.
Edit Message
Say or select Edit Message, and the
system will show the Edit Message
screen. You can enter a message on two
lines. Use to change the line.
Once you have entered the message, say
or select Done.
Message Icon
Say or select Message Icon, and the
system displays a list of icons you can
select to help identify the type of
message you entered. The message icon
you choose will be displayed alongside
the specified date on the Calendar
screen.
Delete
From the Calendar screen, select the
date of the schedule you wish to
remove. To remove the schedule, say or
select Delete.
Done
Once you have finished entering the
schedule, say or select Done. The
Calendar screen is redisplayed and a
message icon appears.
NOTE:
• Only one entry can be stored for each
calendar day.
• A maximum of 50 entries can be
stored in the schedule. After you
reach 50 entries, a warning message
will appear telling you that the limit
has been reached. You can clear any
older entries as needed.
• To reactivate a previous message,
turn the Reminder setting from Off to
On. If it is not turned on, the
reminder will not be displayed when
you start the vehicle.
• The system displays active calendar
entries only after you answer OK on
the Disclaimer screen.
• For more information, refer to
System Start-up on page 16.
Calculator
When you say or select Calculator, the
display changes to:
Use the touch screen to use the
following features:
Calculator
The calculator function operates like a
standard handheld calculator.
Unit Conversion
Values entered on the calculator can be
converted from one unit to another (e.g.,
inches to millimetres).
Navigation System 71
Page 72

Information Features
Index
Table of Contents
Unit Conversion
To perform a conversion:
1. Enter a numeric value to be converted
(for example, 100).
2. Select the type of unit you want to
convert (for example, weight). The
screen for that conversion type
appears (see illustration in step 3).
3. Select the base unit (e.g., kilograms)
that you wish to convert to some
other unit. All other units will change
automatically depending on the base
unit value. In the example below,
100 kg converts to about 3,527
ounces, 220 pounds, etc.
NOTE:
• If you do not enter a value to be
converted, only “Temperature” units
are selectable.
• Conversions using negative value
may produce meaningless or
physically impossible values.
72 Navigation System
Page 73
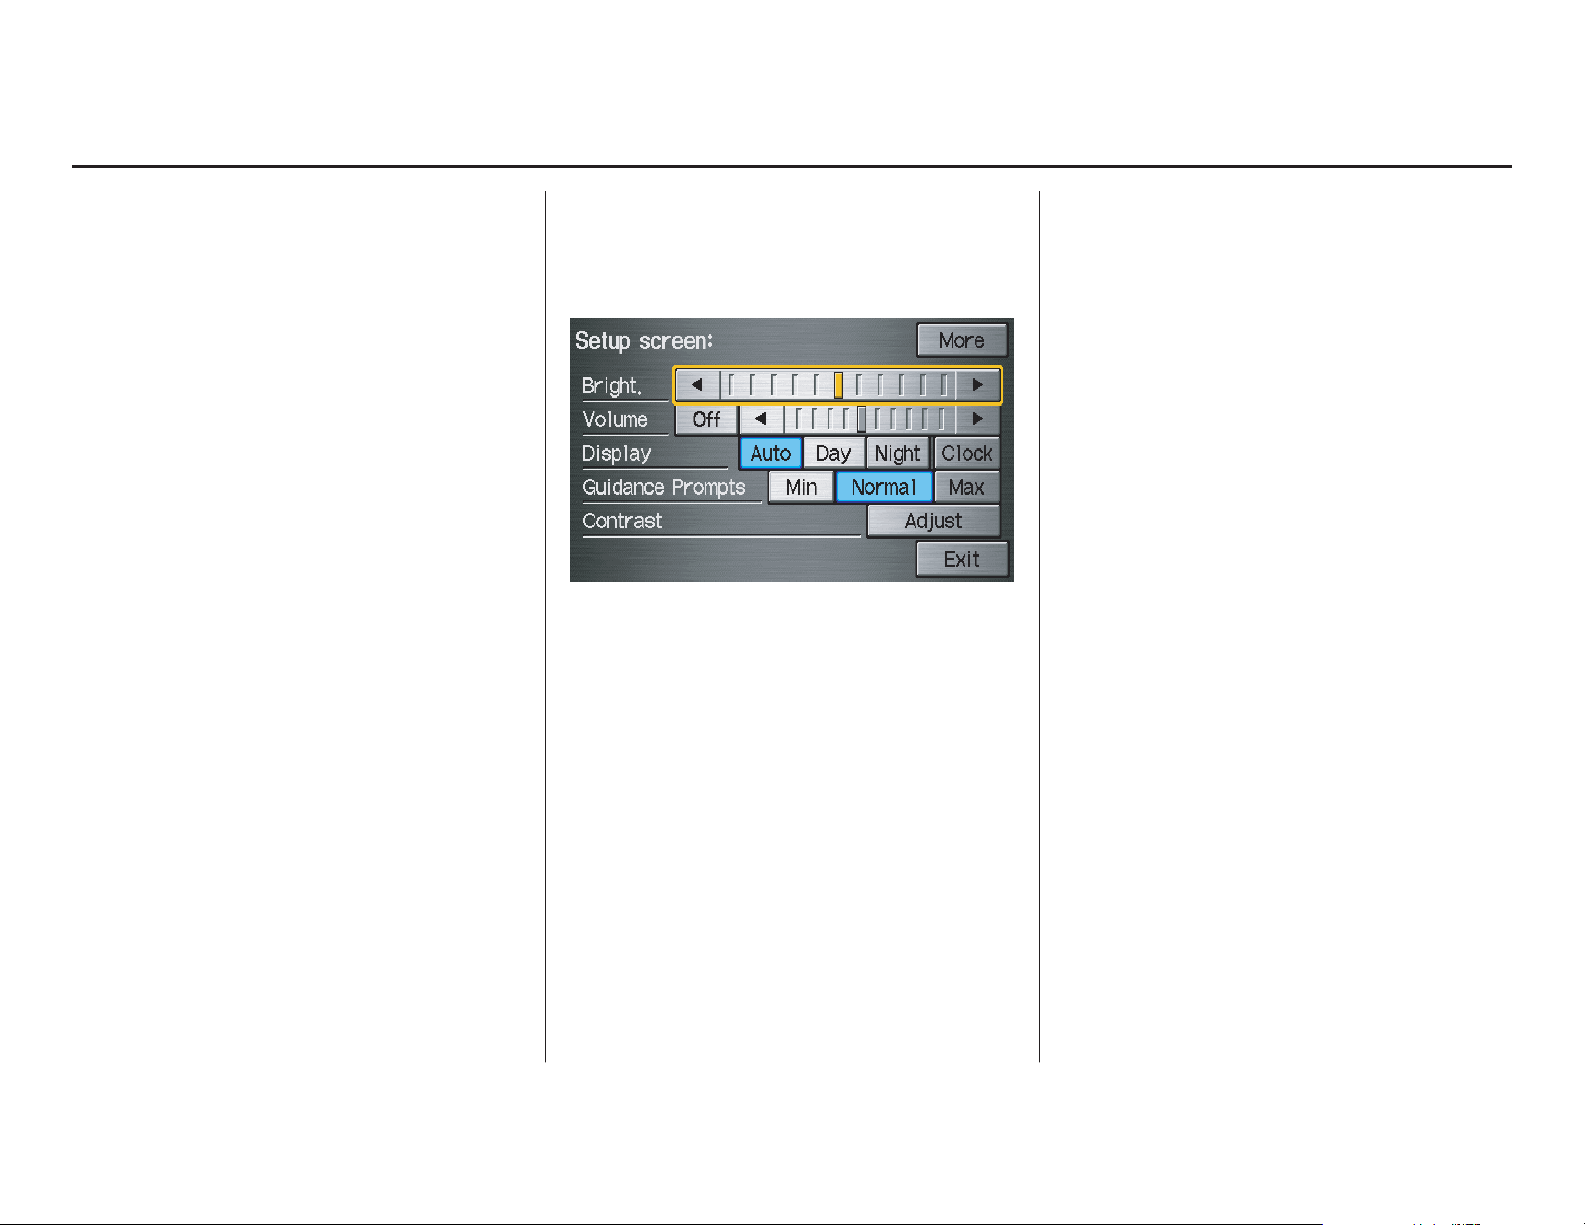
System Setup
Index
Table of Contents
Setup Mode
The Setup function consists of two
different screens that allow you to
change and update information in the
system. To display the Setup screens,
use the voice control system and say
“Setup” or press the SETUP button. To
change to another Setup screen, say or
select More in the upper right corner of
the screen.
On any of the Setup screens, you can
use the voice control system to select
any item on the screen.
NOTE:
• If some items appear to be grayed out
and cannot be selected, it is because
you did not select OK on the initial
Disclaimer screen. See System Start-
up on page 16.
• For information on the available
voice commands, see Voice
Command Index on page 131.
Setup Screen (first)
From any screen, say “Setup” or press
the SETUP button, and the following
screen appears:
Brightness
The screen brightness has 11 settings.
To change the brightness, use the voice
control system and say “Brightness up”
or “Brightness down.” You can also
select the Bright. bar and move the
cursor by moving the joystick left or
right, or by touching the arrowheads in
the bar.
NOTE:
You can have a separate daytime and
nighttime setting for brightness. Adjust
each setting when the display is in either
daytime or nighttime mode.
Volume
The navigation voice volume has 10
settings, and also can be turned off. To
adjust the volume, use the voice control
system and say “Volume up” or
“Volume down.” You can also select the
Volume bar and move the cursor by
moving the joystick left or right, or by
touching the arrowheads in the bar.
After adjusting the volume, you will
hear beeps at the new volume level. You
can also select volume off.
NOTE:
If you turn the volume off, you will not
hear route guidance or voice command
confirmations.
Tip:
If you are having trouble viewing the
screen in bright lighting conditions, try
increasing the brightness.
Navigation System 73
Page 74

System Setup
Index
Table of Contents
Display
There are two screen display modes:
Day Mode Night Mode
Day and Night. The recommended
setting is Auto, which automatically
switches the screen between Day and
Night modes as you turn the headlights
on or off.
You can select Day or Night mode to
override the Auto mode. This is a
useful feature for drivers that like to use
headlights during the day and want to
temporarily override Night mode.
However, the screen in Day mode will
be extremely bright at night.
Display
Mode
Auto
(factory
default)
Day Stays in Day mode. Push and hold the
Night Stays in Night mode. Push and hold the
Clock Turns the screen to the
How setting affects
display mode:
Automatically switches
between Day and Night
mode by sensing if the
headlights are on.
clock screen.
To override setting
while driving:
Override night display:
Adjust dash brightness
(with headlights on) to
full bright.
Override day display:
Turn on headlights and
ensure the dash
brightness is not at full
bright.
joystick for 10 seconds
(switches to Night
mode).
joystick for 10 seconds
(switches to Day mode).
To return to the previous
screen, press the NAVI
BACK button.
But remember:
Adjust the dash
brightness (with
headlights on) back to
normal to allow auto
switching by sensing
headlights.
There is no auto Night/
Day mode change with
the headlights on/off.
You control the setting.
There is no auto Night/
Day mode change with
the headlights on/off.
You control the setting.
Remember, your route
guidance stops when the
clock screen is
displayed.
74 Navigation System
Page 75

System Setup
Index
Table of Contents
When you select Clock mode, the
clock screen is displayed (see page 17).
DISPLAY OFF
When you touch the DISPLAY OFF
button, the screen is turned off. Voice
guidance will continue to work in this
mode. To turn on the screen, press any
navigation or voice control button.
Clock Type
Allows you to choose the design of the
clock screen from three Clock Type
screens and from two Background
images.
Guidance Prompts
While you drive to your destination, the
system displays and announces
guidance prompts for your next
manoeuvre. This setting allows you to
adjust the number of guidance prompts
before each manoeuvre. The settings
Min, Normal, and Max are described
below. The factory default is Normal,
so you can adequately prepare for the
next manoeuvre. If you wish to change
the number of guidance prompts, select
your preferred setting, as shown in the
following table.
Setting
Min Yes
Normal
(factory
default)
Max Yes Yes Yes
Distance before manoeuvre
About
800
metre
About
400
metre
Yes Yes
Just
before
manoeuvre
NOTE:
• To temporarily turn off voice
guidance prompts, select Off for the
“Volume” setting in Setup.
• System uses street name in guidance
phrase when language is set to
English.
Contrast
You can adjust the contrast and black
level. Adjusting these settings can make
the display easier to read.
NOTE:
You can have separate daytime and
nighttime settings for Brightness,
Contrast, and Black Level. Adjust each
setting when the display is in either
daytime or nighttime mode.
Say or select Return to return to the
previous screen.
Navigation System
75
Page 76
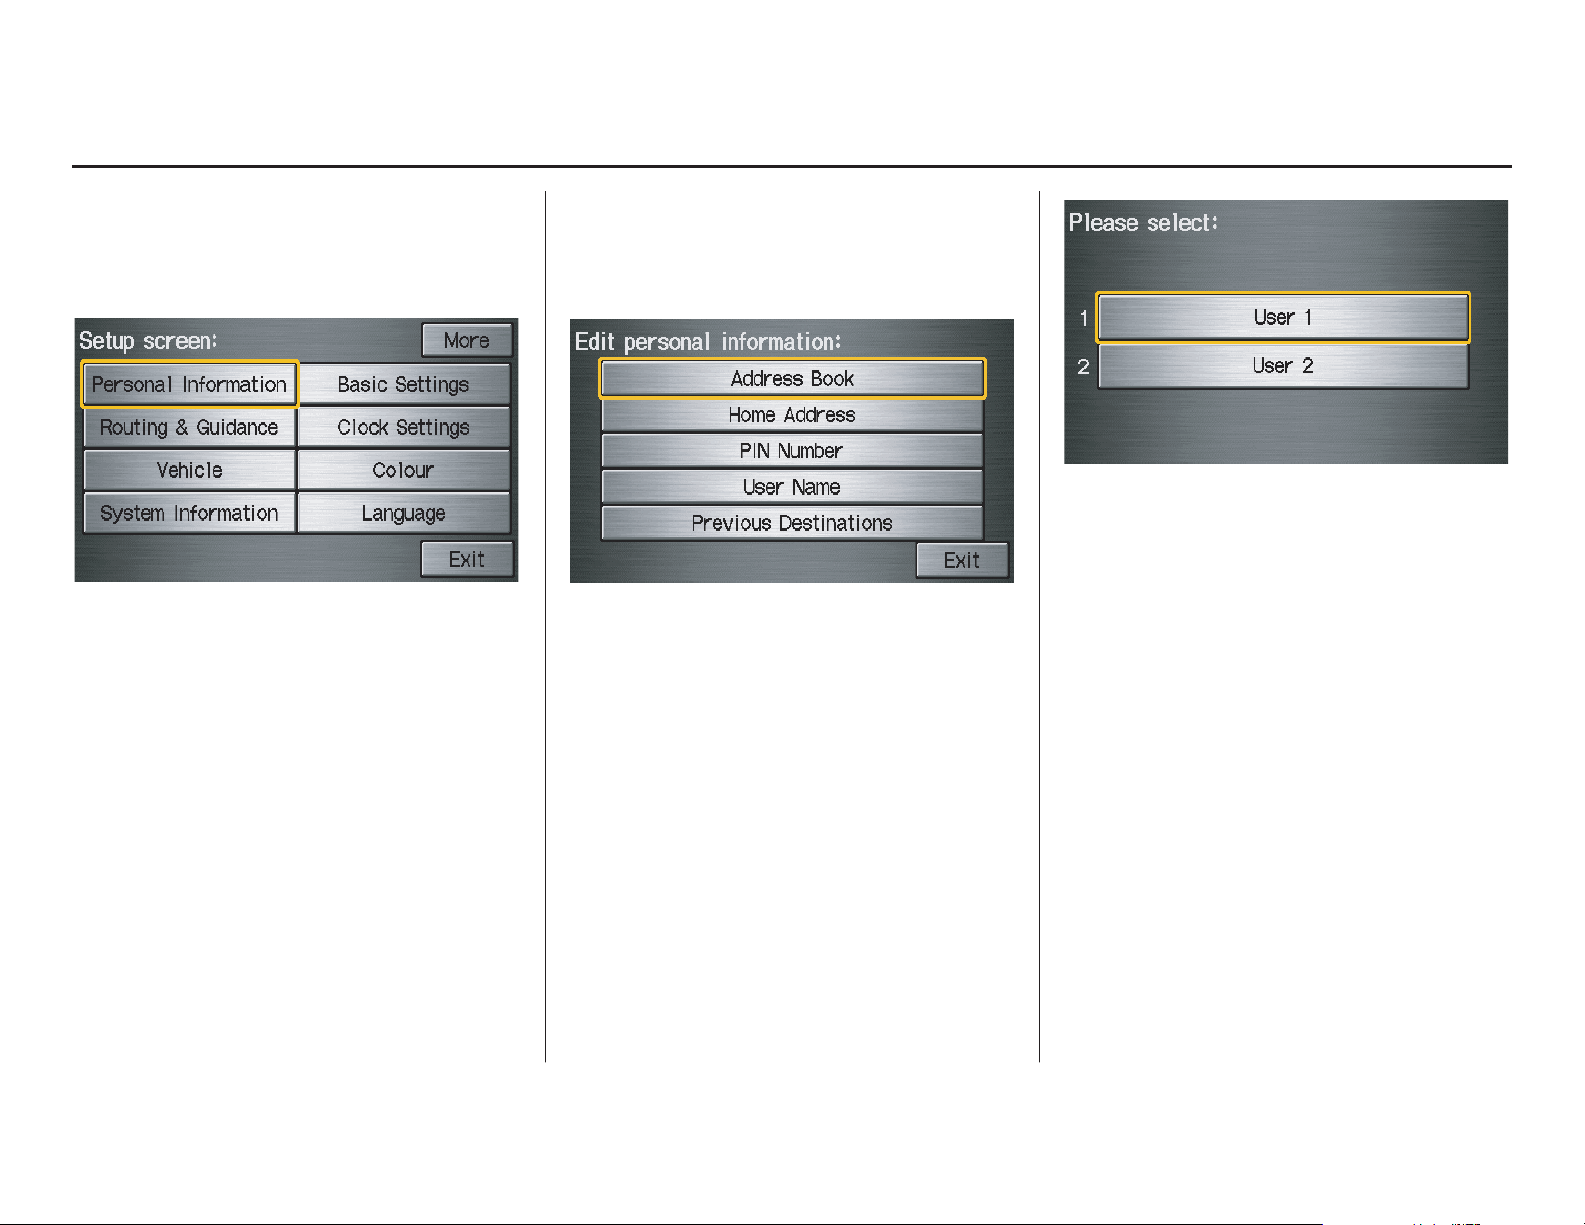
System Setup
Index
Table of Contents
Setup Screen (second)
Say or select More to view additional
Setup functions and the following
screen appears:
Personal Information
From the Setup screen (second), say or
select Personal Information and the
following screen appears:
Address Book
The Address Book allows up to a total
of 200 address entries. After 200 entries,
the ADD TO Address Book button is
grayed out. The 200 addresses are
shared between User 1 and User 2. For
example, if User 1 has 150 addresses,
User 2 can only have 50.
You can add, modify, and delete
information in the personal Address
Book list.
You may choose to use a Personal
Identification Number (PIN) to protect
your privacy. However, PINs are
optional, and if you decide to use one,
record it in case you forget the number
(see page 80).
You can do the following functions in
the address book:
• Enter an address (see page 77).
• Edit an existing address (see
page 79).
• Delete an existing address (see
page 79).
76 Navigation System
Page 77

System Setup
Index
Table of Contents
Accessing the Address Book List
After selecting Address Book, the
system prompts you to select User 1 or
User 2.
If an Address Book PIN has been set,
the system prompts you to enter your
PIN. Verify that the correct user is
displayed, then enter your PIN. After
entering your PIN, say or select Done,
and the system displays your Address
Book.
If no Address Book PIN has been set,
the system displays your Address Book
after selecting User 1 or User 2.
NOTE:
Personal information cannot be backed
up or moved to another navigation
system.
Entering an Address
After you select User 1 or User 2,
your Address Book list appears:
Select New Address in the upper right
corner on the screen when beginning to
build your Address Book list.
Edit Name
You may use the “Name” field to give
the entry a name or title that you will
recognize later, such as “Doctor Smith”
or “Broadway Theatre.” If you do not
give the address a name, the system will
assign one (Address 001, etc.).
Say or select Edit Name. Then use the
on-screen keyboard to enter the name.
Touch Done when finished.
NOTE:
You can always re-enter, edit, or make
changes to any entry. “Address” is the
only required field.
Navigation System 77
Page 78

System Setup
Index
Table of Contents
Edit Address
When you say or select Edit Address,
the display changes to:
Current Position - Allows you to use
your current position as the address.
Address - Requires you to enter the city
and address you wish to store. The
operation is the same as selecting
Address from the Enter destination
by screen (see page 23).
Places - Allows you to select one of the
Point of Interest (POI) locations already
stored in the system as one of your
personal addresses. This operation is the
same as selecting Places from the
Enter destination by screen (see
page 31).
Previous Destinations - Allows you to
choose one of the locations in the
Previous Destinations list for your
Address Book list. This operation is the
same as selecting Previous
Destinations from the Enter
destination by screen (see page 40).
After you have used one of these four
options to enter the address, the initial
screen for entering the personal address
is redisplayed, with the address shown
in the “Address” field. If you have
entered the address using Places, the
phone number corresponding to the
address also appears in the “Phone
Number” field.
Edit Phone Number
You can enter the telephone number of
the address. If the address was chosen
with Places, and it has a telephone
number, that number is entered
automatically.
Say or select Edit Phone Number to
display the Enter phone number
screen. Enter the telephone number,
including the area code, by using the
voice control system (say the entire
phone number one digit at a time) or by
using the on-screen keyboard. Say or
select Done when finished.
78 Navigation System
Page 79
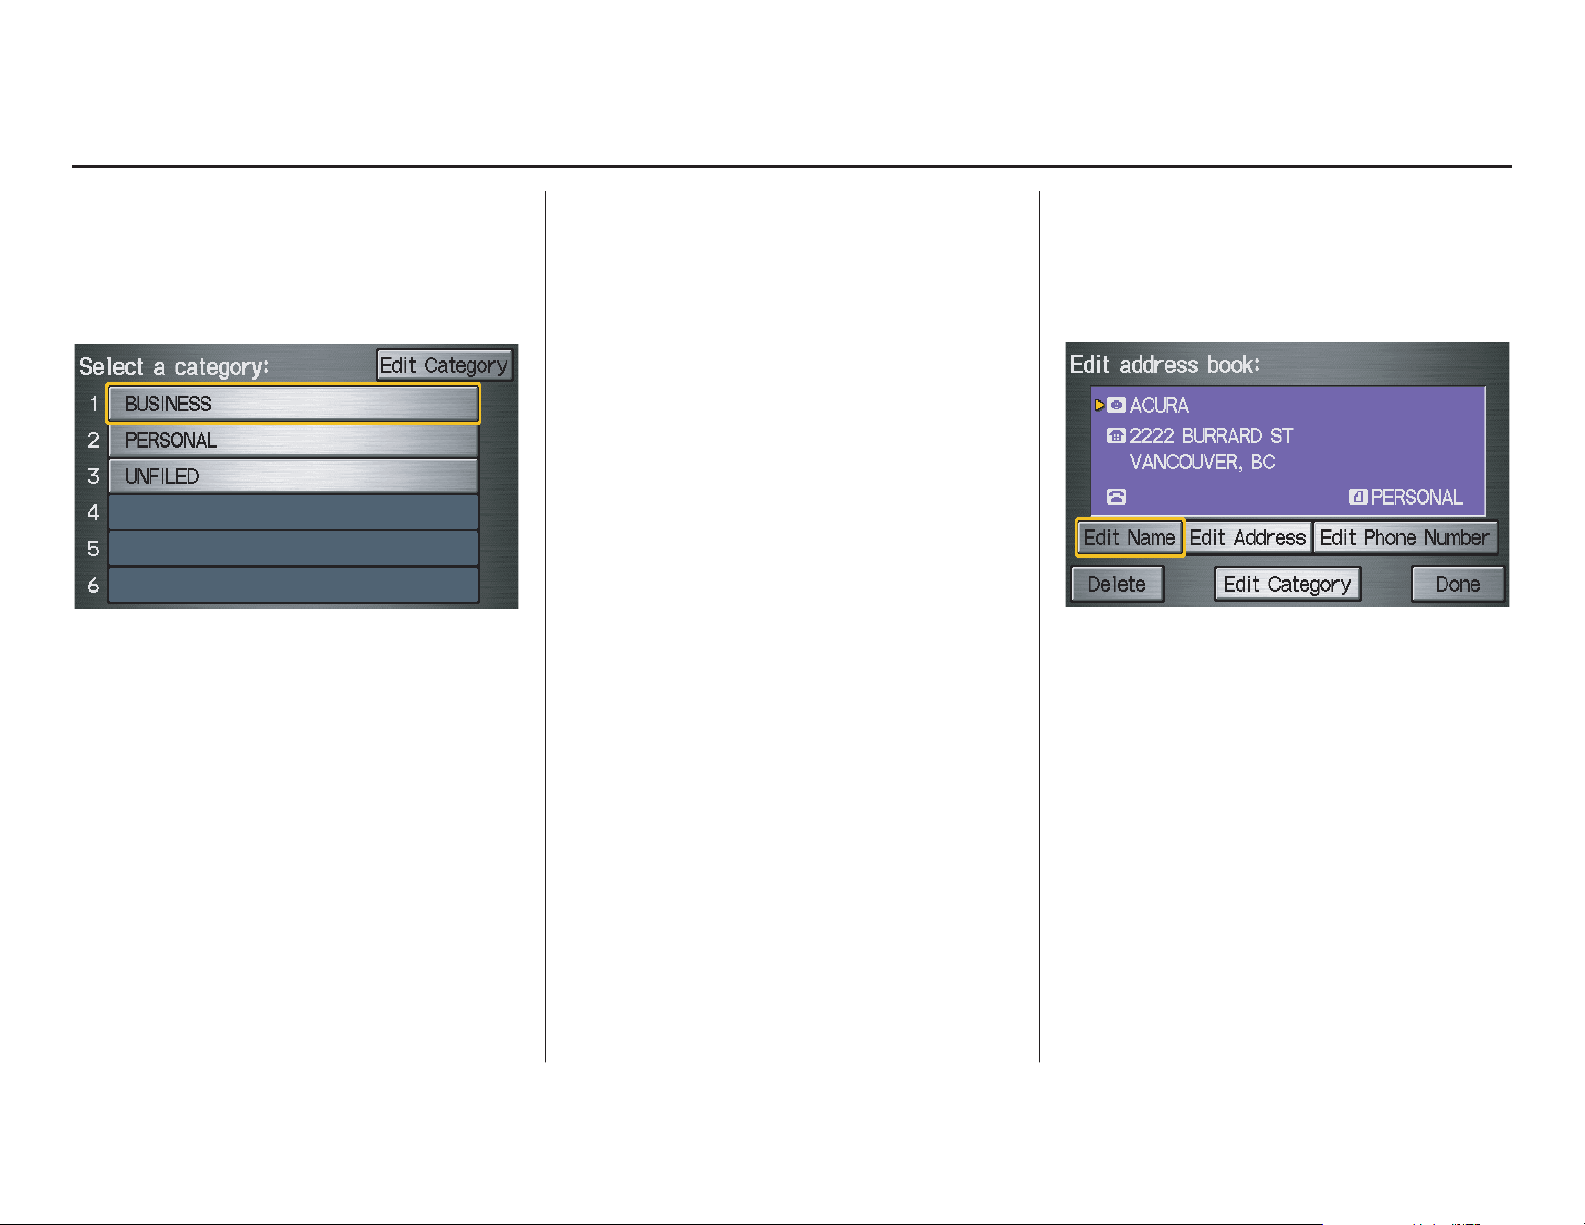
System Setup
Index
Table of Contents
Edit Category
If desired, you can specify the category
of the address. Say or select Edit
Category to display the Select a
category screen.
Scroll the screen and select a category
by saying the number next to your
choice, or by touching the item.
If you wish to set, add, or edit a new
category, select Edit Category in the
upper right corner on the screen. The
system will show the Select a
category to edit screen. Follow the onscreen prompts to add, change, or delete
a category.
If you delete a category that was used to
categorize addresses, the category for
those addresses becomes “UNFILED.”
NOTE:
You may have up to 100 categories.
These are shared between User 1 and
User 2.
The system will then display everything
that you have entered. If all the
information is correct, say or select
Done. This will return you to the
Address Book list.
If you want to enter another address,
select New Address in the upper right
corner on the screen, then repeat the
procedures above. If not, press the
CANCEL button.
Edit/Delete an Address
This feature allows you to select an
address to edit or delete. Once an
address is selected, choose the
appropriate function.
Navigation System 79
Page 80
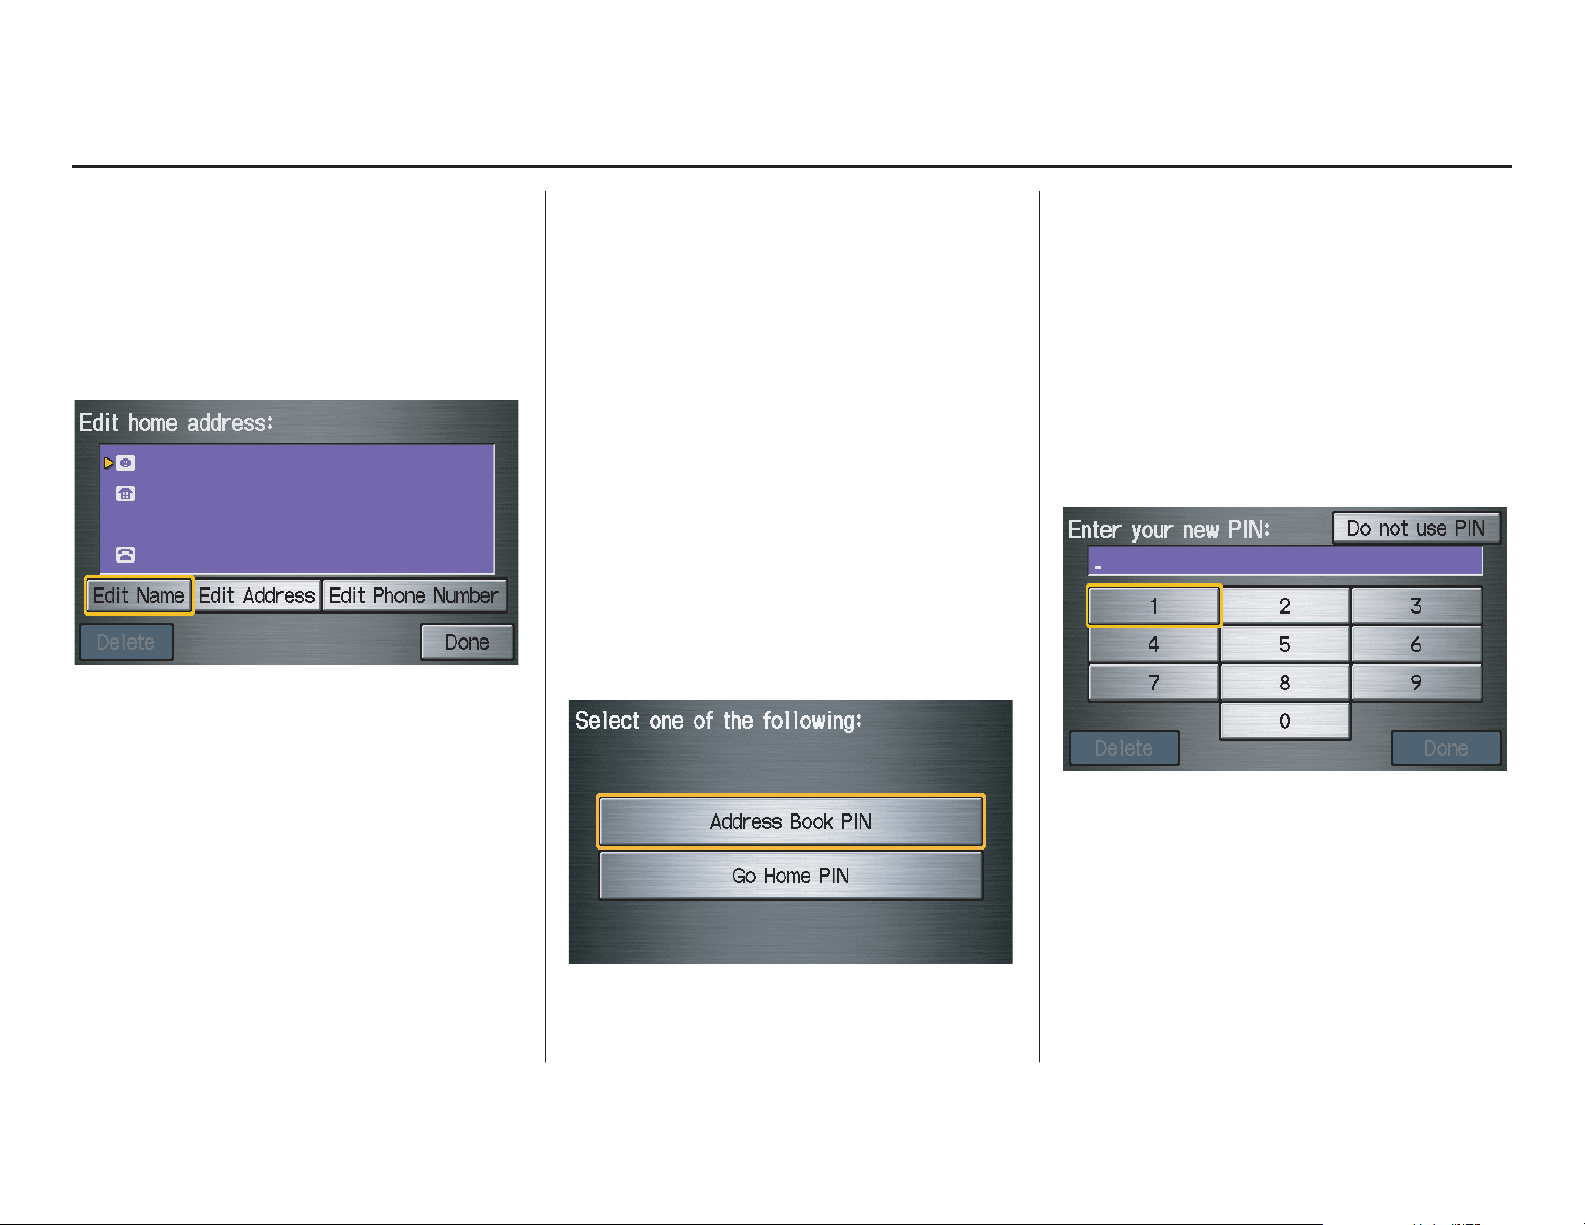
System Setup
Index
Table of Contents
Home Address
This feature lets you return “Home”
from any location simply by saying “Go
home” at the map screen. Alternatively,
you can select Go Home on the Enter
destination by screen (see By Go Home
on page 43).
Enter the name, address, and phone
number in the same way as entering a
personal address, then say or select
Done. To leave the screen, press the
CANCEL button.
NOTE:
If your Home address cannot be found
in the system, while located on the street
close to your home, select “Current
Position” when entering the “Edit
Address” field.
PIN Number
You can set a four-digit PIN (Personal
Identification Number) for accessing
and changing personal addresses and
your home address if desired. Once you
set the PIN on this screen, the system
asks you to enter the PIN when you
access a personal address or your home
address.
NOTE:
PINs are optional. If you choose to use a
PIN, make sure you remember it. If you
forget your PIN, the dealer will have to
reset it for you.
When you select PIN Number, the
display changes to:
Address Book PIN
If you choose to enter a PIN for the
personal Address Book, you will have to
enter it any time you edit your Address
Book (see page 76) or select Address
Book on the Enter destination by
screen (see page 42).
1. Select Address Book PIN.
2. Select either User 1 or User 2. The
display changes to:
3. Enter your four-digit PIN and select
Done. If you do not wish to use a
PIN, select Do not use PIN.
NOTE:
The factory default is no PIN.
80 Navigation System
Page 81

System Setup
Index
Table of Contents
4. If you have entered the PIN correctly,
the display changes to the Please re-
enter new PIN screen. Enter the
same number, then touch Done to
validate the number you have
selected.
5. If you have entered the same number
both times, the display returns to the
Edit personal information screen. If
not, “incorrect PIN” appears in the
upper right corner of the screen. Enter
your PIN again.
NOTE:
If you wish to remove your PIN, return
to the same screen and, after entering
your PIN, touch the Do not use PIN
button.
Go Home PIN
1. Select Go Home PIN, and the
system displays the Enter your new
PIN screen.
2. Enter your PIN in the same way as
entering the Address Book PIN.
NOTE:
The factory default is no PIN. If you
choose to use a PIN, you will have to
enter it whenever you say “Go Home”
at the map screen or select Go Home
on the Enter destination by screen.
User Name
You can change User 1 and User 2 to
a desired name. Choose either User 1 or
User 2 on the Select the user name to
edit screen. Enter the name, and say or
select Done to leave the screen.
Previous Destinations
Allows you to delete some or all of your
previous destinations.
1. Select this option, and the display
changes to:
2. Scroll through the list and find the
address you want to delete.
3. Select the address to delete by saying
the line number, using the joystick, or
touching it on the screen.
NOTE:
To cancel the deletion of Previous
Destinations, press the CANCEL
button before performing step 4.
Navigation System 81
Page 82
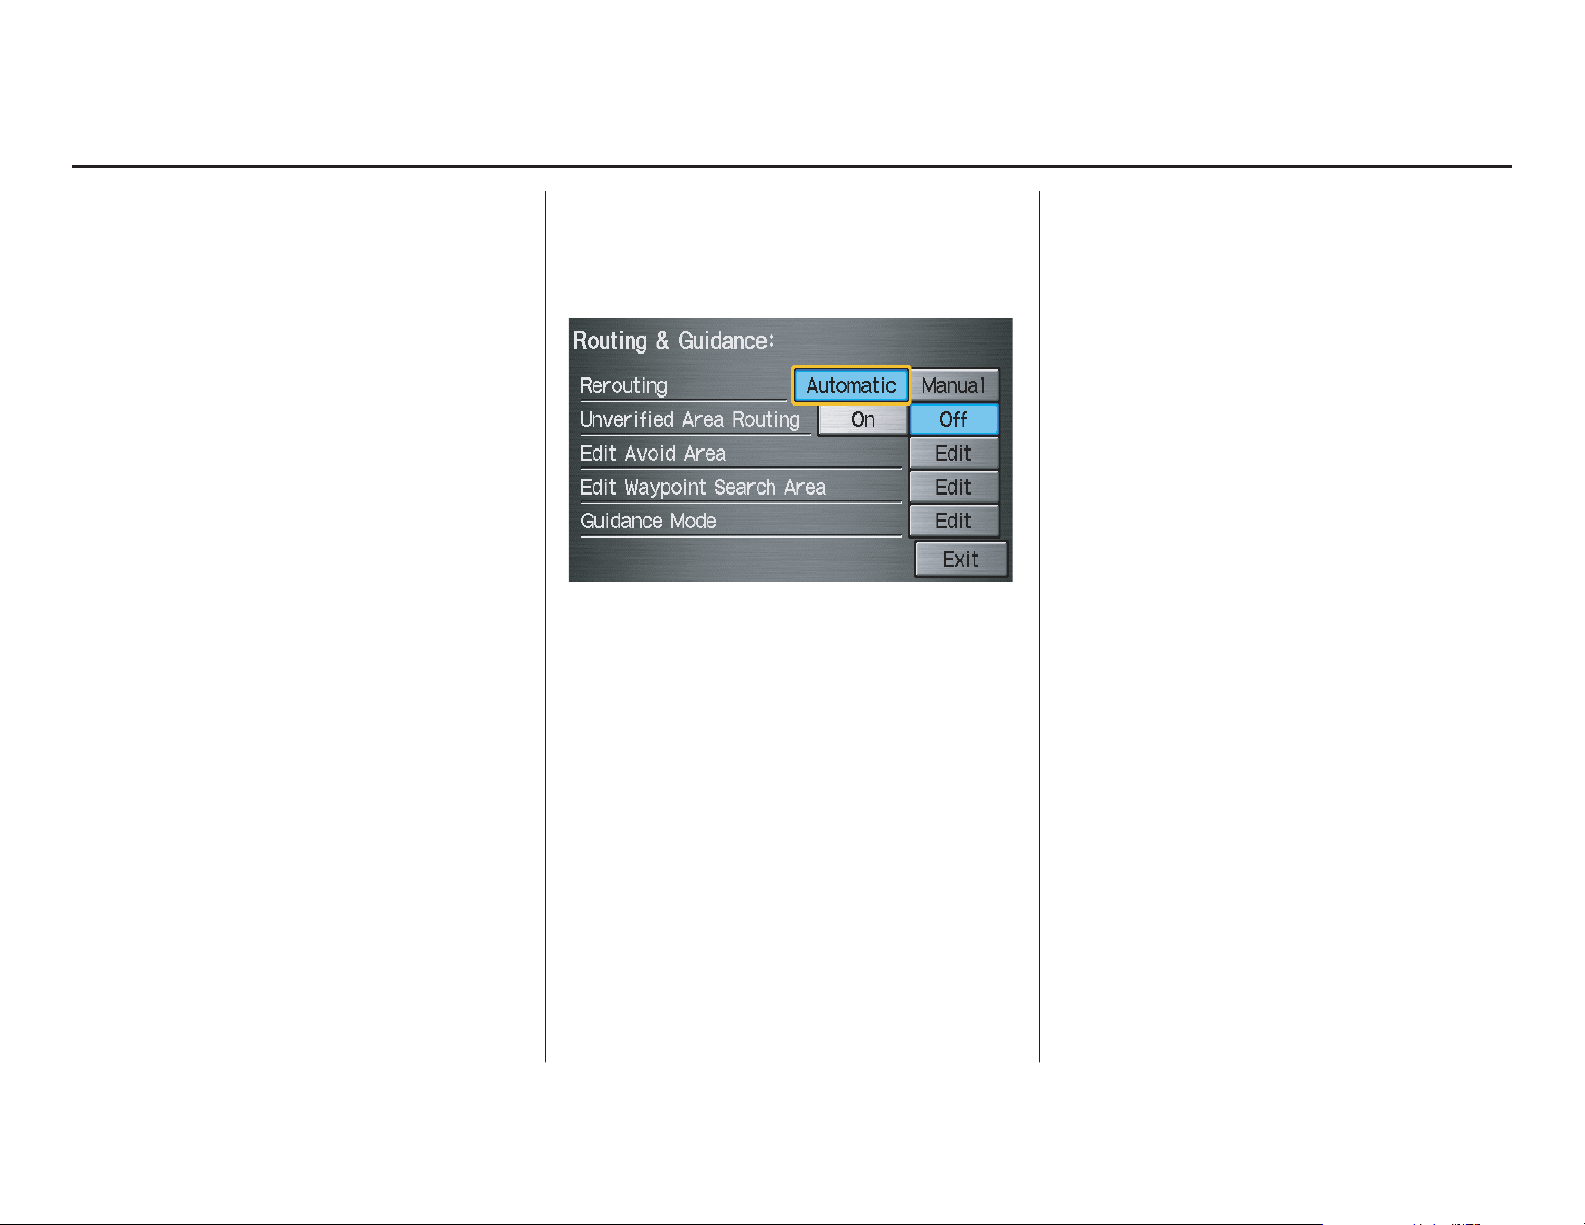
System Setup
Index
Table of Contents
4. Say or select Done to perform the
deletion, and the display returns to
the previous screen.
Tip:
You can delete all addresses by
selecting Delete All.
Routing & Guidance
From the Setup screen (second), say or
select Routing & Guidance and the
following screen appears:
Rerouting
If Rerouting is set to Automatic and
you deviate from the route, you will see
“Recalculating...” at the top of the
screen for several seconds as the system
calculates a new route. This is followed
by new routing instructions.
If Rerouting is set to Manual, you
will hear a tone when the “Off route”
message is displayed. Say “Recalculate”
or select Recalculation on the screen
to make the system recalculate your new
route.
NOTE:
• If you live in an area with poor
mapping, you may wish to set
Rerouting to Manual to avoid
constant recalculation. However, you
will have to manually select
Recalculation on the screen to have
the system plot a new route.
• It is strongly recommended that you
leave the system set to the factory
default (Automatic).
82 Navigation System
Page 83

System Setup
Index
Table of Contents
Unverified Area Routing
Allows you to receive turn-by-turn map and voice guidance in unverified areas when en route to a destination (see Map Overview
on page 6). The chart below illustrates the routing differences with this setting On or Off.
Unverified Area Routing: Off (factory default) Unverified Area Routing: On
Decision:
Why choose
On or Off?
What you will
see…
Cautionary
messages
Guidance
(map/voice)
Directions list A direction list is typically not available. However,
The driver wishes to navigate manually by using the
navigation map and choosing the streets that lead to
the destination. The driver understands that unverified
roads may not be accurate, and can contain errors in
location, naming, and address range.
A blue dotted vector line is displayed on the map that
continually points to your destination. The driver
should stop and then use the map to select streets that
lead to the destination.
There are cautionary pop-up screens and voice
announcements, before and during the route. These
serve as reminders that you should obey all traffic
restrictions.
There is no turn-by-turn map or voice guidance. Voice guidance commands end with the words “if possible.” This
depending on your route, directions are provided to
help you reach the first available verified road.
The driver chooses to let the navigation system suggest possible
routing. The driver understands that in some cases, guidance may
not be appropriate. Unverified roads may not be accurate, and can
contain errors in location, naming, and address range.
A blue-pink dashed route line highlights suggested unverified
streets on the map while travelling to your destination. This is in
sharp contrast to the normal blue route line displayed in verified
areas.
There are cautionary pop-up screens and voice announcements,
before and during the route. These serve as reminders that you
should exercise additional caution, and obey all traffic
restrictions.
is to remind the driver to verify all traffic restrictions before
making a manoeuvre.
A direction list is provided showing street names and turn
symbols in pink.
Navigation System 83
Page 84

System Setup
Index
Table of Contents
Unverified Area Routing
When driving to your destination, you
have the choice of using or not using
“unverified” roads. You make this
choice in the Setup screen (second).
The next few pages contain an example
of a route to a destination in an
unverified area explaining the routing
differences found in unverified areas.
Note that the “Unverified” roads are
displayed only on the U.S. areas.
With Unverified Area Routing Off,
the system tries to use verified roads
whenever possible. In this example,
since only verified streets are used, it
created a longer route than necessary.
With Unverified Area Routing On,
the route is shorter, but consists of
unverified (light coloured) streets that
may not be accurate. Because the streets
are unverified, there may be errors in
street location, name, or address range.
Additional caution is recommended in
these areas. Always obey posted traffic
restrictions.
Because both routes bypass or use
unverified streets, an initial Disclaimer
screen is provided. It is recommended
that you stop and review the map.
Unverified Area Routing “Off”
Unverified Area Routing “On”
NOTE:
Unverified roads are shown only when
viewing the map in the 80, 200, and 400
metre map scales, or the 1/20, 1/8, and
1/4 mile map scales.
84 Navigation System
Page 85

System Setup
Index
Table of Contents
With Unverified Area Routing Off,
the moment you enter an unverified
street a caution box appears on the
screen, and is read by the voice. This
lets you know that you are about to enter
an unverified area and that you will be
following a dotted “vector line” that
points to your destination.
With Unverified Area Routing On,
a caution box appears on the screen and
is read by the voice. In this case, you
will be presented with a dashed blue/
pink line instead of the regular blue
route line. This is your signal to pay
attention to posted traffic restrictions.
You cannot assume that all guidance is
appropriate.
In both cases, when you actually enter
the unverified street, a short caution will
remind you. You will see and hear this
short caution message whenever you
enter unverified areas.
Unverified Area Routing “Off” Unverified Area Routing “On”
Navigation System 85
Page 86
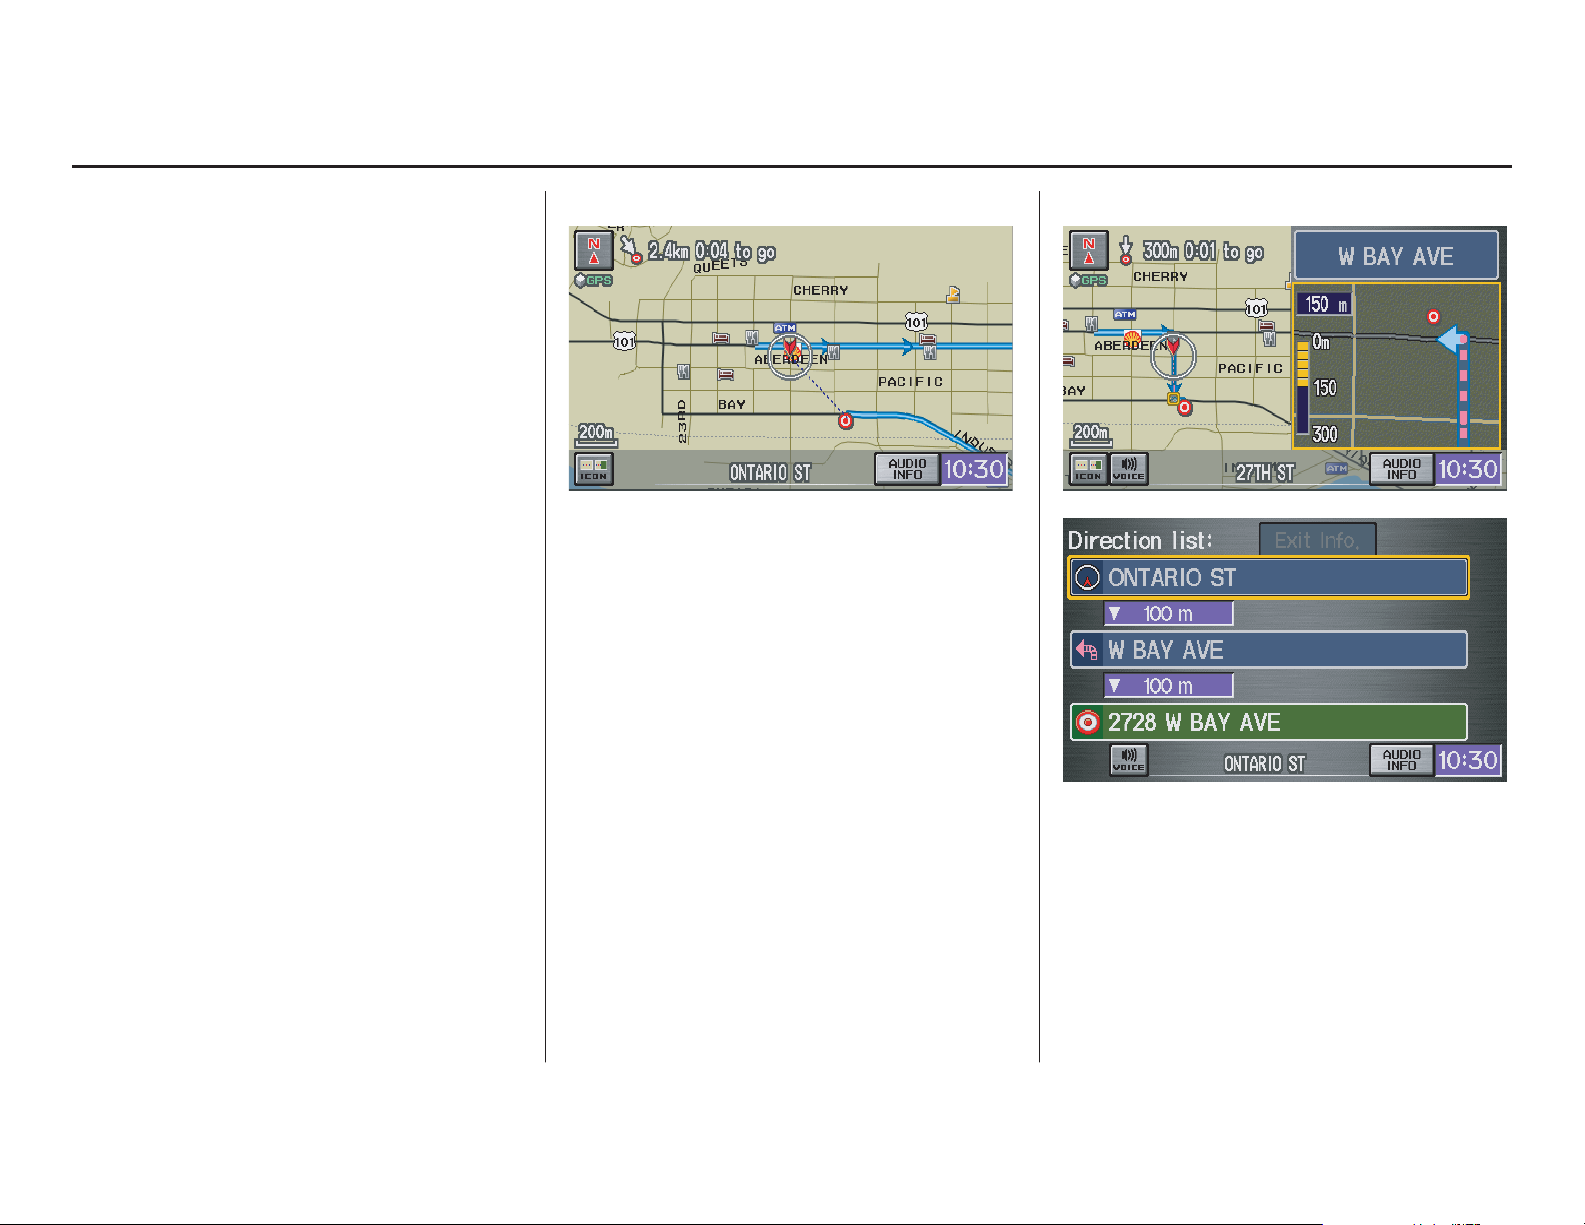
System Setup
Index
Table of Contents
With Unverified Area Routing Off,
you are presented with a blue “vector
line” that always points to the
destination. You must manually choose
streets from the map that will lead to
your destination. No guidance is
provided, and there are no directions to
the destination.
With Unverified Area Routing On,
a blue/pink route line is shown for
unverified segments. Voice guidance
commands in unverified areas always
end with “if possible.” This is your
signal that you should use additional
caution, and obey all traffic restrictions.
The manoeuvre window “arrow” shows
any portions of unverified turns in blue/
pink dashes.
These guidance manoeuvres are only a
suggestion. You should always confirm
that the manoeuvre is possible. A
direction list is also provided that shows
any unverified roads in a blue colour,
with pink arrows pointing to the next
manoeuvre.
Unverified Area Routing “Off”
NOTE:
There is no VOICE button shown on the
screen. With Unverified Area Routing
“Off,” no Direction List is provided.
Unverified Area Routing “On”
86 Navigation System
Page 87
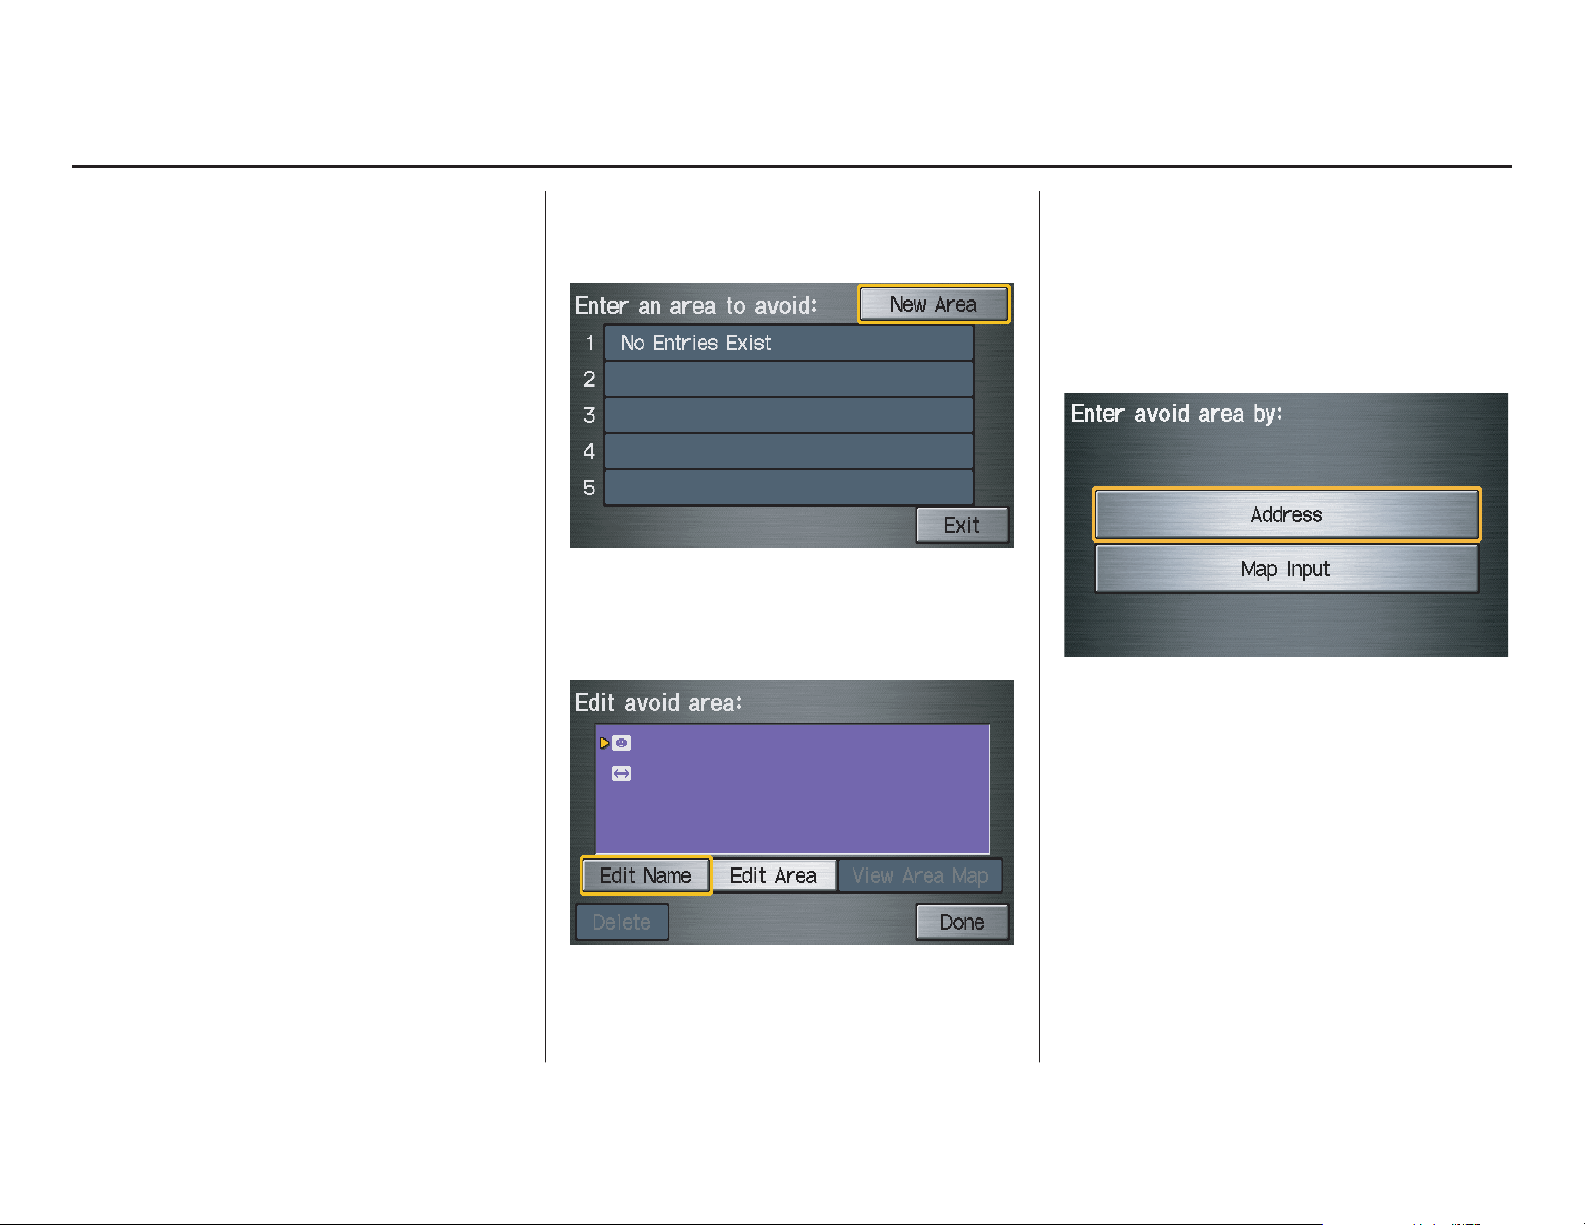
System Setup
Index
Table of Contents
Edit Avoid Area
This function allows you to select areas
you wish to avoid when calculating a
route to your destination. You can select
up to five areas to avoid. You may wish
to set up an “avoid area” to route around
long-term road construction, closures,
or any area you wish to avoid. If you
enter a route that takes you through or
into an “avoid area,” a pop-up box will
warn you that your route takes you into
one of these areas. However, you can
still choose destinations in an avoided
area.
When you select Edit for the setup item
“Edit Avoid Area,” the following list
screen is displayed:
You can select New Area or select (by
touch) one of your existing areas to
modify. If you choose New Area, the
following screen is displayed:
Say or select Edit Name, and use the
keyboard to enter the name on the Enter
avoid area name screen (19 characters
max). Say or select Done to return to
the previous screen. Say or select Edit
Area to create the area to be avoided.
The following screen appears:
Navigation System 87
Page 88
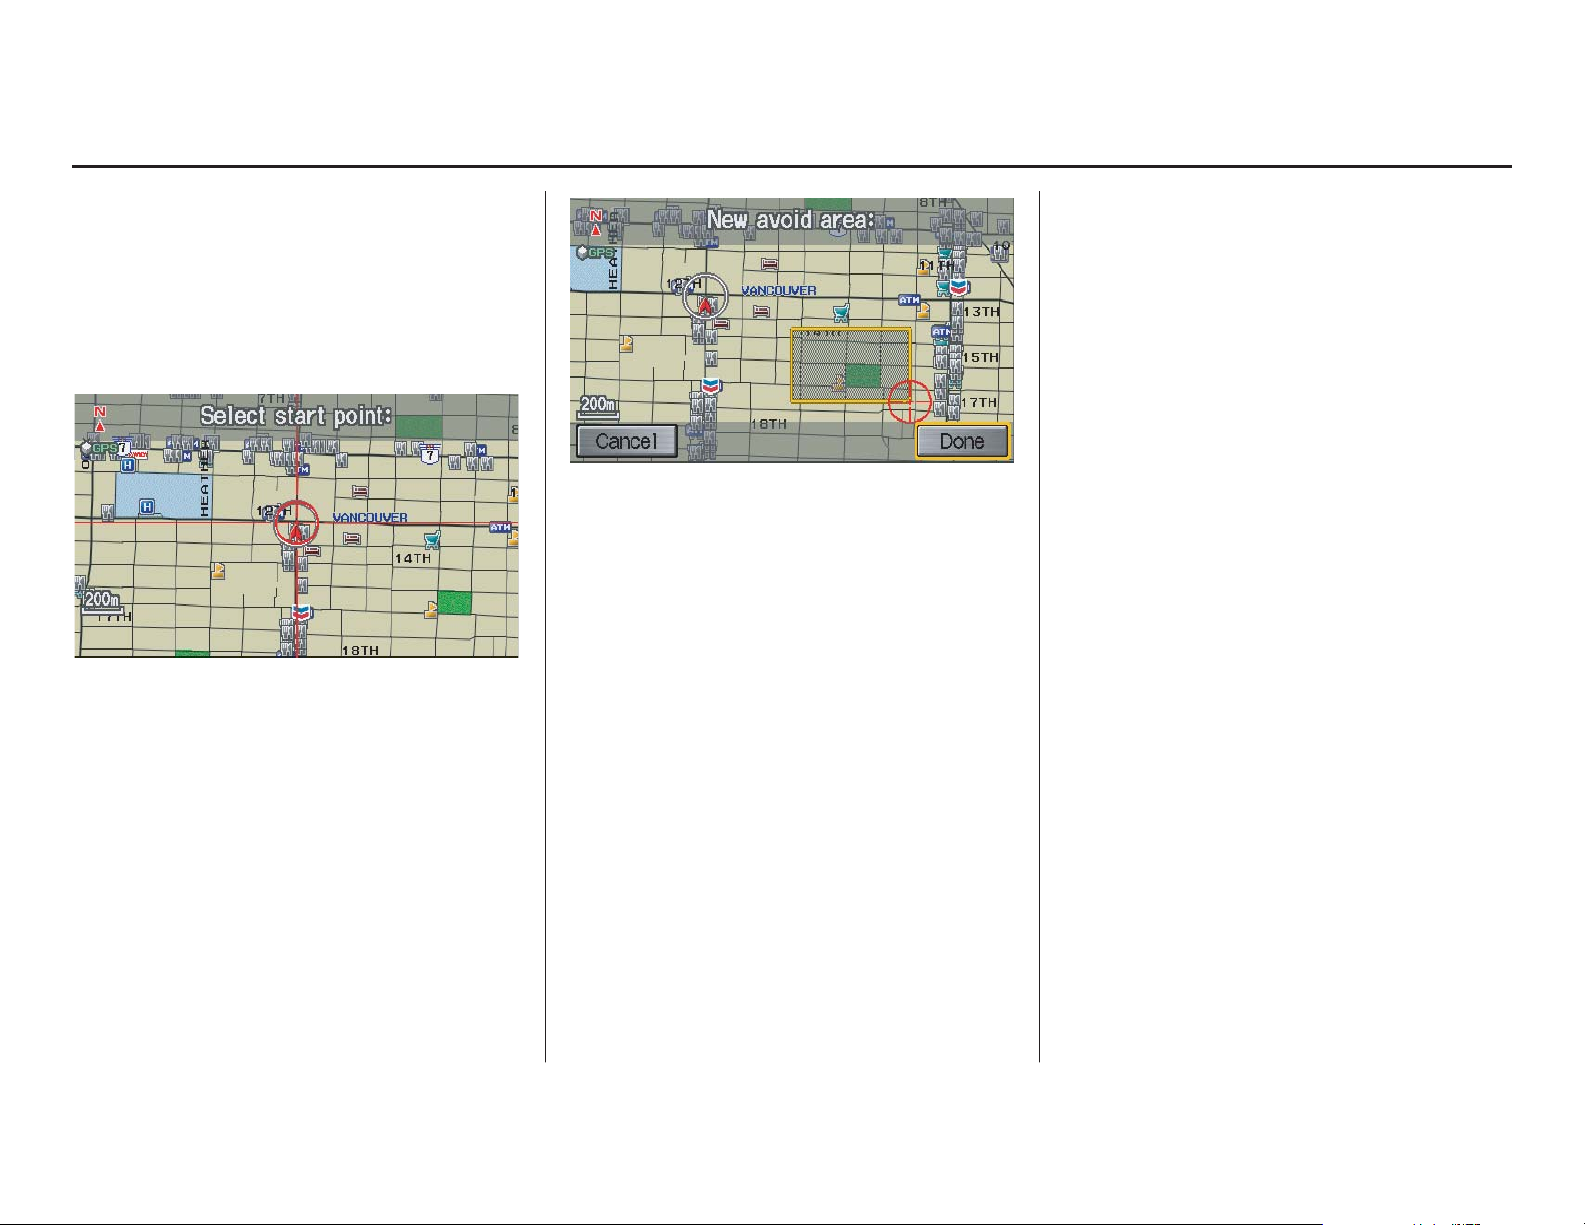
System Setup
Index
Table of Contents
Either select Address or Map Input
on the Enter avoid area by screen.
Each choice provides a slightly different
way to locate the approximate map
display for drawing the area you wish to
avoid. After selecting the choice, a map
screen will be displayed.
Use the ZOOM buttons to select the
map scale (available scales are 80, 200,
and 400 metre scales). Use the joystick
to move the crosshairs (red circle) to the
desired start point and push in the
joystick to “set” the start point. Then
move the joystick in a straight or
diagonal direction to encompass the
area to be avoided.
NOTE:
The maximum size of the “Avoid area”
is 1/4 of the navigation display screen
regardless of the map scale setting.
The selected area will be displayed as a
shaded box with a yellow border. Push
in on the joystick to set the end point of
the avoided area. To “redraw” the area,
touch Cancel and repeat the area
selection process. If your selected area
contains a highway, the system will
prompt you with a pop-up box saying
“Do you want to avoid highways?”
Answering “No” allows you to enter a
route through an avoided area on a
highway and skip the “Avoid area
caution box” (see Pop-Ups and
Disclaimers on page 62).
Say or select Done to return to the Edit
area screen. When you return, the
“Vicinity” field is automatically filled in
by the system. Re-edit the area “Name”
if desired. Select Done on the Edit
avoid area screen to finish editing.
Your new avoided area will now appear
on the “Avoid area” list and be viewable
on the map screen.
88 Navigation System
Page 89

System Setup
Index
Table of Contents
NOTE:
• You can select areas to avoid,
however you cannot select roads or
areas that you want the system to use
for routing.
• If you are drawing a box around a
road as an area to avoid, ensure the
following: When you draw the box,
make sure that the road or portion of
a road that you encircled includes an
intersection. For instance, in the
example below, highway 213 will be
avoided, but Van Ness will not be
avoided because it lacks an
intersection in the enclosed box.
Edit Waypoint Search Area
When driving en route to your
destination, you can select a temporary
destination waypoint (marked with a
small flag on the map) along your route
for gas, a restaurant, or other POI. When
you resume your trip from the waypoint,
the system continues the trip to your
original destination. To use this feature,
see Waypoints on page 63.
This Setup item allows you to select the
distance from your highlighted route
line (on either side of your route) that
the system will search for a waypoint.
From the Routing & Guidance screen,
select Edit for “Edit Waypoint Search
Area,” and then choose the desired
search distance for either “On
Highways” or “On Surface Street.”
The diagram below shows how the
system handles the search for “Places
Along the Route” or “Places Around the
Destination” (see Waypoints on
page 63).
Navigation System 89
Page 90

System Setup
Index
Table of Contents
For “Places Along the Route,” the
system looks in front of you within a
corridor width specified by your values
for “On Highways” or “On Surface
Street.” The system checks the
upcoming area, based on your input.
For “Places Around the Destination,”
the system searches outwards in a spiral
from the destination. In this case,
specific search values are not needed;
the matches are displayed in order of
distance from destination.
NOTE:
These settings do not affect the search
range used for the voice commands like
“Find nearest gas station” that are also
available when viewing the map screen.
Guidance Mode
Allows you to select the guidance
display mode: Single Screen or Split
Screen.
To get to Guidance Mode from the
Setup screen, select in sequence
“More,” “Routing & Guidance,” and
“Guidance Mode.”
The factory default is Single Screen.
NOTE:
The Guidance Mode can also be
selected on the Icon Selection screen.
See Showing Icons on the Map on
page 58.
Vehicle
From the Setup screen (second), say or
select Vehicle and the following screen
appears:
Off-road Tracking
With this On, the system will provide
white off-road tracking dots
(“breadcrumbs”) on the map screen
whenever you drive into an area where
the map does not show any roads.
See Map Screen Legend on page 19.
90 Navigation System
Page 91

System Setup
Index
Table of Contents
After you have travelled approximately
800 metres away from a mapped road,
the system will display a series of white
dots on the map screen to show the path
you have travelled. This is provided so
you can follow the dots to backtrack to
the mapped road you originally left.
Tracking continues until you reach a
mapped road. See Off-road Tracking on
page 60.
Tracking is shown only in the 80, 200,
400, and 800 metre scales, or the 1/20,
1/8, 1/4, and 1/2 mile scales. Use the
ZOOM buttons to change the scales if
necessary.
NOTE:
To clear existing dots, turn this feature
off and exit Setup. To re-enable this
feature, return to Setup and turn it on
again.
Correct Vehicle Position
The system relies on satellites for
positioning information. Buildings,
tunnels, and other objects can block or
reflect these signals, requiring the
system to use “dead reckoning” to
determine your location and direction.
This can sometimes lead to small errors
in positioning, such as showing you on
an adjacent street.
NOTE:
Using this function to adjust vehicle
position is not recommended. When the
system acquires a GPS signal, it will
automatically place the vehicle in the
correct location.
If you choose to do this, follow these
steps:
1. Stop the vehicle.
2. Select Adjust, and the system will
display a map adjustment screen.
3. Use the ZOOM buttons and the
joystick to move the location
arrowhead to the correct location.
Touch the arrow buttons on the
bottom of the screen to rotate the
direction arrows so the vehicle
position is pointing in the correct
direction.
NOTE:
If you continually have to do this, there
are either problems in the database or
GPS reception problems. See
Accessories Precautions on page 5.
4. When you have finished, press the
joystick or select Done to return to
the previous screen.
5. As you drive, the current road will be
displayed at the bottom of the screen.
Navigation System 91
Page 92
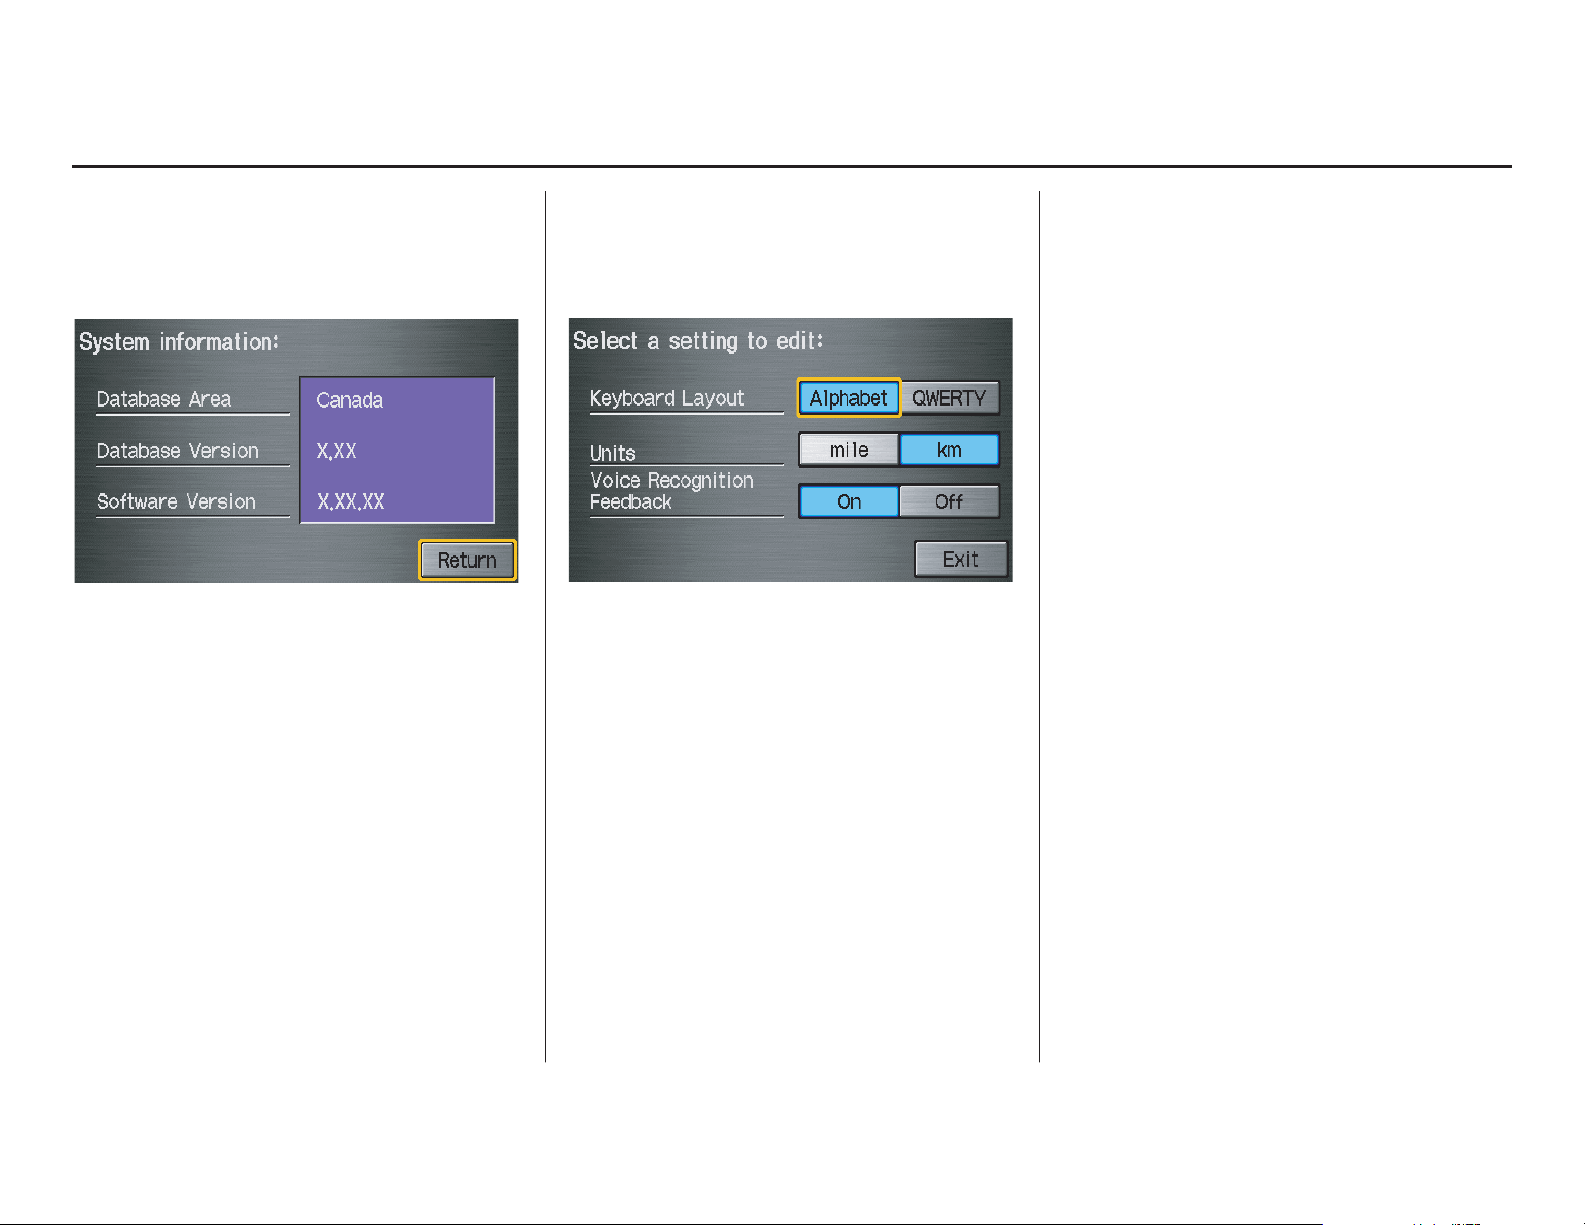
System Setup
Index
Table of Contents
System Information
From the Setup screen (second), say or
select System Information and the
following screen appears:
This information is for dealer use only.
For ordering updates, use the version
number stamped on the label (as Ver. X.
XX) of the navigation DVD. See
Obtaining a Navigation Update DVD on
page 103.
When finished, say or select Return to
return to the previous screen.
Basic Settings
From the Setup screen (second), say or
select Basic Settings and the
following screen appears:
Keyboard Layout
Allows you to select the displayed
keypad screen: Alphabet or
QWERTY.
Units (km or mile)
Allows you to select the units for the
entire system (km or mile).
Voice Recognition Feedback
Allows you to turn voice control system
prompts On or Off. When Off, you will
not hear the voice control system
confirmations or prompts.
92 Navigation System
Page 93

System Setup
Index
Table of Contents
Clock Settings
From the Setup screen (second), say or
select Clock Settings and the
following screen appears:
Clock Adjustment
When you select Clock Adjustment,
the following screen appears:
This screen allows you to set or adjust
the following:
• Auto Daylight Saving Time
(Default = On)
• Auto Time Zone by GPS
(Default = On)
• DST (Daylight Saving Time)
Selection (change DST schedule)
• Time Adjustment (adjust your clock)
• Reset button (resets this screen’s
settings to factory defaults)
Auto Daylight Saving Time
Sets automatic daylight saving time On
or Off. If set to On, the clock will
automatically “spring ahead” or “fall
back” by one hour when a daylight
saving time change occurs. If you reside
in a province or area where daylight
saving time is not used, then you may
want to turn this feature off.
Auto Time Zone by GPS
Sets automatic time zone selection by
GPS to On or Off. If you are driving
across the country and passing through
time zones, then this feature will
automatically set the time to the time
zone you are travelling through.
However, if you live and work in two
different time zones, you may want to
turn this feature off.
NOTE:
When driving near a time zone
boundary, the displayed time zone may
fluctuate between the two zone times.
NOTE:
If you set Auto Daylight Saving Time to
On
, the daylight saving time function is
activated even in an area that does not
use daylight saving time.
Navigation System 93
Page 94

System Setup
Index
Table of Contents
Daylight Saving Time (DST)
Selection (Change DST Schedule)
This option lets you select the schedule
(April-October or March-
November) when daylight saving time
will automatically occur in your
navigation system. The system default is
the March-November schedule.
Time Adjustment
Adjusts the current time in hours and
minutes. You can reset the adjustment
by selecting Reset. Selecting Done
returns you to the previous screen.
NOTE:
Selecting Reset also clears any
changes you made to “Auto Daylight
Saving,” “Auto Time Zone,” or “DST
Selection” settings. Depending on your
location, you may need to adjust these
settings.
Clock Type
Allows you to choose the design of the
clock screen. For more informaion, see
Clock Type on page 75.
Colour
From the Setup screen (second), say or
select Colour and the following screen
appears:
Navigation System
94
Page 95

System Setup
Index
Table of Contents
Map Colour
Allows you to choose the map colour
from one of four colours for the Day
and Night modes.
Say or select Return to return to the
previous screen.
NOTE:
• Choose White (factory default is
Beige) as the Day colour to obtain
the best daytime display contrast.
• Choose Black (factory default) as
the Night colour to obtain the best
nighttime display contrast.
Menu Colour
Allows you to choose the menu colour
from one of five colours for the Base
and Window.
Say or select Return to return to the
previous screen.
NOTE:
• Choose Black (factory default) as
the Base colour to obtain the best
display contrast.
• Choose White (factory default) as
the Window colour to obtain the
best display contrast.
Language
Allows you to select the operating
language: French or English.
\
When you select the language to be
changed, a confirmation box will pop
up. Select Oui or OK to perform
changing the operating language, and
the system will restart with the specified
operating language.
Navigation System 95
Page 96

System Initialization
Index
Table of Contents
System Initialization
If for any reason you lose power to the
navigation system (e.g., the battery was
disconnected), the navigation system
will require initialization. Once
completed, your system will be ready to
use.
This initialization requires the
following:
• Entry of the 4-digit anti-theft security
code.
• GPS initialization (may not be needed
depending on the length of time the
system was without power).
• Map matching to align the GPS
coordinates to a place on the map
(displays current street at the bottom
of the map).
Entering the Security Code
If the battery goes dead or is
disconnected for any reason, you will
have to enter a security code for both the
audio system and the navigation system
before you can use it again.
When you purchased the vehicle, you
should have received two cards
containing the audio and navigation
system’s security codes and serial
numbers. Keep these cards in a safe
place in case you need the codes. If you
lose the cards, you must obtain the
security codes from your dealer.
Enter the four-digit security code, then
select Done. If you have entered it
correctly, the display changes to the
Disclaimer screen. If you make a
mistake, the system will display
“incorrect PIN.” Re-enter your 4-digit
security code. You have 10 chances to
enter the correct code. If all 10 are
incorrect, turn the ignition to OFF, then
back to ON (II) to have 10 more chances
to enter the correct code.
NOTE:
The anti-theft security code is unrelated
to your optional navigation system PIN
(for Personal Address Book or Home
Address).
96 Navigation System
Page 97

System Initialization
Index
Table of Contents
GPS Initialization
Depending on the length of time the
battery was disconnected, your system
may require GPS initialization. If it
does, the following screen appears:
The navigation system lost power and is acquiring its
location from the GPS satellites. This usually takes
less than 10 minutes.
* Start the engine.
* Park the vehicle in an open area away from trees,
power lines, and tall buildings.
* Remove loose articles, cell phones, or electrical
accessories located near the GPS antenna.
* If this screen is displayed repeatedly when starting
the vehicle, see your dealer.
If this procedure is not necessary, the
system proceeds directly to the
Disclaimer screen (see page 16).
During initialization, the system
searches for all available GPS satellites
and obtains their orbital information.
During this procedure, the vehicle
should be out in the open with a clear
view of the sky.
If the navigation system finds the
satellites properly, this box clears and
the Disclaimer screen is shown. If
within 10 minutes the system fails to
locate a sufficient number of satellites to
locate your position, the following
screen appears:
Something is interfering with the system’s ability to
acquire its location. Check the following:
* The vehicle must be in an open area with a clear
view of the sky.
* Remove sources of GPS interference like metallic
window tint above antenna, or electrical items
near antenna (see owner's manual for details).
* Check GPS antenna cable connection.
* Restart the engine and repeat the GPS acquire
procedure. If the problem persists, see your dealer.
If the system is still unable to acquire a
signal, follow the instructions on the
screen, or contact your local dealer for
assistance.
NOTE:
The average acquiring time is less than
10 minutes, but it can take as long as 45
minutes.
Map Matching
This part of the initialization matches
the GPS coordinates found above with a
road on the map screen. To perform this
part of the procedure, ensure that the
navigation system is displaying a map,
and drive the vehicle on a mapped road
(a road shown on the map screen). Do
not enter a destination at this time.
When the name of the current road you
are driving on appears at the bottom of
the screen, the entire procedure is
complete. Your system is now ready to
use.
Navigation System 97
Page 98

System Limitations
Index
Table of Contents
Although your navigation system is one
of the most highly sophisticated pieces
of equipment you will find in a modern
automobile, you may find during its use
that it has certain limitations.
The system uses GPS signals to aid in
determining its current location. The
GPS is operated by the U.S.
Department of Defense. For security
reasons, there are certain inaccuracies
built into the GPS that the navigation
system must constantly compensate for.
This can cause occasional positioning
errors of up to tens of metres.
For example, in urban areas where
streets are close together, this could
cause the system to show that you are
travelling on a street that parallels the
street you are actually on. The system
will, under most circumstances, correct
itself while you drive.
Depending on your current view of the
sky and the position of the satellites, the
elevation may be shown incorrectly.
You may also notice some delay of the
vehicle position icon at intersections;
this is normal.
GPS Reception Issues
The signals received from the GPS
satellites are extremely weak (less than
a millionth of the strength of a local FM
station) and require an unobstructed
view of sky. The signal can easily be
interrupted or interfered with by the
following:
• Aftermarket metallic window tint
above or to the sides of the GPS
antenna (located under the
dashboard)
• Cell phones, PDAs, or other
electronic devices docked in a cradle
or lying loose on the dashboard
• Radar detectors mounted on the
dashboard
• Remote starters, or “hidden” vehicle
tracking systems mounted near the
navigation unit
• Other aftermarket audio electronic
devices mounted near the navigation
unit
• Trees, tall buildings, highway
overpasses, tunnels, or overhead
electrical power wires
Although the system will direct you to
your desired destination, it may not
always generate what you consider to be
the most direct route. Try changing the
method of routing. See Changing the
Routing Method on page 46. You may
also have Unverified Area Routing set
to OFF. See Unverified Area Routing on
page 83.
Additionally, the mapping database
contains verified and unverified maps.
See Map Overview on page 6. A
Disclaimer screen will warn you if your
route includes unverified streets.
Unverified streets may be missing from
the map, in the wrong location, or have
an incorrect name or address range.
Exercise additional caution when
driving in these unverified areas.
98 Navigation System
Page 99

The destination icon shows the
Index
Table of Contents
approximate location of the destination.
This occurs because a city block can
have as many as 100 possible addresses
(for example, the 1400 block is followed
by the 1500 block). Since most cities
use only a portion of the 100 possible
addresses (for example, in the 1400
block, the addresses may only go up to
1425 before the 1500 block starts), the
address 1425 will be shown a quarter of
the way down the block by the system
instead of at the end of the block where
the destination is actually located.
You may find that the system
occasionally reboots. This is indicated
by the display returning to the globe
screen. A reboot can be caused by a
number of things, such as extreme
temperatures or shock from bumpy
roads. It does not necessarily indicate a
problem that requires service. If this
happens frequently, please see your
dealer.
System Limitations
Navigation System 99
Page 100

Database Limitations
Index
Table of Contents
You will find that some points of
interest (POI) may be missing when you
search the database. This can be caused
if at the time the database was gathered,
the name was misspelled, the place was
improperly categorized, or the POI
change is not yet in the database. This
means you may not find places listed
that you know exist. This is also true for
police agencies and hospitals. In
outlying areas, facilities listed may not
be the closest. Always check with local
information sources if you need law
enforcement or hospital services.
Every effort has been made to verify
that the system’s database was accurate
at the time it was created. However,
businesses do close or relocate and new
businesses start in the old locations. For
this reason, you may occasionally find
inaccurate information when you select
and drive to a point of interest (for
example, a restaurant is now a jewellery
store). The number of these inaccuracies
increases the longer you go without an
update.
The digitized map database reflects
conditions as they existed at various
points in time before production.
Accordingly, your DVD may contain
inaccurate or incomplete data or
information due to the passage of time,
road construction, changing conditions,
or other causes.
Due to ongoing software and database
improvements, navigation disc versions
may change in the middle of a
production year. The version shipped
with your vehicle was the most recent
available at the time of production and
is considered standard equipment for
that vehicle. There is no free program to
retrofit early production vehicles with
the latest disc. For DVD ordering
information, see page 103.
In addition, this database does not
include, analyze, process, consider, or
reflect any of the following categories
of information:
• Neighborhood quality or safety
• Population density
• Availability or proximity of law
enforcement
• Emergency, rescue, medical, or other
assistance
• Construction work, zones, or hazards
• Road and lane closures
• Legal restrictions (such as vehicular
type, weight, load, height, and speed
restrictions)
• Road slope or grade
• Bridge height, width, weight, or other
limits
• Road traffic, safety, or conditions
100 Navigation System
 Loading...