

Page 1

AcuBrite 15-NAV User Guide AcuBrite 15-NAV User Guide
1
ACUBRITE ™ 15-NAV
Sunlight Readable
Marine Certified Monitor
User’s Guide
Edition 1.0
Overview
ACUBRITE ™ 15-NAV, the high-performance, rugged touch monitor, is specially
engineered to su rviv e from t he most de mandin g w orkin g e nvironme nt. Hou sed in a
milled billet aluminu m case, the slim-profile ACUBRITE ™ 15-NAV is light weig ht
and watertight. The front-mounted sunlight readable touch screen makes the
industrial rugged
efficiency and low h eat design guarante e the stability and l ongevity required for
mission critical deployment.
Main Features
monitor vividly and use r-friendly. In addition, the high power
- 1000 nits Sunlight Readable LCD
- Long Life, Low Power Consumption LED Backlight
- Wide Operating Temperature
- Picture In Picture Function
- Advanced Optical Bon ding (AOT)
- High Shock & Vibratio n Resistance
- Resistive Touc h S u pp ort
- IP65 Facial Waterproof
- 9-36V DC Input
Application:
- Marine
Page 2
AcuBrite 15-NAV User Guide AcuBrite 15-NAV User Guide
3
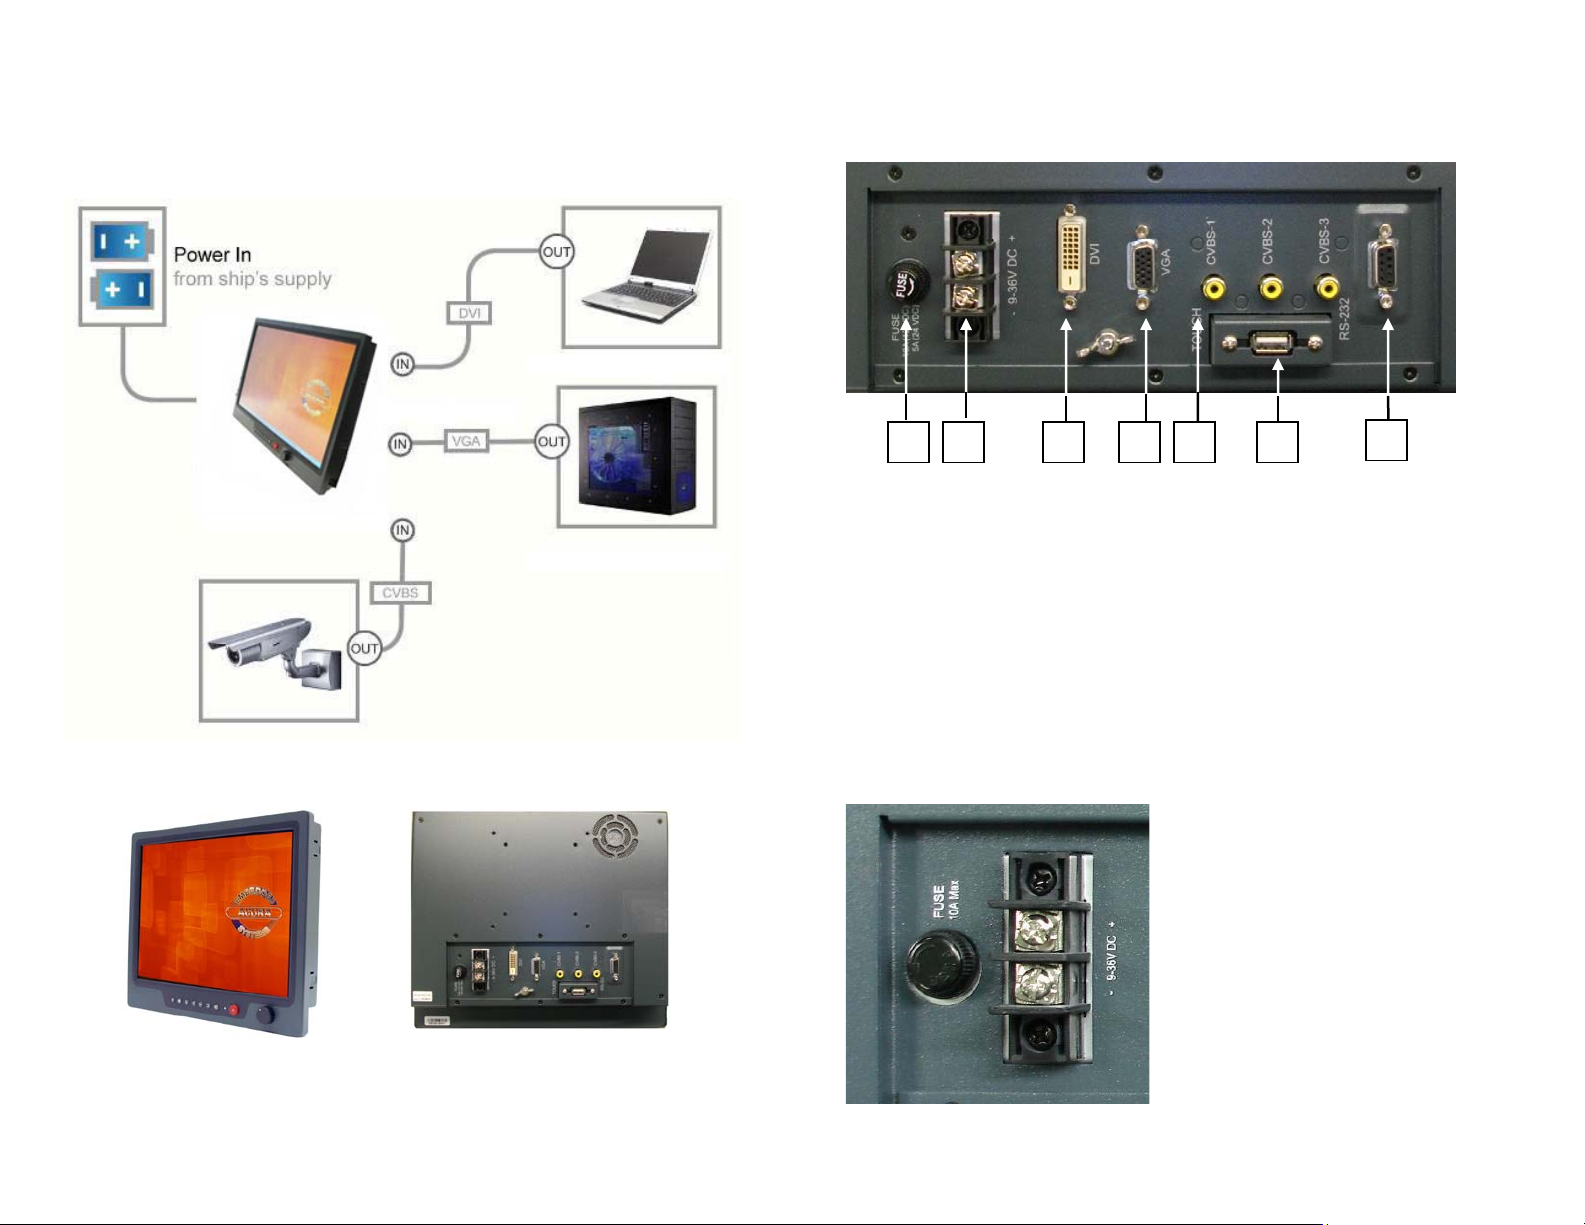
1 2 4 6 7 5 3
CONNECTIONS AND CONTROL FEATURES
Rear connections
1.Fuse 2. Power Input 3. DVI Input 4. VGA-Input 5. RS232 Input
6. CVBS-1,2,3 Input (Composite Video ) AV Input 7.USB for Touch con t rol
This monitor is designed to run on marine vehicle’s power systems, with 9~36V DC
wide range power input.
You must ground the monitor by conne cting the drain wire (shield) of the power
input. It is important that an effective radio frequency (RF) ground is connected to
2
the monitor.
Power connections
The power connection to the monitor
should be made at either the output of
the battery. isolator switch, or at a DC
power distribution panel. AcuBrite15-Nav
recommends that power is fed directly to
the monitor via its own dedicated cable
system and MUST be protected by a
thermal circuit breaker or fuse, fitted
close to t he power c onnection . If you do
not have a thermal circuit breaker or
fuse in your power circuit, you MUST fit
an in-line break er or fuse to the positive
(red) lead of the power cable.
Page 3

AcuBrite 15-NAV User Guide AcuBrite 15-NAV User Guide
5
Control panel
AUTO KEY
Automatically adjust monitor features
UP
/ DOWN KEY
When you press and hold the “INPUT” KEY,
the menu screen will show as
RGB→DVI→..→VIDEO3→VIDEO2→..
If you release the “INPUT” KEY for 5
seconds without any action, the menu
selection screen will be closed. And it will
remain at the item which you’d selected.
It works as menu item selection use, the “UP”KEY can be used as “RIGHT” KEY
and the “DOWN” KEY can be used as “LEFT”KEY.
MENU KEY
When press “MENU” KEY, the OSD main menu screen will appear as below:
INPUT KEY
4
If release the “MENU” KEY for 30 seconds without any action, the menu OSD
screen will disappear automatically. You can also choose “QUIT” and then press
“MENU” KEY to exit this OSD menu screen.
Page 4

AcuBrite 15-NAV User Guide AcuBrite 15-NAV User Guide
7
DVI setting screen:
RGB setting screen:
RGB Setting Item Description:
・ PHASE――― Horizontal Sampling Phase Adjustment
・ CONTRAST――― Contrast Adjustment
・ H_POSITION―― Horizontal Screen Adjustment
・ V_POSITION―― Vertical Screen Adjustment
・ R_LEVEL――― Red Color level Adjustment
・ G_LEVEL――― Green Color level Adjustment
・ B_LEVEL――― Blue Color level Adjustment
・ TEMPERATURE――― Color Temperature Adjustment
・ EXIT――― Quit from current setting
6
DVI Setting Item Description:
・ CONTRAST ――― Contrast adjustment
・ R_LEVEL ――― Red Color level Adjustment
・ G_LEVEL ――― Green Color level Adjustment
・ B_LEVEL ――― Blue Color level Adjustment
・ TEMPERATURE――― Color Temperature Adjustment
・ EXIT ――― Quit from current setting
BRIGHTNESS Key
When you press the BRIGHTNESS Key, the screen will show the follow ing ima ge
Page 5

AcuBrite 15-NAV User Guide AcuBrite 15-NAV User Guide
9
8
NIGHT MODE KEY
When you press the “NIGHT MODE” KEY, the dimming will be down to under 0.5 nit
directly. And if you press “BRIGHTNESS” KEY or “VR” knob at this moment, it will
be no function until you press the “NIGHT MODE” KEY again to release this
restriction.
Customer
Name: ____________________________________
OSD Setting Main Screen:
Location: _________________________________
Serial Number: ____________________________
VIN Number: ______________________________
Unit Number: ____________
Date Installed: _____________________________
Who Installed: _____________________________
Contact Number: ___________________________
OSD Setting Item Description:
・ H_POSITION ―― Horizontal Screen Adjustment
・ V_POSITION ―― Vertical Screen Adjustment
・ TRANSLUCENT ―― Screen background color can be adjusted as
transparent as you want (total 10 scales)
・ BRIGHTNESS ―― Selection between “BRIGHTNESS” key or “VR”
Button for brightness adjustment
・ SYSTEM RETURN ―― Restore all parameter setting to factory default
value
・ EXIT ―― Quit from current setting
Notes:
Toll Free 1-866-502-9666
www.acuraembedded.com
 Loading...