

Page 1
Page 2
Page 3
Page 4
Page 5
Part I
Getting to Know
Hydra-Alert
TM
Part II
How to Operate Your
Hydra-Alert
TM
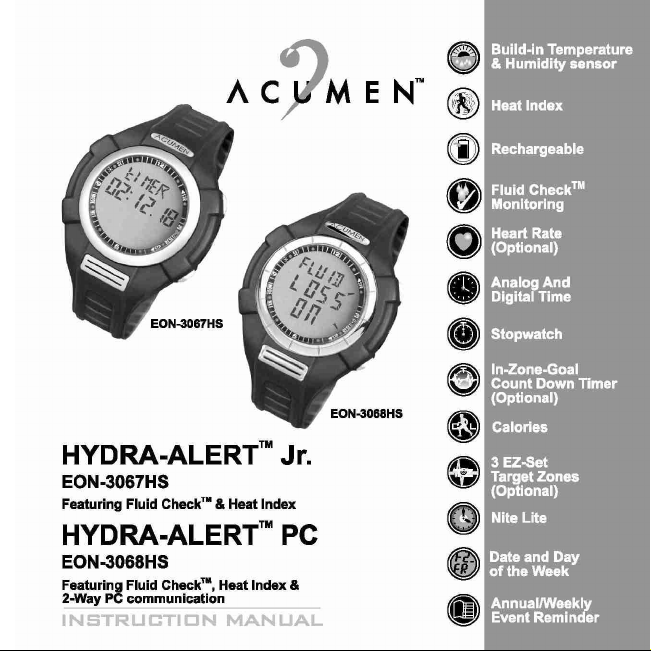
HYDRA-ALERTTM Jr.
EON-3067HS
Featuring Fluid Check
TM
& Heat Index
HYDRA-ALERTTM PC
EON-3068HS
Featuring Fluid CheckTM, Heat Index and
2-Way PC communication
Part III
Technical Reference
Part IV
Precautions,
Warranty Service
and Repair
Page 6

Congratulations!
Welcome to the future of hydration technology! Your purchase today shows
that you are serious about your exercise and are committed to achieving your
best. Today, getting the most from your exercise doesnít necessarily mean you
have to spend longer periods of time to achieve those goals. With Fluid
CheckTM Training, you will increase the effectiveness of your workout by
monitoring and quantifying your results every step of the way. The HydraAlertTM will act as your personal coach and guide you to your fitness goals
more effectively.
Mission Statement
At Acumen we have listened to what people such as yourself have been
asking for in fitness equipment and are committed to your satisfaction. We
know you will enjoy all of the innovative features of the Hydra-AlertTM and the
ease of use incorporated into our products. If you ever have any questions,
comments or suggestions, please write or call our staff. We greatly value your
feedback and look forward to continuing to provide you with products and
support that is second to none. Thank you for your purchase and anticipated
support.
Product Development Team
Page 7

CONTENTS
Part I Getting to Know Your Hydra-Alert
TM
Hydra-AlertTM Features .................................................................................
What's in Your Package ...............................................................................
Buttons and Functions ..................................................................................
Overview ......................................................................................................
Getting Going ................................................................................................
Charging the Battery
Attaching Your Heart Rate Monitor (Optional)
Part II How to Operate Your Hydra-Alert
Time, Calendar, Heat Index Mode ................................................................
To View Anolog Tiem, Digital Time, Calendar, Humidity, Temperature & Heat Index
Setting the Time
Setting the Calendar
Alarm with Event Reminder Feature .............................................................
To View the Alarm Settings
Setting the Alarm
Turning the Alarm ON or OFF
Fluid CheckTM Mode ......................................................................................
Getting to Know Fluid Loss
Fluid Loss Related Settings
Personal MET Calibration - Max MET (VO2 Max) Calibration (Optional)
Select Target Zone (TZ) Mode (Optional) ......................................................
Getting to Know the three Target Zones (TZ)
Select Target Zone Before Exercise
Setting the Heart Rate Limits for Each Zone
Setting the Target Zone Alarm
Chrono Mode ...............................................................................................
Heart Rate Display (Optional)
TM
6
8
11
13
14
19
27
32
41
46
Page 8

Start Your Exercise
Reset the Stopwatch
Alarms During the Exercise
Other Operations During the Exercise
Recall Data Mode .........................................................................................
Review Data During the Exercise
Review Data After the Exercise
Quick Reset Stopwatch & Entering Basic Settings
Clear the Memory
Basic Settings for Exercise
Program Mode ..............................................................................................
How to Connect Your Watch with the PC (Optional for EON-3067HS) .......
Installing the software
Connecting the watch with PC
Part III Technical Reference
Target Zone & Fitness Training (Optional) ....................................................
Getting to Know Heat Index ..........................................................................
Determining Your MET Parameter..................................................................
How to Calculate Your Fluid Loss..................................................................
84
Body Fluid CheckTM Monitoring Tips and Guidelines ....................................
Specifications ................................................................................................
Technical Display Guide ................................................................................
Part IV Precautions, Warranty, Service and Repair
General Precautions .....................................................................................
Limited Warranty ...........................................................................................
Service and Repair.........................................................................................
53
65
72
76
81
86
88
91
93
96
98
99
Page 9

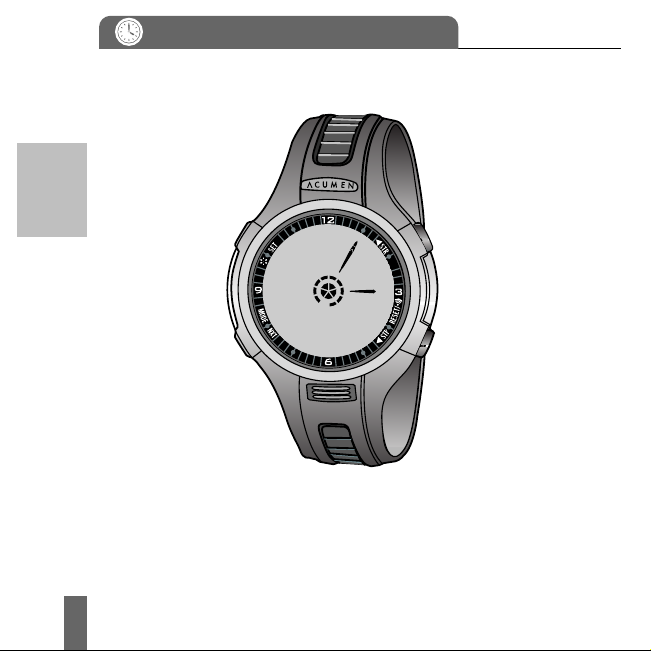
Part I
Getting to Know Your Hydra-Alert
TM
Page 10

Part I
6
Hydra-AlertTM Features
Fluid CheckTM for Safeguarding Against Dehydration
Build-in sensor for detecting Temperature and Humidity
2-Way PC Communication (USB) (Optional)
Display Heat Index
Advanced Calorie Count
MAX MET (VO2 MAX) Calibration (Optional)
Heart Rate Monitoring (Optional)
Three separate EZ-Set Target Zone with Visual and Audible alarms (Optional)
Records and Display Time Below / Above / Within TZ (Optional)
In-Zone-Goal Count Down Timer (0-60 min) (Optional)
Heart Rate Sampling: 5, 15, 30, 60 sec or 5 min (Optional)
Easy to Read Stopwatch
Dual Display for Analog and Digital Time
Weekly and Annual Event Reminder
Date and Day Display
Daily Alarm
Nite Lite with Smart Lite Function
Scratch Resistant Crystal Lens
Water Resistant to 30 Meters
Rechargeable Battery
Page 11

Computer Interface:
2-Way PC Communication (USB)
WindowsTM 98 (2nd edition) Compatible
Printout files and Program Settings
Download and Save Data for Long Term Memory
Overlap Workouts and Track Progress
System Requirements:
WindowsTM 98 (2nd edition) or Newer
Hard Disk 50 MB Free (min.)
Ram: 64MB (min.)
All Heart Rate related function are optional for EON-3067HS &
EON-3068HS.
All PC downloading function are optional for EON-3067HS.
Ask Your Dealer for the Optional Heart Rate Training Kit or
Activity Manager PC Software Kit.
Part I
7
Page 12
Part I
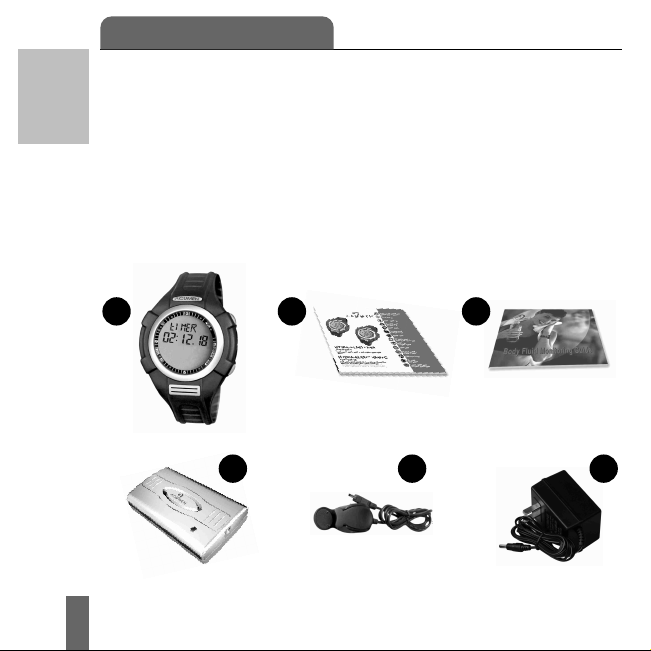
What's in Your Package
EON-3067HS package includes:
A. EON-3067HS Watch
B. Instruction Manual
C. Body Fluid Monitoring Guide
D. Charger
E. Charger Connector
F. AC / DC Transformer
A
8
B
D
E
C
F
Page 13
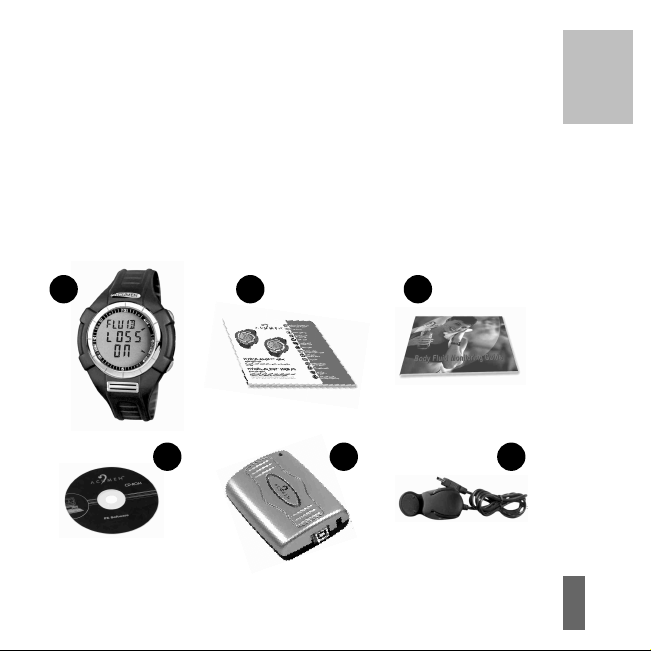
EON-3068HS package includes:
A. EON-3068HS Watch
B. Instruction Manual
C. Body Fluid Monitoring Guide
D. Activity Manager PC Software
E. PC Interface and Charger
F. PC Interface and Charger Connector
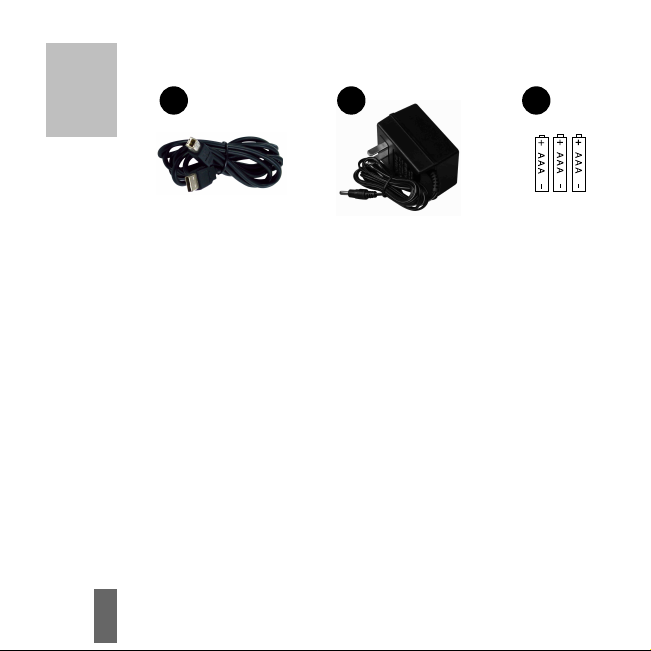
G. USB Cable
H. AC / DC Transformer
I. 3 x AAA Batteries
Part I
A
D
CB
FE
9
Page 14
Part I
G
10
H
I
Page 15
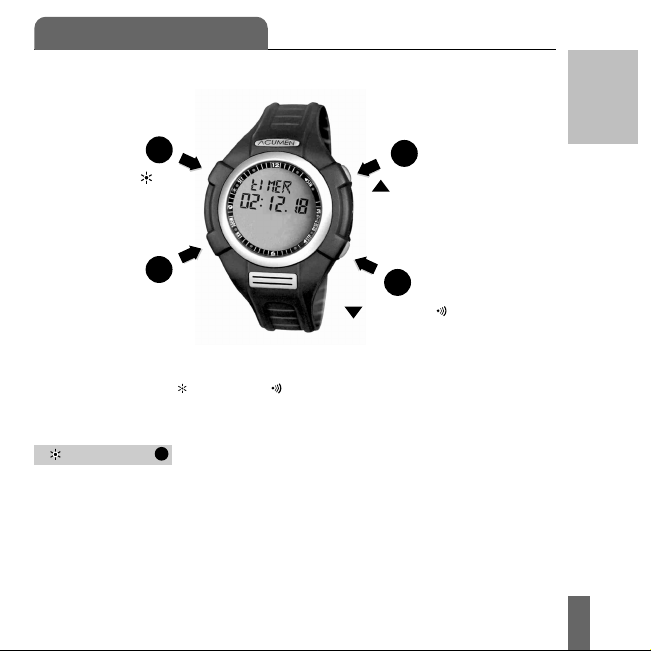
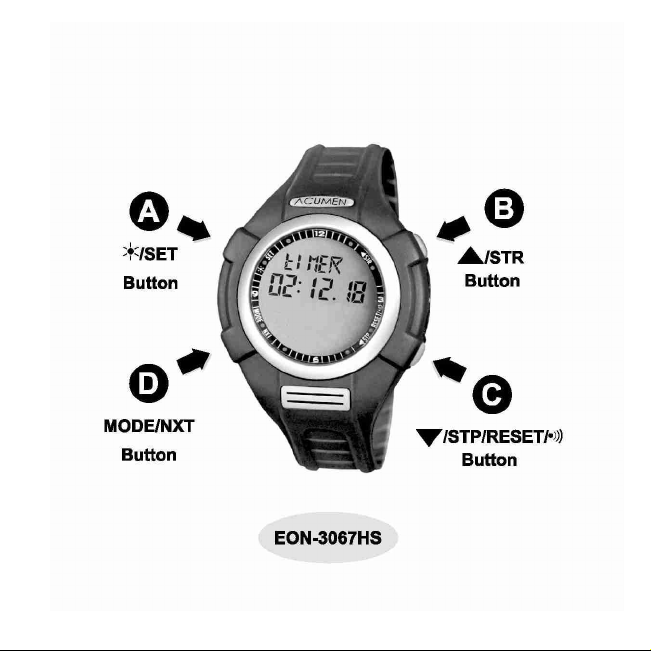
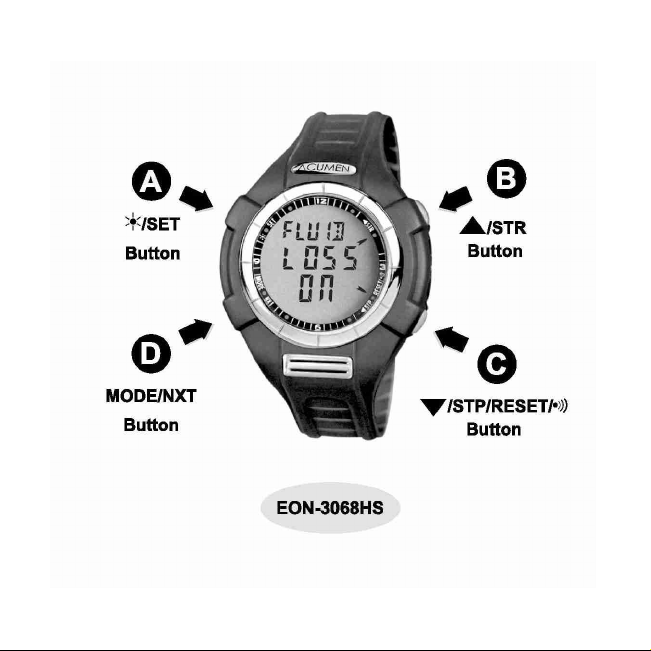
Buttons and Functions
A
/SET
Button
Part I
B
/STR/LAP
Button
D
MODE/NXT
Button
Definition of the buttons:
: Night Lite : Alarm NXT: Next
STR/LAP: Start/Lap STP: Stop
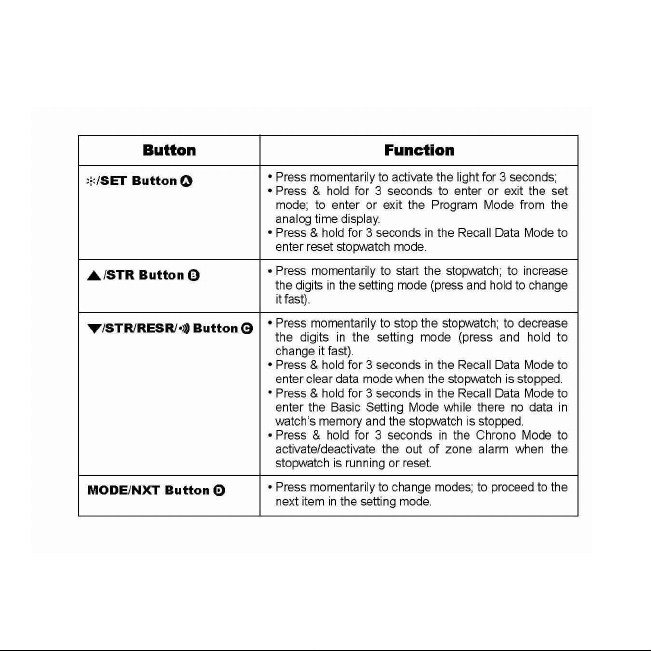
/SET Button
- Press momentarily to activate the light for 3 seconds;
- Press & hold for 3 seconds to enter or exit the set mode; to enter or exit
the Program Mode from the analog time display.
- Press & hold for 3 seconds in the Recall Data Mode to enter Reset
Stopwatch Mode.
A
C
/STP/RESET/
Button
11
Page 16

Part I
/STR/LAP Button
B
- Press momentarily to start the stopwatch; to increase the digits in the
setting mode (press and hold to change it fast)
/STP/RESET/ Button
C
- Press momentarily to stop the stopwatch; to decrease the digits in the
Setting Mode (press and hold to change it fast).
- Press & hold for 3 seconds in the Recall Data Mode to enter clear data
mode when the stopwatch is stopped.
- Press & hold for 3 seconds in the Recall Data Mode to enter the Basic
Setting Mode while there no data in watchís memory and the stopwatch
is stopped.
- *Press & hold for 3 seconds in the Chrono Mode to activate/deactivate
the out of zone alarm when the stopwatch is running or reset.
MODE/NXT Button
D
- Press momentarily to change modes; to proceed to the next item in the
setting mode.
Note: All buttons produce one short beep when pressed. Press and hold
operation also produces another beep. When the daily alarm is beeping, it
can be silenced by pressing any botton.
12
Page 17
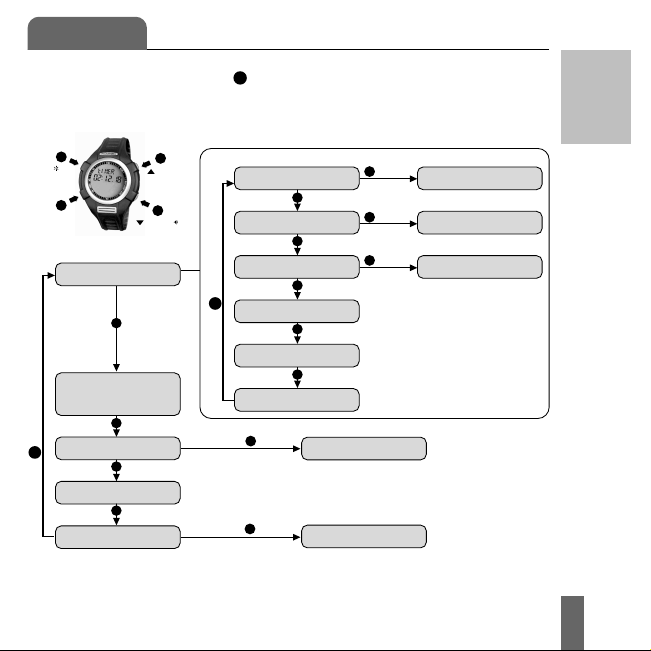
Overview
When MODE/NXT Button D is pressed, the modes of Hydra-Alert
displayed in the following sequence:
A
/SET
Button
D
MODE/NXT
Button
Time, Calendar and
Heat Index Mode
Press D
Fluid CheckTM Mode
(
Set Fluid Loss
Related Settings)
Press D
Button
* Select TZ Mode
D
Press D
Press
Chrono Mode
Press D
Recall Data Mode
Button
Button
Button
Button
B
/STR/LAP
Button
C
/STP/RESET/
Button
Press & hold AButton
Press & hold A Button
after clearing the memory
Analog Time Display
Press BButton
Digital Time Display
Press BButton
Calendar Display
Press BButton
Button
B
Humidity Display
Press BButton
Press
Temperature Display
Press
Heat Index Display
Press & hold
Button
A
Press & hold
Button
A
Press & hold
Button
A
BButton
*Set Heart Rate Limits
Set Exercise Related
Settings
Set All Program
Settings
Set Time
Set Calendar
TM
are
Part I
13
Page 18
Part I
14
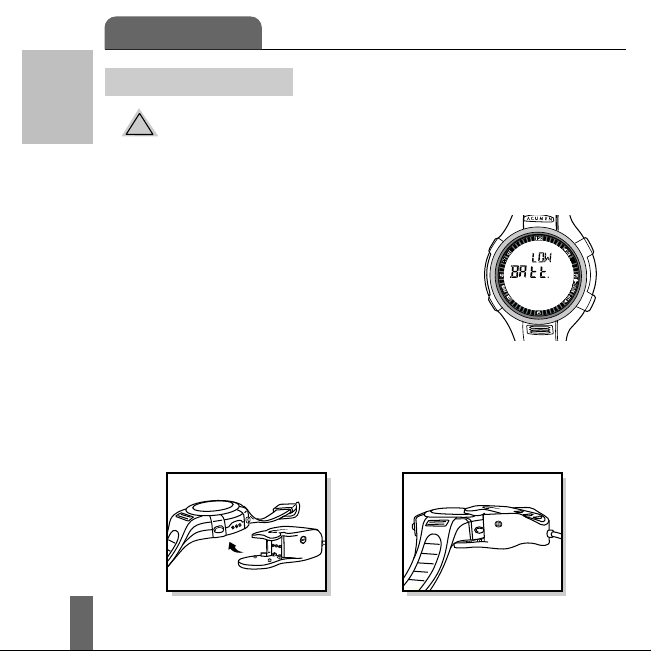
Getting Going
Charging the Battery
!
CAUTION - ONLY CHARGE WITH A RECHARGEABLE,
LITHIUM BATTERY (LIR 2032) AND THE 110-VOLT(1) OR 230-VOLT(2)
AC/DC TRANSFORMER PROVIDED. OTHER BATTERY AND
TRANSFORMER WILL CAUSE INJUREY AND DAMAGE.
(1) For US only (Optional) (2) For European country
The watch must be fully charged before its
initial use. When the watch displays ìLOW
BATT.î (as shown in Figure 1) means the battery
in your watch need to be charged, please follow
the below sequences to charge the battery:
Step 1: Use the Connector with one end clamp to the watch and the
other end connect with the PC Interface and Charger (for EON3068HS) or Charger (for EON-3067HS). Make sure the three pins in the
clamp are properly in contact with the three contacting points on the
watch. (as shown in Figure 2 & 3)
Fig.2 Fig.3
Fig.1
LAP
Page 19

Step 2: Use the supplied Transformer, one end connect with the PC
Interface and Charger (for EON-3068HS) or Charger (for EON-3067HS),
the other end plug into a proper voltage AC wall outlet.
When the light on the Charger turns from red to green, indicates the battery
is fully charged. (Note: For the purpose of watch only, the battery will last for
about 3 weeks. If you fully utilize the Fluid Loss and Heart Rate features
(optional) for 1 hour everyday, the battery has to be re-charged for every week.)
Note:
1) The first time you try connecting the watch to the connector. Center the connector so
that it is guided between the 2 mode buttons on the watch before it is fully inserted.
2) The bottom tab on the connector when properly inserted should be flush with
the bottom of the watch. (as shown in Figure 3)
3) When the watch and connector are properly connected, the LED on the
Charger will light up as red.
4) To achieve the best performance out of the watch battery, it is recommended to
charge the watch for at least 12-hour before its initial use.
5) If you fully utilize the Fluid Loss and Heart Rate features for an average of 1hour a day, you are recommended to recharge the watch once a week. (For
Time purpose only, the watch should last about 3 weeks.)
6) To ensure a longer period of the battery life, we recommend you to charge the
battery immediately when the low-battery warning (i.e. "LOW BATT." ) appears
on the watch.
7) After the first low battery warning comes on for 15 minutes, the EL, Heart Rate,
Humidity & T emperature features will be turned of f in saving the battery energy.
8) When you charge the watch after it shut down, it will first enter Time & Calendar
Setting Mode automatically, that enable you to adjust the time and calendar for
the watch. After you finish the setting, it exits to the normal mode. Your personal
settings and exercise data for your last exercise are well kept by the watch.
Part I
15
Page 20
Part I
16
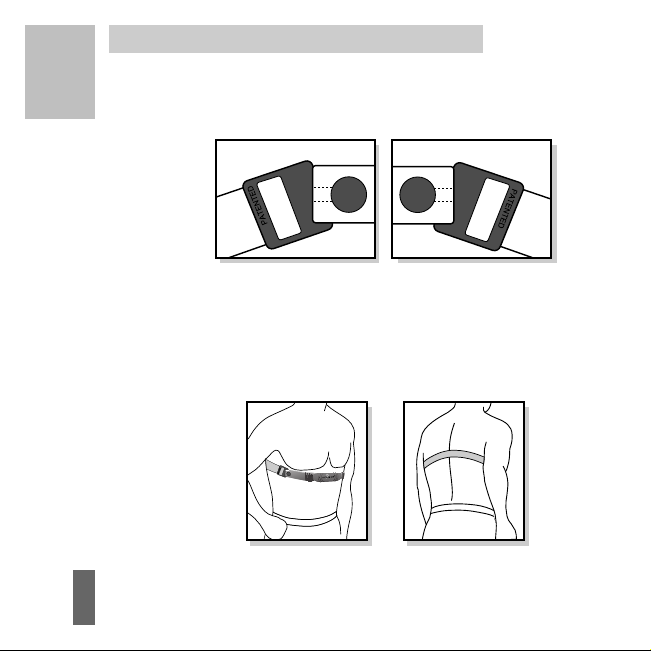
Attaching Your Heart Rate Monitor (Optional)
1. Attach the adjustable strap to transmitter belt. Insert round end of clip
through the hole and twist gently. (Fig.1)
Fig. 1
2. Strap the transmitter belt around your chest.
3. Adjust the tension of the elastic strap to fit snugly, but comfortably
around your chest (Fig.2)
Fig. 2
Page 21
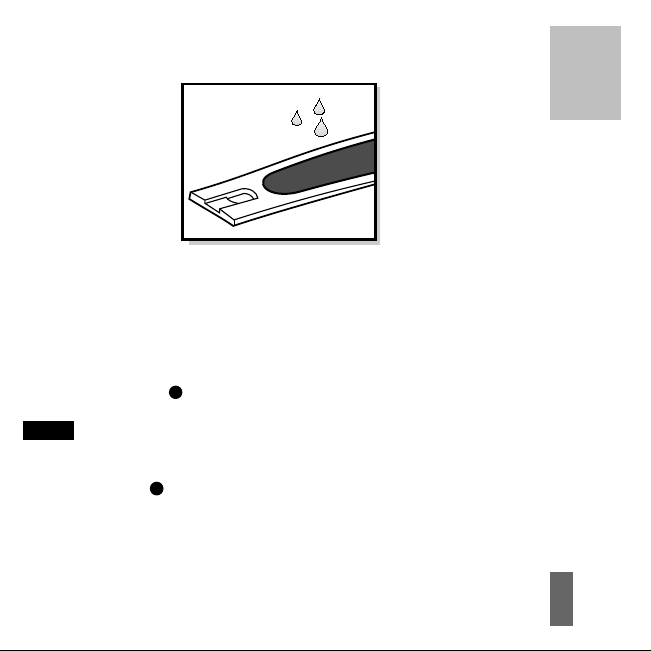
4. Moisten the transmitter electrodes by applying a small drop of water on
each of the two contact areas. (Fig. 3)
Fig. 3
Using your watch
The watch does not have to be worn on your wrist to register your heart
rate, but it must be within 3 feet of your transmitter belt.
You must be in the Chrono Mode to view the heart rate information. Press
MODE/NXT Button
Note:
If the watch receives no heart rate signal for 15 seconds, Heart Rate Mode
will automatically turn off. To reactivate the Heart Rate Mode, press and
hold SET button
The Hydra-AlertTM with advanced Fluid CheckTM feature, for best estimate
your Fluid Loss, please do MET Calibration before exercise. (refer to Page
37 )
repeatedly to enter Chrono Mode.
D
A
while in the Chrono Mode.
Part I
17
Page 22

Part II
How to Operate Your Hydra-Alert
18
TM
Page 23

Time, Calendar,
Heat Index
Mode
Page 24
Part II
20
Time, Calendar, Heat Index Mode
LAP
In this mode, user can view Time, Calendar, Time Alarm
Settings, Humidity, Temperature & Heat Index reading. And
Set Time, Calendar & Time Alarm.
Page 25
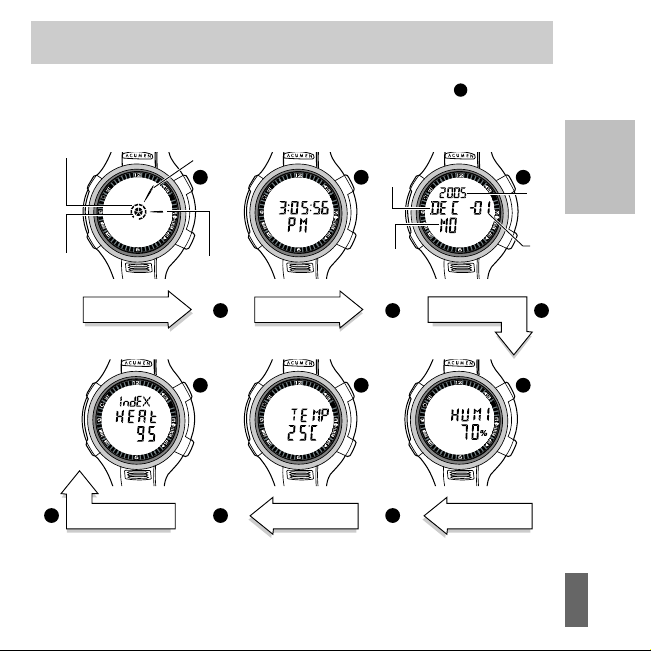
To View Analog Time, Digital Time, Calendar, Humidity,
Temperature & Heat Index
Starting from the Analog Time Display, press STR Button
to toggle the displays as followed:
Second hand
10 seconds
segment
Heat Index
Minute hand
BB B
LAP
Hour hand
Digital TimeAnalog Time
B B B
LAP
Month
LAP
Weekday
BB B
LAP
B BB
B
repeatedly
Calendar
HumidityTemperature
LAP
Year
Part II
Date
LAP
21
Page 26

Tips:
1) Press & hold EL Button
will change the Temperature Display in Fahrenheit or Celsius.
A
for 3 seconds when in the Temperature display
2) When you switch to the Heat Index Display (referred to page 81 to get to
Part II
know the Heat Index) and HI value currently at a very high level, the watch
will alert you by toggling between the Heat Index value and warning
indication as followed:
Range: 80 - 89
LAP
Auto
toggle
Range: 90 - 104
LAP
Auto
toggle
22
LAP
LAP
Page 27
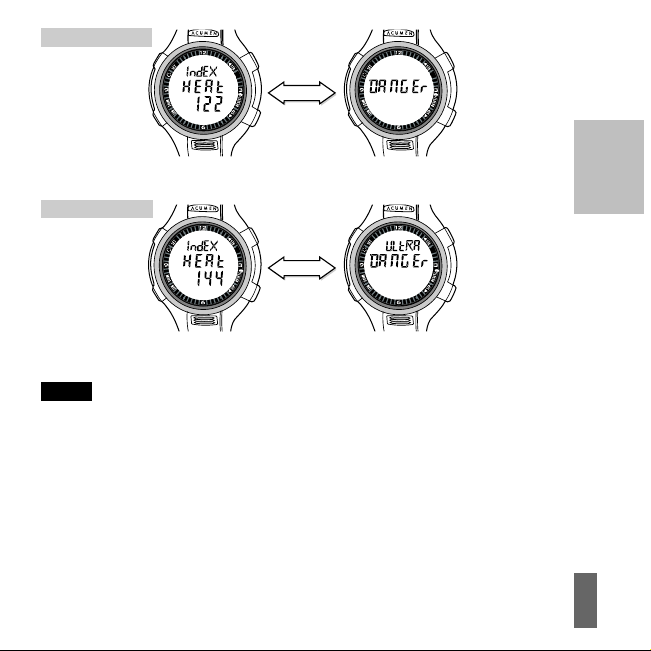
Range: 105 - 129
LAP
Auto
LAP
toggle
Range: 130 - 151
LAP
Auto
LAP
toggle
Note:
Our latest formula for Hydration and Heat Index are based on the Bodies
Radiant Temperature and the Humidity around the body. The values
shown on your watch when it is worn on the wrist are your Bodies
Radiant Temperature, Humidity around the body and the Body Heat
Index. To get the ambient temperature, humidity and heat index, please
remove the watch from the wrist and allow at least 15-20 minutes before
reading.
Part II
23
Page 28
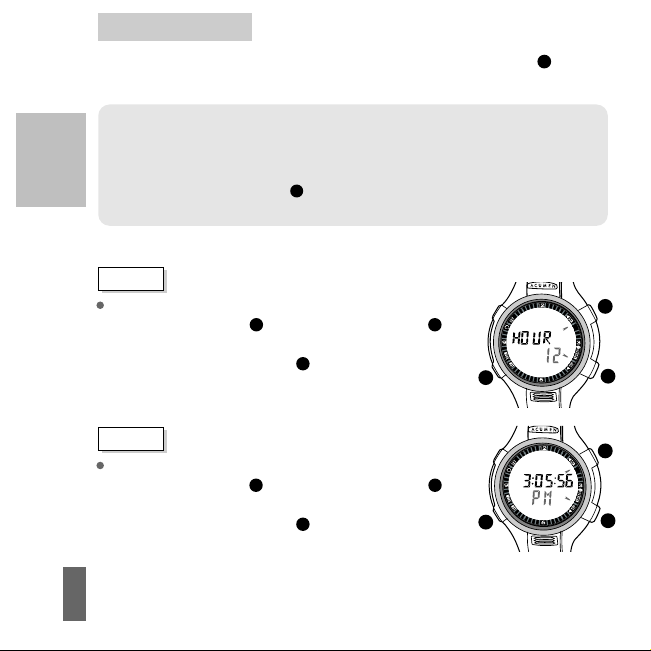
Setting the Time
From the Digital time Display, press & hold SET Button A for 3
seconds to enter the Set Mode.
Part II
Tips:
1) There are two arrows on the LCD display to indicate the Adjust Buttons.
2) If no button is pressed for 60 seconds, the watch will automatically exit the
Setting Mode.
3) Press & hold SET Button
Mode.
A
for 3 seconds at any time will exit the Setting
Step 1
12/24 Hour Time Display Format (blinking)
- Press STR Button
B
or STP/RESET Button C to
select 12 or 24 hour time.
- Press MODE/NXT Button
D
to proceed to the next
item. (If you have selected 24 hour time , go to
step 3.)
B
LAP
D
C
Step 2
AM/PM (blinking)
- Press STR Button
select AM or PM.
- Press MODE/NXT Button
item.
24
B
or STP/RESET Button C to
D
to proceed to the next
B
LAP
D
C
Page 29
Step 3
Hour (blinking)
- Press STR Button
adjust the value.
-
Press MODE/NXT Button
item.
B
or STP/RESET Button C to
D
to proceed to the next
B
LAP
D
C
Step 4
Minute (blinking)
- Press STR Button
B
or STP/RESET Button C to
adjust the value.
- Press MODE/NXT Button
item.
Step 5
B
LAP
Second (blinking)
- Press STR Button
reset the value to zero.
- Press MODE/NXT Button
D
C
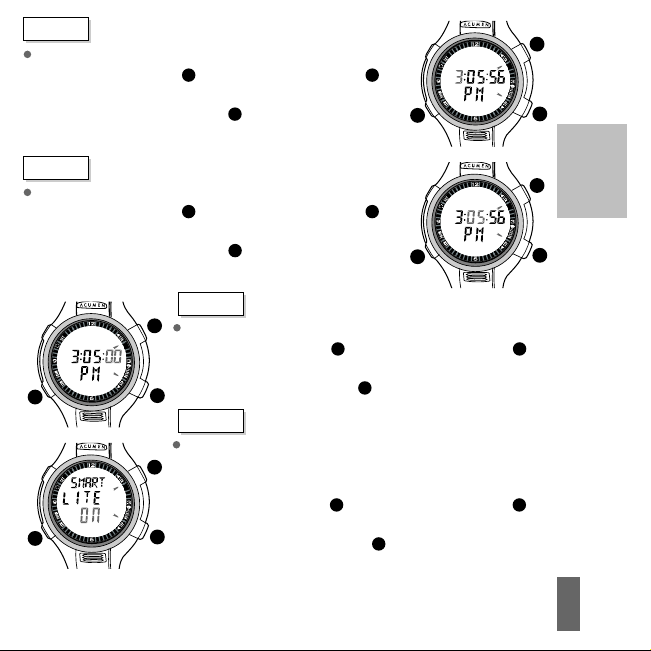
Step 6
Smart Lite (blinking)
LAP
between 6pm and 6am with any button pressed.
This feature will activate the Nite Lite for 1.5 seconds
B
- Press STR Button
set the Smart Lite to ON or OFF.
D
C
- Press MODE/NXT Button
Digital Display.
D
to proceed to the next
B
or STP/RESET Button C to
B
or STP/RESET Button C to
D
D
to proceed to the next item.
D
to exit and return to the
B
LAP
Part II
C
25
Page 30
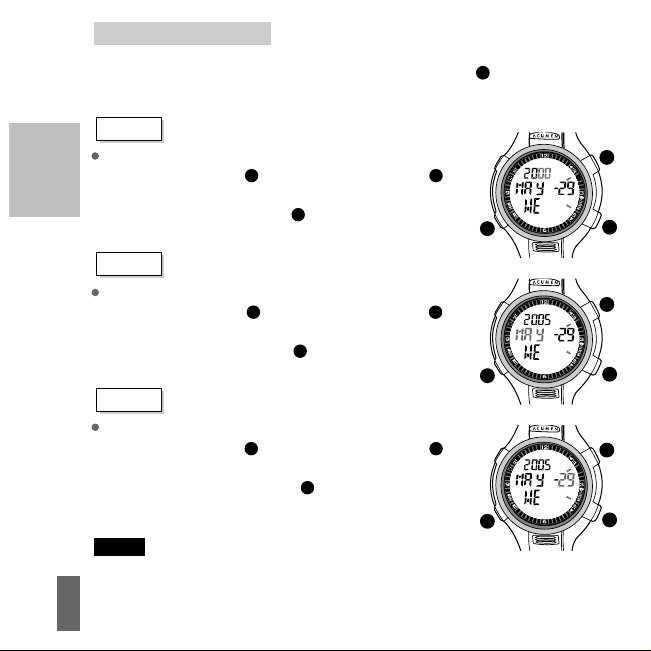
Setting the Calendar
From the Calendar Display, press & hold SET Button A for 3 seconds to
enter the Setting Mode.
Part II
Step 1
Year (blinking)
- Press STR Button
B
or STP/ RESET Button C to
adjust the value.
- Press MODE/NXT Button
D
to proceed to the next
item.
Step 2
Month (blinking)
- Press STR Button
B
or STP/RESET Button C to
adjust the value.
- Press MODE/NXT Button
D
to proceed to the next
item.
Step 3
Date (blinking)
- Press STR Button
B
or STP/ RESET Button C to
adjust the value.
- Press MODE/NXT Button
D
to exit and return to
the Calendar Display.
Note: Weekday is automatically set according to the
year, month and date entered.
26
B
LAP
D
D
D
C
B
LAP
C
B
LAP
C
Page 31

Alarm with Event
Reminder
Feature
Page 32

Alarm with Event Reminder Feature
The Hydra-AlertTM includes three alarms, which can be programmed to
operate independently.
Part II
Alarm Date
28
The alarm can act as your Event Reminder if you set it to a specific day or
date. It will begin to beep 12 hours before the set time. It will beep and flash
once every hour for the 12 hours prior to the set time. It will beep and flash
for 1 minute when it reaches the set time.
To View the Alarm Settings
From any display of Time/Calendar Mode (ie. Analog Time, Digital Time,
Calendar, Humidity, Temperature and Heat Index Display), press
STP/RESET Button
C
repeatedly to display the settings of Alarm1, Alarm2
and Alarm3, then back to Analog Time Display.
Alarm Number
Alarm 1
LAP
Alarm
Time
C
C C
LAP
C C
Alarm 2
LAP
Alarm 3
Page 33

Setting the Alarm
From the Alarm1, Alarm2 or Alarm3 Display, press & hold SET Button
A
to enter the Setting Mode.
Step 1
Alarm Day (blinking)
- Press STR Button
B
or STP/RESET Button
C
to select the alarm days. The choices include:
Daily or MO, TU, WE, TH, FR, SA, SU or MOFR or MO-SA or Date (e.g. JAN-01).
- Press MODE/NXT Button
D
to proceed to the
D
next item. (If you do not want to set a specific day
go to step 4.)
Step 2
Month (blinking)
- Press STR Button
B
or STP/RESET Button
to adjust the value.
- Press the MODE/NXT Button
D
to proceed to
C
D
LAP
LAP
the next item.
Step 3
Date (blinking)
- Press STR Button
B
or STP/RESET Button
to adjust the value.
- Press MODE/NXT Button
D
to proceed to the
C
D
LAP
next item.
B
Part II
C
B
C
B
C
29
Page 34

Part II
D
D
D
30
Step 4
B
LAP
AM/PM (blinking)
- Press STR Button
C
Button
C
- Press MODE/NXT Button
to select AM or PM.
B
or STP/RESET
D
to proceed to
the next item.
Step 5
B
LAP
Hour (blinking)
- Press STR Button
C
Button
- Press MODE/NXT Button
C
the next item.
to adjust the value.
B
or STP/RESET
D
to proceed to
Step 6
Minute (blinking)
B
LAP
- Press STR Button
C
Button
to adjust the value.
- Press MODE/NXT Button
C
return to the Alarm1, Alarm2 or Alarm3
B
or STP/RESET
D
to exit and
Display.
Page 35

Turning the Alarm ON or OFF
From the Alarm1, Alarm2 or Alarm3 display, press & hold STP/ RESET
C
Button
to turn the alarm on or off. ON status is indicated by a" " icon.
See the following figures:
Press & hold
LAP
C C
Alarm is turned on Alarm is turned off
C
LAP
Note:
1) If you've set the Alarm Time in the Setting Mode, the alarms will
automatically set to ON.
2) When the alarm sounds, press any button to turn it off.
From Alarm1, Alarm2 or Alarm3 Display, press STP/RESET Button
repeatedly to return to the Analog Time Display.
Part II
C
31
Page 36

Fluid Check
Mode
TM
Page 37

Fluid CheckTM Mode
LAP
From the Analog Time Display, press MODE/NXT Button D one time to
enter the Fluid CheckTM Mode. In this mode you can turn on/off Fluid Loss
function, set MET Parameter, set Drink Interval Timer and calibrating your
personal MET Value (Optional).
Part II
33
Page 38

Getting to Know Fluid Loss
When exercising, your body regulates temperature through sweat loss,
heat radiation and respiration. Dehydration reduces maximal aerobic
power and endurance performance. Greater dehydration results with
greater decrements in performance. The Fluid CheckTM feature provides
Part II
feedback to you with respect to your dehydration level. See page 88 for
Fluid CheckTM Monitoring Tips and Guidelines.
Fluid CheckTM feature is controlled by the stopwatch. If you have turned
on the Fluid CheckTM feature, the watch will show the fluid loss value in
the Recall Data Mode. When in the Chrono Mode, the watch display will
flash and the watch will beep each time your fluid loss equals .5% of your
body weight. The higher the amount of fluid loss, the faster it will beep.
Tips:
1) If you did the Personal MET Calibration ( Optional ) and take the Transmitter Belt
with you during exercise, the watch will calculate the amount of your fluid loss
by detecting the physiological changes of your body ( see page 37 ) .
2) If you have no Transmitter Belt (or forgot take it with you), you would need
to manually input Exercise Type & Intensity (see page 35).
Note: Unless the stopwatch is running, the Fluid CheckTM feature will
automatically turn off at the midnight (i.e. 12:00 PM).
34
Page 39

Fluid Loss Related Settings
Step 1
Fluid Loss ON or OFF (blinking)
- Press STR Button
B
or STP/RESET Button
to select "ON" or "OFF".
- Press MODE/NXT Button
D
to proceed to the
C
D
B
LAP
next item if it is set to ON. If it is set to OFF,
press the button will enter the Select TZ Mode.
Step 2
Exercise Type (blinking)
The Exercise Type & Intensity are used for
B
LAP
calculating your fluid loss.
- Press STR Button
B
or STP/RESET Button
to select desired Exercise Type. The Exercise
C
D
Type in the watch includes:
Aerob (Aerobics)
bike (Bike)
bowl (Bowling)
Dance (Dancing)
Golf (Golf)
Hike(Hiking)
Jog (Jogging)
Walk (Walking)
Run (Running)
Swim (Swimming)
Ski (Skiing)
CC.ski (CC. Skiing)
Stair (Stairs)
Tennis (Tennis)
MET(MET Parameter)
If you do not find the particular activity in your watch, you can select "MET"
to input the MET value manually.
- Press MODE/NXT Button
D
to proceed to the next item. (If select
"MET" go to Step 4)
C
Part II
C
35
Page 40

Step 3
Exercise Intensity (blinking)
- Press STR Button
B
or STP/RESET Button
to select HI (High), MED (Median) or LO (Low).
Part II
- Press MODE/NXT Button
D
to go to Step 5.
Step 4
MET Parameter (blinking)
- Press STR Button
B
or STP/RESET Button
to adjust the value. (Refer to page85 to determine
your MET Parameter).
- Press MODE/NXT Button
D
next item.
Step 5
Drink Interval Timer (blinking)
The watch will remind you to drink during exercise
if the timer is set.
- Press STR Button
B
or STP/RESET Button
to adjust the value (Range: OFF, 1 to 60minutes).
- Press MODE/NXT Button
"Fluid Loss ON" display.
36
to proceed to the
D
to back to the
B
C
D
C
D
C
D
LAP
C
B
LAP
C
B
LAP
C
Page 41

Personal MET Calibration (Max MET (VO2 Max) Calibration) (Optional)
Your body fluid loss and calorie consumption are determined by your
metabolism level. And it is very drastically from one individual to another.
For better estimation, you are recommended to calibrate your MET value
before exercise.
Please follow the following sequences to calibrate your MET Value:
Phase 1: Recording Your Rest Heart Rate
From the Fluid Loss ON or OFF display, press & hold SET button A until the
watch displays blinking "MET CAL MODE" and beeps for five times to indicate
entering into calibrating mode. Then it will go to next display automatically.
Part II
A
LAP
Step 1 (Optional)
AUTO/MANU REST HR (blinking)
You can select to enter your Rest Heart Rate by auto
recording or manually input.
- Press STR Button
B
or STP/RESET Button C to
select "REST HR AUTO" or "REST HR MANU" (If
select "REST HR MANU" go to step 4.)
B
LAP
C
37
Page 42

Step 2 (Optional)
Rest Heart Rate Recording
- Press MODE/NXT Button
During the recording, the timer and current heart
Part II
rate are shown on the screen. Your average rest
heart rate will be displayed when the timer counting
is completed (i.e. a circle is displayed).
D
to start recording.
LAP
D
Step 3 (Optional)
- Press MODE/NXT Button D to proceed to Phase 2.
Note:
1) When recording the rest heart rate, press any
D
button will have no respondence except the EL Button.
2) If no heart rate signal is detected when recording, the watch will display the
"REST HR ERR" and return to HR input Manual/Auto display automatically.
Tips:
During recording, you should relax yourself and bring your body down to a
comfort rest by taking deep slow breathes.
Step 4 (Optional)
Rest Heart Rate (blinking)
- Press STR Button
adjust the value.
- Press MODE/NXT Button
B
or STP/Reset Button C to
D
to proceed to Phase 2.
D
38
LAP
B
LAP
C
Page 43

Phase 2: 1600M or 1.0 Mile Assessment
This assessment allow the watch to find out the physiological changes of
your body at a normal speed. You will need to find a standard 400M field
track or 1 Mile distance to finish the assessment.
Note: Before assessment, please make sure the Heart Rate Transmitter is
attached on your chest properly.
Step 1 (Optional)
M or Mi (blinking)
- Press STR Button
B
or STP/RESET Button C to
select 1600 M or 1 Mile.
- Press MODE/NXT Button
step.
Step 2 (Optional)
Stopwatch (displayed)
- Press STR Button
- Press STP/Reset Button
B
to start and run.
C
Step 3 (Optional)
When Stopped the Stopwatch
- Press MODE/NXT Button
D
to display MET value.
D
to proceed to next
to stop.
B
LAP
D
B
LAP
D
LAP
D
Part II
C
C
39
Page 44

Note:
If no heart rate is detected, the watch displays the "MET CAL. ERR", press
MODE/NXT button
ON" display.
D
will exit Calibrating Mode and back to "FLUID LOSS
Part II
From the Fluid CheckTM Mode, press MODE/NXT Button D repeatedly to
return to the Analog Time Display.
40
Page 45

Select Target
Zone (TZ) Mode
(Optional)
Page 46

Part II
Select Target Zone (TZ) Mode (Optional)
LAP
Freezes for two seconds
From the Analog Time Display, press MODE/NXT Button D two times to
enter the Select TZ Mode. There are three Heart Rate Target Zones in the
watch. In this mode, you can select Heart Rate Training Zone, Set Target Zone
Limit, Out of Target Zone alarm, and Heart Rate Sampling Interval Time.
42
LAP
Page 47

Getting to know the three Target Zones (TZ)
In order to benefit the most from your workout, you need to become familiar
with your Heart Rate Target Zone. For most people, as your heart rate
exceeds the upper limit, your body begins to become anaerobic and produce
acids. By working within the correct range, you will achieve your fitness
goals and strengthen your cardiovascular system in less time.
Zone 1 (Fat Burning Zone, 55-65%) -This range is recommended for those
who haven't worked out in a long time, are trying to lose weight, are at a high
risk for heart problems or if you're just not feeling 100% one day.
Zone 2 (The Aerobic Zone, 65%-85%) - This range is recommended for
those in good physical condition who have been exercising on a consistent
basis for an extended period of time. Exercising at this range helps improve
your fitness level and prevent injury caused from overtraining.
Zone 3 (The Anaerobic Zone, 85% - 95%) This range is used only for those
in extremely good physical condition during races or training for competition.
It is typically used for interval training to help improve or measure endurance
levels.
Select Target Zone Before Exercise
Select a desired Target Zone before exercise. The watch will record the time
you are In, Below and Above this Zone, the Average Heart Rate, and will
give both visual & audible indications when you are out of the Zone during
exercise.
Part II
43
Page 48

In the Select TZ Mode:
- Press STR Button
- Press SET Button
B
to circle around Zone2, Zone3 & Zone1.
A
to toggle between the displays of heart rate shown
in BPM (beats per minute) and percentage of your Maximum Heart Rate.
Part II
Setting the Heart Rate Limits for Each Zone
Select your desired Target Zone, press & hold SET Button
setting mode.
Note: To enter the Setting Mode, the stopwatch must be reset to zero.
Step 1 (Optional)
Heart Rate Sampling Interval Time (blinking)
The watch will store the heart rate readings into
the memory based upon your desired interval for
downloading after exercise.
- Press STR Button
to adjust the value. (Range: OFF, 5, 10, 30, 60
seconds and 5 minutes)
- Press MODE/NXT Button
next item.
44
B
or STP/RESET Button
D
to proceed to the
C
D
A
to enter the
B
LAP
C
Page 49

Step 2 (Optional)
Upper Limit (blinking)
- Press STR Button
B
or STP/RESET Button
to adjust the value.
- Press MODE/NXT Button
next item.
D
to proceed to the
B
LAP
C
D
C
Step 3 (Optional)
Lower Limit (blinking)
- Press STR Button
B
or STP/RESET Button
to adjust the value.
- Press MODE/NXT Button
D
to exit and return
C
D
LAP
to the Heart Rate Mode.
Note: Press SET Button A to toggle the heart rate limit in BPM or
Percentage of your Maximum Heart Rate in the Setting Mode.
Setting the Target Zone Alarm
If you set the Target Zone Alarm to ON, the watch will beep when you are
above or below the selected Target Zone. From the Select TZ Mode, Press
" icon.
B
to select a desired Target Zone, then press & hold
C
to set the alarm to ON or OFF. ON is indicated by
D
repeatedly to return
STR Button
STP/RESET Button
the "
From the Select TZ Mode, press MODE/NXT Button
to the Analog Time Display.
B
C
Part II
45
Page 50

Chrono Mode
Page 51

Chrono Mode
LAP
Freezes for two seconds
Part II
LAP
From the Analog Time Display press MODE/NXT Button
D
repeatedly to enter the Chrono Mode. In this mode, you can activate/
deactivate/ reset Stopwatch, Record and Store Exercise Data, activate/
deactivate Out of Target Zone Alarm (Optional).
47
Page 52

Heart Rate display (Optional)
When the watch detects your heart rate, it will be displayed on the lower
screen in the Chrono Mode as followed:
Blinking "
Part II
Blinking "
" means that the heart rate receiver is activated.
" means that heart rate signal is being received.
Blinking " - " means that there is an error in the heart rate signal being
received.
"TZ" and Heart Rate reading (displayed in BPM or Percentage) means
your heart rate is in the target zone.
Blinking "TZ
" and heart rate reading (displayed in BPM or Percentage)
flashing means your heart rate is below the target zone.
Blinking "
TZ" and heart rate reading (displayed in BPM or Percentage)
flashing means your heart rate is above the target zone.
Tips:
When the stopwatch is running, you can toggle to display your heart
rate in BPM or Percentage by pressing SET Button
Mode.
Start Your Exercise
A
in the Chrono
- From the Chrono Mode, press STR Button
and start measuring the exercise data.
- Press STP/RESET Button
B
Button
48
again to continue the exercise.
C
B
to activate the stopwatch
to stop / pause the stopwatch, press STR
Page 53

Reset the Stopwatch
- Press & hold STP/RESET Button C in the Chrono Mode (when the
stopwatch stops) will reset the stopwatch to zero. At the same time, your
exercise data will be saved in Recall Data Mode.
Alarms During the Exercise
1. Out of Zone Alarm (Optional)
The watch will beep constantly if your heart rate is above or below the
selected Target Zone. This is to remind you to speed up or slow down.
- When the stopwatch is running, press & hold STP/RESET Button
activate/deactivate the Target Zone alarm.
OR
- When the stopwatch is stopped and has already reset to zero, press & hold
STP/RESET Button
2. In-Zone-Goal Countdown Timer Alarm (Optional)
You can set a goal time for being in your Target Zone. This In-Zone-Goal
Countdown Timer is set while in the Recall Data Mode or the Program
Mode. It can be set from 5 to 60 minutes. This value is set by pressing STR
Buttons
is displayed in the Chrono Mode as the following figure:
B
or STP/RESET Buttons C. If it is set to ON, the " " icon
C
to activate/deactivate the Target Zone Alarm.
C
to
Part II
49
Page 54

In-Zone-Goal Count
LAP
Part II
Down Timer Segments
The " " represents time segments. Each blinking segment means 1/9
of your goal time has been reached. When the total goal time is reached,
the watch will give four beeps and the display will flash your goal time for
10 seconds. (You can view the In-Zone-Goal Count Down Timer display
in the Recall Data Mode).
3. Drink Interval Timer Alarm
The watch will remind you to drink during exercise by giving a long beep
and flash with the amount of fluid loss for 10 seconds. Note: You must set
the Drink Interval Timer to ON and have the stopwatch running. (You
can set the Drink Interval Timer under the Fluid Check
TM
Mode refer to page
36.)
50
Page 55

Other Operations During the Exercise
1. When the stopwatch is running:
- Press MODE/NXT Button
D
repeatedly to circle around Chrono Mode,
Fluid Loss Display, Fluid Loss Settings and Recall Data Mode. See
the figures below:
D
Chrono Mode
LAP
D D
D D
Fluid Loss Display
D
D
Recall Data Mode
Part II
(Exercise Type)
LAP
D
LAP
LAP
LAP
Fluid Loss Settings
LAP
D
Fluid Loss Settings
D
(Exercise Intensity)
51
Page 56

If you do not have a calibrated MET value or put on a HR transmitter, the watch
will only use your pre-set MET value or our default value (Aerobic with Medium
Intensity). Please make sure to re-select your exercise type and intensity every
time with the procedure mentioned above.
Part II
However, if you have already calibrated your own MET value and put on a
HR transmitter, the displays of Fluid Loss Setting (Exercise Type and Intensity)
will automatically be turned off as the watch will calculate the best MET value
for you.
2. When the stopwatch is stopped ( Optional ):
- Press MODE/NXT Button
mentioned before, plus the Select TZ Mode. You are allowed to re-
select the Target Zone before start a new exercise.
From the Chrono Mode, press MODE/NXT Button D two times to return to
the Analog Time Display.
52
D
repeatedly to circle around all modes
Page 57

Recall Data
Mode
Page 58

Part II
Recall Data Mode
LAP
Freezes for two seconds
From the Analog Time Display press MODE/NXT Button D repeatedly to
enter the Recall Data Mode. In this mode you can review and delete the
exercise data, and quick set the watch.
54
LAP
Page 59

Review Data During the Exercise
While the stopwatch is running or paused, enter the Recall Data Mode and
press STR Button
B
to be continued
B
to view your exercise data as followed:
LAP
LAP
OR
B
LAP
B
LAP
(Optional) (Optional)
BBB
B
LAP
Fluid Loss in MilliliterReal Time Fluid Loss in Ounce
B
BBB
LAP
B
Total in-Zone TimeMaximum Heart RateTotal Calories
- If no button is pressed after entering the Recall Data Mode, the watch will
display the real time for 3 seconds and back to Chrono Mode automatically .
- During reviewing the data, press STP/RESET Button
D
Button
at any time to quit and back to Chrono Mode.
C
or MODE/NXT
Part II
55
Page 60

LAP
LAP
Part II
Average
Total Time
Heart Rate
You can quickly quit the Recall Data Mode and go to the Chrono Mode by
pressing STP/RESET Button
C
.
Note: If the In-Zone-Goal Countdown Timer (Optional) and the Calorie
values are zero, In-Zone-Goal Countdown Timer (Optional) or Calories will
not be displayed.
56
Lower related heart rate
display are optional
Page 61

Review Data After the Exercise
You can review your exercise data after the stopwatch is stopped. The
displaying sequence is as followed:
- Press STR Button
B
repeatedly to change the displays.
- Press STP/RESET Button
Fluid CheckTM Mode.
Beginning
LAP
Time
B
Date & Time of Exercise
B
Total Calories
to be continued
Month/Date
LAP
LAP
B
C
to quit the Recall Data Mode and go to the
LAP
LAP
OR
Fluid Loss in Ounce Fluid Loss in Milliliter
B
LAP
LAP
B
Max Heart Rate Total in-Zone Time
(Optional) (Optional)
Part II
BBB
B
BBB
57
Page 62

Part II
LAP
LAP
LAP
B B
Total Exercise Time In-Zone Time for Zone1 Time in above Zone1
(Optional) (Optional)
B
BBB
B
LAP
B
In-Zone Time for Zone2 Exercise Time for Zone1
(Optional) (Optional) (Optional)
B
LAP
B B
Time in above Zone2 Time in below Zone2 Exercise Time for Zone2
(Optional) (Optional) (Optional)
58
BB
LAP
LAP
B
Time in below Zone1
LAP
BBB
LAP
B
to be
continued
Page 63

LAP
B B
LAP
BBB
LAP
(Optional) (Optional) (Optional)
Time in Above Zone3In-Zone Time for Zone3
Time in Below Zone3
Exercise Time for Zone3
(Optional)
B
B
LAP
Part II
59
Page 64

Part II
Quick Reset Stopwatch & Entering Basic Settings
At any time from the real time display in Recall Data Mode, press & hold
SET Button
displayed for indication. Press STR Button
A
will enter the Reset Stopwatch Mode and the "RESET" is
B
will reset the stopwatch,
store the current exercise data and enter the Basic Settings Mode. (If no
button is pressed for 3 seconds it will exit Reset Stopwatch Mode
automatically.)
Clear the Memory
You can clear the stored exercise data in the Recall Data Mode when the
stopwatch is stopped. Press & hold STP/RESET Button
C
until the watch
sounds two beeps and the "RESET DATA" appears. Press STR Button
which is indicated by an arrow to clear all exercise data. See the figures below:
B
LAP
C
LAP
LAP
B
Date of Exercise Display
in Recall Data Mode
Reset Data
BC
No Data
Basic Settings for Exercise
From the Recall Data Mode, after clearing the memory, press & hold SET
A
Button
to enter the setting mode (or after quick reset the stopwatch).
60
Page 65

Step 1 (Optional)
In- Zone Goal Count Down Timer (blinking)
- Press STR Button
B
or STP/RESET Button C to
adjust the value (Range: OFF or 5~60 minutes).
- Press MODE/NXT Button
D
to proceed to the
next item.
Step 2
Fluid Loss Unit (blinking)
- Press STR Button
B
or STP/RESET Button C to
select OZ (Ounce) or ML (Milliliter).
- Press MODE/NXT Button
B
LAP
D
to proceed to the next item.
Step 3
Temperature Unit (blinking)
- Press STR Button
D
C
to select oF (Fahrenheit) or oC (Celsius).
- Press MODE/NXT Button
next item.
Step 4 (Optional)
B
LAP
Age (blinking)
- Press STR Button
D
C
to adjust the value.
- Press MODE/NXT Button
next item.
D
D
B
or STP/RESET Button
D
to proceed to the
B
or STP/RESET Button
D
to proceed to the
B
LAP
C
B
LAP
C
C
Part II
C
61
Page 66

Part II
Step 5
Weight Unit (blinking)
- Press STR Button
B
or STP/RESET Button
to select KG or Lbs.
- Press MODE/NXT Button
next item.
D
to proceed to the
B
C
D
LAP
C
Step 6
Weight Value (blinking)
- Press STR Button
to adjust the value.
- Press MODE/NXT Button
next item.
D
D
62
B
LAP
B
or STP/RESET Button
D
to proceed to the
Step 7 (Optional)
B
LAP
Maximum Heart Rate (blinking)
- Press STR Button
C
to adjust the value.
- Press MODE/NXT Button
C
D
B
or STP/RESET Button
D
to proceed to the
C
C
next item.
LAP
Heart Rate Sampling Interval Time (blinking)
- Press STR Button
C
to adjust the value.
- Press MODE/NXT Button
B
or STP/RESET Button
D
to proceed to the
C
Step 8 (Optional)
B
next item.
Page 67

Step 9 (Optional)
B
LAP
D
Upper Limit for Zone 1 (blinking)
- Press STR Button
to adjust the value.
C
- Press MODE/NXT Button
B
or STP/RESET Button
D
to proceed to the
C
next item.
Step 10 (Optional)
B
LAP
D
Lower Limit for Zone 1 (blinking)
- Press STR Button
to adjust the value.
C
- Press MODE/NXT Button
B
or STP/RESET Button
D
to proceed to the
C
Part II
next item.
Step 11 (Optional)
Upper Limit for Zone 2 (blinking)
- Press STR Button
B
or STP/RESET Button
to adjust the value.
- Press MODE/NXT Button
D
to proceed to the next
item.
Step 12 (Optional)
Lower Limit for Zone 2 (blinking)
- Press STR Button
B
or STP/RESET Button
to adjust the value.
- Press MODE/NXT Button
D
to proceed to the next
item.
B
LAP
C
D
C
D
C
B
LAP
C
63
Page 68

Step 13 (Optional)
Upper Limit for Zone 3 (blinking)
- Press STR Button
to adjust the value.
Part II
- Press MODE/NXT Button
next item.
Step 14 (Optional)
Lower Limit for Zone 3 (blinking)
- Press STR Button
to adjust the value.
- Press MODE/NXT Button
next item.
B
or STP/RESET Button
D
to proceed to the
B
or STP/RESET Button
D
to proceed to the
B
LAP
C
D
C
D
C
B
LAP
C
Step 15 (Optional)
Out of Zone Alarm (blinking)
- Press STR Button
B
or STP/RESET Button
to set the alarm to ON or OFF.
- Press MODE/NXT Button
D
to exit and return
C
D
to the Recall Data Mode.
Note: Press and hold SET button A at any time in the Setting Mode to exit
the Setting Mode.
From the Recall Data Mode, press the MODE/NXT Button
D
return to the Analog Time Display.
64
B
LAP
one time to
C
Page 69

Program Mode
Page 70

Part II
66
Program Mode
LAP
From the Analog Time Display press & hold SET Button A to enter
the Program Mode. This mode includes most of the settings in the
watch.
Page 71

To set the watch according to the following figures:
- Press MODE/NXT Button
- Press STR Button
- Press SET Button
D
B
to proceed to the next item.
or STP/RESET Button C to adjust the value.
A
to select heart rate limit in BPM or percent of your
maximum heart rate ( Optional ).
LAP
D D
D D D
LAP
D
to be continued
DD D
LAP
LAP
Part II
LAP
D
DD
LAP
67
Page 72

LAP
D D
LAP
LAP
Part II
D D D
D DD
D D D
Note:
Press STR Button
Press SET Button
maximum heart rate. (Optional)
68
LAP
LAP
DD
D
LAP
D D
B
or STP/RESET Button C to adjust the value.
A
to select heart rate limit in BPM or percent of your
LAP
D
LAP
LAP
D
to be
continued
Page 73

LAP
D D
LAP
D D D
LAP
D
LAP
LAP
D DD
D
LAP
D
LAP
D D D
(Optional)
Note:
Press STR Button
Press SET Button
B
or STP/RESET Button C to adjust the value.
A
to select heart rate limit in BPM or percent of your
maximum heart rate. (Optional)
or
DD
LAP
LAP
D
to be
continued
69
Part II
Page 74

LAP
LAP
D
LAP
or
Part II
Note:
Press STR Button
Press SET Button
maximum heart rate.
70
D D D
LAP
D
LAP
or
D DD
D
LAP
D
LAP
or
D D D
(Optional) (Optional) (Optional)
B
or STP/RESET Button C to adjust the value.
A
to select heart rate limit in BPM or percent of your
(Optional)
D
LAP
LAP
D
to be
continued
Page 75

LAP
D
LAP
D
D D D
LAP
(Optional) (Optional) (Optional)
D
LAP
D
LAP
D
LAP
D DD
(Optional) (Optional) (Optional)
When finished with the setting, press MODE/NXT Button D to return to the
Analog Time Display.
Note: During the Setting, press & hold SET Button
A
at any time to exit the
Setting Mode.
Part II
71
Page 76

How to Connect Your
Watch with the PC
(Optional for EON-3067HS)
Page 77

How to Connect Your Watch with the PC (Optional for EON-3067HR)
Note: All PC downloading related function are optional for EON-3067HS.
Ask your dealer for the optional Activity Manager PC Software Kit.
Installing the Software
System Requirements:
CPU: Pentium IIITM processor compatible or above
Operating system: WindowsTM 98 (2nd) or newer
Hard Disc: 50 MB (min)
Ram: 64 MB (min)
Note:
Pentium IIITM is a trademark of the Intel Corporation.
Windows is a registered trademark of the Microsoft Corporation.
Step 1: Insert the Activity Manager PC Software (included) into the CD-
ROM driver.
Step 2: Installation screen will appear in monitor. Refer to the screen
instructions to complete installing the software.
Step 3: Running the software.
Click Start | Program | ACUMEN | Activity Manager | Activity
Manager
Connecting the Watch with PC
Attention:
The Temperature, Humidity Heart Rate feature will be deactivated
during uploading / downloading.
73
Part II
Page 78

Step 1: Clamp the PC Interface & Charger Connector to your watch with
the other end connect to the PC Interface & Charger. Make sure the
three pins in the clamp are properly in contact with the contacting
points on the watch. (as shown in Figure 1)
Part II
Fig.1
Step 2: Plug the USB connector to your PC, with the other end to the PC
Interface and Charger. (as shown in Figure 2)
Fig.2
Step 3:The wordings "PC LINK" on the watch means it is ready for uploading
or downloading. (as shown in Figure 3)
Fig.3
LAP
74
Page 79

Part III
Technical Reference
Page 80

Target Zone &
Fitness Training
(Optional)
Page 81

Target Zone & Fitness Training
Determining Your T arget Zone
What is Target Zone Heart Rate Training? In order to benefit the most
from your workout, you need to become familiar with your heart rate
training zone. By working within the correct range, you will achieve your
fitness goals and strengthen your cardiovascular system in less time.
Here is basically how it works.
Effective conditioning requires that you maintain your heart rate at the
proper level for at least 20 minutes per workout (or per day). At too high
of a heart rate your activity can become counter effective. For most
people, as your heart rate exceeds 85% (the upper limit), your body
begins to become anaerobic and produce acids. This also burns less fat
which can begin to burn and strain muscles, and even start storing fat. As
for the lower limit, this number tells you when you have reached a level of
intensity that is productive. A heart monitor will tune you into your body's
internal activity level and helps prevent injury or worse.
To make this part easy for you, the Hydra-AlertTM automatically sets the
correct target zone for you after you enter in your age in the heart rate setup
mode. The internal auto-setting is based on a generally accepted standard
range of 65 to 85% of your maximum HR (where max HR = 207 - Age x 0.7).
There are many variations of formulas for calculating target zones. In most
cases they will come up with a range very close to or the same as the autosetting of the Hydra-AlertTM. If you prefer to fine-tune or program your own
limits, this can also be done in the HR Setting Mode (see page 43). The
internal automatic TZ calculation is based on the following example:
Part III
77
Page 82

TARGET ZONE CALCULATION FORMULA
207 - Your age x 0.7 = max HR
For a 30 year old person, your
calculations would be as follows:
207 - 30 X 0.7 = 186 Maximum Heart Rate
65% of this number = 121
85% of this number = 158
The calculated exercise range for a 30 year old would be a low of 121 and a high of 158 beats per
minute. (You should never exercise near your maximum heart rate (max HR) for any period of time.)
Basic Fitness Tips & Target Zone
Part III
Depending on your specific goals, individual fitness level or just on how
energetic you feel, you may want to modify your range from one day to the
next based on the following chart:
or Less
78
Page 83

Stretching
Begin and end every workout with stretching. Stretching done before your
workout increases flexibility to help prevent muscle strain or injury and
stretching after, loosens tight muscles and helps prevent soreness.
Stretch before warm up & after cool down.
Stretch slowly & gently, never bounce or stretch to a point of pain.
Hold each stretch 30-60 sec. & exhale as you extend stretches.
Warm Up & Cool Down: 55% or Less
Start every exercise with a slow and gradual warm up and end with a slow
and gradual cool down. Smoothly easing into and out of strenuous activity
helps your body prepare your metabolism and blood flow to efficiently break
down fat and change over from one intensity level to another. Going into your
target zone too quickly can cause your heart rate to increase too rapidly
causing you to loose your energy too soon, strain yourself or possibly worse.
Slowly bring your heart rate to a level just below the lower limit of your target zone.
Maintain heart rate at this level for 5-10 min.
The Fat Burning Zone: 55- 65%
The Fat Burning Zone: 55-65% --This range is recommended for those who
haven't worked out in a long time, are trying to loose weight, those at a high
risk for heart problems or if youíre just not feeling 100% one day. It is
intended for low intensity and/or long duration exercise. The lower intensity
helps you maintain your exercise for longer periods of time. When exercising
for weight loss or starting a new exercise routine, longer duration is more
important and much healthier than higher intensity.
Build up gradually to 30 to 60 min. per workout.
Workout 3 or 4 times per week.
Part III
79
Page 84

The Aerobic Zone: 65- 85%
This range is recommended for those in good physical condition who have
been exercising on a consistent basis for an extended period of time.
Exercising at this range helps improve your fitness level and prevent injury
caused from over training.
Duration: 20-30 min. per workout.
Frequency: At least 3 or 4 times per week.
The Anaerobic Zone: 85% to Max HR
Part III
To be used by ultra-athletes only and never recommended without close
medical approval or supervision. This range is used only for those in
extremely good physical condition during races or training for competition. It
is typically used for interval training (or short sprints) to help improve or
measure endurance levels.
Monitor Your Progress
Track yourself to determine how your overall health and fitness improves and become
aware of your various heart rate levels. As your cardiovascular system improves, your
normal resting heart rate will decrease. It will take longer to reach your target zone, it
will take less and less time for your heart rate to come back down after working out.
If you ever notice your resting heart rate to be higher than usual, it may be a good
idea to take a rest from exercise, or at least workout easier that day, Similarly, if you
notice that your heart rate doesnít come back down as quickly as usual at the end of
your workout, it could be an indication that your workout was more (or too) strenuous,
or that you havenít recovered well enough from a previous extraneous workout or
injury. These signals in your heart rate could also be an indication of an illness coming
on, stress, or a good reason for a check up with your doctor.
80
Page 85

Getting to Know
Heat Index
Page 86

Getting to Know Heat Index
High humidity makes heat more dangerous because it slows the
evaporation of perspiration-the body's natural cooler. That caused
outdoor exercise more dangerous even for those in good shape.
Key rules for coping with heat are to drink plenty of water to avoid
dehydration and to slow down and cool off. Overheating can cause
serious, even life-threatening conditions such as heat stroke.
Part III
The Heat Index is to show how hot a particular combination of heat and
humidity feels. The Heat Index in the Hydra-AlertTM is a report of the
latest weather conditions based on the current temperature and the
relative humidity. You can refer to the following Heat Index Chart to know
the apparent temperature and to avoid getting into danger during
exercise.
82
Page 87

How Temperature and Humidity Combine to Make If Feel Hotter
Ultra Danger Danger Ultra Care Care
110
109 121
108 127117
106 113 121 130 140
105 109 115 122 129 138 148
102
105
109 114 120 127 134 142 151
100
102
104 107 112 116 122 128 135 143 151
97
94
90 90 90 91 92 94 96 98 101 105 108 113 117 122 13312790
86 86 85 85 86 86 87 89 90 92 94 96
82 82 81 81 82 82 82 83 84 85 86 87 89 90 92 94 96 99 104 107
77 77 78 78 78 78 79 79 79 80 80 81 81 82 82 83 84 84 85 86 87
72
67
101 1049998 107 111 116 121 127 133 141 148
94 94 95 97
737475
71
69
99
75 76
72 74 75 76
105 109 113 118
102
767777
76 77 7677 76
129
123
135 142
99
105 109 113 117 121
102
101
77
77
77
76
77
77
73
75
75
74
76
727069 66
73 72
74
64
Part III
61
83
Page 88

Determining Your
MET Parameter
Page 89

Determining Your MET Parameter
If you do not find the particular activity in your watch, refer to a similar
exercise type and look for the corresponding parameter from the table below
to set your watch. (Refer to page 36 to set the MET Parameter.)
Table of MET Parameter
Exercise
AEROBICS
BASKETBALL
BOWLING
CYCLING
DANCING
FOOTBALL
GOLF
HIKING
JUMPING ROPE
RUNNING
SKATING(Ice/Inline)
SKIING
SKIING(Cross-Country)
SWIMMING
STAIRS
TENNIS
VOLLEYBALL
WALKING
6
7
2
3~5
3
6, 7
4, 5
3~5
8
8~10
5
6, 7
5
4
4
4, 5
3
3
Intensity Level
Light Medium High
7, 8
8, 9
3
6~8
4~6
8
6
5~8
9, 10
11~15
6, 7
8~10
6, 7
5~7
5, 6
6, 7
4, 5
4~6
9
10~12
4
9, 10
7, 8
9, 10
7
9~11
11, 12
16, 17
8, 9
11, 12
8
8~10
7, 8
8, 9
6
7
Part III
85
Page 90

How to Calculate
Your Fluid Loss
Page 91

How to Calculate Your Fluid Loss
Calorie/ minute =(3.5 x EF x Body weight) / 200
EF: Exercise Factor (2-20)
Body Weight in kg: 30-250kg or 50-500lbs (1kg = 2.21lbs)
Fluid Loss (Ounce) / Hour = (Kcal Per Hour * T + H 2) / 1450
T: Temperature in
H: Humidity in percentage
When the EON-3067/3068HS has been updated with heart rate feature, the above
formula will be changed as below:
o
F
Calorie/ minute =(3.5 x EF x Body weight x Heart rate factor) / 200
Heart rate factor: 0.95, HR < 65% Max. HR
1.0, HR = 65-85% Max. HR
EF: Exercise Factor (2-20)
Body Weight in kg: 30-250kg or 50-500lbs (1kg = 2.21lbs)
Fluid Loss (Ounce) / Hour = (Kcal Per Hour * T + H 2) / 1450
T: Temperature in
H: Humidity in percentage
1.05, HR > 85% Max. HR
o
F
<
<
87
Page 92

Body Fluid Check
Monitoring Tips
and Guidelines
TM
Page 93

Body Fluid CheckTM Monitoring Tips and Guidelines
The ACUMEN Hydra-AlertTM provides an indication of the level of
dehydration. The purpose of the dehydration reading is to remind an
individual to drink fluids.
It takes the human body 12 to 24 hours to replace fluids from heat and
exercise. To prevent the harmful effect of excessive dehydration it is
necessary to drink before you become thirsty.
The thirst mechanism is not precise in humans. An individual can lose
fluids equaling up to 3% of their body weight before the thirst mechanism
tells the person they need fluids.
Strength and endurance are reduced by 10-15% after just a 2% loss of
body weight, through dehydration.
Most people need more than eight ounce glasses of water per day. The
water intake each day needs to be half your body weight in ounces. Do
not drink over 32 ounces at any one time. Do not consume more than
four ounce glasses of water in any one hour period. Divide the water
intake over the entire day.
If the exercise period is under 60 to 90 minutes water is always
appropriate. If the exercise period is more than 60 to 90 minutes, a sports
drink offers an energy advantage that can enhance stamina and
endurance.
Part III
89
Page 94

Cardiac drift occurs because dehydration causes a drop in blood volume
with less blood being pumped with each heartbeat. The heart rate increases
7 beats per minute for each 1% loss in body weight due to dehydration.
The keys to Proper Hydration:
Drink on schedule, rather than relying on thirst
Drink during training as well as competition
Drink cold water to increase gastric emptying
Part III
The opinion of the American College of Sports Medicine on Exercise and
Fluid Replacement (ACSM, 1996) is that adequate fluid replacement helps
maintain hydration and, therefore promotes the health, safety and optimal
physical performance of individuals participating in regular physical activity.
Use of the dehydration indicator on the ACUMEN Hydra-AlertTM will help
an individual develop a regimen to maintain appropriate levels of hydration.
90
Page 95

Specifications
Page 96

Specifications
Shock Resistant
Part III
92
Standard shock resistance.
Water Resistance
98 feet (or 30 meters). Not intended for diving.
Operating Temperature
32 F to 122 F (0 C to 50 C)
Heart Rate Range (Optional)
20-240 BPM
Heart Rate Transmitter/Receiver Distance (Optional)
0-34 inches
Battery Type
Chest Transmitter: Lithium CR 2050 or CR 2032 (Optional)
Watch: Rechargeable Lithium LIR 2032
Battery Life
Chest Transmitter: Approx. 2.5 years, average use 1
hr/day; (Optional)
Watch (stand by): 60 days, average use 1 hr/day.
AC/DC Transformer
Input: 120V 60Hz 9VA
Output: DC 9V 400mA
Page 97

Technical
Display Guide
Page 98

Technical Display Guide
Part III
94
Display Items
Time
Time Alarm
Date
Chrono
Age (Optional )
Weight Unit
Weight KG
Lbs
In-Zone-Goal Count
Down Timer (Optional)
TZ Alarm (Optional )
Zone 1 (Optional )
Zone 2 (Optional )
Zone 3 (Optional )
Drink Interval
Humidity
Temperature
Fluid Loss
Heat Index
MET Parameter
Exercise Type Aerobics
Max MET (VO2 MAX) (Optional )
Default Setting
12:00:00 AM
off,#1,12:00 AM
01/01/2000
00:00:00
30
75.0KG
150lbs
OFF
OFF
102~121BPM
121~158BPM
158~177BPM
OFF
OFF
5
Range
12/24 HR.Clock
ON/OFF,#1~3, MO, TU,WE,
TH, FR, SA, SU, MO-FR,
MO-SA, DAILY, Jun-o1
TO 12/31/2099
24:00:00
7-99
KG/LB
30-250KG
50-500Lbs
5-60 minutes
ON/OFF
20-240,OFF
20-240,OFF
20-240,OFF
1~60 minutes
1-99%
14-140 F/-10-60 C
0-999.9 Ounce/0-99.99%
or 0-99999 ml/0-99.99%
64-151
2-20
14 Exercise Types
By Calibration
OFF/ONOFFSmart Lite
Page 99

Part IV
Precautions, Warranty, Service
and Repair
Page 100

General Precautions
Do not operate buttons under water
Although your monitor is water resistant, be sure that you do not operate
the buttons under water as pressure can cause them to leak.
Dry off watch after use
Moisture can affect the Temperature and Heat Index reading. Please dry
off your watch after use.
Dry off transmitter after use (Optional)
The transmitter will automatically shut itself off once you have removed it
from your chest. However, it is important to thoroughly dry it off after
every use since moisture on the electrodes can cause it to remain on
longer.
Part IV
Electrode precautions (Optional)
Be sure not to excessively twist or bend the electrode portions of the
chest transmitter (never bend backwards), especially when storing it. This
can permanently damage their conductivity and cause mechanical
damage to the internal circuit.
Global Reset
If your monitor should ever get stuck or act erratically due to dropping it,
static shock or some other unforeseen reason, this feature will allow you
to reset the unit and return all settings back to their internal defaults. To
perform this function, press and hold four buttons together for 3 seconds
under any mode (display dual LCD). The unit will automatically clear and
return to setting mode.
96
 Loading...