

Page 1
HR427
ENGlish
Page 2
1
ENGLISH
TABLE OF CONTENTS
Congratulations 1
Warning 2
HR427 Features 2
HR427 Components 2
Button Functions 4
Modes Of Operation 4
Setting The Clock 5
Determining Your Target Zone 5
Setting Your Target Zone 6
Setting Alarm Sound On & Off 7
Basic Fitness Tips And Target Zone Explanation 7
Attaching your HR427 9
Exercising with your HR427 11
Troubleshooting 11
Taking Care Of Your HR427 12
Technical Specifications 13
Warranty & Service 14
CONGRATULATIONS!
Welcome to the future of wireless heart rate technology! Your
purchase today shows that you are serious about your exercise and
are committed to achieving your best. Today, getting the most from
your exercise doesn’t necessarily mean you have to spend longer
periods of time to achieve those goals. With Target Heart Rate
Training, you will increase the effectiveness of your workout by
monitoring and quantifying your results every step of the way. For
most individuals as little as 20 minutes in your target heart rate zone
each session is enough to achieve substantial health improvements.
The Vetta HR427 will act as your personal coach and guide you to
your fitness goals more effectively.
Heart Rate Technology provided by Acumen,
Inc. EZ Set Target Zone™ is a trademark of
Acumen, Inc. EZ-Set Target Zone and Angled
Belt Clip are patent pending from Acumen, Inc.
Page 3

2
WARNINGS & CAUTIONS
Overexertion can cause serious injury , including heart attacks. Some
individuals cannot safely elevate their heart rate to the levels of
typically used heart rate training zones. No one should begin an
exercise program without first obtaining medical clearance,
especially if there is a personal or family history of heart disease,
high blood pressure, or if you are over age 40, have diabetes, high
cholesterol, smoke cigarettes, are overweight or are taking certain
medications. Stop exercising and seek medical attention if you
notice signs of overexertion or heart problems, such as pain or
pressure in the left or mid-chest area or left neck, shoulder or
arm, light-headedness, cold sweat, unusual paleness or
fainting. Also note that the signals used by this monitor may interfere with a pacemaker or other implanted devices, consult the manufacturer of the implant device and/or your physician prior to using
this monitor.
HR427 FEATURES
• Shock resistant design
• Water resistant to 30 meters
• Nite Site Electroluminescent Night Light
• EZ-Set Target Zone Automatic Programming
• Target Zone (TZ) audible and Visual Alarm Indicators
• Wireless, ECG accurate Heart Rate Chest Belt
• 12/24hr Time/Date display with Daily Alarm
• Quick Release Bike Mount Design
• Memory Recall of Time in Target Zone & Fitness Index
Page 4
3
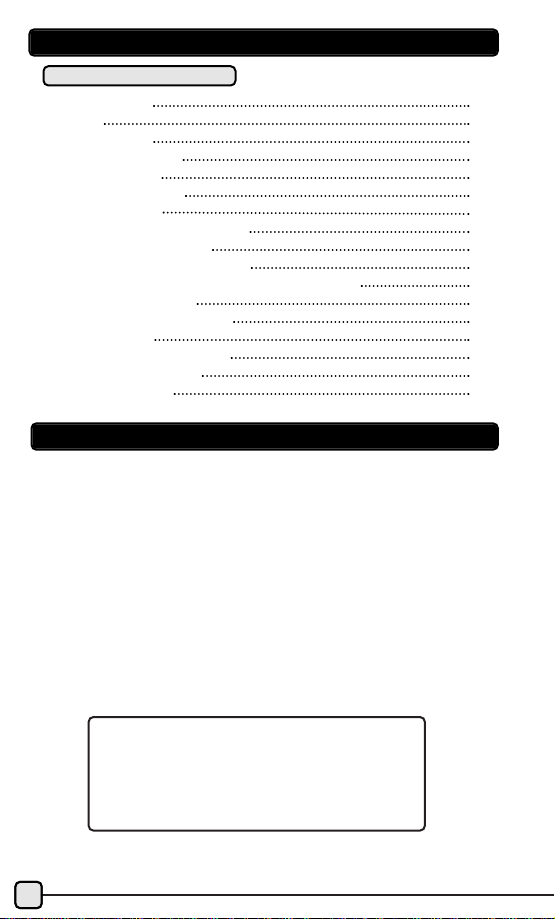
CHEST TRANSMITTER ADJUSTABLE ELASTIC STRAP
WITH EZ-FIT BELT CLIPS
Soft, flexible electrodes comfortably hug your chest providing
optimum stability. Elastic strap is easy to adjust and includes a unique
angled design patented clip which helps eliminate slippage and provides added comfort.
HR427 COMPONENTS:
HEART RATE MONITOR
Sleek, sporty styling with an easy-to-read display and comfortable
button locations.
Page 5
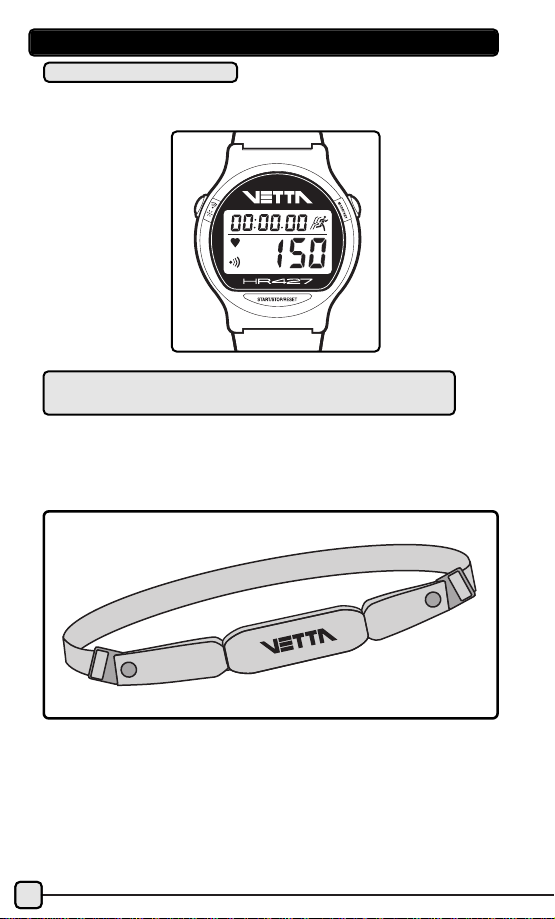
VETTA BIKE MOUNT
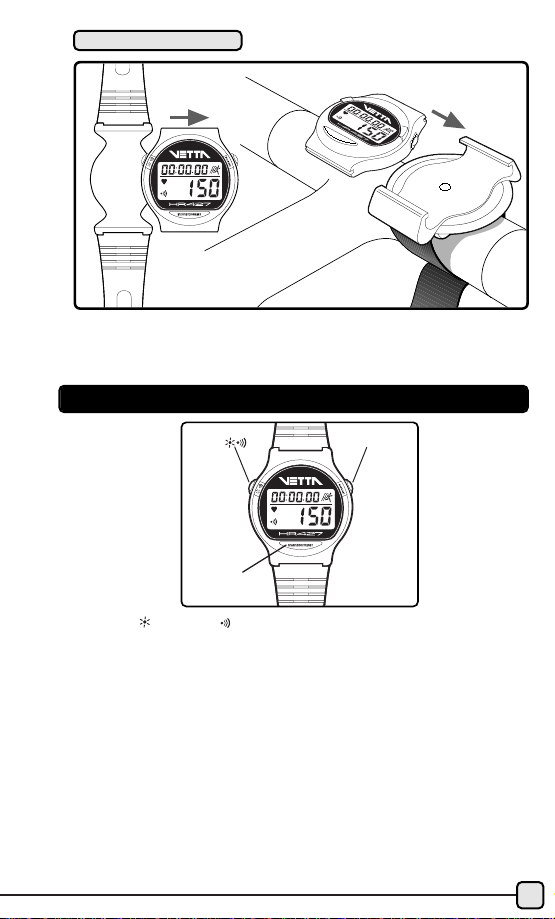
BUTTON FUNCTIONS
• LIGHT ALARM Button Press momentarily to light display
3 seconds. Press and hold to keep light on longer & hold 3
seconds to toggle alarm ON/OFF for the current mode displayed.
• MODE/SET Button Press momentarily to change modes. Press &
hold for SET.
• START/STOP/RESET Button Press momentarily for start/stop.
Press and hold to reset stopwatch.
Note: All button produce a short beep when pressed. Pr ess and
hold commands also produce another beep.
Mode/Set
Start/Stop
Reset
The head unit of the HR427 can be detached from the wrist strap
mount and inserted into the handlebar mount as shown.
4
Page 6
5
• T o exit Setting Mode when finished, just press and hold the SET button.
Note: If no button is pressed after 1 minute, the monitor will
automatically exit the Setting Mode.
The two Setting modes-Clock and Tar get- ar e accessed from the T ime
of Day & HR/Stopwatch display modes.
• Press & hold the SET button to enter setting mode .
• Adjust blinking digits with the RESET or ALARM buttons.
• Press RESET button to increase the digits. Press ALARM to decrease
the digits press and hold changes the digits fast.
• Proceed to the next setting option with the SET button.
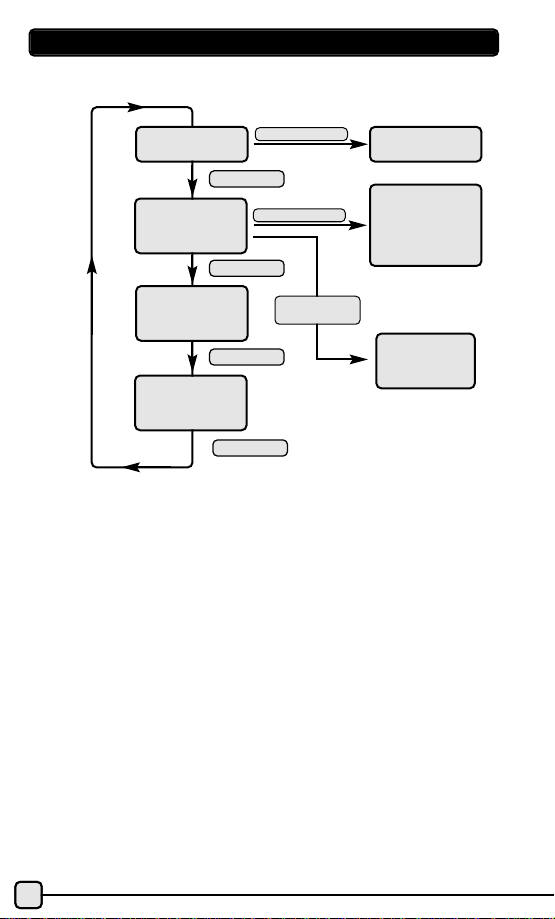
MODES OF OPERATION
To switch through different modes, click the MODE button.
SET TARGET
ZONE
HEART
RATE
PRESS MODE
SET TIME
TIME IN
TARGET
ZONE
FITNESS
INDEX
CLEAR
WORKOUT
DATA
TIME/DATE
PRESS MODE
PRESS MODE
PRESS MODE
PRESS & HOLD SET
PRESS & HOLD SET
PRESS &
HOLD RESET
Page 7

Start from the Time-of-Day Mode.
1. Press & hold the SET button to enter
the time setting mode.
2. Hour (blinking) -Set using the RESET
or ALARM button. Press the SET button
to proceed to the next item.
3. Minutes (blinking) -Set using the
RESET or ALARM button. Press the SET
button to proceed to the next item.
4. 12/24hr. Time Display(blinking) --Set
using the RESET or ALARM button. Press
the SET button to proceed to the next
item.
5. Year (blinking) -Set using the RESET
or ALARM button. Press the SET button
to proceed to the next item.
6. Month (blinking) -Set using the RESET
or ALARM button. Press the SET button
to proceed to the next item.
7. Day (blinking) -Set using the RESET or
ALARM button. Press the SET button to
proceed to Alarm settings.
8. Daily Alarm (blinking) -Set on or off
with the RESET or ALARM button. Press
the SET button to proceed to the next
item.
9. Alarm Hour (blinking) -Set using the
RESET or ALARM button. Press the SET
button to proceed to the next item.
10. Alarm Minutes (blinking) -Set using
the RESET or ALARM button. Press the
SET button to proceed to the next item.
11. Smart Lite (blinking) -Set on or off
using the RESET or ALARM button. Press
the SET button to exit the setting mode.
SETTING THE CLOCK/CALENDAR
6
Page 8

7
What is Target Zone Heart Rate Training?
In order to benefit the most from your workout, you need to
become familiar with your heart rate training zone. By working
within the correct range, you will achieve your fitness goals and
strengthen your cardiovascular system in less time. Here is basically
how it works.
Effective conditioning requires that you maintain your heart rate at
the proper level for at least 20 minutes per workout (or per day). At
too high of a heart rate your activity can become counter effective.
For most people, as your heart rate exceeds 85% (the upper limit),
your body begins to become anaerobic and produce acids. This also
burns less fat which can begin to burn and strain muscles, and even
start storing fat.
As for the Lower limit, this number tells you when you have reached
a level of intensity that is productive. A heart rate monitor will tune
you into your body’s internal activity level and helps prevent injury
or worse.
To make this part easy for you, this monitor automatically sets the corr ect
target zone for you, after you enter in your age in the heart rate setup
mode. The internal auto-setting is based on a generally accepted
standard range of 65 to 85% of your max HR (where max HR = 220 -
Age).
There are many variations of formulas for calculating target zones.
In most cases they will come up with a range very close to or the
same as the auto-setting of this monitor. If you prefer to fine-tune or
program your own limits, this can be done in the 2nd portion of the
HR Setting Mode (see page 8). The internal automatic TZ calculation
is based on the following example:
The calculated exercise range for a 30 year old would be a low of
124 and a high of 162 beats per minute. You should never exercise
near your maximum heart rate (max HR) for any period of time.
TARGET ZONE CALCULATION FORMULA
220 - Your Age = max HR
For a 30 year old person, your
calculations would be as follows:
220 - 30 = 190 Maximum Heart Rate
65% of this number = 123.5
85% of this number = 161.5
DETERMINING YOUR TARGET ZONE
Page 9

8
The alarm sound for both the Daily Alarm and the Target Zone
Range can be turned ON or OFF by pressing and holding the
ALARM button. To indicate this, the alarm indicator on the display will switch ON or OFF.
To switch the Daily Alarm ON or OFF, press and hold the button
while in the Time Mode. When this alarm is beeping it can be
silenced by pressing any button.
Start from the Heart Rate Mode
1. Press & hold the SET button to enter
the setting mode.
2. Age (blinking) --Set age using the
RESET or ALARM button (Range is 7-99,
default is 30). Press the SET button to
proceed to the next item. (If you want
to use the built-in EZ-Setting of 65-85%
of your max, set only your age and skip
steps 3, 4 & 5 by pressing SET 3 times.)
3. Target Zone Alarm (blinking) --Set
ON/OFF using the RESET or ALARM button. Press the SET button to proceed to
the next item.
4. Target Zone High (blinking) --Set
using the RESET or ALARM button (TZ
High auto-sets based on age setting,
modifying it is optional.). Press the SET
button to proceed to the next item.
5. Target Zone Low (blinking) --Set
using the RESET or ALARM button (TZ
Low also auto-sets based on age setting, modifying it is optional.). Press the
SET button to exit setting mode.
Note: Any items not set will default to standard average
values. The TZ limits automatically set to 65-85% of your max.
based on your age setting (where Max. = 220 - Age) every time
the age setting is changed. This watch will allow you to
program your upper and lower limits within one beat of each
other. It will also allow you to set either limit to the "off"
position But it will not let you set the lower limit higher than
the upper or the upper to less than the lower.
SETTING YOUR TARGET ZONE
SETTING ALARM SOUND ON AND OFF
T
T
T
Page 10

9
Depending on your specific goals, individual fitness level or just on
how energetic you feel, you may want to modify your range from
one day to the next based on the following chart:
EXERCISE TARGET ZONE CHART
To activate or deactivate the Target Zone Alarm Sound, simply press
the button while in the Heart Rate/Stopwatch Mode.
STRETCHING
WARM UP & COOL DOWN 55% OR LESS
Begin and end every workout with stretching. Stretching done
before your workout increases flexibility to help prevent muscle
strain or injury and stretching after, loosens tight muscles and helps
prevent soreness.
• Stretch before warm up & after cool down.
• Stretch slowly & gently, never bounce or stretch to a point of pain.
• Hold each stretch 30-60 sec. & exhale as you extend stretches.
Warm Up & Cool Down: 55% or less --Start every exercise with a
slow and gradual warm up and end with a slow and gradual cool
down. Smoothly easing into and out of strenuous activity helps your
body prepare your metabolism and blood flow to efficiently break
down fat and change over from one intensity level to another.
Going into your target zone too quickly can cause your heart rate
to increase too rapidly causing you to loose your energy too soon,
strain yourself or possibly worse.
• Slowly bring your heart rate to a level just below the lower limit
of your target zone.
•Maintain heart rate at this level for 5-10 min.
BASIC FITNESS TIPS & TARGET ZONE
200
180
160
140
120
100
Heart Rate - Beats per Minute
80
Age:
20 25 30 35 40 45 50 55 60 65+
Anaerobic Zone
Aerobic Zone
Fat Burning Zone
Warm-up Cool Down
% of Max.
Heart rate
85% to Max
65% to 85%
55% to 65%
55% to 65%
Page 11

10
FAT BURNING ZONE: 55-65%
MONITOR YOUR PROGRESS
This range is recommended for those in good physical condition
who have been exercising on a consistent basis for an extended
period of time. Exercising at this range helps improve your fitness
This range is recommended for those in good physical condition
who have been exercising on a constant basis for an exteneded
period of time. Exercising at this range helps improve your fitness
level and prevent injury caused from over training.
• Duration: 20-30 min. per workout.
• Frequency: At least 3 or 4 times per week.
To be used by ultra-athletes only and never recommended
without close medical approval or supervision. This range is
used only for those in extremely good physical condition during
races or training for competition. It is typically used for interval
training (or short sprints) to help improve or measure endurance
levels.
THE ANAEROBIC ZONE: 85% TO MAX HR
The Fat Burning Zone: 55-65% --This range is recommended for
those who haven’t worked out in a long time, are trying to loose
weight, those at a high risk for heart problems or if you’re just not
feeling 100% one day. It is intended for low intensity and/or long
duration exercise. The lower intensity helps you maintain your
exercise for longer periods of time. When exercising for weight loss
or starting a new exercise routine, longer duration is more
important and much healthier than higher intensity.
• Build up gradually to 30 to 60 min. per workout.
• Workout 3 or 4 times per week.
THE AEROBIC ZONE 65%-85%
Track yourself to determine how your overall health and fitness
improves and become aware of your various heart rate levels. As
your cardiovascular system improves, your normal r esting heart rate
will decrease. It will take longer to reach your tar get zone, it will take
less and less time for your heart rate to come back down after
working out.
If you ever notice your resting heart rate to be higher than usual, it
may be a good idea to take a rest from exercise, or at least workout
easier that day, Similarly, if you notice that your heart rate doesn’t
come back down as quickly as usual at the end of your workout, it
could be an indication that your workout was more (or too)
strenuous, or that you haven’t recovered well enough from a
previous extraneous workout or injury. These signals in your heart
rate could also be an indication of an illness coming on, stress, or a
good reason for a check up with your doctor.
Page 12

11
3. Center and position the belt as shown, at heart level, just below
your pectoral muscles or breasts (but not too low) and attach the
other end of the strap to the transmitter. The "Vetta” logo should be
positioned at the center of your chest.
4. Moisten the transmitter electrodes. For best results, the belt
should be worn directly on your skin. A small amount of moisture is
needed to assist in conducting the electrical impulses generated
from your heart beats to the transmitter. Gently pull belt away from
skin and apply a small drop of water or saline solution to each of the
two electrodes (one on each side) (Fig. 3).
Electrodes
Fig. 3
ATTACHING YOUR HEART MONITOR
1. Attach the adjustable strap to one side of the transmitter. Push
the round tab of the belt clip through the back side of the attaching
hole on the transmitter and twist it into place (Fig. 1). The unique
angled clip is designed to prevent the belt from slipping down your
chest. It can be attached in either the up or down position (keeping
both the same). Depending on the contour of your torso, one
direction may be more comfortable than the other.
Belt Clip
Transmitter
Elastic
Strap
Fig. 1
2. Adjust the tension of the strap to fit snugly but comfortably
around your chest. Wrap the belt around your chest as shown
(Fig.2)
Fig. 2
Page 13

12
If you prefer to wear your belt over a light shirt you will need to
generously moisten the areas of the shirt directly beneath the
electrodes in order to insur e proper signal pick-up. You may wear as
many layers of clothing as desired over the transmitter belt without
affecting the operating range.
5. Put your wrist monitor on. The monitor doesn’t have to be
attached to your wrist to register your heart rate, it just has to be
within 3 feet of your chest.
EXERCISING WITH YOUR HR427
HEART RATE
THE TARGET ZONE
From Time of Day Mode click MODE button once to go to Heart
Rate Mode and begin your exercise. If your transmitter is correctly
attached, the running man indicator on the monitor display should
begin to blink and your current heart rate in beats per minute will
come up on the display. If no heart rate is detected for 5 min. the
heart rate circuit will switch itself off. The HR427 Heart Rate Monitor
indicator tells if the heart rate circuit is on. To switch it back on
after it has shut off, simply restart the Heart Rate Mode by clicking
the MODE button.
Your monitor will provide both a visual indicator (by flashing the
heart rate digits) and an audible alarm (beeping) if your heart rate
is above or below your set target zone range. The "TZ" indicator
with the or will indicate if your heart rate is within, above or
below the set target zone, respectively. The beeping alarm can be
turned on or off by pressing the Alarm button (indicated by the
on the display).
USING THE MEMORY RECALL MODE
From the Time mode, click the MODE button 2 times to go to the
Recall mode. The upper display will show your Total Elapsed Time
for your workout and the lower display will show how much time
you have spent in your TZ.
SMART-RECALL DISPLAY
This feature allows you to view the Recall display in real time while
the stopwatch is running. To use it during your workout, switch to
the Recall mode.
Page 14

13
THE STOPWATCH
From the Heart Rate mode simply press the ST ART/STOP button to activate
the stopwatch. You can pause and restart by pressing the START/STOP
button. You can also press the MODE button to view the Recall or Time
modes without interrupting the stopwatch. When you have finished, simply press the STOP button to end the recording. Press the MODE button
to proceed to the Recall or Time mode.
QUICK START
This feature instantly takes you to the Heart Rate/Stopwatch mode
and starts or stops the stopwatch and recordings fr om any mode, at
one simple press of the START/STOP button.
NITE-SITE NIGHT LIGHT OPERATION
Simply press the LIGHT button once to light the display for 3 seconds.
SMART-LIGHT
Between the hours of 6 PM & 6 AM pressing any button will
activate the night light for 2 seconds.
RESETTING THE STOPWATCH & CLEARING
WORKOUT DATA
To reset the Stopwatch and clear workout data, press and hold the
RESET button for 3 sec, while in the Heart Rate/Stopwatch mode
and with the Stopwatch timer stopped. You will hear a second beep
and the stopwatch timer display will go to all zeros. This will allow
you to record a new workout starting from zero. Keep in mind that
USING THE FITNESS INDEX RECORDING
This feature is used to monitor your fitness efficiency level by monitoring how quickly your heart rate starts to come back down after
your workout. As your cardiovascular system improves it will take
less and less time for you heart rate to come back down to a resting
level after your workouts.
This measurement is automatically activated at the end of your
workout when you press the STOP button. To use it correctly, it’s
best to activate it immediately as soon as you have completed your
exercise (or as soon as you finish your cool-down).
When you stop the stopwatch, the display will automatically switch
to the Fitness Index Mode and begin a 60 sec, countdown timer.
During this countdown you should be concentrating on bringing
your body down to a comfortable rest, by taking deep slow breaths
and relaxing your muscles. When the countdown timer reaches
zero, the watch will beep twice and display a number between 0
and 99. The higher this number , the better your r ecovery rate. Note:
The transmitter belt needs to remain attached to your chest for this
feature to work.
Page 15

TROUBLESHOOTING
Can't get a Heart Rate reading?
The most common cause for the heart rate not turning on or
working erratically is that the belt is not positioned correctly or not
moistened properly. Make sure that the belt is positioned high
enough on your chest (too high is better than too low) and
properly moistened. The tension should be comfortable but it
shouldn’t be so loose that it slides down the chest. Also make sure
that your monitor is within the 3ft. transmitting distance of the
transmitter and check the angle of its position (at greater distances,
the monitor face should be parallel and facing the transmitter,
instead of on an angle).
It is also known that a small percentage of the population may have
trouble getting an accurate heart rate reading with this type of
device due to the many various intricacies of the heart rate signal.
The signal may be too weak on the surface of the skin, stronger in
a different location of the chest or irregular in waveform. Also, if the
user has had recent heart problems, surgery, or other various
differentiating factors, they might cause a problem. If you are
experiencing difficulties in picking up a steady signal, you may want
to try your monitor on another person, or try positioning the belt
higher on your chest, or shifting it more to the left or right of your
chest (instead of centering the logo).
Blank screen or missing digits?
This can be an indication of mechanical shock damage, a dead
battery or possibly moisture damage. If this occurs, you could first try
a Global Reset (see below) otherwise send it in for service. Repairs
should only be done by a Vetta Dealer or a Vetta service center.
Stuck or Erratic Display?
If your monitor should ever get stuck or act erratically due to dropping it, static shock or some other unforeseen reason, the Global
Reset feature will allow you to reset the unit and return all settings
back to their internal defaults. To perform this function press and
hold both buttons at once. Caution: THIS WILL CLEAR EVERYTHING!
including all of your personal settings.
My heart rate readings act strange while in my car or on an airplane.
Though the HR427 is designed with high integrity
interference elimination circuitry, extremely excessive electrical or
14
the previous data will remain in the memory recall displays until it is
replaced with new data by restarting the stopwatch and recording
a new workout.
Page 16

15
TAKING CARE OF YOUR HR427
Your Vetta Heart Rate Monitor was built with a commitment to
quality and dependability. To extend the life of your monitor and
keep it operating at its peak, please read your instructions carefully
and keep the following tips in mind.
CARE & MAINTENANCE
To maximize the life of your heart monitor it is important that
you keep all of its components clean and always dry off any
moisture before putting it away.
For cleaning, use only mild soap and water. Be careful to never
use abrasive cleaners or chemicals as they will cause permanent
damage
For safekeeping, always store your monitor in its original box
and in a safe, mild and dry location. Be sure not to expose it to
extreme temperatures such as, leaving it in direct sunlight or in a
hot or freezing cold car for extended periods of time.
•
•
magnetic fields like those in a vehicle (or on board an aircraft) can
cause disturbances in the heart rate readings. When your monitor
detects too much interference such as this, it will usually display "00"
or “- -” and eventually turn its heart rate circuit off. The indicator
tells you if the heart rate circuit is on. In most cases, holding the
monitor within a foot of the front of the chest belt will allow your
monitor to receive the signal and display your heart rate accurately.
My Fitness Index Reads Zero or Low
This feature tracks how quickly your heart rate comes down within
one minute’s time. If your rate remains the same, increases, or only
decreases by a very small amount within that time, it will produce a
zero (or a low) reading. To insure a more accurate measurement, it
is important to activate this feature at the correct time. If you
activate it too soon, such as before you have finished your exercise,
there’s a good chance that your heart rate could stay high or
increase within that time. If you activate it too late, your heart rate
may have already reached its resting level and therefore could be
higher or nearly or same within that time, (which would also
produce a zero or low reading). For best results, activate the Fitness
Index recording as soon as you stop your activity and try to
completely relax during the countdown recording.
If your monitor should ever get stuck or act erratically due to
dropping it, static shock or some other unforeseen reason, The
Global Reset feature will allow you to reset the unit and return all
settings back to their internal defaults. To perform this function pr ess
and hold both buttons at once. Caution: THIS WILL CLEAR
EVERYTHING! including all of your personal settings.
Page 17

16
TECHNICAL SPECIFICATIONS
Standard shock resistance.
30 meters. Not intended for diving.
0 to 50˚C (32 to 122˚F)
Transmitter--Lithium CR2032
Monitor--Lithium CR2025
Approx. 2 years, avg use of 1 hr/day, 7
days/week.
Total Elapsed Time, Time in TZ,
Fitness Index
After 5 minutes of no key press or no
heart rate Monitor returns to the timeof-day Mode.
This feature will clear all memory data
and user settings and return allsettings
to the default values listed. Press and
hold both all three buttons for 2 seconds (Global Reset also happens when
battery is replaced.)
Shock Resistant:
Water Resistance:
Operating Temperature:
Battery Type:
Battery Life:
Memory Recall Items:
Time Default Mode:
Global Reset:
GENERAL PRECAUTIONS
Although your Heart Rate Monitor is water resistant, be sure not to operate its buttons under water as pressure can cause them to leak.
The transmitter will automatically shut itself off once you have
disconnected it from your chest. However, it is important to
thoroughly dry it off after every use, since moisture on the
electrodes can cause it to remain on longer.
Be sure not to twist or bend the electrode portions of the belt excessively (never bend backwards), especially when storing it. This can
permanently damage their conductivity and cause mechanical damage to the internal circuit.
BATTERY REPLACEMENT
Should your monitor need battery replacement we recommend that
you take it to a local jewelry store or an authorized Vetta Dealer in
order to guarantee that it will maintain its water resistance.
Improper battery replacement or service will void the warranty.
Repairs should only be performed by a Vetta Service Center.
•
•
•
Page 18

17
Display Items Default Settings Range
Time 8 AM 12/24 hr. clock
*AM & PM indicators
active only in the
Setting Modes.
Alarm Time 8AM/OFF ON/OFF
Date 01/01/1996 to 12/31/2095
Age 30 years 7-99
Heart Rate Display 0(20)-250
TZ Alarm OFF ON/OFF
Upper Target
Zone Limit 162 beats per minute OFF-250
Lower Target
Zone Limit 124 beats per minute OFF-250
Stopwatch 23:59:59 (rolls over at 24 hours)
Fitness Index 0 0-99
WARRANTY
The Vetta companies, including Vetta USA Limited and AH Vetta
Europe Limited, warrant all V etta products, to the original pur chaser, to
be free of defects in materials or workmanship for a period of three years
from the original date of purchase. Vetta will, at its sole discretion,
repair or replace any pr oduct deemed defective. This express warranty
is in lieu of all other warranties, either expressed or implied. Any
warranties of merchantability or fitness for a particular purpose are limited to the three years duration of the above express warranty. Vetta will
not be held liable for any incidental or consequential damages,
including but without limitation damage or injuries resulting from
possible measurement inaccuracies or malfunctions.
WARRANTY & SERVICE
TECHNICAL DISPLAY GUIDE
SERVICE
If you ever experience a problem with the function of your Vetta
HR427 Heart Rate Monitor, please visit your local Authorized Vetta
Dealer for assistance.
Should you experience a problem with your V etta HR427 Heart Rate
Monitor that can not be solved by your local Authorized Vetta
Dealer, please follow these simple steps to assure quick and efficient
processing of your claim.
Note: TZ High cannot be set less than TZ Low and TZ Low
cannot be set greater than TZ High. However, they can be set within 1 beat of each other, or either one can be set to OFF.
Page 19

18
Step 1 Contact the appropriate V etta Customer Service Center listed
below for help and to obtain a Return Authorization Number (RA
Number).
Step 2 Send the unit back to the appropriate V etta Customer Service
Center, together with the original copy of your purchase receipt and
a detailed explanation of the problem that you are experiencing.
Please be sure to write the Return Authorization Number (RA
Number) on your return package.
Acumen Inc
101 A Executive Drive, Suite 100
Sterling, VA 20166, USA
Phone: 703-904-0405
Fax: 703-904-0218
Email: customerservice@vetta.com
Internet: www.vetta.com
VETTA CUSTOMER SERVICE CENTERS
 Loading...