

Page 1
P
Page 2
CONTENTS
OC
S
T
N
E
TN
1. INTRODUCTION TO THE PRODUCT
1.1 FEATURES
1.2
PACKAGE CONTENTS.....................................3
1.3 CHEST BELT INSTALLATION.............................4
1.4 SYNC
2. SETTING UP YOUR WATCH...........................5
SET MODE..................................................................
2.1
TIME SETUP.........................................................7
2.2
ALARM SETUP....................................................
2.3
INTERVAL TIMER SETUP...................................
HEART RATE(HR) SETUP...................................9
2.4
2.5
MET SETUP..........................................................9
2.6
SYNC SETUP.......................................................10
3. USING YOUR WATCH.......................................11
OVERVIRW..................................................................12
CLOCK MODE .....................................................13
3.1
INTERVAL TIMER MODE.....................................14
3.2
FREE TRAINING MODE.......................................14
3.3
LAP TRAINING MODE.........................................17
3.4
EXERCISE FILE MODE........................................18
3.5
FILE MODE (FOR FREE TRAINING)...................18
3.6
FILE MODE (FOR LAP TRAINING).....................19
3.7
SET MODE............................................................21
3.8
4. TECHNICAL REFERENCE..............................22
TARGET ZONE & FITNESS TRAINING..............23
4.1
DETERMINING YOUR MET PARAMETER.........25
4.2
SPECIFICATIONS.................................................26
4.3
TECHNICAL DISPLAY GUIDE.............................27
4.4
.......................................................3
SETUP.......................................................
..........2
Introduction to the Product
t
5
6
7
8
c
ud
1
o
rP
eh
t
o
t n
oi
t
c
u
dor
5. PRECAUTIONS, WARRANTY, SERVICE &
REPAIR
5.1 GENERAL PRECAUTIONS..................................29
5.2
5.3
...................................................................28
WARRANTY..........................................................29
SERVICE AND REPAIR........................................30
tnI
1 2
Page 3
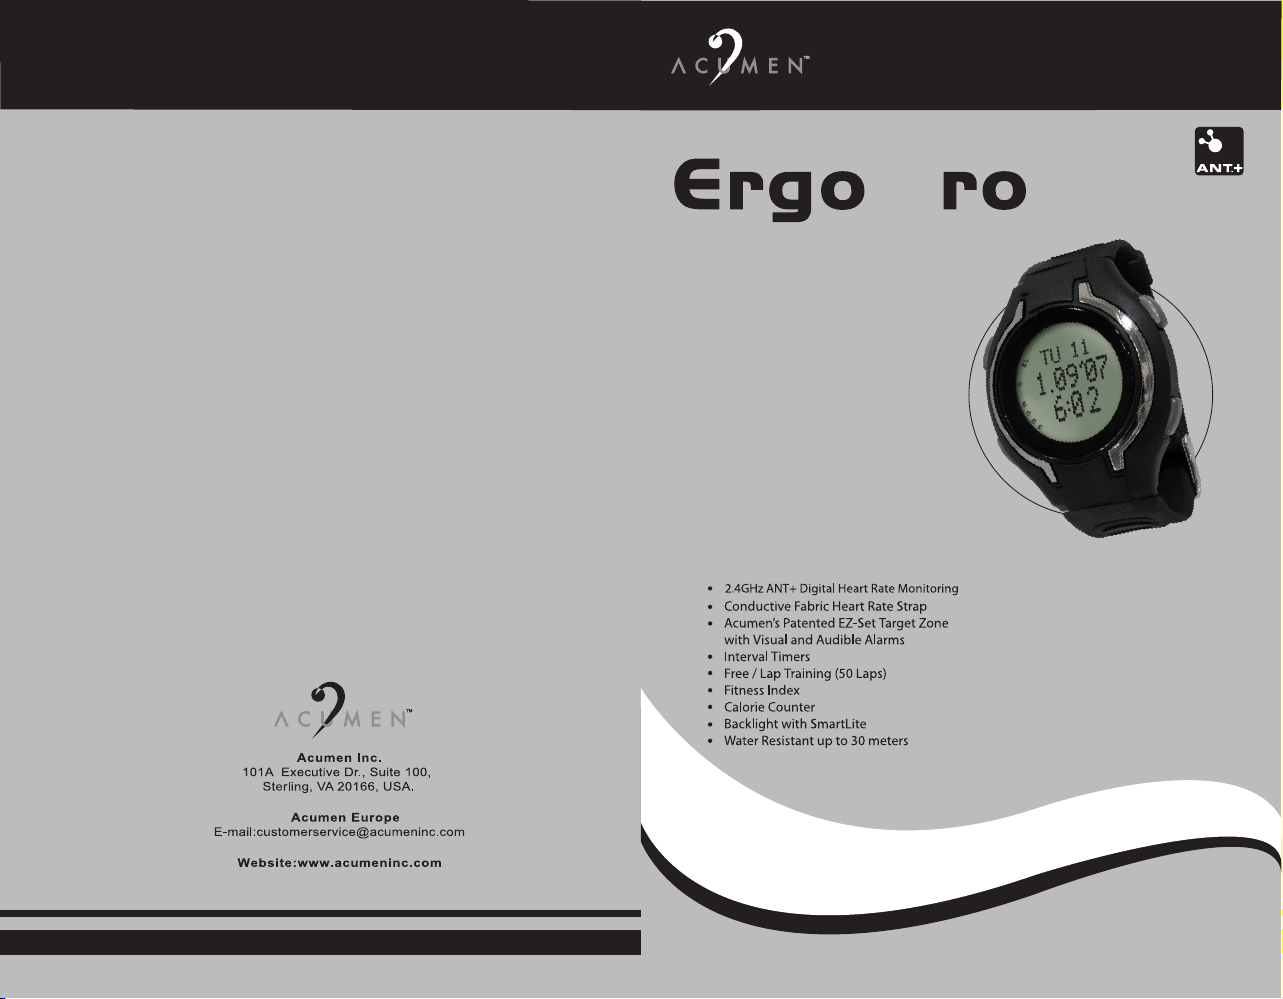
1.1 Features 1.3 Chest Belt Installation
HEART RATE MONITORING (HRM)
2.4 GHZ ANT + Sport Digital HRM
Conductive Fabric Chest Belt
Current / Average / Maximum HR
EZ - Set Target Zone with Visual & Audible Alarms
Time Above / Within / Below Target Zone
In - Zone - Goal Count Down Timer (5-60 minutes)
Average HR Per Lap
TRAINING
Free Training
Lap Training (50 laps)
Interval Timers
FITNESS
Fitness Index
Programmable Exercise Type
Calorie Counter
STANDARD FEATURES
Daily Alarm
Clock / Date / Day Display
NiteLite with SmartLite
Scratch Resistant Crystal Lens
Water Resistant to 30 Meters
1.2 Package Contents
A. Ergo Pro Watch
B. 2.4 GHz ANT+ Conductive Fabric Chest Belt
C. Instruction Manual
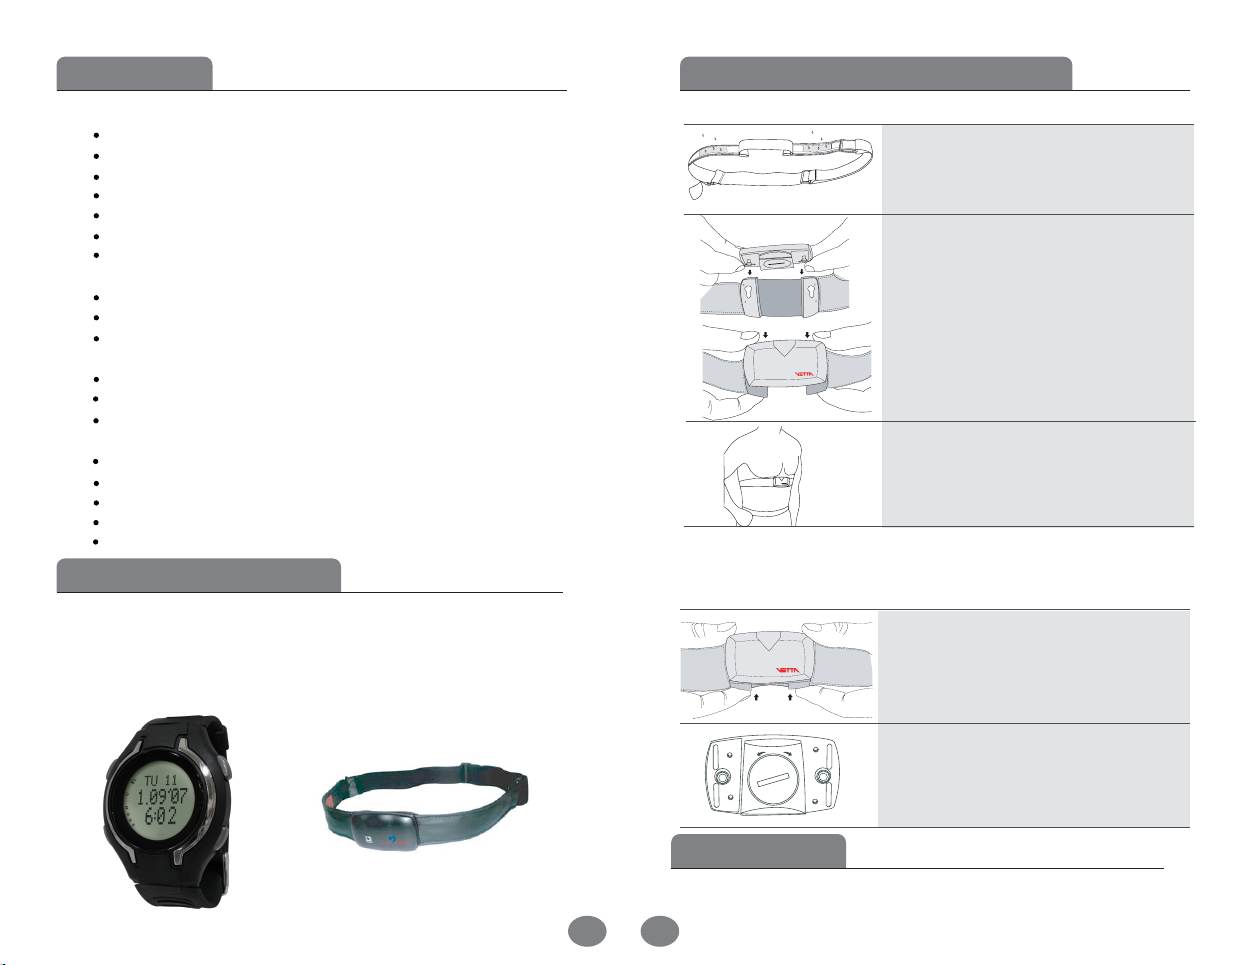
Attaching Your Chest Belt
Moisten both strips of conductive fabric on the
. 1
chest belt.
2.
Insert the two pins at the back of the transmitter
i
nto the two mounting holes on the Conductive
Fabric Chest Belt.
s s e r P s s e r P
Note:
The watch does not have to be worn on your wrist to register your heart
rate, but it must be within 3 feet from your Conductive Fabric Chest Belt.
t n e m e c a l p e R y r e t t a B
s s e r P
s s e r P
3. Push the transmitter downwards to lock the
transmitter in place. (See the picture on the left).
Check and adjust the tension of the Elastic Strap
. 4
to ensure that the conductive fabrics fit tightly
against your skin.
Remove the transmitter from the Conductive
.
1
Fabric Chest Belt.
A B
3
w e r c S
c s n U
w e r
2. Use a coin to open the battery door.
3. Replace the used battery with a new battery.
1.4 SYNC Setup
Before you start training, enter SYNC Setup under Set Mode to synchronize the
heart rate chest belt with the watch as described in section 2.6.
4
Page 4
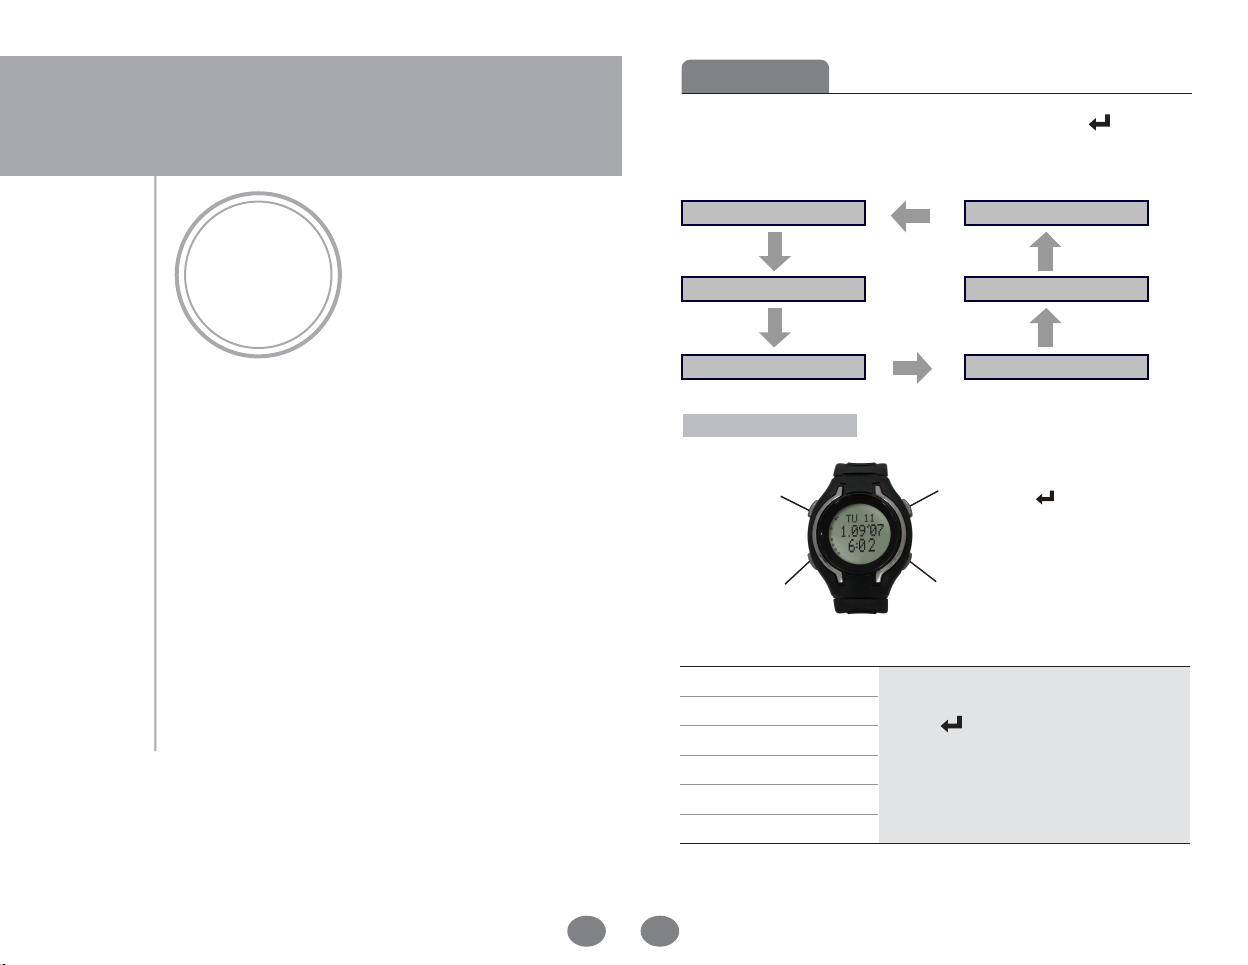
Setting up Your Watch
Set Mode
Press the “NXT” button in Clock Mode 5 times and then the " " button once
to enter Set Mode. Time Setup, Alarm Setup, Interval Timer Setup, HR Setup,
MET Setup and SYNC Setup are found within Set Mode.
Press “MODE”
Clock Mode
Press “MODE”
Set Mode
Press “MODE”
2
Setting up Your Watch
Interval Timer Mode
Press “MODE”
Free Training Mode
Button Distribution
-
/ EL / ON-OFF
Button
NXT / MODE
Button
In Set Mode
Time Setup
Alarm Setup
Interval Timer setup
HR Setup
MET Setup
SYNC setup
Exercise File Mode
Press “MODE”
Lap Training Mode
/ STR / LAP /
+
Button
STOP / CL / EXIT
Button
●
Press "EL" to activate the NiteLite.
●
Press “ ” to start configuring the selected
setup.
●
Press "NXT" to toggle between setup sections
in the order shown on the left.
●
Press "EXIT" to return to the Normal Modes.
Press “MODE”
6 5
Page 5
2.1 Time Setup
Parameters Press "+ "/ "- "
12/24 Format
Hour
Minutes
Year
Month
Date
SmartLite
SmartLite
(From)
SmartLite
To)
(
Note:
1.
In 12-hour format,
2.
SmartLite will turn on the night light for 3 seconds between pre-set intervals
Set 12 / 24 hour format
I
●
eulav
●
Press & hold to increase
the speed at which the
values adjust
the SmartLite
Set
to ON / OFF
●
Increase/Decrease
the value
●
Press & hold to
increase the speed
at which the value
adjusts.
Time
rce
D/esaercn
displayed without the “PM” icon represents “AM”.
esae
the
Press
"NXT"
Advance to
the next
parameter
Press
Return to
Time Setup.
"EXIT"
when any button is pressed. Set the interval as follows.
2.3 Interval Timer Setup
Press "+ "/ "-
Interval Timer
Timer ON/OFF
Number of timers
Number of cycles
for timer1
Minutes for timer1
Seconds for timer1
Number of cycles
for timer2
Minutes for timer2
Seconds for timer2
Number of cycles
for timer3
Minutes for timer3
Seconds for timer3
Set
to ON/OFF
●
Increase/Decrease
the value
Press & hold to
●
increase the speed
at which the value
adjusts.
" Press "NXT " Press "EXIT"Parameters
Advance to
next setting
item.
Return to
Interval
Timer Setup.
2.2 Alarm Setup
Press "+ "/ "- " Press "NXT" Press "EXIT"
Parameters
●
Hour
Minutes
Alarm ON/OFF
Press & Hold " " in Clock Mode to set the Alarm (ON/OFF)swiftly.
Note:
Increase/Decrease
the value
●
Press & hold to
increase the speed
at which the value
adjusts.
the Alarm to
Set
ON / OFF
Advance to the
next parameter.
Return to
Alarm Setup.
7 8
Press & Hold " " in Interval Timer Mode to set the Interval Timer
Note:
(ON/OFF)swiftly.
Page 6

2.4 Heart Rate (HR) Setup
Press "+ "/ "- " Press "NXT" Press "EXIT"
Parameters
Menu Short/Long
Unit
Weight
Age
Max HR
Upper Limit for
Target Zone (TZ)
Lower Limit for
Target Zone (TZ)
In-Zone-Goal
Count Down
TZ Alarm ON/OFF
Note:
Press & Hold " " in Free Training & Lap Training Mode to set the
Set short/long Menu
Set Unit to Metric
or US
●
Increase/Decrease
the value
●
Press & hold to
increase the speed
at which the value
adjusts
Timer
Set TZ Alarm
to ON/OFF
Advance to
the next
parameter
Return to HR
Setup.
TZ Alarm (ON/OFF) swiftly.
2.5 MET Setup
Press "+ "/ "- " Press "NXT" Press "EXIT"
Parameters
Exercise
Exercise Intensity
MET Parameter
Type
Select an Exercise
“MET”
Type or
Select exercise
intensity (2-15).
● ● Increase / Decrease
the MET value
Press & hold to
increase the speed
at which the value
adjusts
Advance to
the next
parameter.
Return to
MET Setup.
Note:
1. If you select a type of Exercise, press "NXT" to return to MET
Setup after setting the Exercise Intensity.
2. If you select MET in Exercise Type, Press "NXT" to go to
MET Setup.
2.6 SYNC Setup
●
To quit synchronization, press "EXIT"
to return to Set Mode while waiting for
a signal.
langiS rof gnitiaW
●
Returns to Set Mode automatically
after 2 seconds.
If SYNC Succeeds
●
Press " " to start
SYNC Setup
again.
If SYNC Fails
●
Press "EXIT" to return to
Set Mode.
9 10
Page 7

USING YOUR WATCH
Overview
The Normal Modes in Ergo can be toggled in the following sequence by
pressing “MODE” .
Press “MODE”
Clock Mode
Press “MODE”
Set Mode
Press “MODE”
3
USING YOUR WATCH
Interval Timer Mode
Press “MODE”
Free Training Mode
Button Distribution
-
/ EL / ON-OFF
Button
NXT / MODE
Button
Icons Summary
Heart Rate
Current HR
Above TZ
Interval Timer
Current HR
Below TZ
Exercise File Mode
Press “MODE”
Lap Training Mode
/ STR / LAP /
+
Button
STOP / CL / EXIT
Button
TZ Alarm Daily Alarm
Turn on / off Daily Alarm, TZ
Alarm & Interval Timer
Press “MODE”
12 11
Page 8

Beep Summary
t
ot
B
n
u
puteSCNYS
m
alAy
r
D
lia
remiTlavretnI
mralAZT
m
re
Tla
T
oGZ
i
3.1 Clock Mode
Without HR
rohs a secudorP
If SYNC fails, produces a 3-second beep
Produces 1-minute of double short beep
until a button is pressed to stop it
Produces 4 double short beeps at the
completion of each Interval
Produces 4 triple short beeps at the
completion of each Cycle
Produces a 3-second beep at the
completion of the Final Interval
Beeps constantly until HR is back to TZ
T laoG ZT dehcaer si
●
Press "EL" to activate the NiteLite.
●
Press & hold " " to turn ON/OFF the
Daily Alarm.
●
Press "MODE" to advance to Interval
Timer Mode.
peeb t
emi
3.2 Interval Timer Mode
●
Press "EL" to Activate the NiteLite.
●
Press & Hold " " to
Interval
●
●
In Interval Timer Mode, you can view the settings for each of the Timers.
Timer 1
eht nehw peeb dnoces - 3 a secudorP
Timer 2
Timer 3
●
●
Interval
●
● Press "EXIT" to return to Interval
Mode.
Timer.
Press " "
Press "MODE" to advance to Free Training
Mode.
Press "EL" to activate the NiteLite.
Press & Hold " " to
Timer.
Press "NXT"
Note: All three Timers are turned ON/OFF simultaneously. Set the time of
any timer you are not using to zero in Set Mode in order to deactivate
any unused timers.
Turn
ON/OFF
to enter
Interval Timer Mode.
Turn
ON/OFF
to Advance to next timer.
Timer
the
the
With HR
Press & Hold the button corresponding to the icon that is blinking
Note:
slowly.
3.3 Free Training Mode
Before you start training, make sure you have synchronized the heart rate
chest belt with the watch. Press “STR ” to start Free Training Mode and
enter the Total Time of Free Training.
1413
Page 9

● Press "EL" to activate the NiteLite.
● Press & hold "
" to turn ON/OFF
the TZ Alarm
● Press "STR " to start Free Training
and enter
Total Time.
● Press "MODE " to advance to Lap
Training Mode.
While the Interval Timer stops, the following information is available:
Information with (Long Menu) can only be viewed in
1. Fitness Index
LM
2. Total Time
E L
Long Menu
format.
3. Time in TZ
S T R
E L
S T R
N X T
T
E X I
N X T
T
I
X
E
While the Interval Timer is running, the following information is available:
Information with (Long Menu) can only be viewed in
1. Total Time
LM
2. Time in TZ 3. Time Above TZ
LM4. Time Below TZ 5. AVG HR 6. Max HR
Long Menu
LM
format.
LM
7. Calorie
●
Press "EL" to activate the
●
&
Hold
Press
●
Press "STOP " to stop the
●
Press "NXT " to advance to the next item in the order as listed above.
" " to turn
NiteLite.
ON/OFF
the
Interval Time
TZ Alarm
r.
.
4. Time Above TZ
E L
N X T
7. Max HR 8. Calorie
E L
N X T
●
Press "EL" to activate the
●
&
Press
●
Press "STR " to start
●
Press "NXT " to enter the next item in the order as listed above.
●
Press "EXIT " to advance to
Note:
Fitness Index
LM
S T R
T
X I
E
EL
N X T
LM
S T R
T
X I
E
E L
N X T
NiteLite.
Hold
" " to turn
ON/OFF
Free Training
Store Data.
is used to measure your fitness level by monitoring how
quickly your heart rate slows down
The Fitness Index Level and its corresponding gr
LM5. Time Below TZ 6. AVG HR
S T R
T
I
X
E
S T R
T
I
X
E
the
TZ Alarm
and enter
Total Time
in one minute.
N X T
.
ade:
0-20 Poor 21-40 Fair 41-60 OK
61-80 Good 81-100 Excellent
Store Data
● Press "EL" to activate the NiteLite.
● press " " to store data and exit to Free
Training Mode.
● Press "EXIT " to exit to Free Training Mode
without storing data.
E L
S T R
T
X I
E
.
1615
Page 10

3.4 Lap Training Mode
Before you start training, make sure you have synchronized the heart rate chest
belt with the watch. Press “STR” to start Lap Training Mode and enter the Lap
Time of Lap Training.
● Press "EL" to activate the NiteLite.
● Press & hold
Alarm.
● Press “STR” to start Lap Training and enter
Lap Time.
● Press "MODE " to advance to Exercise File
Mode.
While the Lap Timer is running, the following information is available:
Information with (Long Menu) can only be viewed in
1. Lap Time
LM
2. Total Time
L
E
" to turn ON/OFF the TZ
"
Long Menu
3. Time in TZ
L
A
P
format.
L
A
L
E
P
After press "LAP"
Start a
new lap
● The screen will freeze for 2 seconds, then
return to the previous screen.
While the Lap Timer stops, the following information is available:
Information with (Long Menu) can only be viewed in
1. Fitness Index
4. Time Above TZ
L
E
LM
LM
S
Long Menu
2. Total Time
S
T
L
E
N
X
T
5. Time Below TZ 6. AVG HR
LM
T
R
L
E
R
T
I
X
E
LM
S
T
R
3. Time in TZ
L
E
N
X
T
L
E
format.
S
T
R
T
I
X
E
S
T
R
N
N
X
T
4. Time Above TZ
L
A
&
Hold
LM
L
P
A
P
T
S
" " to turn
L
E
N
X
T
7. Max HR 8. Calorie
L
E
N
X
T
●
Press "EL" to activate the
●
Press
●
Press "LAP " to start a new lap.
●
Press "NXT " to enter the next item in the order as listed above.
●
Press "STOP " to stop the
5. Time Below TZ 6. AVG HR
LM
L
E
P
O
T
S
P
O
N
X
T
L
E
N
X
T
NiteLite.
ON/OFF
Lap Timer.
the
P
O
T
S
LM
L
A
P
P
O
T
S
L
A
P
P
O
T
S
TZ Alarm
X
T
L
E
N
X
T
.
P
O
T
S
N
X
T
7. Max HR 8. Calorie
L
A
P
P
O
T
S
LM
T
I
X
E
N
X
T
T
I
X
E
N
X
T
9. Time & AVG HR of
Lap-50
T
I
X
E
11. Time & AVG HR of
Lap-1
………
●
Press "EL" to activate the
●
Press
&
Hold
●
Press "STR" to start
●
Press "NXT" to enter the next item in the order as listed above.
●
Press "EXIT" to advance to
" " to turn
NiteLite.
ON/OFF
Lap Training
Store Data.
the
TZ Alarm
and enter
.
Lap Time.
1817
Page 11

Note: 1. Refer to the Fitness Index in Free Training for more information about
the Fitness Index.
2. You can view the time and average HR of all the laps from the last lap
to the first one.
Store Data
● Press "EL" to activate the NiteLite.
●
Press " " to store data and exit to Lap
Training Mode.
●
Press "EXIT" to exit to Lap Training Mode
without storing data.
3.5 Exercise File Mode
Recorded Exercise Information:
Information with (Long Menu) can only be viewed in
1. File
4. Time Above TZ
LM
LM
2. Total Time
5. Time Below TZ
LM
LM
Long Menu
3. Time in TZ
6. AVG HR
format.
● Press "EL" to activate the NiteLite.
● Press "MODE" to advance to Set Mode.
Important:
when another file is saved.
Ergo can only save one exercise file. An existing file will be overwritten
3.6 File Mode (for Free Training)
● Press "EL" to activate the NiteLite.
● Press " " to start viewing the recorded
information.
● Press "MODE" to advance to Set Mode.
● Press & hold
to Exercise File Mode.
" CL " to reset the file and return
7. Max HR
●
Press "EL" to activate the
●
Press "NXT" to scroll through the recorded exercise information.
●
Press "EXIT" to return to
LM
8. Calorie
NiteLite.
File Mode
3.7 File Mode (for Lap Training)
● Press "EL" to activate the NiteLite.
● Press " " to start viewing the recorded
information.
● Press "MODE" to advance to Set Mode.
● Press & hold
to Exercise File Mode.
2019
9. Fitness Index
for
Free Training.
" CL " to reset the file and return
Page 12

Recorded Exercise Information:
Information with (Long Menu) can only be viewed in
1. File
LM
LM
2. Total Time
Long Menu
3. Time in TZ
format.
Technical Reference
4. Time Above TZ
7. Max HR
10. Time & AVG HR
of Lap-50
●
Press "EL" to activate the
●
Press "NXT" to scroll through the recorded exercise information.
●
Press "EXIT" to return to
Under all normal modes, if there is no HR or button pushed for 3
Note:
minutes, the display will return to
3.8 Set Mode
LM
E L
N X T
5. Time Below TZ
LM
X I T
E
8. Calorie
......
NiteLite.
File Mode
LM
for
Free Training.
Clock Mode.
6. AVG HR
9. Fitness Index
12. Time & AVG HR
of Lap-1
ecneref
e
R
l
a
ci
n
h
c
eT
4
Please refer to
Setting Up Your Watch
in
Section 2.
2221
Page 13

i
n
4
.
e
D
What is Target Zone Heart Rate Training? To benefit the most from your workout,
you should become familiar with your heart rate training zone. By exercising within
the correct heart rate range, you will achieve your fitness goals and strengthen your
cardiovascular system in less time. Here is basically how it works.
Scientific research has shown that effective conditioning requires that you maintain
your heart rate at the proper level for at least 20 minutes per workout (or per day).
Exercising above your heart rate training zone can be counter-effective. For most
people, as your heart rate exceeds 85% of your maximum Heart Rate, which is the
upper limit, your body begins to become anaerobic and produces acids. At this stage,
your body begins to burn muscle instead of fat. When you have reached the lower
limit of you Target Zone Heart Rate Training, effective conditioning can be achieved.
A heart monitor will tune you in to your body’s internal activity level and helps prevent
injury.
The Ergo automatically sets the correct Heart Rate Target Limits by using the
American Heart Association standard range of 65% to 85% of the calculated maximum
Heart Rate based on your age. The maximum HR is calculated based on the
equation, max HR = [207 – (Age x 0.7)].
There are various formulas for calculating Heart Rate Target Zones. In most cases,
the formulas provide a range that is the same as or very close to the auto-setting
of
the Ergo. If you prefer to fine-tune or program your own limits,
be done in the HR Setting Mode. The internal automatic TZ calculation
the following example:
The calculated exercise range for a 30-year-old would be a low of 121 beats per
minute and a high of 158 beats per minute. You should never exercise near your
maximum heart rate (max HR) for any period of time.
Basic Fitness Target Zone & Tips
Depending on your specific goals, individual fitness level or just on how energetic
you feel, you may want to modify your heart rate range from one day to the next
based on the following chart:
egr
aT1
im
gnin
ret
&
Zt
eno
o
e
egra
t
uoY
Z
Tr
n
i
a
r
sentiF
Ts
g
n
this can also
is based on
gnihctertS
Stretch at the beginning and end of every workout. Stretching before your workout
increases flexibility and helps prevent muscle strain or injury. Stretching after your
workout loosens tight muscles and helps prevent soreness.
• Stretch before warm up and after cool down.
• Stretch slowly and gently. Never bounce or stretch to a point of pain.
• Hold each stretch for 30-60 seconds and exhale as you extend into stretches.
Warm Up & Cool Down: 55% or Less of Max. HR
Begin and end every workout with a slow and gradual warm up and cool down.
Respectively, Smoothly easing into and out of strenuous activity helps your body
prepare your metabolism and blood flow to efficiently break down fat and change
from one intensity level to another. Going into your Heart Rate Target Zone too
quickly can cause your heart rate to increase too rapidly. Rapid increase of the
heart rate could compromise consistent energy levels during a workout.
• Slowly bring your heart rate to a level just below the lower limit of your Heart
Rate Target Zone.
• Maintain your heart rate at this level for 5 to 10 minutes.
The Fat Burning Zone: 55%-65% of Max.HR
The Fat Burning Zone is recommended for those who are not in adequate physical
shape. This is the ideal zone for those who are beginning to exercise regularly,
would like to loose weight and are at high risk for heart problems. It is intended
for low intensity and/or long duration exercise. Exercising at a lower intensity allows
for a longer, continuous exercising period. For weight loss and new exercise programs,
l
onger, continuous, low intensity workouts are safer and more beneficial. Slow and
steady wins the race!
• Duration: Build up gradually to 30 to 60 minutes per workout.
• Frequency: Workout 3 or 4 times per week.
The Aerobic Zone: 65%-85% of Max. HR
The Aerobic Zone is recommended for those in good physical condition who
have been exercising on a consistent basis for an extended period of time.
Exercising at this range helps improve your fitness level and prevent injury
2423
Page 14

from excessive training.
• Duration: 20 to 30 minutes per workout.
• Frequency: At least 3 or 4 times per week.
R
Ae
T
The Anaerobic Zone is ONLY recommended for professional athletes or
those in exception physical condition. This zone can also be used for interval
training (high intensity for short durations) to help enhance overall strength and
endurance.
Heart rate fluctuations during physical activity can be tracked and documented
to determine overall health and fitness progress. As the cardiovascular system
becomes stronger, the resting heart rate will decrease. It will require more intensive
physical activity to reach the target zone and less time for the heart rate to recover.
Higher than usual resting heart rate and slower than usual heart rate recovery
could be an indication of strain of the heart from strenuous exercise or dehydration.
Resting for a day, lower intensity exercising, and replenishing the body with fluids
are advised. If your heart rate activity does not return to normal, please consult
a doctor.
rea
n
h
bo
noM
Pruoyroti
%
noZci
58:e
s
s
ergor
H
ot
xa
M
4.2 Determining Your MET Paraneter
If a specific activity is not available in your watch, choose a similar exercise
type and use the corresponding parameter from the table below to set your
watch.
e
a
T
xE
e
R 6E9A 8
S
C
CY
A 8D
U
PTEMfoelba
r
esic
S
CIBO
LLABRE
K
GNILWOB 2 3
GNIL
GNICN
LAB
L
TOO
F
LO6G 5,4
GNIKIH
GNI
R
PM
O
r
r
tema
L
e
n
nI
t
g
imL
th
7A
3
5 -
3
7F ,6 08 1,9
5 - 3
EP
8J
leve
ytis
ide hM
u
,7
8 - 6
4
6 -
8 -
5
giH
19,8
2B
0
1
-
4
1,
9
0
7
,
7
1
1-9
21,1
101,9
e
nI
esicrexE
GNIGGO 2J
N
INNU7R
G
l
i
SKATING
e
D3.3
r
e
t
S
SKIING (Cross-Country)
W
4.3 Specifications
• Shock Resistant
Standard shock resistance.
Water Resistant
•
98 feet (or 30 meters). Not intended for diving.
• Operating
32 °F to 122 °F (0 °C to 50 °C)
• Heart Rate Range
20~240 BPM
• Heart Rate
0~34 inches
• Battery
Heart Rate Chest Belt : CR2032
( 95,87,6
GNI
IK
GN
IWS
IMM
SRIA
T
INN
S
ET
Y
LO 63V 5
A
EL
B
A
GNIKL
Temperature
Transmitter/Receiver Distance
Type
)en
ni/eci
LL
t
gi mL
th
8
01 - 8
,6
7
5
4
4
5
, 94 ,
3
Watch: Lithium CR2032
leveL
ytisn
e hM giH
uid
01
51 - 11
01 -
8
7 - 5
6
7,
,4
6 - 4
1
1
61
,
,11
21
87,6
01-8
,76,5
8 S
8
7
2625 26
Page 15

4.4 Technical Display Guide
Display Items
Time
Time Alarm
Date
Age
Unit
Weight(KG/Lbs)
In-Zone-Goal Count Down Timer
Heart Rate Display
Target Zone Limit
Upper
Target Zone Limit
Lower
TZ Alarm
MET Parameter
Exercise
Calorie Display
Type
SmartLite
Default Setting
12:00:00 AM
off,12:00 AM
01/01/2000
30
Metric
75.0 KG/150 Lbs
OFF
162 BPM
124 BPM
OFF
5
Aerobics
0
OFF
Range
12/24 hr. Clock
ON/OFF
To 12/31/2099
7~99
Metric/US
30~250KG/50~500 Lbs
F, 5~60 minutes
OF
20~240 bpm
OF
F, 20~240 bpm
F, 20~240 bpm
OF
ON/OFF
2-20
19 Exercise
0~9999 Kcal (rolls over at 10,000)
Types
ON/OFF
Precautions, Warranty,
Service & Repair
5
Precautions,Warranty, Service & Repair
2827
Page 16

lareneG1.5
arepot
on
oD•
A
uohtl
tub
y
r
D
•
o
tsi
oM
D
•
esu
•
If your monitor should ever get stuck or act erratically due to dropping it, static
shock or some other unforeseen reason, the Global Reset feature will allow
you to reset the unit and return all settings back to their internal defaults. To
perform this function, Press and Hold all four buttons together for 3 seconds
under any mode (display all LCD). The unit will automatically reset and return
to initial setting mode.
Caution: Global Reset will RESET ALL FUNCTIONS BACK TO ORIGINAL
FACTORY SETTINGS including your Personal Settings.
• Battery Replacement
The Ergo HRM uses a Lithium CR2032 battery.
To maintain the watch’s water resistance, professional battery replacement
service is advised. Improper battery replacement or service will void the warranty.
In the case of self replacement, removal of the old battery should be documented
in detail to ensure proper replacement of the new battery, position of contacts,
and O-ring line-up. It is a good idea to smear a small drop of silicone lubricant
spray on the O-ring.
This product is warranted by Acumen Inc. for one year from the date of purchase
(with the exception of batteries and elastic chest strap) against defects in
workmanship and material. During this one-year period, these defects will be
repaired or the product will be replaced by Acumen Inc. at its sole discretion
without charge. This warranty covers normal consumer usage and does not
cover damage which occurs in shipment or failure which results from accident,
misuse, abuse, tampering, alteration or disassembling of the product or improper
maintenance. This warranty is effective only if the product is purchased and
operated in the USA and does not extend to any units which
mruoyhg
i
o
rotin
retawrednusnot
a
ctawff
an
a
u
cer
r
u
.es
ahctawruoy
etf
et
m
a
snartffoyr
r
i
t
nartehT
nis
W2.5
liw
retti
ms
e
hcruoymorf
mec
ewoH.
ts
io
teseRlabolG
tnoeruts
yt
narra
snoituacerP
tawrednusnottubet
re
a
ws
t
uss
er
ps
esuretfah
epmeTehttceff
es
etf
r
u
acitamotual
rev
noceh
,tnatsis
e
rre
r
ud
b
esu
acnace
t
ae
a
er
utar
hsyll
p
o
misiti,
I
Hdn
atr
n
rb
afevitc
acnacci
aelotmeht
a
rxedn
e
oyecnoffoflestitu
ylhguorohtott
u
es
oduoytahteruse
.k
nid
g
yrd
have been used
are
o
n
a
.
elP
revahu
fot
i
ni
amerotti
ehtet
pot
f
oyrde
f
s
tidevo
me
y
retfaf
rev
e
oln
gn
o
in violation of written instructions furnished by Acumen Inc. or to units which
have been altered or modified without authorization of Acumen Inc., or to damage
to products or parts thereof which have had the serial number removed, altered,
defected or rendered illegible. The product must be returned to an authorized
dealer for service if purchased outside of the USA.
Note: Please return the product to local authorized dealer for service if
purchased outside of the USA.
r
a
dna
vre
3.4
S
re
.
Do not attempt to repair your product. Should the product malfunction, please
visit our website at www.acumeninc.com for Consumer Customer Service. If
the problem cannot be resolved, return the product to the factory for repair. Under
no circumstances should you attempt to open the housing and repair the product.
Should you do this, your warranty will be voided.
In USA, securely package and return the product pre-paid to:
Acumen Inc.,
101 A Executive Dr., Suite 100,
Sterling, VA 20166
USA.
o
atb
c
.d
eS.
v
e
A
f
oT.
p
cr
u
r
p
a
O
uo
i
yn
uc
A
iaM-
E
W
eci
re
nruteRoT
Srof
tisivtsriF.a
e
a
R
i
n
rut
ruoy
esolcnE.b
olcnE.
dehtes
noitp
rcsed A
i
a
e
n
muc
h
.
lec
a:l
a
l
lod
sr
.cnIne
morpe
rusni
p
.esa
n
emmocereW
d
Uedistu
y
rtnuocr
uEnem
emuc
@
n
ca.ww
w:etisbe
p
r
e
i
iv
ec
ta
bewruo
etis
h
tuAn
an
m
foeta
ufl
t
am
fo
eh
cy
tfifdn
e
rute
rrof
w
ra
I“t
n
uohsuoy,AS
ro
f
tsuc
VBepor
c
ni
n
emu
muca
www
.
noitaziro
bmuN
dn
asserdda,e
noitcn
t
$(
.7
n
s
dnaegatsopn
tnar
ecenehtekatuoy
civ
remo
res
m
.cninemucA
o
c
mo
c.
moc.cn
ne
i
.re
enohp
ecerro(esahcrup
ah
.e
er
/
t
.
mun
eb
r
tpi
.)tfigasa
ter o
nosaer ro
t
yrass
.n
ru
oMr
n
okcehC)05
gnildn
.
n
ioteruseb,ecivres”y
c
a
u
erp
dlacolehttcatnocdl
z
a
nru
e
c
t
ta
rohtu
i
i
e
Oy
r
d
e
dul
cArorelae
nemu
no
ot
psa.
e
t
bayapr
o
l
fofoorp
foetad
ehtgnirusnifonoi
rotubirtsid
3029
Page 17

 Loading...