

Page 1
INSTRUCTION MANUAL
AirForce Dome Series
H.264 HD AiP cameras
Page 2

1
Executive Summary
Full HD AiP cameras, AirForce Series, adopts the latest compression
technologies providing 4-Streaming of H.264 and JPEG in different resolutions.
4-Streaming technologies allow transmitting digital video at various bitrate and
frame rate to fit both high and low bandwidth network environment.
Full HD AiP camera series are equipped with 2, 3, or 5 progressive mega-pixel
CMOS providing superior video quality. The DSP technologies of the AiP
cameras provide wide dynamic range (WDR), 3D noise reduction, backlight
compensation (BLC), ePTZ, region of interest (ROI), adjustable shutter speed,
and privacy mask features enabling the camera be installed at most
environments.
Built-in intelligent video analytics engine enables face, tampering, audio, and
motion detection for extra protection. These features can be easily interfaced by
other applications. Other useful features include two-way audio, SD card
recording, mobile phone live access, email snapshot, and continuous JPEG FTP.
AiP series have the latest technologies providing 2, 3, or 5 mega pixel H.264
video, outstanding DSP capacities, built-in video analytics, ONVIF conformant,
and PoE built-in with all these features integrated within one camera. AIM
Software HD and Full HD AiP camera series can maximize entire system
performance providing integrated system solution in migrating to IP Video
application.
Key Features
Full HD AiP camera at 30 FPS
Support dual encoding format H.264 and JPEG
4-Streaming technology, 4 concurrent streaming available
MoonLight function for difficult light condition
Day or night video quality scheduling
Built-in intelligent video analytics (IVA) engine for face, tampering, audio, and
motion detection
IVA alarm notification via Email or FTP
Support 3D DNR, WDR, BLC, ePTZ, ROI, Shutter Speed, and privacy mask.
Two-way audio (for audio models only)
Bit rate and frame rate adjustable on-the-fly
Support Android, iPad, and iPhone mobile live monitoring
Page 3

2
Dynamic DNS (DDNS) supported
Network time protocol (NTP) supported
Support PCM/G.711
Support ONVIF protocol
Support AIM Software HD 2.6
Trademark Acknowledgments
Microsoft, Windows 2000, Windows XP, Windows Vista, Windows 7, ActiveX, and
Internet Explorer are registered trademarks of Microsoft Corporation in the U.S.
and/or other countries.
Java and all Java-based trademarks and logos are trademarks or registered
trademarks of Sun Microsystems, Inc. in the United States and other countries.
Flash, Macromedia, and Macromedia Flash Player are either trademarks or
registered trademarks of Adobe Systems Incorporated in the United States and/or
other countries.
Linux and DynDNS are registered trademarks of the respective holders.
Intel, Pentium, and Intel® Core™ 2 Duo are registered trademarks of Intel
Corporation.
FFmpeg is a trademark of Fabrice Bellard, originator of the FFmpeg project.
QuickTime and the QuickTime logo are trademarks or registered trademarks of
Apple Computer, Inc., used under license there from.
Other names of companies and their products mentioned in this manual may be
trademarks or registered trademarks of their respective owners.
Page 4

3
Other References
Mobile phone
For free mobile surveillance, please refer to eMobile document in the product CD
or download the document from our company web site.
AI Universal ActiveX Control
Sample code and document are included in product CD and can be downloaded
from our company web site.
AI HTTP API
For non-ONVIF integration, please see AI HTTP API document. We adopt
HTTP API document for all Full HD AiP cameras.
Caution
Do not drop or strike this equipment
Do not install the equipment near any naked flames or heat sources
Do not expose this unit to rain, moisture, smoke or dust environment
Do not cover the opening of the cabinet with cloth and plastic or to install this
unit in poor ventilated places. Allow 10cm between this unit and its
surroundings
Do not continue to operate the unit under abnormal conditions such as
detection of smoke, strange smell or no display on screen while power is
turned on
Do not touch the power connection with wet hands
Do not damage the power cord or leave it under pressure
Do not operate this unit near magnet, speaker system, etc., to avoid
unnecessary magnetic interference
Connection cables should be grounded properly
Page 5

4
Table of Content
Chapter 1 System Overview .................................................................................... 6
Chapter 2 Before Accessing AiP camera................................................................. 7
Chapter 2-1 Configure IP Address Using IPScan Utility ........................................ 7
Chapter 2-2 Configure IP Address Using HTML Page .......................................... 8
Chapter 2-3 Internet Browser Setting & Software Component Required .............. 8
Chapter 2-4 Login .................................................................................................. 9
Chapter 3 Start Using H.264 FULL HD AiP camera Network Features ................. 10
Chapter 3-1 AiP camera Operational HTML Page .............................................. 10
Chapter 3-2 AiP camera Main Page Controls ..................................................... 10
Chapter 3-2-1 ePTZ ........................................................................................ 11
Chapter 3-2-2 Region of Interest (ROI) .......................................................... 12
Chapter 3-2-3 Control Panel ........................................................................... 12
Chapter 3-2-4 Two-way Audio ........................................................................ 13
Chapter 3-2-5 Record in a Local PC .............................................................. 13
Chapter 3-3 Configuration ................................................................................... 13
Chapter 3-3-1 Server Settings ........................................................................ 14
Chapter 3-3-2 User Settings ........................................................................... 15
Chapter 3-3-3 Timer ....................................................................................... 16
Chapter 3-3-4 System Setting ........................................................................ 16
Chapter 3-4 Network ........................................................................................... 18
Chapter 3-4-1 General Settings ...................................................................... 18
Chapter 3-4-2 DHCP Setting .......................................................................... 19
Chapter 3-4-3 HTTP & RTSP Service ............................................................ 20
Chapter 3-4-4 SMTP Service ......................................................................... 20
Chapter 3-4-5 FTP Service ............................................................................. 21
Chapter 3-4-6 DDNS Settings ........................................................................ 22
Chapter 3-5 Video Settings ................................................................................. 23
Chapter 3-5-1 Video General ......................................................................... 23
Chapter 3-5-2 Weighted Streaming Mode ...................................................... 24
Page 6

5
Chapter 3-5-3 Video Quality ........................................................................... 24
Chapter 3-5-4 MoonLight function .................................................................. 26
Chapter 3-5-5 Privacy Mask ........................................................................... 26
Chapter 3-5-6 Region of Interest (ROI) .......................................................... 27
Chapter 3-6 IR Cut Removable ........................................................................... 28
Chapter 3-7 SD Card Recording ......................................................................... 28
Chapter 3-7-1 SD Card Recording Setting ..................................................... 28
Chapter 3-8 Alarm Settings ................................................................................. 30
Chapter 3-8-1 Motion/Alarm Setup ................................................................. 30
Chapter 3-8-2 Setup for Camera with Alarm Input ......................................... 30
Chapter 3-8-3 Motion Area ............................................................................. 30
Chapter 3-8-4 Face Detection ........................................................................ 31
Chapter 3-8-5 Audio Detection ....................................................................... 32
Chapter 3-8-6 Tampering Detection ............................................................... 32
Chapter 3-9 Audio Setting ................................................................................... 33
Appendix ................................................................................................................... 34
Advance Network DDNS and PPPoE Technologies ........................................... 34
Advance Network Port Forwarding Technology .................................................. 35
Emergency Factory Default ................................................................................. 35
SD Card Compatibility List ................................................................................... 35
Specification ............................................................................................................. 36
Page 7
6
Chapter 1 System Overview
Chapter 1-1 System Requirements
The AiP camera’s Full HD H.264 video compression technology can provide high
compression rate and superior video quality. However, the performance highly
depends on both CPU computational power of a client PC and the network
bandwidth for transmitting video streaming. The following sections specify
system requirement for running Full HD H.264 AiP camera:
Chapter 1-2 Software Requirements
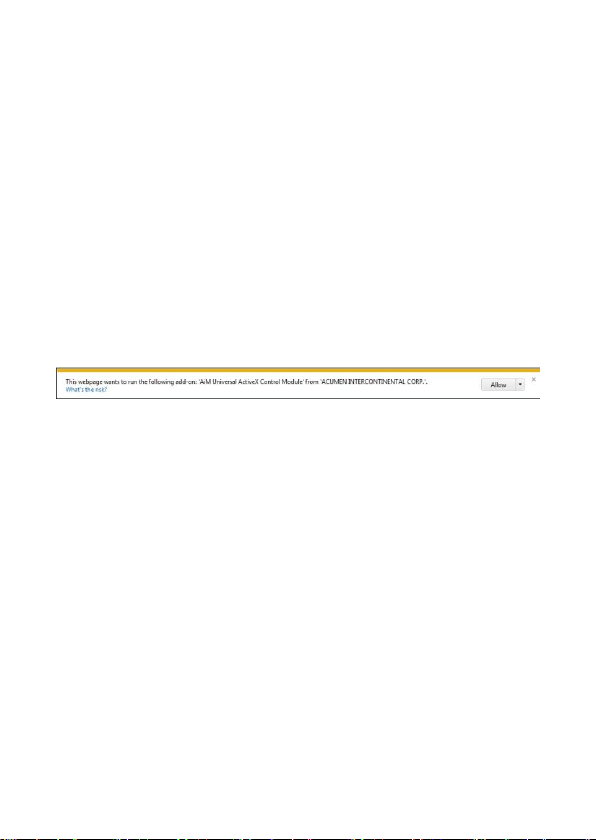
AI Universal ActiveX software components are required for web interface
displaying JPEG or H.264 FULL HD video. When you first time login the AiP
camera using Internet Explorer, it prompts for a security warning dialog box for
downloading AI Universal ActiveX. Please click on Install button to download.
Page 8
7
Chapter 2 Before Accessing AiP camera
Note: Make sure that IPScan is version 1.0.0.31 or above.
Before accessing the AiP camera, make sure that the camera’s RJ-45 network
cable, audio cable, and AiP camera’s power cable are properly installed. For
setup IP address, please consult your network administrator for available IP
addresses. The default IP address of AiP camera is 192.168.0.200. User can
also use default IP address to verify AiP camera’s network connection.
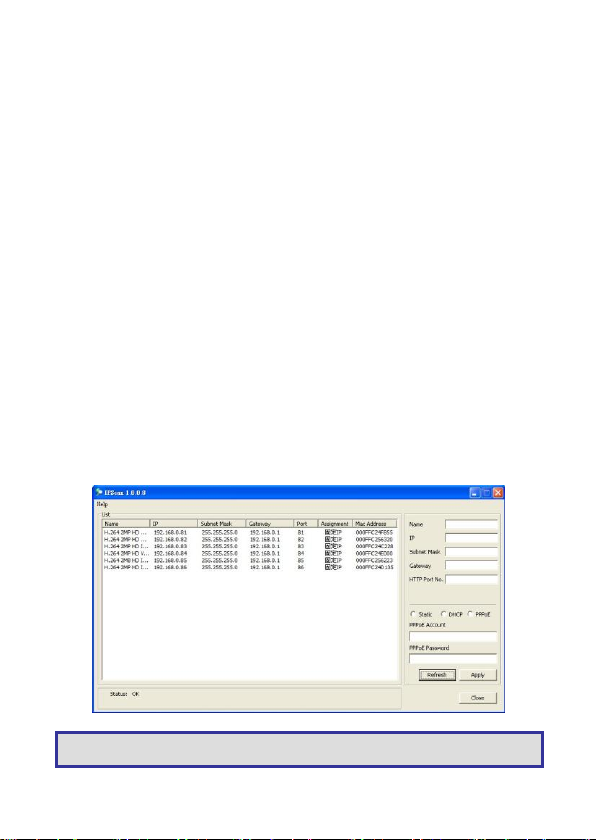
Chapter 2-1 Configure IP Address Using IPScan Utility
To configure IP address using IPScan utility, copy IPScan application from
installation CD to your local PC or execute IPScan software from installation CD
directly. IPScan utility can also be downloaded from our company web site. To
change IP address, subnet mask, gateway, or HTTP port, please follow steps
below:
Run IPScan utility.
Click on Refresh button. All available devices get listed in Device list box.
Select the device item in Device list box.
Edit or modify addresses in IP, Subnet Mask, Gateway, or HTTP Port edit box.
Click on Apply button to configure the settings.
Click on Refresh button to verify the settings.
Page 9
8
Chapter 2-2 Configure IP Address Using HTML Page
To change IP address using HTML page, please first type the default IP address,
192.168.0.200 in Internet browser and follow steps below:
Logon H.264 FULL HD AiP camera using default username and
password—“admin” and “pass”.
Click on “Configure” hyper link.
Click on “Network->General” hyper link.
Type or modify edit box for IP address, subnet mask, gateway, or HTTP
connection port.
Click on Submit button.
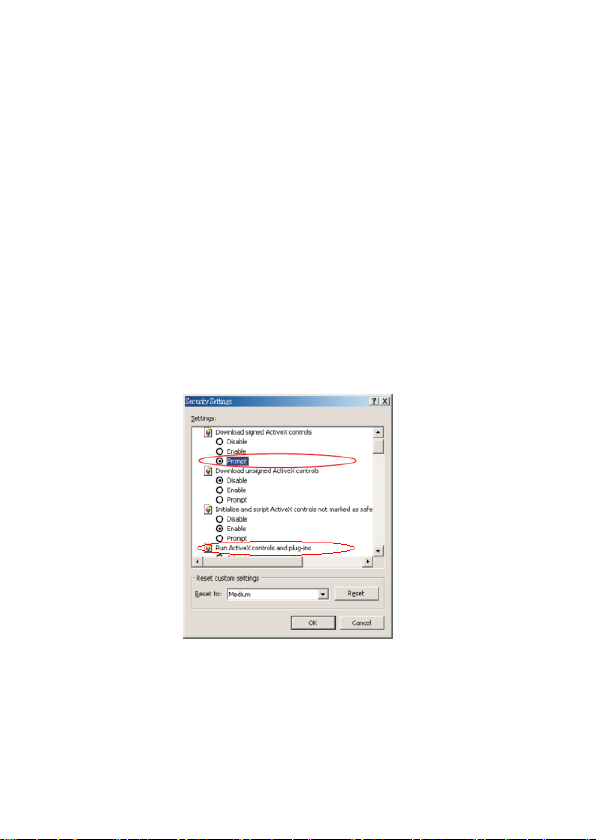
Chapter 2-3 Internet Browser Setting & Software Component Required
Make sure that your Internet Browser allows signed ActiveX plug-in running on
your PC. Set “Download Signed ActiveX plug-in controls” to “Prompt” and “Run
ActiveX control and plug-in” to “Enable” at Internet
Explorer->Tools->Options->Security Settings.
After finishing above security settings, accessing H.264 FULL HD AiP camera’s live
video by default IP address of H.264 FULL HD AiP camera using Internet Explorer
will prompt a Security Warning dialog box. Click on OK button to download the
ActiveX directly from H.264 FULL HD AiP camera.
Page 10

9
Chapter 2-4 Login
Administrator
Guest
Username
admin
guest
Password
pass
guest
There are two levels of user authentication including administrator and guest for
accessing the H.264 FULL HD AiP camera.
The default settings of username and password are described as follows:
To logon the H.264 FULL HD AiP camera, please type username and password
in logon HTML page and click on Submit button to enter the system.
Page 11
10
Chapter 3 Start Using H.264 FULL HD AiP camera
2.
3.
4.
1.
Network Features
After login H.264 FULL HD AiP camera as administrator, there are two main
features—system operation and configuration. Operation and configuration
features are described as follows:
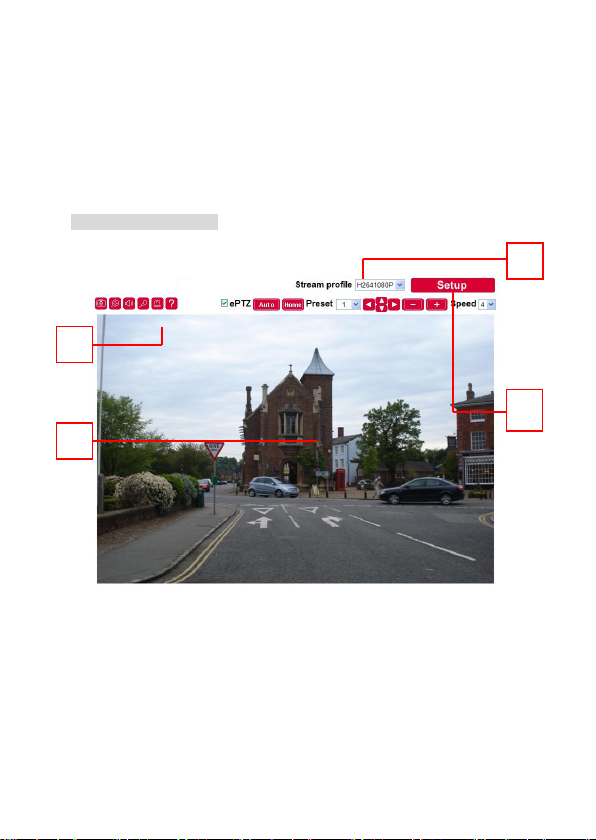
Chapter 3-1 AiP camera Operational HTML Page
H.264 FULL HD Series operational HTML page layout
1. Control panel—AiP camera control panel.
2. AI Universal ActiveX control—Display RTSP H.264 or JPEG network
video.
3. Profile switching menu—Switching one profile to another
4. Setup menu—AiP camera setup menu
Chapter 3-2 AiP camera Main Page Controls
AiP camera control panel contains ePTZ or ROI. These features cannot co-exist
together. For ePTZ and ROI, they are described as below:
Page 12
11
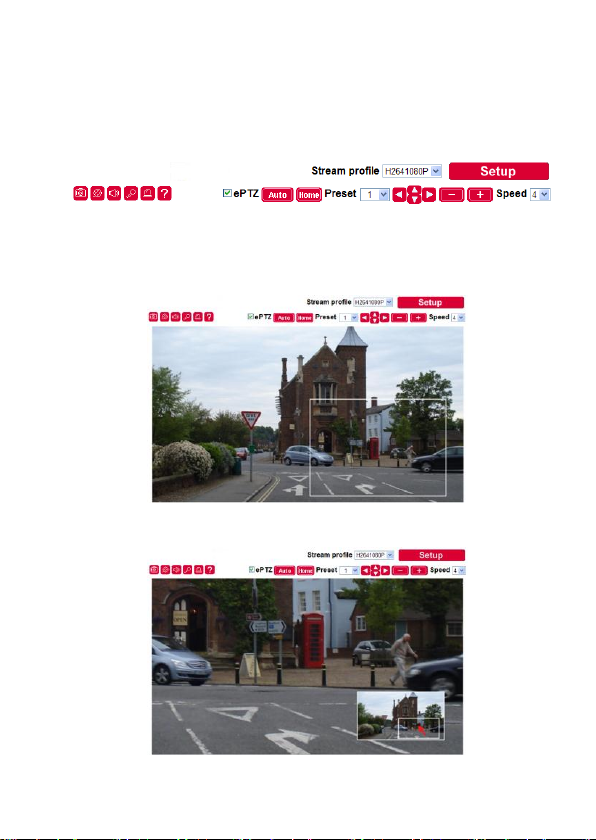
Chapter 3-2-1 ePTZ
To operate AiP camera DSP’s ePTZ, please enable ePTZ feature on the main
page. A user can operate up, down, left, right, zoom in, zoom out, and presets
on main page.
When ePTZ is off, AI Universal ActiveX control also provides ePTZ (electronically
pan, tilt, and zoom) feature. To perform ActiveX ePTZ feature, please use a
computer mouse to drag on the ActiveX control.
AI Universal ActiveX control becomes eZoom mode.
Page 13

12
Please use computer mouse pointing to the sub-window of PIP view. Dragging
Snapshot: Take a snapshot of the video.
Audio on: Set audio on (for audio model only).
Speak on: Speak to remote site (for audio model only).
Recording at PC
Activate alarm output (for alarm model only).
Auto Pan for presets at ePTZ or ROI mode
Home position for ePTZ or ROI mode
Presets
Presets recall for ePTZ or ROI
Perform left, right, up, and down operations.
Main Video Stream: 1920 * 1080
Sub-stream:720 * 480
the sub-window can perform ePan and eTilt. Using mouse scroll button can
perform zoom in and out features.
Performing right-mouse click on the video can disable ePTZ feature.
Chapter 3-2-2 Region of Interest (ROI)
For D1 and below resolution, ROI feature can apply to the main video stream.
Main video stream remains the biggest video resolution such as 1080P. The
sub-stream can be cropped and scaled based on the main video stream for saving
bandwidth and storage.
Chapter 3-2-3 Control Panel
Control panel buttons are described as below:
Page 14

13
Perform zoom in and out operations for ePTZ or ROI.
Speed
The PTZ speed of above operations.
Note: Only IP camera models with audio can support this feature.
Chapter 3-2-4 Two-way Audio
For two-way audio, please click on Microphone icon for speaking to the remote
site. To stop speaking to the remote site, please click on Microphone icon again.
To listen to the remote site, please click Speaker icon for listening to the remote
site. To stop listening to the remote site, please click on Speaker icon again.
Chapter 3-2-5 Record in a Local PC
To record into a local PC, please first right-click on AI Universal ActiveX control.
It shows up in the setting dialog box. A user can specify recording path and
recording size. Please make sure that the ePTZ or ROI feature is unchecked for
displaying recording setting dialog box by right-mouse-click.
To playback the AVI video, simply click on Windows Media Player.
Chapter 3-3 Configuration
H.264 FULL HD AiP camera’s administrator can configure H.264 FULL HD AiP
camera via standard HTML web page. This chapter explains the detail of each
configuration setting.
Page 15

14
Chapter 3-3-1 Server Settings
Server settings contain H.264 FULL HD AiP camera server’s system information
such as MAC address, firmware version, users, system timer, and other system
settings. To change or to use these options, please follow the instructions at this
section.
Firmware Version
Firmware update allows a user to upgrade H.264 FULL HD AiP camera’s
firmware remotely. A user can use firmware version to verify if the device has
the latest version.
Device Name
The device name can be used by IPScan utility to identify the H.264 FULL HD
AiP camera To change the device name, enter the name for H.264 FULL HD
AiP camera and click on Submit button.
Language
Language setting can be changed dynamically.
OSD Name
Camera OSD name
OSD Time
Camera OSD time
ActiveX OSD Name
Camera OSD name on only ActiveX
Page 16

15
Chapter 3-3-2 User Settings
There are ten user accounts allowed for the system. Each account can be
configured for its access rights. To add/edit a user, please click on Add/Edit
User button. To access H.264 FULL HD AiP camera without authentication, set
Bypass Logon radio button to ON.
To change account name, please type new account name in Account edit box.
To change new password, please type the new password in the New Password
edit box. Click on Submit button to update the user settings. To delete a user,
please click on “Remove User” button.
Administrator: Enable or disable setup mode for a user.
Panel Control: Enable or disable Control Panel for a user.
ePTZ: Enable or disable ePTZ feature for a user.
Streaming: Enable or disable a streaming for a user.
Page 17

16
Chapter 3-3-3 Timer
Note: Network Time Protocol feature requires Internet connection.
Note: In case of forgetting password, the device is required to send back to our
company for a manufacturing default or read appendix for emergency default.
H.264 FULL HD AiP camera allows a user to change system timer via standard
HTML web page. To change H.264 FULL HD AiP camera’s system timer, please
enter the date and time in the edit boxes. Click on Submit button to apply this
operation.
Synchronize with NTP
To synchronize Internet time system, check Auto Synchronize option to “Every
Hour”. H.264 FULL HD AiP camera synchronizes its system timer with a time
server every hour.
Chapter 3-3-4 System Setting
Load Default feature allows to load manufacturing default. There are certain
critical settings such as IP addresses and video system which are not affected by
this operation. To reboot H.264 FULL HD AiP camera, click on Reboot System
hyper link.
Page 18

17
To update firmware of H.264 FULL HD AiP camera, please click on
Firmware
Page 19

18
Update hyper link. Locate “flasham.bin” in your computer by clicking the Browse
button. Click Submit button to finish firmware upgrade. To ensure the quality
of transmission, please make sure that there is no user accessing H.264 FULL
HD AiP camera during firmware upgrade.
Chapter 3-4 Network
H.264 FULL HD AiP camera provides Internet protocols including IP, DHCP, and
DDNS. A user can configure these Internet protocol settings. To setup above,
please read the following sections:
Chapter 3-4-1 General Settings
Network general settings are the basic settings connecting H.264 FULL HD AiP
camera to the network. The default IP Address of H.264 FULL HD AiP camera
is 192.168.0.200. A user can use this IP address to verify the network
connection between a local PC and H.264 FULL HD AiP camera using Internet
Browser.
For local area network configuration, please enter, at least, IP address, Subnet
Mask, and Gateway IP. Click Submit button to update these settings.
Page 20

19
For Internet access configuration, please contact your local ISP for global IP
Note: Once the DHCP option gets enable, IP camera of the IP address assigned by
DHCP server. This feature allows only in LAN environment.
address. Once the physical Internet connection gets installed, enter IP address
(global), Subnet Mask, and Gateway IP from the ISP.
Default DNS IP Address—First Domain Name Server, the IP address of the
domain name server
Second DNS IP Address—Second Domain Name Server, the IP address
of the domain name server, a backup DNS server for default DNS
PPPoE Account—Account name of PPPoE service
PPPoE Password—Password of PPPoE service
Chapter 3-4-2 DHCP Setting
Router, gateway, or other software DHCP servers can dynamically assign an IP
address to the H.264 FULL HD AiP camera. There is no need to configure IP
address, subnet mask, and gateway. Since the DHCP may assign a different IP
address to the H.264 FULL HD AiP camera after power off, a user can use
IPScan utility to launch Internet browser for searching H.264 FULL HD AiP
camera. To enable DHCP, click on DHCP option and click on Submit button.
Page 21

20
Chapter 3-4-3 HTTP & RTSP Service
HTTP protocol is a reliable protocol for sending video streaming. Port
forwarding technology can be used for sending video over Internet. The detail is
described in the appendix. For changing HTTP service’s port number, please
consult available port number from your network administrator. Change the port
number at the port field and click on “Submit” button.
Chapter 3-4-4 SMTP Service
Alarm or motion notification feature can send an alarm or motion detection
snapshot to an E-mail account. To enable alarm or motion sending E-mail
feature, please setup the following email accounts.
Page 22

21
E-mail receiver setting
E-mail address— E-mail address of the recipient
E-mail sender setting
E-mail address— E-mail address of the sender
Auto E-mail sent with snapshot—constantly send JPEG snapshot within
E-mail dwell time.
SMTP server— Sender’s SMTP server
Authorization— SMTP server’s authorization option if applicable
Authorization account— Account of the SMTP server
Authorization password— Password of the account
To send a testing snapshot to a SMTP server, please click “Send” button to test
and to verify the connection of the SMTP server.
Chapter 3-4-5 FTP Service
Alarm or motion notification feature can send alarm or motion detection snapshot
to an FTP account. To enable alarm or motion sending FTP feature, please
setup the following FTP account information.
Page 23

22
FTP server IP/DNS— IP address or domain name of the FTP server
Note: DDNS feature requires Internet connection.
Account— Account of the FTP server
Password— Password of the account
Directory—File path for storing the JPEG snapshots
Prefix—Prefix of the JPEG filename
Date format—Date format string for the JPEG filename
Postfix—Postfix of the JPEG filename
Auto FTP sent—Constantly send JPEG snapshot within FTP dwell time.
FTP sent time—Schedule FTP snapshot at specific time
Chapter 3-4-6 DDNS Settings
DNS stands for domain name server, it provides domain name translation service
for a device’s IP. Basically, domain name is easier to remember than numeric
values (IP). DNS service requires service registration and subscription. DynDNS
(DDNS) provides domain name service without subscription.
To use www.ddnsipcam.com, you can use the last 6 digits of the MAC address as
the host name with default account, the last 6 digits of the MAC address, and the
default password, pass, if the AiP camera is on Internet with global IP address.
The AiP camera tries to automatically register to www.ddnsipcam.com without
further registering. For example, type “24094f.ddnsipcam.com” in a browser with
login name “24094f” and password “pass” for login into the AiP camera, if the AiP
camera is on Internet.
Page 24

23
Chapter 3-5 Video Settings
This section describes the details in setting the H.264 FULL HD video’s attributes.
Bit rate control, video input, and video resolution, settings can be configured.
Chapter 3-5-1 Video General
For transmitting H.264 FULL HD video over low bandwidth network such as
Internet, please set the bit rate close to network upload bandwidth. H.264 FULL
HD can encode frames based on the bit rate setting.
Profiles: Selections of streaming combination
Profile Name: Description of the profile
Compression: compression type of the profile
Resolution: the resolution of the compression
VBR/CBR: VBR: Video quality encoding mode/constant bit rate encoding
mode.
Page 25

24
Bit Rate: Maximum bit rate available for a network connection
Alarm Interval
Output Frame Rate: the frame rate of the profile
GOP: I frame period per second
Video Output: NTSC/PAL video system
Power line frequency: 60Hz/50Hz lighting power frequency
Chapter 3-5-2 Weighted Streaming Mode
Weighted streaming mode is activated when an alarm went off. The
streaming goes to the maximum speed, for example 30 FPS. If there is no
alarm activity, the streaming stays one frame per second for saving bandwidth
and storage.
Chapter 3-5-3 Video Quality
To setup video quality, please adjust brightness, contrast, hue, saturation, and
sharpness accordingly. The AiP camera can be set for day and/or night video
quality for best video quality.
Day or Night Video Quality Mode
Day or night video quality can be fine tuned separately; the quality setting is
scheduled based on the IR Cut scheduling table.
Page 26

25
To setup Exposure Control, Automatic Gain Control, White Balance Control,
please adjust the value accordingly.
To increase, the sensitivity at nights, please adjust Sense Up feature.
Exposure Value: Adjust the value of the image exposure
WDR: Enable or disable wide dynamic range feature.
Black-light Compensation: Increase the exposure to the darker object.
Shutter limited: Min and max shutter range
White Balance Control: Automatically adjust itself depending on the
ambient light including tungsten, indoor, fluorescents, or outdoor.
Mirror: Video mirroring
Flip: Video flipping
MoonLight function
Auto Gain Control, AGC (MoonLight function): Increase the gain of the
video signal. If AGC can not still gain enough light, please set the
Sense-Up feature. However, Sense-Up feature might cause motion blur at
night.
3D Noise Reduction: Reduce noise at night.
Sense-Up: Slow shutter feature for increasing CMOS sensitivity at
night.
Page 27

26
No Sense-Up
3 Frame Sense-Up
Chapter 3-5-4 MoonLight function
MoonLight function feature is for low-light and high sensitivity DSP control enabling
outstanding video quality at difficult environment. MoonLight function technology
can be used for both black-n-white and/or color video mode. To do so, please
first enable Auto Gain Control (AGC) setting. However, the combinational use of
3D noise reduction (3D DNR) can even reduce noise at low light environment.
AGC and 3D DNR do not cause motion blur. If the sensitivity is still not good for
the environment, Sense-Up feature can then be used. However, the drawback
can cause motion blur at low light condition.
Chapter 3-5-5 Privacy Mask
Each AiP camera has four privacy masks. A user can define the privacy mask for
security reason. To use it, simply select the mask number and drag the mask on
video area.
Page 28

27
Chapter 3-5-6 Region of Interest (ROI)
Crop & Scale to D1
Not Important Area
Region of interest (ROI) feature is for sub-stream (D1 or CIF) video buffer to scale
and to crop on main video buffer (1080P) to meet best-fit video area. The major
purpose is to use sub-stream for saving storage or bandwidth.
To enable ROI feature, please first select “Enable ROI”. Click on Zoom Out or In
button to get best-fit video area.
Page 29

28
Chapter 3-6 IR Cut Removable
IR Cut removable allows to schedule IR activation by (1) auto, (2) day, (3) night,
or (4) schedule. When the setting is set to "Auto", IR activation is determined by
the light sensor. "Night" setting means that the IR cut filter is removed. "Day"
setting means that the IR cut filter is forced to be always on. When activation
schedule is enabled, IR cut filter can be scheduled based on a specific time frame.
For example, a user can set the IR cut activation time starting from 19:00 pm (day
to night time) until 6:00 am (night to day time).
Chapter 3-7 SD Card Recording
To record video on SD Card, please insert SD card into the SD card slot. Enable SD
card recording feature. The AiP camera can start to record video into the SD card.
Chapter 3-7-1 SD Card Recording Setting
For SD card recording setting, please see the following for detail.
Page 30

29
SD Recording: Enable SD card recording.
Alarm/Motion Triggering: Digital input, face detection, tampering
detection, and motion detection SD card recording.
Recording Time: Post alarm recording time.
Continuous: Continuous recording mode
No Network Activity: If there is no network connection, perform
SD recording.
Recording Format: Recording resolution
SD System Status: SD Linux mounting status.
SD Card State: SD card inserting status
SD Card Capacity: SD card total capacity
SD Card Free Space: SD card free space
To un-mount the SD card, please click “un-mount SD Card” button. It might
crash the file system of the SD card, if a user does not un-mount the SD card
properly.
Page 31

30
Chapter 3-8 Alarm Settings
H.264 FULL HD AiP camera’s hardware alarm system contains motion detection,
alarm sensors, and one alarm/relay output. Many alarm features such as
motion/alarm email notification and FTP archiving can be found at this section.
Chapter 3-8-1 Motion/Alarm Setup
There are motion detection zones allowed in the H.264 FULL HD AiP camera. A
user can enable the detection zones with different sensitivities ranging from 1 to
99 (highest to lowest) for motion detection. Once a suspicious motion activity
gets triggered, H.264 FULL HD AiP camera can start to capture one JPEG
snapshot on various recording mediums.
Chapter 3-8-2 Setup for Camera with Alarm Input
Alarm Notification—Enable alarm notification.
Alarm Input Mode—Normal open/normal close for detecting alarm input
Alarm Output Time—Trigger alarm output based on the dwell.
For video encoder model, since there are two alarm outputs, a user can specify
alarm output time.
Chapter 3-8-3 Motion Area
Once above information get set, please configure the motion area of the
monitored environment. To configure motion area, perform mouse click on the
video area.
Page 32

31
Not detected
1/20 in size
1/10 in size
Chapter 3-8-4 Face Detection
The video analytics contains face detection engine. There are up to 4 faces can
be detected. Each face should be at least 1/20 out of the video size for
recognition purpose. Once a face is detected, the alarm output, e-Mail with a
snapshot, and/or an FTP snapshot can be triggered.
Page 33

32
Chapter 3-8-5 Audio Detection
For audio model, the AiP camera has audio detector detecting acoustic level. If
the volume exceeds the audio sensitivity value, audio detector triggers an alarm
for notification.
Chapter 3-8-6 Tampering Detection
The AiP camera’s video analytics engine is able to detect tampering. Tampering
detection works (1) lens spray paint prevention, (2) camera move prevention, and
(3) out of focus prevention. To enable this feature, please set Enable option.
Page 34

33
Chapter 3-9 Audio Setting
Audio setting is based on the following:
MIC Volume: MIC or line input volume
Audio Input Mode: Choose MIC input or Line input.
Audio Input Gain: Voice input gain magnification
Audio Output Volume: Line output volume adjustment
Audio Coding Type: G.711 u-Law
Sample Rate: Audio sample rate
Bit Rate: Audio bit rate.
Page 35

34
Appendix
DDNS Server
2. ISP assigns global IP to
IP CAMERA
Internet
4. Access IP CAMERA using
the dynamic global IP
address.
ISP
Remote PC
5. Resolve domain name to IP
address and sent back to
remote PC..
1. Get IP address from ISP after reboot.
2. Notify DDNS server for the new IP address if FAST
DOME CAMERA gets reboot or assigned a new IP
address.
Advance Network DDNS and PPPoE Technologies
The advantage of using DDNS and PPPoE is to save the cost of IP address.
H.264 AVC AiP camera’s PPPoE service gets a dynamic global IP address after
system reboot. This IP address may get changed periodically. This is the
address needed to access the video server over Internet. When ISP re-assigns
a new IP address to H.264 AVC AiP camera, H.264 AVC AiP camera notifies
DDNS service. A remote PC can access H.264 AVC AiP camera by typing
domain name in a browser. The domain name gets resolved by DDNS service
and gets translated to its dynamic global IP address. The dynamic global IP
address can now be accessed by the remote PC.
Page 36

35
Advance Network Port Forwarding Technology
Manufacturer
Size
SDHC/SDSC
Sandisk
16GB
SDHC
Sandisk
8GB
SDHC
Transcend
8GB
SDHC
Transcend
4GB
SDHC
Router’s global IP: http:// 122.116.191.129
Port 80: 192.168.0.10
Port 81: 192.168.0.11
http:// 122.116.191.129:86
Internet
IP: 192.168.0.10
IP: 192.168.0.11
Port forwarding technology is an advanced network technology which is widely
used for using one global IP shared by many network devices. The network
architecture is illustrated as below. Port 80 of the router (192.168.0.10) is
assigned to the device IP address, 192.168.0.10. Port 81 of the router is
assigned to the device IP address, 192.168.0.11. When Remote PC accesses
the router’s port 86 (122.116.191.129), it eventually accesses the video server at
192.168.0.11.
Emergency Factory Default
To restore the server to factory default setting, please:
1. Hold Load Default Button or short Reset Cable for 10 seconds, then
release the button or Reset Cable.
2. After about 40 seconds, the network LED light is off, and then it
becomes lit again.
3. This camera has completed the factory default setting, and it reboots.
4. Use IPScan scanning for the IP address of the IP device.
5. Launch Internet browser for the IP address of the IP device.
6. Type default username “admin” and password “pass” for enter web
interface of the IP device.
SD Card Compatibility List
Page 37

36
Specification
Video compression
H.264 and Motion JPEG, dual codec
Resolution
QXGA(2048 x 1536), 1080P(1920 x 1080), 720P(1280 x 720), D1(720 x 480),
CIF(352 x 240)
Multiple profile
Up to H.264 2048x1536 15 FPS (Only 3MP AiP cameras provide)
Up to H.264 1920x1080 30 FPS, H.264 720x480 30 FPS,
JPEG 720x480 25 FPS, JPEG 352x240 25 FPS
Up to H.264 1280x720 30 FPS, H.264 720x480 30 FPS, JPEG 352x240 25 FPS
Up to H.264 1920x1080 30 FPS, H.264 720x480 30 FPS, JPEG 1280x720 25 FPS
Up toH.264 1920x1080 30 FPS, H.264 720x480 30 FPS, JPEG 720x480 25 FPS
Streaming
4-Streaming
Video streaming
RTSP: RTP/HTTP, RTP/TCP, RTP/UDP
Video bitrate
5Mbps to 128Kbps
Change frame rate and bitrate on-the-fly
CBR/VBR/GOP supported
Security
Base64 HTTP encryption
Multiple user access levels with password protection
10 user accounts available
Users
8 simultaneous users
ePTZ & ROI
Yes
OSD
Overlay for date and time
Alarm/motion
Face detection
Tampering detection
Audio detection
Motion detection
External digital input alarm
Image upload over FTP and e-mail by above alarm signals
CPU, memory
Embedded SoC CPU at 528Mhz, 256 MB DDR, 256 MB flash memory
IR cut removable
Auto, day , night, scheduling, day & night models only
Alarm input
TTL input +3VDC to +5VDC, alarm input models only
Alarm output
DC 24 1A, dry-contact (N.O.), alarm output models only
Maintenance
Firmware update via HTTP, Firmware available at web site
Network interface
10Mbps/100Mbps, RJ-45
Two-way audio
G.711 64Kbits u-Law, audio model only
PC requirement
OS: Windows 2000, Windows XP, Windows Vista, Windows 7
Browser: Windows Internet Explorer 6.0 or above
CPU: Intel Pentium 4 1.8GHz or above
RAM: 1GB or above
Network protocols
IP, TCP, UDP, HTTP, SMTP, NTP, DDNS, UPnP, FTP, ARP, DHCP, PPPoE, DNS,
RTSP, RTCP, Telnet, Onvif
Mobile phone & PDA
Support iPhone, iPad, and Android
System integration
ONVIF and HTTPAPI
AIM
AIM HD 2.6 support
OS
Embedded Linux 2.6.32
Page 38

37
DISTRIBUTOR:
AirForce Dome Series
 Loading...