

Page 1

ACUMEN AIM Software HD 2.6 User Manual
Table of Contents
How to Register AIM Software HD 2.6.......................................................................................... 5
General Notations .......................................................................................................................... 6
Before Using AIM Software HD 2.6............................................................................................... 6
On-line User Manual ...................................................................................................................... 6
Uninstall AIM HD 2.6 ...................................................................................................................... 6
Using AIM Software HD 2.6 on Windows Vista and Windows 7 platforms .............................. 6
CPU Usage ...................................................................................................................................... 7
Streaming Information .................................................................................................................. 7
Technical Support Information ..................................................................................................... 7
Chapter 1. Using AIM Software HD 2.6 ...................................................................................... 8
Chapter 1-1. System Settings .................................................................................................... 8
Chapter 1-2. Add a New Device ................................................................................................. 9
Chapter 1-3. Device Type .......................................................................................................... 11
Chapter 1-4. ONVIF Setting ...................................................................................................... 11
Chapter 1-5. IPScan Utility ....................................................................................................... 12
Chapter 1-6. Dual Monitor Outputs .......................................................................................... 12
Chapter 2. Recording Settings................................................................................................. 12
Chapter 2-1. Schedule Recording Settings ............................................................................ 13
Chapter 2-2. Motion Detection Recording .............................................................................. 13
Chapter 2-3. Recording at System Startup ............................................................................. 15
Chapter 2-4. Estimated Recording Days ................................................................................. 15
Chapter 2-5. Network Storage .................................................................................................. 15
Chapter 3. Grouping Settings .................................................................................................. 18
Chapter 3-1. Grouping Name ................................................................................................... 18
Chapter 3-2. Grouping’s Devices ............................................................................................. 19
Chapter 3-3. Grouping Authentication .................................................................................... 19
Chapter 3-4. Recall a Grouping ............................................................................................... 20
Chapter 3-5. Grouping Sequence ............................................................................................ 20
Chapter 3-6. Main Grouping ..................................................................................................... 20
Chapter 3-7. Window-divisions ................................................................................................ 20
Chapter 3-8. Dynamic Video Channel Editing ........................................................................ 21
Chapter 3-9. Digital Zoom ......................................................................................................... 21
Chapter 4. Video Playback ....................................................................................................... 23
Chapter 4-1. Playback ............................................................................................................... 23
Chapter 4-2. Playback for an IP Camera within the Main Grouping ..................................... 23
Chapter 4-3. Multiple Channels Playback ............................................................................... 24
Chapter 4-4. Remote AIM Multiple Channels Playback ......................................................... 24
Chapter 4-5. Remote DVR/NVR Playback ............................................................................... 25
Chapter 4-6. Remote DVR/NVR File Download ...................................................................... 25
Chapter 4-7. AVI File Exporting & Play From a File ............................................................... 26
Chapter 4-8. Snapshot .............................................................................................................. 27
Chapter 4-9. Alarm Event Playback ......................................................................................... 27
Chapter 5. Audio ....................................................................................................................... 28
Chapter 5-1. Two-way Audio .................................................................................................... 28
Chapter 5-2. Two-way Audio .................................................................................................... 28
Chapter 5-3. Audio Recording ................................................................................................. 28
Chapter 6. Archiving Manager ................................................................................................. 29
Chapter 6-1. Archiving Source ................................................................................................ 29
- 1 -
Page 2

Chapter 6-2. Archiving Destination ......................................................................................... 30
Chapter 7. User Settings .......................................................................................................... 31
Chapter 7-1. Add a User ........................................................................................................... 31
Chapter 7-2. Modify an Existing User ..................................................................................... 31
Chapter 7-3. Delete a User ........................................................................................................ 31
Chapter 7-4. User Authorization .............................................................................................. 31
Chapter 7-5. Alarm Email Notifications ................................................................................... 32
Chapter 8. Multiple Monitors, PTZ & Keyboard ...................................................................... 33
Chapter 8-1. Preset Point Settings .......................................................................................... 33
Chapter 8-2. AIM Software HD 2.6 Status Panel ..................................................................... 34
Chapter 8-3. Control PTZ via Keyboard .................................................................................. 34
Chapter 8-3-1. DVR/NVR Control Mode ................................................................................... 34
Chapter 8-3-2. Window-division............................................................................................... 35
Chapter 8-3-3. Recall a Camera ............................................................................................... 35
Chapter 8-4. IP Camera ePTZ or ROI Feature ......................................................................... 35
Chapter 8-5. Multiple Monitors Virtual Matrix Output ............................................................ 36
Chapter 8-6. Switching in Between AIMs and Virtual Matrix Monitors ................................ 37
Chapter 8-7. Keyboard Playback ............................................................................................. 38
Chapter 9. eMap Manager ......................................................................................................... 39
Chapter 9-1. Before Accessing eMap Manager ...................................................................... 39
Chapter 9-2. Tool Bar ................................................................................................................ 40
Chapter 9-3. eMap Alarm Options ........................................................................................... 41
Chapter 9-3-1. Setup a Map ...................................................................................................... 41
Chapter 9-4. Setup a Device on a Map .................................................................................... 42
Chapter 9-4-1. Delete a Device on a Map ................................................................................ 42
Chapter 9-4-2. Arrange a Device .............................................................................................. 42
Chapter 9-4-3. Device Property ................................................................................................ 43
Chapter 9-5. Find a Device on eMap ....................................................................................... 43
Chapter 9-6. Camera View Control .......................................................................................... 43
Chapter 10. Web Server ............................................................................................................ 44
Chapter 11. Database Manager ................................................................................................... 45
Chapter 11-1. User Operational Report ................................................................................... 45
Chapter 11-2. Event Report ...................................................................................................... 45
Chapter 11-3. Database Maintenance ...................................................................................... 45
Chapter 11-4. Import Database ................................................................................................ 45
Chapter 11-5. Export Database ................................................................................................ 45
Chapter 12. Alarm Management .............................................................................................. 46
Chapter 12-1. Enable Alarm Input ............................................................................................ 46
Chapter 12-2. AIM Motion Detection & Remote Motion Detection ....................................... 46
Chapter 12-3. Alarm Output Management .............................................................................. 46
Chapter 12-4. Remote Alarm Input (DI) & Digital Alarm Output (DO) ................................... 47
Chapter 13. Retail and Distribution Business Solutions....................................................... 48
Chapter 13-1. POS Connection Basis for Retail Business .................................................... 48
Chapter 13-2. Test POS Communication with a PC ............................................................... 48
Chapter 13-3. Link POS with a Channel .................................................................................. 49
Chapter 13-4. Playback for POS Transactions ....................................................................... 50
Chapter 13-5. Search POS Transactions ................................................................................ 51
Chapter 13-6. Scanner Connection Basis for Transportation Business ............................. 51
Chapter 14. Trouble Shooting ..................................................................................................2
Chapter 14-1. What should I do if i experience video flickering in AIM................................2
Chapter 14-2. What should I do for verifying RS-485 keyboard that is properly installed..53
- 2 -
Page 3

APPENDIX ..................................................................................................................................... 54
nimum System Requirement .................................................................................................. 54
Mi
Username and password ............................................................................................................ 54
Benchmark Environment: ........................................................................................................... 54
G
raphics Card for Supporting 6 Monitors: ............................................................................... 54
H.264 benchmark table ................................................................................................................ 55
AIM 1080P dual-streaming H.264 benchmark table .................................................................. 55
AIM 2.6 HD Software Specification ............................................................................................ 57
- 3 -
Page 4

AIM Software HD 2.6 User Manual
Central Management Software (AIM Software HD 2.6) is a total solution for managing Acumen’s
network products including IP cameras and DVRs/NVRs. AIM Software HD 2.6 contains (1)
network video recording software, (2) eMap Manager, (3) Database Manager, (4) Web Server, (5)
AIM remote playback, (6) video archiving, and (7) remote AIM/DVR/NVR playback and file
download.
Major features including managing 72 H.264/JPEG IP cameras and DVR’s/NVRs cameras
recording, remote DVR/NVR video playback and file download, and camera groupings with user
authentication are integrated within one system application. Two monitors for displaying up to 72
channels 1080P H.264 IP cameras are available for TV wall application.
One important feature of eMap is the central management system for live monitoring, alarm
snapshot management, and map management. IP devices installed at different locations can be
represented and managed by using maps. Face detection, motion detection, audio detection,
and tampering detection provided by an IP camera can trigger various alarm outputs including
PTZ preset recall, snapshot email, alarm popping up in full screen, PC siren warning, and pre- and
post-alarm recording.
Circular recording, schedule recording, limited recording time, individual HDD recording size
configurable, and individual camera recording frame rate configurable provide the flexibilities in
managing recording storages. For large video storage, video archiving into a NAS for backup
purpose and video recording from AIM to eSATA RAID and internal RAID, and network RAID are
also supported. POS, network cash drawer, and text overlay recording into a database are
available for quick video search.
AIM Software HD 2.6 is designated for hybrid solution for IP camera, video server, IP Fast Dome,
and DVRs/NVRs. It provides total solutions for IP Video digital surveillance. Major features are:
AIM Software HD 2.6 Main Features
1. Record and manage up to 72 channels of H.264/JPEG HD IP cameras or DVR/NVR’s
cameras.
2. Up to 72 channels 1080P IP cameras on two monitors for TV wall application
3. Scheduling, continuous, and motion detection recording supported
4. eMap live video with alarm snapshots
5. RAID, network RAID, and video archiving
6. Multiple channels playback for remote network AIM
7. Integrated alarm management for various alarm outputs
8. Web server for live video
9. iPhone and Android phones support
10. Retail and transportation business solutions
11. Device grouping and recall
12. IP Fast Dome control
13. Export recorded video to AVI file format
14. Easy-to-use calendar and time selections for video playback
15. User access levels configurable for groupings and features
16. Complete operational event logs
17. Two-way audio and audio recording
18. Digital zoom, device ePTZ and ROI supported
19. Dynamically video channels swapping with mouse drag-and-drop
- 4 -
Page 5
Copyrights
ACUMEN INT. CORP. holds exclusive ownership of the software and all intellectual property
rights embodied therein, including copyrights and valuable trade secrets incorporated in the
software's design and coding methodology. The software is protected by international treaty.
This agreement provides you with only a limited use license, and does not grant you any
intellectual property rights in the software.
Adobe and Acrobat Reader are either registered trademarks or trademarks of Adobe Systems
Incorporated in the United States and/or other countries.
Windows, Windows 2000, Windows XP, Windows Vista, and Windows 7 are registered
trademark of Microsoft Corporation in the United States and other countries
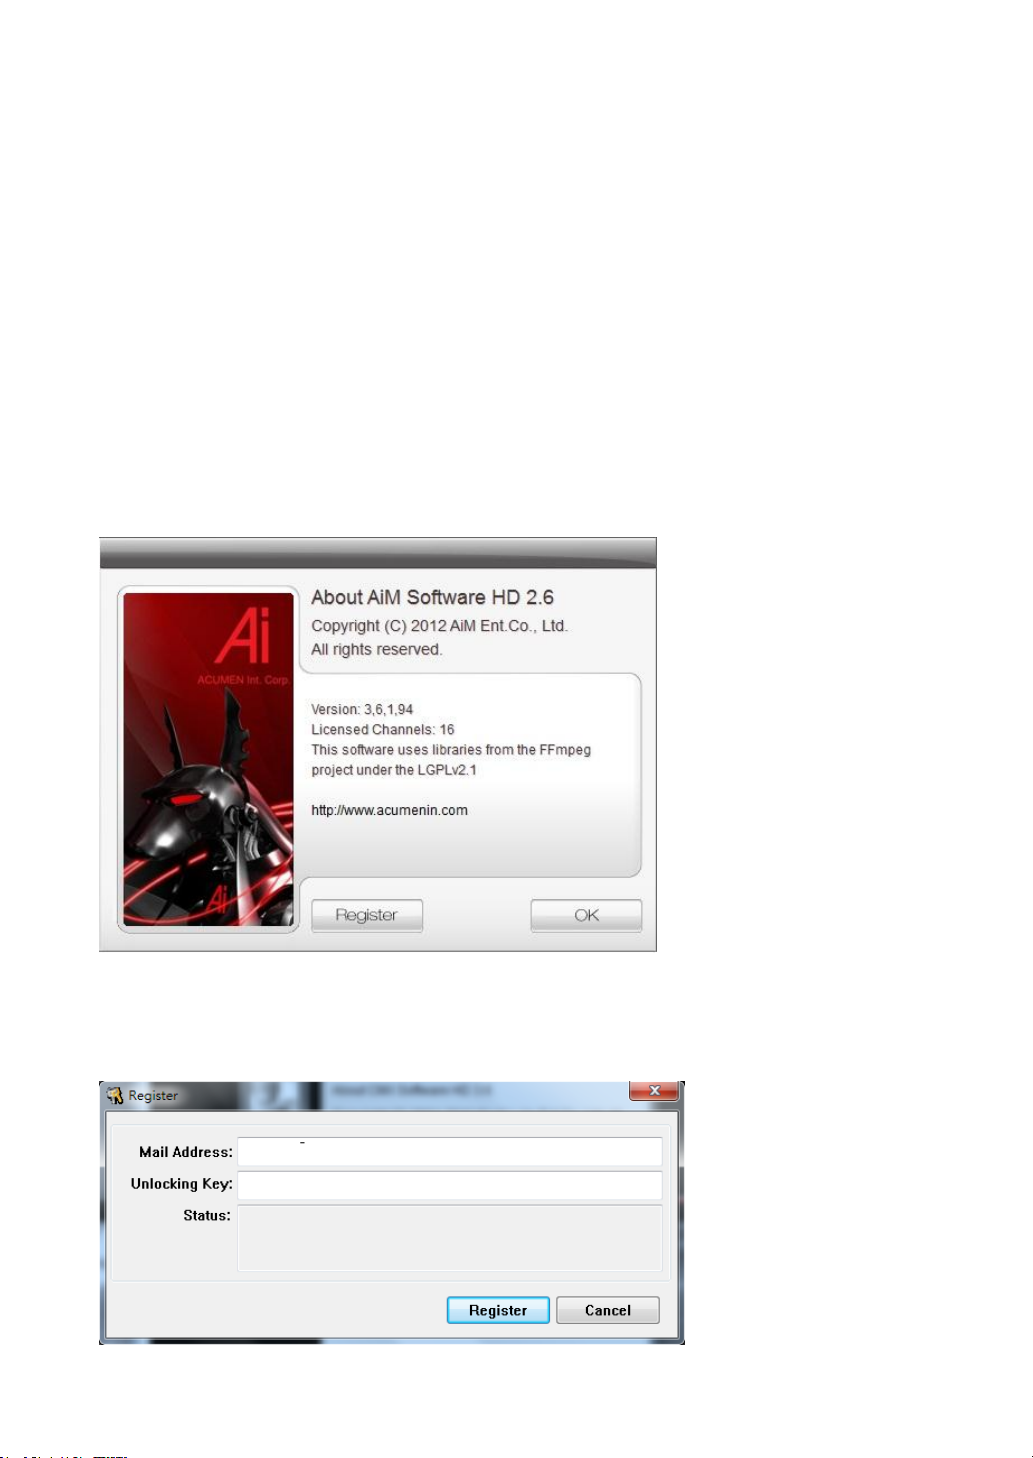
How to Register AIM Software HD 2.6
To register AIM Software HD 2.6, please click on Register button from Login dialog box or About
button to register the software. To get unlocking key, please visit http://www.acumenin.com.
Please type all the necessary information. The unlocking will be sent to your email account.
After receiving the unlocking key email, please click on Register button. Enter mail address
and unlocking key to get full access of AIM Software HD 2.6.
- 5 -
Page 6
General Notations
The terms of IP-based devices or products used in this document refer to H.264 HD/JPEG IP
Fast Domes, Video Servers, or IP Cameras. The terms of DVR/NVR devices/products refer to
DVR 3, DVR5 series, and NVR Touch Series.
Before Using AIM Software HD 2.6
AIM Software HD 2.6 contains video recording. AIM Software HD 2.6 supports
multiple hard disk drives recording. If overwritten setting is enabled, the oldest
recorded video clips get deleted first. If you want logical partitions in your hard disk
drive, please setup at least 20 GB for each drive. To setup hard disk setting, please
click on “System Setting” button.
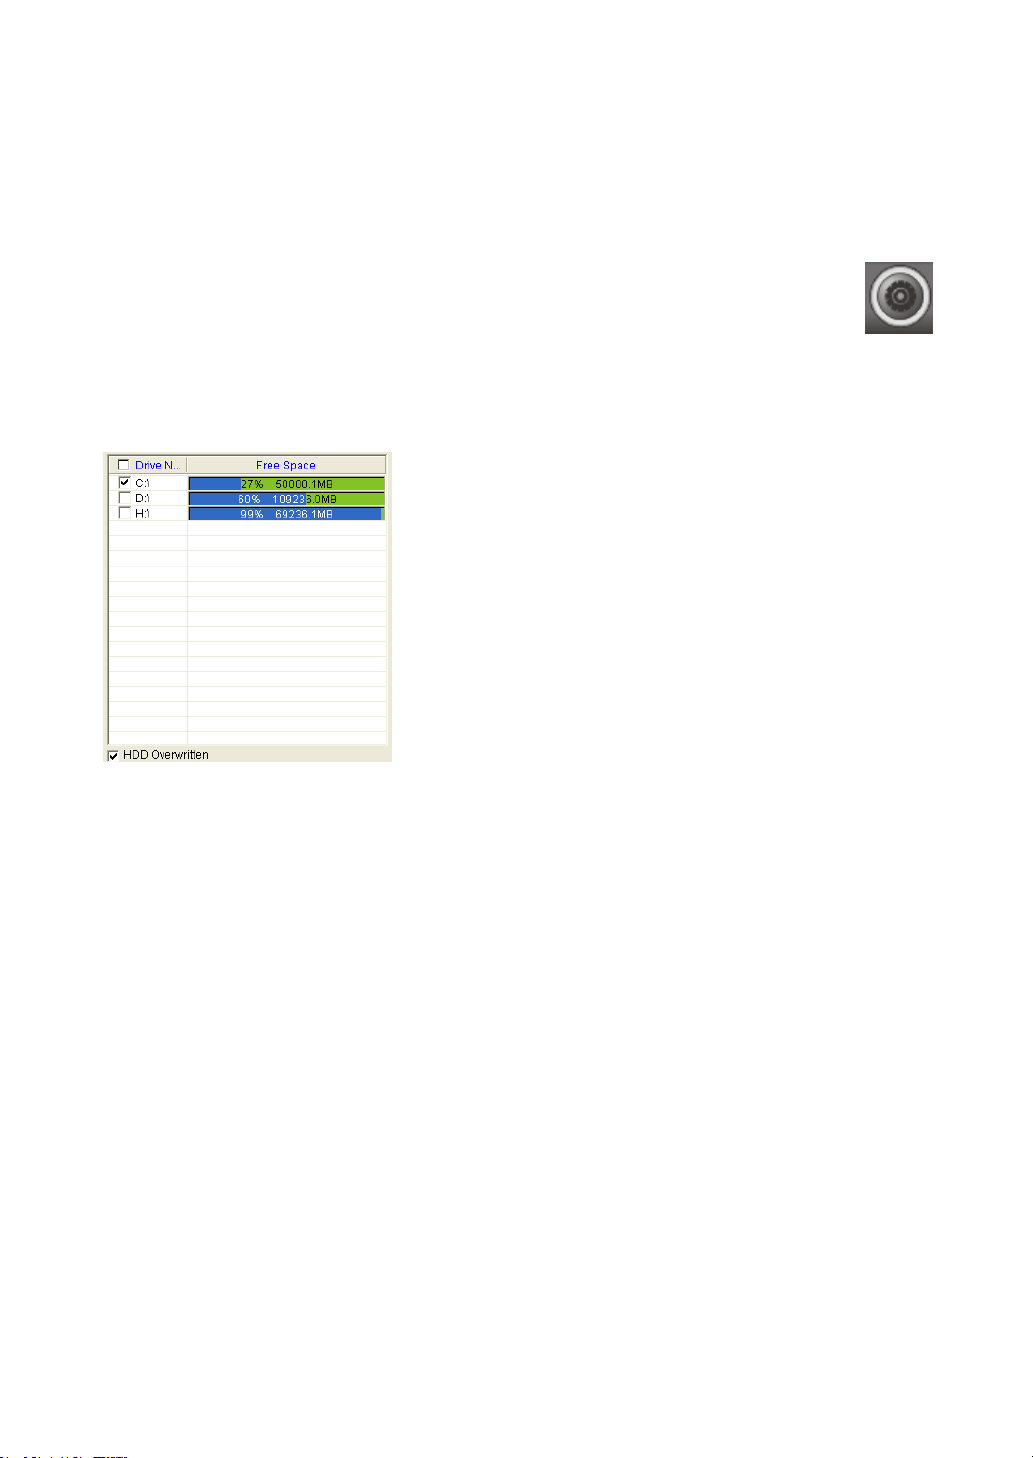
Select recording hard drives for AIM Software HD 2.6 recording. To enable HDD overwritten
option, please check this option.
Furthermore, each logical HDD drive should contain at least 10% empty space for storing video
data. AIM Software HD 2.6 deletes the oldest files first until it reaches 90% of the logical drive,
and it proceeds to the next logical hard disk drive for recording.
On-line User Manual
AIM Software HD 2.6 adopts Acrobat Reader for its on-line manual by clicking on “Windows->
ACUMEN AIM HD 2.6->User Manual”. You must install Acrobat Reader before opening the
on-line manual.
Uninstall AIM HD 2.6
To uninstall AIM HD 2.6, please select Start->Program Files-> ACUMEN AIM HD 2.6->Uninstall.
A user might want to export the database. Re-import the database after new installation.
Please see Database Manager for detail.
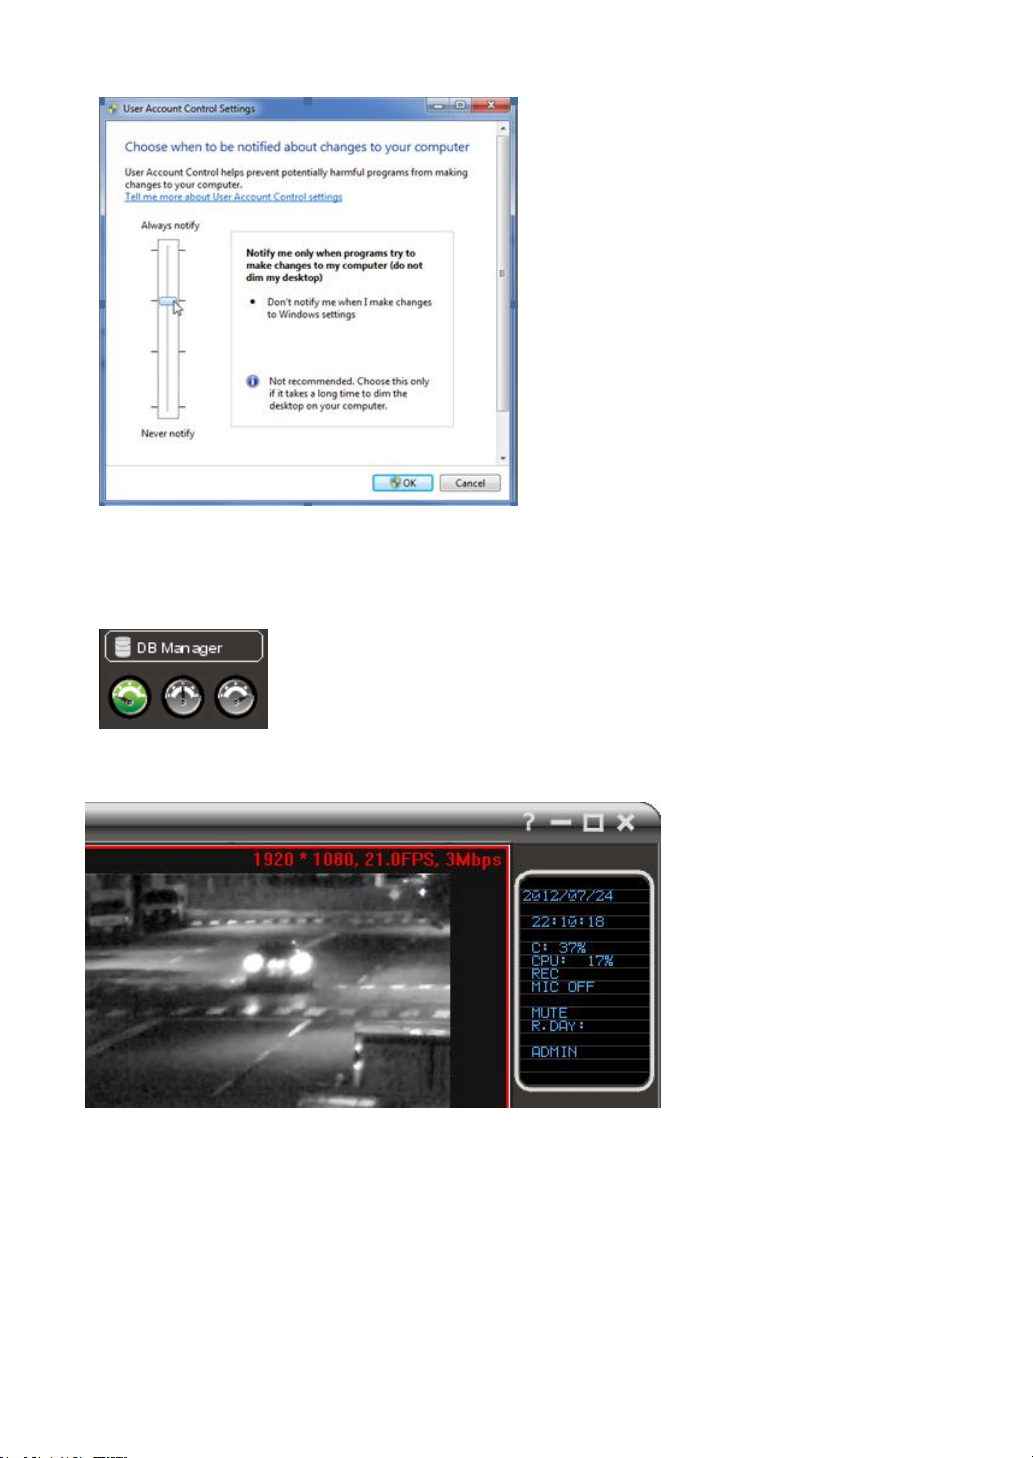
Using AIM Software HD 2.6 on Windows Vista and Windows 7 platforms
When you install AIM Software HD 2.6 on Windows Vista and Windows 7 platforms, please go to
control panel->User Account Control Setting and low the setting to Default. This can make sure
that AIM can login automatically when AIM watchdog performs system reboot.
- 6 -
Page 7
CPU Usage
To limited AIM Software HD 2.6 CPU usage, a user can click on CPU usage button to limit CPU
usage at certain percentage.
Streaming Information
To get live video streaming information, click "F2" function key on the keyboard.
- 7 -
Page 8
Chapter 1. Using AIM Software HD 2.6
Note: The default passwords for all users are empty.
To access AIM Software HD 2.6, follow these steps:
1) Click on AIM Software HD 2.6 via Start->Program Files->ACUMEN AIM Software HD
2.6->AIM Software HD 2.6.
2) Click on AIM Software HD 2.6 on desktop.
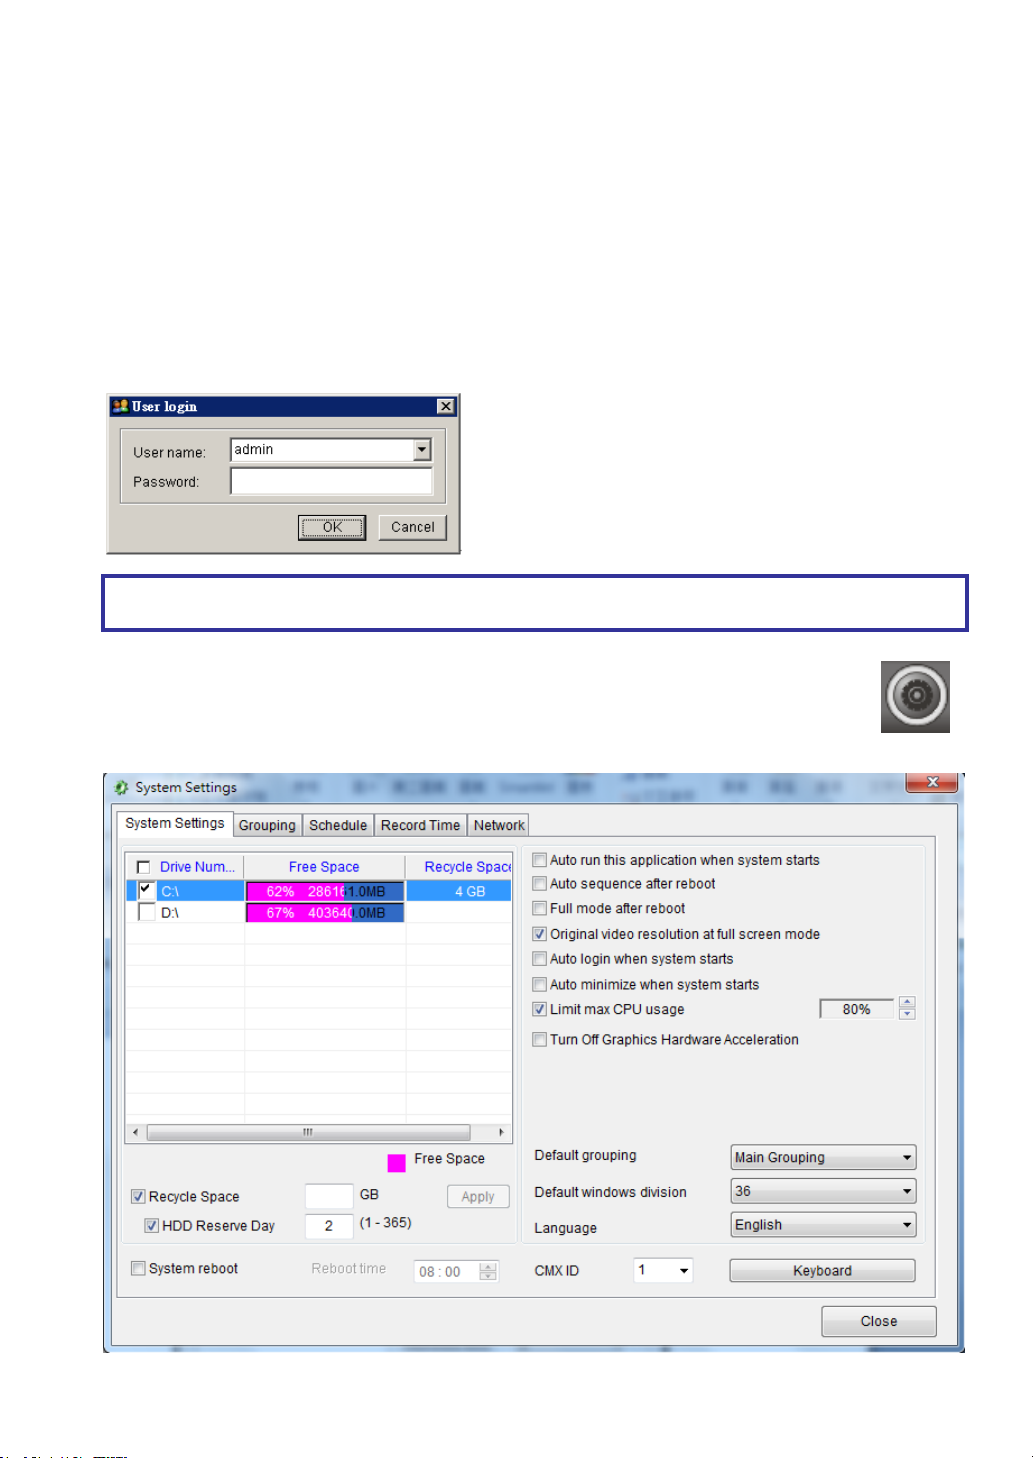
To login AIM Software HD 2.6, please follow these steps:
Step 1. Select a user from User name dropdown list.
Step 2. Type the password or leave it blank if you are first time to use this software.
Step 3. Click on OK button.
Chapter 1-1. System Settings
System settings contain HDD settings, device settings, and grouping settings.
Please finish System Setting before operating AIM Software HD 2.6.
- 8 -
Page 9

Auto run this application when system starts:
AIM Software HD 2.6 auto-run when Windows starts
Auto sequence after reboot:
Perform grouping sequence after system reboot.
Full mode after reboot:
Perform full screen mode after system reboot.
Original video resolution at full screen mode:
Use original resolution at single channel view mode. Do not scale original video.
Auto login when system starts:
Bypass login when system starts.
Default grouping:
Set default grouping at start-up.
Auto minimized when system starts:
AIM runs in the background when system starts.
Limit max CPU usage:
Limit the CPU usage at certain rate.
Default grouping:
Set default grouping.
Default window division:
Set default window division at start-up.
To enable circular recording, please check HDD Overwritten option. To select HDDs
for recording, please select HDD(s) for recording in HDD Information list box.
System reboot:
enable the system to reboot every day at certain time.
Recycle space:
Reserved recycling HDD space for other applications or OS using.
HDD reserved day:
Limit video recording within certain days.
Turn off hardware acceleration
By default, AIM utilizes Direct3D on a graphics card quick video rendering. It the PC
does not have such device, turn off this option.
AIM ID:
The AIM ID controlled by keyboard
Language:
To choose language setting, please select your language from Language combo box.
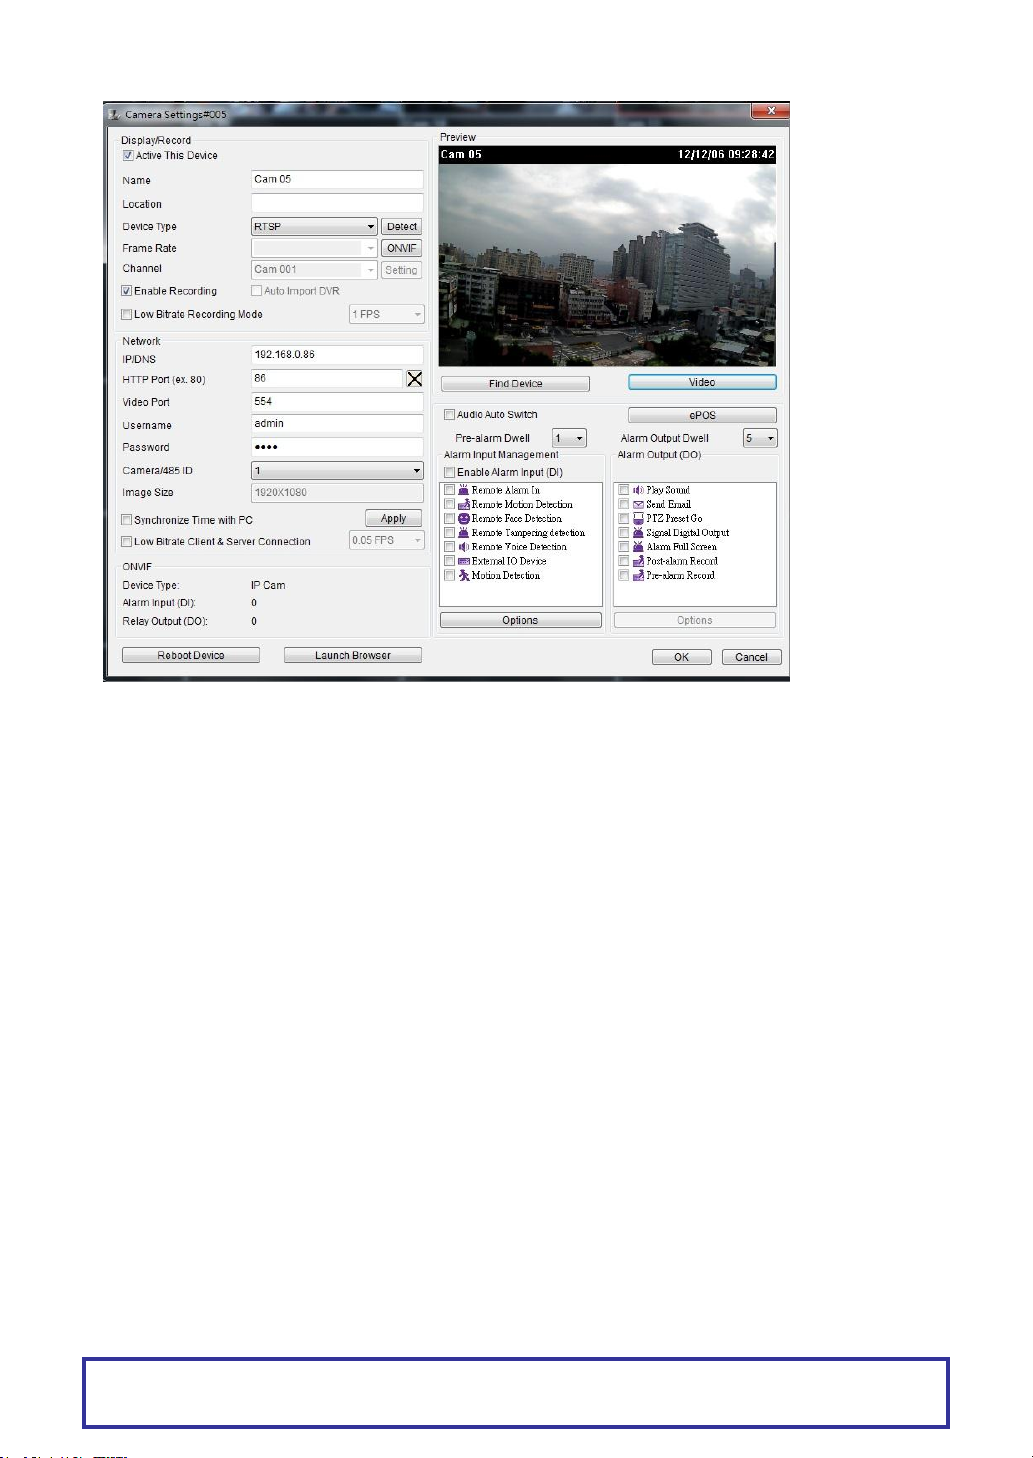
Chapter 1-2. Add a New Device
To add a particular device, please first select the channel and click on “Property”
button for adding a new device. The “Camera Settings” dialog box shows up.
Please type at least, IP/DNS address, port number, username, and password for
connecting the live video of the device. You can also click on “Find Device” and
selection one device from the IPScan tool. Click on “Detect” button for detecting the device
type.
- 9 -
Page 10
Note: 1. RS-485 camera ID (1 to 128) must match the ID setting of the IP Fast Dome. The
software may not control PTZ movement if the ID setting is incorrect.
To edit Camera Setting dialog box, please right mouse click on a channel and select Camera
Properties menu item.
Name—Camera name which is displayed on top of live video channel
Location—Indicating the location of the camera installed.
Frame Rate—Frame rate for the device
ONVIF—Frame rate and video quality settings based on ONVIF protocol.
Device Type—Device type selection box, RTSP is for H.264 D1 or H.264 HD IP
cameras.
Enable Recording—Enable or disable recording for the device
Auto Import DVR--Automatically import DVR/NVR cameras into AIM automatically.
Low bitrate recording mode—Record one frame per second.
IP/DNS (required)—The IP address of the device
HTTP Port Number—The HTTP port number of the device
Video Port Number—DVR/NVR’s video port number/IP camera’s RTSP port
number
Username—The username which is allowed to login the device
Password—The password for the username
Image Size—The source video size of the device
Camera/485 ID—IP Fast Dome RS-485 ID.
Low Bitrate Client and Server Connection—Connect in between AIM in low bitrate
mode.
Synchronize Time with PC—Synchronize time with the remote PC.
Find device—Search IP cameras and configure the IP camera.
Auto Audio Switch—For automated two-way audio connection
- 10 -
Page 11

If the above settings are done, you can click on Connect button to test if the device is properly
For default username and password information, please see appendix for detail.
Chapter 1-3. Device Type
There are few device type drivers for connecting streaming:
RTSP—Connect an IP camera with RTSP streaming protocol.
DVR/NVR-JPEG--Connect a DVR/NVR by MJPEG protocol.
DVR/NVR-H264—Connect a DVR/NVR by H.264 protocol.
AIM-JPEG—Connect a AIM by MJPG protocol.
Low Bitrate IP Camera—Connect an IP camera by low bitrate protocol.
Low Bitrate DVR Camera--Connect an IP camera by low bitrate protocol.
Looping Camera—For demonstration purpose, you can choose Looping Camera at
Device Type selection box for duplicate video channel without physically connecting
to an IP camera or a DVR’s camera. It can reduce bandwidth for the network video.
Chapter 1-4. ONVIF Setting
To use RTSP streaming, please first setup ONVIF protocol. The detail setting of ONVIF is
described as below:
Profile—A user can select different streaming profile such as H.264 720P or JPEG
720P.
Protocol—Streaming protocol such as RTP/UDP, RTP/TCP, or RTP/TCP/HTTP.
Quality—Compression quality
Brightness: Brightness setting of the video
Saturation—Saturation setting of the video
Contrast—Contrast setting of the video
Sharpness—Sharpness setting of the video
Frame rate—Change frame rate setting of the IP camera.
Bit Rate—Bit rate setting of the video
- 11 -
Page 12

Note: IPScan can only work under LAN environment, not Internet environment.
Note: ONVIF setting can only support Acumen’s ONVIF cameras.
Chapter 1-5. IPScan Utility
To find out the network devices, IPScan utility can scan through all IP address within LAN.
A user can select a device item in IPScan and click on Close button to setup the device. All the
device information such as IP address and port number get automatically carried over AIM
Software HD 2.6. Click on Connect button in the device dialog box which can test the
connection between the PC and the device.
You can also manually add devices information of IP Fast Dome/IP camera/video server/DVR
Chapter 1-6. Dual Monitor Outputs
AIM Software HD 2.6 supports dual-screen outputs. There are up to 72-channel
H.264 decoding at same time To do so, please have two monitors' PC first. AIM
detects each screen's resolution automatically and display video on its monitor..
Chapter 2. Recording Settings
AIM Software HD 2.6 is configured as continuous recording after an IP camera is connected.
- 12 -
Page 13
To change recording configuration, please follow the following selections.
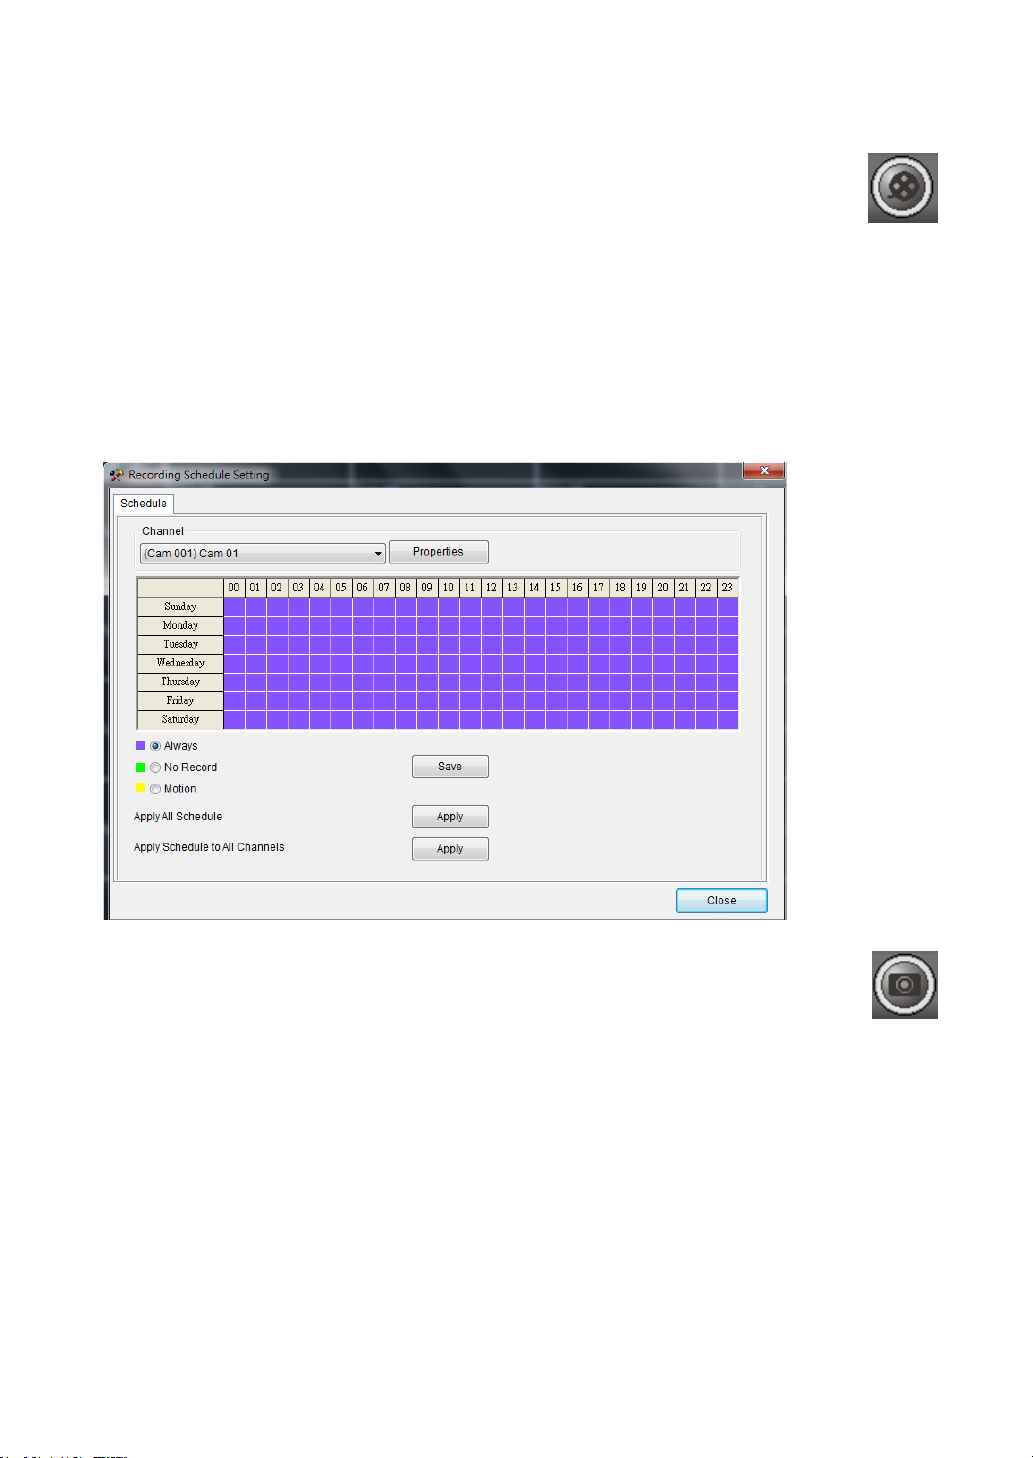
Chapter 2-1. Schedule Recording Settings
AIM Software HD 2.6 can schedule recording based on “Always”, “No Record”, and
“Motion recording for a particular hour.
To enable recording for a particular hour, please click on the week control and set the recording
option for the hour. Please also specify the recording type by selecting one of the recording
types.
To enable recording schedule for all hours, please click on Apply button for “Apply All Schedule”.
To apply the recording settings for all cameras, please click on Apply button for “Apply Schedule
to All Channels”
Chapter 2-2. Motion Detection Recording
To enable motion detection recording, please click on camera “Property” button to
enable “Camera Settings” dialog box. Once the IP camera is configured properly,
please click on “Video” button to test the video streaming.
- 13 -
Page 14
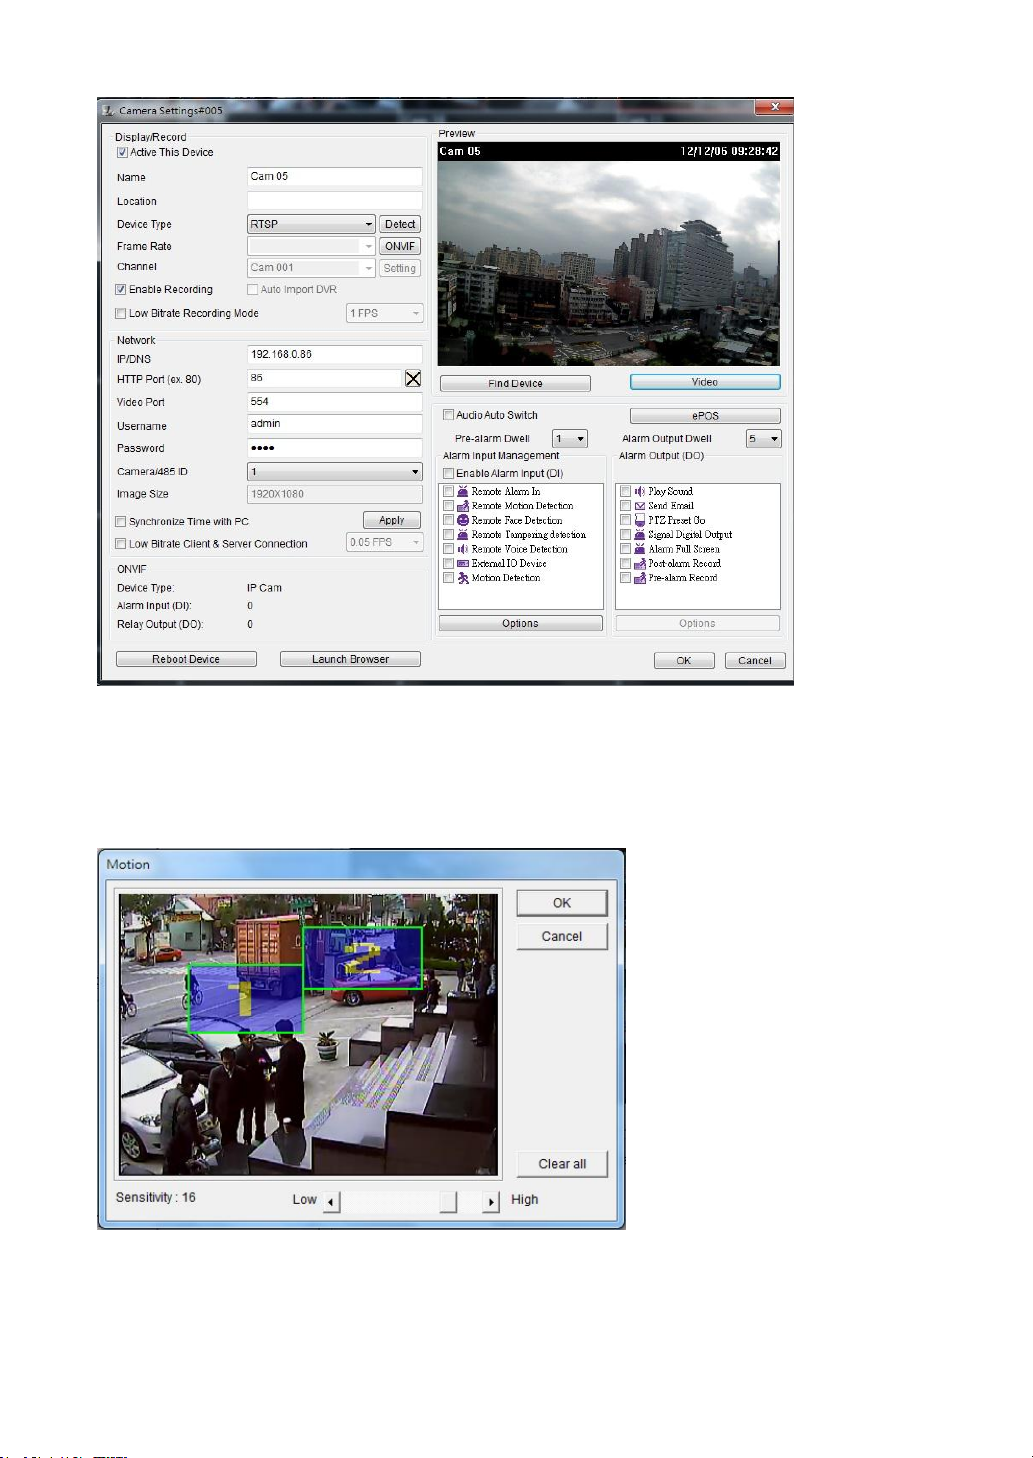
Please enable on “Motion Detection” option and click on "Optiona" to setup motion detection.
There are up to four motion areas available for a user to configure. Perform mouse-dragging on
the video area to define a motion area. Perform right-mouse click can clear a area or clear all
areas. To change motion detection sensitivity, please click on the scroll bar for adjust.
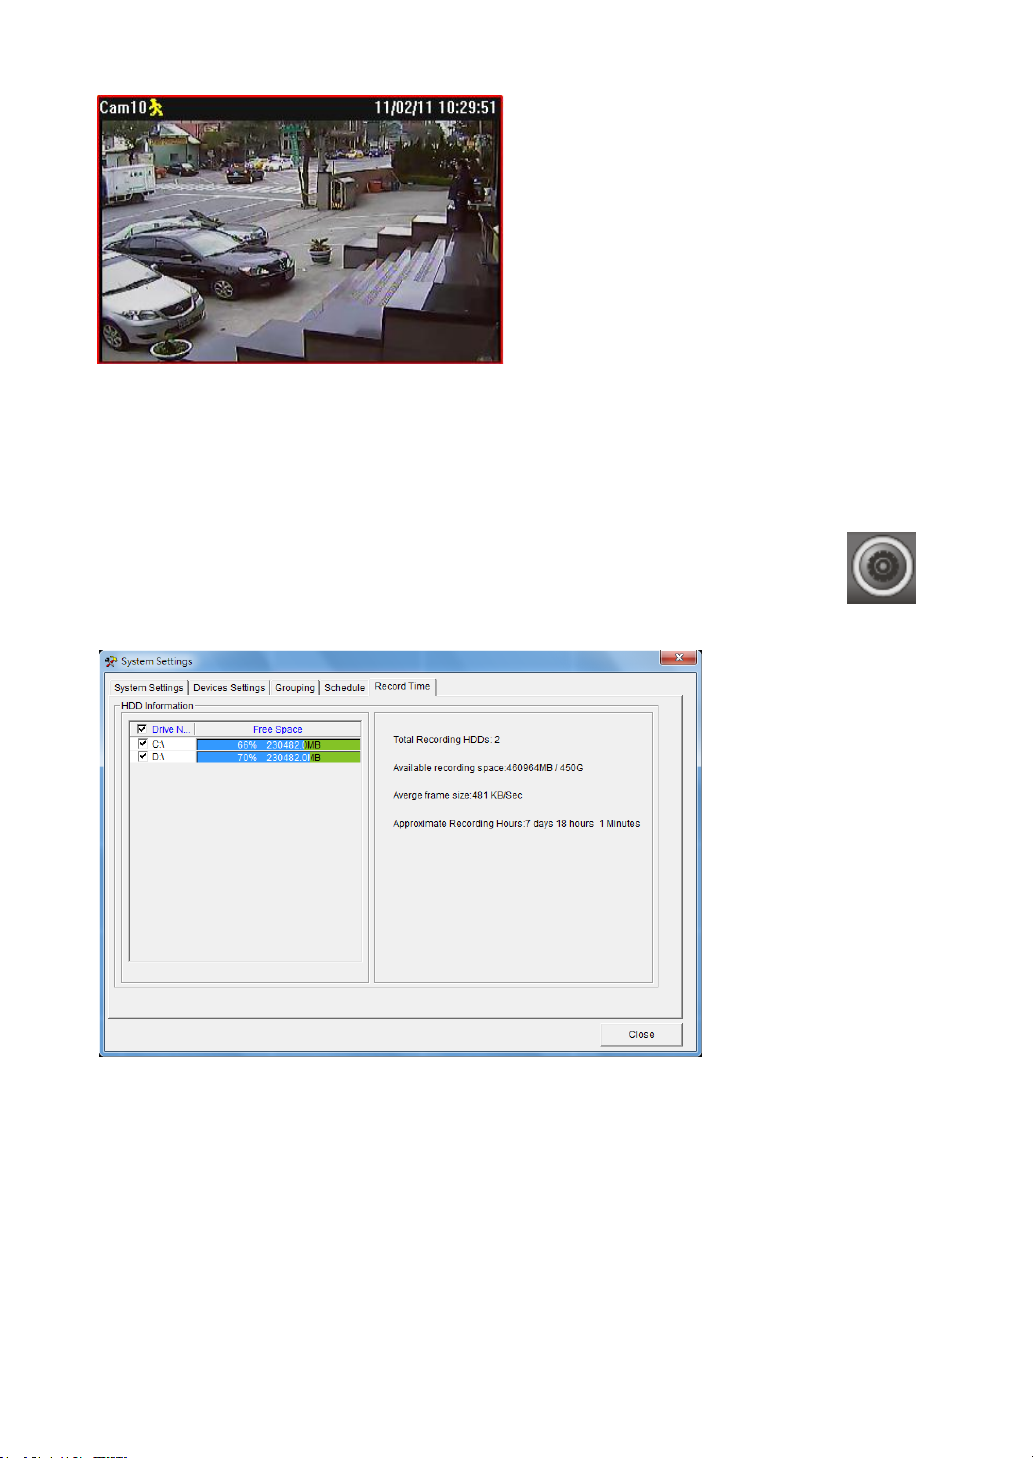
At live monitoring mode, if a motion detection is triggered, the camera window shows “little man”
to indicate a motion detection event.
- 14 -
Page 15
Chapter 2-3. Recording at System Startup
After the restart of AIM Software HD 2.6, AIM Software HD 2.6 starts recording automatically.
There is no need to restart recording service. If a schedule is set, AIM Software HD 2.6 records
video based on the schedule at startup.
Chapter 2-4. Estimated Recording Days
After system installation, to estimate approximate recording days, a user can click
on System setting button to enable system dialog box. Click on “Record time” tab.
Estimated recording day and time information gets shown on the dialog box.
Chapter 2-5. Network Storage
For recording over network storage such as iSCSI or NAS RAID storage, a user can configure
AIM Software HD 2.6 to record the video to the network storage, if the network storage supports
“Network Neighborhood” or Samba protocols.
- 15 -
Page 16
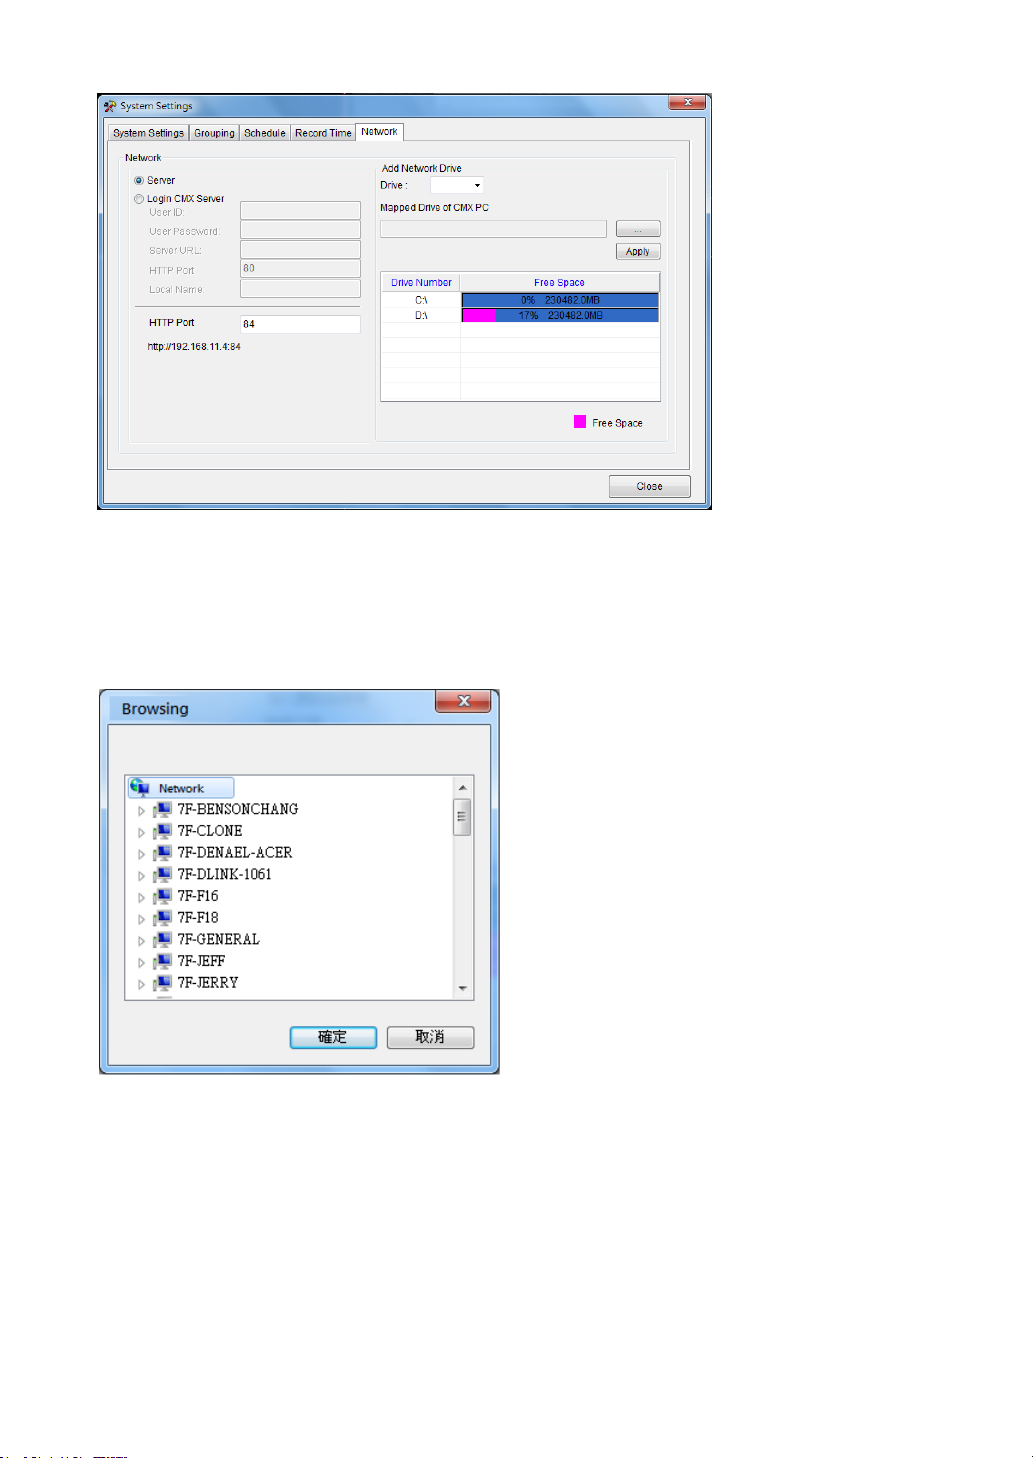
To do so, please first select a drive at “Add Network Drive” list. Select network storage by click
on “Mapped Drive of AIM PC” button. Once the network storage is selected, click on Apply
button. At the last, please check the newly added network storage from Drive Number for
enabling the storage. AIM records based on the selected drivers at circular recording basis.
- 16 -
Page 17

For "Map Network Drive", please make sure that "Reconnect at logon" option is checked. This
can avoid losing connectivity from AIM due to network driver rebooting.
For adding a network driver for AIM, please select one of the PC HDD or network HDD.
Perform right mouse click on the HDD. Click on "Map Network Drive.." menu item. "Map
Network Drive" dialog box shows up.
- 17 -
Page 18
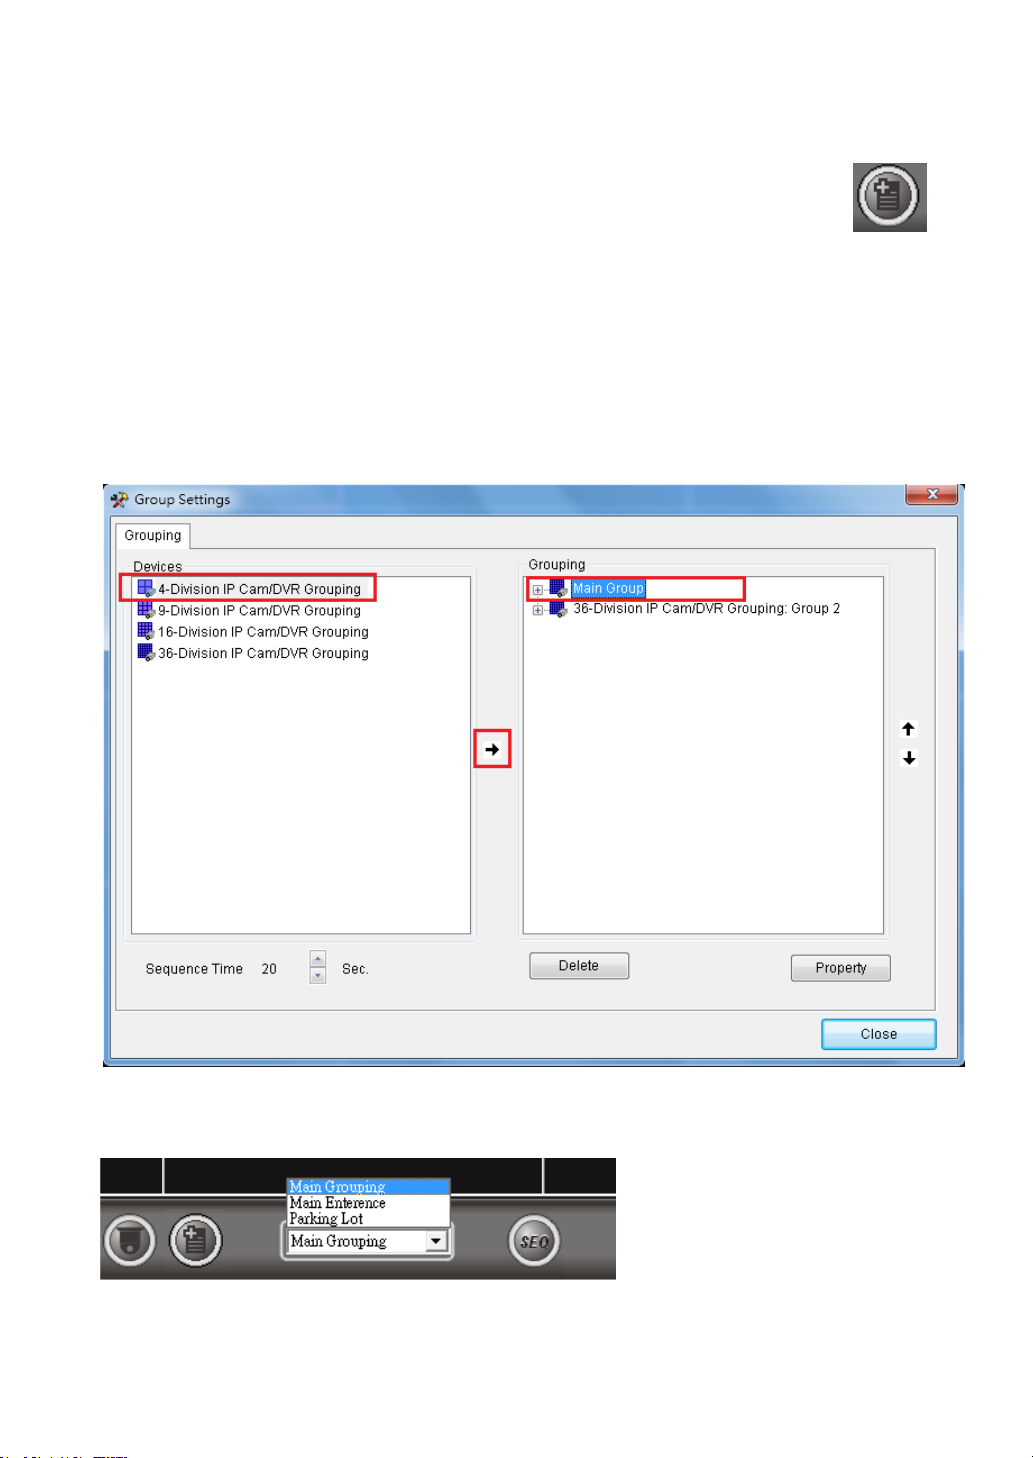
Chapter 3. Grouping Settings
A user may want to manage camera or DVR/NVR groupings based on their
geographic locations or their functions. The video of the grouping devices can be
recalled easily later on. To setup groupings, please click on the Grouping button
and follow the followings steps.
Select left IP Cam/DVR/NVR grouping and select right grouping item. Click on
Right button to create a grouping.
Click on Up or Down button to change the sequence in Grouping tree view.
Click on Apply button for the grouping settings.
Once the groupings are set, a user can switch to different grouping view quickly.
Chapter 3-1. Grouping Name
A user can assign a name for a grouping. To assign grouping name, please right click on a
- 18 -
Page 19

grouping, or select on a grouping and click on Property button for its name. Type the grouping
name in Grouping dialog box.
Chapter 3-2. Grouping’s Devices
Once a grouping is set, please select the device of the grouping. Right click on the
pre-assigned grouping device item. Select on the device item and perform right mouse click
for assigning Property.
Chapter 3-3. Grouping Authentication
To assign a grouping access right, please right click on a grouping and select Property menu
item. It shows a Grouping Access dialog box. The default setting of a grouping allows every
user to access. To disable access right, please uncheck a user access right. Grouping
access right also applies to web server. Only groupings assigned to a user can be seen by the
user after login to the web server.
- 19 -
Page 20

Chapter 3-4. Recall a Grouping
To recall a grouping, click on grouping drop down list.
Chapter 3-5. Grouping Sequence
In grouping tab, please specify Sequence Time. In live monitoring mode, please click on SEQ
button to perform Sequence Display feature.
Chapter 3-6. Main Grouping
Main Grouping refers to AIM Software HD 2.6’s main screen which contains 36
windows-division screen. To add a device for the main grouping, please follow the steps:
(1) Select Main Grouping in grouping dropdown list.
(2) Right mouse click on one of the cameras.
(3) Select Camera Properties to assign the camera properties.
Alternatively, a user can add devices into Main Grouping at System Settings->Device Settings.
Device Settings allows a user to manage up to 36 channels of IP cameras, video servers, and
H.264 HD IP’ cameras.
Chapter 3-7. Window-divisions
Currently, AIM Software HD 2.6 supports four types of window-division including maximized
window (each view), 4-window-division, 16-window-division, and 36- window-division. To see
the maximized camera window, you can select particular camera window and click on Each
View button. You can also double-click on the live video for the maximized window. To see 4-,
16-, and 36-window-division, click on the window-division buttons.
- 20 -
Page 21

Drag-n-drop
Each
16-window-division
4-window-division
36-window-division
Chapter 3-8. Dynamic Video Channel Editing
If a user wants to change the arrangement of a camera channel, the user can drag a camera
and drop to another video channel. This operation swaps these two cameras’ positions
dynamically in software. There is no need to re-assign all the IP settings, if the user later
changes his/her mind for the camera’s display position after installation.
Chapter 3-9. Digital Zoom
To perform digital zoom, please first drag on the window for digital. Once the channel is in
digital zoom mode, please select the green area for other region.
To perform digital zoom in playback, please follow above procedure.
- 21 -
Page 22

- 22 -
Page 23

Chapter 4. Video Playback
AIM Software HD 2.6 can perform video playback task for all IP-based products including H.264
HD IP Cameras, full D1 IP Cameras, IP Fast Domes, Video Servers, LAN Cameras, and
DVR/NVRs. To perform video playback on various IP devices, follow the following sections:
Chapter 4-1. Playback
To perform playback operation, you have to select a camera channel or a
DVR/NVR. By clicking on playback button, the playback dialog box shows up.
Based on a DVR/NVR device or an IP camera device, each device of the playback operation is
described in the following sections:
Chapter 4-2. Playback for an IP Camera within
the Main Grouping
For the main grouping, the video can be recorded
at a local PC. To retrieve stored video clips,
playback operation can be performed based on
date and time specified. Please follow the
following steps to play video clips on the PC:
Step 1. Click on the date on the calendar
control.
Step 2. Specify starting time and ending time.
Step 3. Click Search button to search the video clips.
- 23 -
Page 24

Alarm Recording
Continuous Recording
Once a video clip is playing, click on Stop, Play, Pause, <<, >>, and snapshot buttons for the
video clip. A user can also click on the time-bar for video playback.
Chapter 4-3. Multiple Channels Playback
A user can select a grouping for multiple channels playback. To do so, please click
on multiple channel playback button. A playback button shows up as below:
There are up to 36-channel that is available in the system. Please specify date and time.
Perform Search button for playback task.
Chapter 4-4. Remote AIM Multiple Channels Playback
A user can perform playback on a remote AIM for its video recording. To do so, click
on "Remote Playback" button. Click on "Connect" button and enter IP/DNS
address, port number, username, and password for accessing the AIM. Select a
grouping for multiple channels playback.
- 24 -
Page 25

Chapter 4-5. Remote DVR/NVR Playback
For playback on a remote DVR/NVR, please first perform right-mouse click on a DVR/NVR
channel. Select “DVR/NVR Remote Playback” menu item for DVR/NVR video playback.
The DVR/NVR Playback dialog box shows up. Specify date and time information in the dialog
box for remote DVR/NVR playback.
Chapter 4-6. Remote DVR/NVR File Download
To download remote DVR/NVR’s files, please first perform right-mouse click on a DVR/NVR’s
channel. Select “DVR/NVR File Backup” menu item. A DVR/NVR File Backup dialog box
shows up. Specify date, time information, and click on Search button. It can list all the files of
the DVR/NVR. For downloading the files, please click on Save Folder button and click on
Download button for downloading the files into a specific folder.
- 25 -
Page 26

Chapter 4-7. AVI File Exporting & Play From a File
Exporting AVI with OSD
To export an AVI file for main grouping device, please perform playback operation for the device.
Once the video clips have been located, specify the file name and click on Save Now button for
the AVI file.
Exporting AVI without OSD
For direct exporting H.264 AVI file without OSD time stamp, this operation performs fast than
rendering OSD.
AIM Software HD 2.6 video clips are stored in a hard drive’s Video folder followed by a GUID
folder. The GUID folder is a 32-digit hex folder. AIM Software HD 2.6’s video clips are stored
as in the folder under year, month, day, hour, and minute. To retrieve a particular a file, please
locate the file by the button of “Play from a File”.
- 26 -
Page 27

Chapter 4-8. Snapshot
For IP-based devices, you may want to capture a particular video into a picture. You can click
on the Snapshot button. The picture is exported to a JPEG file format. For DVR/NVR devices,
please perform right-mouse-click and select “Save As JPEG” menu item.
Chapter 4-9. Alarm Event Playback
To playback based on motion detection events, please click on the alarm radio button at the
Playback dialog box. Click on Search button to list all the motion detection events. Click on a
motion event can play associated video.
- 27 -
Page 28

Chapter 5. Audio
Chapter 5-1. Two-way Audio
To perform two-way audio, please first select a particular channel for listening to the audio of
the channel. Click on Speaker icon to enable audio feature. To change volume, please
change volume bar.
To speak to remote site, please click MIC On button.
To enable audio monitoring, please double click on a channel in full screen mode for audio
monitoring.
Chapter 5-2. Two-way Audio
AIM Software HD 2.6 supports two-way audio for IP cameras with two-way audio
supported. For automatic speak and listen to audio while the camera is triggered
by the remote IP camera, enable "Audio Auto Switch" button.
You can also enable various audio input triggering by "Enable Alarm Input (DI)" and activate
various alarm output.
Chapter 5-3. Audio Recording
For IP cameras with audio input models, AIM Software HD 2.6 can record audio with it video.
To listen the audio recording, playback feature can play the audio.
- 28 -
Page 29

Chapter 6. Archiving Manager
AIM Software HD 2.6 Archive Manager can archive video to a central storage. Archive Manger
is located in each AIM PC. It can perform video clips archiving to the central storage
automatically.
Chapter 6-1. Archiving Source
To perform video archiving, select the cameras for video archiving. You can keep the video
clips from the AIM PC (Duplicate Archiving), remove the video clips from the AIM PC, or choose
the time not for archiving. After configuring above, you can apply the archiving hour for the
week of the camera or apply the schedule to other cameras.
- 29 -
Page 30

Chapter 6-2. Archiving Destination
A user can choose the Archive Driver for archiving the video clips from a AIM. The Archive
Drive could be a network RAID drive or internal SATA RAID for large among data. For a
network RAID (NAS), click on "Setup Network Disk" button to attach the drive to the AIM.
After setup the archiving drive. Please select Real-Time Archiving or Scheduled Archiving.
For Read-Time archiving, the archiving task is activated in next minute. After all the
configurations, a user can click Start button for archiving task.
- 30 -
Page 31

Chapter 7. User Settings
User setting allows add a user, delete a user, change password for a user, and assign feature
accessed by a user.
To add, delete, and modify a particular user, click on User button in NVR tool box.
The User Setting dialog box shows up.
Chapter 7-1. Add a User
To add a user, click on a particular user in the user list and click Add button. Add User window
shows up. To add user, specify user name, password, and confirm password. Please also
specify the user level and click on OK button.
Chapter 7-2. Modify an Existing User
To modify an existing user, click on a particular user in the user list and click Property button.
To modify the user, specify user name, password, and confirm password.
Chapter 7-3. Delete a User
To delete a user, please select the user in user setting window and click on OK button.
Chapter 7-4. User Authorization
Features of AIM Software can be assigned for a user. To enable a feature for the user, please
- 31 -
Page 32

first click on Property button. The User Property dialog box shows up. Click on the check
box for the user in Access Level list item.
Chapter 7-5. Alarm Email Notifications
For sending alarm email notifications, please configure the email setting in the user. After
finishing email setting, please configure Alarm Output Management at Camera Settings.
- 32 -
Page 33

Chapter 8. Multiple Monitors, PTZ & Keyboard
PTZ control
IRIS control
Focus control
Speed control
Zoom control
Auto pan
Preset settings
Preset points
In order to perform PTZ movements, you have to select a particular live channel which contains
an IP Fast Dome. Once an IP Fast dome is selected, you can control the movements using PC
keyboard and/or PTZ control Panel.
Chapter 8-1. Preset Point Settings
To setup preset points, please invoke Presets dialog box. Follow the following
steps:
Step 1. Select preset point dropdown list.
Step 2. Type the time field.
Step 3. Type the speed field.
Step 4. Click up, down, left, or right to move the IP Fast Dome to specific position.
Step 5. Click Apply button to set the position.
- 33 -
Page 34

Chapter 8-2. AIM Software HD 2.6 Status Panel
+
+
+
+
+ +
Recording percentage of HDD
System date
System time
Sequence mode
PTZ indicator
RS-232<->RS-485 Convertor
MIC status
CPU usage
User status
Speaker status
AIM Software HD 2.6 status panel is described as following chart.
Chapter 8-3. Control PTZ via Keyboard
To use PIH-931D keyboard for AIM, please follow the following steps. First, please add a
RS-232<->RS-485 convertor for connecting keyboard and a AIM PC.
Chapter 8-3-1. DVR/NVR Control Mode
Press the SHIFT button and the DVR/NVR button to set the keyboard to DVR/NVR control
mode.
To control a AIM, please first enter the DVR/NVR ID (AIM ID) follow by the ENT button.
To recall a grouping, please type 1 + MON and following by grouping ID and the PRESET
button.
To recall a grouping on second monitor, please call a DVR/NVR ID (AIM ID) following the ENT
button. After that, please type 2 + + MON and following by grouping ID and the PRESET.
- 34 -
Page 35

+
+ +
Chapter 8-3-2. Window-division
16-division
8-division
36-division
AIM ID + DVR/NVR + ENT
9-division
4-division
Zoom in
Zoom out
Tilt up
Tilt down
Pan left
Pan right
Zoom in
Zoom out
Focus near
Focus far
IRIS small
IRIS large
Auto Pan
+ +
To change window-division, please first control a AIM and type the following buttons.
To recall 36-window-division, please type AIM ID followed by DVR/NVR and ENT buttons. The
operation is same controlling a AIM.
Chapter 8-3-3. Recall a Camera
For recalling a camera, please select camera number and follow by CAM button.
Example: Call camera #8
Chapter 8-4. IP Camera ePTZ or ROI Feature
For some IP cameras, they provide ePTZ or ROI feature. A user can still use the keyboard
controller for ePTZ or ROI feature via AIM Software HD 2.6.
- 35 -
Page 36

Chapter 8-5. Multiple Monitors Virtual Matrix Output
AIM can up to support 6 monitors, one main monitor + 5 additional monitors. AIM TV wall
virtual matrix can be connected as the system described below: To support 6 monitor outputs,
please use ASUS 7970-DC2-3GD5 graphics card.
After installing the graphics card, click on Monitor button. It shows all the detected
monitors shown below:
- 36 -
Page 37

Once all the monitors are properly installed, click on "Identify Monitor". All monitors are shown
+
+
+
IDs as below:
Few functions for controlling AIM monitors are described below:
Quad display: for large LCD panel, AIM can be configured to show 4 AIM monitors on
one big LCD monitor.
Default grouping: the default grouping to be shown on the monitor.
Sequence time: the monitor can be programmed for sequence display.
Division: the default camera division of the grouping.
Low CPU usage mode: this mode can only display I frame for reducing CPU time.
Chapter 8-6. Switching in Between AIM and Virtual Matrix Monitors
Please first gain AIM access by press SHIFT button and DVR button.
To control the AIM, please type AIM ID, DVR button and ENT button.
After a AIM gets controlled, a user can address the monitors of the AIM.
To control #5 monitor, please click 5 button + MON for controlling #5 AIM monitor.
To recall a grouping, please type the monitor ID + MON and following by grouping ID and the
PRESET button.
- 37 -
Page 38

Chapter 8-7. Keyboard Playback
Please press SHIFT and DVR buttons for playback a AIM and press one of the follow buttons for
playback.
To control multiple channel playback feature, please click on Stepping Forward button.
This invokes multiple channel playback features.
To control single channel playback feature, please click on Play button.
A date and time dialog box shows up. Please use for entering date and time. Press
ENT button for searching the video. Please ESC to exit the dialog box and press ESC again to
exit playback dialog box.
For operating playback features, please follow the following:
Pause: Press PAUSE button during playing video can pause the video in pause mode.
Play: Replay the video after Pause, Fast Forward, or Fast Rewind.
Fast Forward: Fast Forward the playback video.
Fast rewind: Fast Rewind the playback video.
Stop: Stop the playback video and return to playback menu.
- 38 -
Page 39

Chapter 9. eMap Manager
Alarm Snapshot
Camera with Camera View
Multiple Live Video
Map Representation
Alarm Snapshot
Device Tree
eMap is an application which can manage devices such as IP camera,
IP Fast Dome, and DVR/NVRs on multiple maps. With eMap Manager,
user can easily locate a particular device on a map.
Chapter 9-1. Before Accessing eMap Manager
Before accessing eMap, terms and screen layout are described in the following section:
Find Device Panel
To find a device, please click on Find Device Panel button or View->Device menu. Click on the
device in Find Device Panel.
- 39 -
Page 40

PTZ Control Panel
New map: Create a new map.
Delete map: Delete an existing map.
Export map as: Export existing for later use.
Map properties: Set map properties.
Device properties: Set device properties
Refresh: Refresh eMap map list and device information.
Drag device mode: Drag a device on a map for its position.
Camera view control: Clockwise and counter-clockwise rotate a camera view.
Device list panel: Switch to Device panel.
Find device panel: Switch to Find Device panel
To control PTZ device, please double click on a PTZ device. Perform PTZ feature on the PTZ
control panel.
Chapter 9-2. Tool Bar
The buttons from left to right are described as follows:
- 40 -
Page 41

PTZ control panel: Switch to PTZ control panel.
eMap edit mode: for editing a map, deleting a map, and setup a device on map.
eMap control mode: for PTZ control and live monitoring mode
Chapter 9-3. eMap Alarm Options
Chapter 9-3-1. Setup a Map
To setup a device map, click on File->New Map or New button at Map list. A file opening dialog
box gets displayed. Please select the JPEG map file representing the installation site. Type
both map name and location information.
To delete a map, please first select the map in Map List and click on File->Delete Map or click on
Delete button.
To access property of the page, click on Property button.
- 41 -
Page 42

Chapter 9-4. Setup a Device on a Map
To setup devices on a map, drag-and-drop a device from Device List to its associated map.
The device item shows checked if the device is setup on the map.
Chapter 9-4-1. Delete a Device on a Map
To delete the device on the map, follow the following steps:
1. Select on the device.
2. Right click on the device.
3. Select “Device Delete” menu item.
Or, uncheck the check box of the device item.
Chapter 9-4-2. Arrange a Device
To arrange the device position on the map, click on Drag Mode tool or menu item
to enable device drag mode. Use mouse point drag the device to the
destination area.
- 42 -
Page 43

Chapter 9-4-3. Device Property
To show a Device Property, select “Device Property” menu item on the menu. A Device
Property dialog box shows up. Device name and device text color can be changed for
distinguishing its background image.
Chapter 9-5. Find a Device on eMap
DVR, DVR/NVR’s camera, or IP-based devices can be setup on different maps. It is very
difficult for a user to find the live video of a particular device. To find a device on eMap instantly,
a user can click on Find Device Panel button/View->Find menu item. List of all devices in Find
Device Panel can be found on a map instantly. The user can click on the device that eMap can
automatically switch to the map and show the device and its live video.
Chapter 9-6. Camera View Control
A camera view control can indicate a camera’s viewing angle. To setup
camera view control, please click on the clockwise/counter-clockwise
camera view control to rotate camera viewing angle.
- 43 -
Page 44

Chapter 10. Web Server
Each AIM has one web server for displaying live video. To enable the service, please specify
the port number of the PC’s IP address.
Once this is done, the user can click on the HTTP Link and launch Internet browser to see the
video.
Chapter 10-1. Login Web Server
To login AIM web server, please provide the username and password for the service. The live
video is grouped based on grouping as in AIM Software HD 2.6. Once a grouping is managed,
the grouping can be assigned for its access right of a user. Please see grouping section for
detail.
- 44 -
Page 45

Chapter 11. Database Manager
Database Manager allows a user to perform operational report
printing, event report printing, database importing, database exporting,
and database repairing. To perform above features, please see the
following:
Chapter 11-1. User Operational Report
For showing all logon logs, please click on “User Log Report” menu item. To print
out the report, please click on “Print/Print Preview” menu item.
Chapter 11-2. Event Report
For showing all alarm event logs, please click on “Event Report” menu item. To
print out the report, please click on “Print/Print Preview” menu item.
Chapter 11-3. Database Maintenance
Database maintenance is constantly required. To perform database maintenance,
please click on Tool->Compact DB or click on Compact DB tool button.
Chapter 11-4. Import Database
Database configuration can be imported from a XML configuration file. To import
database, please click on Import Database button.
Chapter 11-5. Export Database
Database configuration can be export to a XML file for later use. To perform
exporting, please click on Export Database button.
- 45 -
Page 46

Chapter 12. Alarm Management
Note: It is highly recommend to use IP camera's remote motion detector.
Chapter 12-1. Enable Alarm Input
AIM Software HD 2.6 can be managed to receive remote IP camera motion detection
signal and AIM motion detection signal. Depend on IP camera models, AIM
Software HD 2.6 can also receive alarm signals including face detection alarm,
tampering detection alarm, audio alarm, and dry-contact digital input alarm. These alarm
signals can be received by AIM and eMap manager. Please enable "Enable Alarm Input (DI)"
option for receiving alarms.
Chapter 12-2. AIM Motion Detection & Remote Motion Detection
Many IP cameras have motion detector built-in. If a camera do not have a motion detector, a
user can use AIM motion detector for detecting camera motion alarm. Software motion
detector in AIM is a heavy CPU oriented task. It is highly recommend to use IP camera's
remote motion detector.
Chapter 12-3. Alarm Output Management
For motion and remote motion alarm detection management, the alarm output feature allows
various reactions after receiving an alarm. The alarm output includes:
Play Sound--Trigger PC alarm sound after receiving an alarm.
Send Email--Send an JPEG email snapshot after receiving an alarm.
PTZ Preset Go--Recall a PTZ preset after receiving an alarm.
Signal Digital Output--Triggering a DO output of an IP camera after receiving an
alarm.
Alarm Full Screen--Triggering full screen mode after receiving an alarm.
Pre-alarm Record--Record before the alarm event.
Post-alarm Record--Record after the alarm event.
Please select the alarm output from the selection list to enable the option.
- 46 -
Page 47

Chapter 12-4. Remote Alarm Input (DI) & Digital Alarm Output (DO)
If a camera is equipped with a digital input and an digital output, a user can configure the digital
input (DI) triggered by an access control or an digital relay input. AIM Software HD 2.6 is
capable of receiving the digital signal from a camera via network. After receiving the alarm
signal, AIM Software HD 2.6 can trigger various alarm outputs including the digital output. The
digital output signal is sent to the IP camera via network for external alarm devices such as a
siren light or a door lock built-in with a relay input. The following diagram shows digital input
marked as DIN and a relay output with triggering state N.O. (normal open).
- 47 -
Page 48

Chapter 13. Retail and Distribution Business Solutions
AIM Software HD 2.6 is able to connect to Point of Sale (POS) terminals. POS transaction data
can be captured by AIM Software HD 2.6. POS transaction data can be displayed on live video
and playback video. AIM Software HD 2.6 also provides smart transaction search for
associated video clips. To perform these features, please follow the steps below:
Chapter 13-1. POS Connection Basis for Retail Business
AIM Software HD 2.6 basically listens to the ASCII/COM output of a POS system via RS-232.
Please check POS’s display output or printer output for ASCII data of your POS system.
Please consult your POS provider for more detail.
Basically, please connect RX/TX of the RS-232 of a POS register/terminal to AIM PC. Please
see wiring diagram below:
To connect more than one POS terminals, add more RS-232/COM port into the AIM PC.
Chapter 13-2. Test POS Communication with a PC
After the POS connects to the AIM PC, please use Hyper Terminal or other RS-232 capturing
application to test and to verify POS data that can be captured in the AIM PC.
- 48 -
Page 49

Chapter 13-3. Link POS with a Channel
To link a POS to a camera, please click on “Property” button and “POS” button.
The POS Setting dialog box shows up.
In POS Setting dialog box, please specify the following information for capturing POS
transactions.
Device: POS register number.
COM Port: The mapped COM port number for the POS terminal.
Print on Video File: Record POS transaction into video file.
Print on Playback: Display POS transaction during playback.
Print on POS Live: Display POS transaction at live video.
Text Alignment: Alignment of POS transaction.
- 49 -
Page 50

Note: For demo purpose, please press F3 to show simulated POS transitions.
Once above information is setup correctly, AIM Software HD 2.6 starts to capture and to display
POS transactions on live video.
Chapter 13-4. Playback for POS Transactions
During playback, the recorded POS transactions get shown on the video and displayed on the
list box. Click on a POS transaction. The video clip is played associated with the time of the
POS transaction.
- 50 -
Page 51

Chapter 13-5. Search POS Transactions
Too search a particular search conditions such as an amount, a product item, subtotal, and total,
a user can set the search condition for associated time stamp. Click on the item in the listbox.
It can play the video of the transaction.
Chapter 13-6. Scanner Connection Basis for Transportation Business
For transportation business, a barcode scanner and a keyboard are widely used. The barcode
scanner for scanning barcode is connected to a PC via the PS/2 connector of the AIM PC. The
barcode scanner acts as a keyboard. In AIM Software HD 2.6, the scanner connection only
accepts 0 to 9 for keyboard scanner or the barcode scanner.
To use barcode scanner as transaction device, connect barcode scanner into PS/2 connector.
In “Camera Settings” dialog box, enable “barcode scanner” option. For one PC, there is only
one video channel that can be set for the barcode scanner.
For search barcode transactions and playback on the barcode transaction, please see “Playback
with POS Transactions” and “Search POS Transactions” for detail.
- 51 -
Page 52

Chapter 14. Trouble Shooting
Chapter 14-1. What should I do if I experience video flickering in AIM
If you experience video flickering at AIM of the PC’s graphic card, please follow the instruction
for solving the problem.
Step 1: Please go to “Control Panel->System and Maintenance->System Properties” at
Windows 7.
Step 2: Click on “Performance Setting” button and select “Adjust for best performance” option.
It can solve the flickering problem.
- 52 -
Page 53

Step 3: Turn off the graphics hardware acceleration from AIM at System Settings, if
the graphic card of your PC might not support Direct3D technology.
Chapter 14-2. What should I do for verifying RS-485 keyboard that is properly installed?
Click on System button and Keyboard button in AIM. Please select proper COM
port. Start to move the joystick of the keyboard. The keyboard starts to send
keyboard protocol to AIM that can be trapped and shown on the Keyboard Setting
box.
- 53 -
Page 54

APPENDIX
Device
Admin
Admin pass.
Oper
Oper pass.
Guest
Guest pass.
IP Cameras
admin
pass
None
None
guest
guest
DVR/NVR
admin
1111
None
None
guest
2222
AIM Software
admin
EMPTY
operator
EMPTY
guest
EMPTY
Minimum System Requirement
OS: Windows XP Home, Windows Vista Home, SP3 required, Windows 7 Home
CPU: Minimum Intel Duo CPU 2.0 GHz or above
RAM: 4 GB DRAM or above
HDD Size: At least 250 GB for recording storage
Network: Gigabit network
Product Supported
Full HD IP Camera Series: AiP-M24K, AiP-L24N, AiP-B24N, AiP-R24K, AiP-V24K
AiP-O53N, AiP-P24N, AiP-U24K, AiP-U53K, AiP-Z24N
H.264 HD IP Camera: AiP-Y14D, AiP-I14D
H.264 D1 IP Camera: AiP-W04T, AiP-X04T
Video Server: AiP-E4H, AiP-D4
DVR/NVR: AiP-N6R, AiP-N6D, AiP-F9U, AiP-F4U, AiP-Q4U
Username and password
Default username and password for various devices are described as in the table:
Benchmark Environment:
PC network card—Gigabit network card
Gigabit hub * 1
Graphics Card for Supporting 6 Monitors:
ASUS 7970-DC2-3GD5 is tested and verified for support 6 monitors virtual matrix output.
- 54 -
Page 55

H.264 benchmark table
Intel Core i7-2630QM
2.00GHz
RAM: 8 GB DDR III
CPU model: Intel i7 Quad-Core
2.93GHZ
RAM: 2 GB DDR III
CPU model: Intel T5750,
2GHZ DuoCore
RAM: 3 GB DDR II 677
OS: Windows 7, 64 bit
OS: Windows 7, 64 bit, SP1
OS: Windows XP SP1
H.264 at 1080P,
30 FPS
H.264 at D1
30 FPS
H.264 at 1280X768
15 FPS
H.264 at D1
30 FPS
H.264 at 1280X768,
15FPS
Ch.
CPU Usage
CPU Usage
CPU Usage
CPU Usage
CPU Usage
2
25%
1%
3%
22%
15% 4 30%
2%
3%
41%
34% 6 40%
3%
9%
55%
37% 8 50%
5%
19%
63%
55%
10
65%
9%
21%
80%
64%
12
75%
9%
26%
87%
84%
14
Overloading
9%
28%
94%
100%
16
Overloading
9%
35%
100%
Overloading
18
Overloading
9%
50%
Overloading
Overloading
20
Overloading
11%
77%
Overloading
Overloading
24
Overloading
17%
85%
Overloading
Overloading
26
Overloading
20%
85%
Overloading
Overloading
28
Overloading
24%
100%
Overloading
Overloading
30
Overloading
25%
Overloading
Overloading
Overloading
34
Overloading
40%
Overloading
Overloading
Overloading
36
Overloading
48%
Overloading
Overloading
Overloading
CPU model: Intel i7 Quad-Core
2.93GHZ
RAM: 8 GB DDR III
OS: Windows 7, 64 bit, SP1
Multi-division: H.264 at D1, 20 FPS
Full screen: H.264 at full HD, 20 FPS
Full HD recording at 20 FPS
Multi-division: H.264 at D1, 30 FPS
Full screen: H.264 at full HD, 30 FPS
Full HD recording at 30 FPS
Ch.
CPU Usage
CPU Usage
42
40%
44%
44
47%
49%
46
49%
56%
48
49%
62%
50
51%
72%
AIM 1080P dual-streaming H.264 benchmark table
- 55 -
Page 56

52
51%
74%
54
52%
75%
60
54%
75%
64
56%
81%
66
57%
82%
68
57%
83%
70
60%
85%
72
68%
85%
- 56 -
Page 57

AIM 2.6 HD Software Specification
Recording
Schedule / Motion detection / Manual recording
Live
Display up to 72 channels via two monitors
Speed
Up to 1080P 30 FPS and ROI recording supported
Resolution
Full HD: 1920 * 1080 / HD: 1280 * 768 / D1: 720 * 480 / VGA: 640 * 384 / CIF 320 * 240
Schedule
7 days * 24 hrs time table, recording mode configurable
Alarm recording
Face detection, audio detection, tampering, motion, DI alarm detection
Audio recording
Yes
Limited recording
Configurable for 1~180 days
RAID recording
Samba RAID, eSATA RAID, and Network Neighborhood supported
Playback
Time search, event search, date search, POS smart search
Speed
FR: 2x, 4x, 8x, 16X 32X / FF: 2x, 4x, 8x, 16X, 32X
Compression
H.264 / JPEG
Multi-channel playback
Up to 36 channels
Remote AIM playback
Up to 36 channels
Remote DVR playback
Yes
Video input
Managing up to 72 ACUMEN IP cameras / DVR / NVR connections
Camera name
20 characters
Channel editing
Mouse drag-n-drop
Digital zoom
Yes, ePTZ supported
Grouping
User grouping authentication assignable for eMap, and AIM Software HD 2.6
Dual-screen
Up to 72-channel display
Live display
Sequence
Split screen
4, 9, 16, 36
Dual stream technology
Multi-channel displays D1 and full screen displays 1080P resolution
TV wall
Dual monitors support up to 1080P 72 channels decoding
Video archiving
Video archiving to RAID
Archiving
Individual camera configurable, scheduling and instant archiving
Alarm
Alarm management
Alarm popup for full screen, PC sound, redirect IP camera DO, eMail snapshots,
redirect a PTZ preset recall
Event
Various alarm log, video loss, stop recording, schedule, logon, operation log
Digital output
Controllable via IP cameras
Alarm recording
Pre-alarm:1~5 seconds and post-alarm: 5~50 seconds
Accessories
P/T/Z protocol
ACUMEN PTZ controllable via HTTP
Audio
PCM/G.711, two-way audio, audio recording
POS/barcode scanner
RS-232/PS/2
Keyboard
keyboard controllable via RS-485 for PTZ, ePTZ, and ROI features
Digital map
eMap live monitoring
One channel for IP camera/multi-channel for DVR/NVR
eMap snapshot
Yes
PTZ control
Yes
DB Manager
Database
Database configuration import, export, report, and maintenance
Backup
DVR/NVR remote backup, AVI conversion and JPEG snapshots
Management
Access log
Complete access log in database manager
User management
User authentication: three level: admin, operator, and guest, features configurable
Recording calculator
Yes, dynamically calculating available recording days
- 57 -
Page 58

Network
Web interface
Live video web interface
Mobile support
iPhone and Android
Protocols
ARP / TCP/IP / HTTP / SMTP / DNS / PPPoE
IPScan
Supported, easy-to-setup for IP address
Other
DST
Daylight saving time by Windows OS
OS
Windows 7 Home, Windows Vista Home, and Windows XP Home
Language
English, Chinese, Spanish, French, Italian, Japanese, Russian, Portuguese, Simplified Chinese,
Czech, Slovenia, Chinese, and German
CPU requirement
Minimum Intel Duo CPU 2.0 GHz or above
RAM requirement
4GB memory
- 58 -
 Loading...