

Page 1
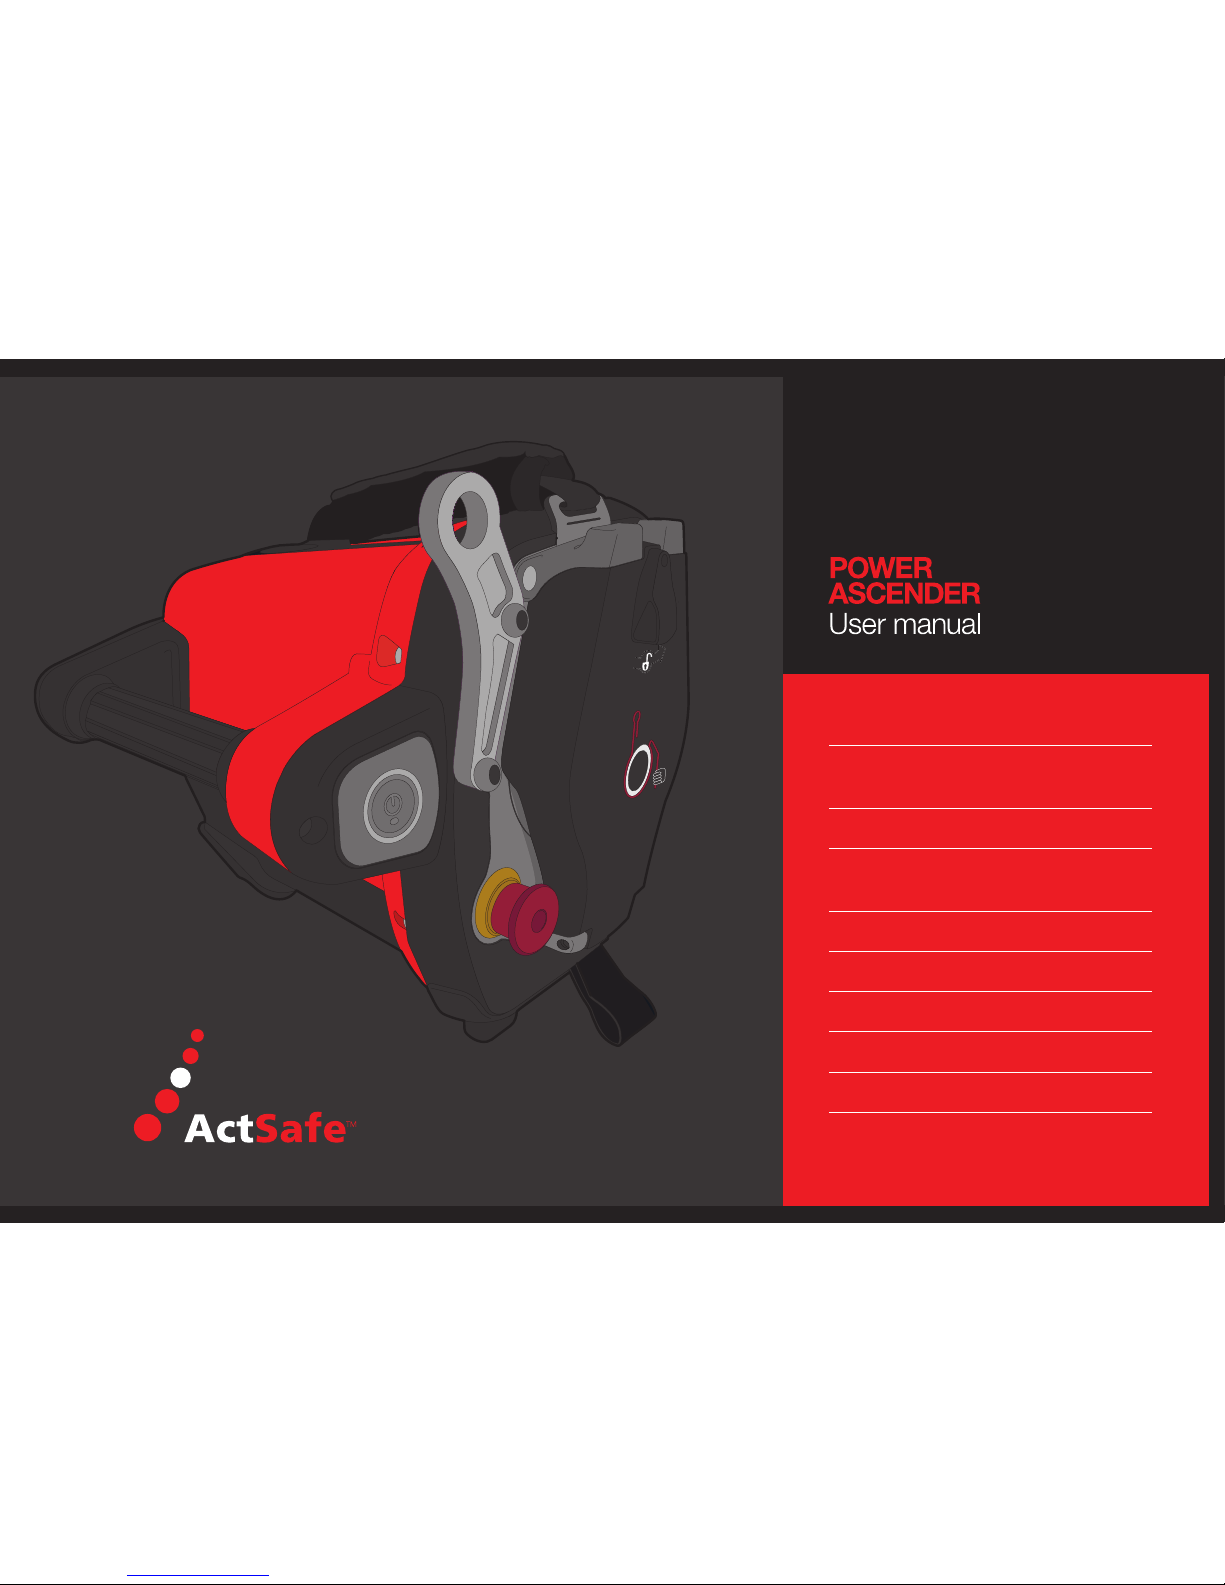
Introduction A
Product safety
& system description B
Rope C
Lifting systems &
equipment setup D
Battery care E
How to use the Ascender F
Service & maintenance G
Warranty terms H
Technical data I
AC X
Rev 1-2015 ENG MASTER
Page 2
Page 3

Page 4

DISCLAIMER
Failure to read and follow
the instructions within
this manual may result
in re, damage to property,
personal injury or death.
WARNING
Training and experience are required to lower the risk
of serious bodily injury or death.
This user’s manual provides general information about safe
operation and risks associated with the use of the ActSafe ACX
Power Ascender. It also gives details of maintenance procedures.
Never use the equipment unless you have read and understood
this manual and completed an ActSafe approved training in the use
of the power ascender system. ActSafe Systems AB, our partners
and subsidiaries, disclaim any liability for damages, injuries or
death resulting from the use of the equipment which is not in
compliance with this manual.
This manual may be updated without notice.
For more information about updates and safety warnings,
visit www.actsafe.se
Page 5

INTRODUCTION
A
About ActSafe A.01
About this manual A.02
Denitions A.03
FOREWORD
BE AWARE:
A Power Ascender is a hi-tech tool
and should be treated with care.
Thank you for choosing the ActSafe ACX
Ascender from ActSafe Systems.
This Ascender has been designed as
an ultra-portable and versatile lifting tool
for lifting people or equipment in a safe
and effective way. It revolutionises working
in a vertical environment.
Page 6
A.01 ABOUT ACTSAFE
A
ActSafe is a pioneer in developing powered
rope ascenders and has been delivering
high-performance equipment since 1997.
ActSafe has a worldwide distribution
network of dedicated experts selling our
innovative products to a wide variety of
users. Our Power Ascenders have been
successfully used for installing reworks at the
top of the Eiffel Tower, hostage rescue from
pirates at sea and providing essential logistical
support in offshore wind turbines.
ActSafe products are redening the
possibilities for work in vertical environments.
We are completely committed to our
customers and do our utmost to deliver
top quality products and service.
Page 7
A.02 ABOUT THIS MANUAL
This manual gives detailed information on
features and safety. However, this manual
cannot replace the need for training and
experience. The Ascender must only be
used by operators who have undergone
the ActSafe-approved training.
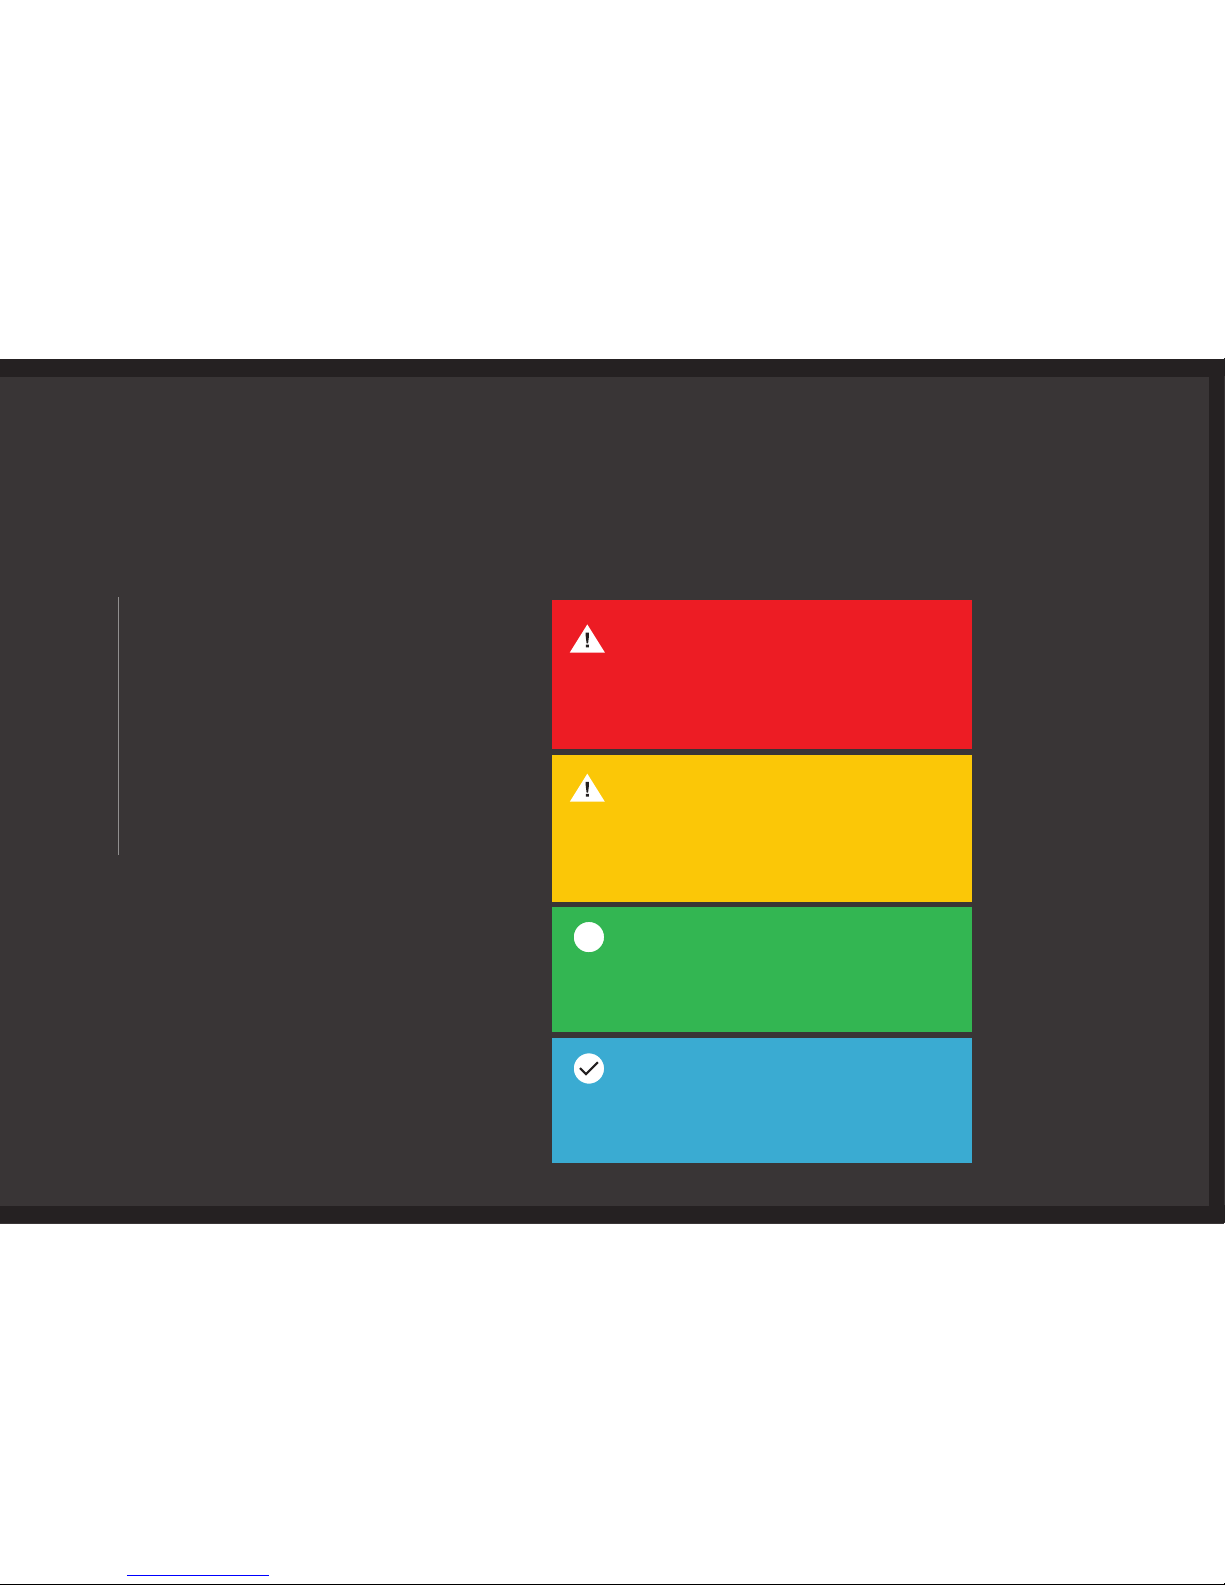
Safety messages of extra importance
are highlighted throughout this manual
using the signals ‘danger’, ‘caution’,
‘recommendation’ and ‘note’:
DANGER
CAUTION
RECOMMENDATION
Note
Not following instructions or training
methods may result in SERIOUS BODILY
INJURY or DEATH.
Not following instructions or training
methods may result in BODILY INJURY,
or DAMAGE TO PROPERTY.
Instructions and tips on how best
to use the Ascender.
Important information on the use of the
equipment used with the Ascender.
i
Page 8

A.03 DEFINITIONS
Active/loaded rope
Loaded end of the work-positioning rope
system.
Anchor
Attachment point for rope or Ascender.
Ascending
Moving up the rope.
Backup system
A rope system which captures the load in case
of primary rope failure. Approved according to
backup system requirements.
Competent Person
Operator with adequate training, experience
and certication.
Descending
Moving down the rope.
Passive/dead rope
Unloaded end of the work-positioning
rope system.
Primary rope
Work rope system used with Ascender.
Rope must be 11 mm and approved according
to EN1891 A or be an ActSafe Equipment
Lifting Rope depending on the application.
User/operator
Operator of the Ascender, either by the
Throttle or by the Remote Control.
Safety Factor
The Safety Factor of equipment is the ratio
between the breaking strength and the Safe
Working Load (SWL).
Secondary rope
See ‘Backup sytem’.
SWL
Safe Working Load. The maximum load
(as certied by a competent person) that an
item of lifting equipment may raise, lower or
suspend under particular service conditions.
WLL
Working Load Limit. The maximum load
that an item of lifting equipment is designed
to raise, lower or suspend.
Page 9

PRODUCT SAFETY
& SYSTEM DESCRIPTION
B
Product safety B.01
Usage exclusions B.02
System description B.03
Rope mechanism B.04
Page 10

B.01 PRODUCT SAFETY
v
ActSafe Ascender operators must, before rst use, have undergone training
in the safe use of the Ascender by either ActSafe Systems AB or by an
ActSafe-approved training partner or ActSafe distributor.
The ActSafe Ascender must be checked before and after every use
by a Competent Person and must undergo a minimum of one inspection
per year by ActSafe Systems AB or an ActSafe-authorised person.
More frequent inspections may be required by your national regulations.
B
Page 11

» For any purpose other than that
for which it has been designed
» In an explosive environment
» If modied in any way by anyone
other than ActSafe Systems
» After a free fall from a height of more
than 0.5 m or any other severe
impact onto a hard surface
» If subjected to misuse in any
way so that parts or components
might have been damaged
» The Ascender system should not
be exposed to high impact forces
caused by people or loads falling
into the system
» With any battery other than the
designated ACX ActSafe battery
» With any other battery charger
than an ActSafe Battery Charger
» With a damaged or modied
ActSafe Battery Charger
» If the operator is unsure of how
to use the Ascender safely
» If you are tired, ill, using prescription
medication that prevents you from
using machinery, or under the
inuence of alcohol and/or drugs.
» Without having performed a
pre-use check
B.02 THE ASCENDER MUST NOT BE USED:
Page 12
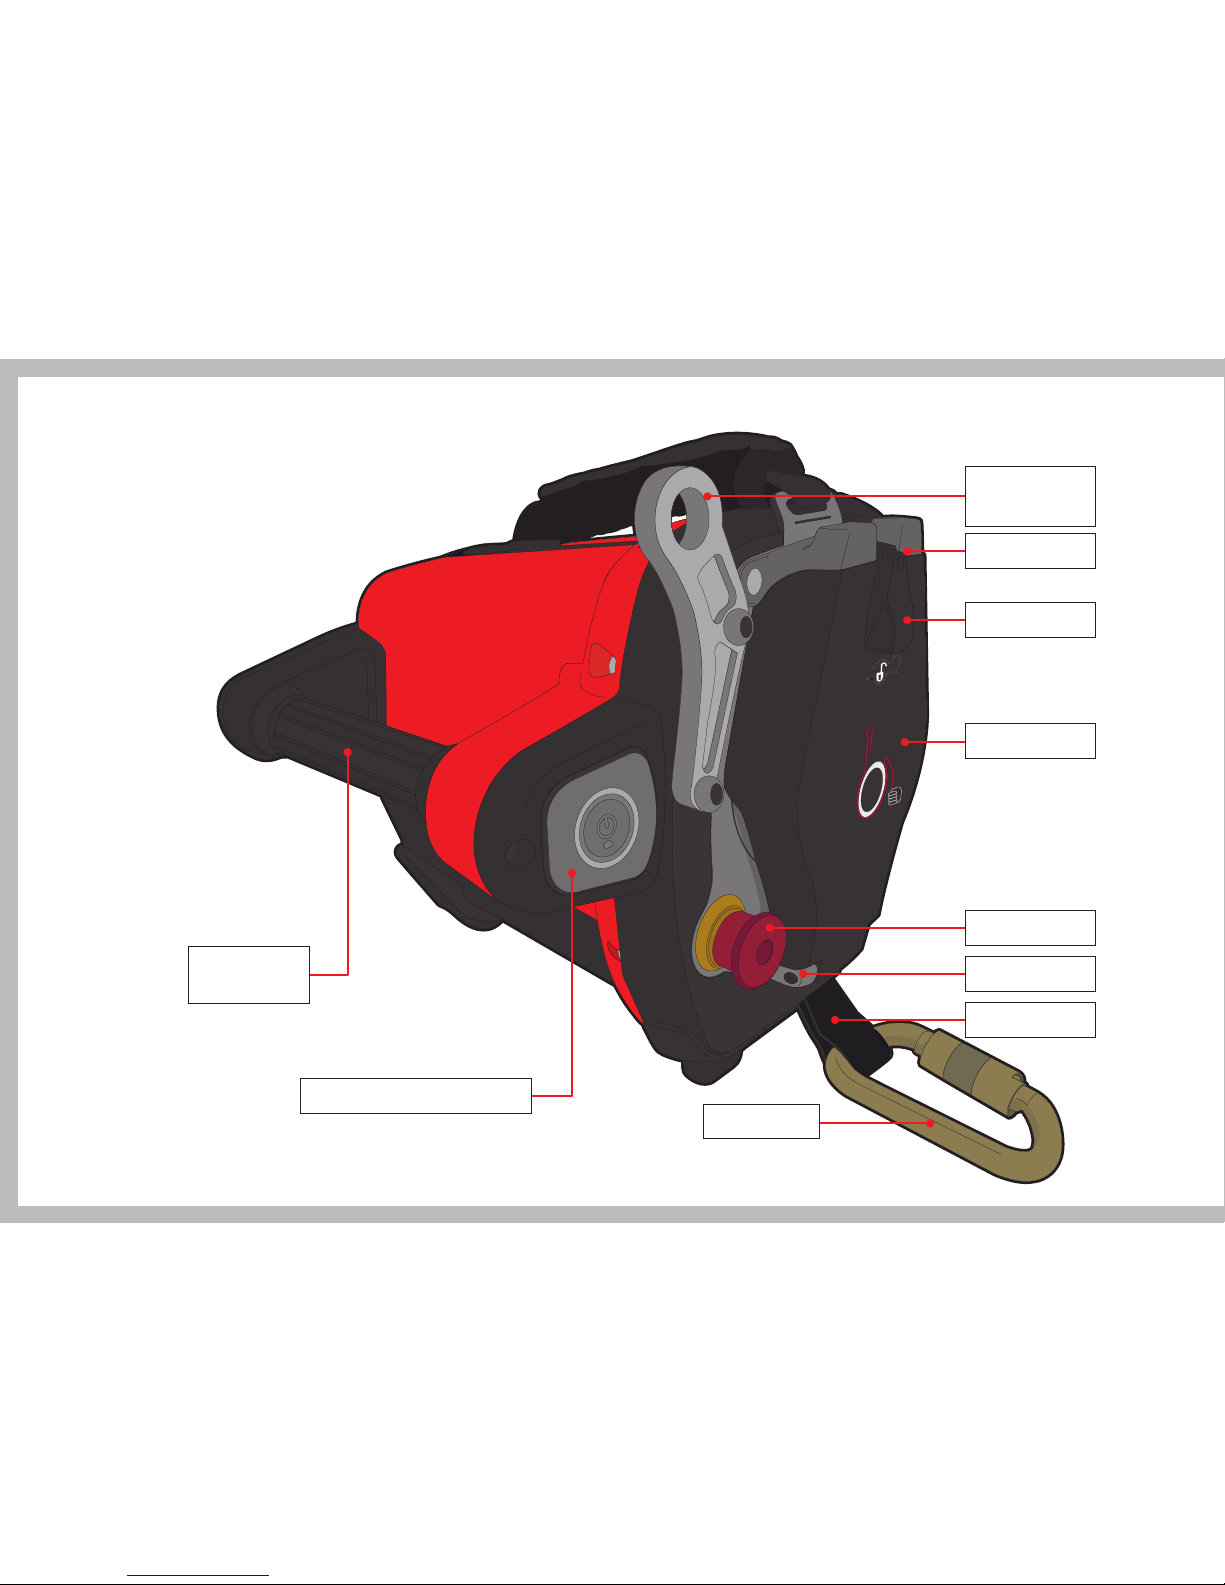
Rope Guide
Rope Cover Lock
Ascender
Positioning Point
B
B.03 SYSTEM DESCRIPTION
Rope Cover
Karabiner
Emergency Stop
Connection Sling
Titanium Sling Bolt
Power Button & Indication LED
Bi-directional
Throttle
Page 13
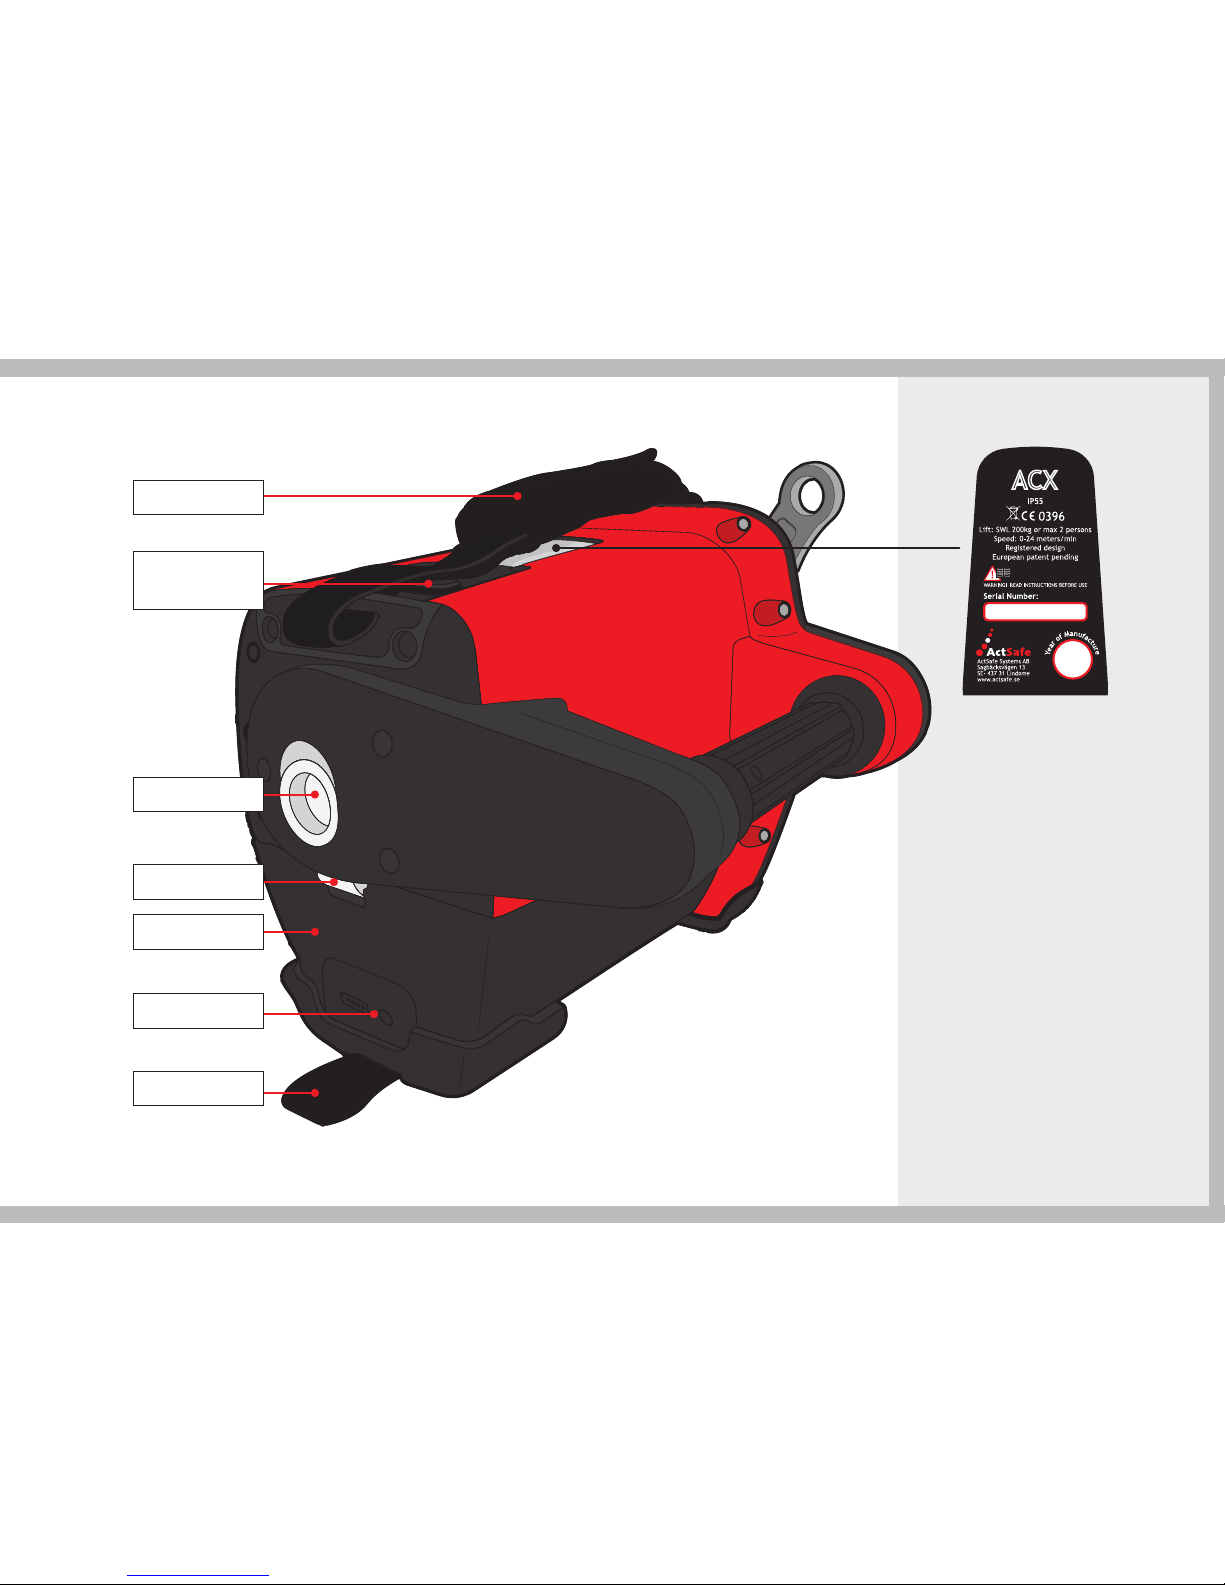
Battery Release
Emergency
Descent Lever
Battery
Battery Lock
Battery Indicator
Battery Strap
Carrying Handle
Machine Rating label
The Ascender is supplied
with a machine label
attached to the housing.
This label must not
be removed!
The ACX Ascender is
approved under the
machinery directive
2006/42/EC and for
lifting both people and
equipment with a Safe
Working Load of 200 kg.
Page 14
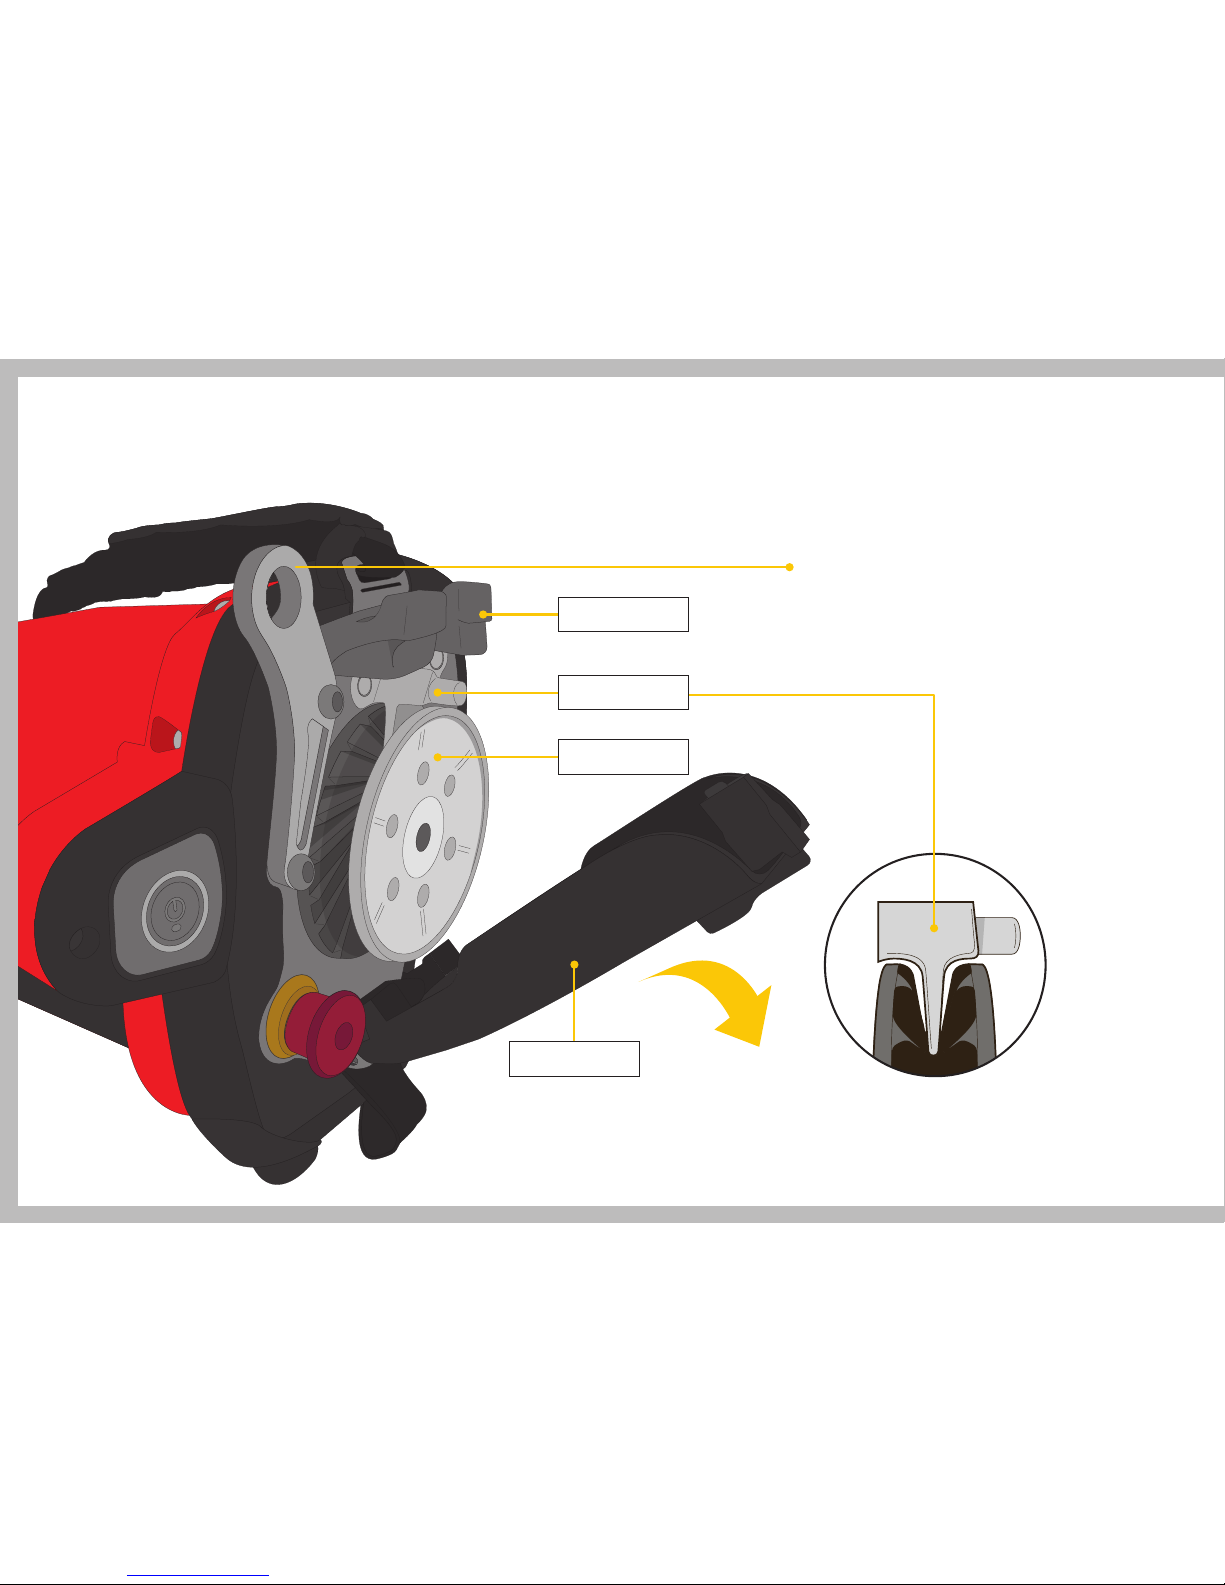
B.04 ROPE MECHANISM
Rope Guide
Rope Wedge
Rope Grab
Rope Cover
The Ascender Positioning Point should
preferably be used for positioning the
Ascender but in some cases can be
used for rigging setups (expert use only).
Page 15

ROPE
C
Rope type
and preparation C.01
Page 16

C
C.01 ROPE TYPE
AND PREPARATION
Rope recommendations
Rope recommendations for the
ACX Ascender depend on the
type of application, whether
personnel or equipment lifting.
Equipment lifting
The ActSafe Equipment Lifting
Rope (ELR) is the only approved
rope to be used in the equipment
lifting system and can be ordered at
ActSafe or your ActSafe distributor.
Personnel lifting
EN1891 A 11 mm low stretch
kernmantle rope of a solid construction.
Soft ropes have the tendency to
deform under load and should be
avoided because of poor grip and
the risk of getting jammed in the
rope grab system.
Ask your local ActSafe distributor
for rope recommendations and also
perform a suitability test before rst
use. Load the intended rope in the
Ascender and lift 200 kg. There
should be no slipping of the rope.
Pre-Soaking
It is recommended that only presoaked ropes are used with ActSafe
Ascenders. New ropes should be put
in cold water (<40°C) for 24 hours
and dried slowly afterwards.
This will make ropes more suitable
for use in ActSafe Ascenders for
two reasons:
1. Rope density
Pre-soaking makes ropes denser.
The bres will absorb the water
and will shrink when drying.
The correct choice of rope
type depends on whether
the Ascender is being used
to lift or lower equipment
or personnel.
Check with your ActSafe
supplier to determine
which rope is the most
suitable to use.
Page 17
The result is that all bres become
more densely aligned and the
sheath sits tighter around the core
of the rope. This will make the rope
more solid and will consequently
result in less mantle slippage and
deformation and thereby lead to
better grip in the Ascender.
2. Oil dissolution
During the production process
some oil is added to the rope bres
in order to reduce the friction
between the individual bres. When
soaking the rope in cold water some
surface oil in the sheath of the rope
will dissolve. This will contribute
further to a better grip. Do not soak
ropes in warm water, this will lead to
greater dissolution of oil, which
will have a negative impact on
the rope properties.
RECOMMENDATION
A new rope will get an increased service life if it is soaked in cold
water before the rst use.
Avoid getting sand or dirt onto/into the ropes since it will wear the
rope grab and rope guide. Use a rope mat, rope bag or similar.
i
CAUTION
Always make sure that the rope is in good condition.
Page 18
Page 19

GENERAL SAFETY
GUIDELINES AND
LIFTING SYSTEMS
D
General safety guidelines D.01
Personnel lifting D.02
Personnel safety checklist D.03
Equipment, material
and tool lifting D.04
Basic lifting safety rules D.05
Lifting setup D.06
ActSafe Training Network D.07
Page 20

D
D.01 GENERAL SAFETY GUIDELINES
» Operate the Ascender according
to the advice contained within this
user manual and pre-planned work
instructions (lift plan, access plan)
» Only trained and competent
operators should operate
the ACX Ascender and its
ancillary equipment
» Plan and evaluate your work
carefully. A rescue plan should
be in place
» Plan for appropriate supervision
of work
» Perform a toolbox talk before
starting the work
» Use only approved and inspected
equipment. This goes for the
Ascender, PPE and/or lifting
equipment
» Inspection of equipment must be
carried out in accordance with local
regulations. The Ascender should
undergo a documented inspection
at least once every year
» Pre-use check of the Ascender should
be carried out in accordance with the
inspection guidance provided
» Use PPE (Personal Protective
Equipment) such as helmet,
gloves and protective eye wear
when required
» Keep your hands, hair and clothing
away from moving parts
» Do not hold the loaded rope when
ascending as there is a risk of
pinching
» Keep a constant eye on the rope
guide to ensure that the rope is
running smoothly through the
rope mechansim
The ACX Ascender
is designed for both
personnel and equipment
lifting. These applications
have different system
requirements that are
described in the
following pages.
DANGER
DO NOT USE the Ascender
if you are tired, ill, using
prescription medication that
prevents you from using
machinery, or under the
inuence of alcohol, drugs.
Page 21
Page 22
The ACX Ascender, when used to lift people,
must be used with personal protective
equipment approved for work at height,
rope access and/or rope rescue.
Basic requirements:
The rope system must consist of a primary work
rope system and a secondary backup rope system.
For personnel lifting the primary rope used in the
ascender must be approved to EN1891 A and
have a diameter of 11 mm and the backup
system must fulll the respective requirements.
Each rope system must be connected to at least
one anchor that can hold a minimum of 15 kN
or must full appropriate anchor requirements.
A competent person shall judge if the anchor
points are sufcient and safe to use.
D.02 PERSONNEL LIFTING D.03 PERSONNEL SAFETY CHECKLIST
Before use make sure that you:
» Check all equipment and components
» Wear appropriate clothing and tie back any loose
clothing or hair
» Do not swing excessively while descending/ascending
» Only use the Ascender if you have successfully
completed approved ActSafe training
» Have an emergency plan in place
DANGER
DO NOT USE the Ascender without a backup system.
RECOMMENDATION
i
The supplied ActSafe karabiner may be replaced
with any other EN362 connector. All other parts
of the Ascender should only be replaced with original
ActSafe parts by an ActSafe-approved service engineer.
CAUTION
Always hold the unloaded rope when using a passive setup
Page 23
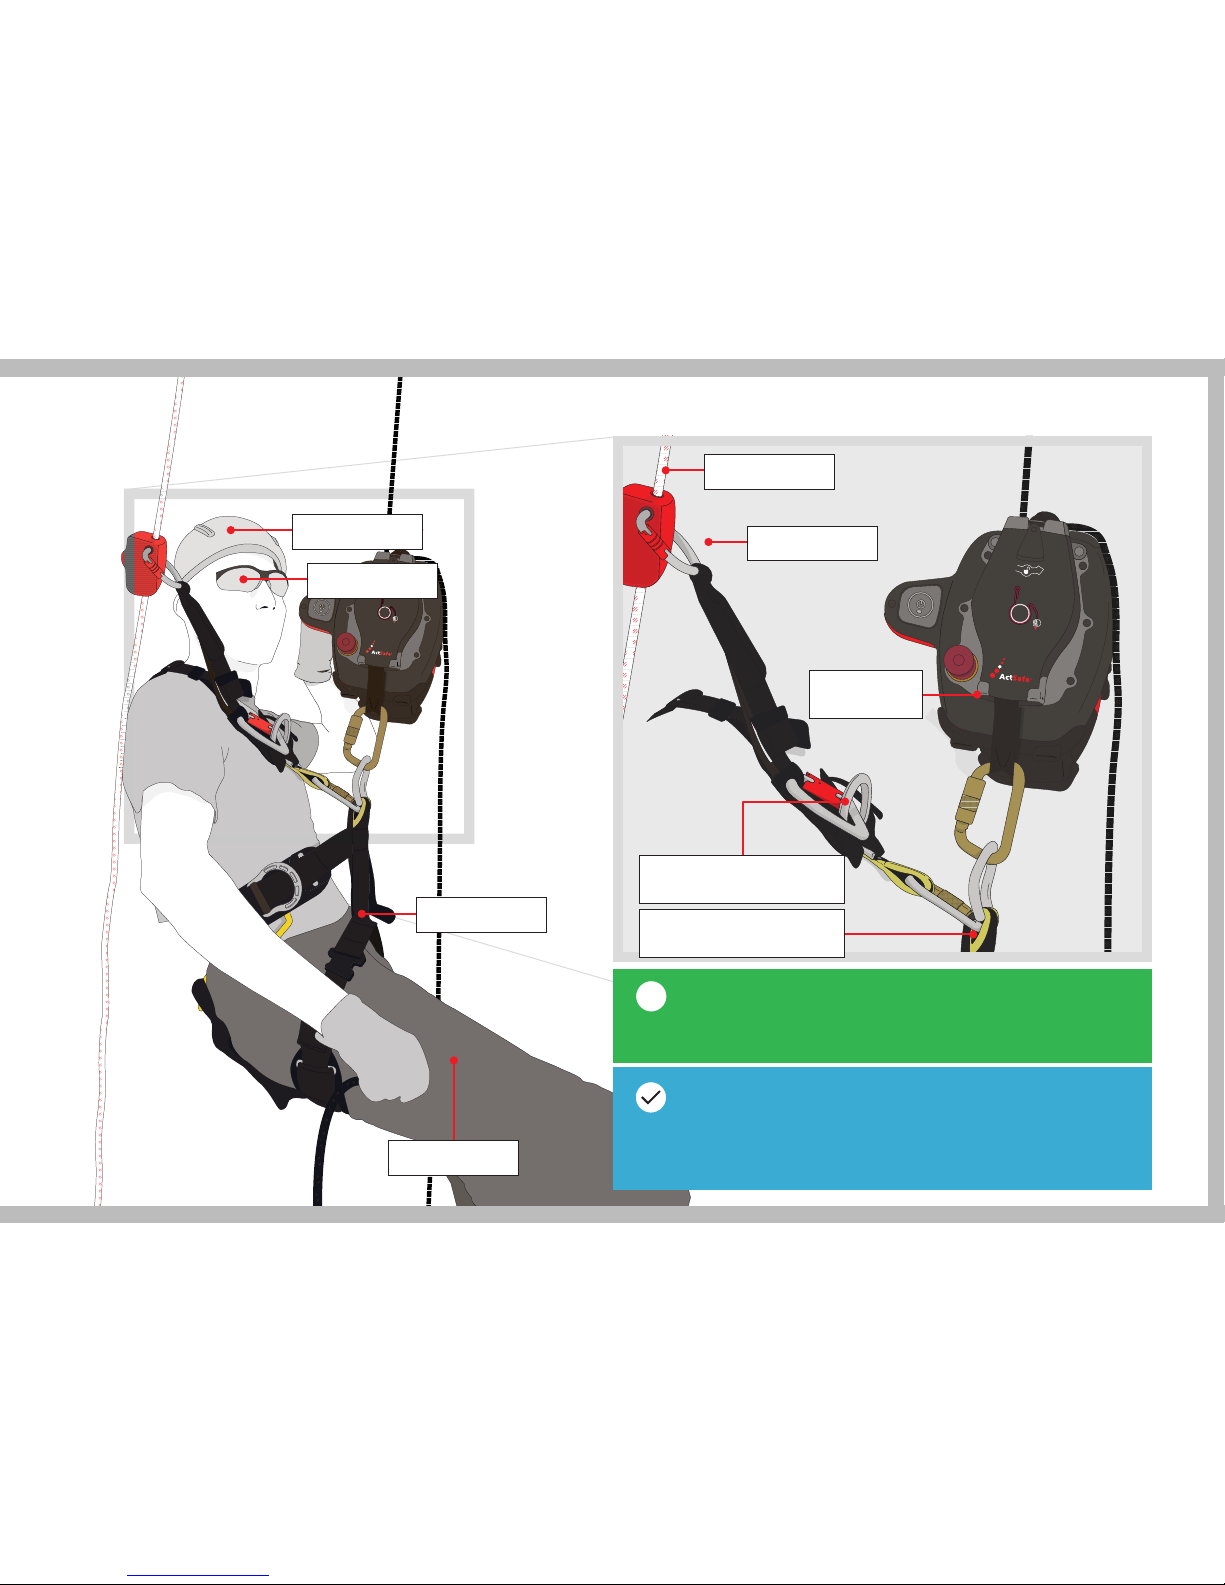
2-Rope system
Note
When driving the Ascender the operator must wear a fall arrest
harness that is also suitable for work-positioning/rope access.
RECOMMENDATION
i
A work seat is recommended for comfort and safety.
Helmet
Gloves
Backup Rope
Backup Device
Ascender/work
system
Harness – upper connection
point (EN361)
Harness – lower connection
point (EN813)
Safety Glasses
Harness
Page 24
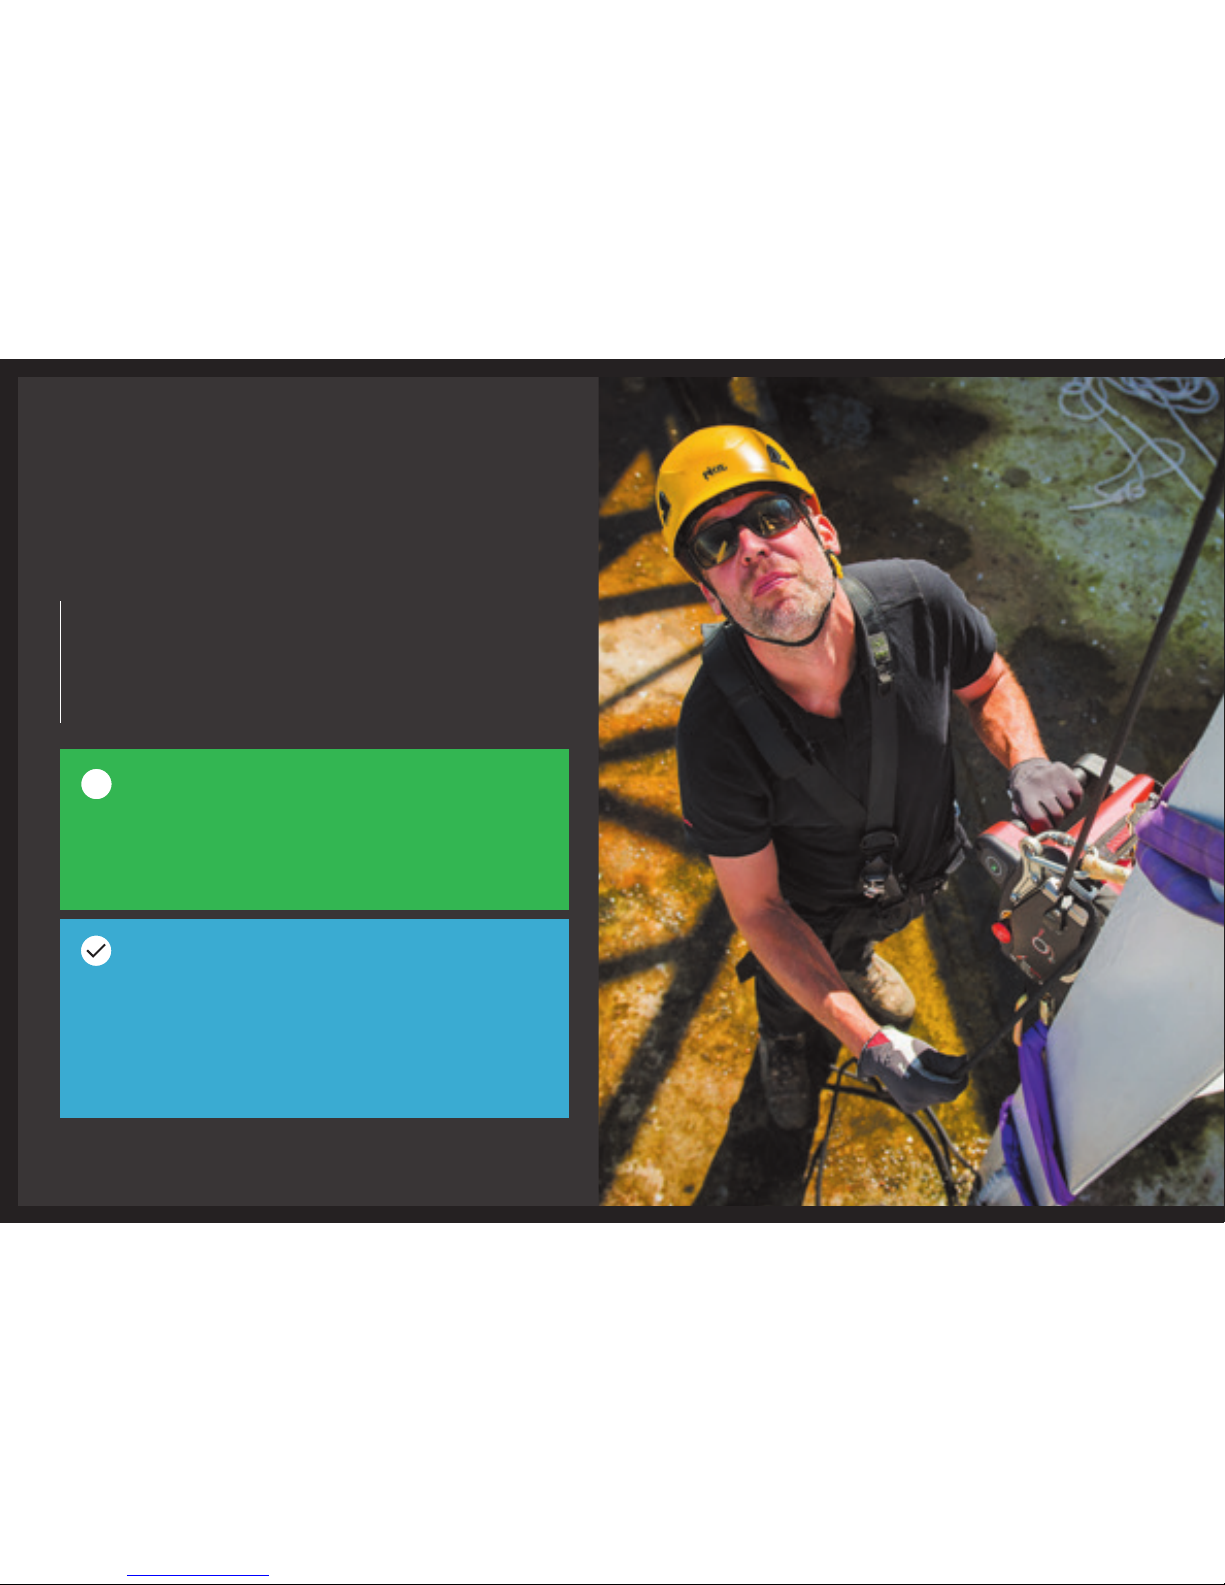
D.04 EQUIPMENT, MATERIAL
AND TOOL LIFTING
The ACX Ascender is, in combination with the ActSafe
Equipment Lifting Rope (ELR), approved under the
Machinery Directive as an equipment lifting system
provided that all other equipment used also meets
lifting requirements.
RECOMMENDATION
Lifting operations are ideally performed with a 3 person
team. A lifting supervisor, a slinger for attaching loads
and an ascender operator.
i
Note
The supplied ActSafe karabiner may be replaced with
any EN13889 shackle with a minimum WLL of 0.5 t.
All other parts of the Ascender should only be replaced
with original ActSafe parts by an ActSafe-approved
service engineer.
Page 25
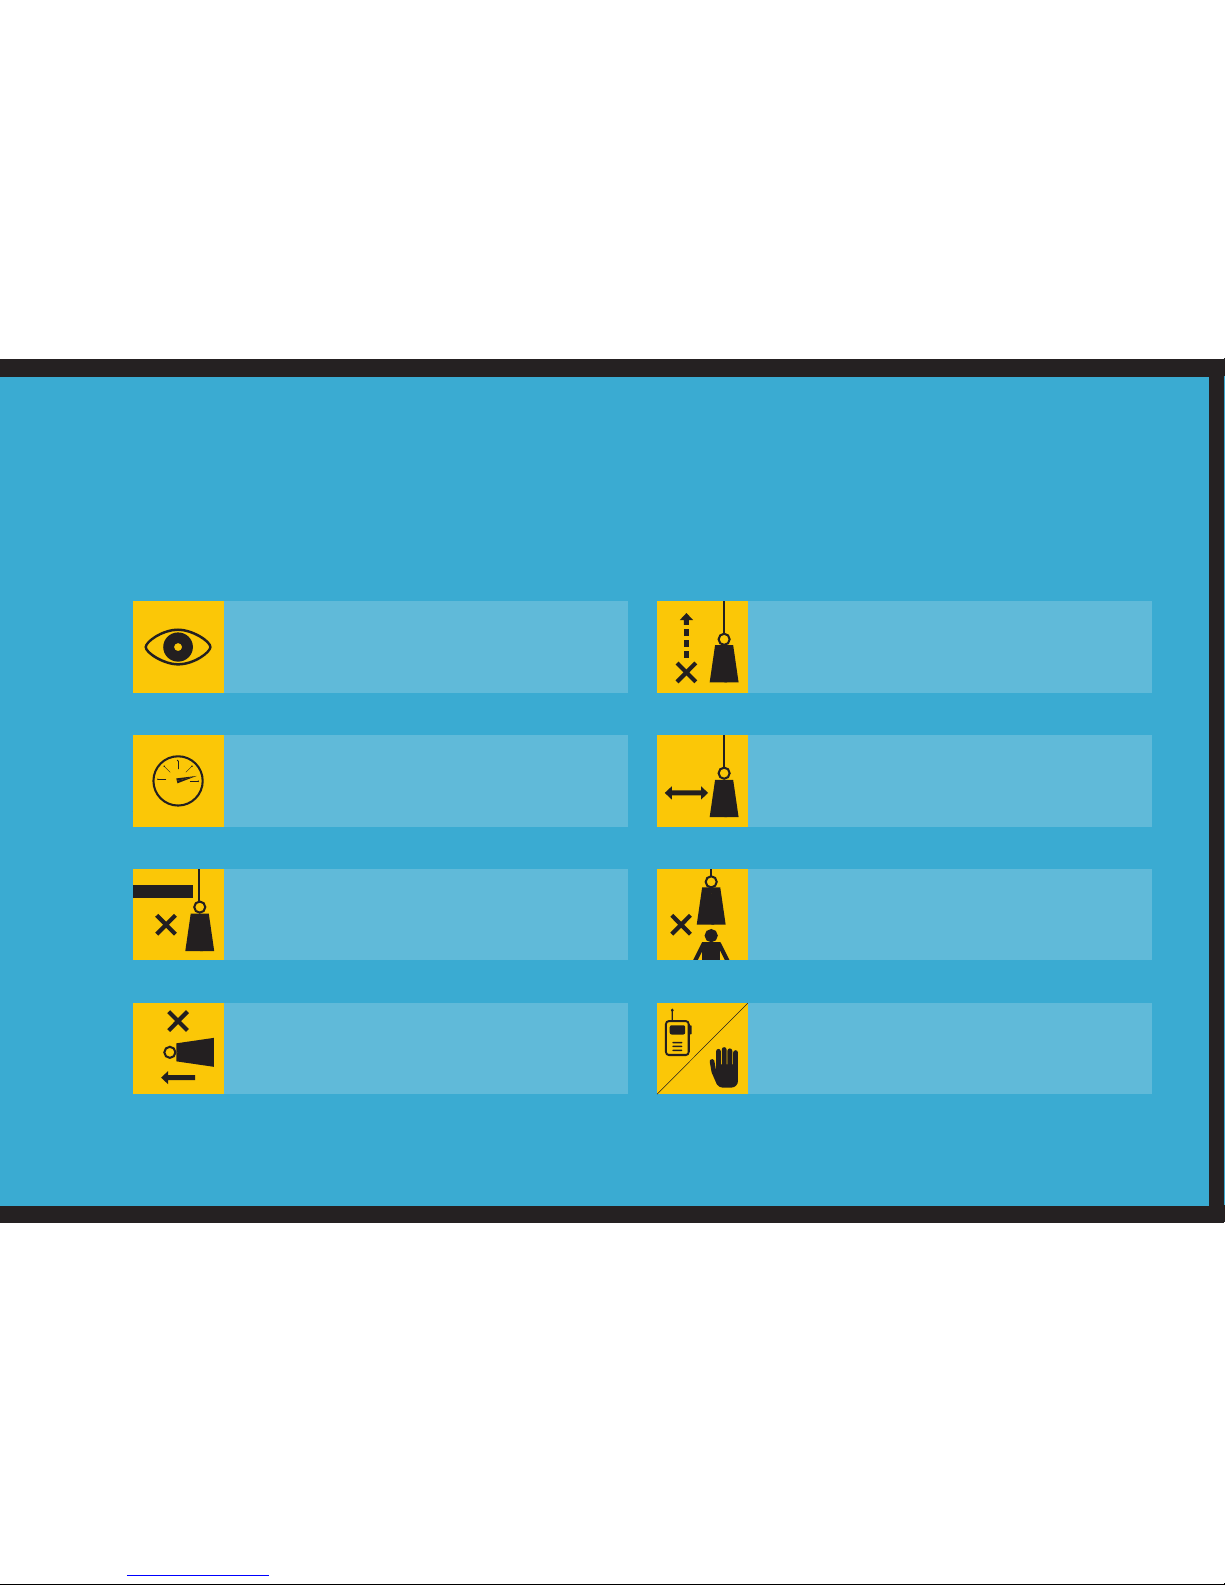
Do not try to lift xed or obstructed loads
Do not stand under the suspended load
D.05 BASIC LIFTING SAFETY RULES
Stay clear of the load whilst lifting
Use hand signal or radio communications
during lifting operation
Always keep an eye on the load while lifting
Do not side-pull loads
Do not exceed the Safe Working Load (SWL)
of the entire lifting system
Avoid excessive inching (i.e. short pulses
of the motor)
Page 26
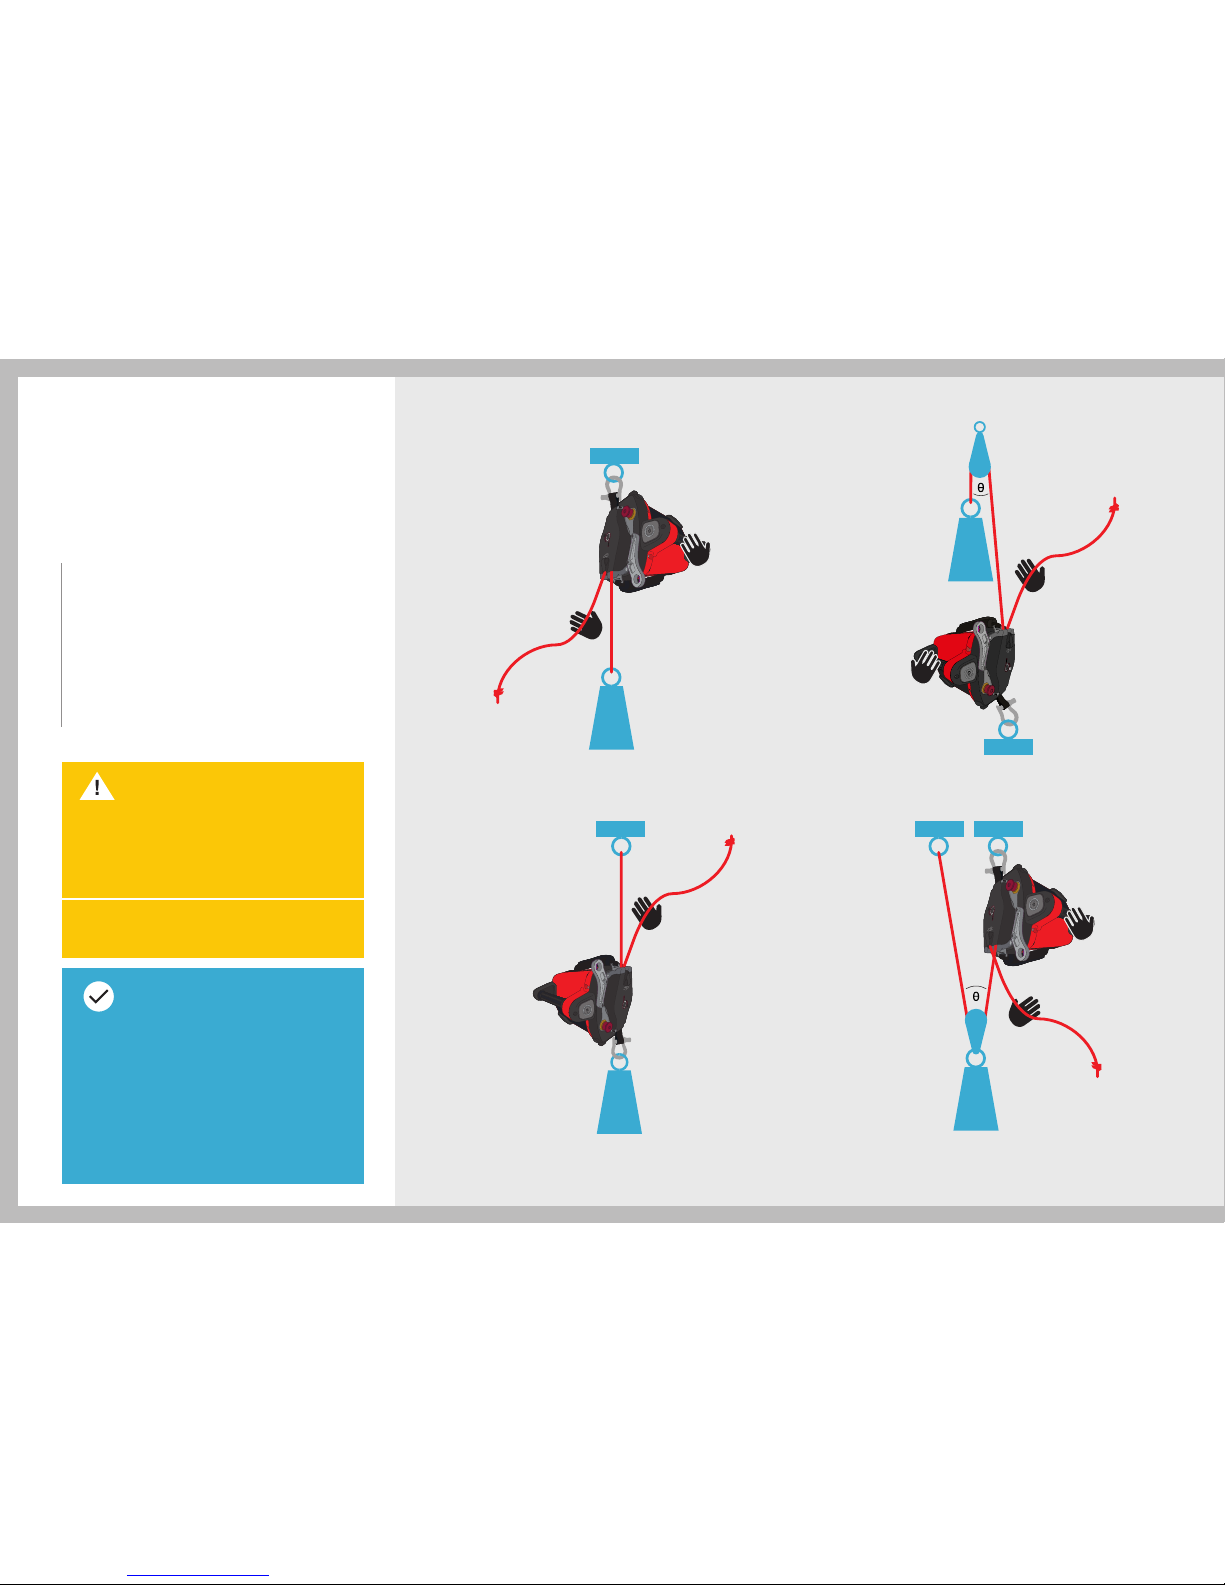
D.06 LIFTING SETUP
Displayed here are the four
standard lifting setups that are
suitable for use with the ACX
Ascender. They are shown for
illustration purposes only. For
specic guidance, please contact
ActSafe or an ActSafe distributor.
Top-rigged
Basic setup
Bottom-rigged
Basic setup
Running Ascender
Expert use only
CAUTION
DO NOT let the rope become
obstructed or blocked when
being going into the Ascender.
Avoid excessive loading angles.
Note
The ascender operator
should, at all times, control
the unloaded rope during
lifting operations to avoid
the rope from twisting when
running into the Ascender.
Pulley
Expert use only
Page 27
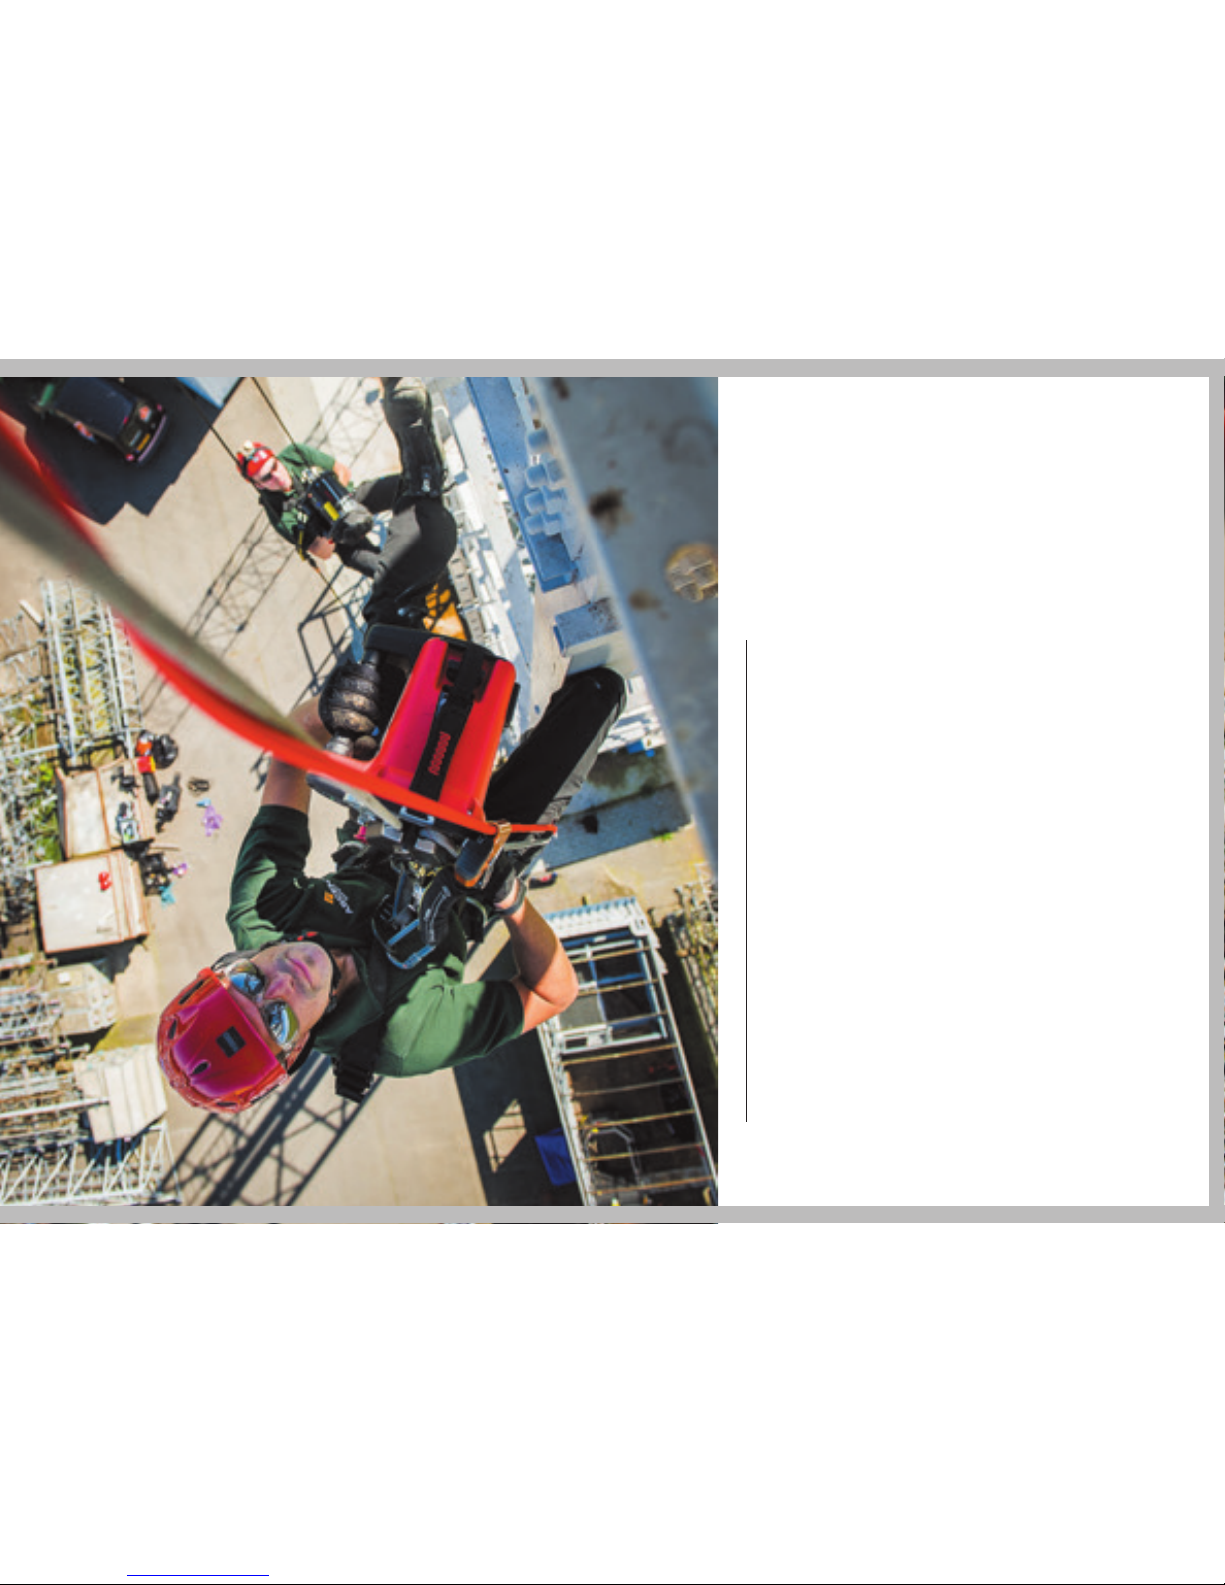
D.07 ACTSAFE TRAINING
NETWORK
The ActSafe Power Ascenders are extremely
versatile high-tech lifting tools that are designed
for use in demanding environments.
Working with these Ascenders requires
experience, competence and a thorough
understanding of its possibilities and
limitations. Therefore, training is essential.
We offer the ActSafe training programme
through our network of highly competent
instructors, who are specialists in their
respective eld of operation and will help
you get the most out of your ActSafe Ascender.
ActSafe training is available for different
skill levels and elds of application and can
be provided on site or in training centres all
around the world. Get in touch with your local
distributor or with ActSafe to learn more about
training possibilities.
Page 28

ACTSAFE BASIC ASCENDER TRAINING
Experience: Working at height
training required.
DURATION: 1 DAY
This training is designed for operatives
who need good basic understanding for
a specic application of the Ascender.
ACTSAFE ADVANCED ASCENDER
ACCESS TRAINING
Experience: For rope access professionals.
DURATION: 2 DAYS
This training is designed for rope access
operatives to provide an advanced
understanding on how to use the
Ascender in a rope access environment.
ACTSAFE ADVANCED ASCENDER
RESCUE TRAINING
Experience: For rope rescue professionals.
DURATION: 2 DAYS
This training is designed for rope rescue
professionals to learn about rescue
capabilities of the Ascender.
ACTSAFE EQUIPMENT LIFTING
OPERATOR TRAINING
Experience: Delegate must have
completed training for personal safety.
DURATION: 4 HOURS
This training is intended for specialist
workers who will use the Ascender as
their everyday equipment-lifting tool.
Operator
lifting
Equipment
lifting
Page 29

BATTERY CARE
E
The Ascender Battery E.01
Performance E.02
Portable Power Supply E.03
Battery charging E.04
Battery Status Indicator E.05
Descending on a full Battery E.06
Connecting and disconnecting
the Battery from the Ascender E.07
Storage and transportation E.08
Battery lifetime and disposal E.09
Page 30
ActSafe Ascenders use specially
designed lithium-based batteries
with a very high energy density and
are therefore very compact, lightweight
and extremely powerful. Due to the
high energy the batteries contain,
it is of utmost importance that they
are treated with care and that the
user has read the following section
with attention. This is for your own
safety, but also for optimal battery
life and performance.
E.01 THE ASCENDER BATTERY
ActSafe recommends users to follow
the battery care guidelines below for
optimal lifetime and performance:
» Disconnect batteries from the
ascender when not in use for
periods longer than a week
» Always charge batteries as
soon as possible after use
» Disconnect batteries from
the charger after charging
» Always store batteries
fully charged
E
CAUTION
Failure to read and follow the
instructions within this manual
may result in re, personal injury
or damage to property.
Note – Battery lifetime
Under normal service conditions
it is expected that the battery
will last 3-5 years or around
approximately 500 charging
cycles. Lifetime is dependent
on how much load is lifted and
the temperatures the cells are
working at.
See also section E.09
Page 31
General guidelines and warnings
» Battery charging must be
conducted in a safe area away
from combustible or other
ammable materials
» When hot, allow the Battery to
cool down to room temperature
before charging
» Immediately remove the Battery
or charger from service:
- If there is visible damage to the
housing, cables or the connector,
including the Battery Connector
on the Ascender
- If the Battery has been dropped
as there may be internal damage
that isn’t visible
- If the Battery emits an unusual
smell, feels hot, changes shape,
or appears abnormal in any other
way. Since a delayed reaction
can occur, observe the Battery
for a minimum of 15 minutes in
a safe area and away from any
combustible material
» Only use the original ActSafe
Battery Charger
» Do not disassemble or modify the
Battery in any way. The Battery
contains safety and protection
devices, which, if damaged, may
cause the Battery to generate heat,
explode or ignite
» Do not expose the Battery
to water
Battery Management System (BMS)
The ACX Batteries have built-in safety
electronics which constantly monitor
and manage the charging levels,
temperature and energy output of all
the cells in these batteries. The BMS
will shut down the Battery temporarily
in case of overheating or overcharging
to avoid battery damage and prevent
the Battery from becoming unstable or
catching re. In case of too low a charge
(deep discharge) or worn out battery
cells, the BMS will shut the Battery
down permanently. This is to prevent
the battery becoming unstable and
dangerous to the user.
When used and charged correctly,
the BMS will increase the safety and
service life of the Battery substantially.
The BMS cannot protect the Battery
from severe misuse as mentioned
earlier. Follow the ActSafe battery
care instructions to enable a long
battery life.
CAUTION
Do not use other battery
chargers as they can damage
the Battery and may create
toxic gases which cause a re
Page 32
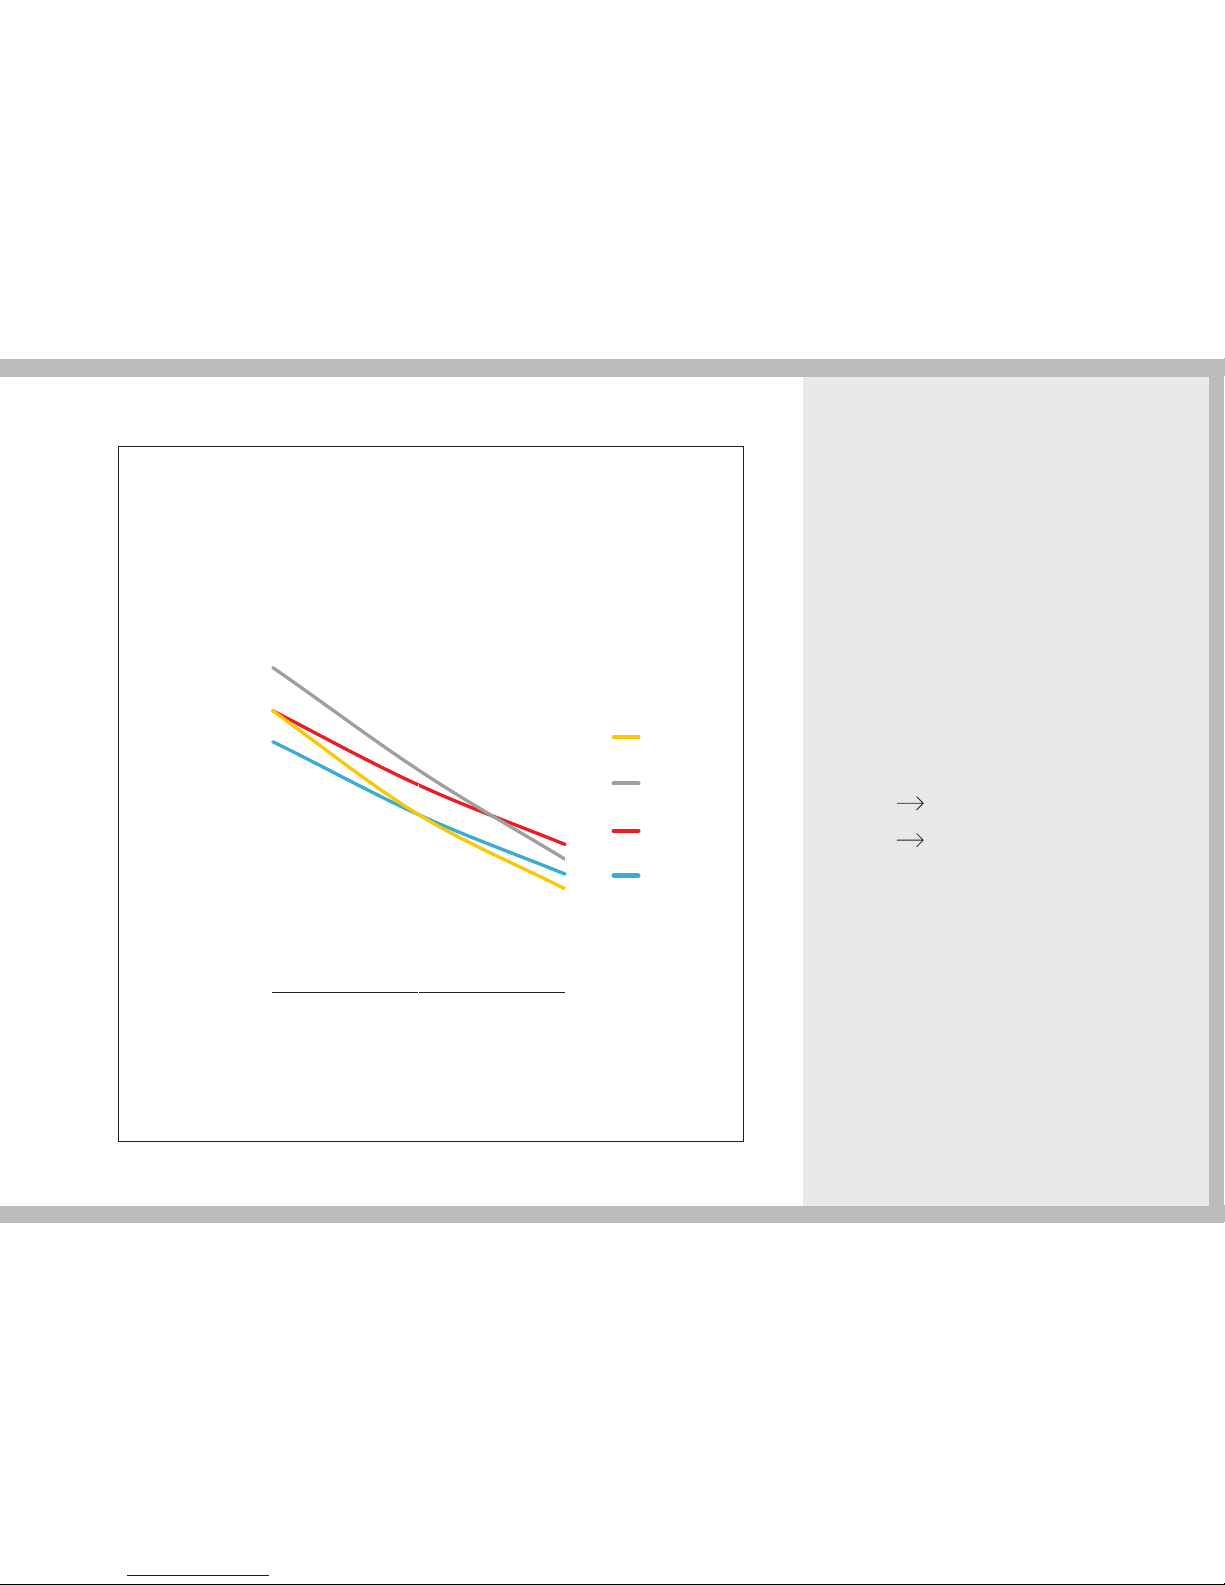
E.02 PERFORMANCE
Ascender Performance
When using the Battery, the Ascender
has a lifting capacity of up to 200 kg
or up to a distance of 200 m.
The distance is dependent on the
lifted load and temperature of the
environment.The optimal operating
temperature range is between 5°C and
35°C. The maximum temperature range
is from -20°C to +40°C; the Battery
performance will be greatly affected
by these extreme conditions. See chart
opposite for detailed information.
Battery Capacity
Low temperatures:
The capacity of the Battery is
affected at temperatures below 5°C
which will result in an initial loss of
lifting performance (speed) and
will affect the lifting distance. The
Battery will behave as if it wasn’t fully
charged but will warm itself during
the rst minutes of operation. Lifting
performance is regained but there will
be a loss in distance depending on
the temperature of the environment.
High temperatures:
Battery performance will be affected
by temperatures over 40°C which
will result in high internal battery
temperatures and therefore in a
reduced lifting distance. In case of
the Battery overheating the BMS will
shut the battery off until the battery has
cooled to operating temperature.
RECOMMENDATION
Note
In cold environments, maintain
optimal Battery temperature
and perfomance by keeping the
Battery in the transportation box
as long as possible.
Initial lift speed capacity will be
limited with a cold battery. It is
only possible to ascend at lower
speeds until the Battery warms
up and normal performance
can be expected.
There is a difference in
performance between old and
new batteries, all gures are
based on new batteries.
i
Page 33
ActSafe Portable Power Supply
The ActSafe Portable Power Supply
is a good alternative to batteries,
especially for ascender operations with
a lot of lifting distance or in extreme
temperatures. The following lifting
distances can be achieved at 20°C:
100 kg 500 m
200 kg 200 m
The limiting factor is the Ascender
temperature. The Ascender motor
runs hot when lifting heavy loads
over longer distances, especially in
hot environments where the heat can
not be dissipated easily. In case of
overheating the Ascender will be shut
off temporarily to protect the motor
from any damage.
Lifting distances with battery powered ACX with 100, 150
and 200 kg at different temperatures.
250 m
200 m
Lifting distance
Load
100 kg 150 kg 200 kg
150 m
100 m
50 m
0
-20°C
0°C
20°C
40°C
E.03 PORTABLE
POWER SUPPLY
Page 34
Note
Charging must be carried
out in a dry area.
The ACX Battery can be charged
at any charging level, no ‘memory
effect’ will occur. It is important that
the batteries are charged with an
original ActSafe Charger.
The charging time is dependent
on the charging level of the Battery.
The maximum charging time is 80
minutes. During charging the current
charging level is displayed on the
Battery LEDs and the Battery is
fully charged when all LEDs are
lit continuously.
E.04 BATTERY CHARGING
Balancing:
After the Battery has been fully
charged, the BMS will start to balance
the Battery for another 10 minutes.
Balancing is a process where the
Battery Management System will
equalise the charging levels of all the
cells in the battery pack in order to
optimize the lifetime and performance
of the Battery. The Battery LEDs will
slowly pulsate after the balancing
is complete.
1. Connect the Charger
to mains supply.
2. Connect Battery to charger.
3. Constant charging controlled by
BMS. The Battery is full when all
Battery LEDs are continuously lit.
4. 10 minutes balancing and all LEDs
are lit continuously. The LEDs
slowly pulsate when balancing is
completed.
5. Disconnect Battery from charger.
6. Disconnect Charger from
main supply.
CAUTION
Before charging the Battery,
check the charger cables and
the insulation on the socket to
avoid risk of electric shock.
Page 35
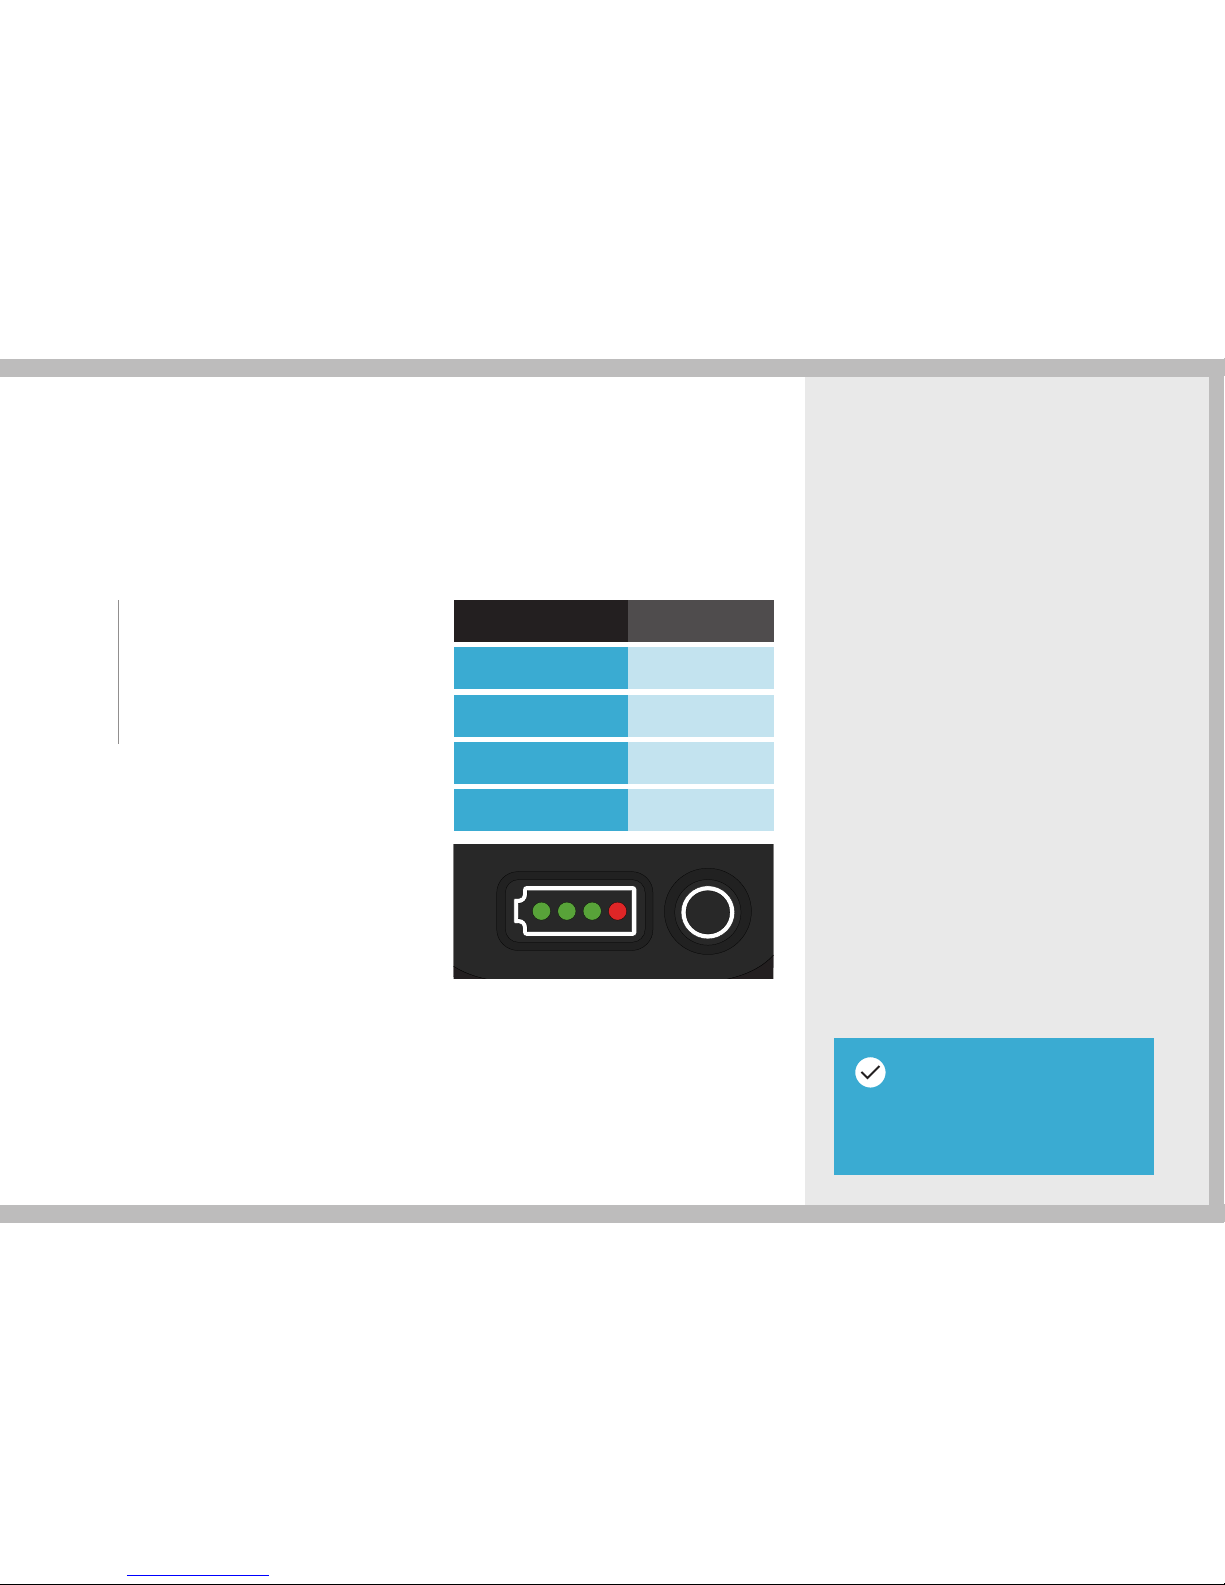
The Battery Status Indicator is
positioned at the back of the battery
and can be activated by pushing
the button next to the LEDs. The
battery indicator has 4 LEDs each
representing 25% charge.
Whilst not recommended as a standard
procedure, the ACX Ascender
electronics and the BMS of the ACX
Battery allow descent with a fullycharged Battery without the risk of
overcharging and eventual damage.
While descending, the Ascender
generates energy that is stored in
the battery as long as there is storage
capacity. The Ascender electronics
will, in case of a fully charged battery,
regulate the speed automatically
to prevent overcharging. On long
descents with heavy loads it is likely
that the speed will be reduced
substantially and the Ascender might
eventually shut itself down temporarily.
E.05 BATTERY STATUS INDICATOR E.06 DESCENDING ON
A FULL BATTERY
LEDs
Capacity
1 red, 3 green
75-100%
1 red, 2 green
50-75%
1 red, 1 green
25-50%
1 red
0-25%
Note
Do not descend on a
fully charged battery as a
standard procedure.
Page 36
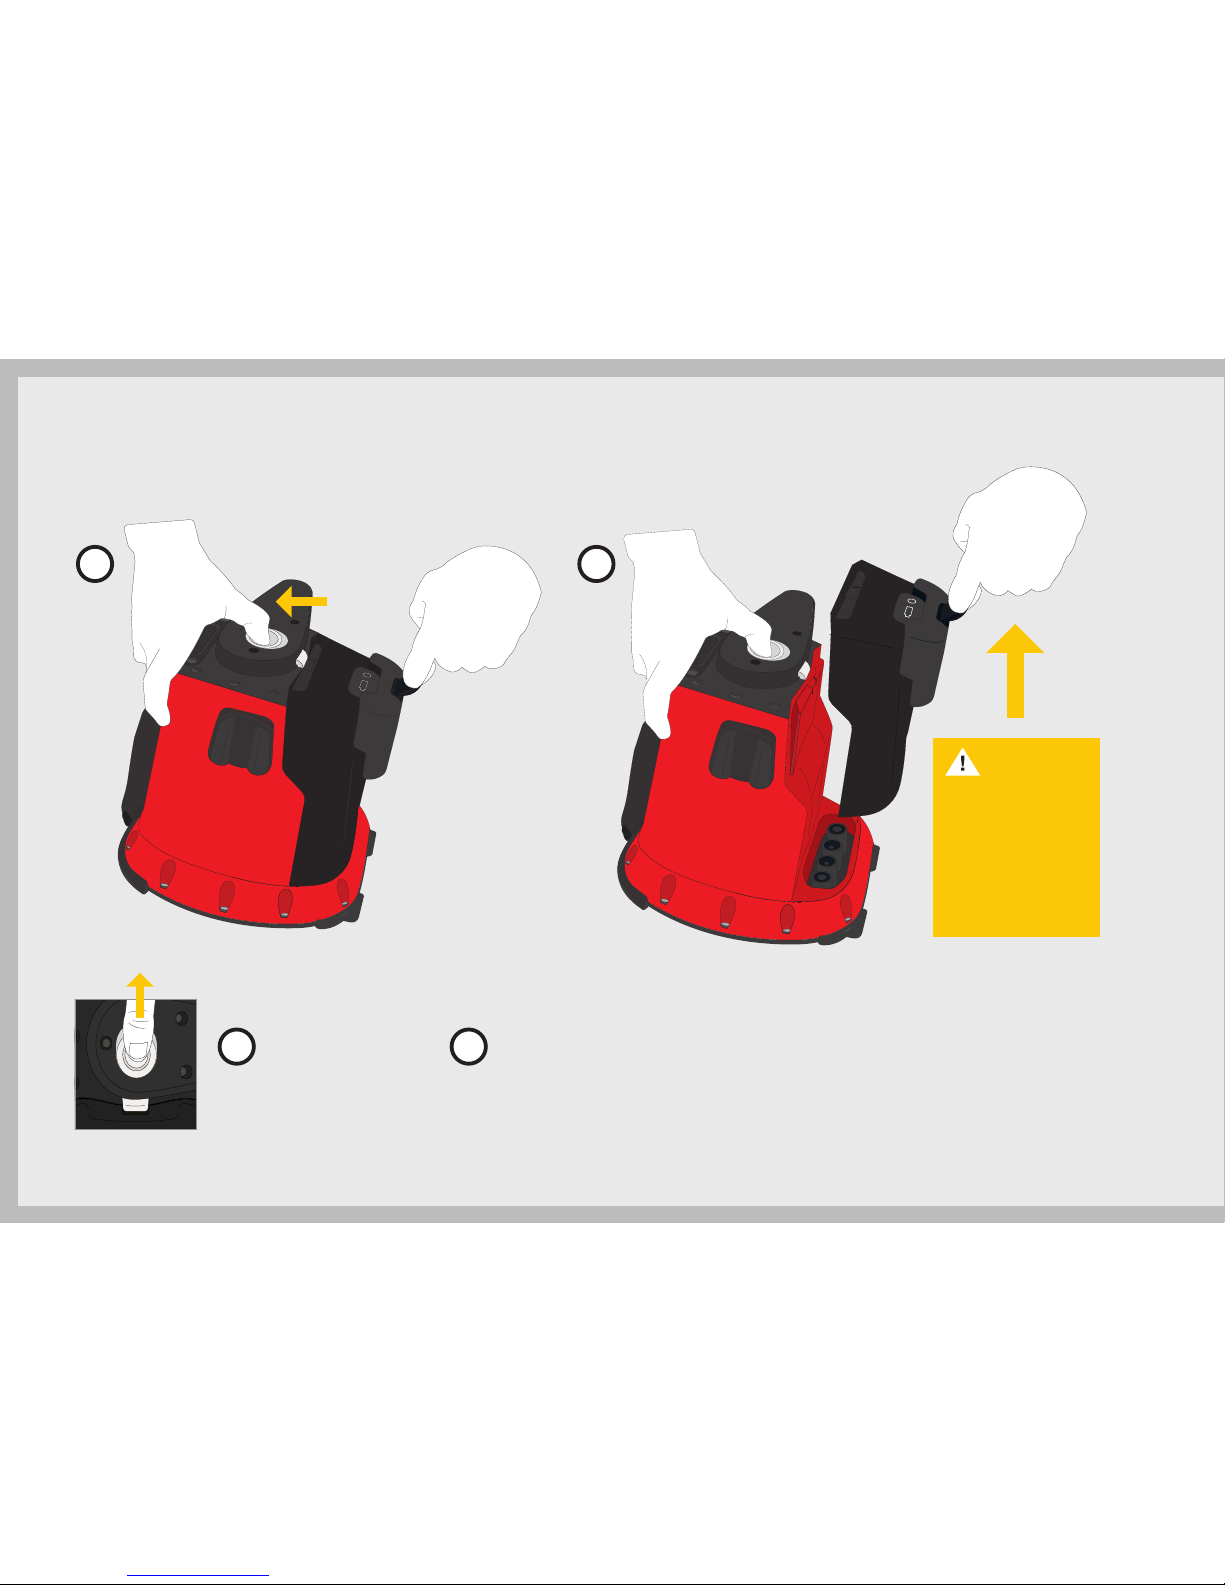
CAUTION
When connecting
or disconnecting
the battery ensure
that the battery is
held or secured by
the battery strap.
E.07 CONNECTING AND DISCONNECTING
THE BATTERY FROM THE ASCENDER
Release the battery by
pulling the battery-strap
with your nger or a
karabiner.
Connecting the Battery:
Slide the Battery onto the Ascender
and ensure that the Battery is locked.
The Battery Lock must snap
into its position (click).
Hold the battery
and slide the
release catch
upwards
1
1 2
2
Disconnecting the Battery
Page 37
The Battery lifetime is dependent
on a lot of different factors such
as: intensity of use, charging
cycles, storage temperature etc.
For this reason is it very difcult to
give a general indication on the
service life of a Battery. The Battery
Management System or BMS
constantly monitors the condition of
all the cells in the Battery and will
shut the Battery down automatically
if the cells become too worn out. In
this instance the Battery can
no longer be used.
Do not incinerate or
dispose of the Battery
in your normal waste
system. Dispose of the
Battery at a recycling
centre as per the
appropriate regulations.
» Product warranty is limited to
original defects in material and
workmanship. The Warranty does
not cover collateral damage
» All lithium-ion batteries degenerate
over time, even if they are properly
stored. Disconnect the battery
when stored for longer periods
with 100% charge
» If storing a Battery for a long
time, recharge the Battery every
third month
» Ideally store the Battery at room
temperature of 5 to 25°C (40 to
80°F). Storing at higher temperatures
will result in a loss of performance
and a shortened service life.
» Do not store the batteries at
temperatures higher than 60°C
(140°F) for extended periods,
as this will cause damage to the
Battery and possibly result in re
» The operator assumes total
responsibility for all risks
associated with lithium-based
battery technology
E.08 STORAGE AND TRANSPORTATION E.09 BATTERY LIFETIME
AND DISPOSAL
NOTE
Batteries are fully regulated
as Dangerous Goods (Class 9
UN3480 Lithium Ion Batteries)
and must be handled
and shipped accordingly.
A defective battery must
not be shipped.
CAUTION
Storing an empty Battery
or a Battery with low charge
level will drain the Battery
and damage it irreversibly
Page 38
Page 39

HOW TO USE
THE ASCENDER
F
Connecting the rope F.01
Ascender activation F.02
Ascent and descent F.03
Emergency descent F.04
Emergency Stop F.05
Twisted rope and rotation F.06
Remote Control F.07
Remote Control operation F.08
Transportation F.09
Storage F.10
Checklist before
and after use F.11
Page 40
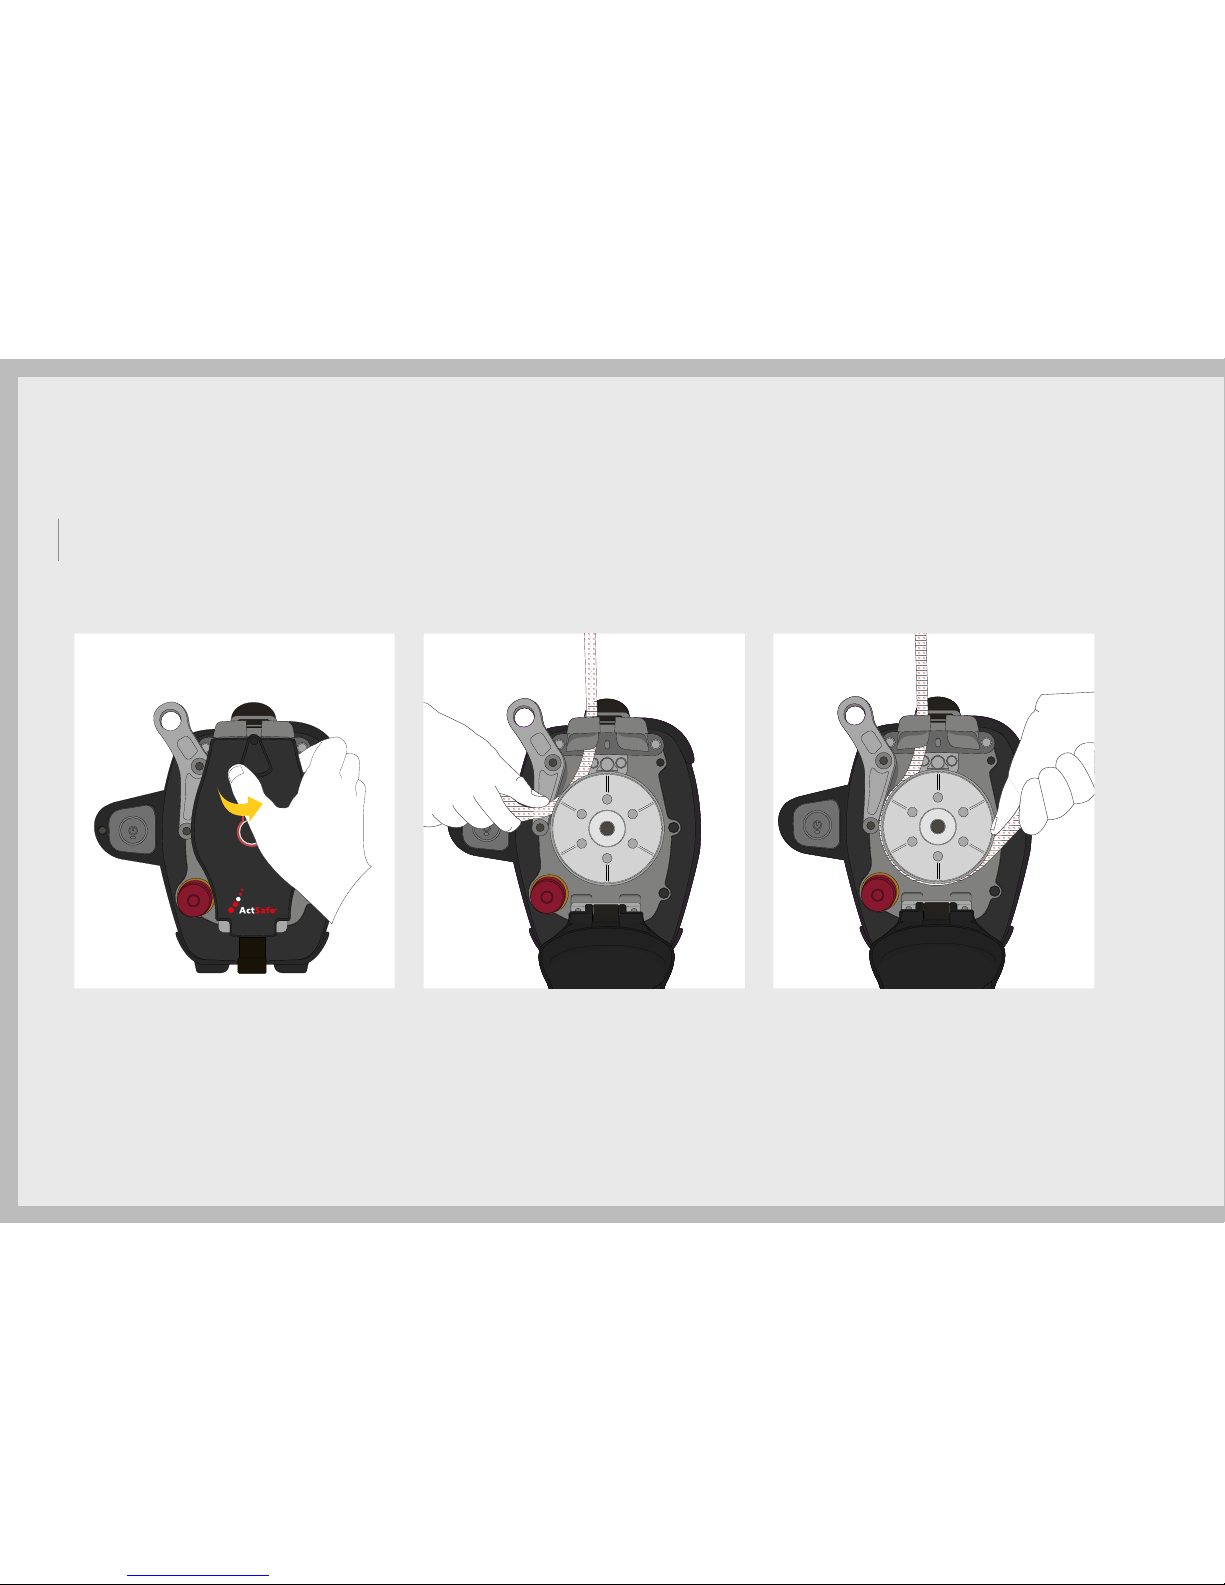
F.01 CONNECTING THE ROPE
The Ascender must be switched off while loading the rope.
Push the Emergency Stop to ensure that the Ascender is switched off.
1. Open the Rope Cover by pulling
on the Rope Cover and pushing
the Rope Cover Lock to the right.
2. Feed the rope counter-clockwise
through the slot in the Rope Guide
and around the Rope Grab.
3. Continue feeding the rope in
a counter-clockwise direction.
Page 41
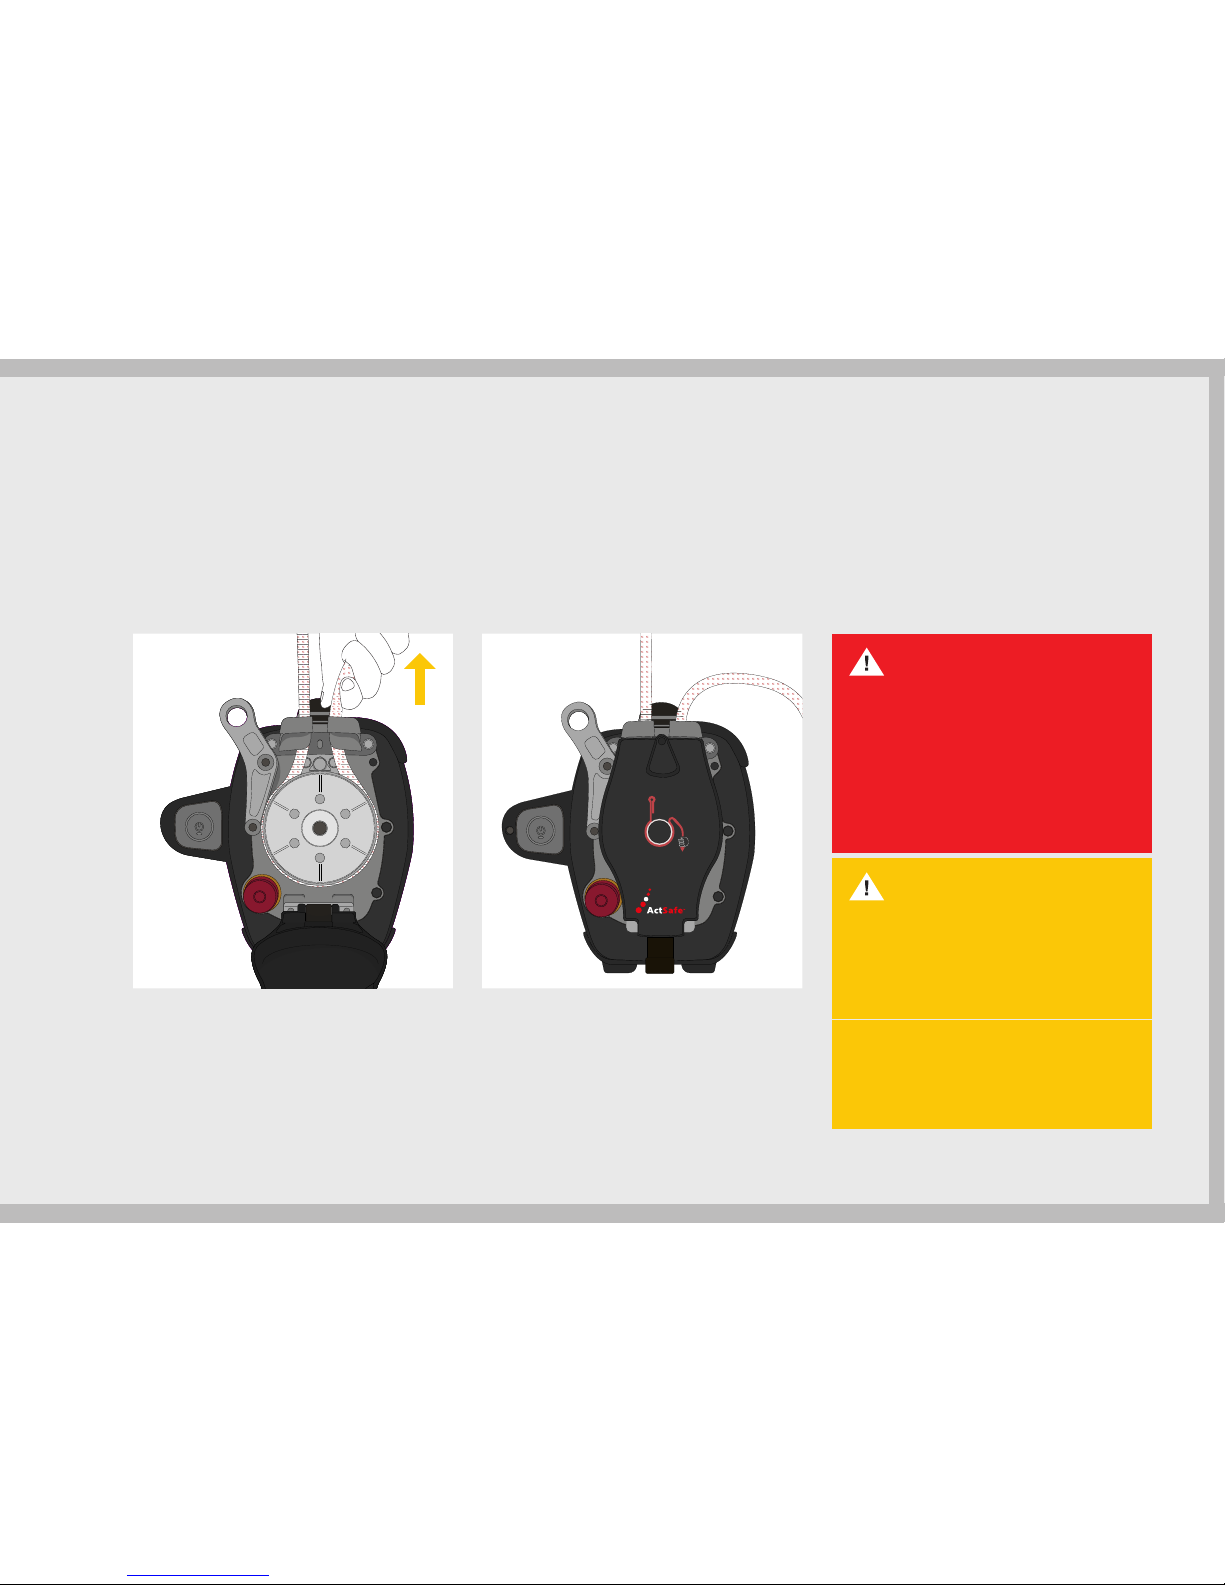
4. Feed the rope through the slot
in the Rope Guide.
Tighten the rope a little.The rope
will be pulled into the Rope Grab
and the rope cover can be
locked more easily.
DANGER
CAUTION
Always check that the rope is
attached correctly and has a
stop-knot on the other end of
the rope. Failure to attach the
rope correctly could result in
SERIOUS INJURY OR DEATH.
Load the rope when the
Emergency Stop of the Ascender
is activated to avoid accidental
activation by the Remote Control.
Ensure that the Rope Cover is
locked into position and that the
rope is running the correct way.
5. Close the Rope Cover and
ensure it is locked. The Rope
Cover lock should snap into its
position. A distinct ‘click’ should
be heard. Never attempt to force
the Rope Cover.
Loaded rope Unloaded rope
Page 42
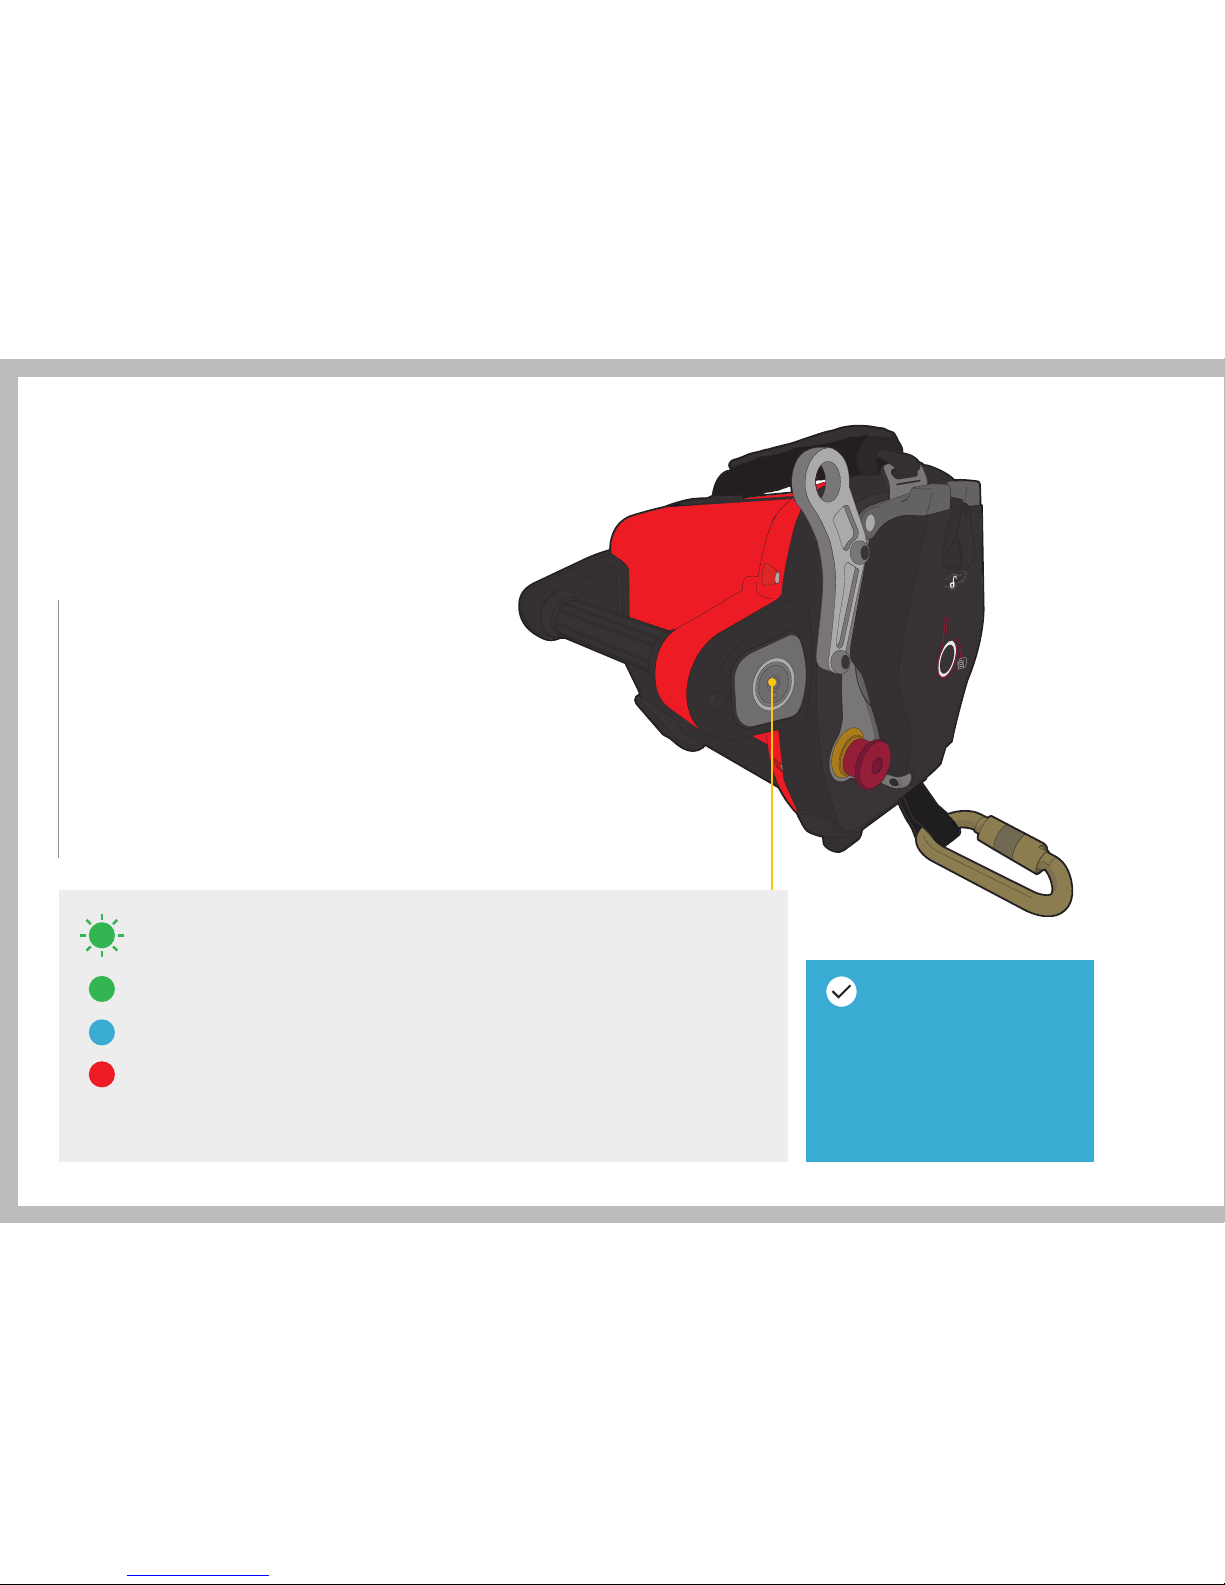
F.02 ASCENDER ACTIVATION
To activate the Ascender check that the Emergency
Stop button is pulled out. Switch the Ascender on
by pushing the Power Button for 2 seconds. The
green indicator LED starts blinking and the Ascender
performs a self-test, which will take a few seconds.
The Ascender is ready to use after you hear
a distinct clicking within the Ascender (brake test)
and the green LED indicator is lit continuously.
The Ascender will remain on for 4 hours after
its last operation.
BLINKING The Ascender is starting up and perfoming self-test
GREEN
GREEN The Ascender is on and ready to use
BLUE The Ascender is being operated by the Remote Control
RED A fault has been detected and the Ascender will not
operate. Restart the Ascender. If the red light remains
lit on restart, check the troubleshooting guide.
NOTE
The Ascender has no
standby function, the
Ascender can only be
switched on by pushing
the Power Button.
Page 43
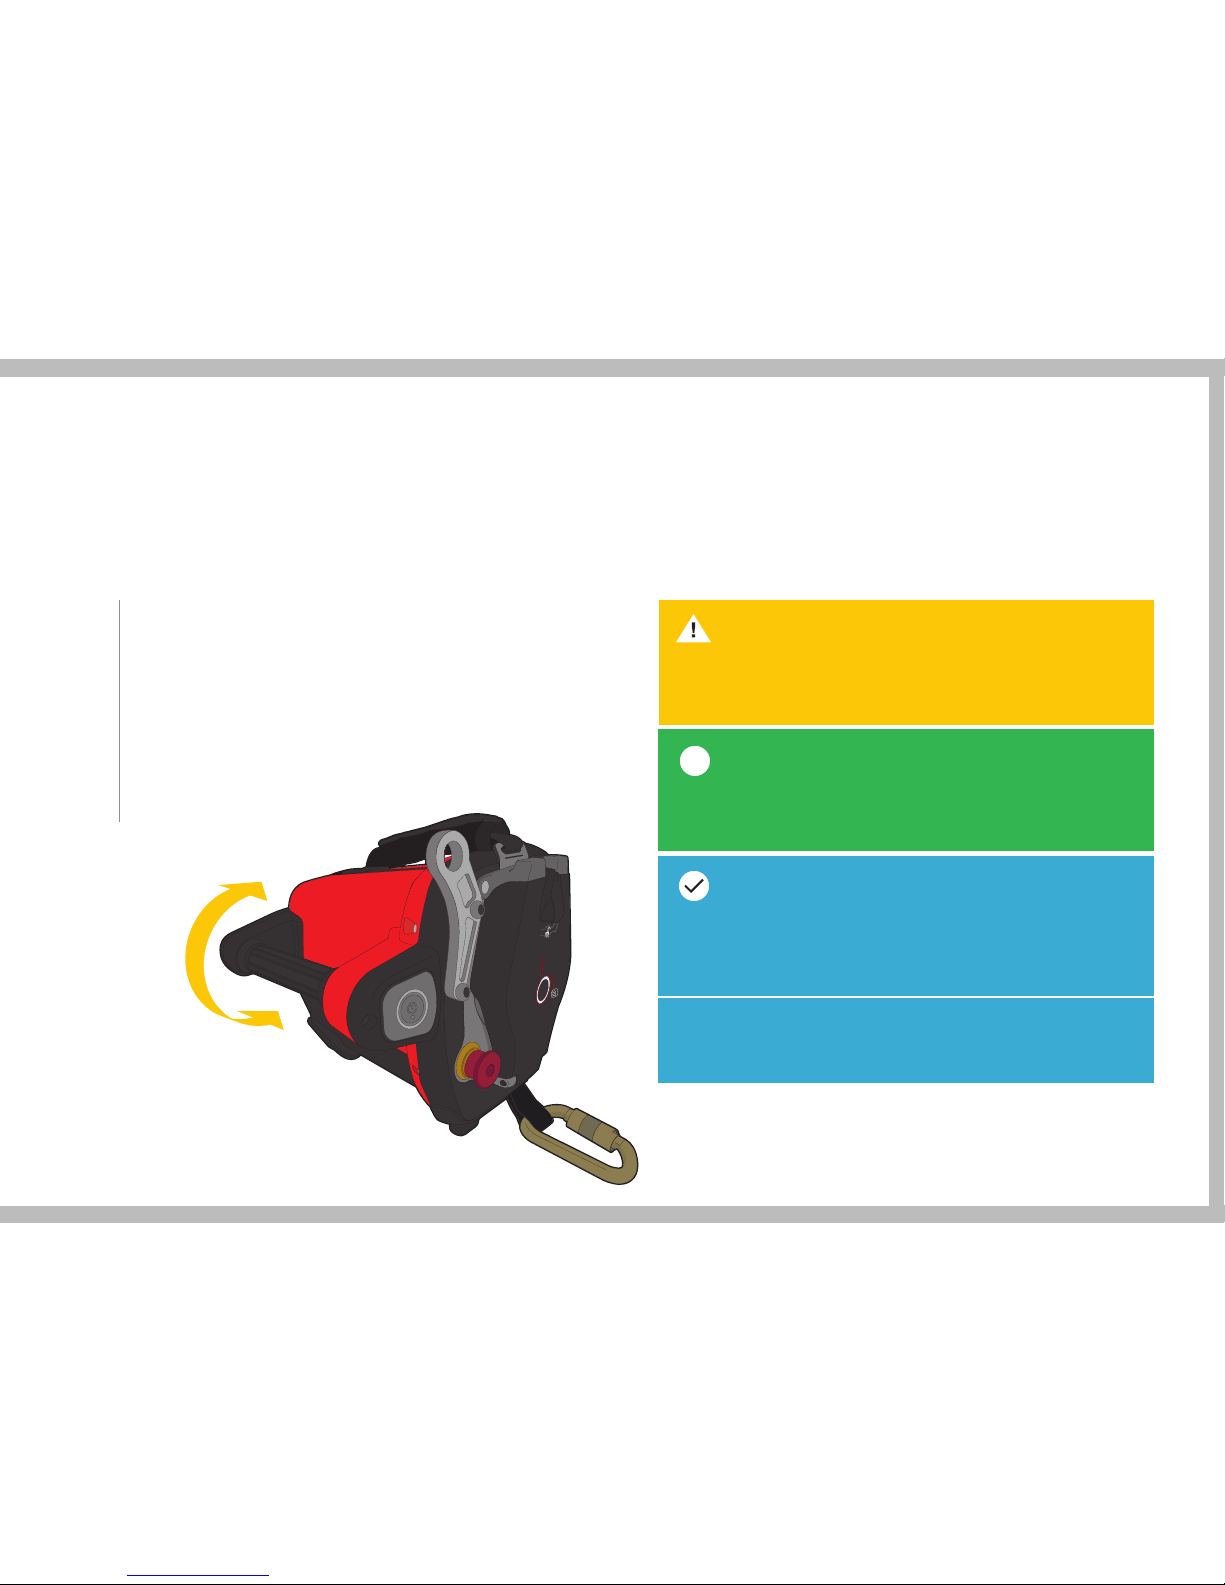
F.03 ASCENT & DESCENT
To move the Ascender up the rope, pull back
on the Throttle. When released the throttle will
return to the neutral position and the Ascender
will stop moving.
To move down the rope, push the Throttle
in the opposite direction.
Adjust the speed according to the circumstances,
be aware and use common sense.
Travel
down
Travel
up
CAUTION
Do not hold on to the loaded rope just above the
Ascender, as there is a risk of injury.
RECOMMENDATION
Stand straight beneath the anchor point in order to avoid
a pendulum movement when starting off the ground.
i
NOTE
Make sure that the unloaded rope runs in a controlled
manner out of the Ascender. Take special care feeding
the loose rope into the Ascender when descending.
The in-built ACX electronic monitoring system will prevent
lifting loads over 250 KG.
Page 44
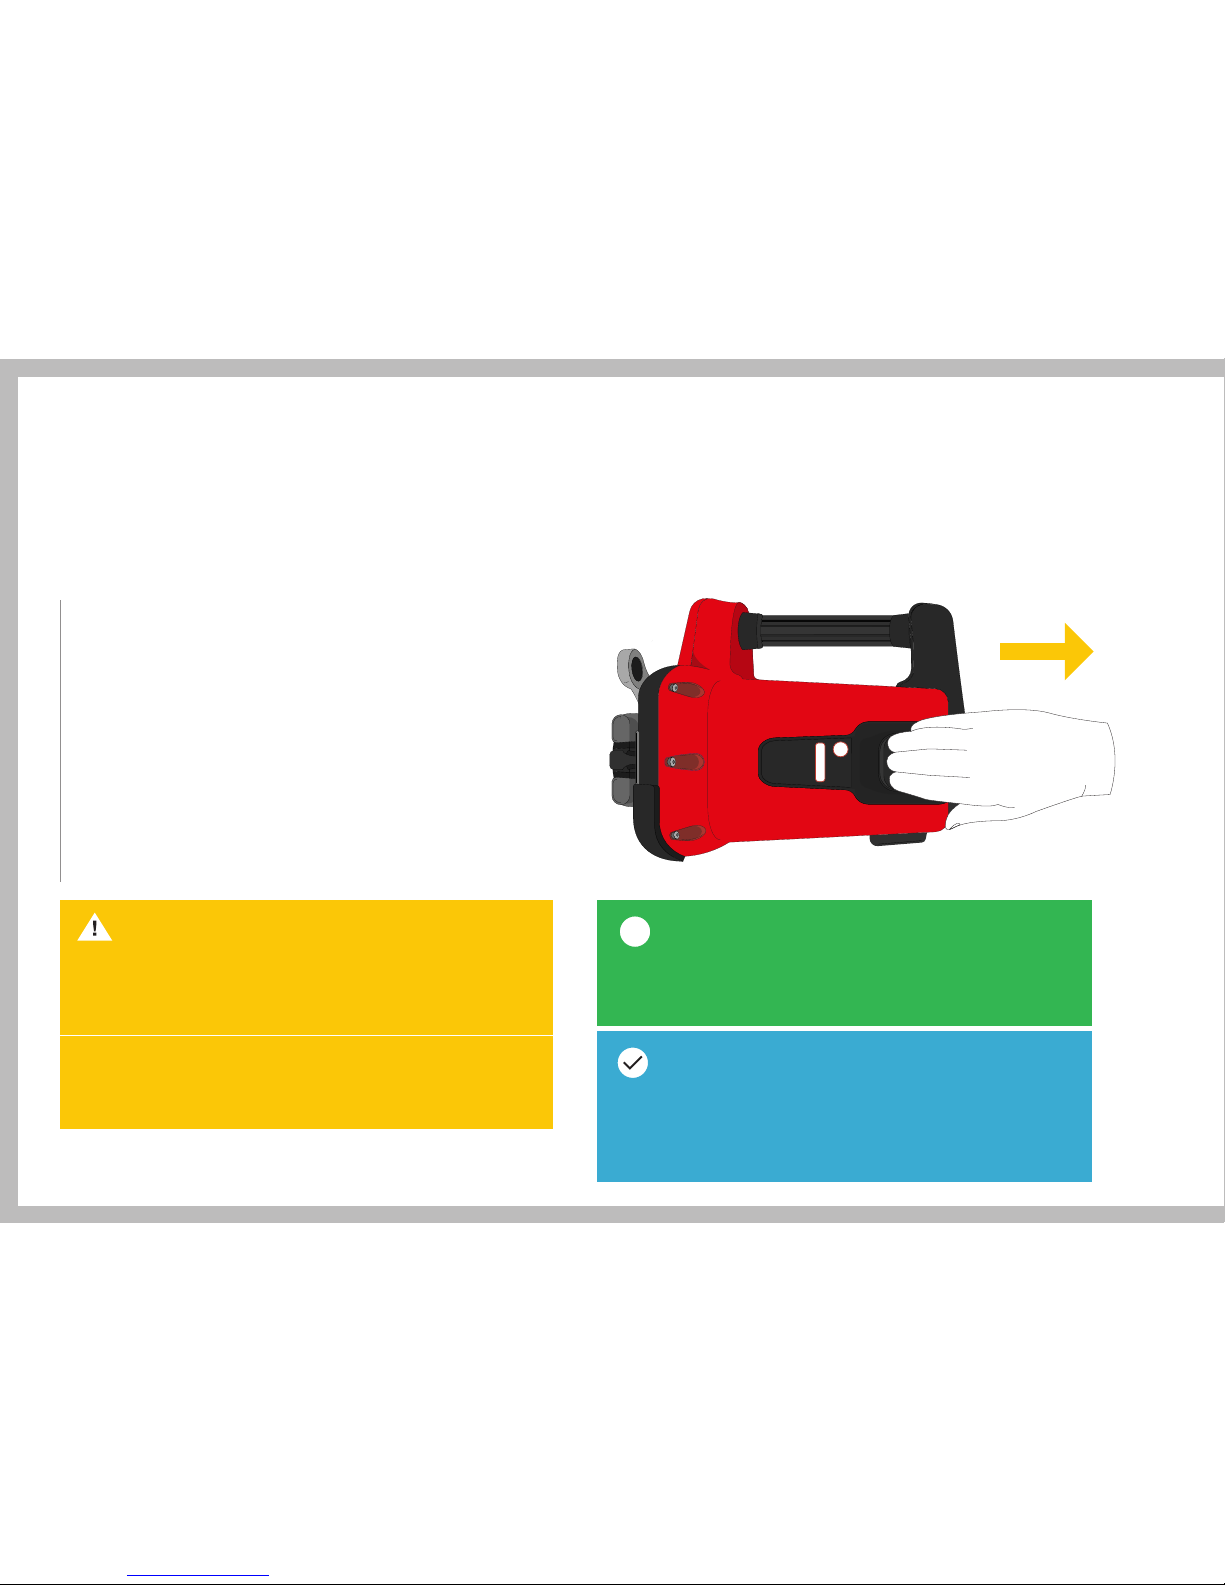
The emergency descent is ONLY to be used to get down in
a safe and controlled manner in case of an Ascender failure.
The Emergency Descent Lever enables a mechanical
release of the Ascender brake, and it should NEVER
be used during normal operation because emergency
descent can, in rare cases, damage the Ascender.
Emergency descent procedure:
1. Hold the dead rope in one hand.
2. Descend by gently pulling the lever backwards as shown.
3. Stop the descent by letting go of the descent handle.
F.04 EMERGENCY DESCENT
CAUTION
An emergency descent can result in serious damage
to the Ascender. Only use the emergency descent
in case of an emergency.
If you do need to descend manually, control your speed
and hold the dead rope in one hand while descending.
RECOMMENDATION
Always try to restart the Ascender rst before using
the emergency descent method.
i
NOTE
In case of the Ascender stopping because of an
empty battery, it is still possible to descend whilst
using the throttle.
Page 45
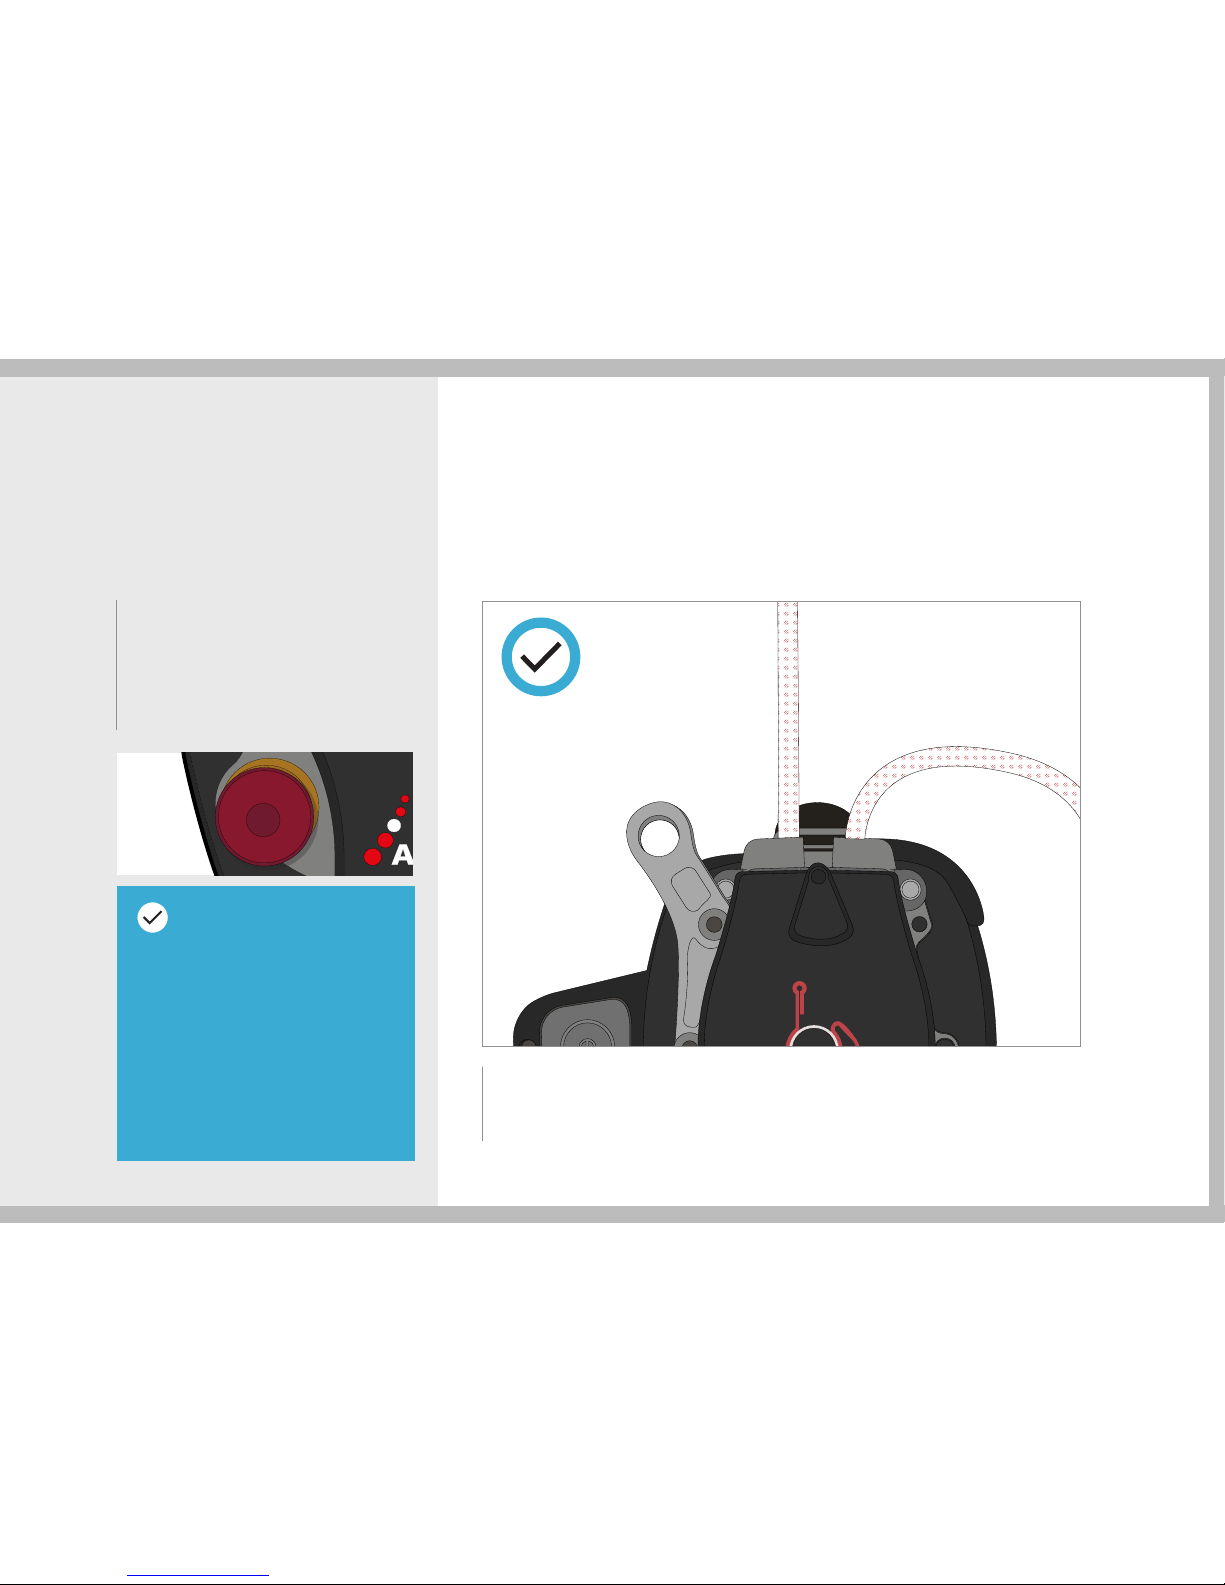
Ensure, especially when descending, that the rope runs untwisted
into the Ascender. Twisted ropes caught into the Rope Guide can
cause a rope jam and can, in rare cases, result in rope damage.
1. Press the Emergency Stop
to immediately turn the
Ascender off.
2. Reset the Emergency Stop
by pulling out the button.
F.06 TWISTED ROPE AND ROTATIONF.05 EMERGENCY STOP
NOTE
The Indication LED will blink
green and then turn red
momentarily when the power
button is pushed while the
Emergency Stop is activated.
The Ascender cannot be
activated as long as the
Emergency Stop is pushed in.
Page 46
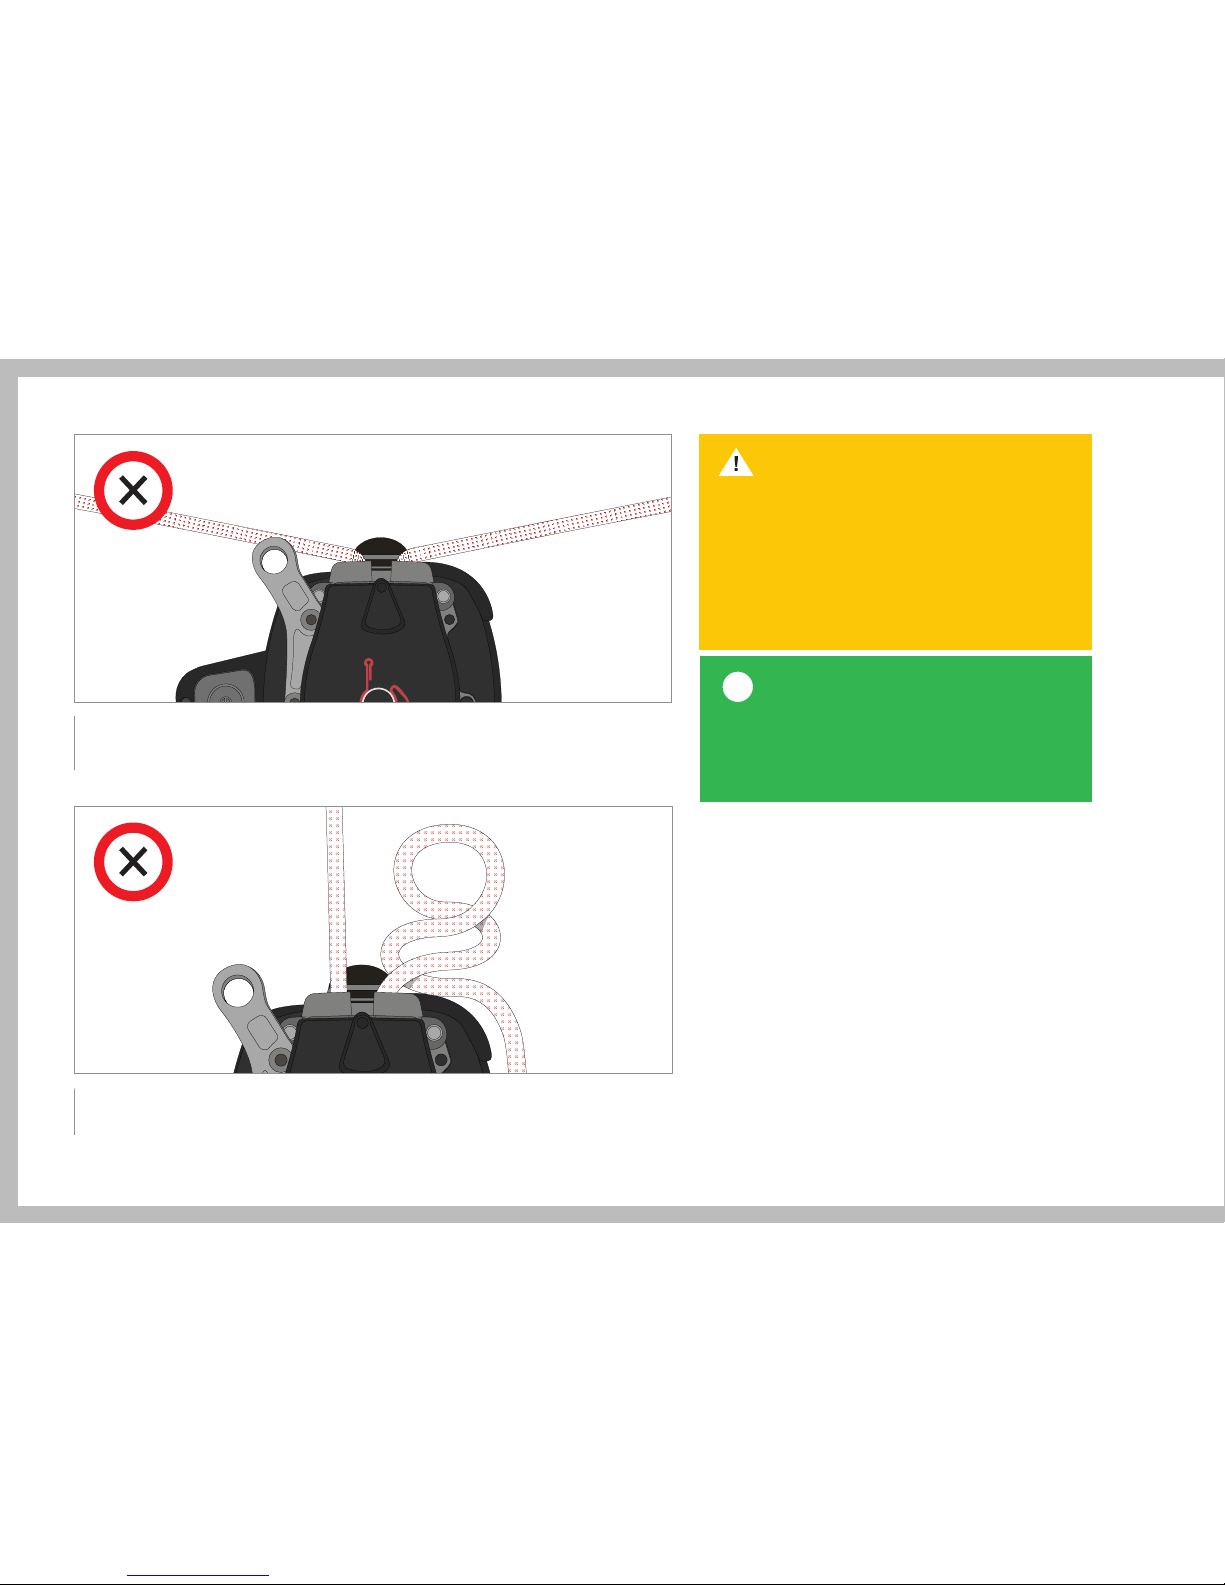
Stop immediately when a rope twist is observed, untwist and organise
the rope before continuing.
The dead rope must never be loaded. Do not build tramways using
the primary rope as shown in the picture.
CAUTION
When descending, make sure the rope
is fed neatly into the rope grab so that
there are no kinks or twists in the rope.
Take special care when using long
ropes to prevent twists or kinks.
Good rope management is ESSENTIAL.
RECOMMENDATION
When descending, hold the rope entering
the Ascender to prevent it from running
twisted into the Ascender.
i
Page 47
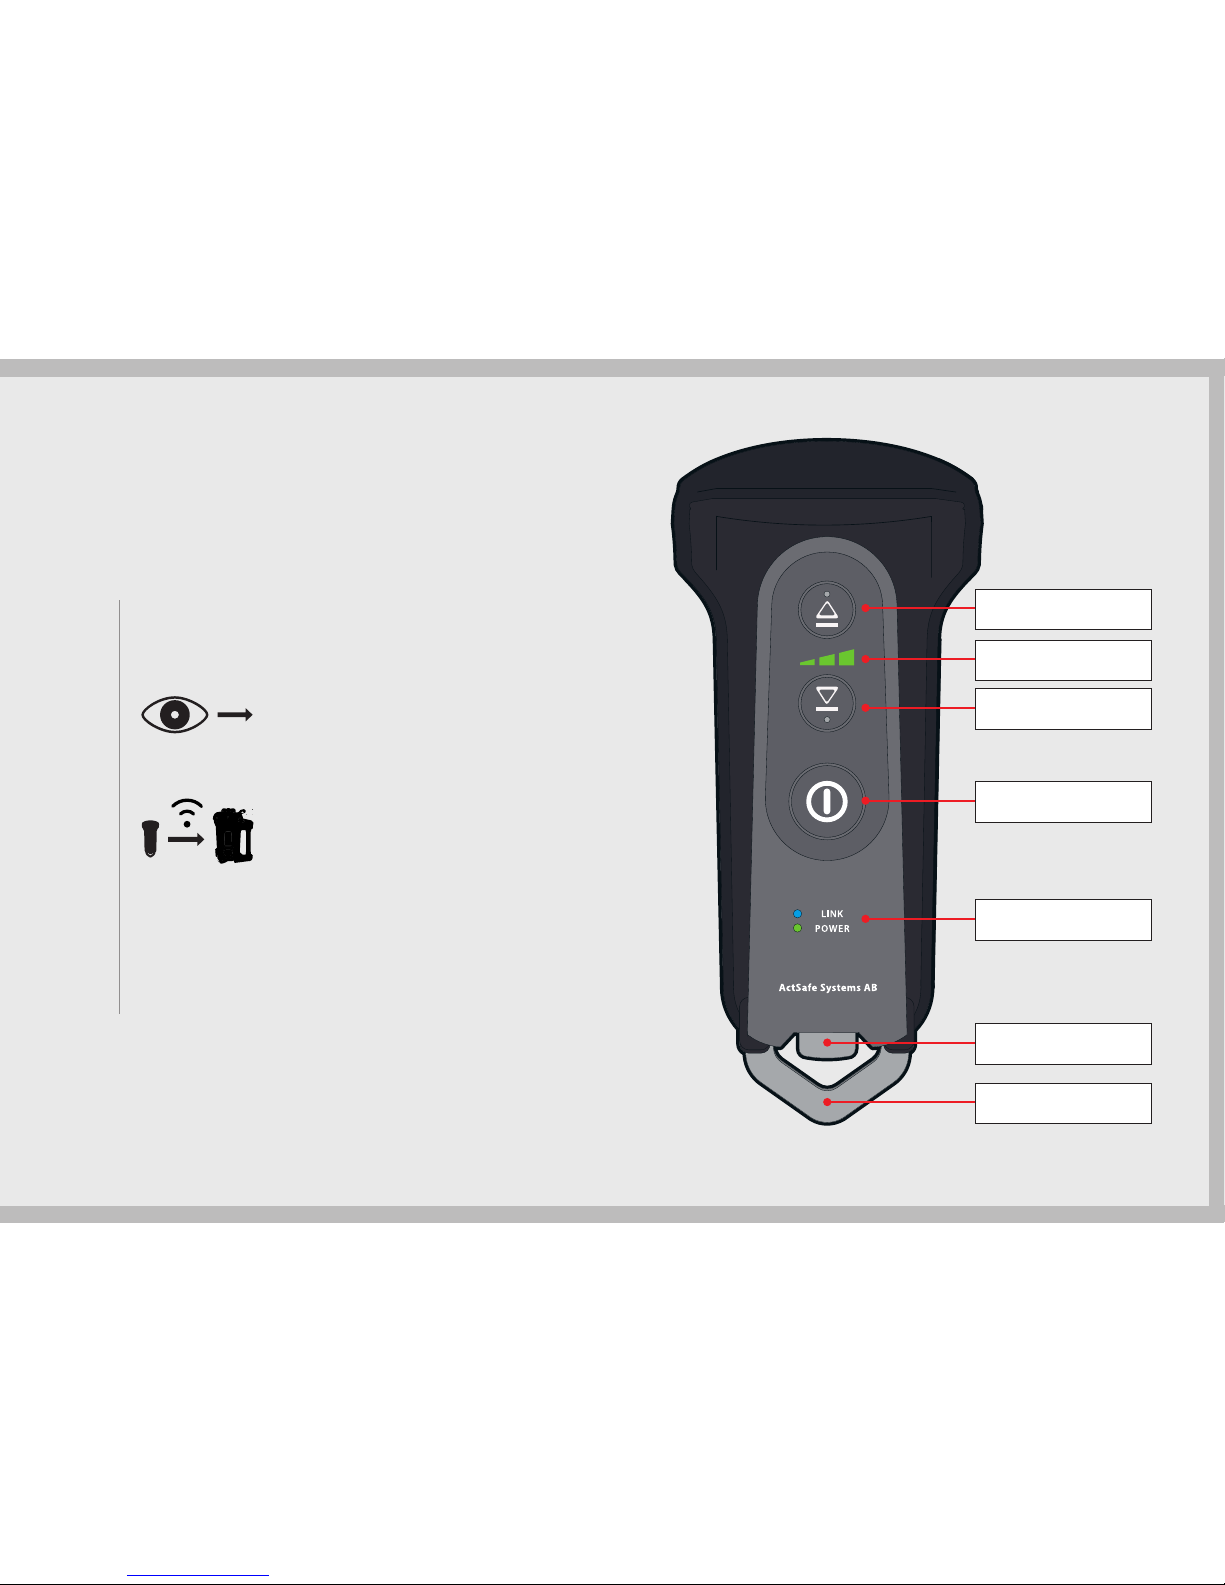
The Remote Control can be used for a
multitude of applications for both personnel
and equipment lifting.
The ACX Ascender can be operated by
a Remote Control to a distance of up
to 150 metres in direct line of sight.
The Remote Control will override the
controls on the Ascender. Once it is in use,
it will not be possible to use the Ascender
by its own controls. If the Remote Control
is not used for 10 seconds, control is
automatically returned to the Ascender.
Control is instantly returned to the Ascender
when the remote is turned off with the ON/
OFF button.
F.07 REMOTE CONTROL
150 m
UP/Speed Selection
Speed Indicator
DOWN/Speed Selection
Power Button
Link and Power LEDs
USB Protection Cap
Connection Point
Page 48
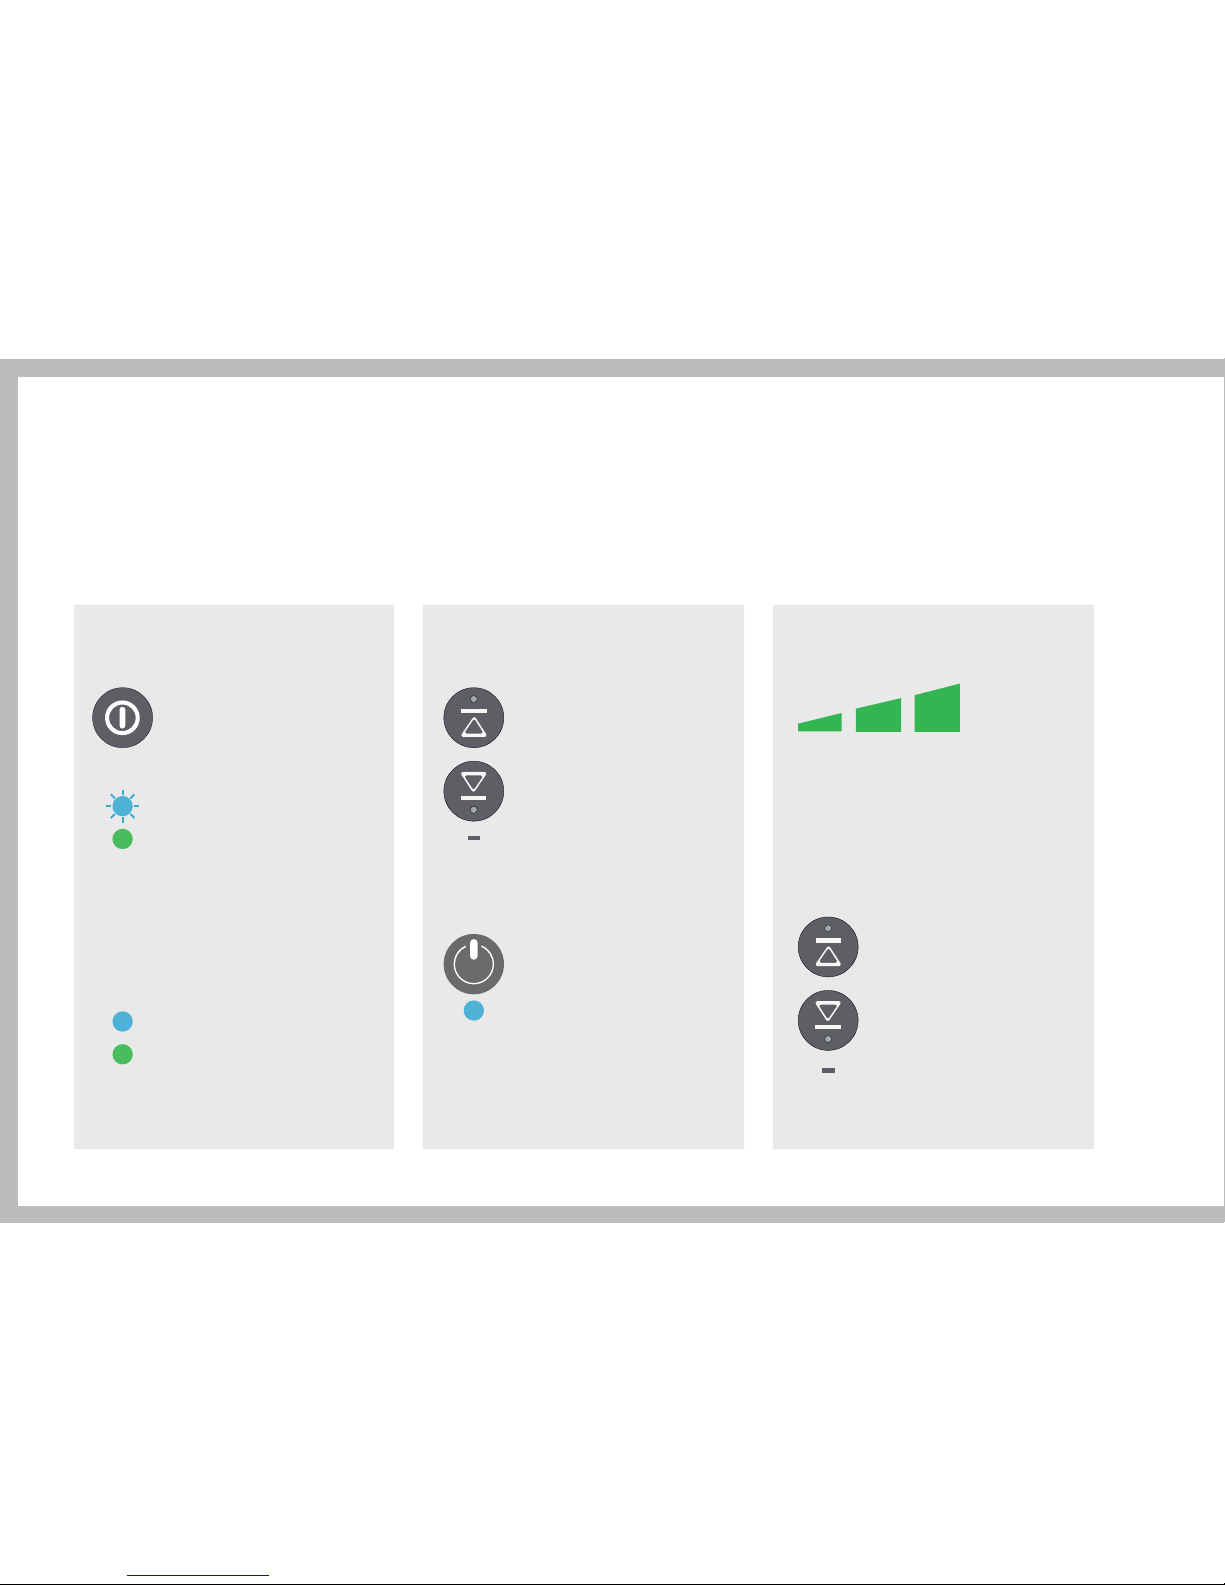
F.08 REMOTE CONTROL OPERATION
Activate the Remote
Control by pushing the
Power button.
By pushing either the
‘UP’ or ‘DOWN’ button
the Remote Control will
take over the control
of the Ascender and
the Ascender will stop
immediately.
Select between 3 speeds
in both ascent and
descent – 20%, 50%
and 100%.
The speeds can be
set by a short push
of the ‘UP’ or ‘DOWN’
button and the LED
bar will indicate the
selected speed.
Short
press
The green LED on
the Ascender will turn
blue to indicate control
has passed to the
Remote Control.
1. Activation and connection 2. Take control of the Ascender 3. Set the Ascender speed
The green ‘POWER‘
LED will show and the
blue ‘LINK’ LED will
start to blink for a
few seconds whilst
a connection is
established with the
Ascender.
Once connected, the
blue ’LINK’ LED on the
Remote Control will be
lit continuously.
25% 50% 100%
Short
press
Page 49
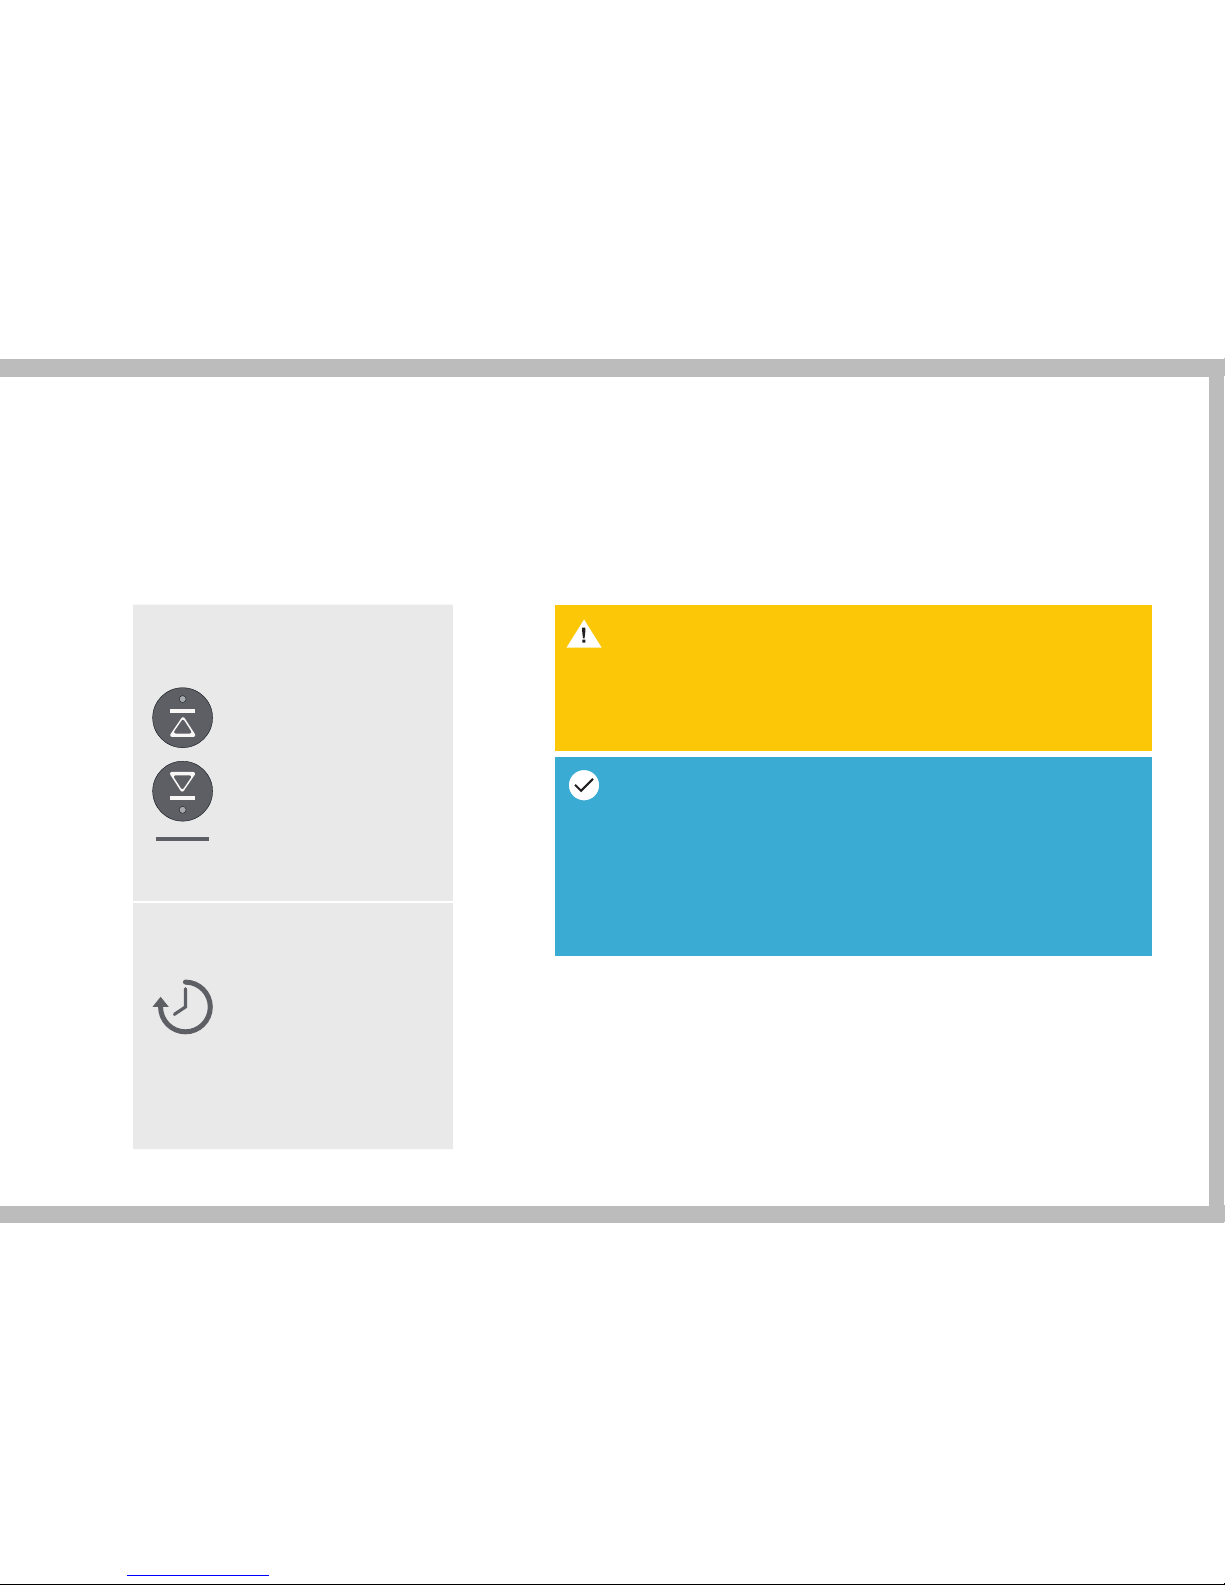
CAUTION
The Remote Control hand unit will only work with the Ascender it
has been delivered with. If you are in possession of more than one
Ascender, mark your Remote Controls to avoid any confusion.
Note
Remote Control does not work if Emergency Stop is pressed or if
the Ascender is switched off. Once the Ascender is switched
back on again the Ascender can be used manually. The remote
connection needs to be re-established by turning the Remote
Control off and on again.
Once the speed is
selected, holding
down either the ‘UP’ or
‘DOWN’ button will then
activate the Ascender
at that speed.
The Remote Control
will turn itself off after
10 minutes of inactivity,
alternatively switch the
Ascender off to disconnect
the Remote Control.
Hold
down
4. Operate the Ascender
5. De-activation
Page 50
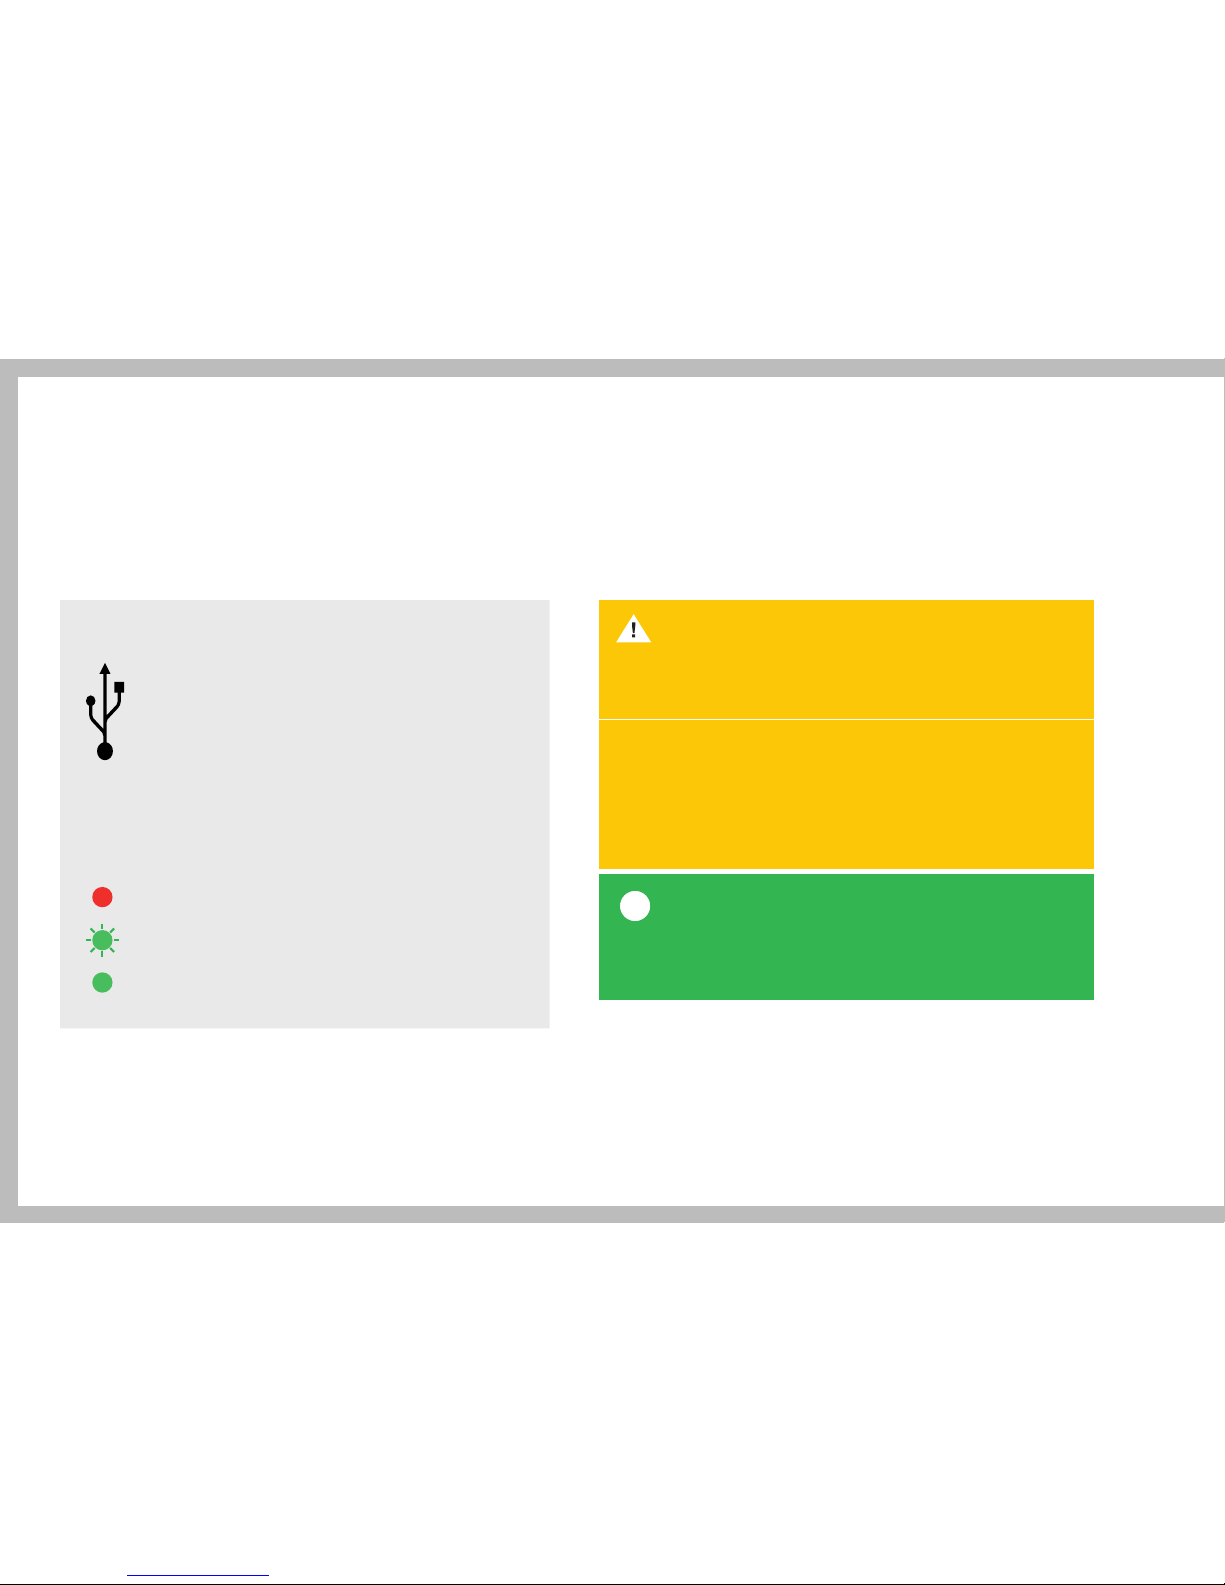
Remote Control Battery
The Remote Control unit is equipped with
an internal battery which is charged via the
supplied USB cable. Complete charging
will take up to 150 minutes via a computer,
or 75 minutes with the supplied adaptor.
The USB Connection Point can be found on
the bottom of the Remote Control under the
protection cap that can be unscrewed.
CAUTION
Make sure that the Remote Control has visual contact
with the Ascender to ensure safety and maximum range.
When using the Remote Control, unloaded rope
should be held by an operator to ensure that the rope
can run unhindered into the ascender while lowering.
Uncontrolled rope running into the ascender can
cause a rope jam and eventually rope damage.
RECOMMENDATION
Always use the Remote Control in combination
with a stop knot at the end of the rope.
i
The power LED on the Remote Control will
turn red at 20% charge. The power LED
will ash during charging and will be xed
green once charging is completed.
Page 51
F.09 TRANSPORTATION F.10 STORAGE
Carry the Ascender by the lifting handle
for short walking distances.
When carrying the Ascender any further
stow it in the transportation box as this will
protect the Ascender from any damage.
Make sure the Ascender is secured
when travelling in any vehicle.
Always clean and dry the Ascender and the
transportation box before storage. See section
G for cleaning instructions.
Always store the Ascender and the Remote
Control in a cool, dry place.
CAUTION
Always store with the Battery fully charged.
Disconnect the Battery from the
ascender while being stored.
During long storage perods, charge
the Battery every 3 months.
Note
The Ascender Batteries holds over
100 Wh of power and are therefore
fully regulated as Dangerous Goods
(Class 9 UN3480 Lithium Ion Batteries)
and must be handled and shipped
accordingly. Contact your ActSafe
distributor or ActSafe directly for
further details.
Page 52
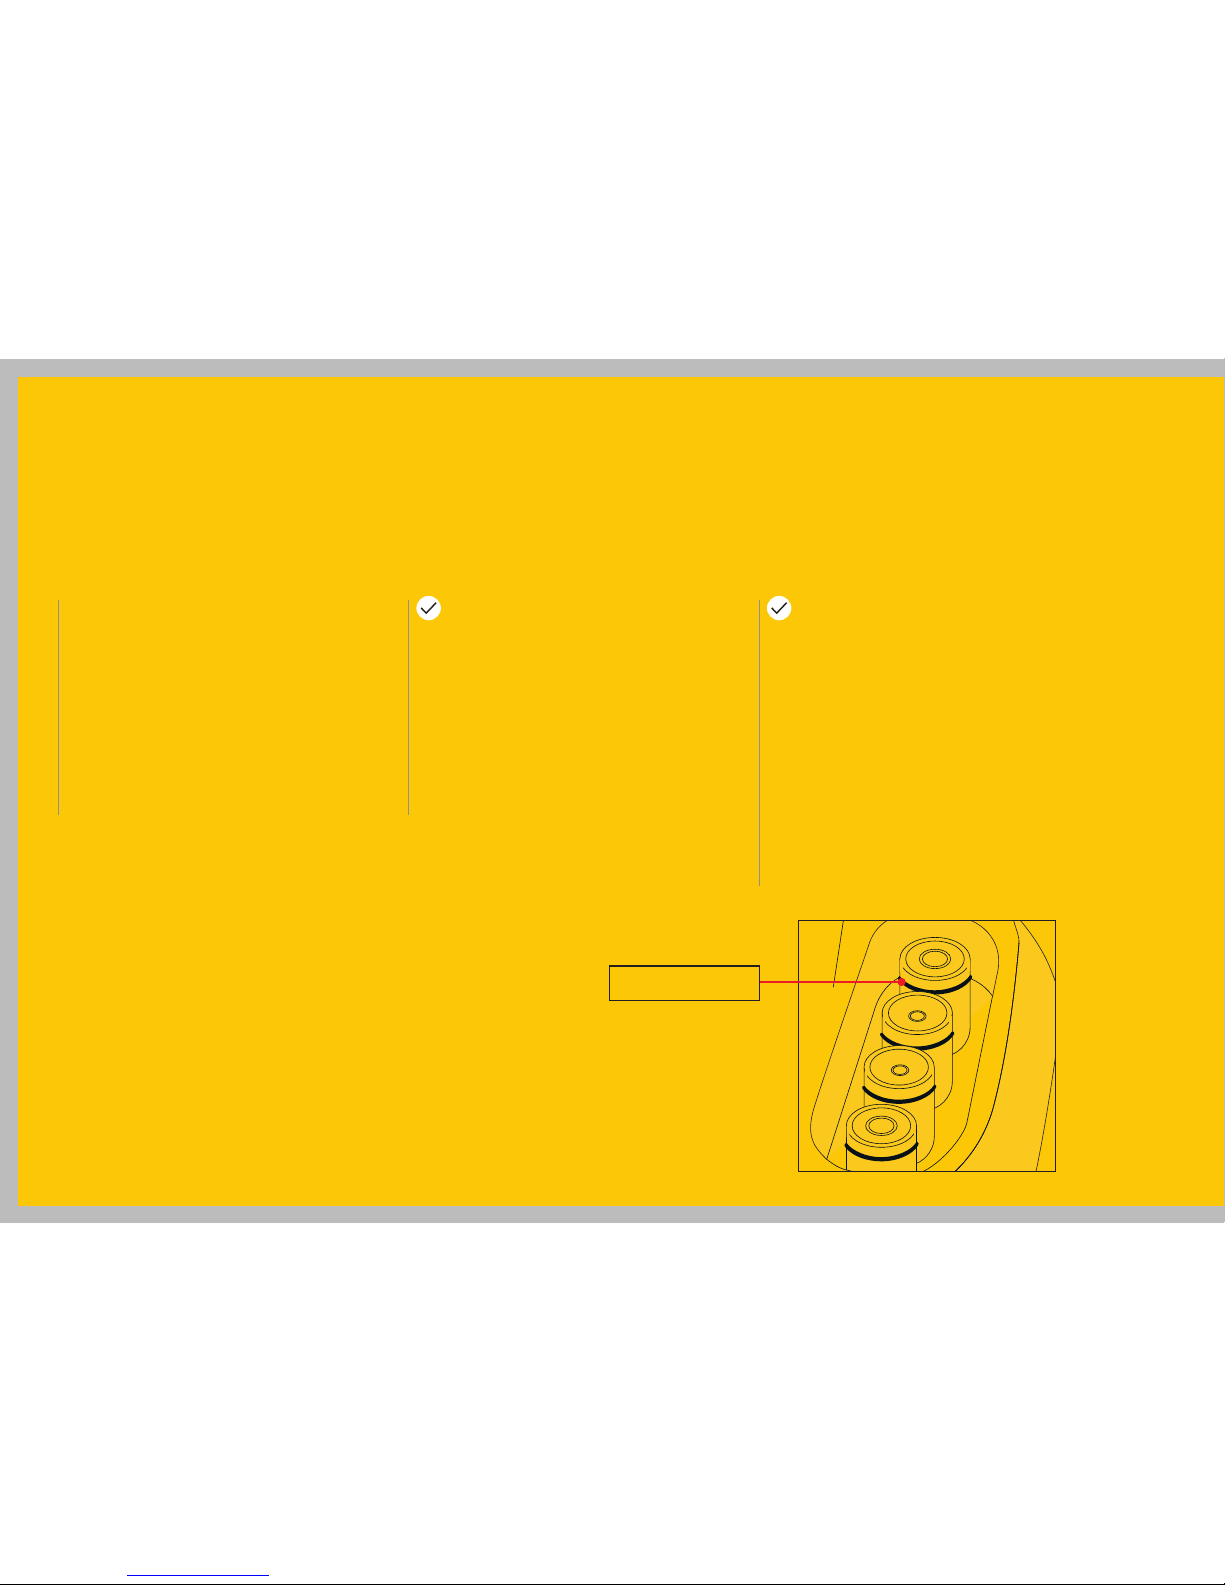
1: Inspection of ACX Battery Pack
» No damage to battery housing
» Connector pins clean and
not damaged
» Battery charged
» Battery Strap present
2: Inspection of ACX Ascender
» Check the Ascender housing for
cracks or severe damage
» Check the Battery Connector
pins on the Ascender:
– Clean and no damage
– Rubber sealing rings should
be present (see below)
» Slide the Battery on to the Ascender
and check that the Battery is locked
in its position
F.11 CHECKLIST BEFORE AND AFTER USE
Always check the Ascender before and
after every use. Check the Ascender
thoroughly and in accordance with
your training and this manual.
If you are in any doubt about the
condition of the Ascender, do not use
it and contact your ActSafe supplier
or ActSafe directly.
Rubber sealing ring
Page 53
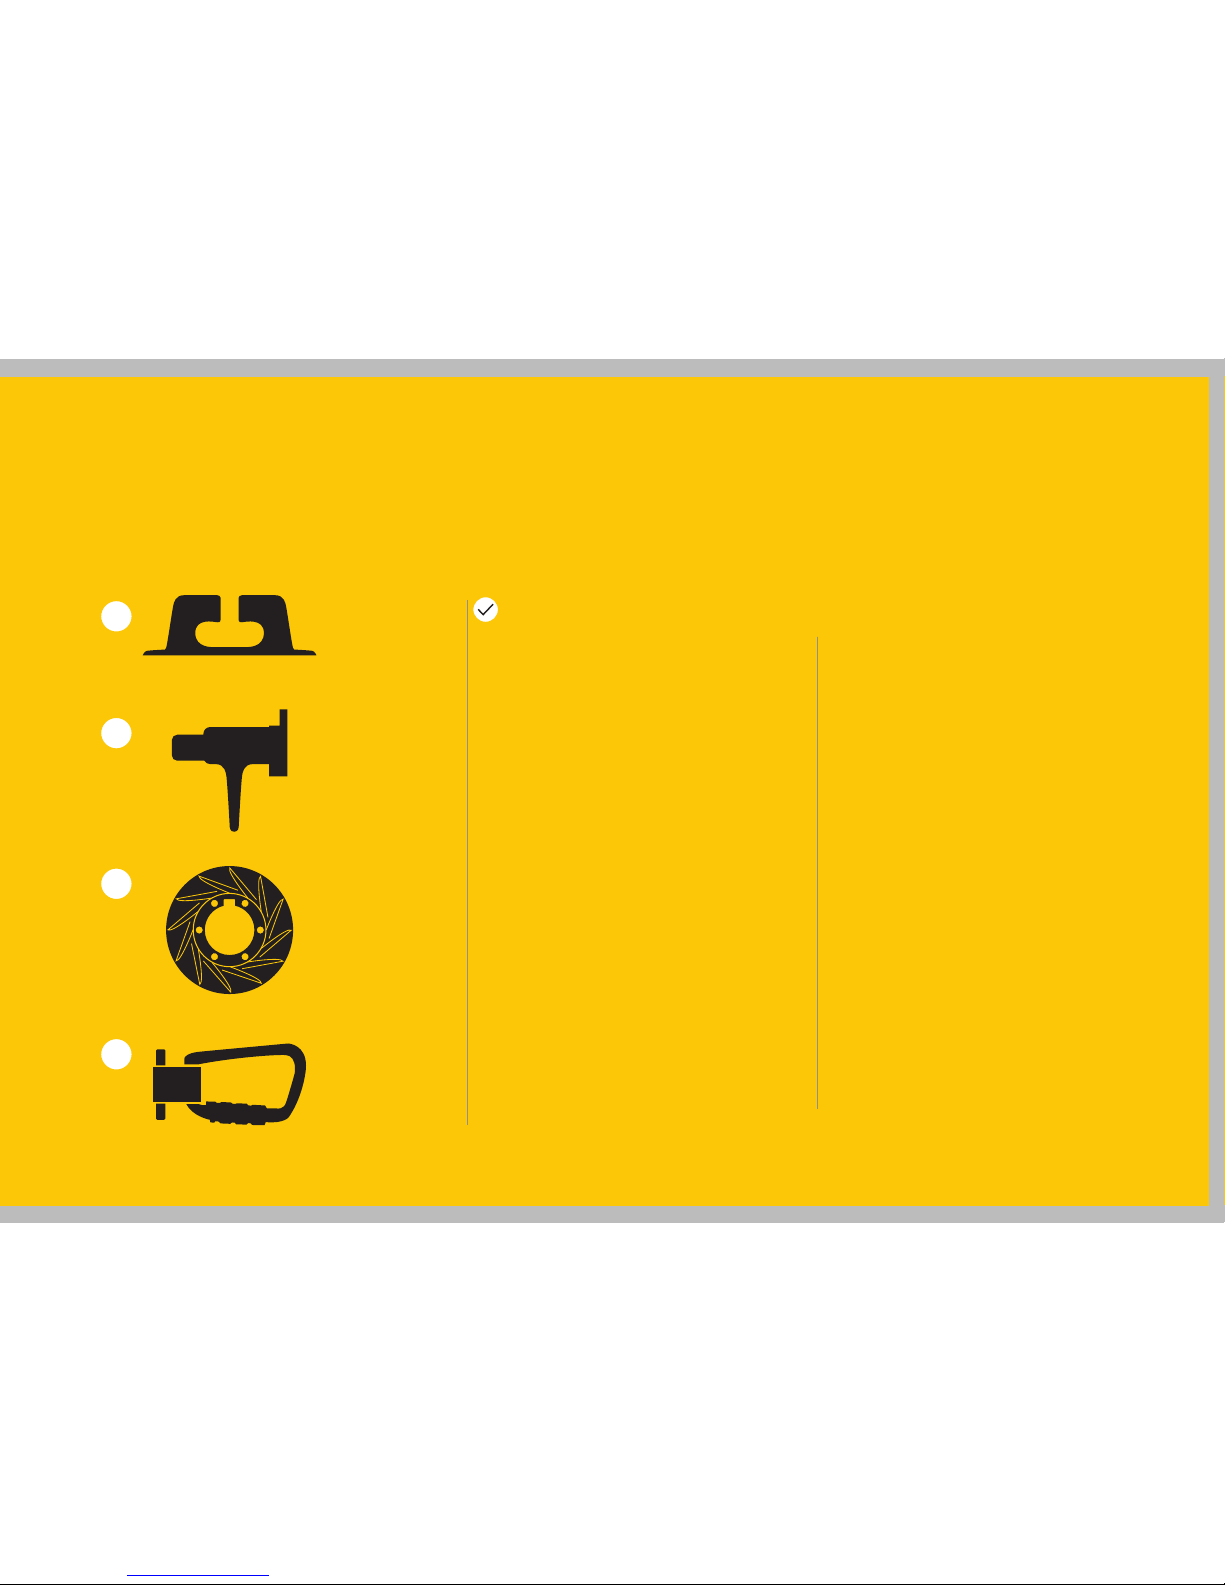
» Rope Guide (A)
Check Rope Guide for obvious
damage of deformation. Rope guide
should not be bent and must t
neatly with the Rope Cover. Check
for excessive wear
» Rope Cover
Check the Rope Cover function
by unlocking and locking into its
position. The lock should snap into
position. Check the Rope Cover
further for deformation, excessive
wear or any sharp edges
» Rope Wedge (B)
Check Rope Wedge for deformation
or any visible damage. The
rope wedge should be straight
and centered and touch the
lowermost part of the rope grab
» Rope Grab (C)
Check that rope grab is clean and
not lled with dirt, sand, paint or any
other foreign material. Check the
inside for obvious damage, signs
of wear or sharp edges
» Connection Sling (D)
Check Connection Sling for wear,
discoloration or damage such as
cuts, abrasion and contaminants
(Paint, glues, chemicals). Take
particular note of the condition
of the titanium Sling Bolt and
Karabiner Loop
A
B
C
D
Visual inspection of load-bearing parts
Page 54
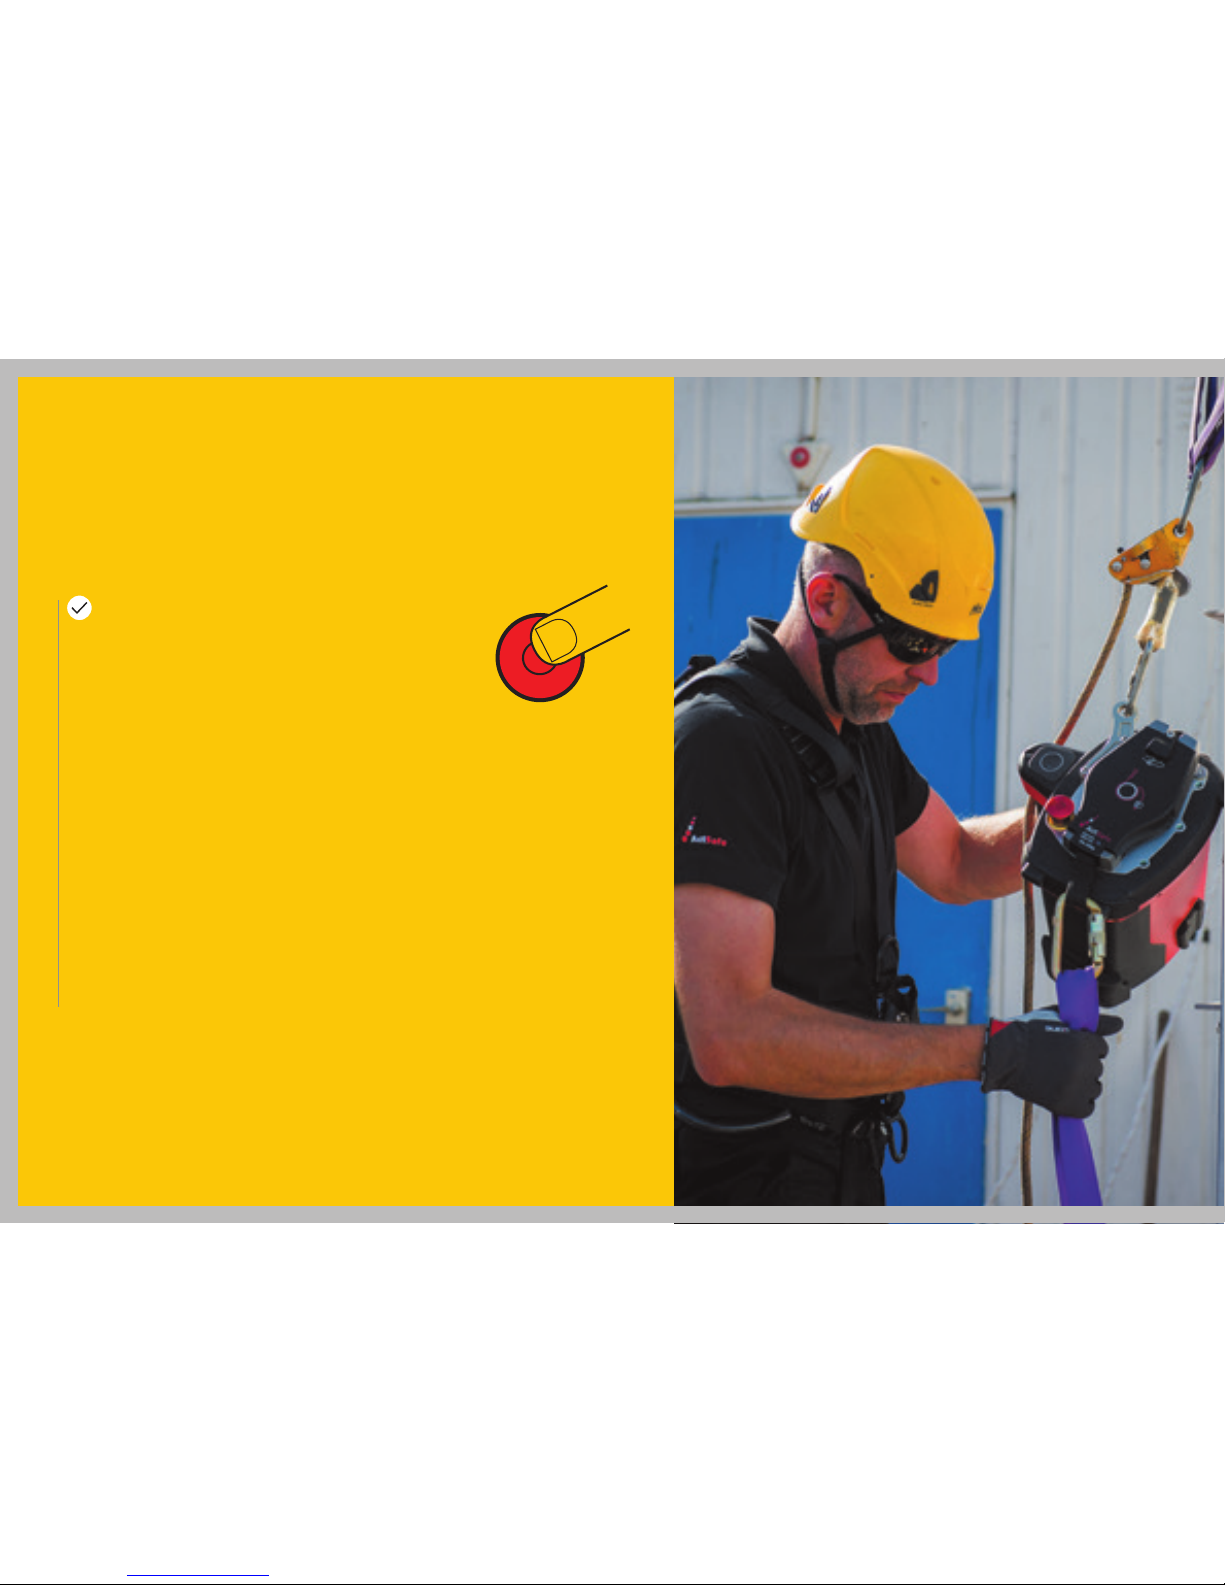
4: Controls check
» Check that the Emergency Stop is pulled
out and switch Ascender on. Wait for full
activation of the Ascender (LED turns green)
» Move the Throttle in both directions
and ensure that Rope Grab turns smoothly
in both directions
» Check that the emergency descent is
working correctly. The lever should return
to neutral position when being pulled
» Push the Emergency Stop and check that
the Ascender is switched off and cannot
be activated by Power button
For a full inspection checklist visit
www.actsafe.se
Page 55

SERVICE &
MAINTENANCE
G
Maintenance and cleaning
of the Ascender G.01
Troubleshooting guide G.02
Page 56
Only use original spare parts and materials
recommended and supplied by ActSafe Systems.
G
G.01 MAINTENANCE & CLEANING
OF THE ASCENDER
Go through ‘Checklist before and after usage’ at every maintenance.
i
RECOMMENDATION
» Wipe the Ascender with a wet cloth
and let it dry. Do not clean the Ascender
with a high-pressure cleaner
» Clean the karabiner thoroughly, lubricate
with thin oil and wipe dry
» Spray the pins with an electronic connector
cleaner/lubricator when needed
Note
Do not use a high-pressure cleaner!
Your annual service and inspection should be
carried out by an ActSafe-authorised service
partner. More frequent inspection intervals
may be required because of local regulations.
Cleaning the Ascender
Basic Inspection Guidance for users and
third party inspection:
To be used safely, each Ascender should meet following
requirements at all times:
» No obvious damage or excessive wear on Ascender
and its components
» Basic function test of ascender including Emergency
Stop and emergency descent (see section F.10)
» 1,25 x SWL dynamic load test; descending full speed
and then stop with max 10 cm slippage
» 1,5 x SWL static load test; no slippage allowed
Page 57

G.02 TROUBLESHOOTING GUIDE
If you need further assistance or are in any doubt
please contact ActSafe Systems or your approved
ActSafe distributor.
Battery is at Charge the Battery
Battery is too cold (below -20°C) Let the Battery warm up
Battery is too hot (above 55°C) Let the Battery cool down
Charger not connected Connect Charger to socket
Battery is too cold (below -10°C) Let the Battery warm up
Battery is worn out Replace the Battery
Charger broken Change charger
Battery is too warm (red LED blinks
on Battery)
Let the Battery cool down
PROBABLE CAUSE REMEDY
BMS shut battery off because of battery
damage or worn out battery
Exchange Battery
Battery does not work
Battery does not charge
PROBLEM
Descent Lever disconnected Gently hold the descending rubber
bulge at the centre and re-position
the descender lever in its slot
Emergency Descent does not work
Page 58

Battery is too warm (red LED blinks
on Battery)
Let the Battery cool down
Battery is too cold (below -20 C) Let the Battery warm up
Emergency Stop engaged Disengage Emergency Stop
Ascender is not switched on Switch the Ascender on
Battery not charged Check battery, charge when empty
Problem with Battery or Power Supply Try another Battery or Power Supply
Distance too far Get closer to Ascender
Power Supply not switched on Activate power supply
Error detected in Ascender Restart: LED Green – OK
LED Red – Contact ActSafe
distributor or ActSafe)
Signal interference Get closer to Ascender
Remote Control from another Ascender Find correct Remote Control
Too short a press on power button Press for 2 seconds
Emergency Stop engaged Disengage Emergency Stop
PROBABLE CAUSE REMEDY
No power
Power LED turns red
Remote control does not connect
PROBLEM
Page 59

Remote Control battery is empty Charge Remote Control
Dirt in Rope Cover Clean Rope Cover
Rope is too soft Use recommended rope/pre-test rope
No power on ascender See ’no power’ section of
trouble-shooting guide
Dirt in locking mechanism Clean and oil locking mechanism
Wrong rope diameter Use recommended rope/pre-test rope
Mechanical damage Contact ActSafe distributor or ActSafe
Rope is not pre-soaked Soak rope
Remote control is operating Ascender
(blue power LED)
Restart Ascender or wait for
Remote to turn off
Worn out rope grab Contact ActSafe distributor or ActSafe
Too much load on the Ascender Reduce the load to SWL or less
Battery not working See Battery section of
troubleshooting guide
PROBABLE CAUSE REMEDY
Remote control does not work
Rope Cover does not lock
Rope slippage in Rope Grab
No Response to Throttle
PROBLEM
Page 60
Page 61

POWER ASCENDERS
WARRANTY TERMS
H
Warranty terms H.01
Page 62

ActSafe Systems AB (“ActSafe”)
guarantees that the ACX Power
Ascender (”Product”) purchased
has no defects due to the use of faulty
parts or poor workmanship during its
manufacture. This is subject to the
terms of the limited warranty
(”Warranty”) given below.
» Any claim will have to be made
within the warranty period which
is one year from delivery unless
otherwise agreed.
» ActSafe will repair or, if necessary
in ActSafe’s opinion, replace any
defective parts and correct any
problems resulting from poor
workmanship, free of charge.
» ActSafe reserves the right to
use reconditioned parts with
performance parameters equal to
those of new parts in connection
with any services performed under
the Warranty.
Claim under ActSafe’s warranty
Claims under ActSafe’s Warranty may
be made only by direct customers of
ActSafe who, upon ActSafe’s request,
can present the original sales invoice
from ActSafe. The Warranty is not
transferable from one user or customer
to another.
H.01 WARRANTY TERMS
Page 63

The Warranty does not apply if:
» A damage or defect has occurred
due to physical breakage, electrical
faults external to the Product, water
penetration of the Product, abuse
or events of force majeure.
» The Product is modied, maintained
or repaired by a party not authorized
by ActSafe.
» The Product is maintained and
operated in ways other than
recommended by ActSafe.
» The serial number stickers have
been removed or tampered with.
» A non-ActSafe certied product
is added to the Product.
Warranty Limitations
The Warranty does not extend to parts
or Products requiring replacement due
to normal wear and tear, corrosion, rust,
stain, etc.
Any service, repair or replacement
outside the scope of the Warranty shall
be subject to the rates and terms of
the ActSafe approved service centre
performing such service.
ActSafe disclaims all other
warranties, express or implied or
statutory, including, but not limited
to the implied warranties of
merchantability or tness for a
particular purpose. Any implied
warranty that may be imposed
by applicable law is limited to the
duration of this Warranty.
Limited liability and applicable law
The customer agrees that repair or
replacement, as applicable, under the
warranty services described herein are
the sole and exclusive remedies with
respect to any breach of the Warranty.
In no case shall ActSafe be liable
for any indirect, incidental, special
or consequential loss or damage of
whatsoever nature.
ActSafe’s sales and delivery of
Products, as well as this Warranty,
shall be governed by Swedish law,
unless otherwise agreed in writing.
Page 64
Page 65

TECHNICAL DATA
I
Technical data 1.01
Page 66

VALUE COMMENT
PERFORMANCE/PART
Rope
Personnel Lifting – EN1891A
11 mm, Equipment Lifting –
ActSafe ELR
Rope must be soaked before rst use.
See section C.01
Safe Working Load (SWL)
200 kg
Ascent speed
0-24 m/min
Descent speed
0-25 m/min
Emergency descent speed
0-25 m/min
Battery range
200 m with 100 kg load At 20°C, continuous ascending. See section E.05
Charging time
80 min
Temperature range
-20°C to + 40°C
Over heating protection
Yes
Ascender weight
10.5 kg Ascender weight with battery is 13 kg
Battery weight
2.5 kg
Dimensions
33 x 28 x 27 cm
Remote Control
Range – up to 150 m
Radio frequency – 2.4 GHz
The remote must have visual contact with
the Ascender to ensure maximal safety and range
Water/dust resistance
IP 55 Dependant on model. See machine rating sign
Noise level
76 dB
Max windspeed
12 m/s Weather conditions should be stable and favourable
to not affect the safety of personnel and/or
lifting operation
 Loading...