

Page 1

Using Mailbox Manager
Page 2

© 2002 Active Voice LLC
All rights reserved.
First edition 2002.
Repartee and TeLANophy are trademarks of Active
Voice LLC.
To access your mailbox by computer
1. Launch Mailbox Manager.
2. When the system greets you, enter:
Host name _______________________________________________________
Extension ________________________________________________________
Active Voice LLC
Seattle, Washington
U.S.A .
www.activevoice.com
Security Code ____________________________________________________
To access your mailbox by phone from inside your organization
1. Call the voice messaging system.
2. When the system greets you, enter:
Personal ID ______________________________________________________
Security Code ____________________________________________________
For assistance, call:
Name ___________________________________________________________
Extension
________________________________________________________
Page 3

Changing your mailbox setup
This guide replaces the “Changing your
mailbox setup” section of the User
Guide.
Mailbox Manager allows you to control
your personal mailbox settings, such
as:
• Your profile
• Security code
• Recorded and spelled names
• Greetings
• Playback options
• Call transfer options
• Call screening options
• Call holding options
• Message delivery options
• Message groups
You can also change most of these
setup options for your personal mailbox
by phone. When you make a change,
the system leads you step by step
through a series of simple yes-and-no
questions.
To make changes to your TeLANophy
applications, refer to the application’s
online Help.
▲
1
Page 4
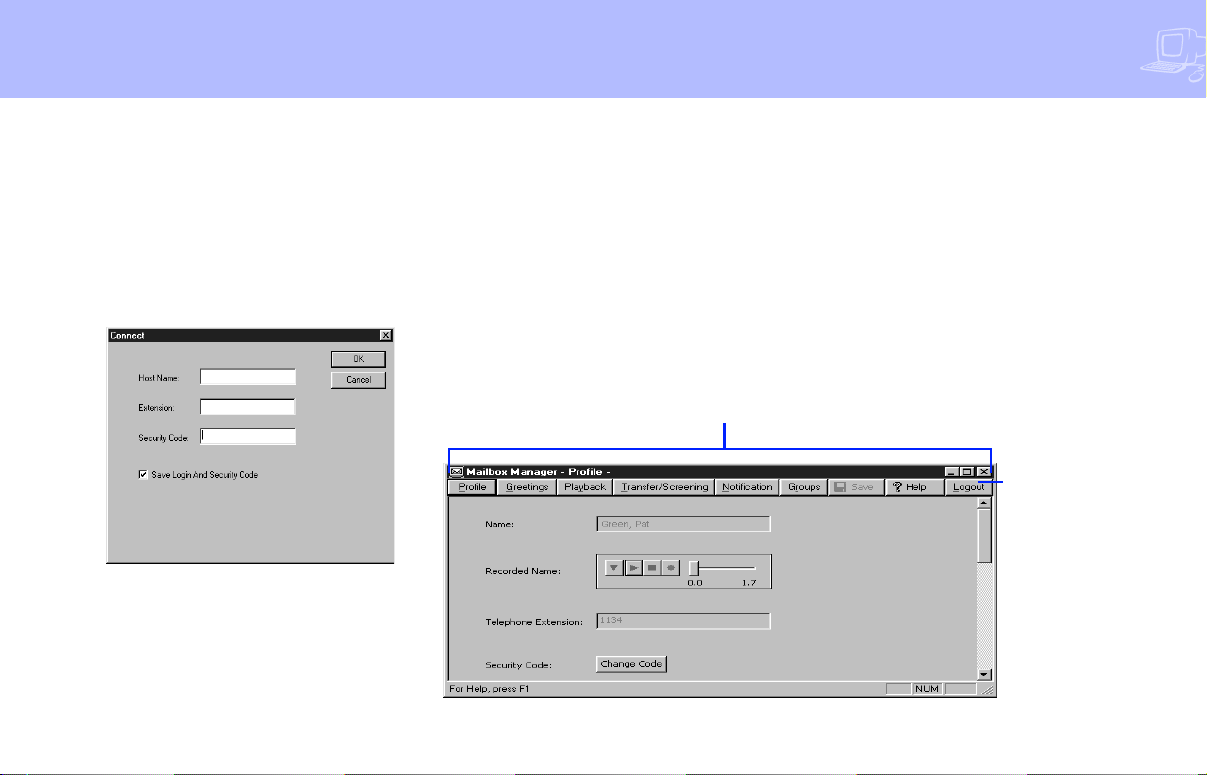
Working with the Mailbox Manager
The Mailbox Manager allows you to control how you and your callers interact
with the voice messaging system by
phone.
The first time you use the Mailbox Manager, you enter the host name, your
extension, and your security code in the
connect dialog box. .
The menu bar allows you to navigate
through the screens of the Mailbox Manager.
TIP:Click “Save” frequently to save
changes as you make them. If you move
to another screen within Mailbox Manager without saving changes first, you
are prompted to save before proceeding.
Menu bar
The Profile screen is where the system
stores your name, extension number, fax
ID, delivery number, and other settings.
Always click
Logout to exit
CHANGING YOUR MAILBOX SETUP
▲
2
Page 5
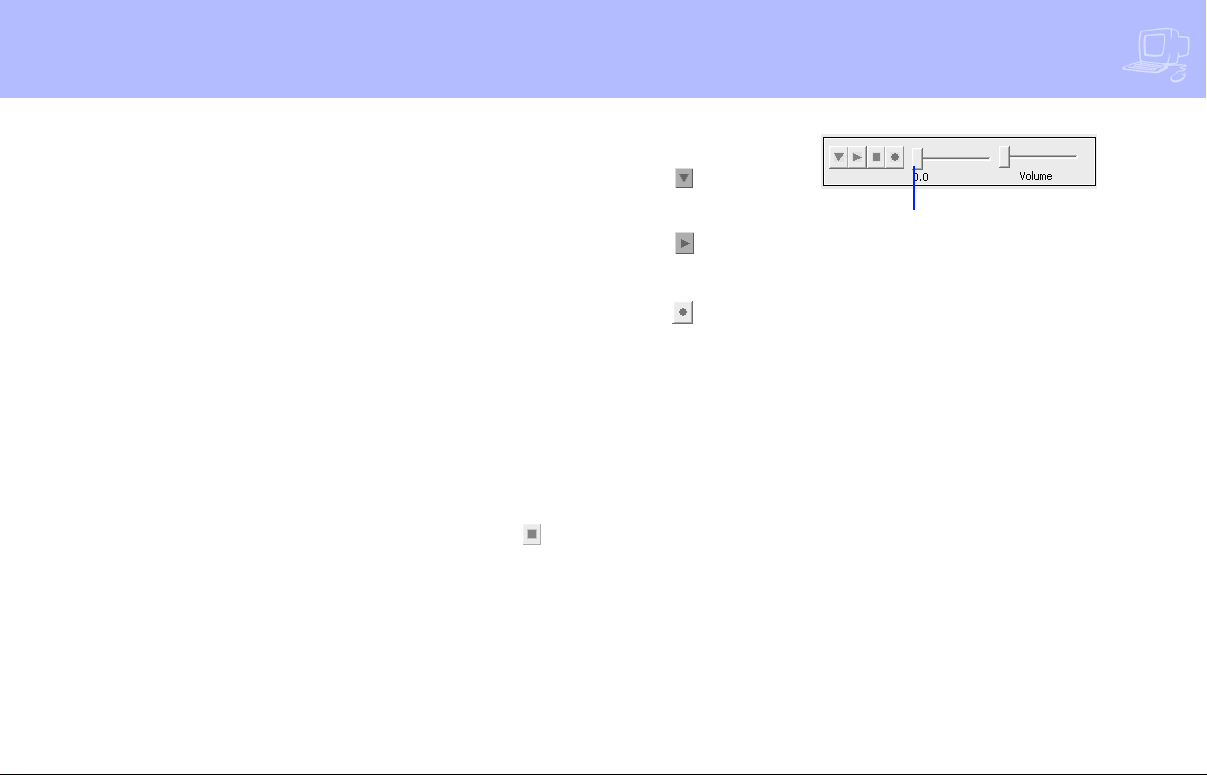
To change your profile
To use the Control bar
a Access the Mailbox Manager (see
b Click “Profile.”
c Confirm and change settings as
d Click “Save.”
TIP:You must select a recording device
before you can record greetings, your
recorded name, or the names of groups.
If your computer is equipped with a
microphone and speakers, select “My
computer.” Otherwise, select “My
phone.”
▲
3
REPARTEE USER GUIDE
inside front cover).
needed.
a On the control bar, click to select
phone or computer playback.
b On the control bar, click to listen
to your recorded name.
c On the control bar, click to record
your name with your recording
device:
Phone: Pick up the handset when the
phone rings, wait for the beep, then
speak into the handset.
Computer: Wait for the tone, then
speak into the microphone.
d Click to stop recording.
Drag slider to skip forward
or back in the recording
Page 6
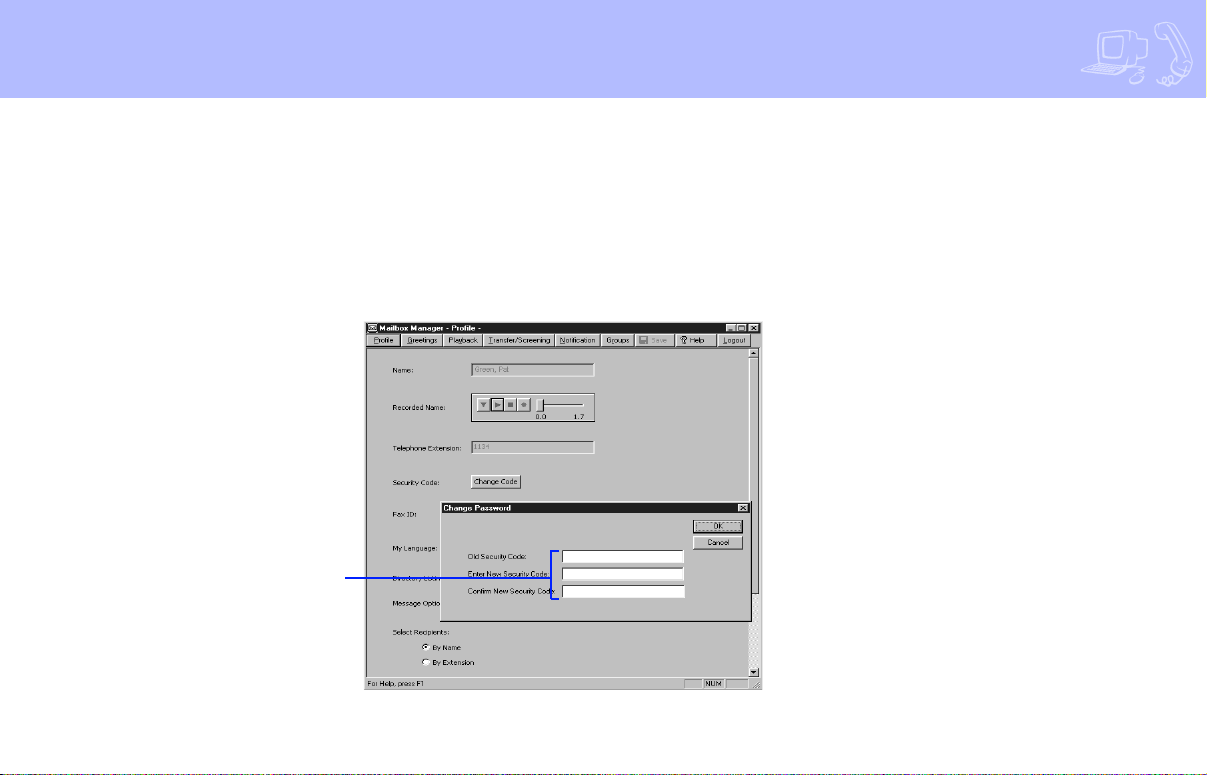
Changing your security code
Your security code prevents others from
using your personal ID to listen to your
messages. Change your security code as
often as you like. Your security code
should be four to ten digits long.
If you forget your security code, contact
your system manager.
Type old and new security
codes here
To change your security code
by computer
a Access the Mailbox Manager (see
inside front cover).
b Click “Profile.”
c Click “Change Code.”
d In the Change Security Code dialog
box, type your old and new passwords in the corresponding fields.
e Click “OK,” and then click “Save.”
To change your security code
by phone
a Access your mailbox by phone (see
inside front cover).
b Enter 7 7 4 to change your security
code.
c Follow the system instructions. Enter
1 for Yes, 2 for No.
TIP:When you change your mailbox
security code, update your TeLANophy
security code. See “To change mail and
service options” in ViewMail online
Help or “Changing mail and service
options” in ViewMail for Microsoft Messaging online Help.
CHANGING YOUR MAILBOX SETUP
▲
4
Page 7

Changing your recorded and spelled names
The system uses your recorded name
to identify both you and your messages
to other callers. You can change your
spelled name only by phone. If your
phone keypad has letters, you can also
spell your name for the system.
The system uses your spelled name for
the directory. Callers can enter the first
letters of your name to locate you in
the directory. You can also remove your
name from this directory.
To add or remove your name
from the directory by phone
a Access your mailbox by phone (see
inside front cover).
b Enter 7 7 7 to change your directory
listing.
c Follow the system instructions to
change your spelled name. Enter 1
for Yes, 2 for No.
To change your recorded
name by computer
a Access the Mailbox Manager (see
inside front cover).
b Click “Profile.”
c On the Control bar, click to
record your name with your recording device:
Phone: Pick up the handset when
the phone rings, wait for the beep,
then speak into the handset.
Computer: Wait for the tone, then
speak into the microphone.
d Click to stop recording.
To change your recorded
name by phone
a Access your mailbox by phone (see
inside front cover).
b Enter 7 7 5 to change your recorded
name.
c Follow the system instructions to
record your name. Enter 1 for Yes, 2
for No.
To change your spelled name
by phone
a Access your mailbox by phone (see
inside front cover).
b Enter 7 7 6 to change your spelled
name.
c Follow the system instructions to
change your spelled name. Enter 1
for Yes, 2 for No.
▲
5
REPARTEE USER GUIDE
Page 8

Changing your greetings
Callers hear a greeting before they leave
a message. Your mailbox can have one
of three greetings: standard, busy, or
alternate. You can rerecord or switch
between greetings by phone or by computer.
If the system has been configured for
message notification to your pager, add
the following message to your greeting:
“or press 1 to beep my pager.”
Standard greeting
The standard greeting plays when your
extension is unanswered. A typical
standard greeting is: “Hello, this is Pat
Green. I am not at my desk right now.
Please leave a message.”
Busy greeting
The busy greeting plays when your
extension is busy.* A typical busy
greeting is: “Hello, this is Pat Green. I am
on the phone now. Please leave a
message.” For callers to hear your busy
greeting, you must activate it.
If you do not want to use a separate
busy greeting, then record a standard
greeting for all situations when you are
unavailable. For example: “Hello, this
is Pat Green. I am not available at this
time. Please leave a message.”
Alternate greeting
The alternate greeting plays for special
occasions, such as a vacation. A typical
alternate greeting is: “Hello, this is Pat
Green. I am out of the office today and
will return tomorrow.”
When your alternate greeting is active,
the system plays it instead of any of your
other greetings.
System-generated greetings
If you do not record greetings in your
own voice, the system plays greetings
that include your recorded name or your
extension. For example:
• For a standard greeting, “Pat Green is
not available right now.”
• For a busy greeting, “Extension 1 2 3
is busy.”
• For an alternate greeting, “Pat Green
is out today.”
To switch between your
greetings by computer
a Access the Mailbox Manager (see
inside front cover).
b Click “Greetings.”
c From the “Choose a greeting” list
box, select a greeting.
d For “This greeting is,” select the
“Enabled” check box.
e Click “Save.”
* This feature may not be available at your site.
CHANGING YOUR MAILBOX SETUP
▲
6
Page 9
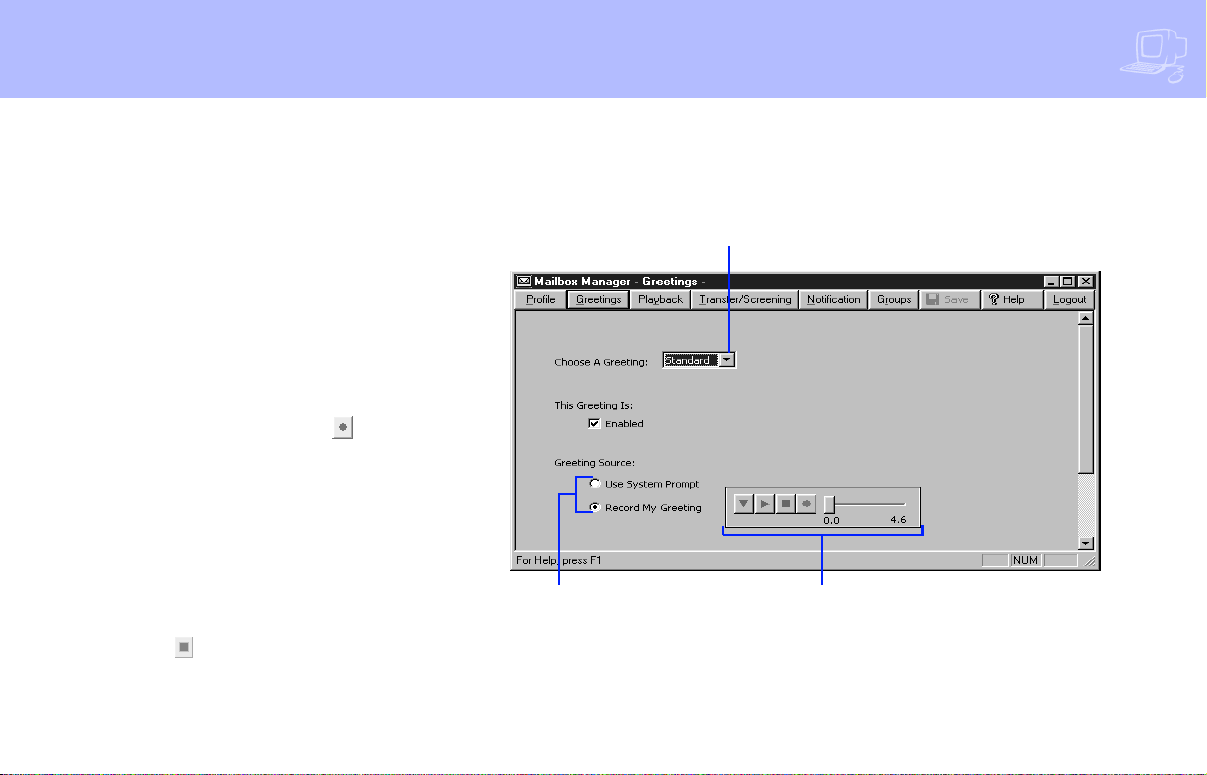
To rerecord your standard,
alternate, or busy greeting by
computer
a Access the Mailbox Manager (see
inside front cover).
b Click “Greetings.”
c From the “Choose a greeting” list
box, select the greeting to rerecord.
d For “Greeting source,” click “Record
my greeting.”
e On the Control bar, click to
record the greeting with your recording device:
Phone: Pick up the handset when
the phone rings, wait for the beep,
then speak into the handset.
Choose a greeting
list box
f Click to stop recording.
▲
7
REPARTEE USER GUIDE
Computer: Wait for the tone, then
speak into the microphone.
Greeting source
Control bar
Page 10

To switch between your standard and alternate greeting
by phone
a Access your mailbox by phone (see
inside front cover).
b Enter 7 4 5 to switch to your other
greeting (standard or alternate).
To rerecord your standard,
alternate, or busy greeting by
phone
a Access your mailbox by phone (see
inside front cover).
b To rerecord your:
• standard greeting, enter 7 4 6 1.
• alternate greeting, enter 7 4 7 1.
• busy greeting, enter 7 4 8 1.
c Enter ✱ to stop recording.
To activate your busy
greeting by phone
a Access your mailbox by phone (see
inside front cover).
b Enter 7 4 8 to hear your busy greet-
ing.
c Follow the system instructions to
activate your busy greeting. Enter 1
for Yes, 2 for No.
CHANGING YOUR MAILBOX SETUP
▲
8
Page 11

Playback options
The Playback options screen stores settings for how messages are played.
These options are not available by
phone. Without Mailbox Manager, you
need to ask your system manager to
change these options. The Playback
options consist of:
Announce
New e-mail messages If the optional
e-mail integration package is installed, the system includes new
e-mail messages in the total when
announcing the number of new messages.
Voice message length The system
announces the total length, in minutes, of new voice messages.
Telephone conversation type
Menu mode conversation This con-
versation plays menus of options.
Enter the number associated with the
option to perform the particular task.
Yes/No conversation This conversation leads you step by step through all
of your options with easy, yes-and-no
questions. Enter 1 for Yes, 2 for No.
Voice message time stamp
Announce timestamp before
messages The system plays the time
and date that the message was
recorded before playing the message.
Announce time stamp after
messages The system plays the time
and date that the message was
recorded after playing the message.
▲
9
REPARTEE USER GUIDE
Page 12
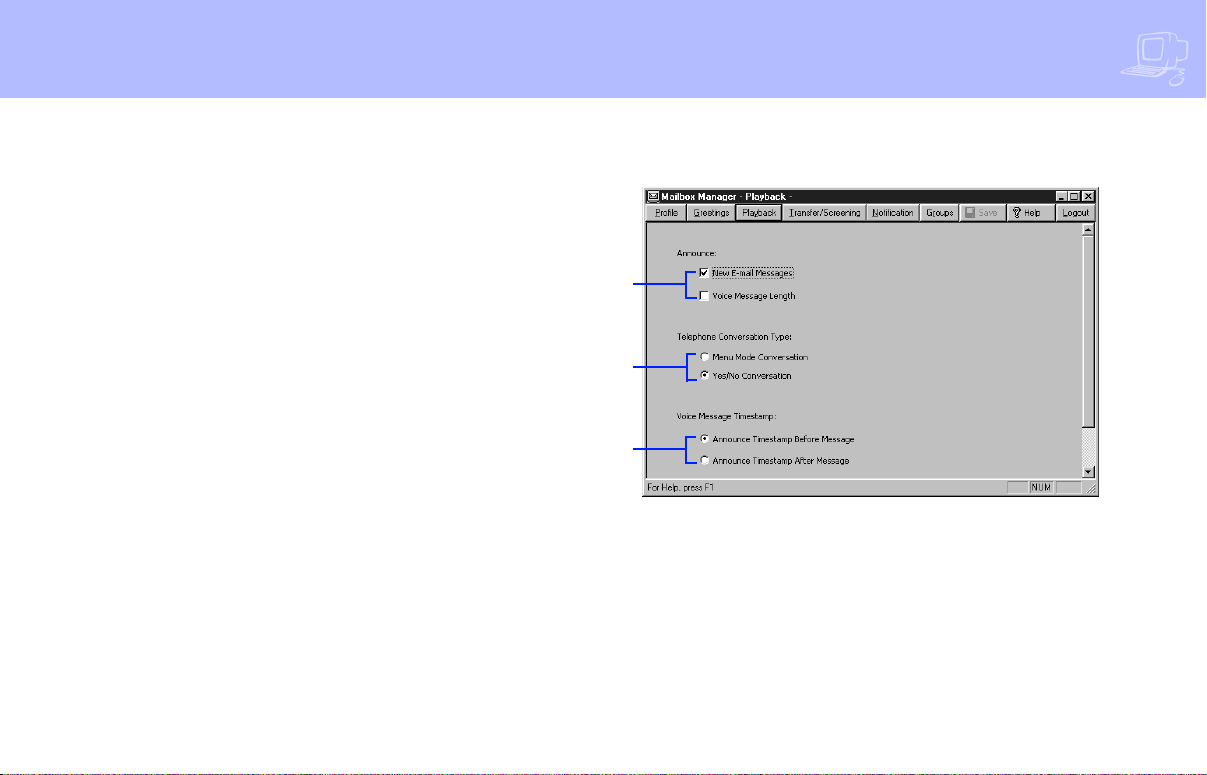
To change your playback
options by computer
a Access the Mailbox Manager (see
inside front cover).
b Click “Playback.”
c Confirm and change the settings as
needed.
d Click “Save.”
Announce options
Conversation options
Listening to a
message options
CHANGING YOUR MAILBOX SETUP
▲
10
Page 13

Changing call transfer options
T
T
The voice messaging system is set up
to transfer calls to your extension just
as a receptionist would. When you are
unavailable or on another call, the system takes a message for you. If you will
be away for a while, you can turn off call
transfer or have your calls transferred to
a different phone number.
Turn on call transfer before transferring
your calls to a different phone number.
You can enter up to nine digits for the
new phone number..
b Enter 7 6 4 to turn call transfer on or
off.
c Follow the system instructions. Enter
1 for Yes, 2 for No.
To change the number to
which calls are transferred by
phone
a Access your mailbox by phone (see
inside front cover).
b Enter 7 6 4 1 4 to change the number
to which your calls are transferred.
c Follow the system instructions. Enter
1 for Yes, 2 for No.
To turn call transfer on or off
by phone
a Access your mailbox by phone (see
inside front cover).
SEE ALSO
IP: T I P : TIP:
IP: TIP: TIP:
Changing call screening options ............13
Changing call holding options................ 15
11
▲
REPARTEE USER GUIDE
Page 14
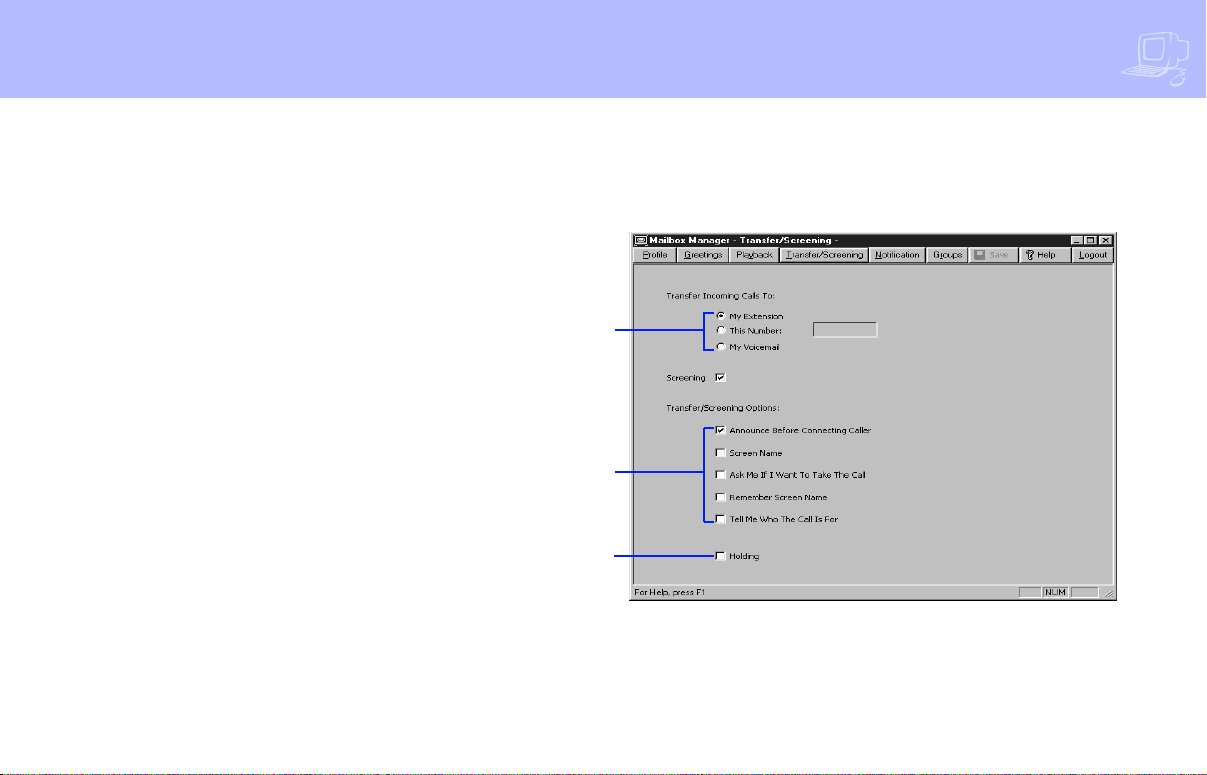
To turn call transfer on or off
by computer
a Access the Mailbox Manager (see
inside front cover).
b Click “Transfer/Screening.”
c To turn call transfer on, for “Transfer
incoming calls to,” select “My extension.” To turn call transfer off, select
“My voicemail.”
d Click “Save.”
To change the number to
which calls are transferred by
computer
a Access the Mailbox Manager (see
inside front cover).
b Click “Transfer/Screening.”
c For “Transfer incoming calls to,”
select “This number.” Type the
phone number or extension.
d Click “Save.”
Turn transfer on or
off here
Select screening
options here
Turn holding on or
off here
CHANGING YOUR MAILBOX SETUP
▲
12
Page 15

Changing call screening options
When available, the system can use a
variety of call screening options.* You
can select these options on the Transfer/
Screening screen of the Mailbox Manager.
These options are not available by
phone. If your system manager has set
up call screening for your extension, you
can only turn call screening on and off
by phone.
What you hear when you pick up the
phone depends on which of the following options you have selected.
Announce before connecting caller
The system plays a beep before transferring the call.
* This feature may not be available at your site.
Screen Name The system asks the
caller’s name before ringing your
extension. The system plays “Call
from <caller’s name spoken by the
caller>” before transferring the call.
Ask me if I want to take the call The
system says “Enter 1 to take the call,
or 2 and I’ll take a message” and then
waits for a response from you before
transferring the call.
Remember Screen Name The systems asks and plays the caller’s name
as above, and if the caller leaves a
message, will append the caller’s
name to the beginning of the message.
Tell me who the call is for The system says, “Call for <your name>”
before transferring the call.
Two or more of these options may be
combined. For example, if you select
“Screen name” and “Ask me if I want to
take the call,” the system asks the caller’s
name, then rings your extension. When
you answer the call, the system plays the
caller’s recorded name, then asks if you
want to take the call.
13
▲
REPARTEE USER GUIDE
Page 16
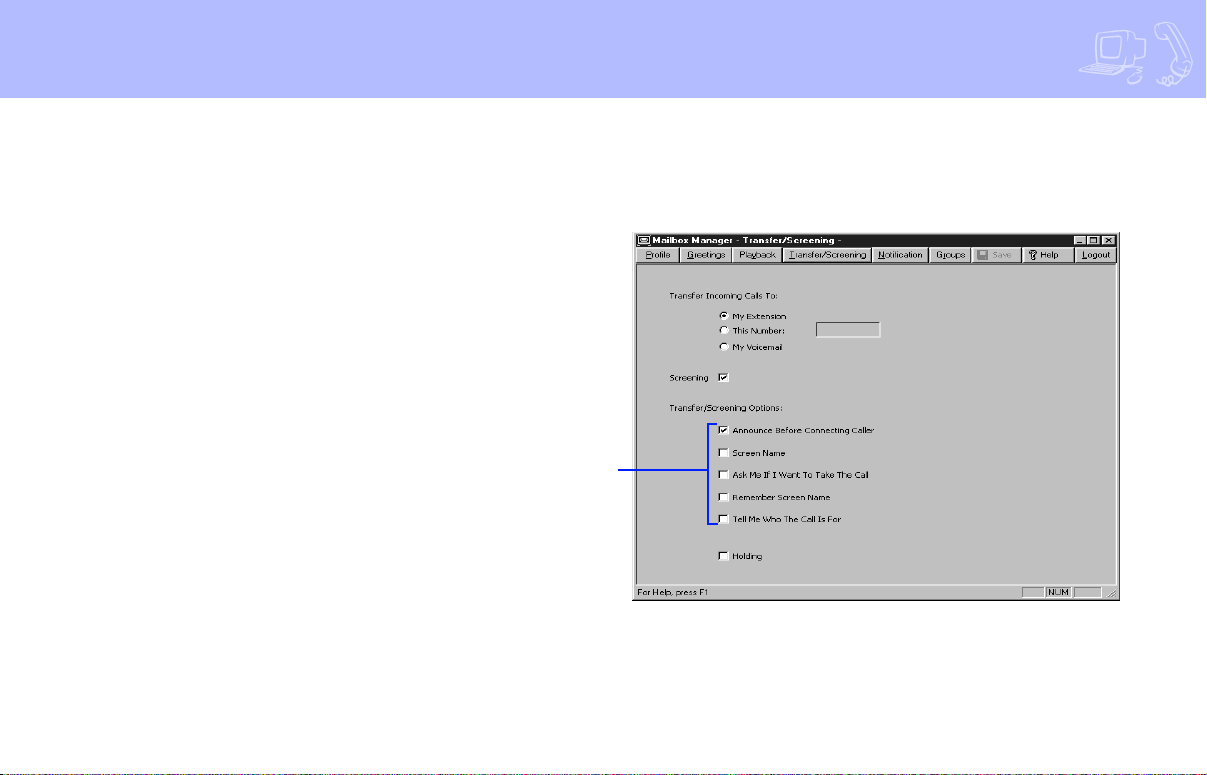
To change call screening
options by computer
a Access the Mailbox Manager (see
inside front cover).
b Click “Transfer/Screening.”
c Select the “Screening” check box.
d Select the transfer/screening options
as needed.
e Click “Save.”
To turn call screening on or off
by phone
a Access your mailbox by phone (see
inside front cover).
b Enter 7 6 4 1 5 to turn call screening
on or off.
c Enter 1 to turn call screening on.
Enter 2 to turn it off.
Select screening
options here
CHANGING YOUR MAILBOX SETUP
▲
14
Page 17

Changing call holding options
The system can hold a call until your
extension is available.* When call holding is turned on and your extension is
busy, the system asks callers if they want
to hold until you are available or to leave
a message. The system also tells callers
how many calls are holding ahead of
theirs.
If your system manager has set up call
holding for you, you can turn call holding on and off. Your system manager sets
the number of calls that the system can
hold for you.
* This feature may not be available at your site.
To turn call holding on or off
by computer
a Access the Mailbox Manager (see
inside front cover).
b Click “Transfer/Screening.”
c To turn call holding on, select the
“Holding” check box. To turn it off,
clear the check box.
d Click “Save.”
To turn call holding on or off
by phone
a Access your mailbox by phone (see
inside front cover).
b Enter 7 6 4 1 6 to turn call holding on
or off.
c Enter 1 to turn call holding on. Enter
2 to turn it off.
15
▲
REPARTEE USER GUIDE
Page 18
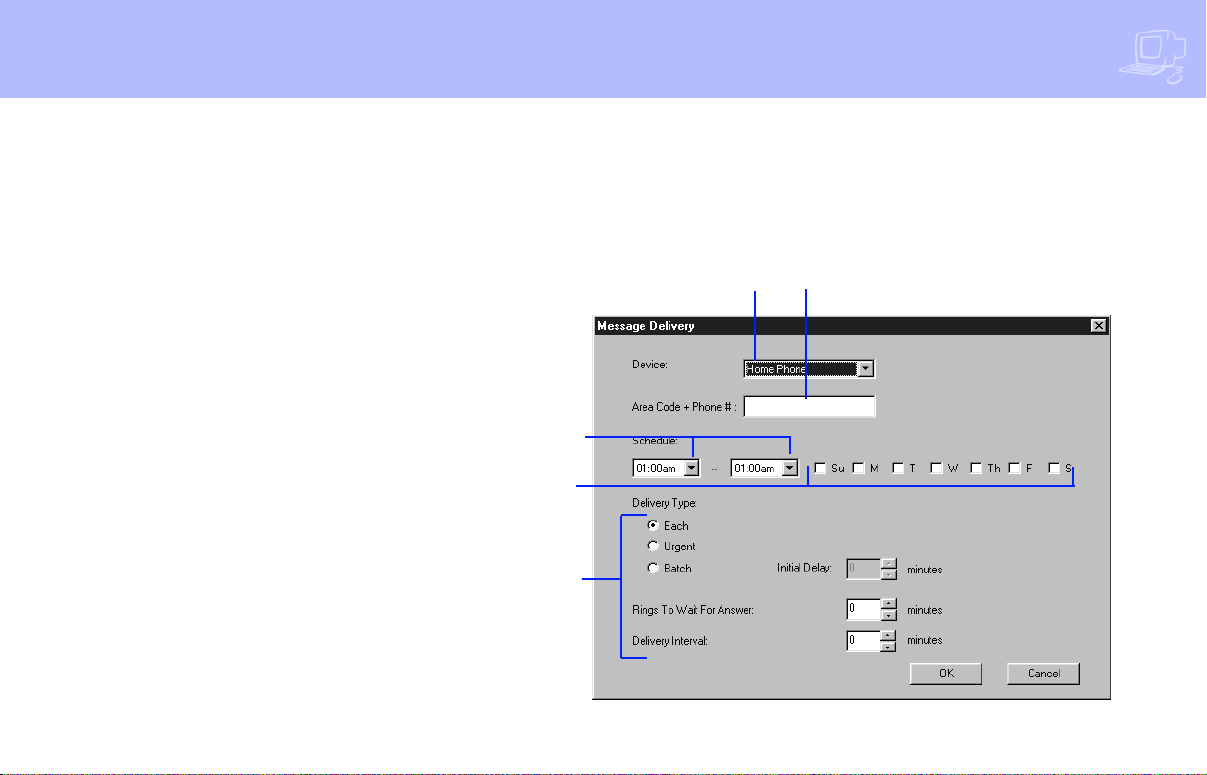
Changing message delivery options
The system can deliver messages to several different phone numbers. You can
set a range of minutes, hours, and days
that a message delivery phone number
is in effect. You can set the system to
deliver only urgent messages. You also
can set the system to delay message
delivery to any of the numbers.
To change message delivery
options by computer
a Access the Mailbox Manager (see
inside front cover).
b Click “Notification.”
c To edit a message delivery device,
select the device and click “Edit.”
To add a new device, click “Add.”
d On the Message Delivery screen,
confirm and change the settings as
needed and click “OK.”
e Click “Save.”
TIP:
Times to deliver
messages
Days to deliver
messages
Types to deliver
and how often
Name of the device
Phone number
to reach device
CHANGING YOUR MAILBOX SETUP
▲
16
Page 19

If changing message delivery by phone,
you may not be able to enter a pager
number that requires special dialing
characters (for example, a semicolon
that represents a three-second pause).
Contact your system manager for assistance.
TIP:Enter # to insert a one-second pause
where you want the system to pause
between digits that it is dialing.
To change message delivery
by phone
a Access your mailbox (see inside front
cover).
b To change your message delivery
options for your:
• work phone, enter 7 6 6 5 4.
• home phone, enter 7 6 6 5 5.
• pager, enter 7 6 6 5 6.
• spare phone, enter 7 6 6 5 7.
• fax phone, enter 7 6 6 5 8.
c Enter 1 to turn on delivery for that
number or 2 to turn off delivery.
d Enter 4 to change the phone
number. After you enter a phone
number, enter ✱ to end the entry.
e Enter 5 to change the schedule, and
then follow the system instructions.
Enter 1 for Yes, 2 for No.
f Enter 6 to change the delivery mode
for messages delivered to this
number, and then follow the system
instructions. Enter 1 for Yes, 2 for No.
g Enter 7 to change fax notification,
and then follow the system instructions. Enter 1 for Yes, 2 for No.
h Change any remaining message
delivery numbers by repeating the
procedure.
17
▲
REPARTEE USER GUIDE
Page 20

Creating groups
You can create your own message
groups. When you send a message to a
group, the message is sent to all members of the group. Each group you create
has a number or a name.
There are three types of message groups:
private, open, and local access. When
you create a private group, only you can
send messages to it. When you create an
open group, other subscribers also can
send messages to it. When you create a
local access group, only subscribers calling from an extension within the company can send messages to it.
To create a group by phone
a Access your mailbox (see inside front
cover).
b Enter 7 5 4 to create a new group.
c For numbered groups, enter a three-
digit group number. For named
groups, enter the first three letters of
the group’s name.
d Record a name for the group.
Enter ✱ when you are finished.
e Enter 1 to make the group an open
group or 2 to make it a private group.
f Follow the system instructions to
add members to the group. You can
add them by name or extension
number.
g Enter ✱ when you are finished add-
ing members.
h Enter 1 to leave a message for this
group now. Otherwise, enter 2.
TIP:Guests do not have extension numbers, so add them to the group by spelling their names or by entering their
personal IDs.
CHANGING YOUR MAILBOX SETUP
▲
18
Page 21
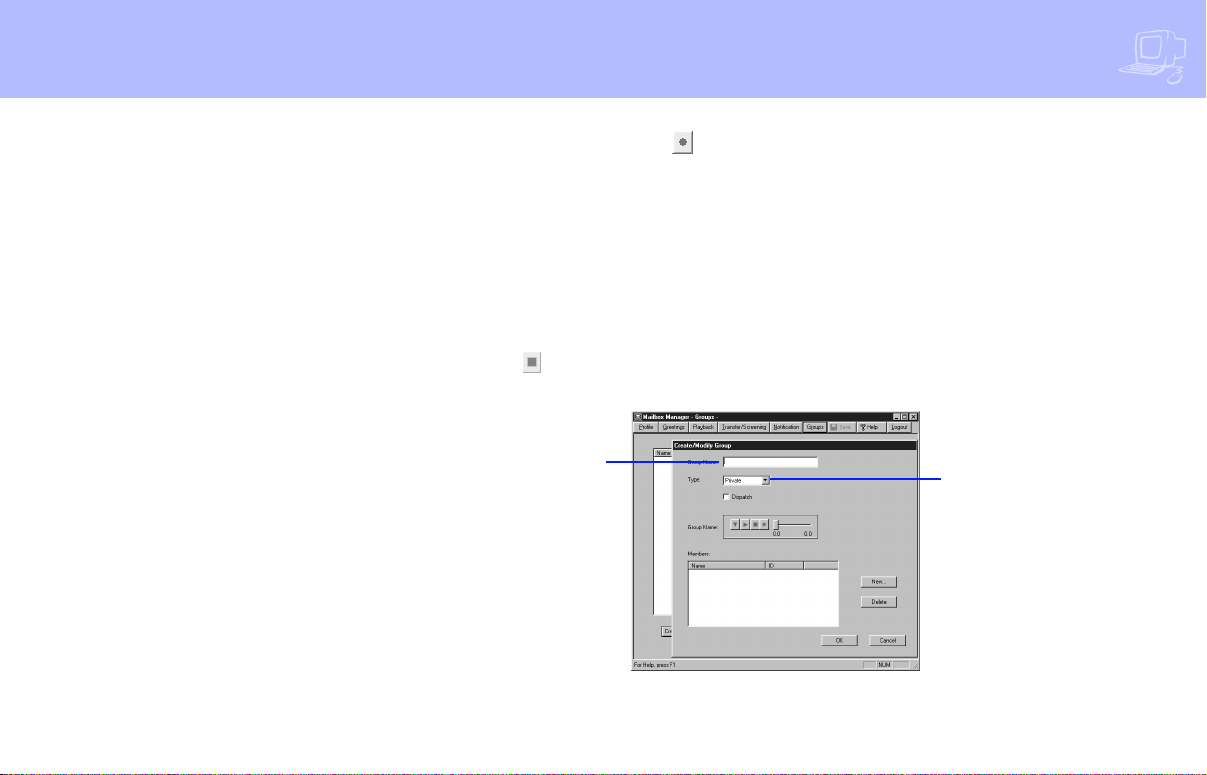
To create a group by computer
a Access the Mailbox Manager (see
inside front cover).
b Click “Groups.”
c Click “Create Group.”
d In the Create/Modify Group dialog
box, type a name for the group.
e Select a type for the group.
f If the group will be used to dispatch
messages to the first member available, select the “Dispatch” check
box. Otherwise, each message sent
to the group will be delivered to all
members.
g On the control bar, click to record
the group name with your recording
device:
Phone: Pick up the handset when
the phone rings, wait for the beep,
then speak into the handset.
Computer: Wait for the tone, then
speak into the microphone.
h Click to stop recording.
Group name
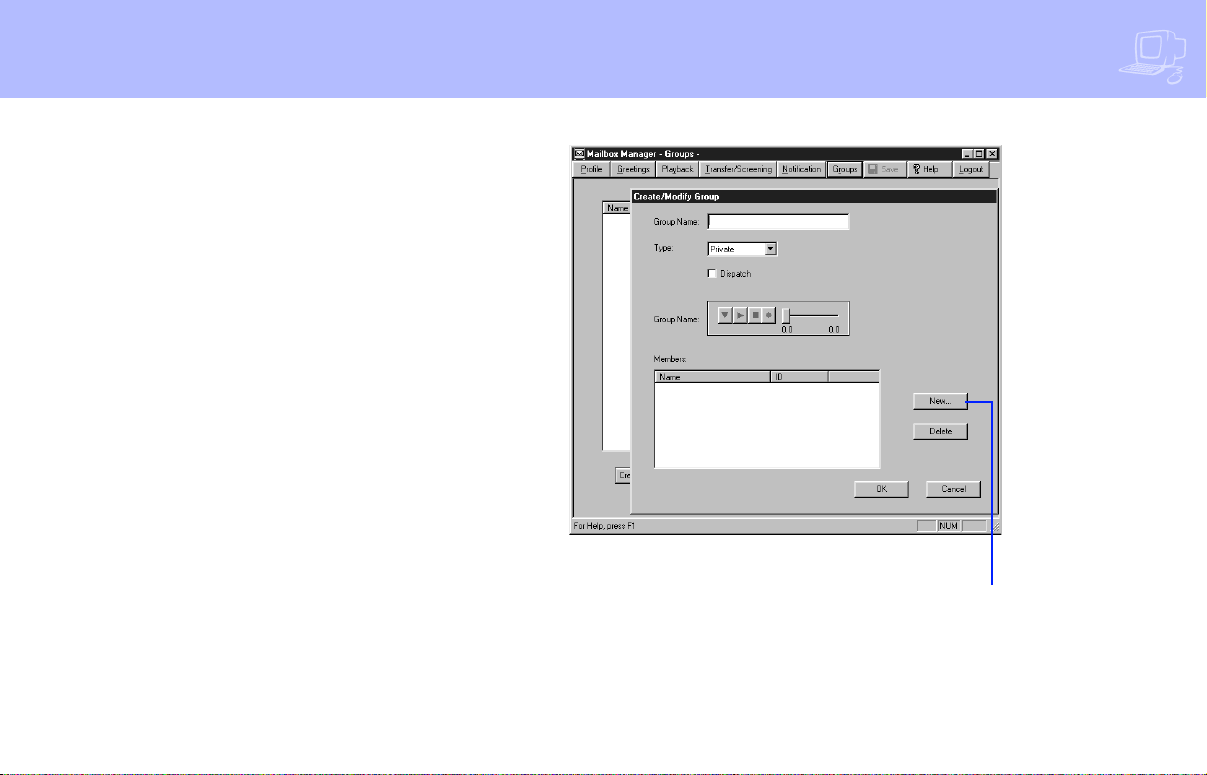
i To add members to the group, click
“New.” Use the Member Properties
dialog to search for enrolled subscribers.
j When you are finished adding mem-
bers, click “OK.”
k Click “OK” to accept the group.
l Click “Save.”
Group type
19
▲
REPARTEE USER GUIDE
Page 22
Changing groups
You can add and delete members of your
message groups.*
You also can delete any message group
that you own, or change the group’s
number, spelled name, or recorded
name.
To change a group by computer
a Access the Mailbox Manager (see
inside front cover).
b Click “Groups.”
c Select the group you want to edit.
Click “Modify Group.”
d In the Create/Modify Group dialog
box, make the desired changes and
click “OK.”
e Click “Save.”
Click to open list of enrolled
subscribers
* This feature may not be available at your site.
CHANGING YOUR MAILBOX SETUP
▲
20
Page 23

To add or delete group
members by phone
f Enter ✱ when you are finished add-
ing or deleting members.
To hear a list of your groups and
group members by phone
21
a Access your mailbox (see inside front
cover).
b Enter 7 5 5 to edit a group.
c Enter the group name or group
number. Enter 2 until you hear the
name of the group you want, then
enter 1.
d Enter 4 to add members to a group.
Or enter 5 to delete members from
the group.
When deleting group members,
enter the first three letters of the person’s last name, or enter three wild-card
numbers (for example, 1 1 1) to list
each group member, then choose the
member’s name you want to delete.
e To confirm your additions or dele-
tions, enter 1.
▲
REPARTEE USER GUIDE
To change a group name or
number by phone
a Access your mailbox (see inside front
cover).
b Enter 7 5 5 to change a group name
or number.
c Enter the first three letters of the
group name. Or, enter the first three
digits of the group number.
d Enter 1 to confirm, or enter 2 to hear
the name of the next group.
e Enter 7 to change the group name or
group number.
f Follow the system instructions to
change the group’s recorded name.
Enter 1 for Yes, 2 for No.
a Access your mailbox (see inside front
cover).
b Enter 7 5 6 to list your groups and
group members.
c Follow the system instructions. Enter
1 for Yes, 2 for No.
Page 24

 Loading...