

Page 1

■
ONLINE DOCUMENT
ONLINE DOCUMENT
ONLINE DOCUMENTONLINE DOCUMENT
Quick Start Installation Guide
Quick Start Installation Guide
Quick Start Installation GuideQuick Start Installation Guide
To print this booklet
a On the File menu, click “Print.”
b To print the entire booklet, click “OK.”
To print a portion of the bo okle t, ty pe a ran ge of pa ge s, then c lick
“OK.”
1
Page 2

Page 3

Page 4

© 2001 Active Voice Corporation.
All rights reserved.
First edition 2001.
Lingo is a trademark of Active Voice Corporation.
Protected by one or more of the following United States patents: 5,070,526;
5,434,906; 5,488,650; 5,533,102; 5,568,540; 5,581,604; 5,625,676;
5,651,054; 5,940,488; 6,041,114.
Additional U.S. and foreign patents pending.
Active Voice Corporation
Seattle, Washington
U.S.A.
www.activevoice.com
Writer: Anita Taylor
Editor: Conrad Wesselhoeft
Graphic artists: Janet Joseph, Gene Breshears
Project Manager: Anita Taylor
800-03903
Page 5

Contents Installation overview............................................................................... 2
Completing the site information...........................................................8
Configuring voice messaging ports.....................................................10
Setting up the operator box.................................................................. 11
Determining system schedules............................................................ 12
Setting up the default subscriber.........................................................13
Selecting message management options............................................14
Adding subscribers at the console.......................................................15
Setting up the phone system integration............................................ 16
Creating transaction boxes...................................................................20
Using reports to monitor the system...................................................28
Recording greetings and prompts....................................................... 32
Testing the system after installation.................................................... 37
Running the Learn Tones utility ..........................................................38
Training.................................................................................................. 41
Maintaining the system........................................................................ 43
Enabling multiple languages................................................................44
Performing a port upgrade................................................................... 46
Troubleshooting....................................................................................47
1
Page 6

Installation overview
This overview offers general guidelines for setting up and configuring
a new Lingo system installed on a Dialogic VoiceBrick hardware unit.
Procedures for customizing Lingo features to meet customer needs
are provided for each system screen. Additional information about
console screen fields and conceptual topics are located in online Help.
Lingo documents available to installers on the Lingo customer CD and
on the Active Voice dealer web site are the User Gu ides , the System
Administration Guide, and the Quick Start Installation Guide.
To set up Lingo at a customer site
1
Unpack the system components.
2
Choose where to put the voice messaging system and complete
the steps listed on the Dialogic W all-Mounting Template included
with the unit.
3
Connect the voice lines from the phone system to the Dialogic
VoiceBrick ports, using RJ11 cables.
4
Plug the VoiceBrick power suppy into a compatible wall outlet.
5
Attach a null modem cable from your laptop computer’s serial
COM port to the VoiceBrick’s COM2 port.
6
Connect to Lingo using CoSession or anothe r remote program. If
you need to install CoSession Remote, see “Installing CoSession
version 7.0 on a support computer” on page 4.
7
Configure the voice messaging system application screens to
meet the customer’s needs. Begin with “Completing the site
information,” on page 8. The bottom of each screen lists the
most frequently used navigational keystrokes for that screen. To
access online Help, press F1.
8
Run the Learn Tones utility. See “Running the Learn T ones utility,”
on page 38.
9
Test the extensions. See “Testing the system after installation” on
page 37.
10
Set up a new system manager ID and train the system manager.
See “Training” on page41.
2
QUICK START INSTALLATION GUIDE
Page 7
Remote Site
Modem
11
Add a password to the default system manager ID to protect the
customer’s system from unauthorized access.
12
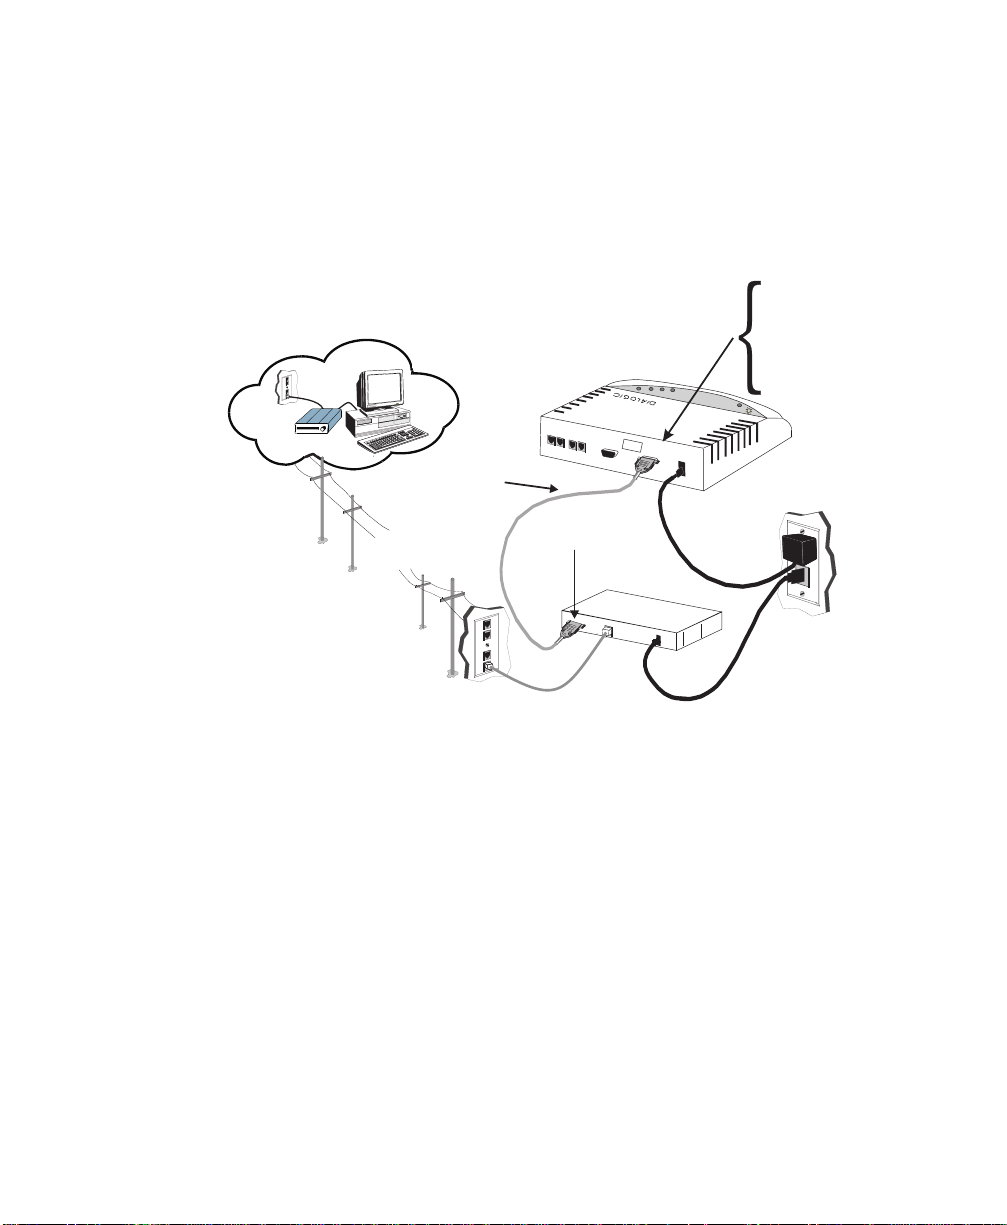
Set up a modem to provide remote access to the customer’s sys-
tem, according to the illustration below.
VoiceBrick default
Use the Datalight
ROM-DOS Comm
program or another
such as HyperTerminal
Serial
Modem Cable
1
III
III
IIII
1
I0I0I
~
24 VAC
2
0.4A50-60Hz
Comm parameters:
- 115,200 bps
- 8 data bits
- 1 stop bit
- parity none
- flow control none
Public
Telephone Network
(Central Office)
Serial
COM Port
Set to
auto-answer
MODEM
Illustration copyright 2000 Dialogic Corporation.
Continued
3
Page 8

Installing CoSession version 7.0 on a support computer
Lingo systems are shipped with CoSession version 7.0 Host software
pre-installed. If you have not already done so, install CoSession
VM/Remote software on your support computer to remotely access
and control a customer site (host) voice messaging system and to
transfer, update, and maintain voice messaging system files.
Microsoft Windows 95 or Windows 98 are required to run CoSession
version 7.0. Windows 3.1 standard mode is not supported. Windows
NT and Windows 2000 are also not supported.
If you already have a previous versi on of CoSession VM/Remote software installed on your maintenance computer, perform t he following
procedure “To copy the connection settings” on page4. If you are
installing CoSession Remote software on your computer for the first
time, skip to “To install the new VM/Remote communications software” on page6.
To copy the connection settings
1
On the computer you use to connect to the voice messaging sys-
tem, exit to a command prompt, then go to the Remote directory.
2
If you are copying settings from a DOS client, continue with step
3. If you are copying settings from a Windows client, skip to step
10.
3
At the command prompt, type remote and press ENTER.
4
Press ALT+LEFT SHIFT. The Main Menu appears.
5
Press F2, then press F3. The Phone Book menu appears.
6
Press PAGE DOWN or PAGE UP to display a site that you want to
record information about.
7
Write down the setting s in the “Login,” “Password,” “Port,”
“Baud,” “Modem (the site's phone number),” “Dial,” and
“Term” fields.
8
Repeat steps 6 and 7 for each additional site that you want to
record information about.
9
When you are finished recording site information, press F10 to
exit the VM/Remote communications software, then skip to the
procedure “To install the new VM/Remote communications software” on page 6.
4
QUICK START INSTALLATION GUIDE
Page 9

10
If you are copying settings from a Windows client, on the CoSes-
sion Remote Viewer Control Center dialog box, click “Phone
Book.”
11
In the Phone Book, click a site that you want to record informa-
tion about.
12
Write down the settings in the “Name,” “Description,” “ Phone
ID,” “Communications Type,” and “Terminal Type” fields.
13
Under Communications Type, click “Setup.”
14
Write down the settings in the “COM Port,” “Baud Rate,” and
“Modem Name” fields.
15
Click “Close.”
16
Under Terminal Type, click “Setup.”
17
Write down the settings for “Login Name” and “Login Password”
fields. Click “Close.”
18
Repeat steps 11 through 17 for each additional site that you want
to record information about.
19
Click “Exit.”
20
Perform the following procedure, “To uninstall the Windows cli-
ent.”
To uninstall the Windows client
1
On the Windows task bar, click "Start."
2
Click Programs>CoSession for Windows> CoSession Uninstall.
3
Restart the computer.
4
Perform the following procedure, “To install the new VM/Remote
communications software.”
Continued
5
Page 10

To install the new VM/Remote communications software
1
Insert Disk 1 or CD 1 into the appropriate drive.
2
If you are installing from a disk, click “Start,” then click “Run.”
Enter a:\setup.exe and click “OK.”
If you are installing from a CD, go to the CD dire ctory and double
click “Setup.exe.”
3
Enter your name, press Tab, enter your company’s name, then
click “OK.”
4
Accept the default installation directory of C:\Insync\csw.
5
When prompted for install options, if you are installing from a
disk, choose “Custom install” and click “OK.”
If you are installing from a CD, choose “Full install.”
6
Follow the on-screen instructions. The install program will make
a copy of your original System.ini file.
7
When prompted, use the following defaults to set up a connection
to the voice messaging system.
Direct connect:
■
Baud Rate: 19200
■
ComPort: COM1
Modem connect:
■
Modem Type: Hayes Extended
■
Baud Rate: 2400
8
Enter the phone number used to dial in to the customer system.
9
Complete the on-screen registration information, and click “Con-
tinue.”
10
When prompted to “Restart Windows or continue,” select
“Restart Windows.” Once Windows restarts, perform the following procedure, “To enter the site connection settings.”
6
QUICK START INSTALLATION GUIDE
Page 11

To enter the site connection settings
1
Start the CoSession Remote client.
2
On the CoSession Remote Viewer Control Center dialog box, click
“Phone Book.”
3
Click “New,” and enter the first site's connection settings for
Name, Description, and Phone ID.
4
Under Communications Type, click “Setup.” The CoSession
Remote Serial Setup dialog box appears.
5
Enter the COM Port, Baud Rate, and Modem Name that you
recorded earlier for this site. Click “Save” and “Close.” The
CoSession Remote Viewer Control Center dialog box appears.
6
Under Terminal Type, click “Setup.” The CoSession Remote
Viewer Control Center dialog box appears.
7
Type the Login Name support and Login
Password voice.
8
Click “Close.” The CoSession Remote Viewer Control Center dia-
log box appears.
9
Repeat steps 3 through 8 for each additional site that you will
want to connect to.
10
In the CoSession Remote Viewer Control Center, click “Save” and
“Close . ” C oS e ssion R em ote is n o w set up to conne ct to clie nt voice
messaging systems.
To connect to the voice messaging system using CoSession
1
In the CoSession Remote Viewer Control Center, in the "Name"
drop-down box, click the name of the site that you want to connect to.
2
Click “Call.” The voice messaging system's Banner screen
appears.
3
At the Banner screen, press F2.
4
T ype the default system manager ID and password and press ENTER.
T o sign out of the voice me ssaging system
1
Press ESC until you see the message “Are you sure you want to
sign out to the Banner screen?”
2
Type y to confirm that you want to sign out.
7
Page 12
Completing the site information
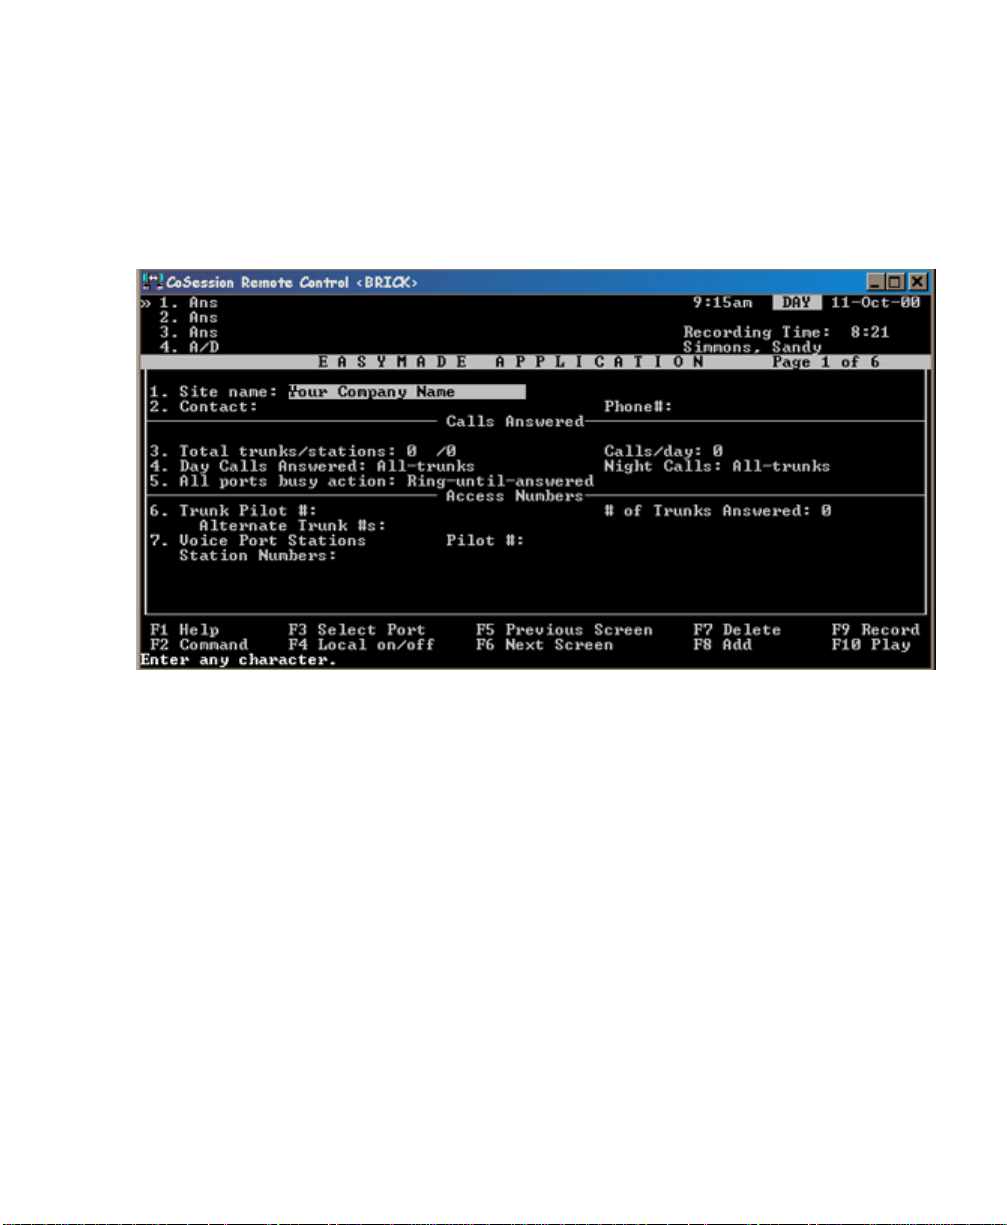
Application screen page 1 holds basic reference information about the
site and the voice messaging syst em. Th e se ttin gs of the fields on lines
1 through 6 do not affect the voice messaging system operation. They
are for informational purposes only. Line 7 does affect the voice messaging system operation and must contain correct information.
8
QUICK START INSTALLATION GUIDE
Page 13

T o complete the site in formation fields
1
On Application screen page 1, in the “Site name” field, type the
organization’s name.
2
In the “Contact” and “Phone#” fields, type the system manager’s
name and phone number.
3
In the “Total trunks/stations” fields, type the number of external
phone numbers and the number of stat ions available on the
phone system.
4
In the “Calls/day” field, type the average number of daily calls
that the organization receives.
5
In the “Day calls answered” field, type the appropriate value.
6
In the “Night calls” field, type the appropriate value.
7
In the “All ports busy action” field, type the appropriate value.
8
In the “Trunk pilot #” field, type the phone number that external
callers dial to call the voice messaging system.
9
In the “# of trunks an swer ed ” field, ty pe the nu mber of trunks that
the voice messaging system answers.
10
In the “Alternate trunk #s” field, type an alternate phone number
that external callers can use to access the system.
11
On line 7 after “Vo ice port stations ,” in the “Pi lot #” field, type the
master hunt group number.
12
On line 7 after “Voice port stations,” in the “Station numbers”
field, type the extension number for each phone system line that
is connected to a voice messaging voice port.
9
Page 14
Configuring voice messaging ports
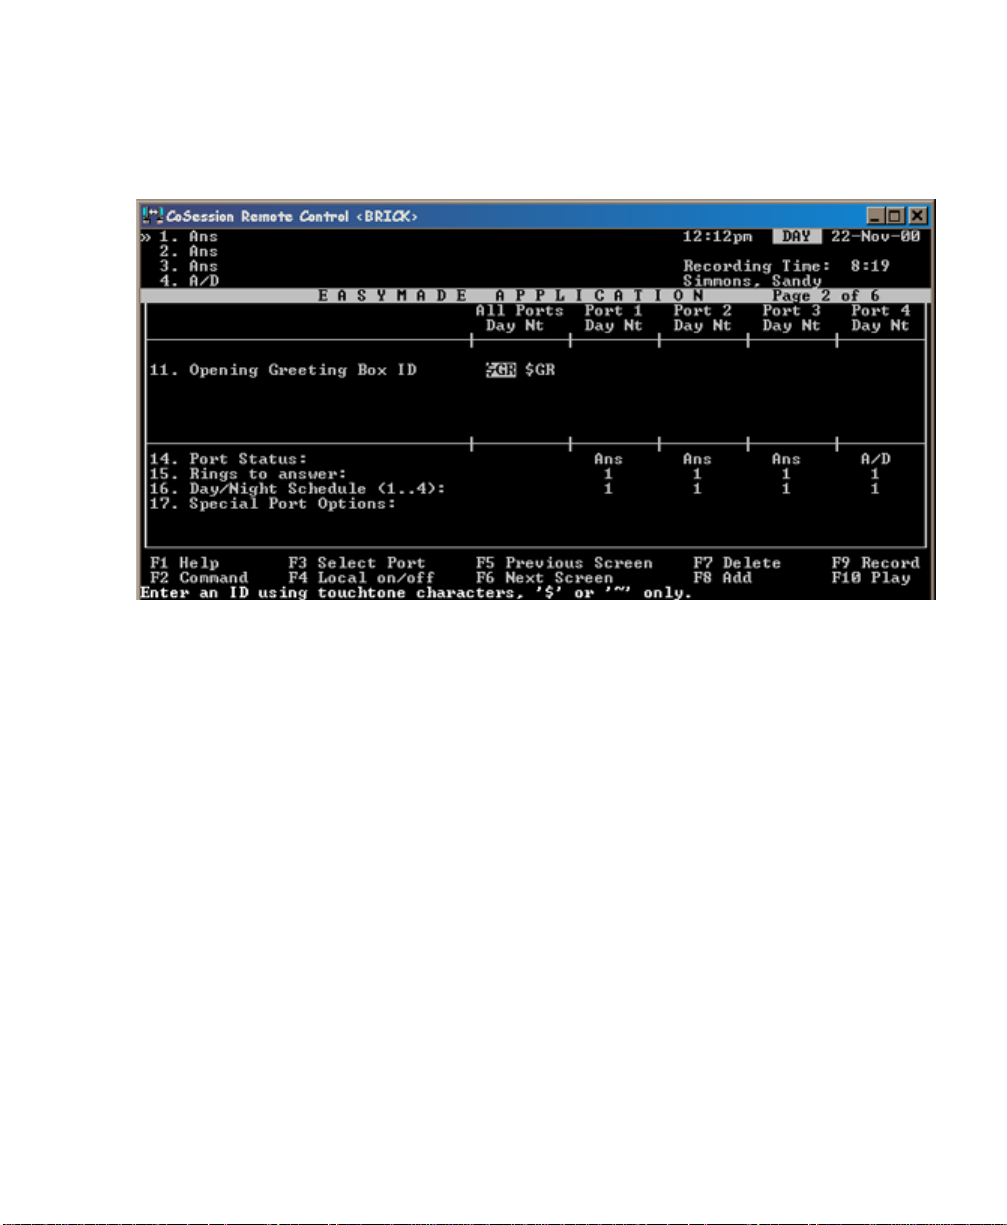
Application screen page 2 contains the voice mes saging system port
settings.
To complete the port settings
1
In the “Opening greeting box ID” field, type the system ID for the
opening greeting box that answers this port for day mode and
night mode.
10
QUICK START INSTALLATION GUIDE
2
In the “Port status” field, type the value for the port’s actions.
3
In the “Rings to answer” field, type the number of rings the sys-
tem waits before it goes off hook for each port. If the phone system uses pooled ringing, type 0.
4
In the “Day/night schedule” field, type the number of the sched-
ule to assign to each port.
5
In the “Special port options” field for each port, type the appro-
priate value f o r the phone system.
Page 15
Setting up the operator box
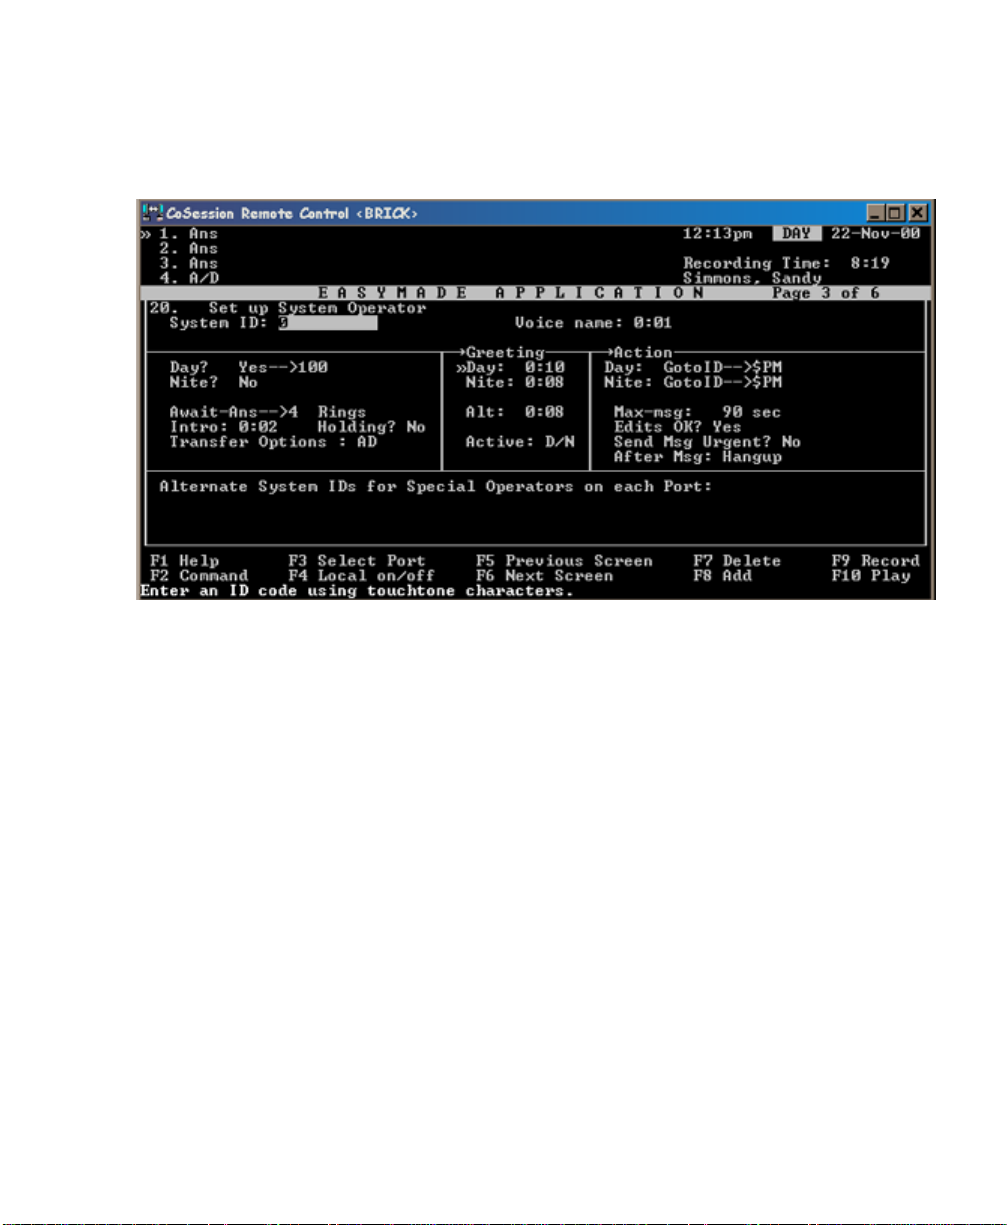
Application screen page 3 contains the operator box settings.
T o set up the operator bo x
1
Review and update the default call transfer settings if necessary.
2
Work with the system manager to record day, night, and alternate
greetings.
3
Review and update the action after greeting, if necessary.
4
Assign multiple operator boxes to ports, if used.
11
Page 16
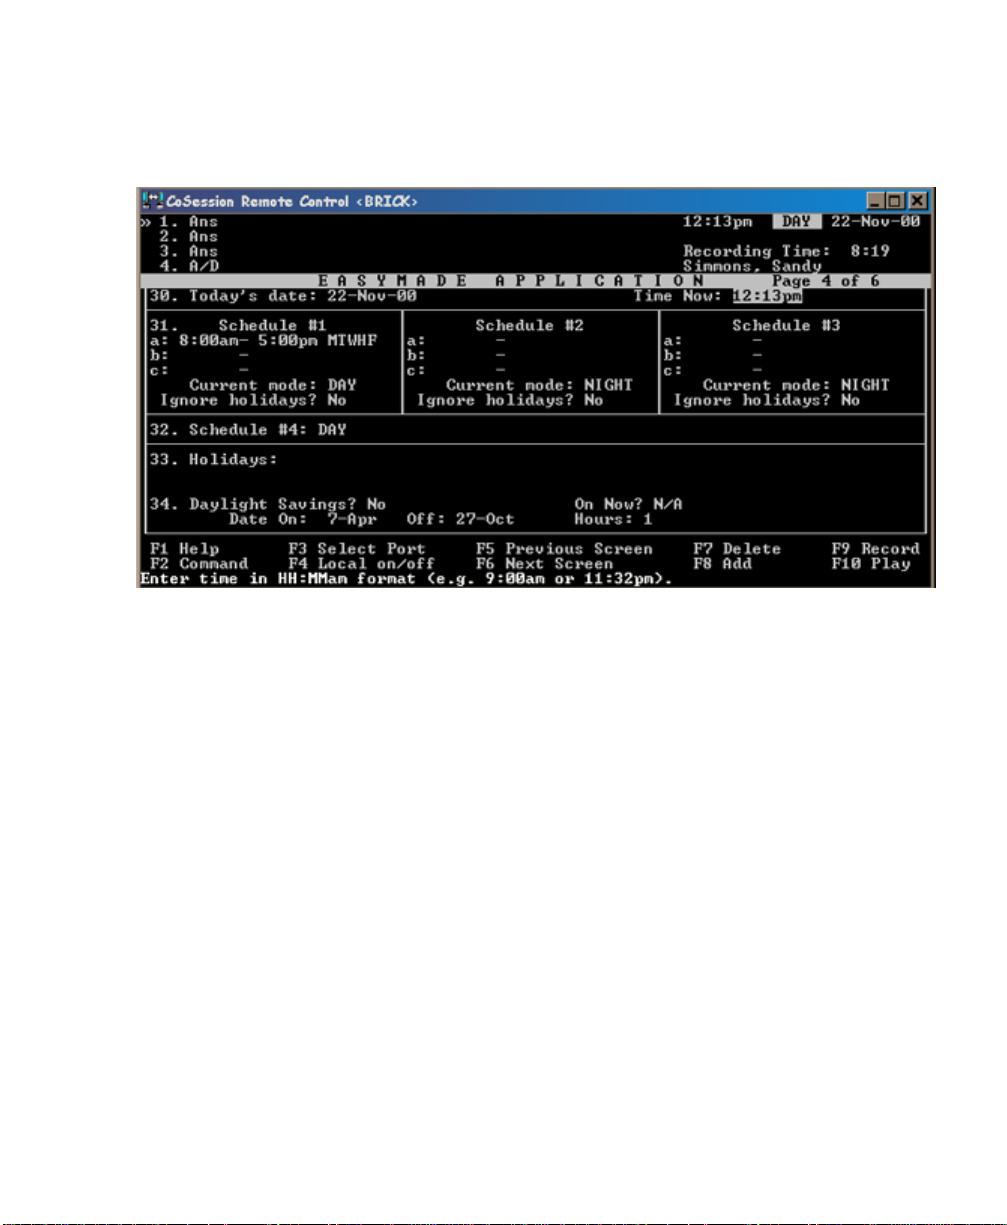
Determining system schedules
The fields on Application screen page 4 control date, time, and schedule information. To set up the voice messaging system to handle calls
differently depending on the day or time, you can use schedules.
To set up system date, time, and schedules
1
In the “Today’s date” field, type the correct date.
12
QUICK START INSTALLATION GUIDE
2
In the “Time now” field, type the correct time.
3
In the “Schedule 1” fields, type the beginning and ending times
and days of the week for day mode.
4
For sites that have multiple departments that follow different
schedules, type the beginning and ending times and d ays of the
week for day mode in the “Schedule 2” and “Schedule 3” fields.
5
In the “Schedule 4” field, select either day or night mode.
6
In the “Holidays” field, enter all holidays observed by the site.
7
Adjust the system for daylight saving time, if necessary.
Page 17
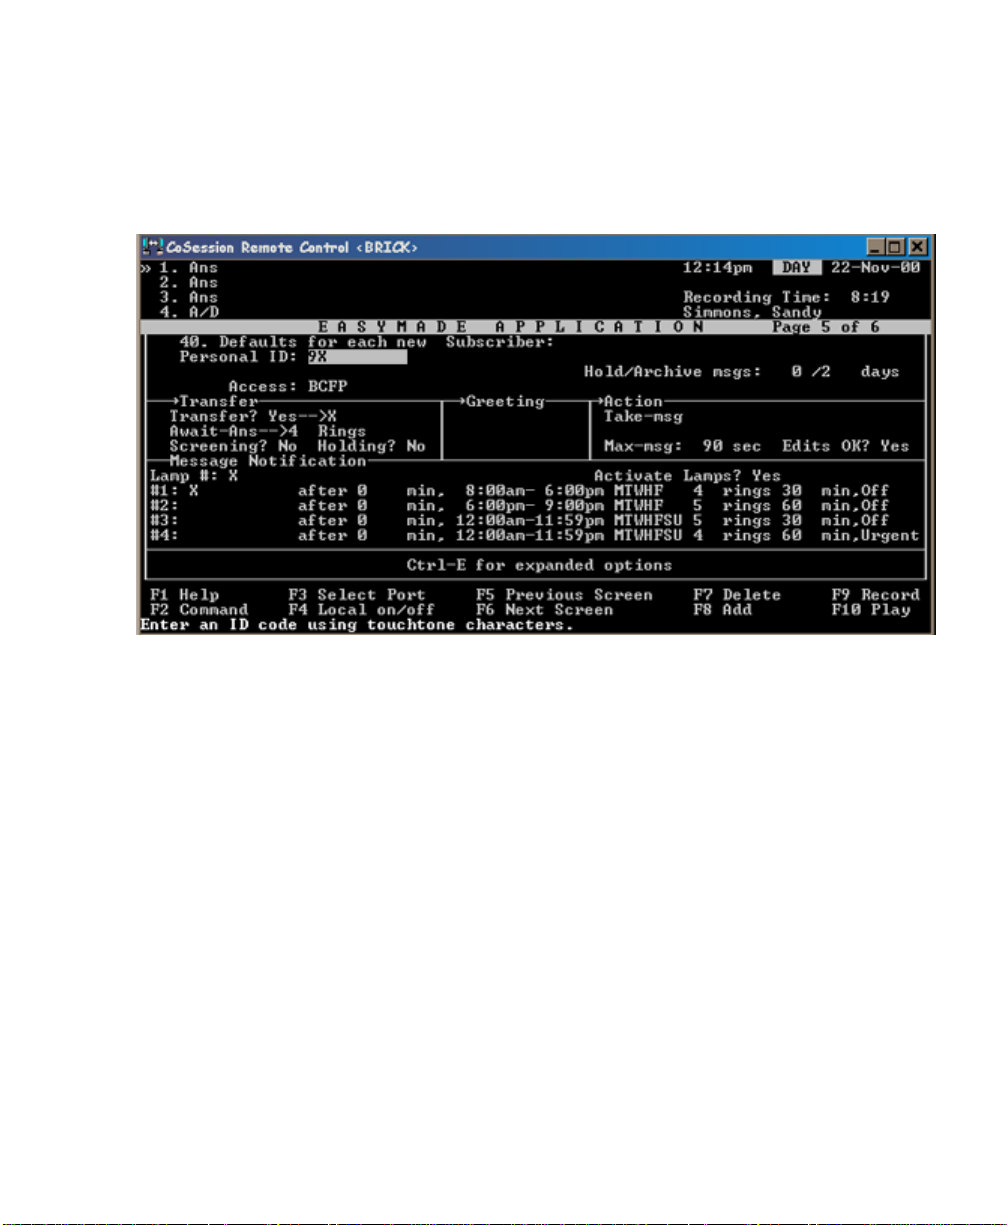
Setting up the default subscriber
When the voice messaging system is first installed, Application screen
page 5 is used to specify the default settings for all subscribers. Before
you add subscribers, set the fields on this screen for the features that
most subscribers will use. There is also an expanded options screen
for selecting subscriber access codes.
To set up the default subscriber
1
In the “Personal ID” field, confirm or change the prefix digit.
2
Confirm or change the “Hold/Archive msgs” settings.
3
Press CTRL+E. From the Expanded Options menu, select “Access
Codes.”
4
On the Access Code options screen, confirm, select, or clear the
appropriate check boxes. To change from the Yes-No conversation to the Menu Mode format, select option M.
5
Press ESC to exit the Access Code options screen.
6
Confirm or change the Transfer, Greeting, and Action options.
7
Confirm or change the Message Notification options.
13
Page 18
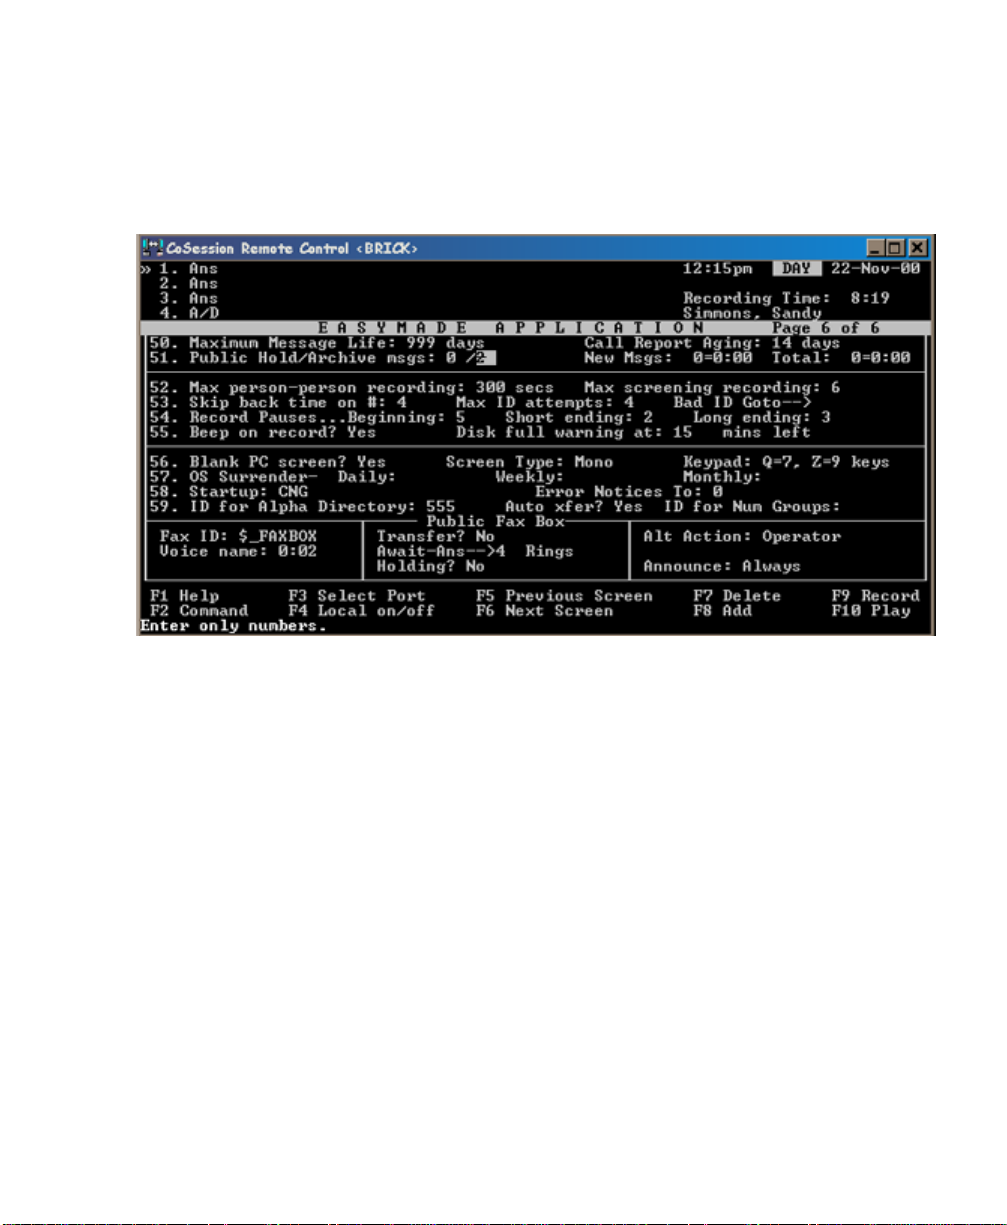
Selecting message management options
Application screen page 6 contains a variety of options for managing
messages, message storage, and the public fax box.
To set message management, storage, and public fax box options
14
QUICK START INSTALLATION GUIDE
1
Confirm or change the values on lines 50 through 53.
2
In the “Bad ID go to” field, type the system ID that calls are routed
to when they exceed the maximum number of invalid ID
attempts.
3
Confirm or change the values on lines 54 through 59.
4
Confirm or change the values for the public fax box fields, if nec-
essary.
Page 19
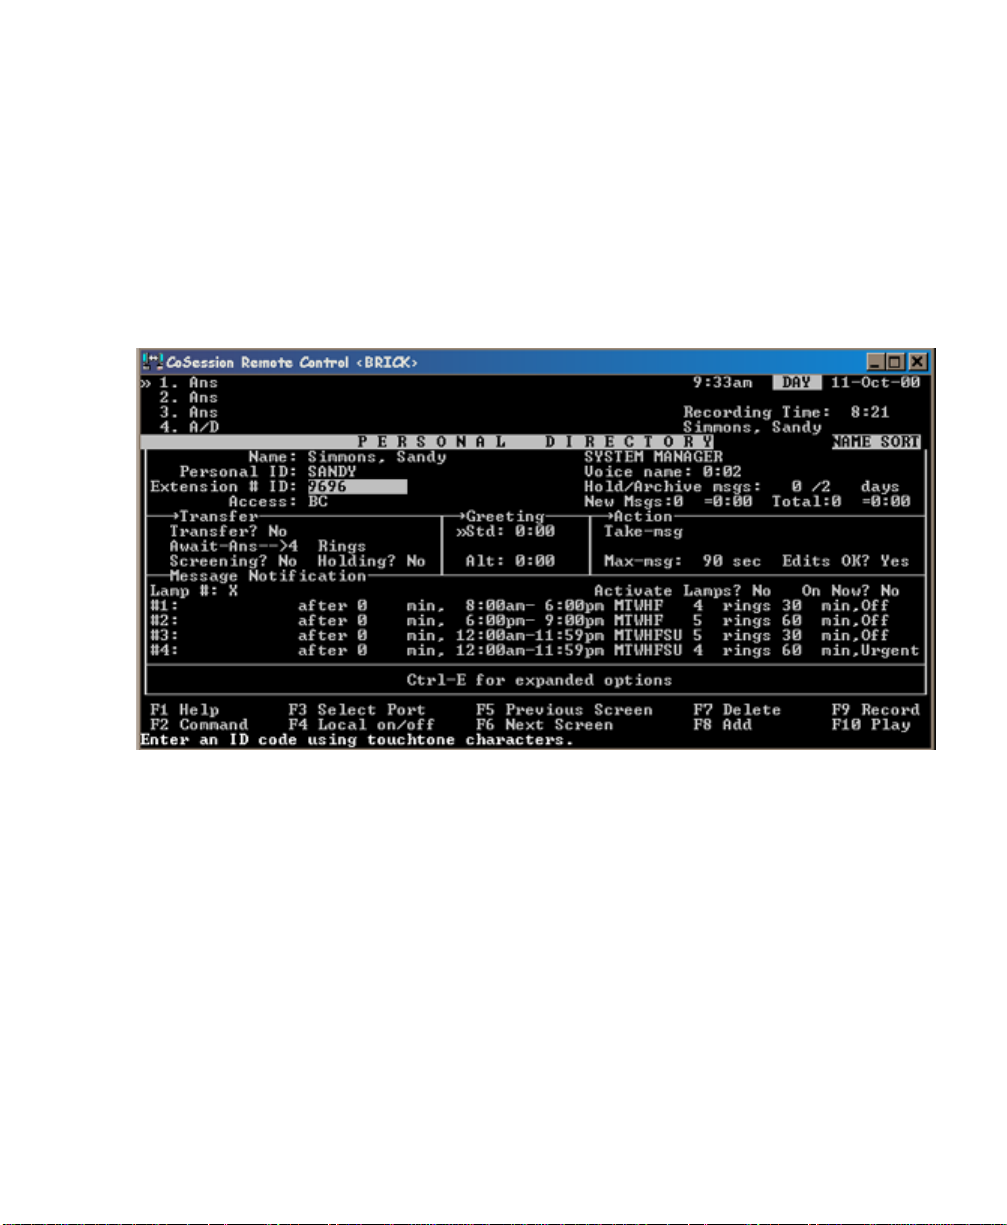
Adding subscribers at the console
The Personal directory contains a page for each subscriber, guest, and
system manager enrolled in the system. When you create a new subscriber, this screen shows the default settings from Application screen
page 5. For a new installation, you typically add a subscriber database
at the console. After initial setup, the system manager adds new subscribers as needed using the system manager conversation.
At any time, you can change the settings on the personal directory
pages for those subscribers who want different options. Changing a
setting for an individual subscriber does not affect the default subscriber settings.
To add new subscribers at the console
1
From the Personal Directory screen, press F8.
2
From the Add menu, select “Subscriber” to add one mailbox, or
“Range” to add a range of mailboxes.
3
Type the subscriber name, extension, and any other preliminary
information. This includes changing default values as needed for
each new mailbox created.
4
Press CTRL+E to select any applicable options from the Expanded
Option s menus.
5
Let subscribers know that they can now enroll in the system.
When subscribers follow the system enrollment conversation,
their mailbox setup will be completed.
15
Page 20

Setting up the phone system integration
Switch setup pages 1, 2, and 3 contain parameters that allow the voice
messaging system to work with the phone system.
The basic integration between the phone system and the voice messaging system is accomplished by connecting the systems using the
procedures in “Installation overview,” on page 2, and selecting your
phone system on Switch Setup screen page 1. Additional online Help
for setting up the in tegr atio n is ava ilable fo r m ost p hon e syst em s. Si mply type the first few characters of your phone system manufacturer’s
name in the “Switch” field and press F1 twice.
16
QUICK START INSTALLATION GUIDE
Page 21
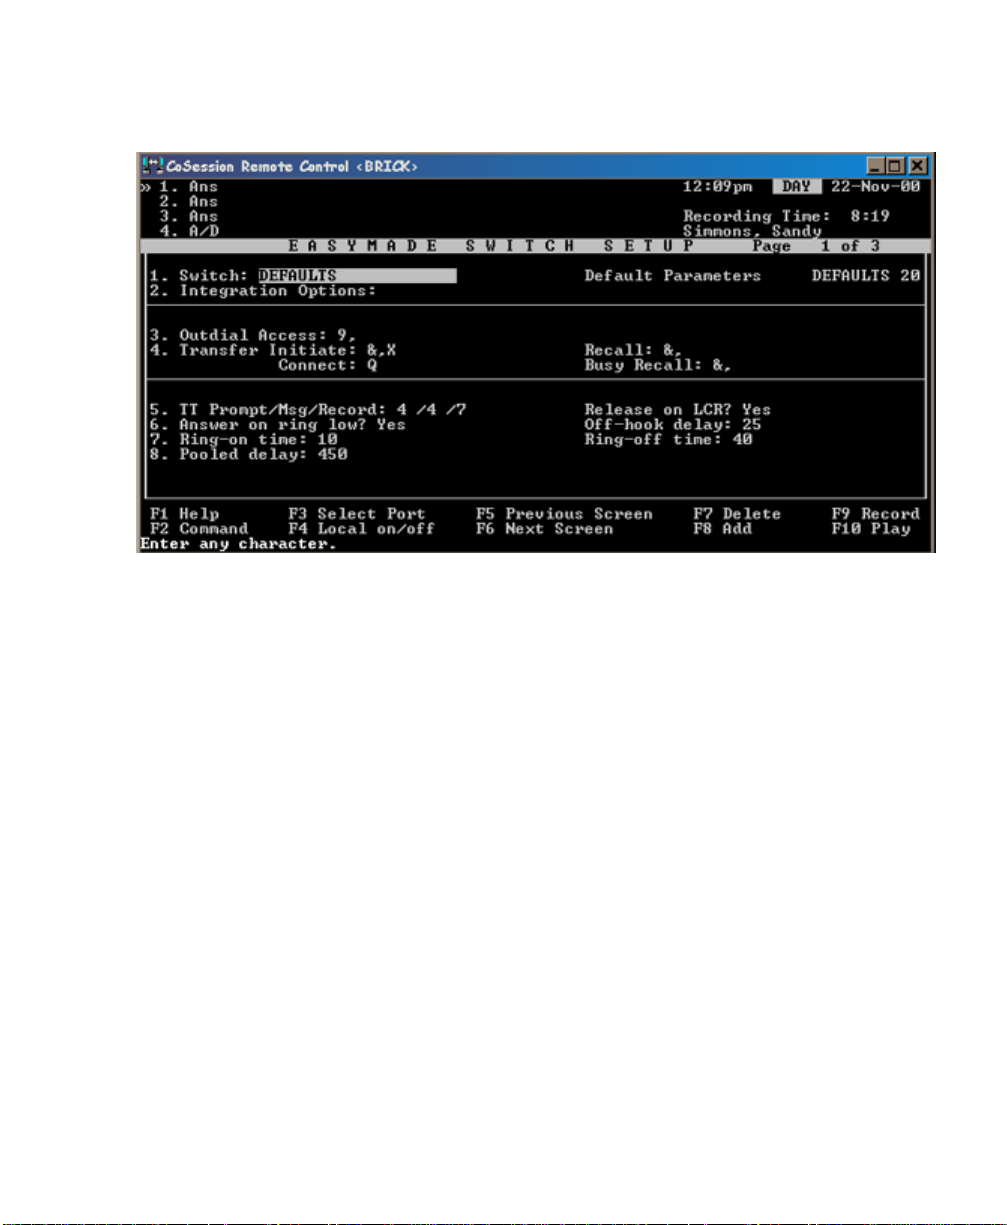
Switch Setup screen page 1 allows you to select your phone system
from the choices offered in the switch setup library.
To select your phone system
1
In the “Switch” field, type the first few characters of your phone
system manufacturer’s name (for example, type mit for Mitel),
and press ENTER.
2
Type y to select the phone system offer ed, or type n to disp lay
the next match.
3
If the choices offered in the switch setup library do not include
your phone system, type def to use the default phone system
parameters.
4
When “Are you sure you want to initialize all switch parameters?”
appears, type y. Default parameters for the phone system you
selected will be automatically filled in on the switch setup
screens.
Continued
17
Page 22
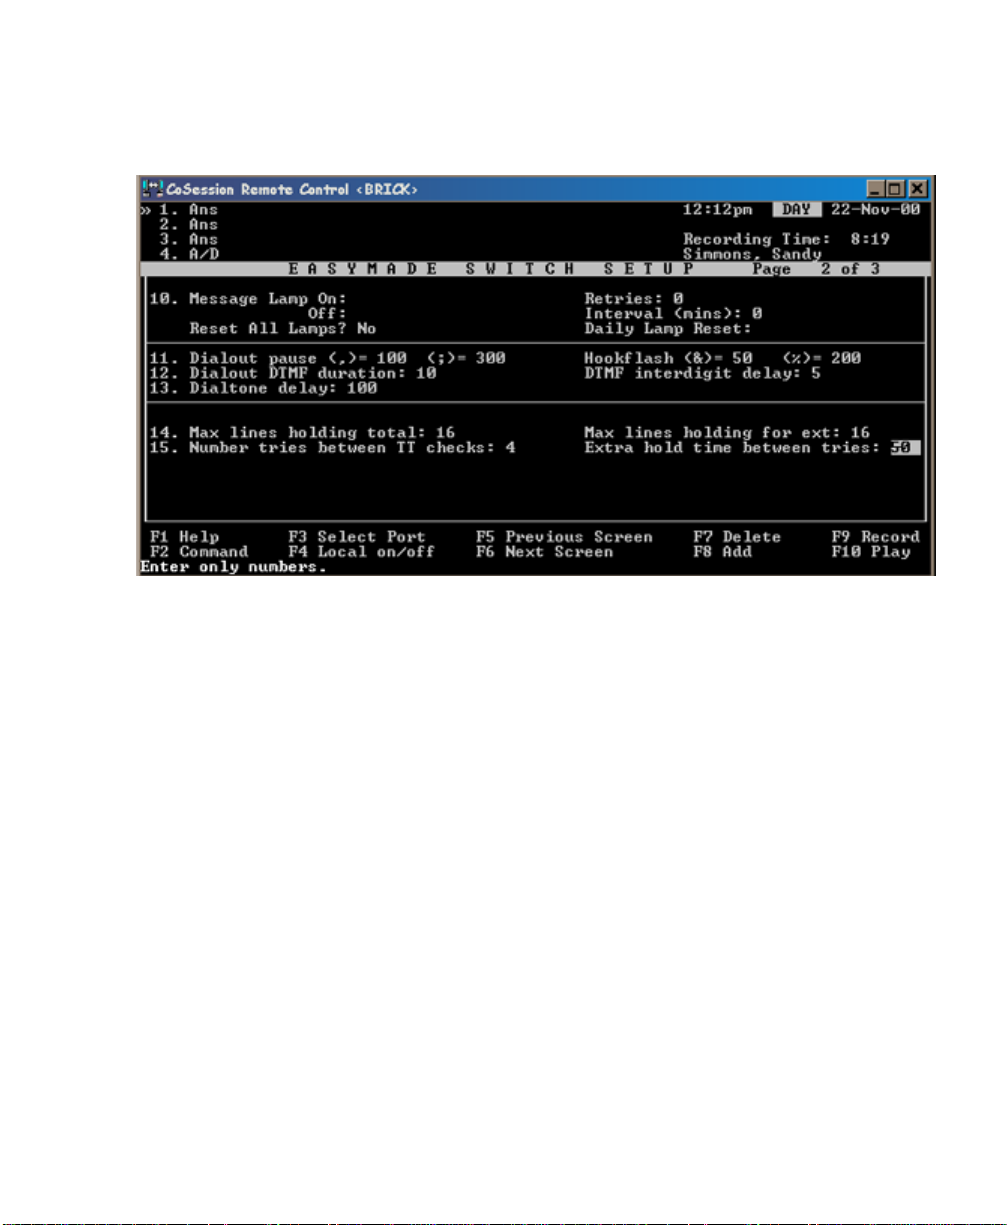
Switch setup screen page 2 includes additional voice messaging system options that allow you to control message waiting indicators,
ports on hold, and the call-holding message cycle.
T o confirm or change Swit ch Setup screen page 2 se ttings
1
On line 10, confirm that the message lamp settings are correct for
your phone system. If your phone system requires a daily lamp
reset, enter the reset time in the “Daily lamp reset” field.
18
QUICK START INSTALLATION GUIDE
2
The touchtone setti ngs in lin es 11 th ro ugh 13 u suall y do n o t n eed
to be changed. Call Technical Support if you are unsure about
changing the values in these fields.
3
In the “Max lines h olding total” field, type the number of ports
that can be on hold for the entire system.
4
In the “Max lines holding for ext” fiel d, type the number of p orts
that can be on hold for any single extension.
5
In the “Number tries between TT checks” field, type the number
of times that you want the voice messagin g syst em to try to transfer a call before checking back with the caller.
6
In the “Extra hold time between tries” field, type the time, in sec-
onds, that you want the voice messaging system to wait before
trying to transfer a call.
Page 23
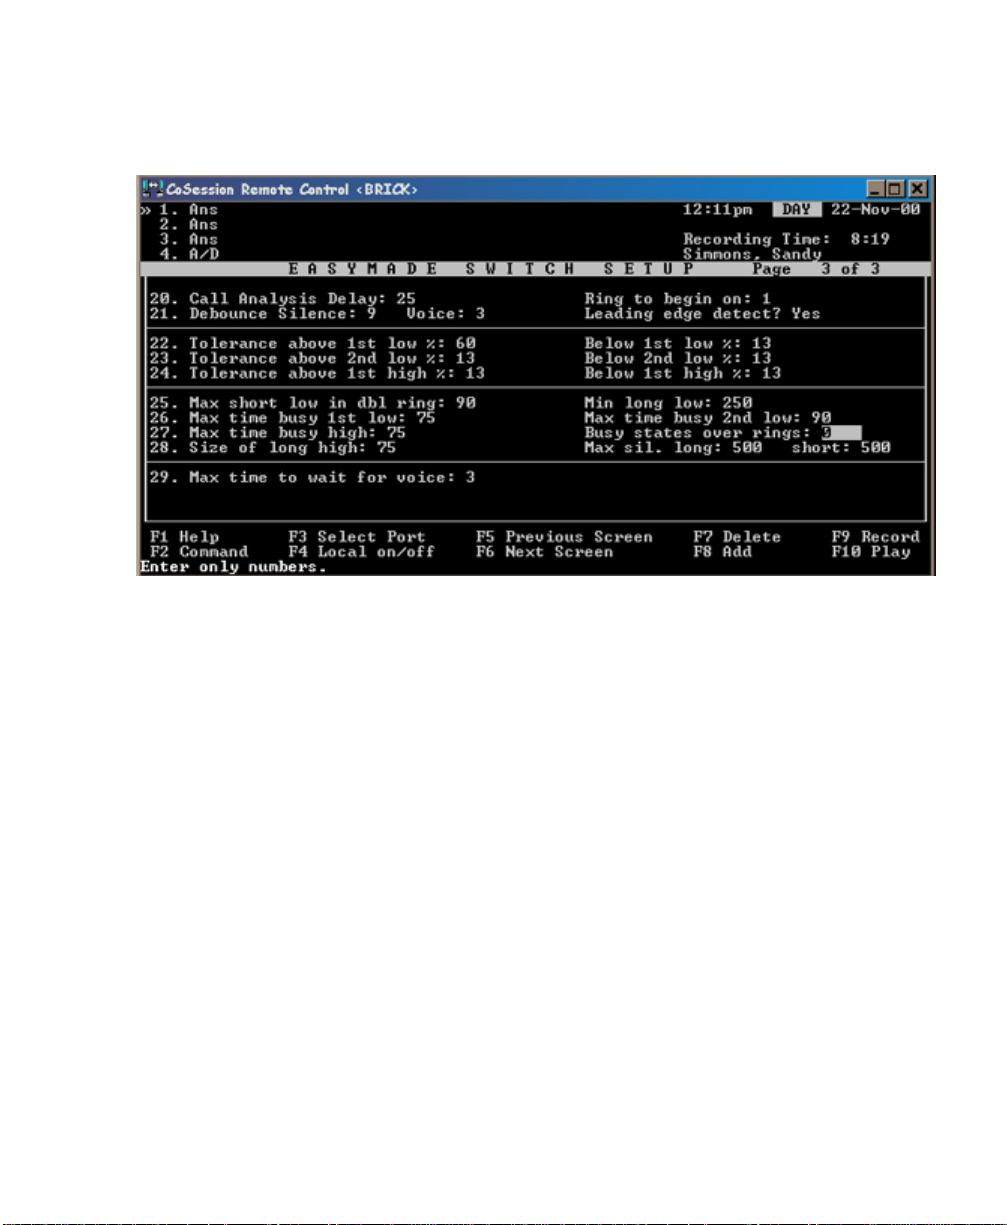
Switch Setup screen page 3 shows the call progress and voice detection settings that are provided for the phone system you selected on
Switch Setup screen page 1.
To confirm or change these settings, perform “To run Learn Tones,”
on page 38.
19
Page 24
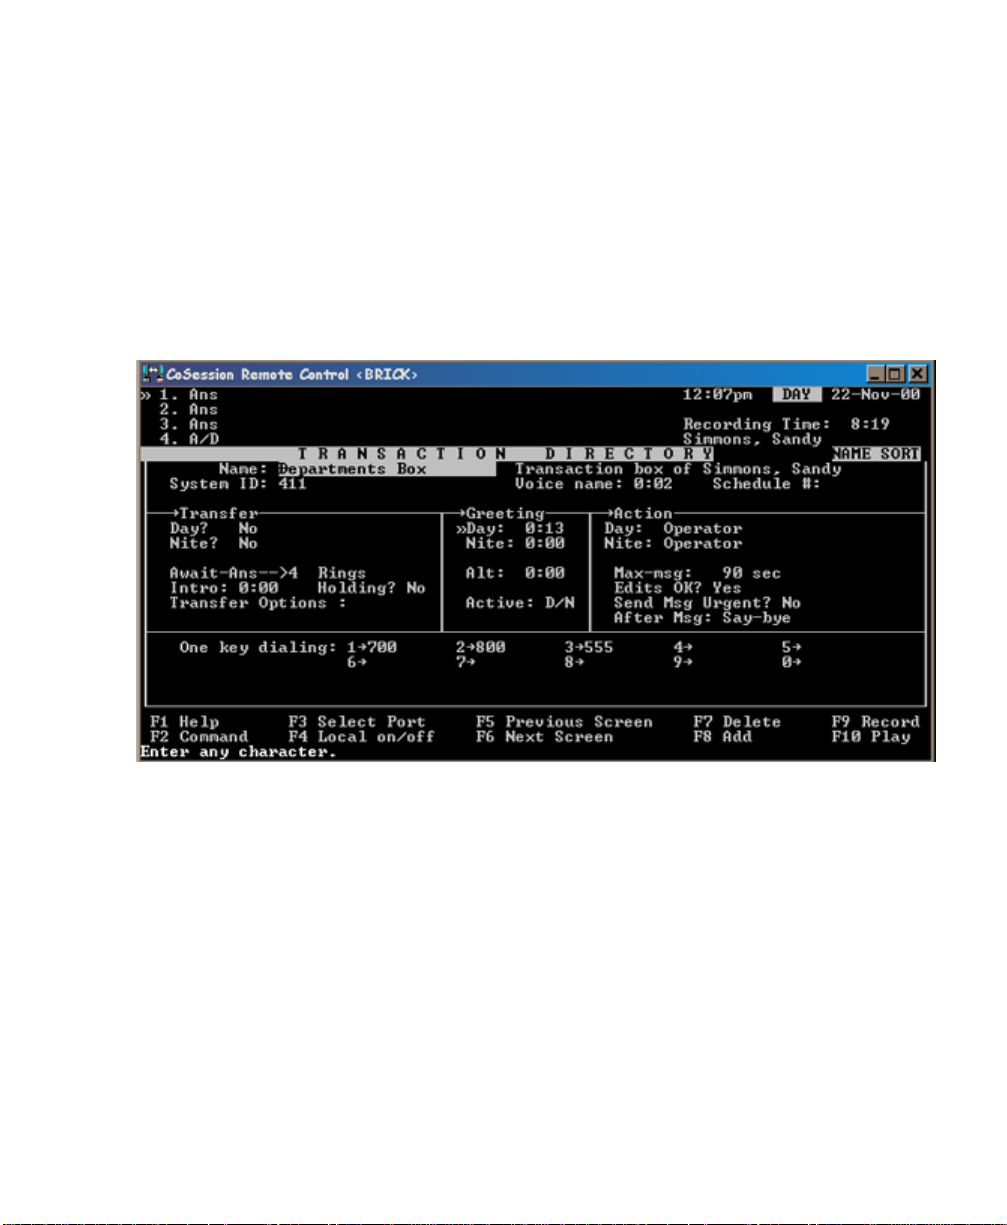
Creating transaction boxes
The Transaction Directory screen allows you to create transaction
boxes, which are the building blocks of the voice messaging system. A
transaction box is a set of instructions that tells the system what to do
when a call reaches the transaction box. You can use transaction
boxes to set up specialized call routing, create menus, or provide
announcements of prerecorded information.
Before adding a transaction box, determine which subscriber (or the
system manager) will own the box. The owner receives messages for
the box when you set the box to take messages. If you delete the
owner, this box is automatically deleted.
20
QUICK START INSTALLATION GUIDE
Page 25

The transfer-greeting-action structure
Each transaction box (except the interview box) has a transfer-greeting-action structure. If call transfer is tur ned on, t he system firs t tri es to
transfer a call to the phone number or extension listed. If the call transfer
is unsuccessful, the system plays the appropriate greeting for the box,
and then follows the instructions in the Action section of the screen.
A transaction box can be set up for two different transfer-greeting-action sequences, one for day mode, the other for night mode.
To add a transaction box
1
Go to the Transaction Directory screen and press F8.
2
From the Add menu, select “Transaction box” and press ENTER.
3
From the dialog box that opens, assign an owner by doing one of
the following:
■
Press ENTER to assign ownership to the voice messaging system
manager.
■
Type n to choose a different owner. Type the owner’s last name,
and press ENTER.
■
To create a delete-proof box, cr eate a virtual subscriber and make
him or her the owner of the box. Tell the real subscriber who will
maintain the box the personal ID of the virtual subscriber.
4
Type a system ID for the box, and press ENTER.
5
Type a name for the box, and press ENTER. You may want to use a
special naming convention for different types of transaction
boxes to keep them sorted together onscreen, such as starting all
box names with “TBOX.”
6
At the Transaction Box screen, in the “Voice name” field, record
the name of the transaction box. See “Recording greetings and
prompts,” on page 32 for more information.
7
In the “Schedule #” field, type the applicable schedule number. If
you do not enter a schedule number, the system uses the schedule of the port the call came in on.
8
Set up call transfer for the transaction box.
9
Set up greetings for the transaction box.
10
Set up the actions that should occur after the greeting for the
transaction box.
Continued
21
Page 26

Adding a range of transaction boxes
To speed up the process of adding transaction boxes, you can add several transaction boxes at the same time.
To add a range of transaction boxes
1
Go to the Transaction Directory screen. If possible, go to an exist-
ing transaction box that has the transfer and action settings that
you want. Press F8.
2
From the Add menu, select “Range” and press ENTER.
3
From the dialog box that opens, assign an owner to the boxes by
doing one of the following:
■
Press ENTER to assign ownership to the voice messaging
system manager.
■
Type n to choose a different owner. Type the owner’s last
name, and press ENTER.
4
In the “Start” field, type the starting system ID, and press ENTER.
5
Type the ending system ID, and press ENTER.
6
It is not necessary to type anything in the “Constant prefix” or
“Constant suffix” fields. Press ENTER.
7
When you are satisfied with the range you have selected, type y.
22
10
11
QUICK START INSTALLATION GUIDE
8
When prompted, press any key or ENTER to continue.
9
When the voice messaging system has finished adding the range,
press PAGE UP or PAGE DOWN until you find the new boxes in
the Tr ansaction Directory.
If you want, type a new name for each box to replace the sys-
tem-generated one.
Record greetings for each box.
Page 27

Deleting a transaction box or its messages
If you delete a transaction box, make sure to delete all refere nces to it s
system ID. The messages are automatically deleted.
To delete a transaction box or its messages
1
Go to the Transaction Directory, and press PAGE UP or PAGE
DOWN to go to the transaction box you want to delete.
2
Press F7. From the Delete menu, select either “Box” or “All mes-
sages.”
3
Press ENTER to confirm.
Continued
23
Page 28

One-key dialing
With one-key dialing, you can offer callers a menu of choices. One-key
dialing enables you to program a single digit to represent the full system ID for a subscriber’s extension ID, a transaction box, or an interview box. Instead of entering the full system ID, the caller just presses
a single key.
Callers can bypass one-key dialing. You set the system to pause a certain number of seconds for additional touchtones before routing the
call according to the transaction box’s one-key dialing menu. These
pauses allow callers to press full system IDs to bypass one-key dialin g,
even during a greeting. You program how long the system waits
between touchtones using the “One-key delay” field.
To set up one-key dialing for a transaction box
1
Go to the Transaction Directory screen for the box .
2
If necessary, rerecord the box greeting so that it describes the
one-key dialing choices.
3
In the “One-key dialing” fields, type the system IDs to which you
want to route callers.
4
In the “D ay ” an d “ N igh t” field s of th e Ac ti on sec tion of the scr een ,
type the code for the action that you want to occur when a caller
does not press a touchto ne key. Press ENTER.
24
QUICK START INSTALLATION GUIDE
In most cases, type o (Go to the operator). This setting transfers
the call to the operator when the caller presses an incorrect key or
does not press a key. The O setting als o transfe rs callers wi thout a
touchtone phone to the operator. See the field descriptions in
online Help for a list of action codes.
5
Go to Application s cre en page 6. In th e “S tartup ” field, type ok1
or ok2. This setting creates a 1- or 2-second pause that lets callers bypass the one-key dialing options and enter full system IDs
instead.
Page 29

Setting up an interview box
You use an interview box to give information to or collect information
from callers, even during nonbusiness hours. For example, a business
could use interview boxes to take sales orders or to conduct market
research.
An interview box can contain up to 20 questions or announcements.
Each interview box has an owner, a name, and a unique system ID.
Messages left at an interview box are available only to the owner of the
box. If you delete the owner, the interview box is automatically
deleted.
If the customer will be collectin g info rmation, se t up the in terview box
to record responses to interview questions. The system beeps after
each question to prompt callers to respond, and you can specify the
maximum recording length of each response to a question. When the
interview box’s owner retrieves the messages, the owner hears the
callers’ replies with a beep separating each response.
Before setting up an interview box, it is helpful to write out the text of
the questions with the system manager. For each questio n, dec ide the
number of seconds a caller’s response can last. The questions can
include introductory statements or other information. It is also he lpful
to decide how a caller will be routed to the interview box. A caller can
be routed to an interview box in either of the following ways:
■
You can set the “After” field for another box (for example, a transaction box, opening box, personal directory box, or interview
box) to route a caller to the interview box’s system ID (for example, GotoID-->$PM).
■
You can also set up a one-key dialing menu, where the system ID
for the interview box is assigned to a single key. The caller can
press the system ID for the interview box. Include the system ID
in the opening greeting so that callers know how to reach the
interview box.
Continued
25
Page 30

To set up an interview box
1
Go to the Transaction Directory screen and press F8.
2
From the Add menu, select “Inter view box” and press ENTER.
3
From the dialog box that opens, assign an owner to the interview
box by doing one of the following:
■
Press ENTER to assign ownership to the voice messaging system
manager.
■
Type n to choose a different owner. Type the owner’s last name,
and press ENTER.
4
Type a system ID for the interview box, and press ENTER.
5
Type a name for the interview box and press ENTER.
6
In the “Voice name” field, record the interview box name.
7
In the first “Question” field, record the first interview box ques-
tion. See“R ecor ding greetings and prompts,” on page 32 for more
information.
8
To make the first question an introduction, set the “Reply” field to
0 (zero) seconds so that the interview proceeds immediately from
the introduction to the first question. Press ENTER.
9
In the subsequent “Question” fields, record the remaining ques-
tions.
26
10
11
12
QUICK START INSTALLATION GUIDE
For each question, in the “Reply” field, type an appropriate
amount of time (in seconds) for the caller’s response. Press
ENTER.
In the “Send msg urgent?” field, type the appropriate value.
In the “After” field, type the appropriate value for the action that
should be taken after the interview is completed.
Page 31

To delete an interview box or its message
1
Go to the transaction box in the Transaction Directory and press
F7.
2
From the Delete menu, select either “Box” or “All messages,” and
press ENTER .
3
Press ENTER to confirm.
Messages are automatically deleted according to the box owne r’s
hold/archive times set in the “Hold/archive msg” fields.
When you delete an interview box, make sure you delete all refer-
ences to its system ID.
Public interview box
The public interview box is a special interview box in the Transaction
directory. Messages left in the public interview box (as well as those
left in the operator box) are public messages, which are available to all
subscribers with public message access. The voice messaging system
can have only one public interview box.
Typically, the public interview box is used to handle calls that are
intended for the operator but go unanswered. The public interview
box asks a caller for his or her name, phone number, and a brief message. However, the use of t his box is n ot re stricte d to ju st thi s p urpo se.
You set up the public interview box in the same way you set up a regular interview box. However, in addition to the fields on the Public
Interview Box screen, the fields on line 51 of Application screen page 6
also control this box.
The public interview box comes with a default system ID of $PM. You
can change this ID, but you cannot delete the public interview box or
add a new one. If you do change the system ID, you must also change
all references to the deleted ID. This system ID is typically used with
the “GotoID-->” action se t on other system screens.
System managers and operators may not want the system to call them
or light their message waiting lamps if the only messages they have
waiting are public messages. You can add the C access code to the
“Access” field on their personal directory pages to have the system
light their message waiting lamps only when they have new messages
specifically addressed to them.
27
Page 32
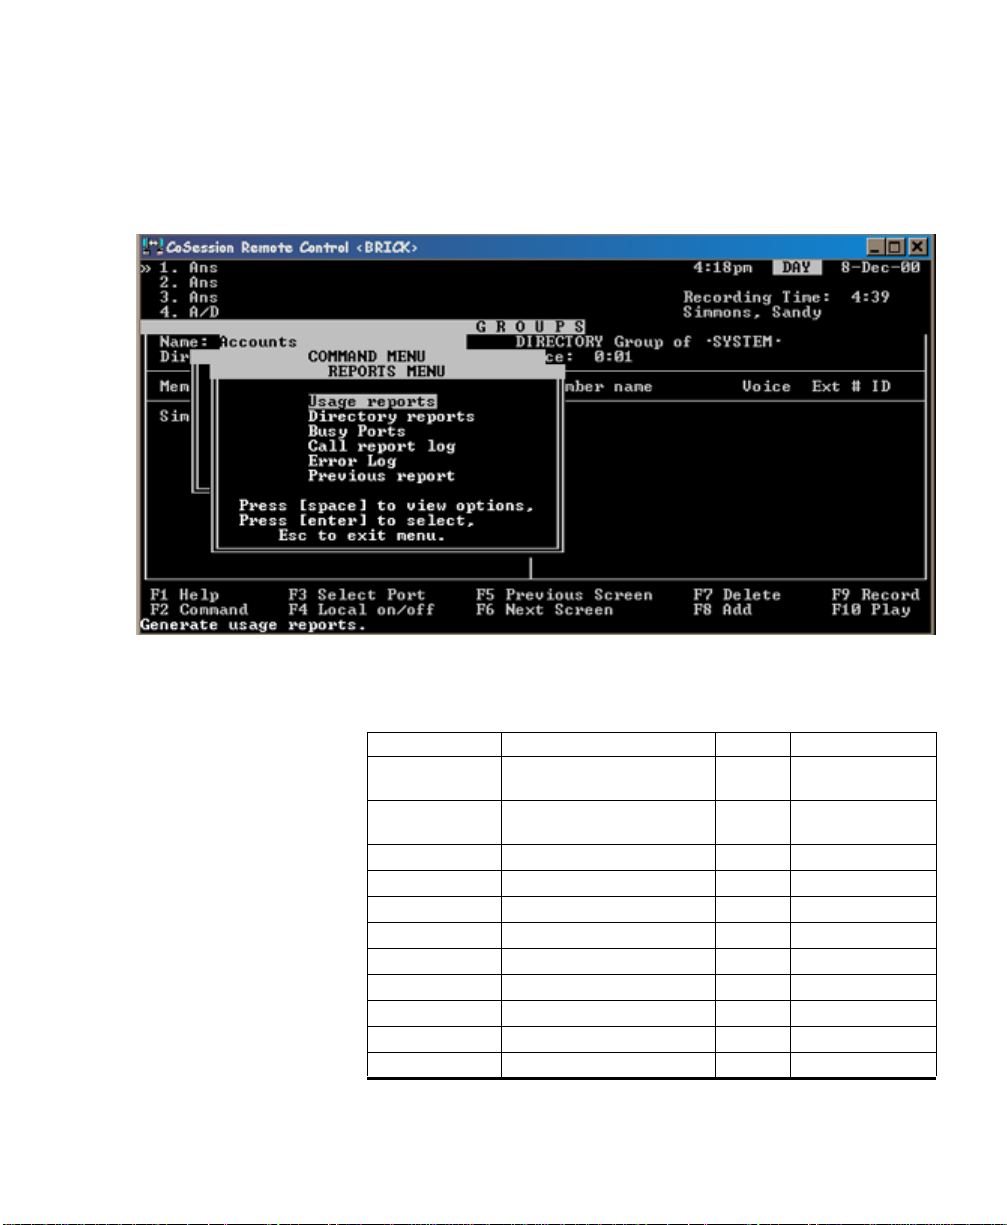
Using reports to monitor the system
The voice messaging system provides five different categories of
reports: usage, directory, ports, call log, and error log. Reports that you
create for customer systems can be viewed on the console, printed on
a printer connected to your computer, saved to a disk, or imported
into spreadsheet or word processing files.
28
Standard voice messaging reports
QUICK START INSTALLATION GUIDE
Title Selection and sort criteria Format Output file name
Usage report Subscribers, extensions,
system IDs
Usage report Subscribers, extensions,
system IDs
Directory report Subscribers Table Subscrib.rpt
Directory report Extensions Table Extensio.rpt
Directory report Message groups Table Grouplis.rpt
Directory report Members in groups Table Groupmem.rpt
Directory report Subscribers Table Membersh.r pt
Directory report Directory assistance Table Dalist.rpt
Busy ports report Ports T able Busyport.rpt
Call log Subscribers Table Replog.prn
Error log Date Table Errlog.rpt
Graph Graph.rpt
Table Table.rpt
Page 33

Using reports to monitor your system
You can use the voice messa gi ng syst em con so le to view a rep ort or to
view the contents of a text file.
To view a previously created report or text file
1
From any voice messaging system screen, press F2.
2
From the Command menu, select “Reports” and press ENTER.
3
Select “Previous report” and press ENTER.
4
Type the full path and file name of the report or text file you want
to view, and press ENTER.
5
Select “Display,” “Copy,” or “Print,” and press ENTER.
If you select “Display,” you can search the report by pressing
CTRL+J and entering the text you want to search for.
If you select “Copy,” the voice messaging system offers a default
file name and directory. You can use the Copy command to save
the report with a different name, as described in step 6.
To use the “Print” option, a printer must be properly configured
and connected to the voice messaging system computer.
6
If you selected “Copy,” you can save the report by doing one of
the following:
To save the report output for use or printing on another worksta-
tion, specify a new file name for the report and save the file to a
disk. When you save your report to a disk, the voice messaging
system automatically replaces the old version of each rep ort with
a new version whenever you create a new report.
To save an old report, rename it or copy it to a different file or
directory before creating the same report again.
Continued
29
Page 34

Source data for reports
Each day, the voice messaging system creates data files containing
information about actions and call traffic. The data is used when you
generate reports. You can set the number of days that the voice messaging system stores these files. The voice messaging system deletes
the files at midn ight o n th e day th a t t he y e xp ire. You can store the f iles
for up to 365 days.
You specify start and stop dates when creating some reports. Your
report contains data only for the number of days in the “Call report
aging” field on line 50 of Application screen page 6.
Evaluating voice messaging system usage
Usage reports show you patterns of voice messaging system activity
over time. A usage report can contain data about the entire voice messaging system or be limited to incoming and outgoing calls, subscribers, groups, and boxes. Usage reports can be formatted as bar graphs
or tables. You can specify a range of days to be covered by the report.
In a usage report, the term “day” represents the hours between 6:00
A.M. and 6:00 P.M. and the term “n ight” repres ents th e hours be twee n
6:00 P.M. and 6:00 A.M.
T o create a usage report
1
From any screen in the voice messaging system, press F2.
30
QUICK START INSTALLATION GUIDE
2
From the Command menu, select “Reports” and press ENTER.
3
From the Reports menu, select “Usage” and press ENTER.
4
To create a report about how the entire voice messaging system is
used, type n and press ENTER. Skip to step 6.
5
To create a report on use of the voice messaging system for an
individual guest, subscriber, extension ID, or system ID, type y
and press ENTER. Continue with step 5.
6
For a single guest or subscriber, type the person’s last name, and
press ENTER .
7
For an extension ID or a system ID , typ e the ID, and press ENTER.
8
A dialog box will ask for confirmation of the name or ID. Type y
to confirm your selection.
9
Type the report start date (using d-mmm format), and press
ENTER.
Page 35

10
Type the report end date (using d-mmm format), and press
ENTER.
11
From the menu, select “Graph of usage” or “Table of usage” and
press ENTER .
12
From the menu, select “Display,” “Copy,” or “Print” and press
ENTER.
Analyzing port usage
The busy ports report lets you evaluate the load on your ports. You can
use information from the busy ports report to make decisio ns regarding port management and adding ports.
The busy ports report shows the total number of times all or selected
ports were busy. It also shows the average percentage of time the ports
were busy during a specific time period. You can create the report for
all ports on the system or for a selected group of ports.
If all or nearly all of your ports are busy during peak hours, external
callers may not get through unless they let the ring continue until a
port becomes free.
T o create a busy ports report
1
From any voice messaging system screen, press F2.
2
From the Command menu, select “Reports” and press ENTER.
3
From the Reports me nu, select “Busy ports” and press ENTER.
4
Type the report start date (using d-mmm format), and press
ENTER.
5
Type the report end date (using d-mmm format), and press
ENTER.
6
Select the ports you want to include in the report. For all ports,
press ENTER .
7
To select a specific port or ports, type port numbers separated by
commas (for example, 1, 3, 6), or type a range of ports separated
by a hyphen (for example, 1–5). Press ENTER.
8
From the menu, select “Display,” “Copy,” or “Print” and press
ENTER.
31
Page 36

Recording greetings and prompts
An important part of customizing Lingo is helping the system manager design and make recordings for the opening greeting, one key
dialing menus, operator box, interview boxes, and transaction boxes.
To listen to a recording (including one that you have just made)
1
Establish a local connection.
2
Move the cursor to the field that contains the recording you want
to listen to.
3
Press F10 to play the recording.
4
If you want to stop the recording before it finishes playing, press
END.
To make a recording
1
Establish a local connection.
2
Go to the screen that contains the voice field whose recording you
want to change, select that voice field, and then press F9.
3
Press the SPACEBAR to start recording. After the beep, speak into
the phone handset.
4
When you ar e fin ishe d, pr es s the S PACEBA R to sto p. The length of
the recording appears in seconds in the voice field. A new recording replaces an existing recording, even if the new one is shorter.
32
QUICK START INSTALLATION GUIDE
5
Press F10 to listen to your recording.
6
Repeat steps 2 through 5 for each recording you want to add or
change.
7
When you are finished, terminate the local connection.
Page 37

Copying or appending a recording to a voice field
You can copy a recording to a voice field or append a recording to the
end of an existing recording. If you copy a recording to a voice field,
the new recording replaces the recording already in the voice field.
You can add a beep to the end of a recording to tell the caller when to
begin speaking. You can also copy silence to a recording to replace the
recording. Appending silence to the end of a recording is useful for
recordings that ask a caller to press a key. Appending silence at the
end of the prompt, rather than just pausing, usually results in a
higher-quality recording.
To copy or append a recording to a voice field
1
Go to the screen that contains the voice field you want to copy or
append a recording to, select that voice field, and press F2.
2
From the Command menu, select “Copy” and press ENTER.
3
From the Copy menu, select “Into current field” and press
ENTER.
4
Type the full path and file name of the file you want to copy or
append and press ENTER. (If you are copying from a compact
disc or floppy disk, include the drive letter.)
5
If a recording already exists in this field, type r to replace the
recording or a to append the recording to the existing recording.
T o append a beep
1
Go to the screen that contains the voice field that you want to
append a beep to, select that voice field, and press F2.
2
From the Command menu, select “Copy” and press ENTER.
3
From the Copy menu, select “Into current field” and press
ENTER.
4
Type beep and press ENTER.
5
Type a to append the beep to the end of the recording.
Continued
33
Page 38
To copy or append silence to a recording
1
Go to the screen that you wan t to cop y or appen d silence to, select
that voice field, and press F2.
2
From the Command menu, select “Copy” and press ENTER.
3
From the Copy menu, select “Into current field” and press
ENTER.
4
Type silence and press ENTER.
If the voice field already contains a recording, the voice messaging system asks if you want to replace or append the recording.
Type r to replace the recording with silence, or type a to
append silence to the end of the recording.
This procedure copies or appends 1 second of silence. For a
longer pause, repeat the procedure until you app end as many
seconds of silence as you want.
34
QUICK START INSTALLATION GUIDE
Page 39

Setting up on-hold prompts
The music-on-hold prompts can co ntain music of your choice,
promotional messages, or information about the use of call holding.
The system has 10 prompts available for playing music to callers
second in line or farther back in the holding queue. The first
caller in the queue is on hold with the phone system, rather than
with the voice messaging system, and hears the music-on-hold
provided by the phone system. The music-on-hold prompt numbers are HD023 through HD032, located in the Holding (HD)
prompt set.
The first music- on-hold prompt comes with your system. It contains piano music by Mozart. You can use the Mozart prompt and
the remaining music-on-hold prompt numbers to record additional music-on-hold prompts. See “To make a recording” on
page 32.
If multiple music-on-hold prompts are recorded, the system
cycles through the prompts. When the voice messaging system
finishes playing one music-on-hold prompt, it asks the caller
whether he or she wants to continue to hold, then plays the next
music-on-hold prompt in the series.
When recording music-on-hold prompts , note that the length of
the prompt determines the length of the message holding cycle
for the caller who is second in line or farther back. Prompts
between 20 and 60 seconds in length work well. If the
music-on-hold prompts are too short, the caller will be asked too
frequently to press a key to remain on hold. If the prompts are too
long, the caller may get tired of holding and hang up.
The length of the message cycle for callers who are first in line in
the holding queue is controlled by fields on line 15 of the Switch
Setup screen page 2. For additional callers in the queue, the message cycle is determined by the length of each of the 10
music-on-hold prompts.
Continued
35
Page 40

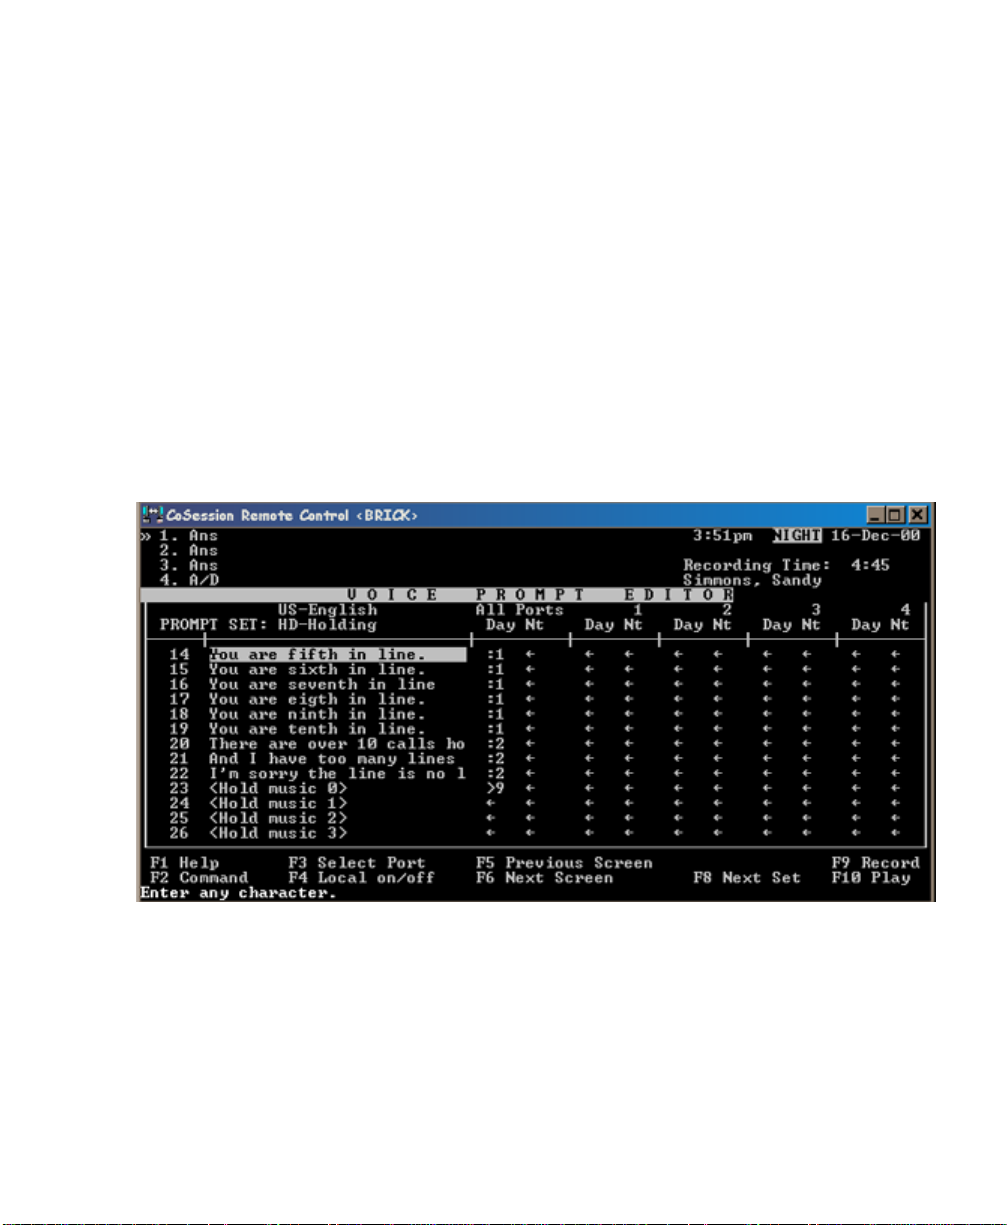
To set up the hold-time message cycle for callers who are farther back
in the queue
1
Press Ctrl+P to go to the Voice Prompt Editor screen.
2
Press F8 to go to the holding (HD) prompt set, and press PAGE
DOWN to locate the music-on-hold prompts.
3
Because the first music-on-hold prompt is already recorded,
record the other nine prompts with music or promotional messages. See “To make a recording” on page 32.
36
QUICK START INSTALLATION GUIDE
Page 41

Testing the system after installation
Test each extension to confirm that the phone system is programmed
correctly.
What you need for the test:
■
A standard analog phone set with a ringer to use as a test set.
■
A system manager’s phone set.
■
Access to a line outside of the phone system
T o test the extension s
1
Connect the phone system to the test phone set and the system
manager’s phone set using lines designated as a voice messaging
system extensions.
2
Confirm that the phone system identifies DTMF dialing through
the test extension. Dial the system manager phone set from the
test phone. Th e syste m manag e r phon e sho u ld ring.
3
Confirm that the phone system transmits DTMF tones to the test
extension. Dial the system manager phone from the test phone.
Answer the system manager phone and enter a digit. You should
hear the tone on the test phone.
4
Confirm that the test phone can access outside lines. Dial a num-
ber outside of the phone system from the test phone. You should
reach the number.
5
Confirm that the phone system generates rings on the test exten-
sion. From the system manger phone, dial the test phone’s extension. The test phone should ring.
6
Confirm that trunk routing is set up correctly for extensions that
answer trunk ca lls . F r om a line o utsid e the phon e syst em, di al the
number designated for the voice messaging system. Answer the
test phone and perform a hookflash (timed break recall); then
dial the system manager phone, listen for ringing, and disconnect. The call should be transferred to the system manager
phone.
37
Page 42

Running the Learn Tones util ity
The Learn Tones utility test s the busy, reo rder, and di al tones from the
phone system, and saves the correct frequency, cadence, and length
for each. Run the Learn Tones utility when you first install Lingo, and
any time thereafter to resolve voice messaging system tone detection
problems.
To run Learn Tones
1
Set up two phones within reach of the computer used for voice
messaging system maintenance. Designate one of these phones
as the test extension, set it to ring-no-answer, and place it in a
busy state.
2
Connect to the voice messaging system using CoSession.
3
Press ESC from the voice messaging system Banner screen.
4
Type y to exit from the voice messaging system and disconnect
all lines.
5
From the Utility menu, type 5 to choose “Learn tones (GTD and
call progress).”
6
If the voice messaging directory prompt appears,
type diskutil and press ENTER.
7
From the Learn Tones menu, type 1 to choose “L e a rn GTD
tones.”
8
From the GTD menu, type 2 to choose “Switch busy.”
38
10
11
12
13
14
QUICK START INSTALLATION GUIDE
9
Type the test extension number and press ENTER.
During the test, the screen displays status messages and the
results of the tests. If any of the tests are unsuccessful, perform
step 11. If all or at least the majority of the tests are successful,
continue with step 12.
From the GTD menu, type 8 to choose “Configure options.”
Increase the number of “switch busy” test attempts to 9. Repeat
step 8 and step 9. If all or at least the majority of the tests are successful, continue with step 12. If less than half of the tests are
successful, call Technical Support.
Return the test extension to an idle state.
From the GTD menu, type 3 to choose “Reorder tone.”
Type the test extension number and press ENTER.
Page 43

15
Each time the test extension rings, take it off hook and quickly
hang up to generate a reorder tone.
16
During the test, the screen displays status messages and the
results. If any of the tests are unsuccessful, perform step 17. If all
or at least the majority of the tests are successful, continue with
step 18.
17
From the GTD menu, type 8 to choose “Configure options.”
Increase the number of “reorder” test attempts to 9, and repeat
steps 13 through 15. If all or at least the majority of the tests are
successful, then continue wi th step 18. I f less than half of the tests
are successful, call Technical Support.
18
From the GTD menu, type 4 to choose “Dial tone.”
19
During the test, the screen displays status messages and the
results. If any of the tests are unsuccessful, perform step 20. If all
of the tests are successful, continue with step 21.
20
From the GTD menu, type 8 to choose “Configure options.”
Increase the number of “dial tone” test attempts to 9, and repeat
step 18. If all or at least the majority of the tests are successful,
continue with step 21. If less than half of the tests are successful,
call Technical Support.
21
Type 5 to save the settings.
22
Type 0 (zero) to exit to the Utility menu.
23
From the Learn Tones menu, type 5 to choose “L e a rn to ne s.”
24
Type 2 to choose “Call progress tones.”
25
When “Ready to begin ring test” appears on the console screen,
press ENTER to begin the ring tone test.
26
Type the test extension number and press ENTER. The test exten-
sion will ring many times. Do not answer the extension d uring
the test.
27
When the ring tone test is complete, “Ready to begin busy test”
appears on the console. If the test extension is still ringing after
this message appears, take it off hook and hang up.
Continued
39
Page 44

28
Place the test extension in a busy state.
29
Press ENTER to begin the busy tone test.
30
When the busy tone test is complete, the screen displays the
results of the test. If all of the values on lines 22 through 24 are
less than or equal to 75 percent, continue with step 31.
If any of the values on lines 22 through 24 a re grea ter tha n 75 pe r-
cent, repeat step 28 and s tep 29. A fter rep eati ng the te st, if the val-
ues are still greater than 75 percent, call Technical Support.
31
Type y to save the values.
32
From the Utility menu, type 8 to restart the voice messaging
system.
40
QUICK START INSTALLATION GUIDE
Page 45

Training Receptionists and operators
The operator, or receptionist, is an advocate for the voice messaging
system. The operator’s attitude and comfort level with the system can
have a significant influence on system acceptance by subscribers and
external callers.
Hold operator training at a phone console identical to the one the
operator uses. This means you will teach the operator at the customer
site in most cases. It is crucial that the operato r not h andle calls during
training. Forward calls to another phone or console, or have someone
else handle calls while the operator is in training.
Teach the operator how to answer calls transferred from the system
versus from direct phone lines. Sometimes there is no way to tell the
difference between direct calls and system transfers. In this case, help
the operator come up with a suitable phrase that can be use d to
answer all types of calls.
If the voice messaging system is used as an automated attendant,
encourage the operator to tell callers the extension they are being
transferred to. This will help educate frequent callers and lighten the
operator’s call load. The operator also must know how to transfer calls
into voice mailboxes. The timing of the transfer is fairly critical on
some phone systems, so have the operator practice a few times with
you on the line as the caller.
While training the operator, look for ways to make things easier on the
particular operator console. For example, you may be able to program
speed-dial numbers or buttons to help the operator transfer calls to
voice mess aging.
Continued
41
Page 46

System manager
A system manager needs a broad understanding of the voice messaging system, because he or she wi ll be exp ected to res pond to question s
and provide one-on-one assistance. All system managers should be
able to perform routine maintenance such as:
■
Adding and deleting subscribers
■
Rerecording greetings
■
Modifying system settings by phone
■
Creating new message groups
■
Changing schedules
The system manager should be comfortable using the system as a subscriber and as an operator before receiving this advanced training.
The system manager training session should be at least one hour long
and held on a functioning voice messaging system, preferably away
from the customer site. The best location is usually the installer’s
office. If you must hold the training at the customer’s site, the session
should be away from the trainee’s usual work space and kept free of
interruptions.
Follow up
42
Make yourself available for several days after the training session to
answer questions. Also, follow up in a week or so to check that the system manager and operators are comfortable with the system.
QUICK START INSTALLATION GUIDE
Page 47

Maintaining the system
The Field Serivce Utility (FSU) allows an installer to back up, restore,
or update the Lingo voice messaging system using a direct serial connection or a modem connection, without physically being on-site.
While the FSU replaces CoSession when performing backup, update,
and restore functions, CoSession is still used for console access.
The FSU uses a host and a remote program. The host program resides
on the voice messaging system, and the remote program runs on the
installer's computer. Perform the following procedure to install FSU
remote software on the computer you plan to use to access the voice
messaging system.
To install FSU remote software:
1
On the computer you plan to use to access Lin g o, open a DOS
window and navigate to the root directory (C:\).
2
Insert the Lingo CD-ROM into the computer's CD-ROM drive.
3
At the C:\> prompt, type
d:\install\fsu\fsuinst -d
and press ENTER. The FSU remote program will be installed in
the C:\FSU directory.
4
From the C:\FSU directory, type FSU to start the FSU remote
program.
43
Page 48

Enabling multiple languages
Lingo can have up to three different languages activated at the same
time, allowing language assignment by port. For example, ports one
and two can use English, port three German, and port four French.
Lingo systems can be purchased with one or three languages activated. For systems with only one language activated, a multiple language upgrade is available.
Contact Sales Support to purchase a language upgrade. You will be
sent an activation code. After you have received the new activation
code, perform the following procedu res to acti vate th e ne w lan gua ge s.
System and port languages
The system language is the default language used for all ports and
prompts, unless you choose another port-specific language. If you
change the system language, it will replace all of the previous system
language prompts with the new language prompts. The only exceptions are the OGM prompts, if you choose not to update them when
you install the new language. OGM prompts are the system voice
prompts, such as the day, night, and alternate greetings, box names,
and transaction box greetings, that are typically customized for a site.
A port language is the language that is used for calls that come in on
specified voice messaging ports. If a port does not have a language
specified, it uses the system language.
44
To assign system and port languages
QUICK START INSTALLATION GUIDE
1
At the Utility menu screen, type 6 and press ENTER.
2
At the the Language Configuration U tility menu, type the number
of the language that you want to assign as the system language
and press ENTER.
3
Type the number of the language that you want to assign to port
one.
4
Repeat step 3 for the remaining ports.
5
From the U ti lity menu, typ e 8 to exi t the co mplete the langua ge
activation and restart the voice messaging system.
Page 49

To install new languages
1
Exit the voice messaging system.
2
At the Utility menu screen, type 3 and press ENTER.
3
Start the FSU client program, and connect to the FSU host.
4
From the FSU Options menu, select “Install.”
5
From the Installation Options menu, select “Partial install.”
6
From the Partial Installation Options menu, select “System lan-
guage prompts.”
7
From the System Language Prompts menu, select the language
that you want to install.
You will be asked if you want to update the OGMs. The most
common answer for upgrades is “No.” If you do choose to update
OGMs, any of these voice prompts created by the customer will
be replaced by default voice messaging system OGMs in the new
language.
8
Follow the on-screen instructions to continue with the installa-
tion.
During the installation process, several error messages may be
generated. It is safe to ignore these errors as long as the file trans-
fer percentage eventually reaches 100%. If the file transfer per-
centage does not reach 100% or if the installation process stops
for more than several minutes, press ESC and begin again at
step 4.
9
When the new system lang uage inst allation is co mplete , ex it from
the FSU.
10
Restart the voice messaging system.
45
Page 50

Performing a port upgrade
Lingo systems can be configured for either two or four ports. Systems
purchased with two ports can be upgraded to four ports by contacting
Sales Support. When you purchase a port upgrade, you will recieve an
activation code. After you recieve the new activation code, perform
the following procedure to upgrade the system.
To activate additional ports
1
Exit the voice messaging system.
2
At the Utility menu screen, type x and press ENTER.
3
At the DOS prompt (C:\VMAIL,) type keyupdat and press
ENTER. System information will be displayed, including the
number of activated languages.
4
Type the new activation code and press ENTER. The system will
be updated with the new port information.
5
Confirm that the system information displays the correct number
of activated ports.
6
Press ESC to exit the Keyupdat program and restart the voice mes-
saging system.
46
QUICK START INSTALLATION GUIDE
Page 51

Troubleshooting Basic troubleshooting can be done on-site by th e system manager. See
the System Administration Guide for common problems and solutions
that you can resolve working with the system manager. Since the system manager typically does not have access to the voice messaging
system console, more advanced troubleshooting is done using CoSession or equivalent remote access software, and resolved if necessary
using the Field Service Utility.
General tone detection
One or more of the following situations indicates a problem with general tone detection (GTD).
■
Calls collide during callout. For example, when the voice messag-
ing system tries to dial out and a new call comes in at the same
time, the caller hears dialed touchtones.
■
Phantom calls go to the operator. This typically occurs when a
caller hangs up during the opening greeting and the call is trans-
ferred to the operator.
■
Dial tones appear in messages in voice mailboxes.
To activate general tone detection
1
Go to line 2 on Switch Setup screen page 1.
2
In the “Integration options” field, type dt and press ENTER.
3
If this does not correct the problem, perform the procedure “To
run Learn Tones” on page 38.
47
 Loading...