

Page 1
VERSION 2.7
User Guide
Page 2

Copyright © 2002-2004 Active Voice, LLC.
All rights reserved.
First edition 2004.
Active Voice, Kinesis, ViewCall, ViewFax, and ViewMail are
trademarks or registered trademarks of Active Voice, LLC.
Other brand and product names used in this document are
trademarks of their respective owners.
Licensed under one or more of the following patents: U.S.
Nos. 4,994,926; 5,291,302; 5,459,584; 4,696,028;
4,809,321; 4,850,012; 4,922,526; 4,935,958; 4,955,047;
4,972,469; 4,975,941; 5,020,095; 5,027,384; 5,029,196;
5,099,509; 5,109,405; 5,148,478; 5,166,974; 5,168,519;
5,249,219; 5,303,298; 5,309,504; 5,347,574; 5,666,401;
5,181,243; 5,724,408; and Canadian No. 1329852.
Active Voice, LLC.
Seattle, Washington
U.S.A.
www.activevoice.com
Page 3

Contents
Introduction..................................................1
Introducing Kinesis ...................................... 2
About this guide.......................................... 3
Getting started.............................................5
To enroll on Kinesis...................................... 6
To log on to Kinesis ..................................... 7
To access the Web Assistant ....................... 8
To log off the Web Assistant ....................... 9
The tools you use .......................................10
Messaging by phone ................................. 11
Messaging from your e-mail Inbox............ 12
Working with the Web Assistant ............... 13
Using the Media Master control bar ......... 15
Checking messages ....................................17
To check messages.................................... 18
To check your calendar.............................. 22
To forward a message ............................... 24
To reply to a message ............................... 26
To return a call........................................... 29
To deliver a fax .......................................... 31
To check e-mail messages in an external
mailbox...................................................... 33
Sending messages ......................................36
To send a voice message ........................... 37
To send an urgent message.......................40
To request a return receipt for
a message ..................................................42
To send a private message.........................44
To send a message with future delivery.....46
To send a message with an expiration
date............................................................48
To send a message to a list of recipients... 50
To send a priority broadcast message.......52
To send a message to another location.....55
Changing personal settings ........................57
To change your recorded name................. 58
To change whether you are listed in the
directory.....................................................60
To change your phone password...............62
To change your Kinesis conversation
language .................................................... 64
To change your text-to-speech language..65
To switch between full or brief
conversation menus ...................................67
CONTENTS IIIKINESIS USER GUIDE
Page 4

Changing recording and playback settings 69
To change recording and playback
devices .......................................................70
To change playback volume.......................72
To change automatic voice message
playback .....................................................74
Changing greeting settings........................ 75
To record a greeting...................................76
To enable or disable a greeting .................78
To change a greeting source......................80
To enable or disable callers to bypass
your greeting..............................................81
Changing call settings ................................83
To change what Kinesis says when you
answer calls ................................................84
To change call screening............................86
To change call handling for when your
phone is busy .............................................87
To change call transfer ...............................89
To change a caller’s message options........91
Changing message settings........................92
To change message types..........................93
To change message summary information 95
To change your log on greeting.................97
To change the sound that notifies you
of new voice messages ..............................98
To change message addressing settings ...99
To set up an external mailbox..................100
Changing message notification settings... 103
To enable or disable a notification
device ...................................................... 104
To change a notification phone number . 106
To change the address and text settings
for a text pager........................................ 109
To change the types of messages you
are notified of .......................................... 111
To change a notification schedule ........... 112
To change notification options................ 113
Changing private list settings .................. 115
To change the name of a private list ....... 116
To change the members of a
private list ................................................ 118
Changing caller options ........................... 121
To enable callers to edit their
messages ................................................. 122
To enable callers to leave urgent
messages ................................................. 123
To ask callers to enter a callback
phone number ......................................... 124
KINESIS USER GUIDE CONTENTS IV
Page 5

Sharing a phone .......................................125
To answer a call to a shared phone......... 126
To check messages with a shared
phone ...................................................... 127
To change call transfer for a shared
phone ...................................................... 129
To set call handling when a shared phone
is busy...................................................... 131
To set how calls to a shared phone are
announced............................................... 133
To set whether calls to a shared phone
are screened............................................ 135
To record a greeting for a shared
phone ..................................................... 137
Working with ViewCall .............................140
The ViewCall window .............................. 141
Connecting or disconnecting from
Kinesis...................................................... 143
Managing incoming calls......................... 144
Tracking your call activity ........................ 145
Reference numbers and menus.................146
Phone numbers, names, and addresses.. 147
Kinesis conversation menus .................... 148
Index .......................................................150
CONTENTS VKINESIS USER GUIDE
Page 6

■ Introduction
Welcome to Kinesis™.
This section gives you a basic introduction to Kinesis and associated
documentation.
IN THIS SECTION
Introducing Kinesis .............................. 2
About this guide .................................. 3
KINESIS USER GUIDE
INTRODUCTION 1
Page 7

Introducing Kinesis
On Kinesis, you and the other users in your organization
are called subscribers. As a subscriber, you can send and
manage voice, fax, and e-mail messages from a touchtone
phone, from your computer, or over the Internet.
With a full-featured system, Kinesis includes:
Unified messaging ViewMail
you manage voice and fax messages in your Outlook Inbox,
along with your e-mail messages.
Fax option You can use a third-party fax program to send
and receive fax messages from your computer the same
way you send and receive other messages with Outlook.
You can also print your fax and e-mail messages to a fax
machine from any touchtone phone.
Text-to-speech Text-to-speech lets you hear the text por-
tion of your e-mail messages and meeting requests over the
phone.
The Web Assistant This Web-based option lets you person-
alize your Kinesis phone settings using your Web browser.
®
for Microsoft® Outlook® lets
Your system administrator can tell you whether these
options are available to you.
INTRODUCTION 2KINESIS USER GUIDE
Page 8
About this guide
The Kinesis User Guide explains how to manage voice and
fax messages, and how to change the settings that define
how you work with Kinesis. For information about managing e-mail messages, see the documentation for your email program.
The Kinesis User Guide presents procedures for a full-featured Kinesis system. Some procedures may work differently for you, depending on how Kinesis is set up at your
organization.
Each task includes procedures that relate to the tools you use
to work with Kinesis and are marked accordingly:
Phone
Inbox
Web Assistant
The Kinesis User Guide includes space for reference information on page 147. Write the phone numbers for calling
Kinesis; your ID; the Web site address for the Web Assistant; the server name; and the name and phone number of
your system administrator.
INTRODUCTION 3KINESIS USER GUIDE
Page 9

ABOUT THIS GUIDE
The map on page 148 shows the main Kinesis menus available by phone. You can print the map as a quick reference
for Kinesis features.
INTRODUCTION 4KINESIS USER GUIDE
Page 10

■ Getting started
Your first step in using Kinesis is to enroll by phone as a subscriber.
During enrollment, you record your name and greeting, set a password, and set whether you are listed in the directory.
You can call Kinesis from inside or from outside your organization to
enroll.
Once enrolled, you can log on to Kinesis by phone to check and send
messages, and to change your Kinesis settings.
IN THIS SECTION
To enroll on Kinesis.............................. 6
To log on to Kinesis.............................. 7
To access the Web Assistant............... 8
To log off the Web Assistant............... 9
KINESIS USER GUIDE
GETTING STARTED 5
Page 11

To enroll on Kinesis
The information that Kinesis asks for when you log on to
enroll depends on where you are calling from:
Inside your organization Kinesis may ask you to enter your
ID and a password.
Outside your organization Kinesis asks you to enter your ID
and may ask you to enter a password.
Your system administrator gives you your ID and a temporary password, if one is required.
NOTE Depending on how Kinesis is set up at your organization,
this procedure may not be required.
USING YOUR PHONE
1 Dial the internal or external Kinesis phone number.
2 If you dialed the external phone number, press when Kinesis
answers.
3 Enter your ID, if required, then press .
4 Enter a password, if required.
5 If asked, follow the instructions to:
• Record your name.
• Record a greeting.
• Set a new password.
• Choose whether you are listed in directory assistance.
#
*
GETTING STARTED 6KINESIS USER GUIDE
Page 12

To log on to Kinesis
After you enroll as a subscriber, use this procedure whenever you log on to Kinesis to manage messages and settings by phone.
The information that Kinesis asks for when you log on
depends on where you are calling from:
Inside your organization Kinesis may ask you to enter your
password.
Outside your organization Kinesis asks you to enter your ID
and may ask you to enter your password.
USING YOUR PHONE
1 Dial the internal or external Kinesis phone number.
2 If you dialed the external phone number, press when Kinesis
answers.
3 Enter your ID, if required, then press .
4 Enter your password, if required.
NOTE You may be able to skip some or all of these steps when
you call Kinesis from your desk, or if your desk phone has a
button that you can press to automatically call Kinesis. See your
system administrator for more information.
#
*
GETTING STARTED 7KINESIS USER GUIDE
Page 13

To access the Web Assistant
Use this procedure whenever you access the Web Assistant
with your Web browser. Web Assistant lets you manage
Kinesis settings, such as greetings, call transfer, message
notification, and distribution lists.
After accessing the Web Assistant, you may have to enter
logon information again, depending on how Kinesis is set
up.
To complete this procedure, you need to know the server
name, and your Microsoft Exchange user name and password. See your system administrator for more information.
USING THE WEB ASSISTANT
1 Start Internet Explorer.
2 Ty pe http://<server name>/saweb/aadefault.htm
(If you do not know the server name, contact your system
administrator.)
3 Type your Microsoft Exchange user name and password, if required.
(Use your Microsoft Windows NT
and password, not your Kinesis phone password.)
®
or Windows® 2000 user name
TIP Add the Web Assistant site to your list of favorites in
Internet Explorer, so you do not have to type the Web address
each time you log on.
GETTING STARTED 8KINESIS USER GUIDE
Page 14
To log off the Web Assistant
Use this procedure whenever you log off the Web Assistant.
To prevent others from accessing your mailbox settings,
close your Web browser after you log off.
USING THE WEB ASSISTANT
1 In the Web Assistant navigation pane, click “Log off.”
2 To prevent others from accessing your mailbox settings, in Internet
Explorer, select File > Close.
GETTING STARTED 9KINESIS USER GUIDE
Page 15

■ The tools you use
This section explains more about three of the tools you can use to
manage your messages and Kinesis settings:
• Any touchtone phone
•Your e-mail Inbox
• Web Assistant and the Internet
IN THIS SECTION
Messaging by phone ......................... 11
Messaging from your e-mail Inbox... 12
Working with the Web Assistant....... 13
Using the Media Master control bar 15
KINESIS USER GUIDE
THE TOOLS YOU USE 10
Page 16

Messaging by phone
When you interact with Kinesis by phone, you hear the
Kinesis conversation. The conversation’s recorded instructions guide you as you listen to, send, and manage messages, and change your settings.
Your system administrator can set you up for one of two
menu types available for the conversation:
Full menus These menus provide comprehensive instruc-
tions for new users.
Brief menus These menus provide abbreviated versions of
menus for experienced users.
In the Kinesis conversation, you choose menu options by
pressing the corresponding touchtone keys on your phone
keypad. A map of the Kinesis conversation menus is provided on page 148.
Help
For conversation Help, press 0 on your phone keypad.
Use these keys anytime
TASK KEY TASK KEY
Cancel last action or
back up to previous
point in Kinesis
conversation
Skip ahead to next point
*
in Kinesis conversation
#
THE TOOLS YOU USE 11KINESIS USER GUIDE
Page 17
Messaging from your e-mail Inbox
With unified
messaging,
voice messages
are collected in
your e-mail
Inbox, along
with your fax
and e-mail
messages.
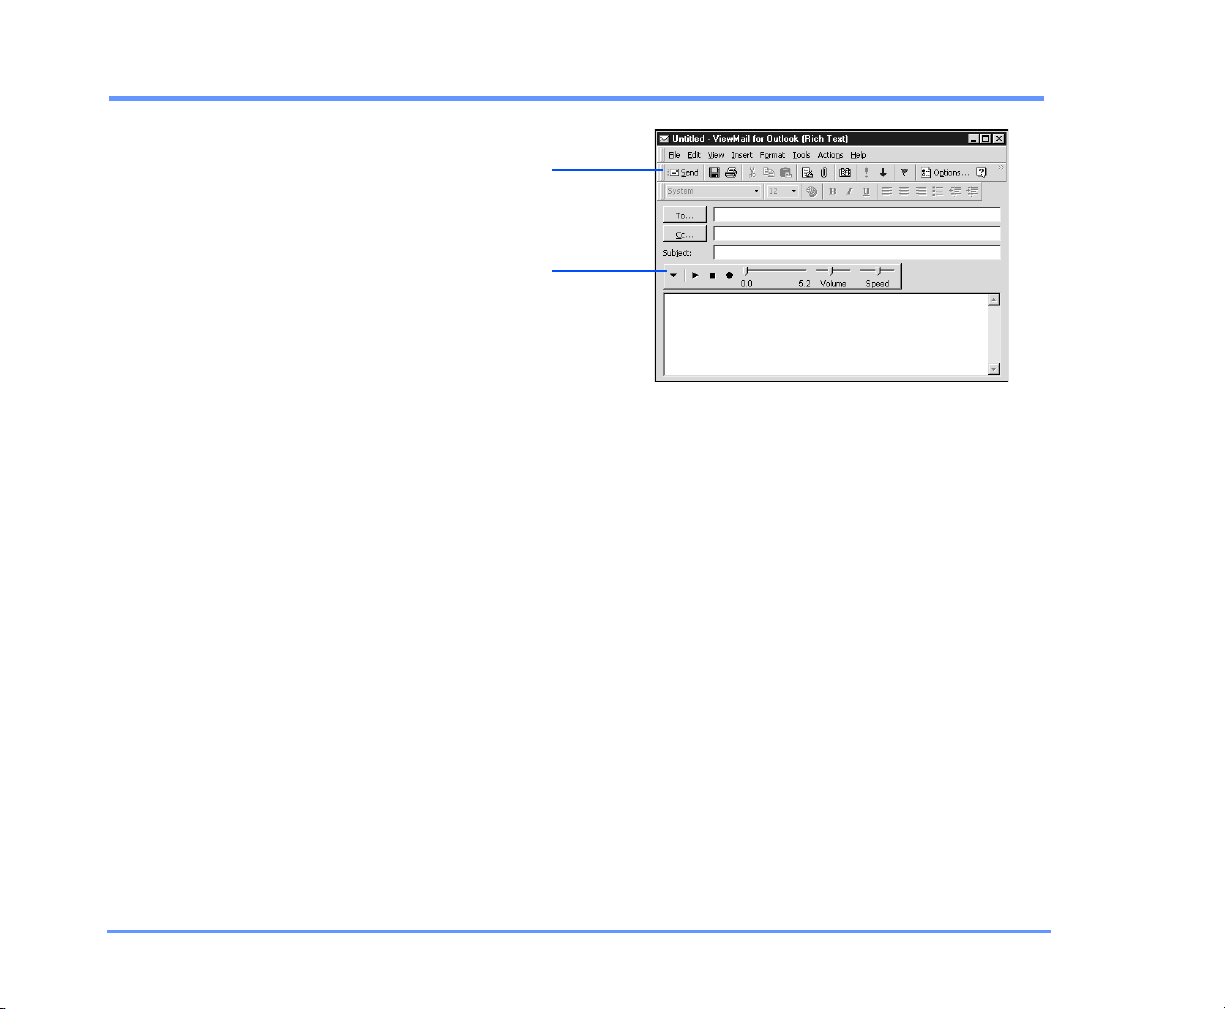
If your organization uses
ViewMail
for
Microsoft Outlook, you can send, listen to, and manage
voice messages from your Outlook Inbox. ViewMail’s voice
message form works the same way as an Outlook e-mail
message form. The ViewMail form also has a Media Master
control bar, which you use to record and play messages
(see “Using the Media Master control bar,” on page 15).
Without ViewMail for Microsoft Outlook, a voice message is
stored as a WAV file attachment to an e-mail message. You
can listen to the WAV file attachment with the speakers on
your computer. Other voice messaging tasks such as
recording must be done by phone.
Message
toolbar
Media Master
control bar
THE TOOLS YOU USE 12KINESIS USER GUIDE
Page 18

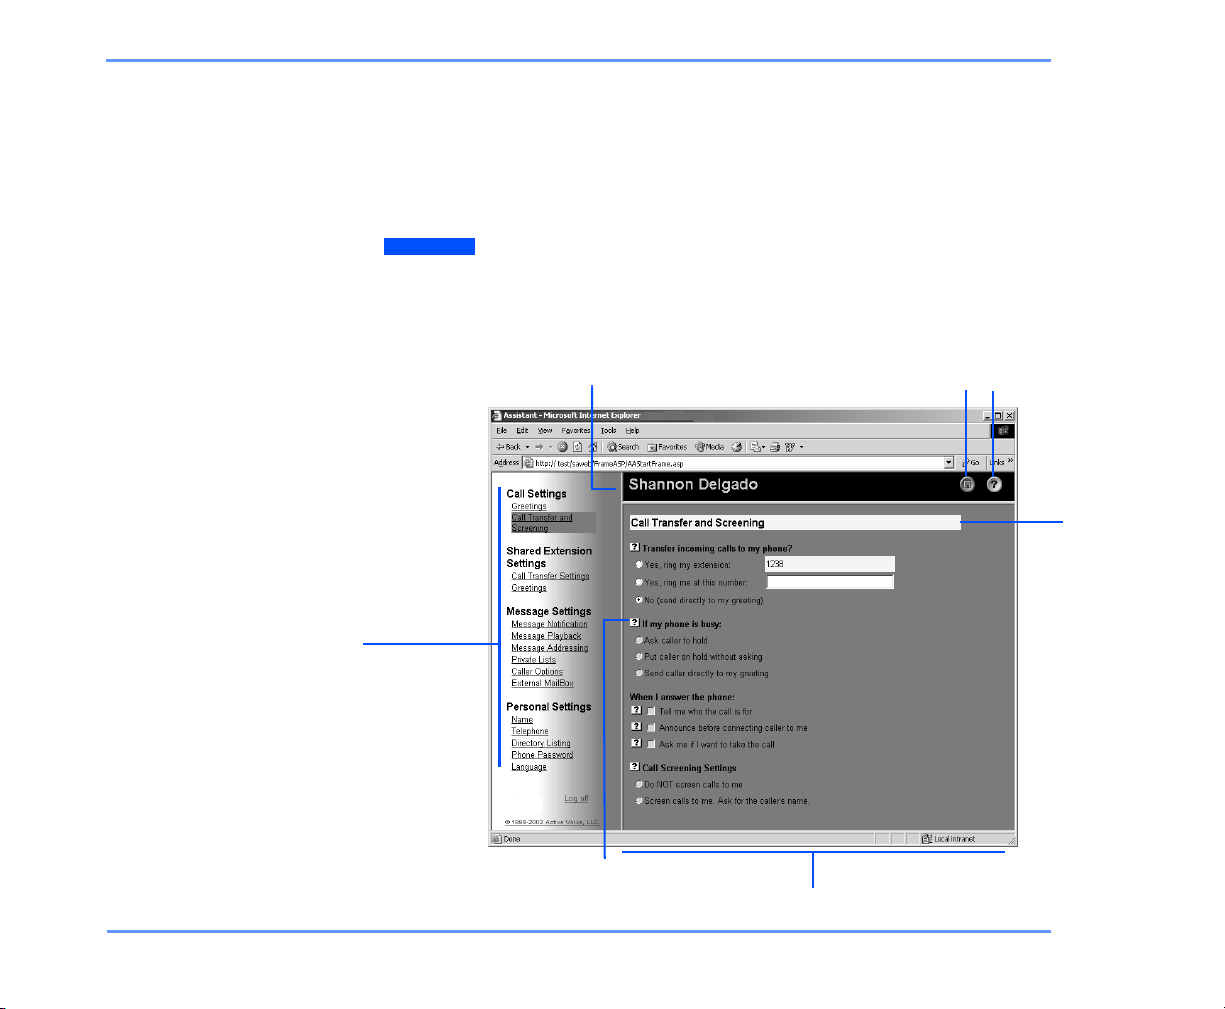
Working with the Web Assistant
The Web Assistant is a Web site that you access by using
your Web browser. Web Assistant pages contain settings
that control how you and your callers interact with Kinesis
by phone, such as your greetings, call transfer settings,
message notification settings, and message distribution
lists.
The site’s navigation bar contains the links to your Web
Assistant pages. You click a link to move from one page to
another as you make your changes.
TIP
Click the Save icon (the disk) frequently to save changes as
you make them. When you have unsaved changes, an
asterisk (*) appears next to your name as a reminder. The
asterisk disappears when you click the Save icon.
Each Web Assistant page with a recorded name or greeting
includes a Media Master control bar (see “Using the Media
Master control bar,” on page 15).
THE TOOLS YOU USE 13KINESIS USER GUIDE
Page 19
WORKING WITH THE WEB ASSISTANT
Help
For Web Assistant help, click the Help icon (the question
mark) at the top of the Web Assistant page. Question mark
links appear next to settings that have descriptions. To see
a description, click the link.
CAUTION!
Do not use the “Back” button in your Web
browser to return to a page that you viewed earlier.
Instead, use the links in the Web Assistant navigation
bar.
Subscriber name
Navigation bar
Save icon
Help icon
Page name
Help link
Page
THE TOOLS YOU USE 14KINESIS USER GUIDE
Page 20
Using the Media Master control bar
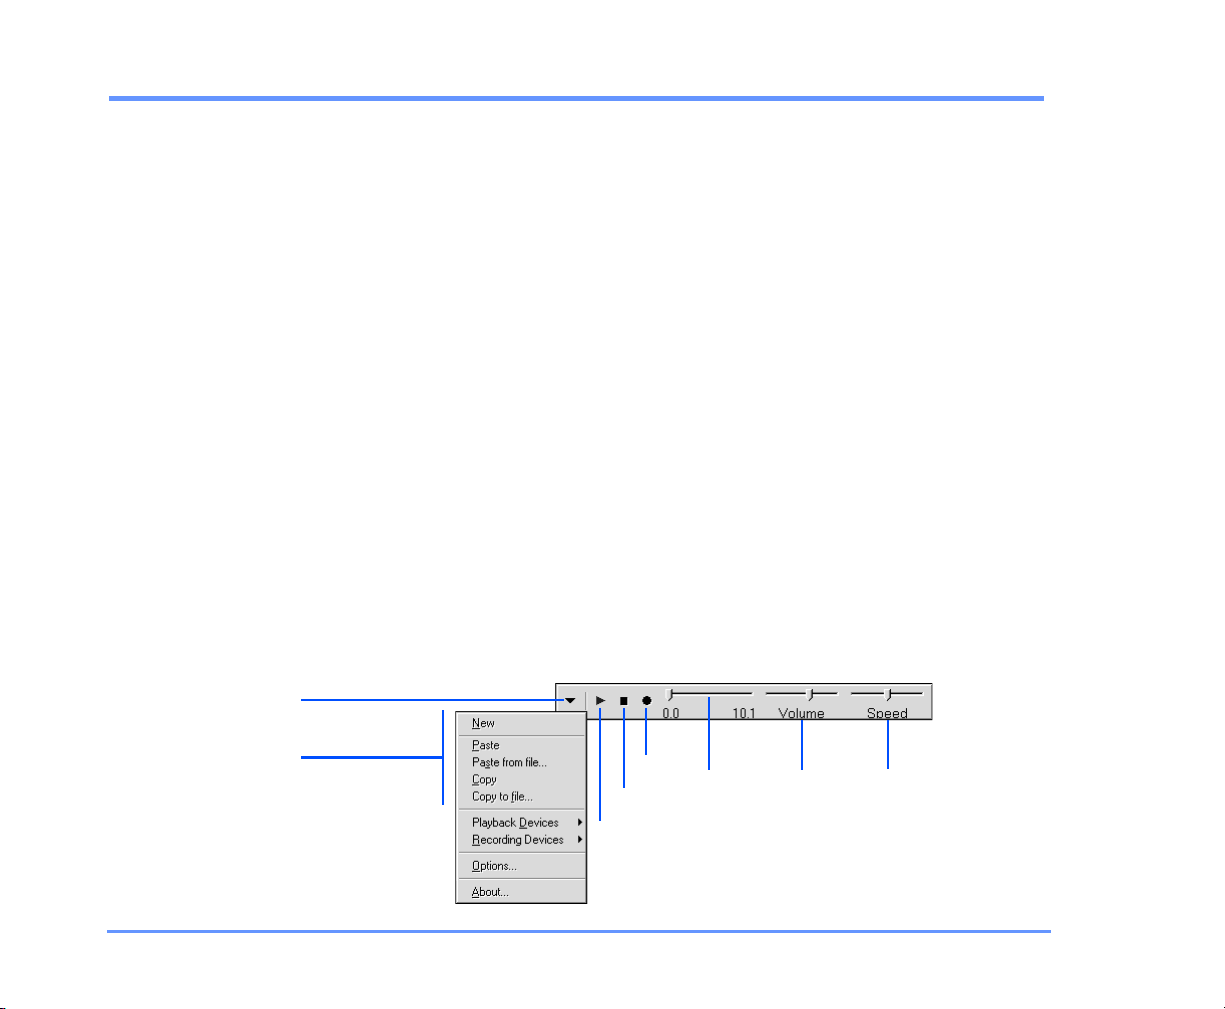
The Media Master control bar appears in ViewMail for
Microsoft Outlook and on Web Assistant pages, anywhere you
can record.
In ViewMail for Outlook, you use the Media Master control
bar to play and record voice messages. On the Web Assistant pages, you use the control bar to record names and
greetings.
Use the Options menu on the Media Master control bar to
work with other sound (WAV) files in your recordings. The following sound file options are available:
New Erase a recording to rerecord.
Paste Paste a sound recording the same way you paste
text in a text file.
Paste from file Paste another sound file to a recording.
Copy Copy a sound recording the same way you copy text
in a text file.
Options menu
Sound file options
Record Recording
Stop
Play
length
Volu me
control
THE TOOLS YOU USE 15KINESIS USER GUIDE
Speed
control
Page 21

USING THE MEDIA MASTER CONTROL BAR
Copy to file Copy the recording to a sound file that you
name.
You also use the Options menu to set your recording and
playback devices, if applicable (see “To change recording
and playback devices,” on page 70).
THE TOOLS YOU USE 16KINESIS USER GUIDE
Page 22

■ Checking messages
You can check messages by phone or from your e-mail Inbox. Once
you have listened to a message by phone, it becomes an old or saved
message—unless you mark it as new or delete it. When you open a
message from your e-mail Inbox, the message is marked as read.
Deleted messages are not completely removed from the system, but
instead are moved to the Deleted Items folder in your e-mail Inbox.
Deleted messages can still be accessed, either from your Inbox or by
phone. If you deleted a message by mistake, you can restore it to a
saved message. Once a message has been deleted from the Deleted
Items folder, it is permanently removed from the system.
It is a good idea to periodically clear old messages out of your Deleted
Items folder. If you do not do this, you may eventually exceed the storage limitations of your Kinesis account, and may find that you are
unable to send any further messages by phone. If this happens, try
removing a few items from your Deleted Items folder. This will bring
your total message store back below its size limitation, and you will
then be able to send new messages.
IN THIS SECTION
To check messages ............................ 18
To check your calendar...................... 22
To forward a message........................ 24
To reply to a message........................ 26
To return a call.................................... 29
To deliver a fax ................................... 31
To check e-mail messages in an
external mailbox................................. 33
KINESIS USER GUIDE
CHECKING MESSAGES 17
Page 23
To check messages
You can check your messages by phone or in your e-mail
Inbox.
If you are using the fax option, Kinesis plays the message
summaries and any voice annotations on your fax messages.
If you are using the text-to-speech option, Kinesis also
plays your e-mail messages and meeting requests. You can
record a reply to an e-mail or meeting request, and you can
accept or decline meeting requests by phone.
Settings for the types of messages you hear when you
check messages by phone and what you hear in message
summaries can be customized in the Web Assistant.
TIP
unwanted messages frequently to save space.
USING YOUR PHONE
1 Call Kinesis and log on.
Old messages are not deleted automatically. Delete
2 Press to hear new messages,
1
or
press to review old messages.
3
3 Use the following keys to manage your messages and to control
playback.
CHECKING MESSAGES 18KINESIS USER GUIDE
Page 24
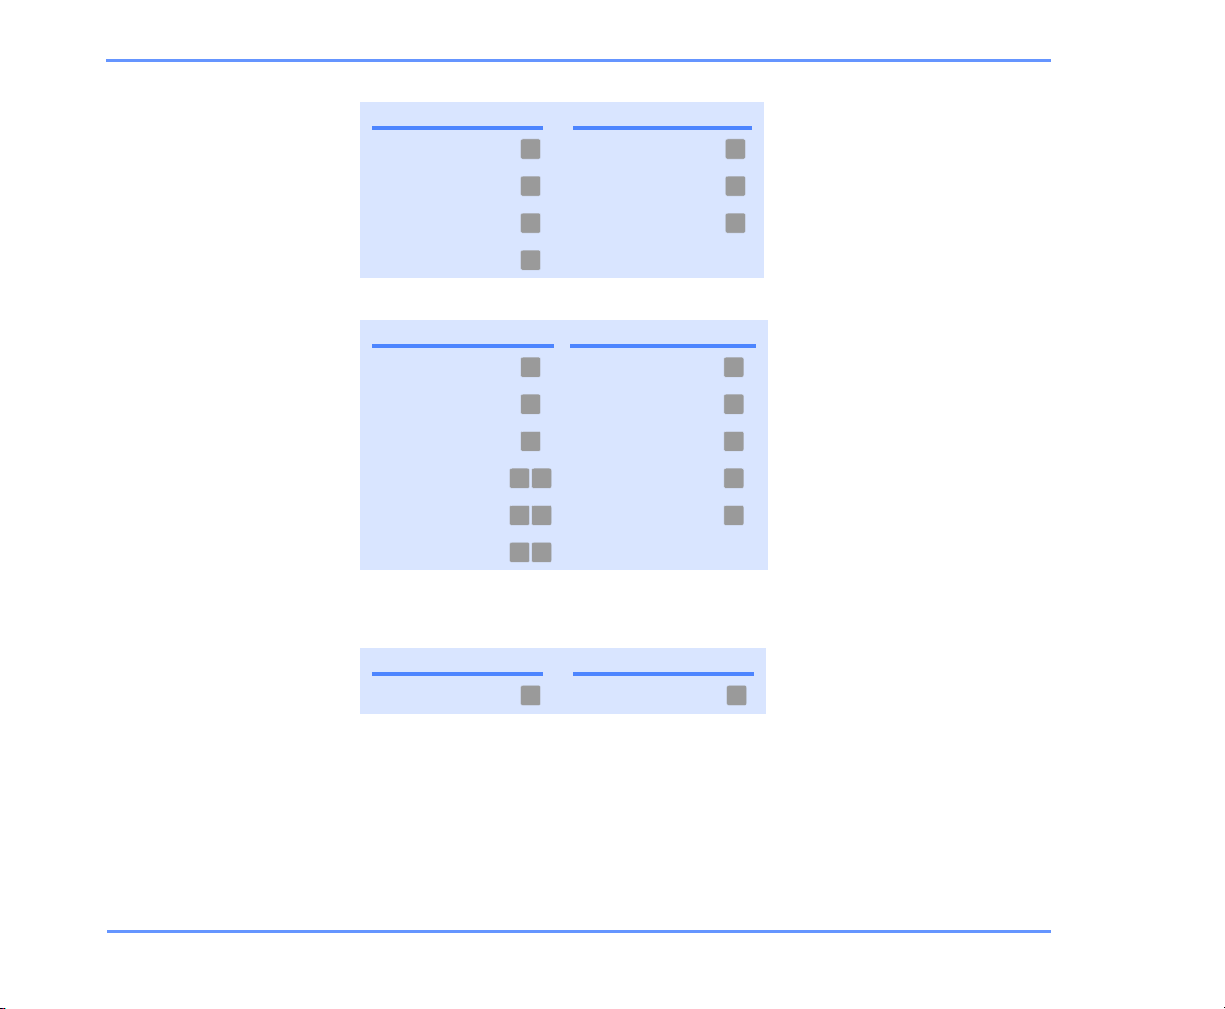
Use these keys during a message
TASK KEY TASK KEY
Repeat Reverse
1 7
TO CHECK MESSAGES
Save Pause or continue
Delete Fast-forward to end
Change volume
2 8
3 9
5
Use these keys after a message
TASK KEY(S) TASK KEY
Repeat Forward message
Save Mark as new
Delete Reverse
Return call
Reply to all Hear summary
Reply to sender
1 5
2 6
3 7
Deliver an e-mail or fax
4 1 8
to a fax phone number*
4 4 9
4 #
* Available only if you are using the fax option.
Use these keys anytime
TASK KEY TASK KEY
Cancel or back up Skip or move ahead
*
#
CHECKING MESSAGES 19KINESIS USER GUIDE
Page 25
TO CHECK MESSAGES
USING YOUR E-MAIL INBOX
1 Open your e-mail Inbox.
2 Follow the steps that apply to your setup.
Without ViewMail for Outlook Open the e-mail message with
WAV file attachment. Double-click the attachment to play it on your
computer speakers with your multi-media software.
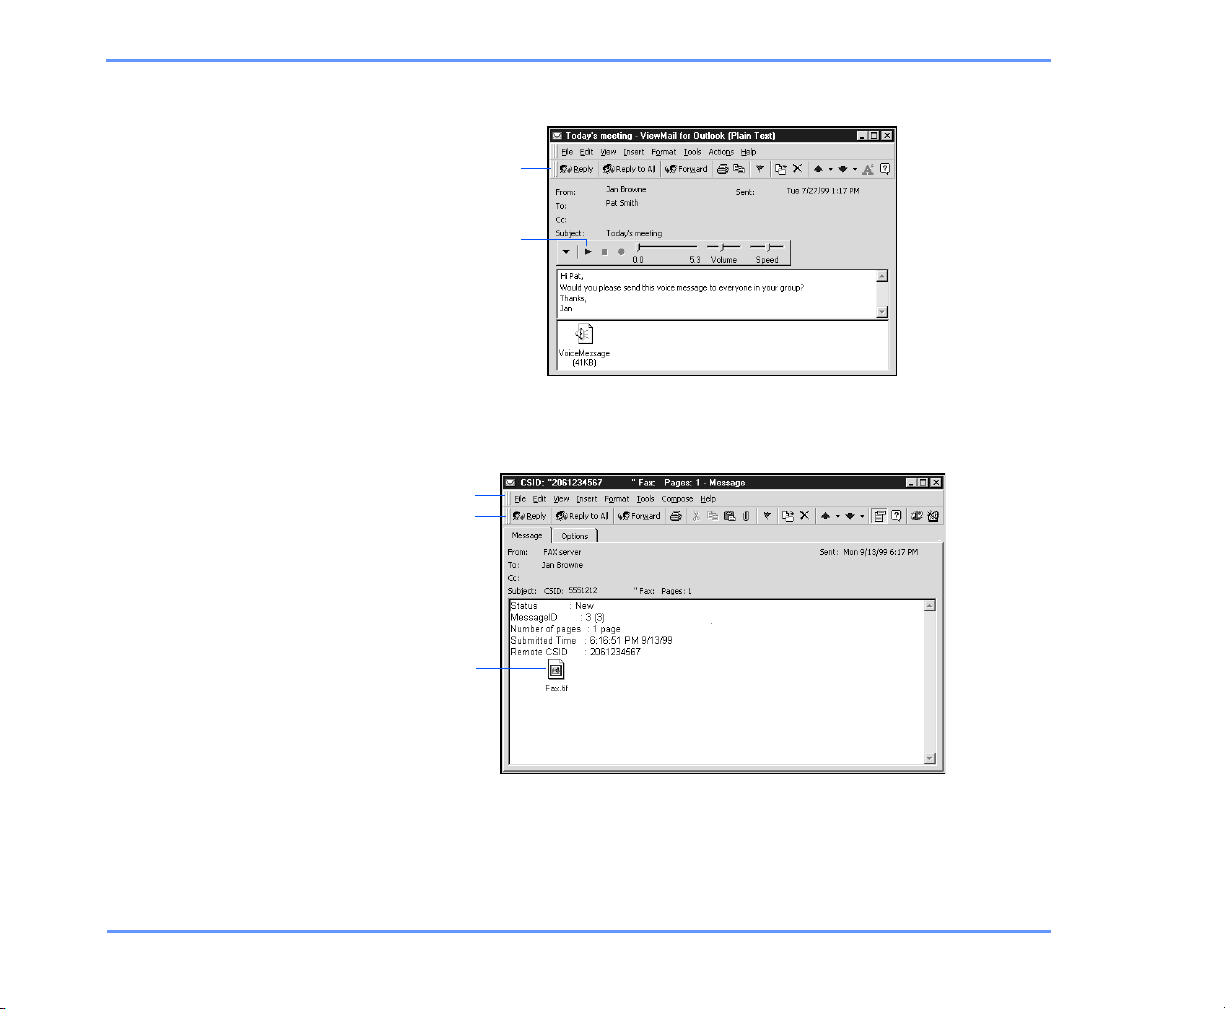
With ViewMail for Outlook Double-click a voice message , or
double-click a fax message .
In the open voice message, click on the Media Master control
bar to play the message.
or
In the open fax message, double-click the attached file to start the
viewer program on your computer.
TIP To have voice messages play automatically when you open
them, on the Outlook Tools menu, click “ViewMail options,”
then select the “Play voice automatically” check box.
CHECKING MESSAGES 20KINESIS USER GUIDE
Page 26
TO CHECK MESSAGES
Voice message in ViewMail for Outlook
Message toolbar
Play
In the voice or fax message, use the buttons on the message toolbar
to handle the message the same way you handle e-mail messages.
Fax message in ViewMail for Outlook
File menu
Message
toolbar
Fax file
Or, in the fax message, click the print button on the toolbar or click
“Print” on the File menu to print the fax.
CHECKING MESSAGES 21KINESIS USER GUIDE
Page 27
To check your calendar
If you are using the text-to-speech option, Kinesis can read
your schedule to you for any day in your calendar. You can
accept or decline each meeting, and you can send a voice
message to the meeting organizer.
USING YOUR PHONE
1 Call Kinesis and log on.
2 Press to check your schedule.
3 Press to hear today’s schedule,
5
1
or
2
press to hear tomorrow’s schedule,
or
press to select a day in the future. Press a four-digit number for
3
the month and day. For example, for May 7, press . You
do not need to enter a year.
0 5 0 7
4 Use the following keys to manage your meetings and control
meeting readback.
CHECKING MESSAGES 22KINESIS USER GUIDE
Page 28
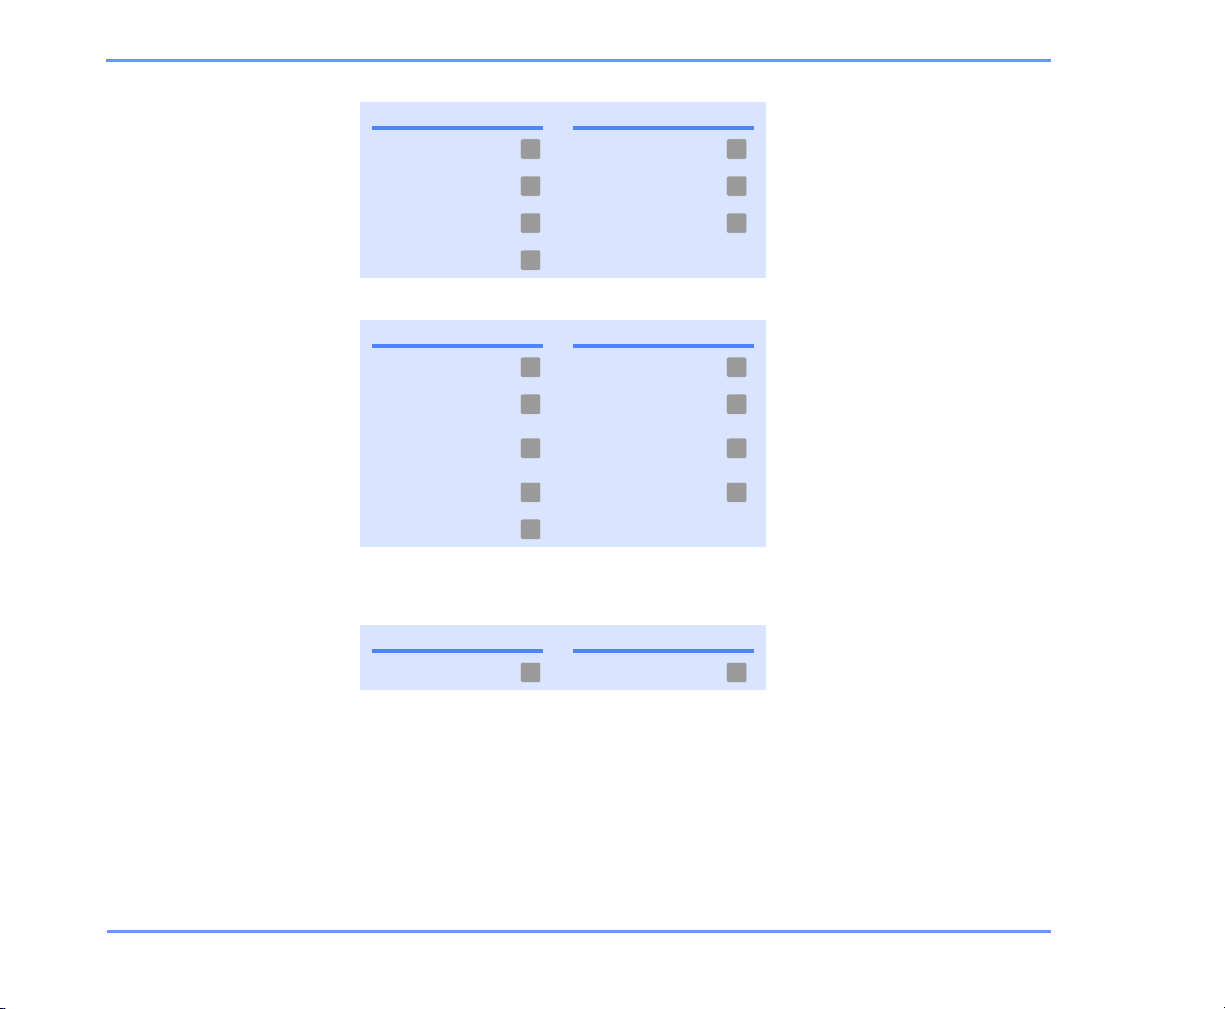
Use these keys during meeting readback
TASK KEY TASK KEY
Repeat Reverse
1 7
TO CHECK YOUR CALENDAR
Accept Pause or continue
Decline Fast-forward to end
Change volume
2 8
3 9
5
Use these keys after meeting readback
TASK KEY TASK KEY
Repeat Mark as new
Accept Reverse
Decline
Tentatively accept Hear summary
Forward meeting
message
1 6
2 7
Deliver meeting
3 8
message to a fax phone
number*
4 9
5
* Available only if you are using the fax option.
Use these keys anytime
TASK KEY TASK KEY
Cancel or back up Skip or move ahead
*
#
CHECKING MESSAGES 23KINESIS USER GUIDE
Page 29
To forward a message
You can forward a message as is or record an introduction
that plays before the forwarded message. You can forward
new or saved messages. When addressing a message,
press to switch between spelling and number mode.
USING YOUR PHONE
# #
1 After listening to the message, press .
5
2 Follow the Kinesis conversation to address the forwarded message.
3 Press to record an introduction. After recording, press ,
4 Press for message options,
2 #
or
3
press for message options,
or
#
press to forward the message as is.
1
or
#
press to forward the message as is.
5 Follow the conversation to handle the original message.
Message options
OPTION KEY OPTION KEY
Change addressing Set special delivery
Change recording Review message
1 3
2 4
CHECKING MESSAGES 24KINESIS USER GUIDE
Page 30
TO FORWARD A MESSAGE
USING YOUR E-MAIL INBOX
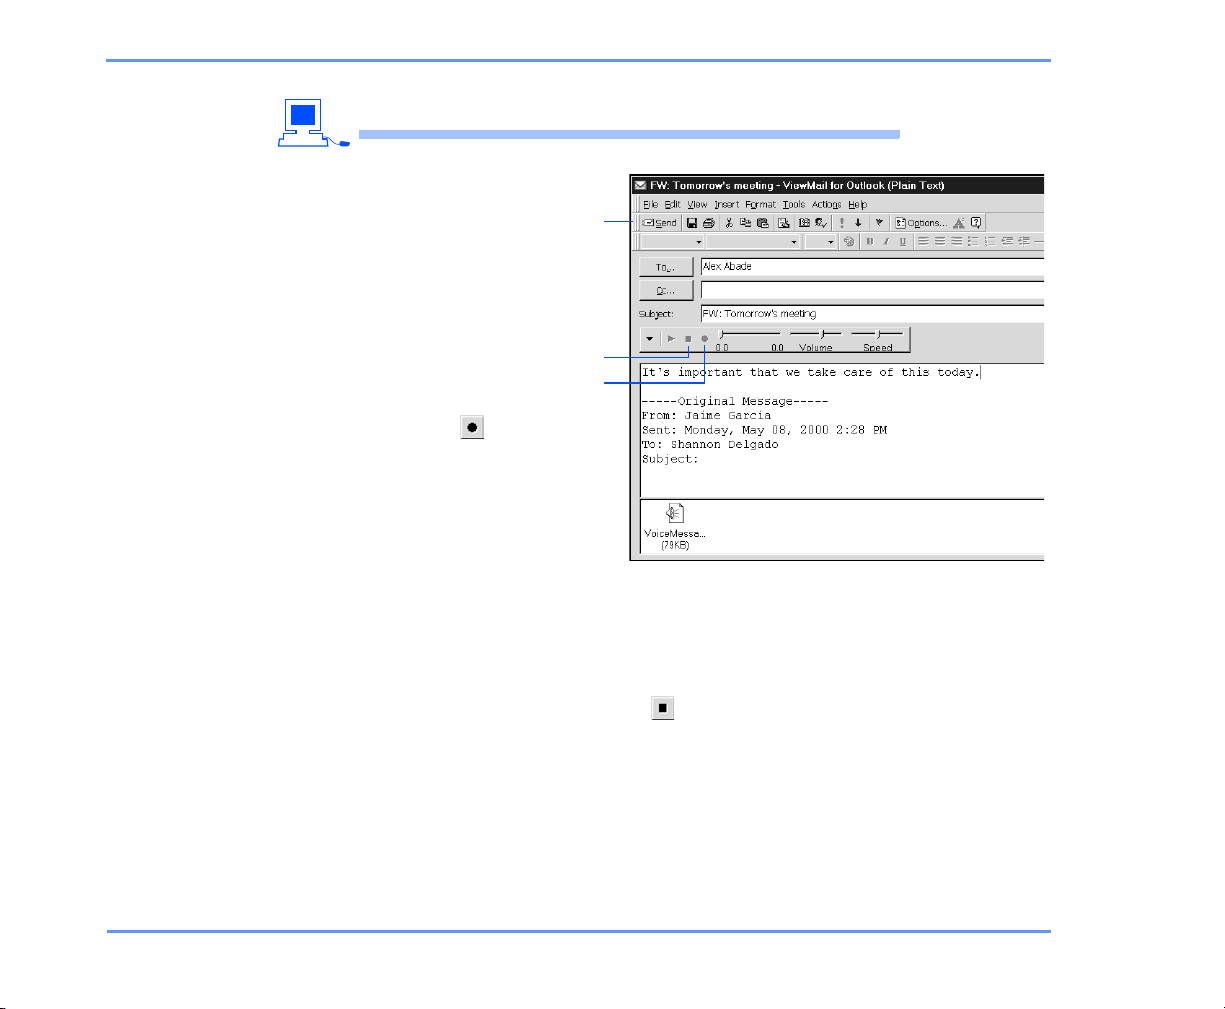
1 With ViewMail for
Outlook, in an
open voice
message, click
“Forward.”
Message
toolbar
2 Enter recipients’
names.
3 On the Media
Master control
bar, click to
record an
introduction with
your recording
device:
Stop
Record
Phone Pick up
the handset when the phone rings, wait for the tone, then speak
into the handset.
Multimedia microphone Wait for the tone, then speak into the
microphone.
4 When you finish recording, click .
5 Add text and attachments as appropriate.
6 Click “Send.”
CHECKING MESSAGES 25KINESIS USER GUIDE
Page 31
To reply to a message
When you reply by phone to any type of message, your
response is a voice message. You can reply by phone to
everyone who received the original message, or you can
reply only to the sender.
By phone or with ViewMail for Outlook, you can record a
reply only to another voice message from a subscriber.
USING YOUR PHONE
1 After listening to the message, press ,
or
if the original message was sent to more than one person, Kinesis
lets you press to reply to all,
or
press to reply only to the sender.
4 #
2 Record your reply. Press to finish recording.
3 Press for message options,
1
or
#
press to send the reply.
4 4
#
4
4 Follow the conversation to handle the original message.
CHECKING MESSAGES 26KINESIS USER GUIDE
Page 32
Message options
OPTION KEY OPTION KEY
Change addressing Set special delivery
1 3
TO REPLY TO A MESSAGE
Change recording Review message
2 4
Use these keys as you record
TASK KEY TASK KEY
Pause or continue End recording
8 #
Use these keys anytime
TASK KEY TASK KEY
Cancel or back up Skip or move ahead
*
#
CHECKING MESSAGES 27KINESIS USER GUIDE
Page 33
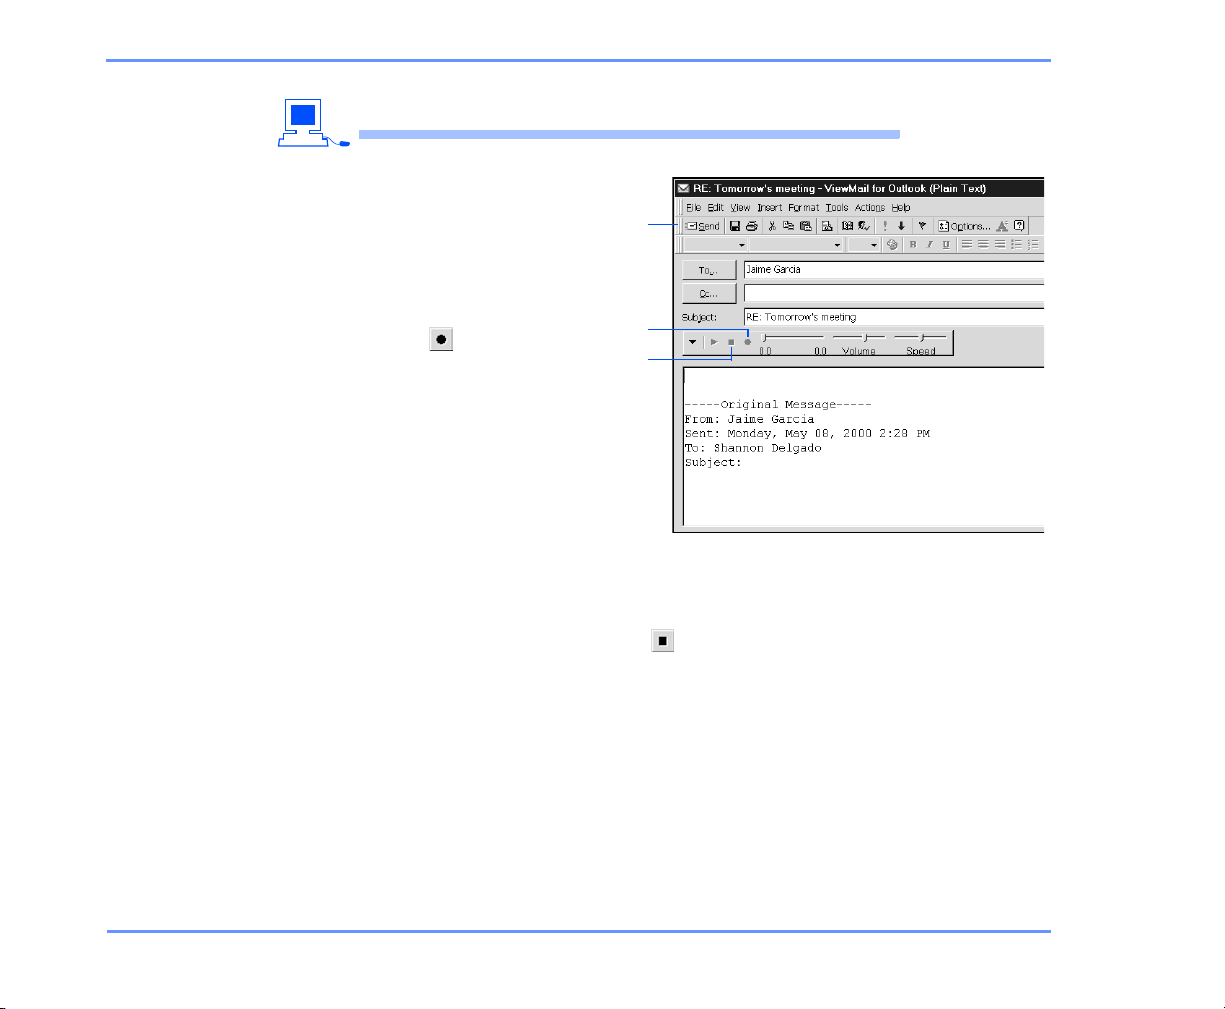
TO REPLY TO A MESSAGE
USING YOUR E-MAIL INBOX
1 With ViewMail for
Outlook, in the open
voice message, click
“Reply.”
Message
toolbar
2 On the Media
Master control bar,
click and record
a reply with your
recording device:
Phone Pick up the
handset when the
phone rings, wait
for the tone, then
speak into the
handset.
Multimedia
microphone Wait for the tone, then speak into the microphone.
Record
Stop
3 When you finish recording, click .
4 Add text and attachments as appropriate.
5 Click “Send.”
CHECKING MESSAGES 28KINESIS USER GUIDE
Page 34

To retur n a cal l
You can immediately return a call to the person who left
you a message. Your system administrator can tell you
whether this feature is available to you.
With the call return feature, when you access your mailbox
from a touchtone phone, you can return a call after you listen to a message. Or, if your phone has Soft Keys, you can
return a call by pressing the CALL Soft Key on the phone.
You can return a call to another subscriber or to an external caller.
To return a call to an external caller, Kinesis can use caller
ID information received from your phone service provider.
Or, you can use Web Assistant to set up the system to ask
your callers to enter their phone number before they are
transferred to your extension. See “To ask callers to enter a
callback phone number” on page 124.
If a returned call is not answered, after you disconnect, call
Kinesis again if you want to continue with using the system by phone. Or, if the line is busy, Kinesis tells you that
the call could not be connected. Then, Kinesis returns you
to your voice mailbox.
The return call feature is available for new and old messages. In some cases, the return call feature may not be
available for a message because certain phone numbers
have been restricted. Kinesis tells you if return call is not
available.
CHECKING MESSAGES 29KINESIS USER GUIDE
Page 35

TO RETURN A CALL
The live record feature is not available during a returned
call.
USING YOUR PHONE
◆ After listening to a message, press to return a call to the
person who left the message,
or
◆ With Soft Keys, after listening to a message, press the Soft Key
below the CALL option on the phone display. If available, the system
dials the phone number associated with the message.
4 1
CHECKING MESSAGES 30KINESIS USER GUIDE
Page 36

To deliver a fax
With the fax option, you can deliver your faxes to a fax
machine. You can also deliver e-mail messages and meeting requests to a fax machine. Your callers may record a
message with their fax. This message is called a voice
annotation.
USING YOUR PHONE
1 Call Kinesis and log on.
2 Press to hear new messages,
1
or
press to review old messages.
3
3 After you listen to any voice annotation included with a fax, an e-
mail message, or a meeting request, press .
8
4 Enter the fax phone number.
5 Use the following keys to manage your fax messages and to control
message playback.
CHECKING MESSAGES 31KINESIS USER GUIDE
Page 37
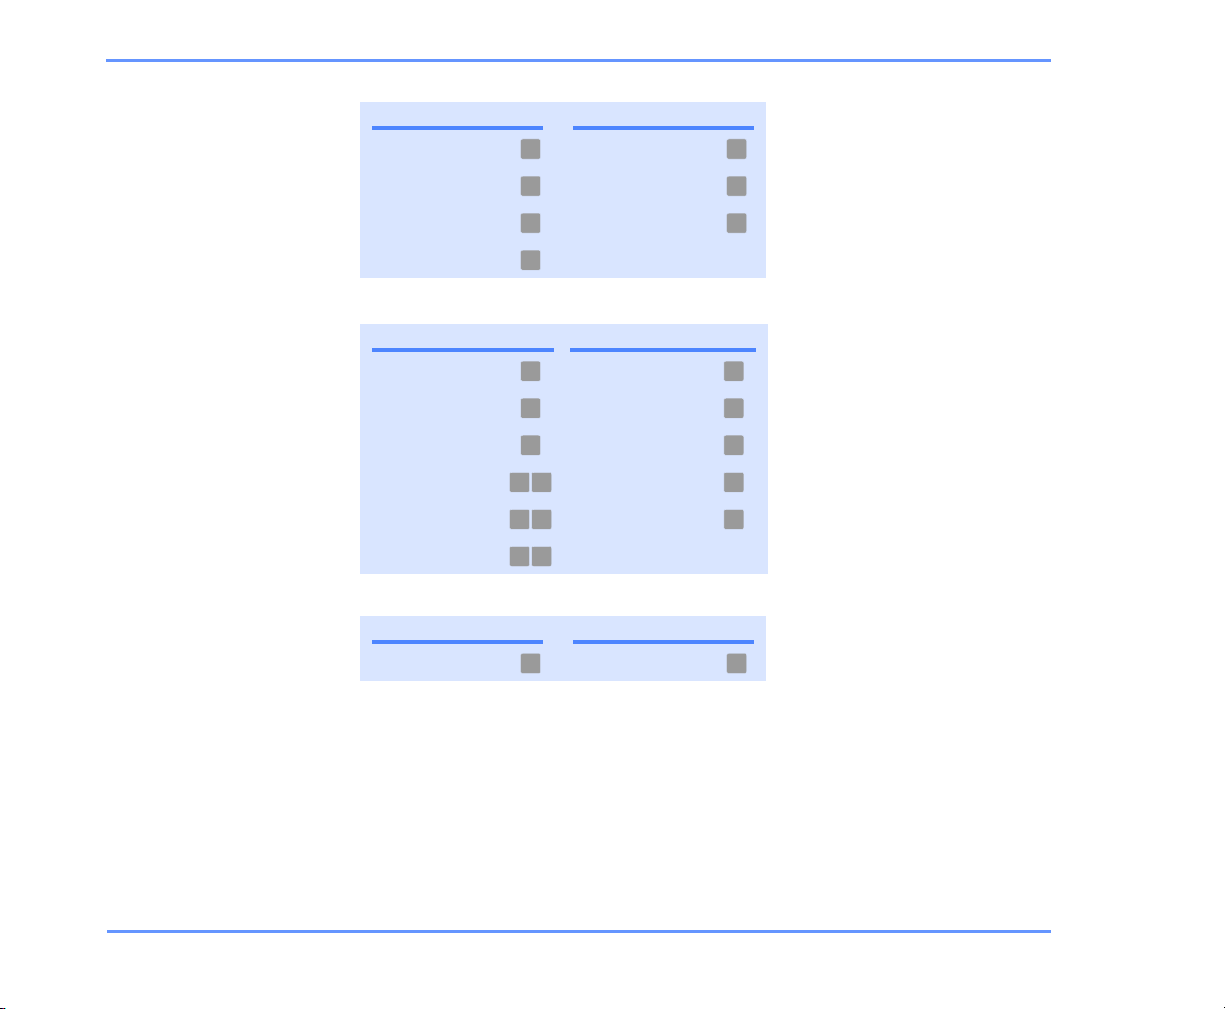
Use these keys during a voice annotation
TASK KEY TASK KEY
Repeat Reverse
1 7
TO DELIVER A FAX
Save Pause or continue
Delete Fast-forward to end
Change volume
2 8
3 9
5
Use these keys after a voice annotation
TASK KEY(S) TASK KEY
Repeat Forward message
Save Mark as new
Delete Reverse
Return call
Reply to all Hear summary
Reply to sender
1 5
2 6
3 7
Deliver an e-mail or fax
4 1 8
to a fax phone number
4 4 9
4 #
Use these keys anytime
TASK KEY TASK KEY
Cancel or back up Skip or move ahead
*
#
CHECKING MESSAGES 32KINESIS USER GUIDE
Page 38

To check e-mail messages in an external mailbox
If you are using the text-to-speech option, you can check
messages for one internal e-mail Inbox, and up to nine different external e-mail accounts. An external mailbox can
be on another e-mail system such as Lotus Notes or
GroupWise, or you can check an Internet e-mail account.
Your system administrator must turn on this feature for
you. Then, using Web Assistant, you define a mailbox
name, server name, user name and password, SMTP server
name, and SMTP server address for each external mailbox.
See your e-mail system administrator or your Internet service provider for this information.
You must define this information using Web Assistant
before you can check messages in an external mailbox. See
“To set up an external mailbox” on page 100.
With external mailboxes, when Kinesis plays your messages for you, it plays your voice messages first, then your
fax messages, followed by your e-mail messages. You cannot hear your messages in any other order. Kinesis asks
you to select which external mailbox you want to check.
Special delivery options, such as future delivery or urgent
delivery, are not available for e-mail messages left in an
external mailbox. You cannot return a call to a person who
left a message in an external mailbox.
CHECKING MESSAGES 33KINESIS USER GUIDE
Page 39

TO CHECK E-MAIL MESSAGES IN AN EXTERNAL MAILBOX
USING YOUR PHONE
1 Call Kinesis and log on.
2 Press to check new messages in an external e-mail mailbox,
1 5
or
press to check old messages in an external e-mail mailbox.
3 5
3 If you have more than one external e-mail mailbox, follow the
prompts to select the external mailbox you want. Kinesis lists
external mailboxes by name, in the order you defined with Web
Assistant.
4 Kinesis reads the text of each message in the external mailbox.
5 Use the following keys to manage your messages and to control
playback.
CHECKING MESSAGES 34KINESIS USER GUIDE
Page 40
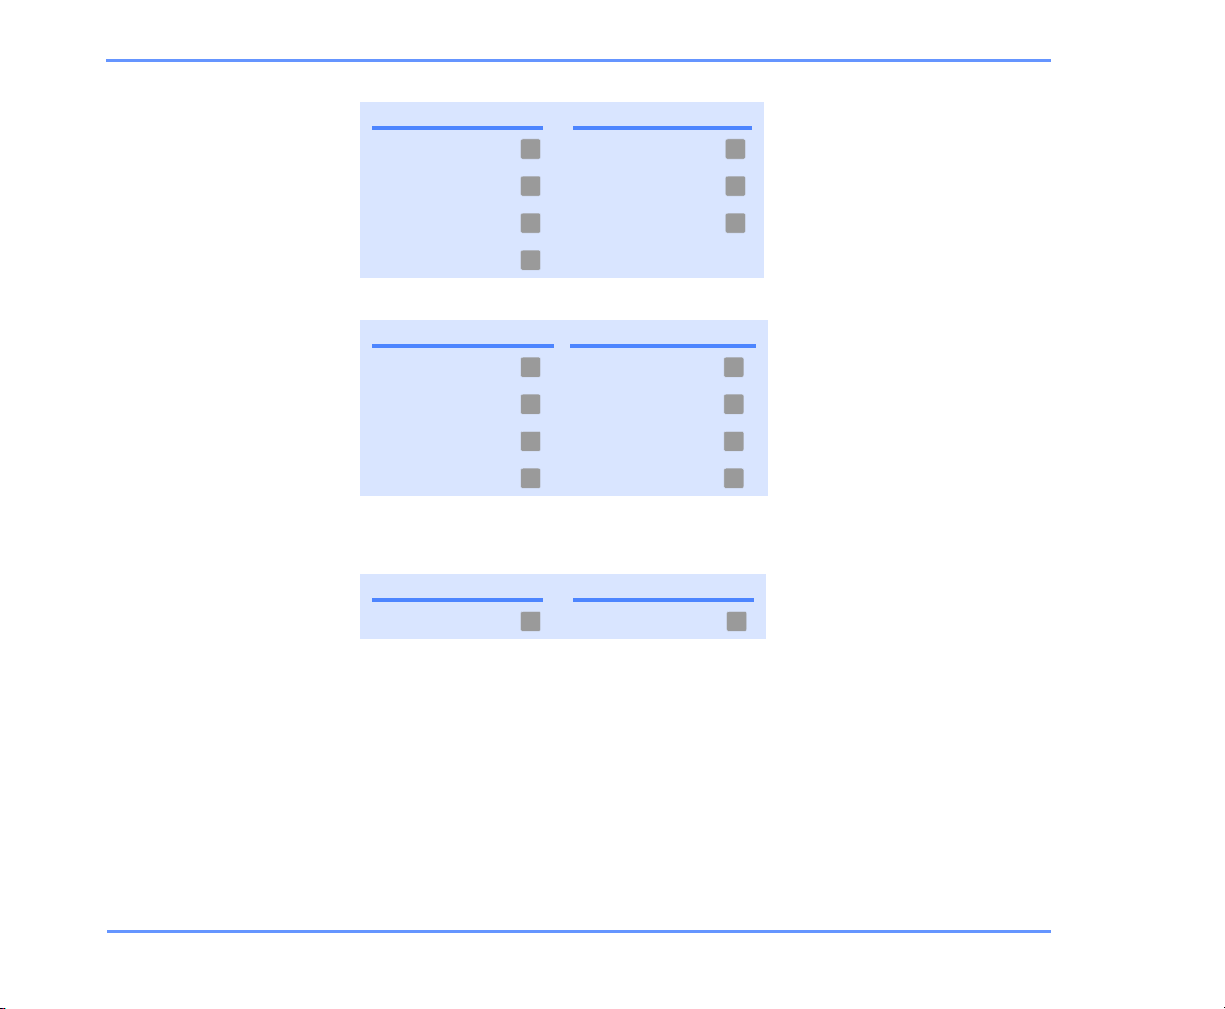
TO CHECK E-MAIL MESSAGES IN AN EXTERNAL MAILBOX
Use these keys during an external e-mail message
TASK KEY TASK KEY
Repeat Reverse
1 7
Save Pause or continue
Delete Fast-forward to end
Change volume
2 8
3 9
5
Use these keys after an external e-mail message
TASK KEY TASK KEY
Repeat Mark as new
Save Reverse
Delete
Forward message Hear summary
1 6
2 7
Deliver an e-mail or fax
3 8
to a fax phone number*
5 9
* Available only if you are using the fax option.
Use these keys anytime
TASK KEY TASK KEY
Cancel or back up Skip or move ahead
*
#
CHECKING MESSAGES 35KINESIS USER GUIDE
Page 41

■ Sending messages
You can send messages to subscribers, private lists, and public distribution lists. If your organization has multiple locations, you also may
be able to send messages to subscribers at another location.
IN THIS SECTION
To send a voice message .................. 37
To send an urgent message.............. 40
To request a return receipt for a
message.............................................. 42
To send a private message................ 44
To send a message with future
delivery................................................ 46
To send a message with an expiration
date ..................................................... 48
To send a message to a list of
recipients ............................................ 50
To send a priority broadcast
message.............................................. 52
To send a message to
another location................................. 55
KINESIS USER GUIDE
SENDING MESSAGES 36
Page 42

To send a voice message
You can address messages by phone either in spelling
mode or number mode.
Press to switch between spelling mode and number
mode. You can address a message to more than one recipient or type of recipient.
Spelling mode On the phone keypad, spell the name of a
subscriber, distribution list, or (if available) another location.
Number mode On the phone keypad, enter the number of
an extension, distribution list, or (if available) another location.
With ViewMail for Outlook, you can use your phone or a
multimedia microphone—if your computer has one—to
record messages from your Inbox.
See “To change recording and playback devices” on
page 70.
# #
SENDING MESSAGES 37KINESIS USER GUIDE
Page 43
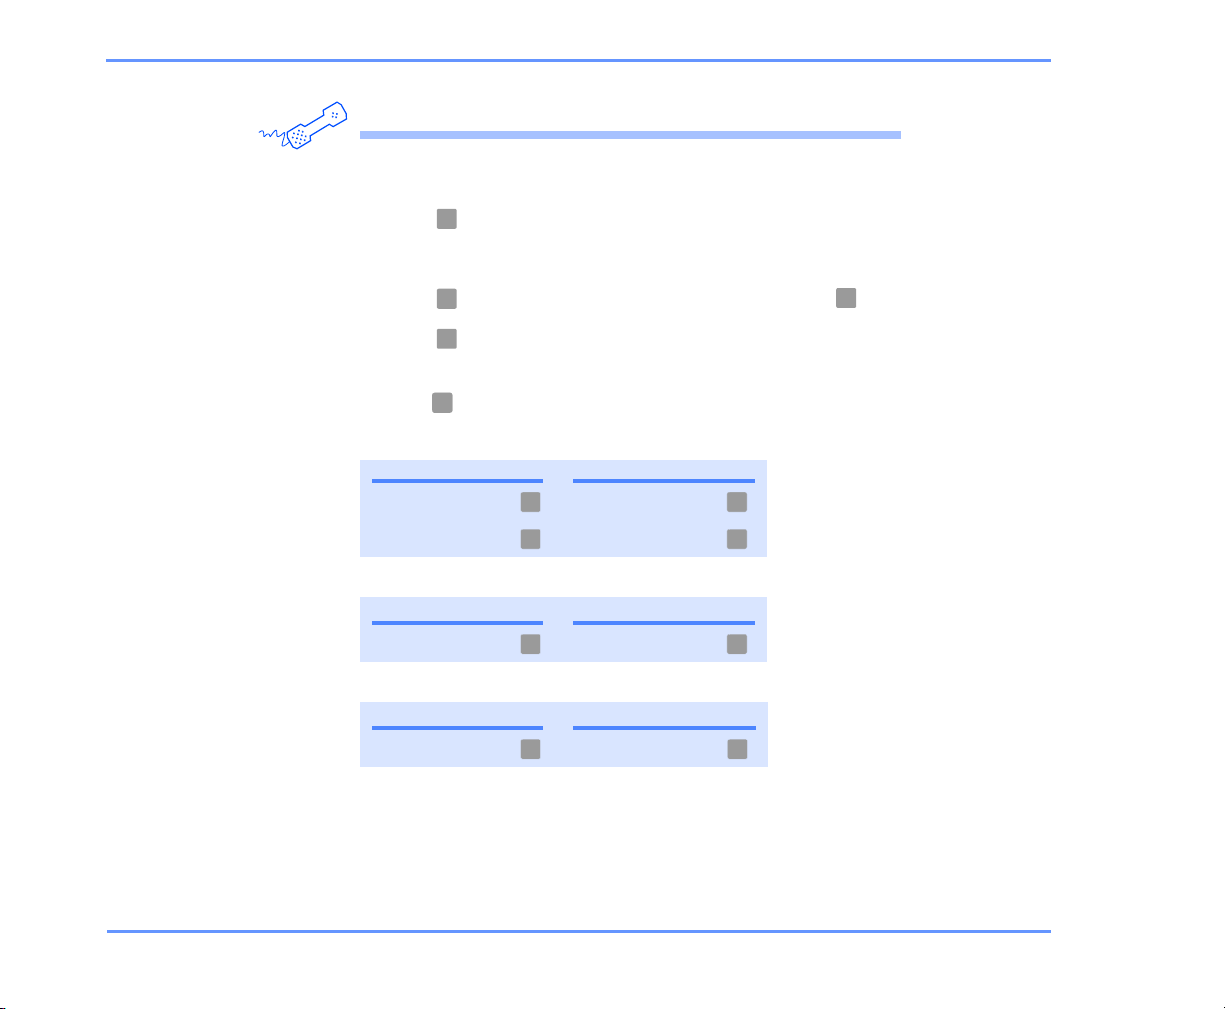
USING YOUR PHONE
1 Call Kinesis and log on.
TO SEND A VOICE MESSAGE
2 Press .
2
3 Follow the Kinesis conversation to address the message.
4 Press to record the message. After recording, press .
5 Press to send the message,
Message options
OPTION KEY OPTION KEY
Change addressing Set special delivery
Change recording Review message
Use these keys as you record
TASK KEY TASK KEY
Pause or continue End recording
Use these keys anytime
TASK KEY TASK KEY
Cancel or back up Skip or move ahead
#
#
or
press for message options.
1
1 3
2 4
8 #
*
#
#
SENDING MESSAGES 38KINESIS USER GUIDE
Page 44
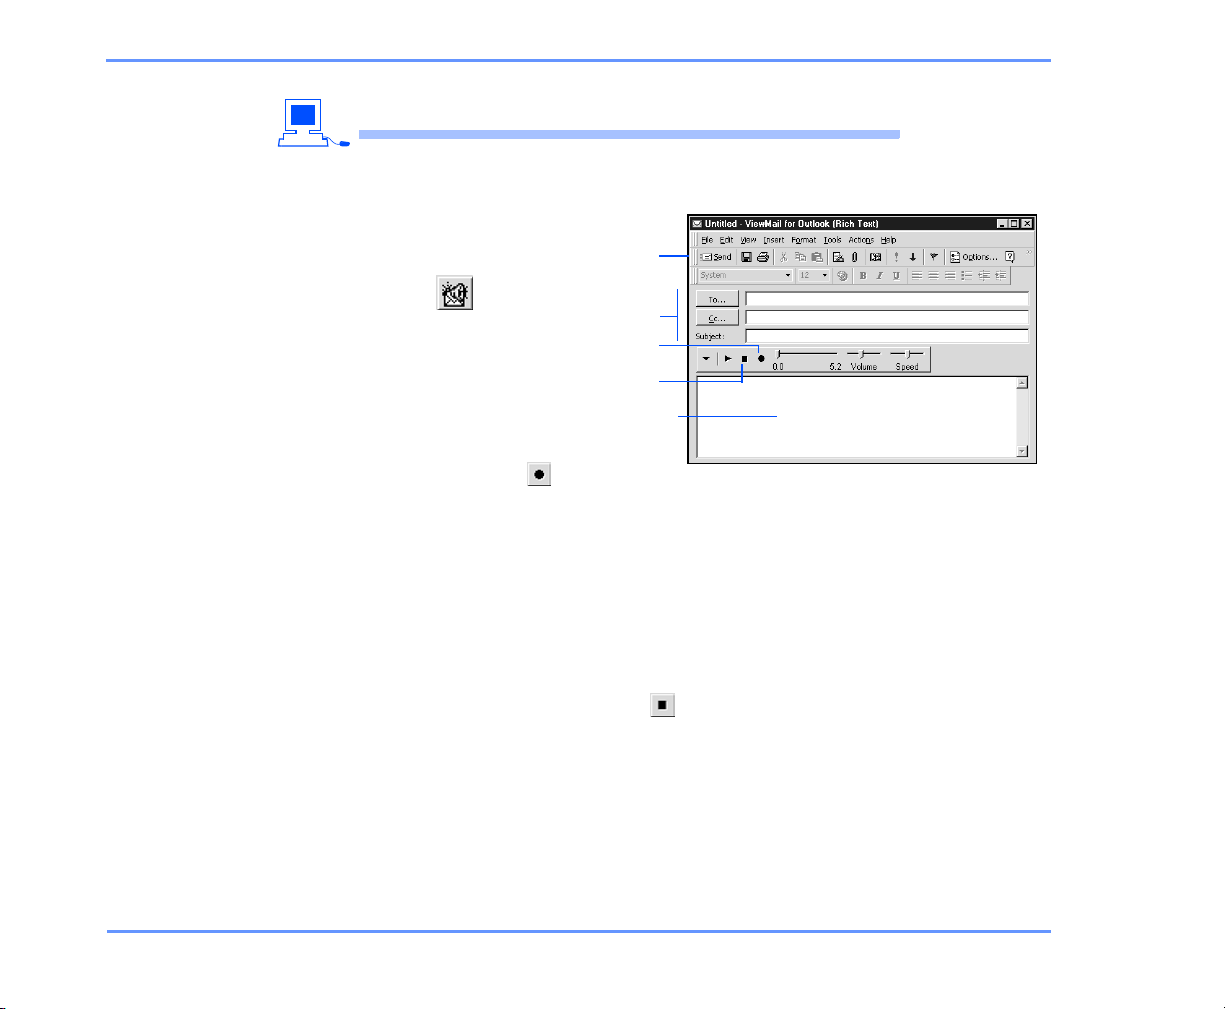
TO SEND A VOICE MESSAGE
USING YOUR E-MAIL INBOX
1 With ViewMail for
Outlook, open your
Outlook Inbox.
Message
2 On the Outlook toolbar,
toolbar
click , or click
“New voice message”
on the Actions menu.
3 Type recipient names
and a subject.
Address
Record
Stop
Text window
4 On the Media Master
control bar, click
and record the
message with your
recording device:
Phone Pick up the handset when the phone rings, wait for the
tone, then speak into the handset.
Multimedia microphone Wait for the tone, then speak into the
microphone.
5 When you finish recording, click .
6 Add text and attachments as appropriate.
7 Click “Send.”
SENDING MESSAGES 39KINESIS USER GUIDE
Page 45
To send an urgent message
You can use special delivery to mark a message as urgent
before you send it. An urgent message is played first,
before normal priority messages.
You can also mark a message as urgent with Microsoft
Outlook. See the online Help for details.
USING YOUR PHONE
1 Call Kinesis and log on.
2 Press .
2
3 Follow the Kinesis conversation to address the message.
4 Press to record the message. After recording, press .
5 Press for message options.
6 Press for special delivery.
7 To mark the message as urgent, press .
8 To send the message, press .
Message options
OPTION KEY OPTION KEY
Change addressing Set special delivery
Change recording Review message
#
1
3
1
#
1 3
2 4
SENDING MESSAGES 40KINESIS USER GUIDE
#
Page 46
Use these keys as you record
TASK KEY TASK KEY
Pause or continue End recording
8 #
Use these keys anytime
TASK KEY TASK KEY
Cancel or back up Skip or move ahead
*
TO SEND AN URGENT MESSAGE
#
SENDING MESSAGES 41KINESIS USER GUIDE
Page 47
To request a return receipt for a message
You can use special delivery to send a message with return
receipt requested. Kinesis sends a receipt to your mailbox
when a message recipient listens to or opens the message.
For messages sent to a distribution list, Kinesis sends a
receipt for each recipient.
You can also mark a message for return receipt with
Microsoft Outlook. See the online Help for details.
USING YOUR PHONE
1 Call Kinesis and log on.
2 Press .
2
3 Follow the Kinesis conversation to address the message.
4 Press to record the message. After recording, press .
5 Press for message options.
6 Press for special delivery.
7 To mark the message for return receipt, press .
8 To send the message, press .
Message options
OPTION KEY OPTION KEY
Change addressing Set special delivery
Change recording Review message
#
1
3
2
#
1 3
2 4
SENDING MESSAGES 42KINESIS USER GUIDE
#
Page 48
TO REQUEST A RETURN RECEIPT FOR A MESSAGE
Use these keys as you record
TASK KEY TASK KEY
Pause or continue End recording
Use these keys anytime
TASK KEY TASK KEY
Cancel or back up Skip or move ahead
8 #
*
#
SENDING MESSAGES 43KINESIS USER GUIDE
Page 49
To send a private message
You can use special delivery to send a private message. A
private message cannot be forwarded.
You can also send a private message with Microsoft Outlook. See the online Help for details.
USING YOUR PHONE
1 Call Kinesis and log on.
2 Press .
2
3 Follow the Kinesis conversation to address the message.
4 Press to record the message. After recording, press .
5 Press for message options.
6 Press for special delivery.
7 To mark the message private, press .
8 To send the message, press .
Message options
OPTION KEY OPTION KEY
Change addressing Set special delivery
Change recording Review message
#
1
3
3
#
1 3
2 4
SENDING MESSAGES 44KINESIS USER GUIDE
#
Page 50
Use these keys as you record
TASK KEY TASK KEY
Pause or continue End recording
8 #
Use these keys anytime
TASK KEY TASK KEY
Cancel or back up Skip or move ahead
*
TO SEND A PRIVATE MESSAGE
#
SENDING MESSAGES 45KINESIS USER GUIDE
Page 51
To send a message with future delivery
You can use special delivery to mark a message to be sent
at a later time. Kinesis does not send the message to any
recipients until the specified date.
You can also mark a message for future delivery with
Microsoft Outlook. See the online Help for details.
USING YOUR PHONE
1 Call Kinesis and log on.
2 Press .
2
3 Follow the Kinesis conversation to address the message.
4 Press to record the message. After recording, press .
5 Press for message options.
6 Press for special delivery.
7 To mark the message for future delivery, press .
8 To send the message later today, press . For tomorrow, press .
#
1
3
4
0 1
For two days later, press ;
or
to enter a date, press . Enter the month, using a number from 1
to 12. Enter the date, using a number from 1 to 31.
2
9
9 Enter the time, including the hour and minutes. For A.M., press .
For P. M., press .
2
#
1
SENDING MESSAGES 46KINESIS USER GUIDE
Page 52
TO SEND A MESSAGE WITH FUTURE DELIVERY
10 To confirm the delivery time and date, press .
11 To send the message, press .
#
#
Message options
OPTION KEY OPTION KEY
Change addressing Set special delivery
Change recording Review message
1 3
2 4
Use these keys as you record
TASK KEY TASK KEY
Pause or continue End recording
8 #
Use these keys anytime
TASK KEY TASK KEY
Cancel or back up Skip or move ahead
*
#
SENDING MESSAGES 47KINESIS USER GUIDE
Page 53
To send a message with an expiration date
You can use special delivery to mark a message to be sent
with an expiration date and time. Kinesis keeps an
unheard message in a recipient’s mailbox until the expiration time and date. Then, Kinesis deletes the message.
You can send a message with an expiration date to another
subscriber, or to a distribution list. You can set an expiration date and time by phone.
You can also set an expiration date with Microsoft Outlook.
See the online Help for details.
Setting an expiration time and date is useful when the content of a message is relevant only until a certain time and
date.
USING YOUR PHONE
1 Call Kinesis and log on.
2 Press .
2
3 Follow the Kinesis conversation to address the message.
4 Press to record the message. After recording, press .
5 Press for message options.
6 Press for special delivery.
#
1
3
7 To mark the message with an expiration time and date, press .
#
5
SENDING MESSAGES 48KINESIS USER GUIDE
Page 54
TO SEND A MESSAGE WITH AN EXPIRATION DATE
8 For expiration later today, press . For tomorrow, press . For
two days later, press ;
2
0 1
or
to enter a date, press . Press the month, using a number from 1
9
to 12. Press the date, using a number from 1 to 31.
9 Enter the expiration time, including the hour and minutes. For A.M.,
press . For P. M., press .
1 2
10 To confirm the expiration time and date, press .
11 To send the message, press .
Message options
OPTION KEY OPTION KEY
Change addressing Set special delivery
Change recording Review message
Use these keys as you record
TASK KEY TASK KEY
Pause or continue End recording
Use these keys anytime
TASK KEY TASK KEY
Cancel or back up Skip or move ahead
1 3
2 4
8 #
*
#
#
#
SENDING MESSAGES 49KINESIS USER GUIDE
Page 55
To send a message to a list of recipients
Private lists and public distribution lists are lists of message recipients that are grouped together. A message sent
to a distribution list goes to every recipient on the list. A
distribution list makes it easier to send the same message
to several people at once.
Any subscriber can send messages to public distribution
lists by phone. You can address a message to a public distribution list using spelling mode or number mode.
Only you can send messages to your private lists. You address
messages to private lists only by phone. You can address a
message to a private list using spelling mode or number mode.
For public distribution lists, your system administrator may
have authorized you to send priority broadcast messages. See
“To send a priority broadcast message” on page 52.
USING YOUR PHONE
1 Call Kinesis and log on.
2 Press .
2
3 If desired, switch between number mode and spelling mode by
pressing .
# #
4 Spell the distribution list name, or enter the number of the list.
(Private lists are numbered 1 through 20.) Press to confirm the
name or number.
5 Press to record the message. After recording, press .
#
#
#
SENDING MESSAGES 50KINESIS USER GUIDE
Page 56
TO SEND A MESSAGE TO A LIST OF RECIPIENTS
6 Press to send the message,
#
or
press for message options.
1
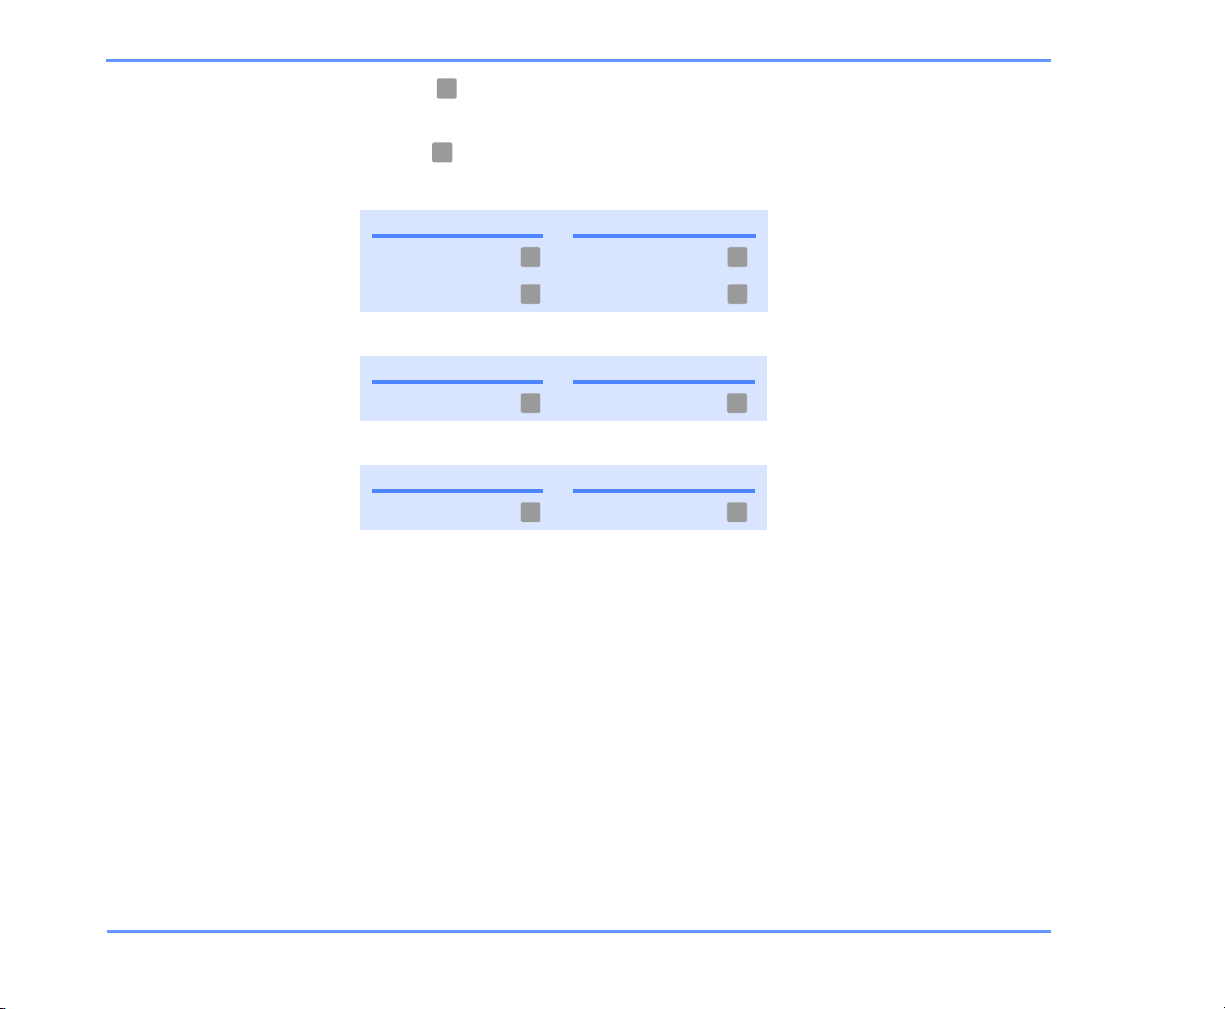
Message options
OPTION KEY OPTION KEY
Change addressing Set special delivery
Change recording Review message
1 3
2 4
Use these keys as you record
TASK KEY TASK KEY
Pause or continue End recording
8 #
Use these keys anytime
TASK KEY TASK KEY
Cancel or back up Skip or move ahead
*
#
SENDING MESSAGES 51KINESIS USER GUIDE
Page 57

To send a priority broadcast message
You can send a priority broadcast message to a public distribution list. A priority broadcast message is played immediately when a recipient logs on, before Kinesis offers any
other options or messages. A recipient must hear the entire
message before Kinesis marks the message as old.
Your system administrator can set you up to send priority
broadcast messages to a particular distribution list. If you
are authorized, for special delivery options, the Kinesis
conversation asks if you want to mark a message as a priority broadcast message.
If desired, you can prevent recipients from skipping or fastforwarding through the message. After you mark a message for priority broadcast delivery, Kinesis asks whether
you want to require recipients to listen to the entire message.
If you require recipients to hear the message, a recipient
cannot skip the message or fast-forward through it. The
recipient cannot use other Kinesis features by phone until
the entire message is played. Each time a recipient calls to
check messages, Kinesis plays the message immediately
and keeps it new until the entire message is played.
If you do not prevent recipients from skipping or fast-forwarding the message, a recipient must still listen to the
entire message before it is marked as old. However, a recipient can skip the message and use other Kinesis features
by phone before hearing the entire message.
SENDING MESSAGES 52KINESIS USER GUIDE
Page 58
TO SEND A PRIORITY BROADCAST MESSAGE
A recipient of a priority broadcast message cannot forward
the message by phone to other subscribers. A recipient
cannot mark a priority broadcast message as new.
You can send priority broadcast messages only by phone.
You cannot mark a priority broadcast message as urgent or
private.
In Outlook, priority broadcast messages are listed as
urgent messages. The subject line for the message begins
with “Priority Broadcast.”
USING YOUR PHONE
1 Call Kinesis and log on.
2 Press .
2
3 If desired, switch between number mode and spelling mode by
pressing .
# #
4 Follow the Kinesis conversation to address the message to a public
distribution list.
5 Press to record the message. After recording, press .
6 Press for message options.
7 Press for special delivery.
8 Press to mark for priority broadcast.
#
1
3
6
#
9 If desired, to require recipients to play the entire message,
press .
9
10 Press to send the message.
#
SENDING MESSAGES 53KINESIS USER GUIDE
Page 59
TO SEND A PRIORITY BROADCAST MESSAGE
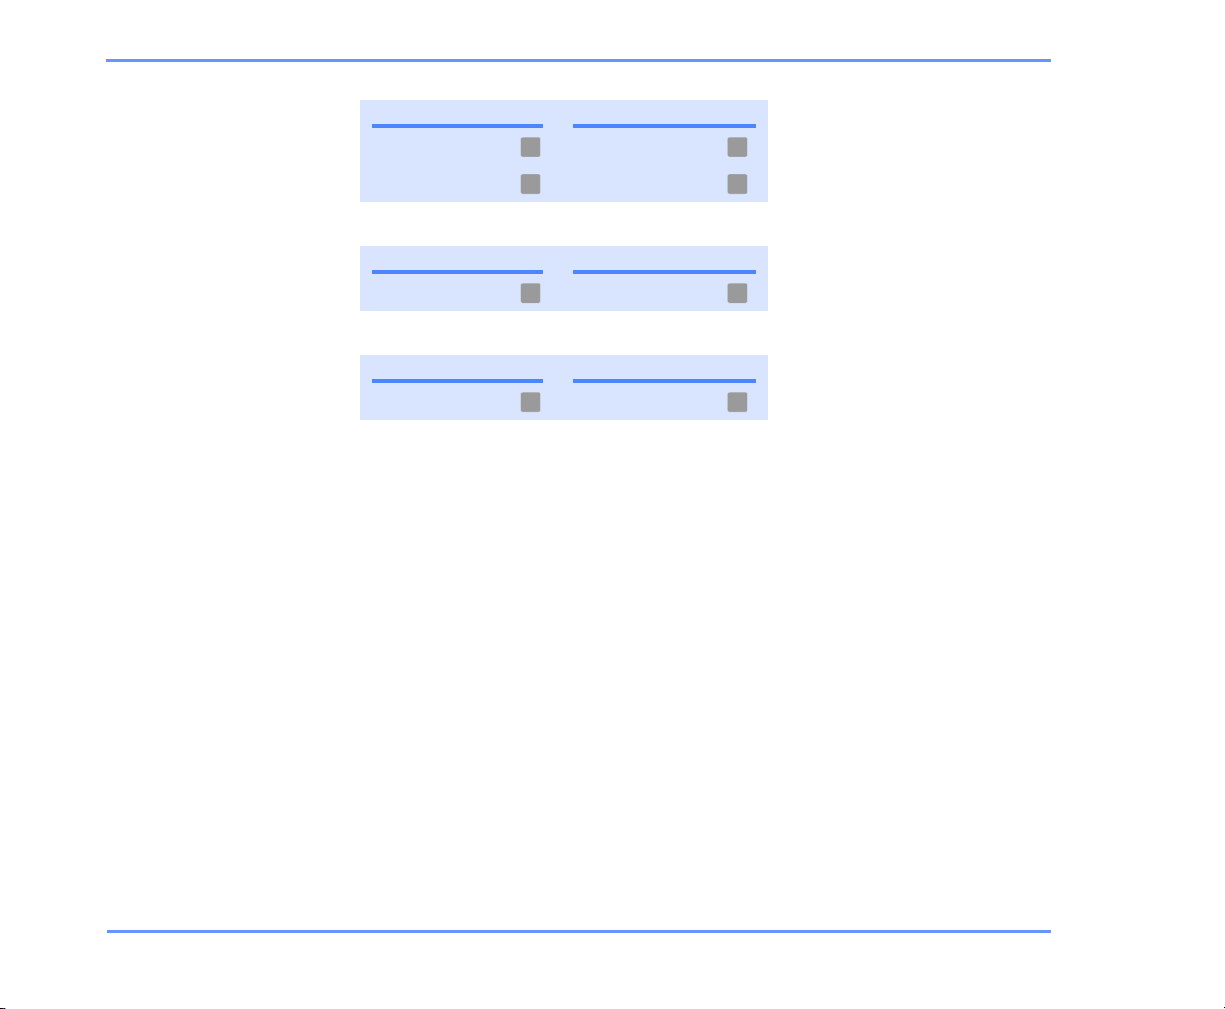
Message options
OPTION KEY OPTION KEY
Change addressing Set special delivery
1 3
Change recording Review message
2 4
Use these keys as you record
TASK KEY TASK KEY
Pause or continue End recording
8 #
Use these keys anytime
TASK KEY TASK KEY
Cancel or back up Skip or move ahead
*
#
SENDING MESSAGES 54KINESIS USER GUIDE
Page 60
To send a message to another location
To send messages by phone to subscribers at other locations, you must identify the location as well as the subscriber when addressing the message. For information
about location names or numbers at your organization, see
your system administrator.
Press to switch between spelling mode and number
# #
mode.
USING YOUR PHONE
1 Call Kinesis and log on.
2 Press .
2
3 If addressing in spelling mode, spell the location name, then spell
the subscriber’s name,
or
if addressing in number mode, enter the location ID, then enter the
subscriber’s extension.
4 Press to record the message. After recording, press .
5 Press to send the message,
#
#
or
press for message options.
1
#
SENDING MESSAGES 55KINESIS USER GUIDE
Page 61
TO SEND A MESSAGE TO ANOTHER LOCATION
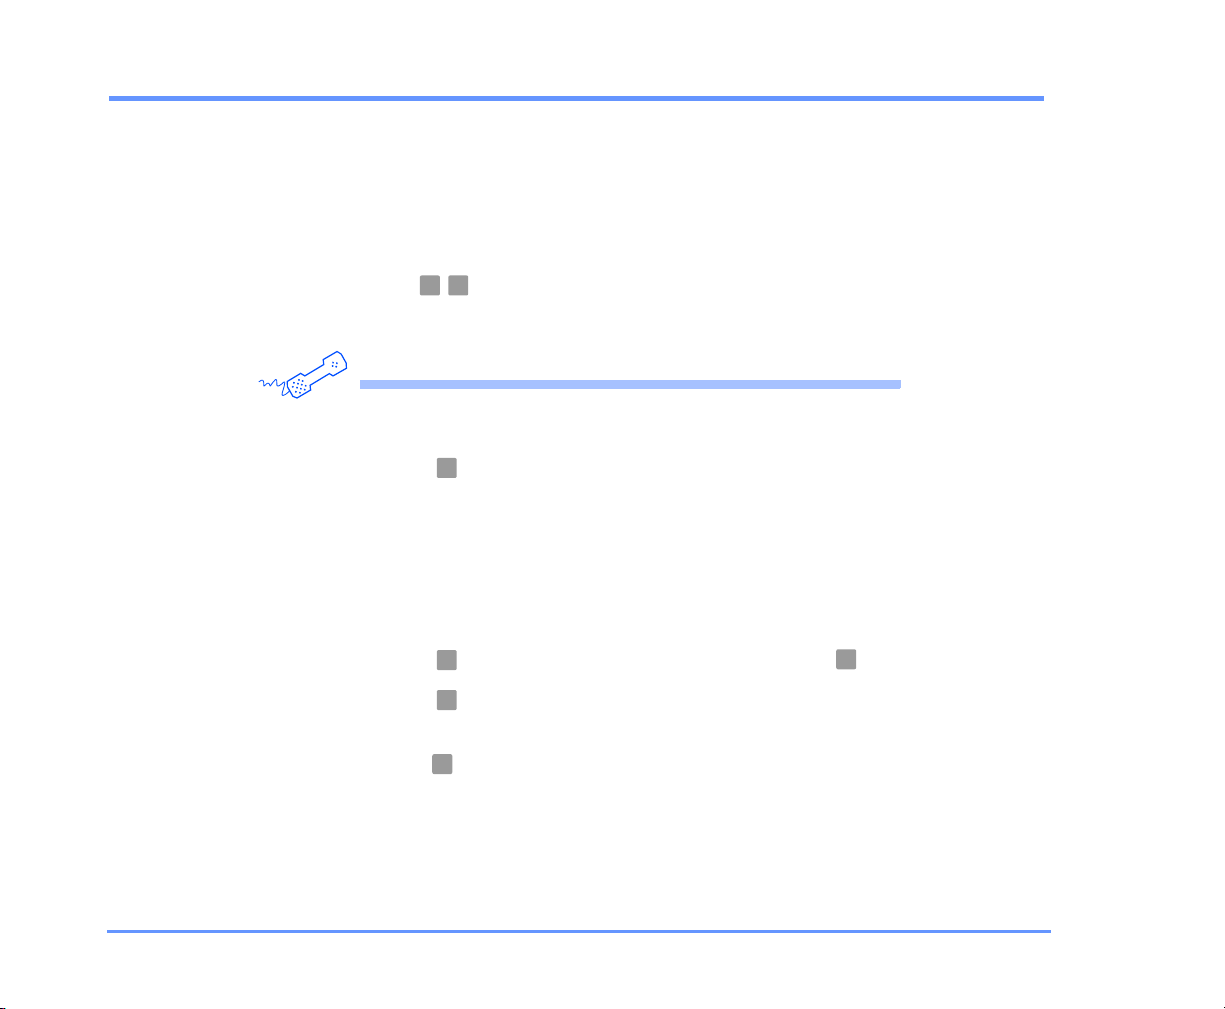
Message options
OPTION KEY OPTION KEY
Change addressing Set special delivery
1 3
Change recording Review message
2 4
Use these keys as you record
TASK KEY TASK KEY
Pause or continue End recording
8 #
Use these keys anytime
TASK KEY TASK KEY
Cancel or back up Skip or move ahead
*
#
SENDING MESSAGES 56KINESIS USER GUIDE
Page 62

■ Changing personal settings
Personal settings control the information about you as a subscriber on
Kinesis and some of the choices you make for interacting with Kinesis.
Recorded name Your recorded name plays with messages that you
leave for other subscribers and identifies you in directory assistance. It
also plays with any of your greetings that use system default recordings instead of your own recordings.
Password Your password protects the privacy of your messages. If
you forget your Kinesis phone password, your system administrator
creates a temporary password for you. Then, the next time you log on,
you are prompted to create a new one.
Directory listing status When you are listed in the directory, callers
can reach you through directory assistance.
Kinesis conversation language When your organization has more than
one language installed on Kinesis, you can select the language in
which you hear the Kinesis conversation when you log on. (Your system administrator sets the language in which callers hear the Kinesis
conversation.)
Kinesis text-to-speech language You can select the language in which
Kinesis plays your e-mail messages and calendar. The text-to-speech
language can be different from the language in which you hear the
Kinesis conversation.
Kinesis conversation menus You can hear either full or brief menus
when you interact with Kinesis by phone. Full menus provide comprehensive instructions, and brief menus provide abbreviated versions of
full menus.
IN THIS SECTION
To change your recorded name........ 58
To change whether you are listed
in the directory ................................... 60
To change your phone password...... 62
To change your Kinesis conversation
language............................................. 64
To change your text-to-speech
language............................................. 65
To switch between full or brief
conversation menus........................... 67
KINESIS USER GUIDE
CHANGING PERSONAL SETTINGS 57
Page 63
To change your recorded name
Kinesis plays your recorded name when callers determine
your extension number in directory assistance, and when
you log on to Kinesis by phone.
USING YOUR PHONE
1 Call Kinesis and log on.
2 Press > > .
4 3 2
3 At the tone, record your name,
or
press to keep the current recording.
*
Use these keys as you record
TASK KEY TASK KEY
Pause or continue End recording
Use these keys anytime
TASK KEY TASK KEY
Cancel or back up Skip or move ahead
8 #
*
#
CHANGING PERSONAL SETTINGS 58KINESIS USER GUIDE
Page 64
USING THE WEB ASSISTANT
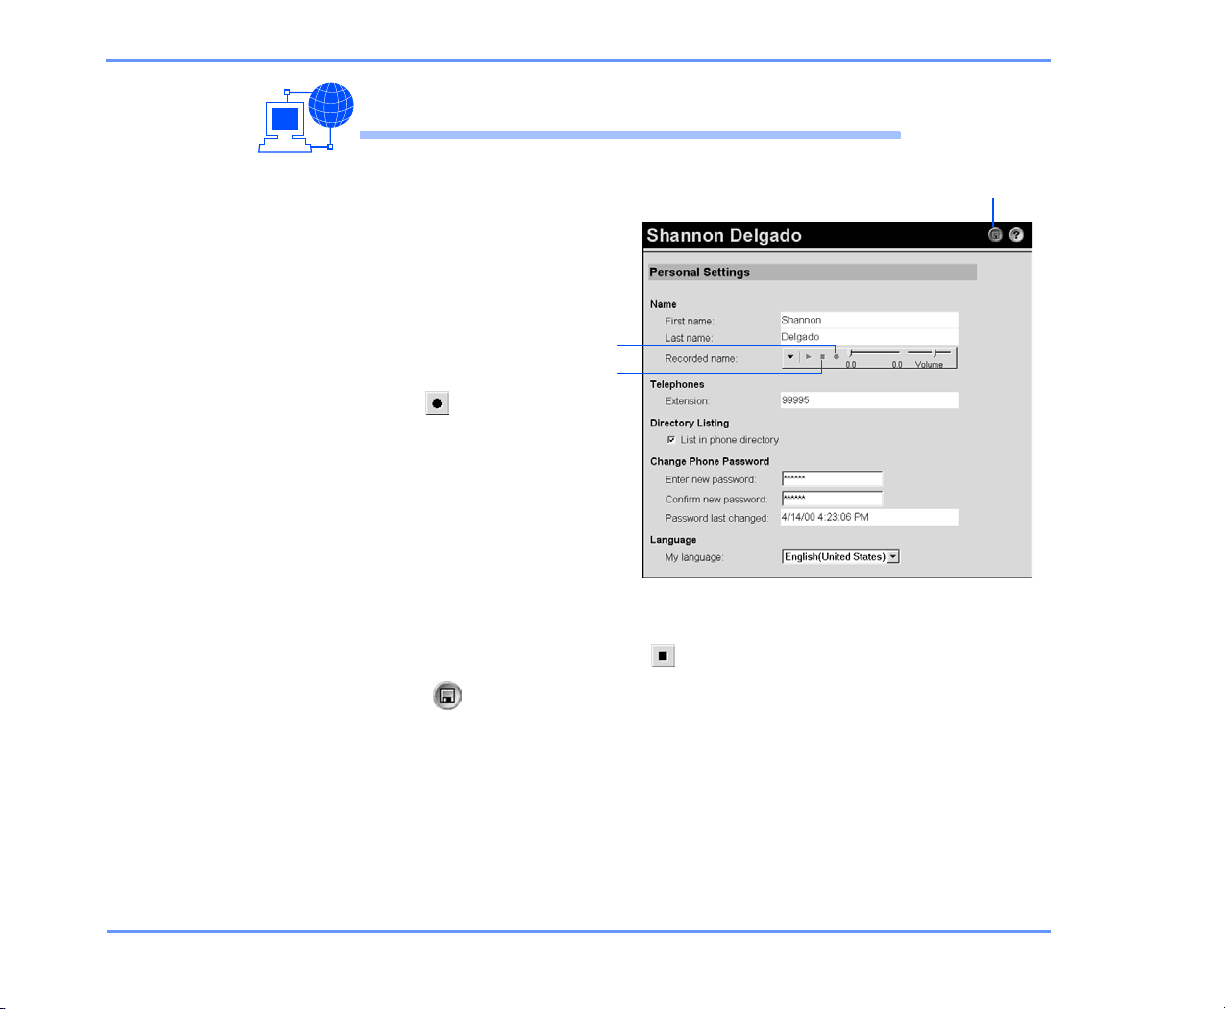
TO CHANGE YOUR RECORDED NAME
1 Access the Web
Assistant.
2 Under Personal
Settings in the
navigation bar, click
“Name.”
3 On the Media
Master control bar,
Record
Stop
click and record
your name with your
recording device:
Phone Pick up the
handset when the
phone rings, wait for
the tone, then speak
into the handset.
Multimedia microphone
Wait for the tone, then speak into the microphone.
4 When you finish recording, click .
5 Click to save your changes.
Save
CHANGING PERSONAL SETTINGS 59KINESIS USER GUIDE
Page 65
To change whether you are listed in the directory
You can set whether you are listed in the Kinesis directory.
When you are listed in the directory, callers can determine
your extension number without assistance from a receptionist.
USING YOUR PHONE
1 Call Kinesis and log on.
2 Press > > .
3 Press to change your listing status,
Use these keys anytime
TASK KEY TASK KEY
Cancel or back up Skip or move ahead
4 3 3
1
or
#
press to keep your current listing status.
*
CHANGING PERSONAL SETTINGS 60KINESIS USER GUIDE
#
Page 66
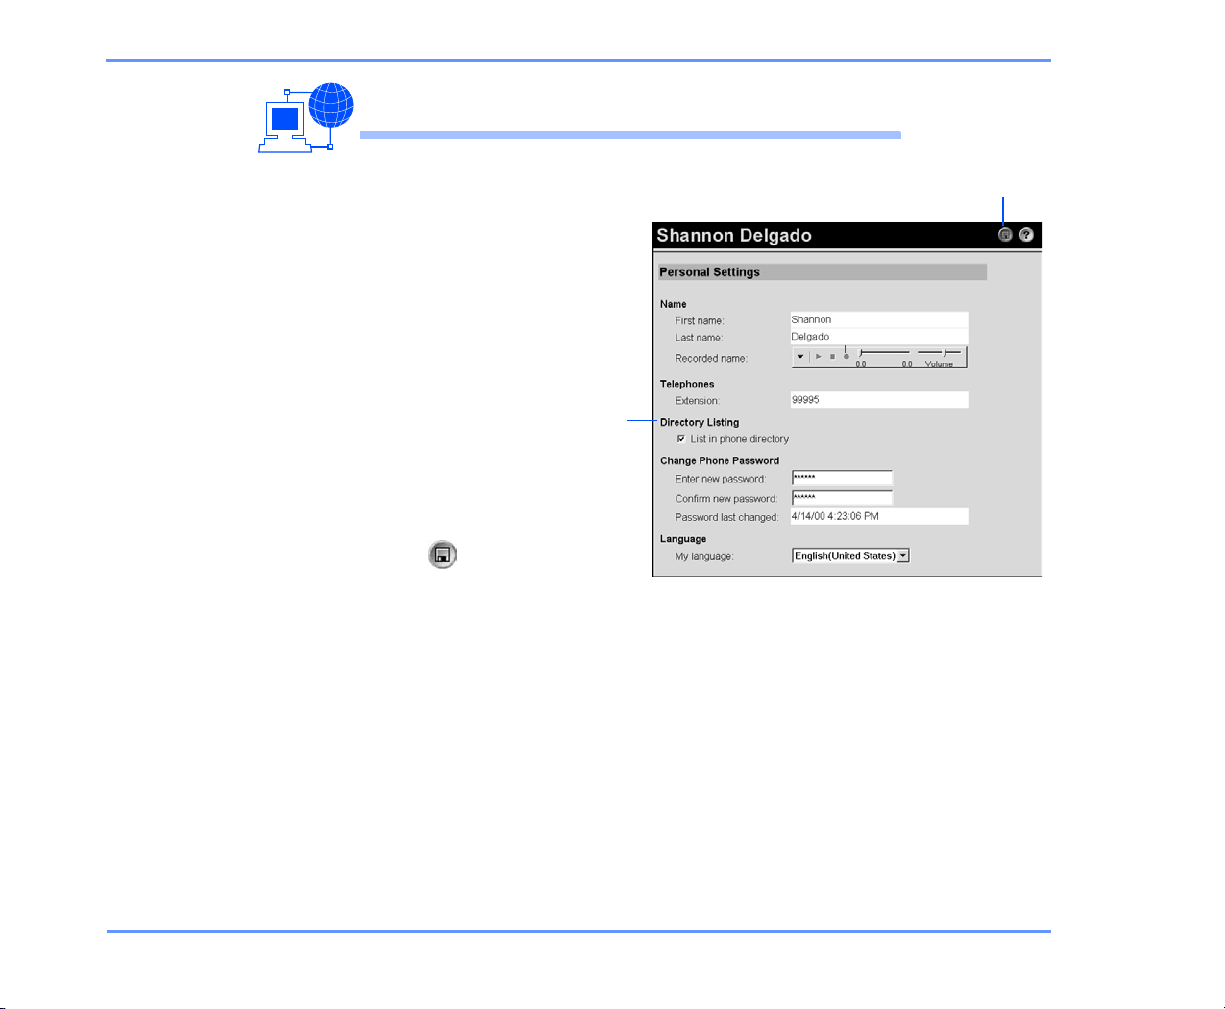
TO CHANGE WHETHER YOU ARE LISTED IN THE DIRECTORY
USING THE WEB ASSISTANT
1 Access the Web
Assistant.
2 Under Personal
Settings in the
navigation bar, click
“Directory Listing.”
3 Select the “List in
phone directory”
check box to be
listed,
or
clear the check box
to not be listed.
4 Click to save
your changes.
Listing
status
Save
CHANGING PERSONAL SETTINGS 61KINESIS USER GUIDE
Page 67
To change your phone password
You enter your Kinesis phone password when you log on to
Kinesis by phone. This password is different from the password you enter when you access Web Assistant by computer.
USING YOUR PHONE
1 Call Kinesis and log on.
2 Press > > .
3 Enter a new password and press .
4 3 1
#
4 Enter the new password again to confirm it and press .
Use these keys anytime
TASK KEY TASK KEY
Cancel or back up Skip or move ahead
*
#
CHANGING PERSONAL SETTINGS 62KINESIS USER GUIDE
#
Page 68
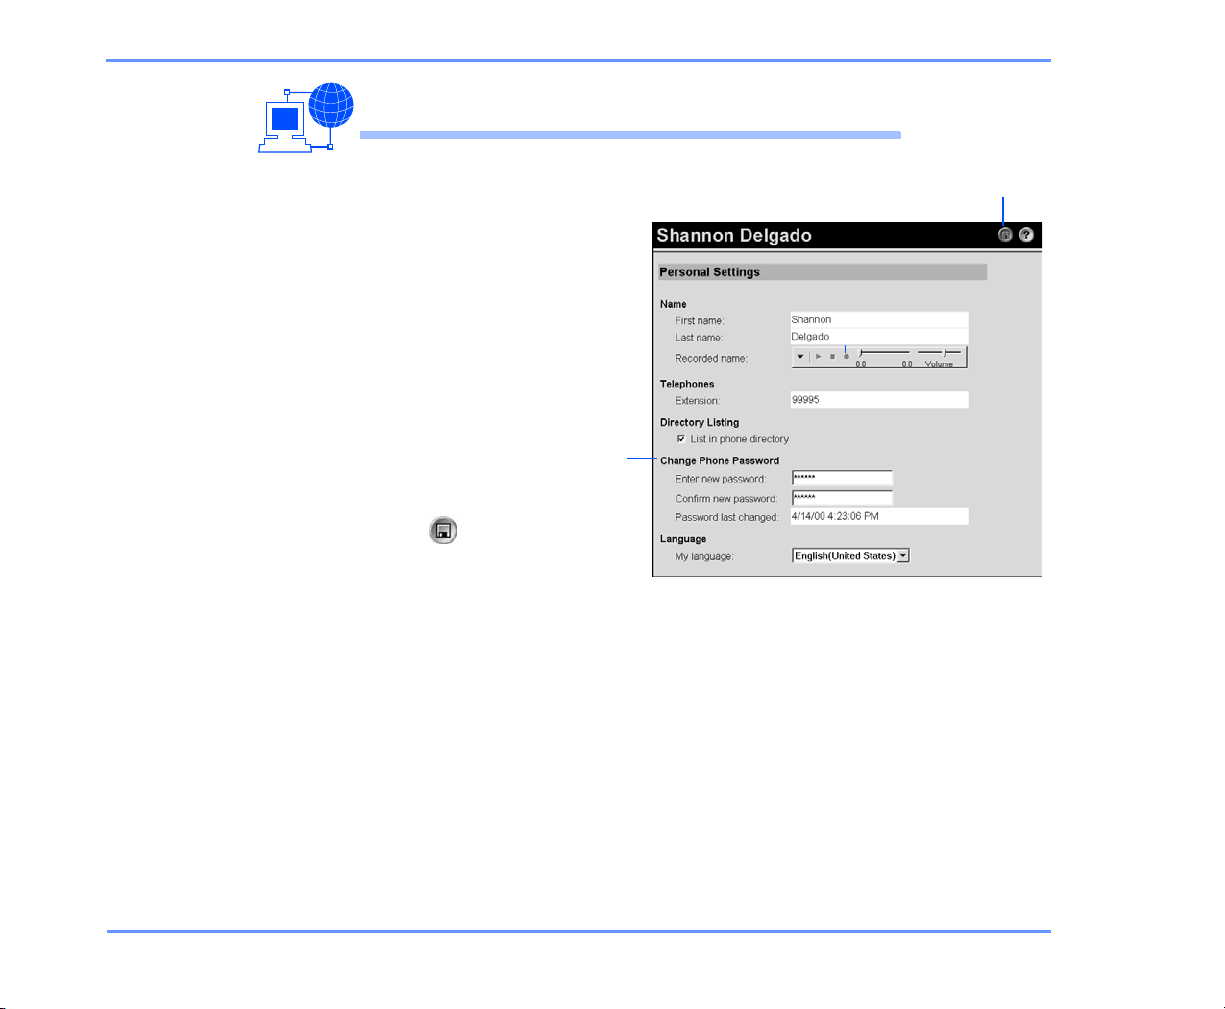
USING THE WEB ASSISTANT
TO CHANGE YOUR PHONE PASSWORD
1 Access the Web
Assistant.
2 Under Personal
Settings in the
navigation bar, click
“Phone Password.”
3 In the “Enter new
password” box, type
a password.
4 In the “Confirm new
password” box, type
the password again.
5 Click to save
your changes.
Phone
password
fields
Save
CHANGING PERSONAL SETTINGS 63KINESIS USER GUIDE
Page 69
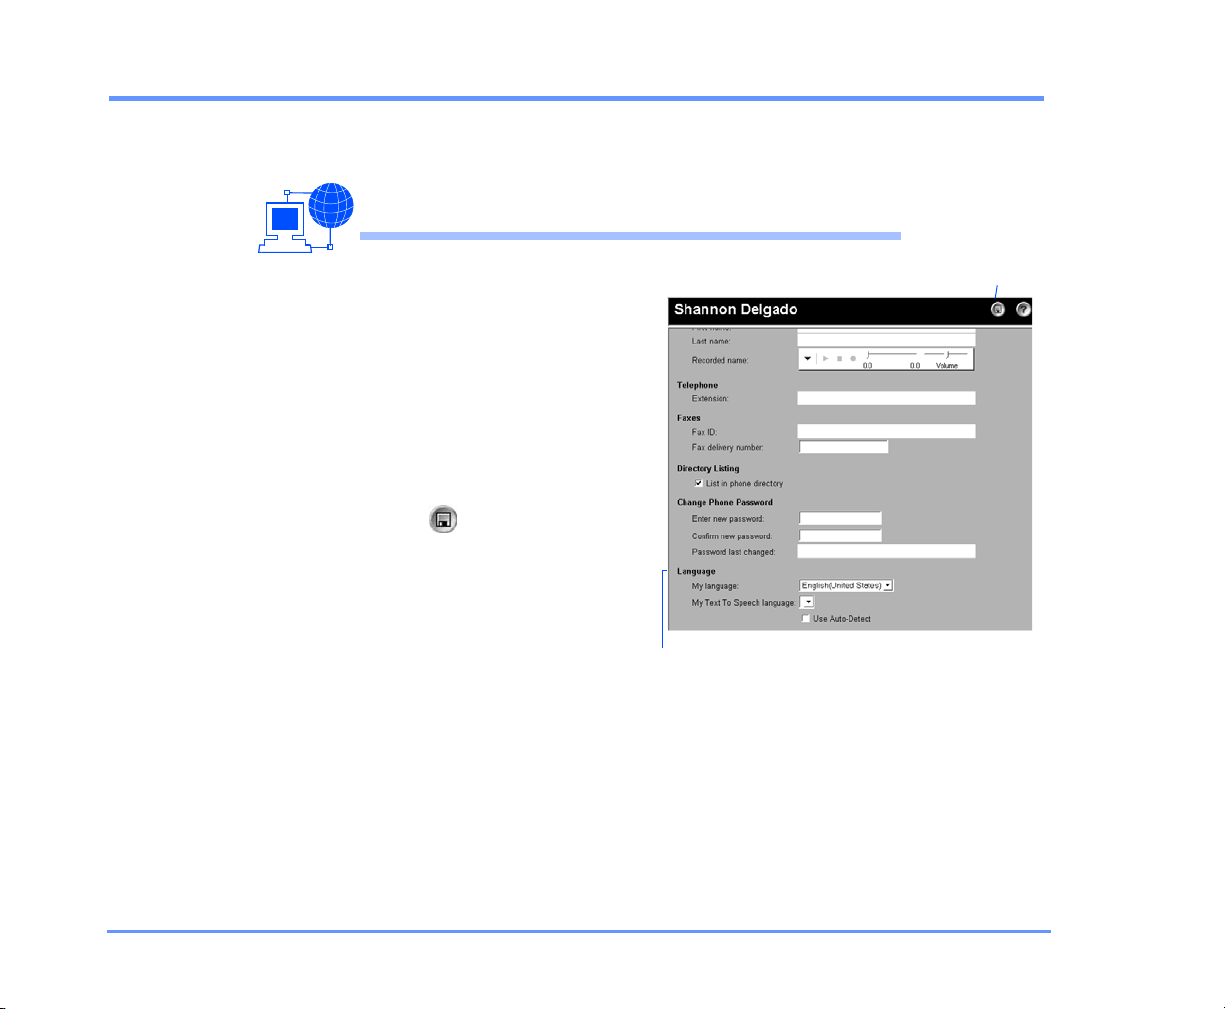
To change your Kinesis conversation language
You can select a conversation language only with the
Web Assistant, not by phone.
USING THE WEB ASSISTANT
1 Access the Web Assistant.
2 Under Personal Settings in the
navigation bar, click
“Language.”
3 In the My Language list, click
the language in which you want
to hear the Kinesis
conversation.
4 Click to save your changes.
Save
Language options
CHANGING PERSONAL SETTINGS 64KINESIS USER GUIDE
Page 70

To change your text-to-speech language
You can set the language in which Kinesis reads your email messages and calendar by phone. The language you
select for your e-mail and calendar can be different from
the language you use for the system conversation.
You can also set whether Kinesis automatically detects the
language used for an e-mail message. If Kinesis cannot
detect the language in which to read an e-mail message,
Kinesis uses the default text-to-speech language.
You can select a text-to-speech language only in the
Web Assistant, not by phone.
CHANGING PERSONAL SETTINGS 65KINESIS USER GUIDE
Page 71
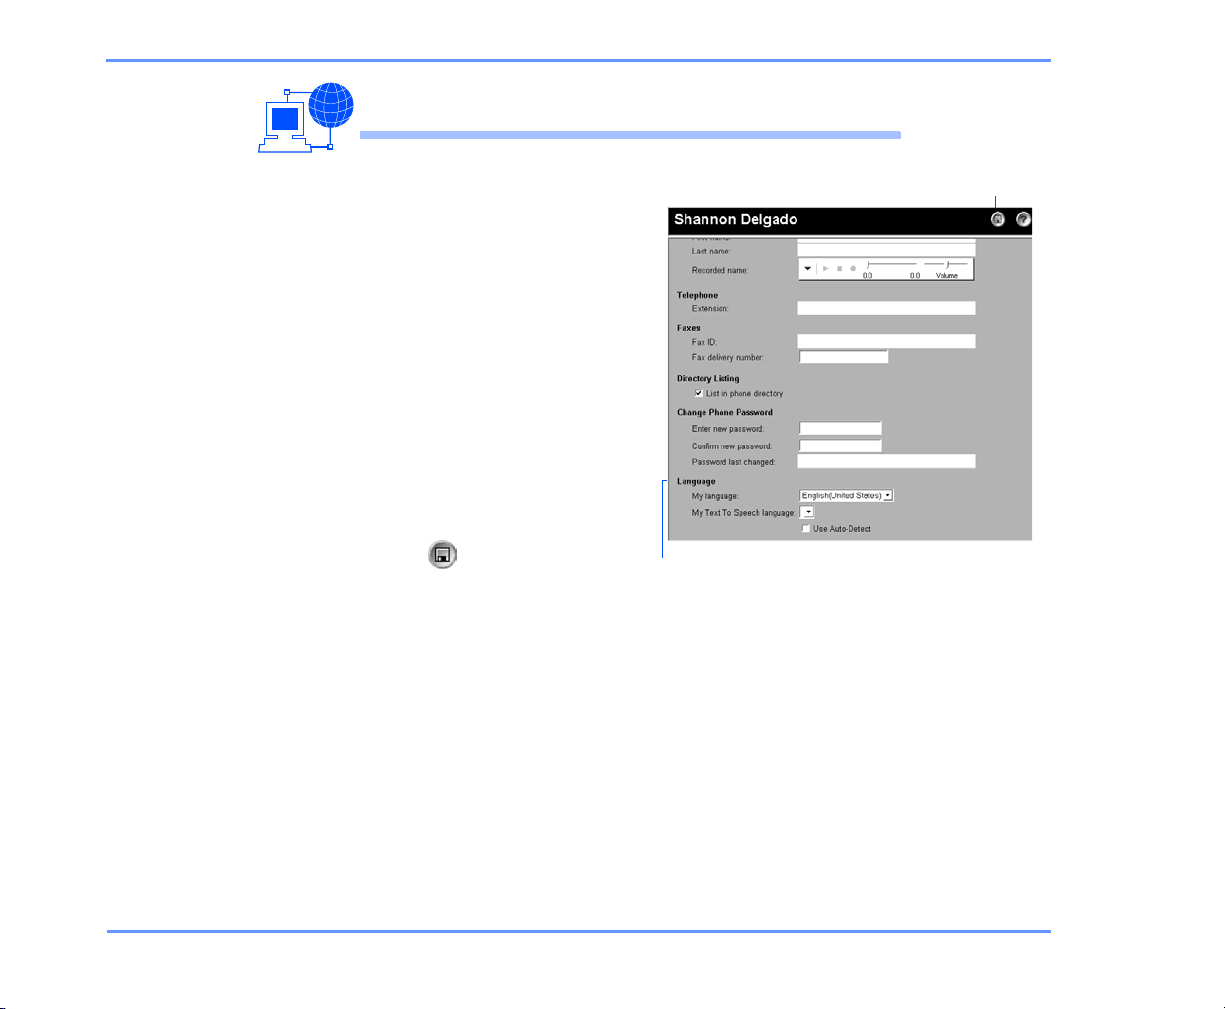
USING THE WEB ASSISTANT
TO CHANGE YOUR TEXT-TO-SPEECH LANGUAGE
1 Access the Web Assistant.
2 Under Personal Settings in the
navigation bar, click
“Language.”
3 In the My Text to Speech
language list, click the
language in which you want to
hear your e-mail messages and
calendar.
4 To have Kinesis automatically
determine the language for an
e-mail or calendar item, select
“Use Auto-Detect.”
5 Click to save your changes.
Save
Language options
CHANGING PERSONAL SETTINGS 66KINESIS USER GUIDE
Page 72
To switch between full or brief conversation menus
You can set whether you hear comprehensive or brief
instructions for menu options when you access Kinesis by
phone.
Most new subscribers begin with the comprehensive
instructions. Once you are familiar with Kinesis features,
you can switch from full menus to brief menus.
USING YOUR PHONE
1 Call Kinesis and log on.
2 Press > > .
3 Press to switch between full and brief menus.
Use these keys anytime
TASK KEY TASK KEY
Cancel or back up Skip or move ahead
4 2 3
1
*
#
CHANGING PERSONAL SETTINGS 67KINESIS USER GUIDE
Page 73
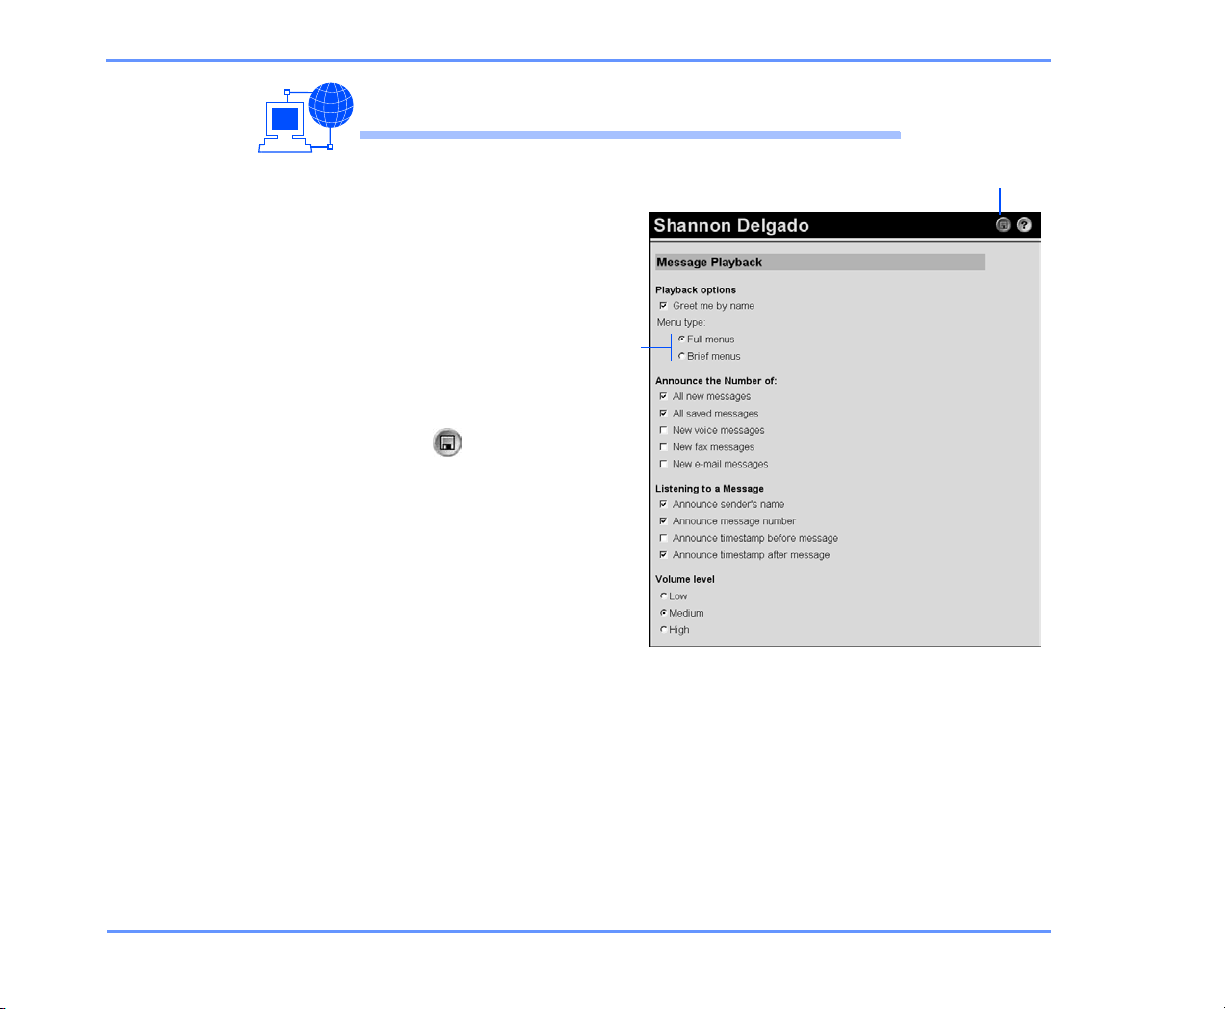
TO SWITCH BETWEEN FULL OR BRIEF CONVERSATION MENUS
USING THE WEB ASSISTANT
1 Access the Web
Assistant.
2 Under Message
Settings in the
navigation bar, click
“Message Playback.”
3 Under Menu Type, click
“Full menus” or “Brief
menus.”
4 Click to save your
changes.
Save
Menus
CHANGING PERSONAL SETTINGS 68KINESIS USER GUIDE
Page 74

■ Changing recording and playback
settings
Recording and playback settings control how you record and play messages from your Inbox and how you record and play greetings and
names in the Web Assistant.
Depending on how your computer is set up, you can choose your
recording and playback devices:
Recording devices You speak into either your phone or a multimedia
microphone (if your computer has one).
Playback devices You hear recordings through either your phone or
multimedia speakers (if your computer has them).
You also have a volume control option and an automatic playback
option for voice messages in your Inbox.
IN THIS SECTION
To change recording and
playback devices................................ 70
To change playback volume.............. 72
To change automatic voice
message playback.............................. 74
KINESIS USER GUIDE
CHANGING RECORDING AND PLAYBACK SETTINGS 69
Page 75
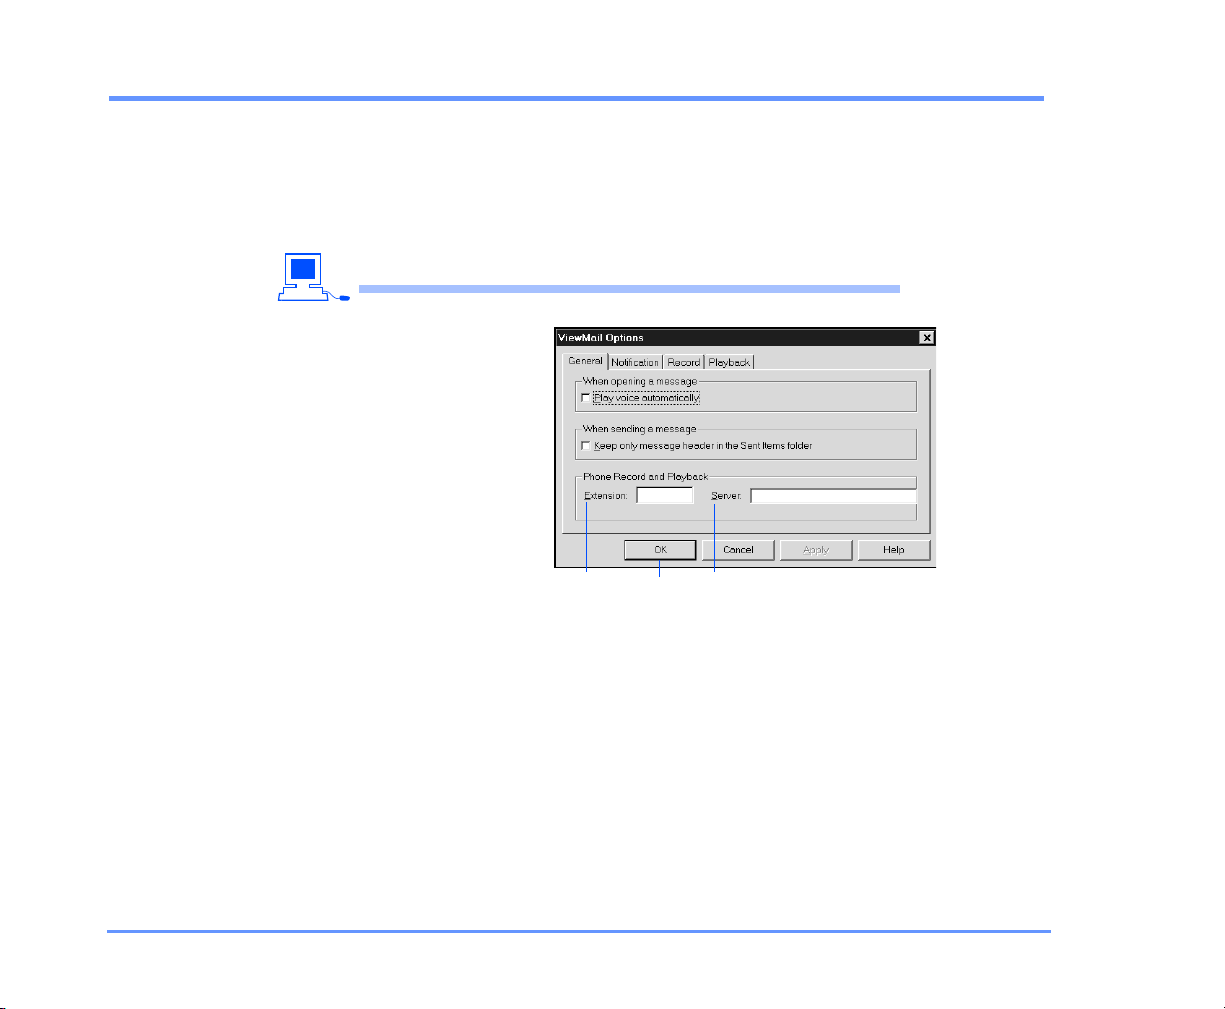
To change recording and playback devices
With ViewMail for Outlook, you can set whether you use
your phone or a multimedia microphone to record and play
messages. You can change this setting in Outlook, or with
any Media Master control bar in the Web Assistant.
USING YOUR E-MAIL INBOX
1 With ViewMail for
Outlook, on the
Outlook Tools
menu, click
“ViewMail
options.”
2 Click the Record
or Playback tab.
3 In the Device list,
click “Phone,” or
the driver for the
multimedia device installed in your computer. (For information on
selecting the appropriate driver, contact your system administrator.)
Extension
number
Save
Server
name
TIP Use your phone as the recording device to get the best
sound quality in your recordings.
4 If you chose “Phone,” click the General tab.
5 In the “Extension” box, type your extension.
6 In the “Server” box, type the name of your server. (If you do not
know your server name, contact your system administrator.)
7 Click “OK” to save your changes.
CHANGING RECORDING AND PLAYBACK SETTINGS 70KINESIS USER GUIDE
Page 76
TO CHANGE RECORDING AND PLAYBACK DEVICES
USING THE WEB ASSISTANT
1 Access the Web Assistant.
2 Under Call Settings in the navigation bar, click “Greetings.”
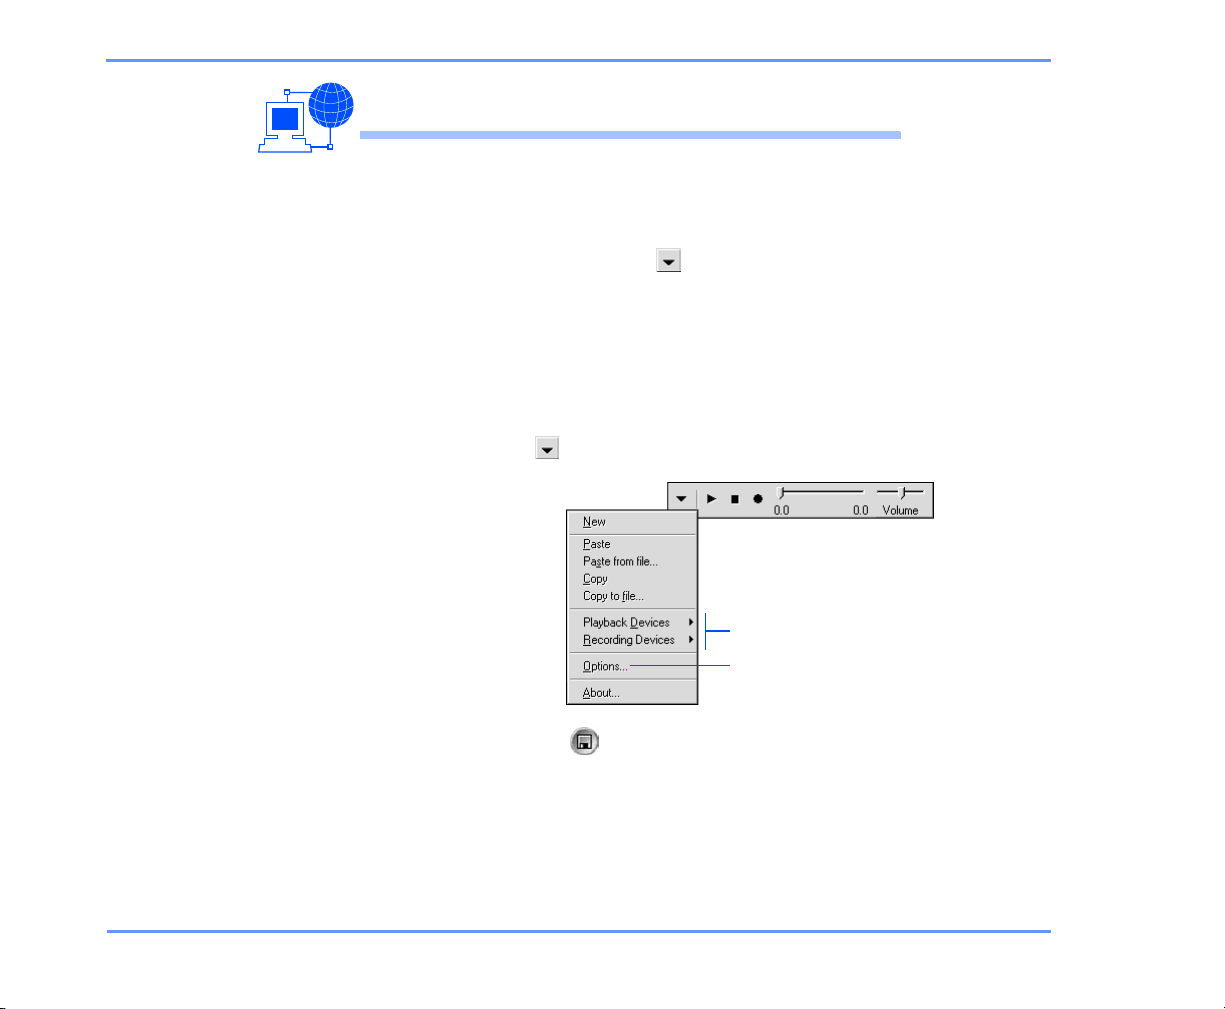
3 On the Media Master control bar menu, click “Playback devices”
or “Recording devices,” then click “Phone” or the appropriate
device driver. (For information on selecting the appropriate device
driver, contact your system administrator.)
TIP Use your phone as the recording device to get the best
sound quality in your recordings.
4 If you chose “Phone” for your playback or recording device, click
“Options” on the menu.
5 In the dialog box,
type your
extension and
the name of your
server. (If you do
not know your
server name,
contact your
system
administrator.)
Playback and Recording
Phone options
6 Click “OK,” then click to save your changes.
CHANGING RECORDING AND PLAYBACK SETTINGS 71KINESIS USER GUIDE
Page 77
To change playback volume
As you listen to a message by phone, you can adjust the
volume of the message. The change does not affect the
playback volume of other messages.
In the Web Assistant, you can adjust the playback volume
for all of your messages.
You cannot adjust the recording volume or the playback
volume of greetings.
USING YOUR PHONE
◆ While listening to a message, press to toggle among these
volume settings:
Press once Increases the volume.
Press again Decreases the volume.
Press again Returns the volume to the default.
CHANGING RECORDING AND PLAYBACK SETTINGS 72KINESIS USER GUIDE
5
Page 78
USING THE WEB ASSISTANT
TO CHANGE PLAYBACK VOLUME
1 Access the Web
Assistant.
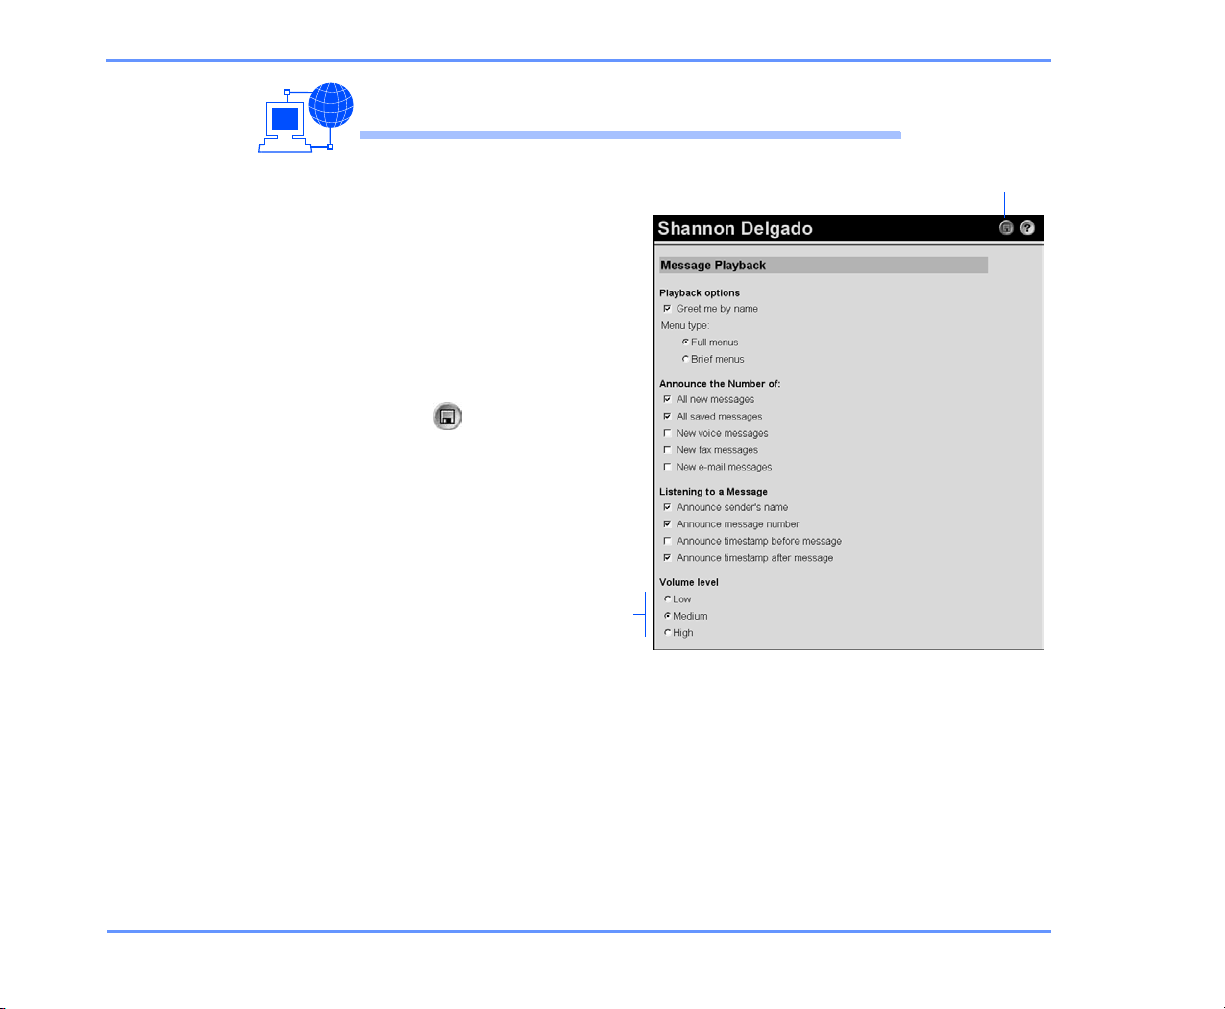
2 Under Message
Settings in the
navigation bar, click
“Message Playback.”
3 Click “Low,”
“Medium,” or “High.”
4 Click to save your
changes.
Volume
options
Save
CHANGING RECORDING AND PLAYBACK SETTINGS 73KINESIS USER GUIDE
Page 79
To change automatic voice message playback
With automatic playback, your voice messages begin playing as soon as you open them in your Inbox.
Without automatic playback, you use the Media Master
control bar to play voice messages.
USING YOUR E-MAIL INBOX
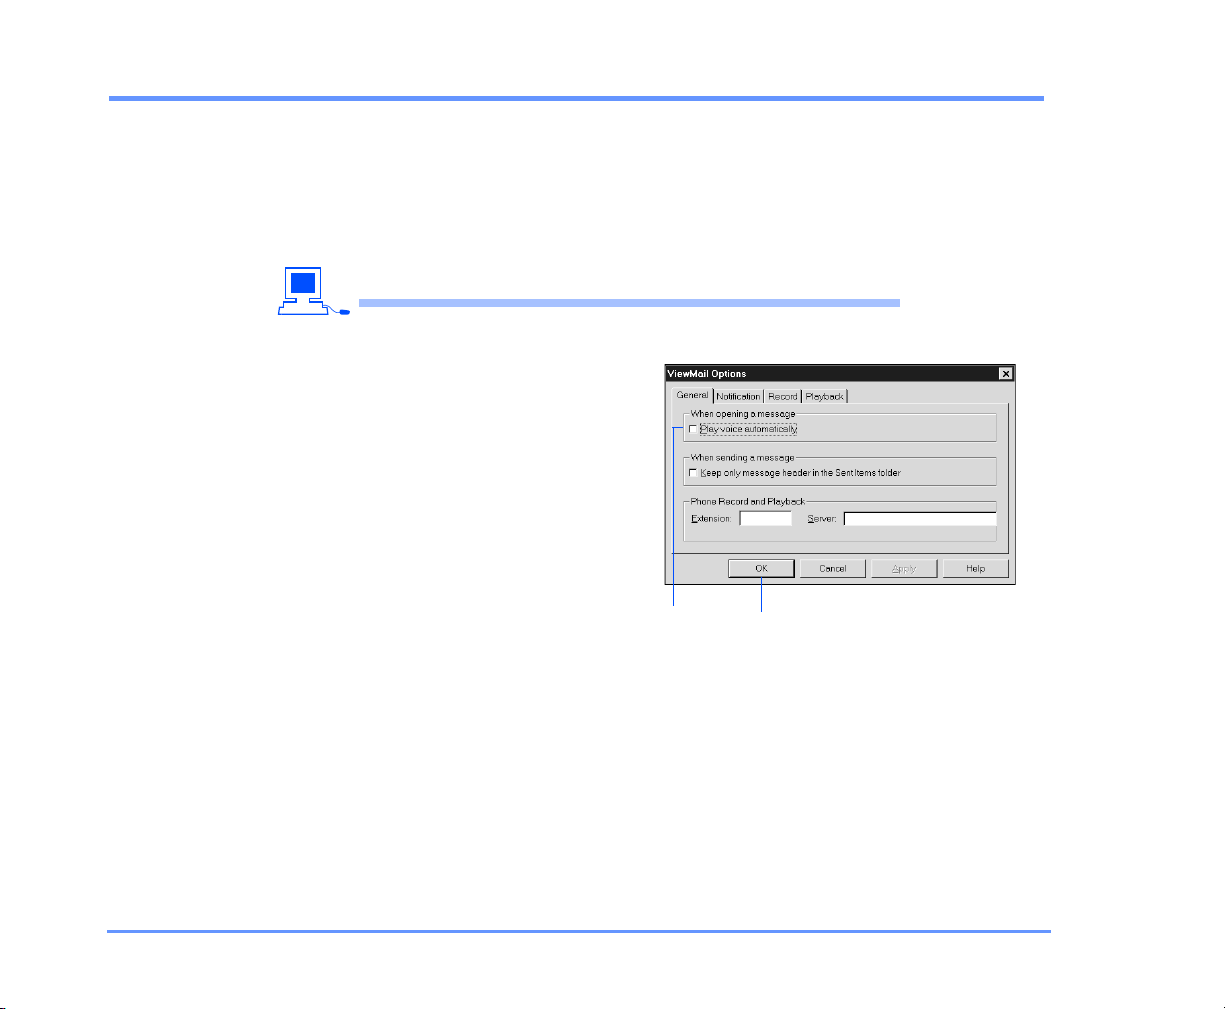
1 With ViewMail for
Outlook, on the Outlook
Tools menu, click
“ViewMail options.”
2 Select the General tab.
3 Select or clear the “Play
voice automatically”
check box.
4 Click “OK.”
Automatic
playback
Save
CHANGING RECORDING AND PLAYBACK SETTINGS 74KINESIS USER GUIDE
Page 80

■ Changing greeting settings
You can record up to five personal greetings that callers hear when you
are not available to take calls.
Kinesis plays your greetings in the appropriate situations, depending
on your organization’s hours and on how Kinesis is set up:
Standard greeting This greeting generally plays during your work
hours. The standard greeting plays unless it is overridden by another
greeting.
Closed greeting This greeting plays during your nonwork hours. The
closed greeting overrides the standard greeting during your organization’s nonbusiness hours.
Internal greeting This greeting plays only to callers within your organization. It can provide information that coworkers need to know. The
internal greeting overrides the standard and closed greetings when
you do not answer your phone.
Busy greeting This greeting plays when you are on the phone. The
busy greeting overrides the standard, closed, and internal greetings.
Alternate greeting This greeting plays to indicate special circumstances, such as when you are on vacation. The alternate greeting
overrides all other greetings.
You can record your standard, closed, and alternate greetings, and
enable or disable your alternate greeting by phone. You can record all
five of your greetings and enable or disable them in the Web Assistant.
Enabling a greeting makes it available for Kinesis to play in the appropriate situations. (Your standard greeting is always enabled.)
Disabling a greeting makes it unavailable for Kinesis to play, but it
does not erase the recording. (You cannot disable your standard
greeting.)
IN THIS SECTION
To record a greeting .......................... 76
To enable or disable a greeting........ 78
To change a greeting source ............ 80
To enable or disable callers to
bypass your greeting ......................... 81
KINESIS USER GUIDE
CHANGING GREETING SETTINGS 75
Page 81
To record a greeting
You can record your standard, closed, and alternate greetings by phone.
If applicable, you can also record a greeting for a shared
phone. See “To record a greeting for a shared phone” on
page 137.
USING YOUR PHONE
1 Call Kinesis and log on.
2 Press > > .
3 After Kinesis plays your current greeting, press to rerecord it,
Use these keys as you record
TASK KEY TASK KEY
Pause or continue End recording
Use these keys anytime
TASK KEY TASK KEY
Cancel or back up Skip or move ahead
4 1 1
1
or
press to choose and rerecord a different greeting.
3
8 #
*
#
CHANGING GREETING SETTINGS 76KINESIS USER GUIDE
Page 82
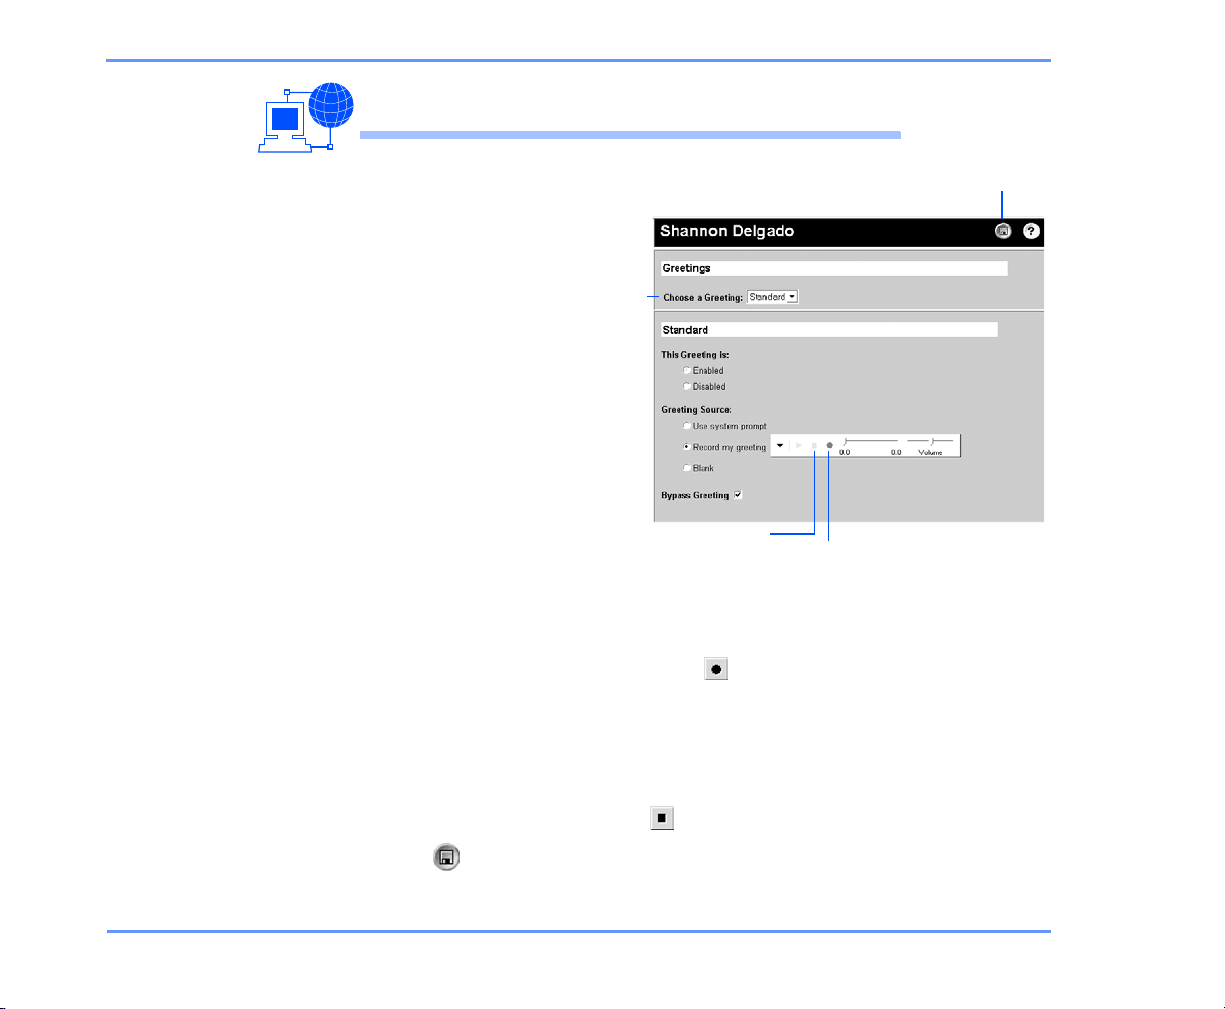
USING THE WEB ASSISTANT
TO RECORD A GREETING
1 Access the Web
Assistant.
2 Under Call Settings
in the navigation bar,
click “Greetings.”
Greeting
list
3 In the Choose a
Greeting list, click
the greeting you
want to record.
4 Click “Enabled.”
NOTE When
your alternate
greeting is
enabled, it
Stop
Record
overrides all
other greetings.
5
Click “Record my greeting.”
6 On the Media Master control bar, click and record the greeting
with your recording device:
Phone
the handset.
Multimedia microphone Wait for the tone, then speak into the microphone.
Pick up the handset when the phone rings, wait for the tone, then speak into
Save
7 When you finish recording, click .
8 Click to save your changes.
CHANGING GREETING SETTINGS 77KINESIS USER GUIDE
Page 83
To enable or disable a greeting
You can enable or disable only your alternate greeting by
phone.
You can enable or disable all of your greetings in the Web
Assistant, except the standard greeting, which is always
enabled.
USING YOUR PHONE
1 Call Kinesis and log on.
2 Press > > .
3 After Kinesis plays your current greeting, press to enable or
4 1 1
2
disable your alternate greeting.
NOTE When your alternate greeting is enabled, it
overrides all other greetings.
Use these keys anytime
TASK KEY TASK KEY
Cancel or back up Skip or move ahead
*
#
CHANGING GREETING SETTINGS 78KINESIS USER GUIDE
Page 84
USING THE WEB ASSISTANT
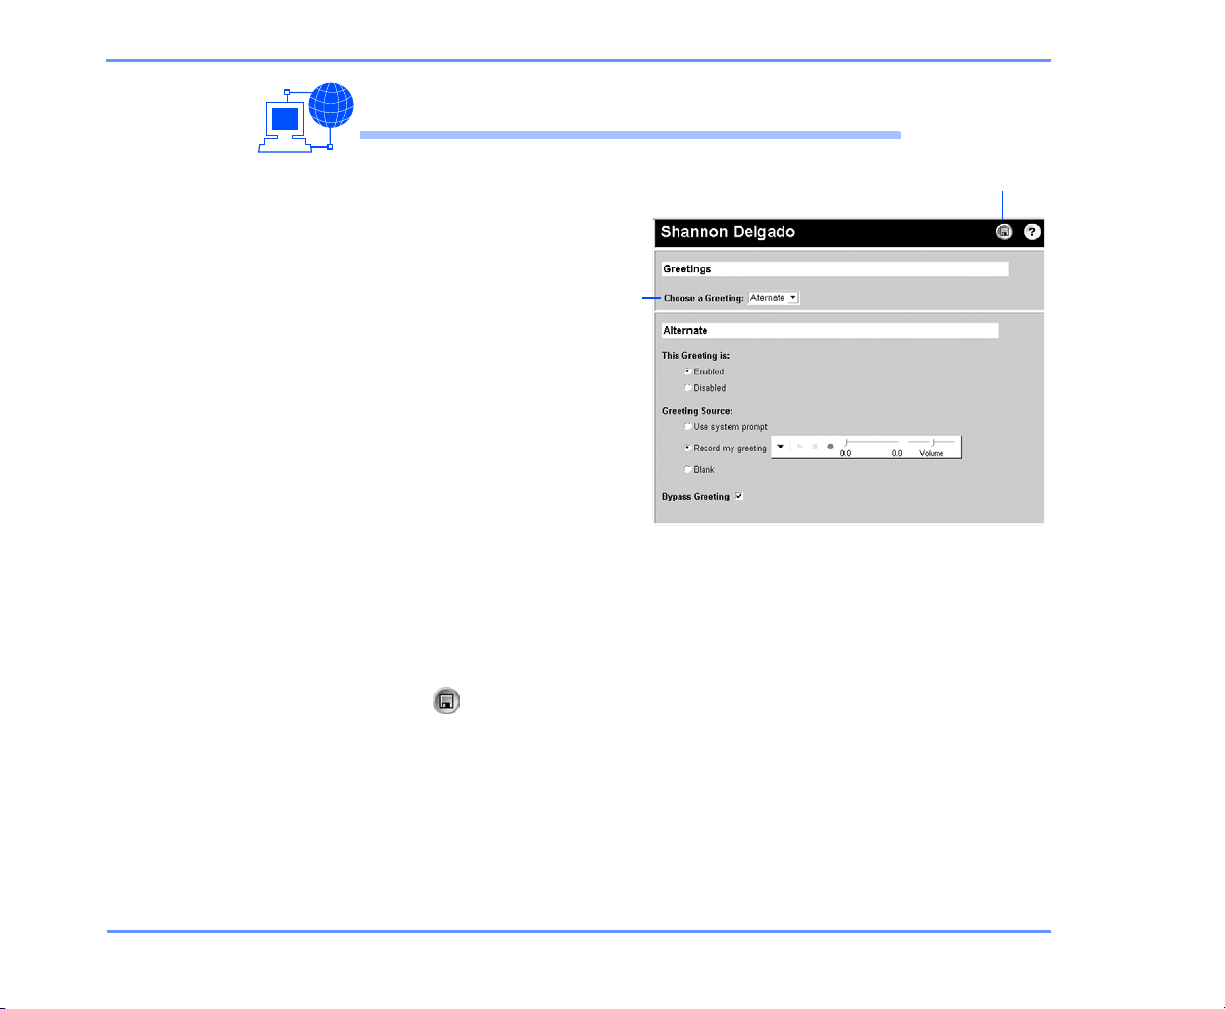
TO ENABLE OR DISABLE A GREETING
1 Access the Web
Assistant.
2 In the Call Settings
section of the
navigation bar, click
“Greetings.”
Greeting
list
3 In the Choose a
Greeting list, click
the greeting you
want to enable or
disable.
4 Click “Enabled” to
make the greeting
available to Kinesis,
or
click “Disabled” to make it unavailable to Kinesis.
NOTE When your alternate greeting is enabled, it
overrides all other greetings.
5
Click to save your changes.
Save
CHANGING GREETING SETTINGS 79KINESIS USER GUIDE
Page 85
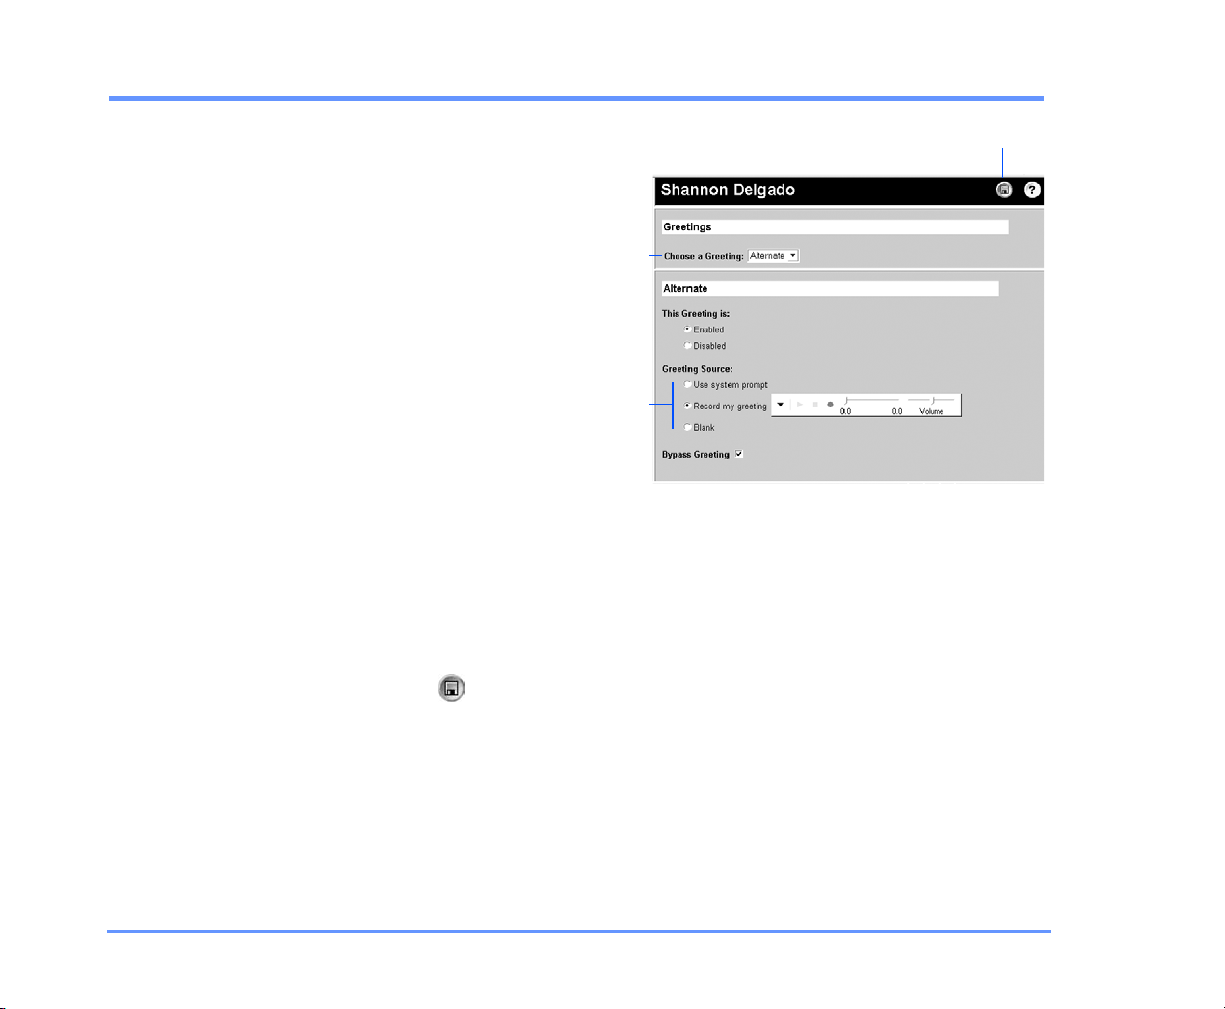
To change a greeting source
1 Access the Web
Assistant.
2 In the Call Settings
section of the
navigation bar, click
“Greetings.”
Greeting
list
3 In the Choose a
Greeting list, click
the greeting whose
source you want to
change.
Source
4 Choose a source:
Use system
prompt Kinesis
plays a prerecorded
greeting along with your recorded name (for example, “Sorry, <your name> is not
available”).
Record my greeting Kinesis plays your recording. (Use the Media Master control
bar to record your greeting.)
Blank Kinesis plays no greeting.
5 Click to save your changes.
Save
CHANGING GREETING SETTINGS 80KINESIS USER GUIDE
Page 86
To enable or disable callers to bypass your greeting
Callers can normally press to skip your greeting and
#
leave you a message immediately.
But there may be situations, such as when you are on
vacation or out of the office for an extended period, in
which you require callers to listen to the entire greeting
before they can leave a message.
You can choose whether or not to let callers skip your
greeting by enabling or disabling the Bypass Greeting
option.
USING YOUR PHONE
1 Call Kinesis and log on.
2 Press > > .
3 After Kinesis plays your current greeting, press to enable or
Use these keys anytime
TASK KEY TASK KEY
Cancel or back up Skip or move ahead
4 1 1
disable Bypass Greeting.
*
5
#
CHANGING GREETING SETTINGS 81KINESIS USER GUIDE
Page 87
TO ENABLE OR DISABLE CALLERS TO BYPASS YOUR GREETING
USING THE WEB ASSISTANT
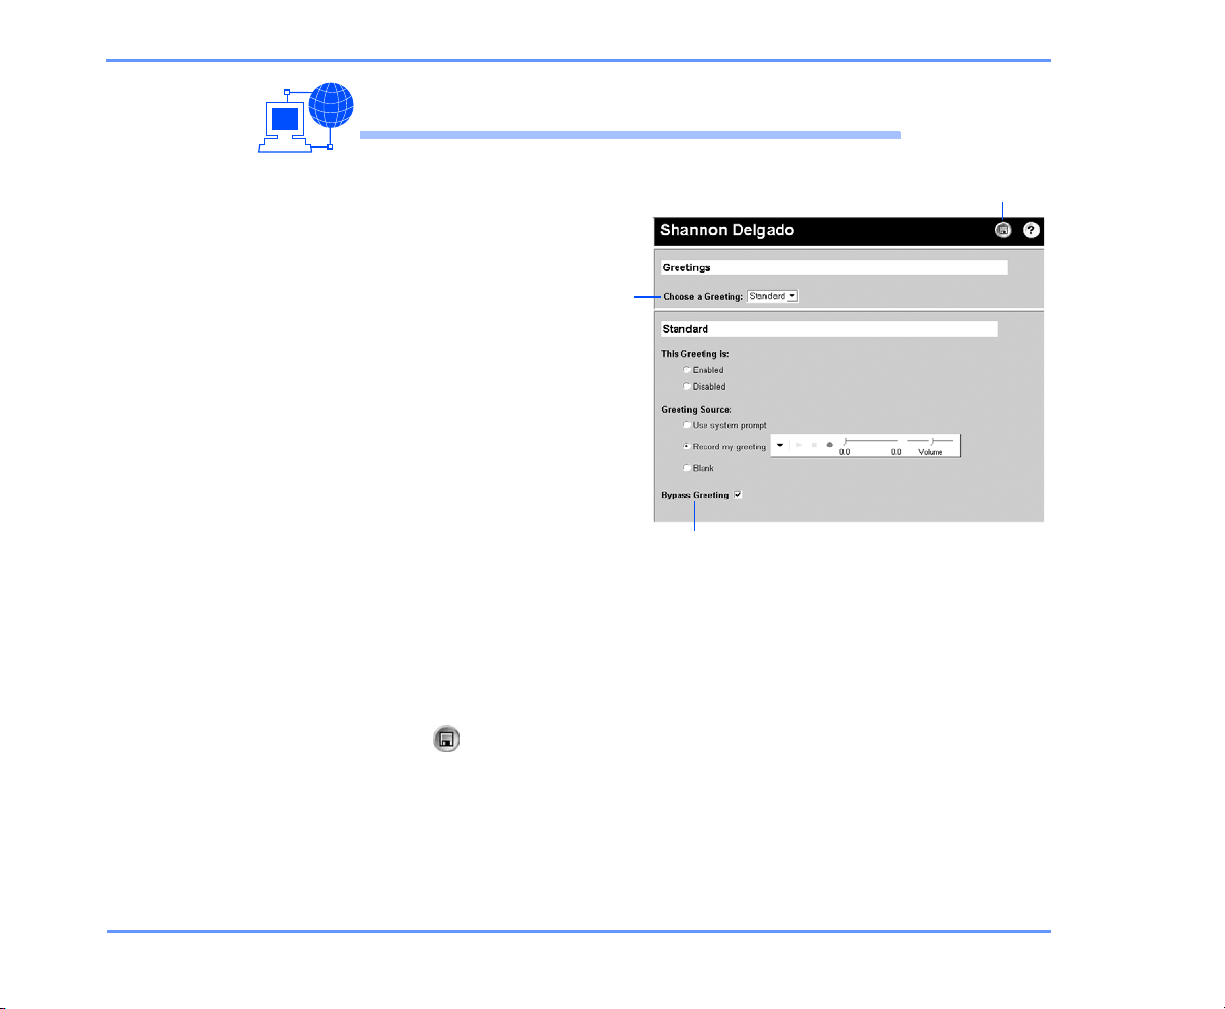
1 Access the Web
Assistant.
2 In the Call Settings
section of the
navigation bar, click
“Greetings.”
Greeting
list
3 In the Choose a
Greeting list, click
the greeting for
which you want to
enable or disable
Bypass Greeting.
4 To let callers skip
this greeting, select
the “Bypass
Greeting” check
box,
or
to require callers to listen to this greeting, clear the “Bypass
Greeting” check box.
Callers can bypass your greeting.
5 Click to save your changes.
Save
CHANGING GREETING SETTINGS 82KINESIS USER GUIDE
Page 88

■ Changing call settings
Call settings control some caller options and how Kinesis handles your
incoming external calls:
Answer options When you answer your phone, Kinesis can announce
who the call is for. When Kinesis connects the call, you can take the
call or route it to your greeting for the caller to leave a message.
Call screening With call screening on, Kinesis records a caller’s name
and plays it for you before connecting the call.
Busy/hold options When your phone is busy, Kinesis has two hold
options or it can route callers to your greeting to leave a message.
Call transfer You can choose to answer your calls or to have them
routed to your greeting. Generally, call transfer is set to ring a phone—
either your extension or another phone—when you are available to
answer calls. You likely would transfer calls directly to your greeting
when you planned to be out of the office for an extended period, such
as when you are on vacation. (When you route calls to your greeting,
callers do not have to wait while your phone rings unanswered.)
Callers’ message options You can choose whether callers who leave
messages can edit their messages and mark them as urgent.
IN THIS SECTION
To change what Kinesis says
when you answer calls ....................... 84
To change call screening................... 86
To change call handling for when your
phone is busy ..................................... 87
To change call transfer....................... 89
To change a caller’s message
options ................................................ 91
KINESIS USER GUIDE
CHANGING CALL SETTINGS 83
Page 89
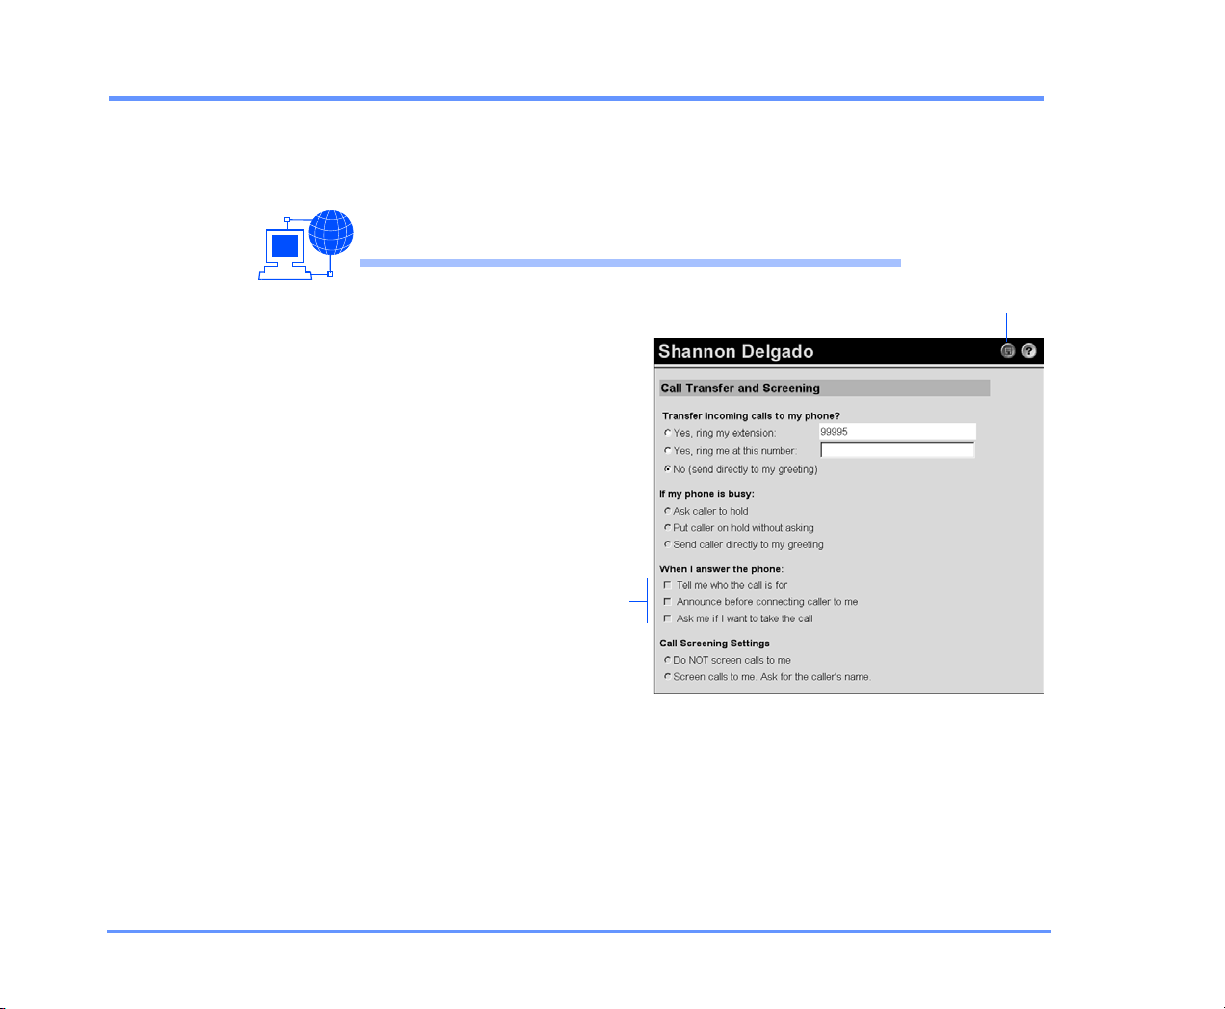
To change what Kinesis says when you answer calls
Whether these options are available depends on the type of
call transfer your phone system uses. See your system
administrator for more information.
USING THE WEB ASSISTANT
1 Access the Web
Assistant.
2 Under Call Settings
in the navigation
bar, click “Call
Transfer a nd
Screening.”
3 Choose what
Kinesis says when
you answer your
phone:
Announce
options
Save
CHANGING CALL SETTINGS 84KINESIS USER GUIDE
Page 90

TO CHANGE WHAT KINESIS SAYS WHEN YOU ANSWER CALLS
Tell me who... Kinesis plays the recorded name associated with
the dialed extension. Use this setting when two or more people
share a phone.
Announce before connecting... Kinesis tells you when it connects
the call.
Ask me if... Kinesis asks if you want to take the call or have the
caller leave a message. You can use this setting with the “Tell me
who the call is for” option (for example, to decline a call for
someone you share a phone with). You can also use this setting with
the “Screen calls to me” option under Call Screening Settings (for
example, to accept or decline calls based on the identity of the
caller).
4 Click to save your changes.
CHANGING CALL SETTINGS 85KINESIS USER GUIDE
Page 91
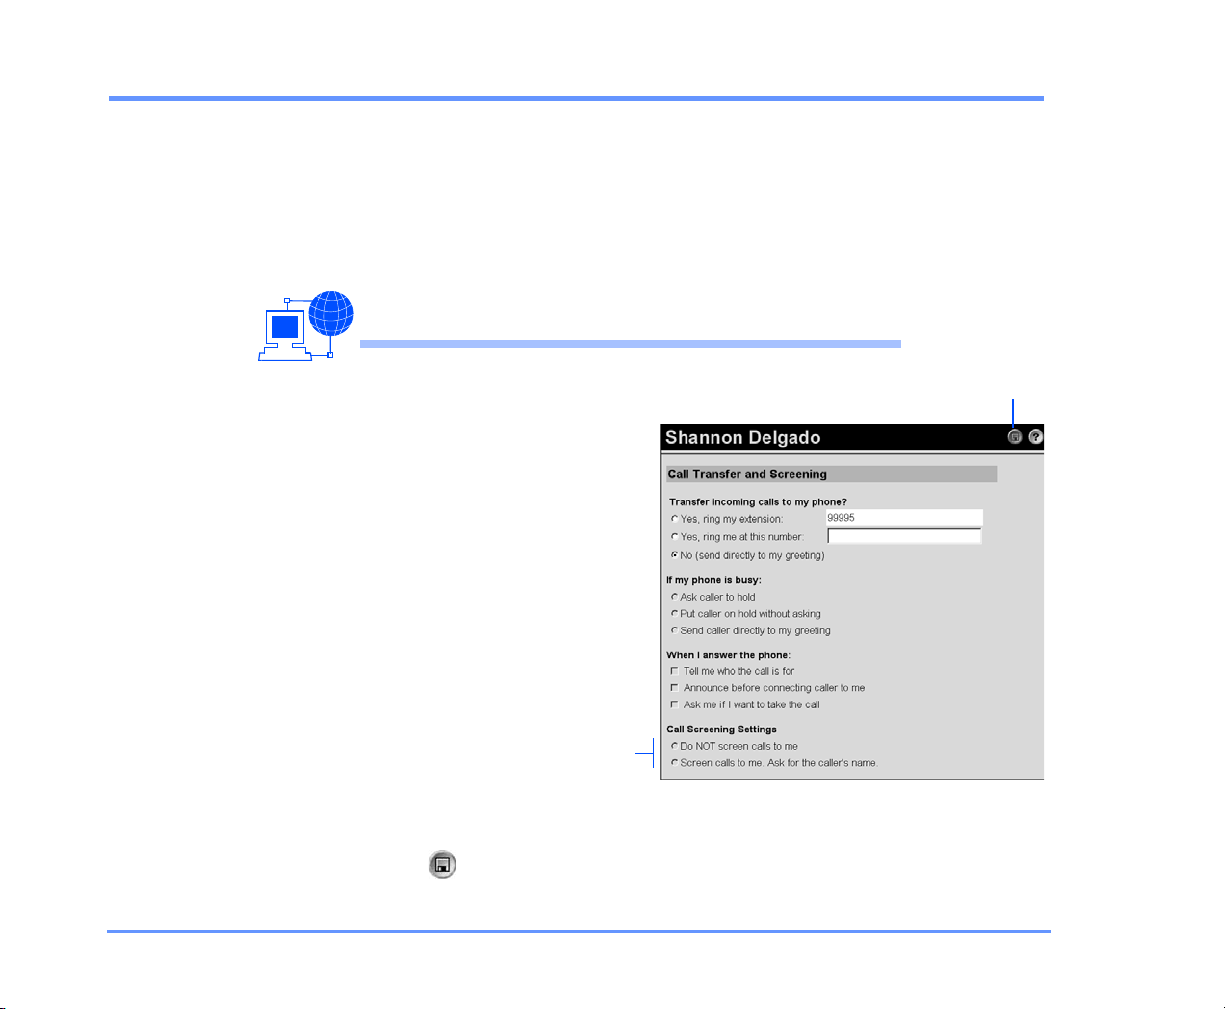
To change call screening
Kinesis screens calls by asking for and recording a caller’s
name, then placing the caller on hold. Kinesis rings your
phone and announces the caller’s name. Whether call
screening is available depends on the type of call transfer
your phone system uses. See your system administrator
for more information.
USING THE WEB ASSISTANT
1 Access the Web
Assistant.
2 Under Call Settings
in the navigation
bar, click “Call
Transfer a nd
Screening.”
3 Choose whether
Kinesis screens your
calls.
NOTE To
decline your calls
and route them
to your greeting
instead, select
the “Ask me if I
want to take the
call” check box.
4
Click to save your changes.
Save
Screening
CHANGING CALL SETTINGS 86KINESIS USER GUIDE
Page 92
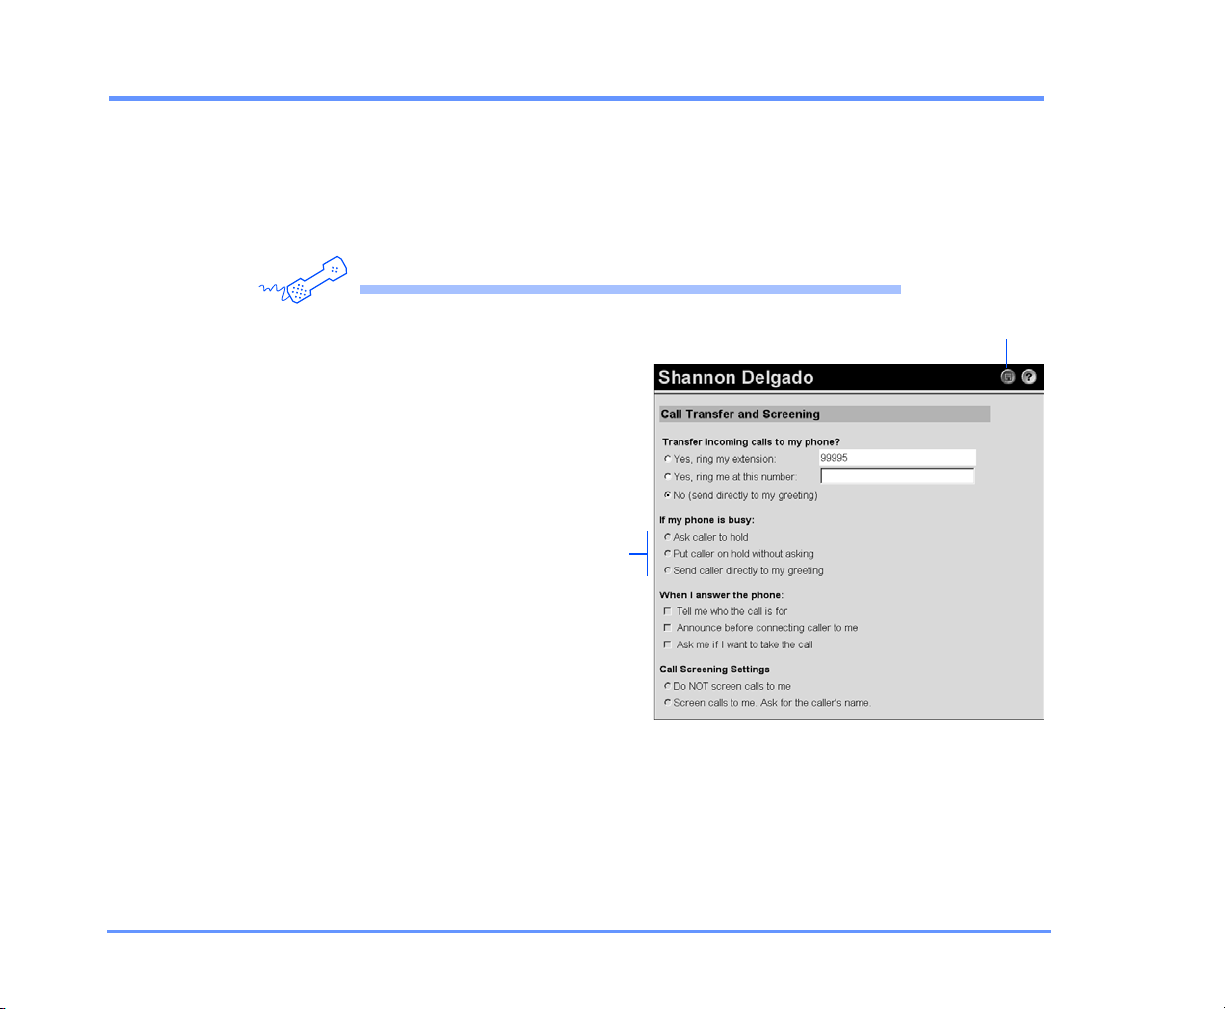
To change call handling for when your phone is busy
S
When your phone is busy, you can have your callers wait
on hold, depending on the type of call transfer used by
your phone system. See your system administrator for
more information.
USING YOUR PHONE
1 Access the Web
Assistant.
2 Under Call Settings
in the navigation
bar, click “Call
Transfer a nd
Screening.”
3 Choose whether
callers are put on
hold:
Ask caller to
hold
Kinesis gives
the caller the options
of holding or leaving
a message.
ave
Holding
CHANGING CALL SETTINGS 87KINESIS USER GUIDE
Page 93

TO CHANGE CALL HANDLING FOR WHEN YOUR PHONE IS BUSY
Put caller on hold... Kinesis automatically puts the caller on hold, without the
option of leaving a message.
Send caller directly... Kinesis automatically routes the caller to your greeting, with-
out the option of holding, then prompts the caller to leave a message.
4 Click to save your changes.
CHANGING CALL SETTINGS 88KINESIS USER GUIDE
Page 94
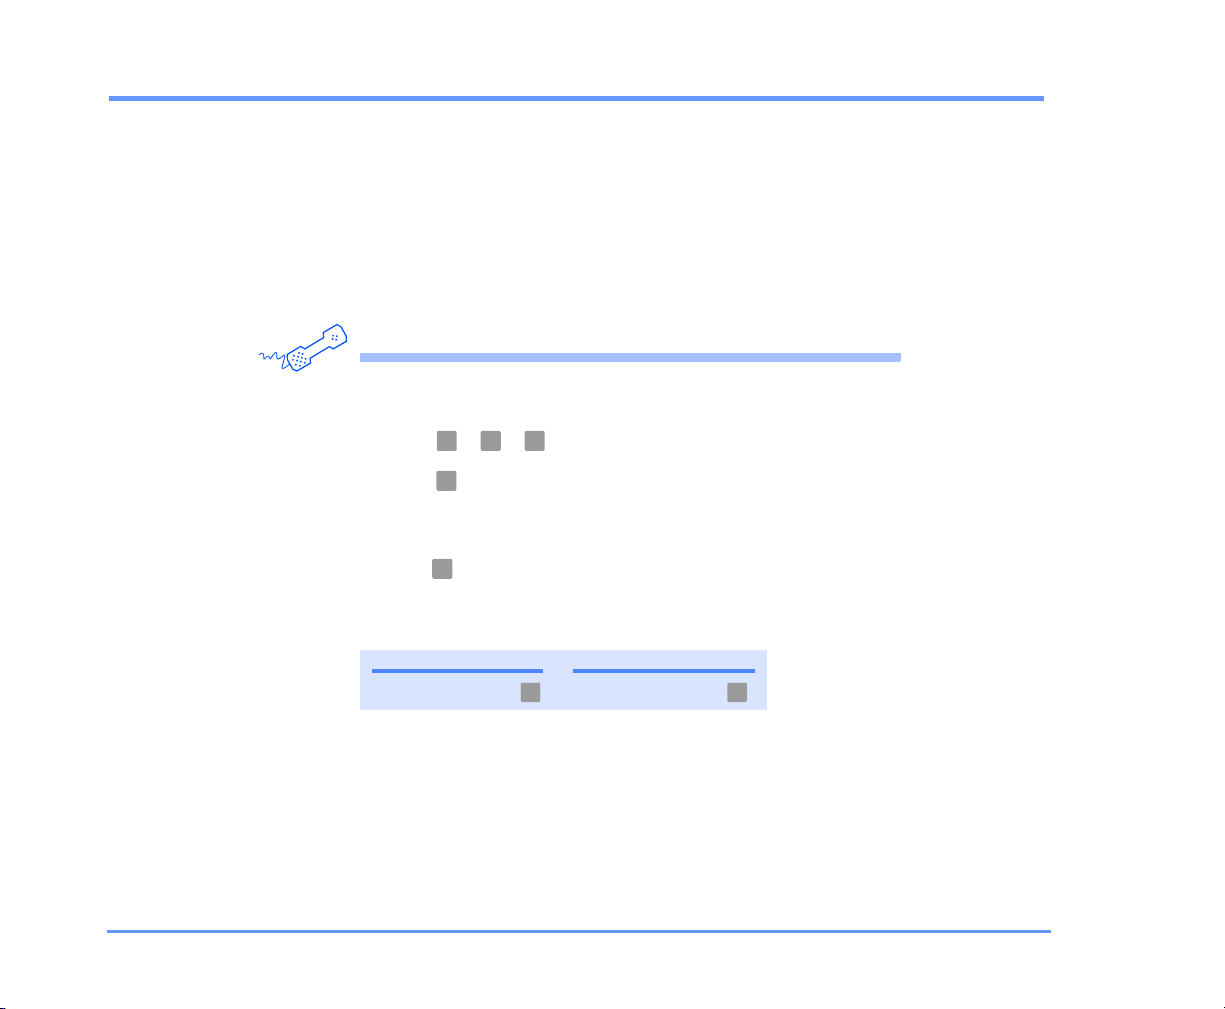
To change call transfer
You can change whether Kinesis transfers callers to your
extension, or routes callers directly to your greeting to
leave a message. You can also change the phone number
that Kinesis transfers your callers to.
Depending on how Kinesis is set up at your organization,
this option may not be available.
USING YOUR PHONE
1 Call Kinesis and log on.
2 Press > > .
3 Press to switch between transferring calls to an extension and to
Use these keys anytime
TASK KEY TASK KEY
Cancel or back up Skip or move ahead
4 1 2
1
your greeting,
or
press to change your transfer phone number. (To transfer calls to
2
an external phone number, contact your system administrator.)
*
#
CHANGING CALL SETTINGS 89KINESIS USER GUIDE
Page 95
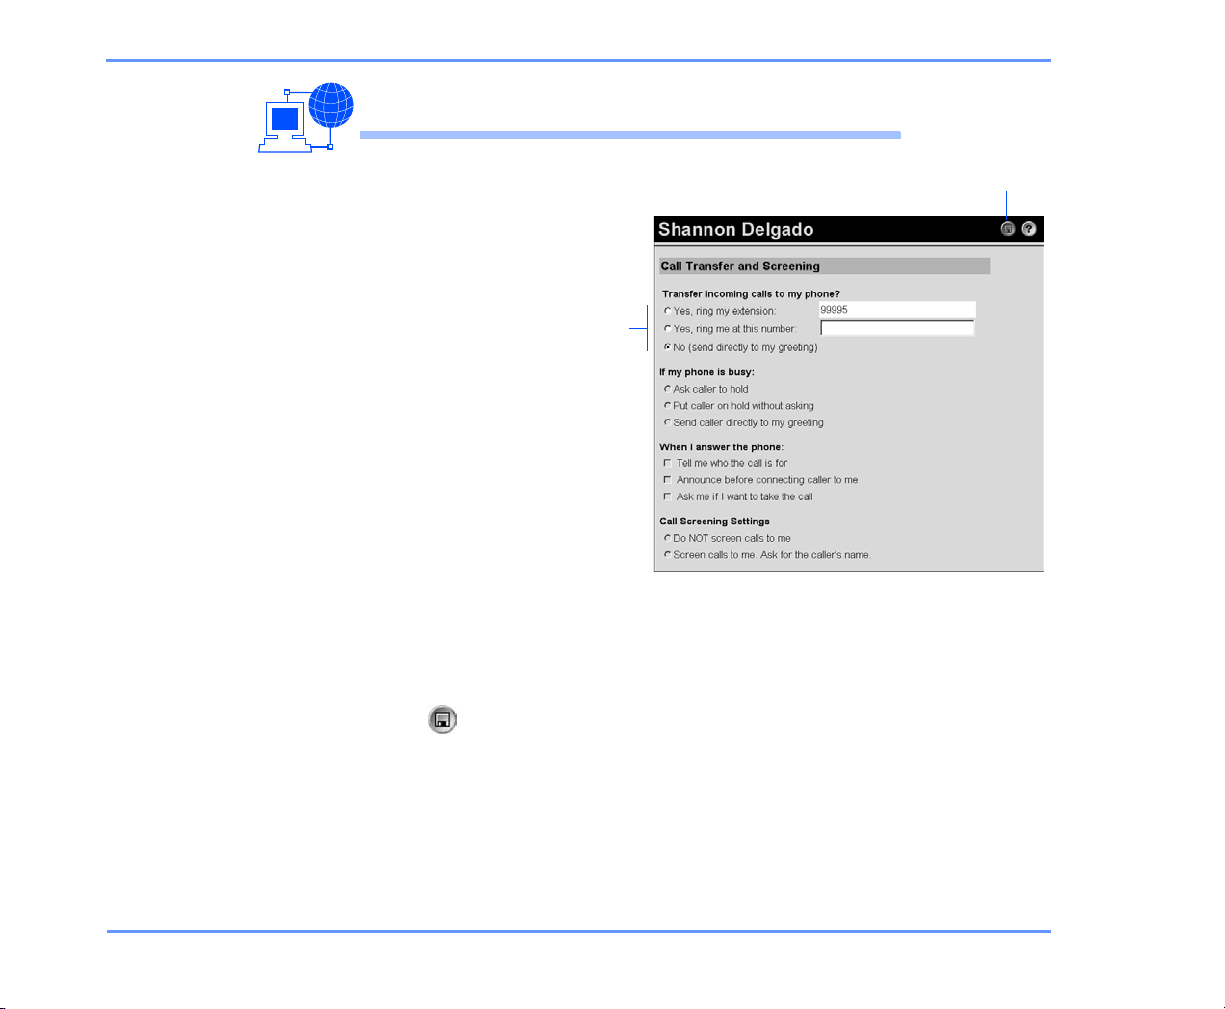
USING THE WEB ASSISTANT
TO CHANGE CALL TRANSFER
1 Access the Web
Assistant.
2 Under Call Settings
in the navigation bar,
click “Call Transfer
and Screening.”
Call
transfer
3 Choose a transfer
setting:
Yes, ring my
extension
setting to have calls
ring your extension.
Use this
Yes, ring me at...
Use this setting to
have calls ring the
extension or phone
number you type in
the adjacent box. (To
transfer calls to an external phone number, contact your system administrator.)
No (send directly...) Use this setting to have calls transferred directly to your greet-
ing. Your phone does not ring.
4 Click to save your changes.
Save
CHANGING CALL SETTINGS 90KINESIS USER GUIDE
Page 96
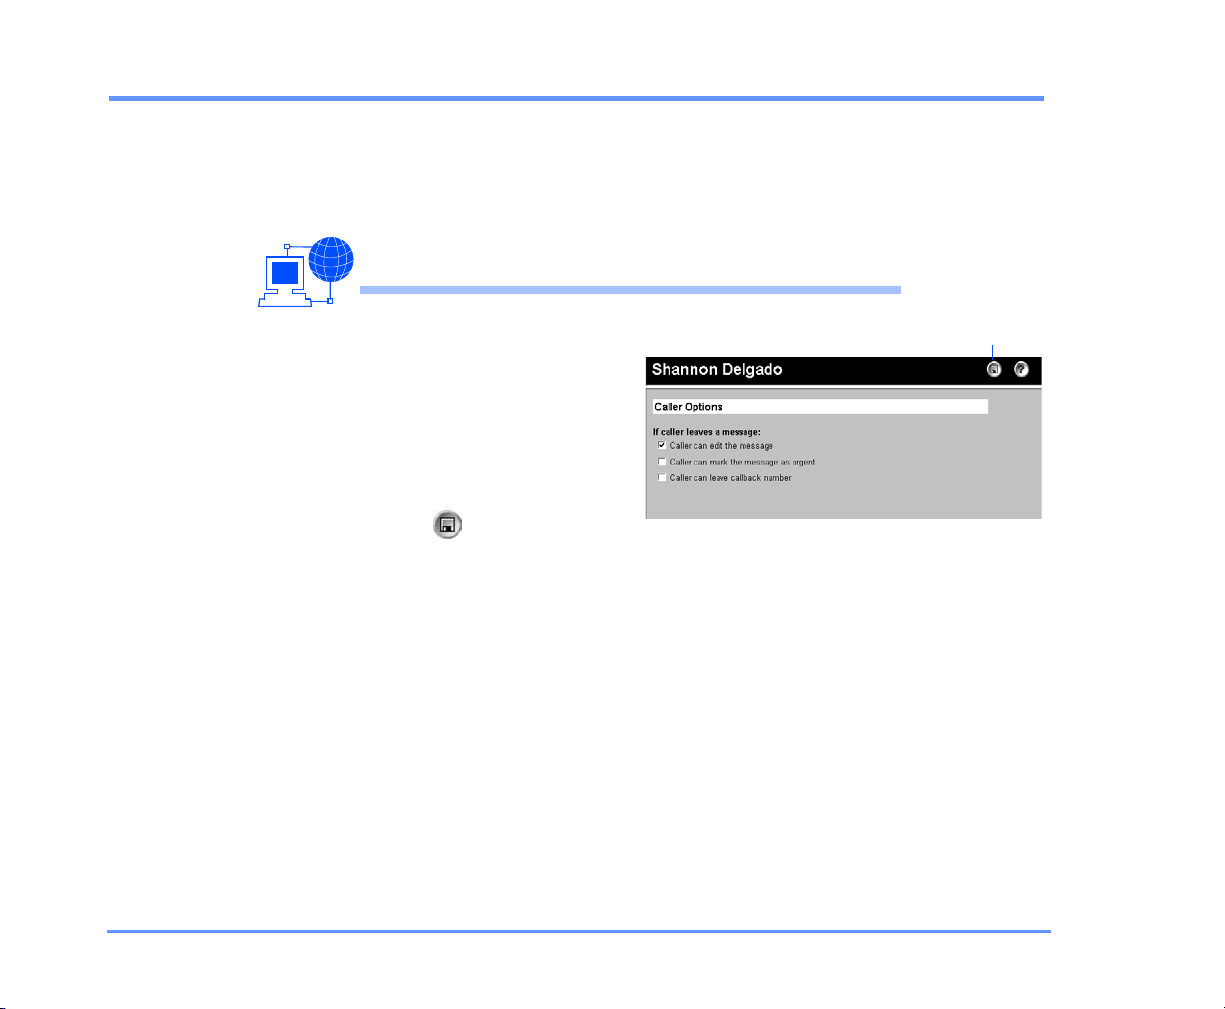
To change a caller’s message options
You can set whether your callers can edit their messages,
whether your callers can leave urgent messages, and
whether your callers are asked to enter a phone number
before being transferred to your extension.
USING THE WEB ASSISTANT
1 Access the Web Assistant.
2 Under Message Settings in
the navigation bar, click
“Caller Options.”
3 Choose what callers can do
when they leave messages.
4 Click to save your
changes.
Save
CHANGING CALL SETTINGS 91KINESIS USER GUIDE
Page 97

■ Changing message settings
Message settings control how Kinesis announces your messages; they
also control some options for the messages you send. You can also use
message settings to set up external mailboxes for checking your other
e-mail accounts.
You can control the following settings:
Message types You can choose the types of messages for which
Kinesis announces count totals then plays when you check messages
by phone.
Message summary information You can choose the items of summary
information you want to hear about messages before or after Kinesis
plays them (for example, sender, date, and time).
Log on greeting You can choose whether Kinesis plays your recorded
name when you log on.
Sound notification You can choose the sound that notifies you at your
computer when new voice messages arrive in your Inbox.
Message addressing You have three options for how you address messages to other subscribers when you send messages by phone.
IN THIS SECTION
To change message types................. 93
To change message
summary information......................... 95
To change your log on greeting ....... 97
To change the sound that notifies
you of new voice messages............... 98
To change message addressing
settings................................................ 99
To set up an external mailbox......... 100
KINESIS USER GUIDE
CHANGING MESSAGE SETTINGS 92
Page 98

To change message types
Kinesis announces the number of messages and plays new
messages in the following order, depending on the types
of messages you choose to hear: urgent receipts, regular
receipts, urgent voice, regular voice, urgent fax, regular fax,
urgent e-mail, regular e-mail.
Kinesis then plays old messages in the same order.
With fax messages, Kinesis plays message summary information only.
CHANGING MESSAGE SETTINGS 93KINESIS USER GUIDE
Page 99
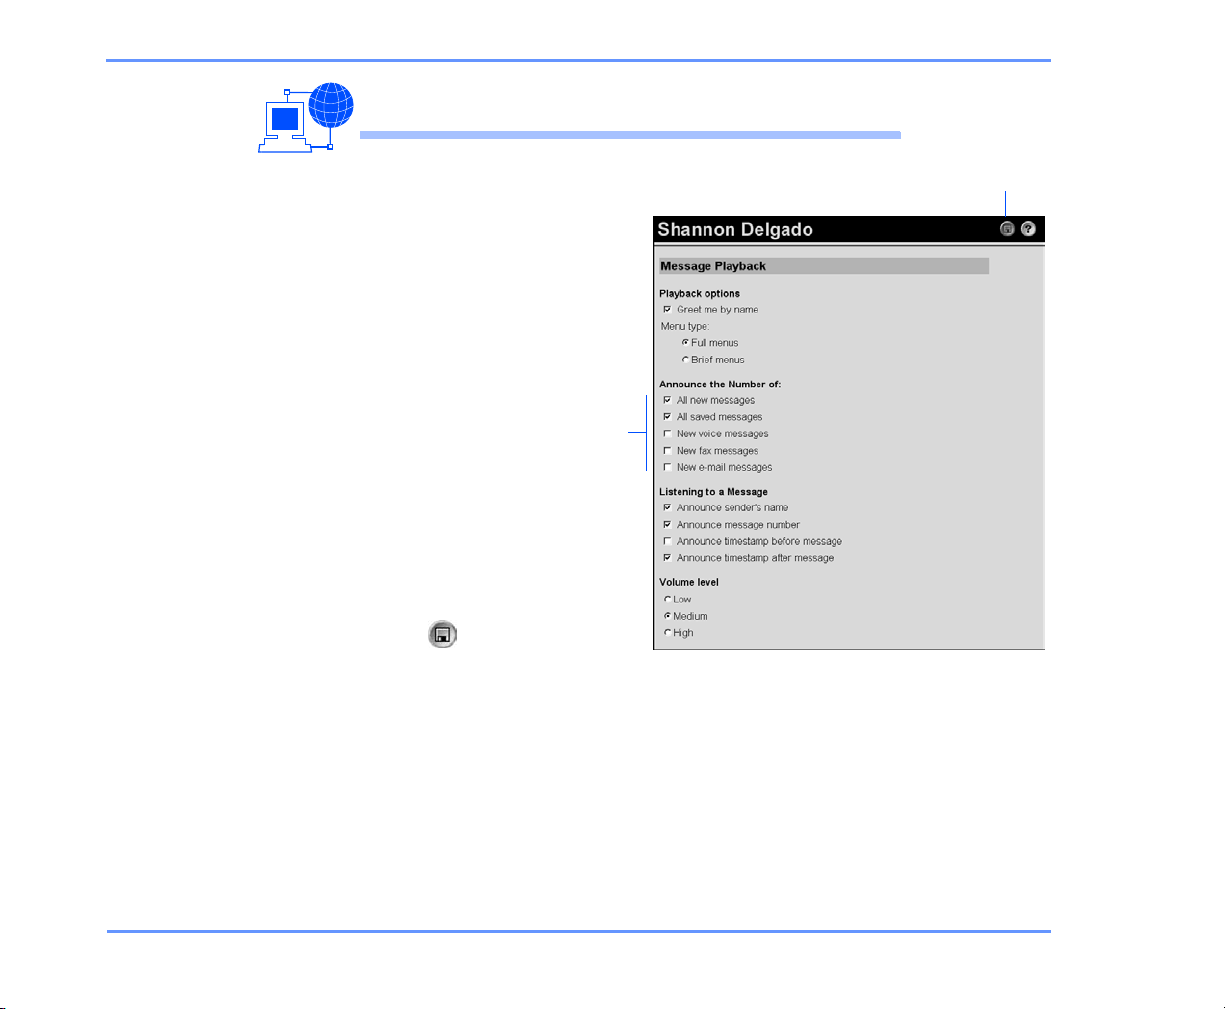
USING THE WEB ASSISTANT
TO CHANGE MESSAGE TYPES
1 Access the Web
Assistant.
2 Under Message
Settings in the
navigation bar, click
“Message
Playback.”
3 Choose the types of
messages you want
to hear when you
check messages by
phone. To hear the
total number of a
specific type, select
that check box. To
hear no totals, clear
all check boxes.
4 Click to save
your changes.
Message
totaling
Save
CHANGING MESSAGE SETTINGS 94KINESIS USER GUIDE
Page 100
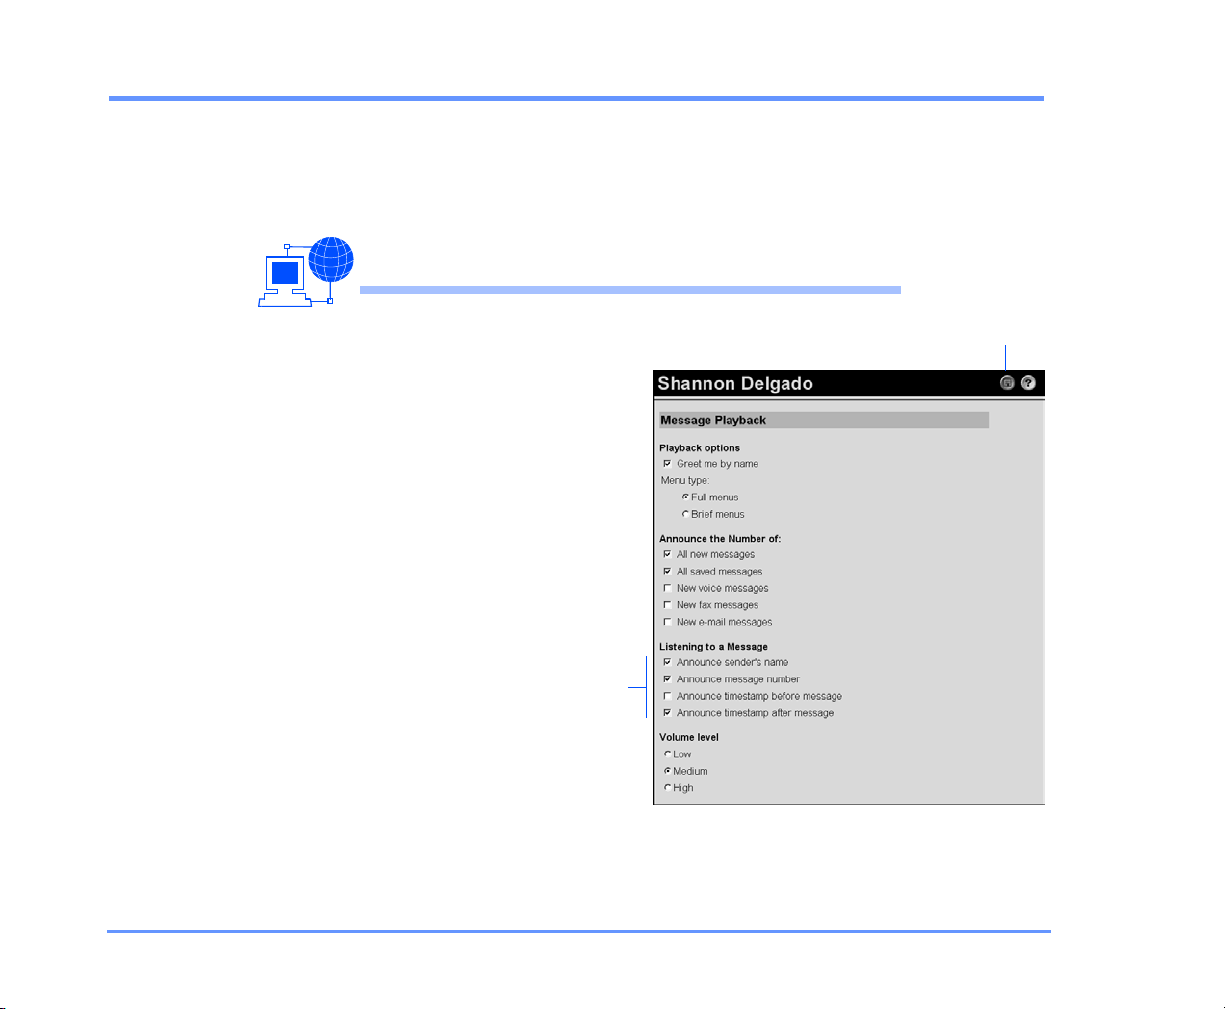
To change message summary information
You can set whether Kinesis tells you a sender’s name, the
sequence number of a message, and whether a message
time stamp is played before or after the message. This
information is called the message summary.
USING THE WEB ASSISTANT
1 Access the Web
Assistant.
2 Under Message
Settings in the
navigation bar,
click “Message
Playback.”
3 Choose the
summary
information you
want to hear
about your
messages:
Message
summary
Save
CHANGING MESSAGE SETTINGS 95KINESIS USER GUIDE
 Loading...