

Page 1
Active Thermal Management
The trusted name in thermal protection
Cool-vent II-E & III-E Installation Instructions
The Cool-vents are compact self-contained air moving devices for use in enclosures housing
heat-producing equipment. They can easily be field-modified to work in either intake or
exhaust mode. If used as an intake device, provisions must be made to allow the escape of hot
air; similarly, when used in exhaust mode, there must be an opening through which room air
can enter.
Cool-vents are powered by a plug-type power supply and are controlled by a thermal probe
connected to a small module, switching on at 90 degrees. They mount on a finished surface
through cutouts shown in the accompanying chart. The fan assembly is easily separated from
the wood grille to allow finishing the grille without damaging the fans.
Model Rough opening Finished size Number/size of
fans
Cool-vent II 4⅛" x 14⅛" 5 ½" x 15 ½" 4/80mm
Cool-vent III 6⅛" x 14⅛" 7 ⅛" x 15 ½" 2/120mm
As shipped, Cool-vents are assembled as an intake device; air is pulled from the grille side
through the fans.
When the fan and grille sections are reattached, the Cool-vent can be assembled to operate in
either intake or exhaust mode.
In intake mode, it can be mounted low on a cabinet to bring room air in.
In exhaust mode, it can be mounted above or behind an amplifier or another heatproducing component to expel heated air.
Main installation steps:
25570 Rye Canyon Rd. Valencia, California 91355
(661) 294-7999 voice (661) 294-1115 fax
techinfo@activethermal.com www.activethermal.com
Page 2
1. Separate the fan and grille sections.
2. Finish the grille as required.
3. Reassemble in intake or exhaust mode.
4. Install in opening.
5. Install thermal switch and connect to power source.
To install Cool-vent:
1. Separate the fan and grille sections by removing the nuts on the threaded studs. Use a
5/16" open-end wrench.
2. Finish the wooden grille section as desired. Allow to dry completely before reassembling
to the fan section. (Read the following cautionary note.)
**IMPORTANT**
In order to protect the grille and prevent warping or cracking, you must
seal the grille on EACH side and in between all slots prior to installation.
Whether you are painting, staining, or sealing the grille with urethane, they must
have the appropriate finish applied BEFORE they are installed. If the grille is
not protected in this way, Active Thermal Management will not be responsible
for any warping or cracking that might occur.
3. Reassemble the two sections in desired operating mode. Do NOT use excessive force
when tightening the nuts holding the fans.
a. For "intake" mode, reassemble as they were shipped, with the fans' labels facing
away from the grille section.
b. For "exhaust" mode, the fans' labels should face the grille section.
4. Cut an opening of appropriate size (see chart above) at the desired location. Pass the
thermal switch and power supply through the opening from the outside and screw or bolt
the grille to the mounting surface either from the outside or inside as appropriate.
5. Attach the thermal probe to the equipment to be monitored, or mount the probe so that it
can sense the temperature of the hottest air in the enclosure. (This might be at the highest
point in the cabinet or just above the hottest component.)
25570 Rye Canyon Rd. Valencia, California 91355
(661) 294-7999 voice (661) 294-1115 fax
techinfo@activethermal.com www.activethermal.com
Page 3
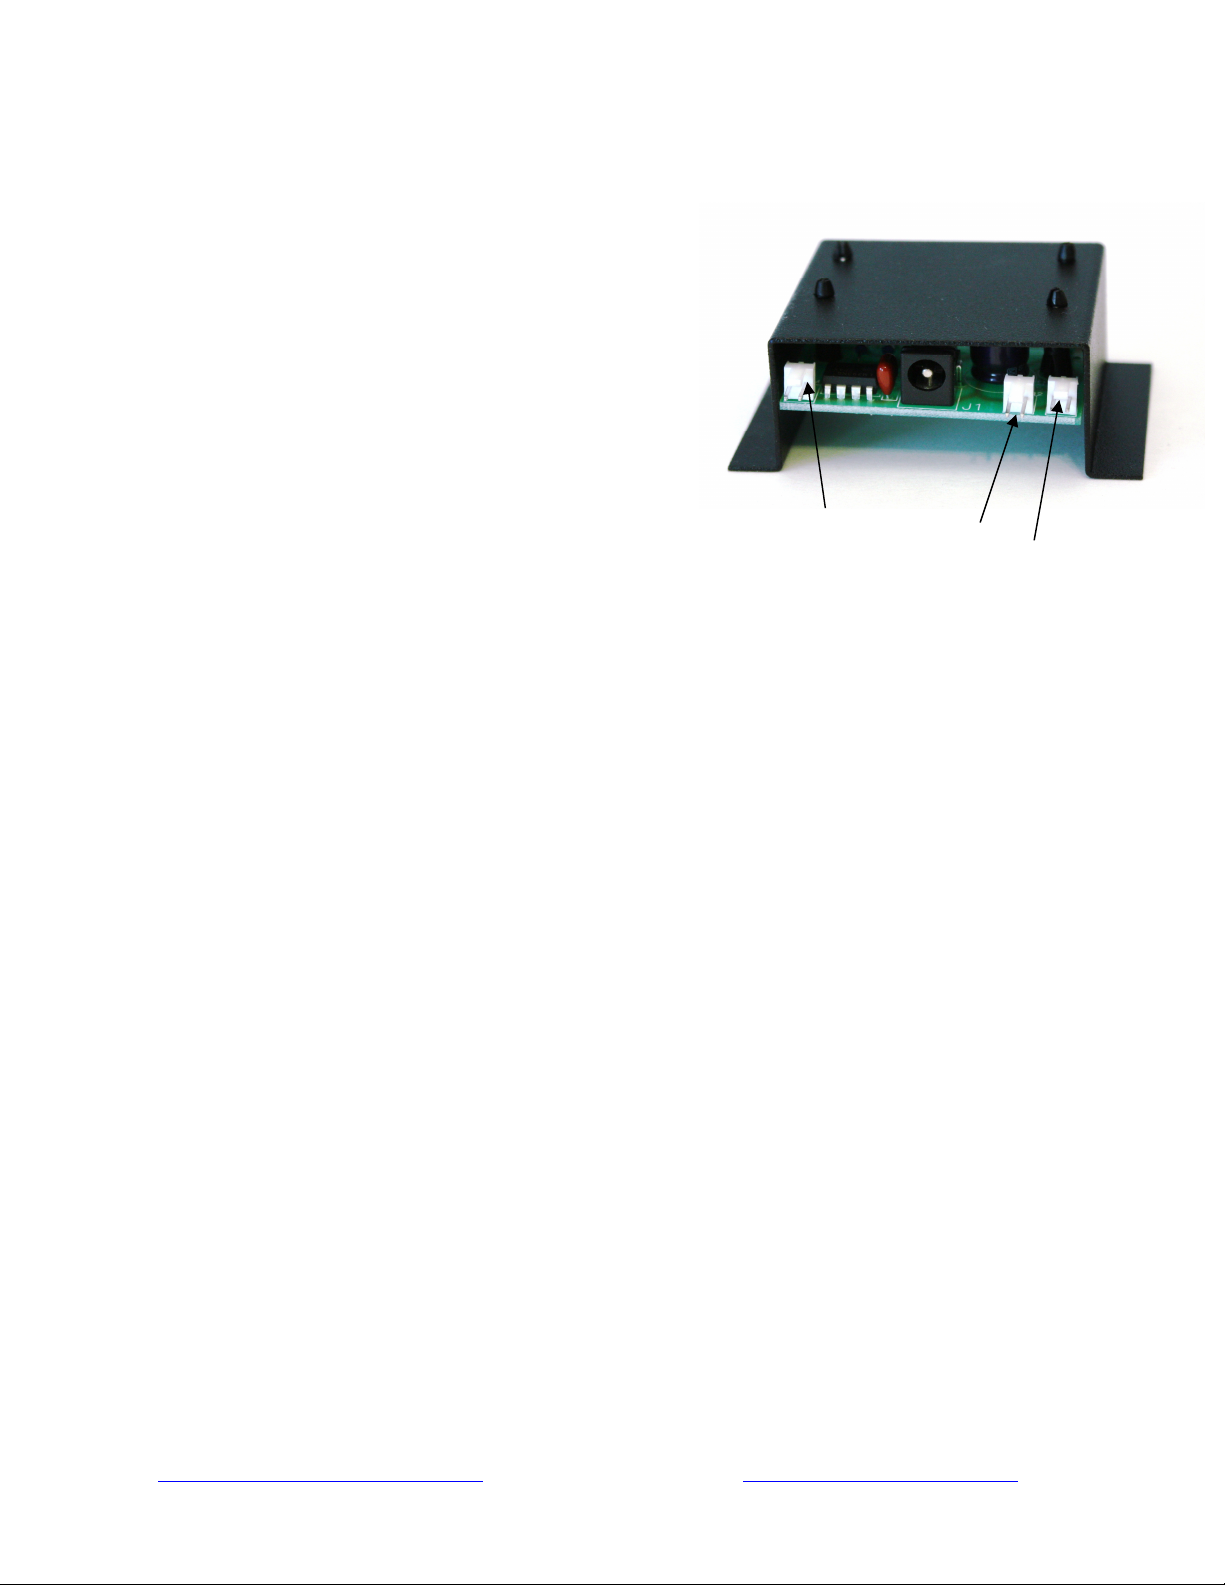
Connections & Operation
After mounting the fans, select the location for the fan
controller. It has 2 magnets on its flanges, allowing it to
adhere to most audio-video components. Run the fan wires
to the controller, and plug them onto the connectors FAN 1
or FAN 2. Plug the thermal probe’s cable onto the
connector THRM on the controller. Plug the power supply
into an AC outlet that is always live, and plug the power
supply’s output lead into J1 on the controller. The green
led should light. When the probe’s temperature-sensitive
tip reaches approximately 88-90 degrees, the fans will
begin to turn and the red led will light. Use a hair dryer to
test the system; do NOT use an open flame or heat-shrink
gun.
Thermal probe Fan 1 Fan 2
Note –
When cooling modern home theater systems, the fans may run continuously. Cable boxes, satellite
receivers, some whole-house amplifiers and digital program recorders run continuously. Their heat
may be enough to keep the Cool-vent fans in operation. The Cool-vents, like all ATM products, are
designed to operate continuously, drawing only a few watts of electrical power while keeping
temperatures low in an enclosure.
25570 Rye Canyon Rd. Valencia, California 91355
(661) 294-7999 voice (661) 294-1115 fax
techinfo@activethermal.com www.activethermal.com
 Loading...