

Page 1
Owner’s Manual
Models STG-1, STG-2, STG-3, and STG-4
Page 2
WARNINGS / AVERTISSEMENTS
WARNING: CHILDREN SHOULD
NOT USE SPAS OR HOT TUBS
WITHOUT ADULT SUPERVISION.
WARNING: DO NOT USE
SPAS OR HOT TUBS UNLESS
ALL SUCTION GUARDS ARE
INSTALLED TO PREVENT BODY
AND HAIR ENTRAPMENT.
WARNING: PEOPLE USING
MEDICATIONS AND/OR
HAVING AN ADVERSE MEDICAL
HISTORY SHOULD CONSULT A
PHYSICIAN BEFORE USING A SPA
OR HOT TUB.
WARNING: PEOPLE WITH
INFECTIOUS DISEASES SHOULD
NOT USE A SPA OR HOT TUB.
WARNING: DO NOT USE
DRUGS OR ALCOHOL BEFORE
OR DURING THE USE OF A
SPA OR HOT TUB TO AVOID
UNCONSCIOUSNESS AND
POSSIBLE DROWNING.
WARNING: TO AVOID INJURY,
EXERCISE CARE WHEN
ENTERING OR EXITING THE SPA
OR HOT TUB.
User’s Guide
AVERTISSEMENT: NE LAISSEZ PAS
LES ENFANTS UTILISER UN SPA OU
UNE CUVE THERMALE SANS LA
SUPERVISION D’UN ADULTE.
AVERTISSEMENT: POUR ÉVITER
QUE LES CHEVEUX OU UNE PARTIE
DU CORPS PUISSENT ÊTRE ASPIRÉS,
N’UTILISEZ PAS UN SPA OU UNE
CUVE THERMALE SI LES GRILLES
DES PRISES D’ASPIRATION NE SONT
PAS TOUTES EN PLACE.
AVERTISSEMENT: LES PERSONNES
QUI PRENNENT DES MÉDICAMENTS
OU ONT DES PROBLÈMES DE
SANTÉ DEVRAIENT CONSULTER UN
MÉDECIN AVANT D’UTILISER UN SPA
OU UNE CUVE THERMALE.
AVERTISSEMENT: LES PERSONNES
ATTEINTES DE MALADIES
INFECTIEUSES NE DEVRAIENT PAS
UTILISER UN SPA OU UNE CUVE
THERMALE.
AVERTISSEMENT: AFIN D’ÉVITER
DE VOUS ÉVANOUIR OU DE VOUS
NOYER, NE PRENEZ NI DROGUE,
NI ALCOOL AVANT OU PENDANT
L’UTILISATION D’UN SPA OU D’UNE
CUVE THERMALE
AVERTISSEMENT: POUR ÉVITER DE
VOUS BLESSER, SOYEZ PRUDENT
EN ENTRANT DANS UN SPA OU
UNE CUVE THERMALE OU EN EN
SORTANT.
2
Ver. 2/25/2005
Page 3
Comfort Line Products
WARNINGS / AVERTISSEMENTS
WARNING: PREGNANT
OR POSSIBLY PREGNANT
WOMEN SHOULD CONSULT A
PHYSICIAN BEFORE USING A SPA
OR HOT TUB.
WARNING: DO NOT USE A SPA
OR HOT TUB IMMEDIATELY
FOLLOWING STRENUOUS
EXERCISE
WARNING: DO NOT PERMIT
ELECTRIC APPLIANCES (SUCH
AS A LIGHT, TELEPHONE,
RADIO, OR TELEVISION)
WITHIN 5 FEET (1.5 M) OF THIS
SPA OR HOT TUB.
CAUTION: MAINTAIN WATER
CHEMISTRY IN ACCORDANCE
WITH MANUFACTURER’S
INSTRUCTION.
WARNING:
ENTERING THE SPA OR HOT
TUB, MEASURE THE WATER
TEMPERATURE WITH AN
ACCURATE THERMOMETER.
WARNING: WATER
TEMPERATURE IN EXCESS OF
98.6ºF (38ºC) MAY BE INJURIOUS
TO YOUR HEALTH.
WARNING: PROLONGED
IMMERSION IN A SPA OR HOT
TUB MAY BE INJURIOUS TO
YOUR HEALTH.
BEFORE
AVERTISSEMENT: LES FEMMES
ENCEINTES, QUE LEUR GROSSESSE
SOIT CONFIRMÉE OU NON,
DEVRAIENT CONSULTER UN
MÉDECIN AVANT D’UTILISER UN SPA
OU UNE CUVE THERMALE.
AVERTISSEMENT: N’UTILISEZ PAS
UN SPA OU UNE CUVE THERMALE
IMMÉDIATEMENT APRÈS UN
EXERCICE PHYSIQUE EXIGEANT.
AVERTISSEMENT: NE PLACEZ PAS
D’APPAREILS ÉLECTRIQUES (LAMPE,
TÉLÉPHONE, RADIO, TÉLÉVISEUR,
ETC.) À MOINS DE 1,5 M (5 PIEDS) DU
SPA OU DE LA CUVE THERMALE.
ATTENTION: LA COMPOSITION
CHIMIQUE DE L’EAU DOIT ÊTRE
CONFORME AUX DIRECTIVES DU
FABRICANT.
AVERTISSEMENT: AVANT D’UTILISER
UN SPA OU UNE CUVE THERMALE,
MESUREZ LA TEMPÉRATURE
DE L’EAU À L’AIDE D’UN
THERMOMÈTRE PRÉCIS
AVERTISSEMENT: IL PEUT ÊTRE
DANGEREUX POUR LA SANTÉ DE SE
BAIGNER DANS UNE EAU DONT LA
TEMPÉRATURE EST SUPÉRIEURE À
38 ºC (98,6ºF).
AVERTISSEMENT: L’UTILISATION
PROLONGÉE D’UN SPA OU D’UNE
CUVE THERMALE PEUT ÊTRE
DANGEREUSE POUR LA SANTÉ.
3
Page 4

User’s Guide
IMPORTANT SAFETY INSTRUCTIONS
e following instructions are required to be printed by Underwriters
Laboratory (U.L.) as well as ETL Testing Laboratories, Inc. as a condition of
their listing of this product. ey contain important safety information, and
we strongly encourage you to read and apply them.
1. When installing and using this electrical equipment, basic safety
precautions should always be followed, including the following:
A. READ AND FOLLOW ALL INSTRUCTIONS.
B. A green colored terminal or a terminal marked G, GR, Ground,
Grounding, or the ground symbol is located inside the supply terminal
box or compartment. To reduce the risk of electric shock, this terminal
must be connected to the grounding means provided in the electric supply
service panel with a continuous copper wire equivalent in size to the circuit
conductors supplying this equipment.
C. At least two lugs marked “BONDING LUGS” are provided on the external
surface or on the inside of the supply terminal box or compart-ment. To
reduce the risk of electrical shock, connect the local common bonding grid
in the area of the hot tub or spa to these terminals with an insulated or bare
copper conductor not smaller than NO. 6 AWG.
D. Temperature Control of your Spa. To set desired temperature, push the
up or down heat button on the display. e display will fl ash current
water temperature set point. To raise set point, push up button for each
additional degree of water temperature to a maximum 104ºF (40ºC). Push
the down button to lower the water temperature set point.
2. WARNING - To reduce the risk of injury, do not permit children to use this
product unless they are closely supervised at all times.
3. A wire connector is provided on this unit to connect a minimum No. 8 AWG
(8.4 mm2) solid copper conductor between this unit and any metal equipment,
metal enclosures of electrical equipment, metal water pipe, or conduit within 5
feet (1.5 m) of the unit.
4. DANGER - Risk of injury.
A. If supply cord is damaged it must be replaced by the manufacturer, its
service agent, or similarly qualifi ed persons in order to avoid a hazard.
4
Page 5

Comfort Line Products
B. Do not bury cord.
C. Connect to a grounded, grounding type receptacle only.
5A. WARNING - For 120 volt versions: is appliance is provided with a ground-
fault circuit interrupter (located near the end of the power supply). With the
unit operating, push the test button. e unit should stop operating and the
reset button should pop out slightly. Push the reset button. e unit should
now operate normally. If the interrupter fails to operate in this manner, there
is a ground current fl owing, indicating the possibility of an electrical shock.
Disconnect the plug from the receptacle until the fault has been identifi ed and
corrected.
5B. WARNING - For 230 volt European version make sure the power cord is
plugged into a grounded RCB or RCCB protected circuit with a 3 mA trip level.
6. DANGER - Risk of Accidental Drowning. Extreme caution must be exercised
to prevent unauthorized access by children. To avoid accidents, ensure that
children cannot use this spa unless they are supervised at all times.
7. DANGER - Risk of Injury. e suction fi ttings in this spa are sized to match
the specifi c water fl ow created by the pump. Should the need arise to replace the
suction fi ttings or the pump, be sure that the fl ow rates are compatible.
8. WARNING - Never operate spa if the suction fi ttings are broken or missing.
Never replace a suction fi tting with one rated less that the fl ow rate marked on
the original suction fi tting.
9. DANGER - RISK OF ELECTRICAL SHOCK. Install at least 5 feet
(1.5 m) from all metal surfaces. A spa may be installed within 5 feet (1.5 m) of
metal surfaces if each metal surface is permanently connected by a minimum of
#8 (SWG 8.4 mm
2
) or (# 6 in Canada) solid copper conductor attached to the
bonding lug on the Power Pack which is provided for this purpose.
10. DANGER - Risk of Electrical Shock. Do not permit any electrical appliance,
such as a light, telephone, radio, or television, within 5 feet of spa or hot tub.
11. WARNING - To reduce risk of injury:
A. e water in a spa or hot tub should never exceed 104°F (40°C). Water
temperatures between 100°F (38°C) and 104°F (40°C) are considered
safe for a healthy adult. Lower water temperatures are recommended for
extended use (exceeding 10 minutes) and for young children.
5
Page 6

User’s Guide
B. Since excessive water temperatures have a high potential for causing
fetal damage during the early months of pregnancy, pregnant or possible
pregnant women should limit spa or hot water temperatures to 100°F
(38°C).
C. Before entering a spa or hot tub, the user should measure the water
temperature with an accurate thermometer, since the tolerance of water
temperature-regulating devices varies.
D. WARNING: e use of alcohol or drugs can greatly increase the risk of fatal
hyperthermia in hot tubs and spas.
E. Hyperthermia Warning!
e causes, symptoms, and eff ects of hyperthermia may be described as
follows. Hyperthermia occurs when the internal temperature of the body
reaches a level several degrees above the normal body temperature of 98.6ºF
(37ºC). e symptoms of hyperthermia include drowsiness, lethargy, and an
increase in the internal temperature of the body. e eff ects of hyperthermia
include:
(1) Unawareness of impending hazard;
(2) Failure to perceive heat;
(3) Failure to recognize the need to exit spa;
(4) Physical inability to exit spa;
(5) Fetal damage in pregnant women; and
(6) Unconsciousness and danger of drowning.
F. Persons suff ering from obesity or with a medical history of heart disease,
low or high blood pressure, circulatory system problems, or diabetes should
consult a physician before using a spa or hot tub.
G. Persons using medication should consult a physician before using a hot tub
since some medication may aff ect heart rate, blood pressure, and circulation.
H. Water chemistry should be properly maintained as described in this manual
to prevent skin irritation.
6
Page 7

Comfort Line Products
ADDITIONAL WARNINGS
1. Never use an extension cord to connect the Power Pack to a power source. e
cord could cause a voltage drop which may cause damage to the control and
pump motor.
2. Always operate Power Pack with the cord mounted GFCI in place and
functional on 120 volt units. Failure to do so could result in a shock hazard.
3. Always operate spa with suffi cient water. Water level must be above suction
inlets. Insuffi cient water will cause pump failure and void warranty.
4. Maintain proper water pH (7.4 - 7.6 is ideal). Failure to do so may cause
damage to vinyl liner, heater element, and damage will not be covered by
warranty.
5. Install spa only on fl oors or areas that can withstand repeated water exposure.
Equipment failure as well as splashing, fi lling and draining will spill water. If
located in a multi-story building, care must be taken to protect the objects on
the fl oors below.
6. Install only on fl oors that can withstand the fl oor loading of your spa. If in
doubt, please consult an architect or engineer to determine the fl oor rating
before fi ling. See specifi cations.
7. Do not open Power Pack or the GFCI. Opening either component will void the
warranty.
8. When storing, always drain all water from tub, plumbing and Power Pack,
especially in freezing temperature as freeze damage is not covered by warranty.
9. Always maintain proper water sanitation with chemicals and routine cleaning.
Warm water is an ideal place for bacteria to thrive. It’s your sole responsibility
to maintain proper water sanitation. Read the sections on water chemistry and
fi lter maintenance.
10. Never add water to chemicals. Always add chemicals to water to avoid strong
fumes or violent reactions that may result in hazardous chemical spray.
SAVE THESE INSTRUCTIONS
7
Page 8

User’s Guide
INSTALLATION
SITE PREPARATION
1. Structure: Your spa should always be installed on a structurally sound,
relatively smooth, and level surface.
2. Electrical: Your spa should be connected to a grounded outlet within
eight feet of the spa. For 120 V units, there should be easy access to the
plug for periodic testing of the cord mounted GFCI.
3. Bonding: A copper wire connector is located inside the spa power pack to
permit connection of a minimum No. 8 A.W.G. (No. 6 for Canada) solid
copper bonding conductor between any metal equipment, water pipe, or
metal enclosures within 5 feet of the spa as required to comply with the
National Electric Code, or local requirements.
INDOOR INSTALLATION
Give special consideration to the following issues when installing your spa
indoors.
1. Make sure the fl oor can support the total spa fi lled weight of 2113 pounds.
2. Install your spa on water resistant, non-slip fl oor. e fl oor should have
a drain to remove water splashed from the spa. Do not install the spa on
carpet or other material that will be damaged by moisture.
3. Take into consideration the room humidity which will exist due to
high temperatures. Providing natural or forced ventilation in the room
will help maintain comfort and minimize moisture damage to the
surrounding environment.
4. Avoid installing the spa indoors on a second story above fi nished living
space due to the possibility of water and humidity damage.
5. Allow enough clearance around the spa for full access to the spa
equipment for service.
8
Page 9

Comfort Line Products
OUTDOOR INSTALLATION
Your spa may be installed on any level, smooth surface that is strong enough
to support the fi lled unit. Observe the following considerations when
deciding where to place your spa:
1. Make sure there are no sharp objects under the spa.
2. Do not install the spa on grass or dirt, as this will greatly increase the
amount of debris entering the spa. Stepping stones or a solid wood 8 ft x
8 ft square platform, 5 to 9 inches in height, will provide a suffi cient area
for installation.
3. Verify that there is adequate room to place the spa and permit safe access.
4. Check local code requirements for restrictions (fencing, enclosures, child
proof gates, etc.)
9
Page 10
User’s Guide
1
10
9
8
6
5
4
3
2
7
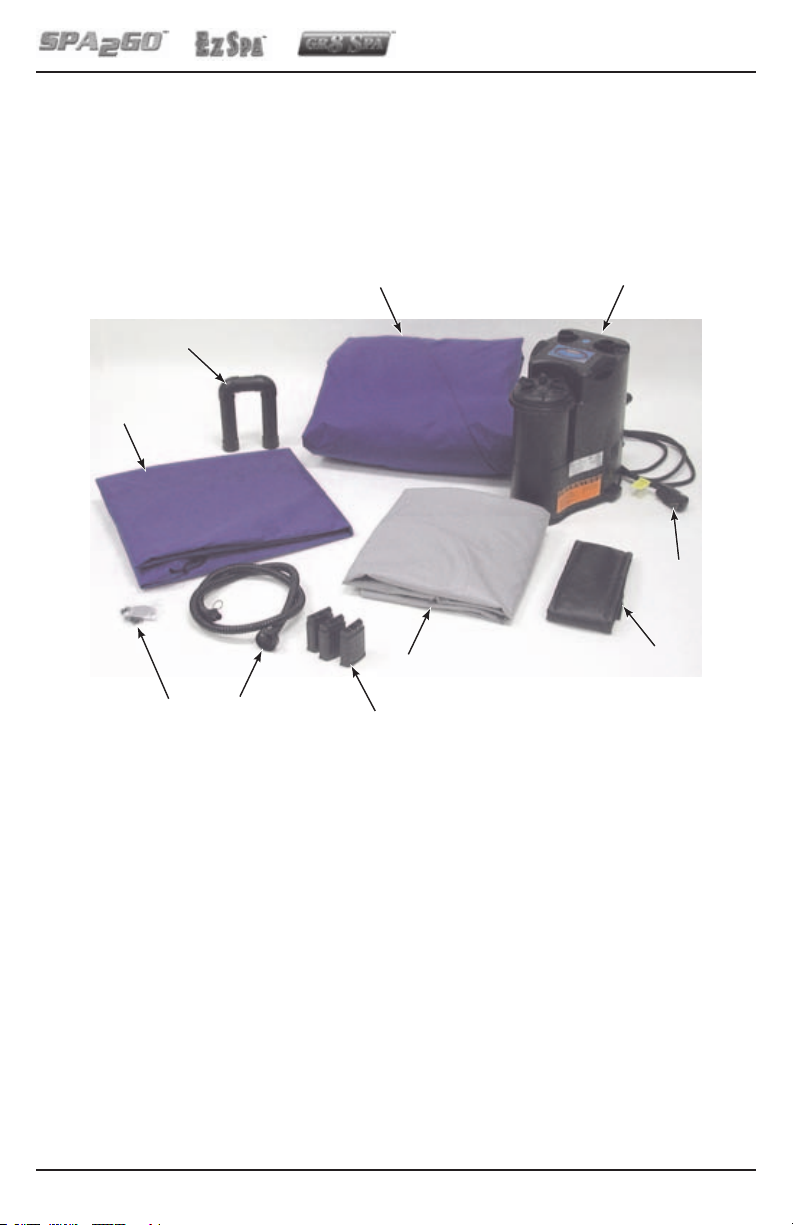
PACKAGE CONTENTS
Refer to the following picture and product checklist to verify that all parts
of the spa have been received and are undamaged. Report and missing or
damaged parts immediately.
1. Power Pack
2. GFCI
(120 V models only)
3. Vinyl Power Pack
Connector Cover
4. Infl atable Bladder Cover
5. Power Pack Feet
10
6. Spa Infl ation Hose
7. Patch Kit and Cover
Clip Keys
8. Top Spa Cover
9. Air Loop
10. Spa Liner with
Outer Cover
Page 11
Comfort Line Products
Key Lock
Pin
ASSEMBLY
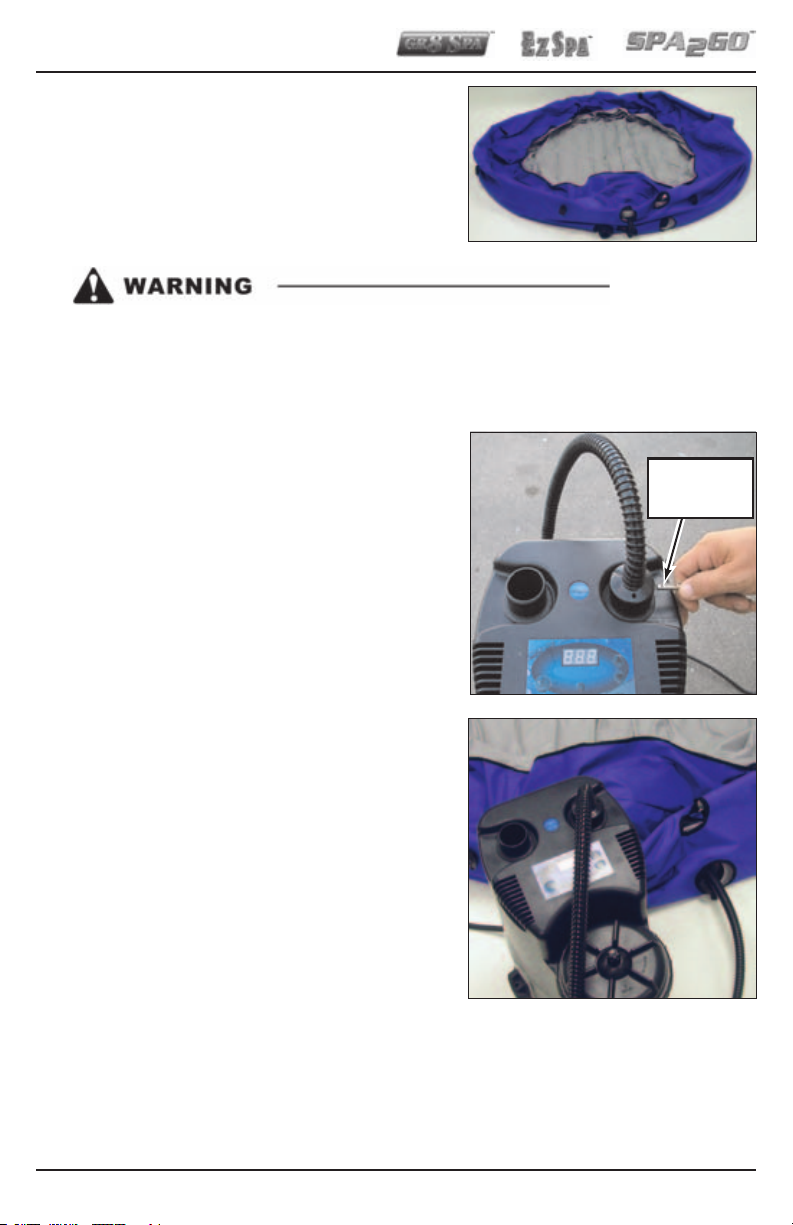
1. Unfold the spa liner to lay fl at.
2. Connect the infl ation hose to the blower
exhaust fi tting on the top of the power
pack.
The key lock pin must be inserted into the adapter of the
infl ation hose fi tting when infl ating the spa. Failure to insert the
key lock pin may result in injury.
3. Insert the key lock pin into the infl ation
hose fi tting on the top of the power pack.
4. Plug the power pack into the electric
outlet. Press the Turbo Wave On/Off
button to start the infl ation.
NOTE: The power pack will make a
rattling noise while the pump
is running with no water. This
is normal. Do not run the
power pack without water for
more than 15 minutes.
5. Infl ate the three spa side tubes and the
spa interior fl oor.
NOTE: Do not over infl ate the lower
tube. Over infl ation may cause
lack of air fl ow and water
action.
11
Page 12
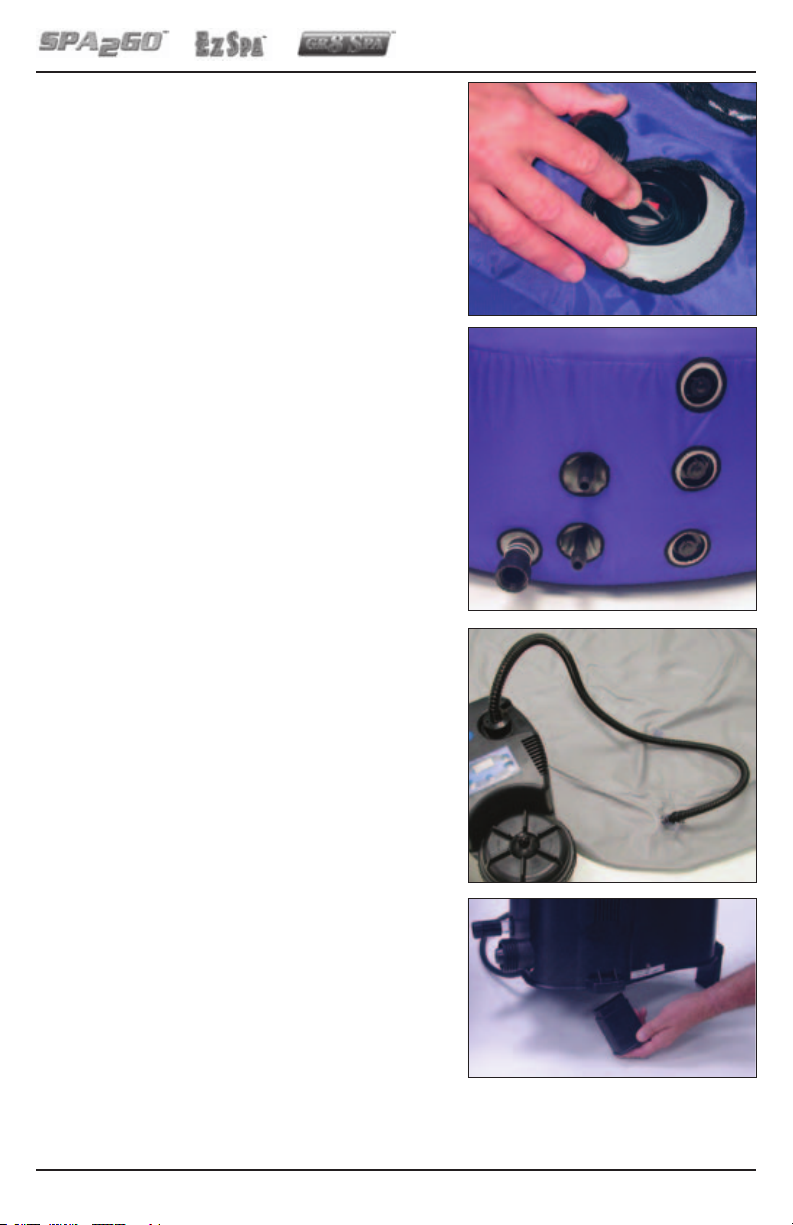
6. When installing the caps on the infl ation
fi ttings, make sure the sealing fl aps on
the fi ttings are not pulled out through
the infl ation fi ttings. is will prevent
the fl aps from sealing properly, and may
damage the infl ation fi ttings.
7. Check the fi t of the nylon outer cover
on the spa. e openings in the side of
the nylon skin should be centered on
the power pack connections. If not, let
some air out of the side tubes and adjust
the nylon skin to center the power pack
fi ttings in the openings. Fill all side tubes
until they are just fi rm.
8. Infl ate the infl atable bladder cover. ere
are two infl ation fi ttings on the infl atable
bladder cover. Pinch the transparent fi ll
valves while fi lling the cover to ensure
good air fl ow through the valve.
User’s Guide
NOTE: After infl ating the spa and
cover, unplug the power pack
while assembling and fi lling
the spa with water.
9. Attach the three feet to the bottom of the
power pack.
12
Page 13
Comfort Line Products
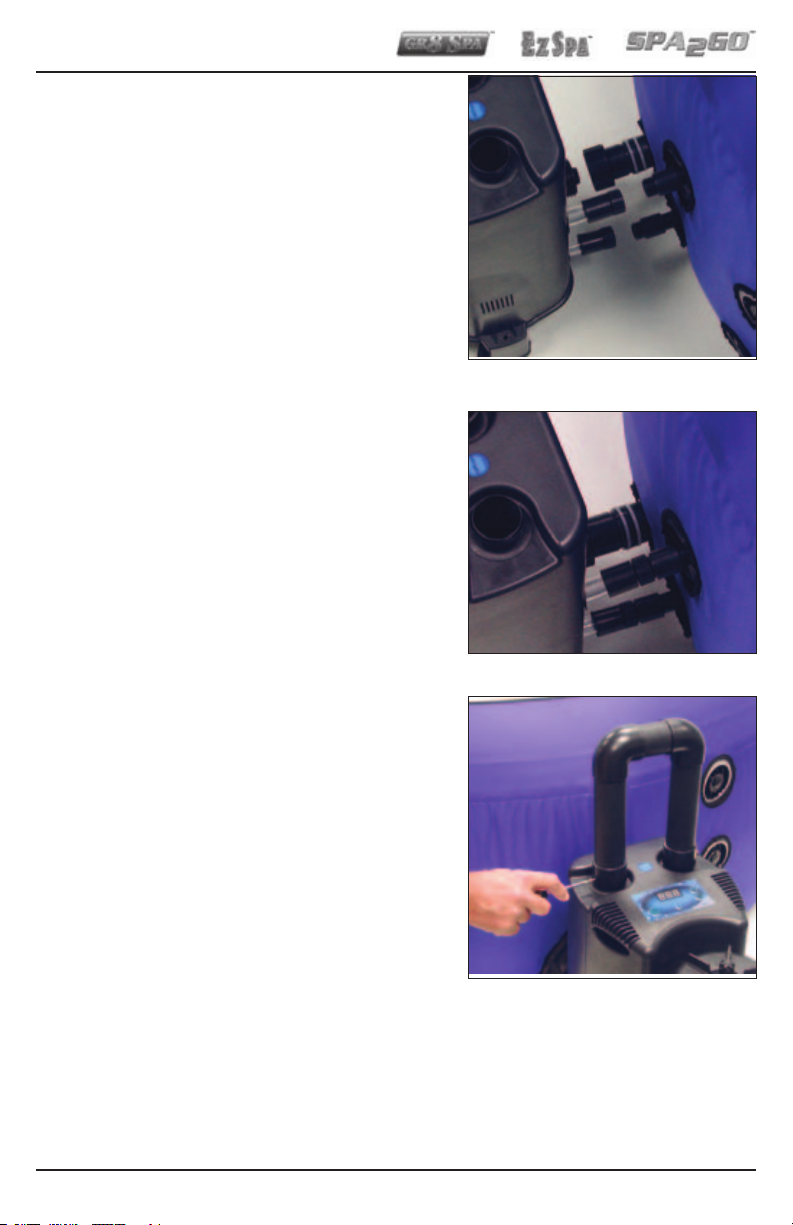
10. Line up the water connections on the
back of the power pack with the fi ttings
on the side of the spa.
11. Remove the two labels from the bottom,
large fi tting of the spa. Make sure the oring inside the fi tting is in place.
12. Attach the bottom, large fi tting on
the back of the power pack to the
corresponding fi tting on the spa, being
careful not to cross-thread the fi tting.
Make sure the o-ring inside the fi tting is
properly seated. Tighten the nut handtight.
13. Attach the middle and upper hose
connections from the power pack to the
spa. Make sure the hose washers are in
place and seated inside the connections.
Tighten the fi ttings hand-tight.
14. Loosen the set screws on the side of the
air loop fi ttings. Insert the air loop onto
the blower connections on the top of the
power pack until snug. Tighten the set
screws.
13
Page 14
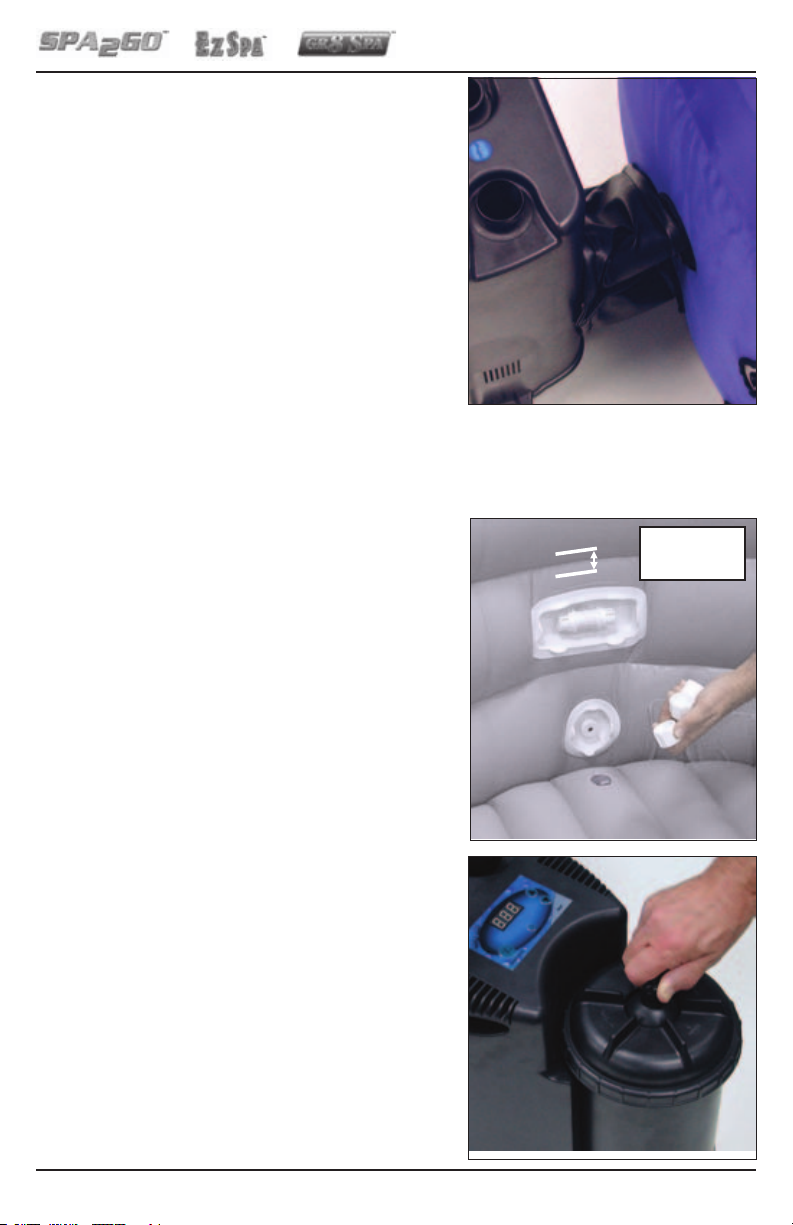
15. Wrap the fi ve inch wide vinyl power
Approx.
Fill Line
2”
pack connector cover around all three
connections between the power pack and
the spa.
FILLING THE SPA
1. Ensure the power pack is not plugged in.
2. Remove the protective caps from the
suction and discharge fi ttings inside the
spa. Place the caps in a safe location.
User’s Guide
3. Using a garden hose, fi ll the spa to
approximately one inch above the top
of the second air chamber ring. Be
careful not to over fi ll the spa, or the spa
may overfl ow during use. Each average
adult will raise the water level in the spa
approximately two inches, and the turbo
wave blower action will raise water level
an additional three to four inches.
4. Bleed the air from the fi lter tank by
turning the small black knob on the top
of the fi lter tank counterclockwise. Allow
the fi lter tank to bleed for approximately
one minute, or until water drips from
the fi tting. Turn the fi tting clock-wise to
close the bleed valve.
14
Page 15
Comfort Line Products
Plug the spa into a properly grounded electrical outlet.
5. Plug the power pack into the electrical outlet. e water pump will turn
on and begin pumping water. Water should fl ow from the small return
nozzle on the bottom inside wall of the spa behind the power pack.
If water is not fl owing from the return nozzle, repeat the air bleeding
instructions provided in step 4. Unplug the power pack while bleeding
air.
NOTE: If the air is not properly bled from the fi lter tank, the water
pump will be air bound and no water will fl ow. This will
prevent the spa from heating, and the water will not be
fi ltered. Make sure water is fl owing from the return nozzle
before continuing.
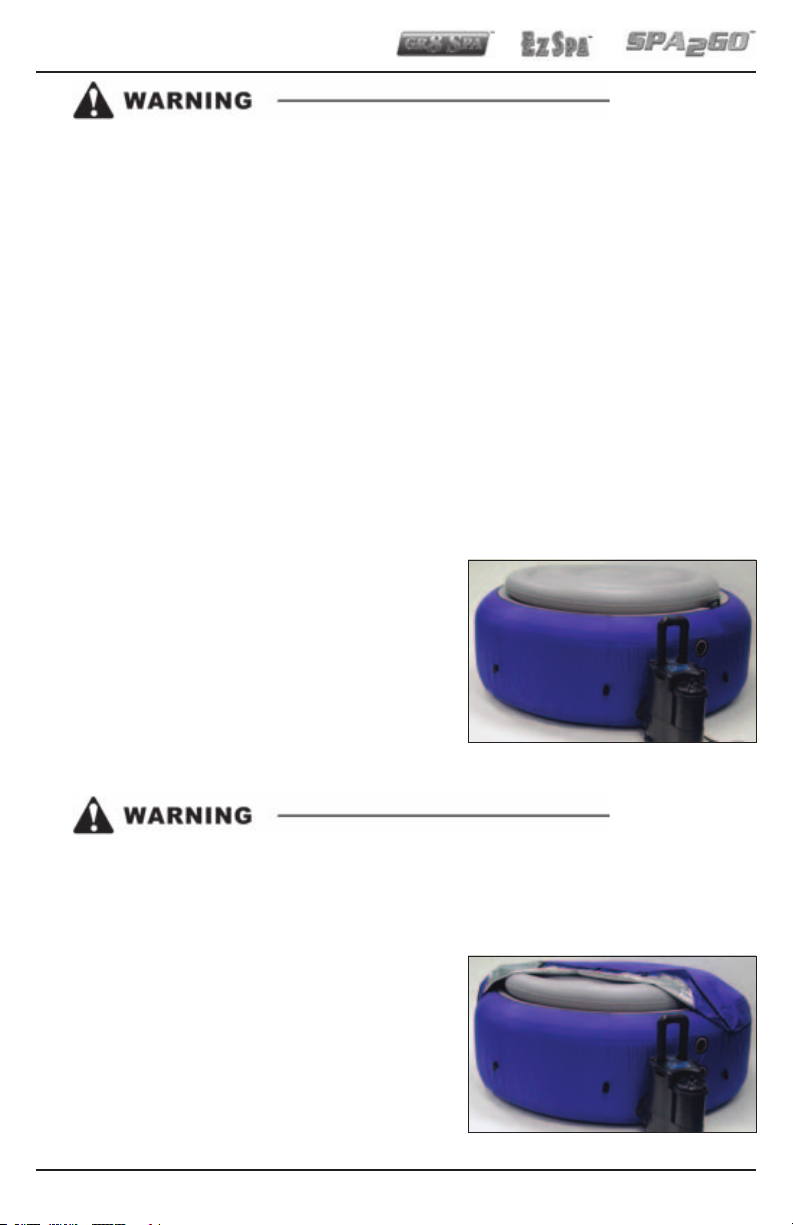
6. Place the infl atable bladder cover on the
spa. Make sure the cover is centered on
the spa.
Always supervise children around bodies of water. The spa
cover is not a safety cover. The spa cover is not a substitute for
adult supervision.
7. Place the top cover over the spa and line
up the eight cover locks.
15
Page 16
User’s Guide
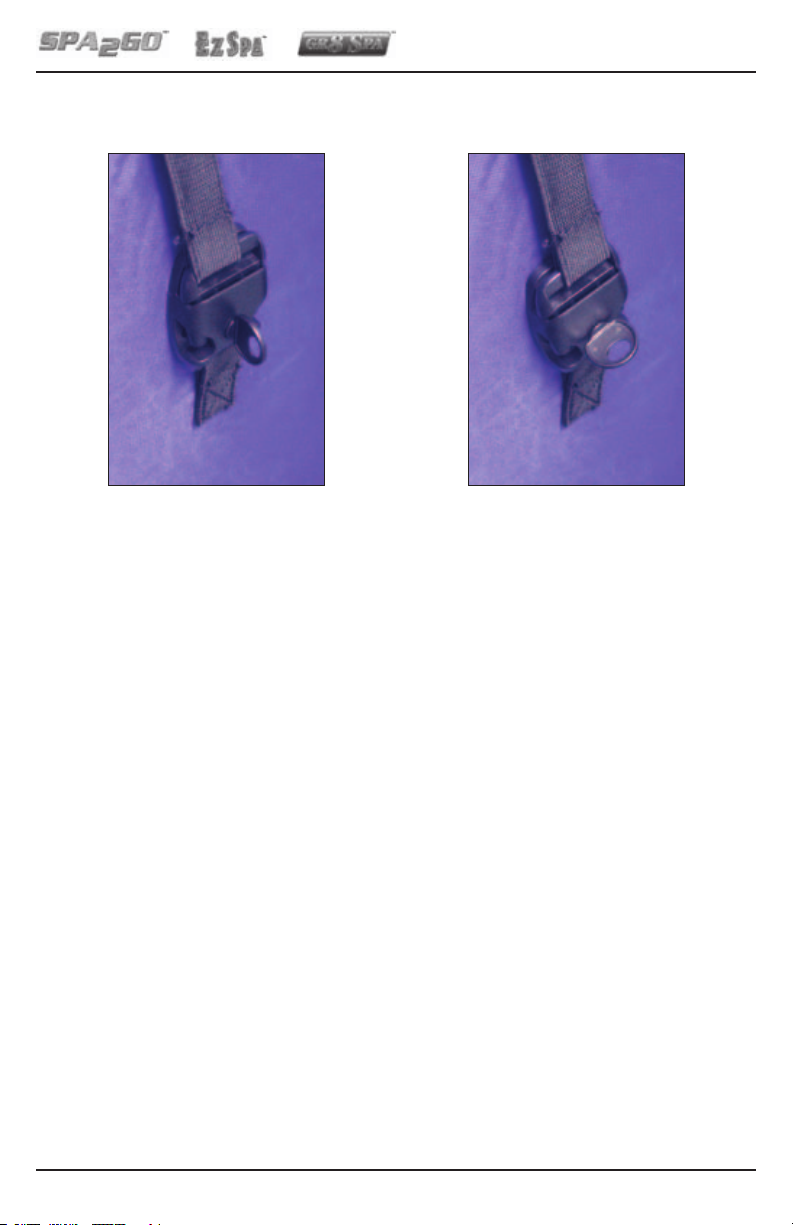
8. Connect the eight clips to secure the cover in place. e clips may be
locked using the small keys provided in the patch kit.
Unlocked Locked
16
Page 17
Comfort Line Products
OPERATION
• Test the GFCI before each use. (Refer to the instructions
provided in the Maintenance section of this manual.)
• Plug into properly grounded receptacle.
• Do not use extension cords.
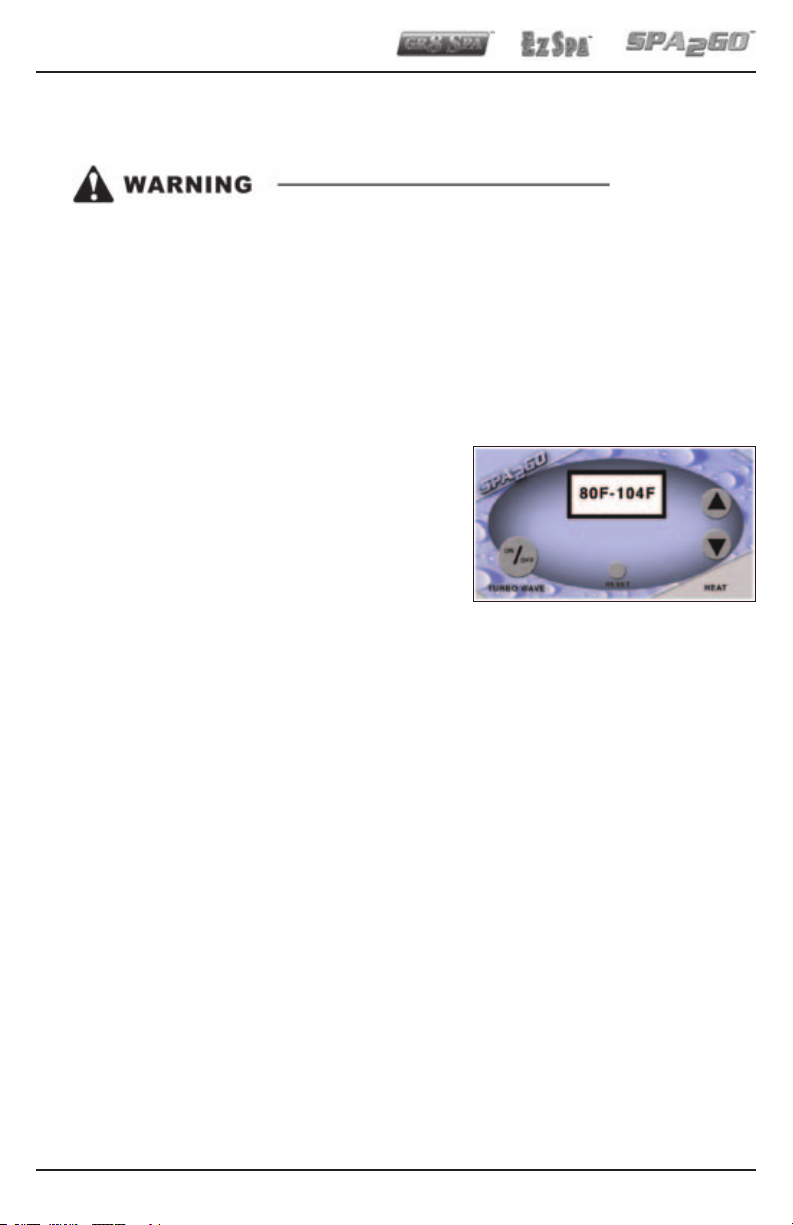
Temperature Control
1. During normal operation, the control
display on the top of the power pack
displays the current water temperature.
2. To set the desired water temperature, press
and release the up or down heat button.
e display will fl ash the desired water temperature set point. To change
the set point, press the up or down button once for each degree of water
temperature, to a maximum of 104ºF (40ºC).
3. After a few seconds pass without pressing either heat button, the display
will return to the current water temperature. e spa will begin heating
to the desired water temperature at a rate of approximately 1 to 1-1/2
degrees F per hour.
4. e spa is made to hold the set temperature. Do not lower the
temperature set point after use. e heater will turn on and off
automatically to maintain the desired temperature.
5. In case of electric power interruption, the spa temperature set point will
default to 100ºF when electric power is restored.
17
Page 18

User’s Guide
Turbo Operation
To turn the turbo wave pump on or off , push the on/off button. Look to see
if the spa blows bubbles uniformly all the way around the spa. If action seems
to fade as bubbles circle the spa and are weak on one side, then the lower air
chamber is over-infl ated. Let some air out of the lower chamber to correct
this. e turbo wave pump will automatically shut off after 15 minutes of
operation.
When the turbo wave blower system is activated, the blower pump is
pumping outside ambient air into the spa, creating much of the action
in the spa. Some cooling of the water will occur as the turbo wave blower
operates. is is normal and the heater will recover lost temperature after use.
Remember, at elevated temperatures, 15 minutes soaking time is considered
safe.
e spa power pack contains a fi lter to help keep the water in the spa
clean. If the fi lter becomes dirty or clogged, water fl ow through the power
pack will be restricted. is may prevent the spa from heating up. Refer to
the Maintenance section of this manual for information on checking and
cleaning the fi lter.
Cover
After use, place the cover on the spa. Lock the plastic clips in eight locations
on the outside of the spa.
Always leave the cover locked and in place when the spa is not
in use. The cover is not a replacement for adult supervision.
Always supervise young children in and around water.
NOTE: The cover must be in place for the spa to heat up.
18
Page 19

Comfort Line Products
MAINTENANCE
Vinyl Care - Interior
1. While the spa is empty, clean the spa interior with a mild soap solution
to remove any soil or stains on the vinyl. Rinse thoroughly before refi lling
the spa. Do not use cleaning aids such as steel wool, metal brushes, or
abrasive cleansers such as Comet or Ajax.
2. Remove and clean the fi lter twice a month, or more often if necessary.
Vinyl Care - Exterior
Clean the exterior with a mild soap solution then rinse with clean water.
Avoid abrasive soaps or tools, or any solvents.
e exterior of the spa as well as the thermal top is made to resist mildew and
discoloration.
Recommended Water Chemistry
Purchase a water test kit from your dealer. Test the water chemistry after each
use of the spa, or no less than once a week. Avoid a low pH. Low pH will
cause wrinkles to form in the vinyl, may damage the heater, and will void
your warranty. e following are the recommended water chemistry ranges
for your spa.
pH .......................................................... 7.4 - 7.6
Total alkalinity ................................ 80 - 120 ppm
Calcium hardness ..........................150 - 250 ppm
Bromine residual ................................... 2 - 3 ppm
Total dissolved solids .................. below 1500 ppm
NOTE: If a bromine feeder is used that requires holes to be
punched in the feeder, start with one hole punched at the
top of the feeder and one hole punched at the bottom.
Place the feeder in the spa and test the water after two
days. If the bromine level has not increased to the ideal
2-3 ppm range, punch another hole in the bottom of the
feeder and retest after another two days.
19
Page 20

User’s Guide
Avoid punching too many holes in the bromine feeder, as
this could cause over bromination. This could bleach the
vinyl, and will void your warranty.
If the bromine level in the spa reaches 5 ppm or higher,
remove the bromine feeder from the spa until the bromine
level drops to the correct 2-3 ppm range.
Adding Chemicals
1. Always activate the turbo wave blower when adding chemicals to the spa.
Add only one chemical at a time.
Failure to properly dissolve or dilute chemicals prior to adding
them to the spa may damage the spa vinyl surfaces and will void
your warranty.
2. When adding chemicals, dip a few gallons of water from the spa into a
fi ve gallon bucket. Dissolve or dilute the chemicals in the bucket. Stir the
bucket until the chemicals are fully dissolved or diluted. With the turbo
wave blower turned on, slowly pour the bucket into the spa in the stream
of the water jets.
3. Do not use gas chlorination, chlorine tablets, ionizers, scents, salts, or
soaps without consulting your authorized dealer.
Cleanliness
1. Drain and refi ll the spa every three months, or when the water becomes
cloudy and is not cleared by proper water chemistry.
2. Remove and clean your fi lter at least once a week. A dirty fi lter will
prevent water fl ow and may prevent the spa from heating.
Vinyl Repairs
If the vinyl is torn or punctured, repair it with the patch kit provided with
your spa. A secure, unnoticeable repair can usually be made. Additional vinyl
pieces may be obtained through your authorized dealer.
20
Page 21
Comfort Line Products
Retaining
Ring
O-Ring
Groo
ve
O-Ring
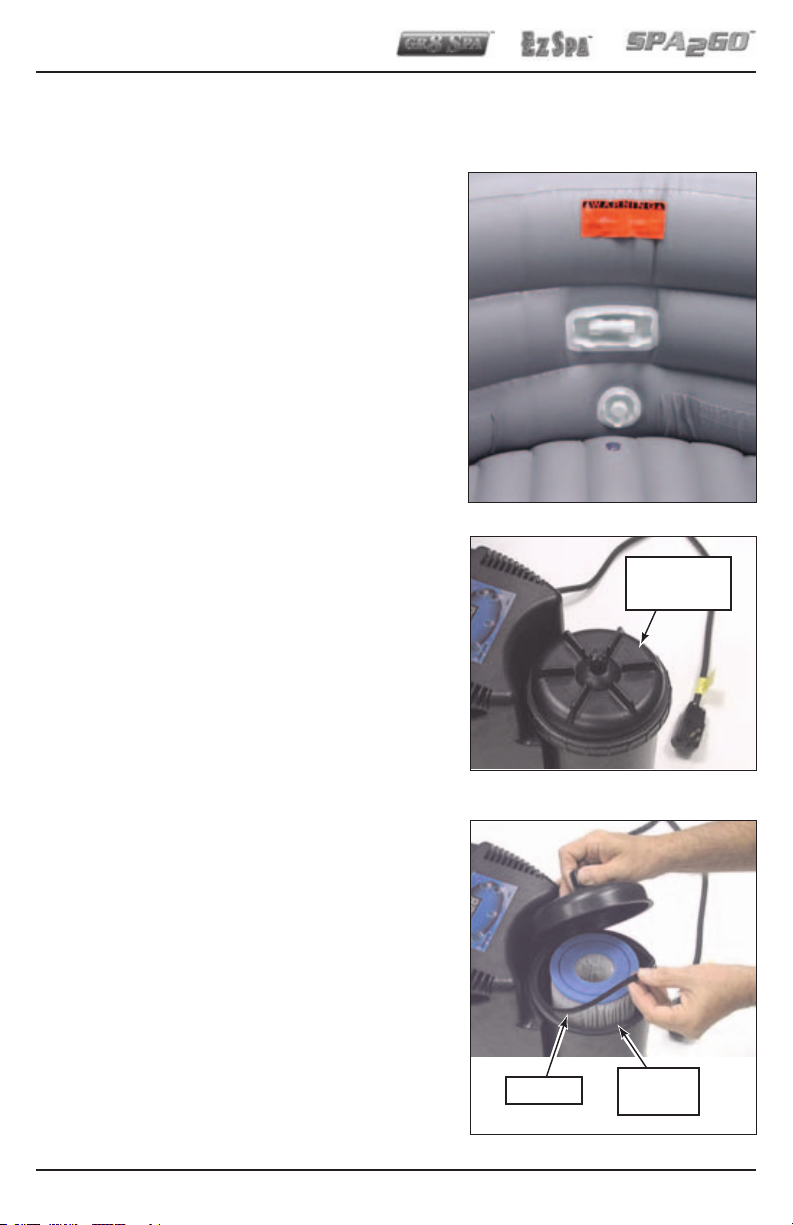
Cleaning the Filter
1. Unplug the power pack from the electrical outlet.
2. Using the three caps provided, cap the
suction and discharge fi ttings on the
inside of the spa.
3. Open the air bleed fi tting on the top of
the fi lter tank.
4. Unscrew the retainer ring from the fi lter
housing and remove the fi lter housing
cover.
5. Lift the fi lter out of the fi lter housing.
Clean the fi lter with the spray from a
high pressure garden hose.
6. Place the fi lter back in the fi lter housing.
Make sure the fi lter is properly seated
in the housing and that the o-ring is
properly seated in the o-ring groove.
7. Install the fi lter housing cover and secure
with the retaining ring. Tighten the
retaining ring hand-tight. Do not over
tighten the retaining ring.
8. Remove the caps from the spa suction
and discharge fi ttings inside the spa.
9. Open the air bleed fi tting on the top of
the fi lter housing. Leave the bleed fi tting
open for one minute, or until water drips
from the bleed fi tting. Close the bleed
fi tting.
10. Plug the power pack into the electrical
outlet.
11. Reset the desired temperature set point.
21
Page 22

User’s Guide
Winterizing and Vacationing
If you are taking a vacation or leaving your spa unused for more than a week,
you should take a few simple precautions. Leave the spa covered with the
plastic clips locked. Leave the turbo wave pump off and set the temperature
set point low. is will allow the water pump and heaters to turn on
occasionally to fi lter the water and protect it from freezing. Upon returning,
and before using the spa, check the bromine and pH levels.
Storing Your Spa
e spa may be stored in its original box. Make sure all water is drained from
the spa and the power pack. We recommend the use of a wet/dry vacuum
to blow or suck all the water from the spa fi ttings and the power pack. Care
must be taken in cold weather as the vinyl will become stiff and brittle when
the temperature falls below 0ºF.
Draining the Spa
A garden hose may be used to siphon the water out of the spa. Place one end
of the garden hose into a suitable drain. Turn the turbo wave blower on and
hold the other end of the garden hose over the water discharge fi tting inside
the spa. When the siphon action starts, place the end of the garden hose on
the fl oor of the spa. Turn off the turbo wave blower and unplug the power
pack. Do not lift the spa if it contains more than 1/4” of water.
22
Page 23
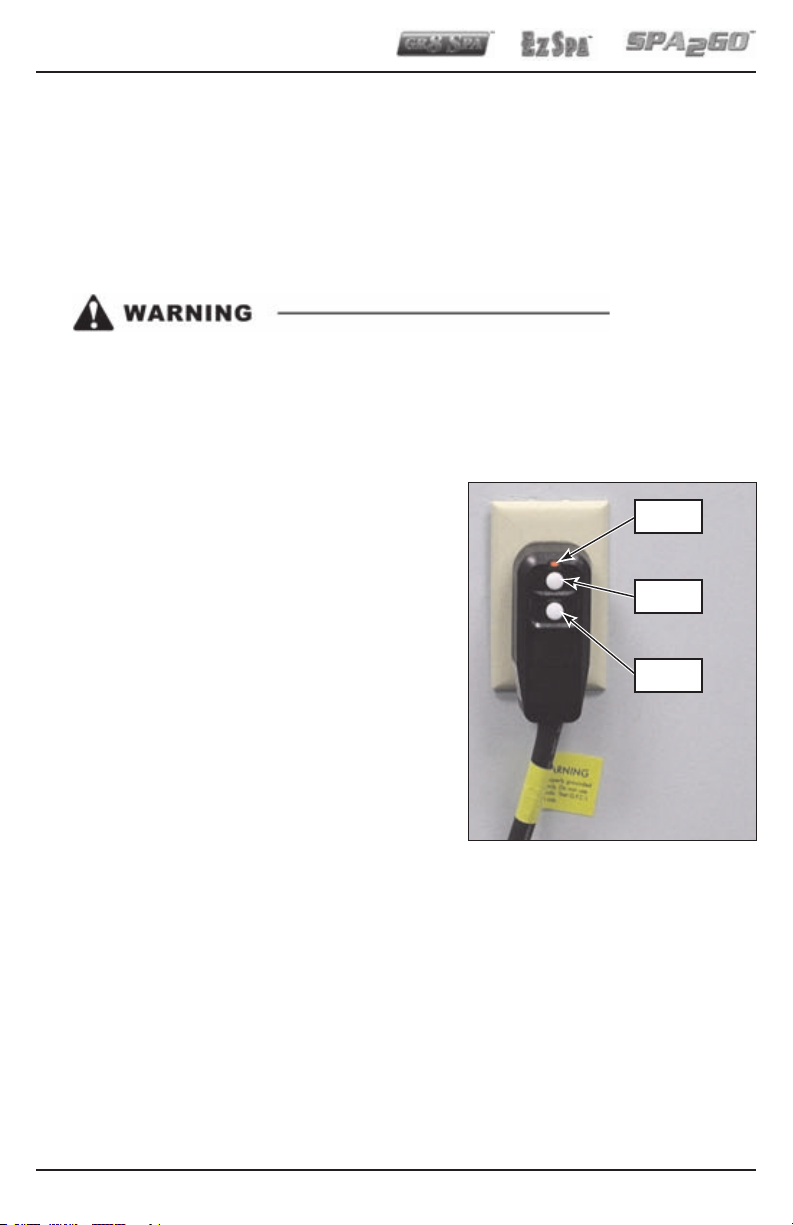
Comfort Line Products
Light
Test
Reset
GFCI (120 volt units only)
e GFCI, or Ground Fault Circuit Interrupt, fi tting on the power pack
electrical cord should be tested monthly. ere are no user serviceable parts
inside the GFCI. Do not open the GFCI as this will void your warranty.
To test the GFCI, use the following procedure.
If the GFCI device does not function properly, do not use your
spa. Call the dealer or factory immediately for instructions. Do
not bypass the GFCI device.
1. Turn on the turbo wave blower.
2. Push the test button on the GFCI located
at the end of the power cord. e GFCI
light should go out and the turbo wave
blower should shut off . If the GFCI light
does not go out, and the turbo wave
blower does not shut off , the GFCI is
faulty. Do not use the spa. Immediately
contact your dealer or the factory for
instructions.
3. Press the reset button on the GFCI. e
light on the GFCI should turn on. If the
GFCI light does not turn on the GFCI is
faulty. Do not use the spa. Immediately
contact your dealer or the factory for instructions.
23
Page 24

User’s Guide
SERVICE AND TROUBLESHOOTING
Your spa was designed to minimize service requirements. If you encounter
problems with your spa carefully go through the following steps.
Air Pump Blower
1. Turbo wave pump will not turn on:
A. Make sure the power pack is plugged into the electrical outlet, and
that there is power to the outlet. Plug another electrical item into the
outlet such as a hair dryer or lamp. If you do not have power, check
the breakers at the main electrical panel.
B. Test the GFCI per the instructions in the Maintenance section of this
manual. If the GFCI is faulty do not use the spa. Immediately call
your dealer or the factory for instructions. DO NOT BYPASS THE
GFCI! DO NOT USE THE SPA!
2. Turbo wave pump will not turn off : Call the factory for instructions.
3. Turbo wave pump blower trips the GFCI when you turn it on:
A. Take the air loop off the top of the power pack. Look down inside the
left fi tting and see if water has collected inside the power pack.
B. If water has collected inside the power pack, disconnect the large
fi tting connecting the power pack to the spa. Ensure the check valve
in the fi tting is in place and working properly.
4. Turbo wave pump makes a squealing noise: Do not continue running
the turbo wave pump. Contact the manufacturer for instructions.
24
Page 25

Comfort Line Products
No Heat
1. Dirty fi lter: Clean the fi lter per the instructions provided in the
Maintenance section of this manual. If the fi lter is more than two months
old, replace it. After cleaning or replacing the fi lter, cover the spa, turn
the temperature set point all the way up, and leave the spa for 24 hours.
If the spa still will not heat, contact the manufacturer for instructions.
2. No circulation, water pump air bound: Unplug the power pack from
the electrical outlet. Bleed air from the fi lter tank by turning the bleed
fi tting on the top of the fi lter tank counter-clockwise. After one minute,
or when water drips from the fi tting, close the bleed fi tting and plug in. If
the water pump still does not pump water, contact the manufacturer for
instructions.
If the water pump becomes air bound again, check the o-ring on the
top of the fi lter tank. Refer to the fi lter changing instructions in the
Maintenance section of this manual. Replace the o-ring if necessary.
3. Bad power pack: Ensure power is available to the spa. Check the circuit
breaker at the main electrical panel. Connect another electrical appliance
to the plug used for the spa. If power is available to the spa, test the GFCI
using the instructions supplied in the Maintenance section. If the GFCI
is working properly and the power pack does not function, then the
power pack is bad. If the GFCI is not working properly, do not use the
spa. Immediately contact the manufacturer for instructions.
4. In some situations, the numerical temperature display may read ‘OH’
(overheat) and the spa will not heat until reset. To fi x this problem,
please use the following procedure:
A. If the spa water is still warm (over 104°F / 40°C), unplug the
power pack and let the water cool to below 104°F / 40°C. (Use a
thermometer to verify the temperature.)
B. Plug the power pack back in and press the small reset button directly
below the temperature display. is will clear the ‘OH’ message and
the spa will resume normal operations.
Should this problem occur repeatedly, please call our customer support
for further instructions.
25
Page 26

User’s Guide
Leaks
1. e two small connections between the power pack and the spa are
leaking: Ensure the garden hose style washer inside each of these fi ttings
is still in place and undamaged. If the washers are in place and the
connection is still leaking, there may be a small piece of plastic behind
the hose washer. Remove the small piece of plastic with a utility knife or
needle-nose pliers.
2. Blower connection is leaking: If the large connection between the spa
and the power pack is leaking, ensure the o-ring inside the fi tting is in
place and undamaged.
3. Plumbing or pressure switch is leaking: Look under the power pack. If
water is coming from underneath the power pack, then the plumbing or
pressure switch inside the power pack is leaking. Contact the factory for
instructions.
26
Page 27

Comfort Line Products
SPECIFICATIONS
Model STG-1 120 VAC Round
Model STG-2 240 VAC Round
Capacity : Seating: 1-4 adults
Water: 250 gallons
Outside Dimensions :
82 inches
Inside Dimensions : 58 inches
Height :
28 inches
Number of Jets : 1 return jet
Over 100 air jets
Power Pack : 1.3 HP turbo blower
Fractional HP circulating pump
Single phase
(120 VAC, 60 Hz, 12 Amps)
(240 VAC, 50 Hz, 6 Amps)
1000 Watt heater
Weight : Dry: Spa - 30 lbs; cover - 8 lbs
With water: 2113 lbs
Dead weight fl oor loading: 80 lbs/ft
2
27
Page 28

User’s Guide
SPECIFICATIONS
Model STG-3 120 VAC Octagon
Model STG-4 240 VAC Octagon
Capacity : Seating: 1-4 adults
Water: 250 gallons
Outside Dimensions :
82 inches
Inside Dimensions : 58 inches
Height : 28 inches
Number of Jets : 1 return jet
Over 100 air jets
Power Pack : 1.3 HP turbo blower
Fractional HP circulating pump
Single phase
(120 VAC, 60 Hz, 12 Amps)
(240 VAC, 50 Hz, 6 Amps)
1000 Watt heater
Weight : Dry: Spa - 30 lbs; cover - 8 lbs
With water: 2113 lbs
Dead weight fl oor loading: 80 lbs/ft
2
28
 Loading...