

Page 1
User Manual
Uživatelský Manuál
Actis 7
1
Page 2

Thank you for purchasing Actis 7.
▪ The Actis 7 Owner’s Manual is for your convenience and safety when using this product.
▪ Before operating Actis 7, and to take full advantage of this multi-functional navigation system, please read the manual carefully
and follow its instructions.
▪ Depending on the navigation system model type, the contents of this owner’s manual may vary. The navigation system and the
owner’s manual are subject to changes in function or performance without prior notice for the convenience of users.
▪ Producer will not be responsible for any equipment damage resulting from improper installation or use.
Safety precautions
For your safety, and that of your passengers, please follow these safety warnings.
▪ Make sure that the unit is installed securely to prevent the stand from coming off or moving during operation. It might cause an
accident.
▪ The GPS receiver might not function normally in some cars that are UV coated, have tinted windows or have anti electromagnetic
wave fitted. In these cases, please contact our sales representative to buy an external GPS antenna which is sold as an optional
item.
▪ GPS signals might be affected under expressways, in tunnels, or in built-up areas due to weak electrical waves.
▪ Use the navigation unit only for reference and do not place too much reliance on it. Map data must be updated annually to avoid
erroneous directions.
▪ Do not use it where it is hot and humid. Install and keep the product out of direct sunlight to prevent it from damage due to
overheating.
▪ Make sure that water or other liquids do not get inside the product. This could cause fire or electric shock.
▪ To reduce the risk or electric shocks, do not open the cover (or back). There are no user-serviceable parts inside.
▪ The GPS receiver operates optimally at 0℃ to 500℃. If the temperature inside of the car is too low or too high, the product might
not function correctly. Make sure that the optimal temperature is maintained.
▪ If the windshield mount is attached to the glass of the vehicle for a long time, it might come off due to reduced adhesiveness.
▪ The memory card (SD or SDHC) could be damaged if used with any other devices.
▪ Do not remove the memory card (SD or SDHC) while the product is in operation. It may cause mechanical problems.
▪ Do not touch the product with wet hands. It might cause electric shock or damage.
▪ Do not disassemble or drop the product. It might cause damage or a mechanical breakdown.
▪ Use only the specified power adaptor. Using a different type of adaptor might cause damage or a mechanical breakdown.
▪ Touch the LCD with fingers or blunt devices only. If a sharp drill or a nail is used, it might cause damage.
▪ Use only soft and dry cotton cloth when cleaning the product. Do not use strong solvents such as alcohol, benzene, or thinners, as
these might damage the surface of the product.
2
Page 3

Table of Contents
1. GETTING STARTED ............................................................................................ 4
COMPONENTS (DEFAULT+OPTION).....................................................4
DESCRIPTION OF EXTERNAL APPEARANCE OF ACTIS 7................................5
INSTALLING ACTIS 7 IN YOUR VEHICLE...............................................8
TAKING OUT MEMORY CARD..........................................................9
TURNING POWER ON.................................................................9
MAIN MENU SCREEN.................................................................10
2. FEATURES AND ITS BASIC OPERATION ............................................................... 12
USING MULTI MEDIA PLAYER.........................................................12
USING TEXT VIEWER..................................................................17
USING GAME.........................................................................18
USING IMAGE VIEWER.................................................................20
USING CLOCK........................................................................22
USING REAR CAMERA................................................................23
USING AV-IN .......................................................................23
USING MEMO.........................................................................25
USING CALCULATOR..................................................................26
USING CONFIGURATION...............................................................27
3. ADDITIONAL FUNCTIONS .................................................................................. 31
MULTI TASKING.......................................................................31
HOW TO REGULATE LCD BRIGHTNESS..............................................32
RESETTING............................................................................32
CONNECTING MINI USB.............................................................32
SCREEN SAVER.......................................................................32
4. COMMON KNOWLEDGE ON GPS ........................................................................ 33
GPS?.................................................................................33
CAUSE OF ERROR OCCURRENCE IN GPS............................................34
CAUTIONS DURING USE OF GPS.....................................................34
5 A/S GUIDE ....................................................................................................... 35
SELF CHECK LIST BEFORE INQUIRING A/S..........................................35
CAUTIONS DURING USE...............................................................35
PRODUCT SPECIFICATION..............................................................36
6. NAVIGATION ................................................................................................... 37
3
Page 4
1. Getting Started
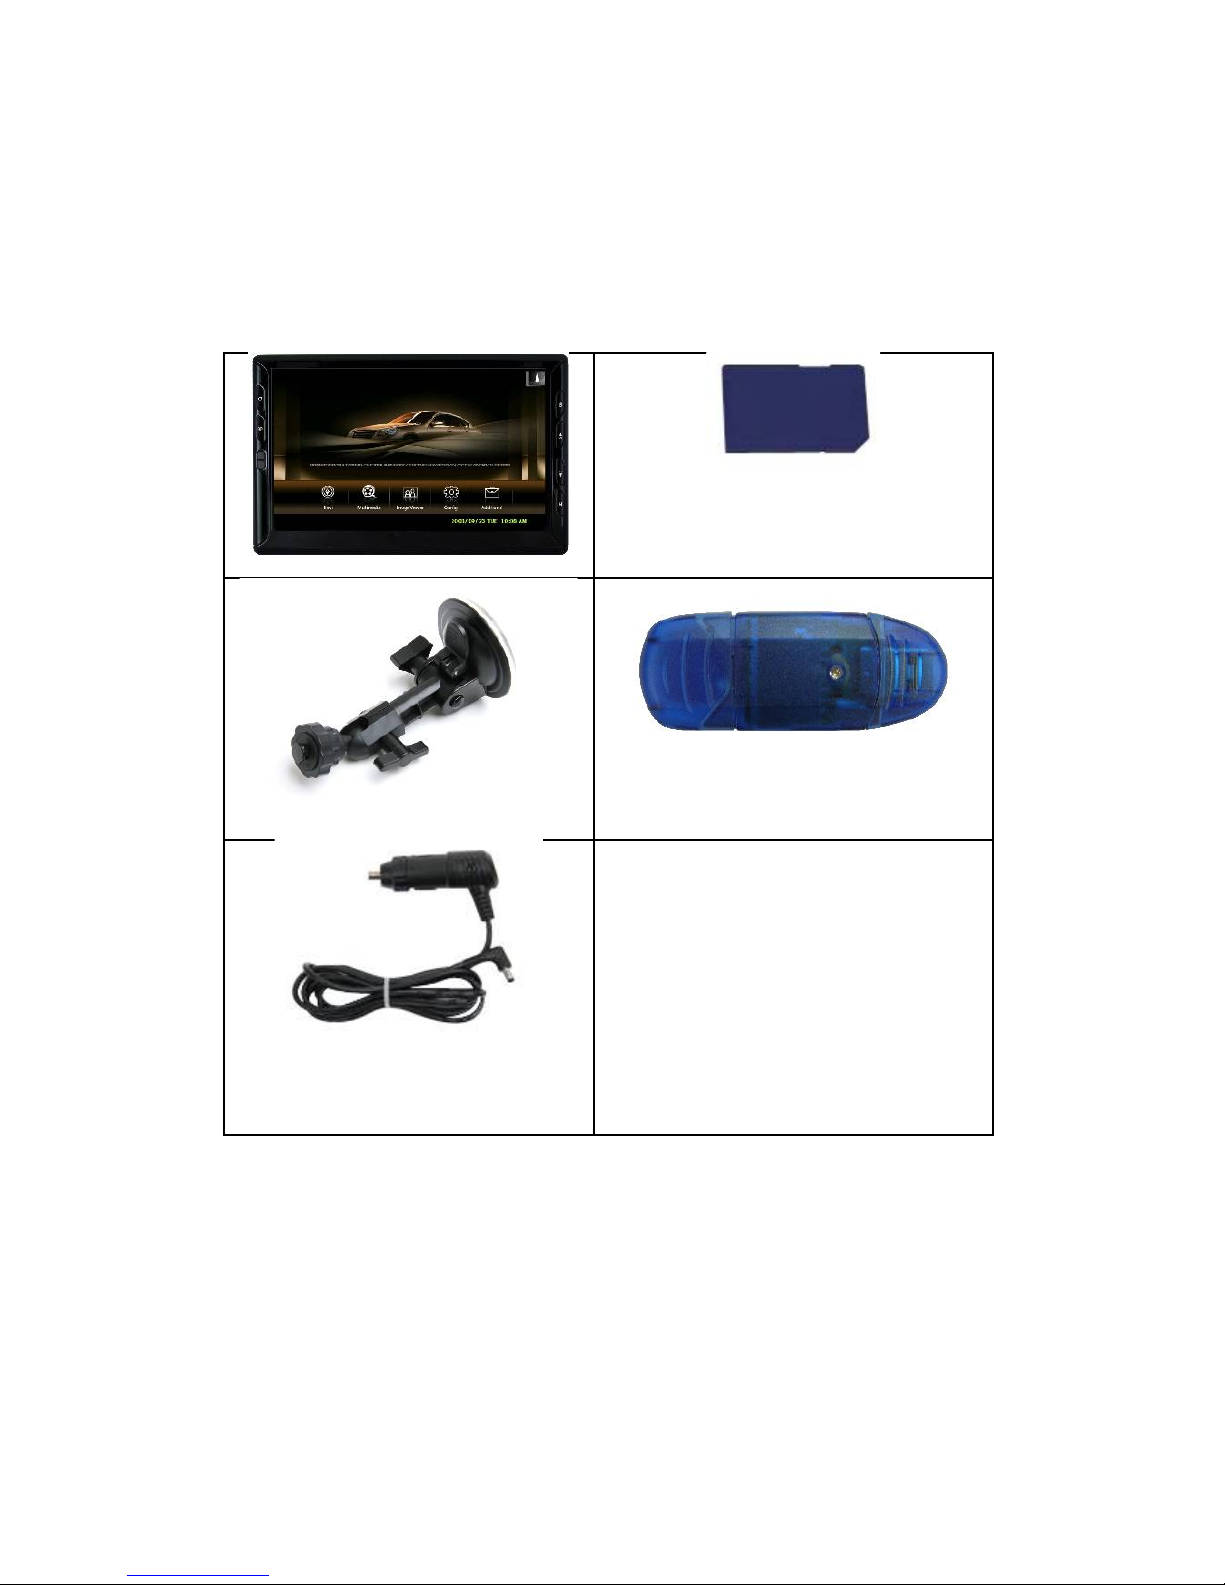
Components (default+option)
ACTIS 7 MAIN BODY
SD MEMORY CARD
CRADLE
SD CARD READER
CIGAR JACK
4
Page 5
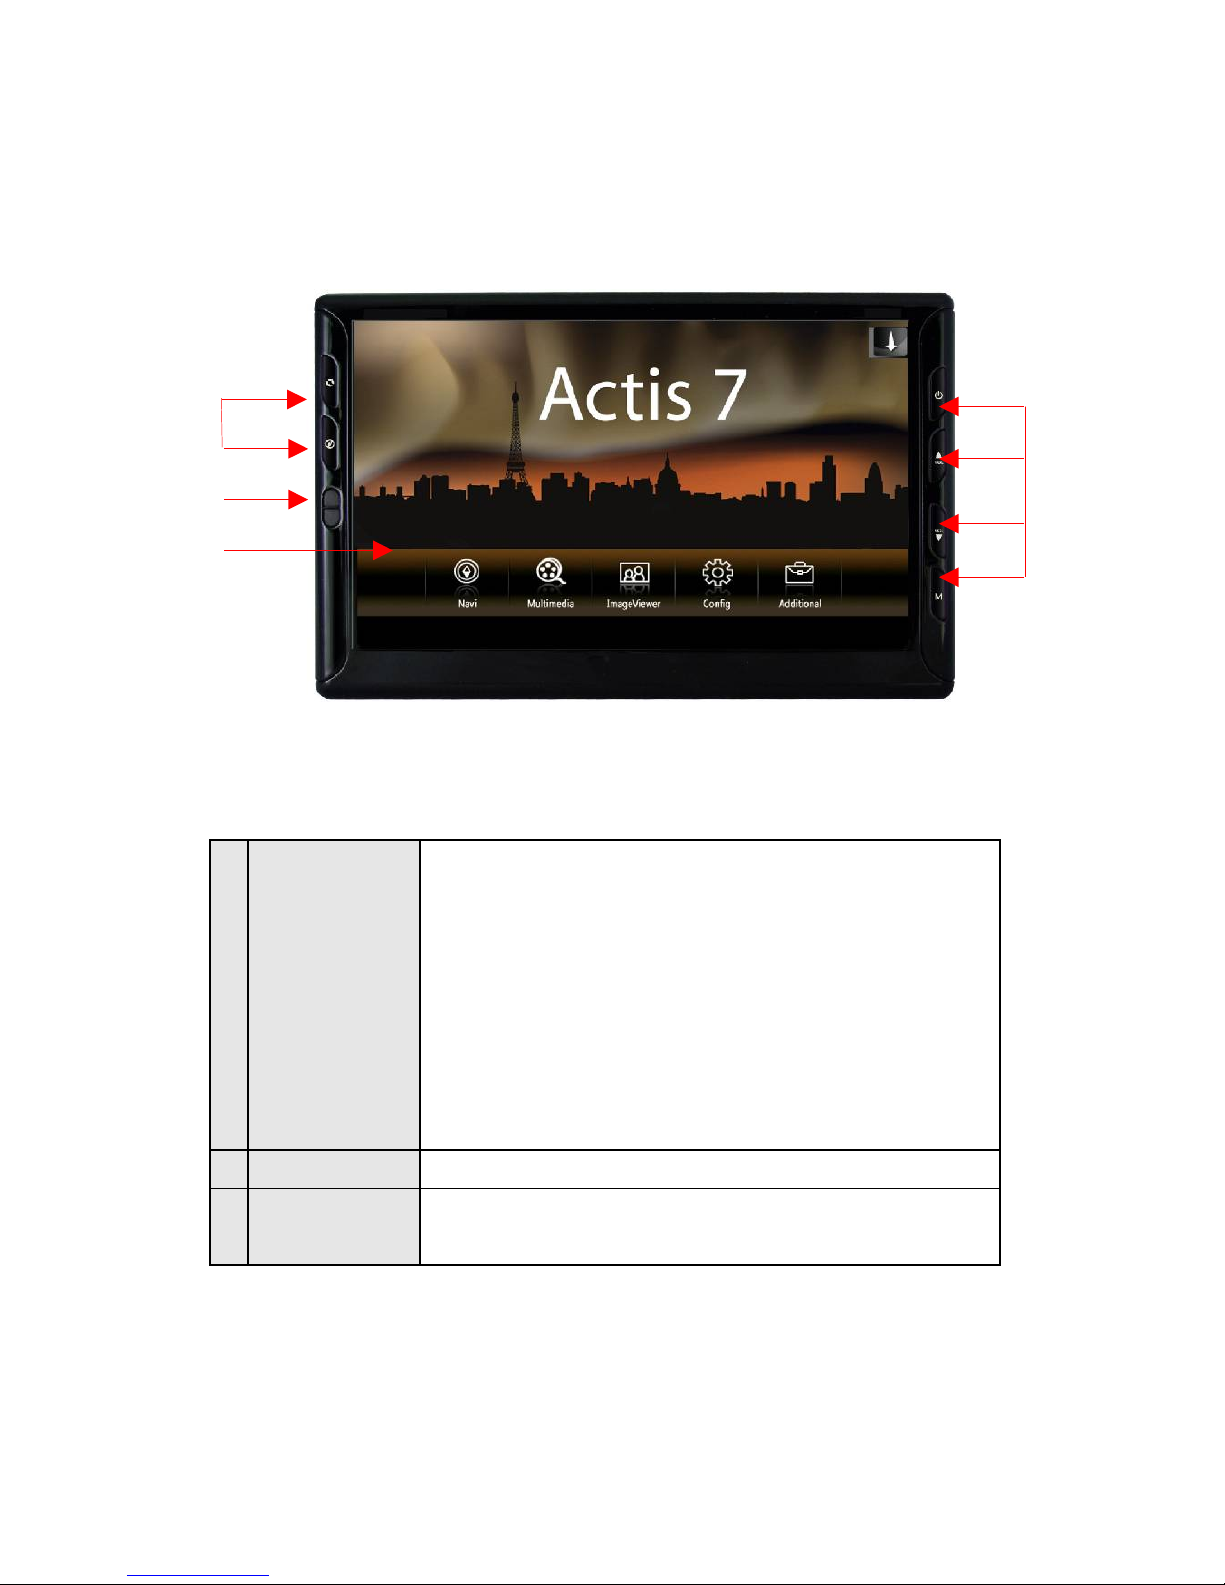
Description of External Appearance of Actis 7
(Front View)
(Front side information)
1
Front Keys <<Right side>>
Power To turn off LCD and sound. Press again
to turn on LCD and sound turn.
Volume up To increase volume
Volume down To decrease volume
Menu To return to main menu screen
<<Left side>>
Mute To mute sound
Navigation To execute navigation
2 Remocon sensor To operate various functions with Remocon (in Separate sales)
3 Touch screen To operate all functions by touching the screen with the stylus
pen provided.
①
③
②
①
5
Page 6
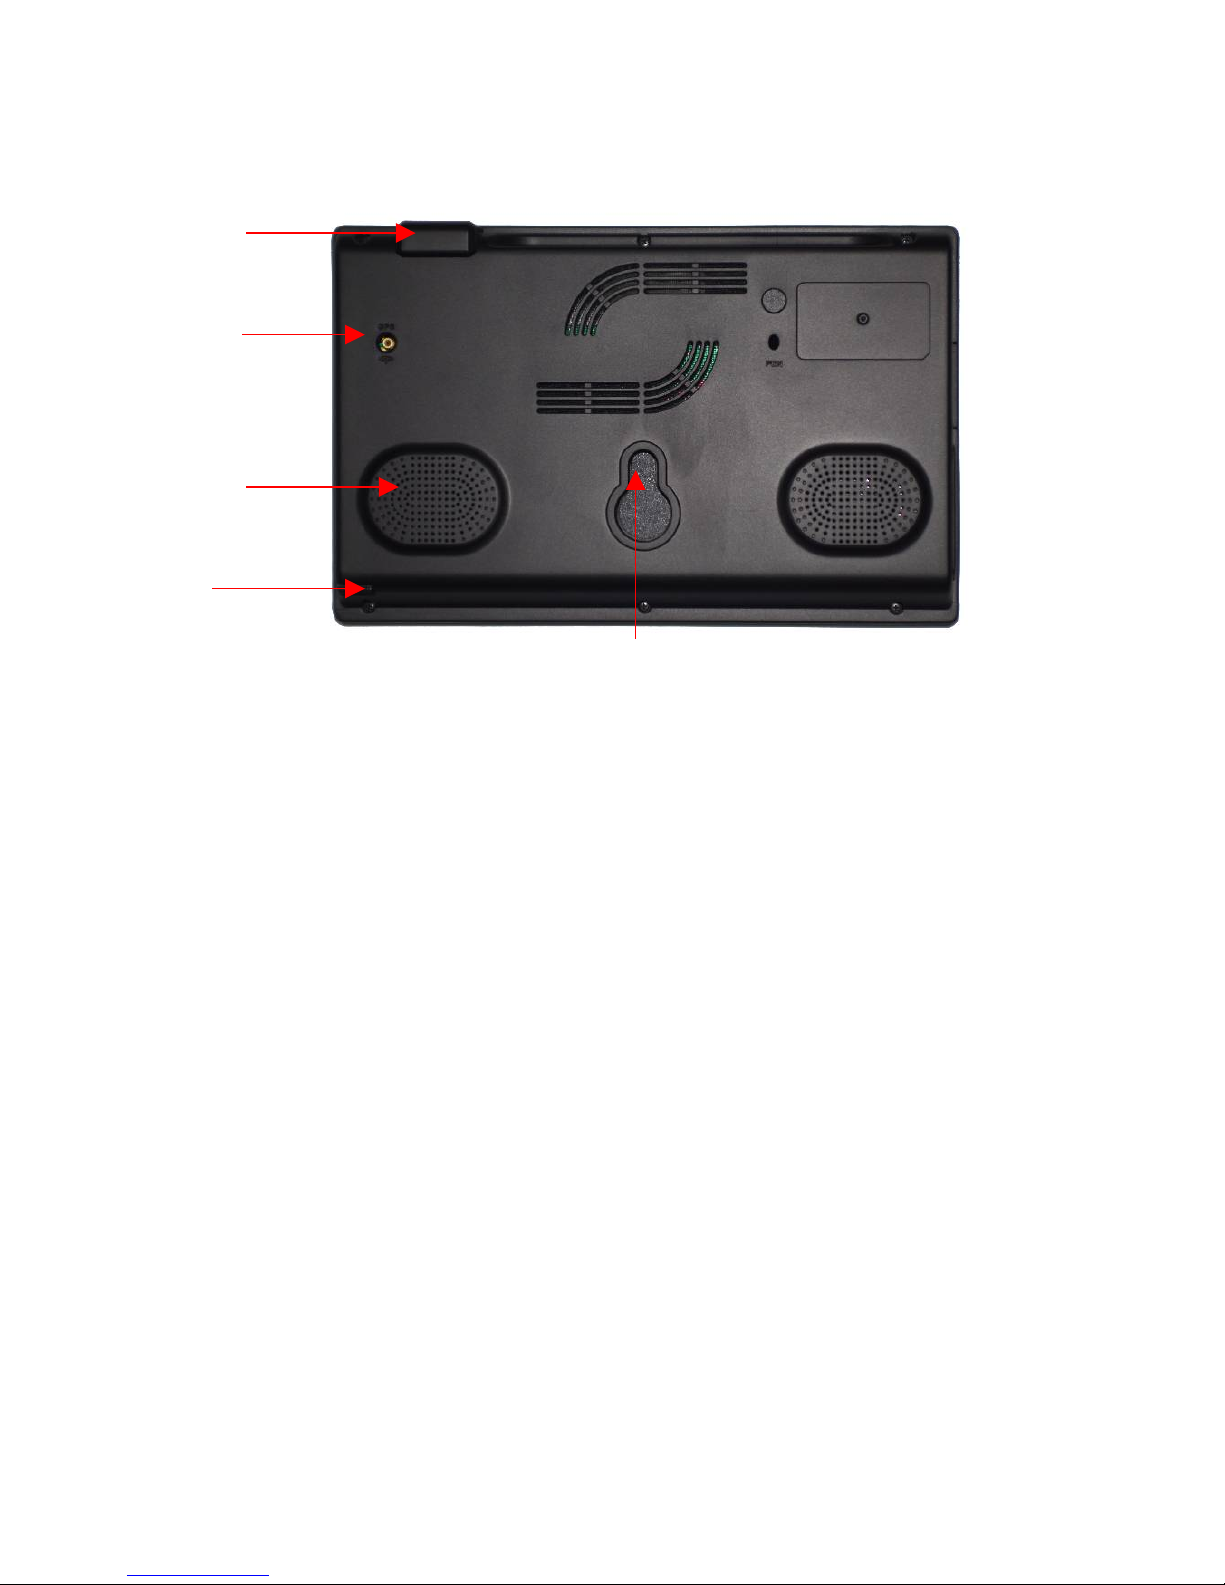
(Rear Side Information)
1 GPS Antenna Receives GPS signal from satellite. In order to make
reception efficiency better, you should maintain the antenna
horizontal to the sky.
2 External GPS
Connection
Terminal
External connection in order to improve reception efficiency
of GPS.
- For vehicles with tinted windshield or truck or bus.
*sold separately
3 Speaker Vocal guidance and audio output.
4 Stylus Store a stylus pen
5 Mount Holder Mount on the cradle
①
②
③
④
⑤
6
Page 7
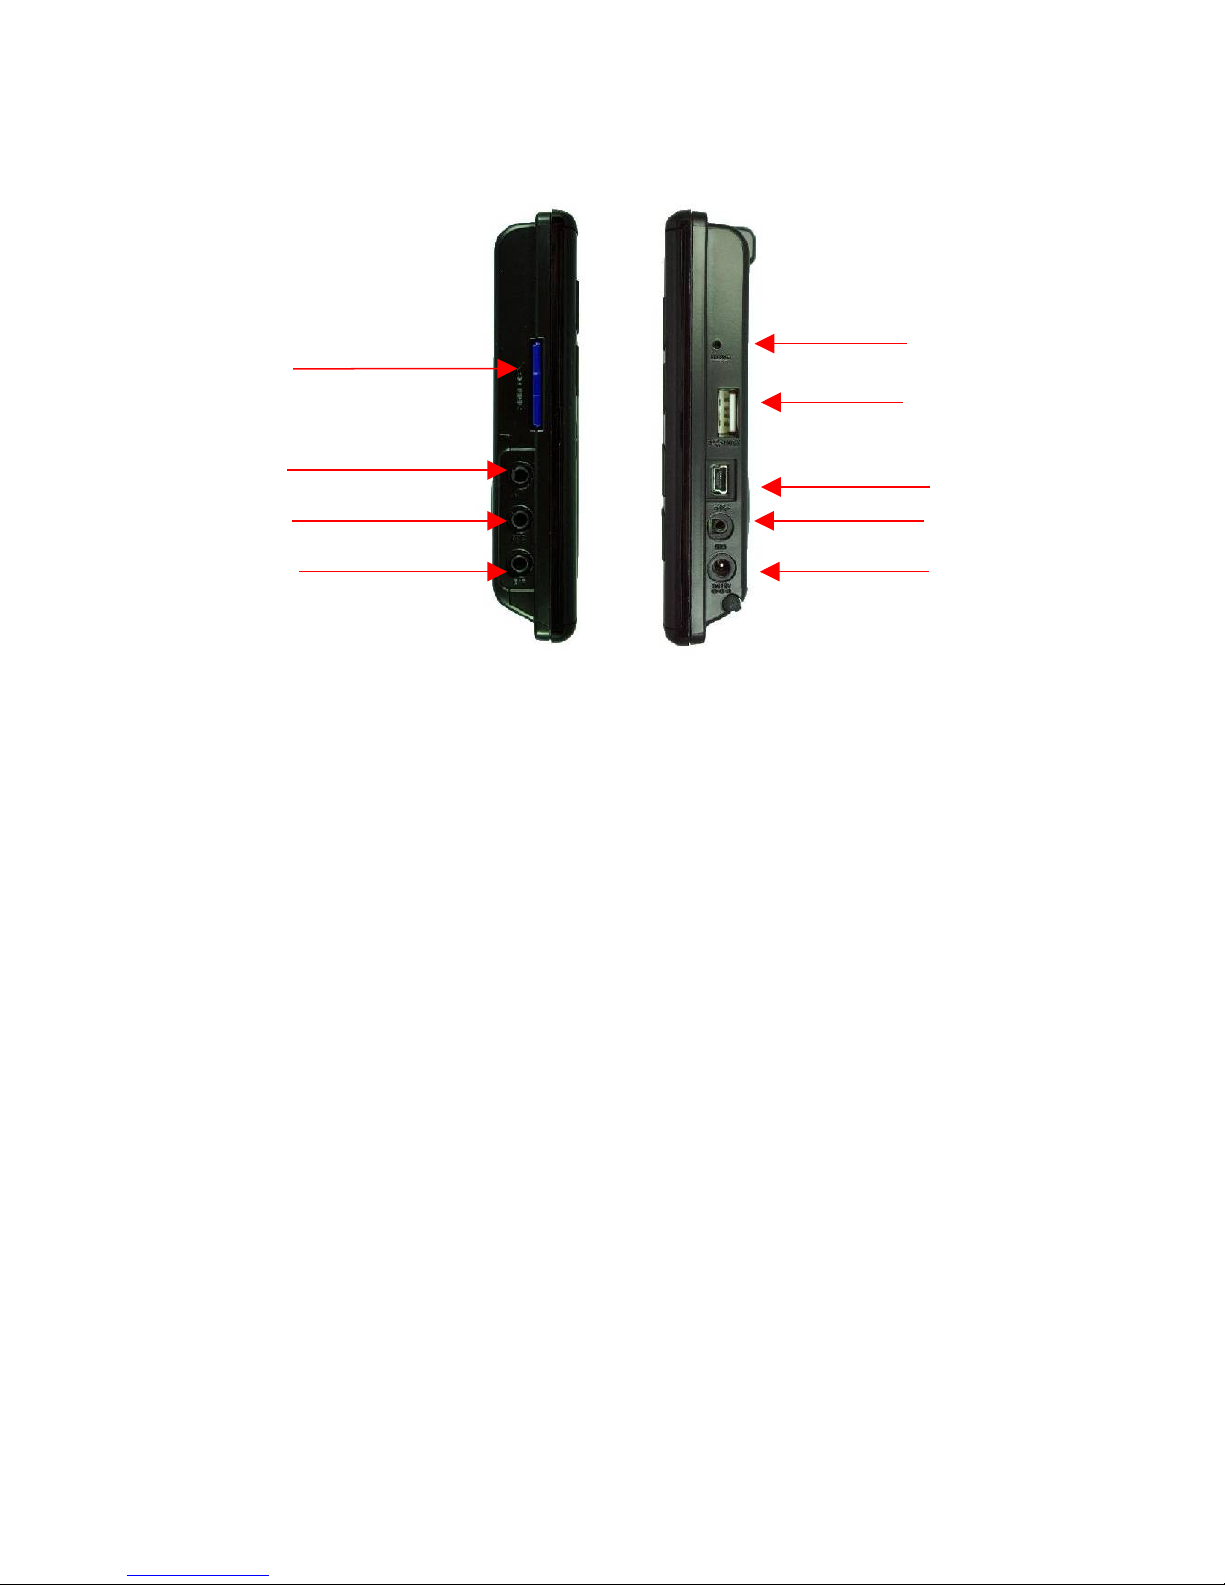
(Side Information)
1 Memory Card
Slot
SD/MMC memory card
2 AV In 1 To connect a rear camera.
It detects rear gear automatically.
Refer to “using AV In 1” for detailed information.
3 AV In 2 To connect external video and audio device
4 Earphone Jack Earphone connection jack
5 Reset Button Restart system when there is system error during
usage.
6 USB Host Slot To connect external USB memory storage and play
video or image files by using Music/Video player or
image viewer
7 Mini USB Slot To connect and download software from PC
8 SIO Jack To connect to external device such as TMC module
9 Power Jack To connect Cigar jack or Home AC-DC adapter
② ⑦
③
⑥
⑧
①
④
⑤
⑨
7
Page 8
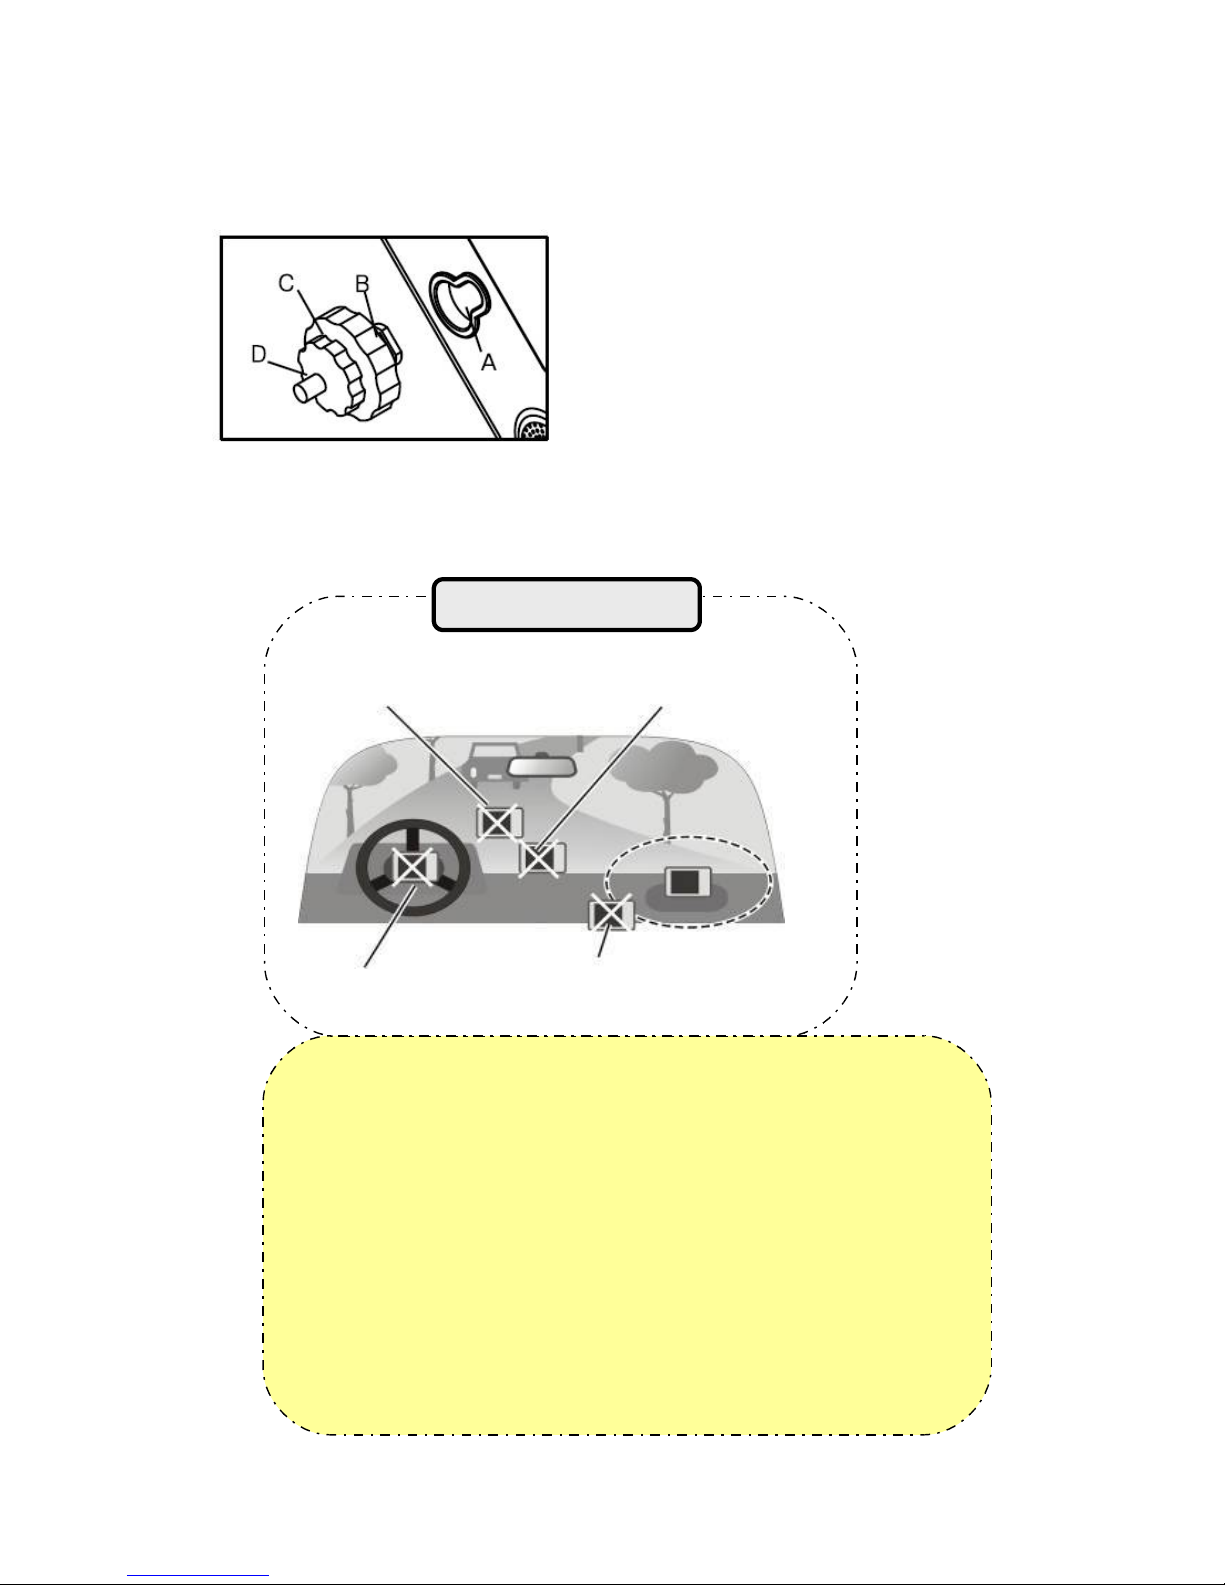
Installing Actis 7 in Your Vehicle
1 Press the suction cup against windscreen
2 Push and connect the projection B of cradle into A until securely fixed
3 Turn “C” in clock wise for fixing the device.
4 Turn “D” in clock wise to hold the device from releasing.
5 After installation, make sure the device is fixed firmly and then use it.
Pleas e make sure that the suction cup of the cradle is securely fixed to
the windscreen, as it may become detached due to severe vibration of
vehicle during travel.
When adjusting angle GPS receiver, make s ure that it has a clear and
horizontal view of the sky.
If power cigar jack for vehicle is not connected, Actis 7 might be
discharged during travel.
Owing to high number of thefts, please remove your Actis 7 from view
when you leave you car.
Please start your vehicle before connecting the cigar jack.
Do n ot in stal l whe re driver ’s view
is blin ded.
Do not in stall o n the u nsaf e
dash board.
Do n ot in stal l in fron t of
airb ag syst em.
Do not in stal l wh ere airba g is
expa nded .
C a u t io n s d u r i n g i n st a ll at io n of
ve h i c l e
8
Page 9

Taking out Memory Card
Press Memory Card lightly.
Turning Power On
Connect power (cigar jack or AC adaptor) to the Actis 7.
1.Atfer power is connected, LED on front panel turns on, and after 2seconds Logo Screen
is displayed.
2. After 10seconds Main Menu Screen is displayed.
9
Page 10
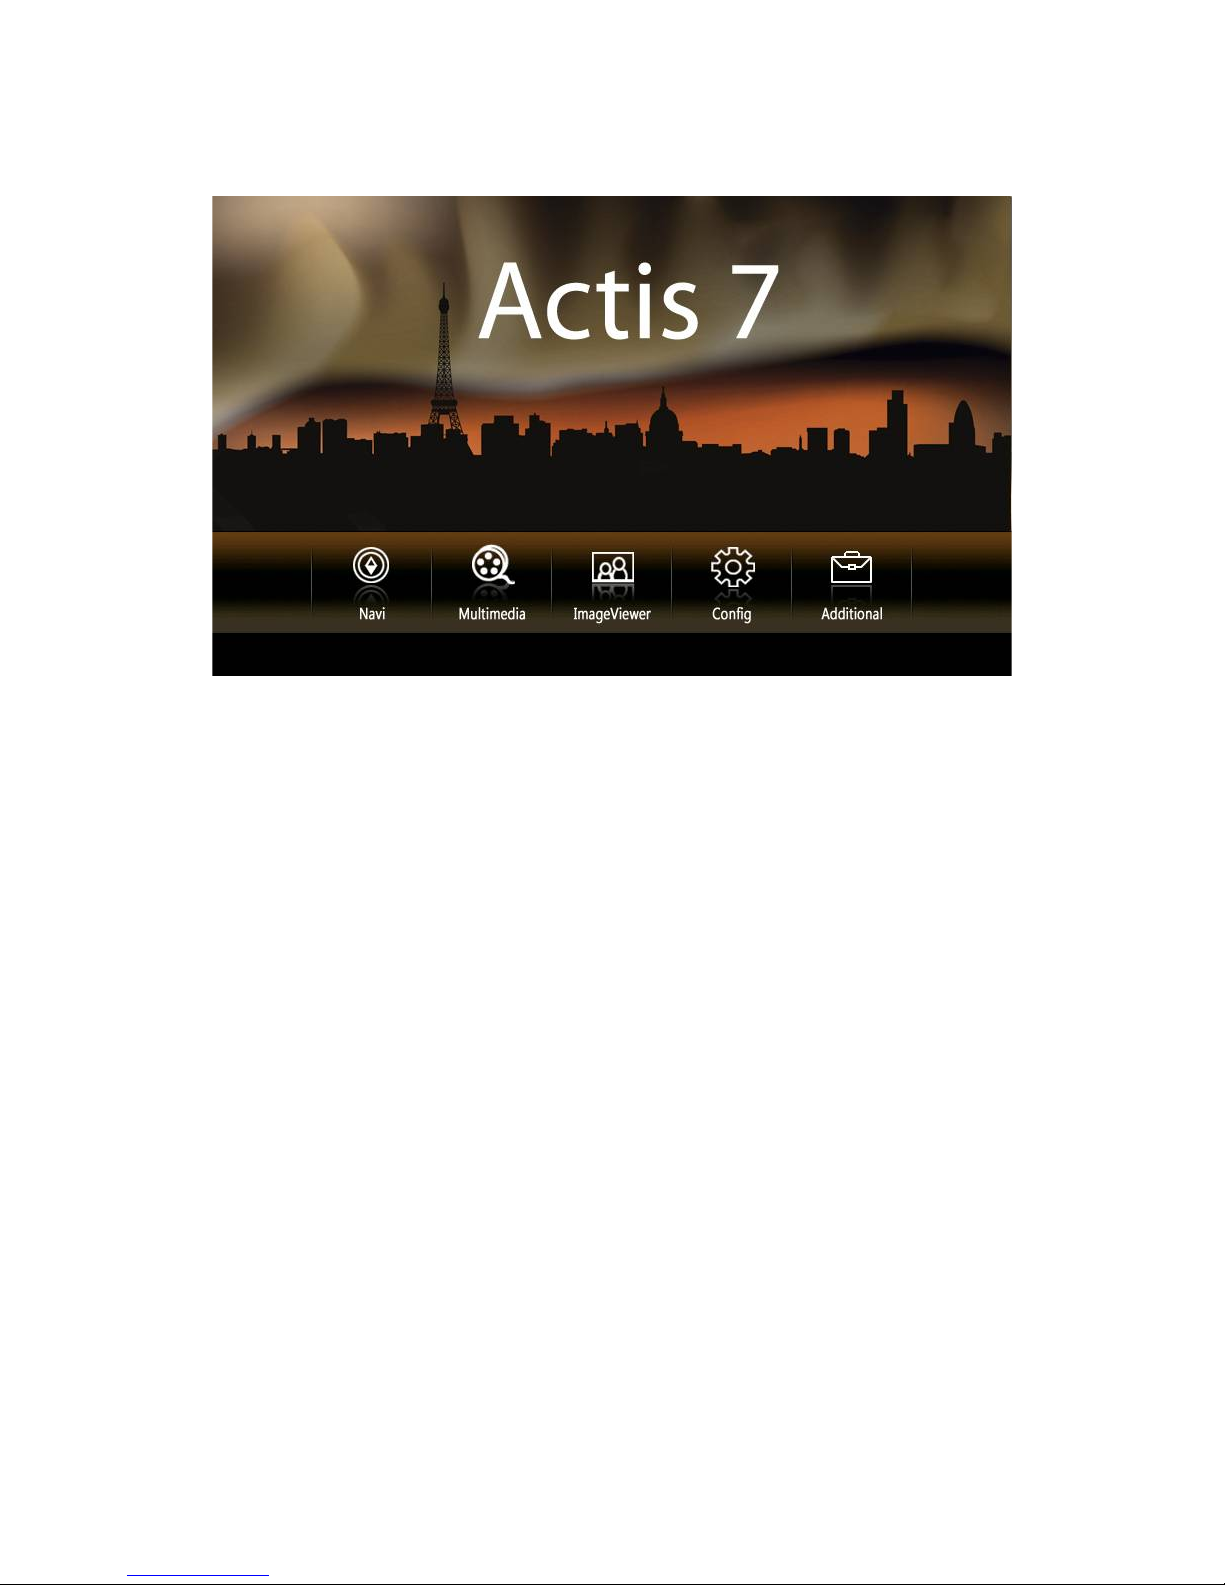
Main Menu Screen
After power is supplied, Main Menu consisting of 5 icons is executed in the first screen.
Each function can be operated by touch screen method. If the application already under
execution is selected repeatedly, the application under execution will be displayed on the
screen.
It supports multi tasking function. You can listen to Music while navigation is on. And
guide sound from navigation take precedence over other function sound.
Configuration of Main Menu Screen
10
Page 11
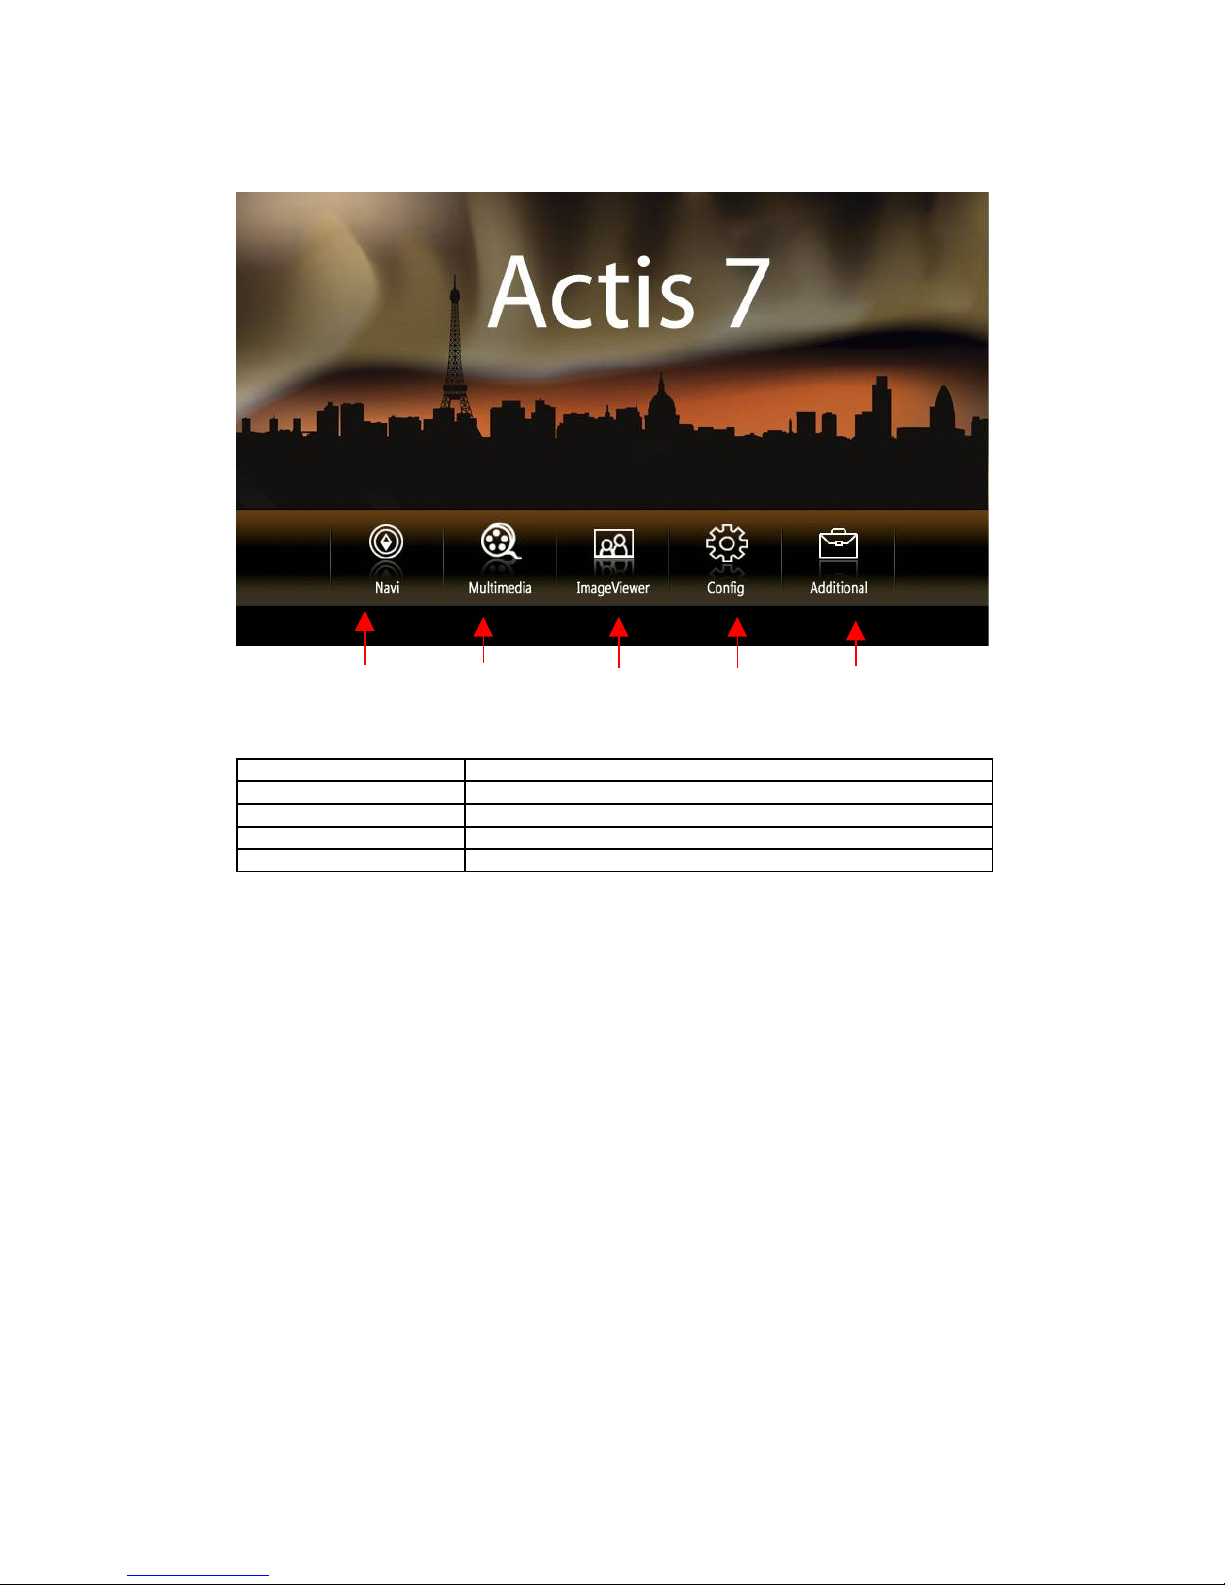
1.Navigation An icon to call Navigation
2.Multi Media Player An icon to call Multi Media Player
3.Image viewer An icon to call Image viewer
4.Configuration An icon to call environmental setup
5.Additional functions An icon to call additional functions
①
②
③ ④
⑤
11
Page 12
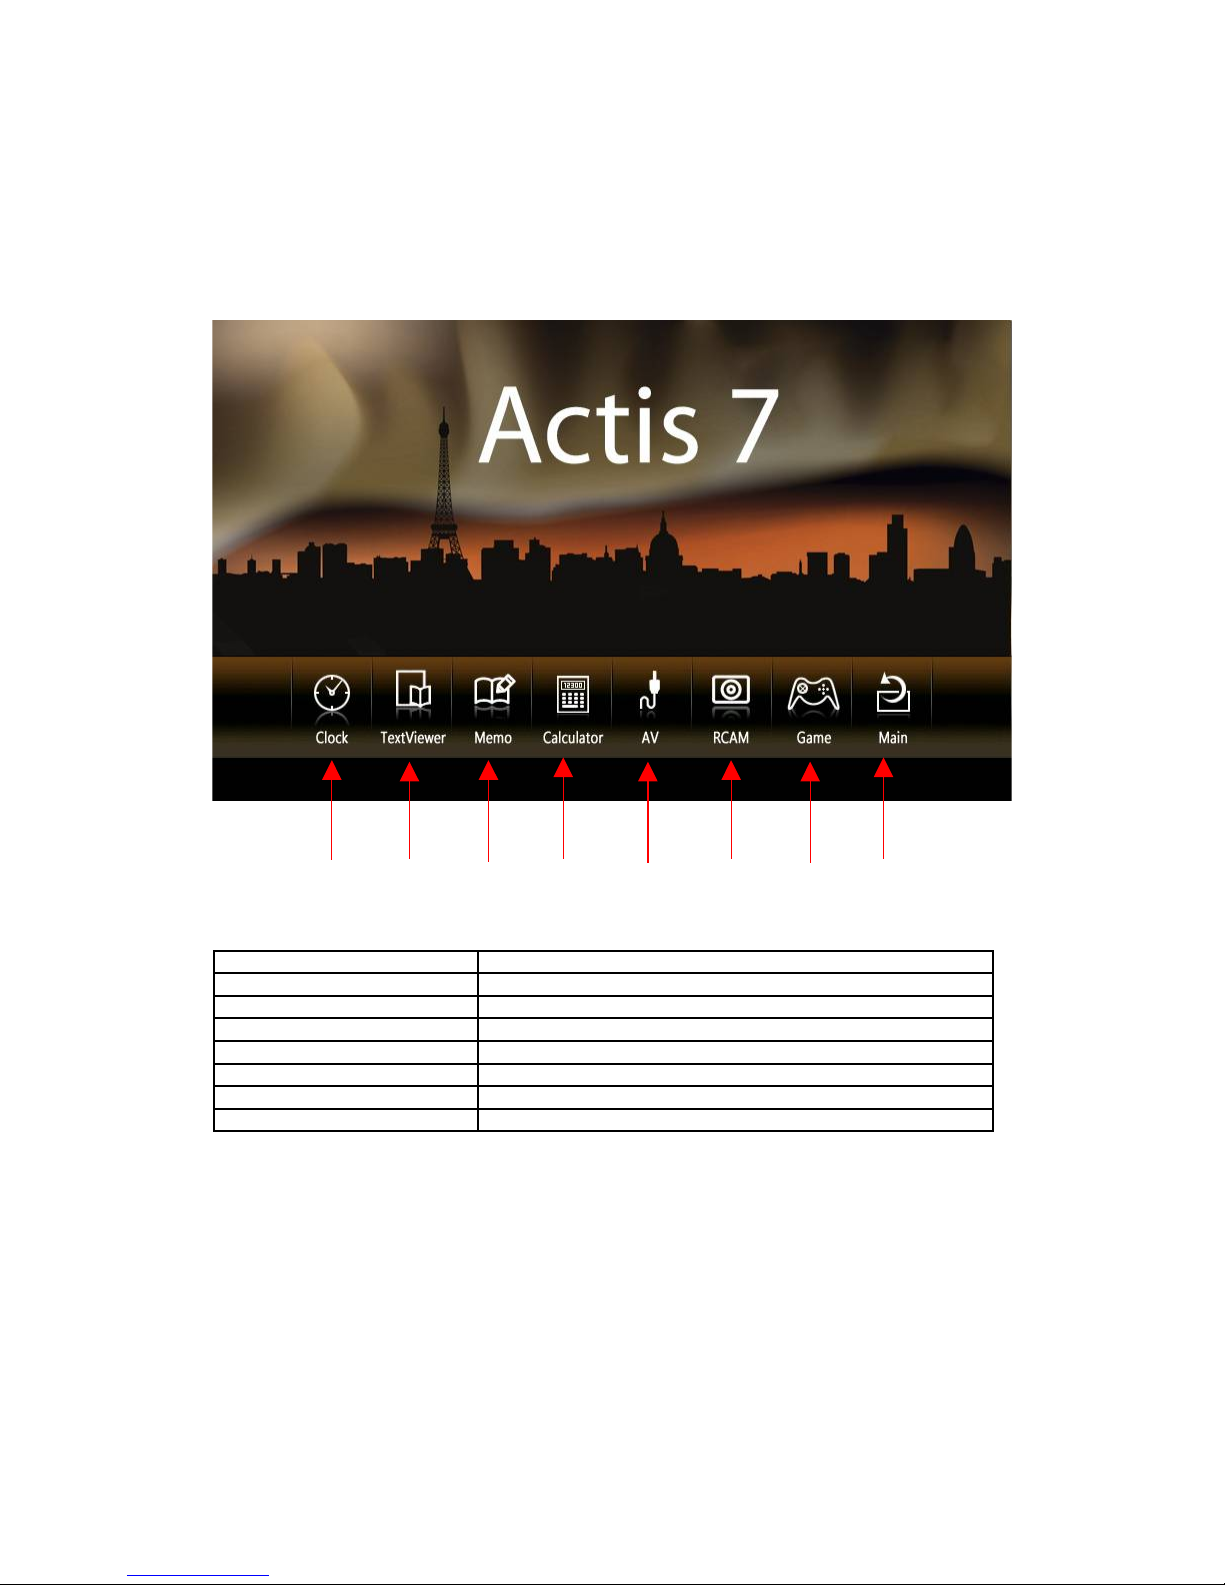
Configuration of Additional Menu Screen
1. Clock To call clock
2. Text viewer To call text viewer
3. AV In To call av in connection
4. Rear camera To call rear camera
5. Memo To call memo
6. Calculator To call calculator
7. Game To call game
8. Main To return to main manu
2. Features and its Basic Operation
Using Multi Media Player
1 Getting started
Execute this by pressing Multimedia Player icon on the Main Menu.
It plays video and music files.
①
② ③ ④
⑤
⑧
⑥
⑦
12
Page 13
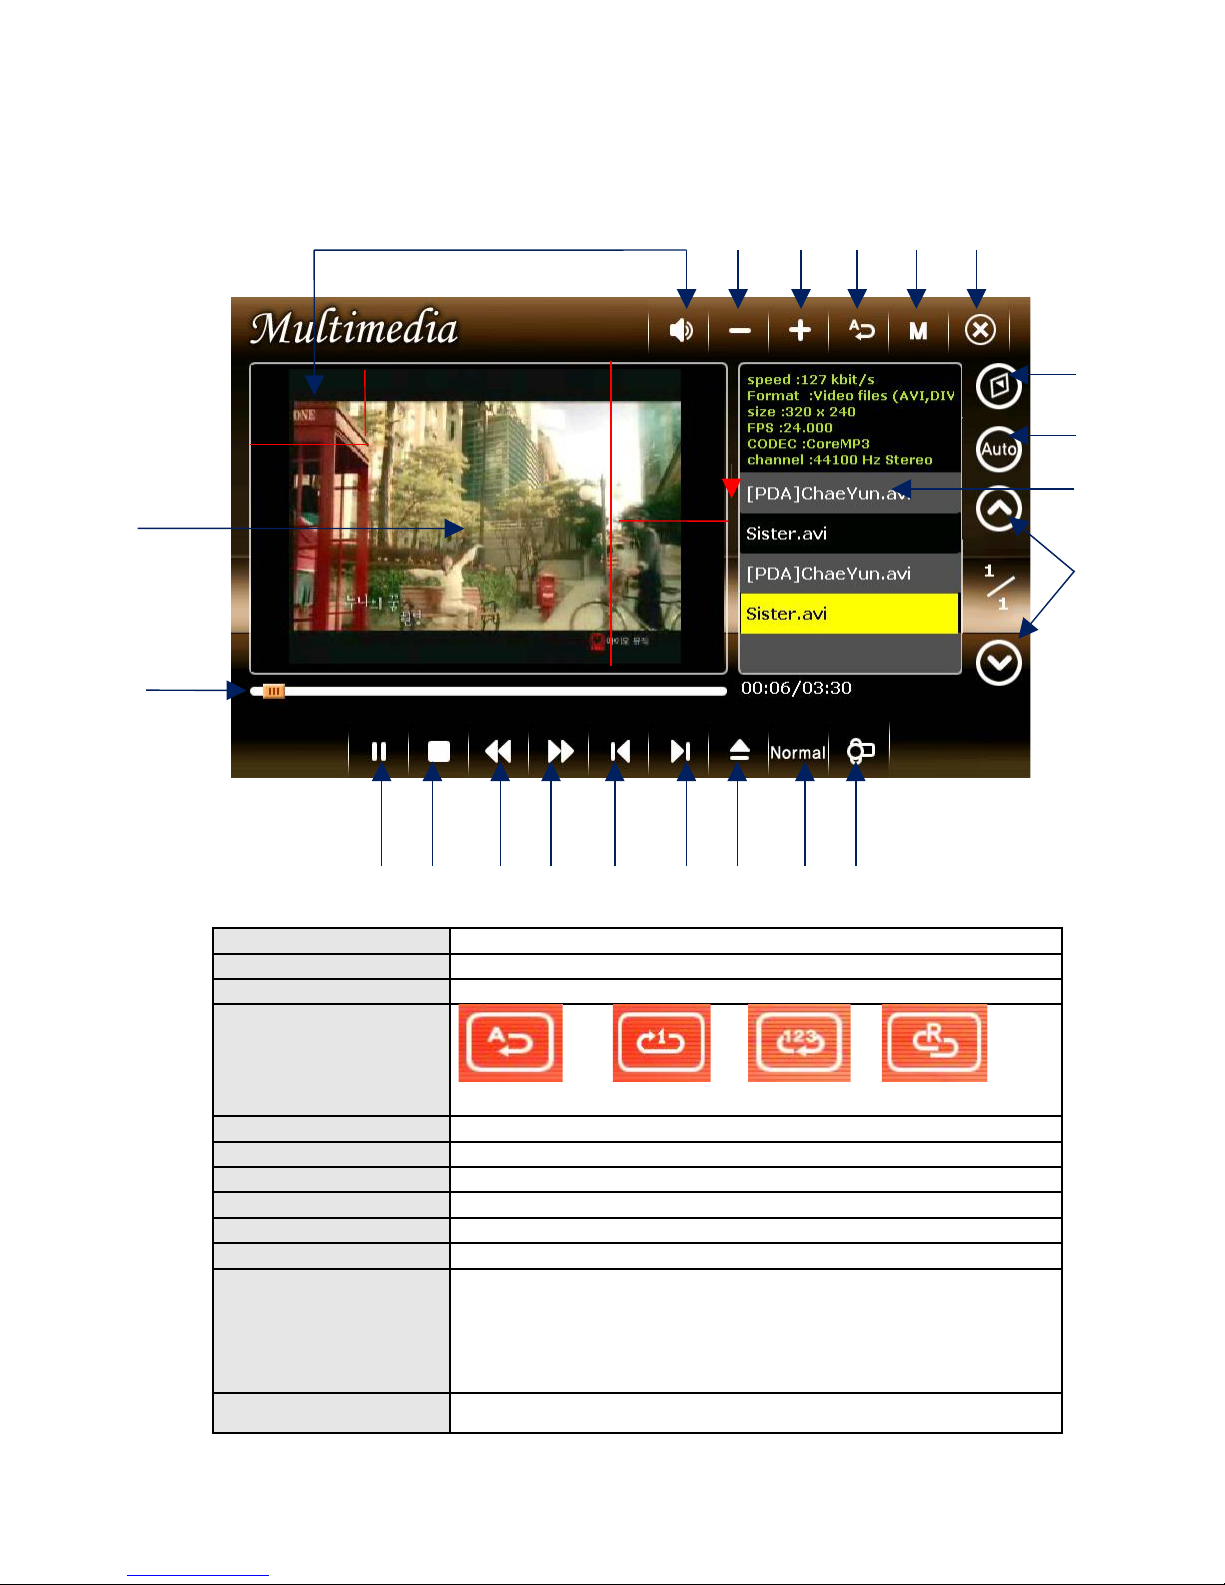
1. Mute To mute
2. Volume Down To decrease volume
3. Volume Up To raise volume
4. Repeat, Random
Repeat all one time Repeat one Repeat all Random
5. Main Menu To return to main menu without closing Multimedia player
6. Close To close the viewer and return to main menu.
7. Navigation To open navigation without closing Multimedia player
8. Screen Ratio To change screen ratio to 4:3 or 16:9
9. Play List Shows play list
10. Play List Page To change play list page
11. Screen - In audio mode, it shows file information, spectrum, and lyrics.
- In video mode, it shows images
(If you touch the screen it changes in full screen, and it returns to
default screen once you touch again)
12. Progress Bar Shows processing time of current playing file.
⑦
⑧
⑨
⑩
⑪
⑫
⑬ ⑭ ⑮
16 17 18 19
⑥① ③ ④ ⑤②
20 21
13
Page 14
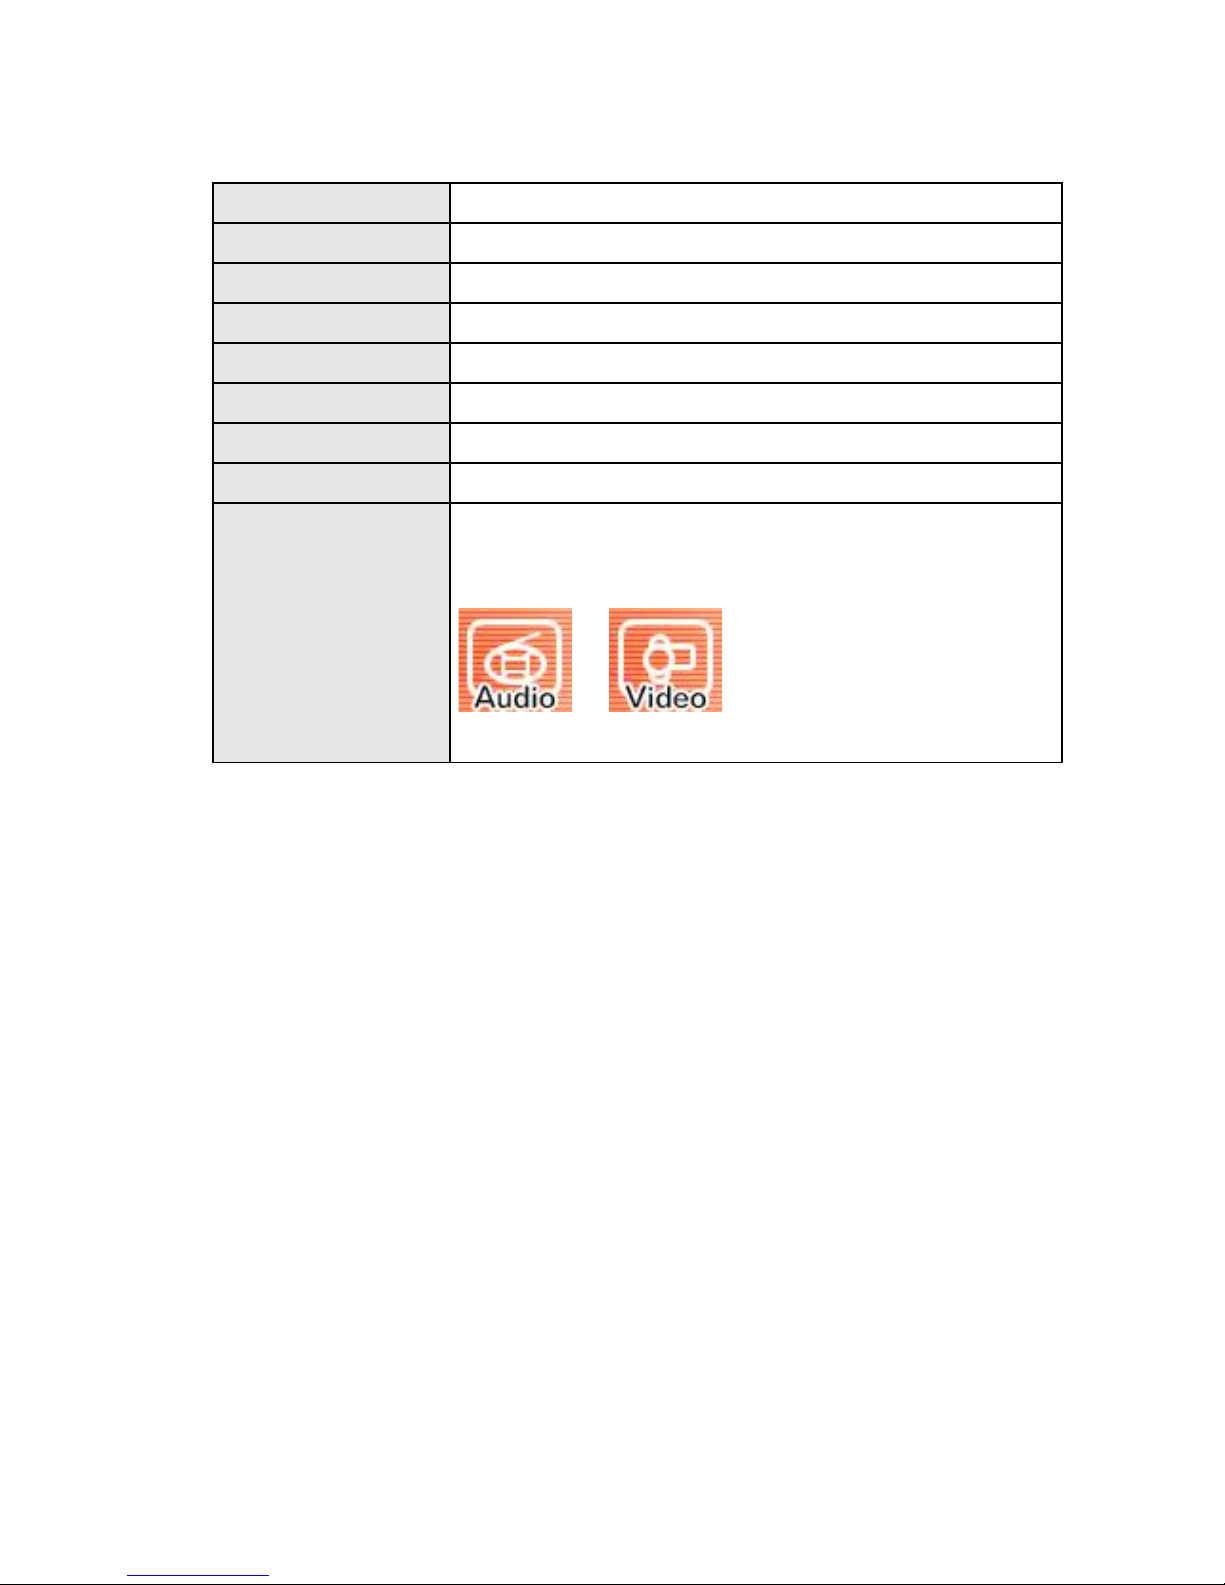
13. Play / Pause To toggle between play and pause of current file.
14. Stop To stop playing.
15. Fast Reward To move backware in played file
16. Fast Forward To move forward in played file
17. Previous To move to the previous file.
18. Next To move to the next file.
19. Play List Display To move to play list display.
20. Equalizer To choose Classic, Rock, Pop mode, etc
21. Video / Audio Mode To change Audio or Video mode.
If you set it in Audio mode, only Audio files are shown in the play
list.
Audio Mode Video Mode
14
Page 15
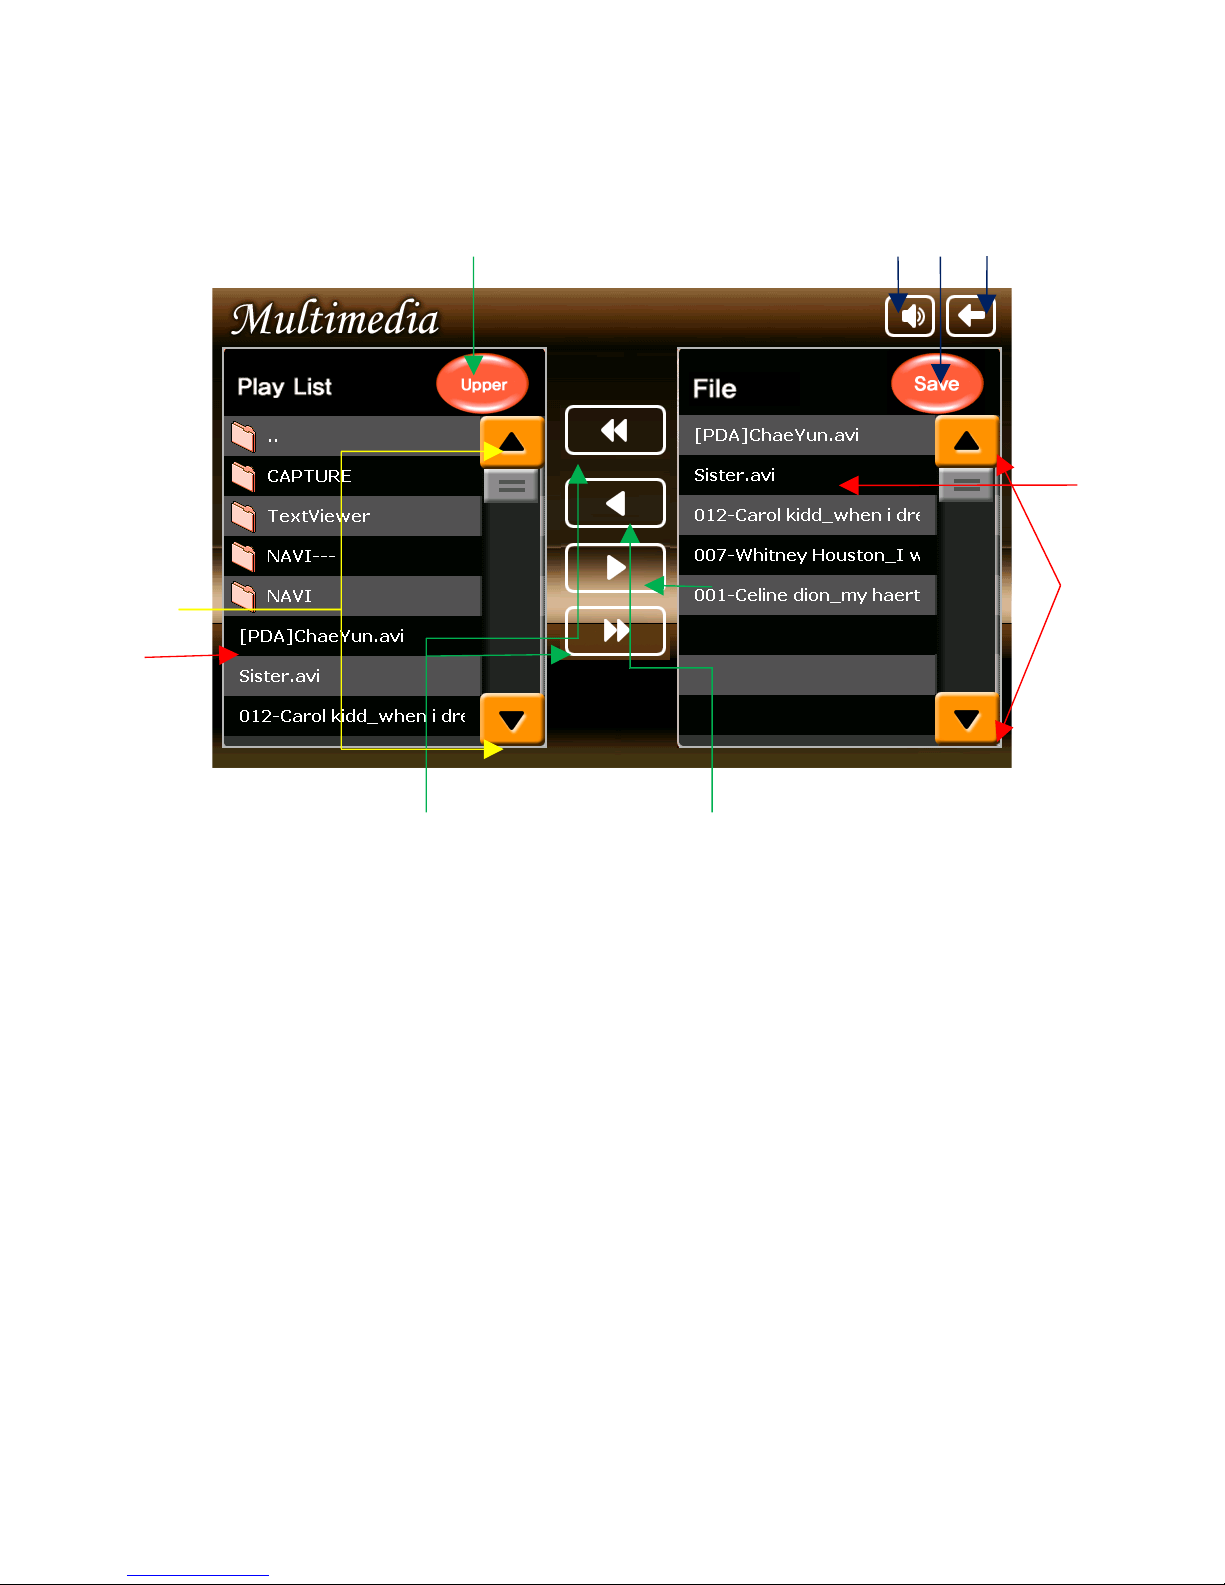
2 Play List Display
Press “Play List Display” button to make play list.
⑥ ⑦ ⑧
①
②
④
⑤
③
⑨
⑩
15
Page 16
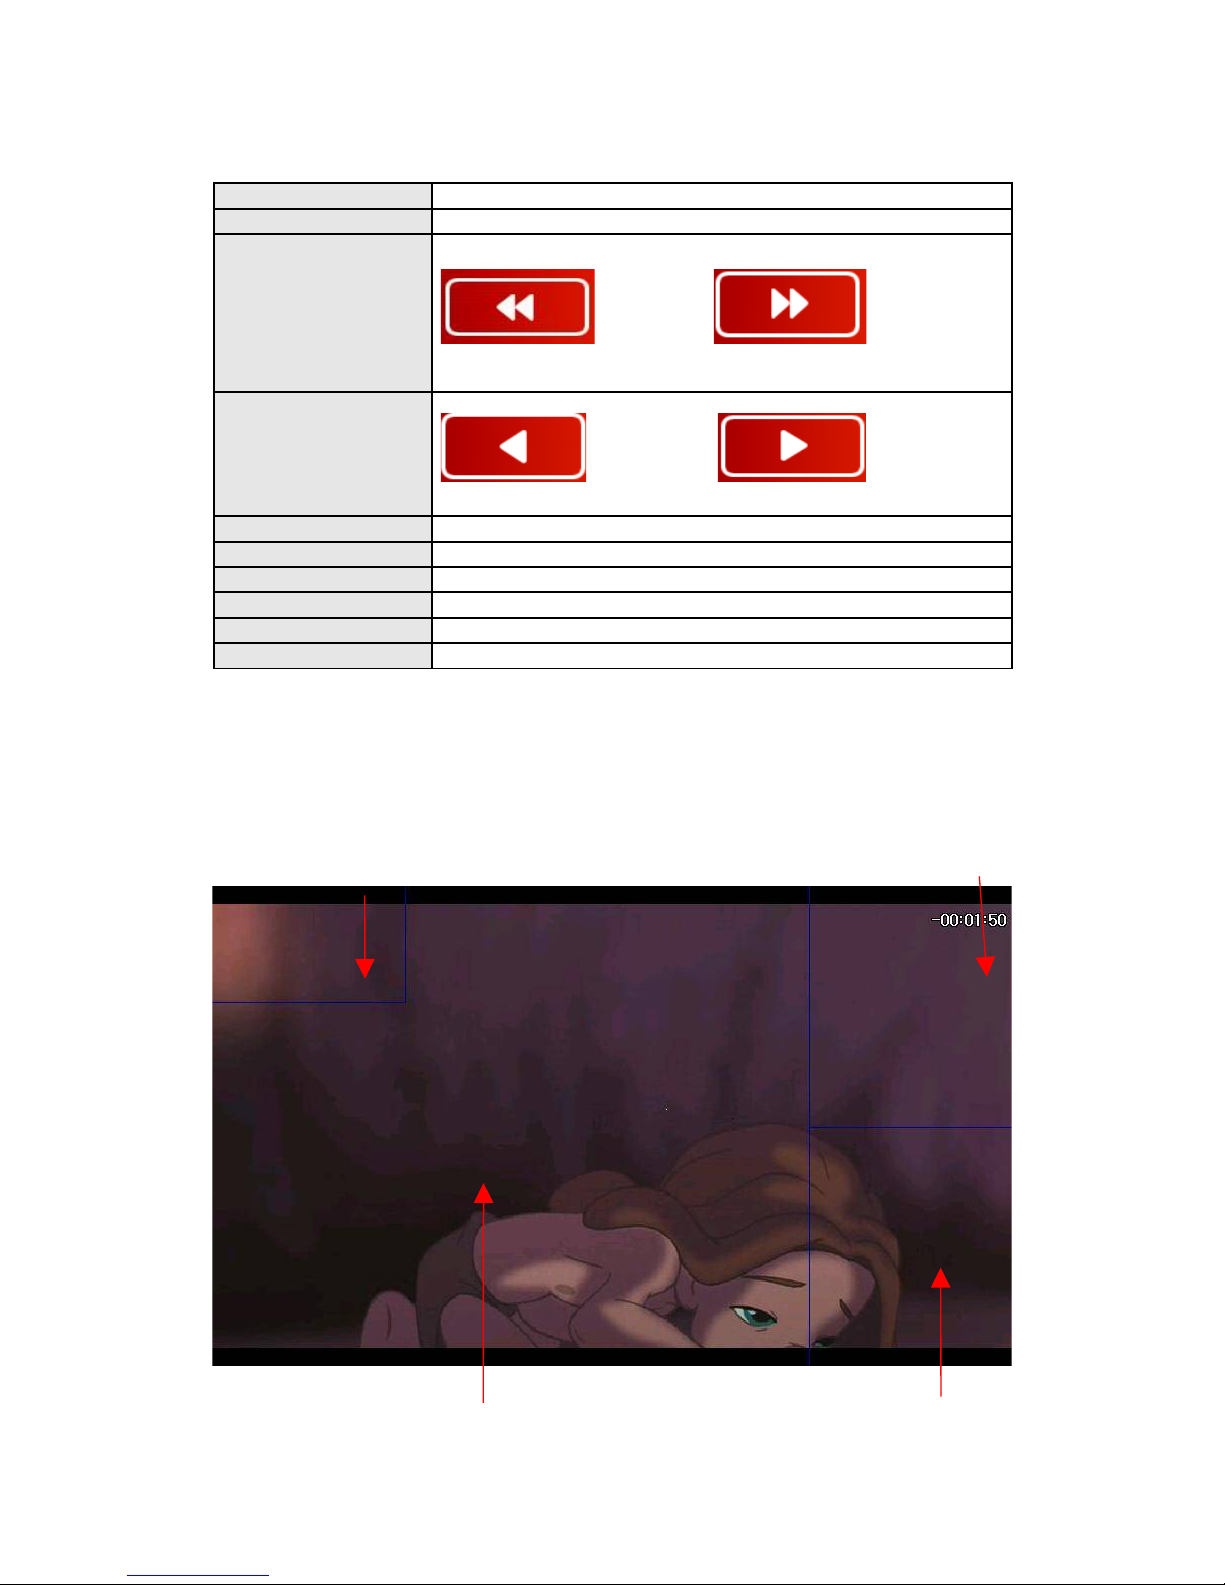
1. File List To select files or folders
2. File Scroll Bar To scroll files
3. Add/Remove Folder To add or remove all files in the selected folder to the play list
Remove all files in fold Add all files in folder
4. Add/Remove files To add or remove files selected to play list
File delete File add
5. Upper To move to upper folder
6. Mute To mute
7. Save To save the selected play list and move to main play screen.
8. Play Screen To move play screen
9. Scroll bar To scroll play list
10. Play List Shows play list
Full Screen
In full screen, there are unseen buttons as below.
Volume UP
Mute
Volume Down
Return to default screen
16
Page 17
3. Available File Formats
Available
Formats
Video Files (AVI,MP4,M4A)
MPEG Movie Files (MPEG,MPG,MPV,DTA)
MPEG Audio Files(MP1,MP2)
Ogg Vorbis Files (OGG, OGM)
* Note
Because of codec license issue and limited function of this product, some files can not
play.
4. How to get the best from the Movie Player
In case of files using codec (avi, mpg, etc) we recommend you to convert the movie
files into their optimal format as below.
Video conversion
1. Resolution : 640x480
2. Frame per second : 15-20 fps
3. Bit rate : 150 Kbps, (250 kbps for fast moving pictures)
Audio conversion
1. Bit rate : 64kbps
2. Sampling rate : 44KHz
3. Mode : stereo
5. To Close
Press close button or MENU key in front panel to close and go back to main menu.
Using Text Viewer
1 Starting
Execute this by pressing Text Viewer icon on the launcher.
17
Page 18
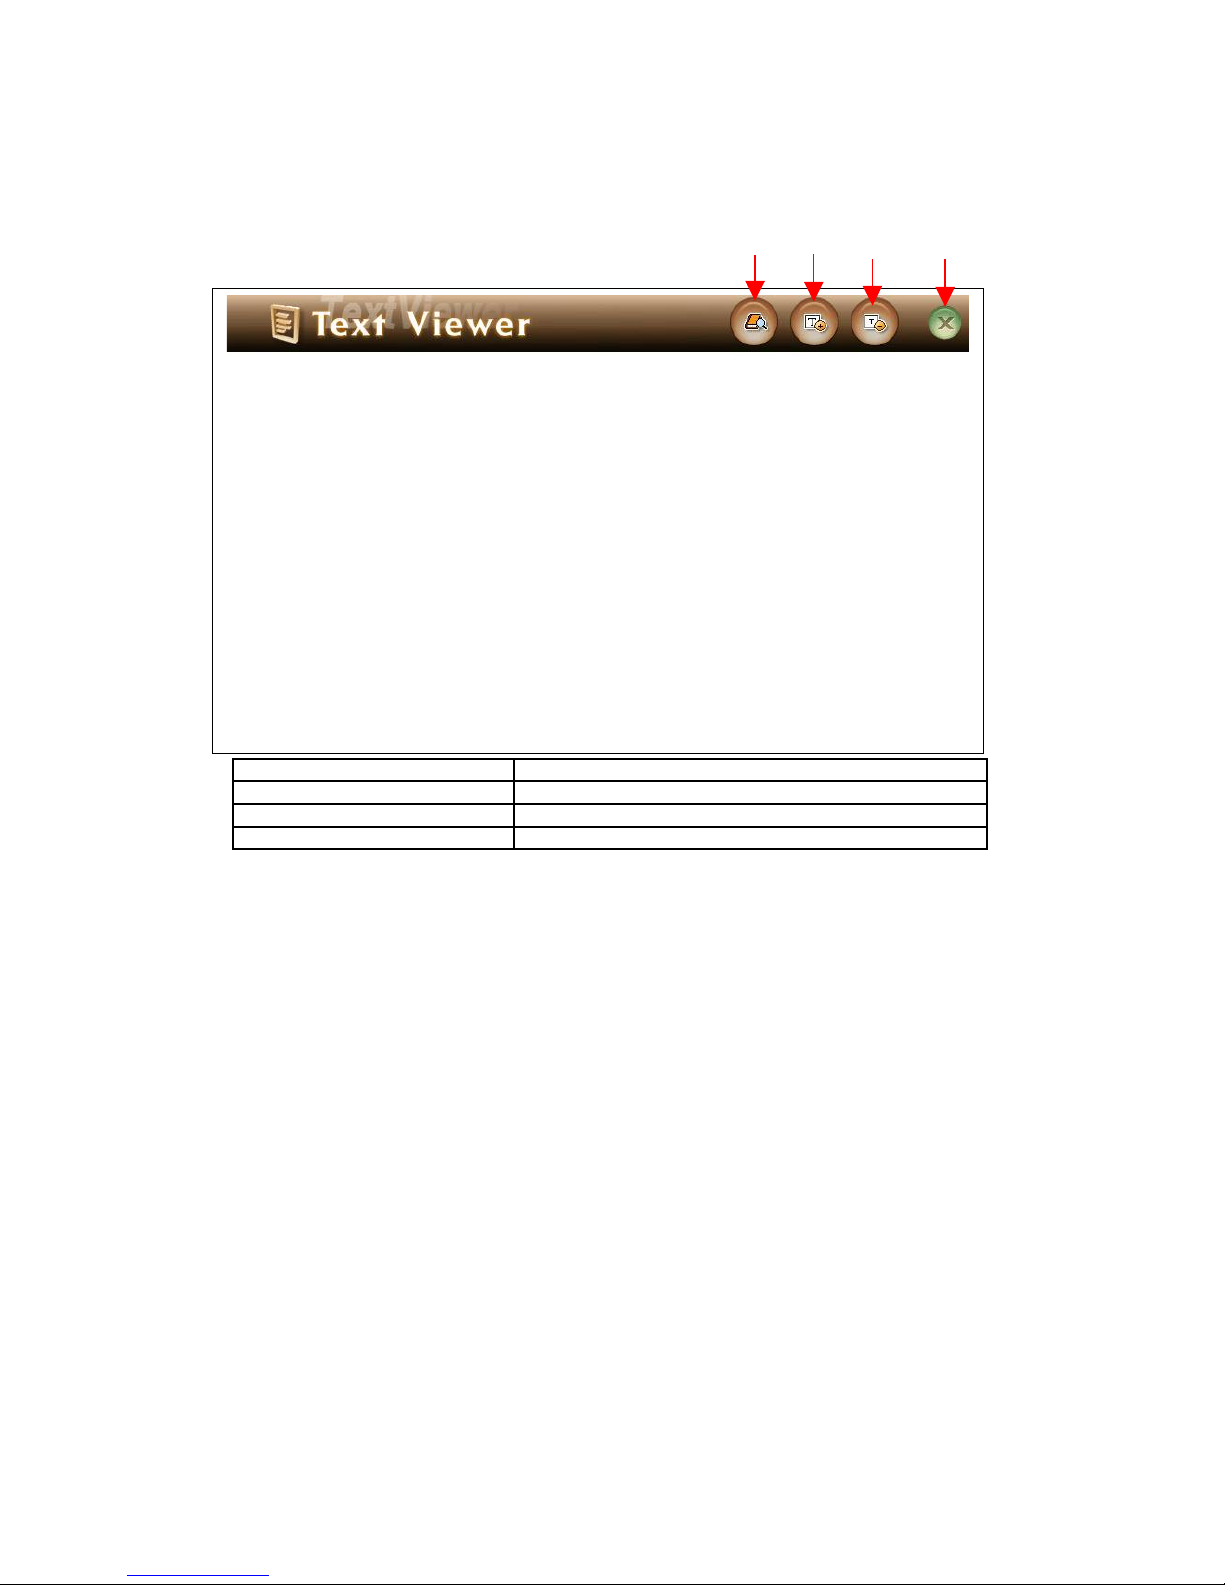
2 Configuration of Screen
1.Text viewer window To open text file
2.Zoom in To zoom in text
3.Zoom out To zoom out text
4.Close Return to main menu screen
Using Game
1 Starting
Click game icon in Additional function main menu. This game is Freechell.
2 Configuration of Screen
② ④③①
18
Page 19
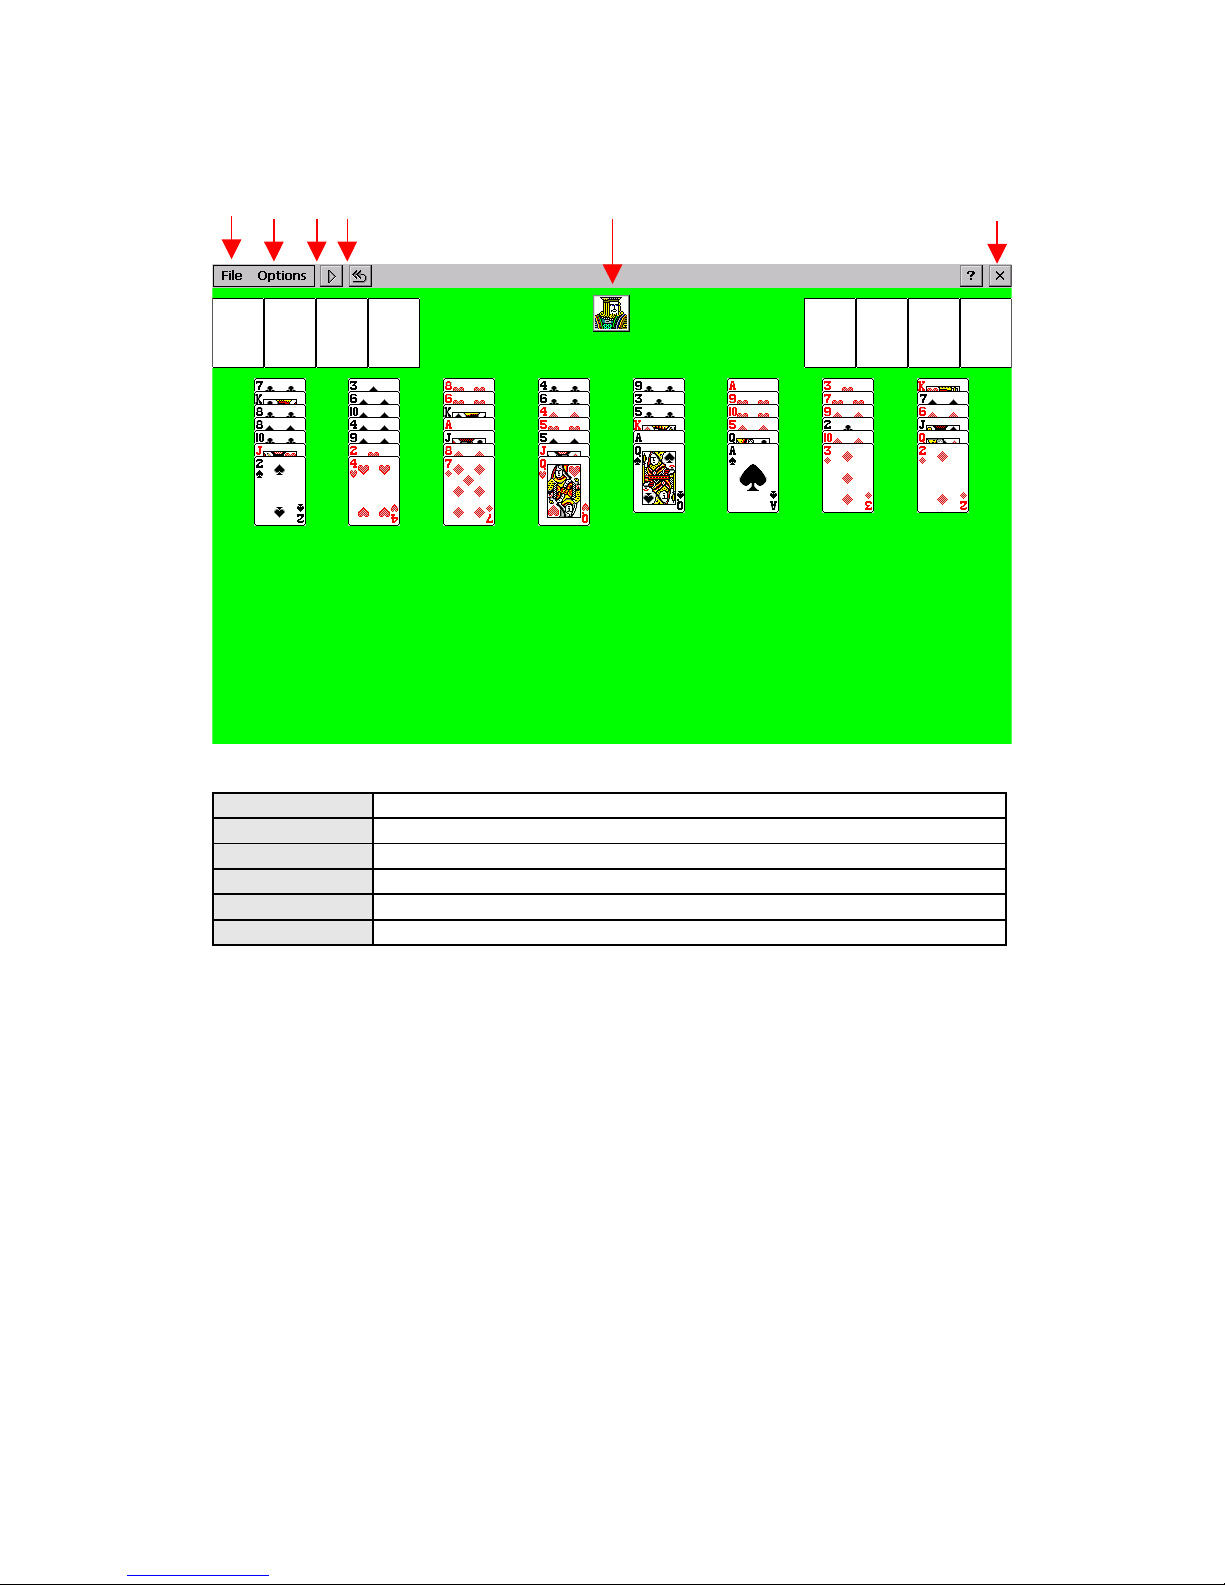
1. File New game, Game restart, Game history, Close menus are included
2. Option Select options for Menu Hide and Freechel Game
3. New game Icon for new game
4. Game start Icon to restart game
5. Menu hide Icon for menu hide
6. Close To close game and return to main menu
In order to move a card, select (touch) the card to move and touch the location to place.
3 Close
Click Close button on screen or Close in file in order to close the game and return to main
menu
①
② ③ ④
⑤
⑥
19
Page 20
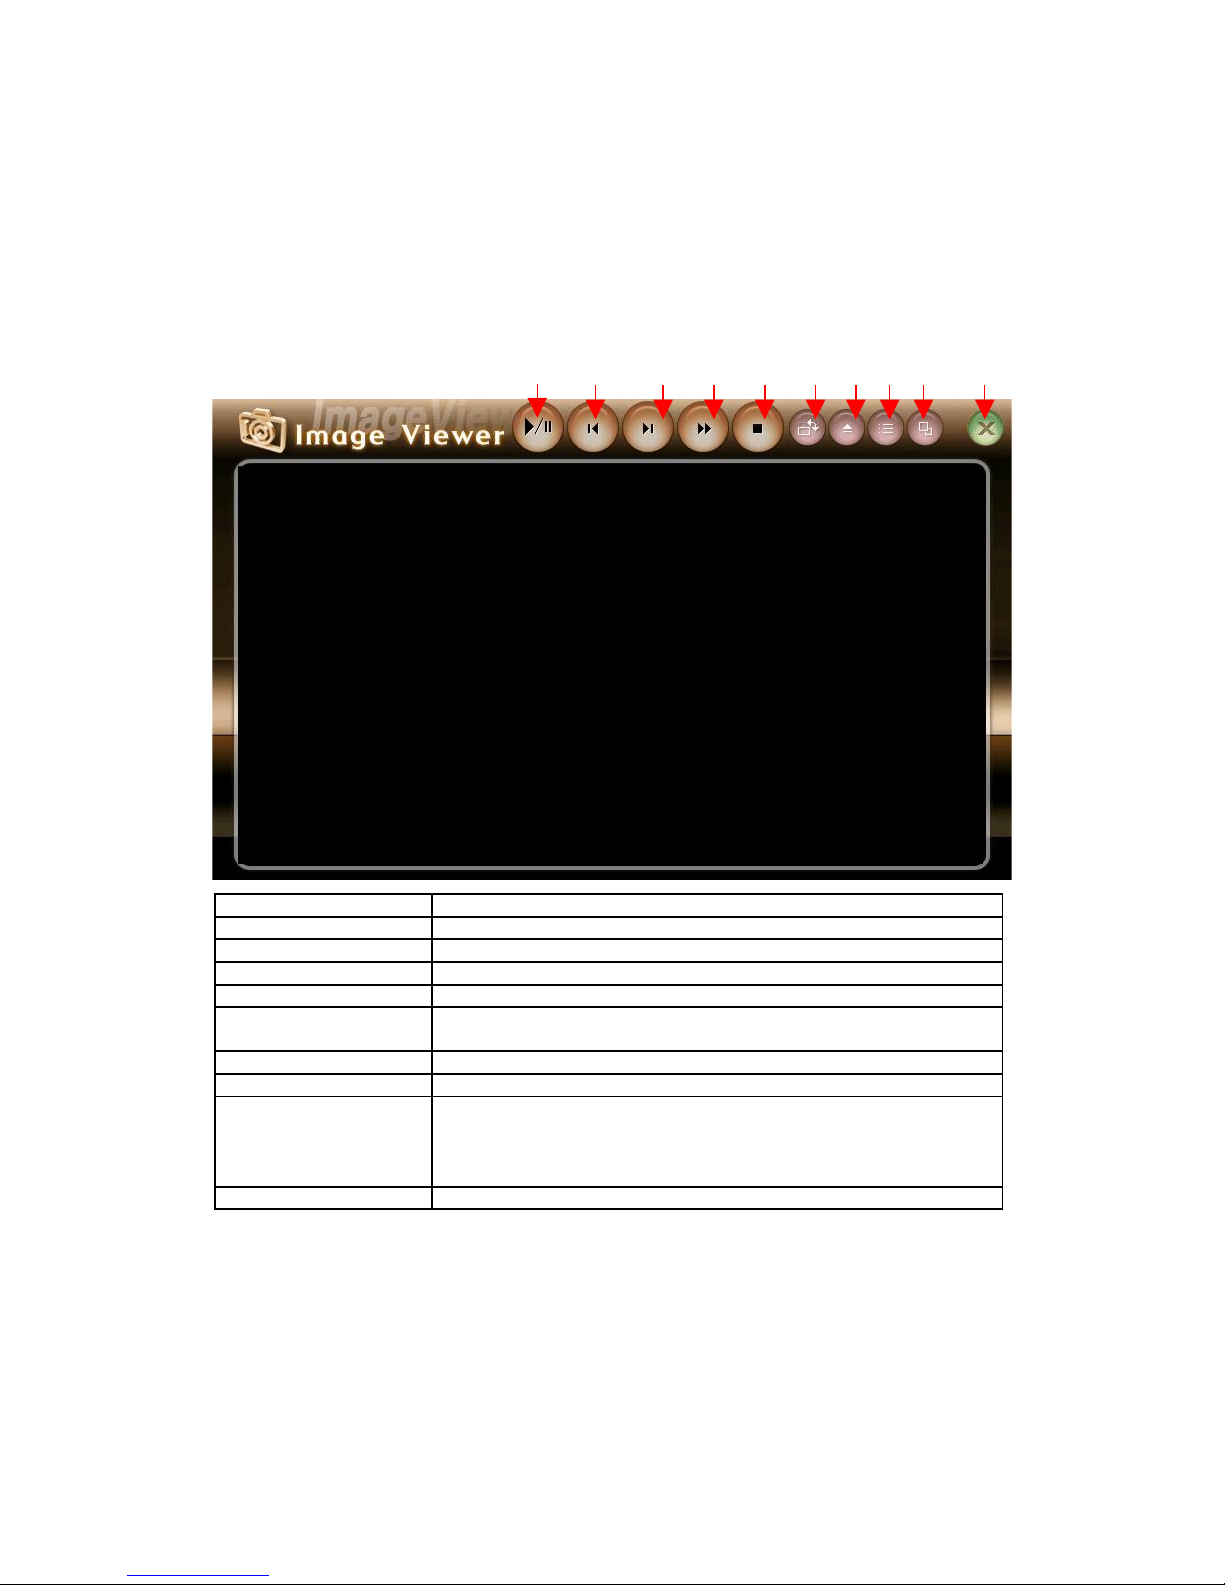
Using Image Viewer
1 Getting Started
Execute this function by pressing Image Viewer icon picture on the Main Menu screen.
2 Configuration of Screen
1 Play slide show To show images in the play list one by one.
2 Previous image To move to previous image in the list.
3 Next image To move to next image in the list.
4 Fast play To show images in the play list in 2x faster than Play speed.
5 Stop slide show To stop showing the images.
6 Rotate To rotate the image to 90° clockwise every time the button is
pressed.
7 Open To open an image in the memory card.
8 Play list To add and delete images for playing.
9 Full screen To see the image in full screen mode.
(When you touch the screen in full screen mode, it returns to
default screen)
10 Close To close the viewer and return to main menu.
Press Open button to select image files to play.
⑦
①
② ③ ④
⑤ ⑥
⑦
⑧ ⑨
⑩
20
Page 21
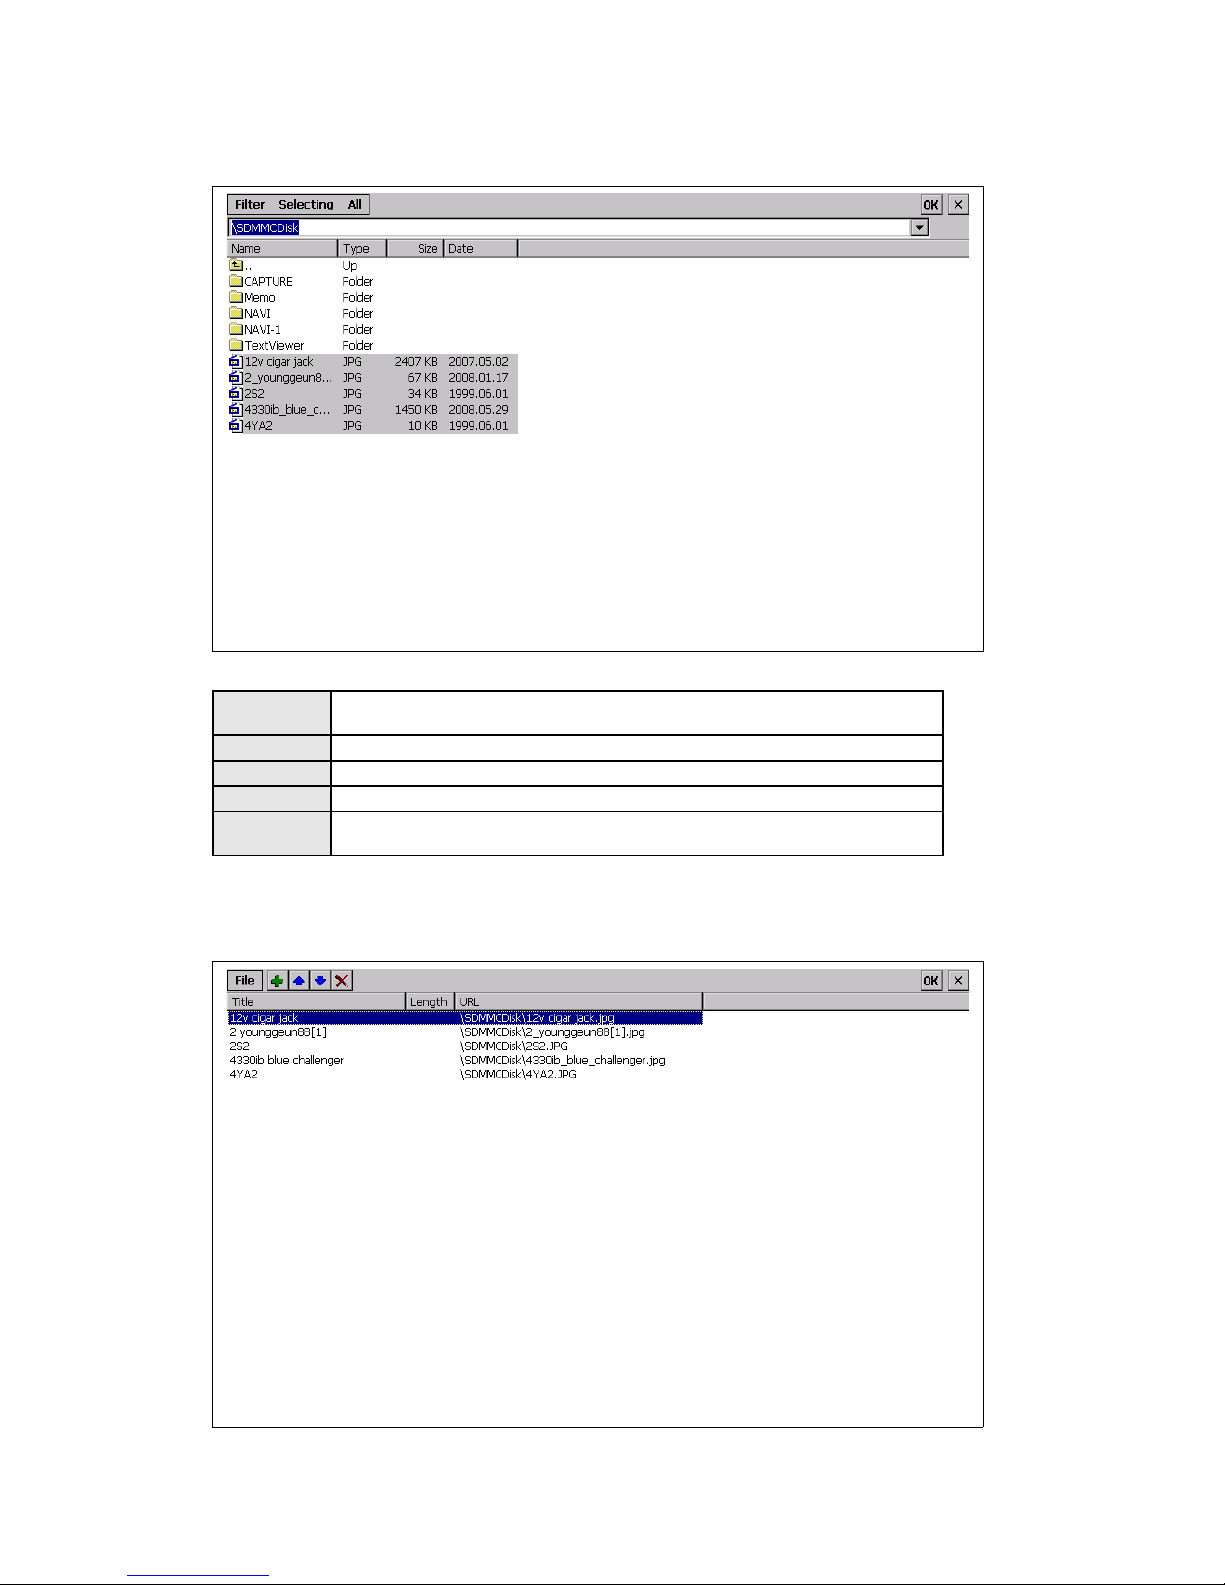
If you select ‘All’-OK, the slide show begins.
Filter You can set the filter for image files, TIFF, PNG, and JPEG.
Selecting “All files” is set as default.
Selecting If you press ‘Selecting’, you can choose multiple files.
All ‘All’ selects all the files listed.
OK Saves the selected file into the play list and starts to play.
X Closes the window and returns to initial screen of the Image
Viewer.
If you press Play List button from the initial screen, following window is launched.
21
Page 22
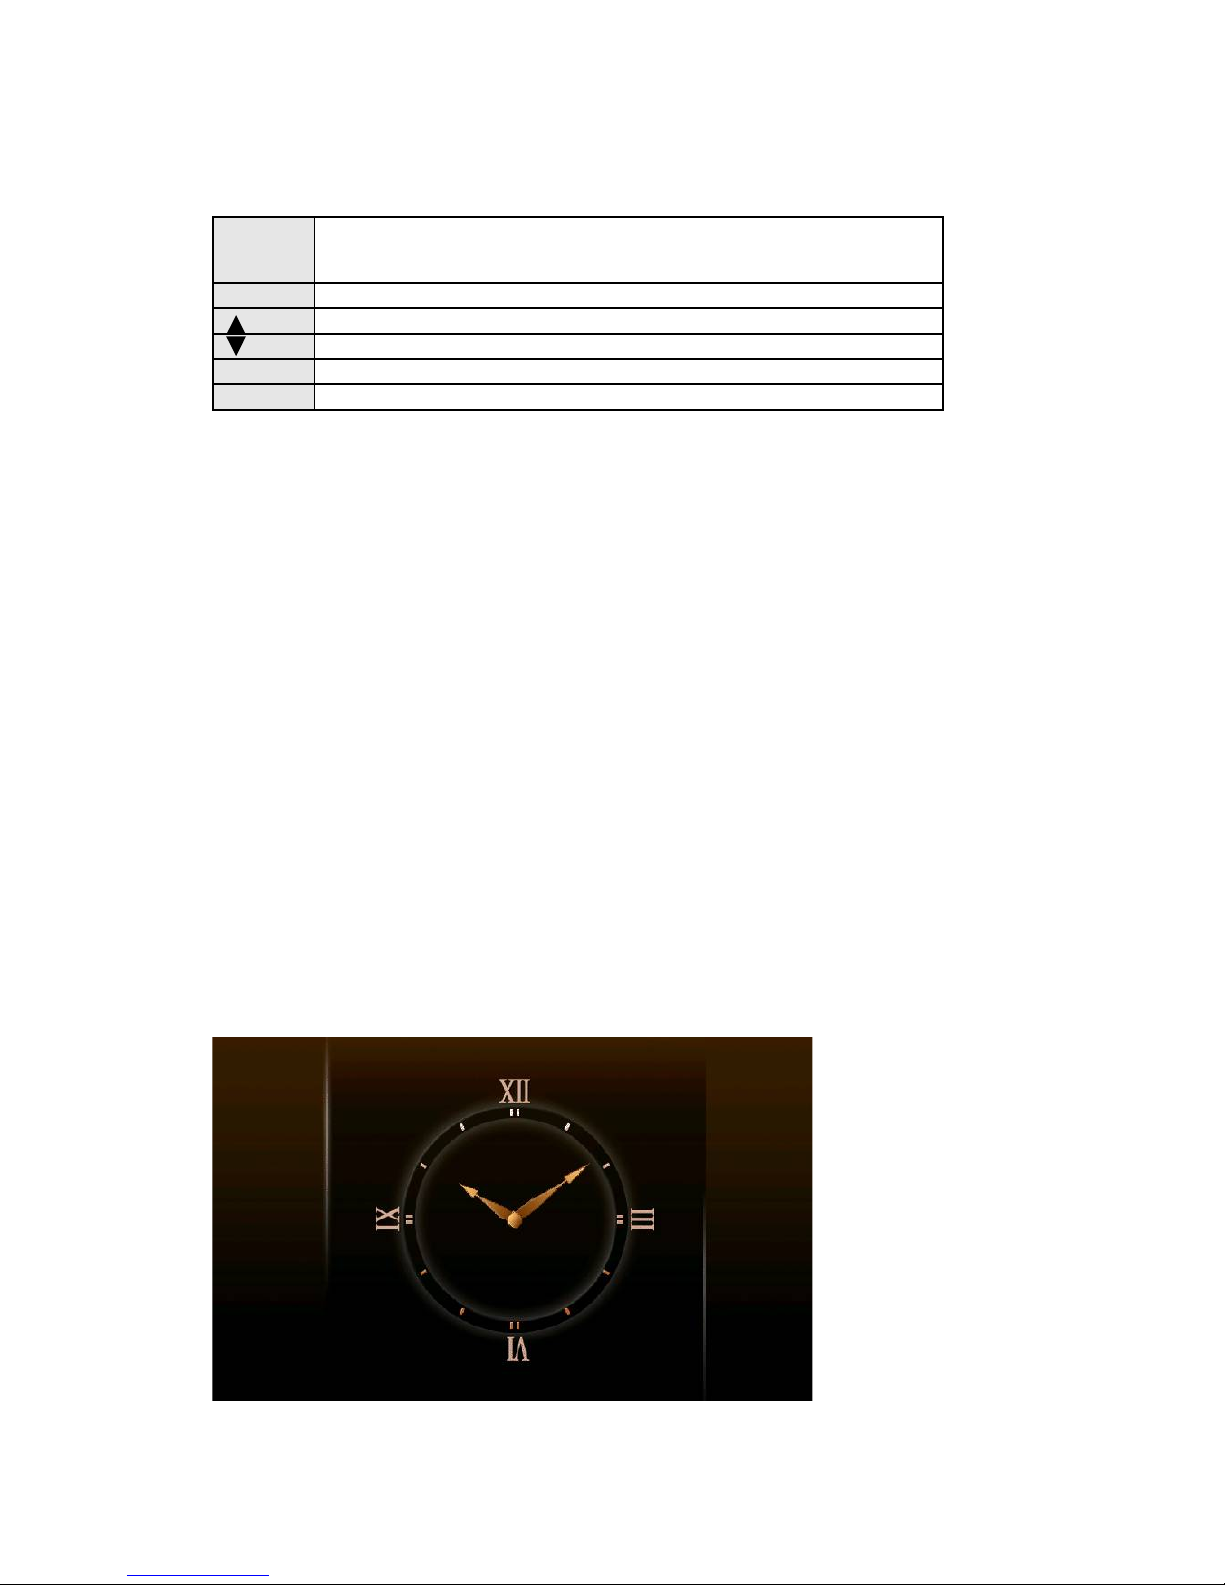
File Leads to pull-down menu which includes followings: (Add
Files…/Play/Delete/Delete All/Sort by Name/Up/Down/Load
Playlist…/Save Playlist
+ Adds file to the play list.
Moves to the previous file.
Moves to the next file.
OK Starts to play the selected file.
X Closes the window and returns to the initial screen.
3 File Format / Codec
The Image Viewer can decode JPG, TIF, and PNG format.
If you have files in other formats, please convert them into one of above formats and try.
4. To Open Image Files
Press open button(number 7) and select SDMMCDisk folder to see the images in the
memory card. You can use any card reader or USB cable to copy the image to the card.
5. To Close
Press close button or MENU key in front panel to close and get back to main menu.
Using Clock
1 Getting Started
Execute this by pressing Clock icon on the Main Menu.
2 Configuration of Screen
The current date and time are displayed on the entire screen.
22
Page 23
Using Rear Camera
1. Getting Started
Connect the rear camera cable between your Rear Camera and AV-In 1 jack.
To execute rear camera, press R-CAM icon on the launcher screen. Or if you set rear
gear it executes rear camera automatically.
*Note: A rear camera cable is supplied in separate sales and only below described pin type jack
can be supported
AV In 1 Connector assignment
2. To close
Press screen or MENU key in front panel to close and get back to main menu.
Note : To connect and set a rear camera in the car, refer to the rear camera user manual or ask
to a local service technician in a Auto service shop.
Using AV-In
1. Getting Started
Connect the AV cable bundled between AV device and AV-In 2 jack.
Execute this function by pressing AV-IN icon on the launcher screen to see AV screen
from the AV device
*Note: Only below described pin type jack can be supported
Vi deo
GN D
Rear Gear Sensor
23
Page 24
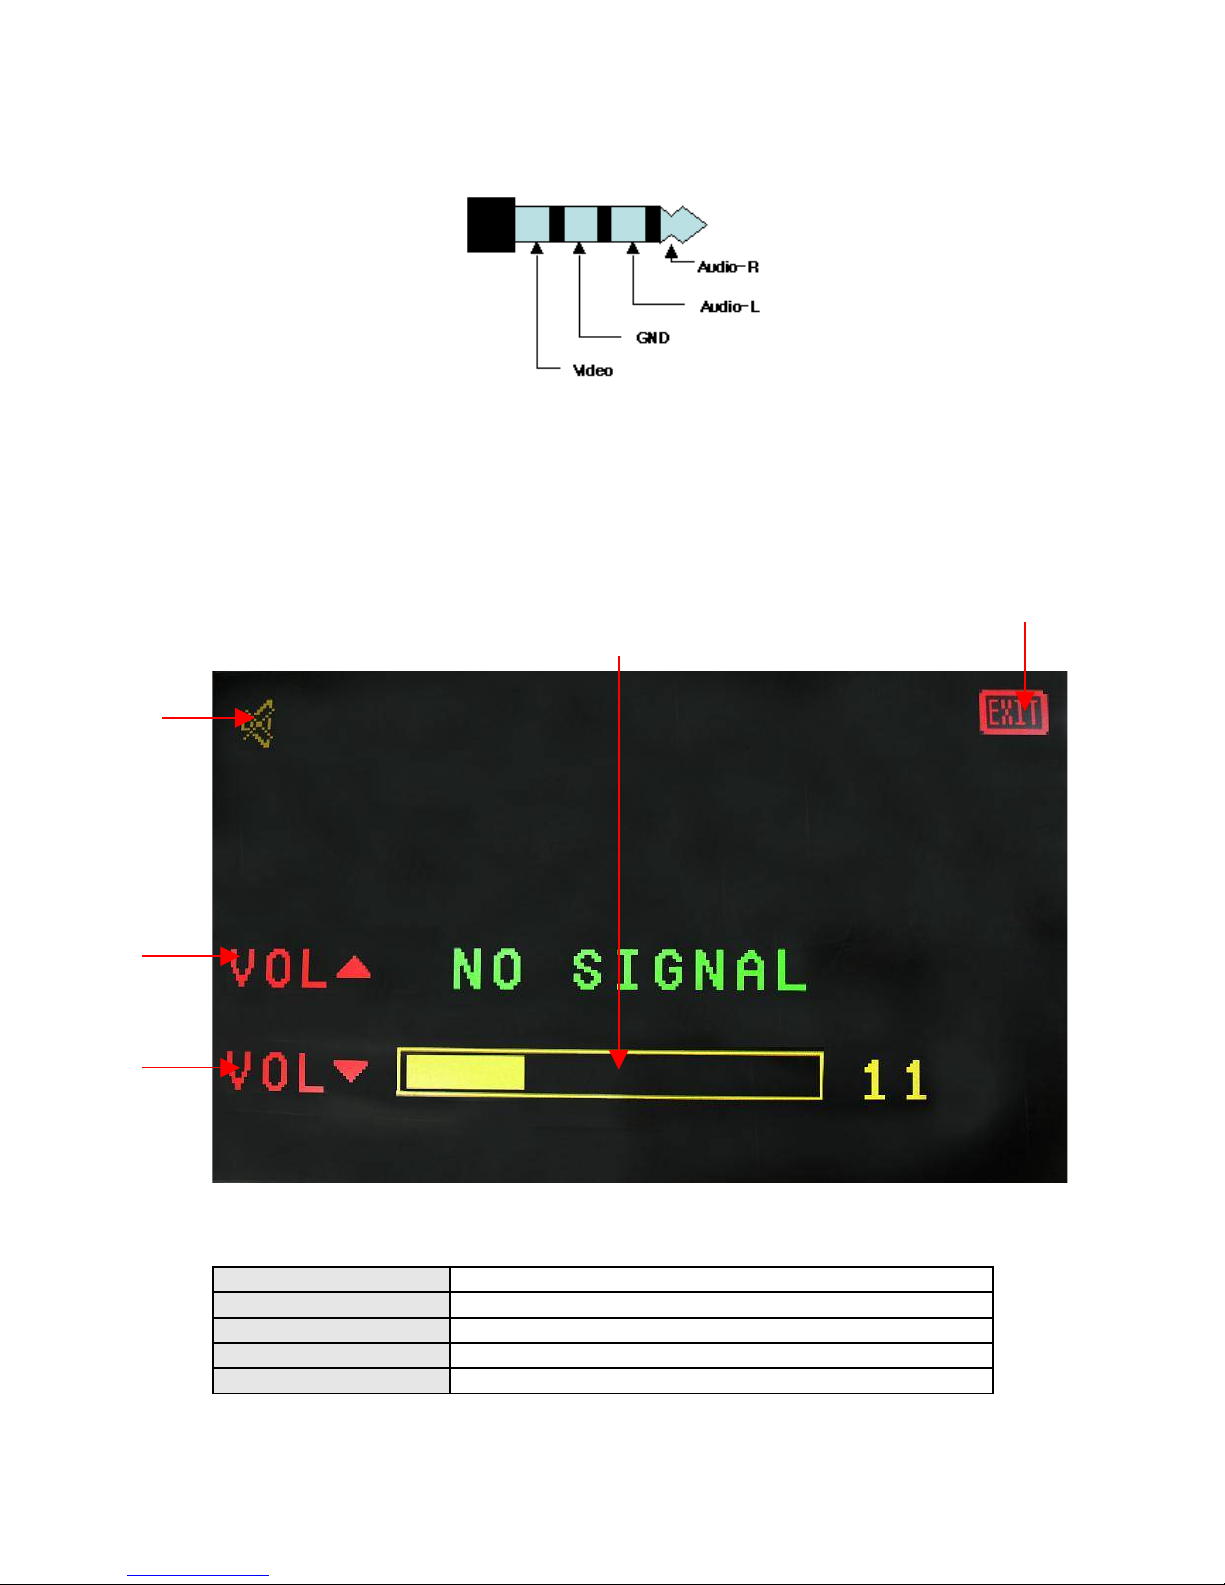
AV Connector assignment
2. Configuration of Screen
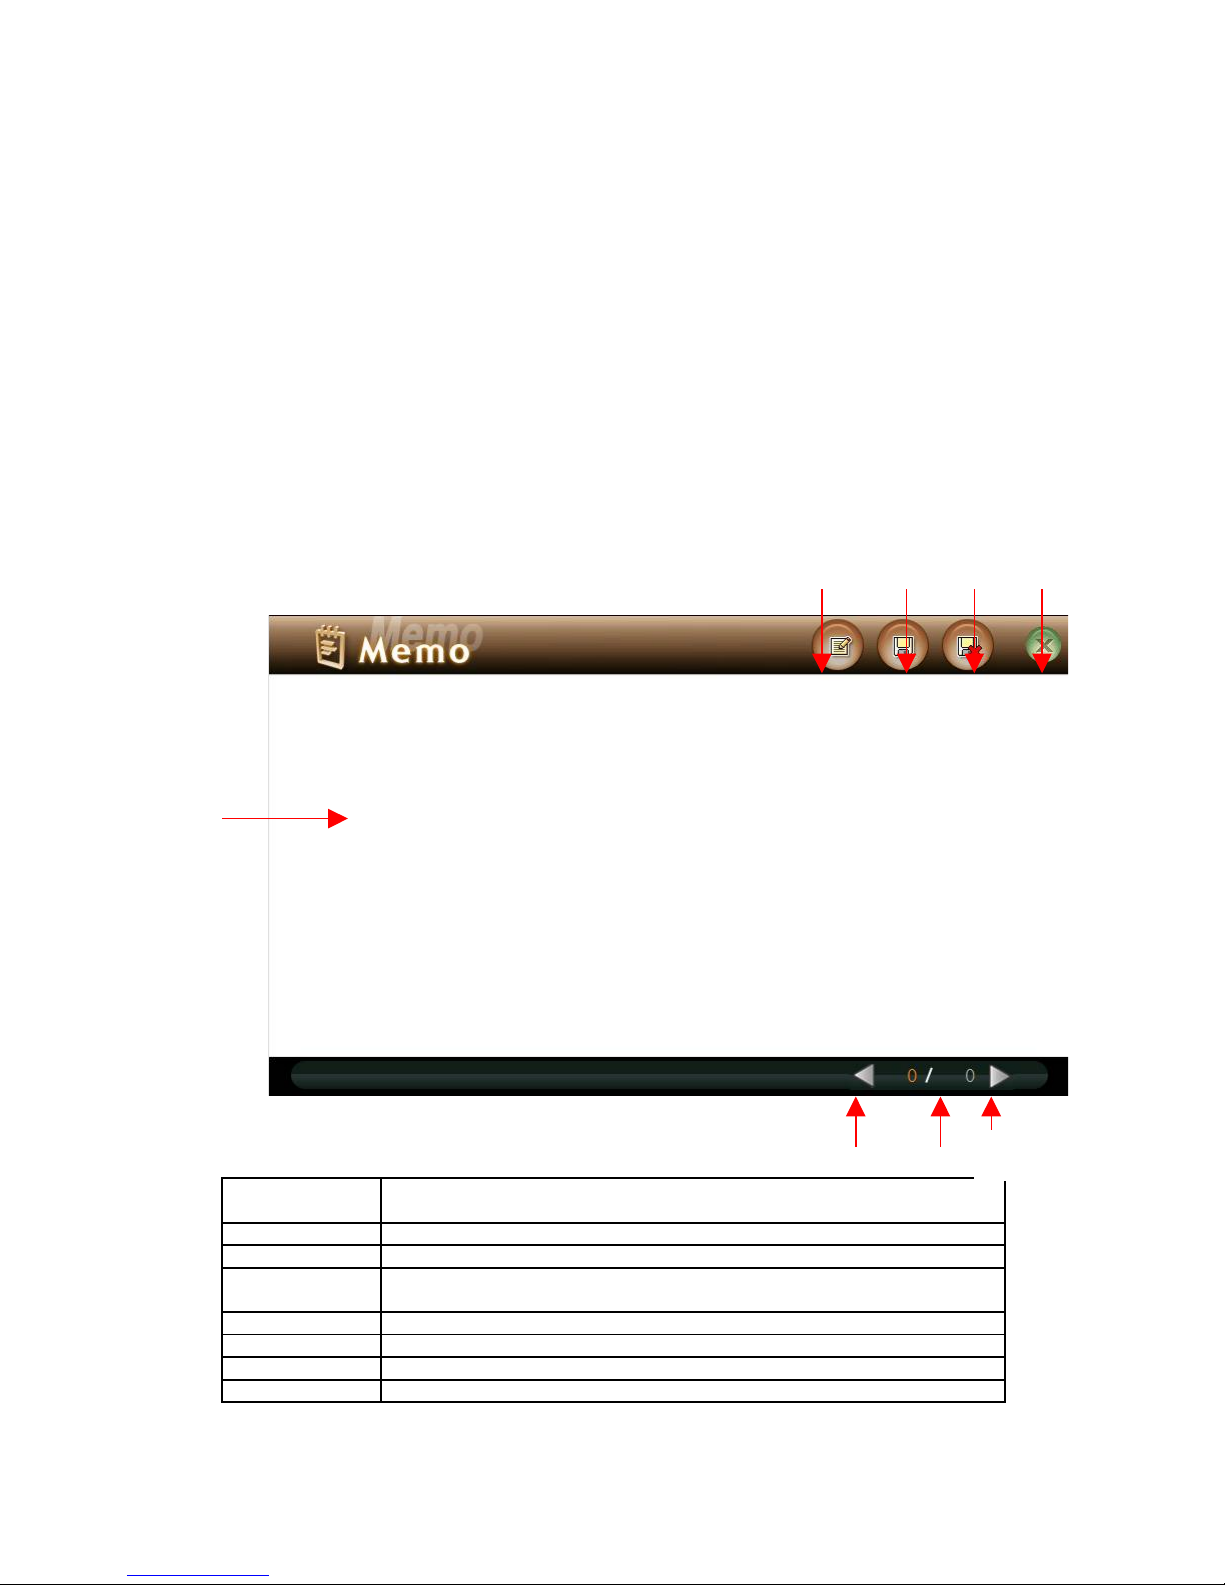
You can see the video screen and sound supplied from to AV-IN 2 jack. If you touch
the screen, current set volume, volume button, close button as shown below are
displayed. These buttons are disappeared after 3 seconds
1 Mute To mute sound
2 Volume UP To increase up volume
3 Volume DOWN To decrease down volume
4 Volume level bar Show AV-IN volume level
5 EXIT To close AV-IN and return to main menu
①
②
③
④
⑤
24
Page 25
3. Close
If you press Menu key on front panel or Exit button after touch the screen, it
returns to main menu.
Using Memo
1 Starting
Execute this by pressing Image Viewer icon on the launcher.
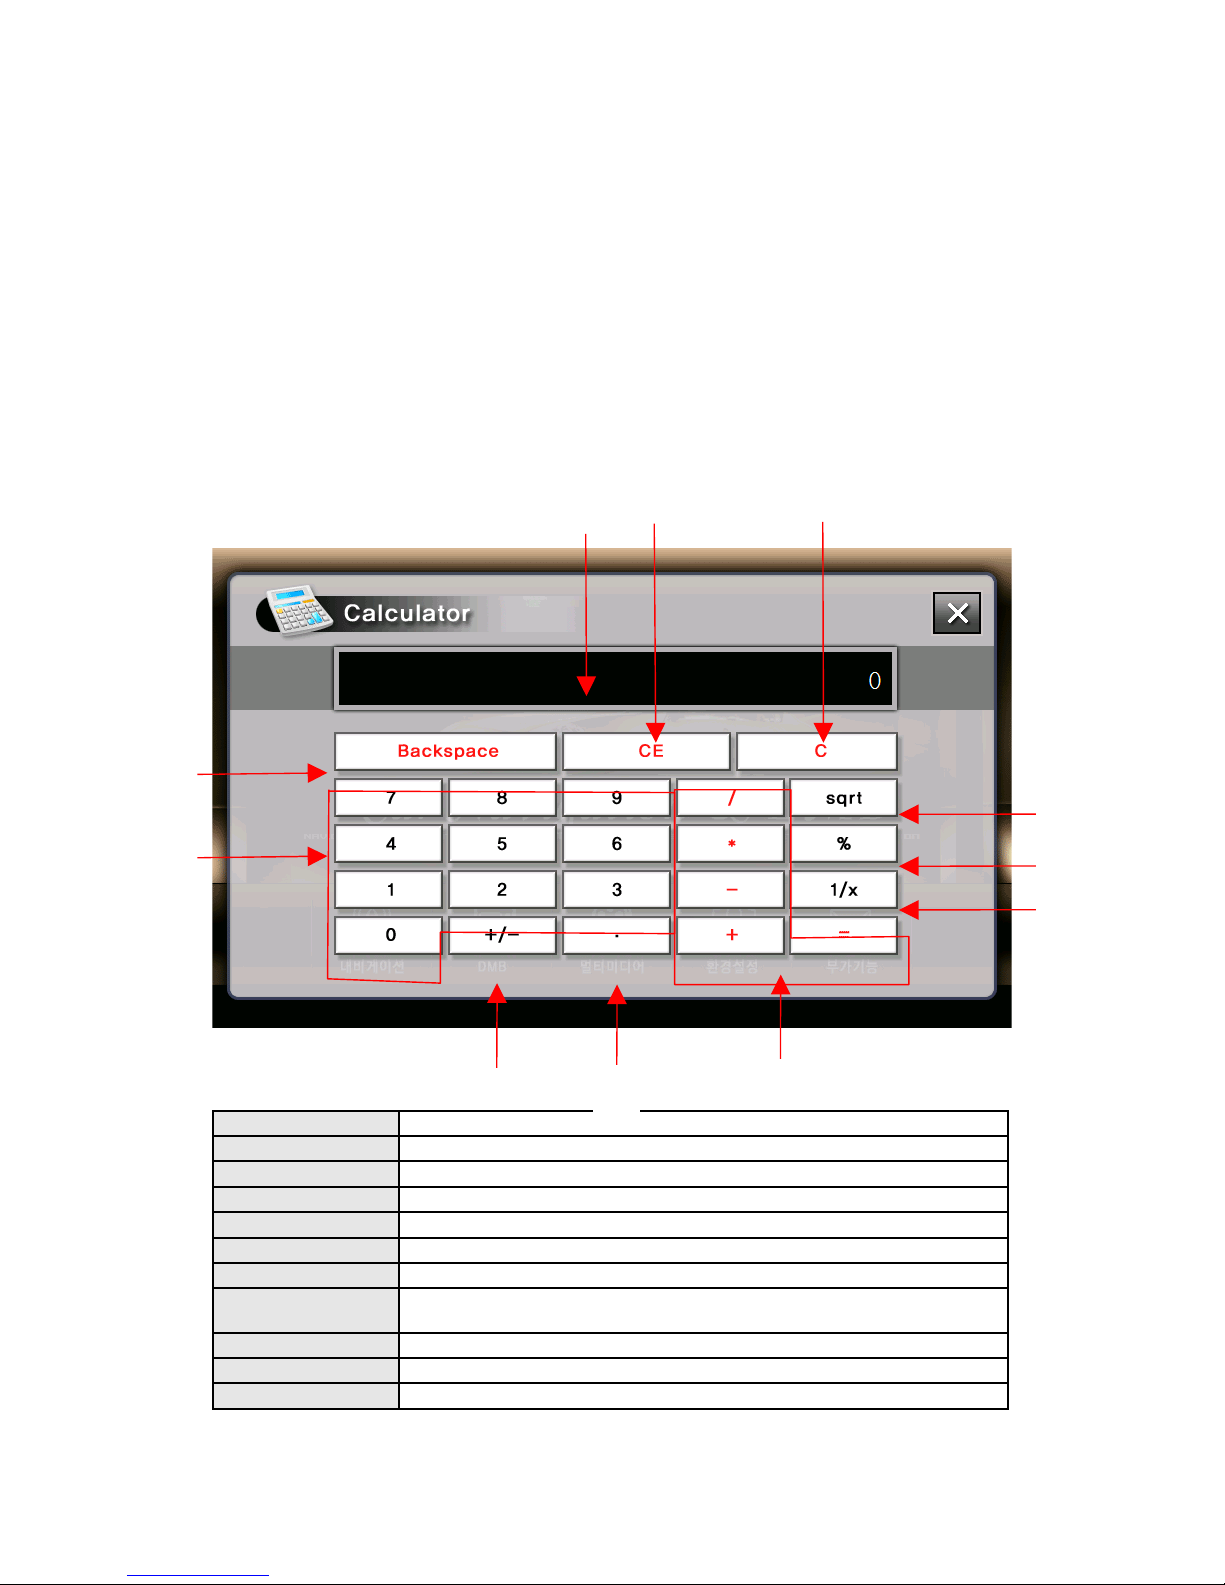
2 Configuration of Screen
1.Memo
window
Where you write down a memo
2.New Opens new memo
3.Save Saves the currently opened file
4.Delete Erases the currently opened file. If the memo is not stored, the
current memo will be deleted.
5.Previous Move to previous memo
6.Total Memo Shows total number of stored memos
7.Next Move to next memo
8.Close Return to main menu screen
①
② ④
⑤ ⑥⑧③⑦
25
Page 26
3. Memo Storing
Memo is stored in Memo folder in SD memory card
Using Calculator
1 Starting
Execute this by pressing Calculator icon on menu.
2 Configuration of screen
1. Screen Shows figure and calculation result
2. Figure input To input figure
3. Backspace To delete last figure input
4. CE To delete whole figure in put
5. C To delete calculated figure
6. +/- To change “+”,”-“ for the figure input
7. Decimal point To input decimal point
8. Four rules of
arithmetic
To use four rules of arithmetic
9. Reciprocal To calculate reciprocal for the figure input
10. Percent To show the result in percent
11. Square root To calculate square root for the figure input
②
③
⑪
⑩
⑨
⑧
⑦
⑥
④ ⑤①
26
Page 27
Using Configuration
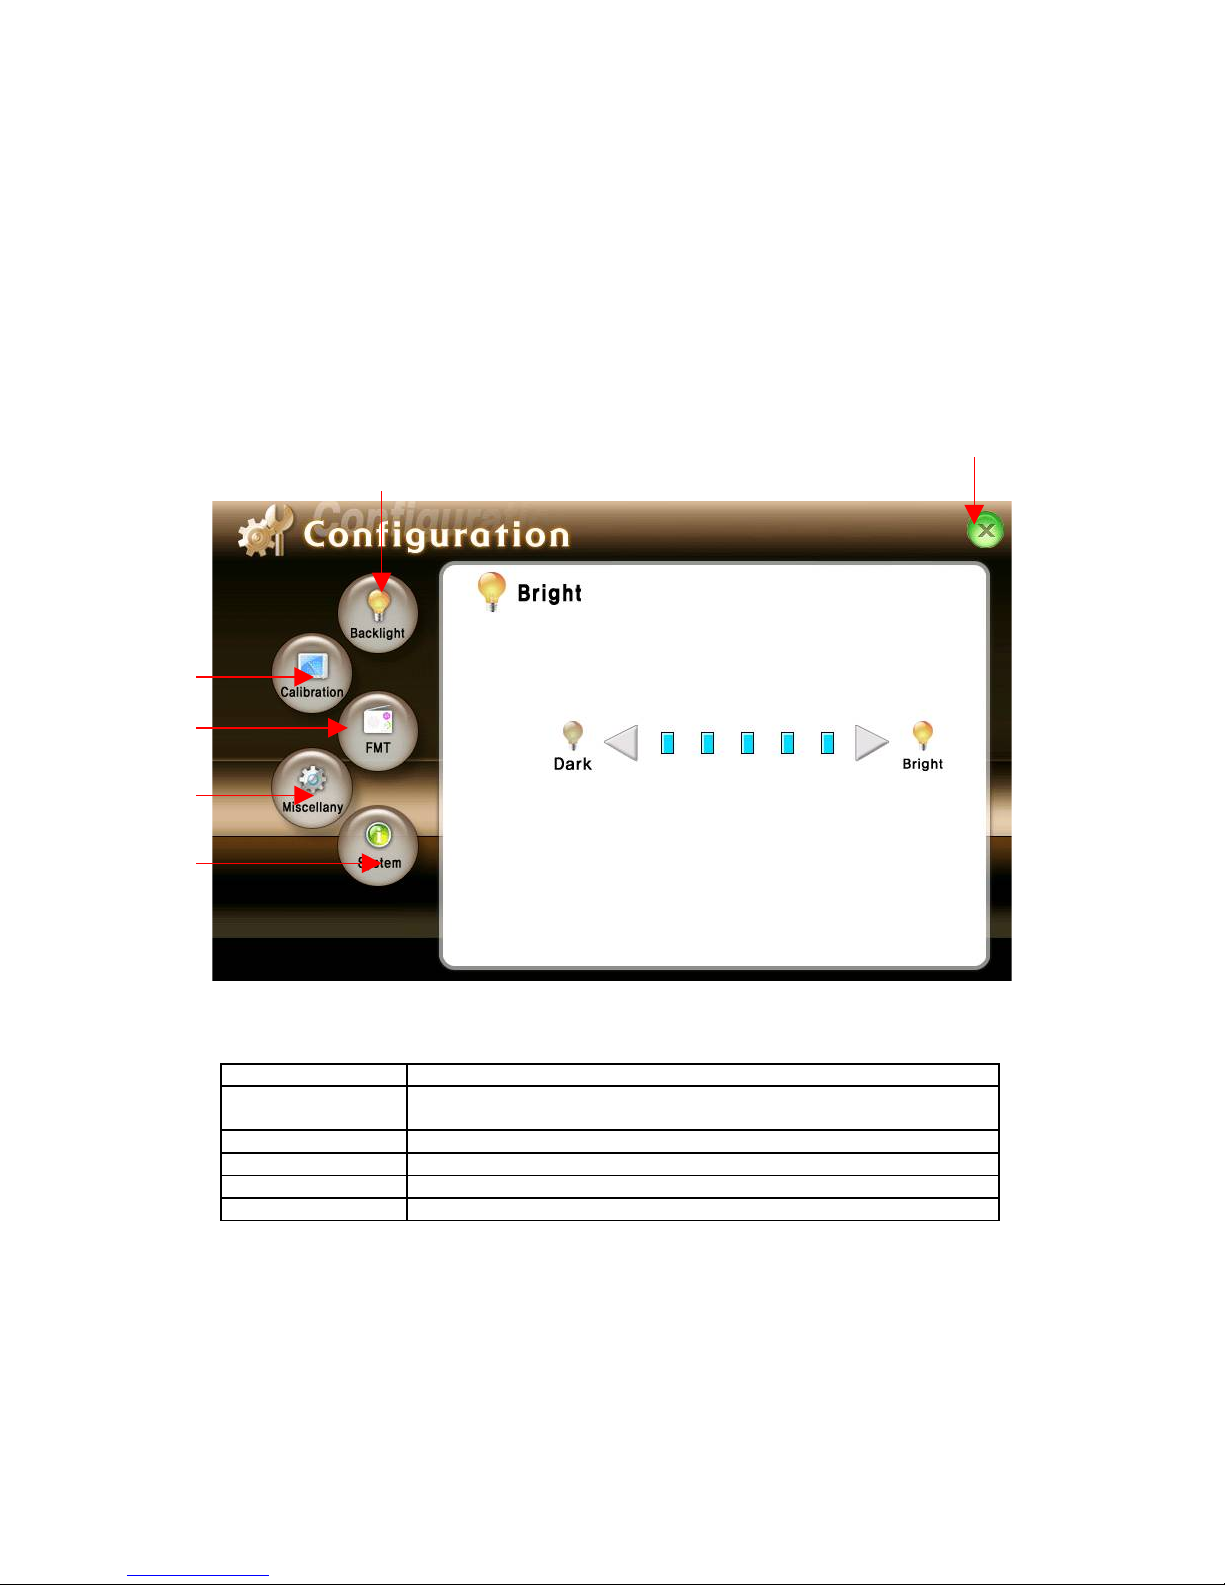
This consists of 6icons. This can be operated by touching screen.
1 Getting Started
1.Brightness An icon to call Back Light control function.
2.Calibration If touch screen malfunctions, it can be calibrated so that
position may be well suited.
3.FMT To turn on / off FMT and select a required frequency.
4.Misc. Other Miscellaneous settings
5.System Shows system information
6.Close To go to main menu screen
①
②
③
④
⑤
⑥
27
Page 28
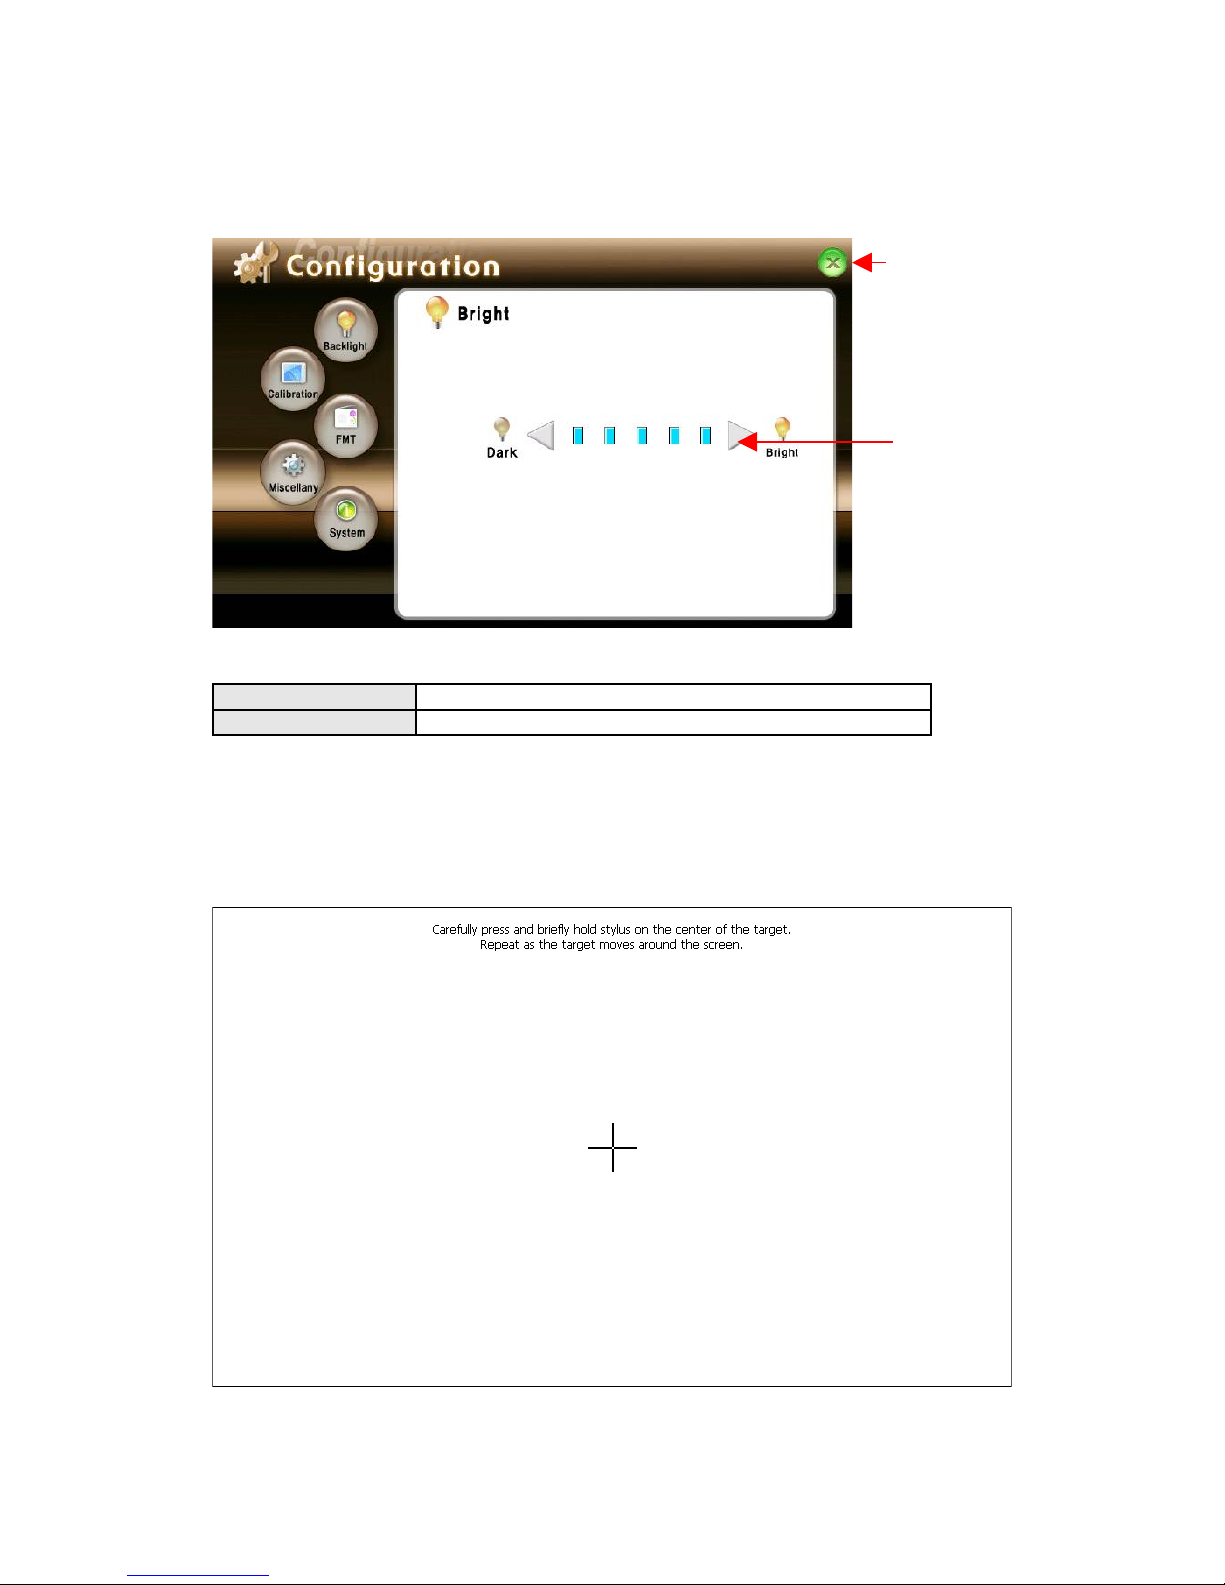
2. How to Regulate LCD Brightness
1.Backlight Control To control backlight of display
2.Close To return to configuration menu.
3. Calibration
If you feel the touch panel position is not accurate, you can calibrate the touch panel
position with this menu.
①
②
28
Page 29
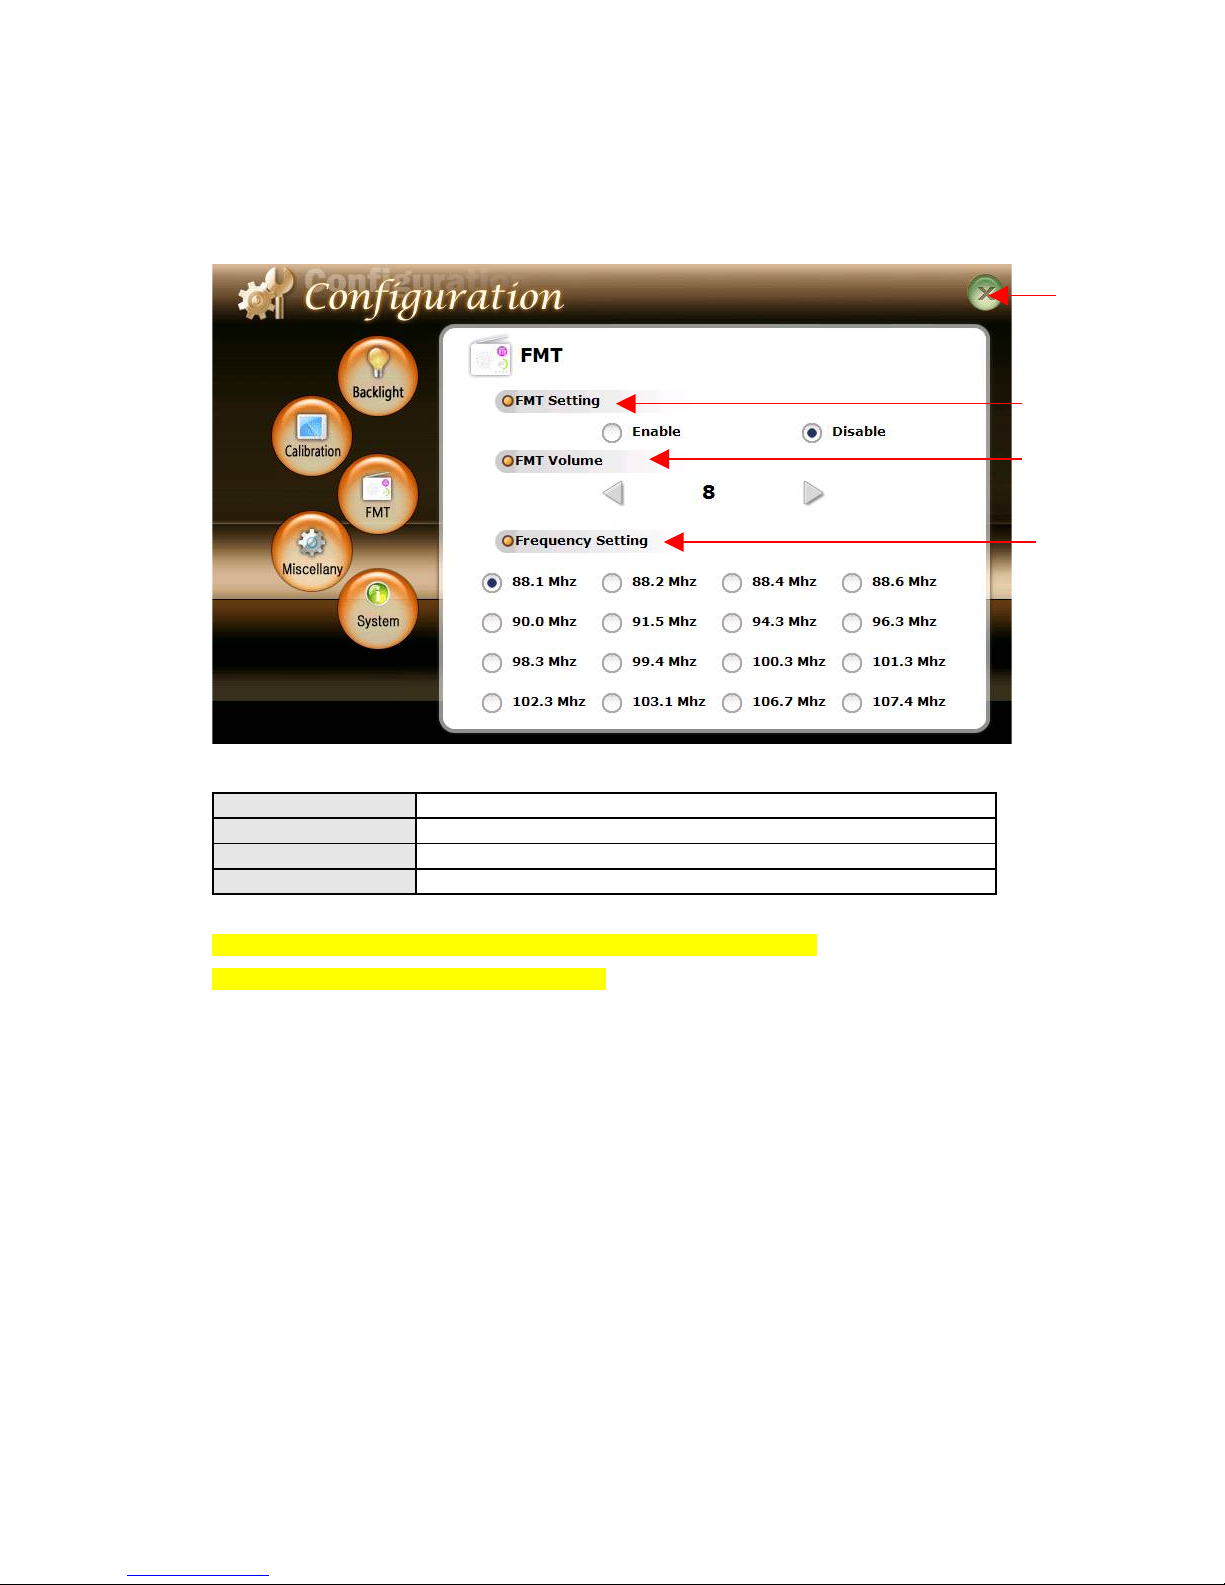
4. FMT setting
1 FMT ON/OFF To turn on and off FMT
2 FMT volume To control FMT volume
3 FMT Frequency To select a required FMT frequency.
4 Close To return to configuration menu.
*. Best fitted frequency could be different depending on type of car.
Choose a frequency best fitted to your car.
5 Miscellany
①
②
③
④
29
Page 30
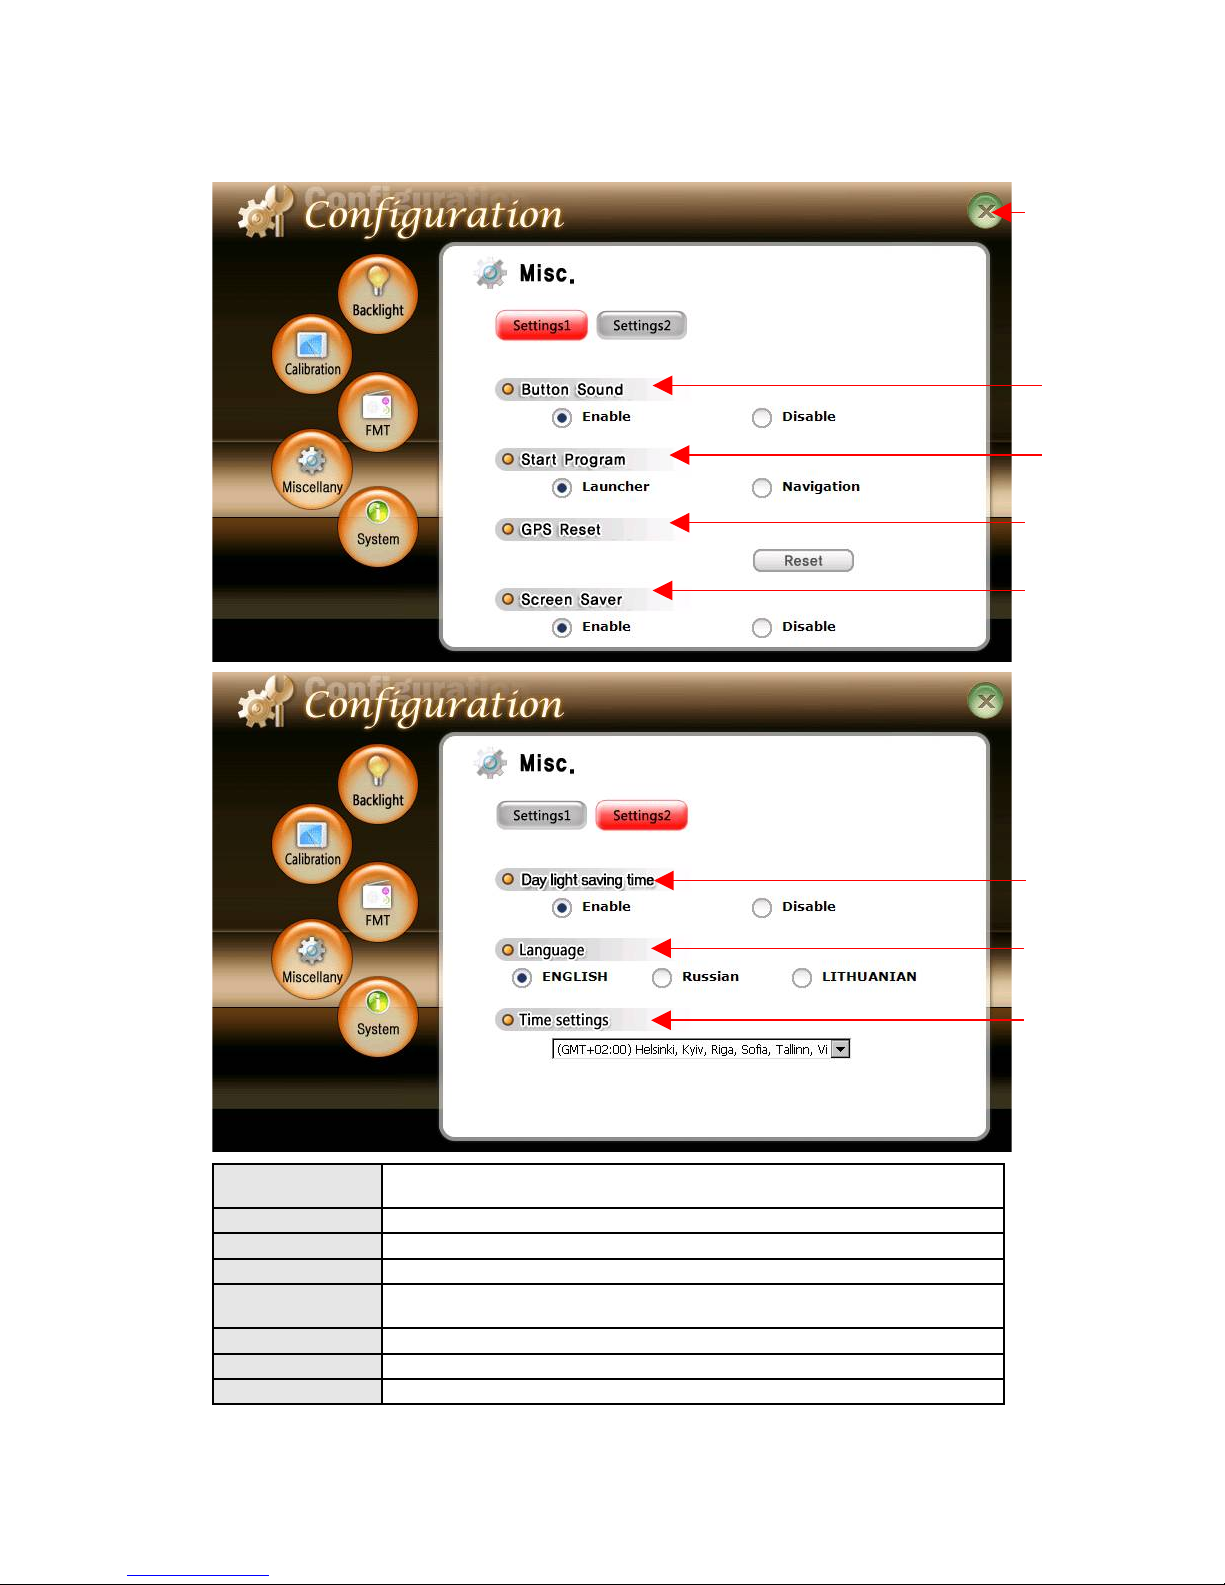
1.Button Sound If you check the check box, you can listen to button sound when
touching buttons.
2.Start program To select a start program or launcher screen
3.GPS reset Reset GPS in case GPS function have a problem.
4.Screen saver To set screen saver.
5.Day light
saving Time
To select Day light saving time
6.Language To select menu language
7.Time setting To select your time zone.
8.Close To return to configuration menu.
①
②
③
④
⑤
⑥
⑧
⑦
30
Page 31
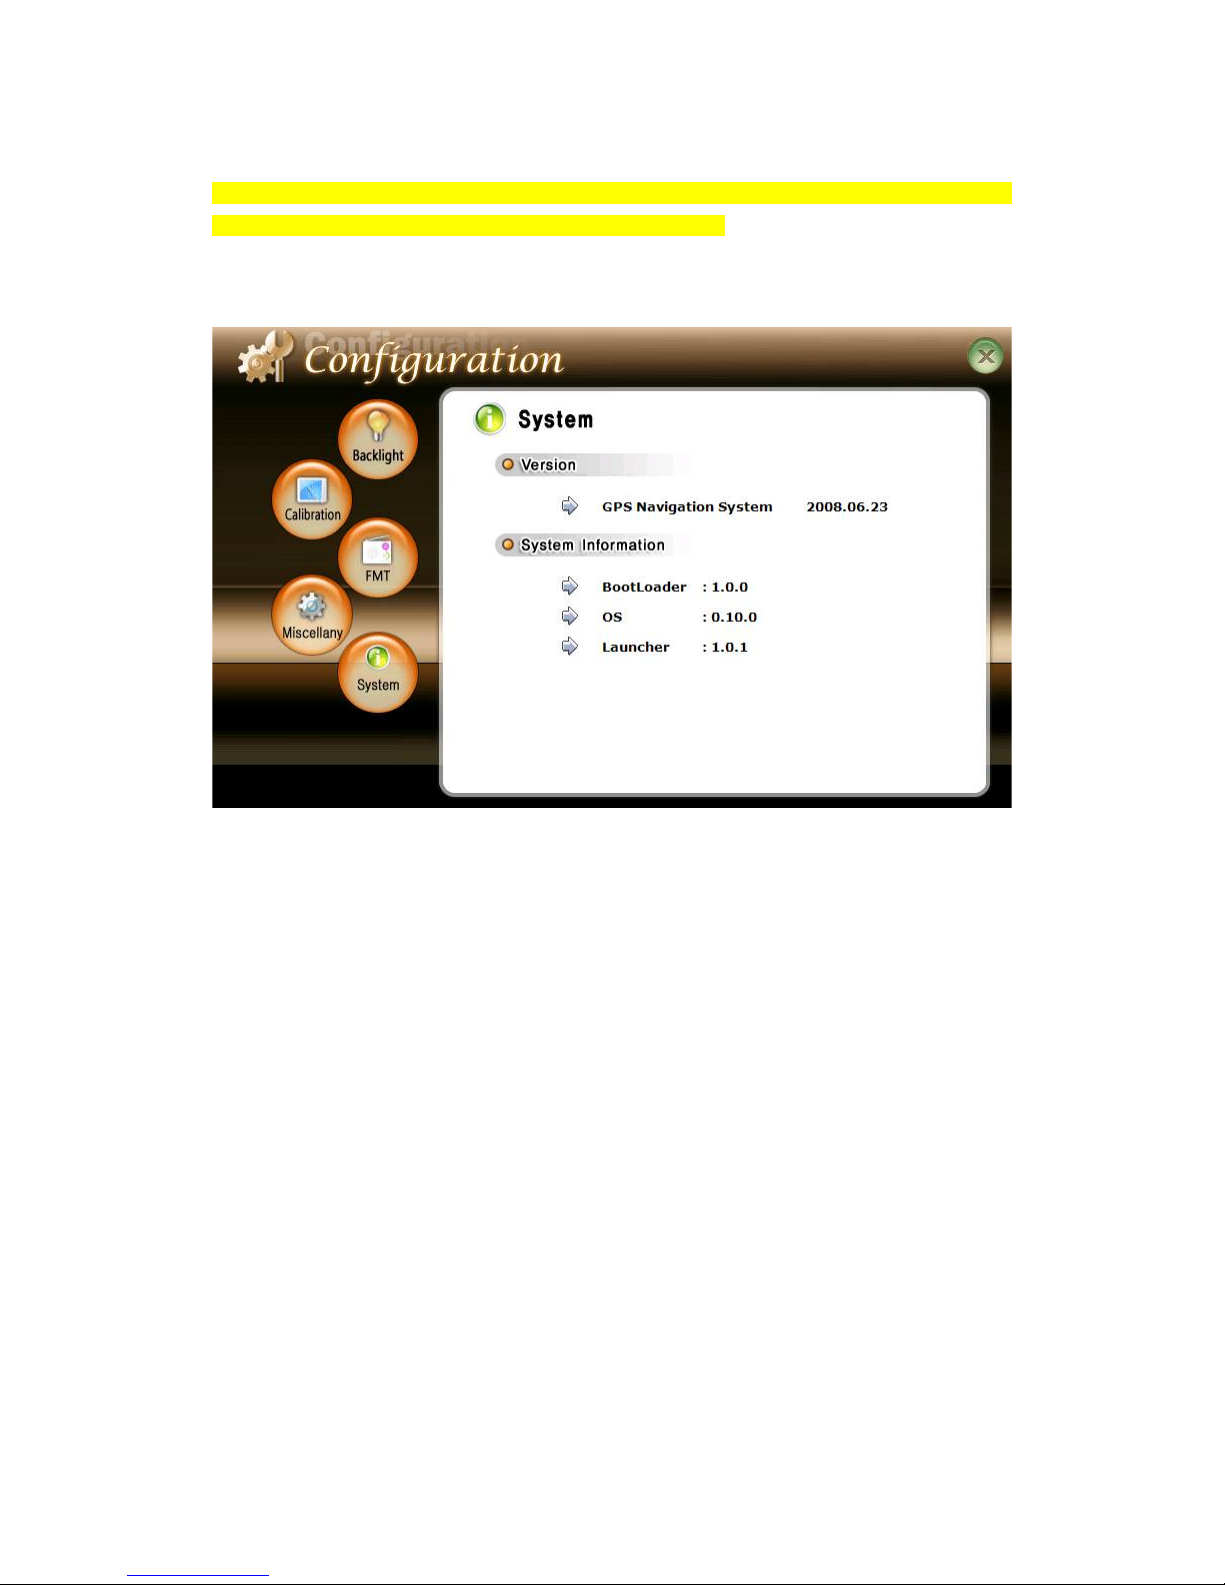
*note : GPS reset should be activated in the open sky after closing all programs. Wait for
about 5minute and check the GPS signal reception in map.
5. System
Shows version informations on embedded applications.
7. Close
By pressing Close button on screen or pressing a Menu Button on front panel, you can return to
Main Menu.
3. Additional Functions
Multi Tasking
Multi Tasking means that you can use multi application programs simultaneously. You can use
Navigation and Music Player at the same time in case of this device.
If you want Multi Tasking for those two programs, operate one of those two at first. After you
press Menu Button on front panel and return to Main Menu, and then if you press another
program’s icon, it operates together with the previous program. Screen from 2nd program is
displayed and basically sound comes from Music Player. When Navigation sound comes up
multimedia player sound is decreasing and disappearing.
To change the displayed screen, press Menu Button and return to Main Menu, and then click the
required icon of the program.
31
Page 32
How to Regulate LCD Brightness
Select Configuration on Main Menu screen and then select Bright icon. Regulate
brightness from Back Light regulation menu.
Resetting
Reset means restarting the device by pressing reset button when operation of the device
is abnormal.
Reset button is situated on right side, and the button can be pressed by using the stylus
pen.
Connecting Mini USB
When this device is connected to PC through USB cable, it is recognized as a movable
storage disk. So you can store, delete, copy and change file name on memory card
inserted in the device.
While programs reading or storing data on SD card are working, if the device is connected
to PC through USB cable, these programs could not work normally. Therefore close all
programs before connecting USB cable.
In order to use this device as a storage disk, OS of PC should be Windows 2000 or higher
version.
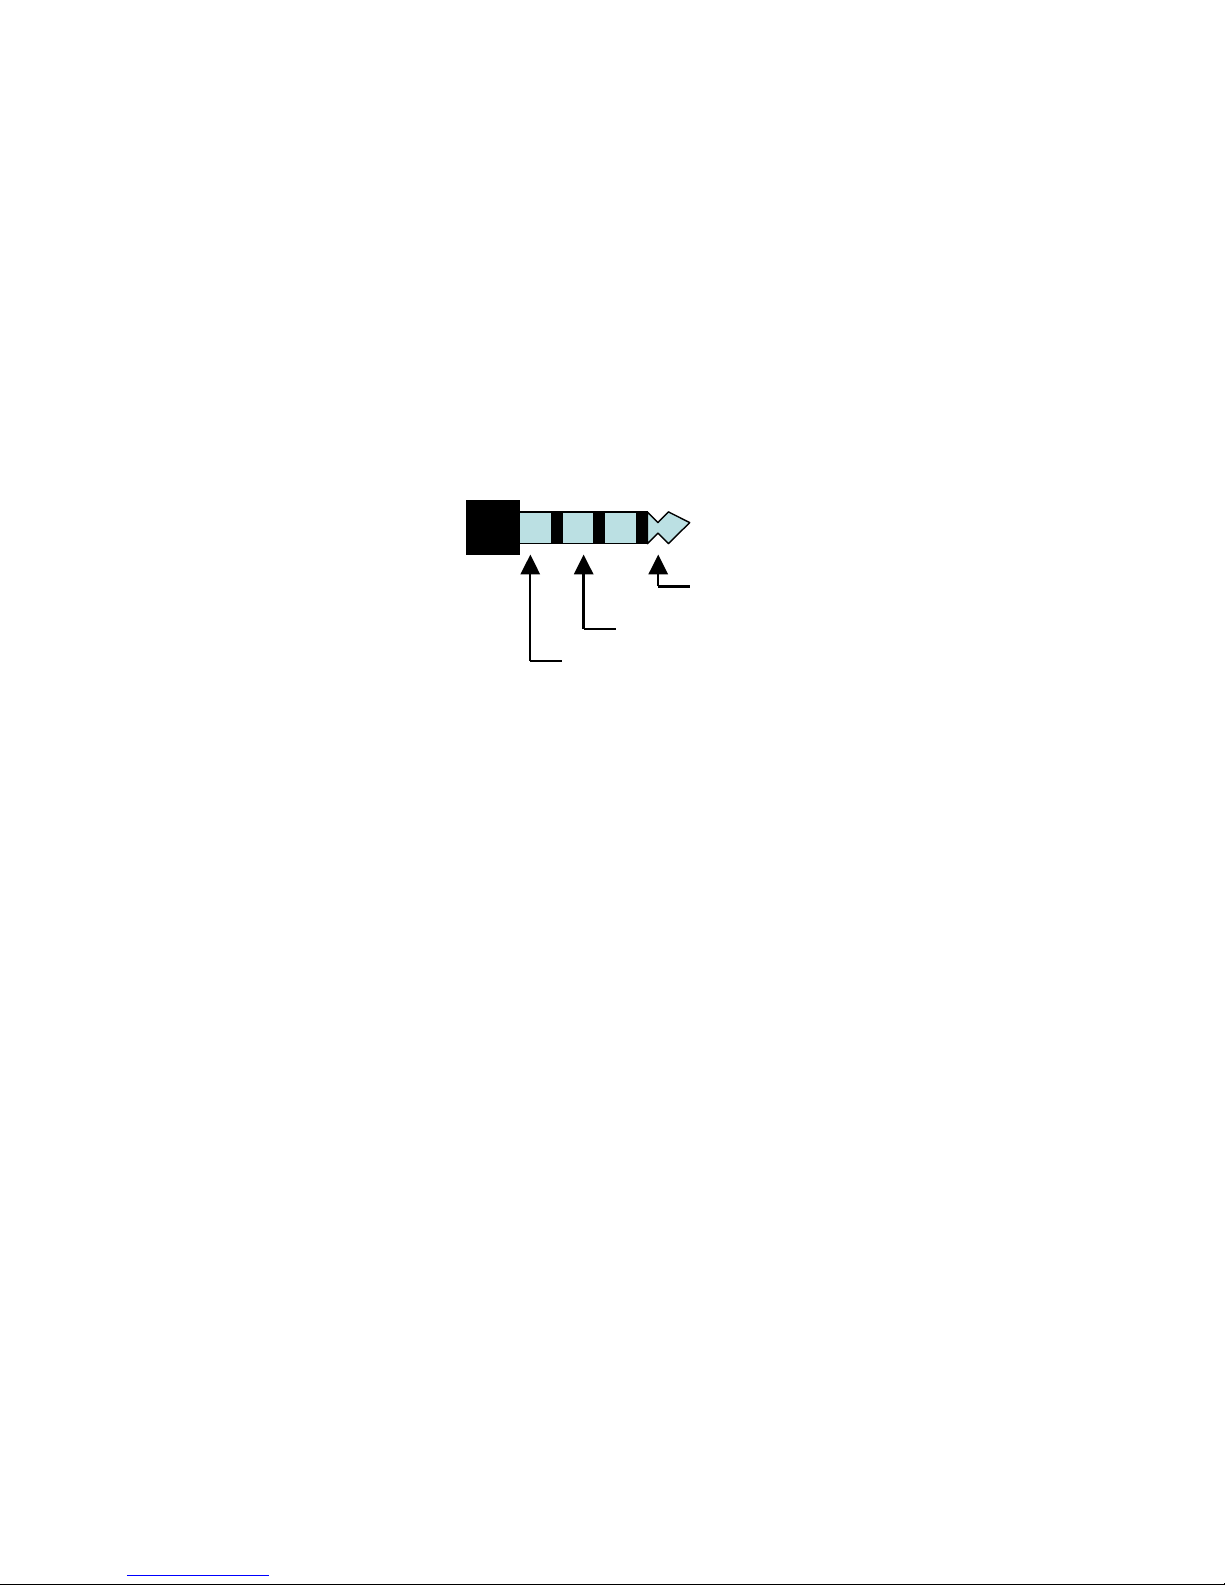
Screen Saver
If there is no touch for 10seconds in main menu, screen saver is operated. Analogue
clock is displayed, and if you touch any point of the clock it is closed.
32
Page 33
4. Common Knowledge on GPS
GPS?
GPS(Global Positioning System) is a system to provide services such as position, speed
and time measurement using satellite that was developed by U.S. Department of Defense.
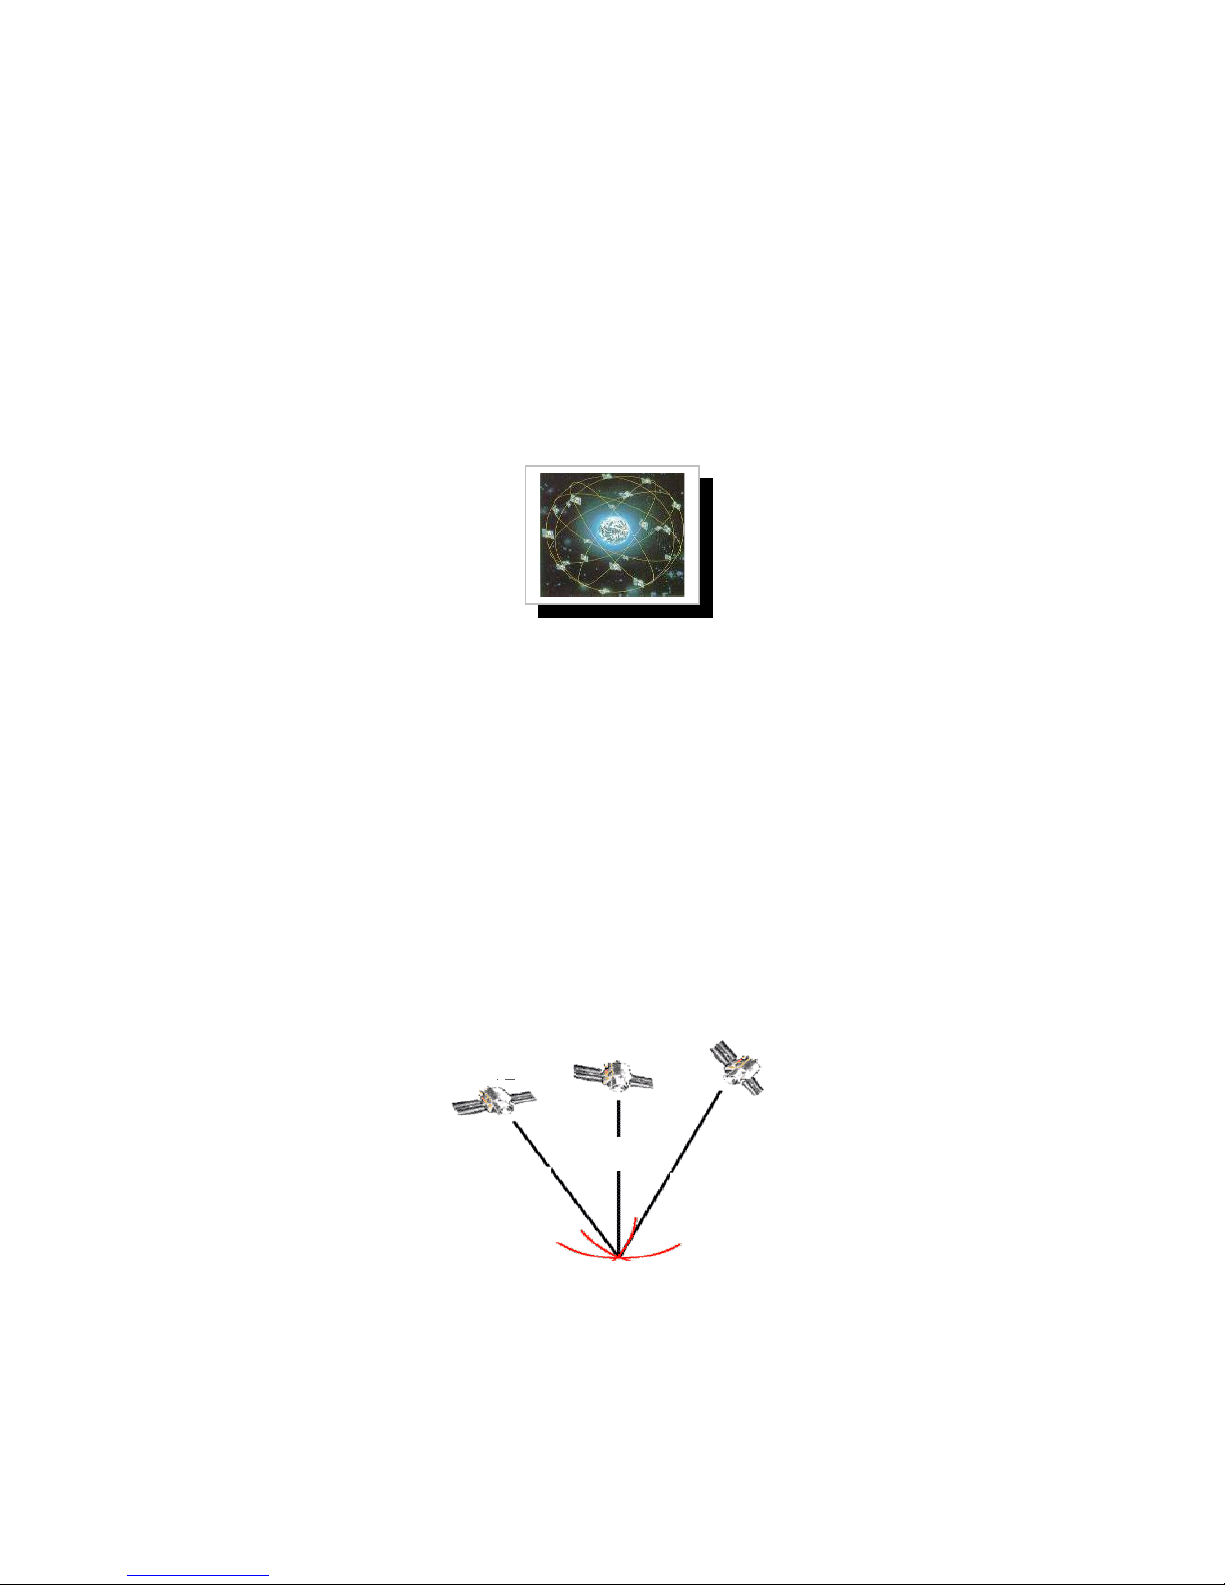
In a word, GPS can be called a global size of navigation system using satellite that has
been promoted for development by U.S. Department of Defense, and there are 24
satellites available currently as a standard.
[24 satellites available]
GPS can perform accurate measurement of three dimensional position, altitude and time,
can provide service continuously for 24 hours, is strong against weather conditions,
interference and obstruction, and has a feature to use global common coordinate system.
User can know exact position only by installing GPS receiver, and should receive electric
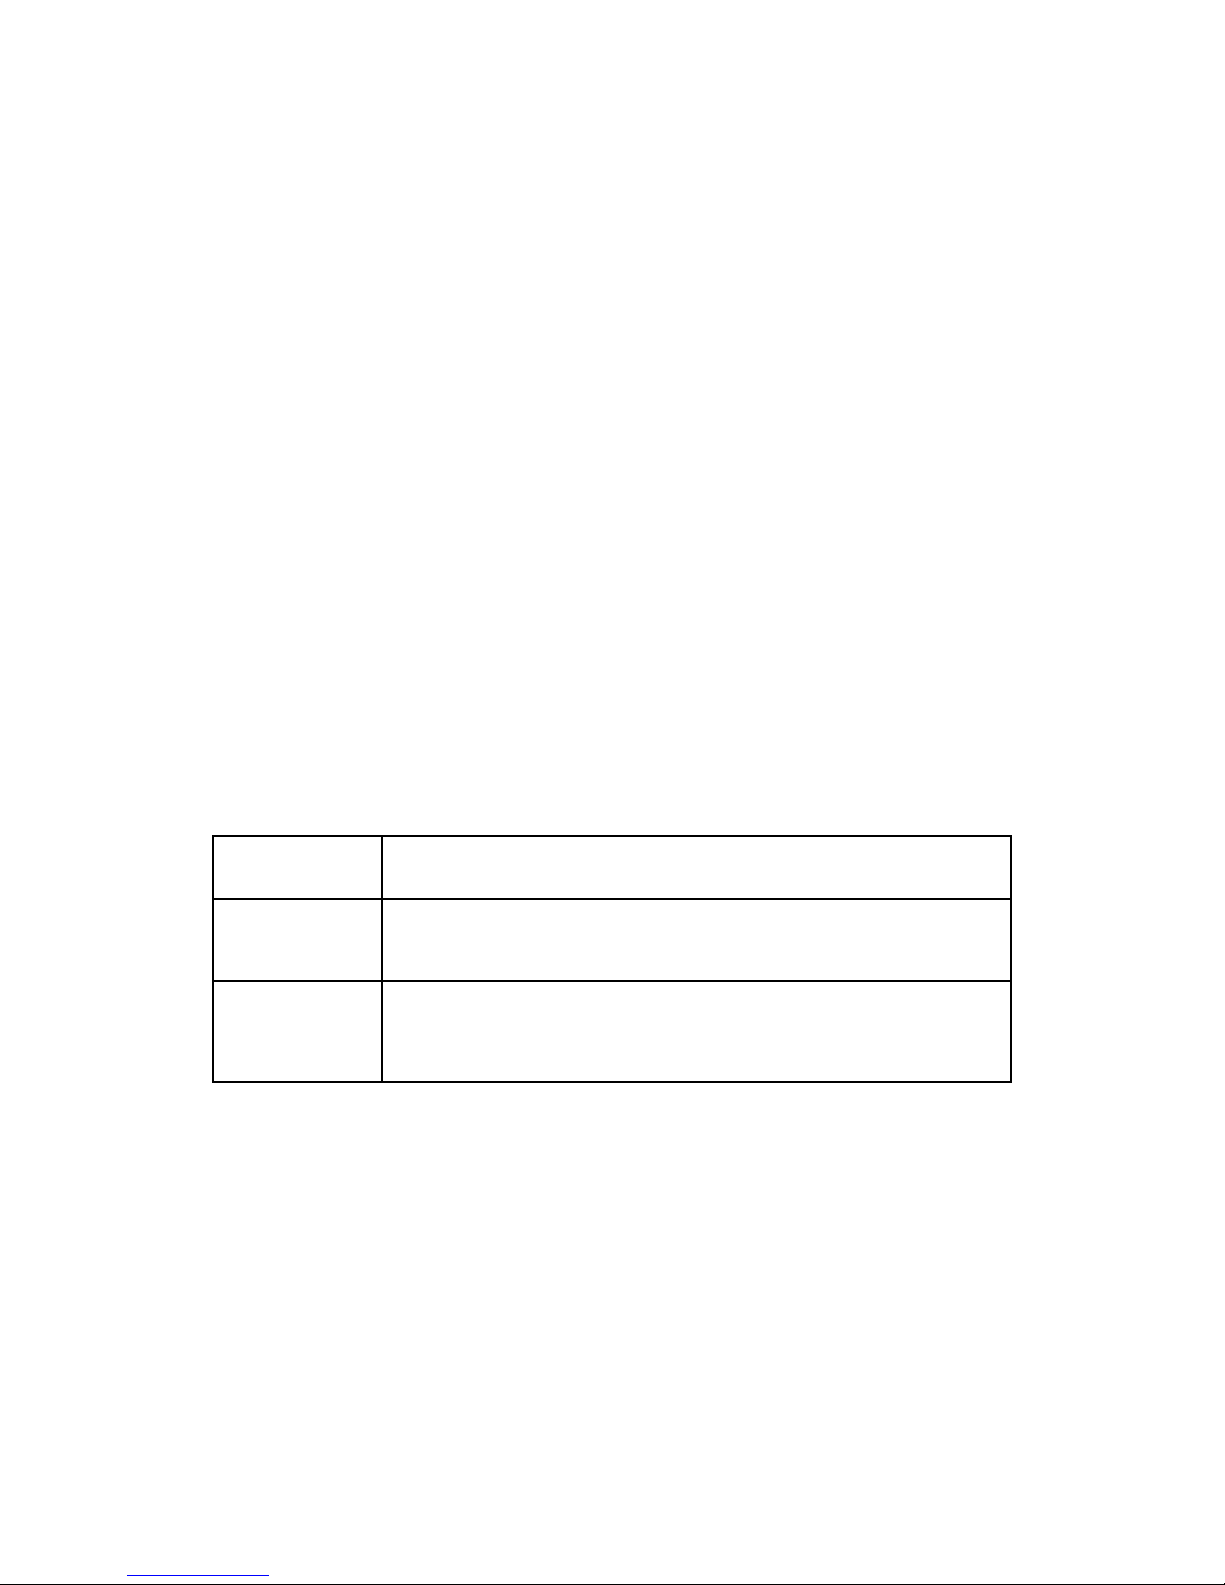
wave simultaneously from at least 4 satellites in order to measure his/her own position via
GPS.
GPS satellite C, Distance C, Positioning point
Intersection point of 3 sections, Principle of GPS positioning
GPS is accompanied with about 5m~15m error even though SA does not activate during
GPS Satellite C
GPS Satellite A
Measuring point (Intersection point
of 3 sections)
[How to meas ure position via GPS]
Distance A
Distance B
Distance C
GPS Satellite B
33
Page 34

single positioning(absolute positioning, 1 point positioning) where position is measured by
only one receiver, so the single positioning method is being utilized mainly for navigation
such as vehicle, ship, aircraft, etc. or in GIS field where allowable error is relatively big
rather than for measurement.
Cause of Error Occurrence in GPS
Factors dropping accuracy in position measurement of GPS can be largely classified into
3 parts.
First, errors occurring due to structure factors include satellite time error, satellite position
error, refraction in ionosphere and troposphere, noise, multi-path, etc.; secondly, there is
geometrical error due to arrangement situation of satellite; and lastly, there is SA (Selective
Availability) that is the biggest error factor.
Potential combination of all these factors brings about very big error result, which is called
UERE(User Equivalent Range Error). Each error vary greatly depending on time and place.
Satellite time error 0-1.5 m
Satellite position error 1- 5 m
Refraction in ionosphere 0-30 m
Refraction in troposphere 0-30 m
Receiver noise 0-10 m
Multi-path 0-1 m
SA(Selective Availability) 0-70 m
In C/A code, horizontal error combined with all errors is 28m when SA does not activate
and 100m when SA activates.
SA code means enlargement of error range so that United States may limit use by non-
allowed GPS satellite users during military operation.
Basically, GPS is not much affected by weather. It cannot be said that there is no effect at
all, but there is no absolute effect. Depending on situation, as sunspot activity of sun
becomes active, if magnetic field change around earth becomes severe, GPS reception
cannot be well performed.
Cautions during Use of GPS
1 Do not dissemble, repair, or remodel it randomly.
2 Pay attention not to pour water or liquid.
3 Avoid use in environments with shock, high temperature, high humidity, etc.
4 Use it by avoiding the following conditions.
34
Page 35
Road blinded from sky by broadleaf roadside tree, forest with many trees,
mountainous area, etc.
Just beside building, near many buildings area, beneath bridge, beneath
elevated road.
Building interior, tunnel interior, aircraft interior, ship interior, etc.
Beneath other objects blinding GPS antenna parts, etc.
If GPS antenna part is wrapped by the palm of hand, GPS information is not
received.
Do not put gold, metallic objects, or electric wave emitting objects around
GPS. Do not leave GPS for long time where there is severely high
temperature or low temperature.
5 A/S Guide
Self Check List before Inquiring A/S
The following checklist will be helpful in solving problems encountered while using your
navigation system. Before reviewing the following checklist, check the equipment connection
and operation procedure.
Screen does not
appear well.
Verify if power is applied to main body.
Navigation is not
performed.
Verify if SD card containing navigation program was inserted.
GPS does not
operate well.
Verify if there is equipment causing trouble to reception of GPS
around it.
Verify if the vehicle in underground parking lot or inside tunnel.
If system abnormality occurs regardless of above verification, please contact our dealers
or customer services.
Cautions during Use
1 Only use the power adaptor provided with this navigation system.
If other adaptors are used, there is a risk of system malfunction and fire.
2 Be careful that no foreign materials may enter your Actis 7, as this may seriously
damage the internal parts.
35
Page 36
3 Do not give severe shock to adaptor or dissemble it, as it may cause damage,
explosion, or fire.
4 Do not use in a humid environment, nor submerge directly into water.
5 Do not disassemble, repair or remodel in a reckless manner.
6 Do not put this near magnets, large speaker, etc., as the Memory Contents may be
erased or LCD screen may be damaged.
7 Back up important data at all time.
Data may be damaged or deleted due to unscheduled reset.
8 Please store your stylus pen keep out of reach of children, as this may cause
serious injury.
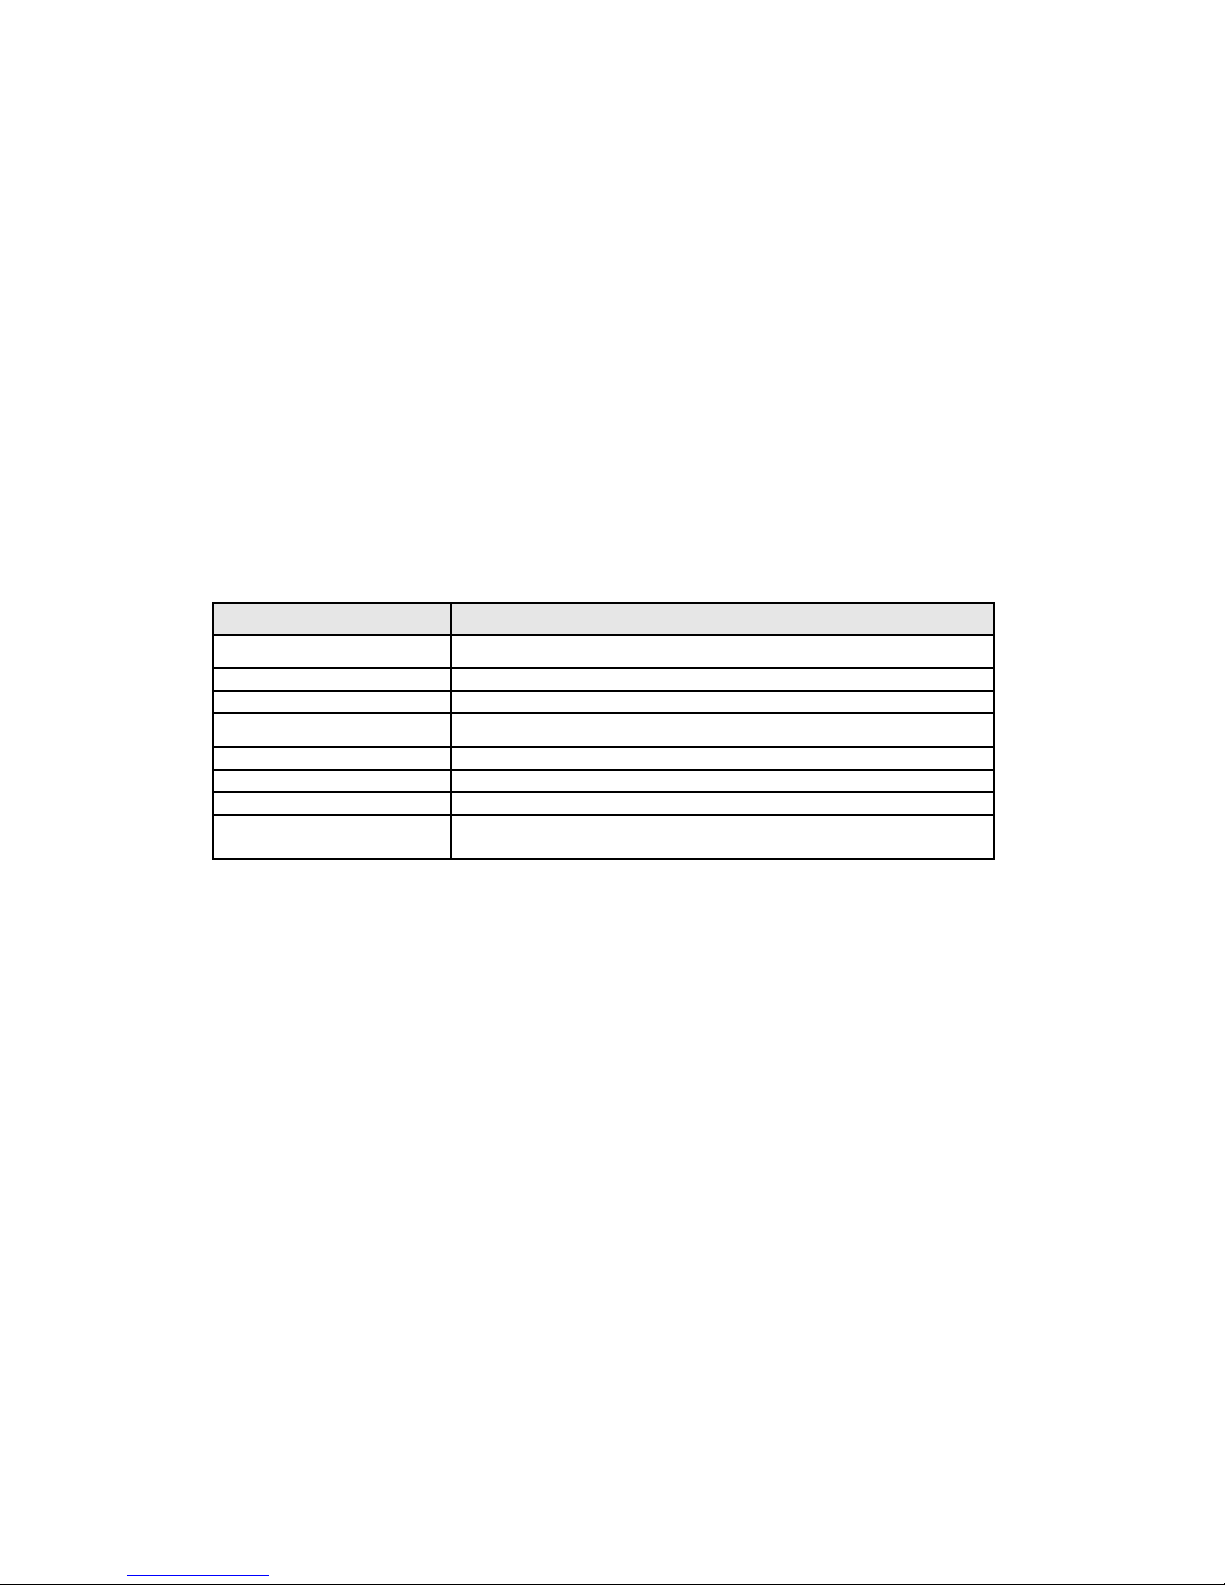
Product Specification
Division Contents
CPU Monahan-PXZ-300 (624MHz)
ROM 128MB NAND Flash
RAM 128MB SDRAM
OS MS Windows CE 5.0
LCD 7.0 inch TFT LCD
POWER INPUT DC 12V~24V
GPS SiRF Star – III
OPERATING
TEMPERATURE
0℃ ~ 50℃
36
Page 37
6. Navigation
Please note that operating your PND while driving can be dangerous and we recommend that you
prepare your journey in advance.
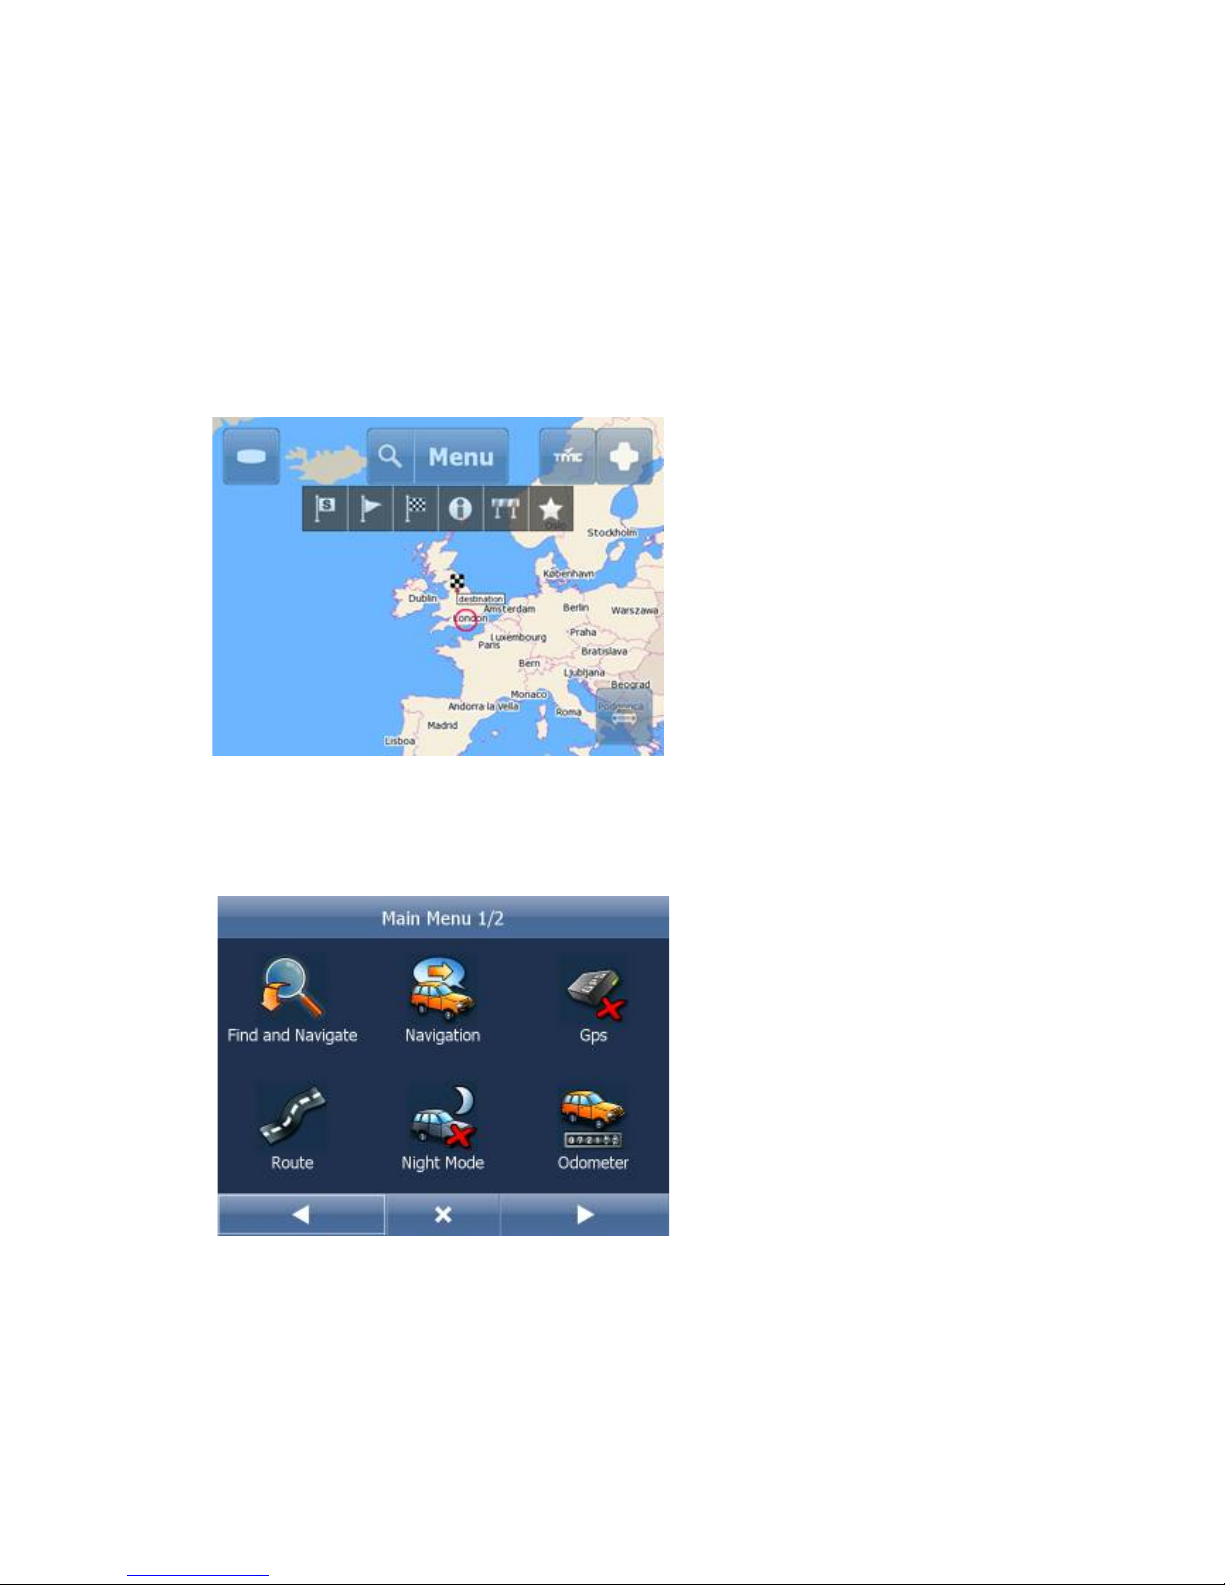
Now you will be presented with an overview map of the region you have installed.
Setting your navigation preferences
Tap the Menu button at the top of the map screen. You will see the following menu:
Tap the right arrow to access the next screen.
37
Page 38
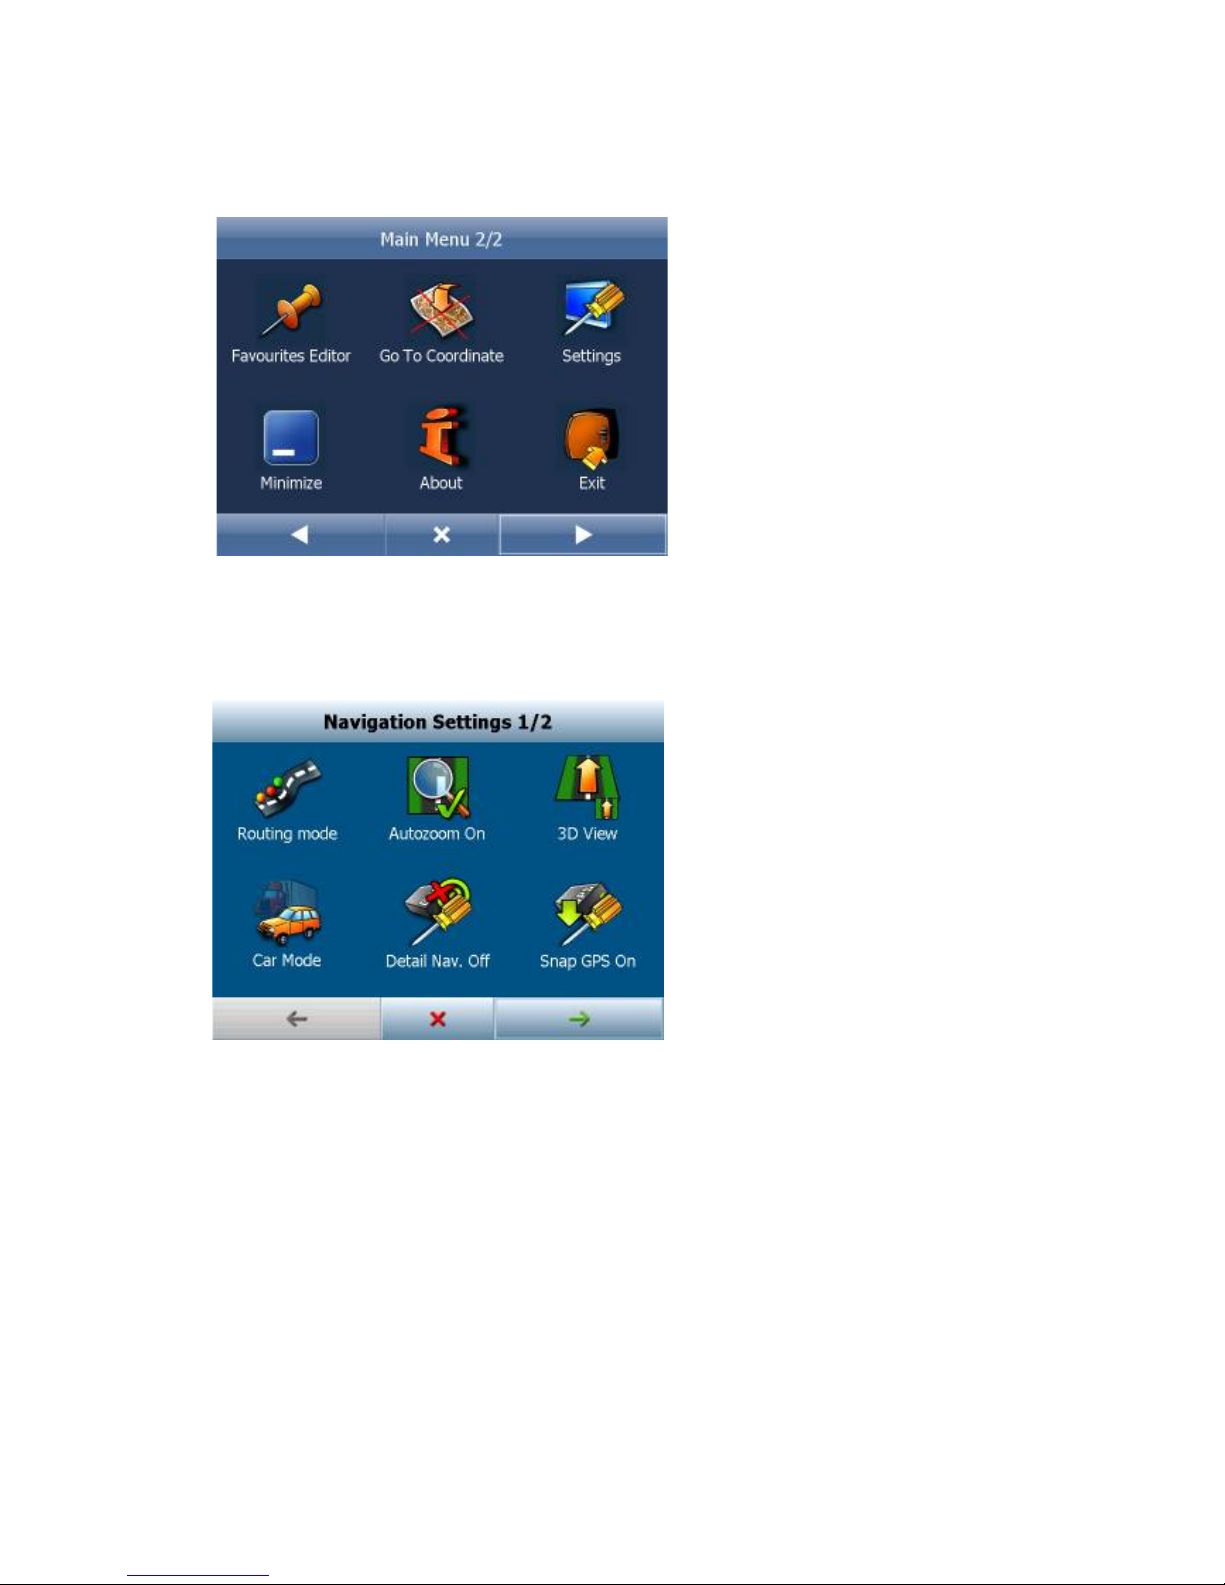
Tap the Settings button. Now you are in the settings menu.
Tap the Navigation button.
You are now in the Navigation Settings menu.
Tap Autozoom to toggle the Autozoom feature on or off. Autozoom will automatically adjust the
map zoom as your drive, zooming out when between manoeuvres and zooming in as you approach
the next junction.
Tap 3D View/Plane View to toggle between 3D and 2D maps as you drive.
Tap Truck/Car to set the type of vehicle you are driving. Truck mode will be more selective about
sending you down narrow lanes etc.
38
Page 39
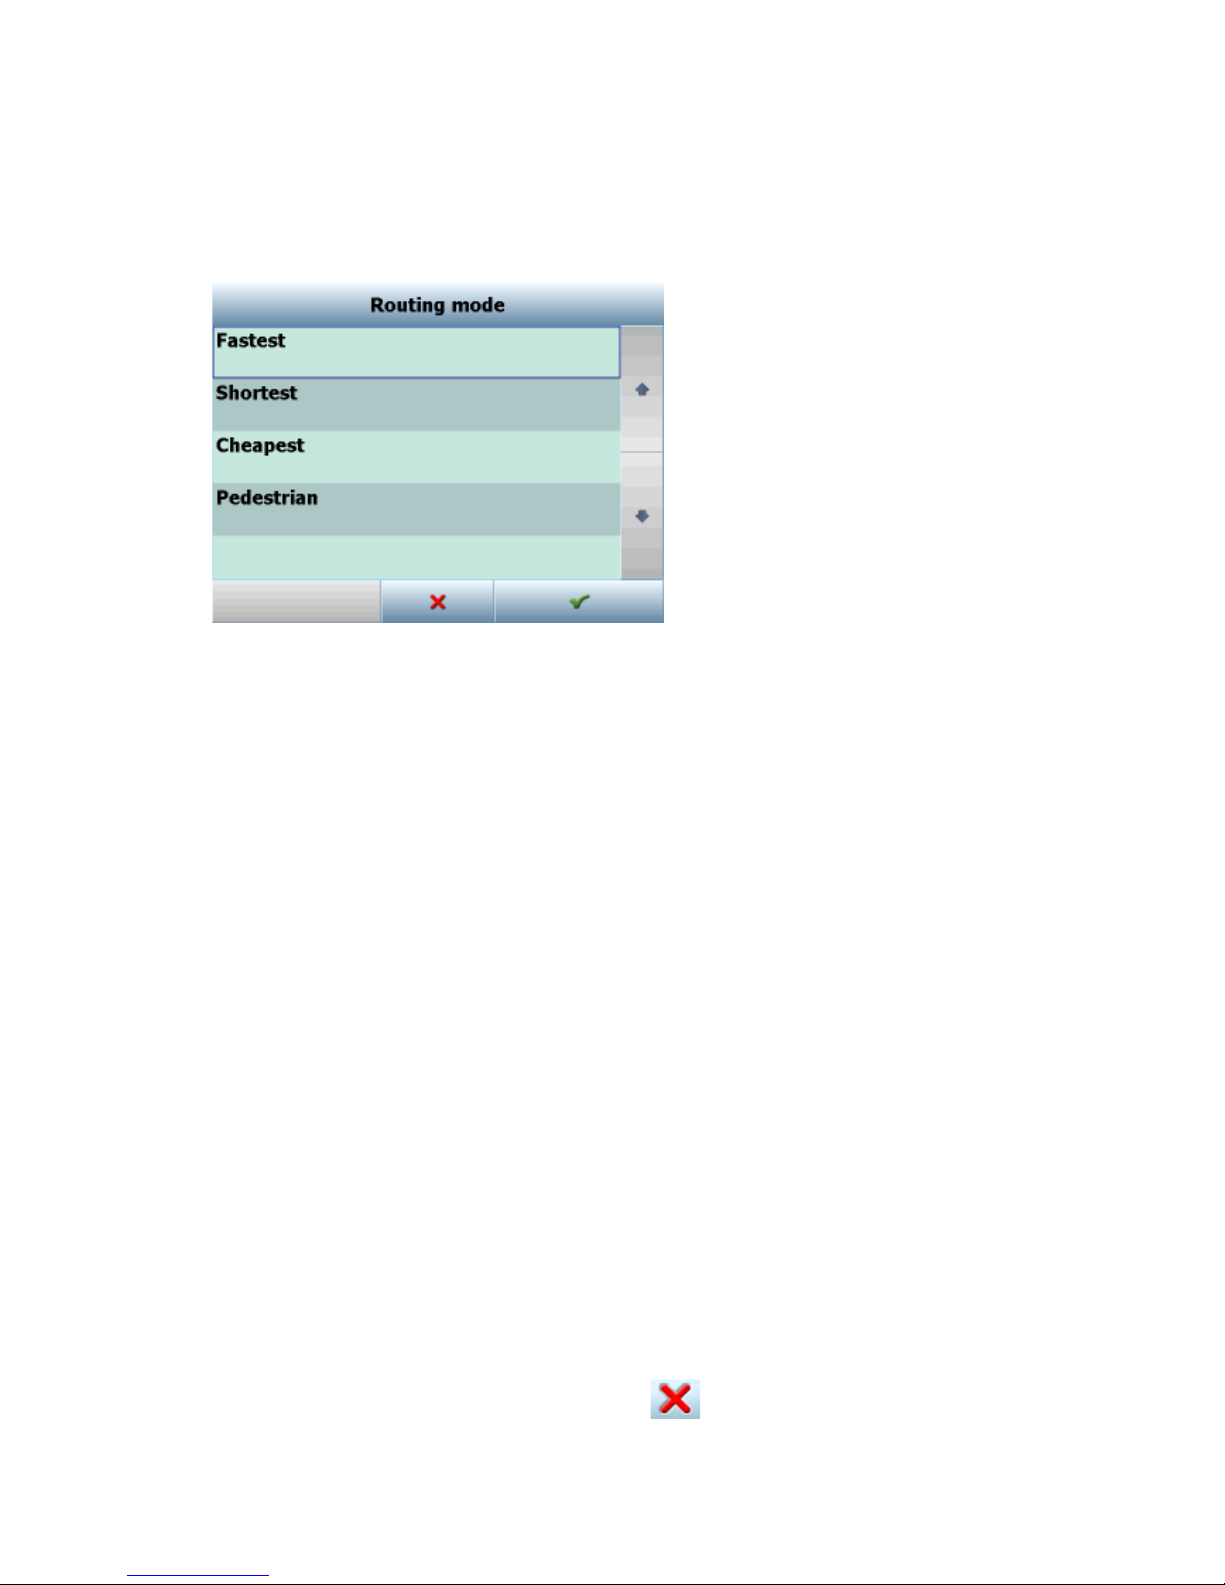
Tap Routing mode to select your preferred route type.
Fastest - this is the default route mode. It takes your to your destination in the quickest time.
Shortest - this mode calculates the route with the shortest travelling distance.
Cheapest - calculates the most petrol efficient route.
Pedestrian - use this mode when walking.
Tap Detail nav on/off to toggle detailed navigation. Detailed navigation gives you extra instructions
when going straight along a road.
Tap Snap GPS on/off to enable or disable GPS snapping to the road as you are navigating. Snapping
keeps you glued to the road and in the direction of your route at all times.
Note that there are two Navigation Settings menus. Tap the right arrow to access menu 2. Here you
can set what type of information you want to see in the navigation panel at the bottom of the screen
as you drive. Possibilities are:
Distance to destination - how far away you are in km or miles
Time to destination - the approximate time left before you reach your destination
Time in destination - the approximate time you will arrive at your destination
Time to maneuver - the approximate time before your next maneuver
Altitude, Speed, Course, Number of satellites, Position, Time and Date give you data about your
current position and the Satellite signal.
Once you have set your Navigation preferences tap the button until you get back to the main
39
Page 40
menu or the map view.
You are now ready to
set your destination
.
Setting your destination
You can set a destination in several ways, from the map, from the search menu or from one of
your favourites.
From the Map
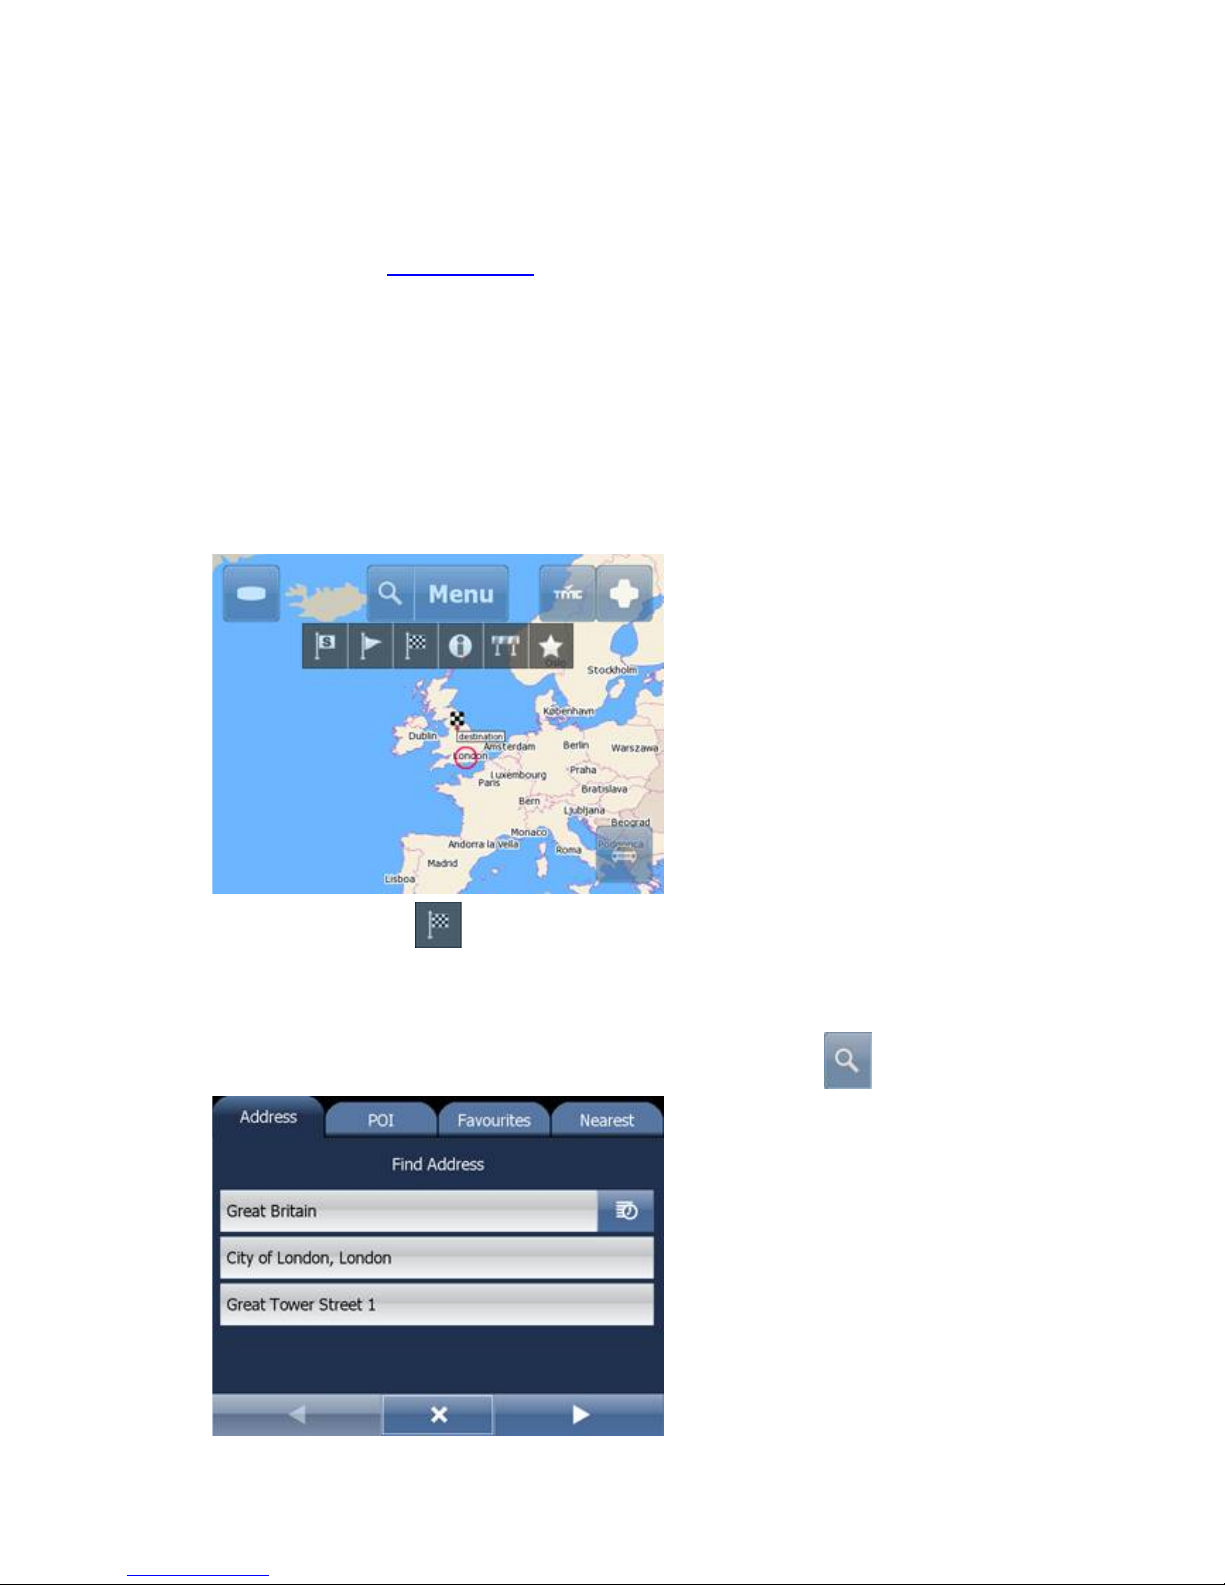
Tap the position on the map where you want to set your destination. The following menu will appear:
Select the destination icon .
From the Search menu
Select Find & Navigate from the Main Menu or Tap the search icon in map view .
40
Page 41
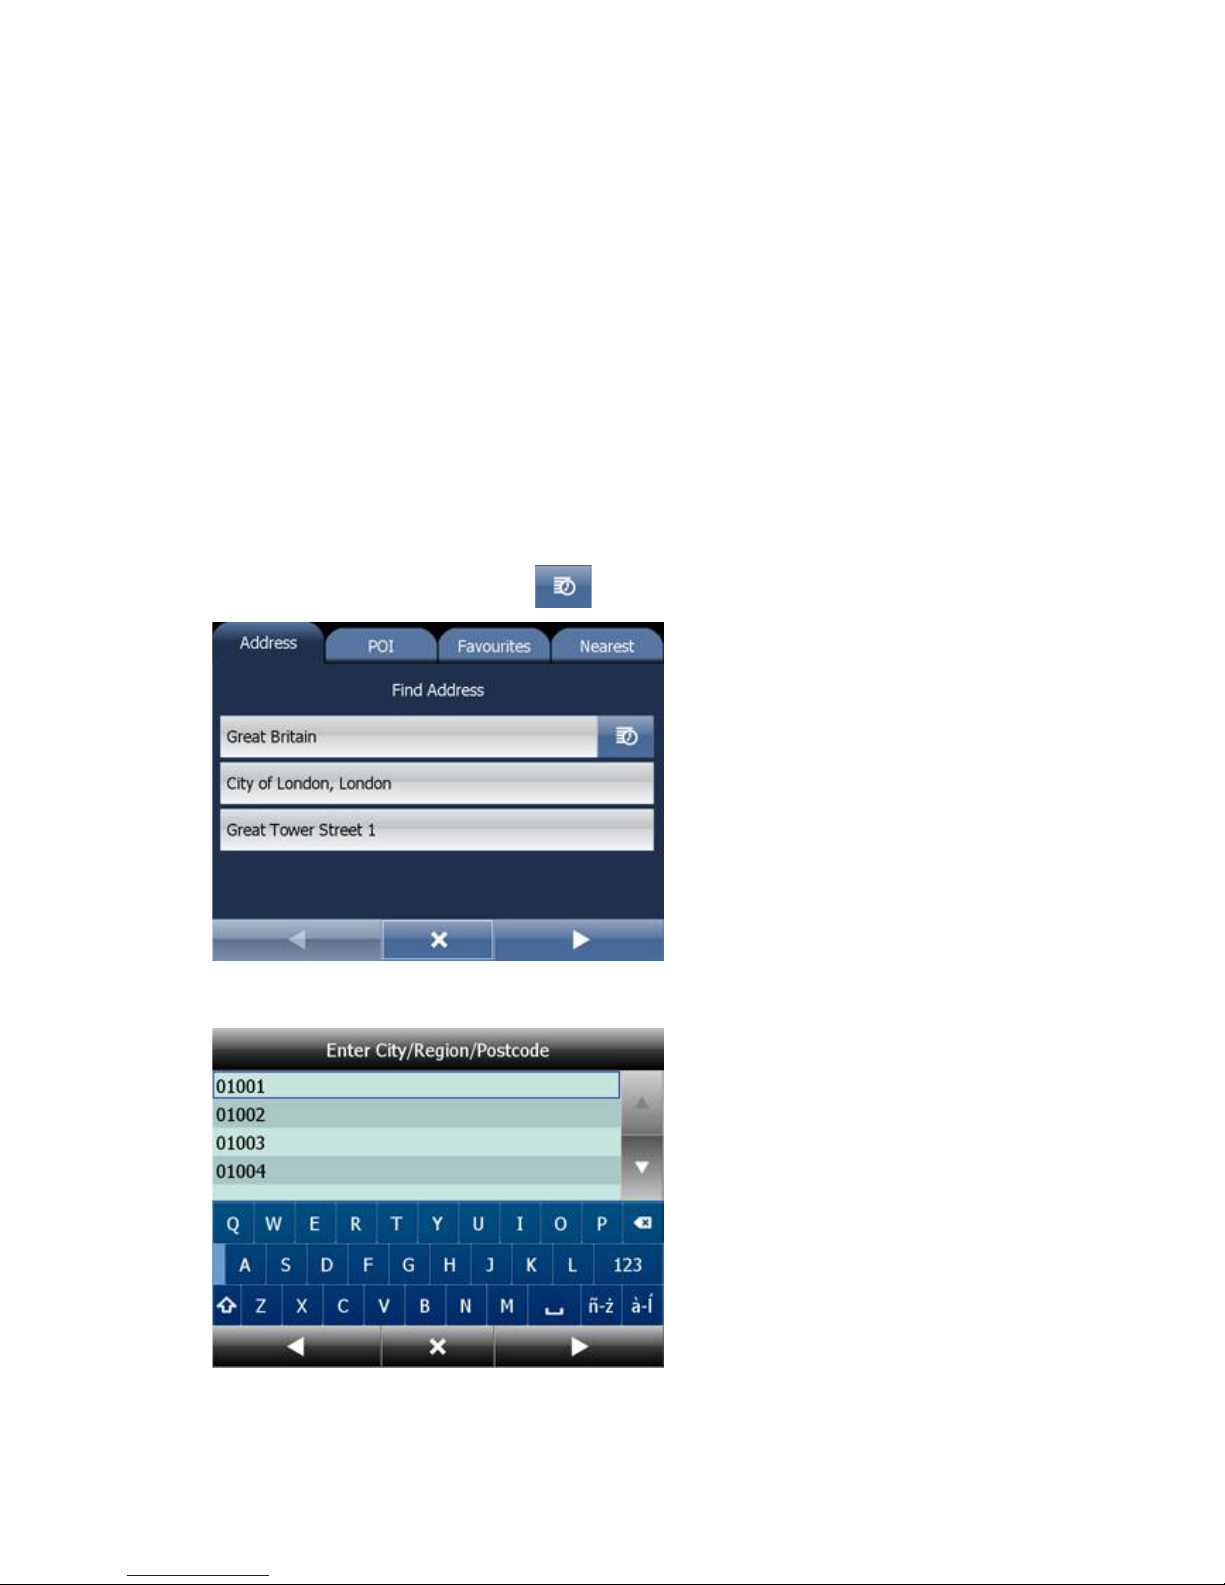
There are several database types to choose from: Address, POI (Points of Interest), Favourites and
Nearest.
To make a change to any detail tap the textbox it is in. If you have entered search text before, you may see
it on the following screen. If you begin typing the old text will be overwritten.
You can also set a destination from that last search performed or from imported data.
Address
If you know the street (and optionally the house number) tap Address.
To see a history of previous searches click .
First select the country.
You will now be prompted for the town or region name or postcode.
You can type using the on-screen keyboard. As you type Navigator will automatically search for nearest
41
Page 42
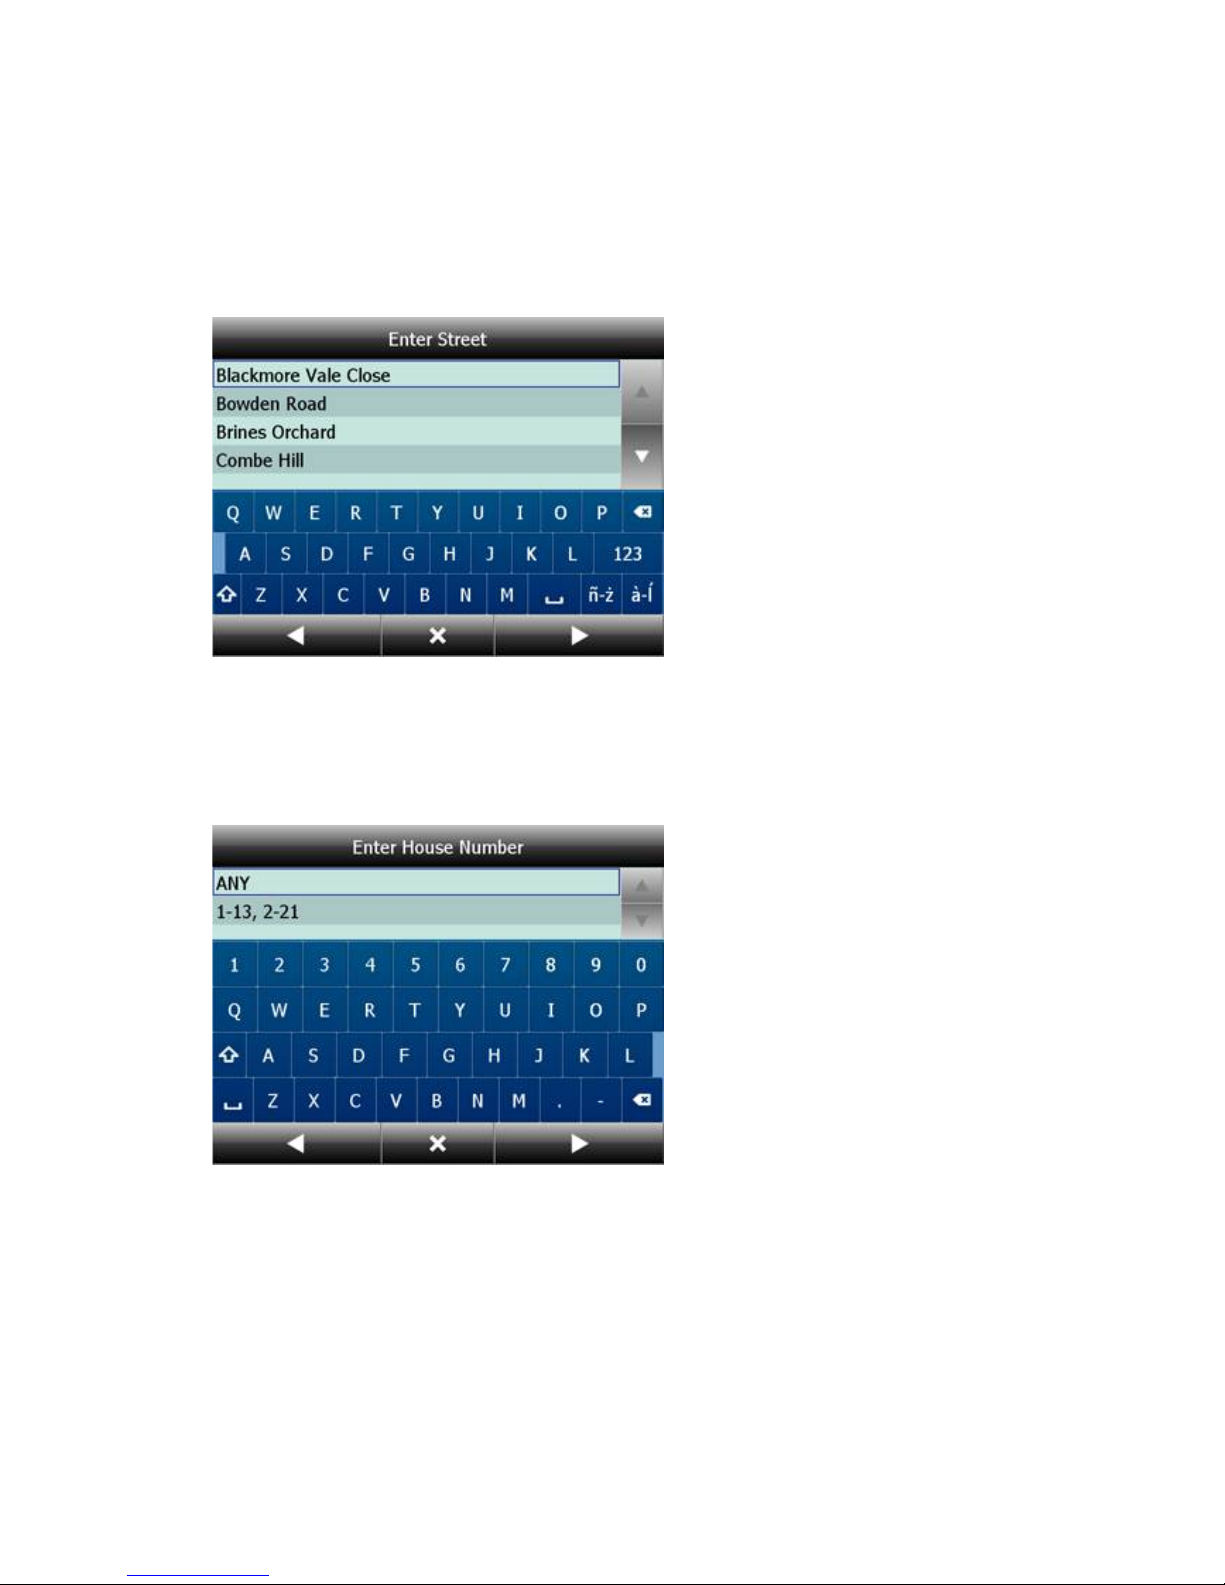
matches and list them underneath.
Once you see your town in the list tap it.
You must now type the street you are going to (or select TOWN CENTRE).
Once you see your street in the list tap it.
You will now be asked to select a house number from the ranges shown in the list.
If you do not know the house number tap ANY. This will allow you to select a destination on the
crossroad with another street. A list of all intersecting street will be shown.
Click the right arrow.
You will now be shown the following screen
42
Page 43
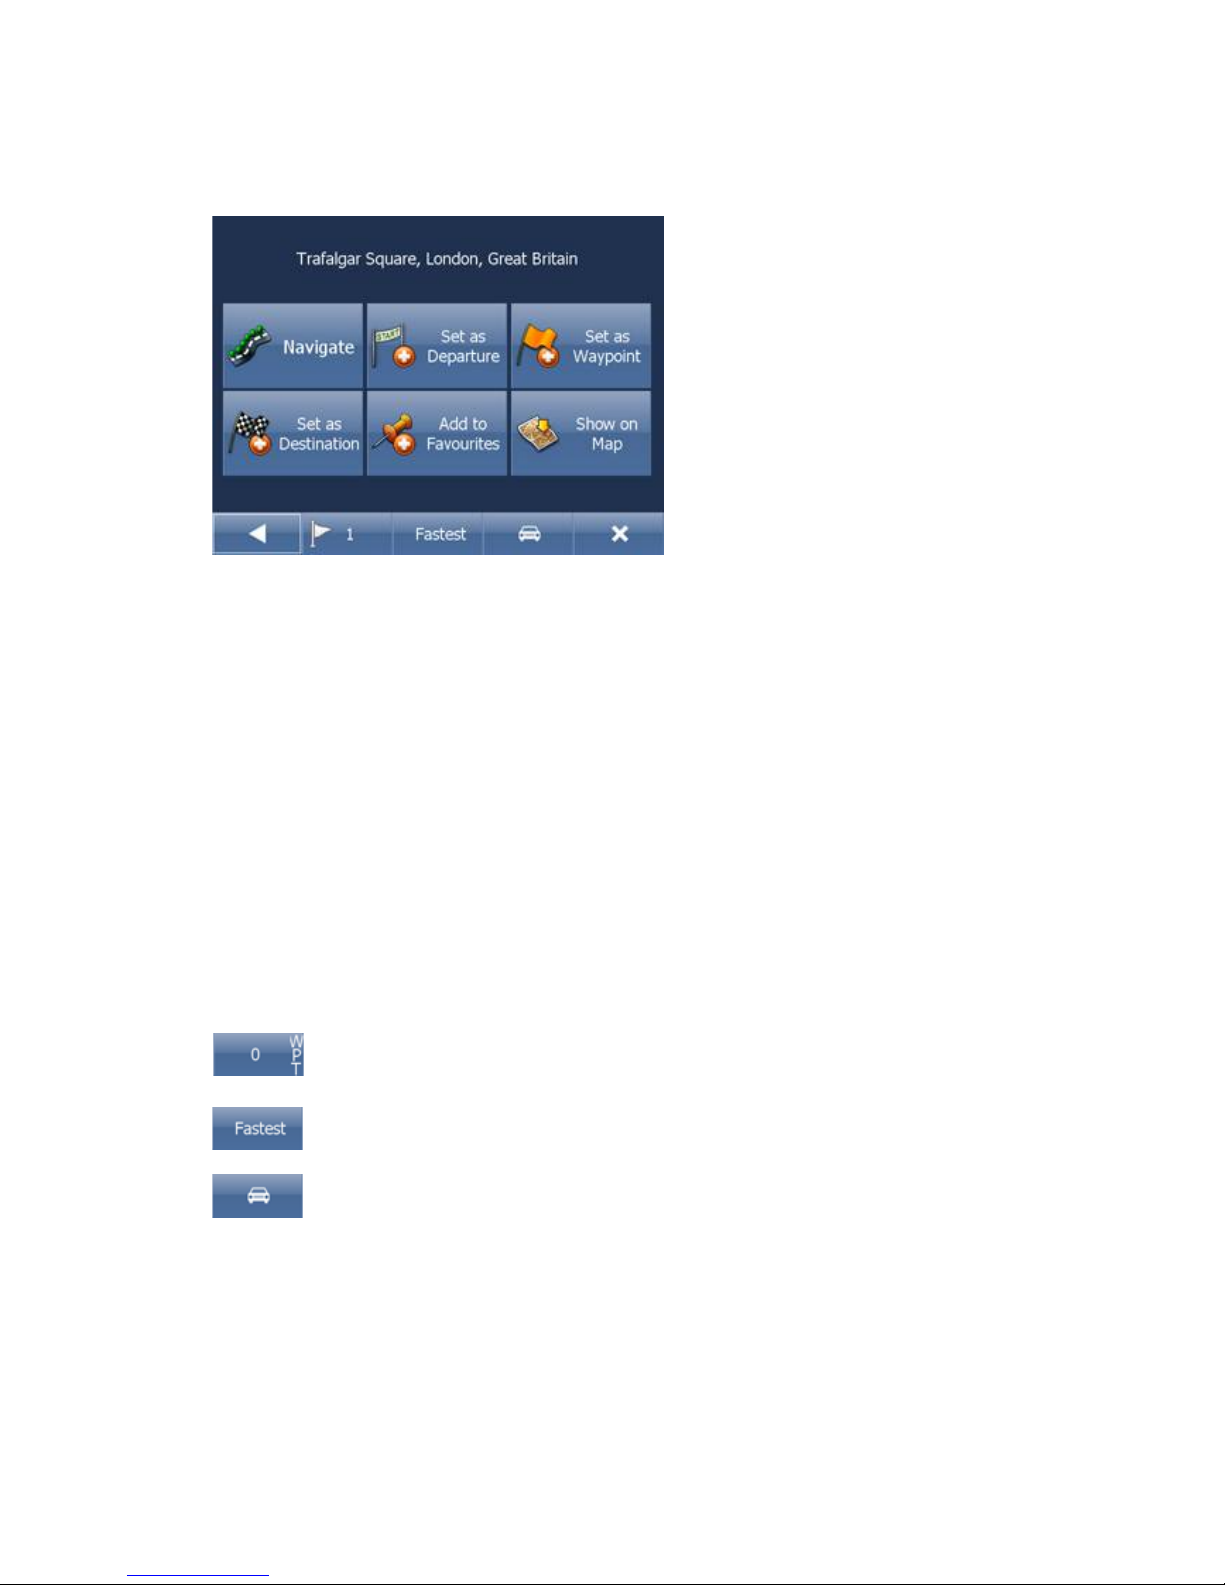
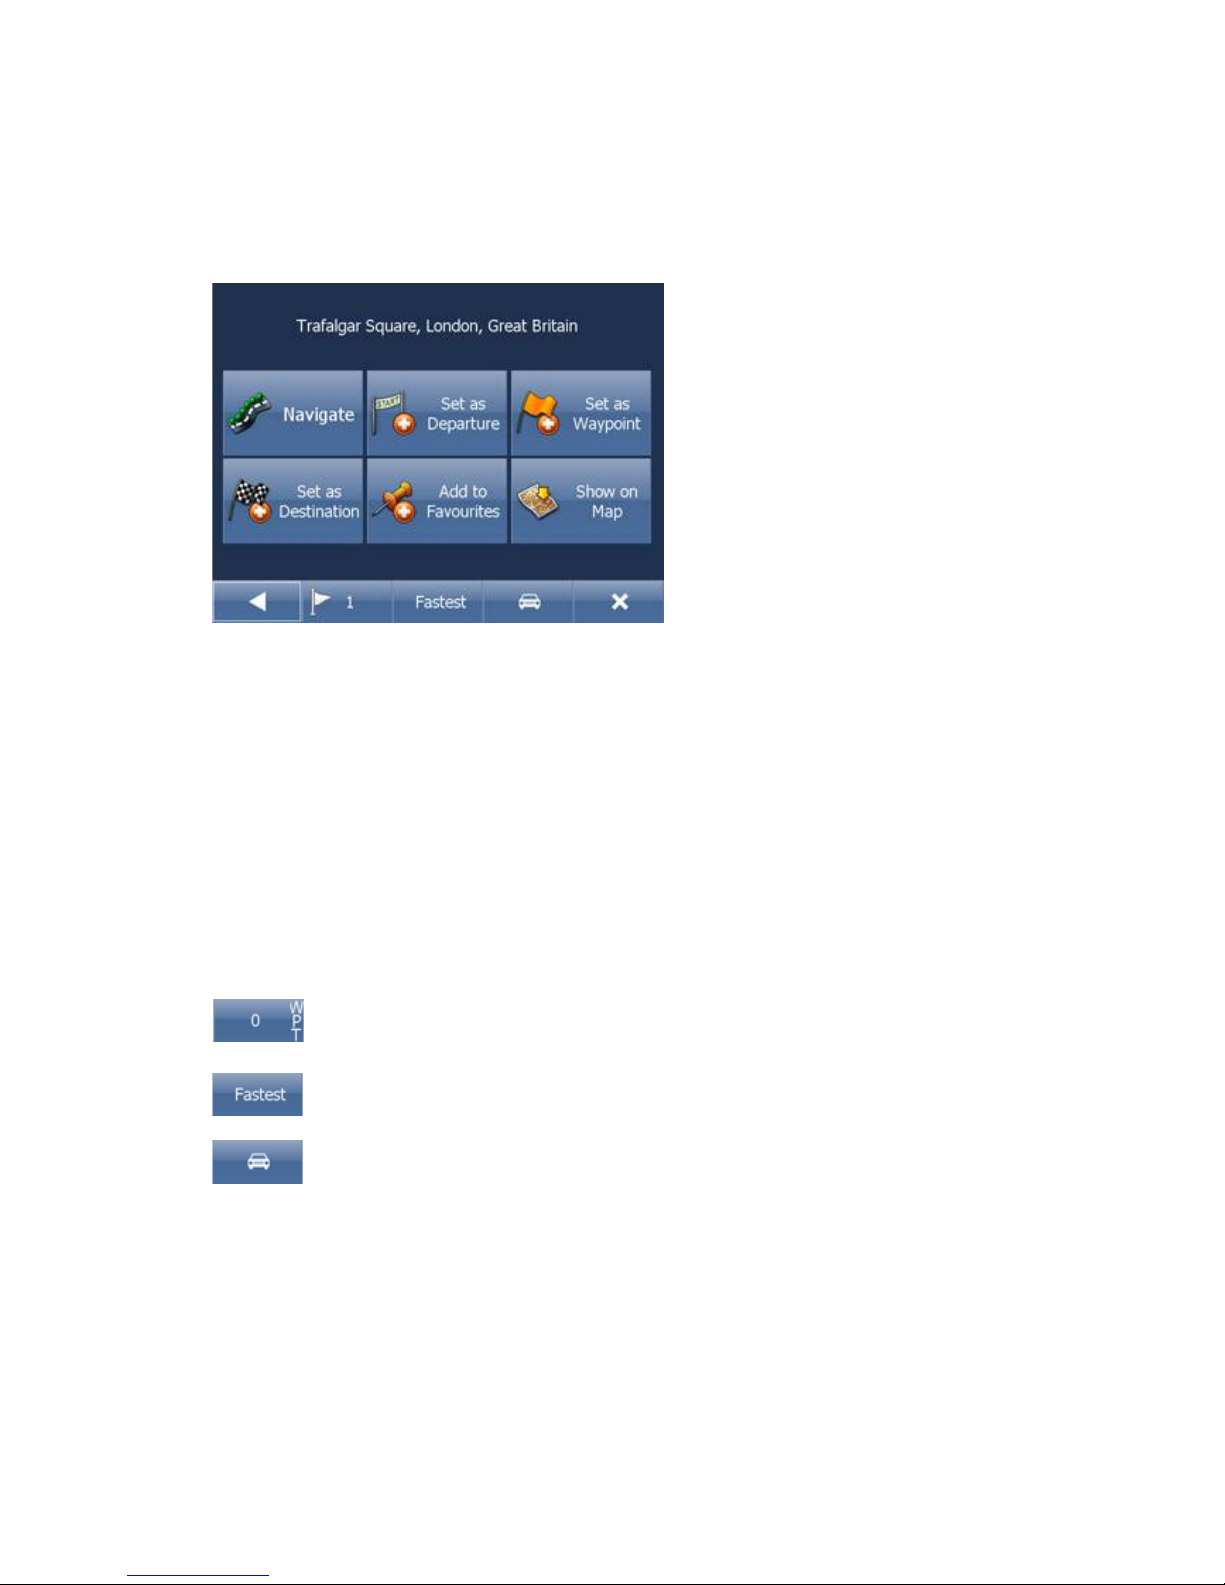
Now tap Navigate and your journey will be calculated.
You have also the following options:
Set as departure - Set the start of your journey (only necessary if you want to calculate a route without
GPS)
Set as waypoint - Add it as a stop along your journey
Set as destination - Set the destination point without starting navigation immediately
Add to favourites - Add your selection to your favourites
Show on Map - Show the result on the map
In the bar at the bottom of the screen you can see some important routing parameters:
- the number of waypoints on the journey
- the routing mode (fastest, shortest, cheapest)
- the car type selected.
You can change any of these parameters by clicking on them.
To restart your search simply click the left arrow.
POI
If you want to go to a point of interest tap the POI tab.
43
Page 44
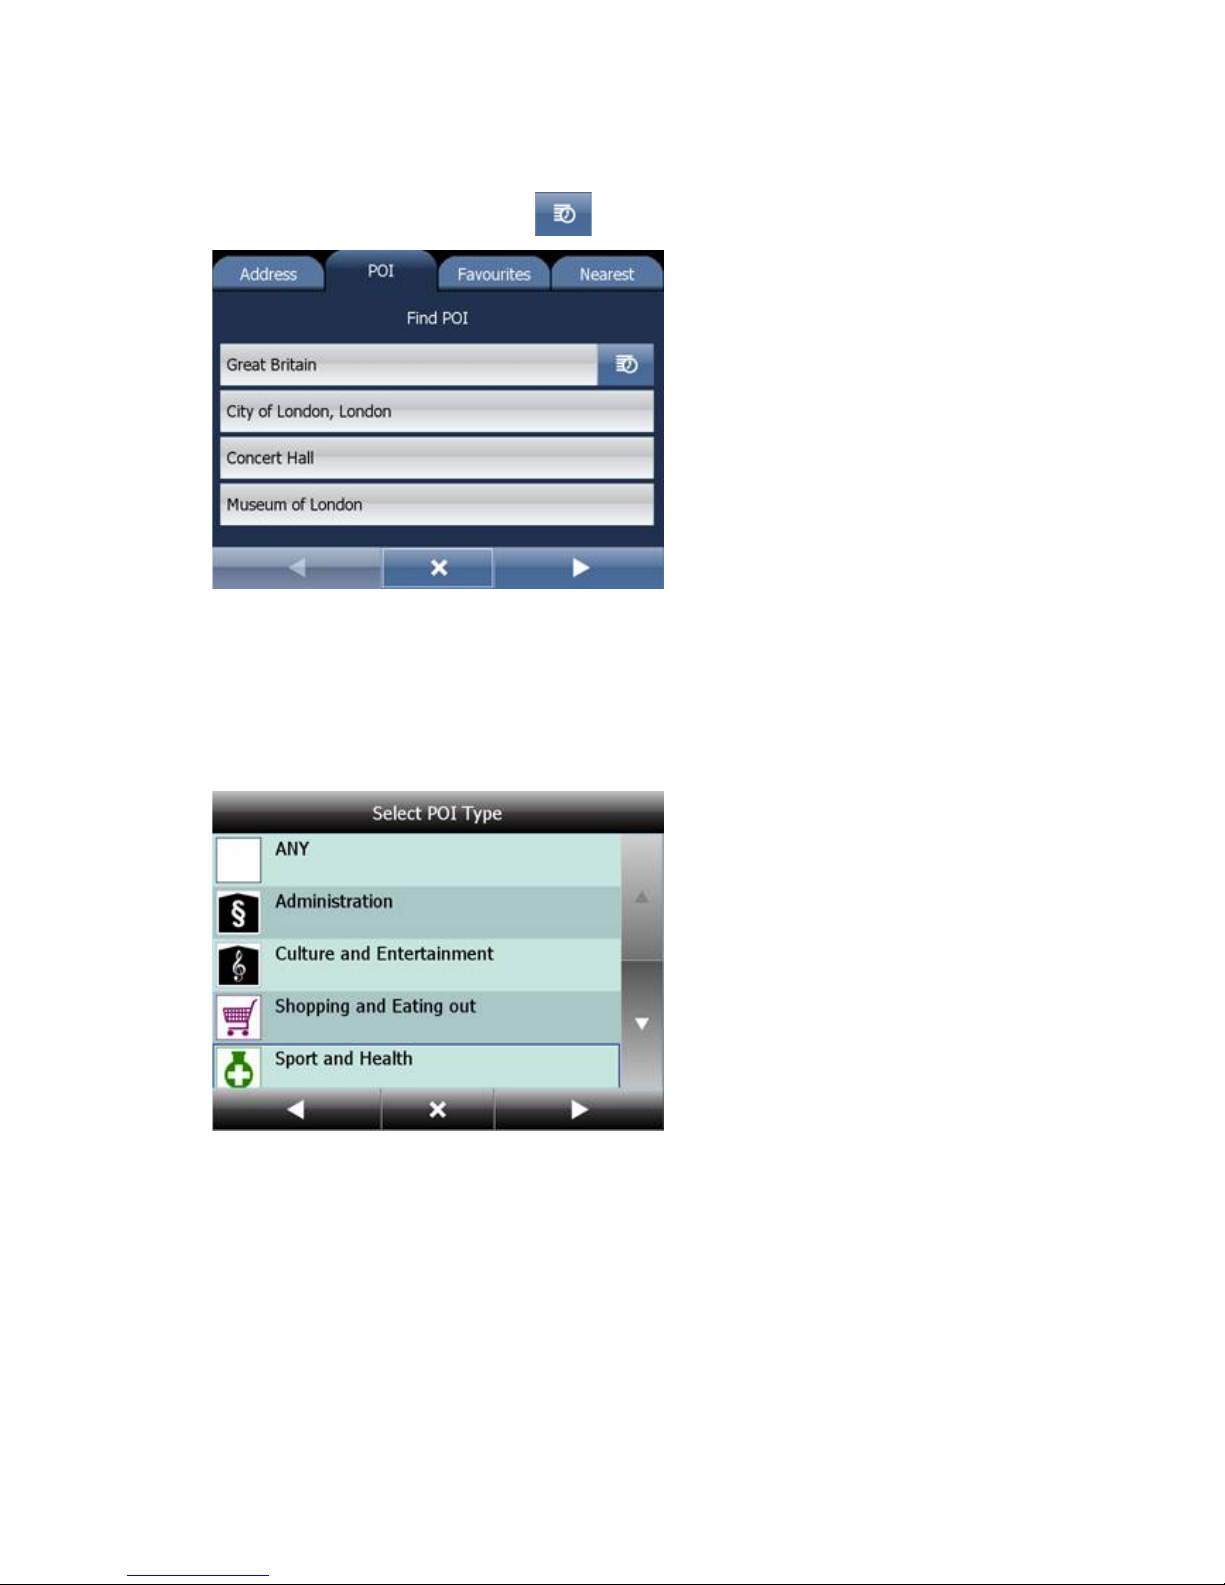
To see a history of previous searches click .
First select the country you want to search in.
Next select the town, region or postcode area. If you want to search the entire country select ANY.
Now you can select the POI type.
Points of interest are divided into six groups.
Now select the type of POI you are looking for. If you want to search through all points of interest tap
ANY.
44
Page 45
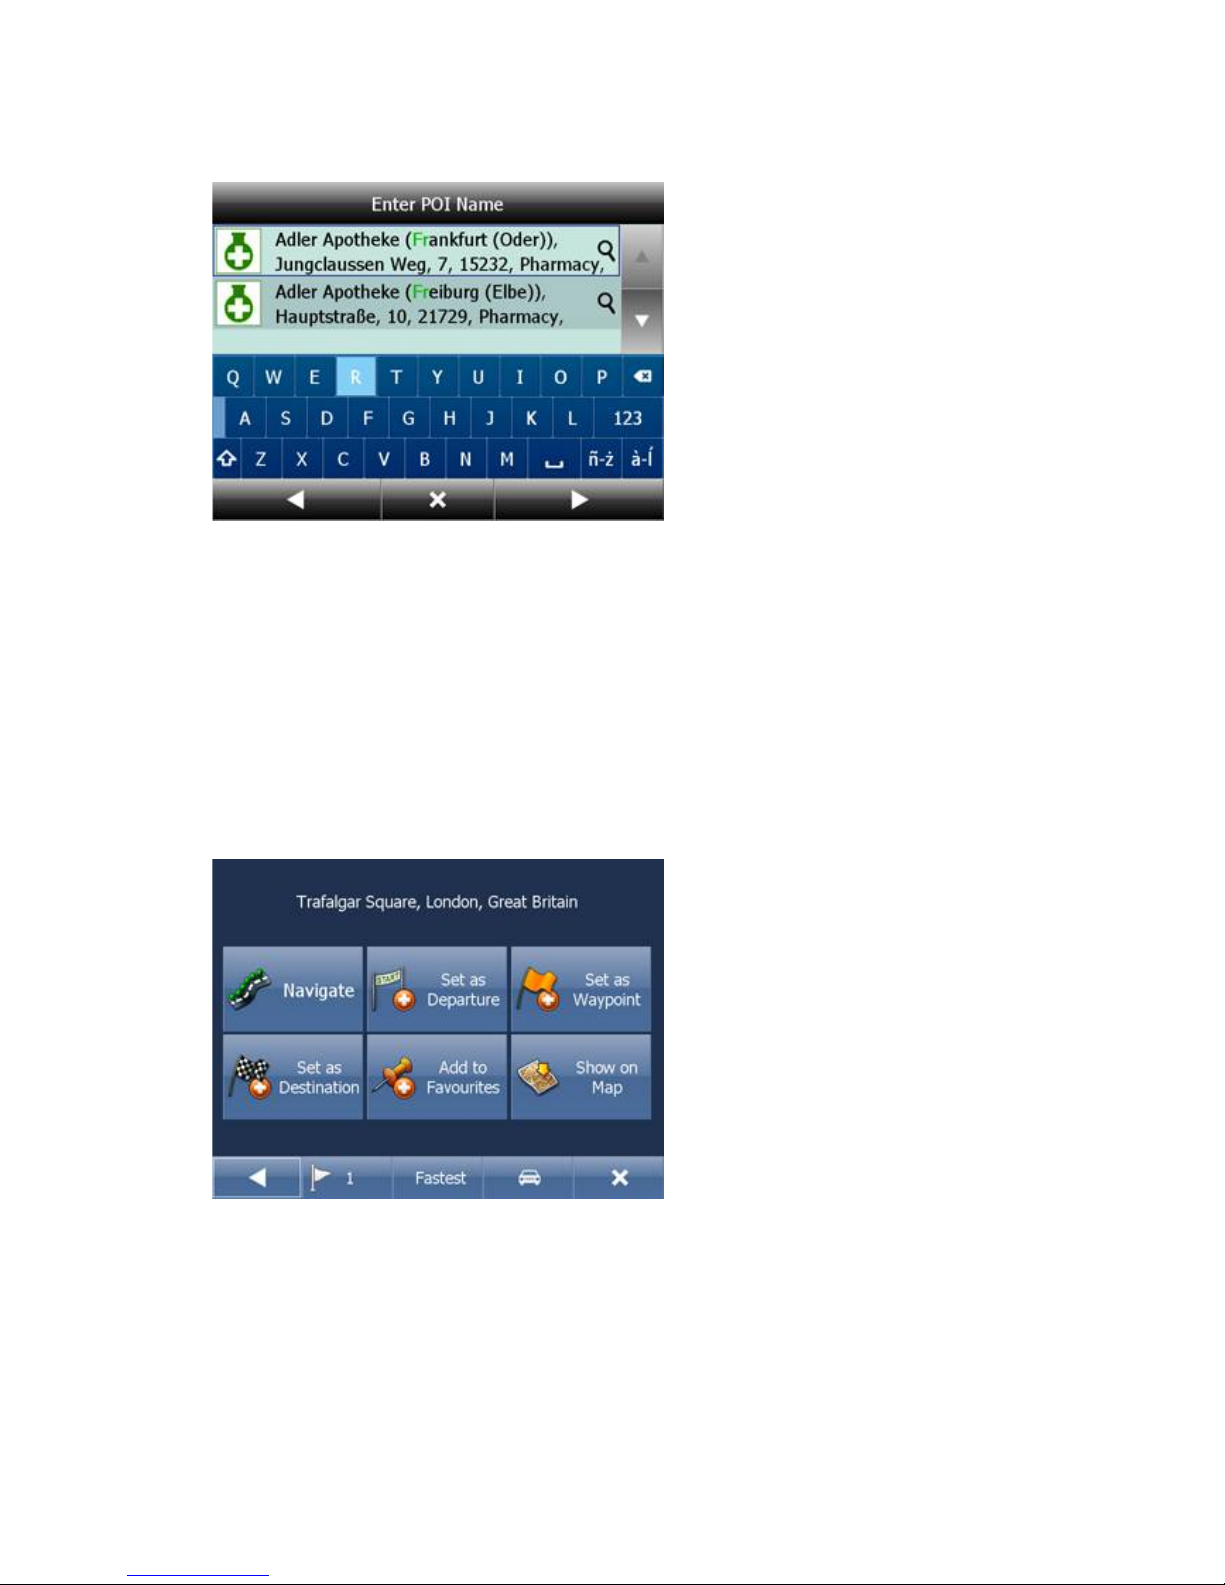
Now type the name of the POI you are looking for.
You can type using the on-screen keyboard. As you type Navigator will automatically search for nearest
matches and list them underneath.
The icon to the right of the name tells you what type POI is listed.
Once you see your POI in the list tap it.
You will now be shown the following screen
Now tap Navigate and your journey will be calculated.
You have also the following options:
Set as departure - Set the start of your journey (only necessary if you want to calculate a route without
GPS)
Set as waypoint - Add it as a stop along your journey
Set as destination - Set the destination point without starting navigation immediately
45
Page 46
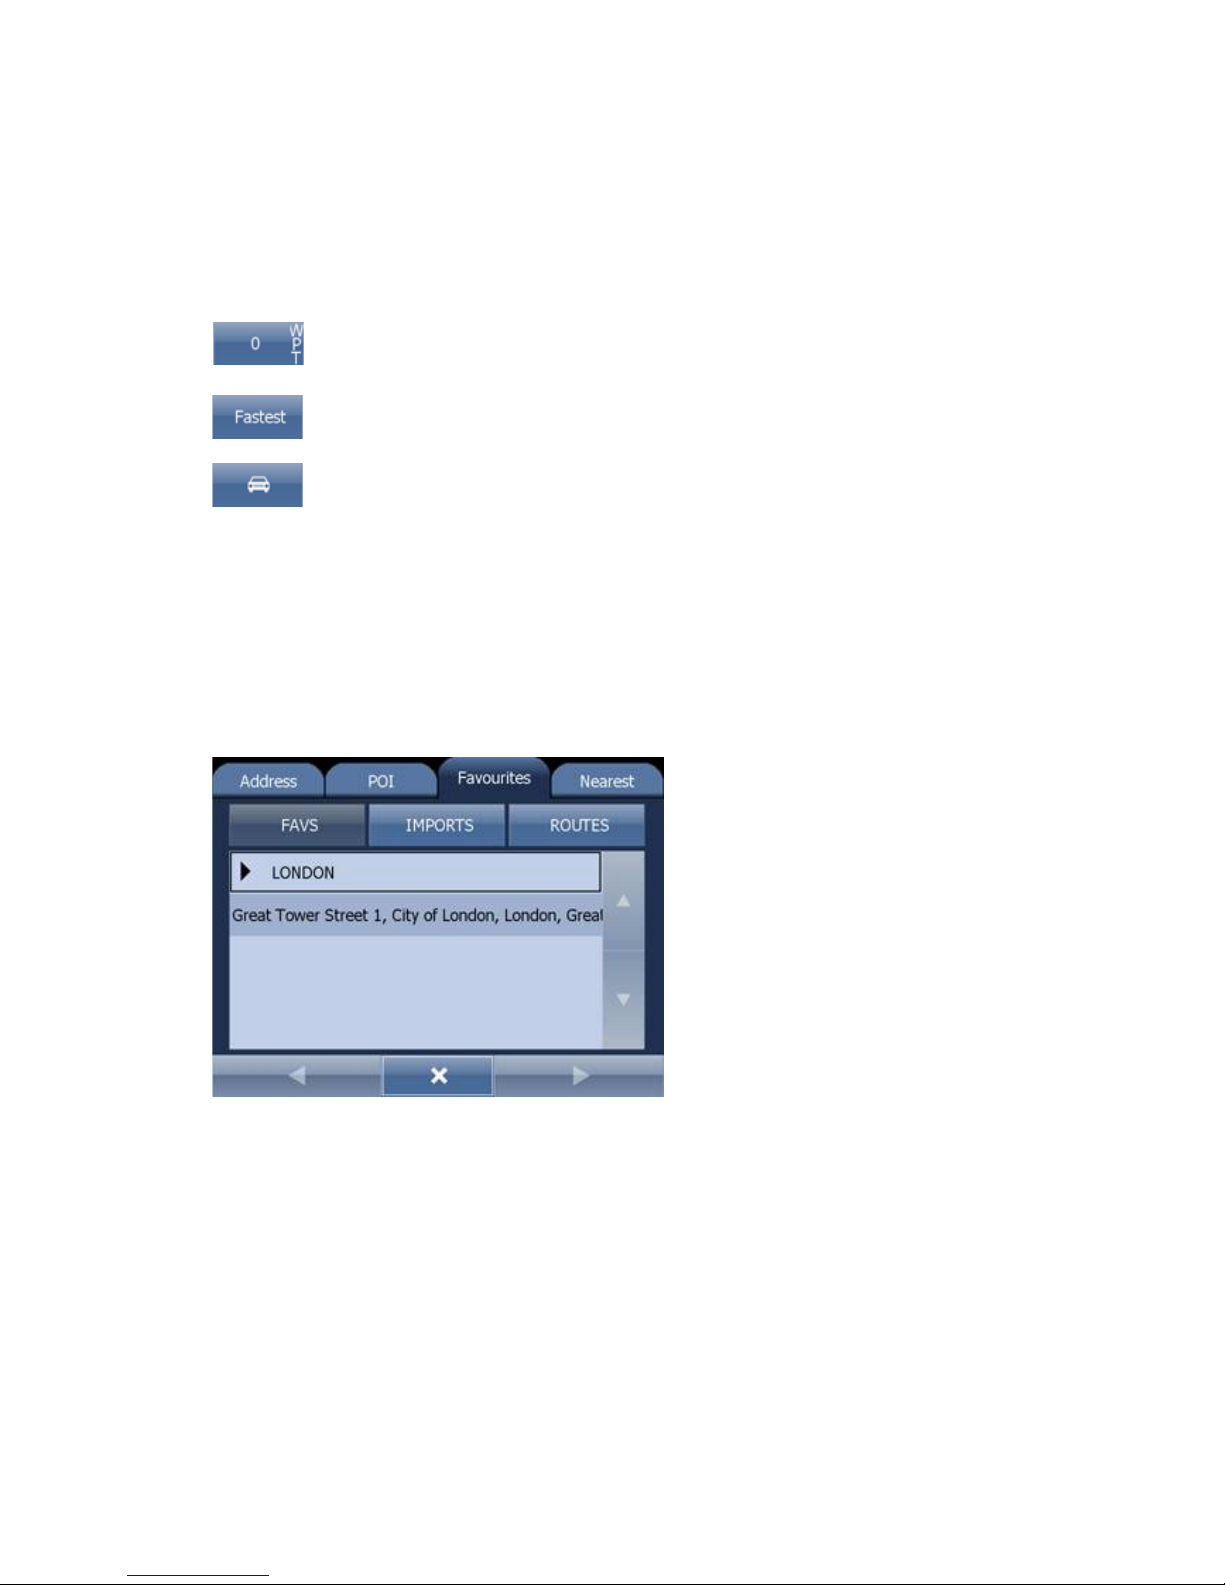
Add to favourites - Add your selection to your favourites
Show on Map - Show the result on the map
In the bar at the bottom of the screen you can see some important routing parameters:
- the number of waypoints on the journey
- the routing mode (fastest, shortest, cheapest)
- the car type selected.
You can change any of these parameters by clicking on them.
To restart your search simply click the left arrow.
Favourites
Using favourites you can quickly access locations and set as navigation destinations.
Tap on a favourite and you will be taken to the following screen. To expand a group tap on it.
46
Page 47
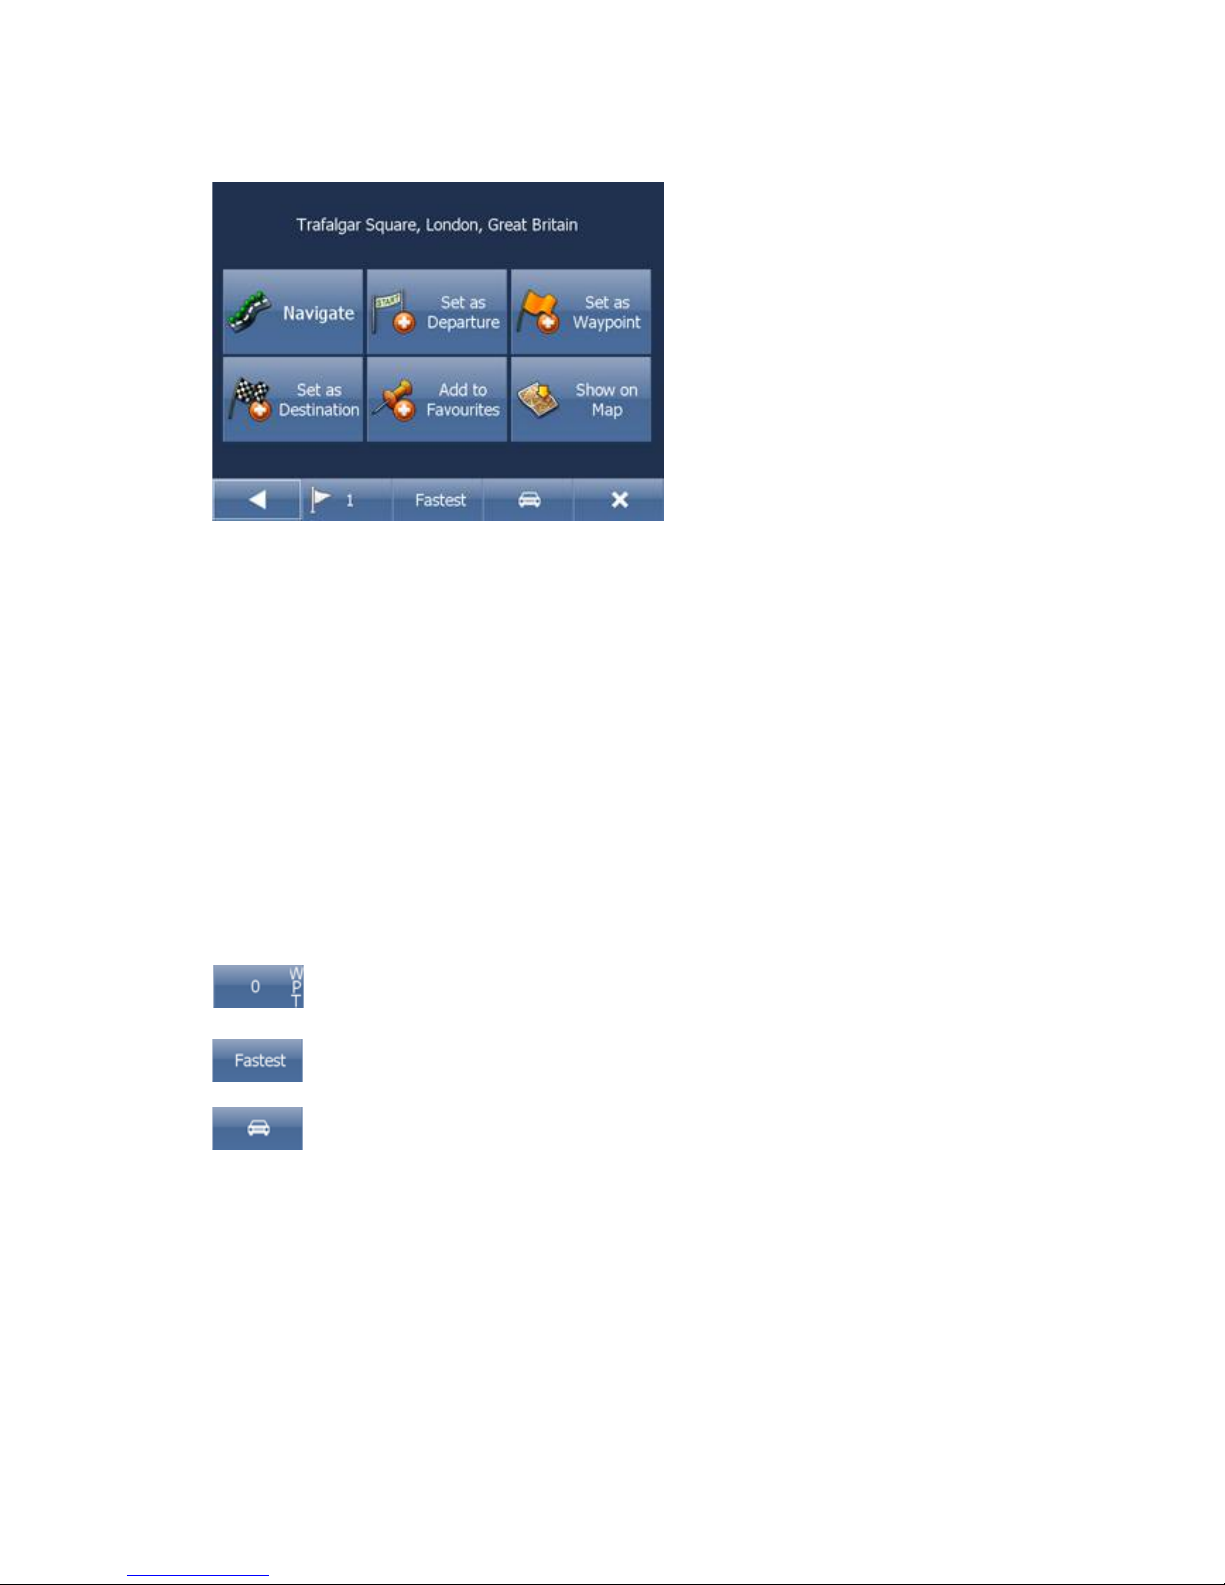
Now tap Navigate and your journey will be calculated.
You have also the following options:
Set as departure - Set the start of your journey (only necessary if you want to calculate a route without
GPS)
Set as waypoint - Add it as a stop along your journey
Set as destination - Set the destination point without starting navigation immediately
Add to favourites - Add your selection to your favourites
Show on Map - Show the result on the map
In the bar at the bottom of the screen you can see some important routing parameters:
- the number of waypoints on the journey
- the routing mode (fastest, shortest, cheapest)
- the car type selected.
You can change any of these parameters by clicking on them.
To restart your search simply click the left arrow.
47
Page 48
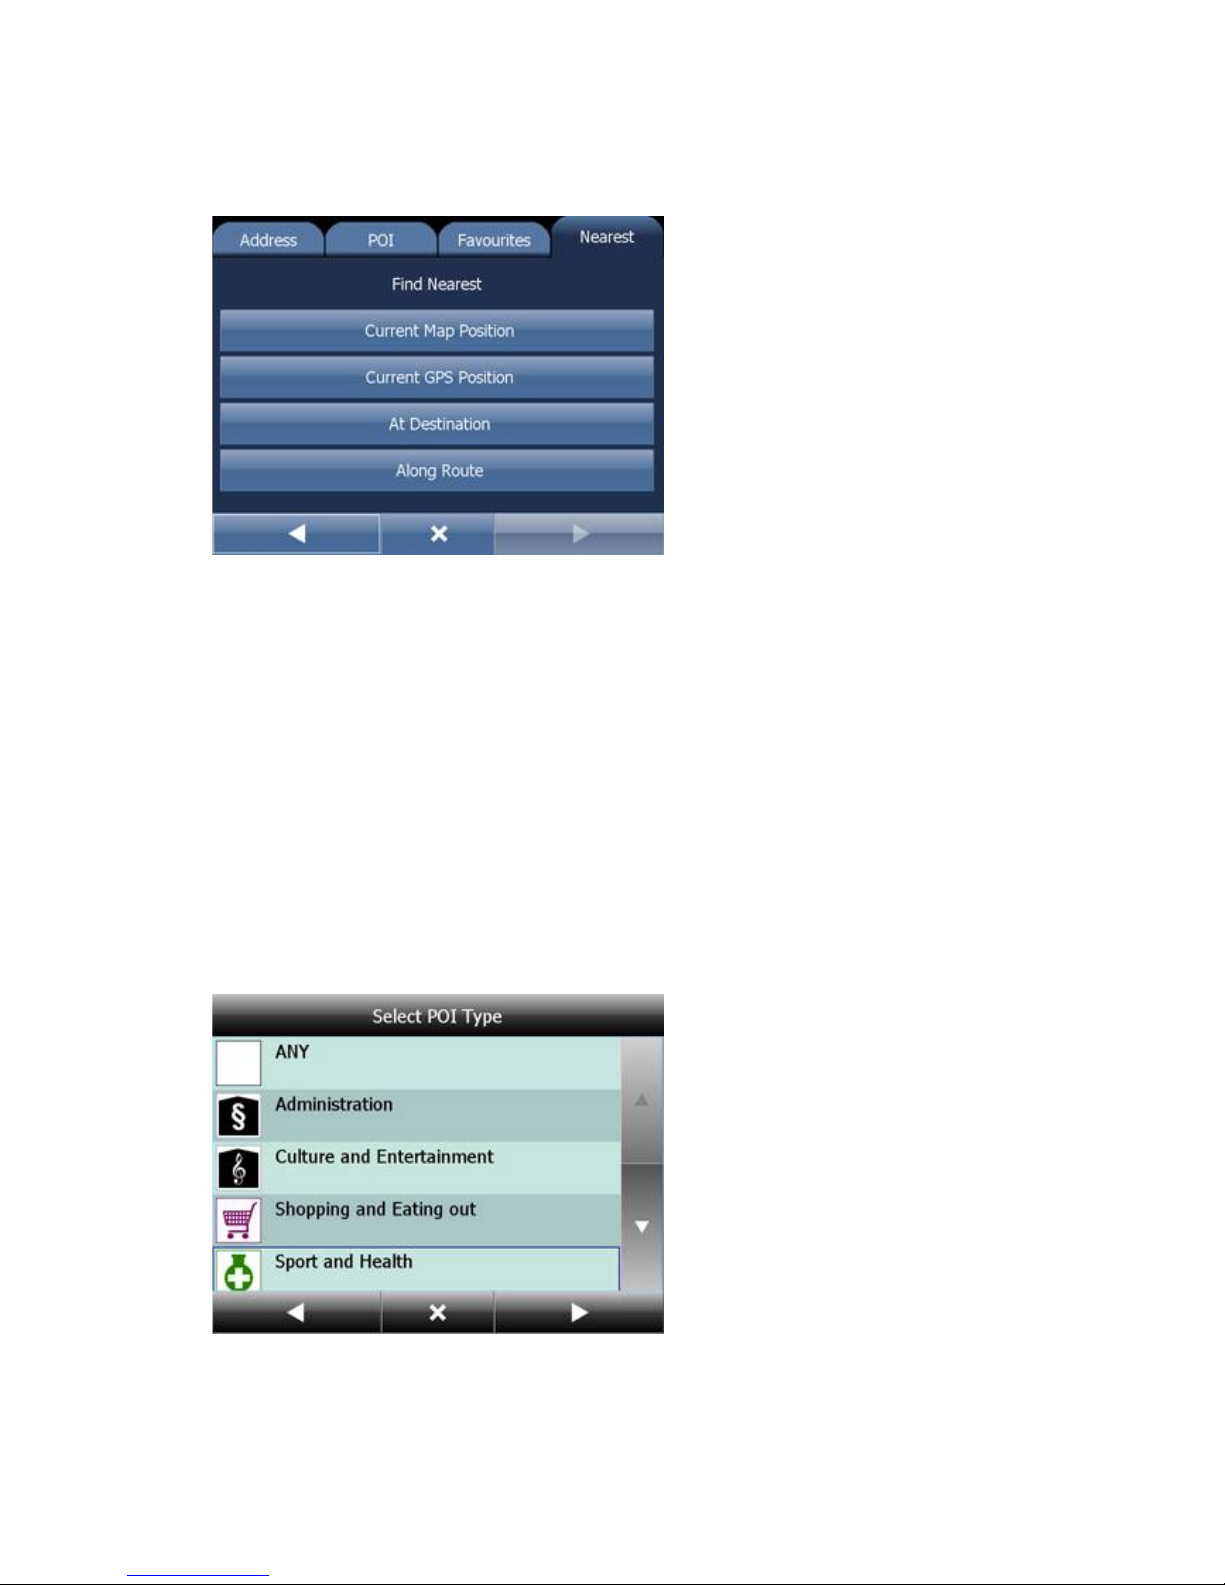
Nearest
This is a location based search useful for finding closest points of interest to:
Current Map Position - nearest to the centre of the current map view
Current GPS Position - nearest you current position
At Destination - nearest to your navigation destination
Along Route - nearest points of interest along your route
Select one of the options.
Now you can select the POI type.
Points of interest are divided into six groups.
Now select the type of POI you are looking for. If you want to search through all points of interest tap
ANY.
48
Page 49
You will now see the location of the closest points of interest along with their direct distance
You will now be shown the following screen
Now tap Navigate and your journey will be calculated.
You have also the following options:
Set as departure - Set the start of your journey (only necessary if you want to calculate a route without
GPS)
Set as waypoint - Add it as a stop along your journey
Set as destination - Set the destination point without starting navigation immediately
Add to favourites - Add your selection to your favourites
Show on Map - Show the result on the map
In the bar at the bottom of the screen you can see some important routing parameters:
- the number of waypoints on the journey
- the routing mode (fastest, shortest, cheapest)
- the car type selected.
You can change any of these parameters by clicking on them.
To restart your search simply click the left arrow.
Navigating
You should now be in navigation mode. Your journey will be highlighted on the map.
49
Page 50
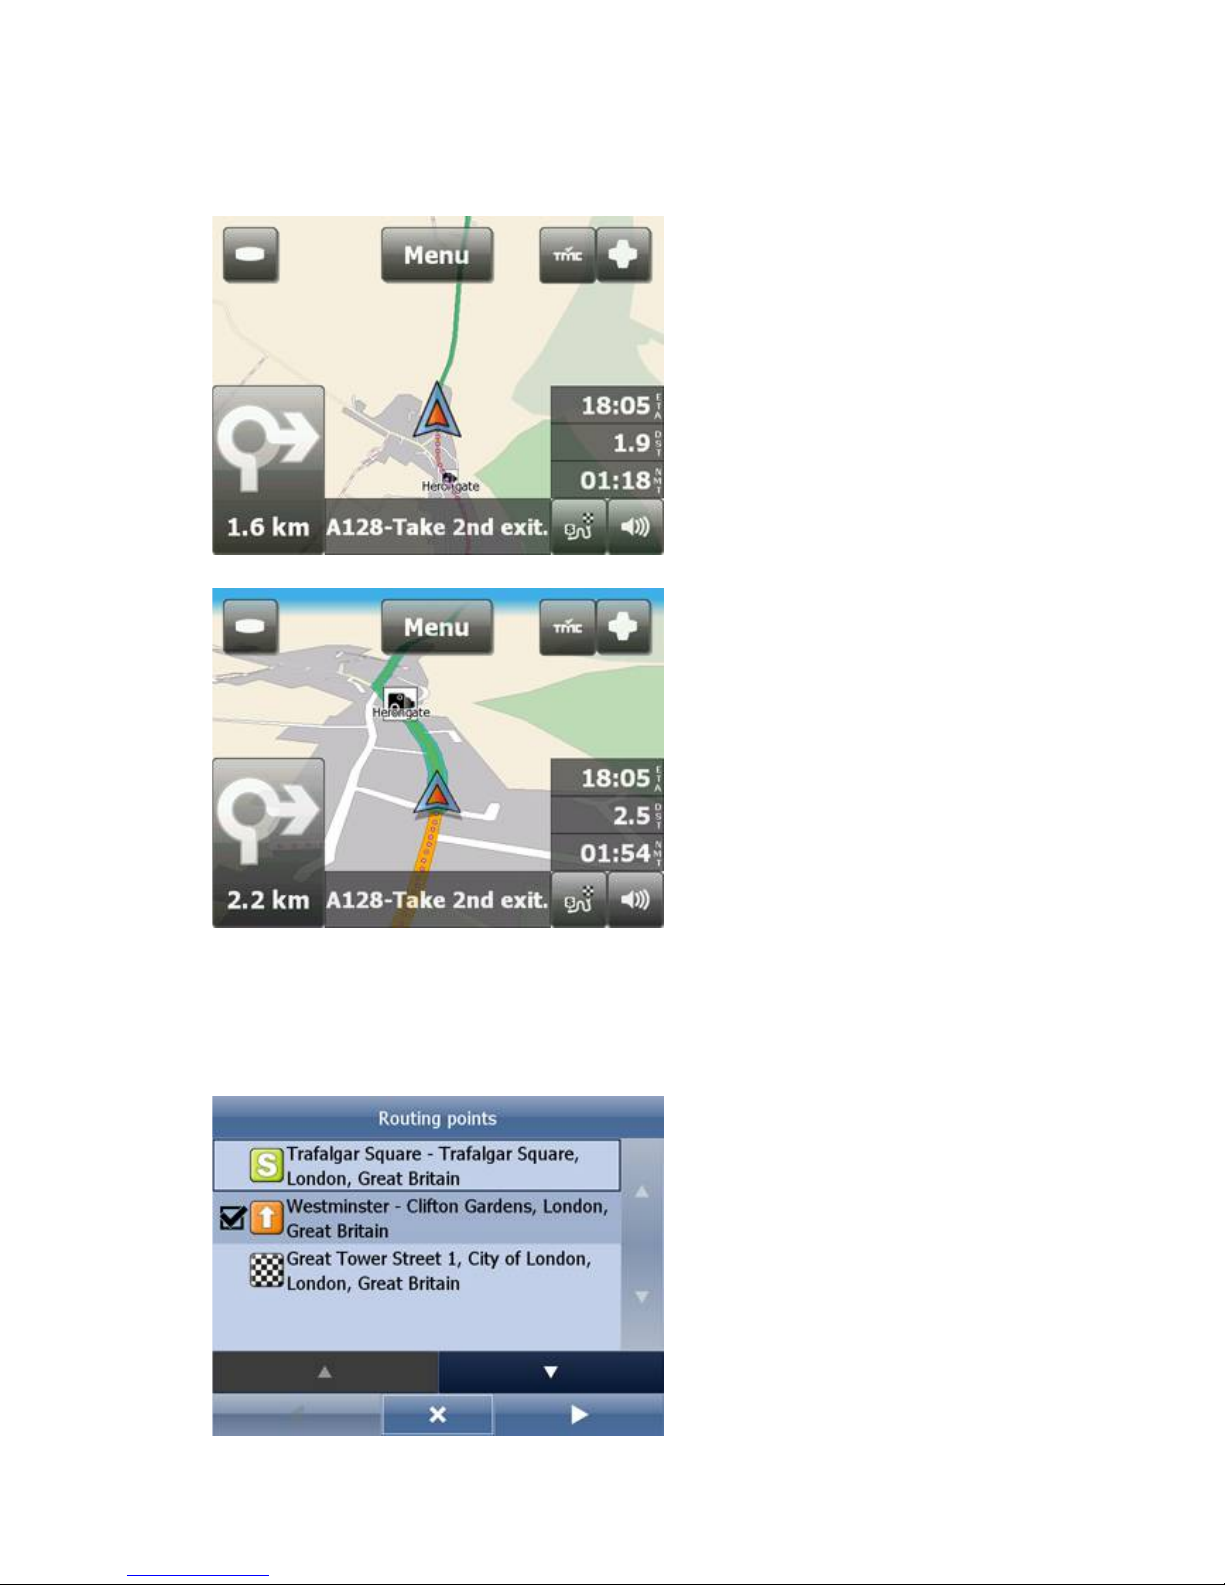
You will see something like
or
depending on whether you selected 2D or 3D mode.
Instructions about your next maneuver are displayed in the opaque bar at the bottom of the screen.
If you have added one or more waypoint to your journey you will see the following screen:
50
Page 51
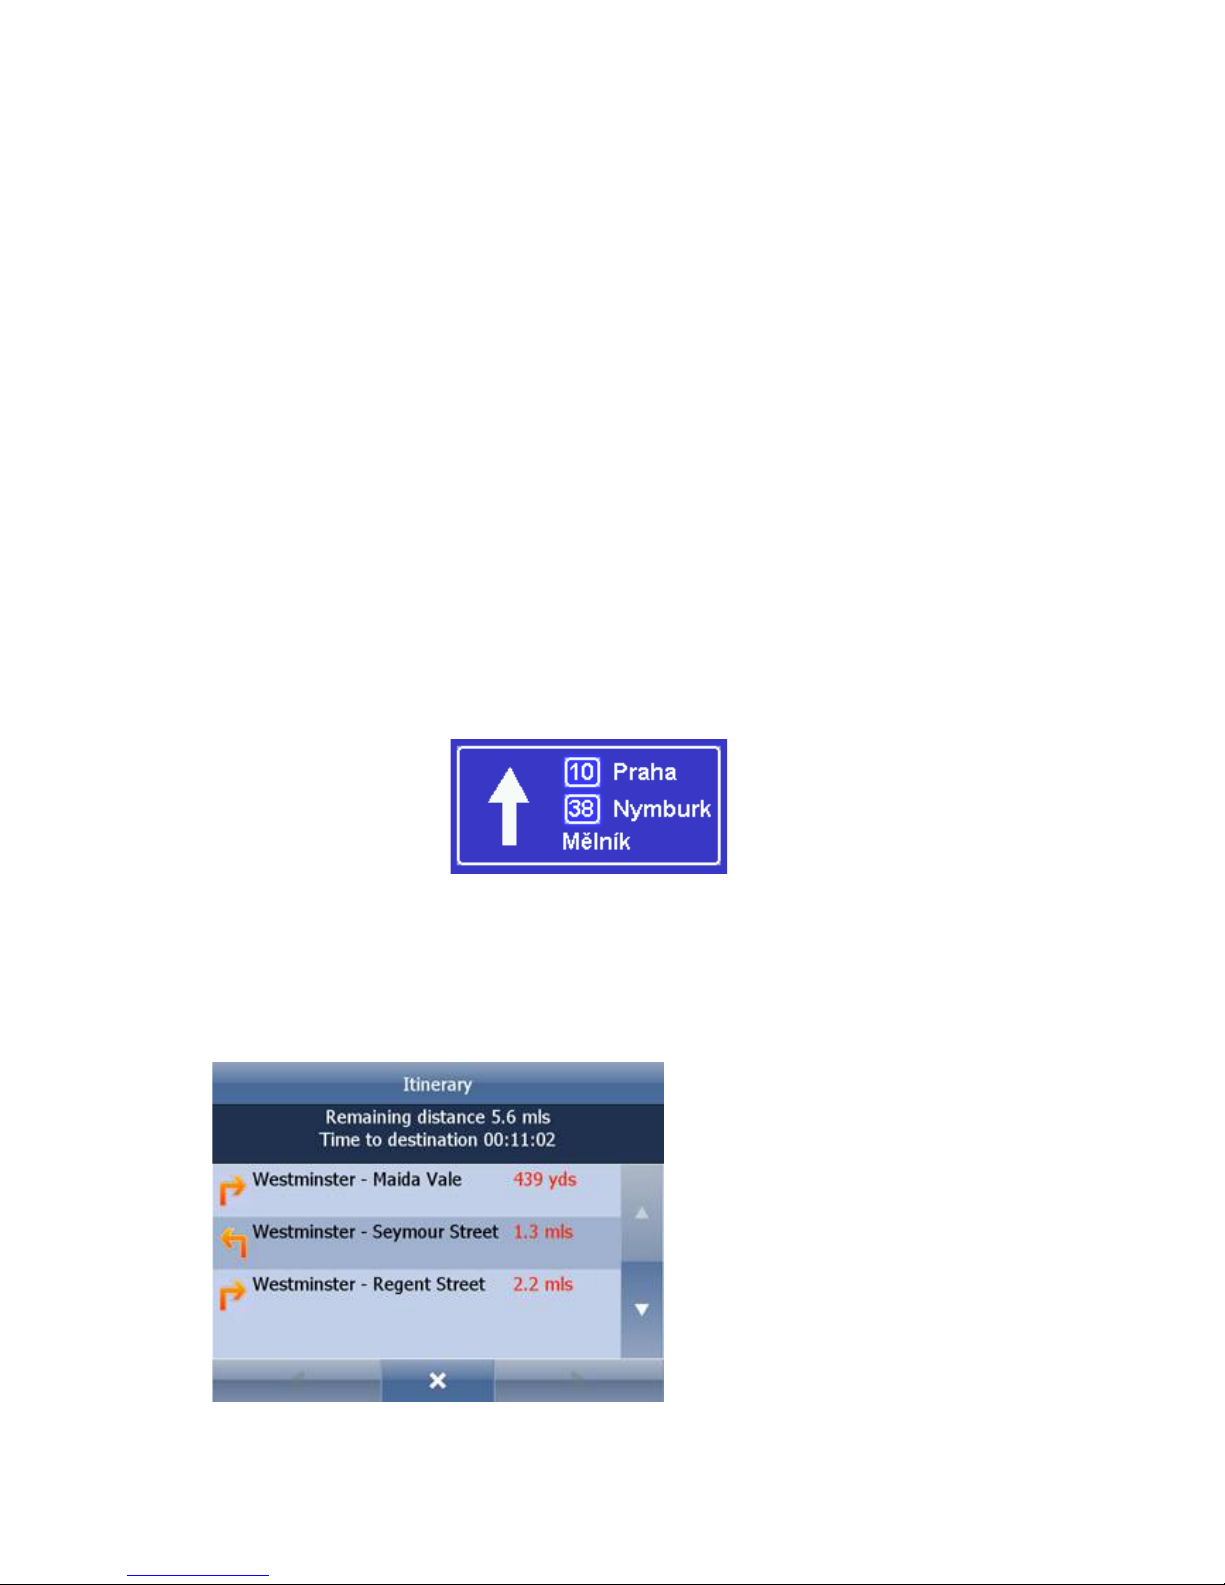
Here you can deselect waypoints that you no longer want to route through by using the checkboxes on the
left of the screen.
On major roads navigator will often activate the lane assistant which helps you get in the right lane for the
next manoeuvre. Correct lanes are shown with green dots, others as red dots.
If you stray from your route Navigator will automatically recalculate your journey.
Tapping on the map screen reveals four hidden buttons - zoom in, menu, zoom out and in the bottom right
of the map the route overview button.
Tap the route overview button to see the whole length of you journey. You can now operate the map
without it centring on your GPS position. This is useful if you want to find other place on the map or find
an alternative route.
To get back to navigation mode tap the route overview button again.
Tap the blue directional sign to shrink it to a couple of lines. To
expand it, tap it again.
To see the full itinerary of your route tap the manoeuvre arrow on the left of the screen. To see the
itinerary you can go from Menu - Route - Itinerary.
Here you can see driving instructions for the whole journey.
51
Page 52
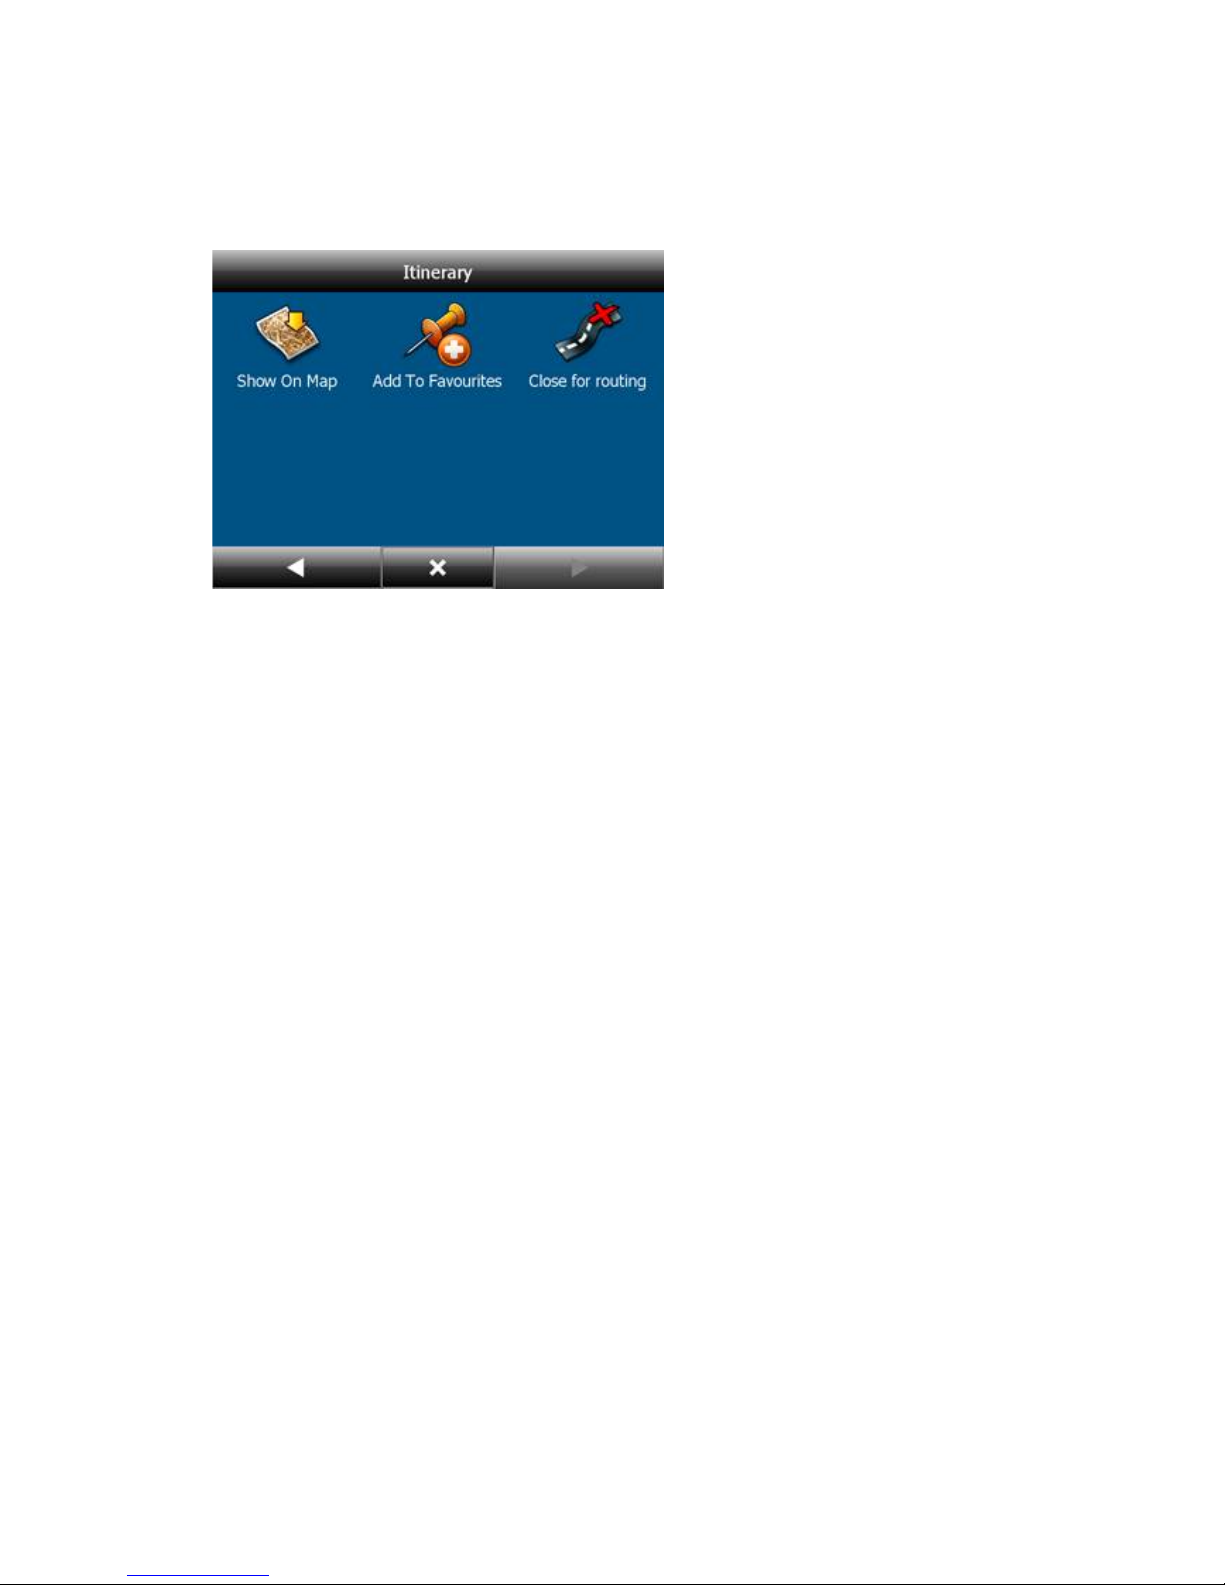
Tap to select any entry in the itinerary. Tap the right arrow to show the following menu.
Here you can select to show the select link on the map, add it to favourites or disable it from the routing
engine. Once a link is disabled it will not be used in future route calculations.
Tap on any navigation panel on the right of the screen to change what it displays.
A screen with several option will appear. Tap one to select it.
Here you can set what type of information you want to see in the navigation panel at the right of the
screen as you drive. Possibilities are:
DST - Distance to destination - how far away you are in km or miles
TTA - Time to destination - the approximate time left before you reach your destination
ETA - Time in destination - the approximate time you will arrive at your destination
TTM - Time to maneuver - the approximate time before your next maneuver
ALT - Altitude, SPD - Speed, AZI - Course, SAT - Number of satellites, GPS - Position, TIM - Time and
DAT - Date give you data about your current position and the Satellite signal.
TTW - Time to the nearest waypoint - the approximate time left before you reach the nearest waypoint
DTW - Distance to the nearest waypoint - how far is the nearest waypoint
SPL - Speed limit - the speed limit on the current road
Note that the number of navigation panels that is displayed can be changed in navigation settings.
This document is for guidance only and does not form part of any contract, and
may be subject to change without notice.
52
 Loading...