

Actiontec electronic WNS100-160, WNS100-400, WNS100-200, WNS100-300, WNS100 User Manual
...Page 1

Wireless Network Attached
Storage Device
Model #s: WNS100, WNS100-160, WNS100-200,
WNS100-250, WNS100-300, WNS100-400
User Manual
Ver. 0.3
Solutions for the Digital Life
™
Page 2

Table of Contents
1 Introduction 1
Features 1
Package Contents 2
System Requirements 2
Technical Support 2
2 Configuring the NAS Device 3
Client PC Setup 3
Accessing the NAS Device 6
Changing the Password 8
USB Devices 10
Adding a Print Server 10
Other Configurations 15
3 Using the Administrative Utility 17
Accessing the Administrative Utility 17
Users 18
System Status 21
Wireless Settings 23
Network Settings 23
System Settings 25
Advanced Setup 29
4 Configuring the Wireless Settings 45
Accessing the Wireless Settings 45
Setting Up Wireless Operation 46
Setting Up Wireless Security 47
5 Accessing the NAS Device on the Internet 51
Connecting Via the Internet 51
Using the Web Browser from the Internet 52
Remote Management 52
FTP (File Transfer Protocol) 52
6 Troubleshooting 53
A Specifications 57
Notices 59
Regulatory Compliance Notices 59
Modifications 59
Miscellaneous Legal Notices 60
Limited Warranty 61
i
Page 3

Actiontec Wireless Network Attached Storage Device User Manual
This page left intentionally blank.
ii
ii
Page 4

Introduction
1
Congratulations for purchasing the Actiontec Wireless Network Attached Storage
(NAS) Device. The Wireless NAS Device adds gigabytes of storage space to your
network without the cost, space, and maintenance hassles of a full-fledged file
server. The Wireless NAS Device also provides solid data transfer performance for
multiple client connections, and you can add as many Wireless NAS Devices to
the network as you like. And now, with its wireless capabilities, you can connect
to the Wireless NAS Device using any wireless-equpped computer on the network.
Compared to using a standard computer as a file server, the Wireless NAS Device
offers lower cost, easier management, and increased reliability.
Features
• Provides from 160 to 400 gigabytes of external hard disk space (depending
on model)
• Includes standard USB 2.0 port that can be connected to hard disk or flash
drives
• Supports NTFS and FAT file format for connected USB hard drive
• Includes Windows utility program for speedy configuration.
• Web-based configuration and diagnostic interface accessible from any computer on the network
• Can act as a stand-alone DHCP server
• Administrator can limit the amount of available disk space available to individual users.
• High-performance file system automatically maintains itself to provide file
system integrity
• Additional NAS Devices can be added to the network at any time
• Supports wireless networking (802.11b, g)
1
Page 5

Actiontec Wireless Network Attached Storage Device User Manual
Package Contents
If any of these items are damaged or missing, please contact the dealer for replacements.
• Wireless NAS Device
• Quick Installation Guide
• Setup CD
• Ethernet Cable
• Power Adapter
System Requirements
• Windows 98SE, Me, 2000 and XP
• Ethernet network employing 10BaseT or 100BaseTX
• TCP/IP protocol
• Wireless capability (if using wireless network option)
Technical Support
Actiontec Electronics prides itself on making durable, high-quality, high-performance products. If you need assistance, the Actiontec Technical Support Department
is available all day every day to provide professional support.
Actiontec Electronics, Inc.
760 N. Mary Avenue
Sunnyvale, CA 94085
Technical Support
Phone: (USA) 1-888-436-0657
(UK) 0845-65-80411
E-mail: http://support.actiontec.com/email_support/support_form.php
Internet: www.actiontec.com/support
2
Page 6
Configuring the NAS Device
After connecting and setting up the NAS Device (see the included Quick Start
Guide for instructions), the user can perform custom configurations. This chapter
explains how to configure the NAS Device on the network for various tasks, includ-
ing file sharing, setting up a print server, and changing the password.
Client PC Setup
The following items need to be checked or configured:
• Network Logon (Windows 98SE and Me only)
• Locating the NAS Device on the network
• Mapping to the NAS Device
Network Logon (Windows 95/98/ME only)
To check the Network Logon, follow this procedure:
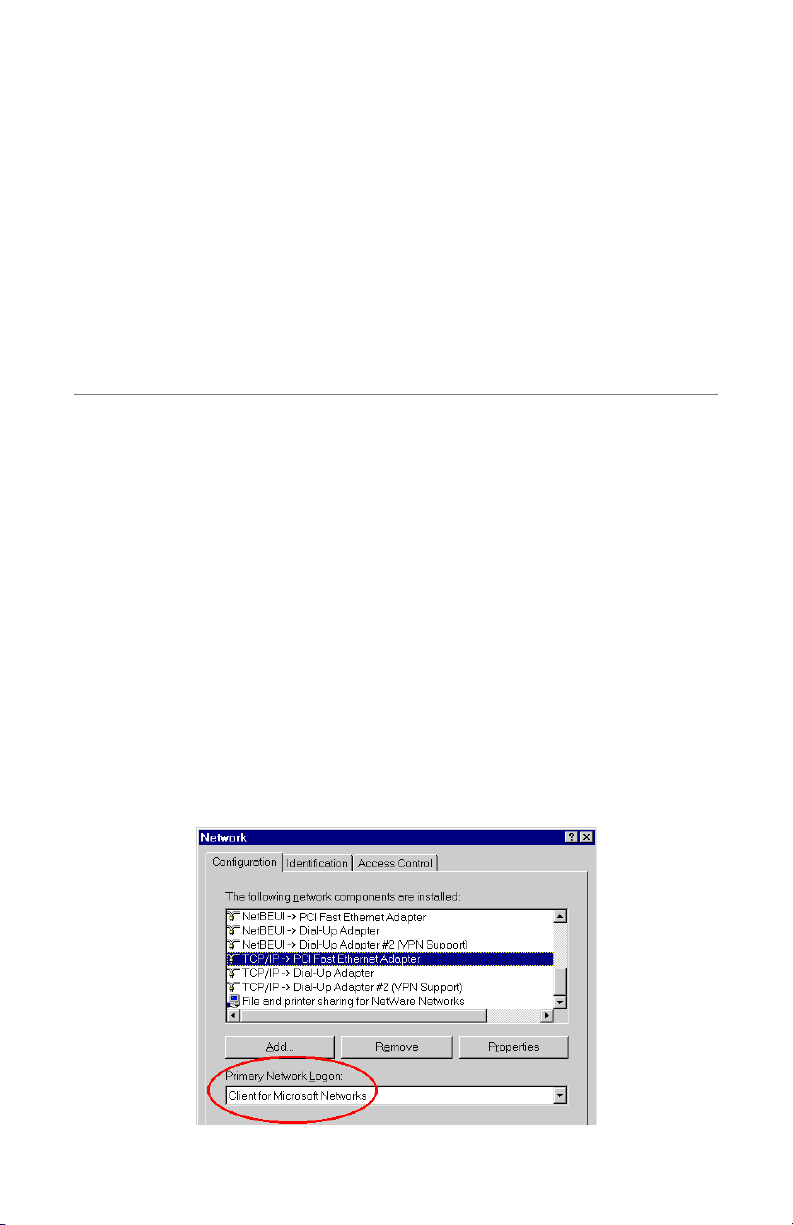
1. Check the Window log on: from the computer’s desktop, select Start >
Settings > Control Panel > Network.
Ensure the “Primary Network Logon” is set to “Client for Microsoft
Networks,” as shown below.
2
3
Page 7
Actiontec Wireless Network Attached Storage Device User Manual
5
Chapter 2 Configuring the NAS Device
2. Log on when Windows prompts for a network logon. If ESC (on the key-
board) or Cancel is clicked, no network resources will be available. When logging on, a valid user name and password must be entered. If the administrator
has defined users on the NAS Device, use the user name and password supplied by him/her.
Using the NAS Server's Storage
To use the NAS Device’s storage capabilities, “map” a drive letter to each folder on
the Device that needs to be accessed. This creates a “network drive” on the computer, which will then be available to all programs. To do this:
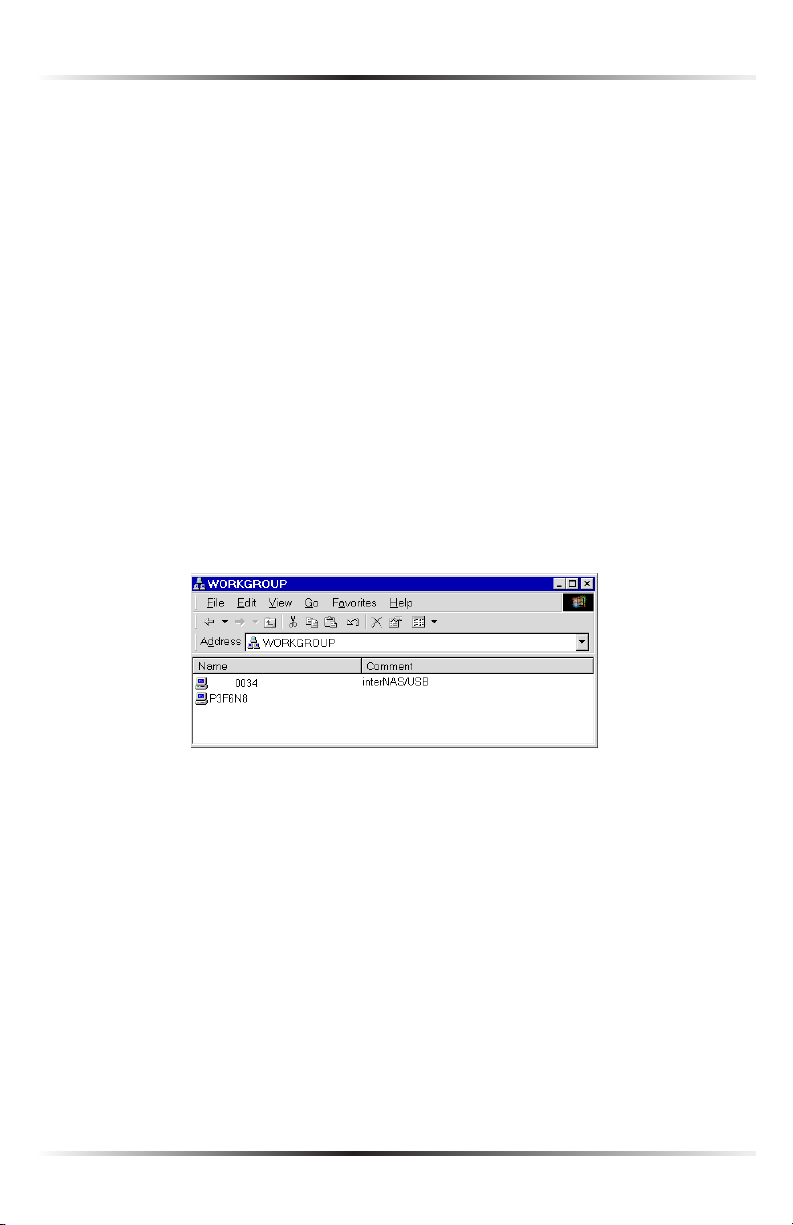
1. Double-click Network Neighborhood (or My Network Places).
2. On the “View” menu, select Details. The “Comment” column appears.
3. Locate the NAS Device, as shown below. If not listed, double-click Entire
Network. Then double-click the workgroup to which the Device belongs. (By
default, the Device’s workgroup is “Workgroup.”)
AEEE
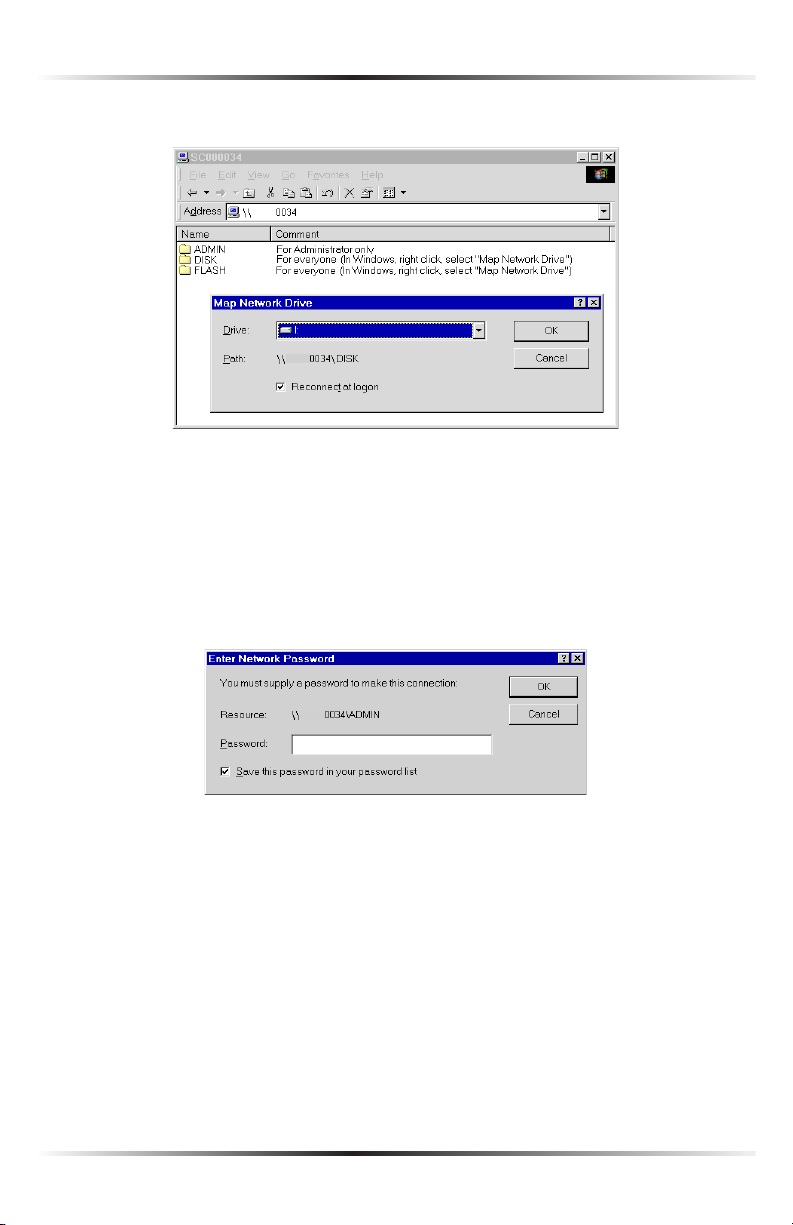
4. Double-click the “NAS” icon. A list of shares (shared folders) appears. Files can
be read from or written to these shares, unless the administrator has blocked
access.
5. To create a shortcut to a NAS folder, drag its icon to the desktop, and accept
Windows offer to create a shortcut.
Mapping a Network Drive
You can give a share (shared folder) on the NAS Device a drive letter on the computer, such as “F:” This is called “mapping” the drive. To do this:
1. Right-click on the desired share on the Device.
4
Page 8
Chapter 2 Configuring the NAS Device
2. From the menu that appears, select Map Network Drive….
AEEE
AEEE
3. Select a drive letter for this folder, click in the “Reconnect at Logon” check box,
then click OK.
4. This drive will now be available in Windows Explorer, and from the “FileOpen” or “File-Save As” dialogs in all applications.
Note: When accessing a folder, a prompt for a password may
☞
appear, as shown below.
AEEE
• If the Windows logon name is the same as the user name on the NAS
Device, but the passwords are different, enter the password in the
“Password” text box.
• If the Windows logon name does not exist on the NAS Device, only guest
access rights are made available, and no password should be entered. Ask
the administrator to create a user name and password for on the Device.
• Even if the user name and password are correct, access will not be granted
if the administrator has not allowed access.
5
Page 9
Actiontec Wireless Network Attached Storage Device User Manual
7
Chapter 2 Configuring the NAS Device
Tips for Storing Data on the NAS Device
• Change the Windows user name and password to match the user name and
password assigned by the NAS Device. This allows just one log in sequence.
• Map multiple NAS folders on the computer, as described above.
• Backup data by copying files from the computer to the NAS Device.
• If Windows Me, 2000, or XP is running on the computer, a backup program
is available. Use this backup program to automate the process of backing
up data to the Device. Read the instructions and help file supplied with this
program for details.
Accessing the NAS Device
To access the NAS Device from the computer to which it is connected:
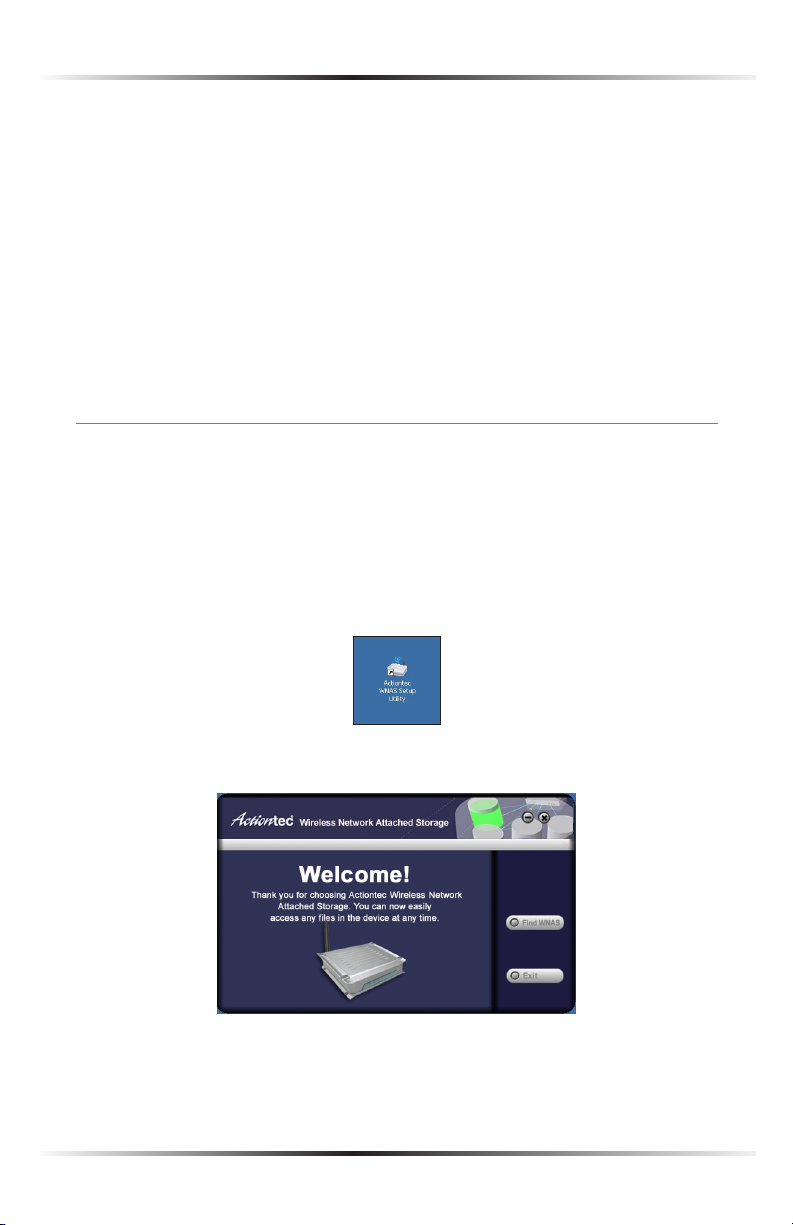
1. Insert the Utility CD in the CD-ROM drive of the computer.
2. Load the “Actiontec WNAS Setup Utility” on the computer
3. Start the Utility by double-clicking on the Utility’s desktop icon.
4. The “Welcome” screen appears. Click on the “Find WNAS” button.
6
Page 10
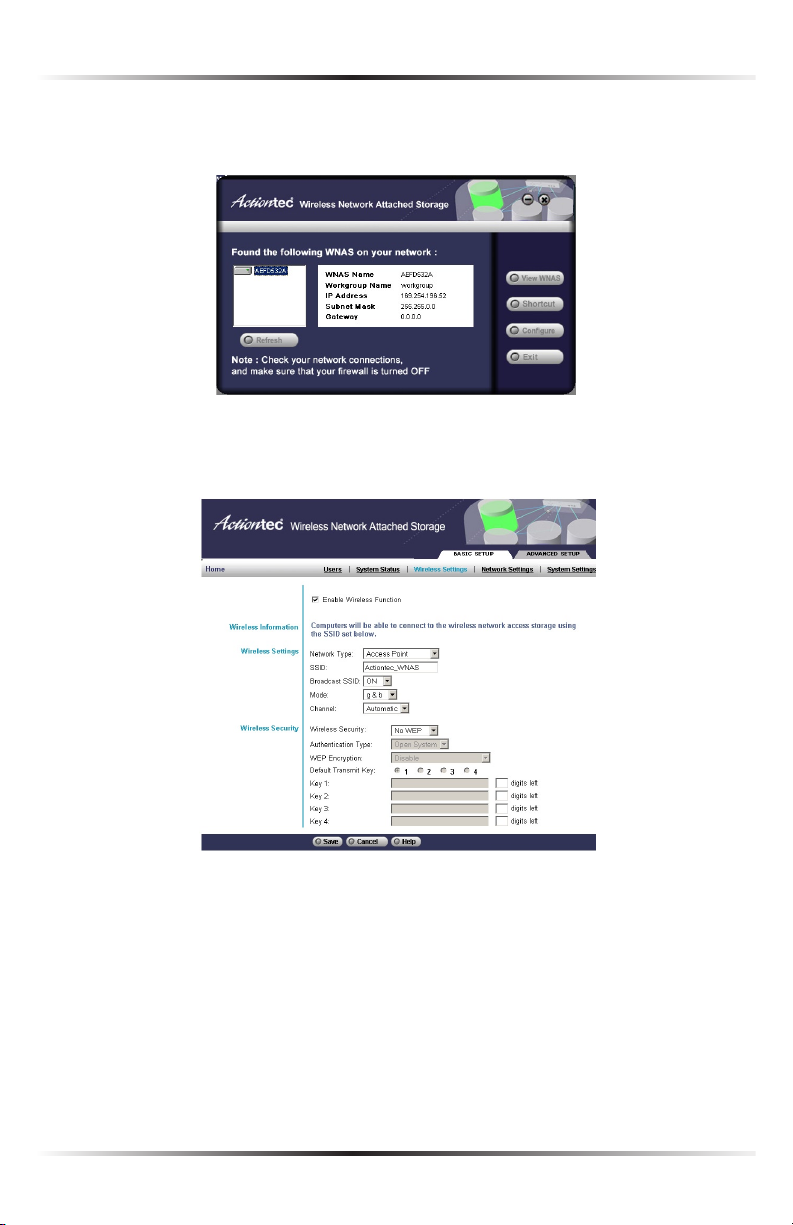
Chapter 2 Configuring the NAS Device
5. The Utility searches for the WNAS device. When it is found, another window
appears. Click on the “Configuration” button.
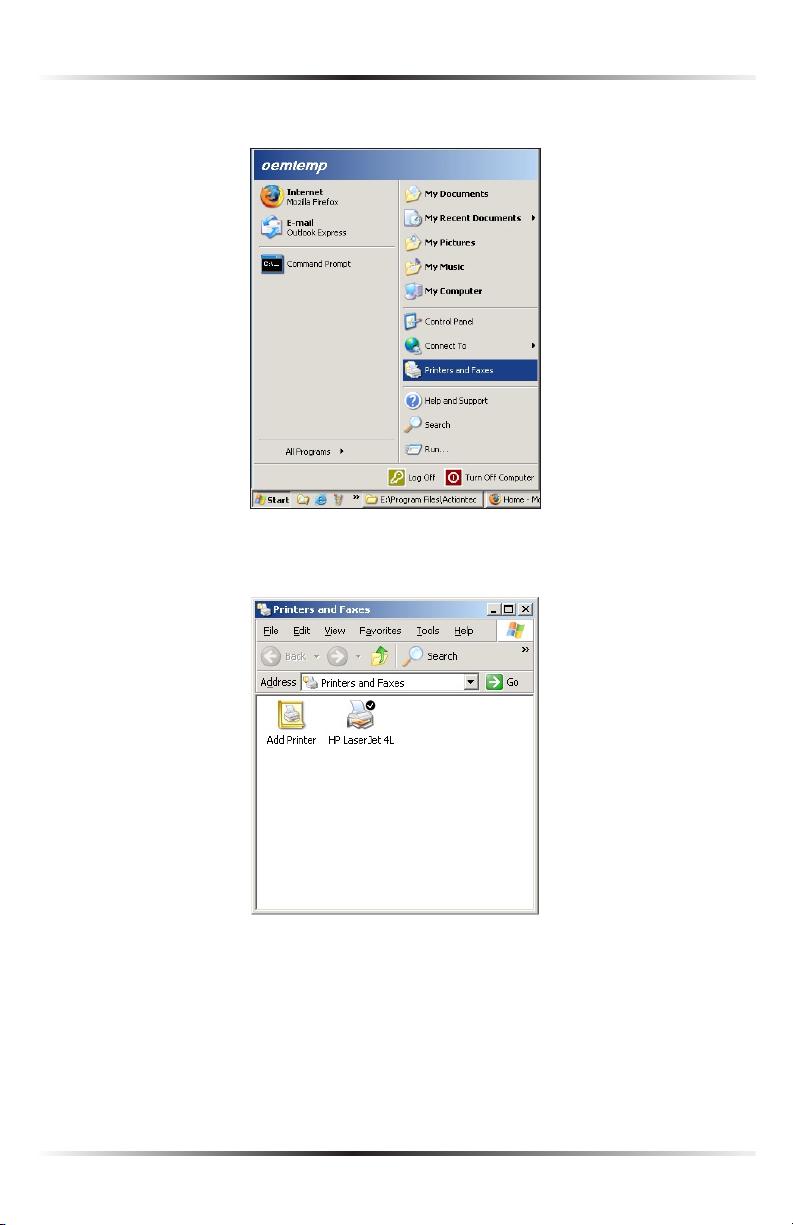
6. The Web browser starts up, and the “Wireless Settings” page of the Web
Configuration Utility appears. Click Home.
7
Page 11
Actiontec Wireless Network Attached Storage Device User Manual
9
Chapter 2 Configuring the NAS Device
7. The Utility’s “Home” screen appears.
8. To browse the files and folders on the NAS Device, click Shared_Data or
FLASH/USB HDD.
• Shares (Folders) to which everyone has access are listed. Access these folders
and files by clicking on the folder name or file name.
• To download a file displayed in the browser, right-click on the file and select
Save Target as….
9. To access data which is password-protected, click User Login.
• A prompt for the user name and password appears. Enter the user name
and password assigned by the administrator.
• The screen will then update, and list all accessible Shares (folders).
10. Navigate through these folders by clicking on the folder name, and download
any file by right-clicking in and selecting Save Target as….
Changing the Password
Although the administrator must create the user name and initial password, they
can be changed by the user. To do this:
1. Follow steps 1 through 7 of “Accessing the NAS Device” (see page 6).
8
Page 12

Chapter 2 Configuring the NAS Device
2. The “Home” screen appears.
3. To change the password, click Change Password. The following screen
appears.
4. Enter the required data:
• User name - the login name of the NAS Device, created by the administrator
• Existing password - the current password
• New password - the new password
• Confirm new password - reenter the new password
5. Click Save to save the changes.
6. Click Home to return to the main screen.
9
Page 13

Actiontec Wireless Network Attached Storage Device User Manual
11
Chapter 2 Configuring the NAS Device
USB Devices
A USB hard drive or USB Memory Disk (flash memory disk) can be inserted in the
NAS Device’s USB port at any time. Once the USB LED on the front panel comes on
and stays on, the USB device is available for use.
For a USB hard drive, the Device can recognize the FAT and NTFS file formats.
Removing a USB device - Method A (USB Hard Drive)
1. Press the “USB Eject” button on the rear panel. The NAS Device beeps.
2. Wait for the USB LED to start blinking slowly.
3. Remove the USB device.
Removing a USB device - Method B (USB Flash Drive)
1. Click the Flash Utility icon in the computer desktop’s system tray.
2. Select Safely Remove Drive.
3. Select the desired NAS Device.
4. Click Eject.
5. Wait for the USB LED to start blinking slowly. (The program will also display a
message when it is safe to physically detach the USB device.)
6. Remove the USB device.
Note: If the USB device is not removed, it will not be re-con-
☞
nected. The USB device must be removed and re-inserted to reconnect.
Adding a Print Server
If a USB printer is connected to the NAS Device, the Device can be used as a print
server. To do this, follow these instructions (this installation is for Windows XP
only; other operating systems may have a slightly different procedure):
1. Plug a USB printer in the USB port on the rear panel of the NAS Device.
10
Page 14
Chapter 2 Configuring the NAS Device
2. From the desktop of the computer, select Start, then Printers.
3. When the “Printers” (or “Printers and Faxes”) window appears, click Add
Printers.
11
Page 15

Actiontec Wireless Network Attached Storage Device User Manual
13
Chapter 2 Configuring the NAS Device
4. Read the on-screen information, then click Next.
5. In the next window, select the “A network printer…” option. Click Next.
6. In the next window, select the “Browse for a printer” option. Click Next.
12
Page 16
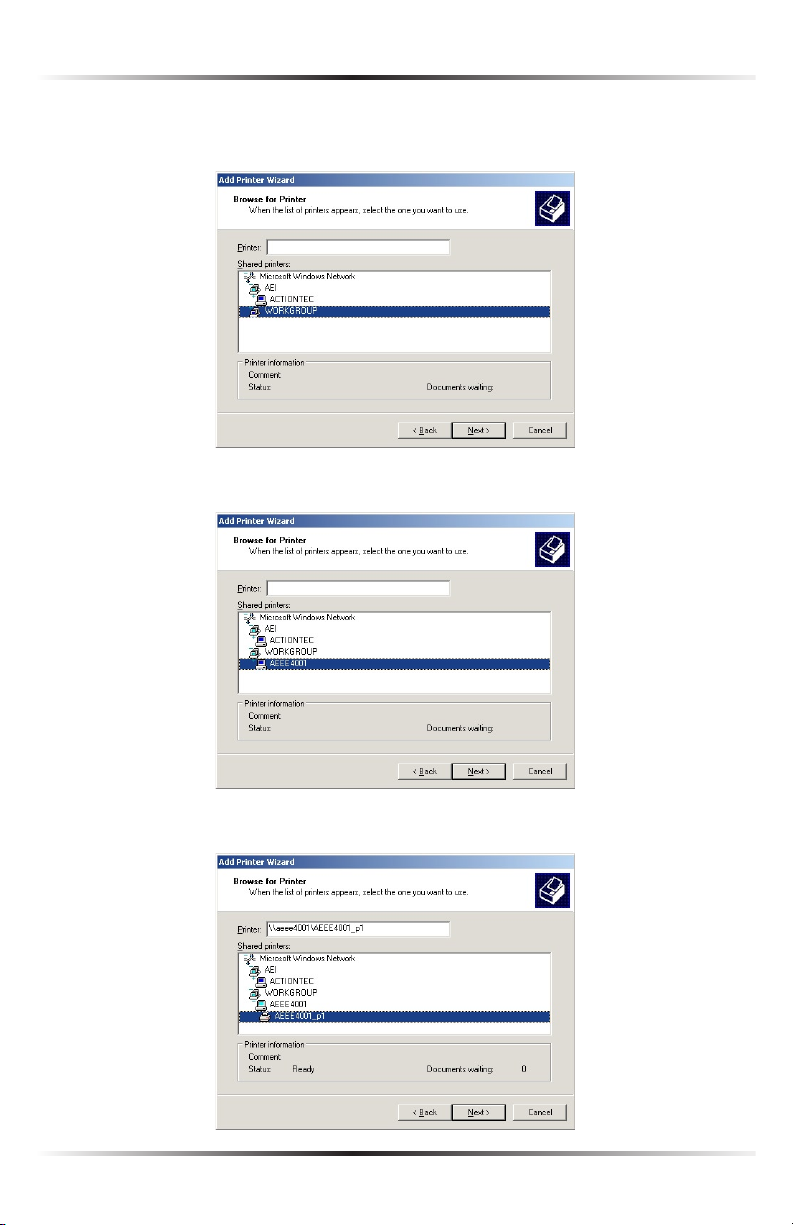
Chapter 2 Configuring the NAS Device
7. In the “Add Printer Wizard” window, select the workgroup to which the NAS
Device belongs. Click Next.
8. From the list that appears, select the NAS Device. Click Next.
9. From the list that appears, select the printer. Click Next.
13
Page 17
Actiontec Wireless Network Attached Storage Device User Manual
15
Chapter 2 Configuring the NAS Device
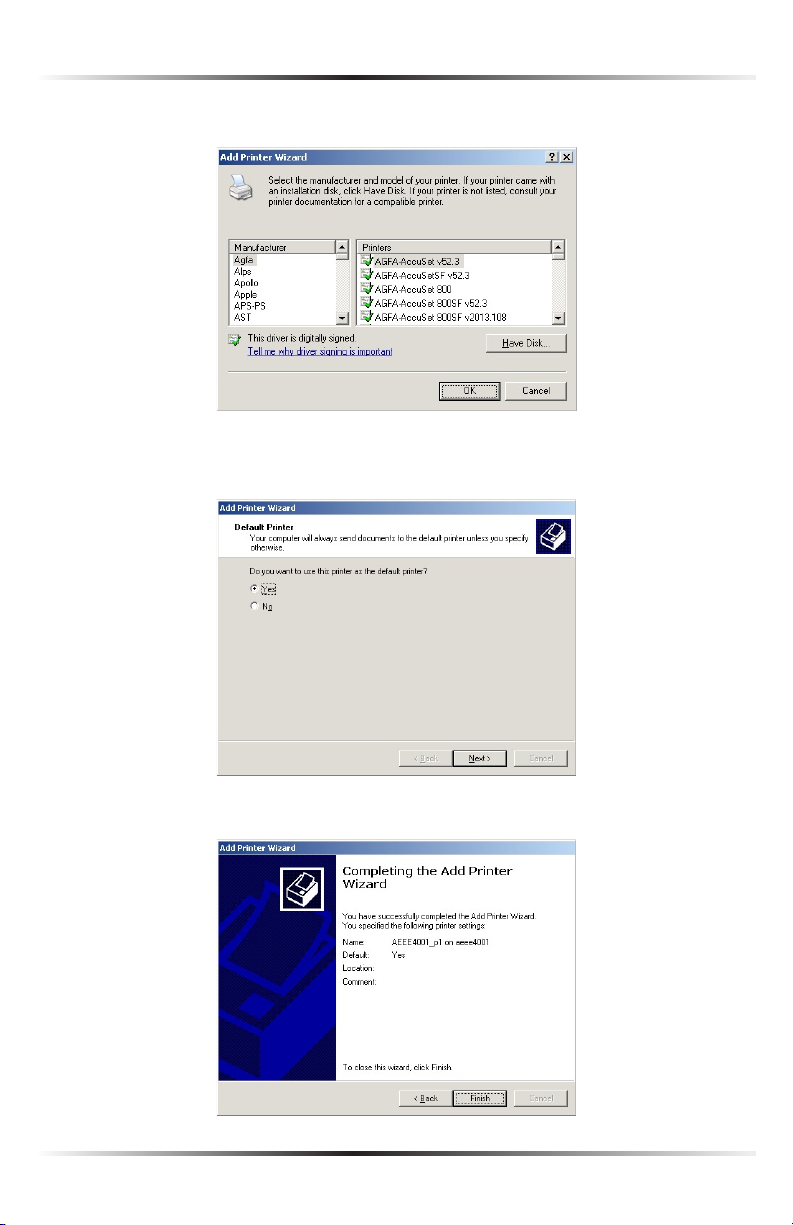
10. Select the printer manufacturer and model. Click Next.
11. Select whether or not the printer will function as the default printer.
Click Next.
12. Click Finish to exit.
14
Page 18

Chapter 2 Configuring the NAS Device
Other Configurations
After configuring the NAS Device, all users can access the Device with “guest”
access rights. This allows access to the public shares (by default, “Disk” and “Flash
or USB HDD”).
However, Actiontec recommends creating a NAS User for each person on the network. This will provide each network user with his/her own name and password,
as well as a personal folder on the NAS Device.
See the chapter 3 (“Using the Administrative Utility”) for details on creating users
via the Web-base Administrative Utility.
15
Page 19

Actiontec Wireless Network Attached Storage Device User Manual
This page left intentionally blank.
16
Page 20
Using the Administrative Utility
This chapter describes using the NAS Device’s Administration Utility. With the
Utility, the administrator can check the NAS Device’s status, add or delete users, or
create user groups.
Accessing the Administrative Utility
To establish a connection from a computer to the NAS Device:
1. Follow steps 1 through 7 of “Accessing the NAS Device” (see page 6).
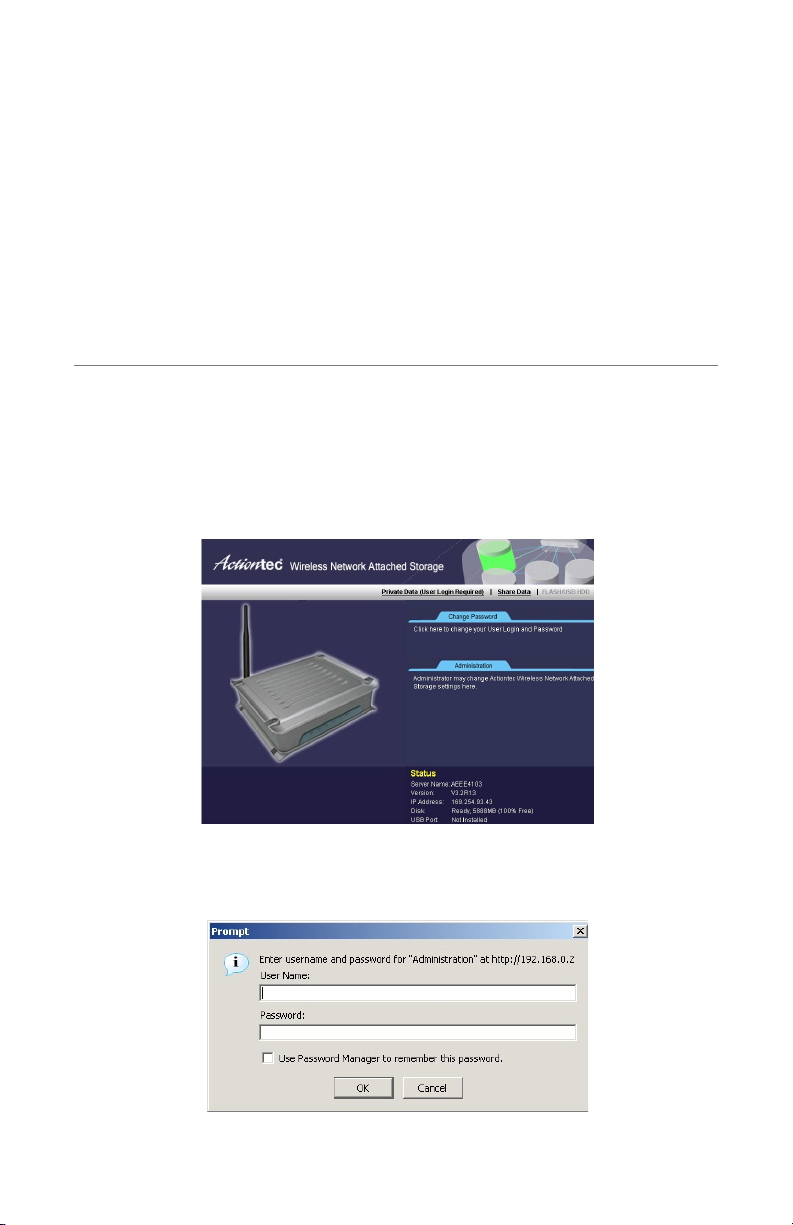
2. The Utility’s “Home” screen appears.
3
3. To access the Administration interface, click Administration on the right. A
password prompt appears, as shown below.
17
Page 21
Actiontec Wireless Network Attached Storage Device User Manual
19
Chapter 3 Using the Administrative Utility
5. Enter “admin” for the name, and leave the password blank.
• To gain access, enter the user name and password of a user in the
“Administrators” User Group.
• By default, the only user in the “Administrators” User Group is “admin.”
(Other users can be added later.)
• The default password for the “admin” user is blank (no password).
This should be changed. Click User Password on the NAS Device home
screen to change the password.
6. The “Users” screen appears, as described in the following section.
Use the menu tabs to select the other screens as desired.
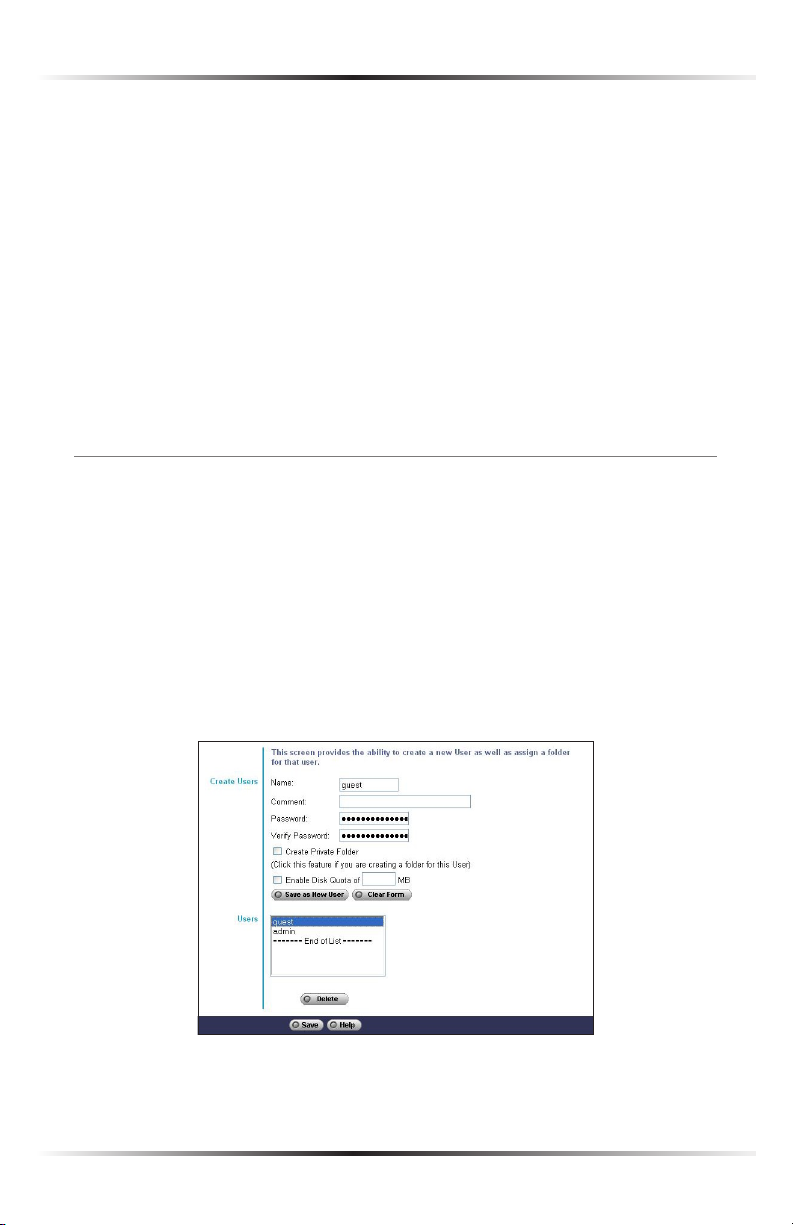
Users
This is the first screen that appears after selecting “Administration.” This screen
allows the user to manage other users created on the NAS Device.
• The “guest” and “admin” users are pre-defined, and cannot be deleted.
• Users can be members of many user groups.
• When a user is created, a Share (folder) is created for them, with the same
name. Only the user and the Administrator group can access this new
Share.
18
Page 22

Chapter 3 Using the Administrative Utility
Name
Enter the user name here. Note that punctuation and other special characters (e.g.
* / | \ ) cannot be used in the name.
Comment
Enter a comment here.
Password/Verify Password
Enter the user’s password in these text boxes.
These text boxes are also used to change an existing user’s password, as follows:
1. Select the desired user.
2. Clear the existing values in the password text boxes.
3. Enter the desired password in both the “Password” and “Verify Password” text
boxes. If no password is required, leave both text boxes blank.
4. Click Save as New User.
When creating a new user, enter the desired password in both of these text boxes.
Create Private Folder
If creating a new user:
• Checking this option creates a Group and a Private Folder (Share) with the
same name as the user.
• The “Private Folder (Share) Location” text box allows the user to select
which disk is used for the Private Folder.
• Read/Write access will be granted to the Share.
If changing an existing user:
• The check box has no effect - it will neither create nor delete. This option is
only available when creating a new user.
• However, the user's private folder can be moved to another disk (if
installed) by changing the location, and saving the change.
19
Page 23

Actiontec Wireless Network Attached Storage Device User Manual
21
Chapter 3 Using the Administrative Utility
Enable Disk Quota
Enable the check box to set the disk usage for the user, then enter the maximum
amount of disk space this user is allowed to access.
Note: Unless the check box is checked, the Disk Quota text box
☞
has no effect.
Users List
This list shows all existing users. Details of the selected user are displayed in the
“Properties” area when scrolling through the list of users.
Save as New User
Use this button to create a new user, after entering their data in the “User
Properties” text boxes.
Clear Form
Use this button to clear the form, preparing the form for the entry of a new user.
Groups
Click this to view and/or modify the Groups which the selected user is in.
Delete
Click this button to delete the selected user.
Warning: When a user is deleted, his/her private folder, and any
M
data it contains, is deleted. If this data is important, the administrator should copy it to another folder before deleting the user.
Save
Use this button to save any changes made to the “User Properties” for an
existing user.
20
Page 24

Chapter 3 Using the Administrative Utility
Modifying Existing User Properties
1. Select the desired user from the list. Their details will be displayed in the “User
Properties” text boxes.
2. Edit the “User Properties” text boxes as required. Note that the “Create matching Share and Folder” option when modifying a user cannot be changed.
However, the “Share (Private Folder) Location” text box can be modified to
change to location of a user's Private Folder, if it already exists.
3. Click Save to save the changes.
System Status
This screen displays many of the NAS Device’s current settings .
Server Name
The current name of the NAS Device. This name will be shown in “Network
Neighborhood” or “My Network Places.”
IP Address
IP address currently used by the NAS Device.
Current Status
Indicates the current status of the Device. This will usually display “Available” or
“Ready” If the Device is not available, the message will say why the Device is not
available (e.g. "Scandisk in Progress”).
21
Page 25

Actiontec Wireless Network Attached Storage Device User Manual
23
Chapter 3 Using the Administrative Utility
Hard Drive
Disk Type - indicates the make and model of the hard drive installed in the NAS
Device, as provided by the manufacturer.
Free Space - indicates the amount of free disk space available.
USB Port
Disk Type - indicates the type of USB disk connected to the NAS Device, as pro-
vided by the manufacturer.
Free Space - indicates the amount of free disk space available.
Print Server
Current Status - indicates the status of the print server (“On Line,” “Off Line”).
No. of Print Jobs - indicates the number of print jobs in the print server queue.
Delete Current Job
Clicking this button deletes the current print job and, if applicable, starts the next
print job in the print server queue.
Delete All Jobs
Clicking this button deletes all current print jobs.
Refresh
Click this button to update the data shown on the Status screen.
Details
Clicking this button will open a new screen, displaying further status details,
including a list of all computers and other devices allocated an IP address by the
DHCP Device function (if enabled).
22
Page 26

Chapter 3 Using the Administrative Utility
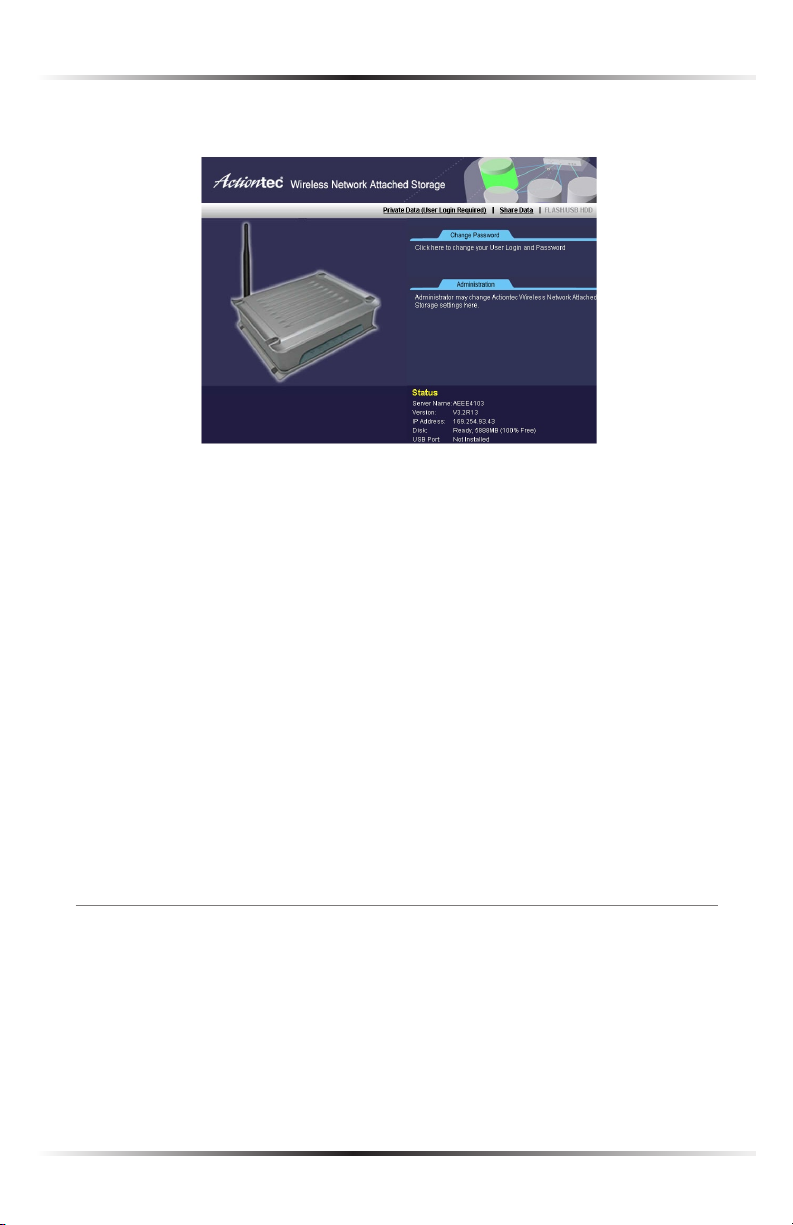
Wireless Settings
See Chapter 4, “Configuring the Wireless Settings,” for more information.
Network Settings
This screen allows the modification of the NAS Devices network settings.
Warning: Actiontec recommends leaving these values at their
M
default settings. Only experienced network administrators
should modify any of the setting in this screen.
Obtain IP Address Automatically (DHCP Client)
Do not select this option unless a DHCP server is connected to the network. A
DHCP server provides an IP address to computers and other devices.
Fixed IP Address
Select this if the Network does not have a DHCP server, and enter the following
data:
IP Address
The IP address must be unused, and compatible with the computers on the
network. Usually, this means the first three text boxes should be the same as the
computer, and the last text box must be an unused number between 1 and 254.
23
Page 27

Actiontec Wireless Network Attached Storage Device User Manual
25
Chapter 3 Using the Administrative Utility
Network Mask
Enter the same Network Mask (Subnet Mask) used by computers on the network.
Gateway (Router)
(Default: None) If the network has a router or gateway connected to it, enter its
IP address here. Otherwise, leave this blank.
Enable DHCP Server Function
Click in the check box to enable/disable the DHCP server. If a DHCP server is
already present, do not enable this feature.
Start/Finish Address
Enter the first and last addresses of the range of IP addresses to be allocated by
the DHCP server in these text boxes, respectively. The first three text boxes of each
must correspond with each other.
Primary
The IP address of the first DNS Server.
Backup
The IP address of the backup DNS server (accessed if the first server is busy).
24
Page 28

Chapter 3 Using the Administrative Utility
System Settings
This screen provides an overview of the NAS Device’s settings.
Server Name
If needed, change the name of the NAS Device here. Note that punctuation and
other special characters (e.g. * / | \ ) cannot be used in the name.
Comment
Enter a comment here (the location of the NAS Device, for instance).
25
Page 29

Actiontec Wireless Network Attached Storage Device User Manual
27
Chapter 3 Using the Administrative Utility
Workgroup
This should match the Workgroup name of the computers on the network. If the
Workgroup name does not match, access to the NAS Device is still possible, but the
Device will not appear when performing a “Browse Network” operation.
Printer Name
This text box displays the name of the printer connected to the NAS Device.
Language Support
Select the language used by computers on the network here. If multiple languages
are used, select the most common.
Time Zone
Select the correct time zone for the location of the NAS Device here.
Local Date
Enter the local date here. The NAS Device will set it own calendar according to the
date provided.
Local Time
Enter the local time at the location here. The NAS Device will set its own clock
according to the time provided Note that the Device’s clock will not reset until
Save is clicked.
Shutdown/Restart
Use these two sets of text boxes to force the NAS Device to turn off and on at the
same time every day, or on the weekends.
Shutdown Now
Clicking this button causes the NAS Device to shut down immediately, breaking all
existing network connections. No data will be saved.
26
Page 30

Chapter 3 Using the Administrative Utility
View Log
Click this button to view the log file in separate window. The log file is a record of
activity on the NAS Device, which can help in management and troubleshooting.
Enable NTP (Network Time Protocol)
If enabled, the NAS Device will synchronize its clock with a NTP (Network Time
Protocol) Server.
NTP Server
Enter the domain name or IP address of the NTP server to be used. The NTP server
can be a public server (on the Internet) or a local server (on the local network).
NTP Status
This shows the status of the NTP update procedure.
Synchronize…
Select how often the NAS Device synchronizes its clock with the specified NTP
device. The time of the next synchronization can also be set.
Sync Now
Click this button to synchronize with the NAS Device immediately.
Send E-Mail Alerts…
Click here to enable the sending of e-mail alerts by the NAS Device. Alerts will be
sent when there is some problem requiring the administrator’s attention.
E-Mail Address (1)/(2)
Enter the e-mail addresses to which the alerts will be sent.
Subject
Enter the text that will appear in the “Subject” text box of an e-mail alert.
27
Page 31

Actiontec Wireless Network Attached Storage Device User Manual
29
Chapter 3 Using the Administrative Utility
Enable WINS
Click here if the network has a WINS Server. If enabled, the NAS Device will regis-
ter with the WINS Server. This will allow users on the network to locate the Device
through a router. (Without WINS, “Network Neighborhood” or “My Network
Places” only scans the local network.)
WINS Server
If WINS is enabled, enter the IP address of the WINS Server. Normally, this will be a
Windows NT/2000/XP Server.
Enable Guest Logins
If enabled, “guest” can be used as user ID to login to the NAS Device. If disabled,
“guest” will not be accepted as a login.
Convert Failed Logins to “Guest” Logins
If this option is enabled, all Windows users will be able to access the NAS Device
via “Network Neighborhood” or “My Network Places,” with “guest” access rights.
By default, the “guest” user has read/write permission to the “Disk” folder on the
USB hard drive, and all folders on the USB flash drive.
Enable FTP Server
If this option is enabled, users can upload and download files via FTP (file transfer
protocol).
Allow anonymous FTP login (“guest” rights)
The FTP server prompts for a user name and password when clients attempt to
connect. If this option is enabled, users will be able to enter “anonymous” as the
user name, and anything as the password. If this option is disabled, users must
provide their correct user name and password.
Enable UPnP Support
If enabled, the NAS Device will broadcast its availability. On systems which support
UPnP (e.g., Windows Me, XP), an icon for the NAS Device will be automatically
generated.
28
Page 32

Chapter 3 Using the Administrative Utility
Enable Print Icon
If enabled, the NAS Device places a printer icon for its print server in all print dialog boxes.
Port Number For HTTP…
This port number is used for Web browser connections to the NAS Device. The
default port is 80, as used by Web servers. If this is changed, use a number greater
than 1024 (8080 is often used). Also, if the port is not 80, specify the port in the
Web browser, in order to connect. To do this, add a “:” and the port number after
the address: e.g.,
http://192.168.0.100:8080
This example assumes the Device’s IP address is 192.168.0.100, and the port number is 8080.
Restore Default Config Button
Click this button to restore all settings on the NAS Device to factory defaults. Data
stored on the NAS Device will not be affected
Advanced Setup
This screen includes many of the NAS Device’s advanced settings, including
Groups, Folders, Backup, Hard Drive, and Upgrade.
Groups
In this screen, manage the user groups on the NAS Device.
29
Page 33

Actiontec Wireless Network Attached Storage Device User Manual
31
Chapter 3 Using the Administrative Utility
New Group
Use this text box to create a new group.
Existing Groups
This list box shows the list of all groups. Two groups - “everyone” and “administrators” - always exist. These groups cannot be deleted.
Create
Click this button to create a new group. Enter the desired name for the new
Group in the “Name” text box, then click this button.
Access
Click this button to display the shares members of the current group are able to
access. Access rights for this group can then be assigned, removed or modified.
See below for details.
Note: The “administrators” group always has read/write access
☞
to all shares.
Members
Click this button to display the users who are members of the selected group.
Members can then be added or deleted.
Note: The “everyone” group always contains all users. Members
☞
cannot be added or deleted.
Delete
Click this button to delete the selected Group.
Note: The “administrators” and “everyone” groups cannot be
☞
deleted.
30
Page 34

Chapter 3 Using the Administrative Utility
Access Rights Screen
In this screen, view and modify the groups which can access this share.
Note: The administrators group always has read/write access to
☞
all shares.
Group Name
The name of the group being modified is shown above the two lists of shares.
Accessible Share Folders
The “Accessible Share Folders” column shows which shares this group can currently
access. The type of access is shown in brackets. (R = Read Only, R/W = Read-Write).
Note: The “administrators” group has read/write access to all
☞
shares.
To Add Access Rights
Select the share or share in the right-hand column, then click << Read Access to pro-
vide read-only access, or click << R/W Access to provide read-write access. Multiple
shares can be selected by holding down CTRL on the keyboard while selecting.
To Remove Access Rights
Select the share or shares in the left-hand column, then click the No Access >>
button. Multiple shares can be selected by holding down CTRL on the keyboard
while selecting. When finished, click Close.
31
Page 35

Actiontec Wireless Network Attached Storage Device User Manual
33
Chapter 3 Using the Administrative Utility
Help
Click this button for more information about this screen.
Group Members
This screen allows the user to check which users are members of the group, and to
add or revoke membership of this group.
Note: The “everyone” Group always contains all users. Members
☞
cannot be added or removed.
Group Name
The name of the group being modified is shown at the top of the screen.
Members (Users)
The “Members” column on the left shows the users who are currently members
of this group.
Other Users
The “Other Users” column on the right shows users who are not currently members of this group.
To Add a Member to the Group
Select the user or users in the right-hand column, then click <<. Multiple users
can be selected by holding down CTRL on the keyboard while selecting.
32
Page 36

Chapter 3 Using the Administrative Utility
To Delete a Member from the Group
Select the user or users in the left-hand column, then click >>. Multiple users
can be selected by holding down CTRL on the keyboard while selecting.When
finished, click Close.
Folders
This screen allows the user to manage the shared data which exist on the NAS Device. A
“Share” is a folder (directory) on the NAS Device which a particular group can access.
• Only the NAS Device administrators can create Shares. However, within a
Share, users who have access to that Share can create other folders (directories) as well as files.
• A Share can be accessed by many User Groups, and a User Group can access
many Shares.
• If a Share within a Share exists, all users with access to the outer share will
always have the same access rights to the inner share.
Shared Folders
All existing shares are listed. When an existing Share is selected in the list of
Shares, its details are displayed in the “Share Properties” area.
33
Page 37

Actiontec Wireless Network Attached Storage Device User Manual
35
Chapter 3 Using the Administrative Utility
Access Rights
Click this button to view the Groups which have access to the selected Share,
and change these access rights as required.
Browse
Use this to view the files and folders in the selected Share. If using Internet
Explorer, right-click a file to perform standard Explorer operations.
Do Not Share
Click this button after a selecting a shared folder in the Shared Folder list box to
“unshare” the selected folder.
Name
The current name is displayed here. The Share Name can be changed. This does
not change the name of the folder (directory) associated with the Share. Note that
punctuation and other special characters (e.g. * / | \ ) cannot be used in the name.
Comment
Change or enter a comment here.
Location
The Location associated with the Share. Note that once a Share is created, its
location can not be changed. There are two options:
• Default folder - if selected, creates the Share in the default folder.
• Specify - if selected, enter the folder (directory) to be converted to a Share.
If the folder does not exist, it will be created.
Save as New Share
After entering the required data in the “Share Properties” area, use this button to
create a new Share on the selected disk.
Clear Form
Clear the form, preparing it for the creation of a new Share.
34
Page 38

Chapter 3 Using the Administrative Utility
Save
Use this button to change the properties of a Share, as follows:
• Select the desired Share from the Shared folders. Its details are displayed in
the “Share Properties” area.
• Change the Share properties as required. Note the location cannot be
changed.
• Click Save to save the changes.
Help
Click this button for more information about this screen.
Share Access
The screen is displayed when Access Rights is clicked on the Folders screen.
Determine which users can access the selected share in this screen.
Share Name
The name of the Group being modified is shown above the two lists of shares.
Groups with Access
This list shows which Group can currently access this Share. The type of access is
shown in brackets. (R = Read Only, R/W = Read-Write).
Note: The “administrators” Group has R/W access to all shares.
☞
35
Page 39

Actiontec Wireless Network Attached Storage Device User Manual
37
Chapter 3 Using the Administrative Utility
Other Groups
The “Other Shares” column on the right shows all other Groups. These Groups
have no access to the current Share.
To Add Access Rights
Select the Group in the right-hand column, then click << Read Access to provide
Read-Only access, or << R/W Access to provide R/W access. Multiple Groups can
be selected by holding down the CTRL on the keyboard while selecting.
To Remove Access Rights
Select the Group in the left-hand column, then click No Access >>. Multiple
Groups can be selected by holding down the CTRL on the keyboard while selecting.
When finished, click Close.
Backup
Config Backup
This facility allows the user to Backup (Download) and Restore (Upload) the
NAS Device's configuration file (named “configuration.bin”). The configura-
tion file contains all network information, as well as the User, Group, and Share
information. It does not include any information about the files stored on the
NAS Device.
Note: Using this feature will overwrite (destroy) any existing
☞
configuration information.
36
Page 40

Chapter 3 Using the Administrative Utility
Download Click this to download the configuration file and save it on the com-
puter.
Upload Use this to restore a previously saved configuration file from the computer to the NAS Device.
Data Backup
Data files can be backed up from the NAS Device to another network device, or
from another network device to the Device. The Backup Jobs text box displays any
defined backup jobs. If no jobs have been defined, the text box will be empty. For
each job defined, the following data is shown:
• Name - displays the name assigned to this backup job
• Source & Destination - displays the name of the source and destination
devices in the form Source => Destination.
• Date/Time - displays the date and time of the last backup.
Backup Now
Click here to run the selected backup job immediately.
Modify
Click here to change the settings of the selected backup job.
Delete
Click here to delete the selected backup job.
37
Page 41

Actiontec Wireless Network Attached Storage Device User Manual
39
Chapter 3 Using the Administrative Utility
View Log
This text box displays a log of completed backup jobs
Add New Job
Clicking this button opens the “Define Backup Job” screen, where a new backup
job can be defined.
Define Backup Job
From this screen new backup jobs can be created, which will be displayed on the
“Backup” screen.
Name
Enter the job’s name here. The backup job’s name must be composed of alphanumeric symbols not exceeding 15 characters in length.
Backup Type
Select the desired backup type:
• Full - backup all files.
• Incremental - only backup files as they change.
• Synchronize - backup all files to start, and then any files on the destination
that do not exist on the source are deleted.
38
Page 42

Chapter 3 Using the Administrative Utility
Direction
Select the desired direction where backing up will occur here:
• From this NAS to another device - data on the NAS Device is backed up to
remote device.
• From another device to NAS - data on remote device is backed up to the
NAS Device.
Share
Select the applicable share here. If backing up from the NAS Device, select the
share to back up. If backing up to the NAS Device, select the share where the
backup-up data will be stored. When the sub-folder text box appears, enter the
location of the sub-folder where the share will be stored.
Other Device
Enter the details of the remote device where data will be backed up or
stored here.
Name
The name of other device, as seen on the network.
Share Folder
Enter the name of share folder. Depending on the direction of the backup, this is
either the share to be backed up or the destination for the backed-up data.
Access the Folder Requires Login
If the share is password protected, click in this check box and enter the Login
Name and Password required to gain access to the share.
Options - Schedule
This text box displays the schedule options for when the backup will occur:
39
Page 43

Actiontec Wireless Network Attached Storage Device User Manual
41
Chapter 3 Using the Administrative Utility
• Never - disables this backup job.
• Every Day - the backup job is performed each day at the specified time.
• Every Monday, Every Tuesday… - select this option to have the backup per-
formed once per week, on the specified day and time.
• The time text box (hour, minute, AM/PM) - specify at what time the backup job
should be performed.
Hard Drive
This screen allows the user to perform various disk operations on the NAS hard
disk drive. No operations can be performed on a USB flash drive.
This screen has four sections: Prepare Disk, Self-Test (S.M.A.R.T.), Scandisk, and
Standby.
Prepare Disk
The Prepare Disk operation reformats the NAS hard drive.
Warning: Performing a “Prepare Disk” operation will destroy
M
any data on the hard drive. Once started, this process cannot be
halted or reversed.
Status The Status text box can have any of the following values:
• Not installed - no disk is inserted, or connection or disk has failed.
• Not Prepared - disk has been detected, but not ready for use (press the
“Prepare Disk” button to prepare the disk for use).
40
Page 44

Chapter 3 Using the Administrative Utility
• Preparing - only displayed after the “Prepare Disk” button is pressed. (See
below for details).
• Prepared - disk is ready for use.
Prepare Disk Click here after installing a new disk. The disk will be partitioned
and quick-formatted. Any data on the disk will be lost.
Warning: Performing a “Prepare Disk” operation will destroy
M
any data on the disk. Once started, this process cannot be halted
or reversed.
Self-test (S.M.A.R.T.)
S.M.A.R.T. (Self-Monitoring, Analysis, and Reporting Technology) can warn of
impending problems with the hard disk before it actually fails. This test should
be performed regularly.
Disk Status This can have any of the following values:
• N/A - no disk is available.
• Not Tested - No S.M.A.R.T. check has been performed on this drive.
• Test OK - No errors were found in the last test.
• Errors - The S.M.A.R.T. check found errors on the drive (drive should be
replaced).
Run Test Select the day and time to perform a S.M.A.R.T. test (select “Never” to
prevent S.M.A.R.T. from running automatically).
Test Now Run a S.M.A.R.T. test immediately.
Scandisk
Running a Scandisk (Disk Check) test checks the file system and corrects any
errors found. This program should be run regularly. The Scandisk program will
also run automatically if an error condition is detected, such as an abnormal
shutdown due to loss of power.
Disk Status The “Disk Status” text box can have any of the following values:
• N/A - No disk is available.
• No Scan performed - No Scandisk has been performed recently on this drive.
41
Page 45

Actiontec Wireless Network Attached Storage Device User Manual
43
Chapter 3 Using the Administrative Utility
• Scandisk in progress - Scandisk operation is in progress. The disk cannot be
used while a Scandisk is in progress. If required, use the “Start/Stop” button
to terminate the Scandisk operation and gain access to data on the disks.
(To see the results of the Scandisk operation, use the “View Disk Log” button.)
• Scandisk completed - The last Scandisk operation has been completed. Use
the “View Disk Log” button to view the results.
• Scandisk terminated - The last Scandisk operation was cancelled by the
administrator before it was completed.
• Run Scandisk - Select the day and time to perform a Scandisk operation.
(Select “Never” to prevent Scandisk from running automatically.)
Run Scandisk Select the day and time to perform a Scandisk test (select “Never”
to prevent Scandisk from running automatically).
Start/Stop If a Scandisk is in progress, click this button to terminate the Scandisk
immediately. Otherwise, clicking here starts the Scandisk operation. The
Scandisk operation may take a few hours, and the disk is unavailable to users
while the Scandisk is in progress.
Standby
The NAS hard drive can be configured to go into standby (or “sleep”) mode here.
Set Hard Disk to standby mode after: Enter the period of idle time after which the
hard disk drive switches to standby mode here.
Save
Click to save the settings on this screen. This has no effect on any operations in
progress.
Cancel
Restore the settings on the screen to their values after the last “Save” operation.
Clicking “Cancel” has no effect on any operations in progress.
Disk Log
Use this to view the results of the last Scandisk operation.
42
Page 46

Chapter 3 Using the Administrative Utility
Help
Click here for more information about this screen.
Upgrade
The “Upgrade” process updates the NAS Device's firmware to the latest ver-
sion. The upgrade file is obtained from the dealer or supplier. Note that the NAS
Device is unavailable during the upgrade process, and all connections will be lost,
including the one used to start the upgrade. The NAS Device will reboot when the
upgrade installation is completed. The procedure may take from 5 to 10 minutes.
Current Firmware
The version number of the NAS Device’s current firmware.
Upgrade
Enter the path (e.g. C:\downloads\utilities\DS36799.rpm) of the upgrade file.
Click Browse to browse the folders on the computer and select the desired file.
Note: Implementation of this feature is Web browser-dependent.
☞
Start Upgrade
Click this button to start upgrading the firmware.
Help
Click here for more information about this screen.
43
Page 47

Actiontec Wireless Network Attached Storage Device User Manual
This page left intentionally blank.
44
Page 48

Configuring the Wireless Settings
This chapter covers setting up the NAS Device for wireless operation, including
configuring security for the wireless connection.
Accessing the Wireless Settings
To access the wireless settings, select Wireless Settings from the Administration
screen. This generates the “Wireless Settings” screen.
4
From this screen, all wireless settings for the NAS Device can be configured.
45
Page 49

Actiontec Wireless Network Attached Storage Device User Manual
47
Chapter 4 Configuring the Wireless Settings
Setting Up Wireless Operation
To set up wireless operation on the NAS Device:
1. Turn on the wireless radio by clicking in the “Enable Wireless Function”
check box.
2. Select “Network Type.” If using the NAS Device as a stand-alone access point,
select Access Point from the drop-down menu. If connecting the NAS Device
to an existing wireless network (a network access point, for example), select
Infrastructure.
3. Enter the SSID of the wireless network in the “SSID” text box. The SSID is a
wireless network identifier. All devices on a particular wireless network must
have the same SSID to communicate with one another. If Infrastructure was
selected in step 2, enter the SSID of the wireless network to which the NAS
Device is connecting. If Access Point was selected in step 2, enter the SSID of
the wireless network being created. This text box is limited to 32 characters,
and is case-sensitive. The default entry is “Actiontec_WNAS.”
4. Select a Broadcast SSID mode. This option works only if Access Point was
selected in step 2. If activated (by selecting ON from the drop-down menu),
the wireless server of the NAS Device will broadcast the SSID to all wireless
devices within the wireless network’s range. Selecting OFF disables Broadcast SSID.
5. Select a wireless mode from the “Mode” drop-down menu. There are three
options: g & b, which allows the NAS Device to use both 802.1b and 802.11g
wireless networks; g only, which allows the NAS Device to use the 802.11g
wireless networks only; and b only, which allows the NAS Device to use
802.11b wireless networks only.
46
Page 50

Chapter 4 Configuring the Wireless Settings
6. Select a wireless channel from the “Channel” drop-down menu. This option
works only if Access Mode was selected in step 2. All devices on the wireless
network must be operating on the same channel in order to communicate
with one another. Selecting Automatic allows wireless devices to join the network, without regard to channel number.
7. Set up the wireless security (see “Setting Up Wireless Security,” below.)
8. Click Save at the bottom of the screen to save all changes.
The NAS Device is now configured for wireless operation.
Setting Up Wireless Security
At the bottom of the Wireless Settings screen is the “Wireless Security” section.
There are three options in this section: No WEP, WEP, and WPA-PSK.
No WEP
Selecting No WEP from the “Wireless Security” drop-down menu disables wireless
security. If selected, any wireless device with access to the wireless network’s SSID
can join the wireless network.
47
Page 51

Actiontec Wireless Network Attached Storage Device User Manual
49
Chapter 4 Configuring the Wireless Settings
WEP
Selecting WEP from the “Wireless Security” drop-down menu generates the
“WEP” (Wired Equivalent Privacy) option in the Wireless Security section. Here,
the authentication type, encryption level, and WEP keys are entered to activate
WEP security encryption for the wireless network.
Authentication Type
There are two authentication types: Open System and Shared Key. Open
System authentication allows any wireless-enabled device to recognize the NAS
Device, if the correct WEP key is enabled on the device. Shared Key allows only
wireless-enabled devices with the correct WEP key or Shared key to recognize the
NAS Device.
WEP Encryption
There are three options in the “WEP Encryption” drop-down menu: Disable, 64
Bit Keys (10 Hex chars), and 128 Bit Keys (26 Hex chars).
Disable Selecting “Disable” from the “WEP Encryption” drop-down menu dis-
ables the WEP keys.
64-bit WEP Keys Selecting “64 Bit Keys” from the “WEP Encryption” drop-down
menu activates 64-Bit WEP encryption. 64-bit WEP requires one or more separate keys. Each key comprises 10 hexadecimal digits. A hexadecimal digits consists of an alphanumeric character ranging from 0-9 or A-F. An example of a
64-bit WEP key is:
4EA33D6872
To create a set of 64-bit WEP keys, activate one to four keys by clicking in the
appropriate circles, then enter 10 hexadecimal digit characters in each Key text
box activated (Key 1-, Key 2-, Key 3-, Key 4-). After activating 64-bit WEP on
the NAS Device, a computer with wireless capability can join the network only if
these same keys are entered in the computer’s wireless encryption scheme.
48
Page 52

Chapter 4 Configuring the Wireless Settings
128-bit WEP Keys Selecting “128 Bit Keys” from the “WEP Encryption” drop-down
menu activates 128-Bit WEP encryption.128-bit WEP requires one or more keys,
comprising 26 hexadecimal digits. A hexadecimal digit consists of alphanumeric
characters ranging from 0-9 or A-F. An example of a 128-bit WEP key is:
3D44FE6CA1EF2ED3C421745DB1
To create a 128-bit WEP key, activate Key 1 by clicking in the appropriate circle,
then enter 26 hexadecimal digit characters in the Key text box. After activating
128-bit WEP on the NAS Device, a computer with wireless capability can join the
network only if this key is entered in the computer’s wireless encryption scheme.
WPA-PSK
Selecting WPA-PSK from the “Wireless Security” drop-down menu generates the
“WPA-PSK” (WiFi Protected Access - Pre-Shared Key) option in the Wireless
Security Section. Here, the pre-shared key, group rekey interval, and type of
encryption are entered to activate WPA-PSK security encryption for the wireless
network.
WPA Pre-Shared Key
Enter the pre-shared key in this text box. All wireless devices wishing to join the
network must enter this pre-shared key to gain access. To create a pre-shared key,
enter at least eight alphanumeric characters in the text box. Also, make sure all
wireless devices on the network support WPA and know the pre-shared key.
WPA Group Rekey Interval
Enter the group rekey interval in this text box (supports values from 1 to 1000;
default is 600). The group key interval is used to specify the frequency of the
temporal encryption automatically generated from the WPA-PSK password.
Group rekey interval is supported by TKIP (see below).
WPA Encryption
TKIP (Temporal Key Integrity Protocol) is the only option here. Note that TKIP
supports the group rekey interval.
49
Page 53

Actiontec Wireless Network Attached Storage Device User Manual
This page left intentionally blank.
50
Page 54

Accessing the NAS Device on the Internet
If the network is connected to the Internet, typically by a broadband router/
gateway and modem, the NAS Device can be made available via the Internet.
Features available to Internet users include:
• Using a Web browser to view and download files
• Remote management
Connecting Via the Internet
If the network is connected to the Internet via a router or gateway, the NAS Device
can be made available from the Internet.
No changes to the NAS configuration are required, unless using a port number
other than the default value of 80 for Web connections.
The router or gateway must be configured to pass incoming HTTP connections
(and, optionally, IP connections) to the NAS Device. This feature is normally called
Port Forwarding or Virtual Servers, and is explained below.
• The default port number for Web browser connections is 80. If using a dif-
ferent port number, specify the port number in the “System” screen (see
page 23). The “Web” entry for /Port Forwarding / Virtual Server must then
use the port number specified in the System screen.
5
• To connect to the NAS Device, Internet users need to know and use the
Internet IP address of the router/gateway. (If the port number is not 80, they
also need to know the port number.)
• If using a domain name, users can connect using the domain name instead
of the IP address. If the router/gateway supports dynamic DNS, use a domain
name even if a different IP address is used every time a user connects to the
ISP. Check the documentation of the router/gateway for further information.
51
Page 55

Actiontec Wireless Network Attached Storage Device User Manual
Using the Web Browser from the Internet
This is identical to using the Web browser from the network. But remember:
• The Internet IP address must be used to connect to the NAS Device, not the
LAN IP address.
• If the port number used by the NAS Device has been changed from the
default (80), specify the correct port number when connecting. For example, if the port is 8080, and the Internet IP address is 203.70.212.52, enter
the following as the browser's IP address:
http://203.70.212.52:8080
Remote Management
Connection via the Web browser from the Internet is the same as connecting via
the network. But remember:
• The Internet IP address must be used to connect to the NAS Device, not the
LAN IP address.
• If the port number used by the NAS Device has been changed from the
default (80), specify the correct port number when connecting. For example, if the port is 8080, and the Internet IP address is 203.70.212.52, enter
the following as the browser's IP address:
http://203.70.212.52:8080
Once connected to the NAS Device via the Internet, all the Web-based management features are available.
However, the “Browse” button on the Shares screen only allows Web-based file
browsing. (If using Internet Explorer on Windows, network users can browse
shares using Windows Explorer.)
FTP (File Transfer Protocol)
An FTP client can also be used to upload and download files from the Internet.
To do this, port forward the FTP port (port 21) on the router or gateway to the IP
address of the NAS Device.
52
Page 56

Troubleshooting
This chapter lists some common problems, and their solutions.
Problem 1: The NAS Utility doesn’t list any NAS Devices.
Solution 1: Check the following:
• The NAS Device is installed, LAN connections are OK,
and it is powered on and startup is complete.
• Ensure the computer and the NAS Device are on the
same network segment. (If you don't have a router,
this must be the case.)
• Ensure the computer has the TCP/IP network protocol
loaded. In Windows, this is done by using Control
Panel-Network. If an entry for TCP/IP -> Network card
is not listed, use Add - Protocol - Microsoft - TCP/IP
to add it.
You then need to select the new entry (TCP/IP ->
Network card), click Properties, and configure the IP
Address tab.
• If the LAN has a DHCP server, you can select “Obtain
an IP Address automatically”.
• Otherwise, you must select “Specify an IP Address,”
and enter values for IP address and subnet mask.
Remember that each device needs a unique IP address,
and the same subnet mask.
6
53
Page 57

Actiontec Wireless Network Attached Storage Device User Manual
55
Chapter 6 Troubleshooting
Problem 2: The NAS Device is configured, but I can’t find it in Network
Neighborhood.
Solution 2 Try using Start - Find - Computer, and enter the NAS
Device's name. If this does not work, use Control Panel Network to check the following:
• TCP/IP protocol is installed. If not, use Add - Protocol
- Microsoft - TCP/IP to install it.
• Check the network Bindings:
• Ensure the TCP/IP protocol is bound to the Network
card (NIC).
Select the Network card, click Properties, and then the
Bindings tab. If TCP/IP is not bound (checked), check
it.
• Ensure the TCP/IP -> Network card entry is bound to
the Client for Microsoft Networks service.
Select the TCP/IP entry for the Network Card, click
Properties, and then the Bindings tab. If Client for
Microsoft Networks is not bound (checked), check it.
• If you don't have a router, check that the IP address is
compatible with the NAS Device's. This means it needs
to be from the same address range (e.g. 192.168.0.1 to
192.168.0.254) and using the same subnet mask (e.g.
255.255.255.0)
• If you do have a router, check that the gateway IP
address is set correctly. Ask the administrator for the
correct value.
54
Page 58

Chapter 6 Troubleshooting
Problem 3 When I click on an NAS folder icon in Network
Neighborhood, I get prompted for a password.
Solution 3 This can happen in the following situations:
• The Logon name you used on the computer is recognized by the NAS Device, but the password is not.
Simply enter the NAS password, or make the Windows
password the same as the NAS password.
• The logon name you used on the computer is not
recognized by the NAS Device, and was converted to
guest, with guest access rights. Ask the administrator to
create a user name for you. (Use the same name as on
the computer.)
• You do not have access permission for this share.
Ask the administrator to grant you access.
Note: Windows uses the computer name,
☞
as shown on Control Panel - Network Identification, as the default Logon Name.
But you can create a new Windows logon
name by merely entering a new name and
password at the Logon prompt.
55
Page 59

Actiontec Wireless Network Attached Storage Device User Manual
This page left intentionally blank.
56
Page 60

Specifications
A
Model Number(s)
WNS100, WNS100-160, WNS100-200, WNS100-250, WNS100-300, WNS100-400
(Actiontec Wireless Network Attached Storage Device)
Capacity
160, 200, 250, 300, or 400 Gigabytes (depending on model)
Ports
10/100 Ethernet, USB 2.0, Power
Network Interface
10/100 (Auto MDIX)
Wireless
802.11g (via mini PCI slot); WEP and WPA-PSK security
Standards
IEEE 802.3; 802.3u
Protocols
TCP/IP; IPP; DHCP
Power Input
12VDC 1A Linear
57
Page 61

Actiontec Wireless Network Attached Storage Device User Manual
Certification
FCC Part 15
LED Indicators
Ready, Status, Disk, Disk Full, USB, Ethernet, Wireless
Operating temperature
0° - 55° C (32° - 131° F)
Relative Humidity
> 80% (non-condensing)
Limited Warranty
1 year
Note: Specifications are subject to change without notice.
☞
58
Page 62

Notices
Regulatory Compliance Notices
Class B Equipment
This equipment has been tested and found to comply with the limits for a Class B
digital device, pursuant to Part 15 of the FCC Rules. These limits are designed to
provide reasonable protection against harmful interference in a residential installation. This equipment generates, uses, and can radiate radio frequency energy and,
if not installed and used in accordance with the instructions, may cause harmful
interference to radio communications. However, there is no guarantee that interference will not occur in a particular installation. If this equipment does cause
harmful interference to radio or television reception, which can be determined
by turning the equipment off and on, the user is encouraged to try to correct the
interference by implementing one or more of the following measures:
s Reorient or relocate the receiving antenna;
s Increase the separation between the equipment and receiver;
s Connect the equipment to an outlet on a circuit different from that to
which the receiver is connected;
s Consult the dealer or an experienced radio or television technician for help.
Modifications
The FCC requires the user to be notified that any changes or modifications made
to this device that are not expressly approved by Actiontec Electronics, Inc., may
void the user’s authority to operate the equipment.
Declaration of conformity for products marked with the FCC logo – United States
only.
59
Page 63

Actiontec Wireless Network Attached Storage Device User Manual
This device complies with Part 15 of the FCC Rules. Operation is subject to the
following two conditions:
1. This device may not cause harmful interference
2. This device must accept any interference received, including interference that
may cause unwanted operation
Note: To comply with FCC RF exposure compliance require-
☞
ments, the antenna used for this transmitter must be installed to
provide a separation distance of at least 20 cm from all persons
and must not be co-located or operating in conjunction with
any other antenna or transmitter.
For questions regarding your product or the FCC declaration, contact:
Actiontec Electronics, Inc.
760 North Mary Ave.
Sunnyvale, CA 94086
United States
Tel: (408) 752-7700
Fax: (408) 541-9005
Miscellaneous Legal Notices
© 2005 Actiontec Electronics, Inc. Actiontec Installation Buddy, Connection 1-2-3,
Solutions for the Digital Life, Actiontec Digital Gear, and the Actiontec logo are
trademarks or registered trademarks of Actiontec Electronics, Inc.
All other names are the property of their respective owners.
60
60
Page 64

Limited Warranty
Hardware: Actiontec Electronics, Inc., warrants to the end user (“Customer”) that
this hardware product will be free from defects in workmanship and materials,
under normal use and service, for twelve (12) months from the date of purchase
from Actiontec Electronics or its authorized reseller.
Actiontec Electronics’ sole obligation under this express warranty shall be, at
Actiontec’s option and expense, to repair the defective product or part, deliver to
Customer an equivalent product or part to replace the defective item, or if neither
of the two foregoing options is reasonably available, Actiontec Electronics may,
in its sole discretion, refund to Customer the purchase price paid for the defective product. All products that are replaced will become the property of Actiontec
Electronics, Inc. Replacement products may be new or reconditioned. Actiontec
Electronics warrants any replaced or repaired product or part for ninety (90) days
from shipment, or the remainder of the initial warranty period, whichever is longer.
Software: Actiontec Electronics warrants to Customer that each software program
licensed from it will perform in substantial conformance to its program specifications, for a period of ninety (90) days from the date of purchase from Actiontec
Electronics or its authorized reseller. Actiontec Electronics warrants the media containing software against failure during the warranty period. The only updates that
will be provided are at the sole discretion of Actiontec Electronics and will only be
available for download at the Actiontec Web site, www.actiontec.com. Actiontec
Electronics’ sole obligation under this express warranty shall be, at Actiontec
Electronics’ option and expense, to refund the purchase price paid by Customer
for any defective software product, or to replace any defective media with software
which substantially conforms to applicable Actiontec Electronics published specifications. Customer assumes responsibility for the selection of the appropriate applications program and associated reference materials. Actiontec Electronics makes
no warranty or representation that its software products will meet Customer’s
requirements or work in combination with any hardware or applications software
products provided by third parties, that the operation of the software products
will be uninterrupted or error free, or that all defects in the software products
will be corrected. For any third-party products listed in the Actiontec Electronics
software product documentation or specifications as being compatible, Actiontec
Electronics will make reasonable efforts to provide compatibility, except where
the non-compatibility is caused by a “bug” or defect in the third party’s product
or from use of the software product not in accordance with Actiontec Electronics
published specifications or user guide.
61
Page 65

Actiontec Wireless Network Attached Storage Device User Manual
THIS ACTIONTEC ELECTRONICS PRODUCT MAY INCLUDE OR BE BUNDLED
WITH THIRD-PARTY SOFTWARE, THE USE OF WHICH IS GOVERNED BY A
SEPARATE END-USER LICENSE AGREEMENT.
THIS ACTIONTEC ELECTRONICS WARRANTY DOES NOT APPLY TO SUCH THIRDPARTY SOFTWARE. FOR THE APPLICABLE WARRANTY, PLEASE REFER TO THE
END-USER LICENSE AGREEMENT GOVERNING THE USE OF SUCH SOFTWARE.
Obtaining Warranty Service: Customer may contact Actiontec Electronics
Technical Support Center within the applicable warranty period to obtain warranty service authorization. Dated proof of purchase from Actiontec Electronics or
its authorized reseller may be required. Products returned to Actiontec Electronics
must be pre-authorized by Actiontec Electronics with a Return Merchandise
Authorization (RMA) number marked on the outside of the package, and sent
prepaid and packaged appropriately for safe shipment, and it is recommended that
they be insured or sent by a method that provides for tracking of the package. The
repaired or replaced item will be shipped to Customer, at Actiontec Electronics’
expense, not later than thirty (30) days after Actiontec Electronics receives the
defective product.
Return the product to:
(In the United States)
Actiontec Electronics, Inc.
760 North Mary Avenue
Sunnyvale, CA 94085
Actiontec Electronics shall not be responsible for any software, firmware, information, memory data, or Customer data contained in, stored on, or integrated with
any products returned to Actiontec Electronics for repair, whether under warranty
or not.
WARRANTIES EXCLUSIVE: IF AN ACTIONTEC ELECTRONICS PRODUCT DOES
NOT OPERATE AS WARRANTED ABOVE, CUSTOMER’S SOLE REMEDY FOR
BREACH OF THAT WARRANTY SHALL BE REPAIR, REPLACEMENT, OR REFUND
OF THE PURCHASE PRICE PAID, AT ACTIONTEC ELECTRONICS’ OPTION. TO
THE FULL EXTENT ALLOWED BY LAW, THE FOREGOING WARRANTIES AND
REMEDIES ARE EXCLUSIVE AND IN LIEU OF ALL OTHER WARRANTIES, TERMS OR
CONDITIONS, EXPRESS OR IMPLIED, EITHER IN FACT OR BY OPERATION OF LAW,
STATUTORY OR OTHERWISE, INCLUDING WARRANTIES, TERMS OR CONDITIONS
OF MERCHANTABILITY, FITNESS FOR A PARTICULAR PURPOSE, SATISFACTORY
QUALITY, CORRESPONDENCE WITH DESCRIPTION, AND NON-INFRINGEMENT,
ALL OF WHICH ARE EXPRESSLY DISCLAIMED. ACTIONTEC ELECTRONICS
62
Page 66

Limited Warranty
NEITHER ASSUMES NOR AUTHORIZES ANY OTHER PERSON TO ASSUME FOR
IT ANY OTHER LIABILITY IN CONNECTION WITH THE SALE, INSTALLATION,
MAINTENANCE OR USE OF ITS PRODUCTS.
ACTIONTEC ELECTRONICS SHALL NOT BE LIABLE UNDER THIS WARRANTY
IF ITS TESTING AND EXAMINATION DISCLOSE THAT THE ALLEGED DEFECT
OR MALFUNCTION IN THE PRODUCT DOES NOT EXIST OR WAS CAUSED BY
CUSTOMER’S OR ANY THIRD PERSON’S MISUSE, NEGLECT, IMPROPER INSTALLATION
OR TESTING, UNAUTHORIZED ATTEMPT TO OPEN, REPAIR OR MODIFY THE
PRODUCT, OR ANY OTHER CAUSE BEYOND THE RANGE OF THE INTENDED USE, OR
BY ACCIDENT, FIRE, LIGHTNING, OTHER HAZARDS, OR ACTS OF GOD.
LIMITATION OF LIABILITY: TO THE FULL EXTENT ALLOWED BY LAW,
ACTIONTEC ELECTRONICS ALSO EXCLUDES FOR ITSELF AND ITS SUPPLIERS
ANY LIABILITY, WHETHER BASED IN CONTRACT OR TORT (INCLUDING
NEGLIGENCE), FOR INCIDENTAL, CONSEQUENTIAL, INDIRECT, SPECIAL, OR
PUNITIVE DAMAGES OF ANY KIND, OR FOR LOSS OF REVENUE OR PROFITS,
LOSS OF BUSINESS, LOSS OF INFORMATION OR DATA, OR OTHER FINANCIAL
LOSS ARISING OUT OF OR IN CONNECTION WITH THE SALE, INSTALLATION,
MAINTENANCE, USE, PERFORMANCE, FAILURE, OR INTERRUPTION OF ITS
PRODUCT, EVEN IF ACTIONTEC ELECTRONICS OR ITS AUTHORIZED RESELLER
HAS BEEN ADVISED OF THE POSSIBILITY OF SUCH DAMAGES, AND LIMITS ITS
LIABILITY TO REPAIR, REPLACEMENT, OR REFUND OF THE PURCHASE PRICE
PAID, AT ACTIONTEC ELECTRONICS’ OPTION. THIS DISCLAIMER OF LIABILITY
FOR DAMAGES WILL NOT BE AFFECTED IF ANY REMEDY PROVIDED HEREIN
SHALL FAIL OF ITS ESSENTIAL PURPOSE.
Disclaimer: Some countries, states or provinces do not allow the exclusion or
limitation of implied warranties or the limitation of incidental or consequential
damages for certain products supplied to consumers, or the limitation of liability
for personal injury, so the above limitations and exclusions may be limited in their
application to you. When the implied warranties are not allowed to be excluded in
their entirety, they will be limited to the duration of the applicable written warranty.
This warranty gives you specific legal rights which may vary depending on local law.
Dispute Resolution: The customer may contact the Director of Technical Support
in the event the Customer is not satisfied with Actiontec Electronics’ response to
the complaint. In the event that the Customer is still not satisfied with the response
of the Director of Technical Support, the Customer is instructed to contact the
Director of Marketing. In the event that the Customer is still not satisfied with the
response of the Director of Marketing, the Customer is instructed to contact the
Chief Financial Officer and/or President.
63
Page 67

Actiontec Wireless Network Attached Storage Device User Manual
Governing Law: This Limited Warranty shall be governed by the laws of the State
of California, U.S.A., excluding its conflicts of laws and principles, and excluding
the United Nations Convention on Contracts for the International Sale of Goods.
64
 Loading...