

Page 1

MyWirelessTV
Model #: MWTV200T, MWTV200R,
MWTV200KIT
User Manual
Ver 1. 0
Solutions for the Digital Life
™
Page 2

Table of Contents
Introduction 3
Minimum System Requirements 3
Features 4
Product Contents 5
Getting To Know MyWirelessTV 6
Connecting MyWirelessTV 11
Connecting the MyWirelessTV Transmitter 11
Connecting the MyWirelessTV Receiver 12
Setting Up IR Control 13
Typical MyWirelessTV Connection Conguration 14
Connecting to a Computer as a Source Device 15
Using USB Backchannel 16
Using the MyWirelessTV Graphical User Interface 17
Remote Control 17
Graphical User Interface 20
Updating MyWirelessTV Firmware 27
Page 3

MyWirelessTV User Manual
Troubleshooting 29
Frequently Asked Questions 29
Specications 32
General 32
LED Indicators 33
GPL License 33
2
Page 4

Introduction
Congratulations on purchasing MyWirelessTV. is product will allow
you to transmit high-denition content from a set top box, gaming
console, or other source with an HDMI port, to an HDTV monitor in
another location, without lag or picture quality loss. It allows you to view
movies and television programs in two dierent locations at the same
time, without wires, or play a game on a television in one room, while the
gaming console resides in another. You can even send content from a
computer to MyWirelessTV and, thanks to the USB Extender, use your
mouse and keyboard remotely.
is user manual will take you through the procedures needed to
connect, congure, and enjoy MyWirelessTV, and also describe a few
dierent possible scenarios concerning set up locations.
Minimum System Requirements
HD set top box, gaming console, or computer equipped with HDMI
•
output port
HDTV monitor with HDMI input
•
Page 5

MyWirelessTV User Manual
Features
Full 1080p HD output - stream judder-free, full high-denition video in
•
1080p 60Hz with 3D capability
Video Pass-through - main HDTV does not lose original HD video
•
content while streaming
Unicast (1-to-1) - stream from 1 Transmitter to 1 Receiver in full 1080p
•
Multi-unicast (1-to-4) - stream from 1 Transmitter to 4 Receivers* with
•
at least one stream at full HD 1080p
Super Low Latency (SSL) - SSL technology allows streaming full HD
•
video with little latency
150-. range - works up to 150 feet in range through wall and ceiling
•
without quality reduction
Control source IR - includes IR Blaster, which allows control of main
•
video source
Extend IR control - includes IR extender, which allows control of video
•
source without need of placing receiver in line-of-sight (e.g., allows
device to be hidden behind HDTV)
USB backchannel - extend PC control (keyboard and mouse) to
•
location of Receiver
Compact design - small and compact design allows wall or ceiling
•
mount
Plug-and-play solution - easy setup with no soware installation
•
needed
*
Requires additional MyWirelessTV Receivers.
4
Page 6

MyWirelessTV User Manual
HDCP compliant† - secured video content protection with standard
•
HDCP 2.0 encryption
HDMI compliant† - complies with HDMI™ industry standard to assure
•
device compatibility
Soware support - obtain newer soware online to enhance product
•
Product Contents
Wireless HD video Transmitter
•
Wireless HD video Receiver
•
Power adapter
•
High-speed HDMI cables
•
Remote control
•
IR Blaster cable
•
IR Receiver cable
•
USB mini adapter
•
Quick start guide
•
†
Certication pending.
5
Page 7
MyWirelessTV User Manual
Getting To Know MyWirelessTV
is section contains a quick overview of MyWirelessTV, including all
ports and LEDS on both the MyWirelessTV Transmitter and Receiver.
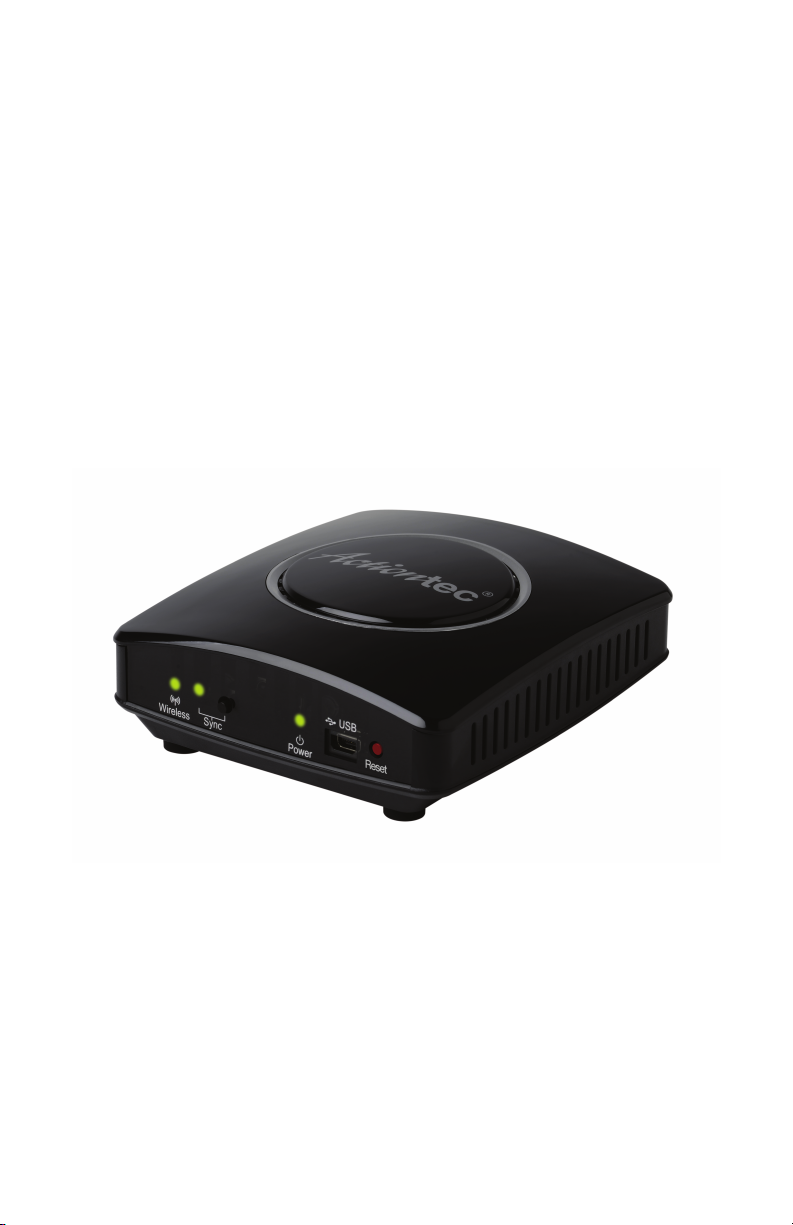
MyWirelessTV Transmitter
e MyWirelessTV Transmitter features ve ports (Power, HDMI Input,
IR Transmit, HDMI Passthrough, and mini USB), two buttons (Sync,
Reset), and three LEDS (Sync, Power, Wireless).
Transmitter Front Panel
Wireless LED e Wireless LED, located on the front of the
Transmitter, is used to display the state of the Transmitter’s wireless
signal. If unlit, the wireless radio is not on. If lit, the wireless radio is on.
6
Page 8

MyWirelessTV User Manual
Sync LED e Sync LED, located on the front of the Transmitter, is
used to display the state of synchronization between the Transmitter
and Receiver(s). If it is blinking or o, the Transmitter is not
synchronized with any Receivers. If it is glowing steadily,
synchronization has been established with at least one Receiver.
Sync Button e Sync button, located on the front of the Transmitter,
is used set up synchronization with a Receiver or Receivers.
Power LED e Power LED, located on the front of the Transmitter, is
used to display the state of the Transmitter’s power. If unlit, the unit is
o. If lit, the unit is on.
Mini USB Port e Mini USB port, located on the front of the
Transmitter, is used to connect a USB stick drive to the Transmitter
when a rmware update is available. See “Updating MyWirelessTV’s
Firmware” for more details. It is also used for the USB backchannel
feature.
Reset Button e Reset button, located on the front of the
Transmitter, is used to reset the transmitter to factory default settings.
7
Page 9
MyWirelessTV User Manual
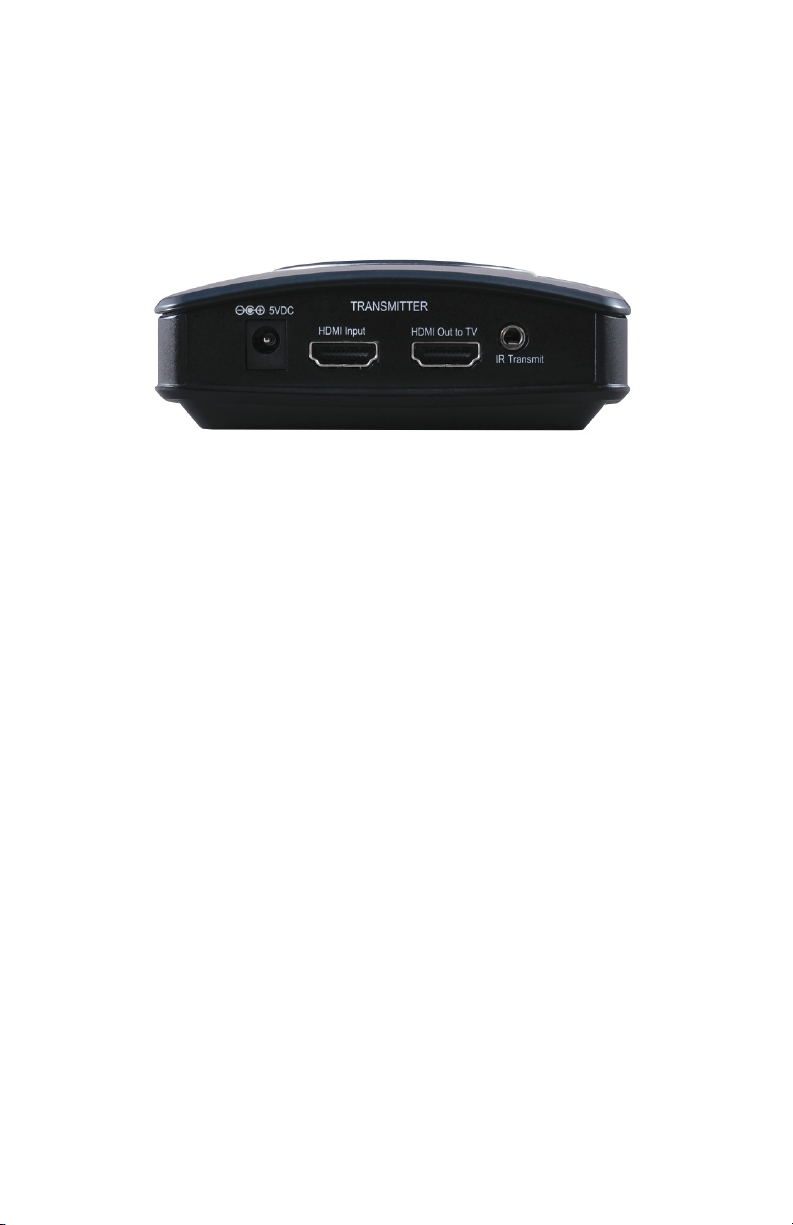
Transmitter Rear Panel
Power Port e Power port, located on the back of the Transmitter, is
used to connect the Power cord to the Transmitter.
HDMI Input Port e HDMI Input port, located on the back of the
Transmitter, is used, via an HDMI cable, to connect the Transmitter to
an HDMI source (set top box, Blu-ray player, gaming console, etc.).
HDMI Passthrough Port e HDMI Passthrough (Out to TV) port,
located on the back of the Transmitter, is used, via an HDMI cable, to
connect the Transmitter to a local HDTV to allow continued video
viewing on the monitor located nearest to the Transmitter.
IR Transmit Port e IR Transmit port, located on the back of the
Transmitter, is used to connect the IR Blaster cable to the Transmitter,
enabling the use of the source device remote control in tandem with
MyWirelessTV.
8
Page 10
MyWirelessTV User Manual
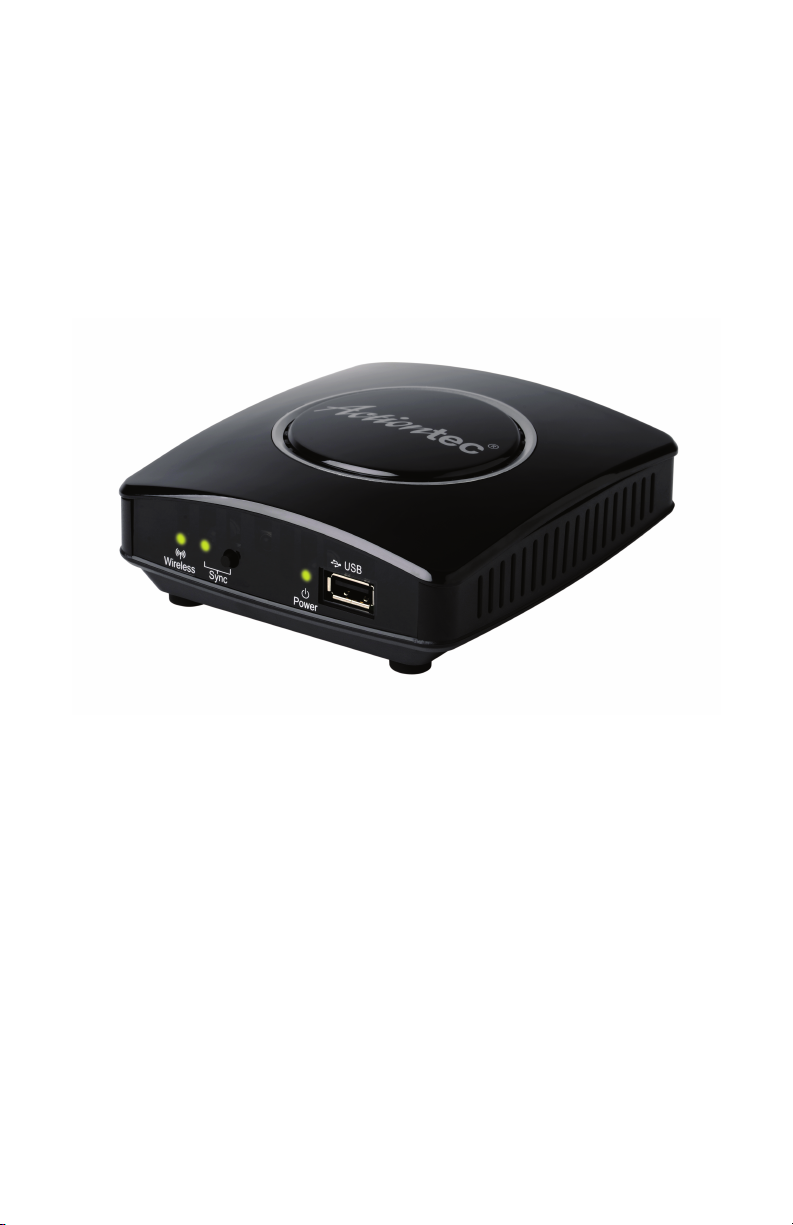
MyWirelessTV Receiver
e MyWirelessTV Receiver features three ports (Power, HDMI Out,
USB), two buttons (Sync, Reset), and three LEDs (Wireless, Sync, Power).
Receiver Front Panel
Wireless LED e Wireless LED, located on the front of the Receiver, is
used to display the state of the Receiver’s wireless signal. If unlit, the
wireless radio is not on. If lit, the wireless radio is on.
Sync LED e Sync LED, located on the front of the Receiver, is used to
display the state of synchronization between the Receivers and
Transmitter. If it is blinking or o, the Receiver is not synchronized
with any receivers. If it is glowing steadily, synchronization has been
established with at least one Transmitter.
Sync Button e Sync button, located on the front of the Receiver, is
used set up synchronization with a Transmitter.
9
Page 11

MyWirelessTV User Manual
Power LED e Power LED, located on the front of the Receiver, is
used to display the state of the Receiver’s power. If unlit, the unit is o.
If lit, the unit is on.
USB Port e USB port, located on the front of the Receiver, is used to
connect a USB stick drive to the Receiver when a rmware update is
available. See “Updating MyWirelessTV’s Firmware” for more details. It
is also used for the USB Backchannel feature.
Receiver Rear Panel
Reset Button e Reset button, located on the back of the Receiver, is
used to reset the Receiver to factory default settings.
Power Port e Power port, located on the back of the Receiver, is
used to connect the Power cord to the Receiver.
HDMI Out to TV Port is port, located on the back of the Receiver, is
used, via an HDMI cable, to connect the Receiver to an HDMI-ready
display, such as a high-denition TV.
IR Port is port, located on the back of the Receiver, is used to
connect the IR Receiver cable, used to extend the range of the source
device’s remote control (in conjunction with the IR Blaster cable
connected to the Transmitter).
10
Page 12

Connecting MyWirelessTV
Connecting MyWirelessTV consists of two parts: connecting the
Transmitter to a source of high-denition video, and connecting the
receiver to a high-denition television monitor. is chapter will take you
through both procedures, as well as setting up the IR Blaster and IR
Receiver to allow you to use the remote control of the source device in the
location you are watching (or playing) your content.
Connecting the MyWirelessTV Transmitter
1. e Transmitter must be installed near the video’s source device (set
top box, Blu-ray player, gaming console, etc.)
2. Get one of the power supplies from the MyWirelessTV kit and plug the
small end of the Power adapter into the 5VDC (Power) port of the back
of the Transmitter
3. Plug the other end into an electrical wall socket. e PowerLED will
glow solid green.
4. Unplug the HDMI cable that connects the source device to the
television monitor from the source device. It should now only be
connected to the monitor.
5. Plug the free end of the HDMI cable you unplugged in step 4 into the
HDMI Out to TV port on the back of the Transmitter. is cable
should now connect the television monitor to the Transmitter.
6. Get an HDMI cable from the MyWirelessTV kit and plug one end into
the HDMI Input port on the back of the Transmitter.
Page 13

MyWirelessTV User Manual
7. Plug the other end of this HDMI cable to an HDMI port on the source
device. is cable should now connect the Transmitter to the source
device.
8. Turn on the HDTV and make sure you can see video from your source
device.
Connecting the MyWirelessTV Receiver
e Receiver must be installed near the HDTV monitor where you intend
to watch the content being streamed from the source device.
1. Get the second power supply from the MyWirelessTV kit and plug the
smaller end into the 5VDC (Power) port on the back of the Receiver.
2. Plug the other end into an electrical wall socket. e Power LED will
glow solid green.
3. Get the second HDMI cable from the MyWirelessTV kit and plug one
end into an HDMI port on the HDTV monitor.
4. Plug the other end of this HDMI cable into the HDMI Out to TV port
on the back of the Receiver. is cable should now connect the
Receiver to the HDTV monitor.
5. Turn on the HDTV monitor. You should be able to see content being
streamed from the source device.
12
Page 14

MyWirelessTV User Manual
Setting Up IR Control
MyWirelessTV comes with an IR Blaster and IR Receiver, which work
together to allow you to control the source device from the location you
are watching, whether it’s in the next room or on the other side of the
house. For example, if your Blu-ray player is in the living room, and
you’ve set up MyWirelessTV to watch on an HDTV in the bedroom, the
IR Blaster/Receiver allows you to control the Blu-ray player from your
bedroom.
Note: If you are using MyWirelessTV in the same location (i.e., the source
device and the HDTV monitor are in the same room), the IR Blaster/
Receiver is not needed.
Connecting the IR Extender Cable
e IR Extender cable receives signals from the source device remote
control and sends them back to the source device.
1. Get the IR Extender cable (it has a green connector) from the
MyWirelessTV kit.
2. Plug the IR Extender’s green connector into the green IR port on the
back of the Receiver.
3. Remove the protective covering of the double-stick tape and attach the
at end of the IR Receiver cable to the front corner of the HDTV
monitor’s bezel or frame
Connecting the IR Blaster Cable
e IR Blaster cable receives the source device remote control signal from
the Receiver and delivers it to the source device.
1. Get the IR Blaster cable (it has a black connector) from the
MyWirelessTV kit.
2. Plug the black connector of the IR Blaster cable into the IR Transmit
port on the back of the Transmitter.
13
Page 15

MyWirelessTV User Manual
3. Place the at end of the IR Blaster cable in front of the remote sensor of
the source device.
You should now be able to use the remote control of the source device
from the location of the HDTV monitor to which you are streaming
content.
Typical MyWirelessTV Connection Conguration
Transmitter
14
Page 16

MyWirelessTV User Manual
Receiver
Connecting to a Computer as a Source Device
If you want to use a computer with an HDMI out port with
MyWirelessTV, connect the computer as you would any other HDMI
device (see “Connecting MyWirelessTV Transmitter” and “Connecting
MyWirelessTV Receiver,” above). You can then use MyWirelessTV’s USB
Backchannel feature (see next page) to operate your keyboard and mouse
from the MyWirelessTV’s Receiver.
15
Page 17

MyWirelessTV User Manual
Using USB Backchannel
1. Aer connecting the computer to the Transmitter, and an HD monitor
to the Receiver, get the mini USB connector from the kit and plug it
into the mini USB port on the Transmitter.
2. Get a USB cable (not included in kit) and connect it to the mini USB
connector plugged into the Transmitter, and a USB port on the
computer.
3. Plug your keyboard/mouse into the USB port on the Receiver. You
should now be able to control your computer remotely.
16
Page 18

Using the MyWirelessTV
Graphical User Interface
is chapter describes using the MyWirelessTV graphical user interface,
which allows you to congure various aspects of MyWirelessTV,
including changing the source device, adjusting latency, and resetting the
devices.
Remote Control
e remote control that comes with MyWirelessTV is used to access the
device’s graphical user interface (GUI). e GUI appears on the HDTV
monitor connected to the Receiver. ere is no access to a GUI on the
monitor connected to the Transmitter.
Page 19

MyWirelessTV User Manual
Buttons
To navigate the GUI screens, you must use several of the buttons on the
remote control. Following is a list of the buttons needed to navigate the
GUI.
Select Source Shortcut
Pressing this button displays the possible source devices available, and
allows you select one (by pressing the Up and Down buttons on the
remote control to navigate, and selecting one by pressing the OK
button).
Menu
Pressing this button generates the Main Menu screen. If you are already
in the Main Menu screen, pressing the Menu button again returns you
to the video screen.
Direction (Up, Down, Left, Right)
Pressing one of these buttons allows you to navigate in the direction
selected within the GUI.
18
Page 20

MyWirelessTV User Manual
OK
Pressing this button conrms the selection made within theGUI.
Back
Pressing this button returns you to the previous screen in the GUI
(cancels the last navigation command performed).
Information
Pressing this button displays the System Information screen.
Exit
Pressing this button exits the GUI and returns you to the video stream
on the HDTV monitor.
19
Page 21

MyWirelessTV User Manual
Graphical User Interface
To access MyWirelessTV’s graphical user interface, press the Menu
button the remote control. e Main Menu appears:
MyWirelessTV’s Graphical User Interface is organized in four categories,
which are represented by the four icons in the Main Menu: Select Source,
Congure, General Settings, and Advanced Settings.
20
Page 22

MyWirelessTV User Manual
Select Source
Selecting Select Source from the Main Menu screen (by navigating to the
appropriate icon and the pressing OK on the remote control) generates
the Select Source screen:
is screen overlays the video stream being transmitted to your HDTV
monitor and allows you to select another source of video streaming,
assuming you have congured multiple MyWirelessTV Transmitters
connected to a range of other source devices (additional Blu-ray Players,
DVRs, gaming consoles, etc.). Navigate over the list using the Up and
Down buttons on the remote control. To select a dierent source,
highlight it, then press the OK button on the remote control. e new
video stream will appear on the HDTV monitor.
21
Page 23

MyWirelessTV User Manual
Congure
Selecting Congure from the Main Menu screen (by navigating to the
appropriate icon and the pressing OK on the remote control) generates
the Congure screen:
ere are four options in this screen: Add Transmitter, Label Transmitter,
Delete Transmitter, and Label Receiver.
Add Transmitter
Selecting Add Transmitter in the Congure screen causes the Receiver
to scan for additional Transmitters within its range, then add the device
to its Source list. Once the Receiver completes its scan, a list of possible
Transmitters appears in the right-hand pane of the screen. Select one,
then press OK on the Remote to select that particular Transmitter.
22
Page 24

MyWirelessTV User Manual
Label Transmitter
Selecting Label Transmitter generates a list of names in the right-hand
pane with which you can label the currently streaming source device,
such as DVR, Blu-ray player, etc. At the bottom of the list is a Custom
option. Selecting this option generates a graphical keyboard with which
you can create a custom label for this source device by entering the
name of your choice.
Delete Transmitter
Selecting Delete Transmitter in the Congure screen allows you to
delete added Transmitters. Once the Receiver completes its scan, a list
of Transmitters appears in the right-hand pane of the screen. Select one,
then press OK on the Remote to delete a particular Transmitter.
Label Receiver
Selecting Label Receiver generates a list of names in the righthand pane
with which you can label the location of the current streaming target
device (the HDTV monitor connected to the Receiver), such as
Bedroom 1, Kitchen, Family Room, etc. At the bottom of the list is a
Custom option. Selecting this option generates a graphical keyboard
with which you can create a custom label for this target device by
entering the name of your choice.
23
Page 25

MyWirelessTV User Manual
General Settings
Selecting General Settings from the Main Menu screen (by navigating to
the appropriate icon and the pressing OK on the remote control)
generates the General Settings screen:
ere are three options in this screen: Language, Latency Mode, and
Wireless Channel.
Language
Selecting Language in the General Settings screen generates a list of
languages for the MyWirelessTV GUI in the right-hand pane.
Currently, only English is available.
24
Page 26

MyWirelessTV User Manual
Latency Mode
Selecting Latency Mode in the General Settings screen causes the
Receiver to list the latency mode options (eater Mode and Game
Mode) in the right-hand pane. Selecting eater Mode causes
MyWirelessTV to prioritize video quality over video speed. Selecting
Game Mode causes MyWirelessTV to prioritize video speed over video
quality. If you are using a computer in conjunction with MyWirelessTV,
we suggest using Game Mode to more eectively control the keyboard
and mouse.
Wireless Channel
MyWirelessTV uses the 802.11n frequency for wireless networking. If
you notice lagging or pixelation with MyWirelessTV’s streaming video,
you may be using an 802.11n channel already in use. Selecting Wireless
Channel generates the wireless channel options available on
MyWirelessTV (Auto, Channel 44, Channel 149, Channel 157). Select a
channel to have MyWirelessTV stream using a dierent channel, or
select Auto (recommended) to have MyWirelessTV select an unused
wireless channel automatically.
Note: Selecting a dierent channel will automatically reset the system.
Also, you must power-cycle all Receivers in the network to use a
dierent channel.
25
Page 27

MyWirelessTV User Manual
Advanced Settings
Selecting Advanced Settings from the Main Menu screen (by navigating
to the appropriate icon and then pressing OK on the remote control)
generates the Advanced Settings screen:
ere are two options in this screen: System Information and Reset to
Factory.
System Information
Selecting System Information in the Advanced Settings screen
generates the System Information graphic in the right-hand pane. is
graphic displays, for both the Receiver and Transmitter, the rmware
version of each device, the IP addresses being used, and their respective
MAC addresses, resolutions, and WiFi channels. Finally, a bar graph
displaying the signal strength between the Transmitter and Receiver is
displayed at the bottom of the screen.
26
Page 28

MyWirelessTV User Manual
Reset to Factory
Selecting Reset to Factory in the Advanced Settings screen generates a
window on the screen, asking the following: Are you sure you want to
reset to factory defaults? If you reset MyWirelessTV to factory default
settings, all saved pairing information will be lost (except the original
pairing information). Select Reset to have MyWirelessTV go through
the reset procedure, which will take about 1 minute. Aer reboot,
MyWirelessTV devices will have been reset to factory default settings.
Select Cancel to exit this window without resetting MyWirelessTV.
Updating MyWirelessTV Firmware
Actiontec recommends that all MyWirelessTV users update their device
with the latest rmware update to take advantage of recently developed
performance enhancements, new features, and bug xes. To view the
current rmware version number, press the Menu button on the
MyWirelessTV remote control, then select Advanced Settings (or press
the (i) button on the remote control. Compare this version number with
the latest version available at http://www.actiontec.com/mwtv. If the
version on your MyWirelessTV device is older, perform the following
procedure.
To update the rmware on your MyWirelessTV devices:
1. Using a web browser, go to http://www.actiontec.com/mwtv.
2. Follow the online instructions to download the latest MyWirelessTV
rmware to the USB thumb drive included in the MyWirelessTV kit.
3. Once the rmware is downloaded to the thumb drive:
a. On a Receiver, plug the USB thumb drive into the USB port on the
front of the Receiver;
b.On a Transmitter, plug the USB thumb drive into the larger end of
the mini USB adapter, then plug the smaller end of the mini USB
adapter into the mini USB port on the front of the Transmitter.
27
Page 29

MyWirelessTV User Manual
4. Watch the Power and Sync LEDs of the device ash for 2-3 minutes.
Do not power down the device or remove the USB thumb drive while
the LEDs are ashing.
5. Aer the LEDs turn o briey, the Power LED will ash, then glow
solid green. When this occurs, remove the thumb drive from the
MyWirelessTV device.
6. Repeat steps 3-5 for all MyWirelessTV devices that need an update.
Once the rmware update has been applied to all MyWirelessTV devices,
perform a power cycle (turn o, then on) on all devices. e
MyWirelessTV devices will pair automatically, streaming audio and
video. Perform another power cycle on all devices. e rmware update
has been successfully applied.
28
Page 30

Troubleshooting
is chapter will describe some problems you may encounter using
MyWirelessTV, and the possible solutions to those problems. Also
included are frequently asked questions, and the answers the questions.
Frequently Asked Questions
Why can’t I see anything on the TV next to the Transmitter?
Check the cable connection from the external source (i.e., cable/
satellite set top box, Blu-ray player) to the Transmitter and from the
Transmitter out to the HDTV.
Why can’t I see anything on the TV, even though all the
cables are connected properly?
Make sure the external source device is powered on and the correct
source input is selected on your HDTV.
Why can’t I see anything on the TV next to the Receiver?
Check the cable connection from the MyWirelessTV Receiver out to
the HDTV. Also, make sure the correct source input is selected.
Why can’t I control my external source device from my
second HDTV?
Make sure the IR Blaster sensor is pointed directly to the external
source device’s IR sensor window. Also, check that the Receiver or the
IR Extender cable is in line-of-sight of the remote control.
Page 31

MyWirelessTV User Manual
Why can’t I change my channel or volume with the
MyWirelessTV remote control?
e remote control is intended only for switching inputs, pairing
congurations, and soware updates. Use the HDTV remote control
for changing channels or adjusting volume.
Why don’t I see any video when I connect my HDMI PC or
laptop computer to MyWirelessTV?
Make sure the HDMI output display is selected from your PC or laptop.
If needed, refer to your PC or laptop’s user manual for more
information.
Why is the video quality so poor?
To improve video quality, try adjusting the orientation of the
Transmitter and/or Receiver. Use the Wireless Power Indicator (in the
MyWirelessTV’s GUI, go to Advanced Settings, then System
Information) to see what orientation works best for your situation.
Why aren’t my remote keyboard and mouse working when I
connect MyWirelessTV to my computer?
Check your cable connections. Make sure you have a USB 2.0 A to
Mini-B cable connected between your Transmitter and your computer’s
USB port.
Why am I not seeing video from my Motorola cable set top
box after seeing an HDCP warning message on my HDTV?
As of October 1, 2011, some Motorola cable set top boxes are known to
have video authentication issues with certain video devices. Check with
your cable service provider to see if a soware update is available for
your cable set top box.
30
Page 32

MyWirelessTV User Manual
I have my MyWirelessTV Receiver and Transmitter in the
same room. Why does my source device accept the
command from the remote control twice?
To prevent the source device from getting the IR command twice,
connect your IR Extender cable to the Receiver and hide the IR sensor
from direct line-of-sight.
What is the remote control used for?
e MyWirelessTV remote control is used to congure dierent setups,
such as connecting two Transmitters to a single Receiver. Also, you can
access the MyWirelessTV’s graphical user interface to change system
settings. See the “Remote Control” section of the “Using the
MyWirelessTV Graphical User Interface” chapter for more information.
31
Page 33

Specications
is chapter lists the specications of the MyWirelessTV devices.
General
Video Specications
Multisource: Multiple Transmitters‡ to 1 Receiver
Multicast: 1 Transmitter to multiple Receivers§ (up to 4)
Range: Up to 150 .
Resolution: 480i, 480p, 720p, 1080i, and 1080p
End-to-end latency: < 20ms
Average Bitrate: 35Mbps
Input: 1 HDMI (Transmitter)
Output: 1 HDMI Wireless (Receiver), 1 HDMI Pass-through
(Transmitter)
Technical Specications
Wireless: 802.11n
Security: Standard WiFi security
Bandwidth: 5Ghz
Pairing: Pre-paired and Sync push button
‡
Additional Transmitters sold separately.
§
Additional Receivers sold separately.
Page 34

MyWirelessTV User Manual
USB: 1 USB Type A (Receiver); 1 USB Mini (Transmitter)
Power: 5V 3A
Weight: 0.30 lb. (per device)
Dimension: 4.125 in. W x 1.25 in. H x 4.75 in. D
Regulatory Compliance: FCC Class B & C, UL, IC
Operating temperature: 0º to 40º C
Color: Glossy black
LED Indicators
Transmitter
Sync, Power, Wireless
Receiver
Sync, Power, Wireless
GPL License
To see the GPL License, go to the following link:
http://opensource.actiontec.com/
33
 Loading...