

Page 1

1
Table of Contents
l. Introduction 2
ll. Contacting Technical Support 3
lll. Connecting the Actiontec USB Wireless Adapter 4
lV. Installing the Actiontec USB Wireless Adapter 5
Configuring Windows 98 SE 5
Configuring Windows ME 8
Configuring Windows 2000 10
V. Configuring the Actiontec USB Wireless Adapter 14
Vl. Configuring the AdHoc Feature 16
Vll. Configuring File and Print Sharing 17
Proprietary Notice and Disclaimer
Unless otherwise noted, this document and the information herein disclosed are proprietary to Actiontec Electronics, Inc the manufacturer. Any
person or entity to whom this document is furnished or who otherwise has possession thereof, by acceptance agrees that it will not be copied or
reproduced in whole or in part, nor used in any manner except to meet the purposes for which it was delivered.
The information in this document is subject to change without notice and should not be construed as a commitment by Actiontec the
manufacturer. Although Actiontec the manufacturer will make every effort to inform users of substantive errors, Actiontec the manufactur er disclaims
all liability for any loss or damage resulting from the use of this document or any hardware or software described herein, including without
limitation contingent, special or incidental liability.
Note: PC is a trademark of IBM Corporation. Windows 98 and 98 SE is a trademark of Microsoft Inc. All other brand or product names and
logos used in this manual are trademarks or registered trademarks of their respective holders.
Table of Contents
0530-0262-000
Page
Page 2

ll
3
Contacting Technical Support
l
2
Introduction
Actiontec Electronics prides itself on making high-quality, durable, high-performance
products. If you should need assistance, the Actiontec Technical Support Department is
available 6 am to 11pm Mon - Sun (Central Time), to provide professional support.
Contacting Technical Support
Actiontec Electronics, Inc.
760 N. Mary Avenue
Sunnyvale, CA 94085
Phone: 1-719-884-8300 E-mail: techsupp@actiontec.com
Thank you for purchasing the Actiontec USB Wireless Adapter. This USB Wireless
Adapter is easy to use and easy to setup. If you are tired off all those messy wires just to
connect a laptop to your Home network, then take your networking to the next level with
the Actiontec USB Wireless Adapter. You will be able to share files, printers and even your
High-Speed Internet access, all without wires.
Package Contents
Make sure the following items came in this package:
USB Wireless Adapter
USB Cable
Actiontec USB Wireless Adapter Installation CD-ROM
This User’s Manual and Quick Start Installation Guide
Minimum System Requirements
One Pentium class computer, 200 Mhz or higher (preferably 300 Mhz or above)
Microsoft Windows 98 Second Edition (SE), Microsoft ME, Microsoft 2000
installed
Introduction
Page 3
lV
5
Installing the Actiontec USB Wireless Adapter
lll
4
Connecting the Actiontec USB Wireless Adapter
1. It will not affect the installation process if your computer is on or off. However, if
your computer is off then after you have connected the USB Wireless Adapter,
please be sure to turn on your computer.
2. Insert the Actiontec USB Wireless Adapter into the appropriate USBslot on either
the front or the back of your PC.
Connecting the Actiontec USB Wireless Adapter
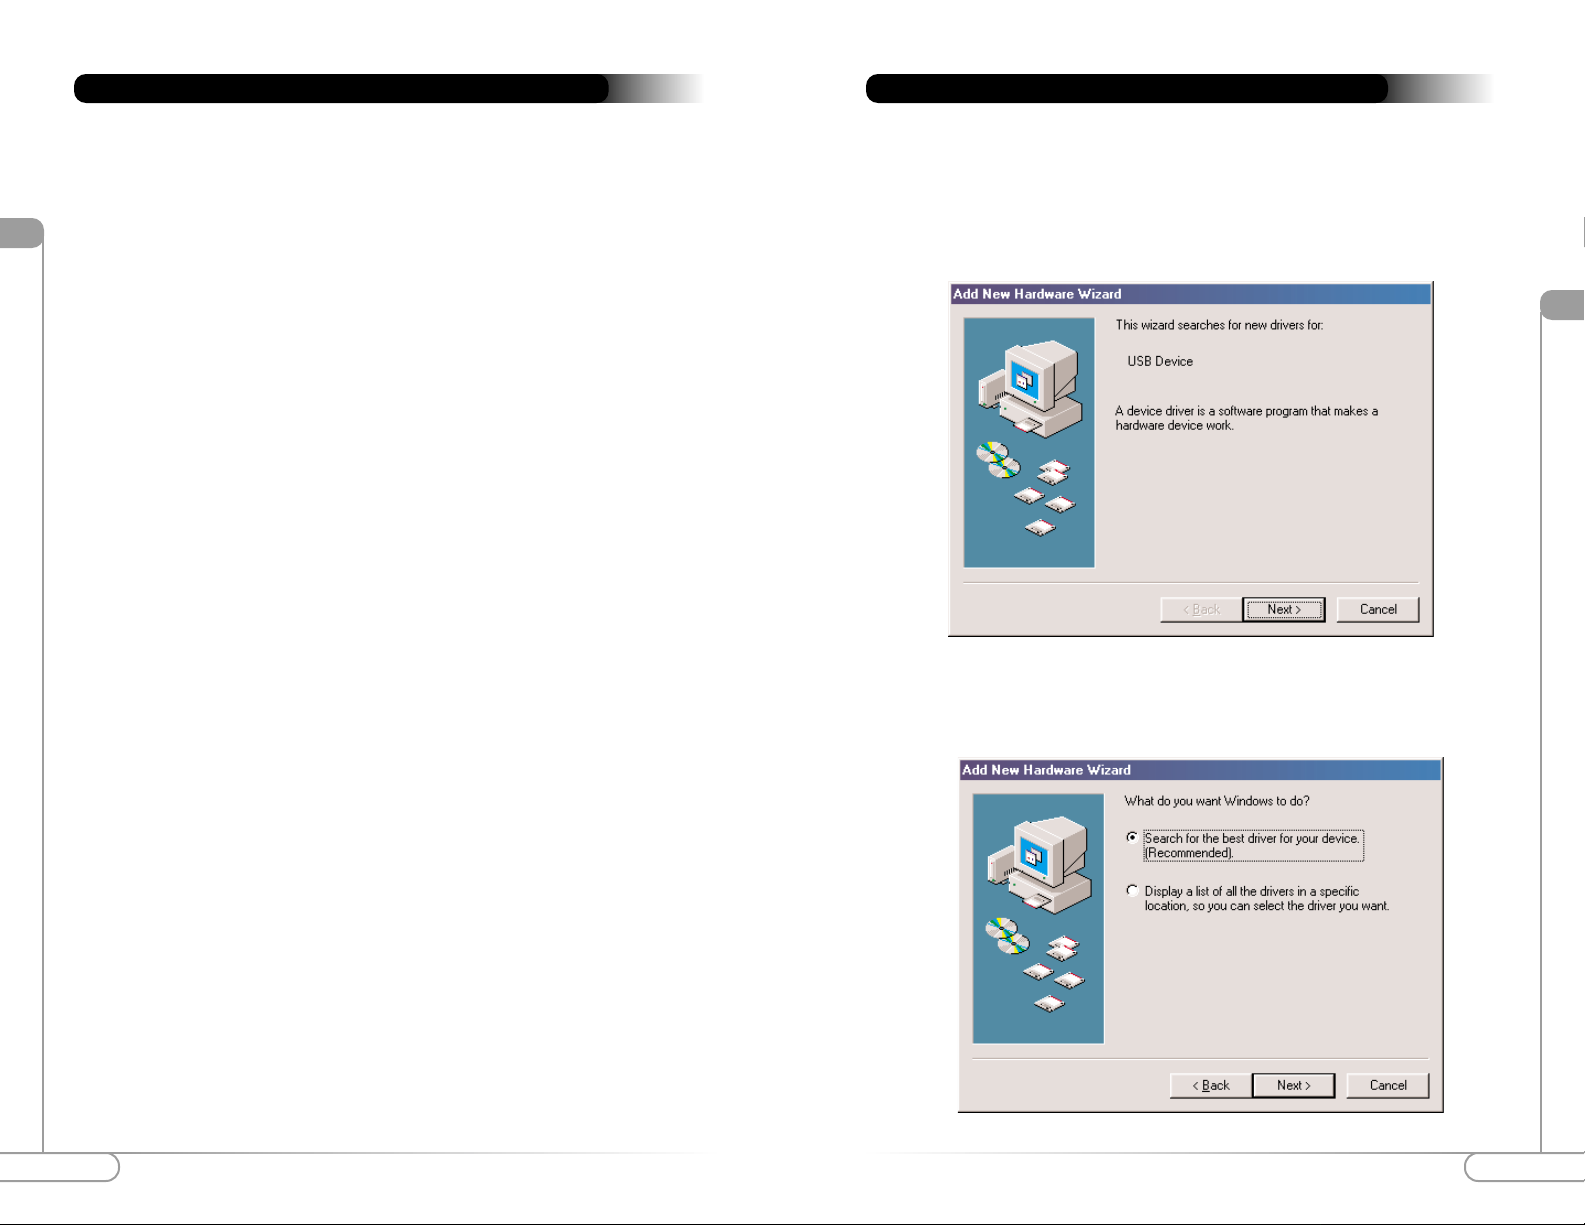
For Windows 98
1. After you have installed the USB Wireless Adapter your computer will display an
“Add New Hardware Wizard” screen. Click Next.
Installing the Actiontec USB Wireless Adapter
2. In the next screen, select the option Search for the best driver for your device and
then click the Next button.
Page 4
lV
7
Installing the Actiontec USB Wireless Adapter
lV
6
Installing the Actiontec USB Wireless Adapter
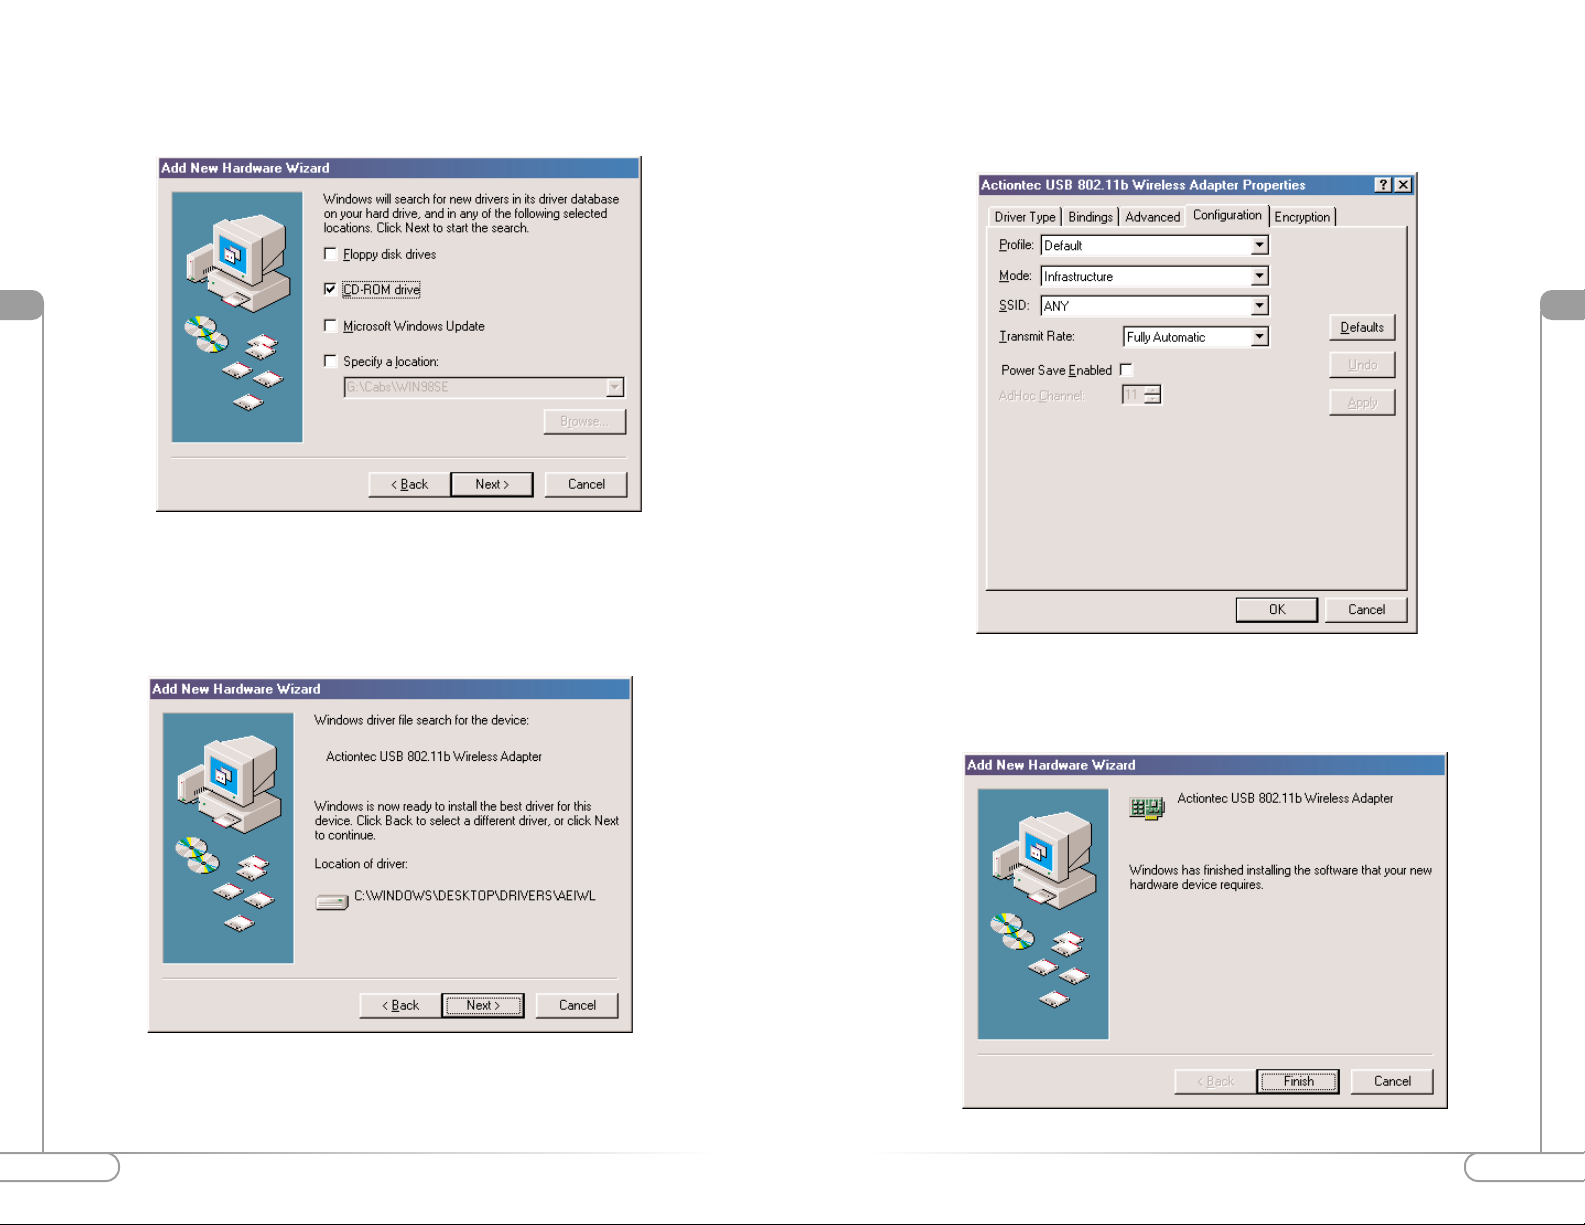
3. Please insert the Actiontec USB Wireless Adapter Installation CD into your CD-
ROM drive. Select CD-ROM Drive and then click Next.
4. Your computer will locate the correct drivers named “AEIWLNIC.inf”. Click Next
to install the drivers.
5. The USB Adapter’s properties screen will appear. (Note: The “SSID” must be the
same as the “ESSID” on your Home Gateway or Access Point.) Click OK to complete the installation process.
6. The installation is now complete. Please click Finish .
Page 5

lV
9
Installing the Actiontec USB Wireless Adapter
lV
8
Installing the Actiontec USB Wireless Adapter
7. It will be necessary for you to shut down your computer. Please click OKto restart
your computer. If this screen does not appear please restart your computer manually.
Windows ME
1. After you have installed the USB Wireless Adapter your computer will display an
“Add New Hardware Wizard” screen. Click Automatic search for a better driver
(Recommended). Then click the Next button.
2. The USB Adapter’s properties screen will appear. (Note: The “SSID” must be the
same as the “ESSID” on your Home Gateway or Access Point.) Click OK to complete the installation process.
3. The installation is now complete. Please click Finish.
Page 6

lV
11
Installing the Actiontec USB Wireless Adapter
For Windows 2000
1. After you have installed the USB Wireless Adapter your computer will display the
“Found New Hardware Wizard” screen. Click Next.
2. In the next screen, select the option Search for the best driver for your device and
then click the Next button.
lV
10
Installing the Actiontec USB Wireless Adapter
4. It will be necessary for you to shut down your computer. Please click OKto restart
your computer. If this screen does not appear please restart your computer manually.
3. Please insert the Actiontec USB Wireless Adapter Installation CD into your CD-
ROM drive. Select CD-ROM Drive and then click Next.
Page 7

lV
13
Installing the Actiontec USB Wireless Adapter
lV
12
Installing the Actiontec USB Wireless Adapter
4. Your computer will locate the correct drivers named “AEIWLNIC.inf”. Click Next
to install the drivers.
5. The “Wireless LAN Configuration Utility” screen will appear. (Note: The “SSID”
must be the same as the “ESSID” on your Home Gateway or Access Point.) Click
OK to continue the installation process.
6. If you have configured any Encryption capabilities in your Home Gateway or
Access Point then complete the following screen accordingly. Otherwise, please
click Finish to complete the installation process.
Page 8

V
15
Configuring the Actiontec USB Wireless Adapter
V
14
Configuring the Actiontec USB Wireless Adapter
After you have installed the software for the Actiontec USB Wir eless Adapter an, Icon will appear
in your Task Bar on the lower right hand side on your Desktop. You will not be automatically
connected to your Home Gateway or Access P oint. Follow these steps to configure y our Actiontec
USB Wireless Adapter.
Configuring the Actiontec USB Wireless Adapter
Actiontec USB Adapter Status Icon
3. After you have entered the appropriate SSID value click Apply and then click OK.
Your Actiontec USB Adapter will now be able to connect to your Home Gateway
or Access Point. If your Home Gateway or Access Point is connected to a DSL or
Cable modem then test your wireless connection. You can do this by opening your
Internet Browser and then surf the web.
Note: There are two colored bars on either side of the Actiontec USB Wireless
Adapter Icon. When they are G reen it means that your wireless connection is
strong or good. When they are Yellow it means that your wireless connection is fair.
When they are Red it means that your wireless connection is poor or weak. When
the bars are Yellow or Red you may experience slower connection speeds then when
they are Green.
Encryption (WEP)
You can use Encr yption to add a level of security to your USB Wireless Adapter network. This is not a required feature. If you are using a Home Gateway or Access Point
you must be sure to use the same Encryption (WEP) keys for your USB Wireless
Adapter. Please follow these steps to set this feature up:
1. Right click on the Actiontec USB Adapter Status Icon. A list will appear as shown
in the picture on the previous page. Then select Advanced Configuration... from
the given list.
2. Click on the Encryption tab.
3. You can either select 64 bitor 128 bit Encryption depending on your needed level
of security . You can select Create Keys with P assphrase(a passphrase is the same as
a password, with the same type of functionality). Once you have entered a pass
phrase the utility will automatically generate the 4 keys. Remember , if you are using
a Home Gateway or Access Point these keys will need to be added to it. If you
already have a set of keys configured into your Home Gateway or Access Point or
you prefer to create the keys manually , select C reate Keys Manuallyand enter them
in the given fields. Click Apply and then OK to activate your settings.
1. Right click on the Actiontec USB Adapter Status Icon. A list will appear as shown
in the picture below. Make sure that there is a black dot next to the Turn Wireless
Radio On. If the dot is not present then simply select it. Then you want to select
the Advanced Configuration... selection from the given list.
2. The USB Wireless Adapter’s Properties screen will appear. Under the “Configuration” tab
the SSID value should be the same as the ESSID value of your Home Gateway or Access
Point. For example, if you have configured your Home Gateway or Access Point ’s ESSID
value to “ ACTIONTEC” then this same value needs to be typed into the SSID field in the
following screen.
Page 9

Vll
17
Configuring File and Print Sharing
Vl
16
Configuring the AdHoc Feature
AdHoc enables two or more computers with the USB Wireless Adapter to talk to each
other. The most common usage for this feature is multi-player games in which each
player can play the game from each computer against one another via this Adhoc network. If you use the AdHoc feature then a Home Gateway or Access Point is not
required. Please follow these steps to set up the AdHoc feature:
1. Right click on the Actiontec USB Adapter Status Icon. A list will appear as shown
in the picture below. Then select Advanced Configuration... from the given list.
Configuring the AdHoc feature
2. In the “Profile” field type in any name you wish. This will save all the settings under
that name. Then click on the down arrow in the “Mode” field and select 802.11
AdHoc. Enter an SSID value in the given field. The SSID value should be the same
on each computer that you want to network together. Then in the “AdHoc
Channel” box select a channel between the numbers 1-11. This v alue also must be
the same on each computer that you wish to network. Finally, click Apply and OK
to activate the settings. Be sure to repeat this for each computer you want to network.
If you have and are using a Home Gateway or Access Point you can establish a network
that will allow you to share files and printers. This is an easy method to set up a network
in your home or small office. Please follow these steps to setup file and print sharing:
For Windows 95, 98 and ME
1. On your computer’s desktop click S tart, then select S ettings and then select
Control Panel. In the “Control Panel” window double click the Network icon.
2. The following “Network” screen should appear. Click the Add button.
Configuring File and Print Sharing
3. In the “Select Network Component Type” screen, click Service and then click the
Add button.
Page 10

Vll
19
Configuring File and Print Sharing
Vll
18
Configuring File and Print Sharing
4. In the following screen please select File and printer sharing for Microsoft
Networks from the given list.
5. In the “File and Print Sharing” screen make sure that both of the selection have a
check mark beside them. If they do not please click on the box next to each statement and then click OK.
6. After you have clicked OK you will return to the network screen from step 2. Please
click on the Identification tab (see the first image on page 26).
Computer Name: In this field you can type any name you want. (i.e. My
Computer, John, CPU654) Do not use the same name for each computer you
wish to have on your network.
Workgroup: This field enables you to set a unique name for your network. This
name must be set up on every other computer you wish to have on your network.
Computer Description: You can enter anything you wish. Traditionally, the
location name or main user’s name is used in this field.
7. Click on the Configuration tab. This will take you back to the screen from step 2.
In the “Primary Network Logon:” box, located just above the “File and Print
Sharing” button, make sure that Client for Microsoft Networks is selected. If it is
not then click the down arrow and select it from the given list. Click OK.
8. A screen will appear asking you to restart your computer. Click Yes to restart the
computer. If y ou do not see this screen please restart your computer manually. After
your computer restarts you will be asked to supply a User Name and Password.
Enter whatever you would like but be sure to write down these values, as they will
enable you to access your network.
Page 11

Vll
21
Configuring File and Print Sharing
Vll
20
Configuring File and Print Sharing
9. After your computer has restarted and you entered a password and user name, you
must enable a file or drive for sharing. Locate the file or drive you wish to share.
(The easiest way to achieve this is through your Windows Explorer, located in the
start menu.) Right click on the File or Drive you wish to share. In the given menu
select Sharing.
10. The following screen will appear. Please select Shared As. This will enable other
users on your network to see the file or drive you selected. Then you can chose the
Access Type:
Read Only:This will allow other users on your network to view and read the file
or drive you selected. They will not be able to modify it in any way. You can fur-
ther restrict their privlidges by entering a password in the appropriate field.
Full: This will allow other users on your network to read, modify, move and
delete any information in the shared drive or file. You can further restrict their
privlidges by entering a user name and password.
Depends on Passwor d:This will allow you to set both Read Only and Full access
on the shared file or drive. The level of access will depend on the passwords you
enter in the appropriate field.
When you are finished click Apply and then OK.
11. Next you need to share your printer. On your desktop, click Start, click Settings,
and then select Printers.
12. Right click on the printer you want to share. Select “Sharing” from the given list.
Page 12

Vll
23
Configuring File and Print Sharing
Vll
22
Configuring File and Print Sharing
13. The next step will be to enable the sharing by selecting the “Share As” button. It
will automatically insert a default name for the Share Name. You may set a password for the printer at this time if you want to restrict who on the network can use
this resource. You may also set the default printer settings by modifying information on the other tabs of this window.
For Windows 2000
1. After you have installed and configured your USB Adapter, Windows 2000 will
automatically enable file and print sharing for your computer. The only item that
needs to be altered is your workgroup settings. All the computers on your network
must have the same workgroup name but different computer names. To check or
change this locate the “My Computer” icon on your desktop . Right click on it and
select Properties from the given list.
2. In the “System Properties” click on the Network Identification tab. If the
“Workgr oup ” name is already the same as all the other computers on your network,
then you do not need to change it. Click OK. If it is not the same then click
Properties.
3. In the “Computer Name:” box type a name that is different from your other PC’s
on your network. Then, in the “Workgroup” box type the name that you are using
to identify your network. This will be the same on each computer on your networ k.
Click OK and you will return to the “N etwork Properties” screen. Click OK again
and even if you are not asked to do so, please restart your computer.
Page 13

24
Notes:
 Loading...