

Page 1
Page 2

Table of Contents
Proprietary Notice and Disclaimer ........................1
Introduction................................................................2
Contacting
Action
Do This First...............................................................3
Minimum System Requirements...........................3
Package Contents.................................................3
Before you Install the 1394 FireWire Card............3
Installing the PCI Card..............................................5
Connecting Devices to the Actiontec 1394 FireWire
Card ......................................................................6
Configuring Windows 98 ..........................................7
Checking the installation in Windows 98.............10
Configuring Windows 2000 Professional..............11
Checking the installation in Windows 2000 Pr ofes-
sional...................................................................15
Notices......................................................................16
Proprietary Notice and Disclaimer
tec Technical Support................2
Unless otherwise noted, this document and the information
herein disclosed are proprietary to Actiontec Electronics, Inc.
Any person or entity to whom this document is furnished or
who otherwise has possession thereof, by acceptance agrees that
it will not be copied or reproduced in whole or in part, nor
used in any manner except to meet the purposes for which it
was delivered.
The information in this document is subject to change without
notice and should not be construed as a commitment by
Actiontec. Although Actiontec will make every ef fort to inform
users of substantive errors, Action tec disclaim s all liability for
any loss or damage resulting from the use of this document or
any hardware or software described herein, including without
limitation contingent, special or incidental liability.
Note: PC is a trademark of IBM Corporation. Windows 98 and Windows 2000 Professional are trademarks of Microsoft, SInc. All other brand or product names and
logos used in this manual are trademarks or registered trademarks of their respective holders.
Proprietary Notice and Disclaimer 1
Page 3

Introduction
Thank you for purchasing an Actiontec 1394 FireWire Card.
Actiontec’s implementation of the IEEE 1394 standard brings
the latest in serial bus technology to your PC in an inexpensive
PCI card. An integral part of any PC-based video editing solution, the 1394 FireWire Card also opens you up to a world of
other fast, inexpensive peripherals, such as storage devices.
FireWire devices also support “hot-swapping”— the ability to
install and remove the devices without turning your computer
off to do so.
Easy to install, the 1394 FireWire Card is a ver y convenient
way to expand your PC into the world of IEEE 1394 devices.
Contacting
Action
Actiontec Electronics prides itself on making high-quality,
durable, high-performance products. If you should need assistance, the Actiontec Technical Support Department is available
from 7:00 AM to 7:00 PM Pacific Coast Time, Monday
through Friday to provide professional support.
New drivers and firmware are released as need arises to insure
maximum compatibility and operation of your new Actiontec
1394 FireWire Card. To find out more about this and other
Actiontec products, and to sign up for a free e-mail newsletter,
visit the Actiontec web site at: http://www.actiontec.com.
Actiontec Electronics, Inc. Phone: 408-752-7714
Technical Support (Choose Option 7)
760 N. Mary Avenue Fax: 408-732-0097
Sunnyvale, CA 94086 BBS: 408-732-0112
tec Technical Support
E-mail:
techsupp@actiontec.com
2 Introduction
Page 4

Do This First
Minimum System Requirements
• 333Mhz (or above) PC with 32MB of RAM and CDROM drive
• One available PCI slot
• Microsoft Windows 98, Windows 98SE, or Win dows 2000
installed
Package Contents
Make sure the following items came in this package:
• 1394 FireWire Card
• This user’s manual
• (1) 4-pin to 6-pin FireWire Cable
• MEI Video-Editing Software
Before you Install the 1394 FireWire Card
Make sure you have your Windows 98 or Windows 98 Second
Edition (SE) CD-ROM on hand during the installation process. Windows may need to copy some files from it s own installation CD-ROM during the installation of the 1394 FireWire
Card. In this case, insert your Windows installation CD when
it is requested and follow the on-screen instructions. When
windows has copied the files it needs, you will be returned to
the installation process where you left it.
• To reduce the chance that there will be problems operating
the 1394 FireWire Card, do not install it at the same time
as you install any other PCI devices.
• Use the extension cable provided to avoid stretching the
power cables in your computer to reach the card. The cable
from your computer’s power supply should be able to reach
farther, when fully extended, than the location of the card.
Make sure there is slack in the cable when the connection
has been made.
Do This First 3
Page 5

• Do not, under any circumstances, insert or remove the PCI
card while the computer is turned on. Doing so with any PCI
card will have unpredictable results which may include permanent physical damage to the card, your computer’s
mainbord, or both.
4 Do This First
Page 6
Installing the PCI Card
Step 1 Turn off the computer and all peripheral devices con-
nected to it.
Step 2 Unplug the computer power cord from the wall
receptacle.
Step 3 Remove the computer’s cover. Refer to your computer
owner’s manual for instructions.
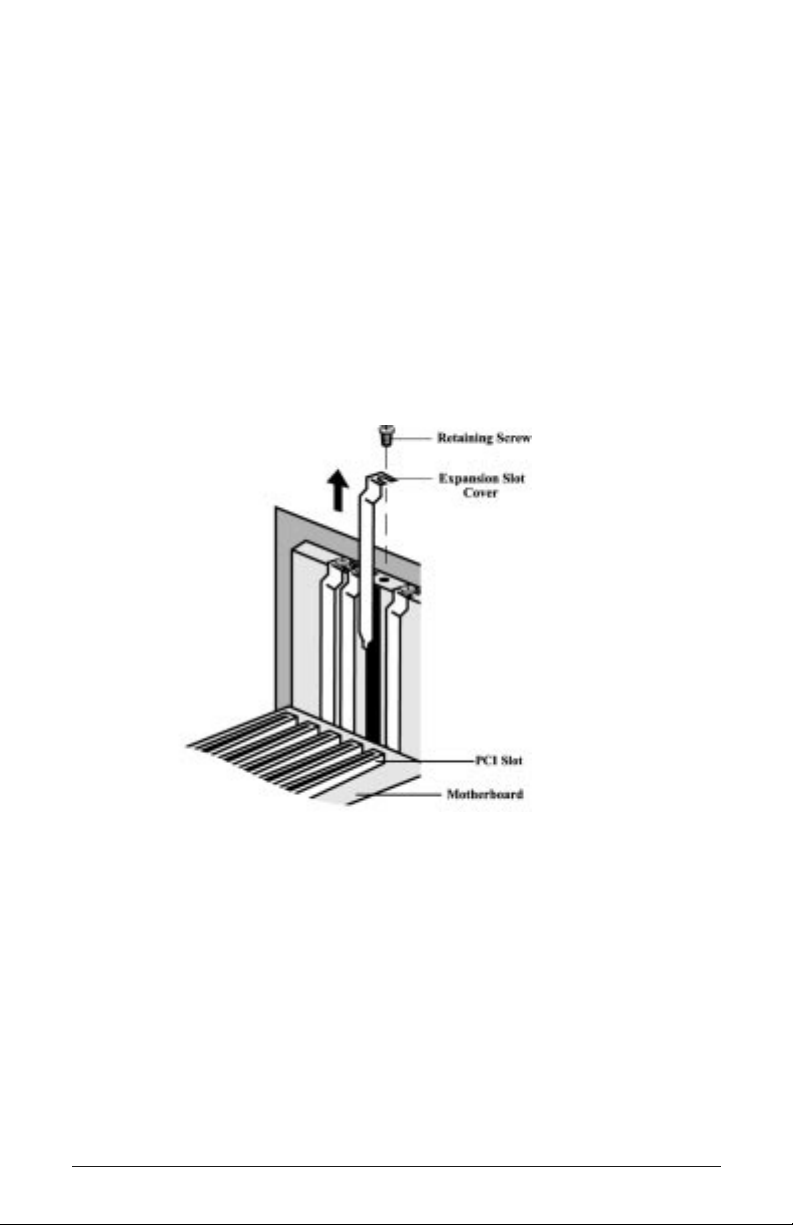
Step 4 Remove the screw securing the expansion slot cover
behind one of the computer’s available PCI expansion
slots. Lift the expansion slot cover out as shown
below.
CAUTION: Always
discharge static
electricity before
handling the1394
FireWire Card. You
may discharge static
electricity by touching a grounde
metal structure or by
using any commercially av ailabl e
grounding strap.
Note: Make sure the
slot is a PCI slot. PCI
slots are smaller
than ISA slots and
nearly always white
in color. ISA slots
are generally black
in color.
Figure 1: Removing the Backplate
The position of the expansion slots in your computer
may differ from the illustrations shown in this user’s
manual, depicting the slots in a vertical position.
Regardless of the position of the expansion slots, the
installation steps remain the same. Please refer to your
computer owner’s manual for more information
about the expansion slot configuration of your computer.
Installing the PCI Card 5
Page 7

Step 5 Insert the PCI card into the available PCI expansion
slot. Ensure that the card is seated properly before
securing it with the screw removed in Step 4, as
shown in the following diagram.
Figure 2: Installing The PCI Card
Note: Make sure the
power connector
from your system is
long enough to
reach the card so
that there is no tension in the wires. If
the spare power
connector available
in your system will
not reach the card,
use the power connector provided with
the card as an
extension
Step 6 On the card is a white, 4-wire “female” power con-
nector. Connect this device to an unused “male” con-
nector coming from your computer’s power supply.
Step 7 Put the chassis cover back on the computer.
Step 8 Make sure that all power switches are in the OFF
position, then reconnect the power cables to the com-
puter and its peripherals.
Step 9 Turn on the computer and proceed to the following
sections to configure the Actiontec 1394 FireWire
Card for the operating system you are using.
Connecting Devices to the Actiontec 1394 FireWire Card
On the rear panel of the Actiontec 1394 FireWire Card are
jacks to connect FireWire devices. Make sure, especially when
connecting multiple devices to the 1394 FireWire Card that
your PC’s internal power has been connected to the card. See
Step 6 above for details on how to make this connection.
6 Installing the PCI Card
Page 8

Configuring Windows 98
Step 1 After you have installed the 1394 FireWire Card in
your computer, turn on the power a nd allow the system to boot normally.
Step 2 Windows 98 will immediately display the Add New
Hardware Wizard and identify the modem as a “PCI
OHCI Compliant IEEE 1394 Host Controller”.
Click the Next button.
Step 3 At the next dialog box, make sure that “Search for the
best driver for your device. (Recommended)” is
selected, and then click Next.
Configuring Windows 98 7
Page 9

Note: After inserting
the CD-ROM, make
sure to wait a few
seconds before
clickin Next. Otherwise, the Wizard
may report that it
was unable to find
the drivers. If this is
the case, click Back
and then click Next,
repeating this process until the CDROM has been recognized by the drive.
Step 4 Next the wizard will ask which drives or folders it
should search for the drivers. Click to select the CD-
ROM drive. Make sure that all the other options are
deselected, clicking them to deselect, if necessar y.
Insert the 1394 FireWire Card installation CD-ROM
and click Next.
Step 5 The Wizard will find the correct driver on the CD-
ROM and identify the device as an “Actiontec 1394
FireWire Card”. Click Next.
8 Configuring Windows 98
Page 10

After Windows has finished copying the files to where
they belong in your system, it will announce the en
of the installation process. Click the Finish button.
Note: If the Add New
Hardware Wizard
asks you to insert
your Windows 98
CD-ROM, leave the
Action
tec 1394
FireWire Card installation CD-ROM
inserted and follow
the on-screen
instructions. The
files that Windows is
asking for ha ve bee
provided on the
installation CDROM.
Configuring Windows 98 9
Page 11

Checking the installation in Windows 98
Next, find out if the 1394 FireWire Card has been properly
installed and configured for use with your operating system.
Step 1 On the Windows desktop, right-click the icon for My
Computer. In the dialog box that appears, click the
Device Manager tab.
Step 2 The Device Manager will be displayed, listing the
kinds of devices that are connected to your system.
Click the plus (+) sign next to “1394 Bus Controller”
to expand that section of the listing.
The highlighted area shown above should match the
same section of the listing displayed by your computer. If so, the 1394 FireWire Card has been
installed correctly. See “Connecting Devices to the
Actiontec 1394 FireWire Card” on page6 to connect
FireWire devices to the card.
10 Configuring Windows 98
Page 12

Configuring Windows 2000 Professional
Step 1 After you have installed the PCI card in your com-
puter, turn on the po wer and allow the system to boot
normally.
Step 2 On the Windows desktop, right-click the icon for My
Computer. On the menu that appears, click Proper-
ties. The system properties dialog box will appear.
Click the Hardware tab to bring it to the front, then
click the Device Ma nager button.
Step 3 In Device Manager, click the plus (+) sign next to
IEEE 1394 Bus Host Controller to expand that section of the listing. A listing for OHCI Compliant
IEEE 1394 Host Controller should appear.
Note: Windows did
not display anything
when you started up
your computer to
acknowledge the
fact that you had
installed new hardware. This was
because it recognized the modem as
one corresponding
with one of the
generic drivers that
come as part of Windows 2000, in this
case the OHCI
Compliant IEEE
1394 Host Controller
driver. This procedure effectively tells
Windows to use the
Action
instead, which will
allow you to take full
advantage of the
1394 FireWire
Card’s f eatures and
capabilities.
tec driver
Configuring Windows 2000 Professional 11
Page 13

Step 4 Double-click the listing for OHCI Compliant IEEE
1394 Host Controller. Click the Driver tab to bring
it to the front, then click Update Driver.
Step 5 This will start the Update Device Driver Wizard.
Click Next.
12 Configuring Windows 2000 Professional
Page 14

Step 6 In the dialog box that appears next (shown below)
make sure “Search for a suitable driver for my device
(Recommended) is selected, then click Next.
Step 7 In the dialog box that appears next, make sure that
“CD-ROM drives” is the only option selected. Insert
the Actiontec 1394 FireWire Card Installation CDROM into your computer’s CD-ROM drive. then
click Next.
Configuring Windows 2000 Professional 13
Page 15

Step 8 In the dialog box that appears next, Windows will
announce that it has found a better driver (the Action-
tec driver) on the CD-ROM. Click Next.
Step 9 Windows will copy the necessary files and report that
installation of the “Actiontec 1394 FireWi re Ca rd ” i
complete. Click Finish.
14 Configuring Windows 2000 Professional
Page 16

Checking the installation in Windows 2000 Professional
Next, find out if the 1394 FireWire Card has been properly
installed and configured for use with your operating system.
Step 1 On the Windows desktop, right-click the icon for My
Computer. On the menu that appears, click Proper-
ties. The system properties dialog box will appear.
Click the Hardware tab to bring it to the front, then
click the Device Ma nager button.
Step 2 In Device Manager, click the plus (+) sign next to
IEEE 1394 Bus Host Controller to expand that section of the listing. A listing for an “Actiontec 1394
FireWire Card” should appear as shown in the illustration below:
The highlighted area shown above should match the
same section of the listing displayed by your computer. If so, the 1394 FireWire Card has been
installed correctly. See “Connecting Devices to the
Actiontec 1394 FireWire Card” on page6 to connect
FireWire devices to the card.
Configuring Windows 2000 Professional 15
Page 17

Notices
FCC Regulations—Declaration of Conformity
This equipment has been tested and found to comply with the
limits for a Class B digital device, pursuant to Part 15 of the
FCC Rules. These limits are designed to provide reasonable
protection against harmful interference in a residential installation. This equipment generates, uses and can radiate radio frequency energy and, if not installed and used in accordance with
the instructions, may cause harmful interference to radio communications. However, there is no guarantee that interference
will not occur in a particular installation. If this equipment
does cause harmful interference to radio and te levision reception, the user is encouraged to try to correct the interference by
one or more of the following measures:
• Reorient the receiving antenna.
• Increase the separation between the equipment and
receiver.
• Connect the equipment into an outlet on a circuit different
from that to which the receiver is connected.
16 Notices
• Consult the dealer or an experienced radio/TV technician
for help.
CAUTION: CHANGES OR MODIFICATIONS NOT
EXPRESSLY APPROVED BY THE PARTY RESPONSIBLE
FOR COMPLIANCE COULD VOID THE USER’S
AUTHORITY TO OPERATE THE EQUIPMENT.
 Loading...