

Page 1

USER MANUAL
TM
© Action Drone, Inc. All Rights Reserved. | AD2 User Manual V1-052316
Page 2

ACTION DRONE SUPPORT
Contact Action Drone USA for questions and technical help.
support@actiondroneusa.com
1-619-870-1796
Monday–Friday, 9am-5pm PST
www.actiondroneusa.com
Shipping Address (not our physical address)
Action Drone USA
2127 Olympic Pkwy, Ste 1006-224
Chula Vista, CA 91915
United States
*Gimbal & CAMERA displayed on the Manual cover may vary from actual purchase
AD2 User Manual V1-052316
© Action Drone, Inc.
© Action Drone, Inc. All Rights Reserved. | AD2 User Manual V1-052316 2
Page 3

CONTENTS
1 | INTRODUCTION ....................................................................................................................................................................................... 4
Using this Manual ...................................................................................................................................................................................... 4
Regulation Overview ............................................................................................................................................................................... 4
Disclaimers .................................................................................................................................................................................................. 4
2 | SETUP OVERVIEW ............................................................................................................................................................................... 5-7
Aircraft & Specifications ......................................................................................................................................................................... 5
Remote Controller .................................................................................................................................................................................... 6
Gimbal & Camera ...................................................................................................................................................................................... 7
3 | SYSTEM OPERATIONS ..................................................................................................................................................................... 8-18
Aircraft & Gimbal Operations .......................................................................................................................................................... 8-9
Radio Controller ................................................................................................................................................................................ 10-13
Flight Controllers, Groundstation Software, Calibration .................................................................................................... 14-16
Battery Use ................................................................................................................................................................................................. 17
Cameras & Sensors ................................................................................................................................................................................ 18
4 | SAFETY ................................................................................................................................................................................................ 19-20
Law ............................................................................................................................................................................................................... 19
Limits ........................................................................................................................................................................................................... 19
Surroundings ............................................................................................................................................................................................ 19
Airspace ...................................................................................................................................................................................................... 19
Propellers .................................................................................................................................................................................................. 20
Battery Safety ......................................................................................................................................................................................... 20
5 | FLIGHT OPERATIONS .................................................................................................................................................................... 21-23
Preflight Checklist .................................................................................................................................................................................... 21
Flight Checklist ....................................................................................................................................................................................... 22
Take-O Sequence ................................................................................................................................................................................ 22
Joystick Control ...................................................................................................................................................................................... 23
Landing Sequence ................................................................................................................................................................................. 23
6 | PILOT MANUAL ............................................................................................................................................................................... 24-29
Beginner Maneuvers ....................................................................................................................................................................... 24-25
Intermediate Maneuvers ............................................................................................................................................................... 26-27
Advanced Maneuvers .................................................................................................................................................................... 28-29
7 | TERMS ........................................................................................................................................................................................................ 30
Terms & Conditions ............................................................................................................................................................................... 30
Support ...................................................................................................................................................................................................... 30
© Action Drone, Inc. All Rights Reserved. | AD2 User Manual V1-052316 3
Page 4

< BACK TO CONTENTS
INTRODUCTION
USING THIS MANUAL
Please refer to online tutorial videos and reading the Disclaimer before flight is recommended.
www.actiondroneusa.com/support
REGULATION OVERVIEW
To operate as a hobbyist, you must operate according to the safety guidance you have acknowledged and in
accordance with a community based set of safety guidance. For further information on the safety guidance,
visit: faa.gov/uas/model_aircraft. For latest information of responsible operations, www.knowbeforeyoufly.org.
Unless you have proper authority and/or authorized certifications, to operate under commercial and industrial
parameters, the user must have an approved 333 Exemption and/or COA authorized by the FAA (information
and regulations subject to change).
U.S. Operators must register their drones with the FAA: https://registermyuas.faa.gov/register
Please remember the Safety Guidance:
I will fly below 400 feet
I will fly within visual line of sight
I will be aware of FAA airspace requirements: faa.gov/go/uastfr
I will not fly directly over people
I will not fly over stadiums and sports events
I will not fly near emergency response eorts such as fires
I will not fly near aircraft, especially near airports
I will not fly under the influence
DISCLAIMERS
Each user is responsible for following the flight rules and regulations set forth in their legal city, county, and
country. Action Drone USA (Action Drone, Inc.) will not be held responsible for your actions, injuries, or damages
caused by or through any products sold or endorsed by our resellers, vendors, aliates, and hence forth, by
improper or even proper use, under any circumstance whatsoever.
Action Drone USA (Action Drone, Inc.) provides these instructions as a reference only. All information is subject
to modifications or updates to Pixhawk or any other flight controller software. Action Drone, Inc. expressly
disclaims all warranties and conditions of any kind pertaining to the document, whether expressed or implied.
The Mission Planner is a full-featured ground station application for the ArduPilot open source autopilot project
created by Michael Oborne.
GoPro, HERO, the GoPro logo, and the GoPro Be a HERO logo are trademarks or registered trademarks of
GoPro, Inc.
Flir Vue, Flir Vue Pro, and the FLIR logo are trademarks or registered trademarks of FLIR® Systems, Inc.
The Sony a6000 and Sony logos are trademarks or registered trademarks of Sony Corporation of America.
© Action Drone, Inc. All Rights Reserved. | AD2 User Manual V1-052316 4
Page 5
< BACK TO CONTENTS
< BACK TO CONTENTS
< BACK TO CONTENTS
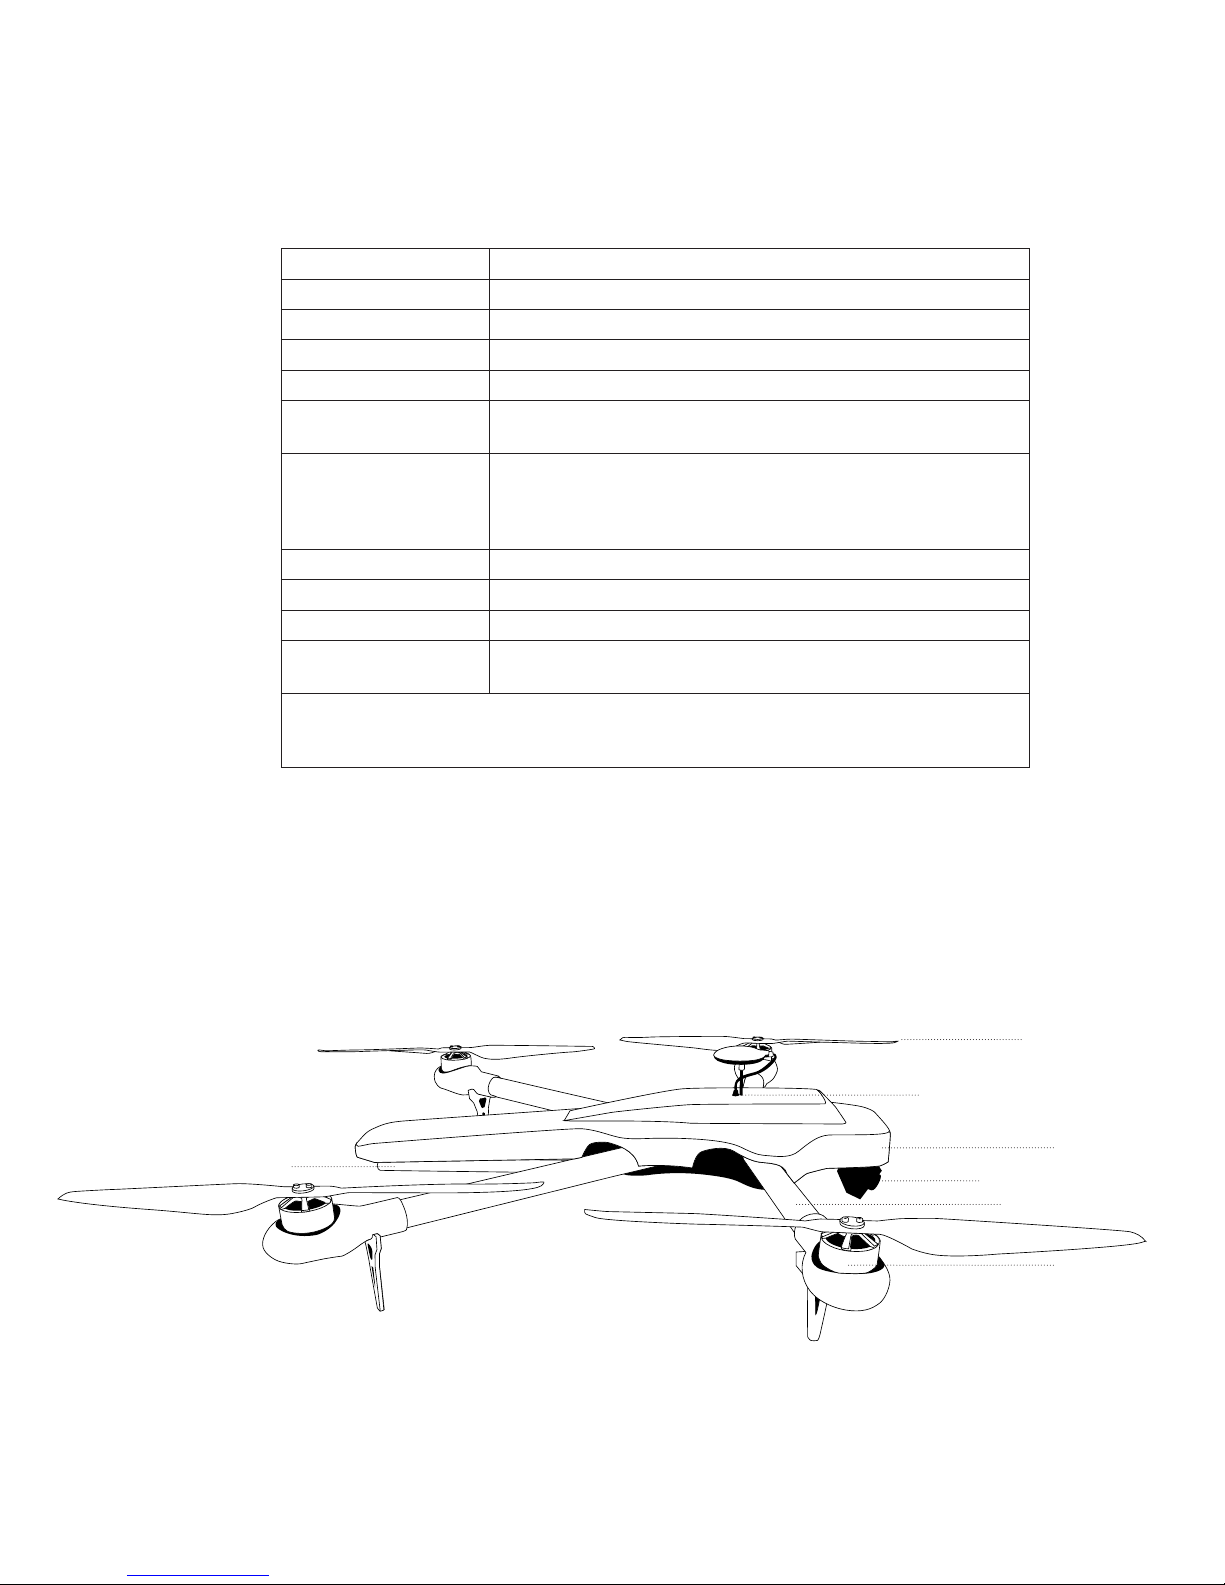
Aircraft & Specifications
Radio Controller
Gimbal & Camera
SETUP OVERVIEW
AD2 SPECIFICATIONS
Size Dimensions 32.75 in (831.85 mm); diagonal motor to motor
Propellers 18 in Carbon Fiber
Wind Tolerance 25 mph
Max Flight Time† 10-30 min (depending on configuration, weight and battery)
Take-O Weight 12-15 lbs (x4 configuration); 15-30 lbs (x8 configuration)
Battery Lithium Polymer 13,000-17,000 mAh (industrial work);
Lithium Ion 20,000 mAh (endurance flights)
Flight Modes Manual/ Altitude Hold
Attitude/ Auto Stabilize
GPS/ Loiter
Ground Station Waypoint System/ Auto-Pilot Mode
Cruising Speed 17.9 mph (8 m/s)
Telemetry Range 1 mi (1.6 km)
Max Altitude 2,000 ft
Payloads GoPro Hero 3 or 4 Black; FLIR Vue Thermal; Thermal/HD Camera;
Sony a6000; Sony RX100; Slantrange/multi-spectral sensor
†Evaluated with stock components at varying flight conditions and envelopes. Actual flight
performance subject to change with alterations to platform components, flight envelope,
environmental conditions, etc.
BATTERY TRAY
AIRCRAFT FRAME
The AD2 is an exceptional multi-rotor unmanned aerial system (sUAS) or unmanned aerial vehicle (UAV),
powered by four industrial-quality grade brushless motors and four 18-inch carbon fiber propellers. The
lightweight, carbon fiber, “spider” frame design encases onboard computer electronics and communication
components critical to flight operations.
PROPELLER
GPS + FLIGHT CONTROLLER
COVER
GIMBAL + CAMERA
FOLDING ARMS
Figure 1.1: AD2 Overview
MOTOR
© Action Drone, Inc. All Rights Reserved. | AD2 User Manual V1-052316 5
Page 6

< BACK TO CONTENTS
< BACK TO CONTENTS
Aircraft & Specifications
Radio Controller
Gimbal & Camera
SETUP OVERVIEW
BATTERIES
AD unmanned systems are not exclusive to its own battery systems. The AD2 includes two Lithium Polymer
batteries (6300-8000 mAh, 6s, 25c) with XT-60 connectors, securely strapped end-to-end onto the battery
tray. A total mAh between 13,000-17,000 mAh for Industrial work is recommended; Lithium Ion 20,000 mAh.
Figure 1.2: Battery Charger, Batteries, AD2 Battery Tray
FPV EQUIPMENT
The AD2 First Person View (FPV) standard equipment include one LCD screen; a video transmitter (VTX) into one
on-board pilot camera; one pair of receiver (Rx) and transmitter (Tx) cloverleaf antennas; and one long range flat
panel receiving antenna (Rx). We recommend mounting the LCD screen to a camera tripod (not included) for
ecient flying.
RADIO CONTROLLER
The Taranis X9D Plus remote controller includes a long-range
(L9R) receiver, one 6s NiMH battery, and charger. The controller
has up to 16 programmable channels and pre-programmed to
operate the basic functions of the AD2.
Figure 1.3: FPV Equipment
Figure 1.4: Radio
© Action Drone, Inc. All Rights Reserved. | AD2 User Manual V1-052316 6
Page 7
< BACK TO CONTENTS
< BACK TO CONTENTS
Aircraft & Specifications
Radio Controller
Gimbal & Camera
SETUP OVERVIEW
PAYLOADS
Versatile gimbal and payload options have integrated vibration dampening systems. The AD2 Frame can be
modified to accommodate whatever your payload specifications. Your AD2 may have either of the following
standard gimbals carrying either: GoPro Hero 4 Black, Sony a6000, Sony a7S, FLIR Thermal Vue, or MAPIR
multi-spectral cameras. Gimbals can be built “switch-ready” with a video camera switcher that transmits live
feed from the primary camera to the secondary pilot camera.
Inspection Package
(Sony a6000/ a7S)
Thermal Package
(FLIR Vue/ Vue Pro)
Figure 1.5: Gimbal and Payload Options
HARD CASE
The AD2 comes with a high-end GPC hard case, complete
with durable traveling handles and wheels. GPC hard cases
resist the elements and are completely watertight with
an automatic ambient pressure equalization valve, and
resistant to UV rays, corrosion and fungus. Their precision
waterjet technologies and top quality foam houses the AD2
system and accessories for your field missions.
Standard/ Agriculture Package
(GoPro/ Multispectral)
Figure 1.6: AD2 GPC Hard Case
© Action Drone, Inc. All Rights Reserved. | AD2 User Manual V1-052316 7
Page 8
< BACK TO CONTENTS
< BACK TO CONTENTS
Aircraft & Gimbal Operations
Radio Controller
Flight Controllers, Groundstation
Software, Maintenance
Battery Use
Cameras & Sensors
SYSTEM OPERATIONS
AIRCRAFT & GIMBAL OPERATIONS
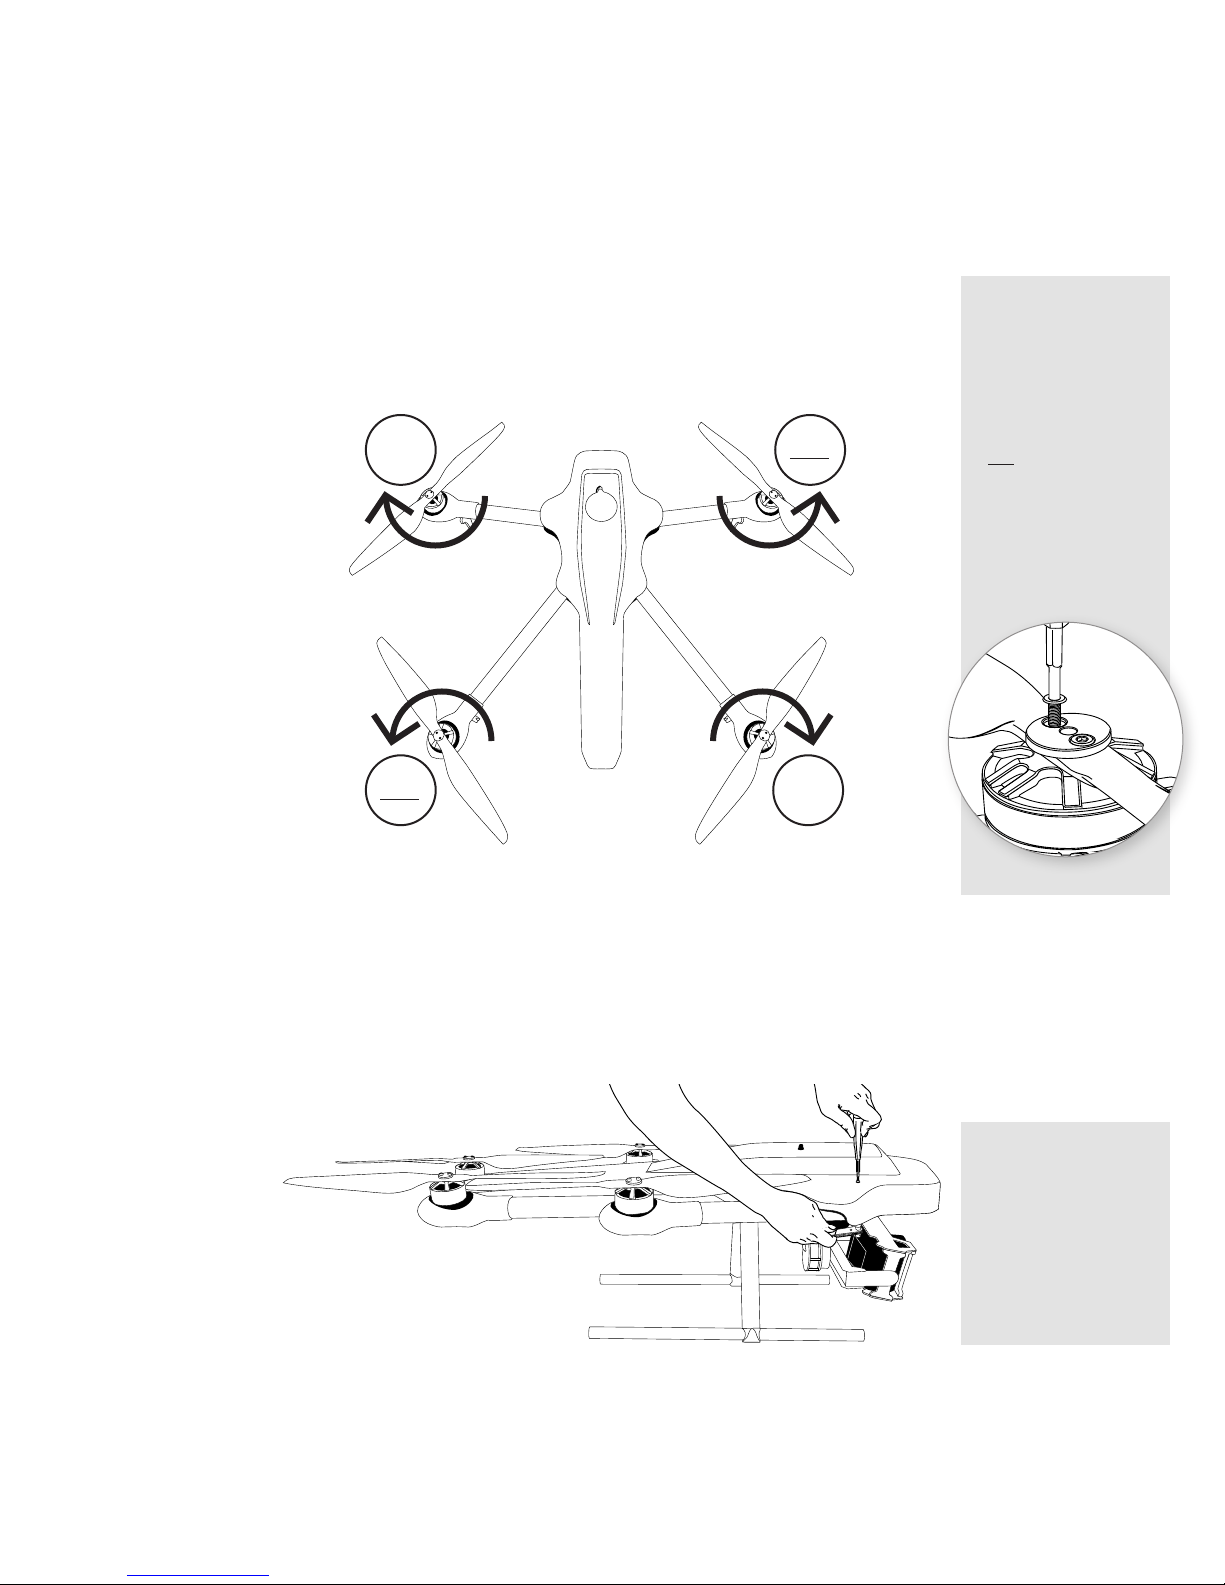
Propeller Orientation & Installation
The propeller orientation is designed to stabilize motion and counteract torque
in flight. The AD2 quadcopter arrangement has one pair of propellers set to spin
counterclockwise (CCW) and the second pair in clockwise (CW) direction.
CW
CCW
IMPORTANT: When
installing propellers
(using a T10 Hex
key/ Allen wrench),
the washer plate
must be placed on
top of the propellers
(sandwiched
between screws
and propeller) – to
prevent damaging
the carbon fiber
propellers.
CCW
Figure 2.1: Propeller Orientation
CW
Travel Position
For portability, the AD2’s arms can be folded “closed” to be stored away, and
“opened” for flight. Upon opening, tighten and loosen corresponding nut/bolt
with a T8 Hex key/Allen wrench and ratchet tool.
CAUTION: Do not
tighten too hard
– to prevent the
carbon fiber from
damaging. Just
tighten enough that
the arms do not
shift when handling.
Figure 2.2: Travel Position
© Action Drone, Inc. All Rights Reserved. | AD2 User Manual V1-052316 8
Page 9

< BACK TO CONTENTS
< BACK TO CONTENTS
Aircraft & Gimbal Operations
Radio Controller
Flight Controllers, Groundstation
Software, Maintenance
Battery Use
Cameras & Sensors
SYSTEM OPERATIONS
Gimbal
The gimbal 2-directional pitch (up/down) is controlled by the Radio right-hand slider (Figure 2.5). All cameras
operate independently. Make sure your camera has been fully charged and you turn on recording functions prior to
take-o.
Before powering on your drone, properly align your gimbal right-side-up to prevent the IMU from malfunctioning.
Do not touch the gimbal while powering up.
Troubleshoot: If your gimbal is glitching upon start up, gently force the alignment to the proper upright position
and the gimbal will automatically orient itself.
Camera Sensors
Your AD2 may have either of the following standard gimbals that can carry either: GoPro Hero 4 Black, Sony
a6000, Sony a7S, FLIR Thermal Vue, MAPIR, or other multi-spectral cameras. By default, the main camera sensor(s)
are not included in AD2 standard packages.
Please refer to your camera’s user manual for detailed operations, and make sure your camera is fully charged
before flight.
Thermal Package
(FLIR Vue/ Vue Pro)
Inspection Package
(Sony a6000/ a7S)
Figure 2.3: Standard Camera Sensors
Standard/ Agriculture Package
(GoPro/ Multispectral)
Cover
The AD2 has a custom polycarbonate top cover that houses the computer components inside the carbon fiber
plates. Using an allen wrench, loosen screws and slowly lift up the cover, being careful not to disconnect the GPS
cable from the cover lid. Detach cable from flight controller and continue necessary maintenance.
Figure 2.4: Maintenance Access
© Action Drone, Inc. All Rights Reserved. | AD2 User Manual V1-052316 9
Page 10
< BACK TO CONTENTS
< BACK TO CONTENTS
Aircraft & Gimbal Operations
Radio Controller
Flight Controllers, Groundstation
Software, Maintenance
Battery Use
Cameras & Sensors
SYSTEM OPERATIONS
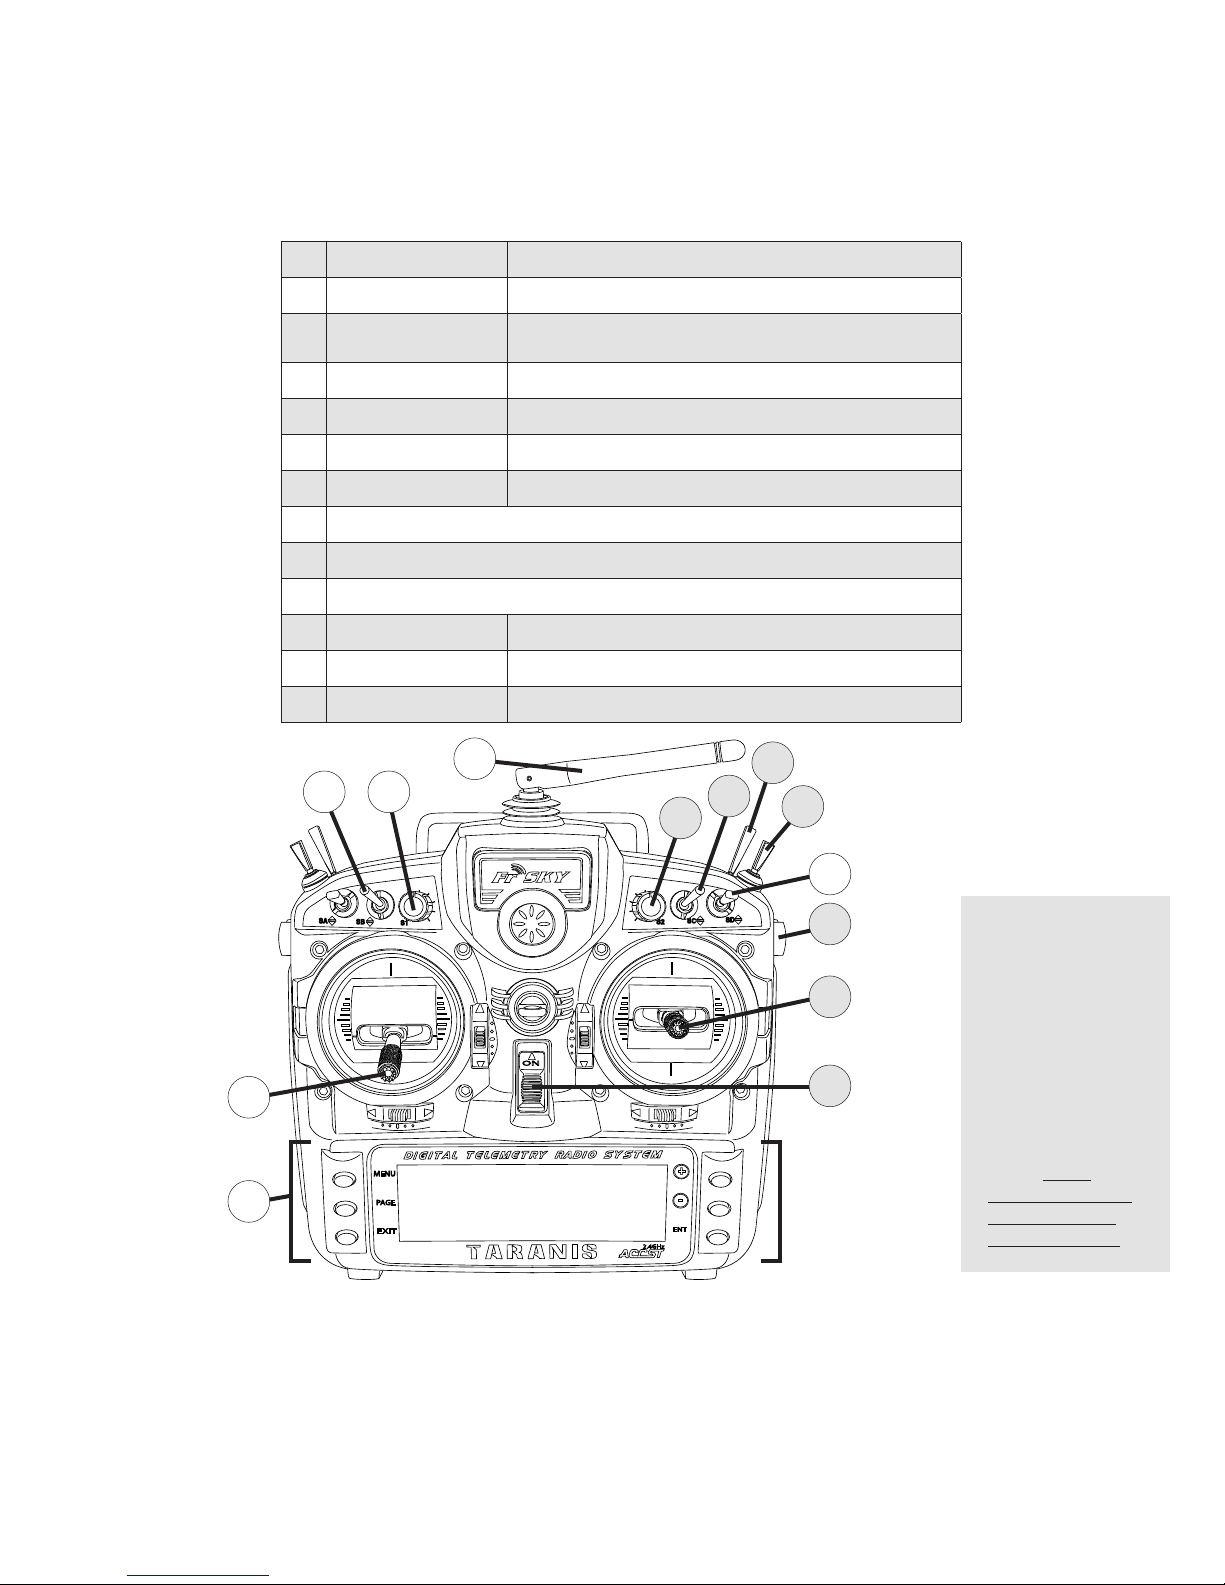
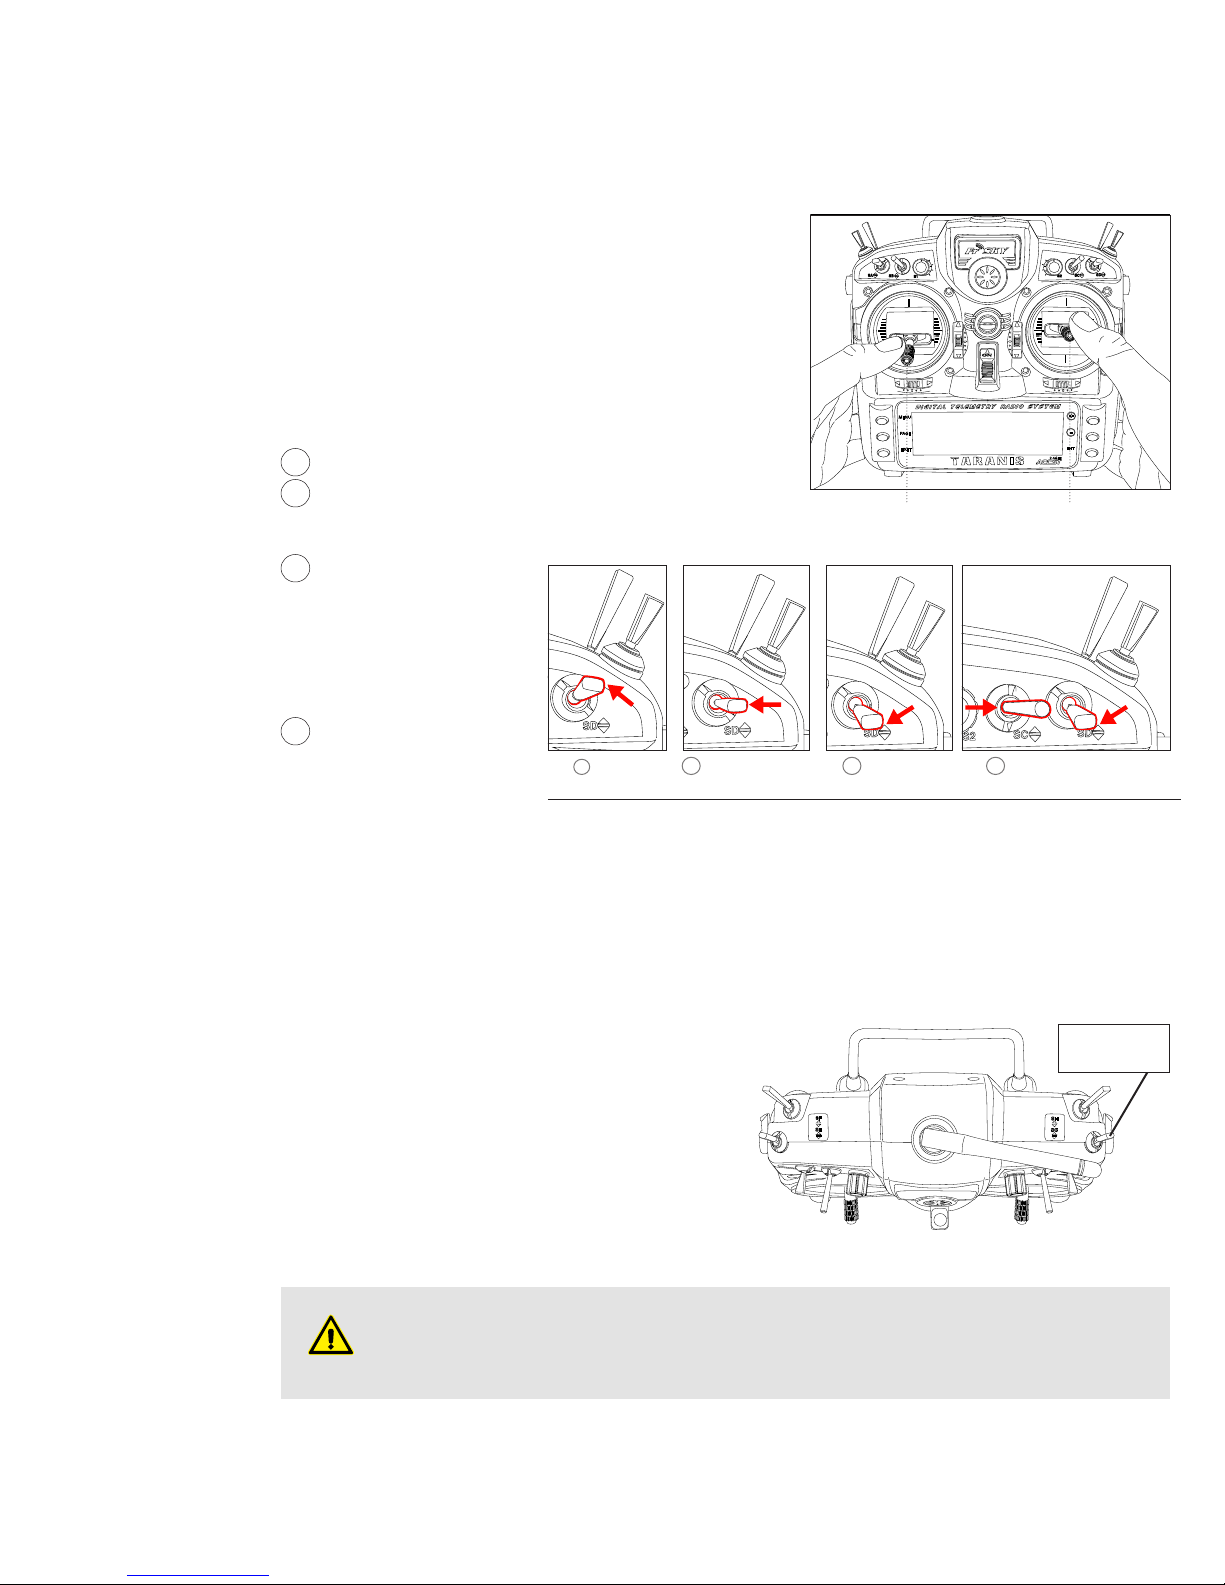
RADIO CONTROLLER
A Left joystick Thrust/Yaw control
B Right joystick Roll/Pitch control
C “SC” switch
D “SD” switch 3 Flight Modes (Optional: See Fig. 2.7)
E Right slider Gimbal control
F “S1” knob Gain control (expert option only)
G “SG” switch Fail-Safe (RTH) “Return-to-home” Mode
H Radio menu and menu interface buttons
I Power switch
J Antenna
K “SH” switch Timer Value
L “SB” switch Video switcher
Continued Flight Modes: Auto Flight Mode
(activated when SD is switched down; GPS/Loiter Mode)
M “S2” knob Volume control
J
FL
B
H
K
C
M
G
D
E
NOTE:
Customizations
and alterations
A
to these radio
functions beyond
stock delivery setup
is to your own
I
discretion. Detailed
manuals can be
found on the FrSky
website for Taranis
radios: http://
www.frsky-rc.com/
download/index.
php?sort=Manual
Specifications
Model Name: Taranis X9D Plus
Number of Channels: Up to 16 channels
Operating Voltage Range:6~15V (2S, 3S Lipos are acceptable)
Operating Current: 260 mAh maximum (both RF module and backlit are on)
Operating Temperature: -10~60°C
Backlight LCD Screen: 212*64, 2 color combinations for select
Model Memories: 60 (extendable by SD card)
Compatibility: FrSky X series, D series and V8-II series receivers (plus other receivers if an external module is used)
Figure 2.5: Taranis X9D Plus Radio
© Action Drone, Inc. All Rights Reserved. | AD2 User Manual V1-052316 10
Page 11
< BACK TO CONTENTS
Aircraft & Gimbal Operations
Radio Controller
Flight Controllers, Groundstation
Software, Maintenance
Battery Use
Cameras & Sensors
SYSTEM OPERATIONS
Joysticks
Controls are in reference to aircraft’s tail-end pointing towards
you. The left joystick controls the thrust and yaw (altitude and
heading) of your AD2. The right joystick controls the roll and pitch
(left/right, forward/backward) movements.
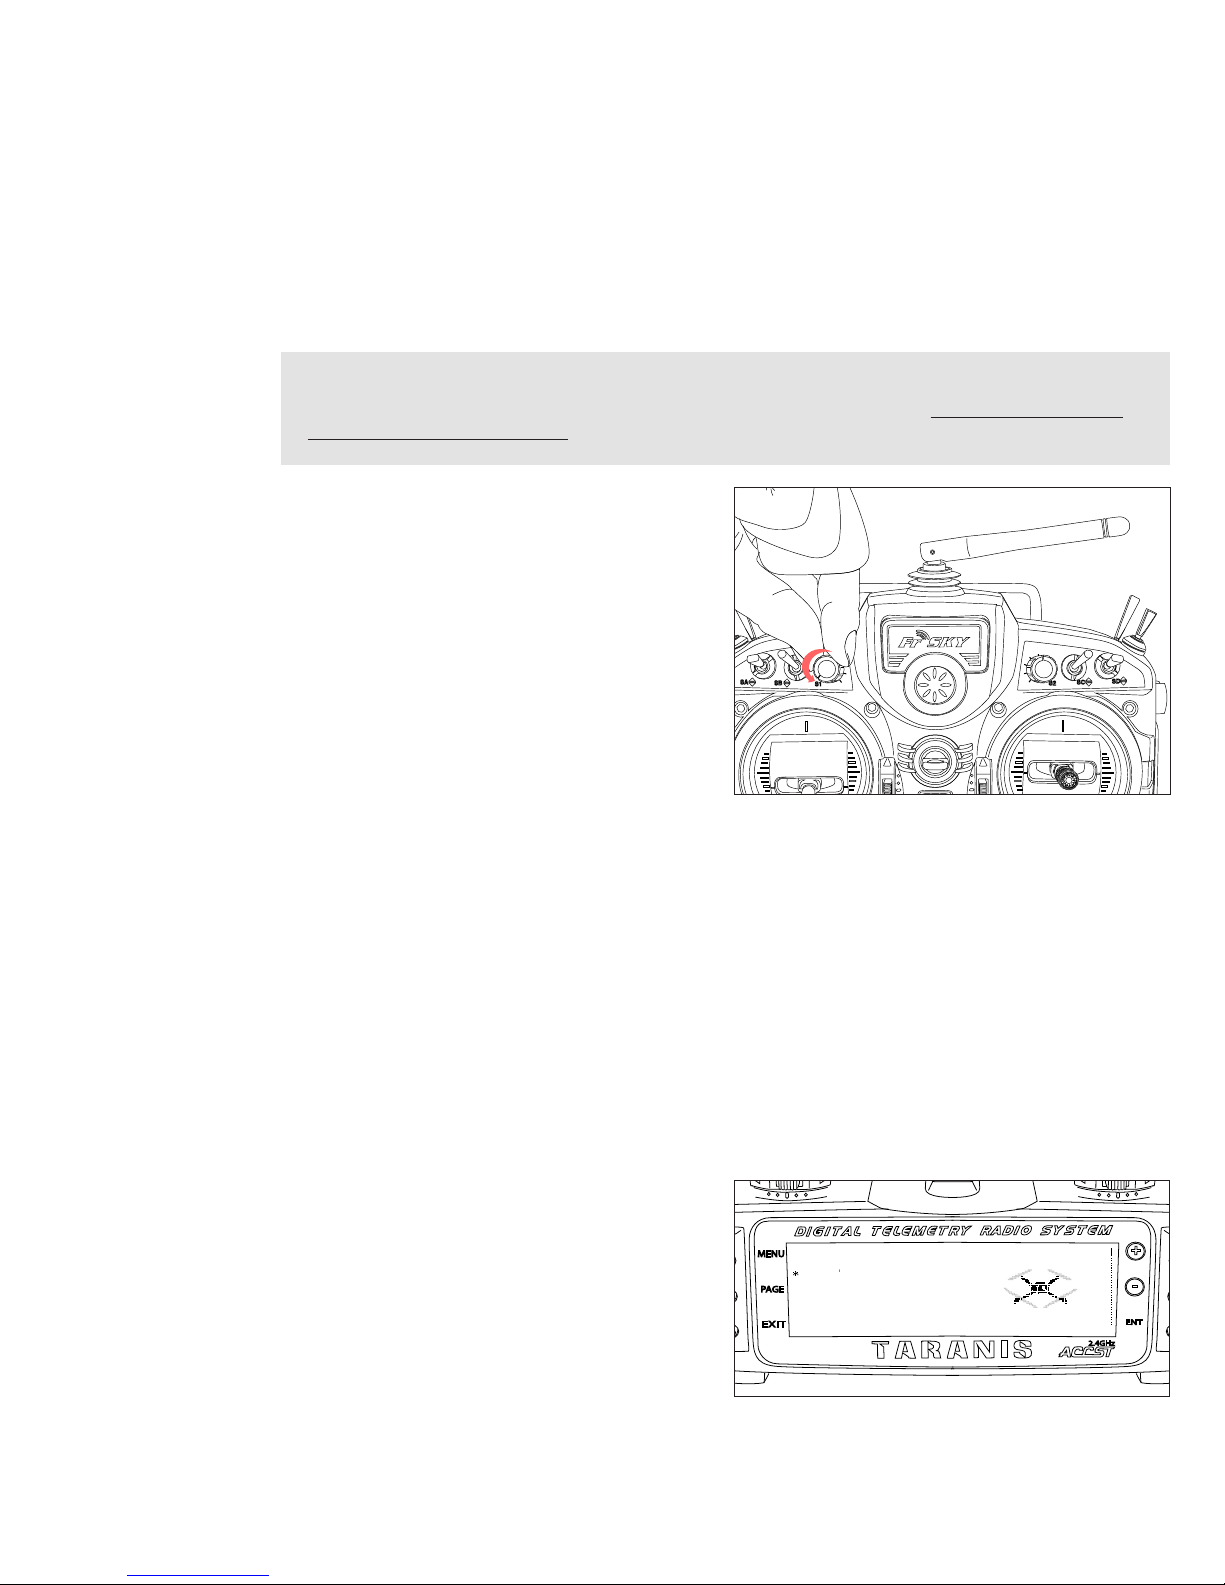
Flight Modes
The “SD” switches between three dierent flight modes, with
respect to your flight controller:
1
Manual Mode – flying without an auto leveling feature.
2
Attitude/Stabilize Mode – recommended flight mode. If you
return the stick to a neutral position, the drone will level and
drift to a halt in hover level.
3
GPS/Loiter Mode – allows
Figure 2.6: Radio Joysticks
further stabilization in
flight and beneficial for
GPS locking and Fail Safe
features. However, not
recommended for standard
flying or indoor flying.
4
Auto Mode (Pixhawk) -
For Auto take-o, turn on
motors, activate the Loiter/
GPS Mode on the “SD”
switch (position all the way
Manual:
1
First position
2
Attitude/Stabilize:
Center position
Figure 2.7: Flight mode “SD” switch control positions
3
GPS/Loiter:
Last position
SD Loiter Mode + SC Center Position
down towards you), then
activate “SC” switch into
Auto Mode (center position). See Flight Checklist for Take-O Sequence.
The flight mode switch also has the ability to calibrate the GPS compass. See the next Flight Controller Chapter
for compass calibration sequences. Activating the Calibration Mode will allow you to calibrate the GPS compass
for safe and proper operation of the AD2’s GPS Mode and “Fail-Safe” features.
Roll/PitchThrust/Yaw
4
(Pixhawk) Auto Mode:
Fail-Safe/Return-to-Home (RTH) Mode
If you experience a problem in flight, lose Visual Line of
Sight (VLOS), or lose orientation of the AD2, activate the
Fail-Safe/RTH Mode. Switching on the “SG” switch (towards
you) will override the AD2 to return within 1-3 meters of the
launching point. The switch may be turned o (switched away
from you) when it is safe again to pilot the AD2.
The Fail-Safe/RTH Mode is automatically activated if the
AD2 loses signal with the radio (anomaly conditions). The
AD2 will automatically launch the Fail-Safe/RTH Mode until
radio signal reconnects or reaches its launching point.
IMPORTANT: The aircraft does not avoid obstacles (i.e. trees, light posts, telephone lines, buildines,
etc) during RTH Mode. Prior to flight, set a reasonable altitude in RTH Mode. The aircraft will ascend
to preset altitude and will return to the launch point.
For Pixhawk Systems, the RTH Mode does not work during Auto Mode. Auto Mode must be switched o in
order to activate RTH Mode.
< BACK TO CONTENTS
Fail-Safe/RTH
"SG" switch
Figure 2.8: Top View of Radio
© Action Drone, Inc. All Rights Reserved. | AD2 User Manual V1-052316 11
Page 12

16 33
< BACK TO CONTENTS
Aircraft & Gimbal Operations
Radio Controller
Flight Controllers, Groundstation
Software, Maintenance
Battery Use
Cameras & Sensors
SYSTEM OPERATIONS
Radio Menu & Interface Buttons
Radio functions such as Audible Warning Adjustments, Timer Calibration, or creating customizable flight profiles
can be accessed with the menu buttons.
NOTE: Customizations and alterations to these
radio functions beyond stock delivery setup is
to your own discretion. Detailed manuals can be
found on the FrSky website for Taranis radios:
http://www.frsky-rc.com/download/index.
php?sort=Manual
7.4v
AD1
SA^
SE^
SB^
SF^
SC^
SG^
SD^
SH^
MODEL SETUP
Model Name
ModelImage
TImer 1
Persistent
Minute call
Countdown
Timer 2
MODEL SETUP
Quad
THs 12:00
OFF 12:00
THs
16 33
12:
2/13
Antenna
The antenna is the main transmitting mechanism of the
radio. It should be oriented horizontally to allow stronger
full range wavelength connections to the AD2. Vertical
orientation causes a weak signal.
Do not touch the antenna during operation. Doing so
could interfere with transmission; causing a crash. Do
not carry the radio by the antenna and do not pull the
antenna forcefully. The antenna wire could break and
prevent transmission.
Radio Battery Use
Before use, ensure that the battery connector polarity is
correct when connecting into the battery compartment.
The 6-cell NiMH battery is for use only in your TARANIS
X9D Plus.
Be careful not to drop the battery. Do not pull the battery
wires as this could produce short-circuits and cause the
battery to explode. Do not remove the battery from the
TARANIS X9D Plus transmitter while the voltage warning
is blinking as this could cause internal setting errors and
memories to be erased. Do not use the transmitter if a
“Backup Error” warning occurs.
Be sure to use the built-in battery charger to charge the
battery. Turn o the Taranis X9D Plus before charging
the battery. The Power Indicator LED will turn on during
charging, and turn o after the charging is finished. Never
leave battery charging unattended.
Figures 2.9: Radio Interface Buttons
Figure 2.10: Radio Antenna
< BACK TO CONTENTS
Figure 2.11: Radio Battery
© Action Drone, Inc. All Rights Reserved. | AD2 User Manual V1-052316 12
Page 13
109
272
< BACK TO CONTENTS
Aircraft & Gimbal Operations
Radio Controller
Flight Controllers, Groundstation
Software, Maintenance
Battery Use
Cameras & Sensors
SYSTEM OPERATIONS
Advanced Settings
Recommended for advanced users only. Detailed manuals can be found on the FrSky website for Taranis radios:
http://www.frsky-rc.com/download/index.php?sort=Manual&cate_id=20&pro_id=0
Manual includes: Internal RF Mode setup, Channel range setup, Receiver number setup, Bind, Failsafe Mode setup,
Range setup, Flying safety, SD Memory card handing, and battery safety handling instructions.
NOTE: Customizations and alterations to these radio functions beyond stock delivery setup is to your own
discretion. Detailed manuals can be found on the FrSky website for Taranis radios: http://www.frsky-rc.com/
download/index.php?sort=Manual
Gains
We have programmed the “S1” knob for Gain
Controls. This gives the ability to change how docile
or aggressive the AD2 will fly with respect to your
joystick input. This is useful for changing your AD2
handling in flight to adjust your flying skill levels with
the current flight conditions, etc.
In all AD systems, we have accurately preprogrammed the Gains percentages according to our
Action Drone USA performance standards.
IMPORTANT NOTE: If you adjust the Gains without
Figure 2.12: Radio Gains Knob
a full understanding of the mechanics, it may cause
your AD2 to drift (yaw), upon flight.
Channel Range
The internal RF module of Taranis X9D Plus supports up to 16 channels. The channel range is configurable, and
needs to be double checked before use.
Receiver Number
When you create a new model, the system will assign you a receiver number automatically, but this can be easily
changed. The range of the receiver number is 00-63, with the default number being 01 (00 is not recommended).
Once the receiver is set to the desired number and is bound to the Taranis X9D Plus, the bind procedure does not
need to be repeated unless the receiver number is changed, In this case, either set the receiver number to the
previous one, and repeat the bind procedure.
Bind / Pair Radio
The Radio will be pre-programmed and bound to
the AD2’s receiver. Bind refers to Taranis X9D Plus
Binding Mode. Move the cursor to “Bind”, press
ENTER button, the cursor will flash and the speaker
will beep to remind you that the RF module has
MODEL SELECTION
01
AD1
02
03
04
05
06
07
30618 bytes free 1/13
109
272
entered the Bind Mode. Then put your receiver into
Binding Mode and finish the bind procedure (refer
to the receiver’s manual for details). Press Enter or
EXIT to exit.
Figure 2.13: Radio Bind
< BACK TO CONTENTS
© Action Drone, Inc. All Rights Reserved. | AD2 User Manual V1-052316 13
Page 14

< BACK TO CONTENTS
< BACK TO CONTENTS
Aircraft & Gimbal Operations
Radio Controller
Flight Controllers, Groundstation
Software, Maintenance
Battery Use
Cameras & Sensors
SYSTEM OPERATIONS
FLIGHT CONTROLLERS
Without exclusivity to any specific flight controller, Action Drone aerial systems come standard with a pixhawk
flight controller. However, users may request any particular flight controller. The following are the currently used
common flight controllers for the AD2 system.
Pixhawk Flight Controller
We recommend using Pixhawk autopilot running ArduPilot copter software for the AD2 systems. ArduPilot is an
open-source flight control based on the MAVlink communication protocol.
The drone operator should have a general understanding of the Pixhawk flight controller and Mission Planner prior
to operating and/or adjusting the AD2 system.
Operations
Please refer to the Arducopter Manual for detailed instructions (scroll
down for APM Copter & Dronecode contents): http://copter.ardupilot.com/
Introducing Copter
First Time Setup - Install Mission Planner, Assembly, Loading Firmware,
Connect Mission Planner to AutoPilot, Configuring Hardware
First Flight - Flight Modes, Pre-arm Safety Check, Arming and Disarming,
Getting O the Ground, Basic Tuning, Measuring Vibration, Setting
Throttle Mid, Save Trim & Auto Trim, Failsafe Mechanisms, Pre-Flight
Checklist
Advanced Configuration - Tuning, Compass Setup
(Advanced), Parameter Reset, Auxiliary Function
Switches, Vibration Damping, Current Limiting and
Voltage Scaling, RCMAP, Sensor Testing, Telemetry
Port Setup, Magnetic Interference, Full Parameter List
*Mission Planning - Planning a Mission with
Waypoints and Events, Copter Mission Command
List, Mission Command List, Camera Control and
Auto Missions in Mission Planner, Rally Points, Terrain
Following, Geotagging Images, Data Log (Flight
Recorder).
Figure 2.15: Mission Planner Setup
*Mission Analysis - Diagnosing problems using Logs,
Dataflash Logs, Telemetry Logs, Recording and Playing Back Missions
Optional Hardware - Telemetry, Power Modules, Rangefinders, Optical Flow Sensor, Cameras and Gimbals, Minim
OSD for FPV, Servo, GPS/Compass, Relay Switch, UAVCAN ESCs, EPM Gripper, PPM Encoder, Received Signal
Strength Indication (RSSI), Parachute, Joystick or Gamepad, External LEDs, Buzzer, Landing Gear, Precision
Landing (IRLock), ADS-B Receiver, Companion Computers
AutoPilot Hardware Options - Pixhawk, APM 2.x, PX4FMU, NAVIO+, Erle-Brain Linux Autopilot, Qualcomm
Snapdragon Flight Kit
Use-Cases and Applications - 3D Mapping, Web Applications, FPV, Indoor
Flying Guidelines, Multi-Vehicle Flying
Antenna Tracking - Mission Planner Antenna Tracking, Antenna Design
Overview
Simulation - Software In the Loop (SITL) simulator
Figure 2.14: Install Mission Planner
Figure 2.16: Mission Planner USB Transmitter
and Ground Station Laptop
© Action Drone, Inc. All Rights Reserved. | AD2 User Manual V1-052316 14
Page 15
< BACK TO CONTENTS
< BACK TO CONTENTS
Aircraft & Gimbal Operations
Radio Controller
Flight Controllers, Groundstation
Software, Maintenance
Battery Use
Cameras & Sensors
SYSTEM OPERATIONS
Ground Station Software - The Mission Planner is a full-featured ground station application for the ArduPilot
open source autopilot project created by Michael Oborne. Read instructions, download and install the Mission
Planner at this website: http://planner.ardupilot.com/
• Available for Windows. Please always run the most current version of Mission Planner.
• Point-and-click multiple waypoint entries, using Google Maps/Bing/Open street maps/Custom WMS.
• Select mission commands from drop-down menus
• Download mission log files and analyze them
• Configure APM settings for your airframe
• Interface with a PC flight simulator to create a full hardware-in-the-loop UAV simulator.
• See the output from APM’s serial terminal
Figures 2.17: Mission Planner Waypoints
Compass Calibration
Advanced Compass Setup section of manual - http://copter.ardupilot.com/wiki/common-compass-setup-advanced/
TIP: Some users recommend performing the calibration outdoors away from metal objects using wireless
telemetry (primarily so you don’t get tangled in the cable) – although, no tests have been performed to
confirm this is necessary.
Configuration Settings
The Mission Planner Compass Setup screen can be found in menu Initial Setup | Mandatory Hardware | Compass in
the sidebar. This screen is used for setting almost all compass configuration and tuning parameters.
Quick Configuration
Mission Planner supports automatic configuration of almost all parameters for the most common autopilot boards.
All you need to do is select the button corresponding to your autopilot controller:
For Pixhawk and PX4, select the button Pixhawk/PX4. You may be prompted for a specific ArduPilot version. For
APM 2.6, select APM with External Compass. For APM 2.5, select APM (Internal Compass).
If your external compass is in a non-standard orientation, you must manually select the orientation in the combo box
(change from ROTATION_NONE). Compass orientations are relative to the flight controller, not the airframe!
Most users will then only need to press the Live Calibration button and perform a Live Calibration.
© Action Drone, Inc. All Rights Reserved. | AD2 User Manual V1-052316 15
Page 16

< BACK TO CONTENTS
< BACK TO CONTENTS
Aircraft & Gimbal Operations
Radio Controller
Flight Controllers, Groundstation
Software, Maintenance
Battery Use
Cameras & Sensors
SYSTEM OPERATIONS
DJI A2 Flight Control System
The A2 flight controller is DJI’s most advanced multi-rotor stabilization controller.
Main Controller - Dual CAN-Bus system, 12 output channels, Built-in 2.4 GHz DR16 receiver, Reserved JR and
SPEKTRUM satellite
IMU - Highly sensitive built-in damper IMU module
GPS-COMPASS PRO PLUS - High gain antenna, high precision satellite receiver
PMU - Voltage detection and alarming, Extendable CAN BUS port
LED - LED Bluetooth indicator (LED-BT-I) adjusting parameters, Internet connection to smartphone
Features - 9 Types of multi-rotor and a customized motor mixer, Intelligent orientation control (IOC), Point
of interest (POI), Intelligent landing gear function, Auto return-to-home /one-key go-home, Multi-rotor onemotor fail protection
A2 User Manual V1.24 (January 2016 Revision) Detailed user instructions available on DJI's website –
http://dl.djicdn.com/downloads/a2/en/A2_Quick_Start_Guide_v1.22_en.pdf
Introduction
Assembly and Configuration
Basic Flying
Protection Functions Setting
Advanced Features
FAQ
Assistant Software & Driver
Download the Assistant Software after installing the DJI
Win Driver – https://www.dji.com/product/a2/download
Videos on How to Use the A2 Assistant Software, Firmware
Upgrades, etc: http://www.dji.com/product/a2/video
Figures 2.18: A2 Assistant Software Setup
Compass Calibrations
Page 22 on DJI A2 Manual: http://dl.djicdn.com/downloads/a2/en/A2_Quick_Start_Guide_v1.22_en.pdf
The Compass can assistant the GPS to position the aircraft, which is very important during flight. As we know,
the compass is very sensitive to electromagnetic interference, which will cause abnormal compass data, and
lead to poor flight performance or even flight failure. Compass Calibration MUST be done for first time use. It is
recommended to calibrate the compass outdoors after the Controller Unit finds 7 or more GPS satellites. Regular
calibration enables the compass to keep optimal performance.
Calibration Cautions
(1) DO NOT calibrate your compass where there is strong magnetic interference, such as magnetite, car park,
and steel reinforcement under the ground.
(2) DO NOT carry ferromagnetic materials with you during calibration, such as keys or cell phones.
(3) Compass Calibration is very important; otherwise the flight control system cannot work.
Calibration Procedures
1. Quickly flip the control (flight) mode switch (all the way up and down 6-10 times) - LED will appear blue
2. Horizontal calibration: Pick up aircraft horizontally and rotate 360° - LED will appear green
3. Vertical calibration: Now turn aircraft vertically, nose down, and rotate 360° - Control Mode LED normal.
If LED appears red, repeat sequence.
© Action Drone, Inc. All Rights Reserved. | AD2 User Manual V1-052316 16
Page 17

< BACK TO CONTENTS
< BACK TO CONTENTS
Aircraft & Gimbal Operations
Radio Controller
Flight Controllers, Groundstation
Software, Maintenance
Battery Use
Cameras & Sensors
SYSTEM OPERATIONS
BATTERY
Warnings & Usage Guidelines
WARNING: Lithium Polymer (LiPo) batteries are significantly more volatile than alkaline, NiCd or NiMH batteries.
All instructions and warnings must be followed exactly to prevent property damage and/or serious injury.
Mishandling LiPo batteries can result in fire. By handling, charging or using LiPo batteries, you assume all risks
associated with LiPo batteries.
The user declares that he/she has read and understood all safety instructions before use, agrees to take full
responsibility of results caused by improper use, and will not hold Action Drone, Inc. (including, but not limited to
its resellers, vendors, and/or aliates) accountable whatsoever. See Battery Safety Handling in Safety section.
Figures 2.19: Battery Charger, Batteries, AD2 Battery Tray
Battery Charger
While the charger is capable of charging the battery, it also can perform other primary functions such as cell
balancing and discharging. Never leave battery charger unattended while charging. Always unplug fully charged
batteries from charger (listen for beeping alerts).
Battery Use
Flight times should never exceed the alarm timer limit value programmed into the radio. Exceeding the timer
value is at your own risk. Follow the safety instructions on the Li-Po battery. Practice safe-handling when using
and storing Li-Po batteries. Never fully drain battery charge upon use.
The two Li-Po batteries (each 6300-8000 mAh, 6s, 25c) are securely mounted end-to-end onto the AD2
battery tray, by use of velcro surfaces and secured straps. Once secured, align the tray to the bolt and washers
underneath the frame, then slide the tray to lock. Always perform your battery connections on the ground.
Connect each battery to its corresponding XT-60 connector.
To disconnect from the AD2 frame, detach both batteries’ XT-60 plugs and pinch the tray lock (on back end) to
release. Be careful to support the battery weight while slowly sliding out the tray.
Battery Life
The battery life meter can be checked using either the battery charger (prior to flight), a portable LiPo Voltage
Checker and Balancer (not included), or by viewing the OSD on the FPV screen during flight. During flight, when
the battery is at 15-20% battery life, we recommend landing the drone. Never fully drain battery charge upon use.
© Action Drone, Inc. All Rights Reserved. | AD2 User Manual V1-052316 17
Page 18

< BACK TO CONTENTS
< BACK TO CONTENTS
Aircraft & Gimbal Operations
Radio Controller
Flight Controllers, Groundstation
Software, Maintenance
Battery Use
Cameras & Sensors
SYSTEM OPERATIONS
CAMERAS & SENSORS
Cameras
We make our aerial systems flexible so they are not exclusive to certain cameras and payloads. Please refer to
your camera’s user manual for detailed operations, and make sure your camera is fully charged before flight.
IMPORTANT: Make sure that the Wi-Fi Mode on your cameras are turned OFF. It can interfere with
communication signals and cause unexpected behaviors.
For 3D mapping, we recommend setting cameras to 1 picture per second, at 12 megapixels wide.
The AD2 is standardized with an onboard FPV pilot camera for the On Screen Display (OSD) telemetry info
displayed on the LCD Screen or user’s goggles (not included). Executing the “SB” switch can toggle views
between the main camera and FPV camera.
Thermal Package
(FLIR Vue/ Vue Pro)
Figures 2.20: Standard Cameras & Sensors
Inspection Package
(Sony a6000/ a7S)
Standard/ Agriculture Package
(GoPro/ Multispectral)
Thermal Sensors
FLIR Vue Pro Literature Flir Vue Literature
http://www.flir.com/suas/content/?id=70728#tab4 http://www.flir.com/suas/content/?id=68335#tab5
FLIR Vue Pro Datasheet
FLIR Vue Pro Technical Drawing
FLIR Vue Pro User's Guide
FLIR Vue Pro STEP File
FLIR Vue Datasheet
FLIR Vue User's Guide
FLIR Vue IDD
FLIR Vue Quick Start Guide
FLIR Vue STEP File
Inspection Cameras
Sony a7S Sony a6000 Manuals
http://esupport.sony.com/US/p/model-home.
pl?mdl=ILCE7S&LOC=3#/manualsTab
Help Guide (Printable PDF)
Instruction Manual
Wi-Fi® Connection / One-touch (NFC) Guide
http://esupport.sony.com/US/p/model-home.
pl?mdl=ILCE6000&LOC=3#/manualsTab
Help Guide (Printable PDF)
Instruction Manual
Updating the camera lens software
Standard Cameras
GoPro Hero 4 Black MAPIR Cameras
https://gopro.com/support/product-manuals-support http://www.mapir.camera/blogs/guide
Customer Support
Product Updates
Product Manuals
User Guide
© Action Drone, Inc. All Rights Reserved. | AD2 User Manual V1-052316 18
Page 19

< BACK TO CONTENTS
< BACK TO CONTENTS
Law
Limits
Surroundings
Airspace
Propellers
Battery Safety
SAFETY
IMPORTANT: Please read and understand all safety instructions before flight to help reduce risk
of injury and accidents.
Action Drone aerial systems are NOT toys. Minors should always fly under adult supervision. Fly with full attention
at all times and never fly under the influence of drugs or alcohol. Fly smart and fly safe.
We recommend becoming a member of The Academy of Model Aeronautics (AMA) – the largest model aviation
organization in the world. Visit the Know Before You Fly website at www.knowbeforeyoufly.org for more
information. For U.S. FAA guidelines, commercial, and/or public-use flying updates, visit www.faa.gov/uas.
LAW
Respect Local ordinances. Respect community ordinances and guidelines established for public places. Even if
nothing is posted, it is good to check with local authorities before you fly. Respect your neighbors’ privacy.
LIMITS
Fly within local enforcement guidelines. For U.S. users, these include rules set forth by federal laws and guidelines
recommended by the AMA. Fly within Federal Aviation Administration (FAA) guidelines. Unless you have proper
authority and/or authorized certifications, do no fly beyond your Visual Line of Sight (VLOS). Do not fly in high
winds or reduced visibility. Do not fly within 25 feet of bystanders. Avoid flying near stadiums and large open-air
events.
SURROUNDINGS
Know the conditions. Scout for large open areas. Be sure there are no distractions when you are flying. Be aware
of your surroundings. NOTE: Flying close to large obstacles such as buildings, structures and trees can reduce
GPS accuracy and may cause anomalies in flight behavior.
Unless you have proper authority and/or authorized certifications, do not fly your unmanned aircraft near
bystanders or during emergency situations such as wildfires, medical evacuations, or search-and-rescue
operations. Watch for and avoid potential hazards in your environment such as: Manned aircraft, Unprotected
people, Moving vehicles, Roadways, Private property, Infrastructure, and Deteriorating weather.
AIRSPACE
Share the sky. Unless you have proper authority and/or authorized certifications, in the U.S., the FAA currently
expects all unmanned aircraft operators to:
1. Fly below 400 feet.
2. See and avoid manned aircraft.
3. Be aware of Temporary Flight Restrictions (TFRs) that aect the operation of unmanned or remote
controlled aircraft. You can find information on current TFRs at www.modelaircraft.org, www.faa.gov.
4. Never fly within 5 miles of an airport without first contacting airport authorities.
© Action Drone, Inc. All Rights Reserved. | AD2 User Manual V1-052316 19
Page 20

< BACK TO CONTENTS
< BACK TO CONTENTS
Law
Limits
Surroundings
Airspace
Propellers
Battery Safety
SAFETY
PROPELLERS
Never touch spinning propellers. Moving propellers can cause serious injury! Keep objects and hands away
from spinning motors/propellers.
Practice safe handling. Before flight, first turn on the radio, then set
radio aside (keep away from anyone who might accidentally engage
motors) while plugging and unplugging the batteries to aircraft.
IMPORTANT: When troubleshooting, never work on your AD2
with mounted propellers!
BATTERY SAFETY HANDLING
Figure 3.1: Propeller Installation
• Always keep battery away from flammable objects.
• Never charge above 5A.
• Never disassemble or modify pack wiring in any way or puncture cells.
• Never exceed the maximum of discharge rate or load.
• Never fully drain battery charge upon use.
• Never leave batteries, chargers and power supplies unattended during use.
• Never attempt to charge low voltage, ballooned/swollen, damaged or wet batteries.
• May explode if damaged or disposed of in fire.
• Store long term at 3.8v per cell. Avoid unnecessary charge cycling.
• When charging, transporting or temporarily storing the LiPo battery the temperature range should be from
approximately 40–120° F (5–49° C). Do not store the battery or aircraft in a hot garage, car or direct sunlight;
the battery may catch fire.
• In cold environments, allow the battery and aircraft to warm up 1-2 minutes before take o.
• Recommended storage: Fire proof cabinets, safes, or ammo cartridge cases.
• Keep a nearby fire extinguisher near charging batteries.
Figure 3.2: Batteries
© Action Drone, Inc. All Rights Reserved. | AD2 User Manual V1-052316 20
Page 21

< BACK TO CONTENTS
< BACK TO CONTENTS
Preflight Checklist
Flight Checklist
Take-O Sequence
Joystick control
Landing Sequence
FLIGHT OPERATIONS
PREFLIGHT CHECKLIST
In order to ensure a safe and smooth flight, always perform the following Preflight Checklist before flying.
Calibrate compass, auto take-o/landing, arm/disarm motors, test.
Ground Station Laptop … Power On
Laptop Battery… Confirm Battery Lifespan
Mission Planner … Start
Telemetry Module … Connect USB
Telemetry Module Antenna … Orient vertically
Com Settings … Com Port Select, Baud 57600
Aircraft
Radio
Camera Sensors
FPV Equipment
Frame … Open & lock arms (ensure all screws secured)
Propellers … Secure (disc on top of prop), Undamaged, Correct Direction
Motors… Secured, undamaged
ESCs … Secured, undamaged
GPC Receiver & Cable … Secured
RC Rx & Connections … Secured
Telemetry Module & Cable … Secured
Flight Controller & Connections … Secured
Battery Charge … Confirm fully charged
Battery Straps … Secure (do not plug into AD2 yet)
Battery Charge … Confirm fully charged
Knobs, switches, and sticks … Inspect for full range of motion
Antenna … Orient horizontally
Timer … Confirm functions
Battery … Confirm fully charged
Memory card … Confirm sucient space for recording footage
Gimbal … Secured to camera
Battery … Confirm fully charged
Antennas … Fastened
Channel … Tune FPV equipment to the same channel
FPV Connections … Secured into onboard camera(s)
Figure 3.3: AD2 in Travel Position
© Action Drone, Inc. All Rights Reserved. | AD2 User Manual V1-052316 21
Page 22

< BACK TO CONTENTS
< BACK TO CONTENTS
Preflight Checklist
Flight Checklist
Take-O Sequence
Joystick control
Landing Sequence
FLIGHT OPERATIONS
FLIGHT CHECKLIST
Initial Sequence
Please read this section carefully before launching your AD2.
Always start with the tail-end of the AD2 pointing towards you.
Pre-Flight Checklist Ground Station, Aircraft, Radio, Camera Sensors, FPV gear
Step 1 - Battery Tray Mount the battery (do not plug in)…Power on FPV screen/goggles.
Step 2 - Radio
Turn on radio. Make sure all switches are in o position (pushed away from
you) and thrust stick down. Set flight mode preference. Set aside radio.
Step 3 - Battery Plugs Place AD2 on ground… Plug in the batteries.
Step 4 - GPS
Step 5 - Satellites
Wait for full GPS lock (flashing green lights) and at least 7 locked satellites
(best if 13 satellites or more); compass calibration may apply.
If flying in conditions where GPS lock is unattainable or where GPS features
are not needed, you can forego compass calibration at your own risk.
Step 6 - Camera Power on camera…set record button.
Step 7 - Start Sequence
Return to radio. Move 3 meters away from AD2. Initiate start sequence to turn
on motors.
TAKE-OFF SEQUENCE
Pixhawk Flight Controller
First hold down the “arm” button (blinking red light button) on top of AD2
cover, until the red light stops blinking. To start motors, pull left (thrust) stick
down and to the right. Slowly increase thrust until lift o.
For auto take-o, turn on motors, activate the Loiter/GPS Mode on the “SD”
switch (position all the way down towards you), then activate “SC” switch into
Auto Mode (center position).
DJI A2 Flight Controller
To “arm” the motors for flight, simultaneously move both joysticks down and
towards the center. Motors will turn on.
Set thrust to 50% (halfway on the left throttle stick). Wait a few seconds, then
bring thrust above 50% to take o.
Figure 3.5: Pixhawk take-o sequence
Figure 3.4: Pixhawk arm button
Figure 3.6: A2 take-o sequence
© Action Drone, Inc. All Rights Reserved. | AD2 User Manual V1-052316 22
Page 23

< BACK TO CONTENTS
< BACK TO CONTENTS
Preflight Checklist
Flight Checklist
Take-O Sequence
Joystick control
Landing Sequence
FLIGHT OPERATIONS
JOYSTICK CONTROL
Practice basic flight maneuvers. Review our
Pilot Manual in next chapter for detailed
instructions.
Left joystick = throttle/thrust and yaw (altitude
and heading).
Right joystick = the roll and pitch (left/right,
forward/backward) movement.
Take time to familiarize yourself with hovering
as well as ascending and descending by
carefully manipulating thrust. While in the
air, perform careful and slow pitch/roll
maneuvers to get a good feel on the lateral and
longitudinal motion of the AD2.
When comfortable, gradually execute yaw
maneuvers when flying.
Familiarize yourself on the orientation of the
sticks, until you can easily pilot Line-of-Sight
(LOS) regardless of where the nose points
(advanced).
NOSE
LEFT RIGHT
TAIL
Figure 3.7: Aircraft Orientation
NOTE: When in doubt, do not panic. Gently pull down throttle/thrust stick and toggle the Fail-Safe/RTH
switch (Marked “SG” on Radio). Keep in mind for Pixhawk systems, the RTH Mode does not work during
Auto Mode. Auto Mode must be switched o in order to activate RTH Mode.
LANDING AND SHUTDOWN SEQUENCE (RTH)
Step 1 - Bring to a hover at a low height. Slowly and incrementally bring thrust down until AD2 has landed.
Step 2 - When AD2 has landed, bring thrust to zero.
Step 3 - If motors remain idle, execute arming stick sequence to disarm/shut o motors.
Step 4 - Wait for propellers to finish spinning! Unplug AD2 batteries on frame.
Step 5 - Turn o camera.
Step 6 - Turn o FPV equipment.
Step 7 - Turn o radio.
IMPORTANT: Practice safe handling. Set radio aside (and away from people) when plugging and
unplugging the battery and drone. Never touch spinning propellers! After landing, always wait until
propellers completely stop before approaching aircraft.
© Action Drone, Inc. All Rights Reserved. | AD2 User Manual V1-052316 23
Page 24

< BACK TO CONTENTS
< BACK TO CONTENTS
Beginner Maneuvers
Intermediate Maneuvers
Advanced Maneuvers
PILOT MANUAL
Review our Pilot Manual for detailed instructions: http://bit.ly/ADPilotManual.
It is recommended to practice these maneuvers with Attitude/Stabilize Mode (or GPS/Loiter Mode).
BEGINNER MANEUVERS
Practice basic flight maneuvers: take o/landing, hover, rotate heading, pitch, and roll.
1. Altitude. Take o and
land with tail-end facing
toward you. Slowly push
up on left joystick throttle
(Altitude) at 50% thrust
then slowly gain altitude.
2. Hover. Hover in one spot
keeping tail-end towards
you, using right joystick to
adjust left/right/forward/
backward (Roll/Pitch)
movement.
3. Heading. Turn left/right
(Yaw) keeping tail-end
towards you, practicing
your heading, using left
joystick.
4. Roll/Pitch. Slowly fly
forward/back/left/right,
keeping tail-end towards
you, using right joystick
to practice the (Roll/Pitch)
movement.
© Action Drone, Inc. All Rights Reserved. | AD2 User Manual V1-052316 24
Page 25

< BACK TO CONTENTS
< BACK TO CONTENTS
Beginner Maneuvers
Intermediate Maneuvers
Advanced Maneuvers
PILOT MANUAL
5. Practice forward and
backward. Fly forward to
a spot 20-30 feet away,
then fly back keeping the
tail-end towards you.
6. Practice A to B, B to A.
Mark a spot (B) on the
B
ground 10 feet away from
take-o point (A). Hover
and fly towards spot B.
2
Land at spot B, then take
o and return to original
take o point. Keep tail-end
1
towards you.
A
7. Practice flying left and
right. Fly left 10 feet away
from your take-o point,
then fly right, 10 feet from
your take-o point. Keep
tail-end towards you.
10 ft 10 ft
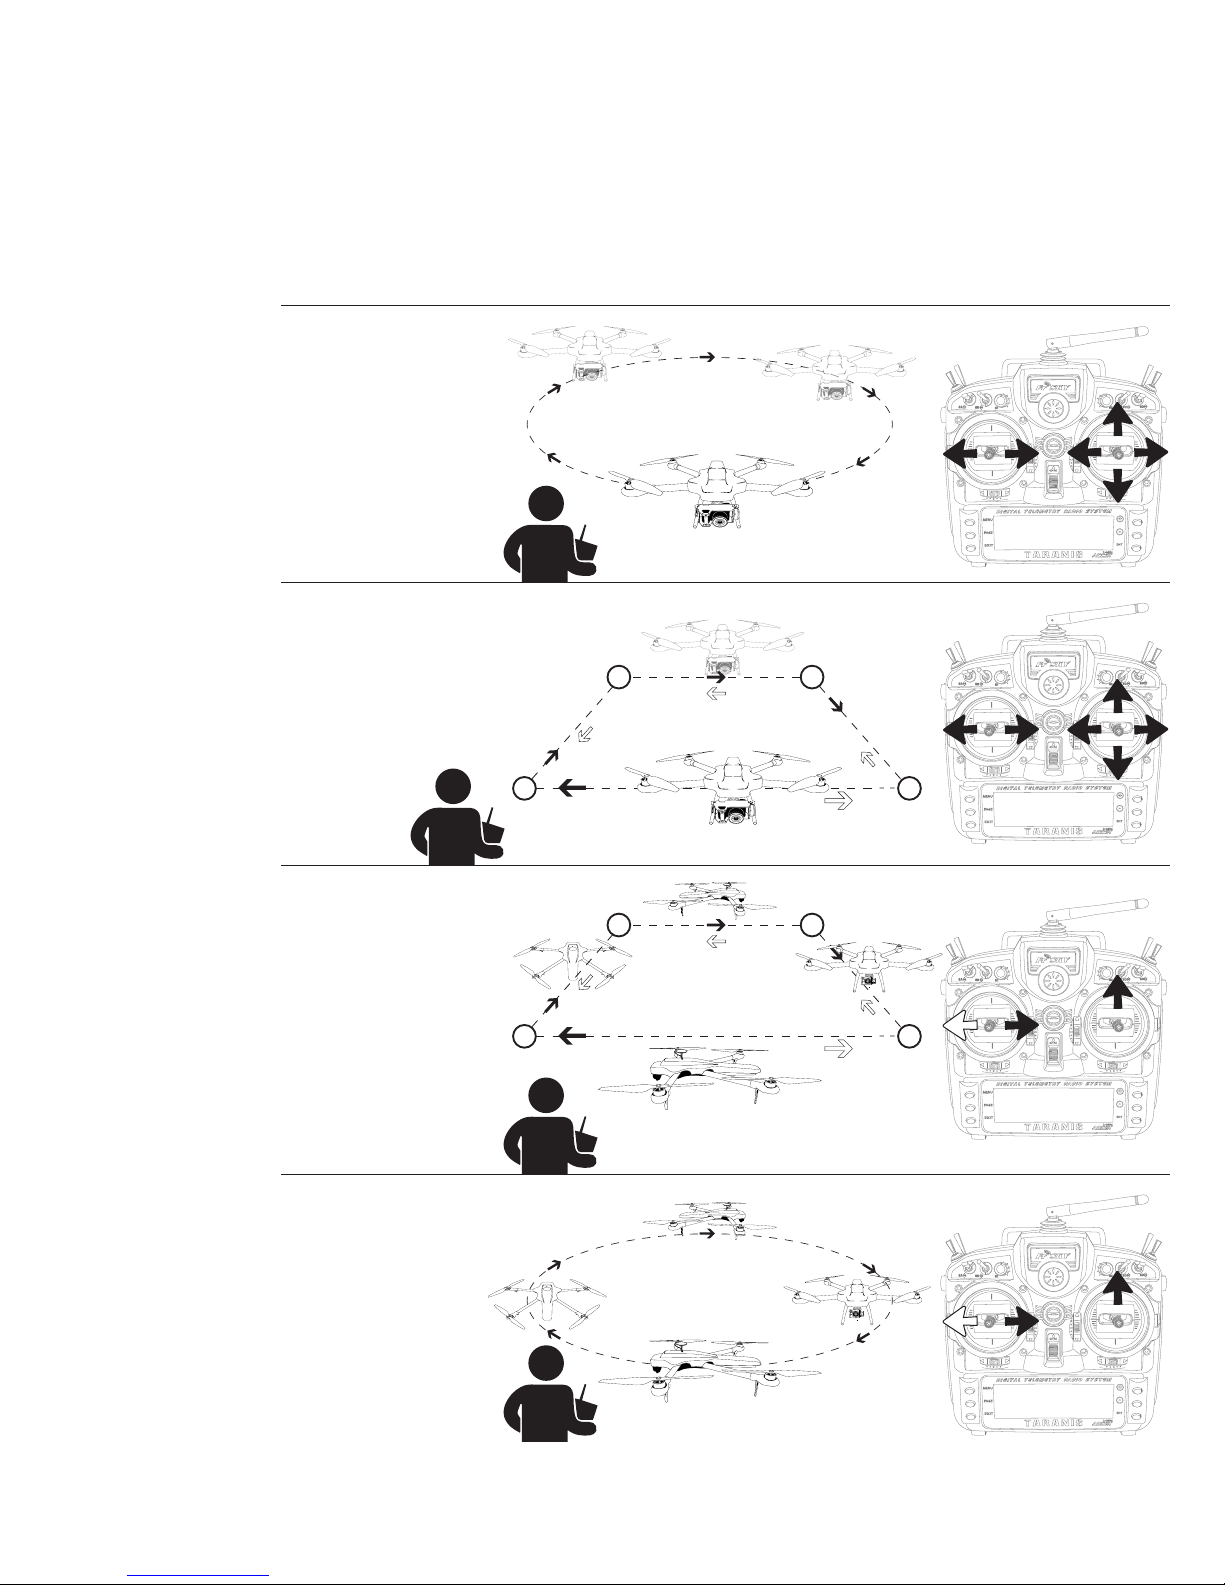
8. Practice flying a 4-point square box formation, in clockwise direction,
keeping the tail-end towards you. Control in hover position at each
point before proceeding to the next point.
Now in reverse, practice flying 4-point box in counter-clockwise
direction, keeping the tail-end towards you. Control in hover position at
each point before proceeding to the next point.
B C
DA
© Action Drone, Inc. All Rights Reserved. | AD2 User Manual V1-052316 25
Page 26
< BACK TO CONTENTS
< BACK TO CONTENTS
Beginner Maneuvers
Intermediate Maneuvers
Advanced Maneuvers
PILOT MANUAL
Intermediate Maneuvers
Intermediate maneuvers: 4-point box/circle formations, directional rotation, orbit turns and formations.
1. Practice rotating yaw. In
a hover, starting with the
tail-end pointing towards
you, rotate 360 degrees
clockwise.
Now in reverse, maintain
hover, starting with the
tail-end pointing towards
you, rotate 360 degrees
counter-clockwise.
2. Orientation flying. Start with tail-end pointing towards you, maneuver into a hover.
Then rotate the aircraft 90 degrees facing left (keep facing same direction), and fly
a 4-point box in clockwise formation. Control in hover position at each point before
proceeding to the next point.
B C
DA
Now in counter-clockwise direction, with tail-end pointing towards you, maneuver
into a hover. Then rotate the aircraft 90 degrees facing right (keep facing same
direction), and fly a 4-point box. Control in hover position at each point before
proceeding to the next point.
3. Uniform flying. Fly in a
circle keeping the tailend pointed towards you.
Try to keep the altitude
and circle, as uniform as
possible. Practice both
directions.
4. Hover selfie. At a
safe distance over 3
meters away, maintain
hover with the camera
pointed towards
yourself and try to
keep the aircraft in
one place.
© Action Drone, Inc. All Rights Reserved. | AD2 User Manual V1-052316 26
Page 27
< BACK TO CONTENTS
< BACK TO CONTENTS
Beginner Maneuvers
Intermediate Maneuvers
Advanced Maneuvers
PILOT MANUAL
Advanced Maneuvers
Once you have fully mastered the beginning and intermediate maneuvers, these advanced maneuvers will help in
overriding and operating the drone at imperative siutations.
1. Fly in a circle with the
camera front (nose)
pointing towards you.
Try to keep the altitude
and circle, as uniform as
possible. Practice both
directions.
2. Fly clockwise in a 4-point
square box keeping the
camera facing towards you.
Then fly counter-clockwise
in a 4-point square box
keeping the camera facing
towards you.
B C
3. Practice directional
rotation. Fly a 4-point
square box clockwise
and rotate the aircraft in
the direction of travel.
Control in hover position
at each point before
proceeding to the next
point. Next, practice
flying counter-clockwise
direction.
4. Fly in a circle,
clockwise and keep
the camera pointed
in the direction of
travel. Try to keep the
altitude and circle, as
uniform as possible.
Next, practice flying
counter-clockwise
direction.
DA
B C
DA
© Action Drone, Inc. All Rights Reserved. | AD2 User Manual V1-052316 27
Page 28

< BACK TO CONTENTS
< BACK TO CONTENTS
Beginner Maneuvers
Intermediate Maneuvers
Advanced Maneuvers
PILOT MANUAL
5. Camera orbit. Fly a circle counter-clockwise with the camera pointed at the center
of the circle. Try to keep the altitude and circle, as uniform as possible. Practice both
directions.
6. Fly a figure-8 without rotating the aircraft. Keep the tail-end facing towards you. Try
to keep the altitude and circle, as uniform as possible. Practice both directions.
7. Now, fly a figure-8 and keep the camera pointed in the direction of travel. Try to
keep the altitude and circle, as uniform as possible. Next, practice flying counterclockwise direction.
8. Fly figure-8 patterns while experimenting with dierent orientations. For example,
camera pointed towards direction or opposite/ left/ right the direction of travel,
etc. Try to keep the altitude and circle, as uniform as possible.
© Action Drone, Inc. All Rights Reserved. | AD2 User Manual V1-052316 28
Page 29

< BACK TO CONTENTS
< BACK TO CONTENTS
Beginner Maneuvers
Intermediate Maneuvers
Advanced Maneuvers
PILOT MANUAL
Practice Emergency Maneuvers
Fail-Safe RTH Mode
1. Scout for a large open area.
2. Before taking o, make sure your aircraft has a full GPS lock (flashing green LED lights).
3. Fly the AD1 at least 50 feet away from take o point.
4. Toggle the top right “SG” Fail-Safe RTH switch towards you.
5. The aircraft will enter its Fail-Safe RTH Mode – it will rise/descend to its programmed altitude,
and will return to its original take o point.
Intercepting Fail-Safe RTH Mode
1. If the aircraft loses radio signal, the aircraft will automatically enter its Fail-Safe function until radio
signal is attained or reaches its point of origin.
2. When you can see the aircraft returning and it is safe again to pilot the aircraft, you can intercept
the “RTH” Mode by switching o the “SG” switch (toggle away from you).
Figure 4.1: Fail-Safe/RTH Mode
Figure 4.2: “SG” Switch
Fail-Safe/RTH Mode
© Action Drone, Inc. All Rights Reserved. | AD2 User Manual V1-052316 29
Page 30

< BACK TO CONTENTS
Terms & Conditions
Support
TERMS
TERMS & CONDITIONS
By using this product, its’ website and/or products manufactured by Action Drone USA (Action Drone, Inc.), you automatically agree to
the terms and policies laid out herein, this Manual, and all other revised versions set forth.
GENERAL | Action Drone USA sells multi-rotor systems, components, and a variety of products made by manufacturers. Action
Drone USA requires the Purchaser to be familiar with the proper use of multi-rotor technologies. All products are sold as is, without
any guarantee that you have the right to use it in your country. The Purchaser is fully responsible for ensuring and obtaining the
proper radio licensing (in the USA, “HAM” required for FPV and/or UHF long range systems or video transmission equipment),
adhering to your government’s rules and regulations.
ART TERMS | The recipients of this Manual (and their correspondents) agree not to distribute, sell, or misuse the content and
artwork of this material outside the specified Action Drone USA intentions. The artwork, background, images and logos are property
of Action Drone USA and may not be used, sold, or reproduced without written permission whatsoever.
LIABILITY | Action Drone USA will not be held responsible for your actions, injuries, or damages caused by or through any products
sold or endorsed on this website (including, but not limited to its resellers, vendors, and/or aliates), by improper or even proper
use, under any circumstance whatsoever.
SAFETY | The Purchaser acknowledges full understanding of the inherent danger involved when operating multi-rotor and other
aerial models. Spinning propellers can cause severe injury. Warning: Never work on your models with mounted propellers.
WARRANTIES | Action Drone USA provides no warranties of any kind with the use of the systems sold. Manufacturer defects will be
repaired and replaced by Action Drone USA. If damages are caused by user, please see RETURNS section.
LIABILITY | Users and Purchasers accept ALL responsibilities. Action Drone USA will NOT be held responsible for your actions,
injuries, or damages caused by or through any products sold or endorsed on this website, by improper or even proper use, under
any circumstance whatsoever.
SHIPPING | The Purchaser must accept all Mail Carriers used by Action Drone USA (USPS, UPS, FedEx, etc). Each product is
carefully packaged to prevent shipping damage. Action Drone USA has no control over the internal processes, delays of Mail
Carriers, nor will be held liable for any damages, mistakes, custom holds, lost packages, or other issues made by the Mail Carriers
or the local postal system in your country. For orders shipped outside USA, you are fully responsible for any and all import duties
your local customs oce may impose on your order. If a package is returned to Action Drone USA due to the Mail Carrier’s inability
to collect customs duties or deliver the package to your provided ship-to address, Action Drone USA will not refund shipping costs
when and if the package is returned to Action Drone USA.
RETURNS | Each assembled Flying Platform is flight tested and approved. Action Drone USA will only accept returns for items
unused and in their original packaging, manuals, cables, etc. A 10% restocking fee will be required. The Purchaser is responsible for
shipping fees and items packaged must be protected with packaging that prevents shipping damage. It may take up to 2-3 weeks
for funds to be refunded into the Purchaser’s bank.
If the item is repairable, Action Drone USA can assist in walk-through repair recommendations via phone or email, but will not be
responsible for any damages further caused by the Purchaser or Mail Carrier. Action Drone USA can repair the items for a negotiable
fee. The Purchaser will be responsible for all shipping fees.
IN NO EVENT SHALL ACTION DRONE USA BE LIABLE FOR SPECIAL, INDIRECT, INCIDENTAL OR CONSEQUENTIAL DAMAGES
RELATED TO THE USE OF PRODUCTS SOLD. INDEMNITY: PURCHASER SHALL INDEMNIFY AND HOLD HARMLESS ACTION
DRONE USA, ITS OFFICERS, DIRECTORS, AGENTS, REPRESENTATIVES, MANUFACTURERS, VENDORS AND EMPLOYEES FROM
ANY AND ALL CLAIMS, LIABILITIES, DAMAGES, AND EXPENSES (INCLUDING ATTORNEYS FEES ACTUALLY INCURRED) ON
ACCOUNT OF DEATH OR INJURY TO ANY PERSON OR DAMAGE TO ANY PROPERTY ARISING FROM OR IN CONNECTION WITH
ANY GOODS SUPPLIED. THIS INDEMNITY SHALL APPLY WITHOUT REGARD TO WHETHER THE CLAIM, DAMAGE, LIABILITY OR
EXPENSE IS BASED ON BREACH OF CONTRACT, BREACH OF WARRANTY, NEGLIGENCE, STRICT LIABILITY, OR OTHER TORT.
ACTION DRONE SUPPORT
Contact Action Drone USA for questions and technical help.
support@actiondroneusa.com
1-619-870-1796
Monday–Friday, 9am-5pm PST
www.actiondroneusa.com
Shipping Address (not our physical address)
Action Drone USA
2127 Olympic Pkwy, Ste 1006-224
Chula Vista, CA 91915
United States
< BACK TO CONTENTS
© Action Drone, Inc. All Rights Reserved. | AD2 User Manual V1-052316 30
 Loading...