


AC32
User Manual
Getting to know your RIDO Camera
www.MyActionCamera.com

1
Table of Contents
1. Key Features ...................................................................................... 3
2. Package Contents .............................................................................. 4
3. Functional Parts.................................................................................. 4
4. Using the Camera............................................................................... 6
4.1. Opening the Back Cover............................................................ 6
4.2. Charging up the Battery ............................................................. 6
4.3. Inserting a microSD Memory Card (not included) .....................7
4.4. Auto Rotation.............................................................................7
5. Camera Function................................................................................ 8
5.1. Turning ON/OFF the Camera.................................................... 8
5.2. Recording Videos ....................................................................11
5.3. Taking Photos ......................................................................... 12
6. Sport Function ................................................................................. 14
6.1. Turning ON/OFF RIDO .......................................................... 14
6.2. Introduction of the Main Menu................................................ 16
6.3. Explanation of the Status Icons..............................................16
6.4. General Rules of Selection .................................................... 17
6.5. Ride Recording....................................................................... 18
6.6. Changing Settings during Ride Recording ............................. 23
6.7. Pausing/Resuming/Finishing the Ride Recording.................. 26
6.8. Reviewing Your Riding History............................................... 28
6.9. Setting Menu .......................................................................... 33
7. Connecting Your Camera to a PC......................................................... 36
8. Connecting Your Camera to an HDTV .................................................. 36
8.1. Taking Photos with HDTV ...................................................... 37
8.2. Recording Videos with HDTV.................................................38
8.3. Playing Back Photo Files with HDTV ..................................... 39
8.4. Playing Back Video Files with HDTV .....................................39

2
8.5. Deleting Photo/ Video Files with HDTV ...................................40
8.6. Changing your Camera Settings .............................................. 41
9. Mounting Your Camera on the Handlebar or Pole ...........................42
10. Specifications ................................................................................... 43
11. Computer System Minimum Requirements...................................... 44
12. Troubleshooting................................................................................ 45

3
1. Key Features
RIDO is a sport camera combining GPS function
which can display the exercise information including
workout distance, time, pace and calories etc.
It mounts on the bike and the rider can not only record
the view during cycling but also trace the cycling track
and all the workout status.
Take 1080p video.
Take 5 Mega Pixels photographs.
Wide angle lens.
Status display shows required features.
The camera is waterproof to 3 meters.
The camera is drop-proof to 1.2 meters.
Show sport workout information through the display.
Backlit display allows the user to see the display in
the dark.
Support the microSD & microSDHC memory card up to
32GB.
Save workout route GPS data in GPX file format at
memory card.
Video with GPS information can be played back with
the Kinomap software.(to be downloaded separately)

4
2. Package Contents
Carefully unpack the package and ensure that you have the
following accessories:
1 Micro USB Cable 6
SUMSUNG 8G
MICRO SD CARD
2 Secure String 7
Bike Mount
3 Carabineer 8 Kinomap CD
4 Neoprene Carry Bag 9 Quick User Guide
5 USB READER
3. Functional Parts

5
1 Cover Lens
High Quality Lens
2
Power/Shutter
button
1. Turn the camera on or off
2. Take single photograph
3 LED Indicator Show the camera status
4
Record& Stop
Slide Switch
Slide to start or stop video recording
5 Tripod Socket
Accept CamLocker or other mount
using similar tripod screw
6
Camera Cover
Latch
Lock the back cover
7 Camera Cover
Shield the camera from water and
dust
8 Strap Vent Loop with wrist or secure string
9 Left Button
1. Move to left/previous selection
2. Choose the top left option on the
display
3. Decrease the number when
setting a value for Date & Time or
custom settings
10 Right Button
1. Move to right /next selection
2. Choose the top right option on the
display
3. Increase the number when setting
a value for Date & Time or custom
settings
11 Back Button
1. Return to previous selection or
interface
2. Choose the bottom left option on
the display
12 Enter Button
1. Enter or confirm the selection
2. Move to next selection.
3. Choose the bottom right option on
the display
13 Display Display the sport and setting

6
information
14 Reset Button Reset the camera
15 micro USB port
1. Connect to a computer via the
USB cable provided for data
transfer and camera setup
2. Charge your camera
16
microSD Card
Slot
microSD card storage location
17 Mini HDMI Jack
Connect the camera to an HDTV
with an HDMI cable (not included)
4. Using the Camera
4.1 Opening the Back Cover
Slide to unlock the camera latch and open the camera back
cover as shown below:
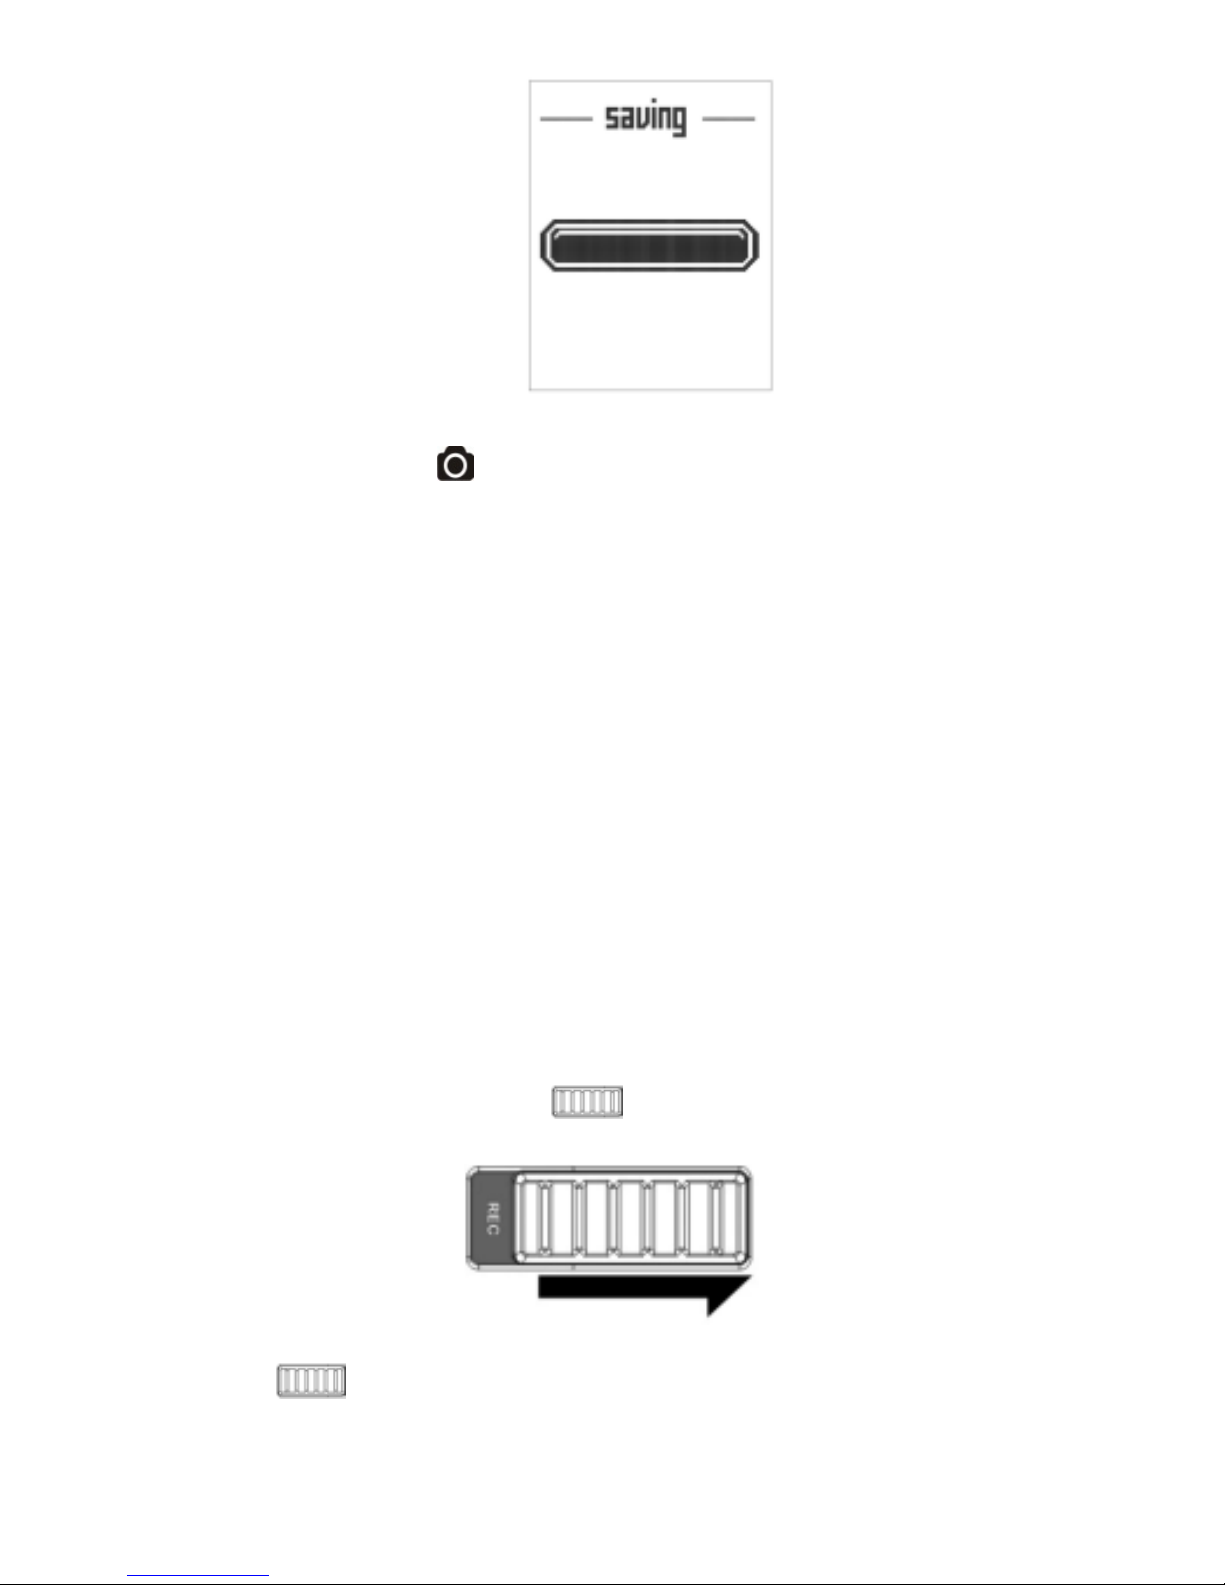
4.2 Charging up the Battery
Charge your camera through the USB cable connected to a
USB2.0 computer port or through the AC /DC adapter (not
included) plugged into the socket. When the camera is charging ,
the LED indicator lights up in RED and turns off once the camera
is fully charged, meanwhile, the “Charging” icon will be
displayed on the LCD screen It takes about 2 hours to fully
charge the camera.

7
4.3 Inserting a microSD Memory Card (not
included)
Insert a microSD card (not included) before using your camera.
Assure that the camera power is turned OFF before inserting the
card to the slot.
Notes:
1. There is only one correct direction to insert the microSD
card into the slot. Do not force the card into the card slot
as it may damage both the camera and the microSD card.
2. A new microSD card should be formatted before using. For
more information, refer to section 6.9, 7 and 8.6.
4.4 Auto Rotation
The camera has a built-in G-sensor which is able to detect the
camera orientation. The feature is available for both video
recording and photo capturing.
By rotating your camera to 180° from the default position, the
recorded video will be rotated in the same angle. Moreover, by

8
rotating your camera to 90°, 180° or 270° from the default
position, the captured photo will be rotated in the same angle as
well. This allows the user to mount the camera in different
orientation without recording a rotated or inverted view.
Notes:
1. Adjust your camera orientation before you start the video
recording. The rotation feature will not be activated
throughout the recording.
2. You can disable the auto rotation function in the “General
settings” in the Setting menu. Refer to section 6.9.
5. Camera Function
5.1Turning ON/OFF the Camera
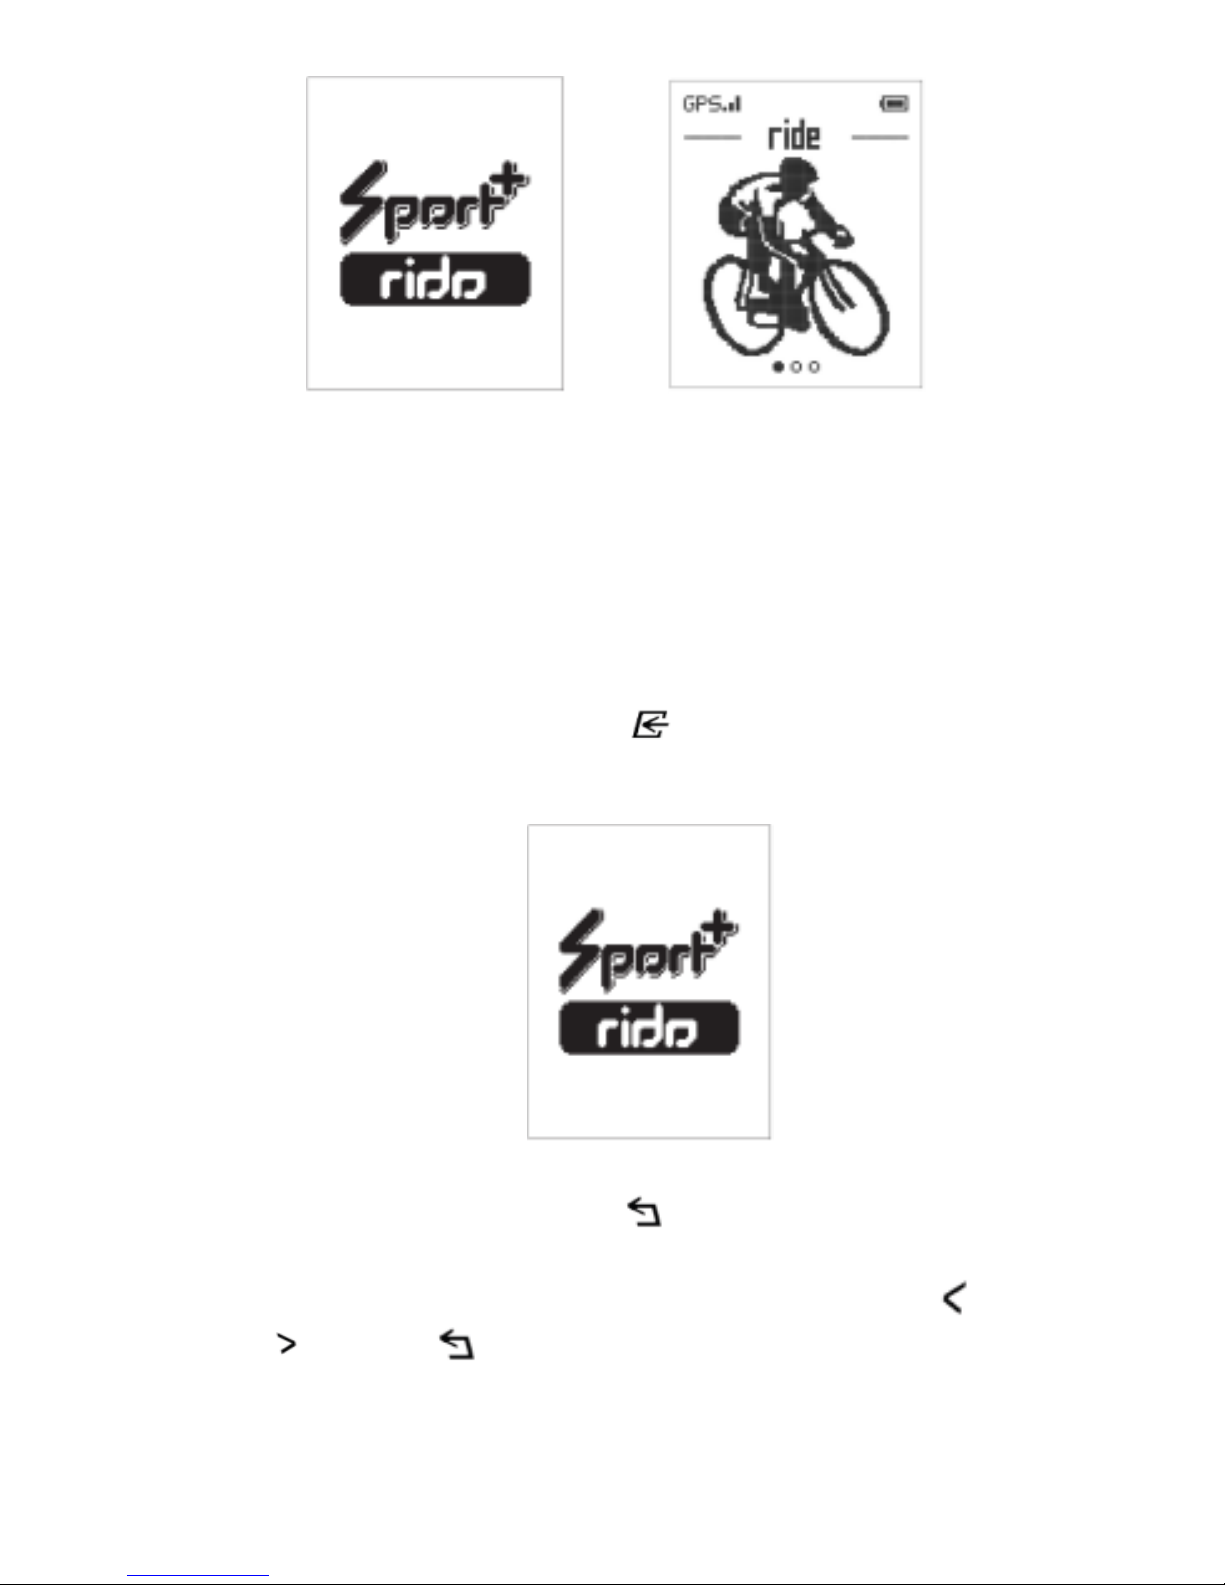
To turn ON the camera:
Press and hold button. The camera will vibrate and the
Green LED will turn on.
Notes:
1. When you turn on the camera, the sport function will turn on
as well.
The Sports+ animation will be shortly displayed on the
screen.

9
2. If the Sport function has been turned on before you turn on
the camera, the display will remain at the status of Sport
interface.
3. If the camera is turned on by the first time, it will enter a
Date & Time setup mode. Only after you have completed
the settings for Date & Time can the camera enter the Ride
interface.
To set Date & Time:
General rules:
1. The flashing value represents the current option ready to be
set.
2. Press the Back button or the Enter button to move
to the option you want to set.
3. Press the Left button to decrease the number or press
the Right button to increase the number.
4. Press to confirm and move to the next setting option.
YEAR MONTH DATE TIME FORMAT HOUR
MINUTE.

10
First, it will enter the Date setup interface. In the Date setup
interface, you can set the values for YEAR, MONTH and DATE.
(Date Range: 2013.01.01-2100.12.31)
After completing the setting for DATE, it will enter the Time
setup interface. In the Date setup interface, you can set the
Time format at either 12 hr or 24hr, also, the value for HOUR
and MINUTE.
Press the Left button or the Right button to select the time
display format from 24 hr or 12hr. You may follow the general
rules to complete the settings for HOUR and MINUTE.
If 24hr is chosen as the Time display format (Time Range:
00:00-23:59);
If 12hr is chosen as the Time display format (Time Range:
12:00-11:59 am/pm).
After completing the setting for minute, the Date & Time
information will be saved.
11
To turn OFF the camera:
Press and hold the button. The camera will vibrate for two
seconds and the Green LED will turn off.
Notes:
1. The sport function will not turn off along with the camera’
turn-off, the display will remain at the status of Sport interface.
2. If the auto power off is set at "1 Min "or "3 Min" in the “General
settings” in the Setting menu. (Refer to section 6.9), the
camera will turn off automatically if no action is detected
within the preset time.
5.2 Recording Videos
There are two methods for starting the video recording function.
When the camera starts recording, there will be a short vibration
indicating recording has started. The LED indicator illuminates
RED throughout recording.
1. Whether the camera power
is ON or OFF, simply slide the
Recording Slide Switch to reveal the letter “REC” to
start recording.
2. When your camera is OFF and the Recording Slide
Switch is at the location that reveals the letter ”REC”,

12
press and hold the Power button to turn the camera ON
and it will start recording.
Tip:
The first time when you conduct video recording, if no GPS
signal is received, the display will show “GPS signal is not
acquired, the recording video may not contain accurate geo
information” and then jump to the ride interface.
To stop Recording, slide the Recording Slide Switch to reveal
the letter “STOP” .The camera will vibrate and the LED indicator
will illuminate GREEN to indicate the recording has stopped.
The camera will then enter the Standby mode.
An additional option is to hold the Power button to stop the
recording and turn the camera off. The camera will vibrate and
the Red LED light will turn off.
Notes:
1. Changing video resolution is disabled during video recording.
2. There will be around 2-3 seconds delay before the camera
starts recording.
3. Assure there is sufficient memory available on the micro SD
card. If the card is full, the camera will vibrate for five seconds
and the Green LED will flash continuously.
4. You can playback video with GPS information using the
Kinomap software (to be downloaded separately).
5. Please visit:
http://www.kinomap.com/#!download/kinomap_uploader
_pc to download the Kinomap software.
5.3 Taking Photos
Turn on the camera by pressingthe button.
1. Take a photo in Single mode

13
To capture a Photo, make sure the camera is in Single mode.
Refer to section 6.9.
Press and release the button to take a photo. A short
vibration and a flash of Green LED indicate the action was
successful.
2. Take photos in Time Lapse mode
Time Lapse mode captures a series of photos at 10 seconds, 30
seconds or 1 minute intervals.
To capture a Time Lapse series, make sure the camera is in
Time Lapse mode. Refer to section6.9.
Press and release the button, the camera will initiate a
countdown. The Green LED will flash once and the camera will
vibrate each time a photo is taken.
To stop Time Lapse:
Press the button to stop and exit the Time lapse mode and
return to Standby mode.
Note:
When you start the recording or turn off the camera, the
time-lapse mode will be cancelled.
3. Take a photo in Self-timer mode
To avoid shaking of the camera, a tripod is recommended.
To capture a Photo, make sure the camera is in Self-timer mode.
Refer to section6.9.
Aim at the object you wish to take photos of. Press and release
the button. The photo will be taken after the timer reaches
the delay time of 2 or 10 seconds.
If you have selected 2 seconds as the delay
time:
During the countdown the Green LED will flash rapidly
and the camera will vibrate when the photo is taken.

14
If you have selected 10 seconds as the delay
time:
During the countdown, the Green LED will flash once
every second in the first 8 seconds, while in the last 2 seconds,
the Green LED will flash rapidly and the camera will vibrate
when the photo is taken.
Notes:
1. After taking the photo, it will return to Single mode.
2. When you start the recording or turn off the camera, the
self-timer mode will be cancelled.
Reminders:
1. The Still Photo function is disabled during video recording.
2. If the card is full, the camera will vibrate for five seconds and
the Green LED will flash continuously.
6 Sport Function
The embedded GPS function enables RIDO to display the
exercise information including the workout distance, time, pace
and calories. RIDO can be mounted on the bike and you can not
only record the view during cycling but also trace the cycling
track and all the workout status.
You can use the sport function no matter the camera is in power
on mode, recording mode or power off mode.
6.1 Turn ON/OFF RIDO
Turn on the Sport Function:
There are two methods for turning on the sport function.
Press and holdthe buttonto turn on the camera, the Sport
function will turn on accordingly.
Press and hold the Enter button to turn on the sport
function.
The Sports+ animation will be shortly displayed on the screen
and then jump to the Ride interface.
15
Note:
If the Sport function is turned on by the first time, it will enter a
Date & Time setup mode.
Only after you have completed the settings for Date & Time can
the camera enter the Ride interface. Please refer to section “To
set Date & Time” to set Date and Time for your camera.
Turn off the Sport Function:
Press and hold the Enter button to turn off the sport
function. The Sports+ animation will be shortly displayed on the
screen and then the screen will turn off.
Backlight
Press and hold the Back button for about two seconds to
turn on or off the backlight steadily.
When the backlight is off, press any one of the LEFT
/RIGHT /BACK /ENTER button once, the backlight will
illuminate for a period of time. Please refer to section 6.9 to set
the specific backlight duration time.

16
6.2 Introduction of the Main Menu
The main menu is composed of three sections: ride, history and
settings.
Press the Left button or the Right button to switch over the
three interfaces of the main menu.
6.3 Explanation of the Status Icons
Item Function Description
1
GPS Reception
Status
Shows the intensity of GPS signal
2
Battery Power
Indicator
Fully charged
Low battery. Recharge needed
3 Page Shows the current page number
4
Recording
Status Indicator
If the icon is displayed on the
screen, the camera is recording a
video;
If the icon is not displayed on the

17
screen, the camera is not recording
a video.
5
Riding Status
Indicator
If the icon is displayed on the
screen, the Ride recording is
ongoing;
If the icon is not displayed on the
screen, the Ride recording is either
paused or disabled.
6 Hi Info
Shows the parameters on the upper
area of the Ride recording interface.
Available parameters :Time,
Distance, Speed(Pace)/Calories
7 Lo Info
Shows the parameters on the lower
area of the Ride recording interface.
Available parameters :
Time/Distance/Speed(Pace)
6.4 General Rules of Selection
1 Top Left Selection
2 Bottom Left Selection
3 Top Right Selection
4 Bottom Right Selection
Select relevant option by pressing the LEFT /RIGHT /BACK
/ENTER button located on the side of the camera body.

18
Select “back” to return to previous interface.
6.5 Ride Recording
There are three ways for you to conduct the ride recording. To
proceed your ride recording, select your desired ride recording
method from quick start, time or distance by pressing their
corresponding buttons on the side of the camera body.
Turn on the Sport function and enter the Ride interface.
Enter the ride interface by pressing the Enter button to
select the ride startup options.

19
Note:
In order to display comprehensive exercise information, please
make sure your camera can receive GPS signal during your
riding. Otherwise, the display will show ”GPS signal is not
acquired, do you want to continue”.
Select “no” to return to the previous interface.
Select “yes” to start as normal ride recording.
While there is no GPS signal, only the time counter will be
proceed.
1. Quick starting the RIDE
Select “quick start” by pressing the Left button
The” ready” and “go” animation will be shortly displayed on the
screen before jumping to the ride recording interface. The
display will show the ride recording data on spot.
2. Setting the Ride time
The ride recording will stop automatically once the preset RIDE
recording time is over.
Select “time” by pressing the Right button

20
Select from 30 min, 1 hr or custom.
If you select 30 min,the ride recording will last for 30 minutes
and stop automatically once it reaches 30 minutes.
If you select 1 hr,the ride recording will last for 1hour and stop
automatically once it reaches 1hour.
Select “custom” to define your desired preset time. Each time
you press the Left button , the value will be decreased by ten
minutes, while each time you press the Right button , the value
will be increased by ten minutes.

21
Press and hold the button, the value will keep decreasing
automatically.
Press and hold the button, the value will keep increasing
automatically.
Value range: 00:10-99:50(hr/min)
The default value is 01:00(hr/min) or the value you have
previously set.
Press the Enter button to confirm.
After setting the ride time, the” ready” and “go” animation will be
shortly displayed on the screen before jumping to the Ride
recording interface. The display will show the ride recording data
on spot.
Note:
You can also finish and save the ride recording data prior to the
preset ride recording time.
3. Setting the Ride distance
The ride recording will stop automatically once the preset
distance is over.
Select “distance” by pressing the Enter button .
Select from 10km, 30 km or custom.

22
Select 10 km or 30km, the ride recording will stop automatically
once it reaches 10 km or 30km.
Select “custom” to define your desired preset distance. Each
time you press the Left button , the value will be decreased by
1 kilometer or 1 mile (depends on the metric set on “Ride”
settings in the setting menu, refer to section 6.9.), while each
time you press , the value will be increased by 1 kilometer or 1
mile.
Press and hold the button, the value will keep decreasing
automatically.
Press and hold the button,the value will keep increasing
automatically.
Value range: 1-999(km/mi)
The default value is 10km/5mi or the value you have previously
set.
Press the Enter button to confirm.
After setting the ride distance, the” ready” and “go” animation will
be shortly displayed on the screen before jumping to the ride
recording interface. The display will show the ride recording data
on spot.

23
Note:
You can also finish and save the ride recording data prior to the
preset ride recording distance.
6.6 Change Settings during Ride
Recording
Press the Enter button during ride recording.
Select” setting” by pressing the Left button to enter the
setting interface.
1. Setting Metric
Select “metric” to set the display units for distance and speed
from “km/kmh” and “mi/mph”.

24
Select “km/kmh” or “mi/mph” by pressing the corresponding
button.
If “km/kmh” is selected, all the Distance information will be
presented in unit “km” and all the Speed information will be
presented in unit “kmh”;
If “mi/mph” is selected, all the Distance information displayed will
be presented in unit “mi” and all the Speed information will be
presented in unit “mph”.
2. Setting the Low Information
Select from “time”, “distance” or “speed”/“pace” to set the
parameters displayed in the lower part of the ride recording
interface.
Note:
Either Speed or Pace will be presented in the bottom right
position when selecting the Low Information parameters. It
depends on the selected parameter in the “movement” setting in
the setting menu, refer to section6.9.)

25
3. Setting Slide
During the ride recording, you can scan different slides with
different High Information.
By setting “Slide”, you can either choose to scan these slides
automatically by setting the interval time or switch these slides
manually.
Select “slide” by pressing the Enter button to enter the
“slide” interface.
Select “5sec”or “10sec”, the slides with different High
Information will switch automatically every 5 or 10 seconds.
Select “off” to disable the slide effect. You need to switch the
interfaces with different High Information manually by pressing
the Left button or the Right button 。
Notes:
1. The High Information may display one of these parameters:
distance, speed/pace, calories or Time.
If one of these parameters has been selected as the Low
Information, (Refer to point 2 in section“6.6”) it cannot be
presented in the High Information area. For example, if “time”
is selected to be the Low Information, it will not be presented
in the High Information area once more.

26
2. The parameter of Speed and Pace are interchangeable while
they cannot be presented at the same time. It depends on the
selected parameter in the “movement” setting in the setting
menu. Refer to section 6.9.
6.7 Pause/Resume/Finish the Ride
Recording
Press the Enter button during ride recording to enter the
setting interface.
To pause the ride recording:

27
Select “pause” by pressing the Right button , the ride recording
will be suspended.
To resume the ride recording:
In the suspended ride recording interface, press the Enter button
again and select “resume” by pressing the Right button ,
the ride recording will continue.
To finish the ride recording:
Select “finish” by pressing the Enter button to end and save
the RIDO recording data. The display will show a summary of
the riding.

28
SUMMARY: shows the ride start date.
S.TIME: shows the ride start time.
R.TIME: shows the ride duration.
Dist: Distance, shows how far you have traveled.
AVG. SPD: Average speed, shows the Average Speed of your
ride.
CALORIES: shows how many calories you have burned.
Press any button to save and exit the ride interface.
6.8 Review Your Riding History
Turn on the camera and press or to switch to the “history”
interface.
Press the enter button to enter the “history “interface.

29
Review the TOTAL ride summary
You may review the ride summary of TOTAL Time, Total
Distance, Max Speed/ Pace/Calories, Average Speed/
Pace/Calories.
Select “Sum” by pressing the Left button to view the
summary of the ride record. The default is the ride summary of
time.
Press the Left button or the Right Button to switch
between slides which display different ride summary.

30
Ride Summary--‐Time
Total Time: shows the total ride time.
Max Time: shows the maximum ride time.
Avg Time: shows the average ride time.
Ride Summary--‐Distance
Total Distance: shows the total ride distance.
Max Distance: shows the maximum ride distance.
Avg Distance: shows the average ride distance.
Ride Summary–Speed/Pace
Max Speed: shows the maximum ride speed.
Avg Speed: shows the average ride speed.
Max Pace: shows the maximum time needed for one mile or one
km.
Ride Summary–Pace/calories
Avg Pace: shows the average time needed for one mile or one
km.
Max Calories: shows the total calories you have burned.

31
Avg Calories: shows the average calories you have burned.
Note:
To clear the data of total ride summary to zero. Please refer to
the setting menu in section 6.9 to conduct “reset history”.
Review SINGLE ride summary
Select “record” by pressing the Right button to view the
individual ride record. The latest ride record will be shown on the
display.
Date: shows the ride start date.
S. Time: shows the ride start time.
R. Time: shows the ride duration.
Dist: shows the ride distance.
Avg Speed/Pace: shows the average ride speed/pace.
Calories: shows the calories you have burned.
Page: shows the current page number.
Press the Left or Right button to review the other single
ride summary pages.
If there is no ride record, a warning message “No record!” will be
displayed on the screen.
Delete Single ride record
During single ride record review, press the Enter button to
enter the delete menu.

32
Select “delete” by pressing the Left button to enter into
delete interface.
Select “yes” to delete the current viewing record and GPS file.
Select “no” to return to the individual ride record interface.
Note:
Deletion of the single ride record will not affect the total ride
summary data in “sum”.
Export the GPX file
After a ride is completed and saved, a GPX file will be generated
and stored at the Internal SPI flash memory IC. The GPX file can
be uploaded to sport sites such as runtactic.com,
mapmytracks.com for sport analysis.
You can export the GPX file from the internal flash to your
microSD card. Before exporting the GPX file to your microSD
card, make sure a microSD card has been installed into your
camera. (Refer to section 4.3)
Select “export gpx” by pressing the Enter button to enter the
“Loading” interface.

33
When displaying the “Loading” interface, the screen will show:
“start export the gpx file to sd card”, select “yes” to start
exporting.
Then the GPX files from the internal flash have been exported to
your microSD card.The file will be saved as
YYYYMMDDHHMMSS.GPX (YYYY, MM, DD, HH, MM, SS
represent the starting year, month, day, hour, minute and
second of the ride record.
Note:
Once the GPX file has been exported to the microSD card, it will
be permanently erased from the Internal SPI flash memory.
6.9 Setting Menu
Turn on the sport function. Press the Left button or the Right
button to switch to the “setting” interface.
Follow the below general rules to enter setup
interface for each Menu item:
Press the Enter button to display menu/submenu selections.

34
Press the Left button or Right button to switch to the
menu/submenu item you want to set.
Press Left /Right /Back /Enter button to select
relevant setting or go back to previous interface.
Note:
The selection with a dot underneath represents the previous
selection you have set. If you change it to another selection,
next time when you enter this interface, the dot will move to the
bottom of the corresponding selection.
This table below shows all the available menu options for your
quick lookup.
Movement Speed/Pace
Movement display
setting
Metric
KM/KMH,
MI/MPH
Change the metric of
distance and speed
Del all
records
No/Yes
Delete all records
and GPS files
Ride
Reset
history
No/Yes
Clear the
accumulated ride
records.(All the
single ride records
and GPS files will
not be deleted)
Settings
Phot
o
Photo
resolution
16MP,5MP,3MP
Photo resolution
setting

35
Mode
Single
Time Lapse:10
sec,30sec,1min
Self timer:2 sec,
10 sec
Photo mode setting
Del all
photos
No/Yes
Delete all photo files
in the memory card
Video
resolution
1080p,720p60,720
p30
Video resolution
setting
Video
Del all
videos
No/Yes
Delete all video files
in the memory card
Back light 5s/10s/ Off
Change the
backlight illuminated
duration after
pressing a button
Clock: 30
sec/1min/3min
Speed:
30sec/1min/3min
Screen saver
Off
Set the Screen saver
type and the amount
of time you would
like the screen saver
to activate or turn
off the screen saver
function
Language
English/ Spanish/
French
Display language
setting
Date/Time
YYYY/MM/DD/HH/
MM
Date or time setting
TV type NTSC/PAL TV Type setting
Frequency 50Hz / 60Hz
Power frequency
setting
Auto power
off
1Min / 3 Min / Off
Auto power off
setting
(When camera is in
standby status)
General
Auto rotation On /Off Auto rotation setting

36
Default
setting
No/Yes
Reset all settings to
factory default
positions
Format No /Yes
Format the microSD
Card
System info
Version
Shows the device name,firmware
version and Date
7. Connecting Your Camera to a PC
The unit can be connected to the computer as mass storage
device and transfer your photo/video files for storage.
1. Connect your camera to a PC via the USB cable included.
2. Press button to turn the camera on.
When the camera is connected to the
computer as mass storage device, you can:
1. Open the microSD folder and browseyou can browse the files
saved in the camera
2. Format the microSD card.
Note:
If you cannot find the mass storage, you can unplug the USB
cable from the PC and turn the camera on and off once and
connect it to the PC again.
8. Connecting your camera to an HDTV
You can connect your camera to an HDTV via the HDMI cable
(not included). Once it is connected you can:
1. Take photos or videos by using your TV as a viewfinder
2. Playback any photo or video files saved in the camera
3. Delete any files saved in the camera
4. Format the microSD Card
5. Change your camera settings

37
Slide the Recording Slide Switch to reveal “STOP”,
connect your camera to an HDTV with an HDMI cable (not
included). Once it is connected, the photo preview mode as
shown in the picture below will pop up.
Press the Left button and the Right button to switch between
photo preview mode and video preview mode.
1. In preview mode, all icons will be hidden if no action is
detected within 5 seconds.
2. Please make sure a microSD card has been inserted into
the card slot of the camera, or a “No card” message will be
displayed on the HDTV screen.
8.1 Taking Photos with HDTV
1. Press the Left button or the Right button to switch to
photo preview mode.
2. Press and release the Power button to take a photo.

38
8.2 Recording Videos with HDTV
There are three methods for starting the video recording
function:
a) In video preview mode, simply press the Power button to
start recording.
b) In either video preview mode or photo preview mode, when
the Recording Slide Switch is at a location that
reveals “STOP”, simply slide the Recording Slide Switch
to reveal the letter “REC” to start recording.
c) When your camera is OFF with connection to an HDTV and
the Recording Slide Switch is at the location that
reveals the letter ”REC”, press and hold the Power
button to turn the camera ON and it will start recording.
To stop recording, press the Power button once or slide the
Recording Slide Switch to reveal the letter “STOP” when
the Recording Slide Switch is at the location that reveals
the letter “REC”.
An additional option is to hold the Power button to stop the
recording and turn the camera off. The camera will vibrate and
the Red LED light will turn off.
39
8.3 Playing Back Photo Files with HDTV
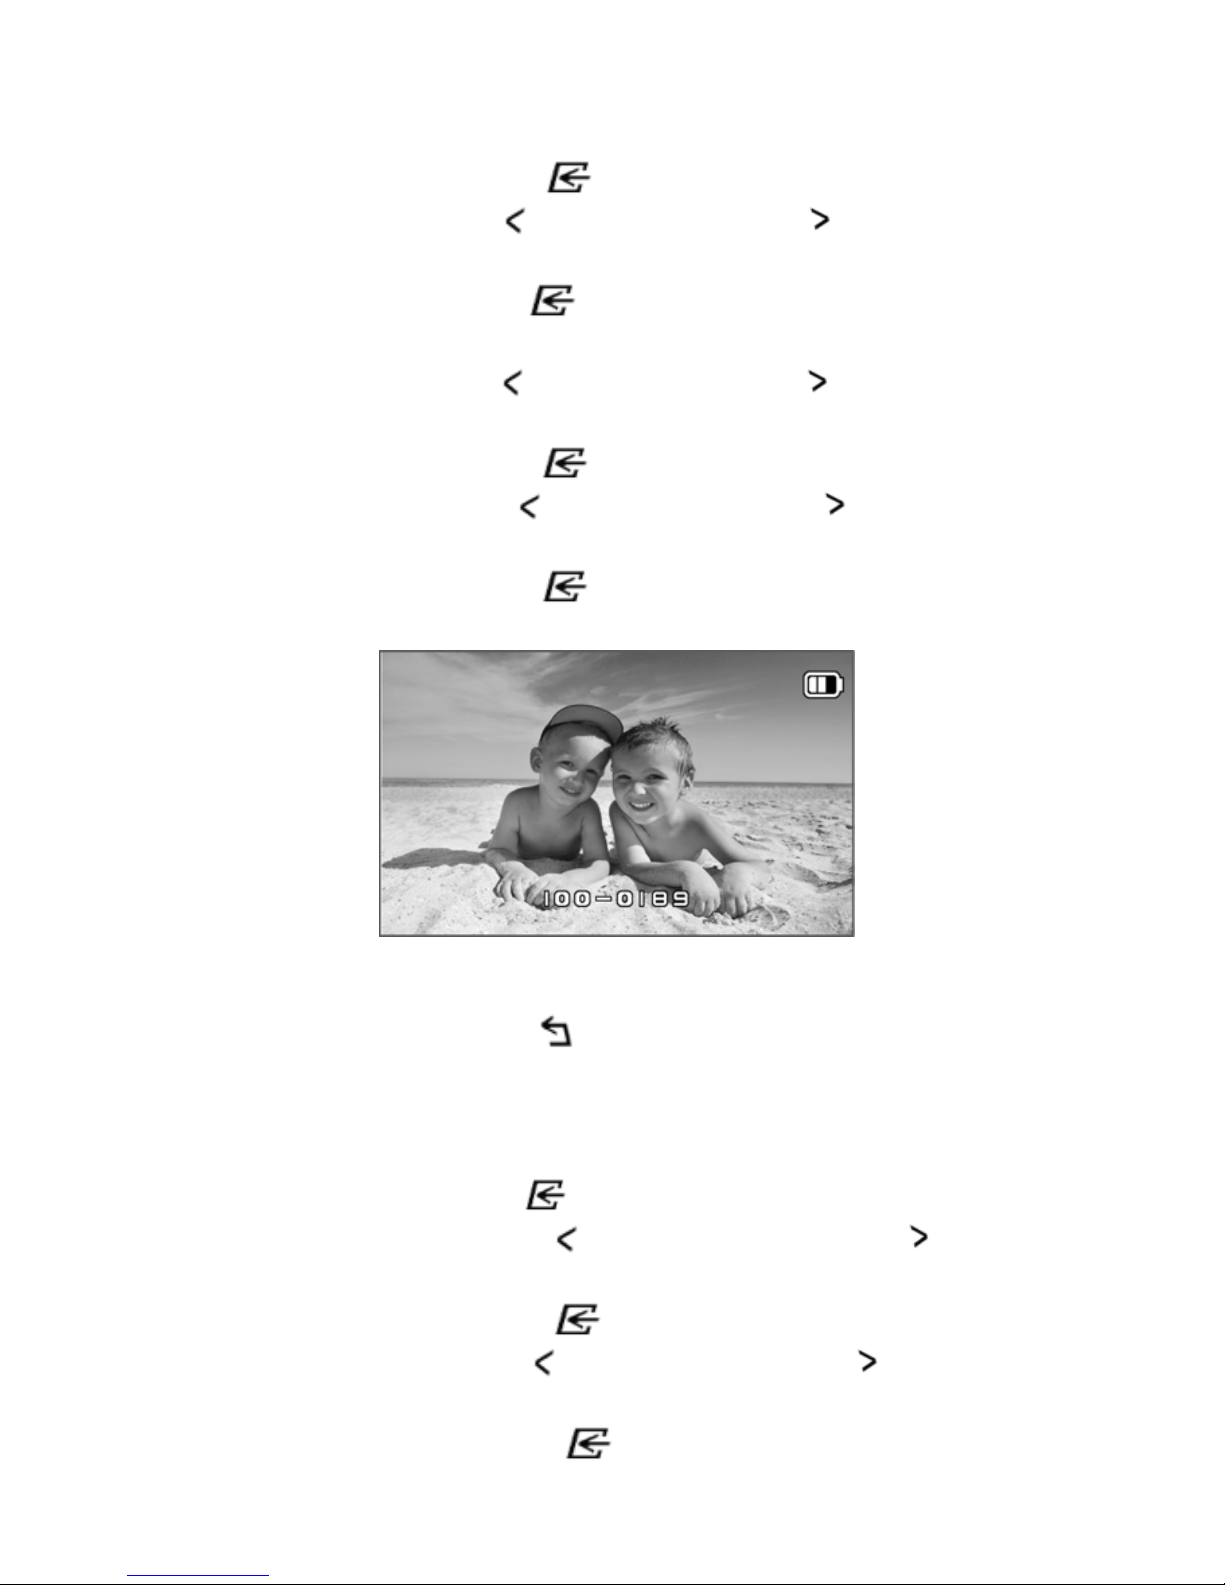
1. Press the Enter button to enter the Menu mode.
2. Press the Left button or the Right button to select
“PHOTO”.
3. Press the Enter button to enter photo thumbnail
mode.
4. Press the Left button or the Right button to select the
desired Photo file you want to view.
5. Press the Enter button to view a single file.
6. Press the Left button or the Right button to view the
previous file or the next file.
7. Press the Enter button shortly to start the slide show
and press it again to stop.
All icons will be hidden if no action is detected within 5
seconds.
8. Press the Back button to go back to Photo thumbnail
mode.
8.4 Playing Back Video Files with HDTV
1. Press the Enter button to enter the Menu mode.
2. Press the Left button or the Right button to select
“VIDEO”.
3. Press the Enter button to enter video thumbnail mode.
4. Press the Left button or the Right button to select the
desired Video file you want to view.
5. Press the Enter button to open the single video file.

40
Press it again to start playing back the video.
During video playback:
1) Press the Enter button to pause and press it again to
continue.
2) Press the Right button to fast forward the video and press it
again to change the speed (x2→x8→x32→Normal speed,
Recycle).
3) All icons will be hidden if no action is detected within 5
seconds.
6. Press the Back button to go back to Vide thumbnail mode.
8.5 Deleting Photo/ Video Files with HDTV
To delete a SINGLE photo/Video
You can delete a single file (photo or video) from the memory
card in single photo or video playback mode.
In single photo or video playback mode, press and hold the
Enter button for about two seconds to enter the delete mode.
Press the Left button or the Right button to select “YES”.
Press the Enter button to confirm.
To delete ALL photo/Video files

41
You can delete all photo/video files in the SETUP menu. Please
refer to section 8.6.
8.6 Changing your Camera Settings
Press the Enter button to enter the Menu mode. Press the Left
button or the Right button to select “SETUP”.
Press the Enter button again to enter the “SETUP” interface.
Follow the below general rules to conduct
the setting for each item:
Press the Left button or the Right button to select the
menu/submenu item you want to set. (In “TIME SETUP” item,
press the Left button to decrease the number or press the
Right button to increase the number.)
Press the Enter button to confirm your selection.

42
Press the Back button to exit to the Menu mode.
This table below shows all the available menu options for your
quick lookup.
Setup Option
TV OUT NTSC, PAL
LANGUAGE
English, German, French, Italian,
Spanish, Dutch, Portuguese, S.
Chinese & T. Chinese, Russian,
Korean, Japanese
TIME SETUP Year, Month, Day, Hour, Minute
AUTO POWER OFF 1 min, 3 min, Off
AUTO ROTATION On, Off
DELETE ALL FILES Photo, Video, All
FORMAT No, Yes
FREQUENCY 50HZ, 60HZ
DEFAULT SETTINGS No, Yes
FIRMWARE VER Shows the firmware version
9. Mounting Your Camera on the
Handlebar or Pole
1. Loosen both bike mount screws.
2. Attach the bike mount to the handlebar or pole and
tighten the screws until the mount is firmly secured
(Fits around any tubes and around bars from
16mm~ 33mm in diameter.

43
3. Tighten the ball joint nut of the bike mount, and then
rotate the fixed plate clockwise until it is tightened at
the very bottom of the screw.
4. Fit the screw of the Bike mount to the tripod socket
of the camera.
5. Screw the camera until it is tight on the bike mount.
Note:
The Ball joint nut allows you to change the angle of the
camera. Simply loosen the nut, adjust the camera angle
and retighten the nut.
10. Specifications
Sensor 5 Mega pixel CMOS sensor
Lens 170
o
wide angle field of view
Focus range 0.5m - ∞
1080p: 1920x1080 pixels (16:9), 30 fps
720p: 1280x720 pixels (16:9), 30 fps
720p: 1280x720 pixels (16:9), 60 fps
Video
Format: H.264 compression, saved as
MPEG4 (MOV) file*

44
16 Mega Pixel s:(4608x3456)
5 Mega Pixels: (2592x1944)
3 Mega Pixels: (2048x1536)
Format :JPEG
Photo
Capture Modes: Single photo, Time lapse,
Self-Timer
Built-in high quality microphone
Audio
ADPCM Compression, Automatic Gain
Control
microSD/microSDHC with minimum Class 6
(not included)
Storage
Average Recording Times: about 6 hours
(using 32GB mSD card in 1080p30)
Micro USB2.0 (for data connection and
battery charging) Connection
Mini HDMI
Built-in 1050 mAH Rechargeable Li-ion
Battery Power
Battery Life: Approx. 2 hrs
Durable plastic and fashionable finishing
Housing
Depth up to 3 meters
Display
Panel
23x28.5mm
Weight 162g
11. Computer System Minimum
Requirement
Operating System
Windows 7&8 / Vista / XP and Mac OS
10.5 or above
CPU
Pentium Ⅲ or above
RAM At least 256MB
Interface USB port

45
CD 4x speed CD ROM or above
12. Troubleshooting
Problems Causes Solutions
Cannot turn on the
camera
Low battery
power
Recharge the battery
Red LED flashes
during recording
Low battery Recharge the camera
Cannot take photos
or videos (Green
LED flashes)
Memory full
Replace with a
memory card with
space available for
contents
Cannot take photos
or video (Green and
Red LED flashes
alternatively)
1.microSD
card is not
inserted
2. microSD
card has not
been
formatted
properly.
1. Insert a SD card
2. Format the microSD
card in the setting
menu, at PC or TV
Cannot find
removable disk after
connecting the
camera to the
computer.
Connection
failure.
1. Make sure all cable
connections are
secured and restart
the computer if
necessary.
2. Try a different USB
port.
AC32
 Loading...