

Page 1

Face Recognition Reader
User’s Manual
R71CF-31, R71CF-32, R71CF-33, R71CF-34
2019/09/23
Page 2

www.acti.com
User’s Manual
TABLE OF CONTENTS
About this Manual ............................................................................................... 4
Precautions ......................................................................................................... 4
Regulatory Information ........................................................................................ 5
Safety Instructions .............................................................................................. 7
1. Installation and Connections ........................... 9
Installation Environment .................................................................................. 9
Installing with Gang Box .................................................................................. 9
Terminal Connection ...................................................................................... 12
2. Device Activation ............................................. 14
3. Basic Operation ............................................... 15
Application Mode Settings ............................................................................. 15
Login ................................................................................................................ 16
General Parameters Settings ......................................................................... 17
Communication Settings ........................................................................... 17
System Settings ........................................................................................ 19
User Management .................................................................................... 22
Managing User ......................................................................................... 25
Other Management ................................................................................... 25
Appendix ............................................................... 27
Tips When Collecting / Comparing Face Picture ......................................... 27
Position (Recommended Distance: 0.5 m) ................................................ 27
Expression ................................................................................................ 28
Posture ..................................................................................................... 28
Size ........................................................................................................... 28
2
Page 3

www.acti.com
User’s Manual
Tips for Installation Environment .................................................................. 29
Relationship Between Wake-Up Distance and Environment ...................... 30
3
Page 4

www.acti.com
User’s Manual
About this Manual
This Manual is subject to domestic and international copyright protection. The manufacturer
reserves all rights to this manual. This manual cannot be reproduced, changed, translated, or
distributed, partially or wholly, by any means, without the prior written permission from the
manufacturer.
Precautions
Read these instructions
You should read all the safety and operating instructions before using this product.
Heed all warnings
You must adhere to all the warnings on the product and in the instruction manual. Failure to follow
the safety instruction given may directly endanger people, cause damage to the system or to
other equipment.
Servicing
Do not attempt to service this video device yourself as opening or removing covers may expose
you to dangerous voltage or other hazards. Refer all servicing to qualified service personnel.
Trademarks
All names used in this manual are probably registered trademarks of respective companies.
Liability
Every reasonable care has been taken during the writing of this manual. Please inform your local
office if you find any inaccuracies or omissions. We cannot be held responsible for any
typographical or technical errors and reserve the right to make changes to the product and
manuals without prior notice.
Support
Should you have any questions, please do not hesitate to contact your local dealer.
Data Protection
During the use of the device, personal data will be collected, stored and processed. To protect
data, the development of devices incorporates privacy by design principles. For example, for
device with facial recognition features, biometrics data is stored in your device with encryption
method; As data controller, you are advised to collect, store, process and transfer data in
4
Page 5

www.acti.com
User’s Manual
accordance with the applicable data protection laws and regulations, including without limitation,
conducting security controls to safeguard personal data, such as, implementing reasonable
administrative and physical security controls, conduct periodic reviews and assessments of the
effectiveness of your security controls.
Regulatory Information
FCC Information
Please take attention that changes or modification not expressly approved by the party
responsible for compliance could void the user’s authority to operate the equipment.
FCC compliance: This equipment has been tested and found to comply with the limits for a Class
B digital device, pursuant to part 15 of the FCC Rules. These limits are designed to provide
reasonable protection against harmful interference in a residential installation. This equipment
generates, uses and can radiate radio frequency energy and, if not installed and used in
accordance with the instructions, may cause harmful interference to radio communications.
However, there is no guarantee that interference will not occur in a particular installation. If this
equipment does cause harmful interference to radio or television reception, which can be
determined by turning the equipment off and on, the user is encouraged to try to correct the
interference by one or more of the following measures:
—Reorient or relocate the receiving antenna.
—Increase the separation between the equipment and receiver.
—Connect the equipment into an outlet on a circuit different from that to which the receiver is
connected.
—Consult the dealer or an experienced radio/TV technician for help
This equipment should be installed and operated with a minimum distance 20cm between the
radiator and your body.
FCC Conditions
This device complies with part 15 of the FCC Rules. Operation is subject to the following two
conditions:
1. This device may not cause harmful interference.
2. This device must accept any interference received, including interference that may cause
undesired operation.
5
Page 6
www.acti.com
EU Conformity Statement
This product and - if applicable - the supplied accessories too are marked with
"CE" and comply therefore with the applicable harmonized European standards
listed under the RE Directive 2014/53/EU, the EMC Directive 2014/30/EU, the
RoHS Directive 2011/65/EU
2012/19/EU (WEEE directive): Products marked with this symbol cannot be disposed
of as unsorted municipal waste in the European Union. For proper recycling, return
this product to your local supplier upon the purchase of equivalent new equipment, or
dispose of it at designated collection points. For more information see:
www.recyclethis.info
2006/66/EC (battery directive): This product contains a battery that cannot be
disposed of as unsorted municipal waste in the European Union. See the product
User’s Manual
documentation for specific battery information. The battery is marked with this
symbol, which may include lettering to indicate cadmium (Cd), lead (Pb), or
mercury (Hg). For proper recycling, return the battery to your supplier or to a
designated collection point. For more information see: www.recyclethis.info
6
Page 7

www.acti.com
User’s Manual
Safety Instructions
Warnings
All the electronic operation should be strictly compliance with the electrical safety
regulations, fire prevention regulations and other related regulations in your local region.
Please use the power adapter, which is provided by normal company. The power
consumption cannot be less than the required value.
Do not connect several devices to one power adapter as adapter overload may cause
over-heat or fire hazard.
Please make sure that the power has been disconnected before you wire, install or
dismantle the device.
When the product is installed on wall or ceiling, the device shall be firmly fixed.
If smoke, odors or noise rise from the device, turn off the power at once and unplug the
power cable, and then please contact the service center.
If the product does not work properly, please contact your dealer or the nearest service
center. Never attempt to disassemble the device yourself. (We shall not assume any
responsibility for problems caused by unauthorized repair or maintenance.)
Cautions
Do not drop the device or subject it to physical shock, and do not expose it to high
electromagnetism radiation. Avoid the equipment installation on vibrations surface or
places subject to shock (ignorance can cause equipment damage).
Do not place the device in extremely hot (refer to the specification of the device for the
detailed operating temperature), cold, dusty or damp locations, and do not expose it to
high electromagnetic radiation.
The device cover for indoor use shall be kept from rain and moisture.
Exposing the equipment to direct sun light, low ventilation or heat source such as heater
or radiator is forbidden (ignorance can cause fire danger).
Do not aim the device at the sun or extra bright places. A blooming or smear may occur
otherwise (which is not a malfunction however), and affecting the endurance of sensor at
the same time.
Please use the provided glove when open up the device cover, avoid direct contact with
the device cover, because the acidic sweat of the fingers may erode the surface coating
of the device cover.
Please use a soft and dry cloth when clean inside and outside surfaces of the device
cover, do not use alkaline detergents.
7
Page 8

www.acti.com
User’s Manual
Please keep all wrappers after unpack them for future use. In case of any failure
occurred, you need to return the device to the factory with the original wrapper.
Transportation without the original wrapper may result in damage on the device and lead
to additional costs.
Improper use or replacement of the battery may result in hazard of explosion. Replace
with the same or equivalent type only. Dispose of used batteries according to the
instructions provided by the battery manufacturer.
Biometric recognition products are not 100% applicable to anti-spoofing environments. If
you require a higher security level, use multiple authentication modes.
Indoor and outdoor use. If installing the device indoors, the device should be at least 2
meters away from the light, and at least 3 meters away from the window or the door. If
installing the device outdoors, you should apply Silicone sealant among the cable wiring
area to keep the raindrop from entering.
8
Page 9
www.acti.com
User’s Manual
Thank you for purchasing ACTi products. The following documentation covers the installation and
configuration of your device.
NOTE: The accuracy of the analytics algorithm may be affected by different environmental
factors or inappropriate installation. Please follow the procedures in this guide. ACTi will
not be held liable for inaccuracies resulting from the aforesaid causes.
1. Installation and Connections
Installation Environment
If installing the device indoors, the device should be at least 2 meters away from the light,
and at least 3 meters away from the window or the door.
If installing the device outdoors, you should apply silicone sealant to protect the cable
wiring area to keep raindrop from entering.
Make sure the environment illumination is more than 100 Lux.
NOTE: For more details about the installation environment, see Tips for Installation
Environment on page 29.
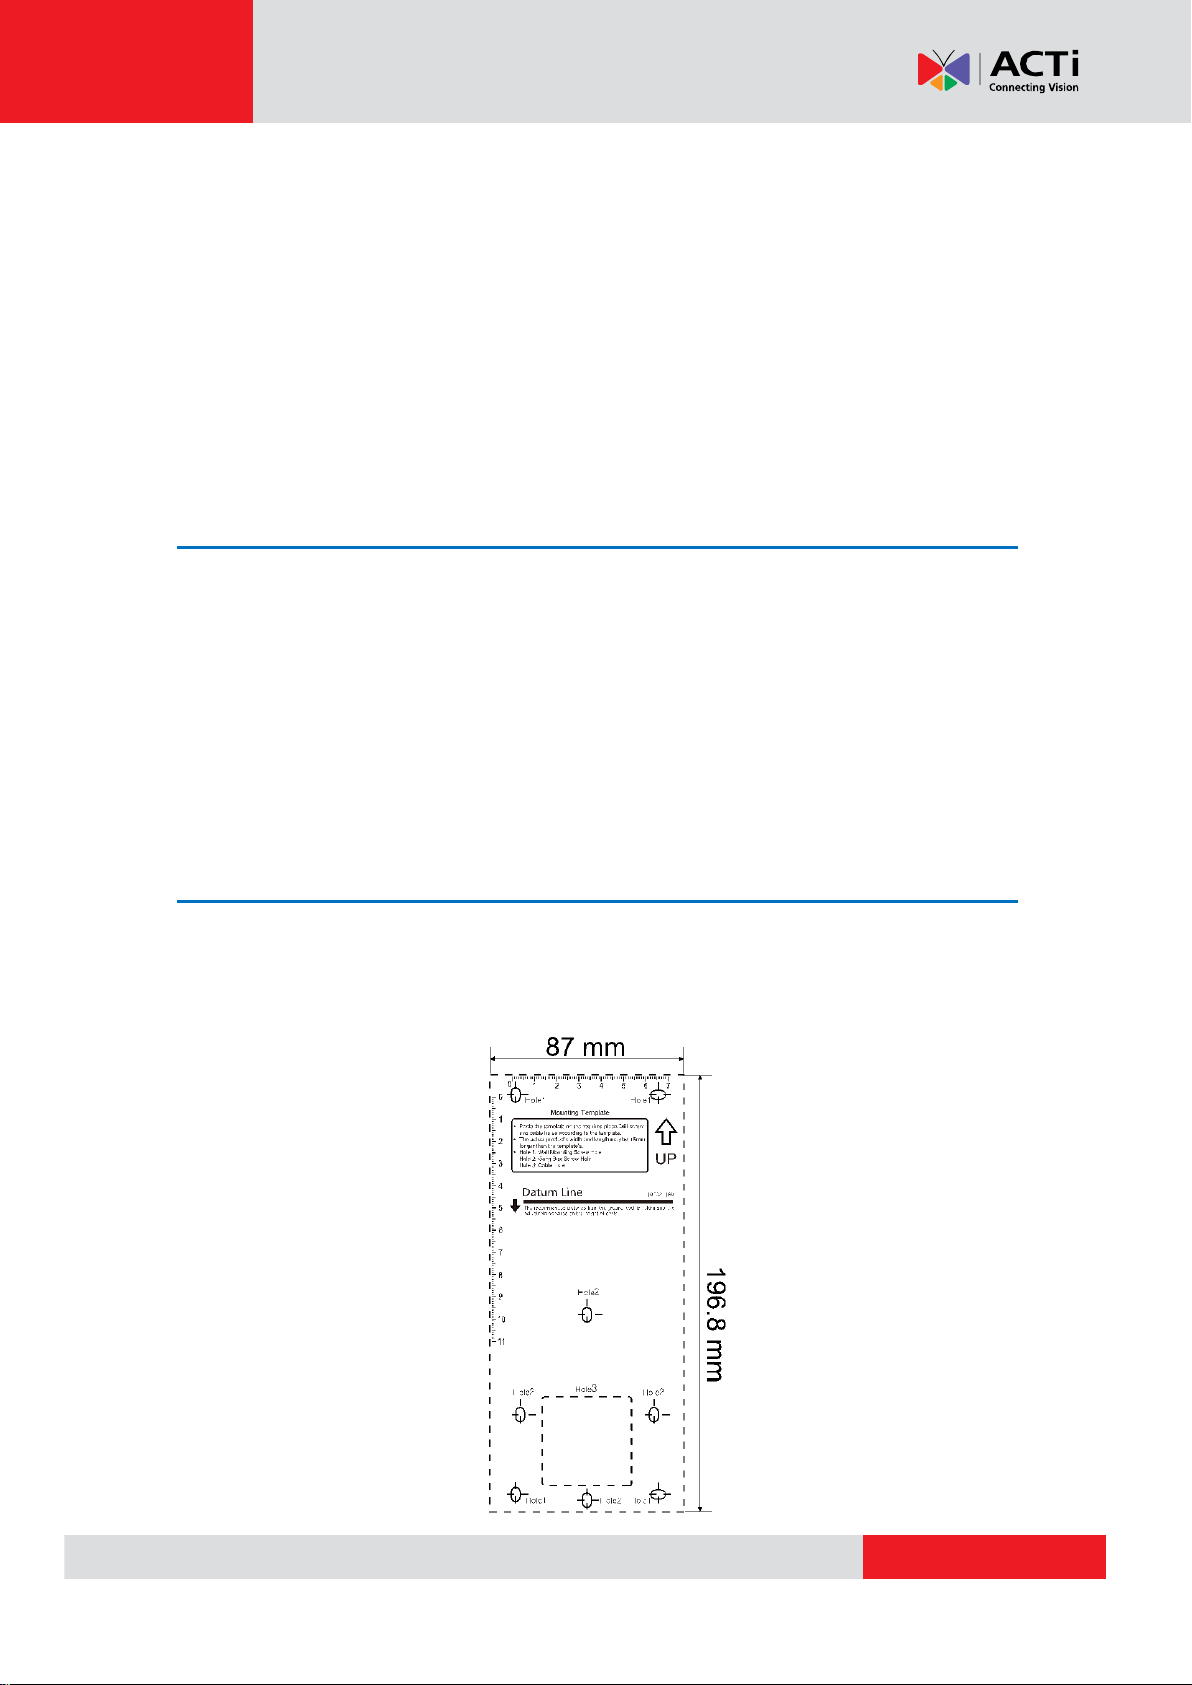
Installing with Gang Box
The device can be directly installed on a wall with gang box.
1. According to the Datum line on the drill template, stick the drill template on the surface at
1.4 meters higher than the ground.
9
Page 10
www.acti.com
User’s Manual
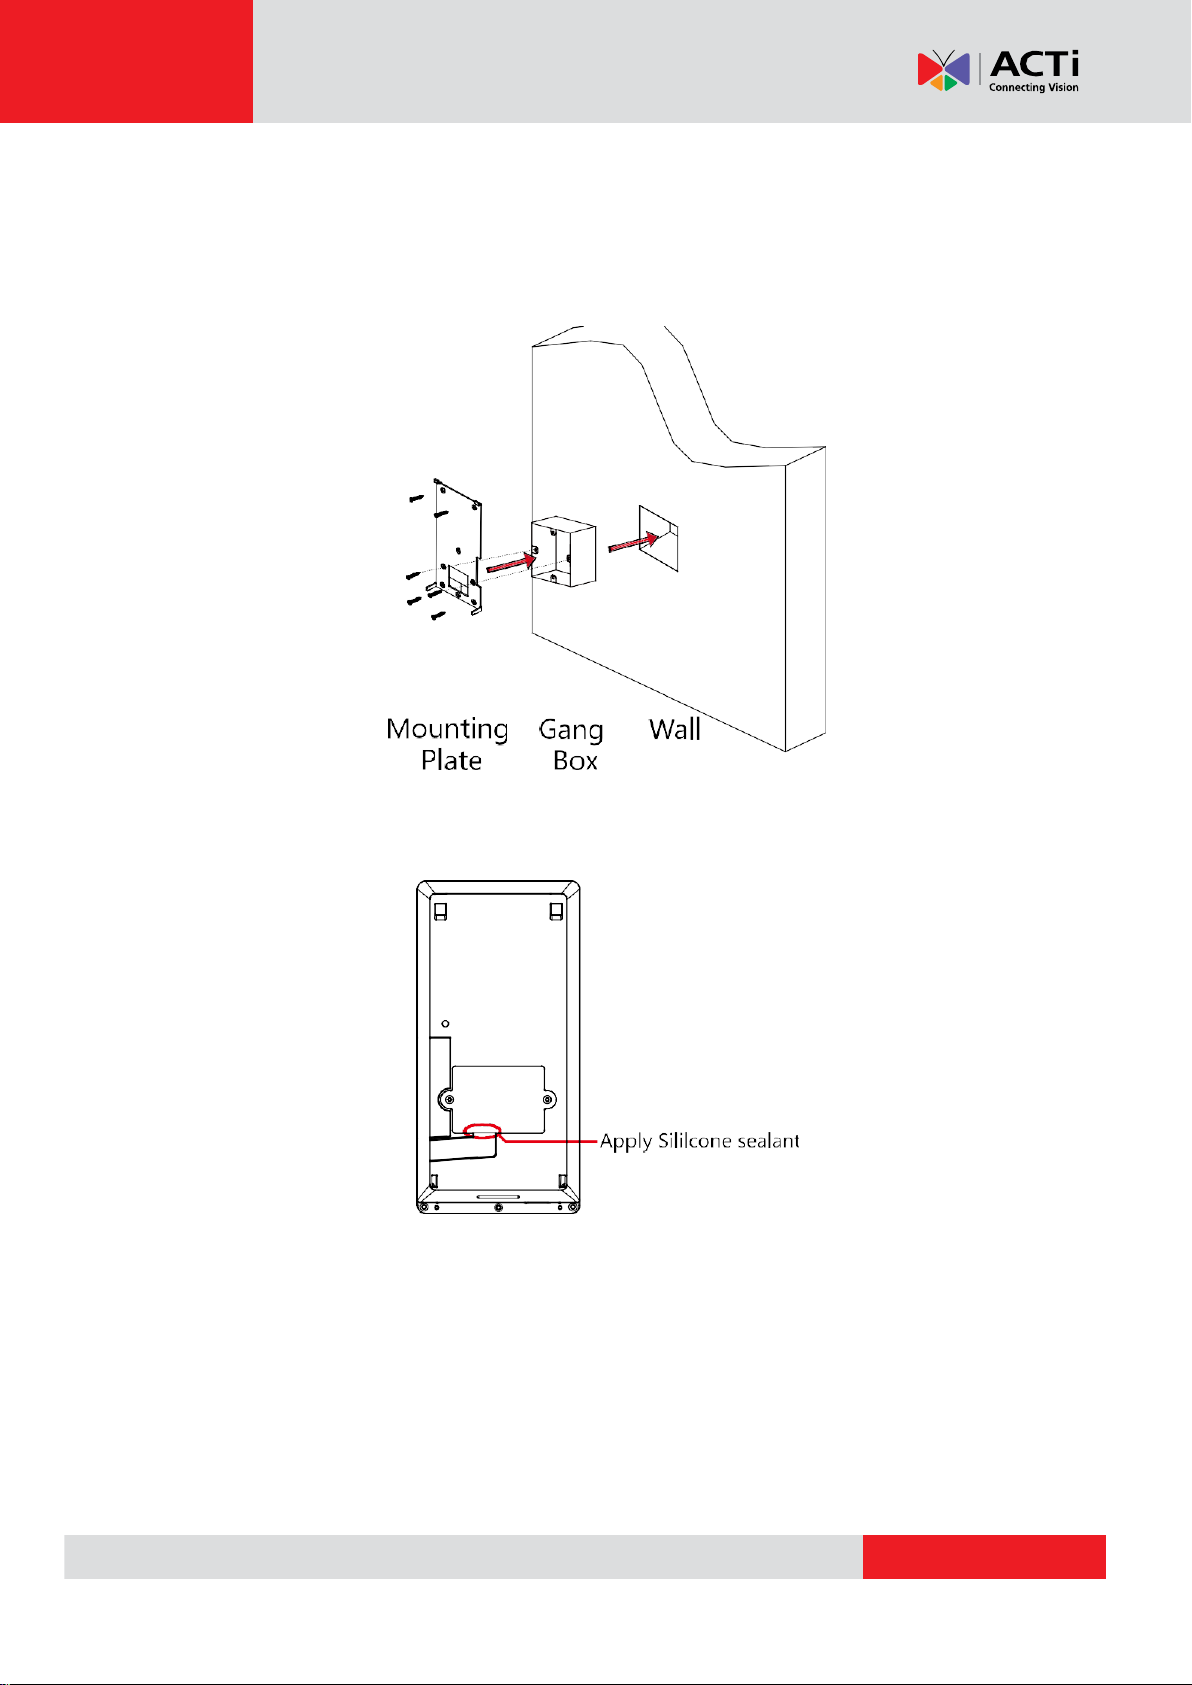
2. Drill the holes on the surface according to the drill template and install the gang box.
3. Using the two (2) supplied screws, secure the mounting plate on the gang box. And use
another four (4) supplied screws to secure the mounting plate on the wall.
4. Route the cables through the cable hole of the mounting plate, and connect to the
corresponding external devices’ cables.
NOTE: If installing outdoors, make sure to apply Silicone sealant on the cable wiring area
to keep raindrops from entering.
10
Page 11

www.acti.com
User’s Manual
5. Align the device with the mounting plate and hang the terminal on the mounting plate.
Make sure the two sheets on each side of the mounting plate are in the holes at the back
of the device.
6. Secure the device and the mounting plate.
NOTE:
The recommended installation height 1.4 meters from the ground is a reference
point. You can change it according to your actual needs.
You may also install the device directly on walls without gangbox. Use the drill
template to mark the screw holes to use.
11
Page 12

www.acti.com
User’s Manual
Terminal Connection
You can connect the RS-485 terminal with the RS-485 card reader, connect the NC and COM
terminals with the door lock, connect the SENSOR terminal with the door magnetic sensor,
connect the BUTTON/GND terminal with the exit button, connect the alarm output and input
terminal with the alarm output/input devices, and connect the Wiegand terminal with the Wiegand
card reader or the access controller.
If you connect the WIEGAND terminal with the access controller, the face recognition terminal
can transmit the authentication information to the access controller and the access controller can
judge whether to open the door or not.
NOTES:
If you use 1.0 mm cables, you should use a 12 V switched-mode power supply. And the
distance between the power supply and the device should be no more than 20 m.
If you use 1.5 mm cables, you should use a 12 V switched-mode power supply. And the
distance between the power supply and the device should be no more than 30 m.
If you use 2.0 mm cables, you should use a 12 V switched-mode power supply. And the
distance between the power supply and the device should be no more than 40 m.
See wiring diagram below:
12
Page 13

www.acti.com
User’s Manual
You can also connect the device with a secure door control unit. See wiring diagram is below:
NOTE: The secure door control unit should connect to an external power supply separately.
13
Page 14

www.acti.com
User’s Manual
2. Device Activation
You are required to activate the device first before using it.
Default IP Address: 192.0.0.64
Default Port Number: 8000
Default User Name: admin
After powering on the device, you can activate it. Follow the steps below:
1. Tap the Password field and create a password.
2. Tap the Confirm field and input the password again.
3. Tap Next and the device will be activated.
NOTE: STRONG PASSWORD RECOMMENDED. It is highly recommended to create strong
password of your own choosing (using a minimum of 8 characters, including upper case
letters, lower case letters, numbers, and special characters) in order to increase the
security of your device. It is also recommended to re-set the password regularly,
especially in the high security system to better protect your device.
14
Page 15

www.acti.com
User’s Manual
3. Basic Operation
After logging in the device, you can manage users, set communication parameters, set access
control parameters, set system parameters, manage data, manage log query, set time, import and
data, maintain data, and view device information.
Application Mode Settings
Select the application mode for better device application.
1. In the Welcome page, select Indoor or Others from the drop-down list.
output
2. Tap OK to save the settings.
15
Page 16

www.acti.com
User’s Manual
Login
1. Long tap the initial page for 3 seconds to open the Enter Administrative Backend page.
2. Tap the Password field and input the device activation password.
NOTE: The Password here is the activation password.
3. Tap OK to enter the home page.
NOTES:
The device will be locked for 30 minutes after 5 failed password attempts.
For details about setting the administrator authentication mode, see Adding User on
page 22.
16
Page 17

www.acti.com
User’s Manual
General Parameters Settings
Communication Settings
You can set the network parameters, the RS-485 parameters, the Wi-Fi parameters, and the
Wiegand parameters on the communication settings page.
Tap Comm. (Communication Settings) on the Home page to enter the Communication Settings page.
Setting Network Parameters
You can set the device network parameters, including the IP address, the subnet mask, and the
gateway.
1. On the Communication Settings page, tap Network to enter the Network tab.
2. Configure the network parameters, including IP Address, Subnet Mask, Gateway, and
DHCP.
NOTE: The device’s IP address and the computer IP address should be in the same
network segment.
3. Tap √ to save the network parameters.
Setting Wi-Fi Parameters
You can enable the Wi-Fi function and set the Wi-Fi related parameters.
1. On the Communication Settings page, tap Wi-Fi to enter the Wi-Fi tab.
2. Tap to enable the Wi-Fi function.
17
Page 18

www.acti.com
User’s Manual
The icon will turns to and all searched Wi-Fi will be listed in the Wi-Fi list.
3. Select a Wi-Fi in the list to enter the Wi-Fi parameters settings page.
4. Select an IP mode.
If selecting Static, you should input the Wi-Fi password, IP address, subnet mask and
gateway. If selecting Dynamic, you should input the Wi-Fi password.
NOTE: Numbers, upper case letters, lower case letters, and special characters are
allowed in the Wi-Fi password.
5. Tap OK to save the settings and go back to the Wi-Fi tab.
6.
Tap
to save the Wi-Fi parameters and go back to the Home page.
18
Page 19

www.acti.com
User’s Manual
Parameter
Description
Community No.
Set the device installed Community No.
Building No.
Set the device installed Building No.
Unit No.
Set the device installed Unit No.
Voice Prompt
Tap
or
to disable or enable the voice prompt.
Voice Volume
Adjust the voice volume. The larger the value, the louder the
volume.
System Settings
On the System Settings page, you can set the system basic parameters, the face parameters, the
fingerprint parameters, and upgrade the firmware.
On the Home page, tap System (System Settings) to enter the System Settings page.
Setting Basic Parameters
You can set the community No., building No., the unit No., voice prompt, voice volume,
application mode, wake-up distance, IR light brightness, and white light brightness.
19
Page 20

www.acti.com
User’s Manual
Parameter
Description
Application Mode
You can select either others or indoor according to actual
environment.
Wake-up Distance
Wake-up means when person or object is approaching the device,
the device
will change its status from sleep mode to
authentication mode.
The wake-up distance means the maximum distance to wake up the
device.
Note: Refer to Appendix D Relationship Between Wake-up
Distance and
Environment to view the relationship between the
wake-up distance and the
environment
IR Light Brightness
Set the IR light brightness when the IR light is enabled.
White Light
Brightness
Set the supplement white light’s brightness. The brightness ranges
from 0 to
100.
0 refers to turning off the light. 1 refers to the darkest, and 100 refers
to the brightest.
Setting Time
You can set the device time and the DST in this section.
1. Tap Time (Time Settings) on the Home page to enter the Time Settings page.
20
Page 21

www.acti.com
User’s Manual
Parameter
Description
Time
Set the time which will be displayed on the device screen.
DST
Enable or disable the DST function. If enabling the DST function, you can
set
the DST start time, end time, and the bias time.
Start Time: Set the DST start time.
End Time: Set the DST end time.
Bias Time: Set the DST bias time when the DST starts.
2. Edit the time parameters.
3. Tap to save the settings and go back to Home page.
21
Page 22

www.acti.com
User’s Manual
User Management
On the user management interface, you can add, edit, delete and search the user.
Tap User on the Home page to enter the User Management page.
Adding User
On the Add User page, you can add users, including the employee number, name, card number.
You can also link the face picture to the user, or set password, authentication mode, schedule
template, administrator permission for the user.
NOTES:
Up to 50000 users can be added.
Some models do not support the fingerprint related function.
1. On the User Management page, tap + to enter the Add User page.
2. Tap the Employee ID. field and edit the employee ID.
22
Page 23

www.acti.com
User’s Manual
NOTE: The employee ID should be between 1 and 99999999. The employee ID should
not start with 0 and should not be duplicated.
3. Tap the Name field and input the user name on the soft keyboard.
NOTES:
Numbers, upper case letters, lower case letters, and special characters are
allowed in the user name.
Up to 32 characters are allowed in the user name.
4. Tap the Card field and input the card No.
Option 1: Input the card No. manually.
Option2: Swipe the card over the card swiping area to get the card No.
NOTES:
The card No. cannot be empty.
Up to 20 characters are allowed in the card No.
The card No. cannot be duplicated.
5. Tap the Password field and create a password and confirm the password.
NOTES:
The Card No. cannot be empty.
Up to 20 characters are allowed in the Card No.
The Card No. cannot be duplicated.
6. Tap the Face Picture field to enter the face picture adding page. Follow the steps below
to add the user’s face picture:
a. Position your face looking at the camera.
NOTE: Make sure your face is in the face picture outline when adding the face
picture.
After completely adding the face picture, a captured face picture will display on
the page.
NOTE:
Make sure the captured face picture is in good quality and is accurate.
For more details about adding face pictures, see Tips When Collecting /
Comparing Face Picture on page 27.
b. Tap Save to save the face picture. Or tap Try Again and adjust your face
position to add the face picture again.
NOTE: The maximum duration for adding a face picture is 15 seconds. You can
check the remaining time for adding a face picture on the left of the page.
23
Page 24

www.acti.com
User’s Manual
7. Tap the Schedule Template field to enter the Schedule Template page. Select a
schedule template and tap √ to save the settings.
NOTE: After applying the schedule template from the client software to the device, you
can select the corresponding schedule template.
8. Tap Authentication Mode to enter the Authentication Mode page. Select Device or
Custom as the authentication mode.
Device: If you want to seelct device mode, you should set the terminal authentication
mode in Acess Control Settings page first. For details see 6.5 Setting Access Control
Parameters. The user will authenticate his identity according to the configured
authenticaion mode. By default, the authentication mode Device. This mode is
applicable to edit users’ authenticaiton modes in batch.
Custom: If an user needs to use a special authentication mode, which is different from
the authentication mode configured in 6.5 Setting Access Control Parameters, he can
use other authentication modes. The user will authentication his identity according to the
customized authentication mode first. This mode is applicable to edit single user’s
authentication mode, which has special permissions.
9. Enable or disable the Duress Card function.
When the function is enabled, the user’s card will be the duress card. When the user
authenticates by swiping this duress card, the device will upload a duress card event to
the client software.
10. Tap √ to save the user parameters and go back to the Home page.
24
Page 25

www.acti.com
User’s Manual
Managing User
Searching User
You can search the user in the list according to the employee ID, the Card No., or the user name.
1. On the User Management page, tap to enter the Search User page.
2. Tap Card on the left of the page and select a search type from the drop-down list.
3. Tap the input box and input the employee ID, the Card No., or the user name to search.
4. Tap to start search. The searching result will be displayed on the list.
Editing User
You can edit the added user information by following the steps in this section.
1. In the User Management page, tap the user that needs to be edited to enter the Edit User
page.
2. Refer to the parameters’ instructions in Adding User on page 22 to edit the user
information.
3. Tap √ to save the settings and go back to the User Management page.
NOTE: The Employee ID cannot be edited.
Other Management
Managing Data
On the Data Management page, you can delete all events, user data, all data, and captured
pictures, and restore device to factory settings or default settings.
1. Tap Data (Data Management) to enter the Data Management page.
25
Page 26

www.acti.com
User’s Manual
Parameter
Description
Delete All Events
Delete all events stored in the device.
Delete User Data
Delete all user data in the device.
Delete All Data
Delete all user data and events stored in the device.
Delete Captured Pic.
Delete the device captured pictured.
Restore to Factory
Restore the system to the factory settings. The device will reboot
after the setting.
Restore to Default
Restore the system to the default settings. The system will save the
communication settings and the remote user settings. Other
parameters will be restored to default.
2. Tap the button on the page to manage data. The available button descriptions are as
follows:
3. Tap Yes on the pop-up window to complete the settings.
Viewing Device Information
You can view the device model, the serial No., the MAC address, the firmware version, the
production date, and the open source code License.
Tap Device to enter the Device page.
NOTE: The device information page may vary according to different device models.
26
Page 27

www.acti.com
User’s Manual
Appendix
Tips When Collecting / Comparing Face Picture
Position (Recommended Distance: 0.5 m)
The position when collecting or comparing face picture is as below:
27
Page 28

www.acti.com
User’s Manual
Expression
Keep your expression natural when collecting or comparing
face pictures. Example on the right:
Do not wear hat, sunglasses, or other accessories that can
affect the facial recognition function.
Do not make your hair cover your eyes, ears, etc. and heavy
makeup is not allowed.
Posture
In order to get a good quality and accurate face picture, position your face looking at the camera when
collecting or comparing face pictures.
Size
Make sure your face is in the middle of the collecting window.
28
Page 29

www.acti.com
User’s Manual
Tips for Installation Environment
Indoor and outdoor installations are supported.
If installing the device indoors, the device should be at least 2 meters away from the light, and at
least 3 meters away from the window or the door.
If installing the device outdoors, you should apply silicone sealant among the cable wiring area
to keep raindrops from entering.
Make sure the environment illumination is more than 100 Lux. If the light source is 0.5m away
from the device, the illumination should not be less than 100 Lux.
29
Page 30

www.acti.com
User’s Manual
Environment
Short
Medium
Long
At Dusk (Low
Illumination)
Normal
Wall
White
1.06 m
1.67 m
3.62 m
Acrylic Wall in
Laboratory
0.85/0.73 m
1.30/1.21 m
4.16 m
Human Body
0.74 m
0.94 m
1.50/1.45 m
Window Glass
/ / /
At Night
(Turn Light off)
Normal
Wall
White
0.97 m
1.61 m
3.91 m
Acrylic Wall in
Laboratory
0.79 m
1.32 m
3.67 m
Human Body
0.47 m
1.03 m
1.65 m
Window Glass
1.18/1.65 m
(Turn on Light at
Night)
1.53/2.66 m
(Turn on Light at
Night)
3.35 m
Daytime (Turn
Fluorescent
Lamp on)
Normal
Wall
White
1.1 m
1.8 m
> 4 m
Acrylic Wall in
Laboratory
0.8 m
1.5 m
3.1 m
Human Body
0.7/0.6 m
1.2/1.14 m
1.5/1.42 m
Window Glass
1.1 m
1.8 m
> 4 m
Daytime (Turn
Camera to
Sunlight)
Human Body
0.3/0.26 m
0.56/0.5 m
1.03/1.06 m
Daytime (Turn
device’s back to
unlight)
Human Body
0.36 m
0.6 m
1.25 m
At Night
(Turn Light on)
Acrylic
Wall
Black
0.56 m
0.83 m
1.25 m
Relationship Between Wake-Up Distance and
Environment
30
Page 31

Copyright © 2019, ACTi Corporation All Rights Reserved
7F, No. 1, Alley 20, Lane 407, Sec. 2, Ti-Ding Blvd., Neihu District, Taipei, Taiwan 114, R.O.C.
TEL : +886-2-2656-2588 FAX : +886-2-2656-2599
Email: sales@acti.com
 Loading...