

Page 1

Face Recognition Reader
User Manual
R21CF-30, R21CF-31, R21CF-32, R21CF-33
2018/05/18
Page 2

www.acti.com
User Manual
TABLE OF CONTENTS
Operating Interfaces ............................................... 4
Touch Screen Interface ............................................................................. 4
Web Interface ............................................................................................. 6
Functional Overview .................................................................................. 7
1 Basic Features .......................................... 9
1.1 Status ........................................................................................... 9
1.2 Log at Web Interface ................................................................. 10
1.3 Log on the Touch Screen Interface .......................................... 10
1.4 User Management at Web Interface ......................................... 12
1.5 User Management at Touch Screen Interface ......................... 19
2 Advanced Features ................................ 22
2.1 Facial Recognition ..................................................................... 22
2.2 Network ...................................................................................... 23
2.3 I/O Control .................................................................................. 23
2.4 Wiegand ..................................................................................... 25
2.5 Display ........................................................................................ 28
2.6 Log Configuration ..................................................................... 29
2.7 Sound ......................................................................................... 30
2.8 Time ............................................................................................ 30
2.9 Password ................................................................................... 31
2.10 System ........................................................................................ 32
2.11 Firmware .................................................................................... 32
3 Facial Enrollment and Recognition ....... 33
3.1 Enrollment .................................................................................. 33
2
Page 3

www.acti.com
User Manual
3.2 Recognition ................................................................................ 35
4 Safety Notice ........................................... 37
4.1 Safety in Using and Handling The Device ............................... 37
4.2 FCC Regulatory Compliance Information ............................... 38
3
Page 4
www.acti.com
User Manual
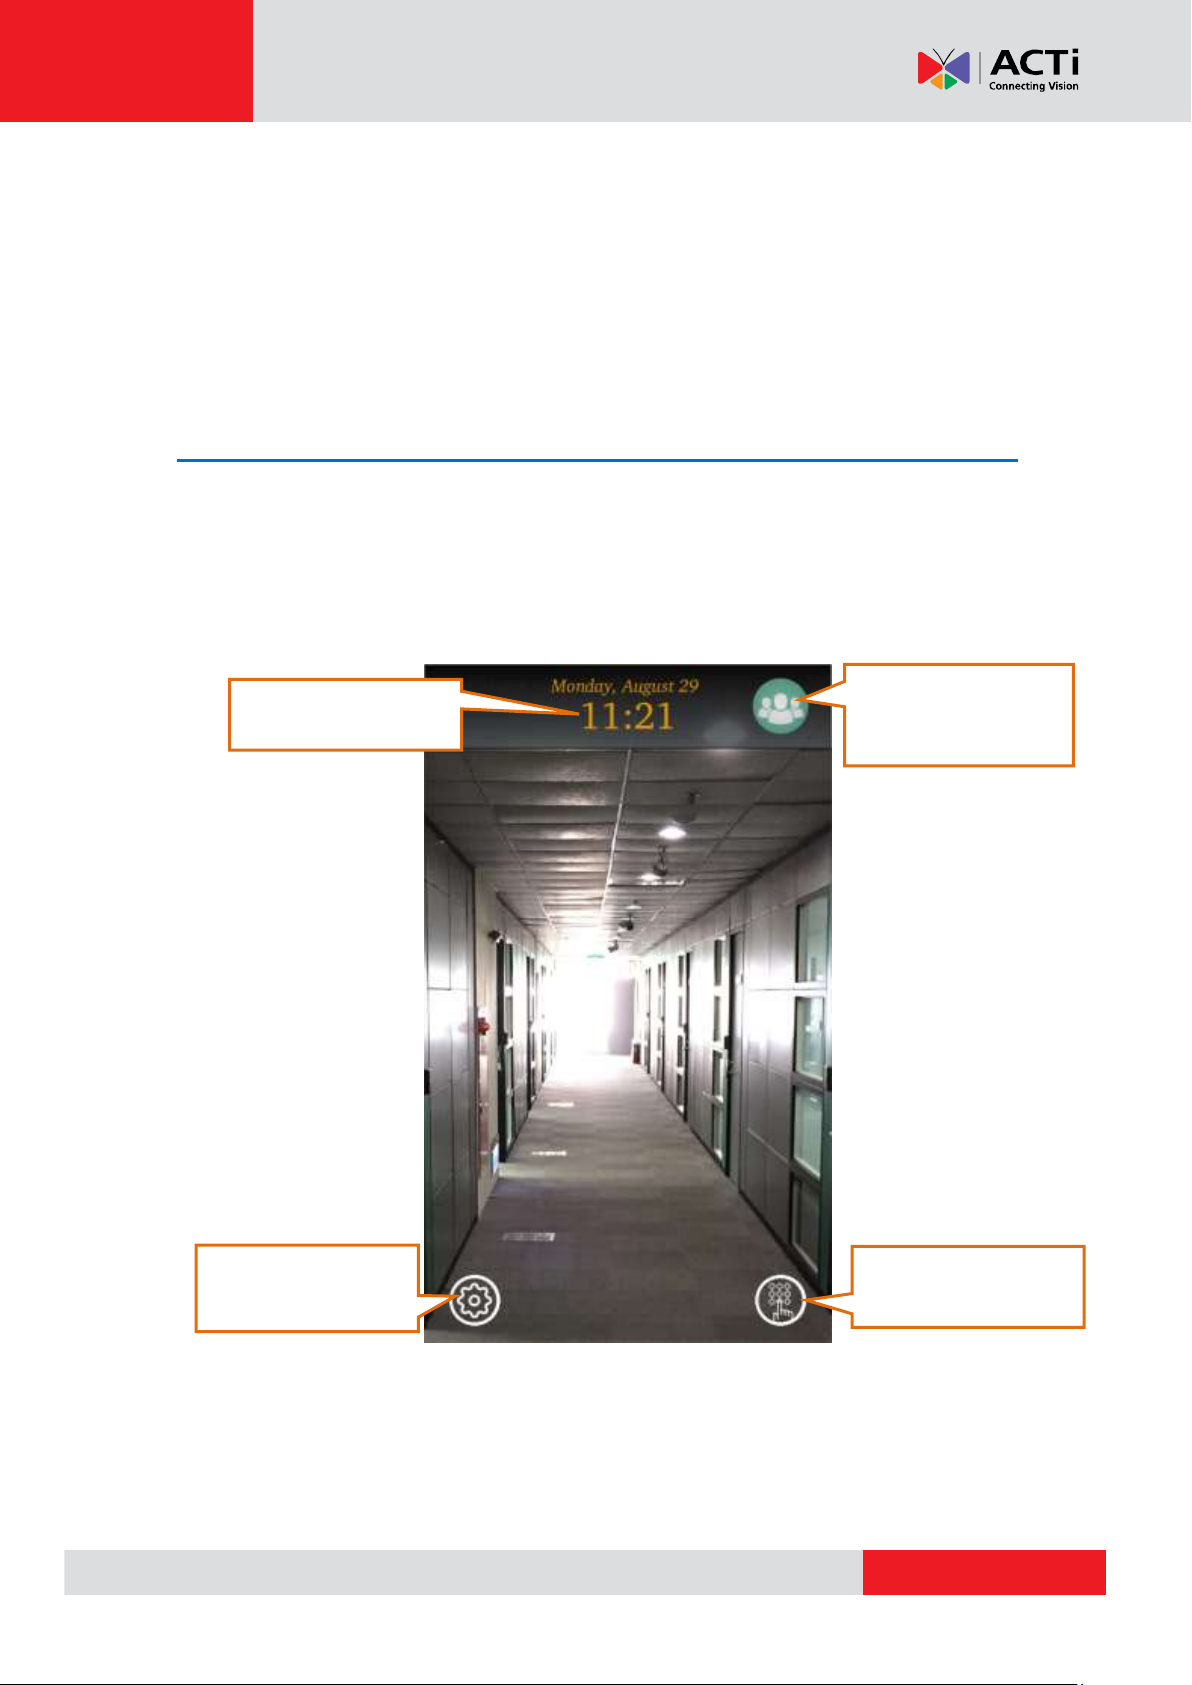
Standalone Mode
button
Current date and time
Current Operating
Mode: 1:N Identification
Keypad to enter User ID
for 1:1 verification
Operating Interfaces
The Device is streamlined for both easy operation and a complete network
experience. There are two interfaces that you can operate the machine: Touch
Screen interface and Web interface.
Touch Screen Interface
With the built-in touch screen, you can initiate “Standalone Mode” to operate The DEVICE
without the need of network connection.
Once powered up, The Device shows below screen.
4
Page 5

www.acti.com
User Manual
Default Root
Passcode: 1234
“Status”
Find IP Address here
“Log”
“User”
“Settings”
Exit Standalone
Mode
Press the Standalone Mode button, and enter Root Passcode (default: 1234,
followed by Enter Key).
After authentication, you will see the “Status” page. Beside it, there are “Log”,
“User”, and “Settings” pages. If network is connected well, the IP Address will
be shown in the “Status” page.
After operation is done, press the button at upper-right corner to leave Standalone Mode.
5
Page 6
www.acti.com
User Manual
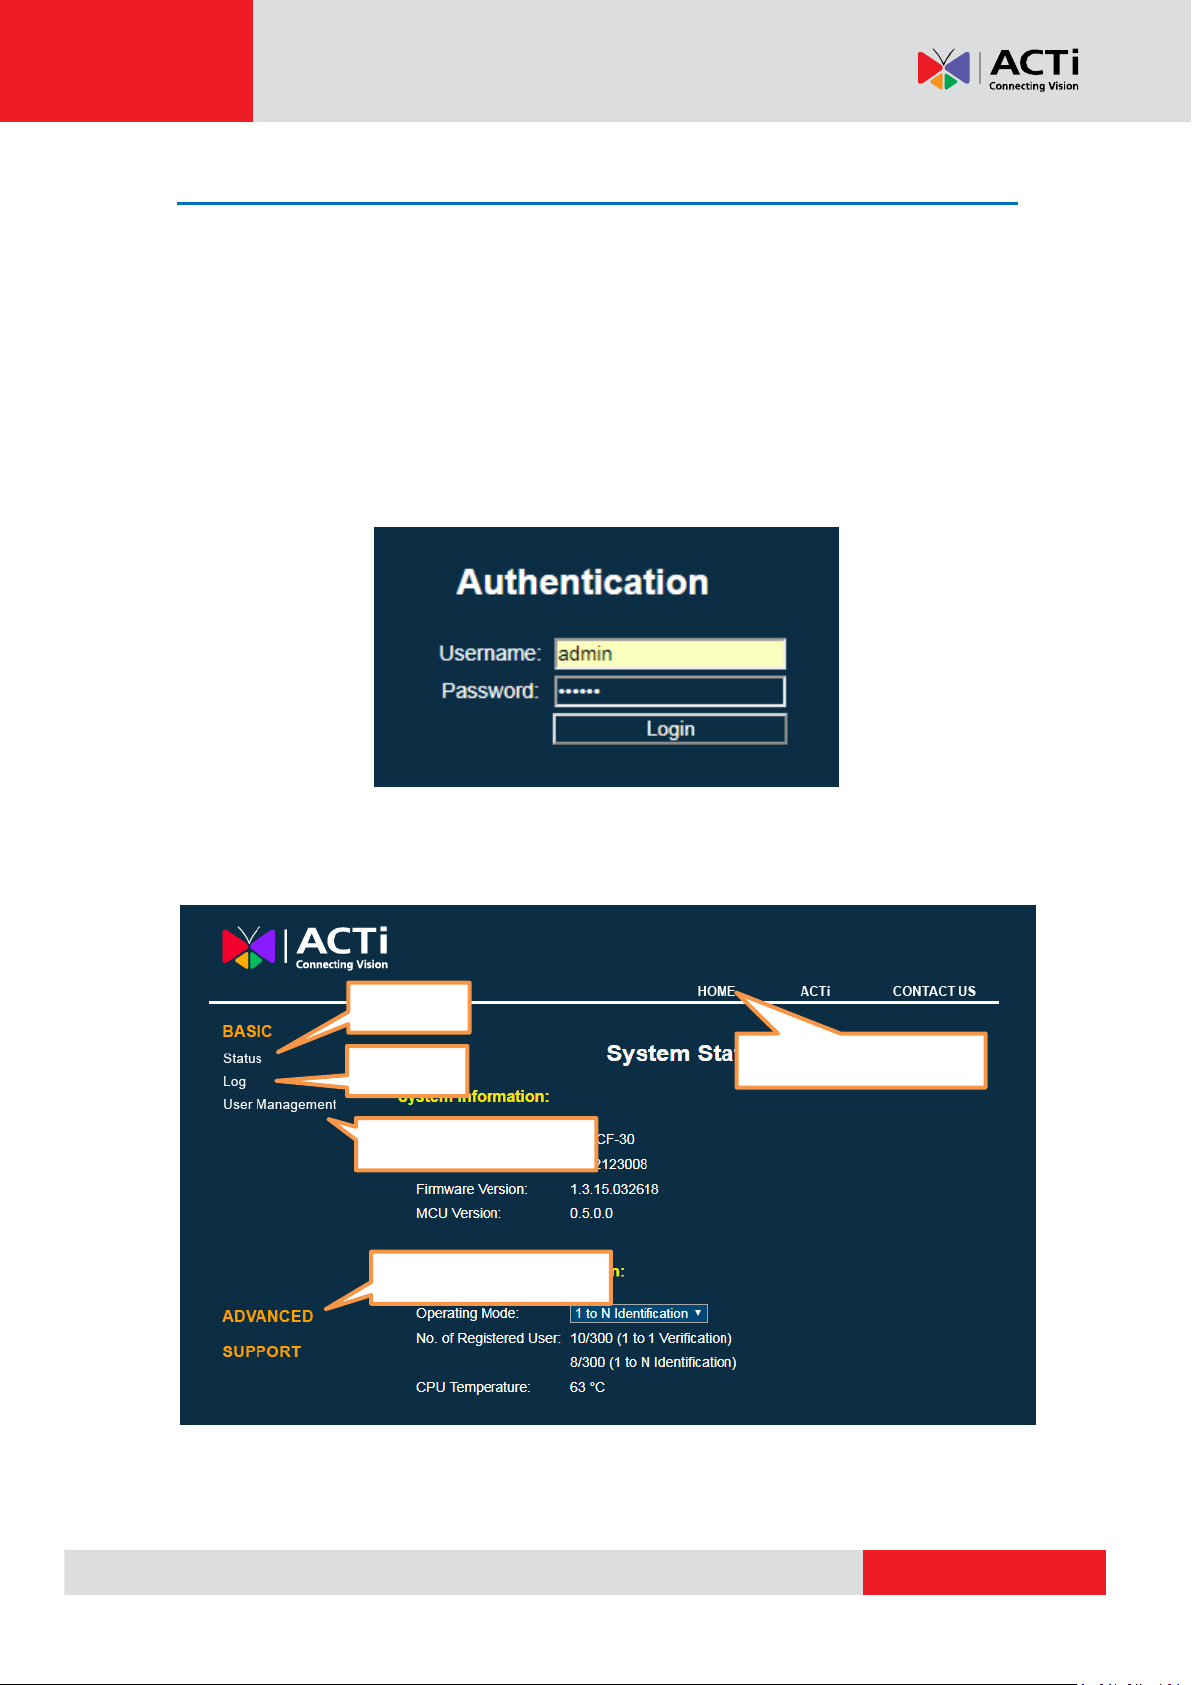
Press “Home” to log out
“Status”
“Log”
“User Management”
“Advanced” settings
Web Interface
The Device provides a Web interface that allows you to manage it remotely with a standard Web
browser (e.g. Internet Explorer, Chrome, or Safari).
In the same LAN environment, open web browser on PC (or smart device) and
point it to The Device’s IP Address (192.168.1.164 in this example).
Then it should prompt you to enter your username and password. Default
username is “admin”, and default password is “123456”. Read Chapter 3.9 for
more about user account settings.
Once authentication is successful, below screen will show.
6
Page 7
www.acti.com
User Manual
Menu
Web interface
Touch Screen interface
Functional Differences
Basic
Status
Status
Log
Log
Touch Screen interface supports
log filter
User Management
User
Network based functions,
including upload & download
user, uploading Self Enroll List,
and etc., are available at Web
interface only. Touch Screen
interface supports user type filter
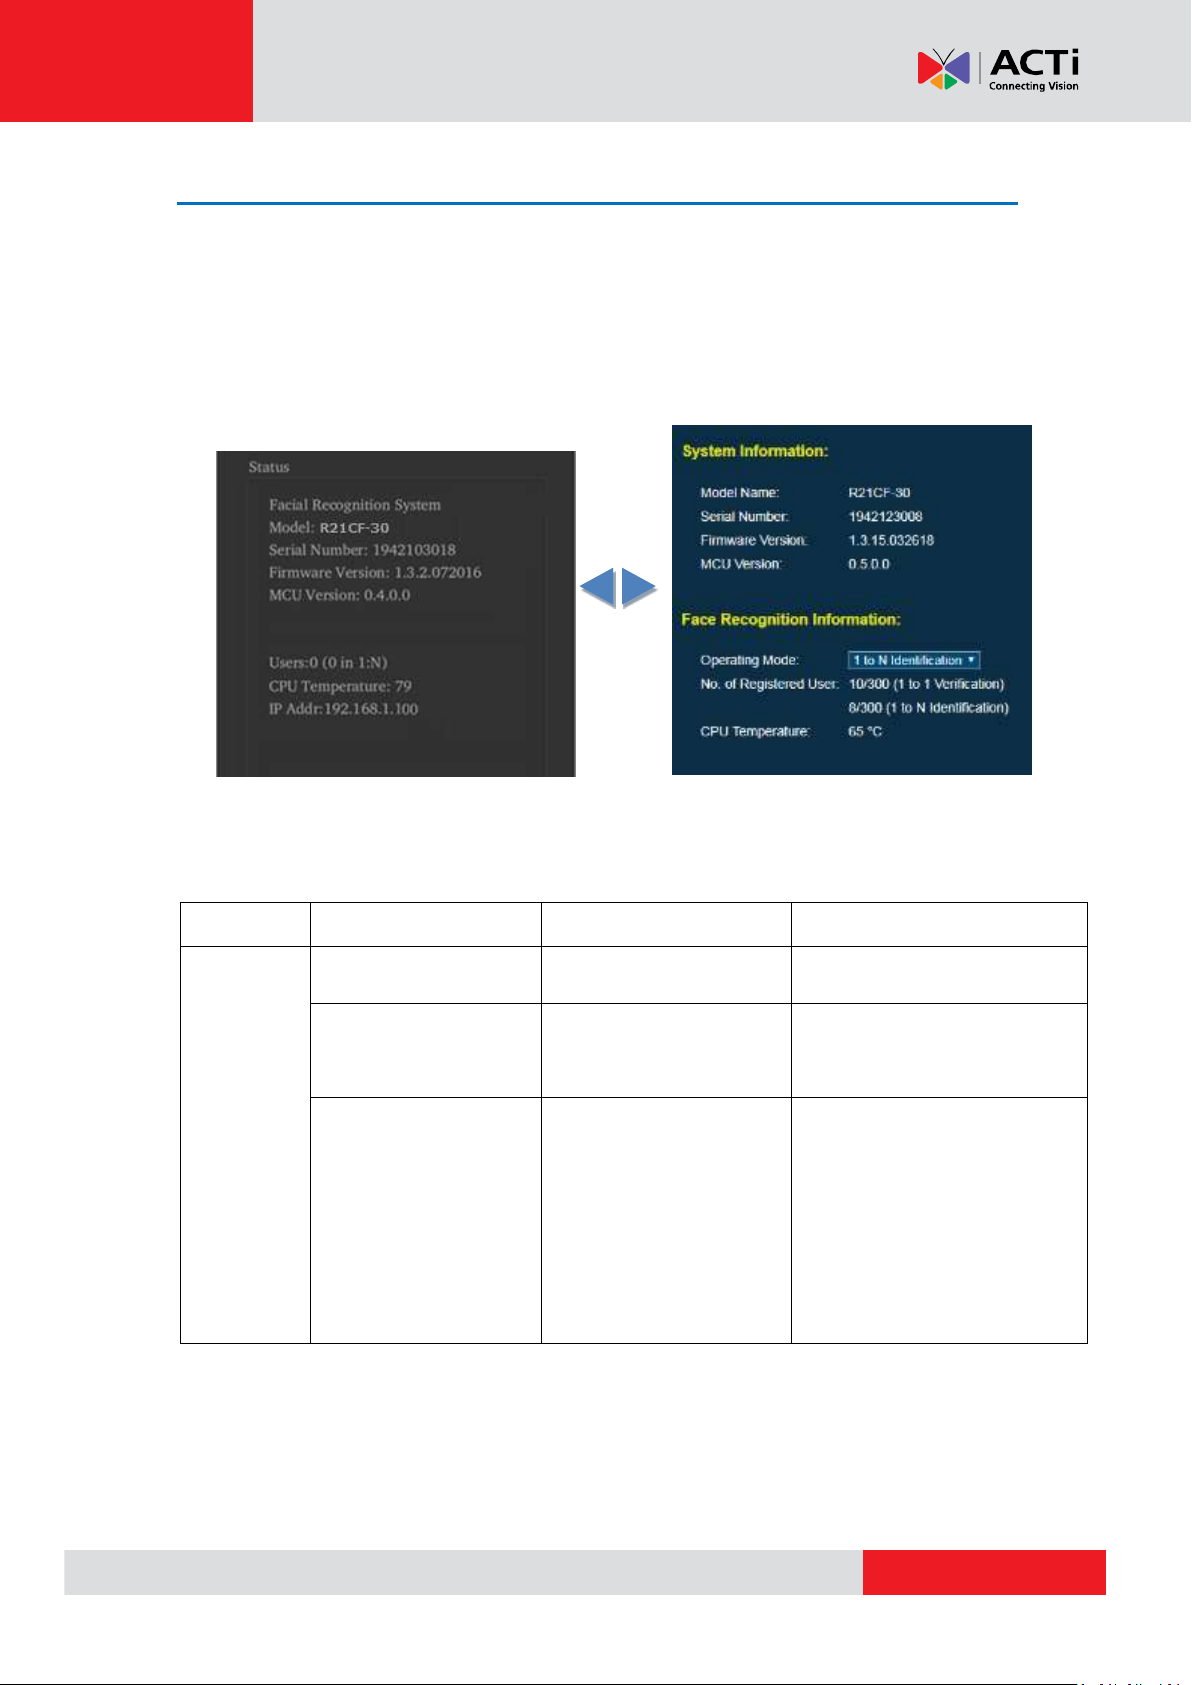
Functional Overview
In general, Web interface provides full functionalities to operate The Device in central
management perspective, while Touch Screen interface provides a subset of them for
single-machine standalone use.
For example, you can find the system status at the first page after entering Touch Screen
interface. Similarly, you can see identical information at Web interface after logging in.
Status page at Touch Screen interface Status page at Web interface
Please see below table to learn about the differences between two interfaces in terms of naming
and functions.
7
Page 8

www.acti.com
User Manual
Menu
Web interface
Touch Screen interface
Functional Differences
Advanced
Facial Recognition
Facial Recognition
Network
Network
DNS address setting is supported
at Web interface only
I/O Control
I/O
Wiegand
Wiegand
Weigand Custom Format is
supported at Web interface only
Display
Display and Sound
Sound
Log Configuration
n/a
Only available at Web interface
Time
Time
Touch screen supports manual
input time only
Password
n/a
Only available at Web interface
System
System
Firmware
n/a
Only available at Web interface
8
Page 9

www.acti.com
User Manual
1 Basic Features
This chapter describes the basic menus of The Device, which contains the following
three functional groups: Status, Log, and User Management.
1.1 Status
Model Name
The model name of The Device.
Serial Number
The serial number of The Device, which is unique on each device.
Firmware Version
This shows basic firmware version. More information can be found at
Advanced->Firmware page. See Chapter 3.11 for details.
MCU Version
This displays the MCU version, which is mostly related to access controller
functionalities.
Users (No. of Registered User)
Depending on the model type, The Device may have different capacity numbers
for 1:N and 1:1 mode.
Take R21CF-31 as an example, it can accommodate 3000 users for 1:1 verification
use, and up to 600 out of 3000 users are supported in 1:N mode. So if there are
900 users registered (enrolled or uploaded) and 550 of them are assigned to
support 1:N mode, the system will show
Touch Screen interface: Users: 900 (550 in 1:N)
Web interface: No. of Registered User: 900/3000 (1 to 1 Verification)
550/600 (1 to N Identification)
For more about 1:N and 1:1 modes, please refer to Chapter 3.1.
9
Page 10
www.acti.com
User Manual
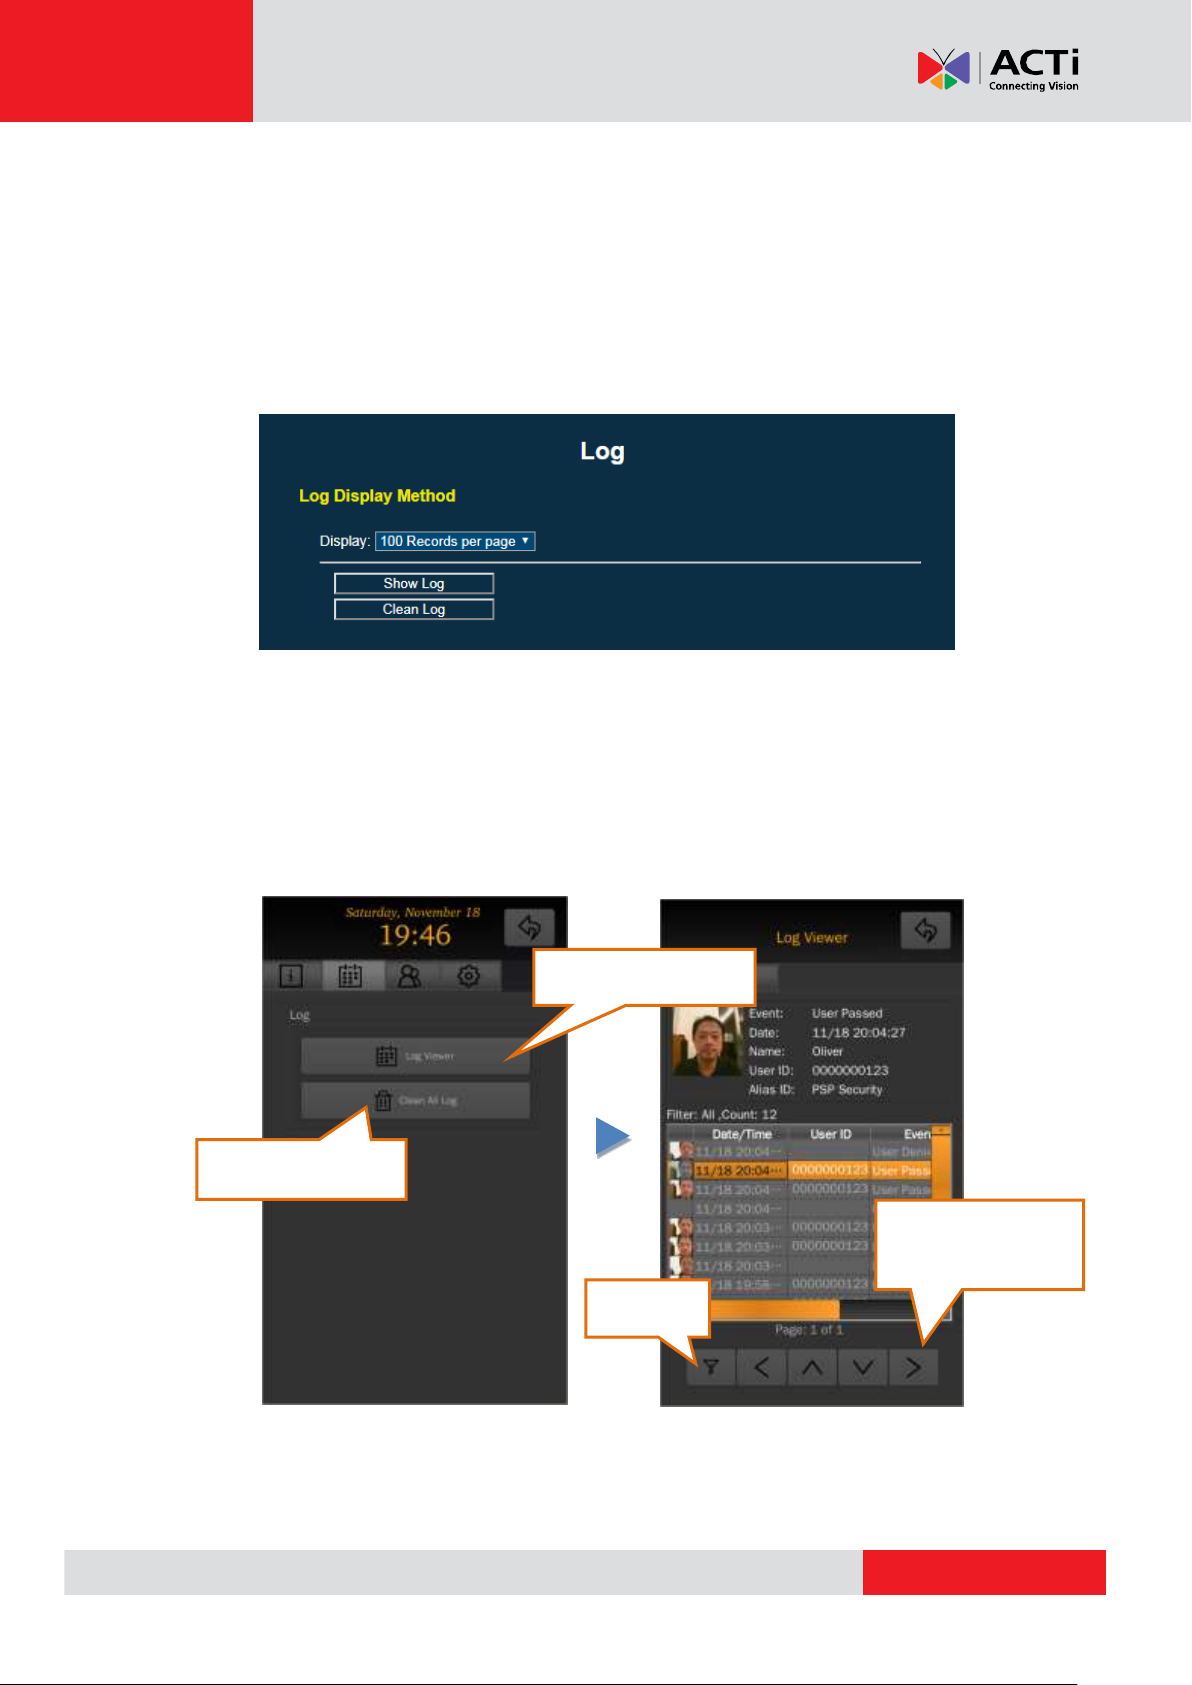
Press “Log Viewer”
“Clean All Log” here
Log Filter
Scroll up/down and
change page
1.2 Log at Web Interface
To view log events at Web interface, choose Basic -> Log. It will show a simple
menu, which allows you to show log, or to clean log. Click “Show Log” button to
start a new web page with events ordered from new to old, 100 records per page.
Click “Clean Log” button will permanently remove all log records.
1.3 Log on the Touch Screen Interface
To view log events at Touch Screen interface, select the “Log” page and press “Log
Viewer” button. You will see all records events ordered from new to old, 100
records per page as well.
10
Page 11

www.acti.com
User Manual
Log Browsing
Press “<” or “>” to change to previous or next page. To scroll events in a page,
you can adjust the scrollbar, press up or down arrow button, or simply “touch
and drag” up or down in the center of log display area.
Log Filter
Press the Log Filter icon and you can search “Critical Log”, “Today’s Log”, or
apply “User ID” to filter the events you are interested in.
“Critical Log” includes Tamper Alarm, User Denied events, which may cause
system security concerns.
Exit Log Viewer
Click the button at upper-right corner to exit log viewer.
11
Page 12
www.acti.com
User Manual
Enroll new user
Upload existing user
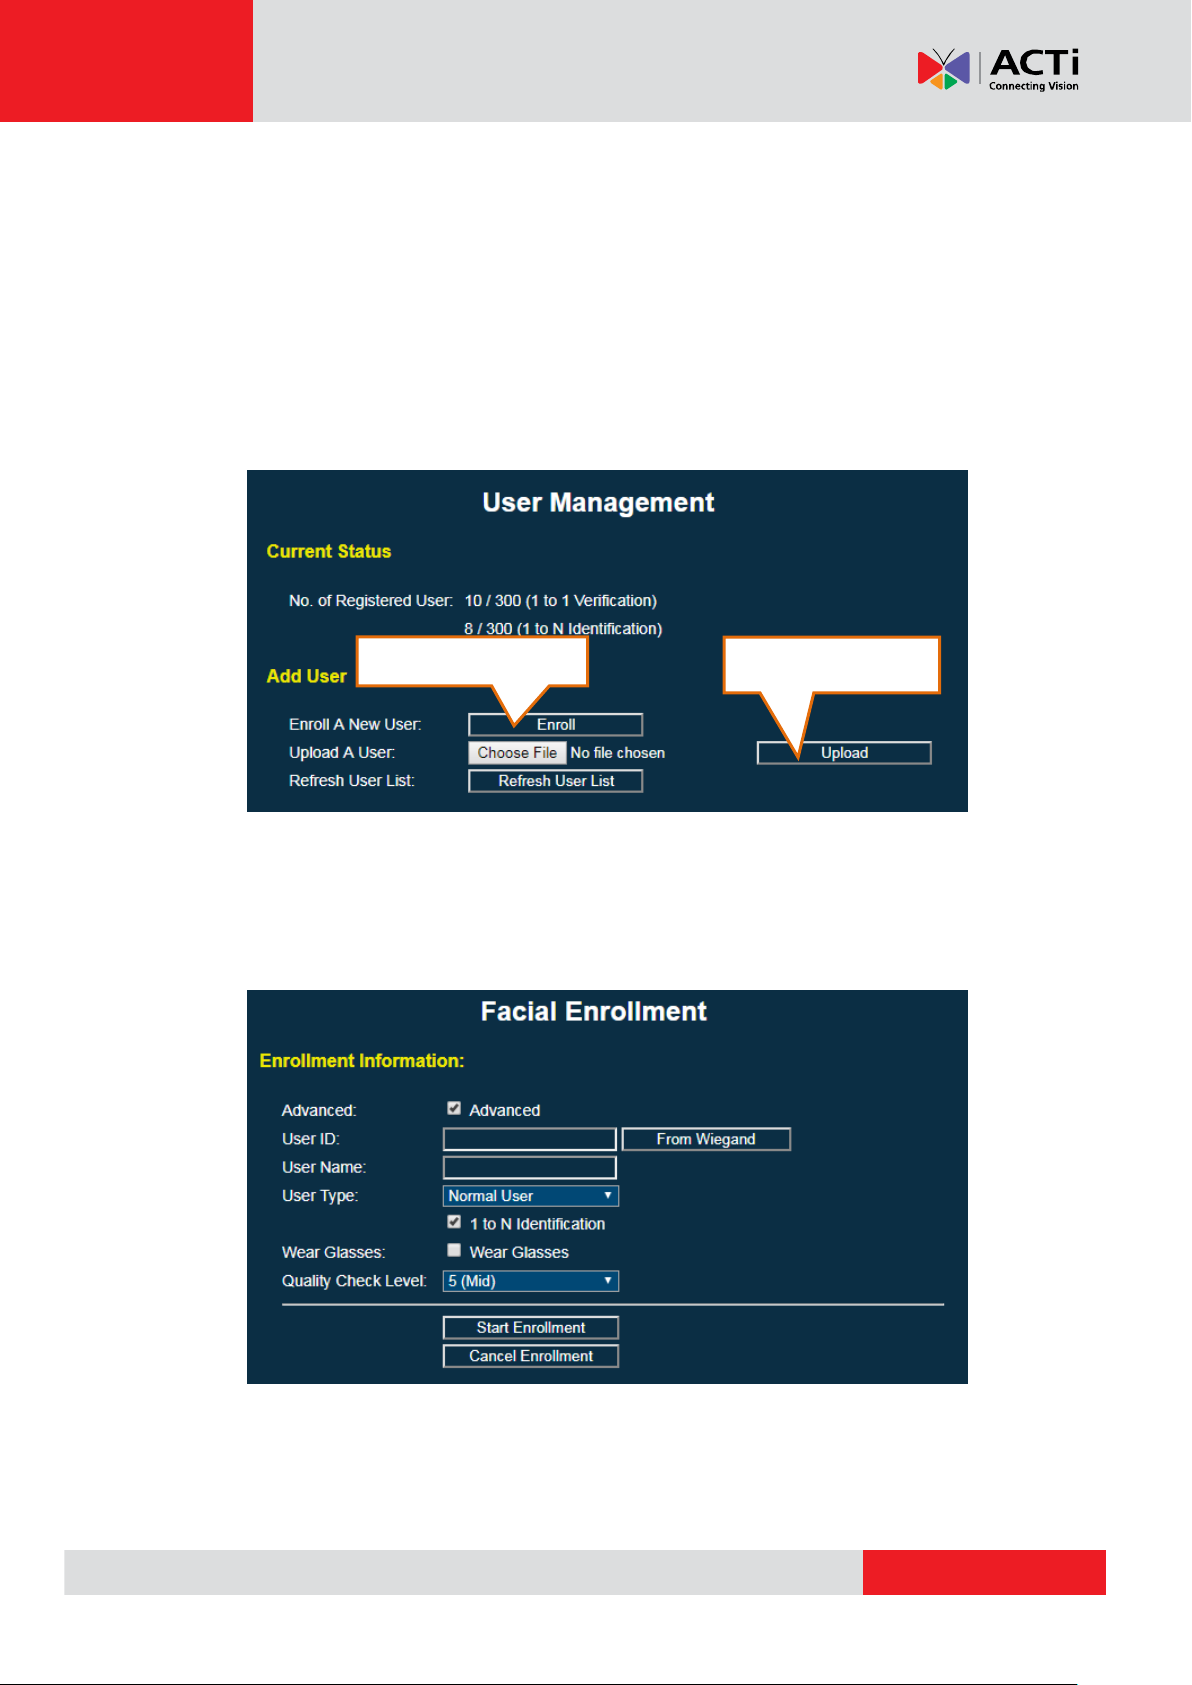
1.4 User Management at Web Interface
To manage users at Web interface, choose Basic -> User Management. The User
Management page has the following options:
Current Status
Display the number of registered users, which is identical to Status page
described in Chapter 2.1
Enroll A New User
Click “Enroll” button to enroll a new user. Once clicked, it will show Facial
Enrollment page as below:
12
Page 13

www.acti.com
User Manual
User Type
Authentication Method
Normal User
Default user type; user needs to pass facial recognition to be granted a pass.
Root User
Administrator users with special privileges to access to Standalone Mode. A
system can have up to 3 root users.
Card Only
A special user type which only needs card scan (or entering User ID) to grant
a pass. No facial enrollment is required.
It can be used as a backup PIN/card to open a door. But special care needs to
taken as it will generate security issue for access control application.
Card+Photo
A special user type similar to Card Only, but the user not only needs the card
scanned (or entering User ID), but also a photo snapshot taken to grant a
pass. No facial enrollment is required.
It is useful to apply for visitors or VIP, as facial enrollment may not be
convenient or required.
Self
Enrollment
A special user type to create Normal User in two phases. When being created,
user information (like User ID, User Name, and etc.) is pre-registered in the
user list. But no facial enrollment is required until the User ID is entered (via
card scan or touch keypad).
It is helpful especially in a larger scale of deployment where enrollment is
time-consuming and the administrator’s involvement is not always available.
Advanced: Check “Advanced” to see more options like enabling “1 to N
Identification” and altering “Quality Check Level.”
User ID: each user must have a unique ID number. For 1:1 verification
mode, the User ID is used to specify user identity before undergoing facial
verification. The range of User ID is from 1 to 4294967295 (i.e., 32-bit long).
You can also read the ID number from a card scan and then click “From
Wiegand” button to fetch it.
User Name: the maximum number of characters is 32.
User Type: please refer to below table regarding the supported user types and their
authentication methods.
13
Page 14

www.acti.com
User Manual
Wear Glasses: if the user wears glasses, check the “Wear Glasses” checkbox.
Half way through the facial enrollment, the LCD display and voice instruction
will remind the user to remove glasses to complete the facial capture.
Quality Check Level: select the quality level required for accepting a face
capture during enrollment. The higher the level, the more accurate the
faceprint at the cost of a longer enrollment process. 5 (Mid) is the default
and recommended setting.
Start Enrollment: once the button is clicked, the enrollment process will
begin. Users should position their face in front of The Device to complete
the facial capture. See Chapter 4 for a detailed description and suggestions
on enrollment process.
Cancel Enrollment: Click this button to exit enrollment page. You may
choose to exit anytime during the enrollment process.
Upload A User
A user’s faceprint can be uploaded (from PC to The Device) and downloaded
(from The Device to PC). These two features are useful when you need to
backup the enrolled users, or to synchronize users to other The Device systems.
Click “Choose File” button and select a faceprint file to upload. By default, a
faceprint file should be named by 10-digit User ID with file extension *.face2.
For example, user with ID 123 will have a faceprint file named
0000000123.face2.
Refresh User List
If user upload/download or editing is not successfully completed, the user list
shown in the page might not be up-to-date. In such rare cases, press “Refresh
User List” button to refresh it.
14
Page 15

www.acti.com
User Manual
Apply “User
Filter” here
Select a user to
view or edit
Hit “Submit”
after editing
Browse User List
You can view the user list. Initially it will show All Users. You can apply User
Filter to find certain type of users you are interested in. Listed users can be
filtered by using following categories:
All Users
Root Users
Users support 1 to N Identification
Card+Photo Users
Card Only Users
User Search: to search for a specific user, simply input a part of a user’s ID
or name in the text box next to “User Filter” and it will show the search
result in the list
15
Page 16

www.acti.com
User Manual
Edit User
After click to select single user, the corresponding user information will be
shown on the right side. Then you can view or edit:
User Name: maximum length is 32 letters.
User ID: maximum length is 10-digit, or 32-bit (0 ~ 4294967295) to be more
exact, as 0 is not an acceptable User ID.
User Alias ID: optional, maximum length is 32 letters.
User Type: display only. not editable.
1 to N Identification: enable/disable the support of 1 to N Identification.
Schedule: to edit the weekly schedule the user belongs to. By default it
supports two schedules: Enabled (always active) and Disabled (always
inactive).
Download: click “Download” button to download the selected faceprint
from The Device to PC.
Remove: to permanently remove the selected user.
Remove All Users
Click on the “Remove All” button to completely and permanently clear all users
from the machine. Be sure to back up users before you do so.
List File Upload
“Self Enrollment” users can be created individually as described previously, or by
uploading a “Self Enroll List” file to generate multiple “Self Enrollment” users in
single step.
16
Page 17

www.acti.com
User Manual
By clicking the ‘Ex.’ button, you can see an example script file as below:
##############################
# Sample Script - Self Enroll
##############################
# To register Self Enroll user list
# Syntax: ID, USER_TYPE, GLASSES:QUALITY, USER_NAME
#
# ID: User ID number to be registered, up to 10 digits
# USER_TYPE: registered user type. "SelfEnroll", "CardOnly", or
"CardPhoto" (case sensitive)
# GLASSES: whether the user wear glasses. "1" for Yes; "0" for No
# QUALITY: The quality of SelfEnroll user at enrollment
# USER_NAME: registered user name, up to 10 letters
0000000011, SelfEnroll, 0:q9, Kevin
0000000012, CardOnly, 0, Mandy
0000000013, CardPhoto, 0, Doug
0000000014, SelfEnroll, 1:q1, K. Sato
0000000015, SelfEnroll, 1, Gordon
0000000016, SelfEnroll, 1, Ricky
0000000017, SelfEnroll, 1, Roy
The syntax is: “USER ID”, “USER TYPE”, “GLASSES”[:”QUALITY”], “USER NAME”,
separated with comma (,) signs. Please follow the syntax explained in the
example script to edit the file, and save it as a pure text file. If you use
non-English user name that requires special font, please save the file in UTF-8
format.
Note that “QUALITY” (Quality Check Level) parameter is optional. If you need to
specify it for a user, it needs to be between “q1” (lowest) and “q9” (highest) right
after “GLASSES” with a colon (:) sign in between. If not specified, it will use
default level (5) to enroll.
As shown in the example script, it also accepts Card Only and Card+Photo user
types, which also do not need facial enrollment upon creation.
17
Page 18

www.acti.com
User Manual
Once the Self Enroll List file is prepared, you can click the ‘Choose File’ button to
select it, and hit ‘Update’ button to upload. Then you should see the updated
user list as below when it is successfully loaded.
To check its functionality, please scan a card of a pre-registered user, and you
should see the user enrollment confirmation dialog initiated on screen.
18
Page 19

www.acti.com
User Manual
Start “User
Manager”
User Filter
Scroll up/down and
change page
Edit User
Remove User
Enrollment Page
1.5 User Management at Touch Screen Interface
To manage users at Touch Screen interface, choose “User” page at Standalone
Mode, and start User Manager. Once opened, you will see the user list.
User List Browsing
Press “<” or “>” to change to previous or next page. To scroll the users in a page,
you can adjust the scrollbar, press up or down arrow buttons, or simply “touch
and drag” up or down in the center of user list area.
User Filter
Press User Filter icon and you can filter the list by following categories:
All: all users
Root: root users
Normal (1:N): users support 1 to N Identification
Card Only: Card Only users
19
Page 20

www.acti.com
User Manual
Click button to
open on-screen
keyboard for User
ID/name editing
Card+Photo: Card +Photo users
User ID: to search for a specific user by entering the complete User ID
Edit User
Select a user in the user list and press “Edit User” button to edit user
information.
Remove User
Select a user in the user list and press “Remove User” button to permanently
remove the user.
Exit User Manager
Click the button at upper-right corner to exit user manager
User Enrollment
To enroll a new user, select “Enrollment” page as below:
Enter User ID from on-screen keypad or badge a card to read card ID
20
Page 21

www.acti.com
User Manual
User Name and Alias ID are optional
For security purpose, it is suggested to enroll at least one Root User
For user who wears glasses, check “Wear Glasses”
Click “Start Enrollment” to start
The system now goes into Enrollment mode and start a 3-second countdown. User is required to
stand in front of The Device and position the face properly. See Chapter 4 for a detailed
description and suggestions on enrollment process.
21
Page 22

www.acti.com
User Manual
2 Advanced Features
2.1 Facial Recognition
Operating Mode
In default 1:N identification mode, The Device identifies a face from all registered
faces in the user database. In 1:1 verification mode, The Device receives a User
ID from card reader, touch screen keypad, or an external Wiegand device and
verifies a user’s face.
Note that when a registered User ID is received (say a card read) in 1:N
identification mode, The Device will switch to 1:1 facial verification temporarily.
Once authentication is completed, it will resume back to 1:N mode.
To know the current operating mode, see the icon at upper-right corner of the
recognition screen.
1:N Mode Icon 1:1 Mode Icon
Recognition Threshold
The Device compares a user’s face with enrolled facial template (faceprint) and
outputs a “score”. A higher score means a better match. The recognition
threshold option allows user to set a minimum score required to grant a pass. A
lower threshold increases recognition speed but increases the chances of false
acceptance (FAR). A higher threshold, in contrast, reduces FAR but increases
False Rejection Rate (FRR) – the likelihood of denying a registered user.
The default recognition threshold of 85 is recommended for optimal FAR and FRR.
The maximum threshold should not exceed 90 to avoid high FRR.
22
Page 23

www.acti.com
User Manual
Mask Detection
Whether to turn on advanced anti-3D Mask function. Default is disabled.
2.2 Network
DHCP Function
When DHCP is enabled, the system will ignore the static IP address and fetch a
dynamic IP Address from the DHCP server.
Static IP Address
When DHCP is diabled, you can configure a static IP address. Precaution should
be taken to avoid IP address conflicts with other network devices.
Static IP Netmask
When DHCP is diabled, you can configure a static IP Netmask. It is
255.255.255.0 in a regular class C LAN environment.
Static IP Gateway
When DHCP is diabled, you can configure a static IP gateway here.
DNS Address
You can configure the DNS (Domain Name Server) address here.
2.3 I/O Control
You have control over the following I/O functions:
Door Sensor Alarm
This option should be enabled only if you have an electronic door lock with a
door sensor output connected to The Device.
Door Sensor Alarm Time
The Device can be programmed to trigger an alarm and log an event if the door is
open for longer than a pre-defined time limit. Enter the alarm time limit in
seconds. Default time is 30 seconds.
23
Page 24

www.acti.com
User Manual
Exit Switch
Enable this option if you have an exit switch connected to The Device that allows
you to open Relay #1 and/or Relay#2 when the switch is activated.
Relay #1
You can enable or disable Relay #1 control signals (N.C and N.O.) here. When
enabled, Relay #1 will engage when a user is granted a “Passed” status.
Relay #1 Open Time
You can set the Relay #1’s duration of engagement after a user is passed.
Default value is 5 seconds.
Relay #2
Except being enabled or disabled like Relay #1, Relay #2 has advanced options
including
Denied: to trigger Relay #2 after a user is denied.
Alarm: to trigger Relay #2 when Tamper Alarm (when The Device is
detached from the mounting bracket) or Door Sensor Alarm (when the door
is open for over a pre-defined time limit) is triggered.
Door Bell: if enabled, The Device will display a touchable Door Bell button
at screen.
Door Bell Button
When this button is touched, the system will play a bell music and trigger
Relay #2, which can be wired to an external door bell hardware.
Relay #2 Open Time
You can set the duration of the engagement for Relay #2. Default value is
5 seconds.
24
Page 25

www.acti.com
User Manual
Letter
Definition
Remark
U
MSB (Most Significant Bit) of User ID
A upper-case U
U
A bit of User ID
A lower-case u
0
A bit must be 0
1 A bit must be 1
X
A don’t care bit
Lower-case x works the same
2.4 Wiegand
The Device can interface with other peripherals using standard Wiegand protocols
to perform multi-factor authentication. Furthermore, The Device can also act as a
standard Wiegand Output device to interface with other controllers. You can
adjust various Wiegand protocol parameters in the Wiegand page.
Wiegand Input
To enable or disable the Wiegand input function.
Wiegand Input Format
Options are Standard 26-bit, Standard 34-bit, and Custom Format. To program
The Device to support a proprietary Wiegand format, please select “Custom
Format”, and then input your own string of custom format in the edit box below.
How to Define Wiegand Input Custom Format
In order to support those special formats, The Device supports an interface
where you can easily define your proprietary Wiegand input format, of up to 64
bits.
By default, the edit box is empty; you can enter your own string of custom format
based on below rules. Once completed, click the Submit button and changes will
take effect instantly.
25
Page 26

www.acti.com
User Manual
Rules and Limitations
Max length of Wiegand bits: 64 bits
Min length of Wiegand bits: 4 bits
Max length of User ID: 32 bits (Including A “U” and a number of “u”)
No undefined letter should be included in the string
A User ID string should either start with a “U” or end with a “U”. A User ID
string without “U” is not able to work
Parity bits are not checked in current design of custom format string. The
user should always mark them as “X” (don’t care) bits.
Example 1
For scanning a card with a fixed Facility ID of 74 (01001010b) in 26-bit code, the
Wiegand format is
P-FFFF-FFFF-Uuuu-uuuu-uuuu-uuuu-P
Where P are the Parity bits
F are the 8-bit Facility ID bits
U is the MSB of 16-bit User ID
u are the later 15 bits of 16-bit User ID
So the string of custom format should be:
X01001010UuuuuuuuuuuuuuuuX
26
Page 27

www.acti.com
User Manual
String of Custom Format
Reason of Error
X01001010uuuuuuuuuuuuuuuuX
No MSB “U” is assigned
X01001010UuuuuuuuuuuuuuuUX
More than 1 “U” is assigned
XpXXXXXXXUuuuuuuuuuuuuuuuX
An undefined letter “p” is included
X01001010 UuuuuuuuuuuuuuuuX
A space is in between
Example 2
For scanning a card with 34-bit Wiegand code with User ID from bit 2 to bit 17 in
reversed bit order, the Wiegand format is
1-uuuu-uuuu-uuuu-uuuU-FFFF-FFFF-FFFF-FFFF-0
Where 1 is the leading bit, always 1
U is the MSB of 16-bit User ID
u are the later 15 bits of 16-bit User ID
F are the 16-bit Facility ID, which are don’t care in this application
0 is the ending bit and is always 0
So the string of custom format should:
1uuuuuuuuuuuuuuuUXXXXXXXXXXXXXXXX0
Error Formats
If the string of custom format is not well defined according the rules mentioned
above, the Wiegand input will be ignored without notice. Below are some
examples of wrong formats.
Wiegand Output
To enable or disable the Wiegand output function.
Wiegand Output Format
You can choose Standard 26-bit, Standard 34-bit, or Echo Custom Format for the
Wiegand output protocol format.
27
Page 28

www.acti.com
User Manual
2.5 Display
Display Unknown User ID
Options are “Disabled”, “Enabled with ID”, and “Enable without ID”, which will
decide if an unknown User ID (from card reader or keypad) is entered, whether
the screen will show the number or not. If the function is disabled, no error
message will appear when an unknown ID is entered.
Display Random Keypad
This option decides whether to display number keys in random order on the
keypad, like below, to enhance system security.
When Passed, Display …
You can choose to enable or disable the display of Score (of facial matching),
Alias ID, and Username, when facial authentication is passed.
Random Keypad
28
Page 29

www.acti.com
User Manual
2.6 Log Configuration
Here you can choose to enable or disable each type of log events. Supported
event types are:
Facial Recognition:
o User enrolled (can log message and image snapshot)
o Authentication passed (can log message and image snapshot)
o Authentication denied (can log message and image snapshot)
o User uploaded
o User removed
o Unknown card/User ID
I/O Control:
o Door sensor triggered
o Exit switch triggered
o Tamper alarm
Network:
o Login passed
o Login denied
o Configuration changed
o Firmware updated
o API connected
System:
o System bootup
o Exiting sleep mode
All event types can be enabled or disabled via a drop-down menu. Some event
types futher allow you to log the captured image associated with the event.
Click the “Submit” button, and the changes take effect immediately.
29
Page 30

www.acti.com
User Manual
2.7 Sound
Here you can configure the sound outputs.
Buzzer
Turn on or off the buzzer. Note that for security purpose, the Tamper Alarm will
still go off even you turn off the buzzer here.
Speaker Volume
Adjust the speaker volume from 1 (low) to 9 (Loud), or to Mute the speaker
here.
Hello at Wakeup
Select whether to say “Hello” when the system wakes up from sleep.
2.8 Time
Manual Input Time
Here you can edit and synchronize the time manually.
Synchronize with PC
When this is selected at Web interface, it will display real-time date and time of
your PC. Simply click Submit to complete the time synchronization.
NTP Server
Network Time Protocol (NTP) is a protocol for synchronizing the clocks of
systems over network. Input the NTP Server IP address and time zone then click
Submit to initiate the communication to NTP server immediately. Before the
time is returned from the NTP server, the System Date/Time display in this page
will show “Synchronizing”, meaning the communication is still in progress.
Otherwise, it will display a newly synchronized time.
30
Page 31

www.acti.com
User Manual
2.9 Password
Here you can set the passwords for both Web and Standalone Mode interfaces.
Username/Password
The Device supports one Administrator account with highest privilege, and
three (3) User accounts with configurable privilege. By default the
Administrator’s username is “admin” (fixed), and password is “123456”.
The default names for three users are “user1”, “user2”, and “user3” and their
passwords are all empty. These 3 users will not be activated unless appropriate
passwords are assigned here.
Privilege
Here you can grant or deny the permissions for “user1”, “user2”, and “user3” to
access the Log page, User (User Management) page, and Advanced
(Configuration) respectively. The available combinations of privilege are:
Log+User+Advanced: full access to 3 parts
Log+User: access to Log and User pages, but not to Advanced part for
configurations
Log: access to Log page only
Administrator has full access to three parts, which is unchangeable.
Standalone Mode
You can enable or disable Standalone Mode here. When disabled, Standalone
Mode button at the recognition screen will disappear.
Passcode
Passcode is a 4-digit numeric code used for initiating Standalone Mode. The
default Passcode is ‘1234’. To further enhance the security, please do change
passcode and assign a root user.
31
Page 32

www.acti.com
User Manual
2.10 System
Motion Detector Sensitivity
In 1:N identification mode, The Device will turn off screen and power down after
10 seconds without finding any user faces. Then it will detect user motion of
certain scale to resume back from power-down status. Here you can adjust the
sensitivity of motion detector from 1 (least sensitive) to 9 (most sensitive).
Factory Default
You can choose to reset the system to factory default settings by clicking the
“Reset to Factory Default”. Note that this process is irreversible.
Reboot System
Click the button to shut down and reboot the system.
2.11 Firmware
Current Status
Here, you can check the current firmware and font (language) versions of The
Device. The “Supported Fonts” shows the language(s) being supported.
New Firmware
To update a new firmware, click “Choose File” button to select the path of
desired firmware file (*.fmr file) to be uploaded. Next click “Update” button to
initiate the firmware update procedure. You need to wait for a few minutes for
the system to reboot to complete the firmware update process.
To update a new font is similar. Click “Choose File” button to select the path of font file (*.font or
patch file), and click “Update” button to initiate it. The system will then reboot as well.
32
Page 33

www.acti.com
User Manual
Operating distance:
45~70 cm
When face is locked in green square box,
enrollment proceeds
3 Facial Enrollment and Recognition
3.1 Enrollment
Here we introduce how users should enroll facial templates and generate faceprints
on The Device. Regarding how to activate enrollment from Web and Touch Screen
interfaces, please refer to Chapter 2.4 and 2.5
Once enrollment is activated, the system now goes into Enrollment mode and
start a 3-second countdown. User is required to stand in front of The Device and
position the face properly.
33
Page 34

www.acti.com
User Manual
During the enrollment, gently tile the face up and down, then gently move
closer and farther. If you wear glasses, you will be asked to remove the glasses
half way through the enrollment.
Follow the screen message and voice instructions to complete the enrollment.
Some guidelines to achieve the good enrollment:
1. Maintain your head within the central area of display during enrollment
2. Move your head closer and further away from the The Device and repeat
this action 2-3 times.
3. Slightly nod your head up (no more than 15 degree) and move your head
closer and then away from the terminal. Repeat this action 2 to 3 times.
4. Slightly nod your head down (no more than 15 degree) and move your head
closer and then away from the terminal. Repeat this action 2 to 3 times.
5. If the enrollment process is not complete, slightly turn your head left/right
(no more than 15 degrees) and move your head closer and further away
from the terminal. Repeat this action 2 to 3 times.
If The Device
time, enrollment will end and escape. Upon completion of the enrollment, the
screen will show a “Enrollment Done” message and voice instruction.
is unable to capture all the required face templates within certain
34
Page 35

www.acti.com
User Manual
Green bar shows how
close the user to be
identified
Passed
score
Enrolled
picture with
user info
3.2 Recognition
The Device facial authentication can operate under 1:N identification or 1:1
verification mode. See Chapter 3 for further details.
In 1:N identification mode, your simply stand in front of the The Device
at a proper
distance to start recognition.
In 1:1 verification mode, The Device requests you to present User ID first before
allowing your face to be scanned. The User ID is received from a card reader,
touch screen keypad, or from Wiegand input interface.
There is even an EFR-API command to send User ID and initiate 1:1 verification over
network.
Only enrolled user can be recognized. If no user has not been enrolled, please
refer to Chapter 2.4 or 2.5 to perform enrollment.
If The Device is set to 1:N mode, simply approach to the machine to start
authentication. Like enrollment, recognition will occur only when the face is
locked at Green square box. User who is identified will be granted with a green
check and a voice welcome.
35
Page 36

www.acti.com
User Manual
Under 1:1 mode, enter
User ID and Enter key
to start verification
If The Device is set to 1:1 mode, user must scan a card or enter User ID from the
touch screen first before The Device could perform facial recognition.
If face is not locked at green square box, please move a little closer or farther
from The Device and gently nod head up and down. Recognition should occur.
36
Page 37

www.acti.com
User Manual
4 Safety Notice
For your personal safety and that of the equipment, please follow the instructions
outlined in this chapter when handling and cleaning your The Device.
Important Notes:
Failure to follow the safety instruction could result in fire, electric shock, and
other injury or damage.
4.1 Safety in Using and Handling The Device
Please follow these guidelines when using The Device.
Do not attempt to open the machine housing for any reason and under any
condition as it does not contain any user-serviceable or replaceable parts.
Furthermore, you run the risk of electric shock and voiding the limited warranty.
Set up The Device in a stable work environment that allows for adequate air
circulation around the device. Do not operate The Device on a soft surface as
this can block ventilation openings. Never insert objects into ventilation
openings.
The Device is an indoor equipment. Always keep it away from moisture.
Make sure the connector matches the port with the right orientation. Never
force a connector into the port. If the connector and port do not join with
reasonable ease, they probably do not match.
Only use a power adaptor that outputs 12 VDC and up to 2 Amp in current. As
the power adaptor may become warm during normal use, always put the
adaptor in a well-ventilated area. Disconnect the power adaptor and other
cables if any of the following conditions exist:
You wish to clean the machine exterior.
The power adaptor becomes frayed or damaged.
The Device or its power adaptor is exposed to excessive moisture.
The Device has a damaged case, or you suspect physical damage.
37
Page 38

www.acti.com
User Manual
Use a damp, soft, lint-free cloth to clean the The Device exterior. Avoid
getting moisture into any openings. Do not use sprays, solvents, or abrasives
that may damage the surface finish.
4.2 FCC Regulatory Compliance Information
This equipment has been tested and found to comply with the limits for a Class A
digital device, pursuant to part 15 of the FCC Rules. These limits are designed to
provide reasonable protection against harmful interference when the equipment is
operated in a commercial environment. This equipment generates, uses, and can
radiate radio frequency energy and, if not installed and used in accordance with the
instruction manual, may cause harmful interference to radio communications.
Operation of this equipment in a residential area is likely to cause harmful
interference in which case the user will be required to correct the interference at
their own expense.
Modifications not expressly approved by the manufacturer could void the user’s authority to
operate the equipment under FCC rules.
38
Page 39

Copyright © 2018, ACTi Corporation All Rights Reserved
7F, No. 1, Alley 20, Lane 407, Sec. 2, Ti-Ding Blvd., Neihu District, Taipei, Taiwan 114, R.O.C.
TEL : +886-2-2656-2588 FAX : +886-2-2656-2599
Email: sales@acti.com
 Loading...