

Page 1

Quick Installation Guide
PLM-100
Parking Lot Management Server
V18.09.26
Page 2
BEFORE YOU START
Thank you for purchasing ACTi Standalone Parking Lot Management Server
(PLM). The PLM combines multiple license plate recognition servers and
enables blacklist and whitelist license plates notications.
This guide contains all the information you need to quickly set up the PLM
system via local display interface.
The items below are required for installation:
• Monitor (with HDMI, DVI or DisplayPort input and the cable)
• USB mouse
• USB keyboard
• Network switch
• Network video recorder
1
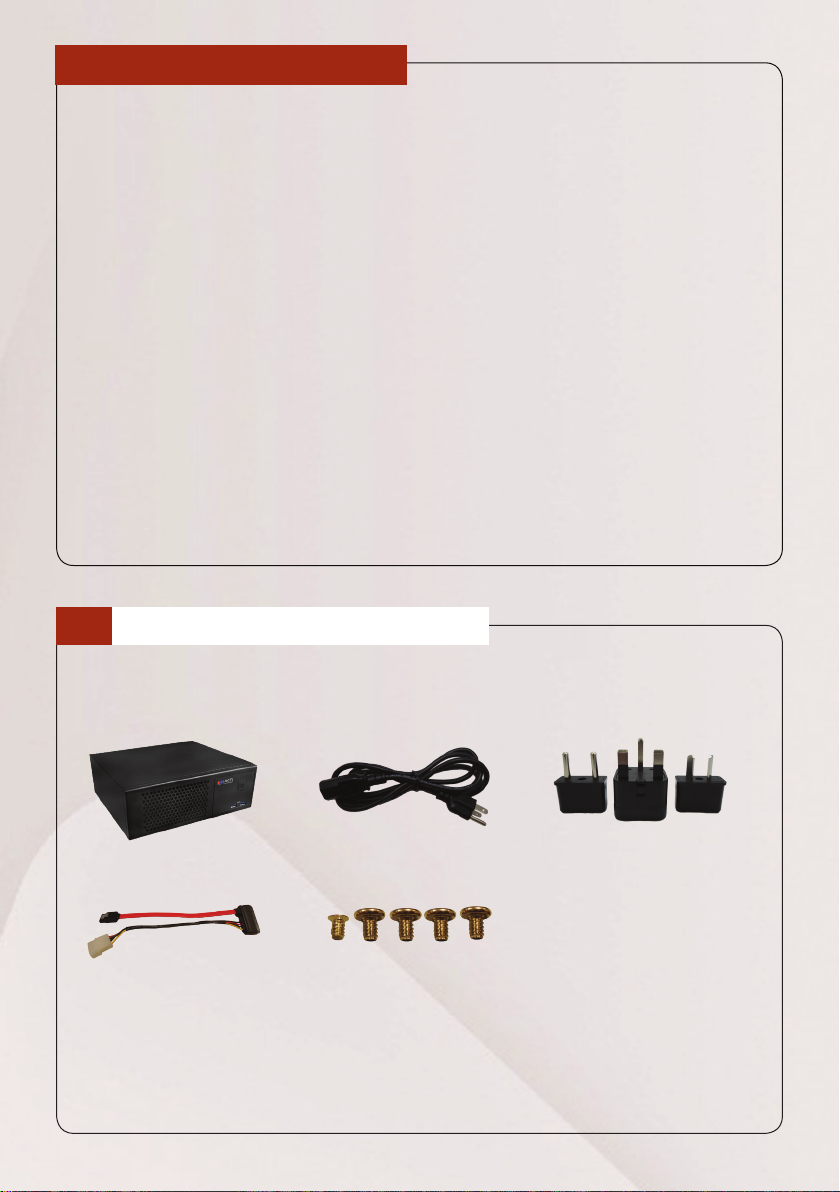
UNPACK
This package includes the following items:
PLM Unit Power Adapter Socket Converters
SATA Cable Screws
2 Quick Installation Guide
Page 3
2
AT A GLANCE
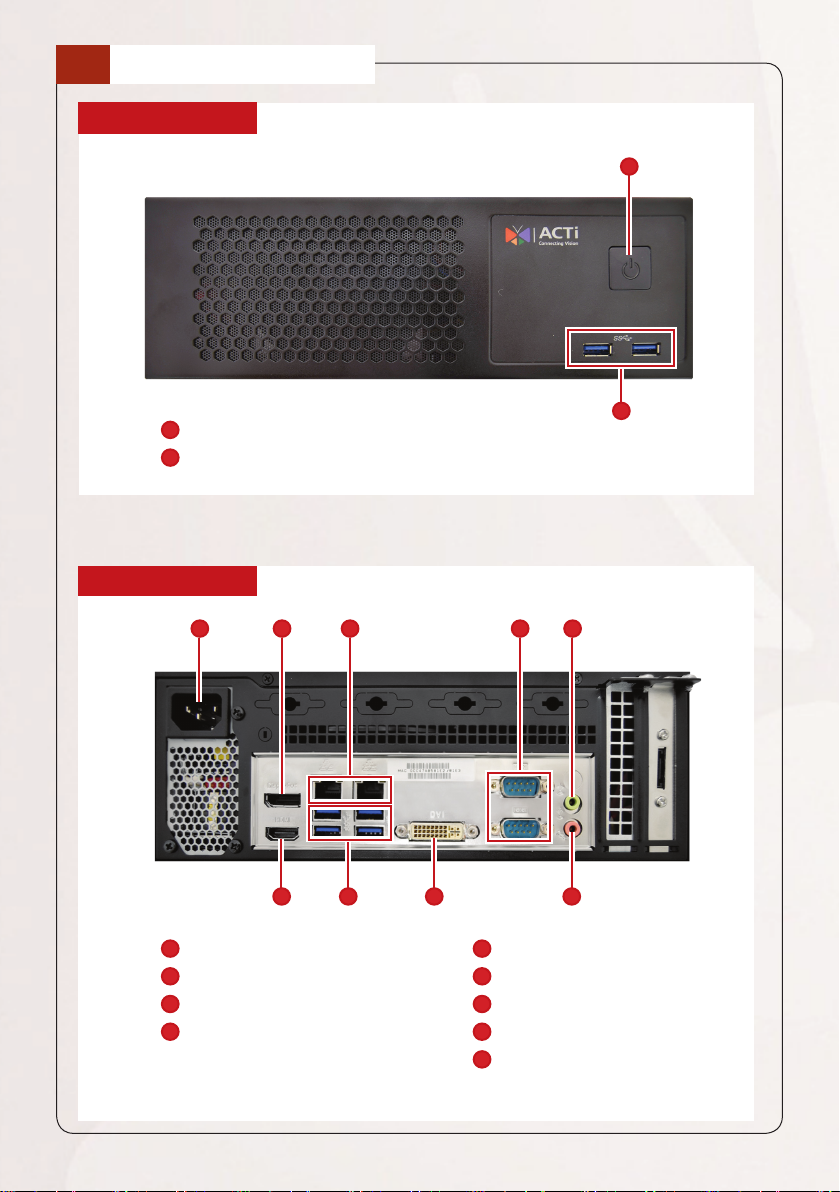
FRONT PANEL
1
1
Power Button
2
USB 3.0 Ports x 2
REAR PANEL
1 2 3 4 5
1
Power Connector
2
DisplayPort
3
LAN Ports x 2
4
COM Port x 2
(for RS-232)
6 7 9
8
5
Audio Output
6
HDMI Port
7
USB 3.0 Ports x 4
8
DVI Connector
9
Audio Input
2
Quick Installation Guide 3
Page 4
3
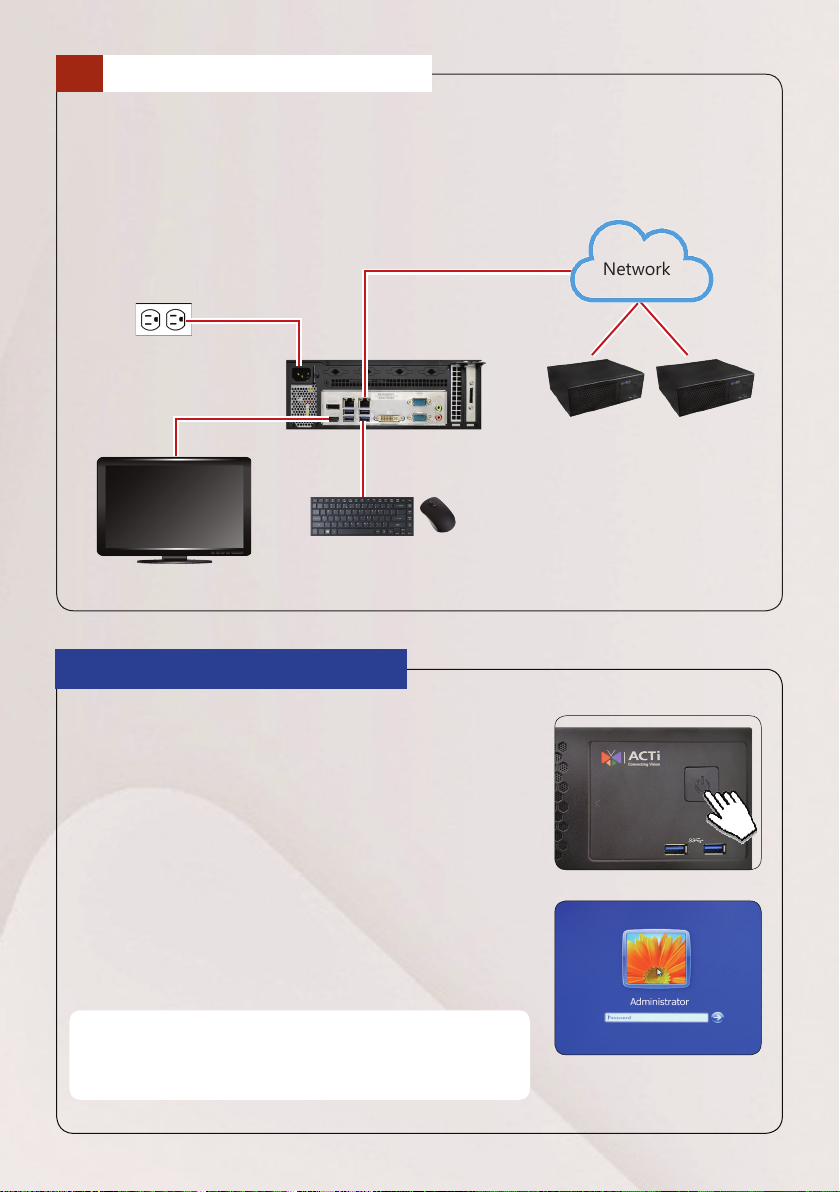
CONNECT THE DEVICE
The example below displays a local network consisting of a PLM server and
basic required peripherals to start using the device.
Network
Power Source
PLM
Automatic License Plate
Recognition (ALPR) Servers
USB Devices
HDMI Monitor
START UP
1. On the front panel, press the POWER BUTTON
to turn on the PLM.
2. On the Windows log on screen, type “123456”
to enter the Windows system.
NOTE: To assign a static IP address to the PLM, after entering
Windows operating system, congure the network settings in
Windows Network and Sharing Center.
4 Quick Installation Guide
Page 5
1
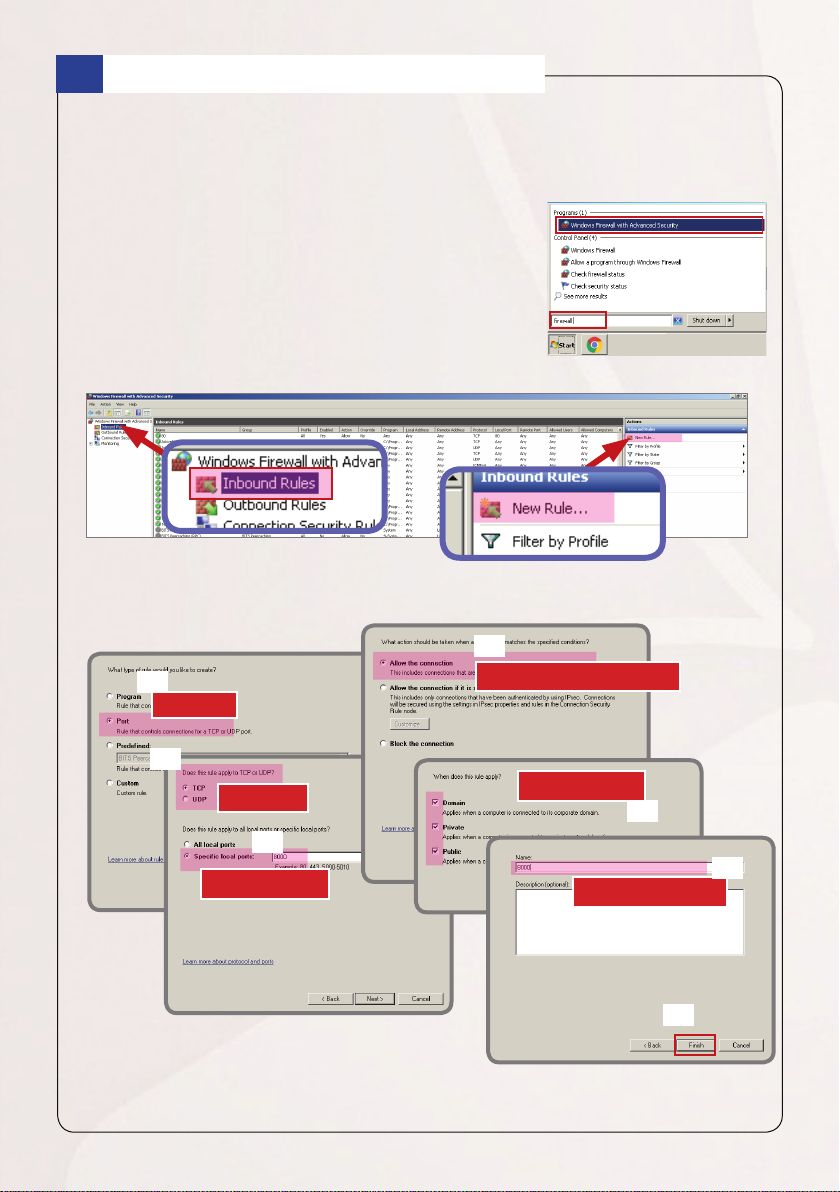
OPEN FIREWALL OF ALPR PORT
For security purposes, Windows Firewall is activated by default. In order to
connect to an Automatic License Plate Recognition (ALPR) server, the rewall
must be opened for the ALPR server.
1. Take note of the IP address and port number of
the ALPR server that will be added to the PLM.
2. On Windows, search for “rewall”.
3. Select Windows Firewall with Advanced
Security.
4. Select Inbound Rules > New Rule...
5. On the pop-up, select the following to open the port rewall. Then click
“Finish.”
4
1
“Allow the connection”
“Port”
2
“TCP”
Select all
3
Type port
6. The new rule will then be added to the Inbound Rule list.
5
6
Type Rule Name
7
Quick Installation Guide 5
Page 6

2
LOGIN
1. On Windows desktop, double-click the Parking Lot Management icon
to open the application interface.
2. Input the default account and password to log in.
Default Account and Password
Account: admin
Password: 123456
Understand the User Interface
Show/Hide
Main Menu
Toolbar
Full Screen
Logout
Page
Minimize menu
Main Menu Options:
• Monitor: Allows you to view the real-time status of the servers, shows the
license plates and pops up notication whenever a black list or white list
license plate is detected, and provides analysis reports
• Conguration: Allows you to congure the license plate servers, manage
accounts, notications and mail servers.
• System: Allows you to search and view the history or system information
Menu
6 Quick Installation Guide
Page 7

CONFIGURE DEVICE
The main thing you need to congure on the PLM server is to link the ALPR
server that manages the cameras on a parking lot. However, before you can
link ALPR servers, you need to congure the “organization” and “stations” and
the user accounts that will access PLM.
For easy management, a default user account, organization, and station have
already been created for you. Simply modify the preset conguration and you
are ready to link the ALPR server. Then, dene the blacklist and whitelist license
plates.
The Monitor page will display the detected license plates and provide pop-up
notications whenever a blacklist or whitelist plate is detected.
1
MANAGE ORGANIZATION
An organization can be a company, branch name or a city, or a name to group
and identify parking lots. The PLM comes with a default organization. You may
edit or create new ones, as needed.
1. On the left menu panel, click Conguration > Structure Setting >
Organization.
2. To modify the existing organization, click the Edit button. Or to create a new
one, click the New button.
3. Type the Organization name.
4. Click Submit to save.
Repeat the above steps to add more organizations.
Quick Installation Guide 7
Page 8

2
MANAGE STATION
A station can be the different parking lots within an organization; for example,
Carpark A and Carpark B. A default station is already created for you. You may
modify this account and create new ones.
1. On the left menu panel, click Conguration > Structure Setting > Station.
2. To modify the existing station, click the
Edit button. Or to create a new one, click
the New button.
3. Select the Organization and TimeZone
Area.
4. Type the preferred Station name.
5. Click Submit.
Repeat the above steps to add more stations.
8 Quick Installation Guide
Page 9

3
MANAGE USER ACCOUNT
The Account Setting page lets you create user accounts and dene its access
rights to the server. By default, an administrator account, “Admin”, is already
created for you. You may modify this account and create new ones.
1. On the left menu panel, click Conguration > Account Setting.
2. To modify the existing account, click the
Edit button. Or to create a new account,
click the New button.
3. Type the Account name and Password.
4. Select the Role, options are:
• Admin: Can access all the menus and congure all the settings.
• Manager: Can view the real-time status, analysis reports, and system
information. A manager can also congure user accounts, ALPR server and
set the notication.
• User: Can only view the real-time status.
5. Select an Organization, then the Station.
6. Click Submit to save.
Quick Installation Guide 9
Page 10

4
CONFIGURE ALPR SERVER
Before associating an ALPR server to the PLM, take note of the ALPR server
name. This will be used to link the ALPR to the PLM server.
On the ALPR server, right-click on the
ALPR icon on the task bar and select
“Setting”.
Use the ALPR Server page to add ALPR servers to the PLM.
1. On the left menu panel, click Conguration > Structure Setting > ALPR
Server.
2. Click the New button.
3. Select the Station and then type the Server Name of the ALPR server to
associate with the PLM.
NOTE: The Server Name MUST be the SAME name on the Server Name as the that on the
ALPR server.
4. Click Submit to save. The ALPR server name will appear on the page.
10 Quick Installation Guide
Page 11

5
CHECK CAMERAS
After associating an ALPR server, the cameras connected to that ALPR server
should appear on the Camera Location page.
1. On the left menu panel, click Conguration > Structure Setting > Camera
Location.
2. Click the Edit button to modify the
settings.
3. Click Submit to save.
MONITOR VEHICLES
Click Monitor to view the Live Monitor page. The list of identied license
plates, including the license plate screenshot, date and time of detection are
shown on the list.
Quick Installation Guide 11
Page 12

1
CONFIGURE BLACKLIST AND WHITELIST
The PLM server provides pop up notications whenever a blacklisted or
whitelisted vehicle is detected. But rst, you must enlist the license plates
accordingly.
There are two (2) ways to mark a license plate as blacklist or whitelist.
From the Live Monitor page
1. On the left menu panel, click Monitor > Live Monitor.
2. On the Data List, can click
corresponding license plate into Blacklist or Whitelist.
or to include the
Manual Input of License Plate
1. On the left menu panel, click Conguration > Notication > Black/White
List.
2. Click the New button.
3. Select the category to add the license plate to either Black List or White List.
4. Check Screen Alert to enable pop up notication on Live Monitor.
5. Select the Station. Type the License Plate and type other Notes as needed.
6. Click Submit to save the information.
7. Repeat to add more.
The added plates will be
listed on the page.
12 Quick Installation Guide
Page 13

2
MONITOR LICENSE PLATES
On the left menu panel, click Monitor > Live Monitor.
Notication pops up here
Search for License Plate
To search for a particular license plate or view the vehicles that have passed for a
certain time range, click Monitor > License Plate List from the left menu panel.
To show All, BlackList only or
WhiteList only
2
1
Filter search here
Click “Search”
Export Data
You can export the data list to an Excel le. Click Monitor > License Plate List
from the left menu panel. Filter the search as needed, then click Export Excel.
View Analysis Data and Charts
To view graphical data for analysis, click Monitor > Analysis Chart from the left
menu panel.
Quick Installation Guide 13
Page 14

OTHER SETTINGS
You can congure the PLM Server to send email notications whenever a
blacklisted or whitelisted license plate is detected as well as lter and view the
history report of detected vehicles.
1
ACTIVATE EMAIL NOTIFICATION
If you wish to receive email notications whenever a blacklisted or whitelisted
vehicle is detected, congure the outgoing mail server of the email account that
will send the email notication.
1. On the left menu panel, click Conguration > Mail Server.
2. Click New.
3. Select the Organization.
4. Type the mail server information.
5. Click Submit.
6. Then on the left menu panel, click Conguration > Notication >
Black/White List.
7. Select the category: Black List or White List.
8. Check Send Email to enable email notication.
9. On Mail Receivers, type the email address(es) where the notication will be
sent, then click
10. Repeat the above steps to add more email addresses.
14 Quick Installation Guide
.
Page 15

2
VIEW HISTORY
The History page allows you to view the system settings log, including the
login/logout, account setting, etc.
On the left menu panel, click System > History Page.
On this page, you can lter by one or a combination of the following:
• Filter the search by date range: Click Start Date & Time and End Date &
Time elds to modify, then Search.
• Filter by category: Select a particular category, then click Search.
• Filter by account: Type the account under Execute By. This will list only the
logs which were done by that account, then click Search.
Filter by category
Filter by account
Filter by date
Note
If you have any question during the system installation, please feel free to contact our engineers via
ACTi Customer Help Desk platform at http://www.acti.com/CHD.
 Loading...