

Page 1

ENR-100 Series
User Manual
2014/08/18
For V4.01.14 Firmware
ENR-110
ENR-120
ENR-130
ENR-140
Page 2

www.acti.com
ENR-100 Series User’s Manual
Legal Notice
Disclaimer
The information contained in this document is intended for general information purposes.
ACTi Corporation shall not be liable for errors contained herein or for incidental or
consequential damages arising from the furnishing, performance, or use of this manual.
The information contained herein is subject to change without notice.
Copyright
Copyright © 2013-2014 ACTi Corporation All Rights Reserved.
Trademarks
ACTi Connecting Vision and its logo are registered trademarks of ACTi
Corporation.
Microsoft® and Windows® are registered trademarks of Microsoft Corporation.
All other product or company names mentioned in this document may be trademarks or
registered trademarks of their respective owners.
2
Page 3

www.acti.com
ENR-100 Series User’s Manual
Regulatory Compliance Information
Federal Communications Commission Statement
This equipment has been tested and found to comply with the limits for
a Class B digital device, pursuant to Part 15 of the FCC Rules. These
limits are designed to provide reasonable protection against harmful
interference in a residential installation. This equipment generates,
uses and can radiate radio frequency energy and, if not installed and used in accordance with
the instructions, may cause harmful interference to radio communications. However, there is
no guarantee that interference will not occur in a particular installation. If this equipment does
cause harmful interference to radio or television reception, which can be determined by
turning the equipment off and on, the user is encouraged to try to correct the interference by
one or more of the following measures:
- Reorient or relocate the receiving antenna.
- Increase the separation between the equipment and receiver.
- Connect the equipment into an outlet on a circuit different from that to which the receiver is
connected.
- Consult the dealer or an experienced radio/TV technician for help.
WARNING: Changes or modifications to the equipment that are not expressly approved by
the responsible party for compliance could void the user’s authority to operate the equipment.
European Community Compliance Statement
This product has been tested and found to comply with the limits for
Class B Information Technology Equipment according to European
Standard EN 55022 and EN 55024. In a domestic environment, this
product may cause radio interference in which cause the user be
require to take adequate measures.
3
Page 4

www.acti.com
ENR-100 Series User’s Manual
About This Manual
Target Audience
This manual is intended for End Users who actually execute security tasks such as
monitoring ongoing activities in the building, patrolling secured zones, searching video data
and managing alarms with use of ENR surveillance system. The reader is expected to own
not only the basic operation skills but permissions to access major functionalities defined by
the System Administrator.
You may also visit ACTi Download Center for updates and documents:
http://www.acti.com/downloadcenter
Technical Support
If you have any questions during system installation, please feel free to contact our engineers
via our Customer Help Desk platform http://www.acti.com/CHD.
4
Page 5

www.acti.com
ENR-100 Series User’s Manual
Table of Contents
1 Legal Notice 2
Disclaimer ............................................................................................. 2
Copyright ............................................................................................. 2
Trademarks ............................................................................................ 2
Regulatory Compliance Information .................................................... 3
2 About This Manual 4
Target Audience .................................................................................... 4
Technical Support .................................................................................. 4
3 Table of Contents 5
4 Introduction 8
Product Overview .................................................................................. 8
ENR Server / Client Architecture ........................................................... 8
At A Glance ......................................................................................... 10
ENR-110 / ENR-120 / ENR-130 .................................................. 10
ENR-140 ...................................................................................... 11
Power Button & Reset Button ............................................................. 12
Turn On the Device ...................................................................... 12
Turn Off the Device ...................................................................... 12
Reset to Factory Default .............................................................. 14
LED Indicators ...................................................................................... 14
5 Local Client Operation 15
Log in to & out of ENR ........................................................................ 15
Log In ........................................................................................... 15
Log Out ........................................................................................ 15
System Overview ................................................................................. 16
5
Page 6

www.acti.com
ENR-100 Series User’s Manual
Main Screen Introduction ............................................................. 16
Input Devices ............................................................................... 17
Monitoring .......................................................................................... 19
Live Screen Overview .................................................................. 19
Display Your Desired Camera View ............................................. 20
Apply a Customized View Layout ................................................ 21
Single Channel Operations .......................................................... 21
Take a Snapshot 22
Start / Stop Manual Recording 22
Digital PTZ Operations 22
Manipulate PTZ Devices on PTZ Panel 23
Manipulate PTZ Devices with Mouse Controls 25
Layout Patrol ................................................................................ 26
Understand Channel Status ................................................................ 27
Channel Status ............................................................................ 27
Understand Event Notifications .......................................................... 28
Playback………………………………………………………………………..29
Playback Screen Overview .......................................................... 29
Start Time Search ........................................................................ 31
Event Search ............................................................................... 33
Play the Video Footage ................................................................ 34
Add and Search Bookmarks ........................................................ 35
Take a Snapshot .......................................................................... 36
Export Video ................................................................................ 36
6 Remote Client Operation 37
Access ENR Server ................................................................................ 37
Log In ........................................................................................... 37
Enter Account & Password 38
Change UI language 38
Remember Login Information 38
Log Out ........................................................................................ 38
Monitoring .......................................................................................... 39
Live Screen Overview .................................................................. 39
Select a Customized Layout ........................................................ 40
Watch a Specific Camera View .................................................... 40
Take a Snapshot .......................................................................... 41
Manual record ................................................................ .............. 41
6
Page 7

www.acti.com
ENR-100 Series User’s Manual
Trigger Digital Output ................................................................... 42
Send Audio Signal to a Camera .................................................. 42
Digital PTZ Navigation ................................................................. 43
Optical PTZ Navigation ................................................................ 44
Go to a Preset Point .................................................................... 45
Start / Stop a Tour ........................................................................ 46
Playback………………………………………………………………………..47
Playback Screen Overview .......................................................... 47
Start Time Search ........................................................................ 48
Event Search ............................................................................... 49
Play the Video Footage ................................................................ 50
Add and Search Bookmarks ........................................................ 51
Take a Snapshot .......................................................................... 51
Export Video ................................................................................ 52
7
Page 8

www.acti.com
ENR-100 Series User’s Manual
Introduction
Product Overview
ACTi ENRSeries (hereafter referred to as ENR) is a compact and reliable multi-channel
standalone NVR. It features a stable embedded Linux operating system and capabilities of
supporting mega-pixel resolution H.264 streaming, an HDMI output for local display, PTZ
control, scheduled / event-triggered / event speed-up recording, event management,
synchronized playback, time / event-based playback search and video bookmarks. Its smart
Setup Wizard and intuitive user interface allow the system installer to enjoy effortless
installation experience, while making it easy for new users to get acquainted with the
operation by first-time use. Other than the local client, the remote PC client may access the
ENR system simultaneously, and experience user-friendly web interface customized for
browser-based operations.
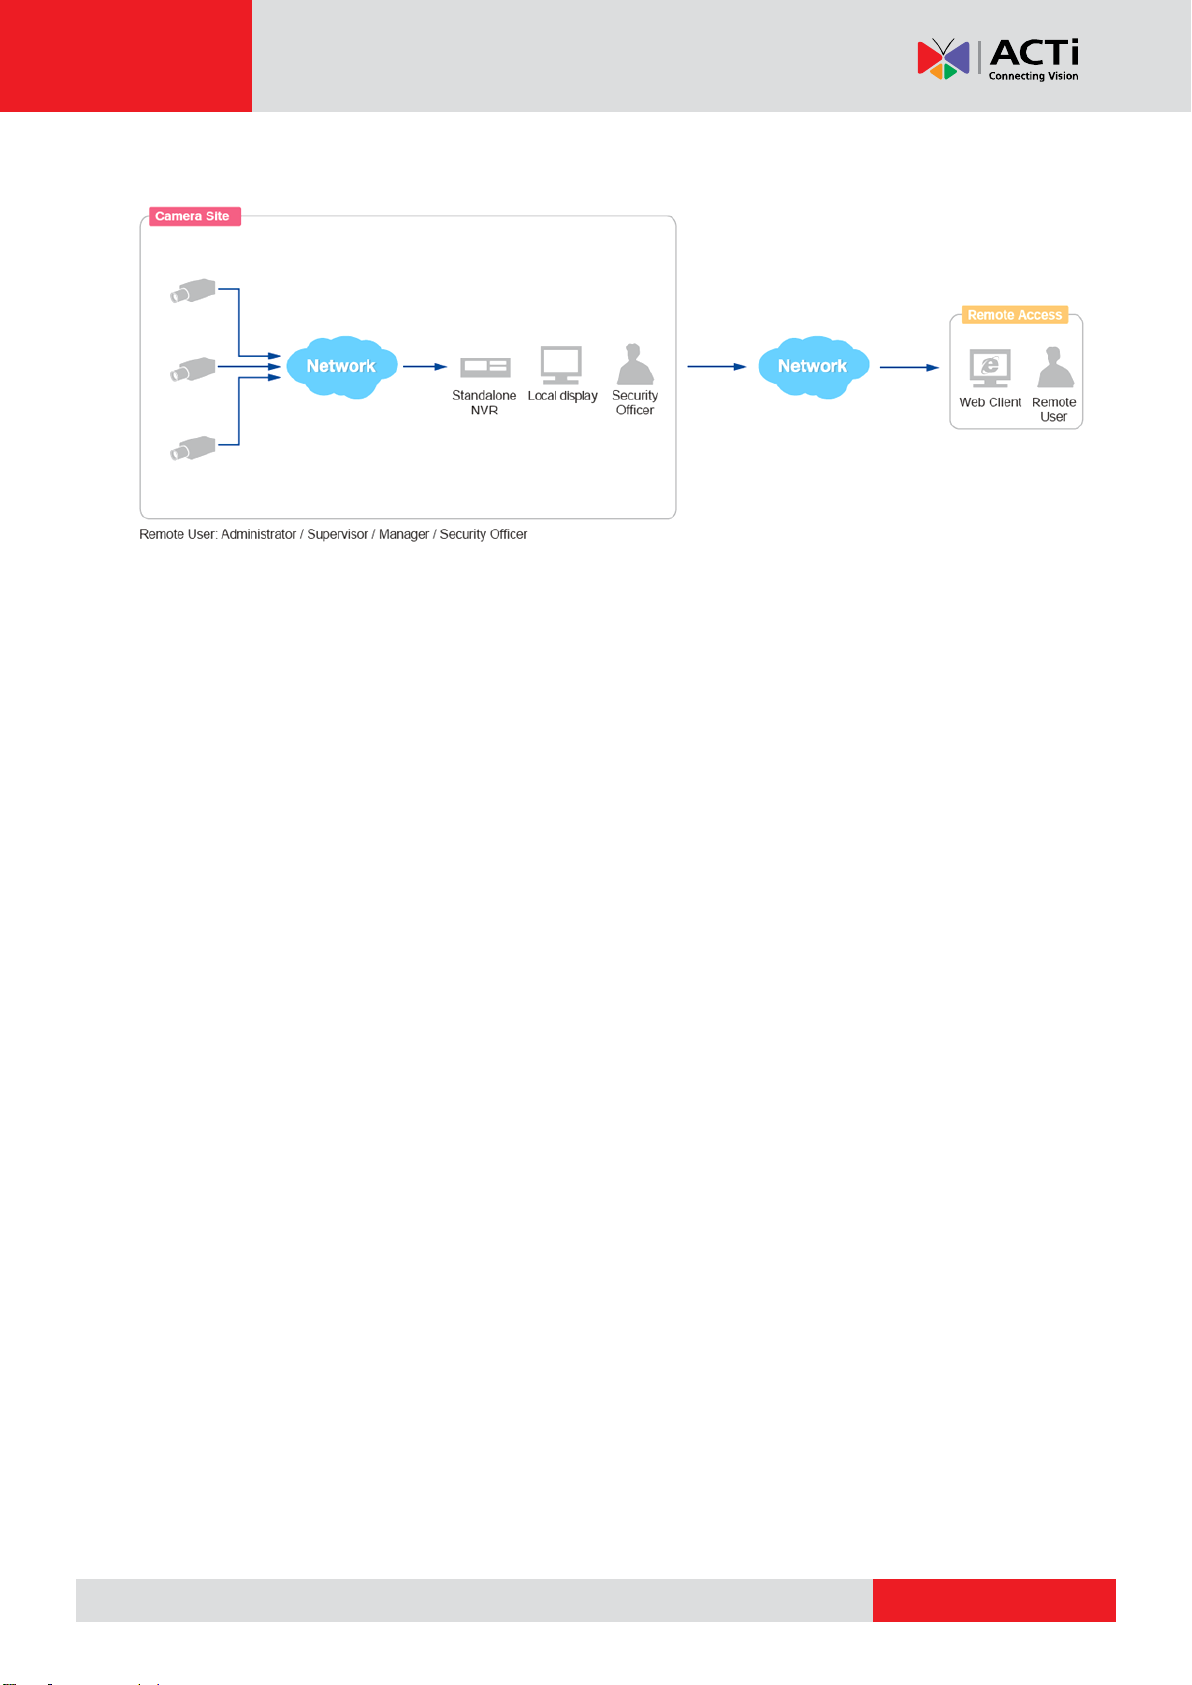
ENR Server / Client Architecture
In a video surveillance system architecture, ENR serves as service provider, aimed to run
24/7 non-stop a video management service for clients. An ENR Client makes requests for
monitoring video streams or playing back recordings of ENR.
There are two types of ENR clients: Local Client and Remote Client. A client, connecting
from whether a remote computer or from local, will be offered the same functionalities of
ENR.
Local Client: In the local site, the client user directly operates ENR by connecting an HDMI
monitor and a USB mouse to the physical ENR.
Remote Client: Over the TCP/IP network, the Remote Client communicates with ENR
through HTTP Protocol. This client user will have to use a computer with Internet Explorer
to access the ENR web interface, without the need of installing any client program
beforehand. Logging in to ENR is as simple as visiting a website.
8
Page 9
www.acti.com
ENR-100 Series User’s Manual
9
Page 10
www.acti.com
ENR-100 Series User’s Manual
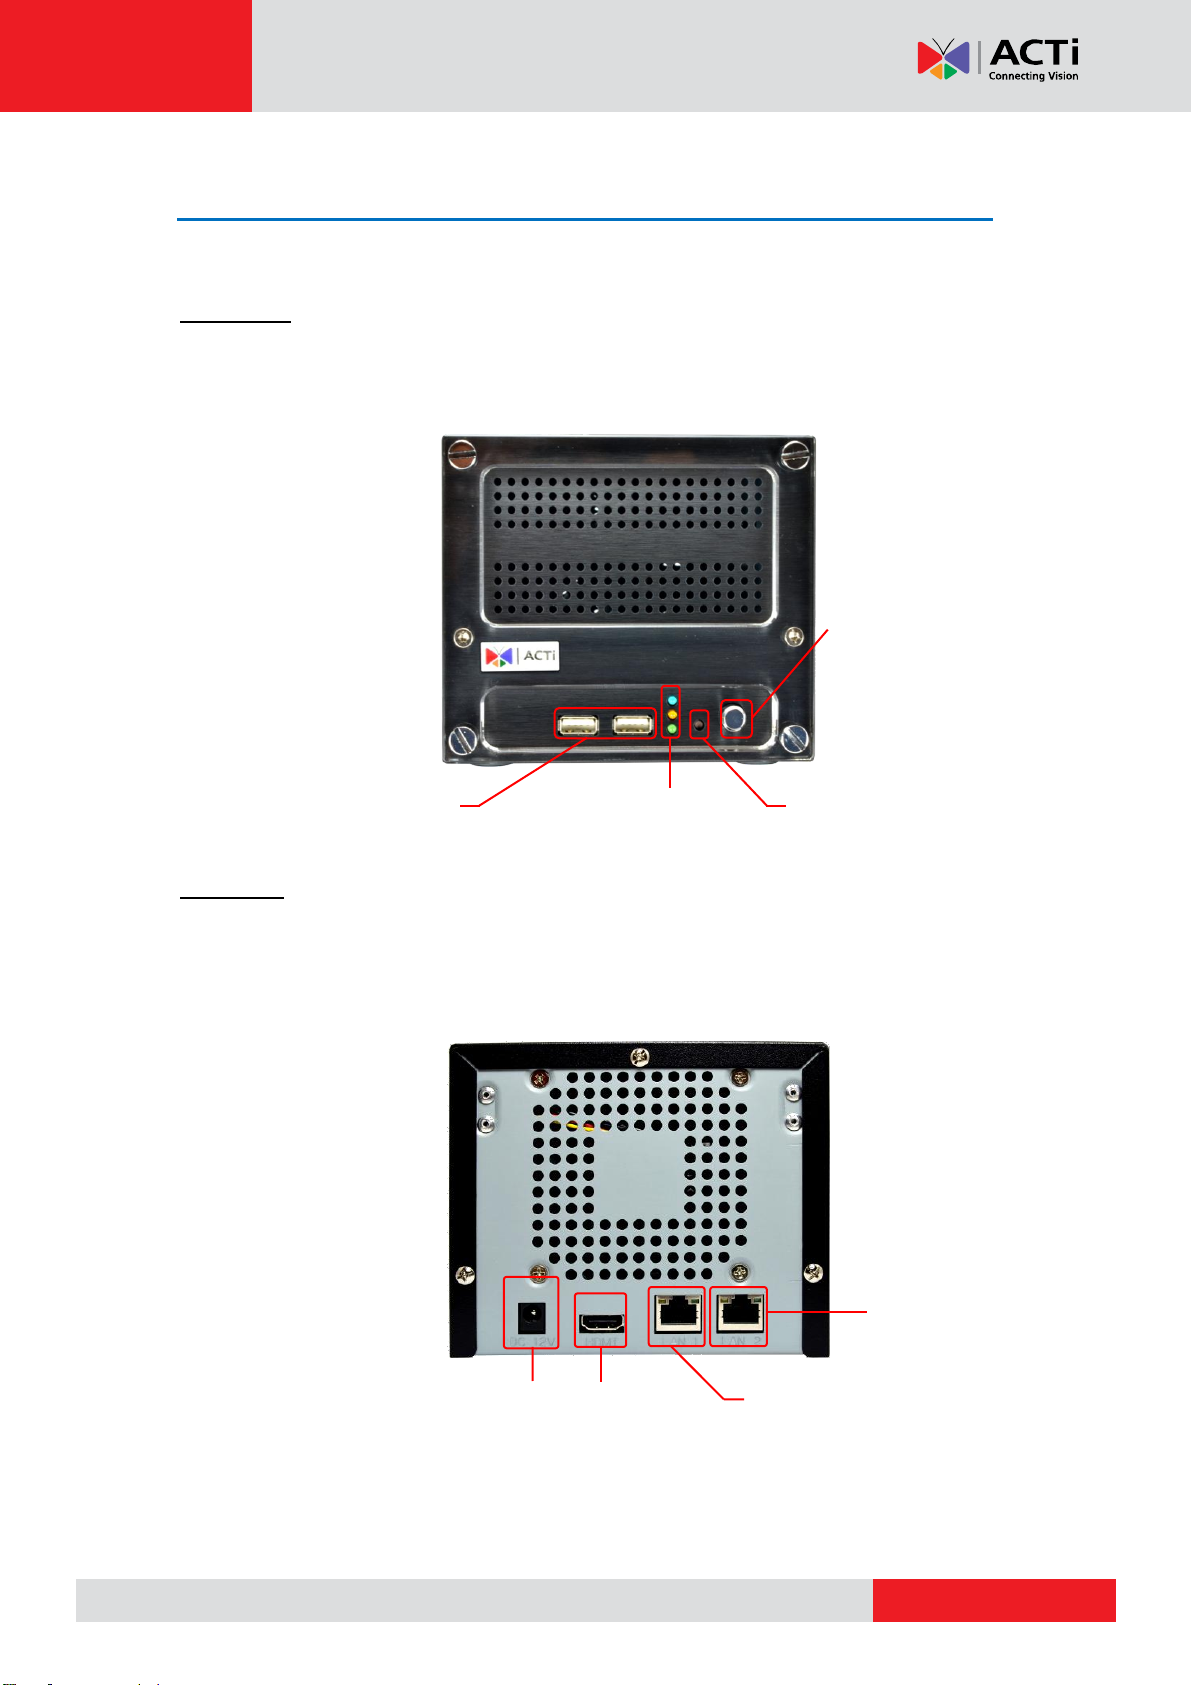
LED Indicators
USB 2.0 Ports
Reset Button
Power
Button
HDMI Output
LAN
LAN 2
Power Connector
At A Glance
ENR-110 / ENR-120 / ENR-130
Front Panel
Rear Panel
10
Page 11
www.acti.com
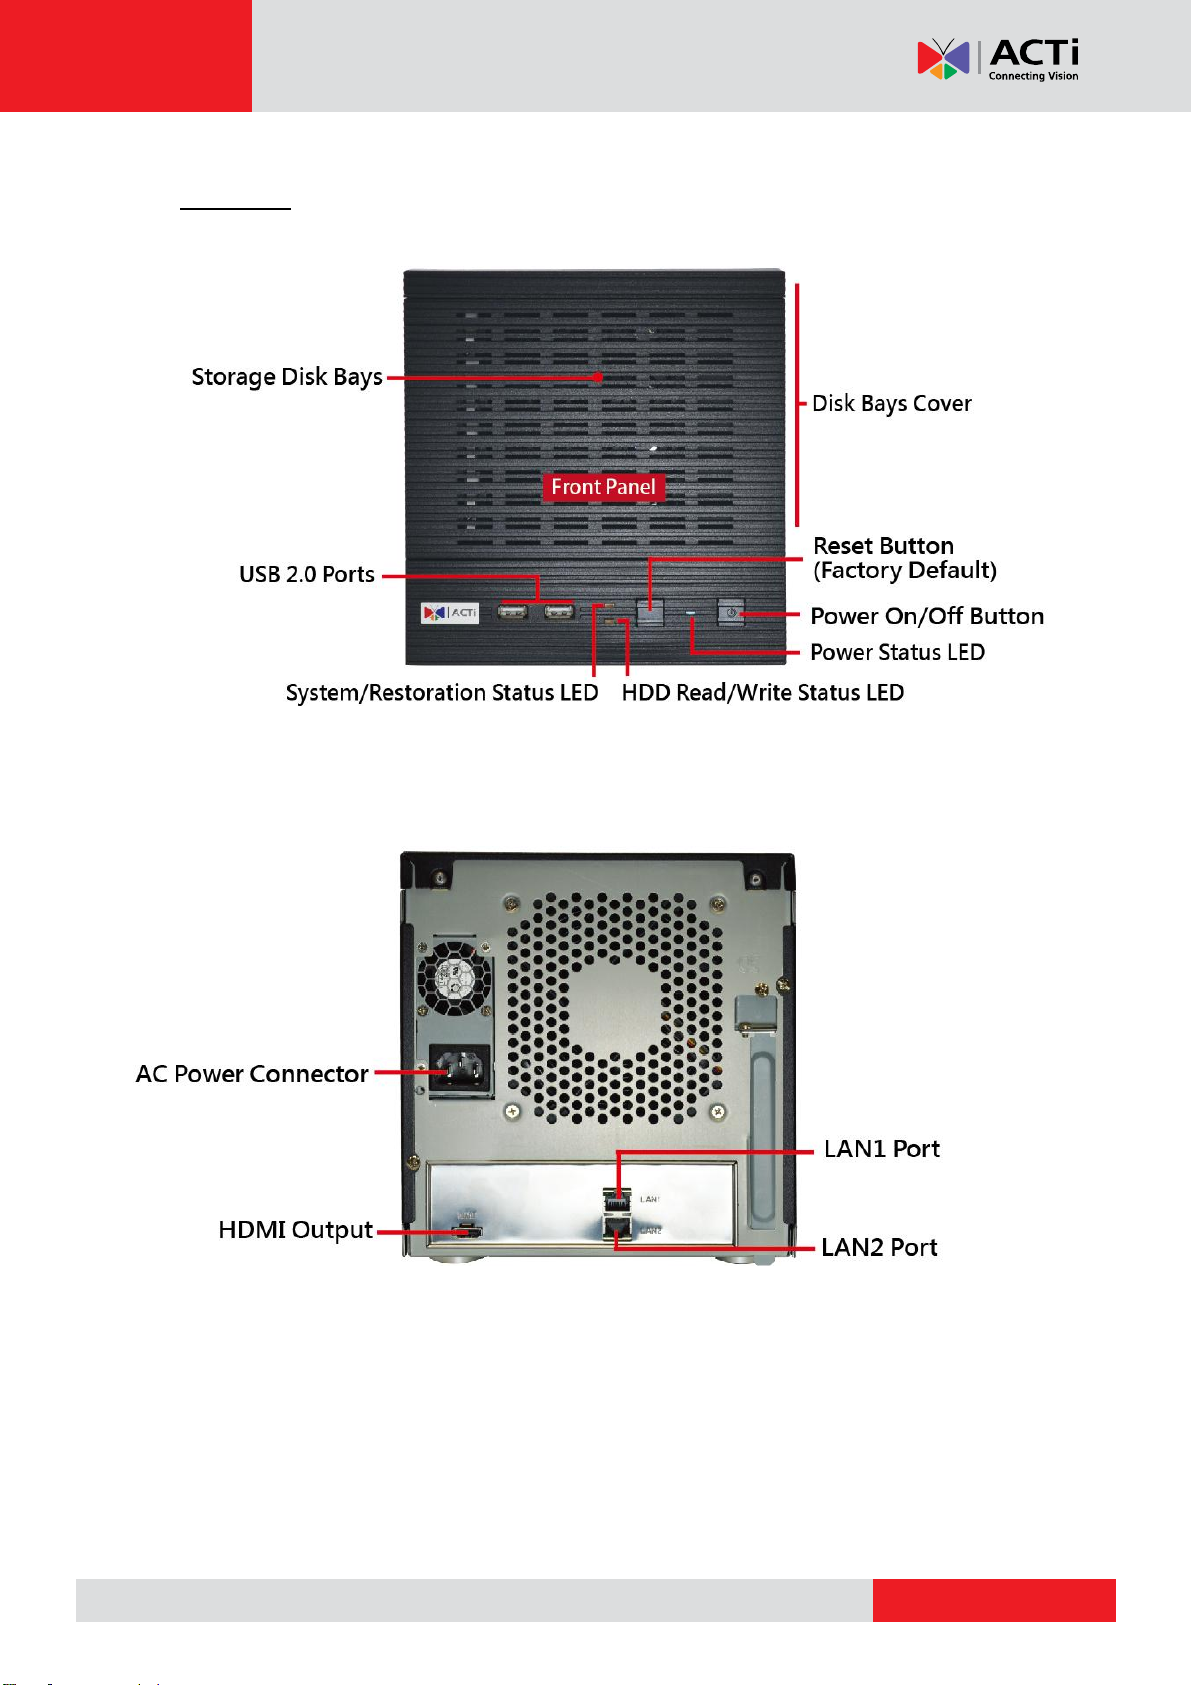
ENR-140
Front Panel
ENR-100 Series User’s Manual
11
Page 12

www.acti.com
ENR-100 Series User’s Manual
Power Button & Reset Button
You can turn on / off the device with Power Button.
Turn On the Device
Press down the Power Button and release, the Power LED will light up and turn solid blue.
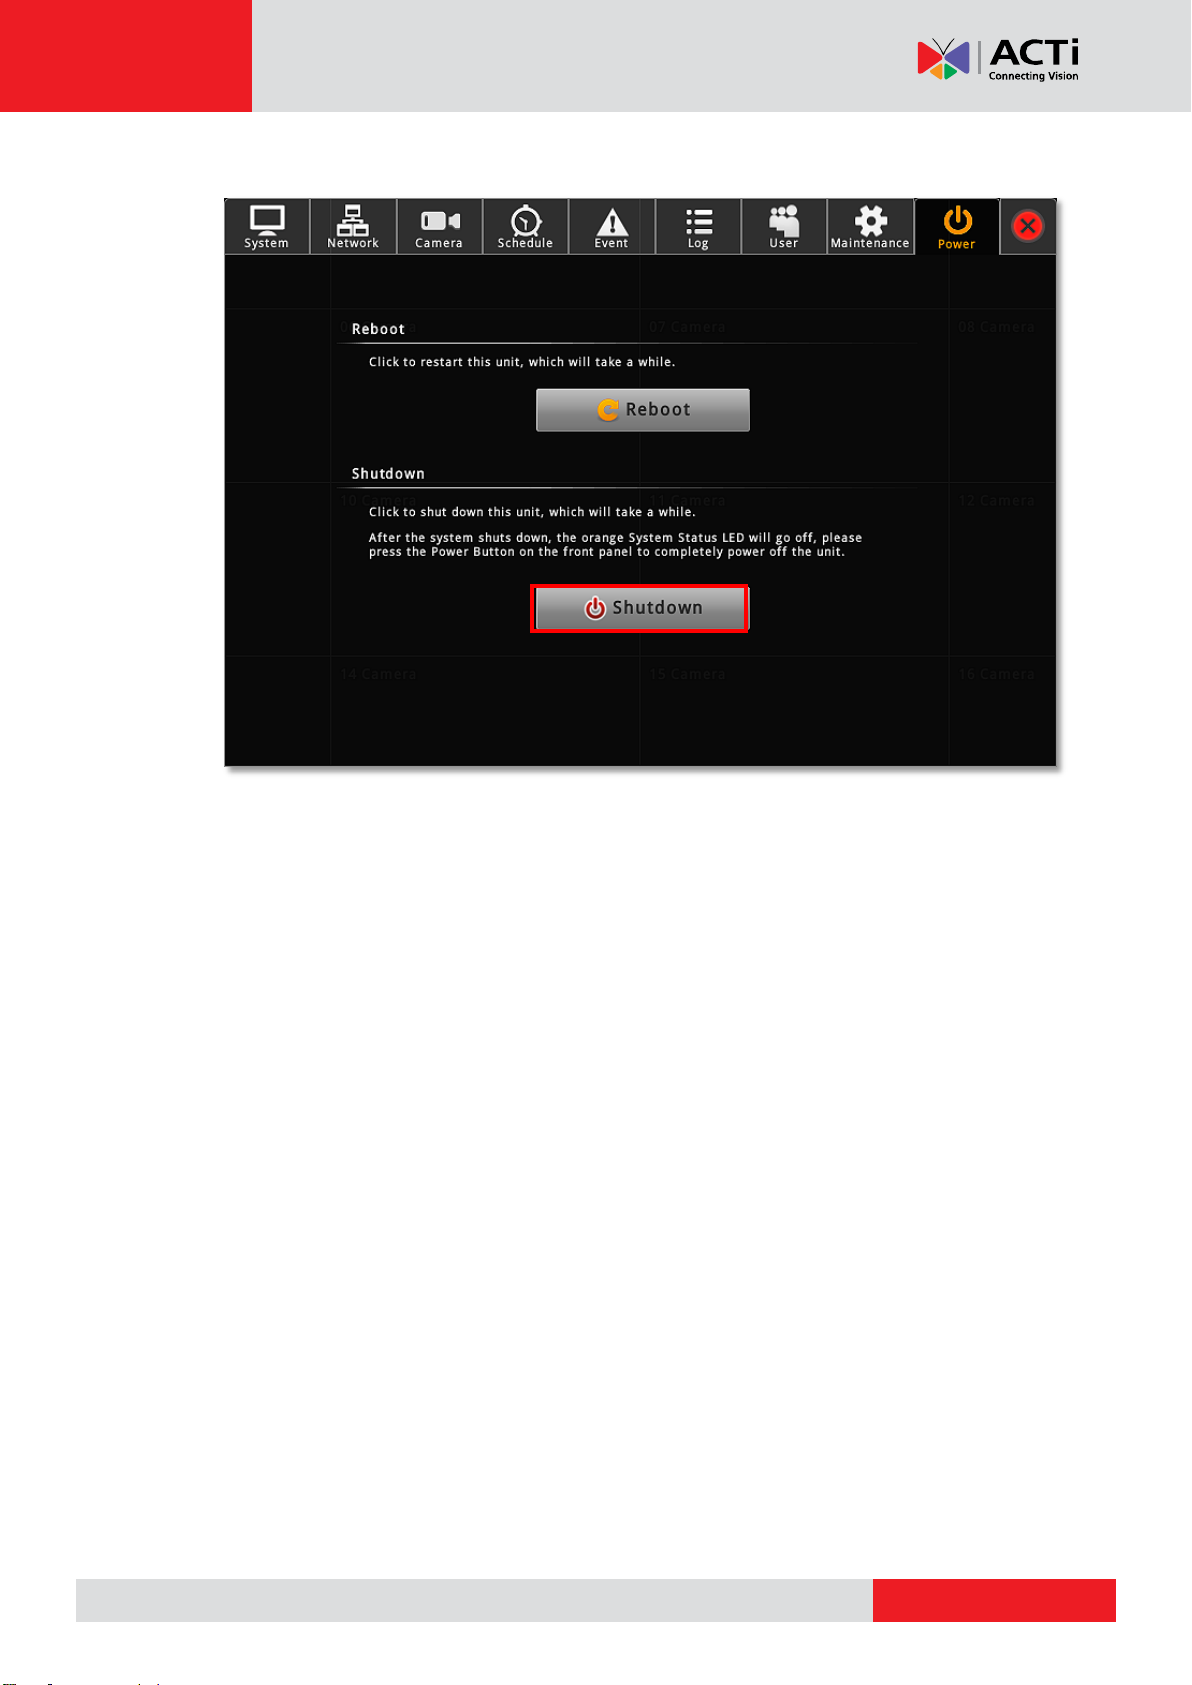
Turn Off the Device
As this unit is powered on, the Power LED and System LED are both lit, and the Power
Button is in pressed state. To turn ENR off, please do the following:
12
Page 13
www.acti.com
ENR-100 Series User’s Manual
1. On Live screen, click Setup Power tab, and click “Shutdown”.
2. The local display screen will turn black, with an information dialogue box showing up.
Please observe the System LED on the front panel, when its orange light is off, you may
press the Power Button to completely shut down the unit.
13
Page 14

www.acti.com
ENR-100 Series User’s Manual
Item
Indicator Status
Light Color
Description
Power LED
Solid
Blue
The device power is on.
System Status
LED
Lights up for three
seconds after Reset
Button is pressed
Orange
The system resetting process is
initializing.
Solid
The system service is running.
HDD LED
Flashing
Green
The hard disk is in activity.
Reset to Factory Default
By resetting this device, all your system settings and system log will return to factory
default. It is strongly recommended that you back up previous settings with Backup function
and export the system logs before resetting to factory default.
1. To begin, please turn off the device first.
2. Press down the Power Button to boot up the device, and immediately press and hold the
Reset Button with a pin or clip, the System LED will light up for about 2~3 seconds, and
you may release the Reset Button as the red light is off.
The device will enter the resetting process immediately and automatically restart.
LED Indicators
The LED indicators on front panel show the current device status:
14
Page 15
www.acti.com
ENR-100 Series User’s Manual
Local Client Operation
Log in to & out of ENR
To log into ENR system for the first time, you will have to key in the account name and
password in Login window. Please contact your system administrator for account and
password information.
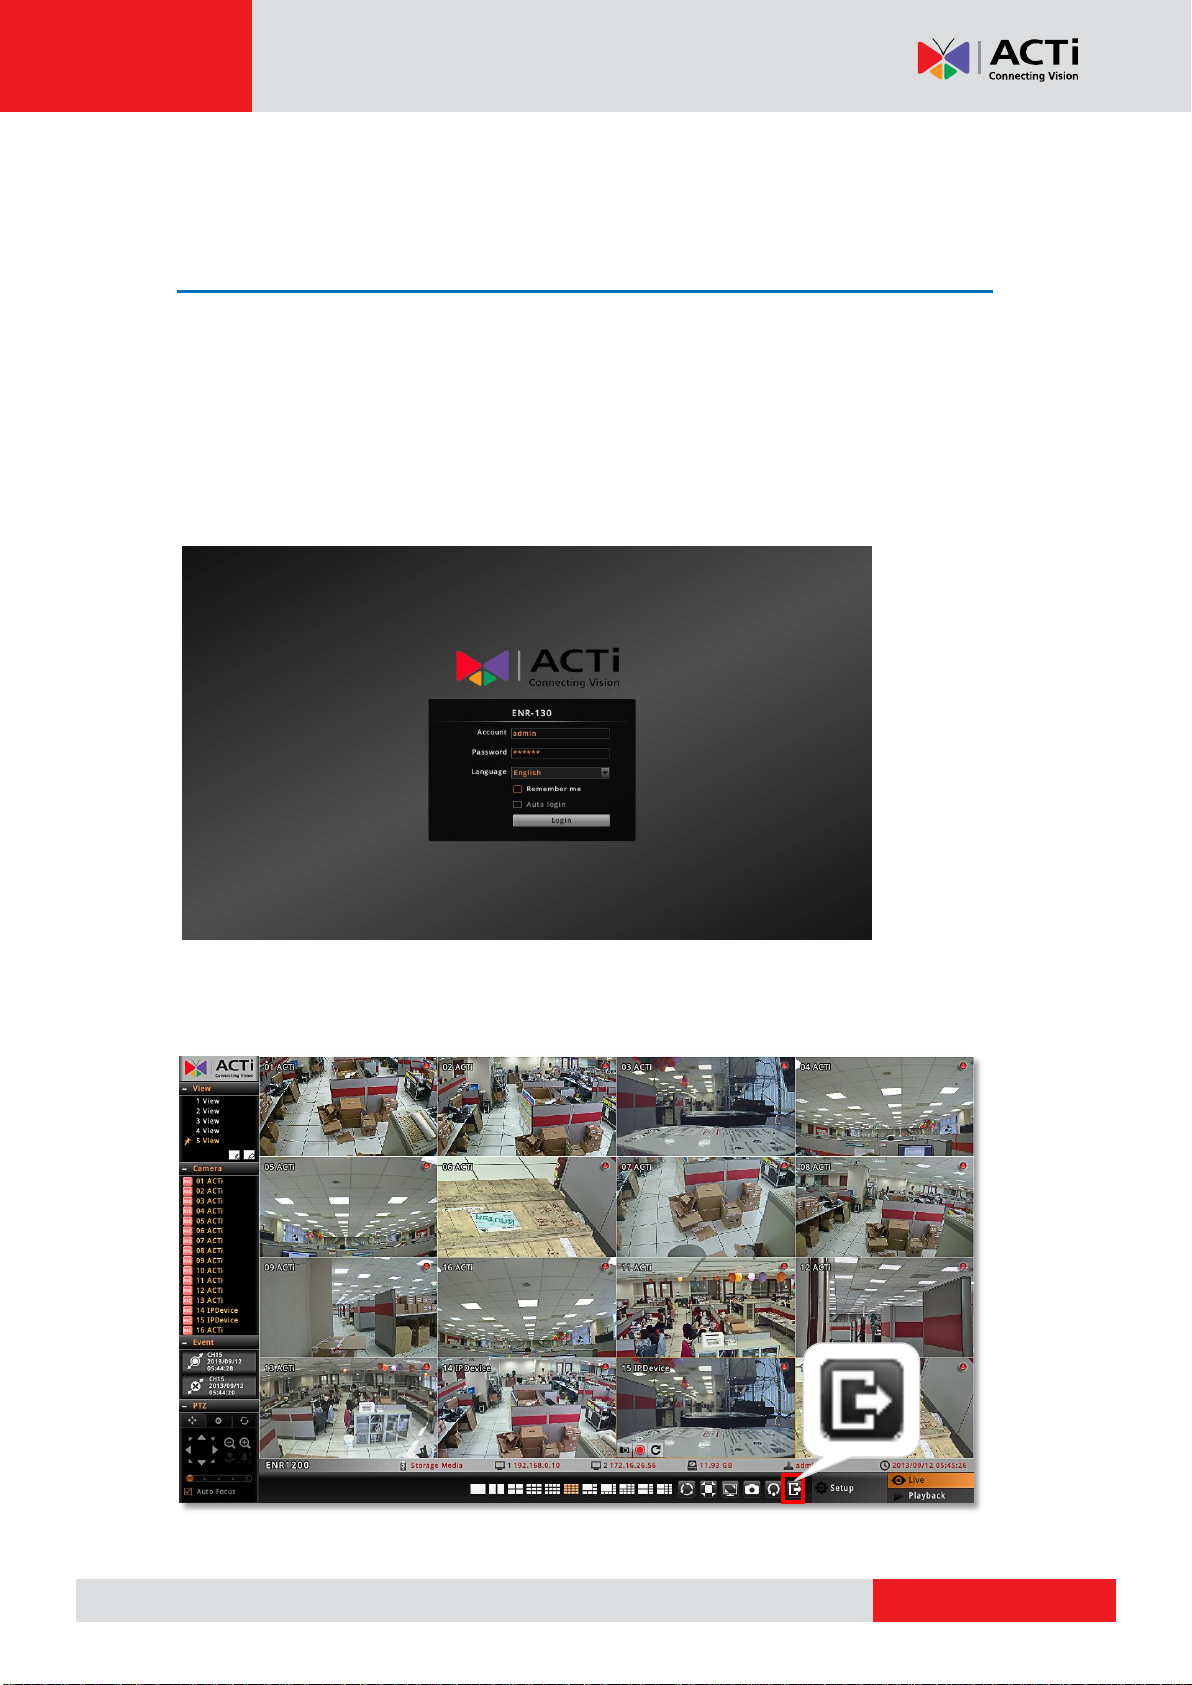
Log In
On Login window, click into the Account and Password fields to enter your account
information.
Log Out
On Live screen, click on the Logout button.
15
Page 16
www.acti.com
ENR-100 Series User’s Manual
CClliicckk ttoo ooppeenn SSeettuupp MMeennuu EEnntteerr PPllaayybbaacckk
System Overview
Main Screen Introduction
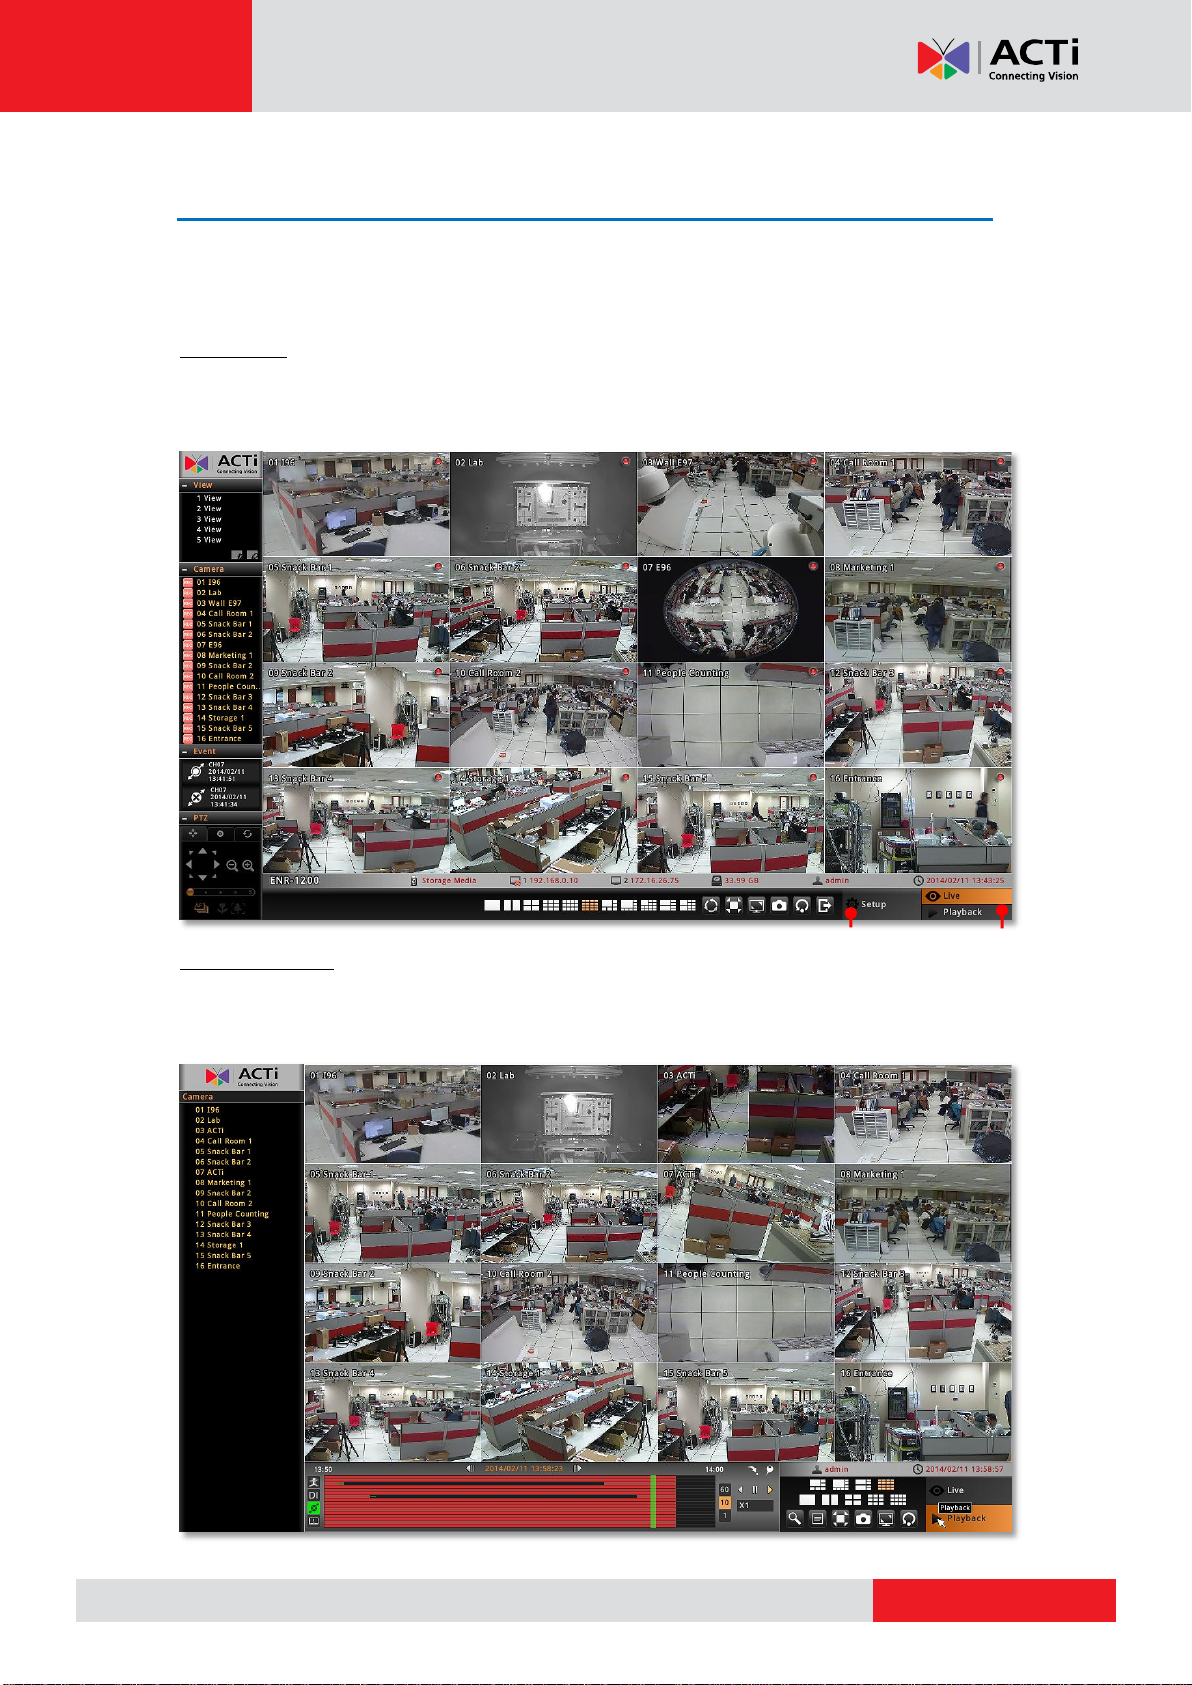
ENR local interface is composed of two main screens:
Live screen
After logging in, you will enter Live screen. Live screen is the interface where you see the live
streaming from your cameras and manipulate PTZ functions.
Playback screen
Where you can search the recordings, view the playback, put video bookmarks and export
the video.
16
Page 17

www.acti.com
ENR-100 Series User’s Manual
Input Devices
IN ENR system, a USB mouse is the required input device to do all the operations on user
interface. All the input devices, including USB mouse, USB joystick and USB keyboard are
ready to use when you connect them to ENR via USB 2.0 ports.
The onscreen keyboards allow you to input characters without using a physical one. By
clicking in a character field (e.g. Account or Server name) or number field (e.g. IP address
or Port), the specific onscreen keyboard will be brought up.
Standard Alphabet + Symbol Keyboard
Number + Symbol Keyboard
Symbol Keyboard
17
Page 18

www.acti.com
ENR-100 Series User’s Manual
To disable the virtual keyboard if a physical one is already in use, on Live screen, click Setup
System tab click “Keyboard”. Uncheck the box “Always shows software keyboard”.
You may adjust other input devices’ settings by entering “Keyboard” or “Joystick”, and refer
to System Administrator’s Manual for further details.
18
Page 19

www.acti.com
ENR-100 Series User’s Manual
Item
Description
View List
Lists five views available for customization.
Camera List
Lists all the added devices and their recording status.
Event List
Displays alerts of detected motion, recording and connection status.
PTZ Panel
Provides live onscreen PTZ controls. This panel is only enabled when
a PTZ device channel is selected on live view display area.
System Message
Displays import messages to inform you of certain system conditions
that require your prompt action.
Status Bar
Displays the following system status from left to right – (1) connected
USB storage device, (2) LAN1 IP address, (3) LAN2 IP address,(4)
total free disk space, (5) your user account and (6) current system
time.
Setup Menu
Opens Setup menu.
Live Menu
Lists available layout selections and live view operation controls.
Display area
VViieeww LLiisstt
CCaammeerraa LLiisstt
EEvveenntt PPaanneell
PPTTZZ PPaanneell
LLiivvee MMeennuu
SSttaattuuss BBaarr
SSeettuupp MMeennuu
SSyysstteemm MMeessssaaggee
Monitoring
You can perform most live monitoring tasks on Live screen. ENR may display all live channels
on the screen, or 1x1 single channel in succession automatically.
Aside from keeping an eye on the video, you may also take snapshots, control PTZ cameras,
start or stop manual recording on a selected channel. In this section, you will be given
instructions on the said fundamental operations. To start, log on to the system first.
Live Screen Overview
19
Page 20

www.acti.com
ENR-100 Series User’s Manual
Display Your Desired Camera View
You can watch a desired camera view in 1x1 channel view by clicking on the camera name on
Cameras list.
You can click this button on Live Menu to display
the selected view in its native aspect ratio.
Enter Full Screen Mode
You can hide the control panels by entering
full-screen mode. On Live Menu, click this button to
enter full-screen mode; on the bottom of full screen
view, click “Exit Full Screen” return to normal display mode.
20
Page 21

www.acti.com
ENR-100 Series User’s Manual
CClliicckk oonn aa cchhaannnneell ttoo rreevveeaall
SSiinnggllee CChhaannnneell MMeennuu
Apply a Customized View Layout
On the View list is where you customize desired Views. A View profile contains the channel
positions, layout style, full screen setting and sequence patrol setting. You can click on the
desired View on View list.
Single Channel Operations
By selecting a specific channel on Live screen, you may perform functions below on a single
channel view:
● Take a snapshot of this single channel
● Start manual recording of this single channel
● Enter Digital PTZ operation mode ( for all cameras, in 1x1 layout)
● Enter Optical PTZ operation mode ( for cameras with pan/tilt/zoom capabilities)
21
Page 22

www.acti.com
ENR-100 Series User’s Manual
Take a Snapshot
The image (at original resolution size) of current channel will be saved as jpg format onto the
USB mass storage, named as “Channelnumber_yyyy-MM-dd-hh-mm-ss.jpg”. Please make
sure the USB mass storage has already been connected to ENR unit.
Start / Stop Manual Recording
This function is useful when you need to record a specific video when no event recording or
schedule recording is proceeding. This video will be displayed as normal scheduled recording
on the Playback time bar. As the video is being recorded, this button will appear in pressed
state , click on it again to stop manual recording.
Digital PTZ Operations
Double-click on a channel to display it in 1x1 layout, and then click on it again to reveal
Single Channel Menu.
On Single Channel Menu, click to enable digital PTZ controls.
22
Page 23

www.acti.com
ENR-100 Series User’s Manual
Note
To take a snapshot of a layout containing all visible channels, select the desired layout and
click on Live Menu.
DDrraagg tthhee lleevveerr oonn tthhee ZZoooomm BBaarr
ttoo aaddjjuusstt zzoooomm lleevveell..
--TToo zzoooomm iinn,, ddrraagg iitt uupp
--TToo zzoooomm oouutt,, ddrraagg iitt ddoowwnn
CClliicckk oonn eeiigghhtt ddiirreeccttiioonnaall bbuuttttoonnss
ttoo nnaavviiggaattee tthhee wwhhoollee vviieeww..
2
1
Manipulate PTZ Devices on PTZ Panel
On Live screen, select a PTZ channel, the PTZ panel will become enabled.
23
Page 24

www.acti.com
ENR-100 Series User’s Manual
No
Function
A
Eight-direction arrow keys
Click to pan or tilt the camera (only available for cameras
with Pan/Tilt/ capability).
B
Pan/Tilt/Zoom speed
Click to change the speed. Provided speed scale is
from 1 to 5 (available for cameras with Pan/Tilt/Zoom
capability).
C
Auto focus (available for cameras with auto focus
capability)
D
Zoom (Available for cameras with a controllable
zoom) Zoom in Zoom out
E
Manual focus
(Available for cameras with a controllable focus)
Near focus Far focus
These buttons are enabled when the “Auto Focus” is
disabled.
A B C D E
2
SSttaarrtt aa TToouur
r
SSttoop
p
1
2
1
Click the tab to enter PTZ operation mode, and make
make use of the device’s PTZ capabilities to define a view.
.
Go to a Preset Point
Click the tab to enter Preset Points Operation mode, and click a red ID button.
Start PTZ Preset Tour
Click to enter Tour list. The ID of a saved tour will
appear red. Click on it to start the tour, and click to stop.
24
Page 25

www.acti.com
ENR-100 Series User’s Manual
+
Zoom in
Zoom out
Pan/Tilt
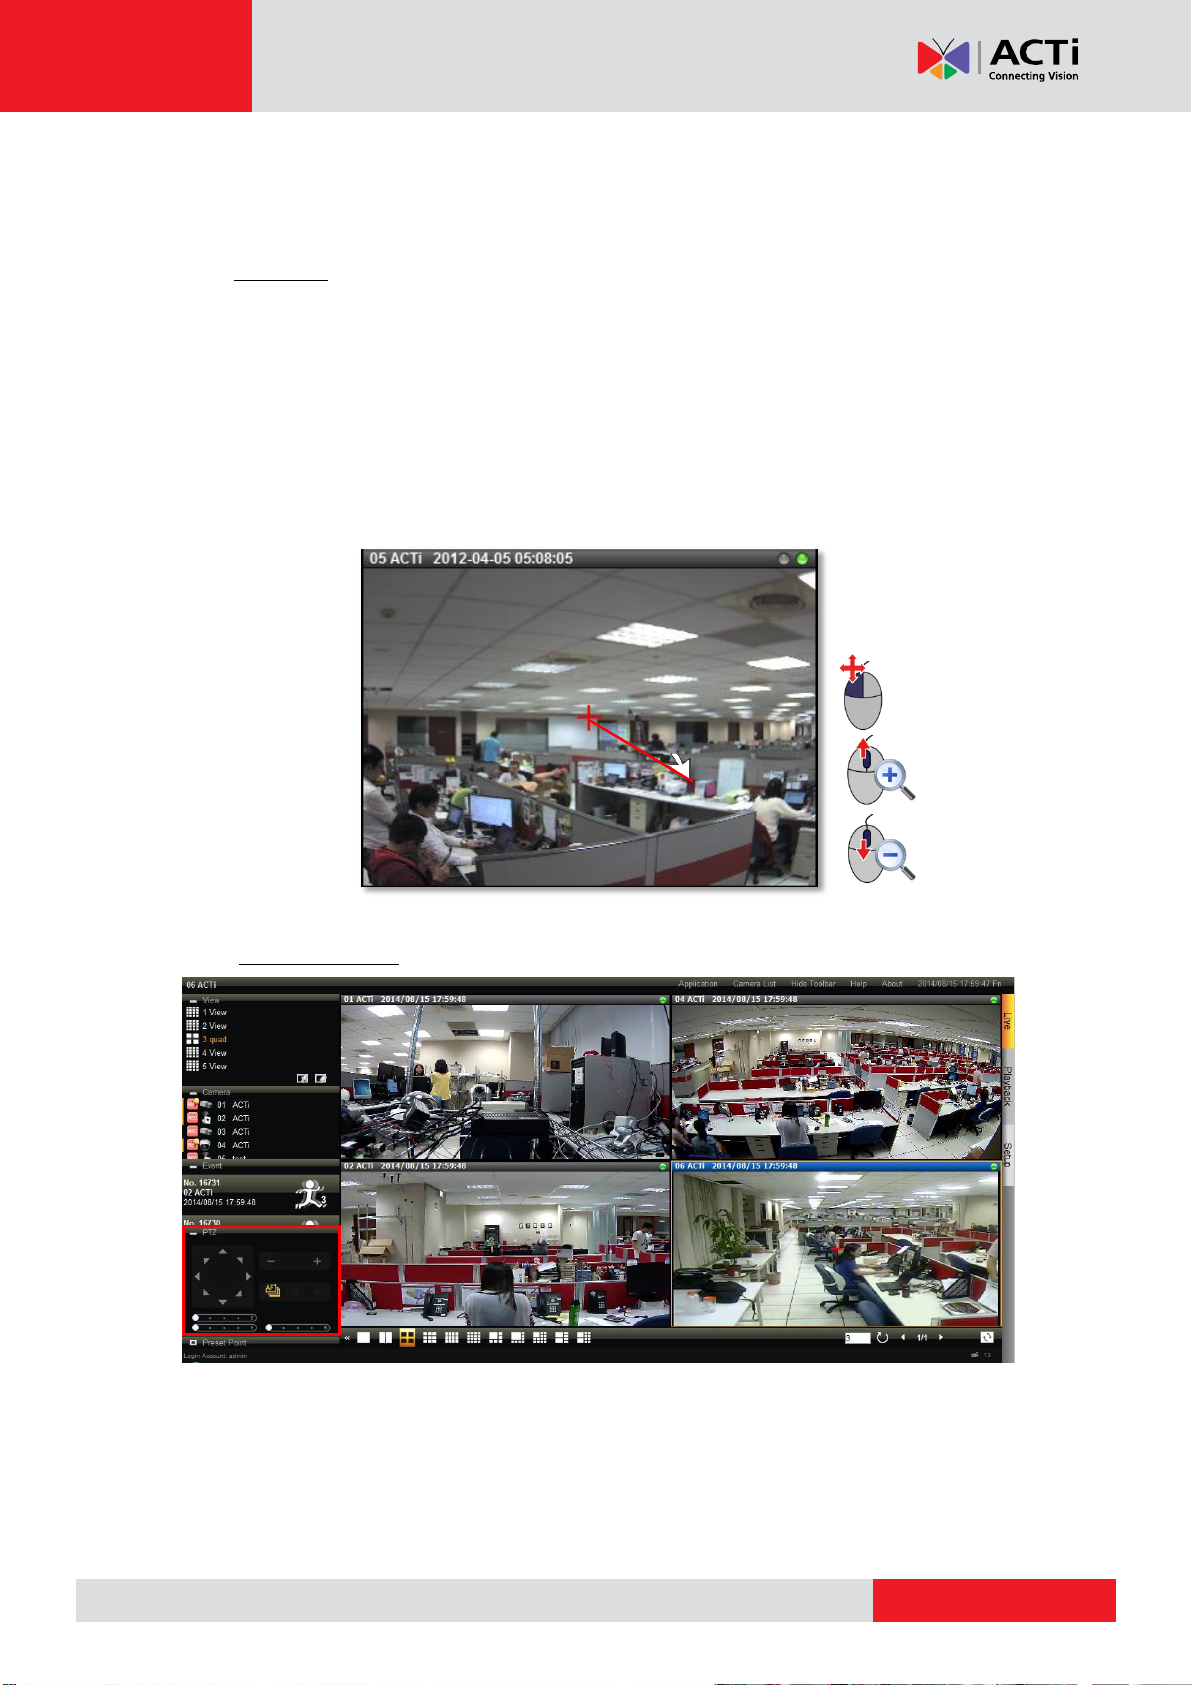
Manipulate PTZ Devices with Mouse Controls
You may directly manipulate a camera’s PTZ movements on the channel view. Select the
channel and enter onscreen PTZ mode by clicking on “ PTZ” , a crosshair will
appear in the middle, you mayu use the mouse to do the following PTZ operations:
1. To execute optical Panning and Tilting, click anywhere on the live window to allow the
camera to move in that direction. The farther you place the cursor from the center, the
faster the Pan/Tilt movement.
2. To execute optical Zoom in or Zoom out, scroll the mouse.
25
Page 26

www.acti.com
ENR-100 Series User’s Manual
Layout Patrol
By performing the Patrol function, all the four channels can be displayed by 1x1 layout in
turns.
26
Page 27

www.acti.com
ENR-100 Series User’s Manual
No
Description
1
Camera Name
2
Digital Input Motion Alert
This will flash along with the channel outline border when the digital input device
detects motion on camera site.
3
Video Motion Alert
This will flash along with the channel outline border when the camera detects video
motions on camera site.
4
Recording Status
This will appear when ENR is recording this channel by schedule, event or user’s
manual control.
Manual recording is proceeding
Scheduled recording is proceeding
1. Entrance
4 3 1
2
Understand Channel Status
On Live screen, it is essential to observe the system status and events, since unexpected
environmental factors or human behaviors may take place, and they might pose security
threats to your site. The channel status icons display important camera status and motion
alerts for you.
Channel Status
On top of each channel window displays certain status information of this device.
27
Page 28

www.acti.com
ENR-100 Series User’s Manual
Understand Event Notifications
On Live screen, the Event Panel displays the latest camera status alerts including digital
input detection, motion detection, network loss, or network recovery. By clicking on the event
notification card, you will be brought to the playback of this very event.
28
Page 29

www.acti.com
ENR-100 Series User’s Manual
Item
Description
Camera List
Lists all channels
Playback Control Panel
Provides controls that help you search through the recorded
footages easily.
Playback Menu
Lists available layout selections and playback related controls.
Display area
PPllaayybbaacckk CCoonnttrrooll PPaanneell
CCaammeerraa LLiisstt
PPllaayybbaacckk MMeennuu
Playback
Playback is the service that processes recorded video clips. You may search by time. by
event or the bookmarks you have set. Playback may include multiple-channel synchronized
playback. Video clips may also be exported in either RAW or AVI formats.
On Live screen, click on Live menu to enter Playback screen.
Playback Screen Overview
Upon entering Playback screen, you will enter 16-channel synchronized playback.
29
Page 30

www.acti.com
ENR-100 Series User’s Manual
You can play certain channel in 1x1 layout by
double-clicking this camera on Camera list.
1 5 9 13
1
5
9
13
To restore all the channels back to their original
positions, click this button.
1
To play back certain channels synchronizedly, please do the following:
1. Move your desired channels up. For example, you want to see Channel 1, Channel 5,
Channel 9 and Channel 13 to be played at the same time in a 2x2 layout. Drag these
channels to the top.
30
Page 31

www.acti.com
ENR-100 Series User’s Manual
1 5
9 13
1
2
2. On layout selection panel, select
Start Time Search
If you know the specific time of the event, you may start from choosing the precise, date and
the hour.
1. Click on the current-time indicator above the time bar
31
Page 32

www.acti.com
ENR-100 Series User’s Manual
Color
Description
Full-time or manual recording
The camera’s video motion detection function had been enabled, and the camera
detected motion events during this period.
The digital input device (e.g. PIR sensor) connected with the camera detected
motion events during this period.
ENR lost network connection with this camera during this period.
Video encoder loses the signal from this camera
Recording exists No recording exists
2
4
3
2. Specify the date on the calendar.
3. Choose the hour from the 24-hour time bar. Special recorded events are indicated in
different colors.
4. Click “OK” to close the window.
32
Page 33

www.acti.com
ENR-100 Series User’s Manual
1
2
3
Event Search
If you want to filter the recording by Event Type, you may perform an event search to locate
the desired video footage.
1. Click on the “Event Search” button on Playback Menu.
2. On Event Search window, define the Search Time, Duration, Cameras and Event Type
then click “Search”.
3. After the search is completed, click “Cancel” to close this window.
33
Page 34

www.acti.com
ENR-100 Series User’s Manual
Click the arrows
to switch pages
List of events
Bookmark the selected time
Reverse Play / Pause / Play
Play Speed Switch
Go to present time
Timeline scale Switch
4
4. The search result will be displayed on the left. Click on an event to enter the playback in
1x1 view.
Play the Video Footage
Use the buttons on Playback Control Panel to play your desired video footages.
1.
34
Page 35

www.acti.com
ENR-100 Series User’s Manual
1
2
Add and Search Bookmarks
You can bookmark a time position on the timeline by clicking on on Playback Menu.
1. Make sure the camera channels you desire to watch are all in display area. On Playback
Menu, click on the “Bookmark List” button.
2. The bookmarks will be shown on the left, click any bookmark to go to the saved time
position.
3. To delete a bookmark, simply right-click on it to being up the confirmation window, click
“OK” to delete the selected bookmark.
35
Page 36

www.acti.com
ENR-100 Series User’s Manual
Take a Snapshot
You can take a snapshot of current layout view containing all the currently displayed
channels by clicking on Playback Menu, this image will be saved as jpg format onto the
USB mass storage. Please make sure the USB mass storage has already been connected to
ENR. If you want to get a snapshot of certain channel in its full resolution size, select the
channel and click
Export Video
You may export video of the selected channel to .avi or .raw file. The provided exported video
duration is from 1 minute ~ 30 minutes.
1. Select a channel and click
2. Select the Export Duration and Export Type, and click “Start”.
The exported video will be saved onto the USB mass storage. Please make sure the USB
mass storage has already been connected to ENR device and the available storage space is
enough.
36
Page 37

www.acti.com
ENR-100 Series User’s Manual
http://ip address:port number
A
B
C
Remote Client Operation
Access ENR Server
To log into ENR system for the first time, you will have to key in the account name and
password in Login window. Please contact your system administrator for account and
password information.
Type in the IP address and port number directly into Internet Explorer. Sample IP will look like
this: http://220.228.146.21:1000 or domain name http://enr.acti.com. If the port number is
80, you do not need to append it when typing the address.
Log In
37
Page 38

www.acti.com
ENR-100 Series User’s Manual
AB C
Enter Account & Password
●Account (non case-sensitive): Your User Account
●Password (case-sensitive): Your User Password
Change UI language
To change UI language, select the desired language from “Language” dropdown list.
Remember Login Information
To have the server remember your Account, Password and language setting for future,
check “Remember me”.
Auto-login
By enabling Auto-login function, you can enter ENR Live screen directly without inputting
user account and password next time.
Log Out
On Live screen, click “Application” “Logout”.
38
Page 39

www.acti.com
ENR-100 Series User’s Manual
Item
Description
View List
Lists five views available for customization.
Camera List
Lists all the added devices and their recording status.
Event List
Displays alerts of detected motion, recording and connection status.
PTZ Panel
Provides live onscreen PTZ controls including Preset
Points and Tour controls. This panel is only enabled when a PTZ
device channel is selected on live view display area.
Live Screen
Menu
Lists available layout selections and live view operation controls.
Screen Switch
Click the tabs to enter other screens: Playback and Setup
Display area
LLiivvee SSccrreeeenn MMeennuu
SSccrreeeenn
SSwwiittcchh
VViieeww
LLiisstt
CCaammeerraa
LLiisstt
EEvveenntt
PPaanneell
PPTTZZ
PPaanneell
Monitoring
You can perform most live monitoring tasks on Live screen. ENR may display all live channels
on the screen, or 1x1 single channel in succession automatically.
Aside from keeping an eye on the video, you may also take snapshots, control PTZ cameras,
start or stop manual recording on a selected channel. In this section, you will be given
instructions on the said fundamental operations. To start, log on to the system first.
Live Screen Overview
39
Page 40

www.acti.com
ENR-100 Series User’s Manual
Select a Customized Layout
You can switch you current view to another pre-set custom layout by clicking on the layout
name.
Watch a Specific Camera View
To watch a certain camera view which is not in your current layout, double-click on it on
Camera list, the new channel will be added to your current layout.
40
Page 41
www.acti.com
ENR-100 Series User’s Manual
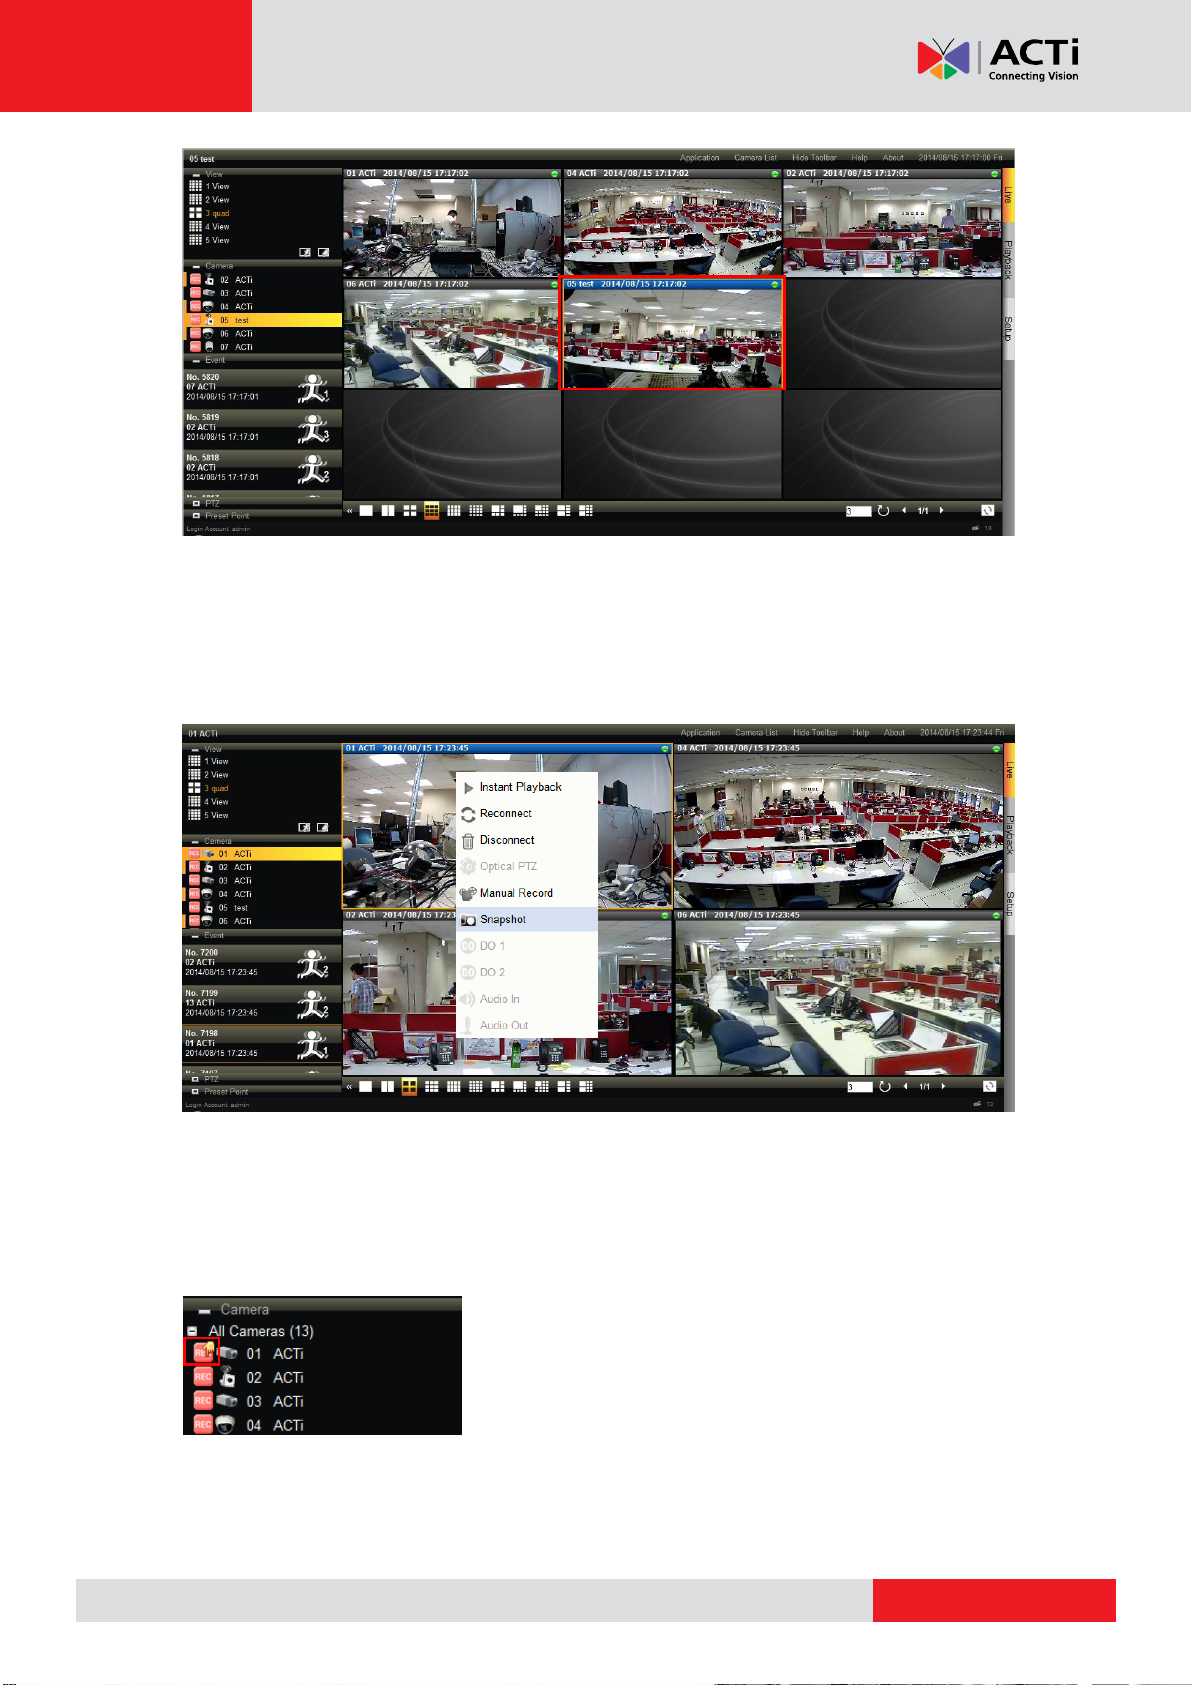
Take a Snapshot
You can take a snapshot of a current live channel by right-clicking on it and selecting
“Snapshot”. This image will be saved to Clipboard. You have to open an image editing tool
and use “CTRL+V” command to view this image.
Manual record
To record the live stream of a channel, right-click on it and then select “Manual Record”. As
the manual recording proceeds, a hand icon will appear right on this channel on Camera list.
To stop recording, right-click on the channel and select
“Manual Record” again.
41
Page 42
www.acti.com
ENR-100 Series User’s Manual
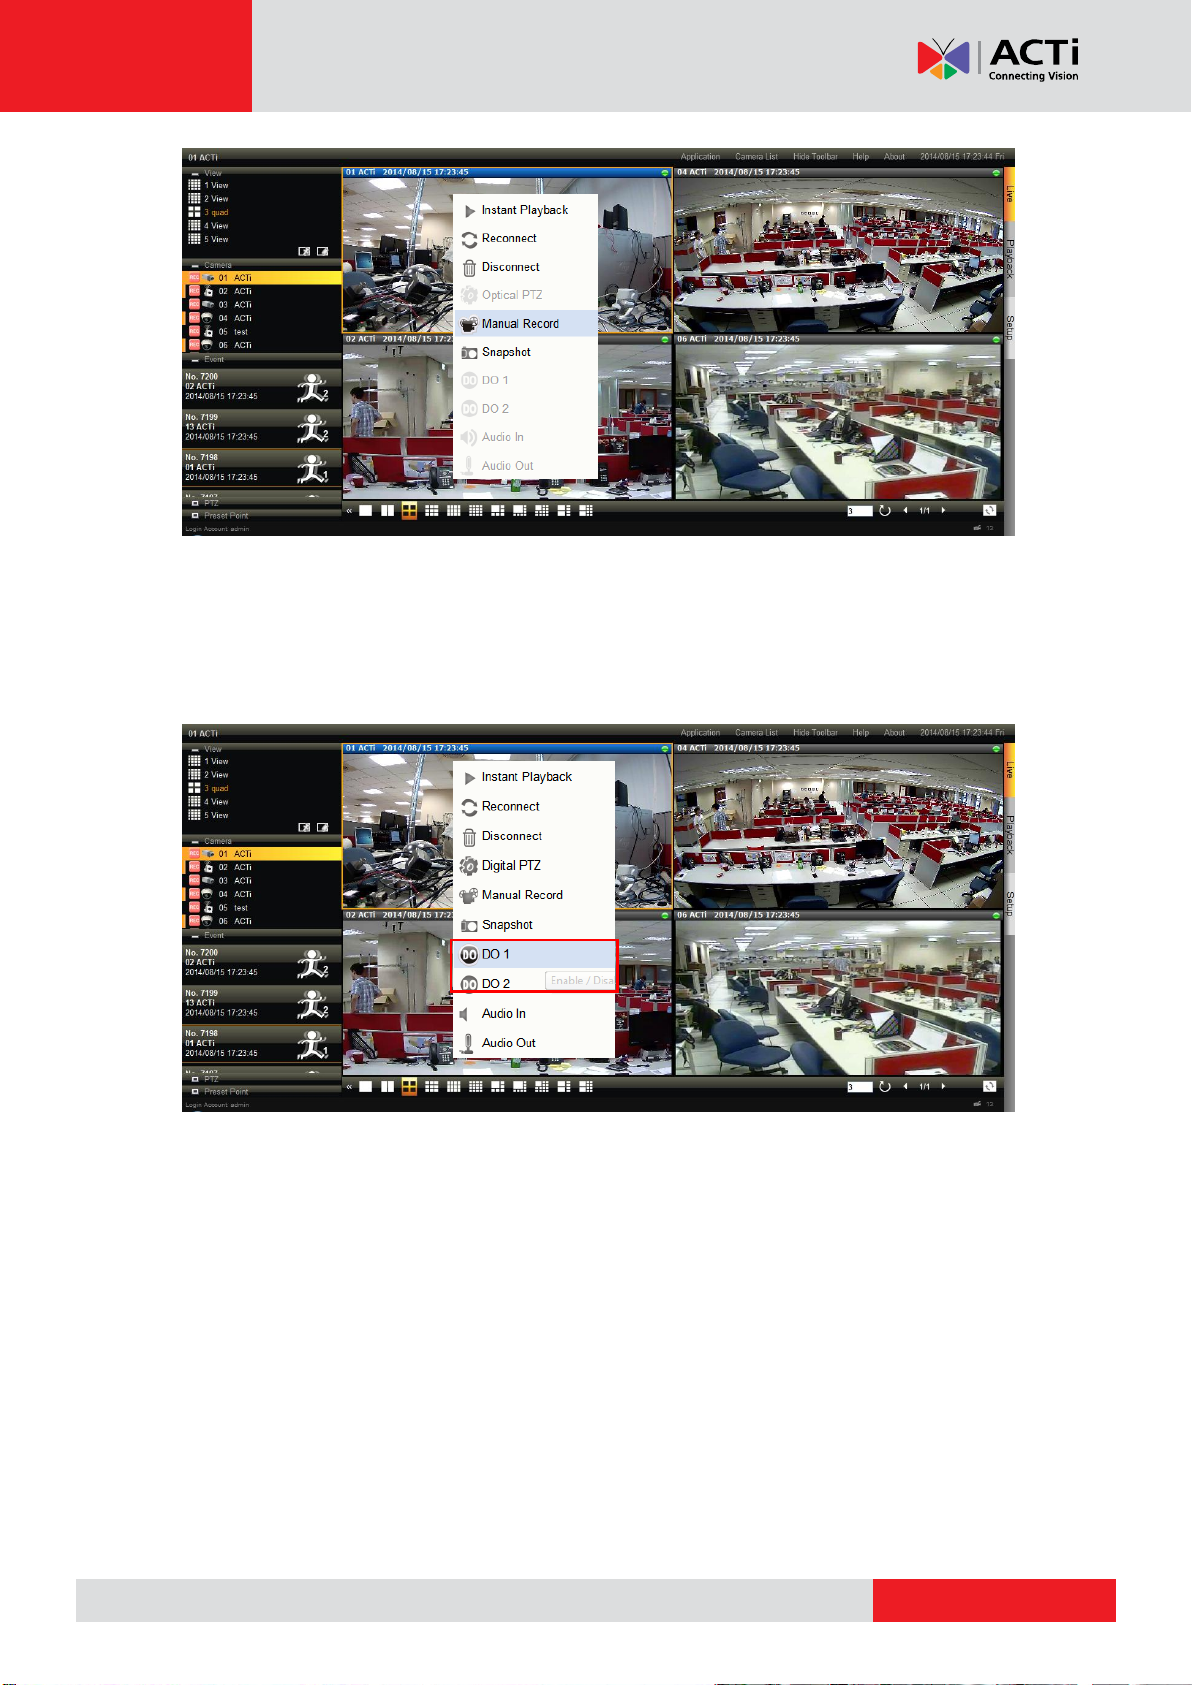
Trigger Digital Output
You can trigger a digital output connected to a camera via remote client interface. Right-click
on the channel and select the DO you want to trigger.
Send Audio Signal to a Camera
If a camera is connected with an audio-out device( e.g. a speaker), you can make use of the
audio-in device ( e.g. a microphone) to send the audio signal to the camera side. To do this,
right-click on the channel and select ”Audio Out”.
42
Page 43

www.acti.com
ENR-100 Series User’s Manual
Cancel Zoom area
Draw Zoom area
Picture-in-Picture area
Digital PTZ Navigation
Digital PTZ allows you to zoom into part of the video and enlarge it to display on screen. This
PTZ function is applied to every camera model. On the channel, click and drag a highlight
rectangle over any channel, and the area highlighted will be displayed in the full live video
window. In this mode, a picture-in-picture view will show in the lower right of live view window.
A red rectangle will mark the currently enlarged view area within the full size video. You may
click and drag the red rectangle to see another area. To go back to the original full video view,
just right-click on the minimized Picture in Picture view.
If this camera has optical PTZ feature, you will have to right-click on the channel and select
“Digital PTZ” to start digital PTZ navigation.
43
Page 44
www.acti.com
ENR-100 Series User’s Manual
Zoom in
Zoom out
Pan/Tilt
Optical PTZ Navigation
If this camera has optical PTZ feature, you can directly operate the PTZ movements on the
channel. First, focus this channel on display area,
- Use the mouse to do the following PTZ operations:
●To execute optical Panning and Tilting, click anywhere on the live window to allow the
camera to move in that direction. The length of the direction indicator is proportional to
the Pan and Tilt speed. The farther you place the cursor from the center, the faster the
Pan/Tilt movement.
●To execute optical Zoom in or Zoom out, scroll the mouse wheel forward to zoom in;
scroll the mouse wheel backward to zoom out.
- Use onscreen controls to operate PTZ movements:
Open the PTZ panel on the left, and click on the controls the functions of which are explained
below:
44
Page 45

www.acti.com
ENR-100 Series User’s Manual
8 directional buttons
Zoom in / Zoom out
Focus Mode / Near Focus / Far Focus
Note
1. The zoom buttons are only applicable for those devices supporting optical zooming.
2. The focus buttons are only applicable for devices with controllable zoom lens, e.g.
KCM5211. Please remember to turn off the autofocus mode on device firmware before
using these buttons.
3. Make sure PTZ mode appears as “Digital PTZ” on right-click channel menu.
Zoom Speed
Pan Speed
Tilt Speed
The executable preset point buttons
appear as buttons 1 and 2 below
Go to a Preset Point
If the system administrator has previously defined certain PTZ preset points, you can directly
click on a preset button to have the camera find the corresponding view.
45
Page 46

www.acti.com
ENR-100 Series User’s Manual
The executable preset tour buttons
appears as buttons 1 below
Start / Stop a Tour
If the system administrator has previously defined certain PTZ tour, you can directly click on a
preset tour button to have the camera execute the tour. To stop the tour, click on the “Pause”
button.
46
Page 47

www.acti.com
ENR-100 Series User’s Manual
Item
Description
Camera List
Lists all channels
Playback Control Panel
Provides controls that help you search through the recorded
footages easily.
Playback Menu
Lists available layout selections and playback related controls.
Display area
PPllaayybbaacckk CCoonnttrrooll PPaanneell
CCaammeerraa LLiisstt
PPllaayybbaacckk MMeennuu
Playback
Playback is the service that processes recorded video clips. You may search by time. by
event or the bookmarks you have set. Playback may include up to 4-channel synchronized
playback. Video clips may also be exported in either RAW or AVI formats.
On Live View screen, click to enter Playback screen.
Playback Screen Overview
Upon entering Playback screen, you will enter 16-channel synchronized playback
47
Page 48
www.acti.com
ENR-100 Series User’s Manual
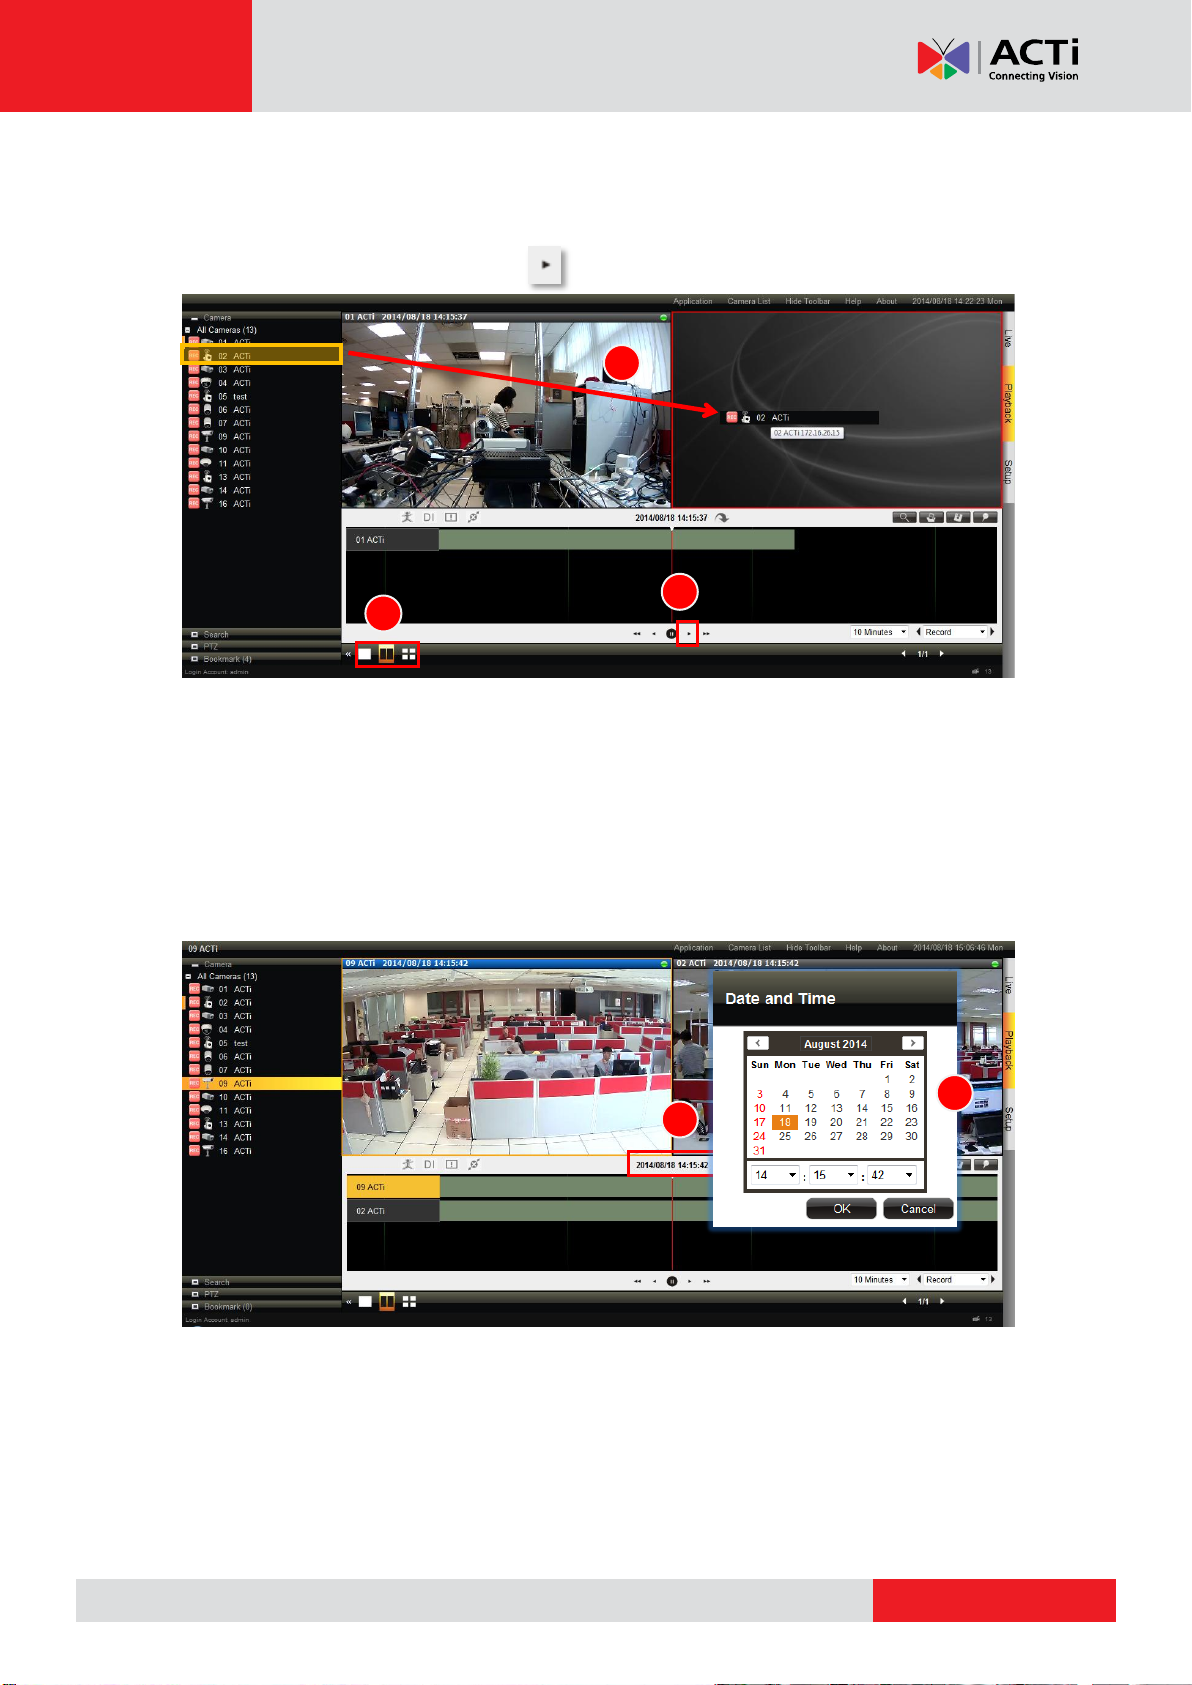
1 2 3 1 2
To play back certain channels synchronizedly, please do the following:
1. Select a layout.
2. Drag the desired camera channels from Camera list to the display window.
3. On Playback Control Menu, click to start playing.
Start Time Search
If you know the specific time of the event, you may start from choosing the precise, date and
the hour.
1. Click on the current-time indicator above the time bar.
2. Specify the date on the calendar, and click “OK”.
3. To search for footage of a specific event, click on the event filter to highlight those special
events in different colors.
48
Page 49

www.acti.com
ENR-100 Series User’s Manual
3 1 2
When there are multiple events, you can use
the event finder to jump to the previous or the
next event directly.
NNeexxtt
PPrreevviioouuss
Event Search
If you want to filter the recording by Event Type, you may perform an event search to locate
the desired video footage.
1. Scroll the time bare to your desired position.
2. Click on the “Search” button on Playback Menu.
49
Page 50

www.acti.com
ENR-100 Series User’s Manual
3
Reverse Play / Pause / Play
Click to change play speed
4
3. On Search window, select the
cameras and specify the event
indicators for each camera and
click “Search”.
4. The search result will be display on the Search Result panel. Click on an event to jump to
the time spot.
Play the Video Footage
Use the buttons on Playback Control Panel to play your desired video footages.
50
Page 51

www.acti.com
ENR-100 Series User’s Manual
1 2 3
4
Add and Search Bookmarks
You can bookmark a time position on the timeline by clicking on Playback Menu.
1. Make sure the camera channels you desire to watch are all in display area and open the
Bookmark list panel.
2. The bookmarks will be shown on the left, double-click on any bookmark to go to the saved
time position.
3. To delete a bookmark, simply click on the “X” icon on the bookmark entry.
Take a Snapshot
You can take a snapshot of the currently-displayed image of a channel and save it as a JPG
file on your computer. On Playback Menu, click . Select the camera channel, input
the overlay text (optional), select the destination folder to save the file and click “Save This”
to export this image.
51
Page 52

www.acti.com
ENR-100 Series User’s Manual
1 2 3
4
Export Video
You may export video of the selected channel to .avi or .raw file. The provided exported video
duration is from 1 minute ~ 60 minutes.
1. Drag the time bar to the start point of the footage, right-click on the time bar and select
“Mark Export Start”
2. Drag the time bar to the end point of the footage, right-click on the time bar and select
“Mark Export End”
3. Click on the Playback Menu.
4. On Export window, select the channels, file format and the destination folder, and then
click “Export”.
52
 Loading...