

Page 1

ACTi CameraGo!
User Manual
Version 1.5.10
2013/04/18
Page 2

www.acti.com
ACTi CameraGo! User Manual
Table of Contents
1 Overview
3
1.1 Introduction ............................................................................ 3
1.2 CameraGo! specifications ........................................................ 5
1.3 Compatible ACTi cameras ....................................................... 5
2 Preparation
6
2.1 Download and installation of CameraGo! .............................. 6
2.2 Prepare camera for CameraGo! .............................................. 7
3 Usage
8
3.1 Connecting to camera via PMON-1001 ................................... 8
Establishing connection to PMON-1001 ........................................ 8
Connecting to the camera by CameraGo! app .............................. 9
Connection or login failure ........................................................... 11
Unplugging the camera while CameraGo! is connected to Wi-Fi 12
3.2 Live View ............................................................................... 13
Launch the live view page ........................................................... 13
Re-focus the camera ................................................................... 14
Digital PTZ Control ...................................................................... 14
Optical zoom control .................................................................... 15
PTZ control .................................................................................. 16
Logout ......................................................................................... 17
2
Page 3
www.acti.com
ACTi CameraGo! User Manual
1. Overview
1.1 Introduction
CameraGo! is a free application for Apple’s iPhone and iPod
Touch with the purpose of assisting system integrators during the
process of camera installation by providing live view and PTZ
controls on the display of the mobile device.
With the help of CameraGo! it is possible to do convenient and
time-saving viewing angle and focus adjustment of ACTi camera without needing to bring
a notebook computer up on the ladder with the long cable attached or ask someone on the
ground for assistance.
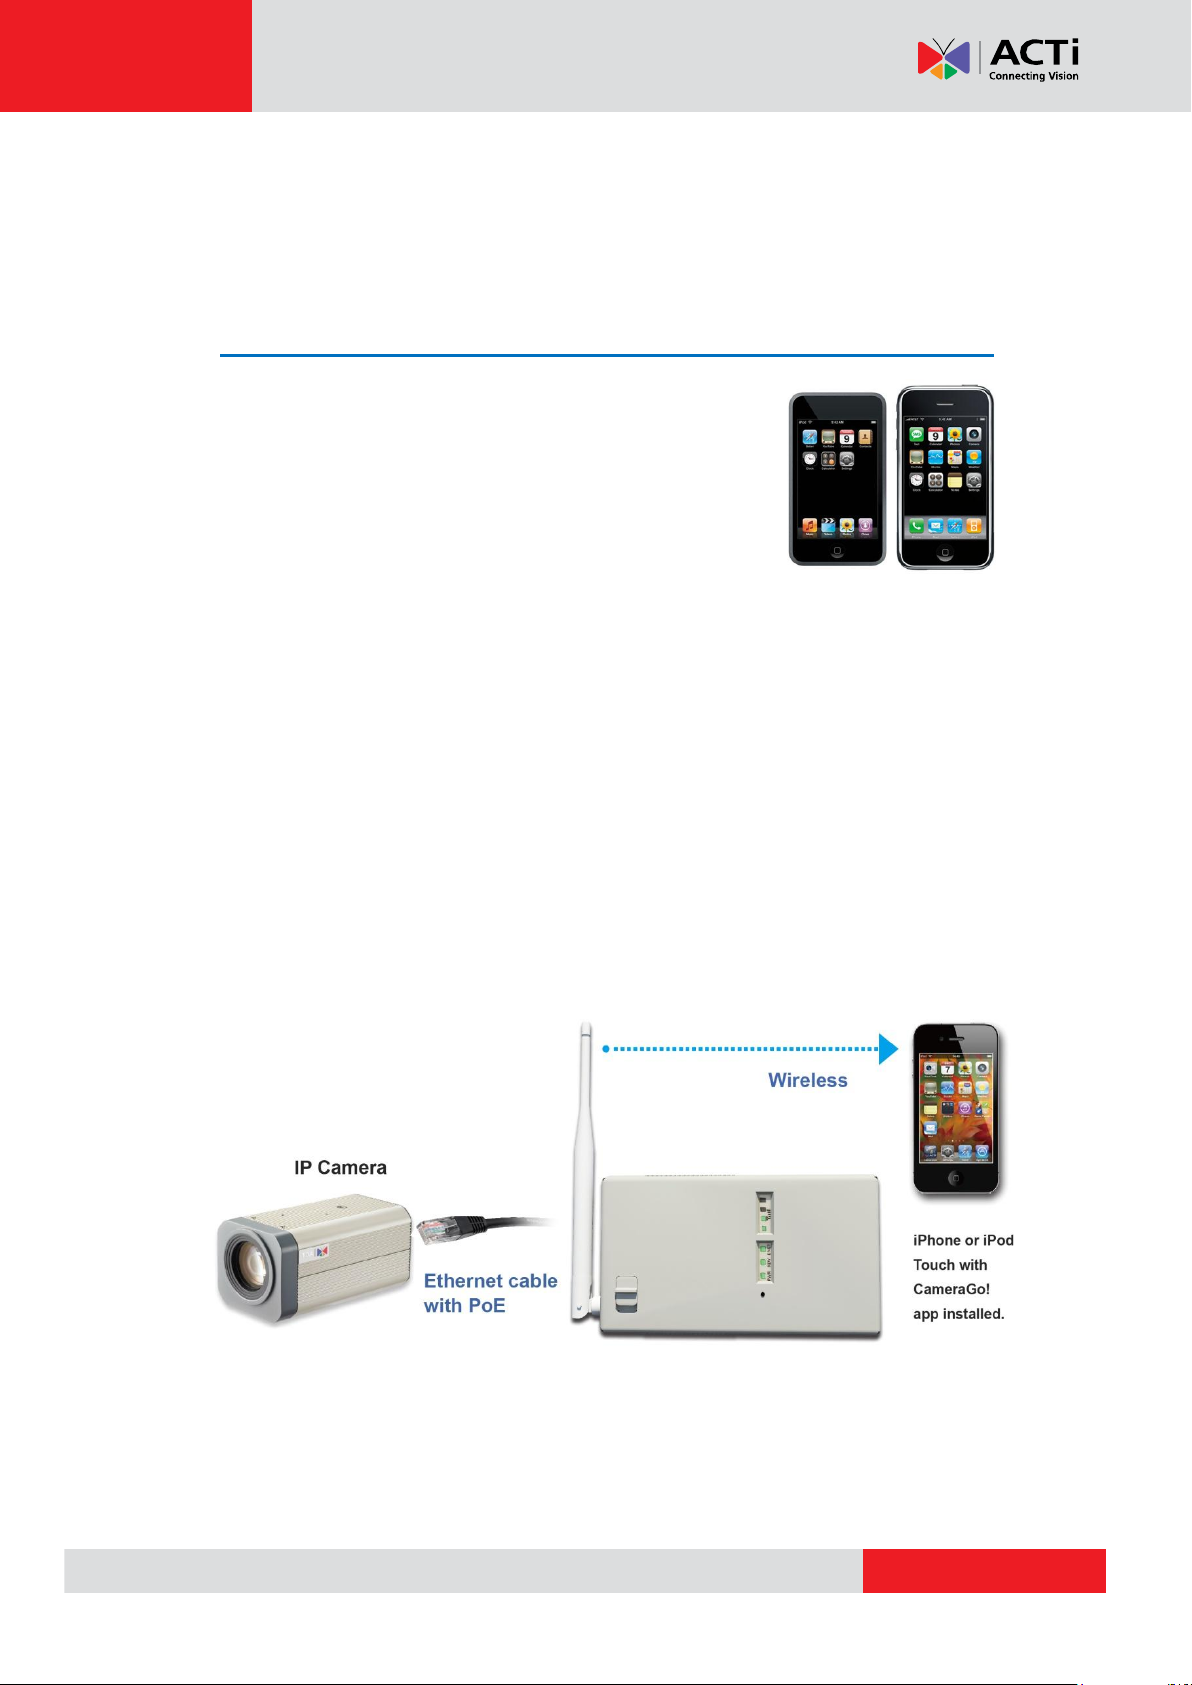
ACTi CameraGo! is designed to be used together with Camera Installation Kit
(PMON-1001) – a light on-the-belt hardware utility serving the purpose of connecting to the IP
camera and providing PoE power through a short network cable while providing wireless
network access for iPhone or iPod Touch that has ACTi CameraGo! app installed.
Fig. 1 Architecture of CameraGo! and PMON-1001
3
Page 4

www.acti.com
ACTi CameraGo! User Manual
Fig. 2 Illustration: Practical use of CameraGo! and PMON-1001
The following chapters of this manual describe the system requirements and functionality of
CameraGo! application. For more details about Camera Installation Kit PMON-1001, please
refer to its product manual.
4
Page 5

www.acti.com
ACTi CameraGo! User Manual
Category
Specification
Live View
Maximum number of cameras
1
Display layout
Single channel
Re-scaling to full screen
Auto
PTZ & Auto Focus
Optical Zoom Control
PTZ buttons as video overlay
Digital PTZ Control
Hand gesture / on screen
PiP(Picture-in-Picture) PTZ controls
Re-focus
Re-focus button for auto focus cameras
System
Device Search
Auto search via UDP
Video streaming protocol
HTTP
License
Free
Security
Password protected access
System Requirements
Hardware
iPhone 3G or newer and iPod Touch
Operating System
iOS 5.01~6.1
Camera Series
Firmware version
KCM series
v5.09.15 or newer
TCM series
v4.12.09 or newer
ACM series
v3.14.18 or newer
D/E/B/I series
V6.03.03 or newer
1.2 CameraGo! specifications
1.3 Compatible ACTi cameras
5
Page 6
www.acti.com
ACTi CameraGo! User Manual
2 Preparation
2.1 Download and installation of CameraGo!
You may use one of the two ways to download
CameraGo! from the Apple’s store for free:
1. Use the “App Store” icon in the mobile
device to search and install the app
directly. It requires Internet access for
the mobile device.
2. Use the “iTunes” software of your PC to connect
to “iTunes Store” over Internet, download the app,
and later sync with mobile device via USB cable.
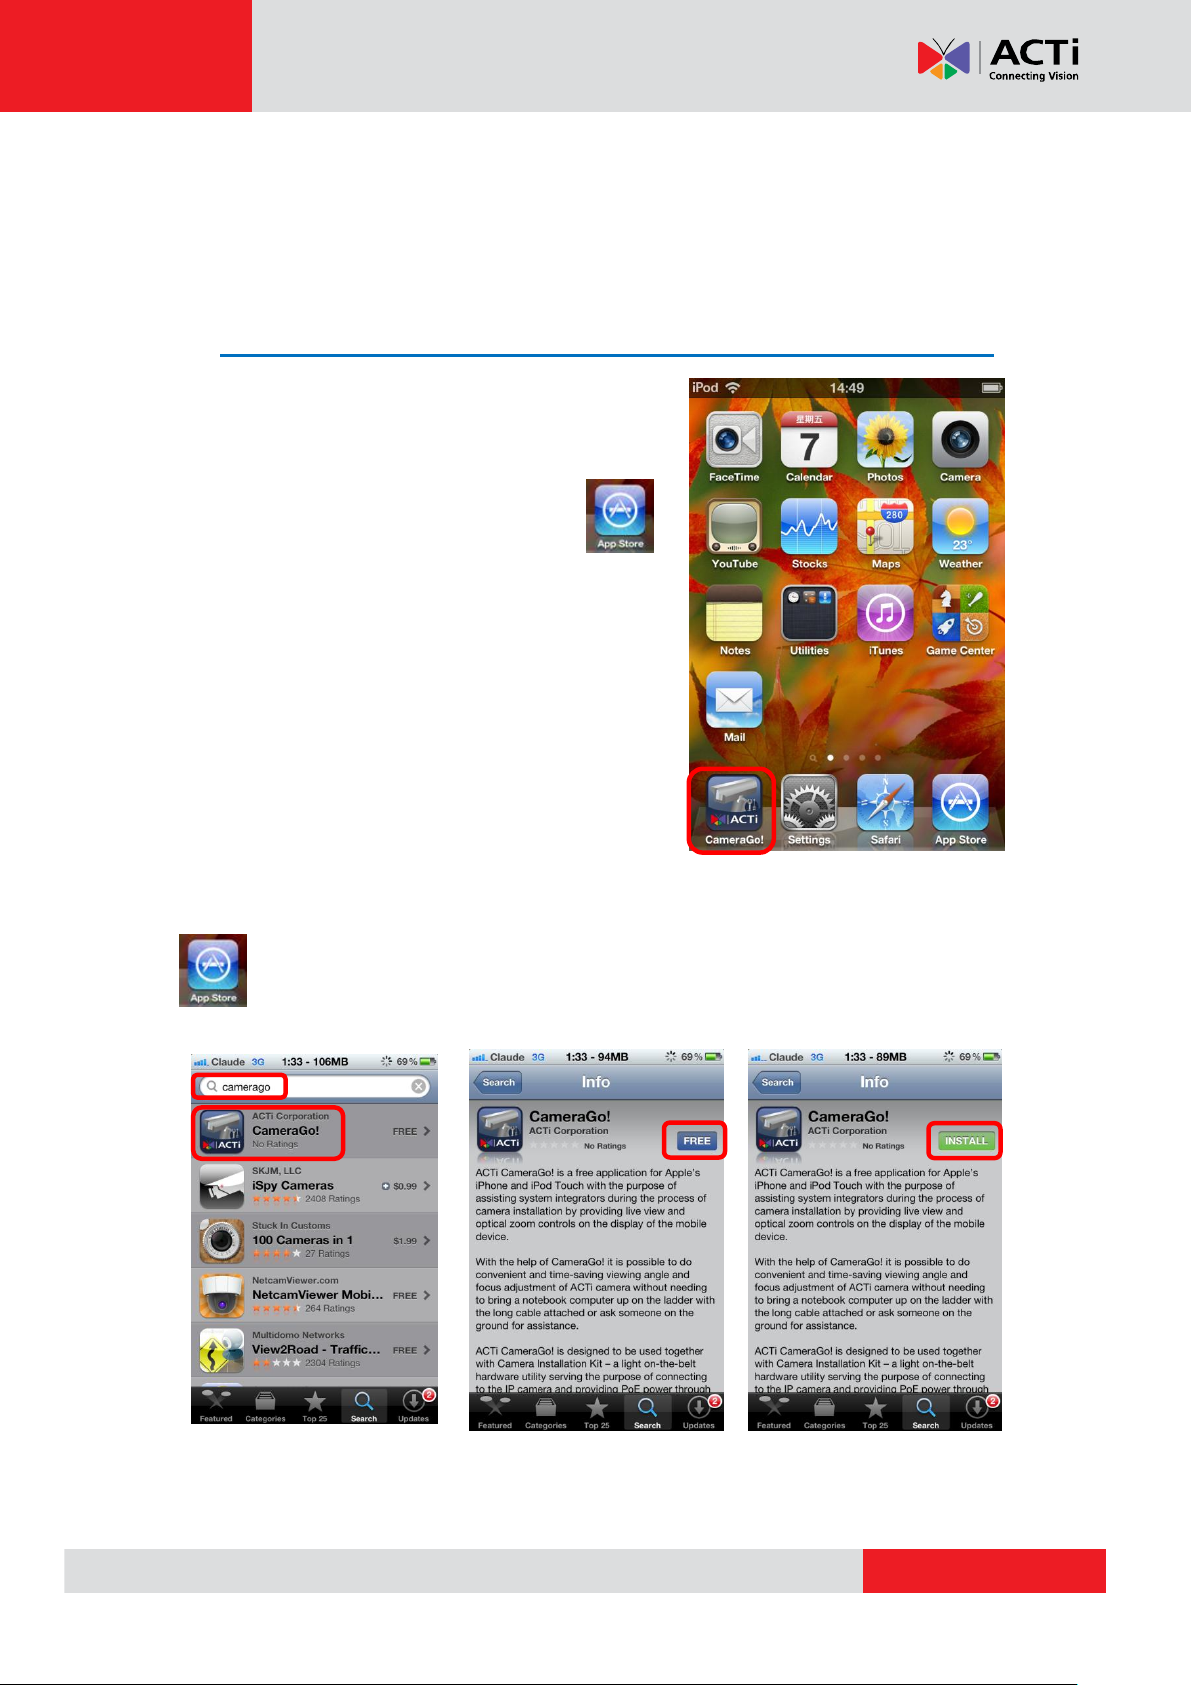
Upon successful installation, the CameraGo! icon will
appear among the list of apps.
Fig. 3 CameraGo! successfully installed
Downloading and Installation Example
Click on the “App Store” icon on the mobile device to enter the search page of apps.
Key in the text “camerago” to find the app and follow the standard installation
procedure!
Fig. 4 Downloading and Installation
6
Page 7

www.acti.com
ACTi CameraGo! User Manual
2.2 Prepare camera for CameraGo!
Please make sure that the firmware version is new enough (see the chapter “Compatible ACTi
Cameras”). If you have purchased the cameras recently then most likely those models already
have the compatible firmware.
It is possible to download the compatible camera firmware from ACTi website (www.acti.com) if
necessary. If you need assistance, then please contact ACTi technical support at
www.acti.com/chd .
Important Notice:
Please note that weaker or interfered wireless signal may cause video latency. It may result
from having too many wireless systems covering the same area, or from too long distance
between PMON-1001 and the mobile device. The less data is there to be sent (smaller
resolution and bitrate of the video stream) the less obvious is the interference.
7
Page 8

www.acti.com
ACTi CameraGo! User Manual
Fig. 5 Go to settings
Fig. 6 Go to Wi-Fi settings
Fig. 7 Select network
3 Usage
3.1 Connecting to camera via PMON-1001
Establishing connection to PMON-1001
CameraGo! utility is designed to work in combination with the Camera Installation Kit
PMON-1001. Among the other functions, PMON-1001 acts as a Wi-Fi access point with DHCP
support, providing wireless network access to the Apple’s handheld device that runs
CameraGo! utility.
The name of the wireless network provided by PMON-1001 is “Camera_Helper” (Fig. 7). This
network is available only when PMON-1001 has successfully established connection to the
camera via Ethernet cable. To select the Wi-Fi network, go to “Settings”, “Wi-Fi”, and select
“Camera_Helper” among the available networks. The password is 12345678.
Having successfully connected to “Camera_Helper” network means that the Apple’s handheld
device has obtained an IP address from the PMON-1001 that is within the same network
segment as the IP address of the camera.
After using “Camera_Helper” network once, the mobile device will remember it as a “known
network”, and next time this network will be joined automatically without needing to go to
8
Page 9

www.acti.com
ACTi CameraGo! User Manual
Fig. 9 Searching for a camera
Fig. 10 Camera found
“settings” page for network selection.
If the “Camera_Helper” network is not found, then please refer to the manual of Camera
Installation Kit PMON-1001 for further instructions.
Connecting to the camera by CameraGo! app
For the convenience of installation, it is recommended to keep
the default account name and password of each camera as
factory default until the end of physical installation and only later
change them by Web Configurator when getting the cameras
ready for VMS access.
This way it is possible to save the effort of typing the customized
account name and password into the CameraGo! settings, as
CameraGo! is designed for your convenience to access cameras
automatically by their factory default credentials (Admin/123456).
You may start using the app by tapping on the “CameraGo!” icon
(Fig. 8).
Fig. 8 Launch the app by tapping on CameraGo! icon
CameraGo! will automatically attempt to find the camera that is connected to PMON-1001 via
Ethernet cable (Fig. 9). Normally, the camera is found instantly. When the camera is found, the
name of the model and its IP address will be displayed (Fig. 10).
When the camera is found, its compression mode will temporarily be set to MJPEG by
9
Page 10
www.acti.com
ACTi CameraGo! User Manual
CameraGo! and B2-Frame will be disabled in camera’s firmware. This way CameraGo! is able
to handle the incoming video stream without consuming too much computing resources of the
mobile device. After logging out from CameraGo!, these settings will be restored as they were
before.
As shown on Fig. 10, the user has four options to click:
1. Change the preset account name and password for CameraGo! that is used to access
cameras by pressing if necessary. The account name and the password for
CameraGo! have to be the same as in the camera that is connected to PMON-1001 via
Ethernet cable.
2. The “New Search” button is used when another camera is connected to PMON-1001 with
possibly different name and IP address. It is usually used when there are several cameras
to be installed on the site, one after another.
3. The “OK” button is used to access the Live View page to proceed with camera viewing
angle and focus adjustment.
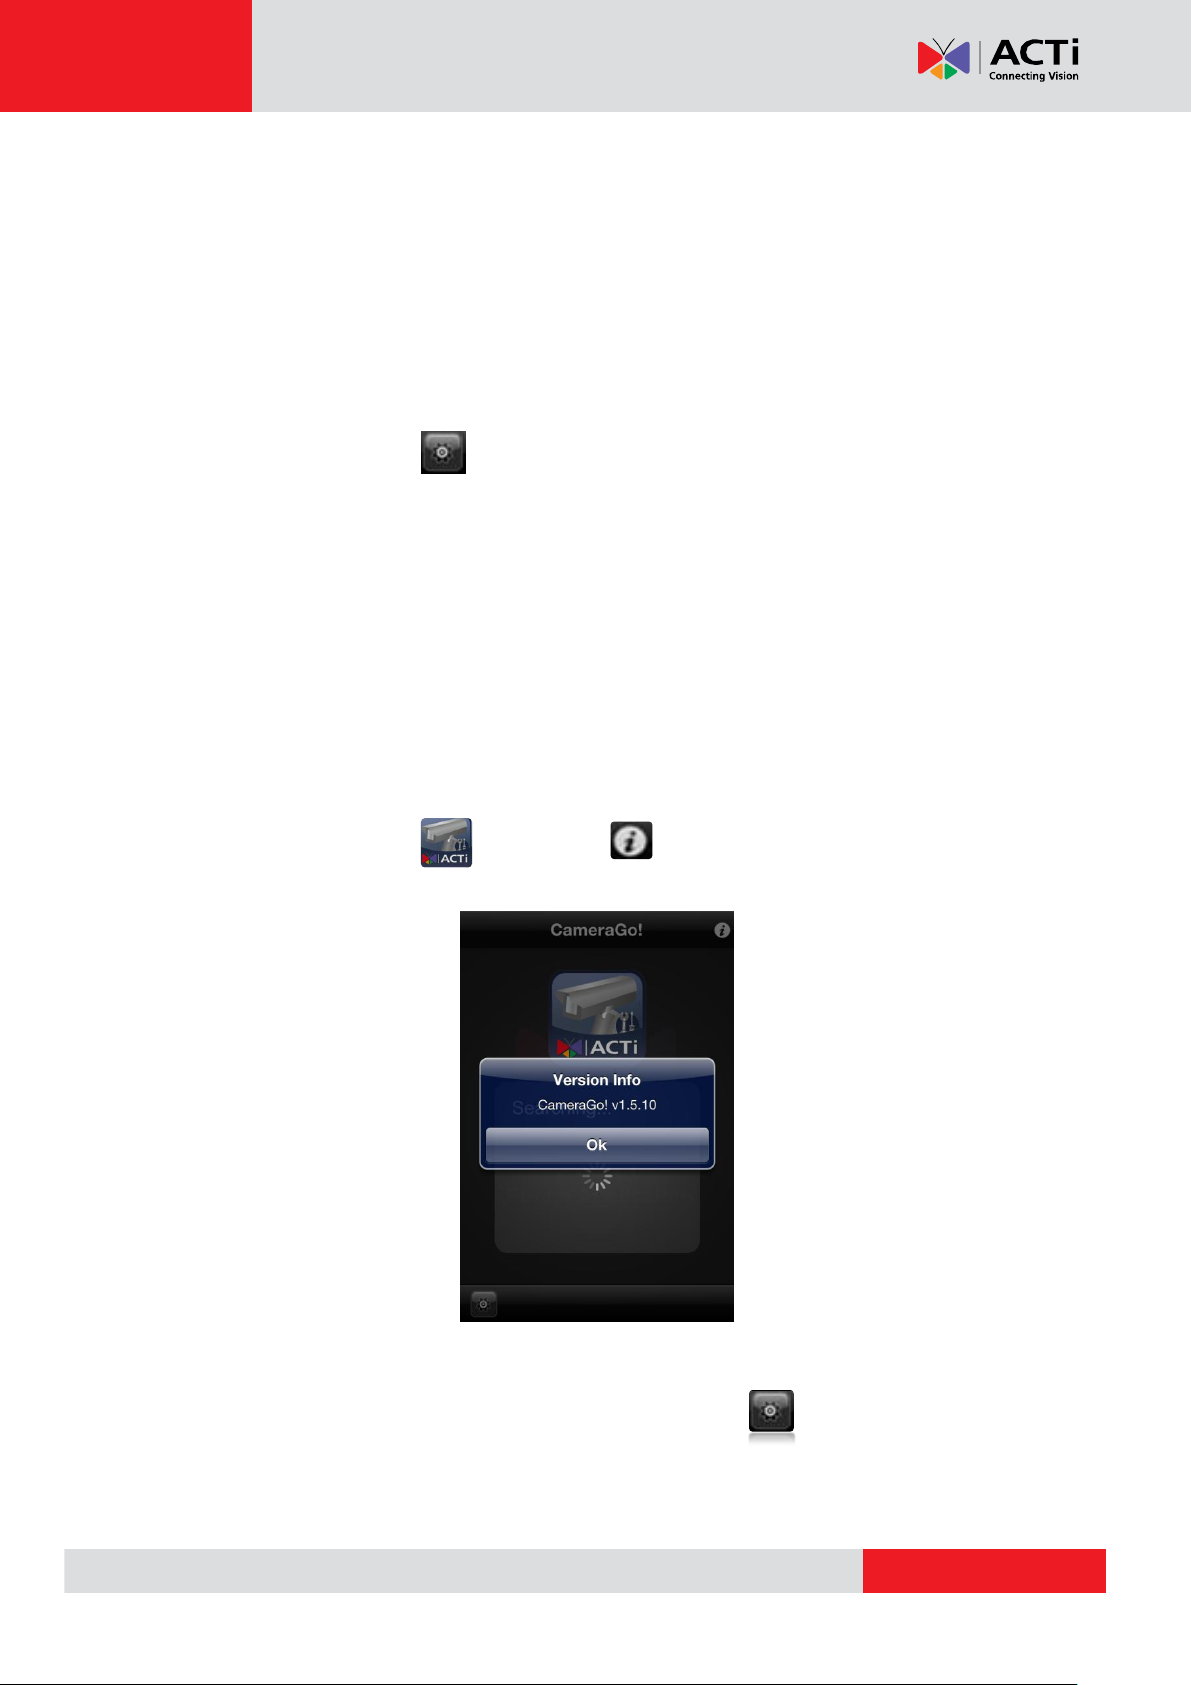
4. By clicking on the icon or the symbol it is possible to check the version of
CameraGo!
Fig. 11 Check the version of CameraGo!
If you are working with the cameras that have account name and password other
than default, then you need to set that information to CameraGo!, too. Click to access the
settings page of account name and password and make changes there.
10
Page 11

www.acti.com
ACTi CameraGo! User Manual
Fig. 13 Result after “Apply”
Fig. 14 Cannot find the camera
Fig. 15 Wrong name or password
Connection or login failure
There may exist connection or login failures. Upon opening CameraGo! app, it will attempt to
find a camera. When it fails to find the camera, it will keep continuously attempting (Fig. 14)
until it succeeds or until the user closes the app. Login failure may occur when the preset
account name or password is wrong (Fig. 15).
11
Page 12

www.acti.com
ACTi CameraGo! User Manual
Unplugging the camera while CameraGo! is connected to Wi-Fi
While CameraGo! is running, it is possible to unplug the camera anytime from PMON-1001
and plug in another camera. When that happens, CameraGo! will automatically show all
available Wi-Fi connections and the user has to select the “Camera_Helper” network to
establish the connection with the new camera via PMON-1001.
Fig. 16 Re-select Wi-Fi network upon switching to next camera
12
Page 13

www.acti.com
ACTi CameraGo! User Manual
3.2 Live View
Launch the live view page
It is possible to launch the Live View page by pressing the “OK” button. Regardless of the
resolution of the video source it will be automatically re-scaled to fit to full width of screen of the
mobile device.
Fig. 17 Open the live video by pressing “OK”
Fig. 18 Successful live view (Portrait view)
13
Page 14

www.acti.com
ACTi CameraGo! User Manual
Fig. 19 Before refocusing
Fig. 20 After refocusing
Function
Zoom in
Cancel Digital Zoom
Digital Pan/Tilt
Hand
Gesture
Spread
Double-tap
Pinch
Double-tap
Move the red frame
within PiP area
Re-focus the camera
When an auto-focus camera is powered up, it will automatically adjust itself to best possible
focus at that moment. When turning the camera’s viewing direction to somewhere else, there
may be a need for re-focusing of the camera due to new distances to the target object. Press
the “Re-Focus” button and the focus will be adjusted instantly. “Re-Focus” button appears
only when CameraGo! connects to the camera that has such capability, and works when the
camera is in “Auto focus” mode.
In case of manual focus cameras, simply adjust the focus ring of the lens manually while
observing the result on CameraGo! live view page.
Digital PTZ Control
The digital PTZ function is supported for cameras without optical zoom function. You can
double-tap or spread on the screen to zoom in the area you desire to see, a picture-in-picture
square will appear on the lower right. Move the red frame to navigate the whole view or
double-tap on the screeen to cancel digital zoom.
14
Page 15

www.acti.com
ACTi CameraGo! User Manual
Fig. 21 Tap on live view
Fig. 22 The PIP area appear
Fig. 23 Tap on live view
Fig. 24 The zoom buttons appear
Spread or double-tap
Picture-in-Picture area
Optical zoom control
If the camera has the optical zoom capability, then the zoom-in and zoom-out buttons will
appear above the video display when tapping on the video area. [+] button zooms in, [-] button
zooms out.
After zooming in or out, the camera will re-focus itself automatically.
15
Page 16

www.acti.com
ACTi CameraGo! User Manual
Fig. 25 Zooming in
PTZ control
If the camera has the pan, tilt and optical zoom capability, then CameraGo! will enable the
8-directional pan and tilt control function automatically. Simply by tapping on the video area,
both Pan-Tilt and Zoom buttons would appear. By pressing any of the PTZ control buttons on
the video display area it is possible to navigate the camera’s viewing direction to desired
location. The “PT On/Off” button below can turn the Pan-Tilt function off or on again.
Fig. 26 8-directional PTZ control
16
Page 17

www.acti.com
ACTi CameraGo! User Manual
Logout
Press button to logout.
PLEASE ALWAYS LOG OUT before you exit this application, for CameraGo! will restore the
original settings of the camera that were used before connecting CameraGo! during logging
out.
Fig. 27 Logout button
17
 Loading...