

Page 1

Encoder Firmware V4.08.06 User’s Manual
Firmware User’s Manual
A1D-311-V5.12.12-AC
2014/03/18
Page 2

www.acti.com
Firmware User’s Manual V5.12.12
Table of Contents
Recommended PC Specification 4
Preparation before setup 5
Connect to device and setup IP .............................................................. 5
Sample screenshots to setup IP of your PC (Win XP) .......................... 7
Configuring the IP device 11
Login ....................................................................................................... 11
Live view ................................................................................................. 12
PTZ Control Panel .................................................................................. 14
How to Use Pan/Tilt (for PTZ models only) ......................................... 15
How to Zoom the Camera In or Out .................................................... 15
How to Set the Home Position ............................................................ 16
How to Set Idle Time and Return Camera to Preset Position
(for PTZ models only).......................................................................... 16
How to Set Serial Hex Command Protocol ......................................... 16
How to Adjust the Focus ..................................................................... 16
How to Set Touring Preset Points ....................................................... 17
How to Set and Enable Tours .............................................................. 17
Setup Menu ............................................................................................ 19
Host ......................................................................................................... 20
Date & Time ............................................................................................ 21
Network Section ..................................................................................... 23
IP Address Filtering ............................................................................. 23
Port Mapping ....................................................................................... 25
ToS ...................................................................................................... 27
UPnPTM ............................................................................................... 28
Bonjour................................................................................................ 28
HTTPS ................................................................................................ 29
IEEE 802.1X ....................................................................................... 29
SNMP Setting ..................................................................................... 30
2
Page 3

www.acti.com
Firmware User’s Manual V5.12.12
RTP ..................................................................................................... 31
Speed & Duplex .................................................................................. 32
IP Settings .............................................................................................. 33
Connection Type ................................................................................. 33
DNS .................................................................................................... 34
DDNS .................................................................................................. 35
Video & Audio ........................................................................................ 36
Stream Mode ...................................................................................... 36
Camera Options .................................................................................. 39
Compression ....................................................................................... 43
Motion Detection ................................................................................. 47
Image .................................................................................................. 52
Exposure / White balance ................................................................... 56
Audio ................................................................................................... 59
OSD/Privacy Mask .............................................................................. 60
Event ....................................................................................................... 62
Event Server ....................................................................................... 62
Event Configuration ............................................................................ 66
Event List ............................................................................................ 74
Manual Event ...................................................................................... 77
Local Storage Management .................................................................. 78
Status .................................................................................................. 79
Utilities ................................................................................................ 80
Setup................................................................................................... 85
File Management ................................................................................ 86
Event Handler with Local Storage ........................................................ 91
System ................................................................ ................................ .... 97
User Account ....................................................................................... 97
System Info ......................................................................................... 98
Factory Default .................................................................................... 99
Firmware Upload ............................................................................... 100
Save & Reboot .................................................................................. 101
Logout ............................................................................................... 101
3
Page 4

www.acti.com
Firmware User’s Manual V5.12.12
CPU
Core 2 Duo 2.13GHz and above
Memory
2 GB or above
Operating System
Windows XP with SP2 or above. Windows Vista / Windows
2003 / Windows 7 / Windows 2008
Internet Explorer 8.0 / Internet Explorer 9.0 (32-bit)
Video Resolution
SVGA or XGA with 1024x768 resolution
Recommended PC Specification
4
Page 5

www.acti.com
Firmware User’s Manual V5.12.12
Preparation before setup
Connect to device and setup IP
Our IP device provides access through Internet Explorer. The IP address for your PC must be
within the same subnet as the IP device. You need to match the TCP/IP settings between PC and
IP device before you can access it via IE.
There are two ways to add devices to the network.
With DHCP server / router:
DHCP server assigns IP addresses to devices automatically. You can find them on the network
with our IP Utility. It is available on NVR CD and our website:
http://www.acti.com/IP_Utility
Run IP Utility to start auto device search. Click on the underlined IP links to access your IP
devices. You do not need to change IP.
Without DHCP server / router:
Please assign a static IP for each device and add them one by one. Connect to the first device by
following steps 1 to 5 below.
Before adding more devices into the network, you need to change the current device to a new IP
address so no two devices have IP conflict. (Steps 6 to 9).
For adding devices without DHCP, please see following steps.
1. Connect the PC to the Network Switch with the CAT5 cable, and change your PC’s IP to
192.168.0.99 / Subnet Mask 255.255.255.0 (101 is just a sample, it may be any number from
1 to 254 except 100.)
2. Connect the device to your Network Switch. If it is a PoE enabled Switch, then the device is
powered on. If it is NOT a PoE enabled Switch, please also plug in the Power Adapter.
5
Page 6
www.acti.com
Firmware User’s Manual V5.12.12
3. Open Internet Explorer, and type in Default IP:
http://192.168.0.100
4. When you see the login window, please input default user and password:
Default Username: Admin Password: 123456
5. After you log in, you will see the video from IP device. To go to the main menu, click the
“Setup” button on the top left.
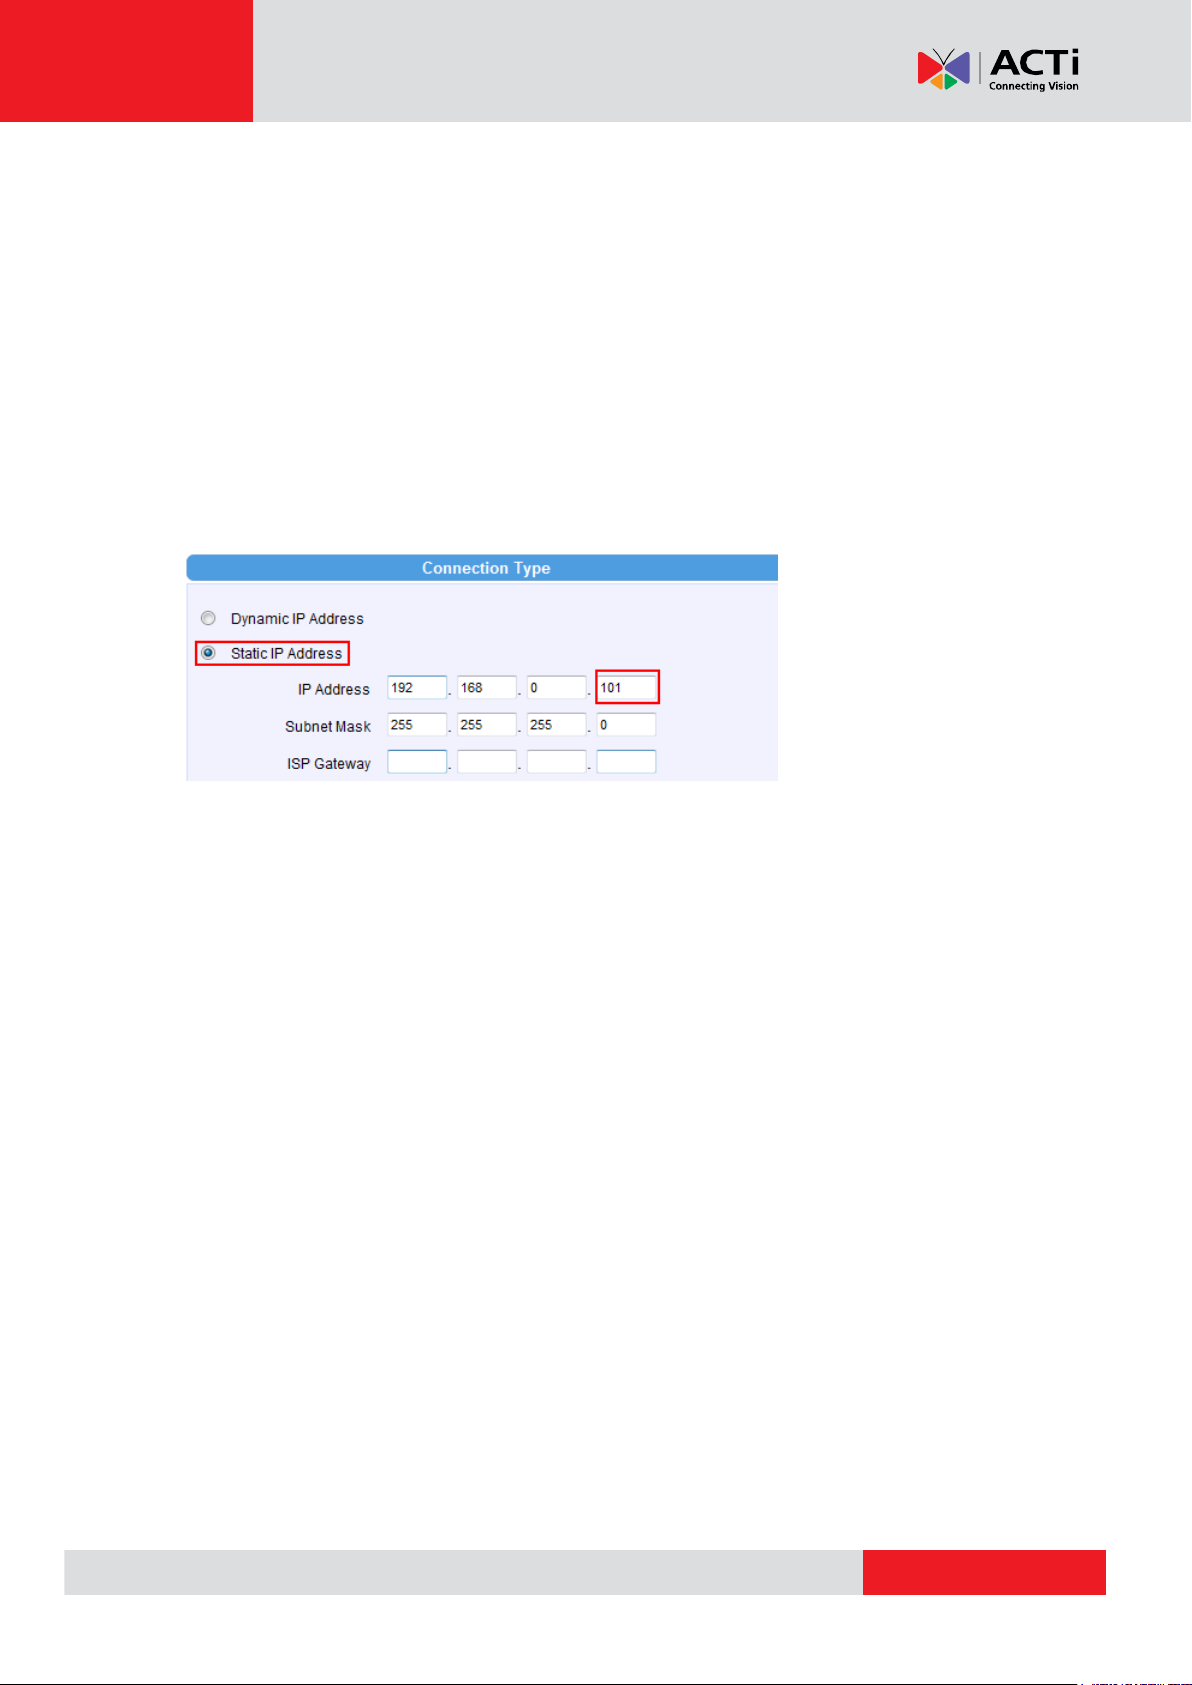
6. Please go to IP settings -> Connection Type. Change the IP mode to Static and the IP
address to 192.168.0.101 or any other unused IP (Avoid 192.168.0.100, the IPs of your PCs
and other devices already in network.). Click “Apply” then click System -> Save & Reboot.
7. Internet Explorer will close after a few seconds. This is normal.
8. Wait for 30 seconds and open IE again by typing in the new IP. (In this example,
192.168.0.101). For later device you add into the network, please choose an IP that does not
is not used by any existing device.
9. If you have more than one device, continue again from step 2. Assign different new IP to each
camera (for instance -> 192.168.0.102, 192.168.0.103 …). You do not need to unplug the
existing devices from the switch because there is no IP conflict.
6
Page 7
www.acti.com
Firmware User’s Manual V5.12.12
Sample screenshots to setup IP of your PC (Win XP)
The procedures below show how to setup your IP on Windows XP. If you use operating system
other than Windows XP, please refer to OS manuals for proper setup procedures.
STEP1
Start up your PC.
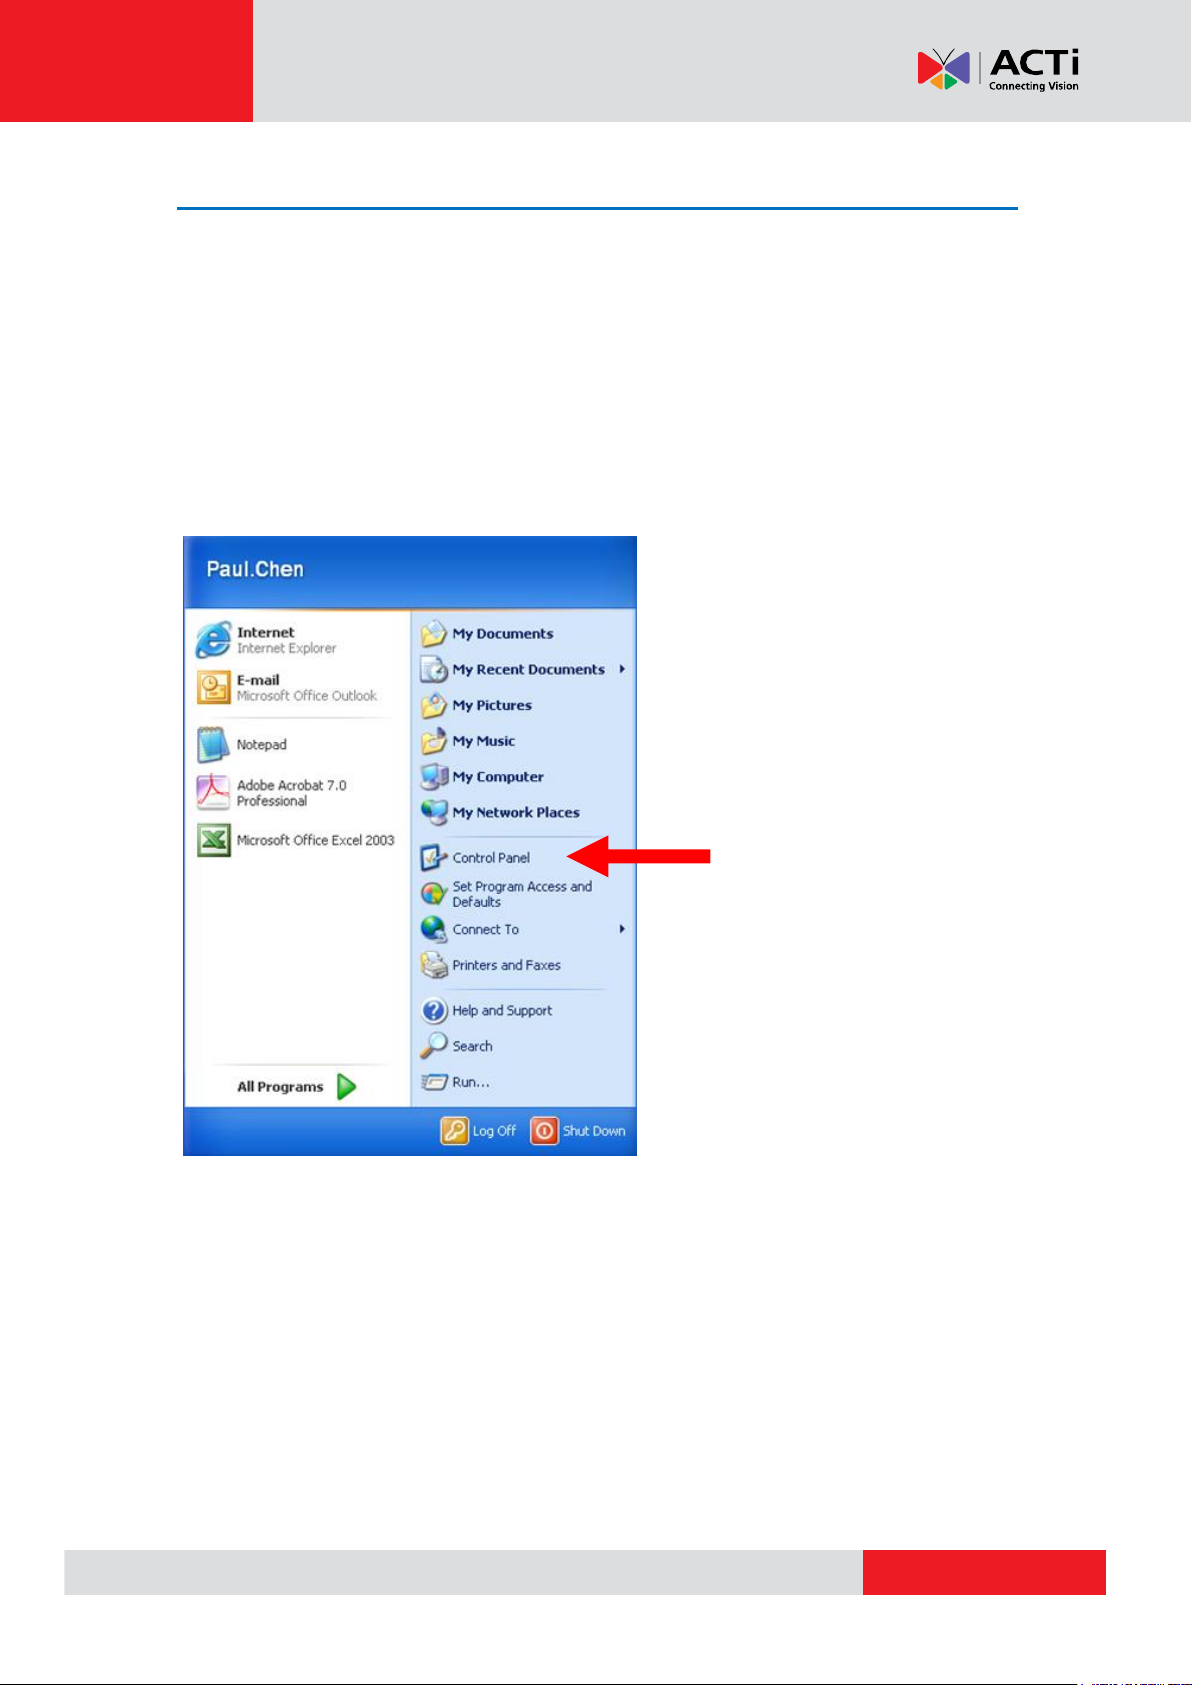
STEP2
Click the [Start] and select the "Control Panel"
7
Page 8
www.acti.com
Firmware User’s Manual V5.12.12
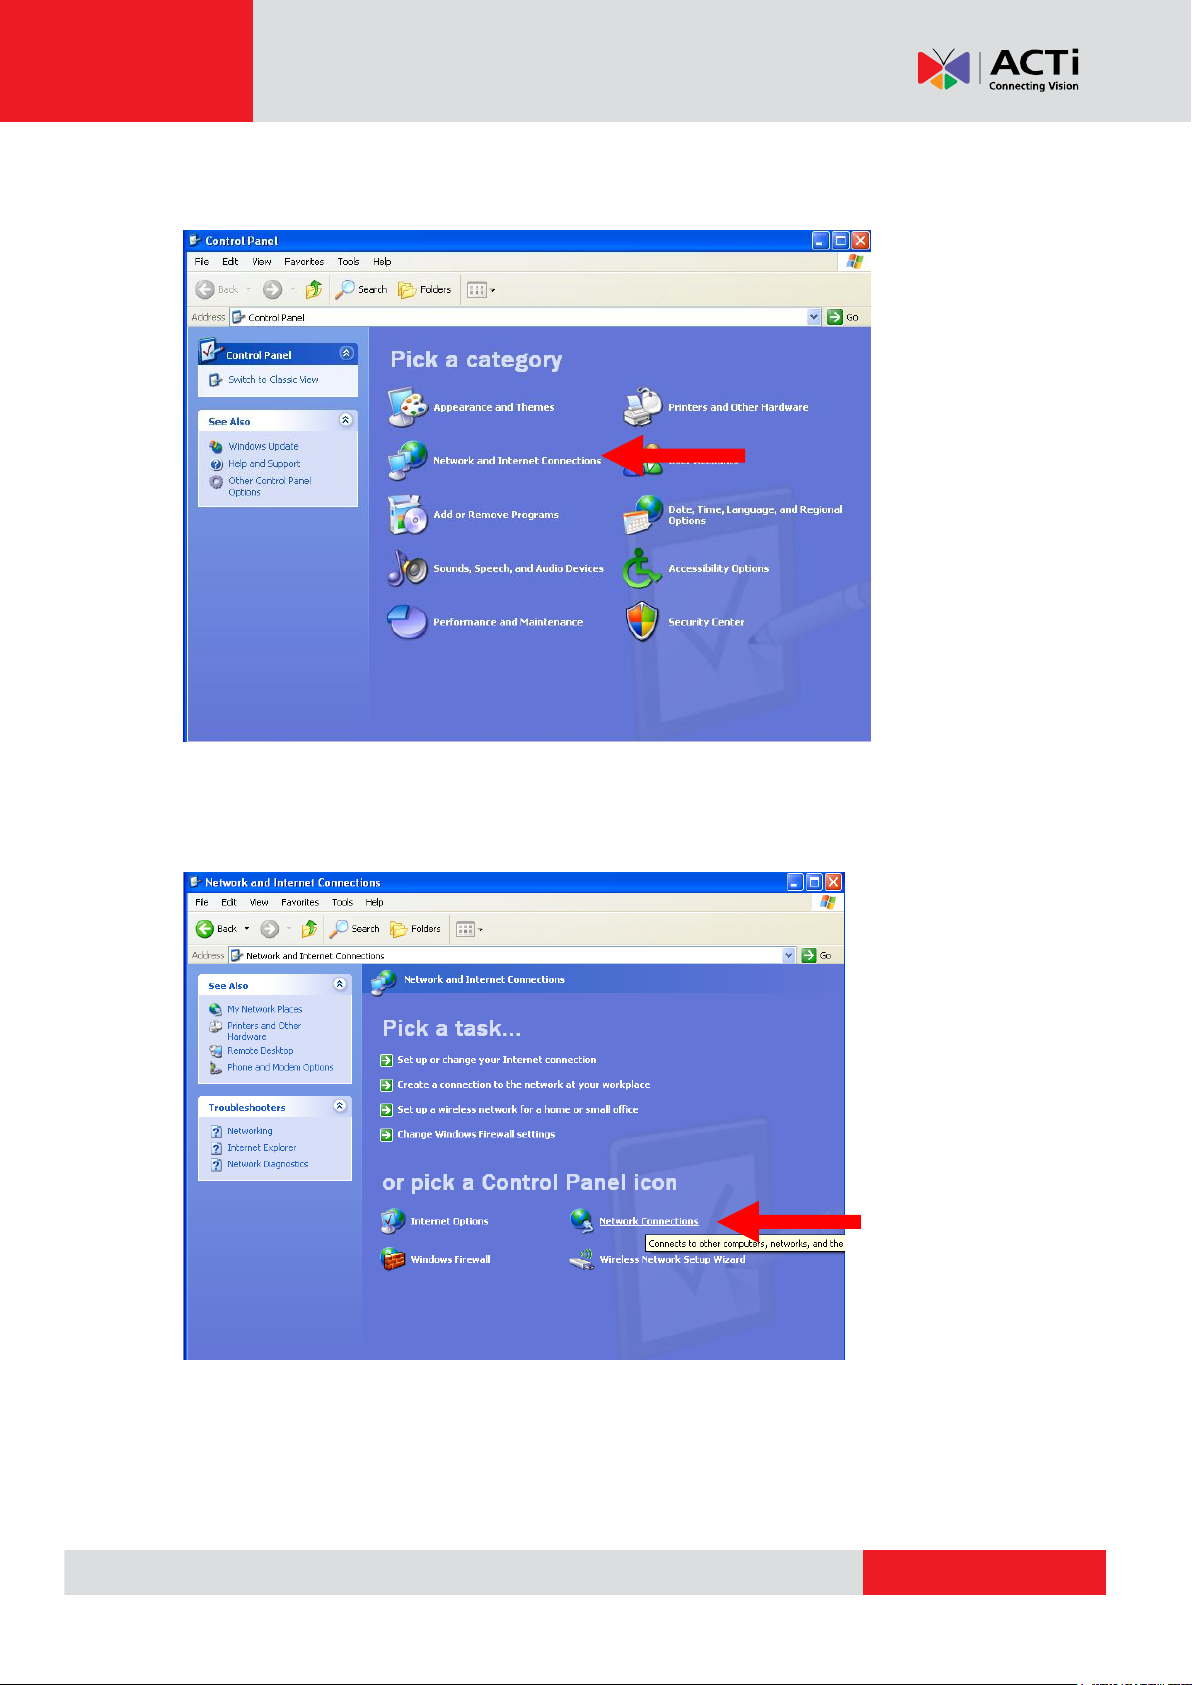
STEP3
Double-click the "Network and Internet connections" icon.
STEP4
Double-click the "Network connections" icon
8
Page 9
www.acti.com
Firmware User’s Manual V5.12.12
STEP5
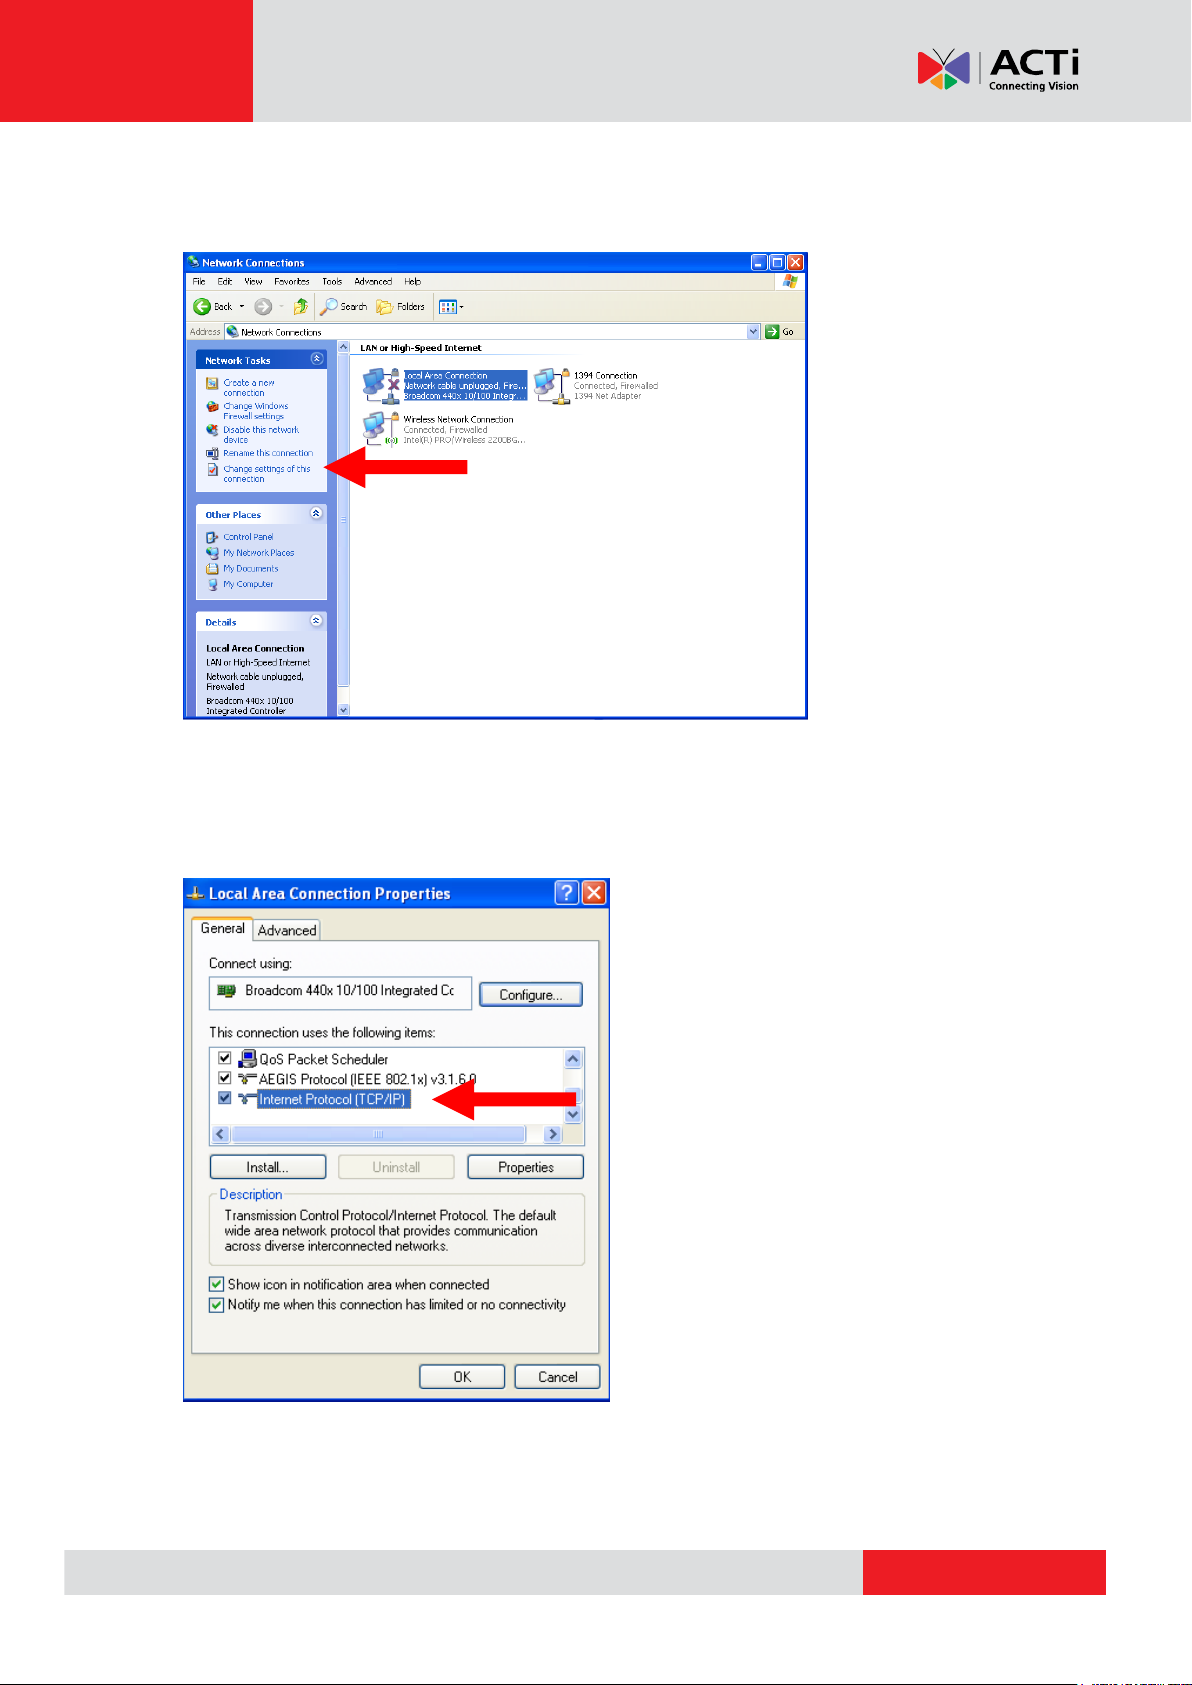
Click “Local Area Connections”, and then click “Change settings of this connection” in the
Network Task menu.
STEP6
Click “Internet Protocol (TCP/IP)”, and then click [Properties]
9
Page 10
www.acti.com
Firmware User’s Manual V5.12.12
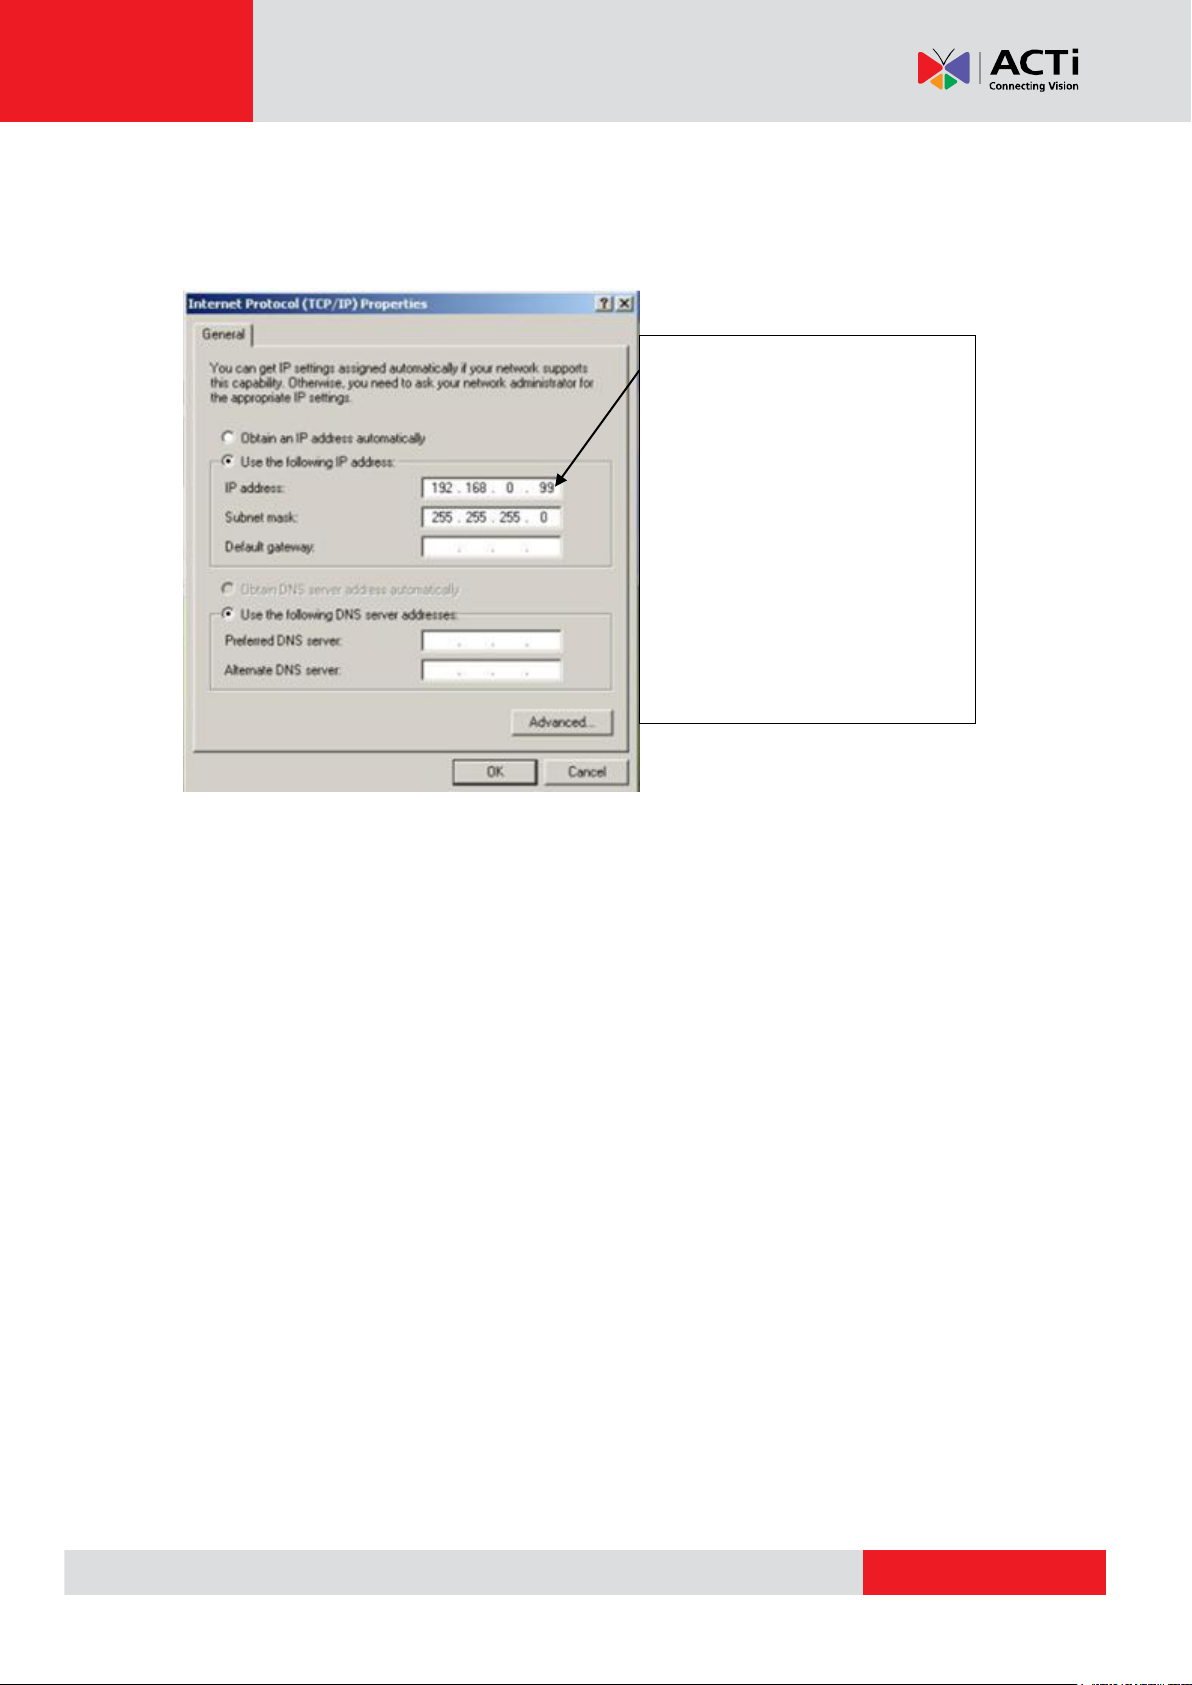
Please set the settings as below.
IP address: 192.168. 0.xxx
Subnet mask: 255.255.255. 0
(NOTE: xxx should be a number
from 1 to 254 except 100, which is
used by the IP device. Please also
make sure that no two equipments
use the same IP address in the
same network.)
STEP7
Click the “Use the following IP address” radio button and enter the IP address and the subnet
mask.
STEP8
Click the [OK] button and the window dialog box will close.
10
Page 11
www.acti.com
Firmware User’s Manual V5.12.12
Configuring the IP device
This section describes how to configure the IP device. The administrator has unlimited access to
all settings, while the normal user can only view live video. The IP device is configured under a
standard browser (Microsoft Internet Explorer 8.0 / 9.0).
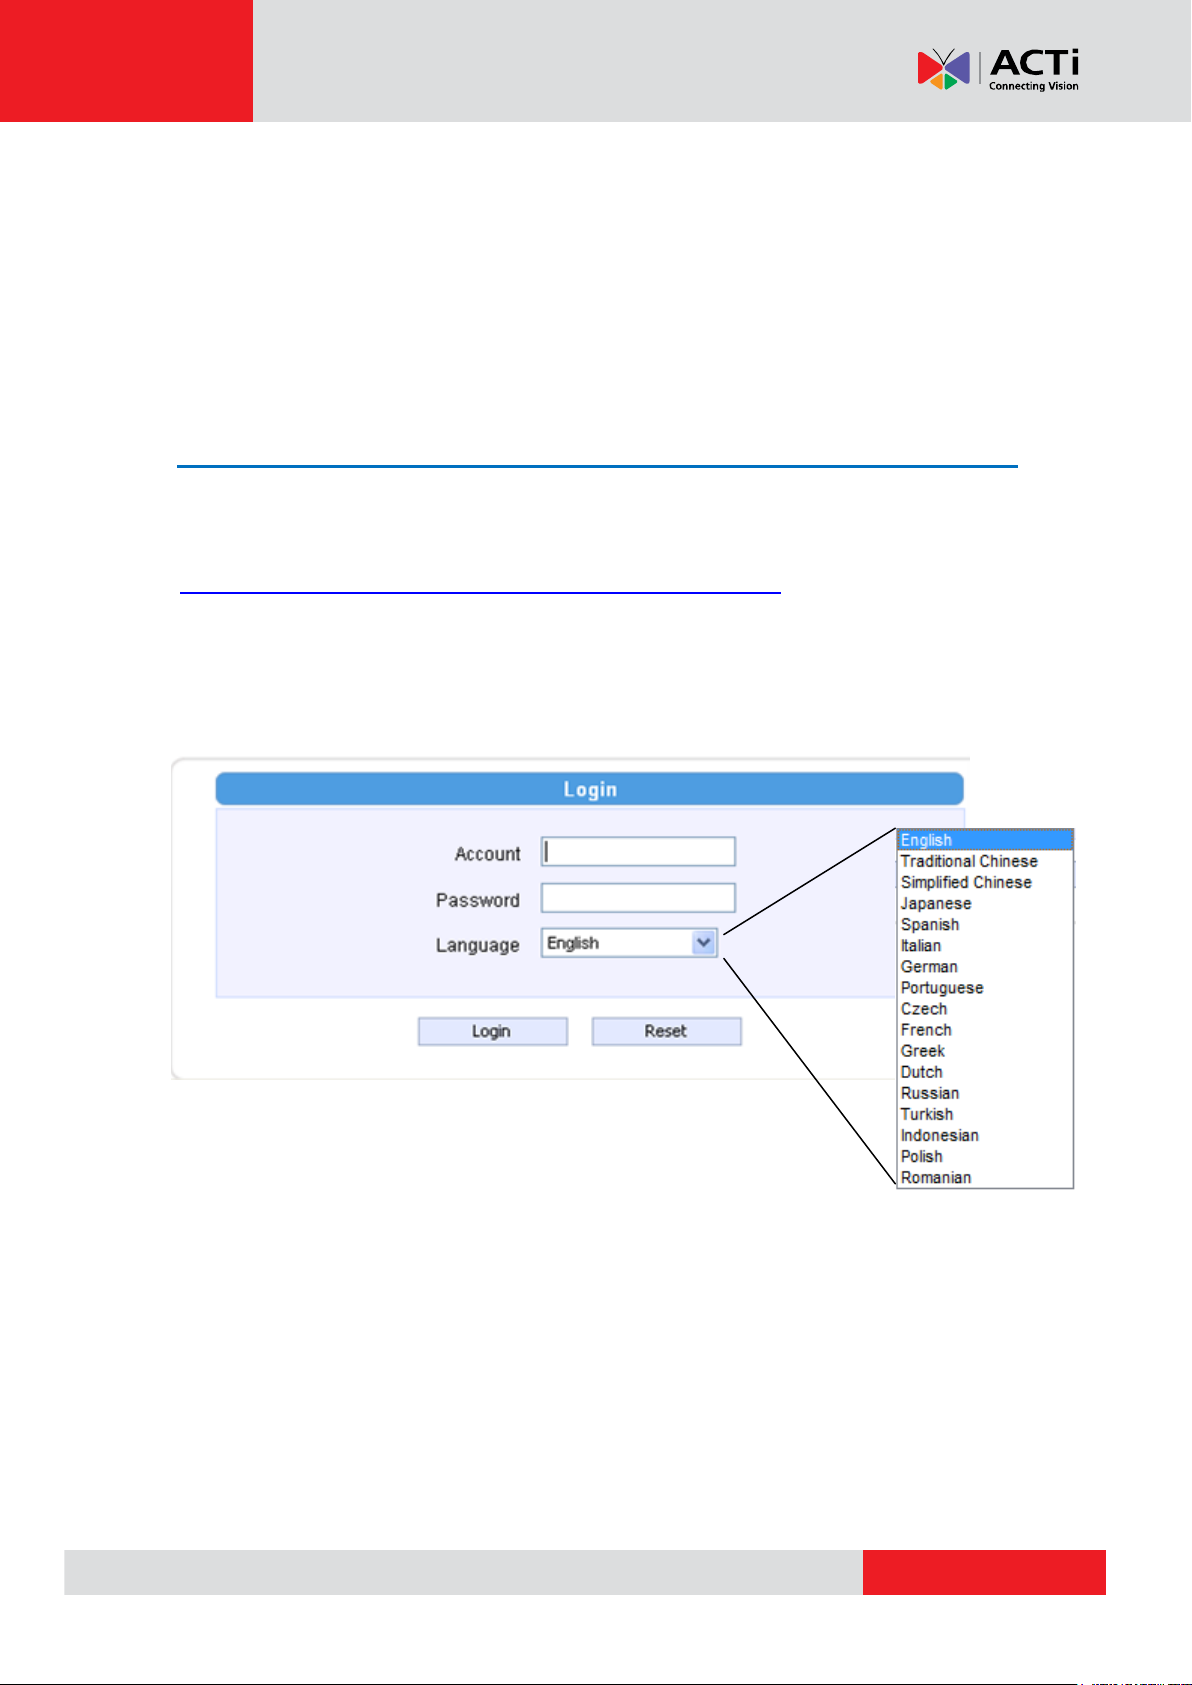
Login
STEP1
Open Internet Explorer 8.0 / 9.0. You may download the latest version from:
http://www.microsoft.com/windows/ie/downloads/default.mspx
(For Internet Explorer 10.0, please enable "Compatibility View" on the Tools menu in IE browser)
STEP2
Enter the IP address of the IP device and press enter to go to Login Page.
The default IP address is “192.168.0.100”
STEP3
Enter the Account name and the Password
(Default Account: Admin / Password: 123456).
STEP4
Select the language of the IP device user interface.
You can select between English, Traditional Chinese, Japanese, Spanish, Italian, German,
Portuguese, Greek, Russia, Turkey, Indonesia and Swedish. This user interface setting will
disappear once you log out, if you want to change the default user interface language, please go
to [Host] in the ”Host” section under the setup tab.
11
Page 12
www.acti.com
Firmware User’s Manual V5.12.12
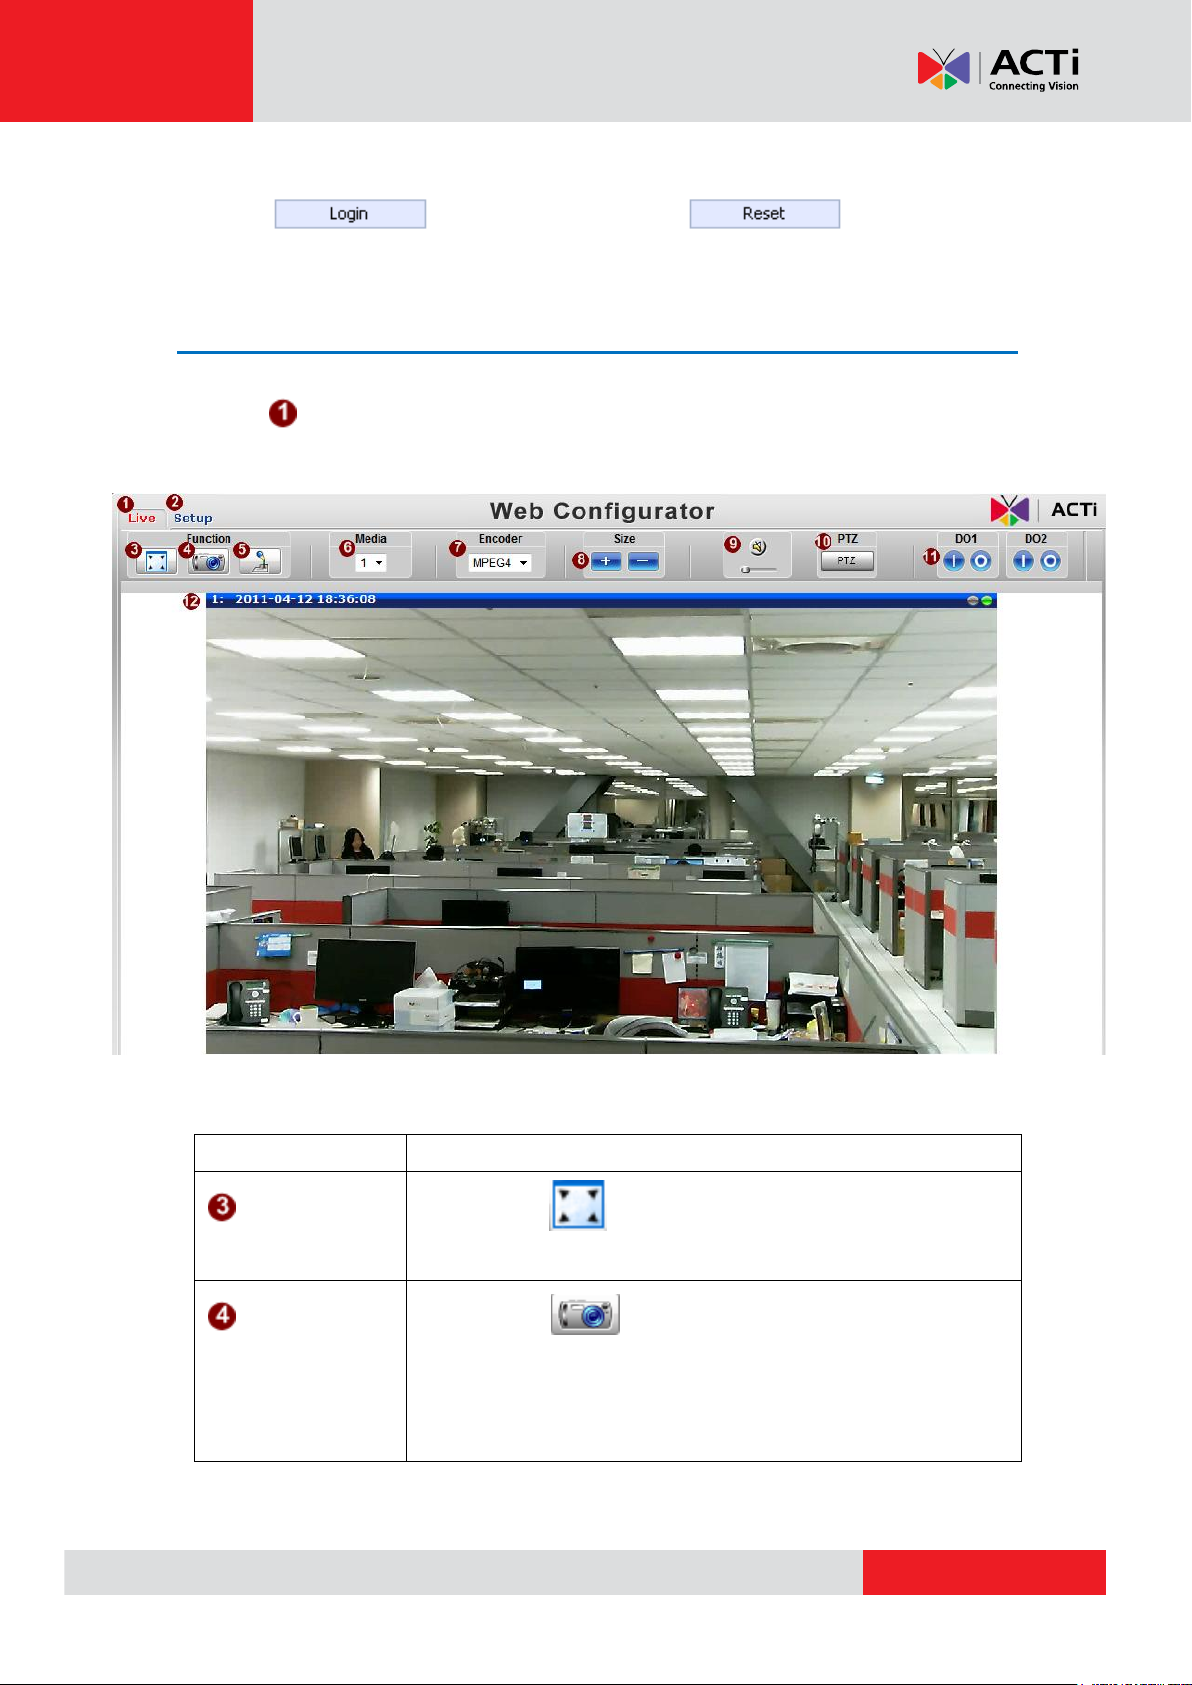
Function
Description
Full Screen
Click the icon to stretch the preview to full screen. You can
click “Esc” button on the keyboard to return to previous display.
Snapshot
Click the icon “ ” to take a snapshot. The snapshot picture
will be saved to the default folder
“C:\Users\”account name”\Picture”, in the format of
YYYYMMDD_HH_mm_ss.jpg.
STEP5
Click the button to login or click the button to re-enter
again. Once you’ve logged in, the “Live page” will be displayed as below.
Live view
Click the [Live] tab to show [Live page]. Refer to the table below for how to configure each
setting.
Function List
12
Page 13
www.acti.com
Firmware User’s Manual V5.12.12
Audio out
Click the icon to enable the audio out from PC to IP
camera or video server. When it is enabled, your voice will be
transferred to the audio out of the IP camera or video server.
NOTE: you will need to have a microphone connected to your PC
to send out audio.
Media
If dual stream mode is enabled, click to select which stream to
display (Media 1 or 2). The default is single stream only. To change
to dual stream mode, please refer to “Media 1” section under
“Setup” tab
Encoder Type
Click to select the compression codec used in video encoding.
The Encoder type option includes MPEG-4, MJPEG and H.264.
Once selected, the video server/IP camera will start to send video
in new stream type.
Display size
Click or to adjust display screen size
Audio in
Click the speaker icon to toggle mute / audio in. Click and drag to
decide volume below. You must first enable audio in setting to
change here.
PTZ Control
Panel
Click on the PTZ button to pop up the Control panel, and enable
Mouse PTZ at the same time. For zoom lens camera, Panning and
Tilting via PT platform will only be activated by mouse PT
command.
*Note: This is not available in 4 cropped VGA mode.
DO Settings
Click to set DO output level to High. Click to set DO
output level to Low. If your device has more than one DO available,
each DO is controlled separately.
Network status
Indicates the network state. If the light on the right is green,
it means the network is ok. If the light is gray, it means the network
is broken. The light on the left is not used
Live View
Live view from Camera is displayed here. The title bar shows the
time and date.
If you want to setup this IP camera/video server, please click the [Setup] tab to switch to
“Setup Page”
13
Page 14
www.acti.com
Firmware User’s Manual V5.12.12
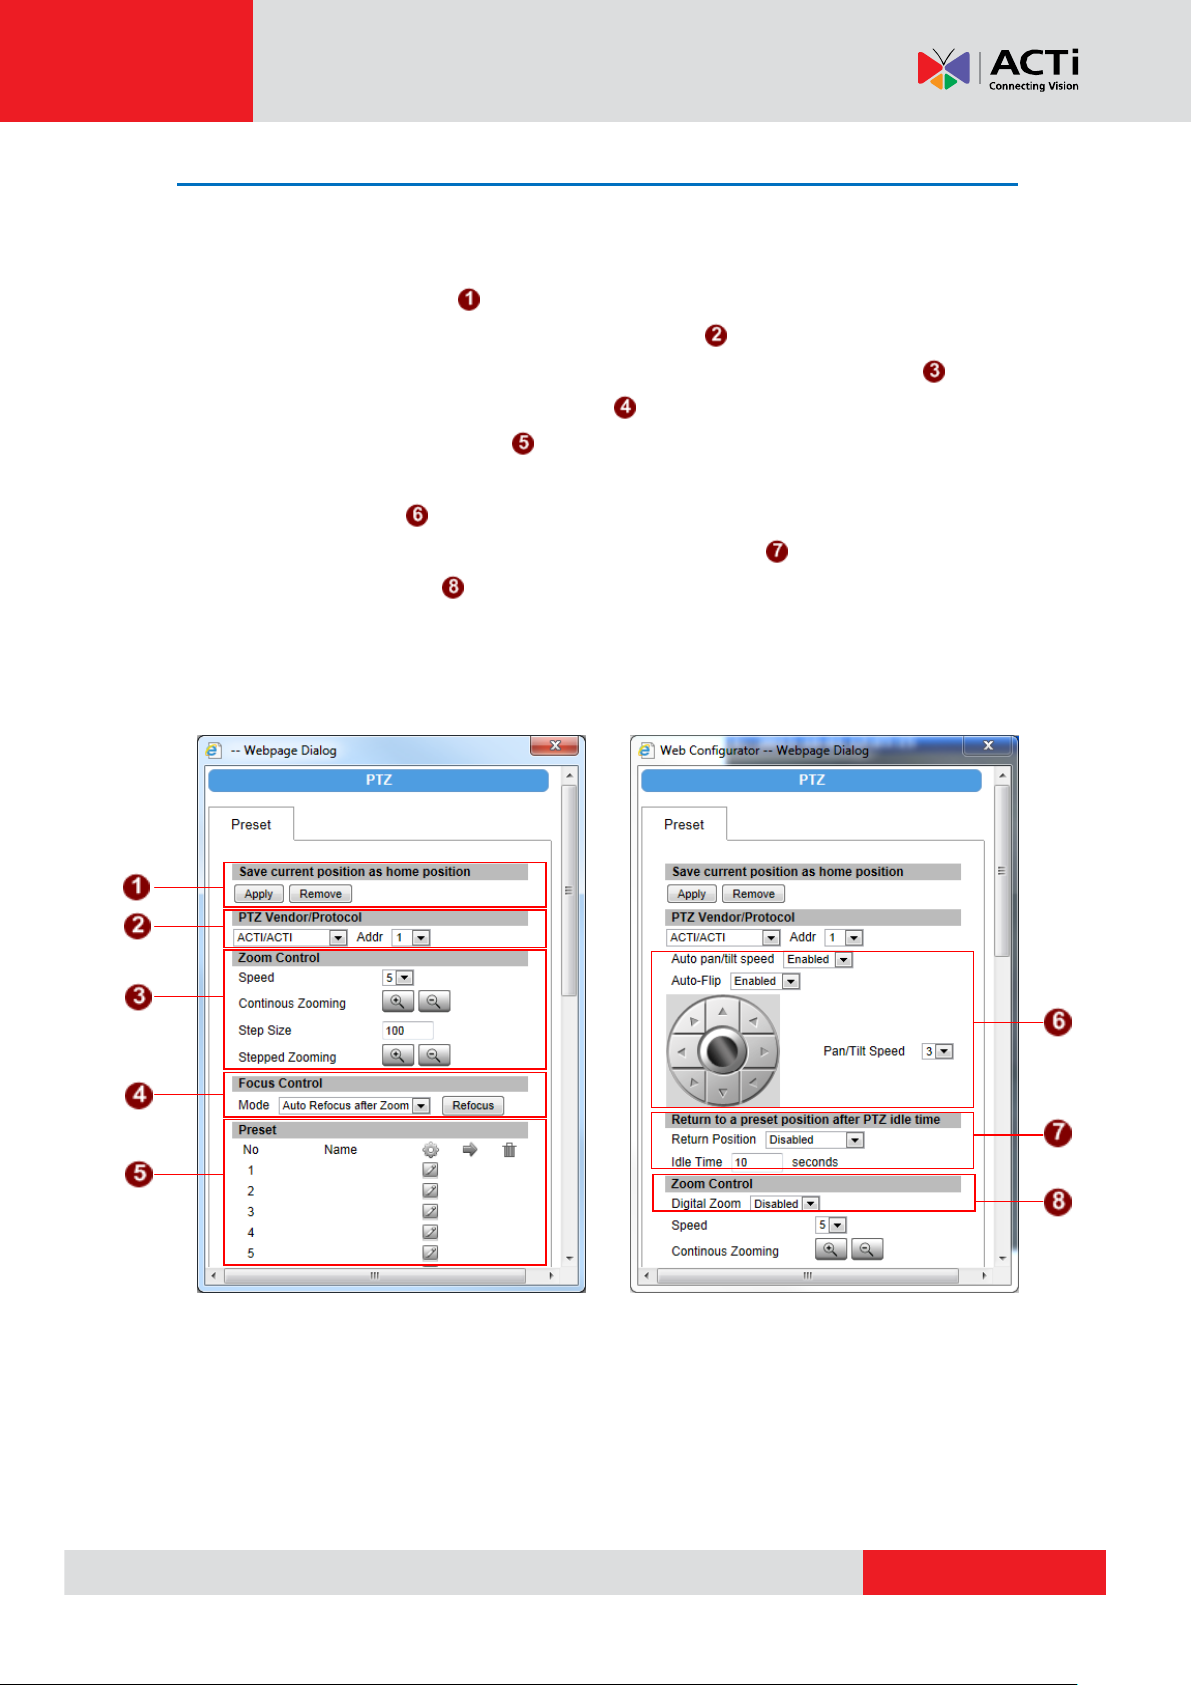
PTZ Control Panel
For PTZ and zoom camera models, click the PTZ button on the Live View screen to display the
PTZ Control Panel. On the PTZ Control Panel, users can do any the following:
Set the home position
Set the serial hex command protocol and address
Zoom the camera in or out as well as adjust the zoom speed and step size
Set the focus to auto refocus or manual
Set Preset points for touring
Set Camera Tour
Pan the camera
Set the camera to go to a preset position during idle time
Enable Digital zoom
The PTZ Control Panel may differ depending on camera model.
Other Zoom Camera Models KCM-8211 / KCM-8111 Models
14
Page 15

www.acti.com
Firmware User’s Manual V5.12.12
How to Use Pan/Tilt (for PTZ models only)
Click the pan/tilt controls (shown on the right) to pan/tilt the PTZ
camera.
Other pan/tilt features include:
Auto pan/tilt speed: When “Enabled”, the camera
automatically sets the pan/tilt speed according to the zoom ratio
and the selected pan/tilt speed while retaining the clarity and
quality of image even as the camera is panning or tilting. When “Disabled”, the pan/tilt
speed follows the value selected on the Pan/Tilt Speed field.
Auto-Flip: When “Enabled”, the camera automatically flips the image when the camera
is panned at 180 and then continues panning to the same direction up to 360 . When
“Disabled”, users can only pan the camera to one direction up to 180 .
Pan/Tilt Speed: Select the desired pan/tilt speed. The bigger the number, the faster the
speed is.
TIP: While the PTZ Control Panel is open, instead of using the pan/tilt controls, move the mouse
cursor over the Live View, the mouse cursor will turn into zoom in/out or directional icons
(e.g. / / / / etc.). Click or drag the mouse to zoom in/out or pan/tilt the camera
view.
How to Zoom the Camera In or Out
Zooming can be done continuously or by one step (one click) at a time.
To zoom continuously, do the following:
1. On Zoom Control , select the Speed, wherein the bigger the number, the faster is the
zooming speed.
2. Click and hold the left mouse button on zoom in or zoom out . When the
mouse button is released, zooming stops.
To zoom by step zooming, do the following:
1. On Zoom Control , enter the desired step size. Size is the amount of zoom scale
taken in each step.
2. Click the left mouse button on zoom in or zoom out . One zoom step is
taken for each click.
For PTZ camera models, users can enable the Digital Zoom feature. When enabled, once
the optical zoom reached its maximum, the camera continues to zoom in the image using digital
zoom.
15
Page 16

www.acti.com
Firmware User’s Manual V5.12.12
TIP: While the PTZ Control Panel is open, instead of using buttons, move the
mouse cursor over the Live View, the mouse cursor will turn into zoom in/out (e.g. / ).
Click or drag the mouse to zoom in/out the camera view.
How to Set the Home Position
1. Using the Zoom Control , zoom on the area that you want to set as the home
position.
2. Click the Apply button on the Save current position as home position .
How to Set Idle Time and Return Camera to Preset Position
(for PTZ models only)
This feature allows the camera to go directly to Home or to a preset position after an idle period of
time. Idle time refers to the time when the camera has no operation like pan, tilt, zoom, or tour.
1. On Idle Time, type the time in seconds.
2. On Return Position, select “Home Position” or a preset point to direct the camera
position.
How to Set Serial Hex Command Protocol
ACTi cameras and video management systems fully support the URL Command, a high level PT
command set. However, in case the cameras will be used with devices from third party vendors
that only support Serial Hex Command (low level PT command set), users must select the PTZ
Vendor/Protocol to use and its address . Otherwise, leave the default settings.
How to Adjust the Focus
After zooming the camera in or out, it is recommended to readjust the focus in Focus Control .
Options are:
Auto Refocus after Zoom: Select this option to let the camera automatically adjust the
focus after zooming.
Manual: Select this option to manually adjust the focus. This feature is useful if the
automatic focus position is not the position that the user wants to achieve. To adjust the
focus manually, select the Step Size and then click the step focus in or focus out
icons until the desired focus is achieved.
When an option is selected, click the Refocus button to apply the focus adjustment.
16
Page 17
www.acti.com
Firmware User’s Manual V5.12.12
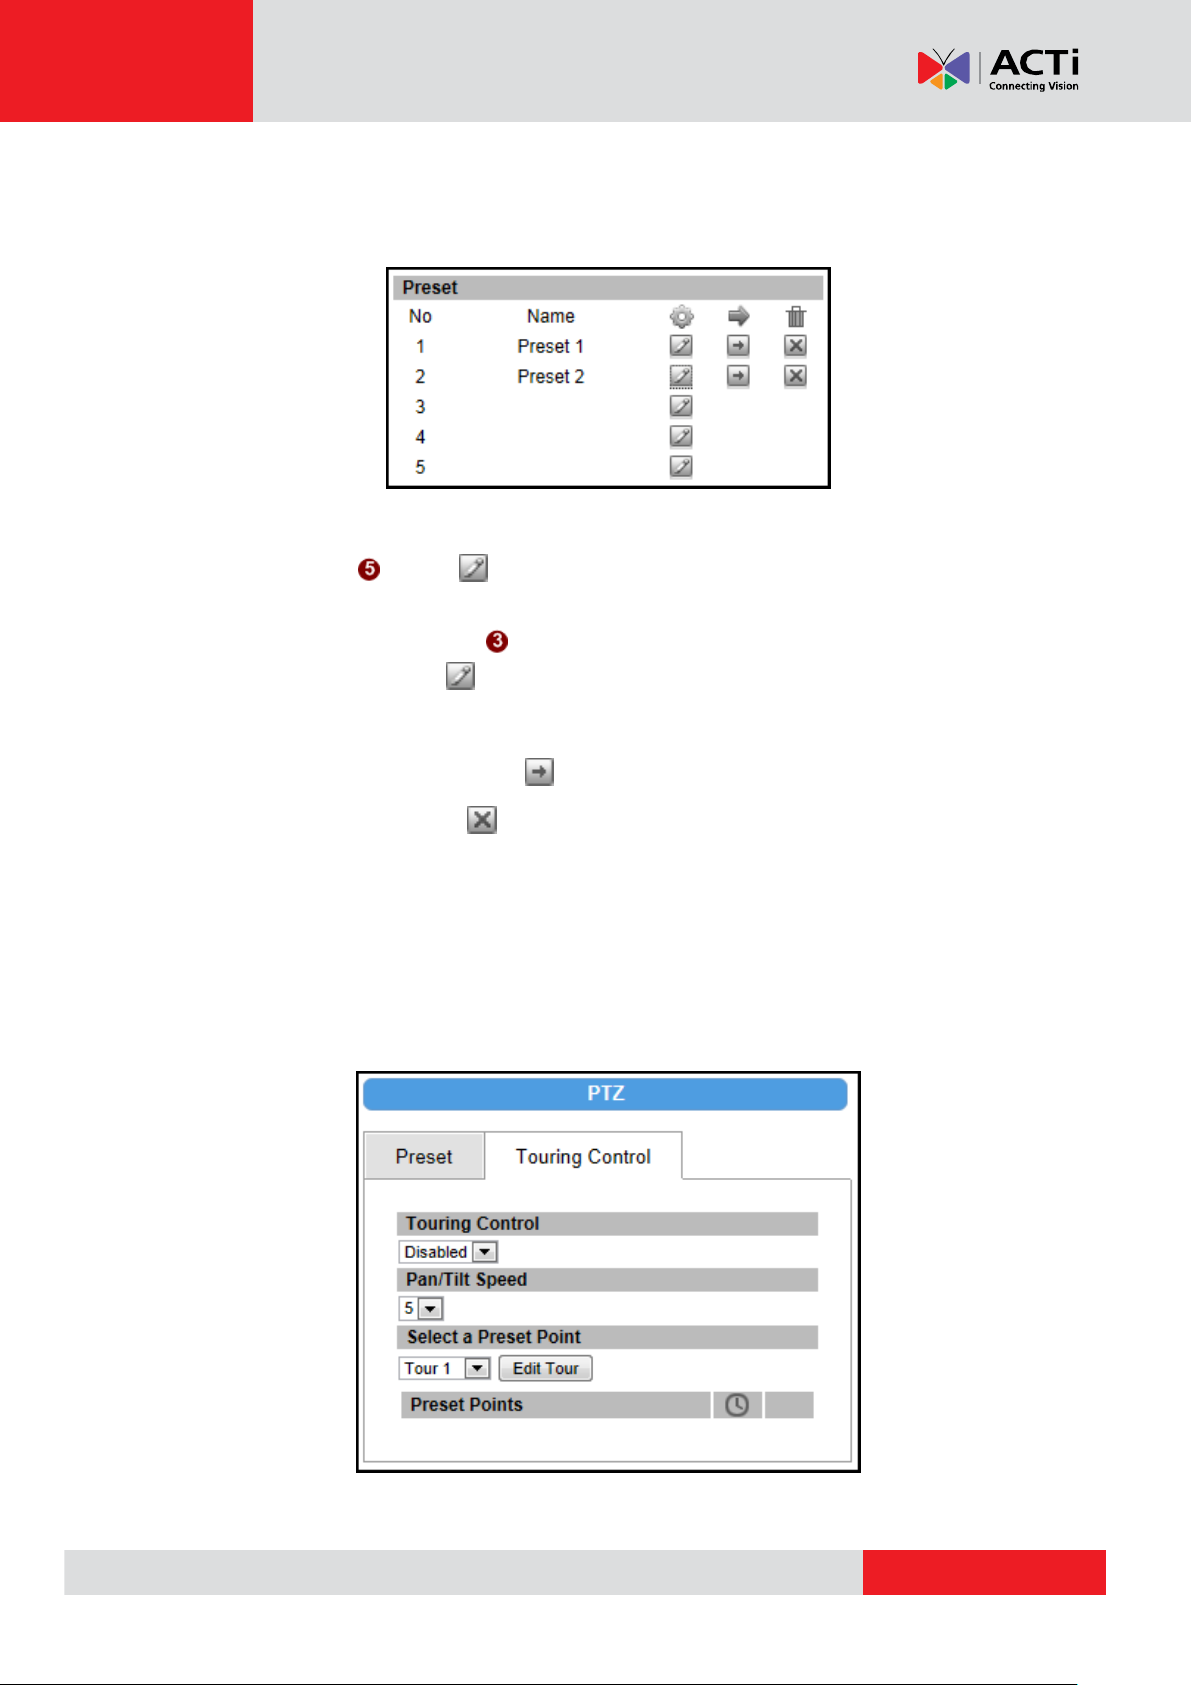
How to Set Touring Preset Points
Preset points are user-defined areas that the camera can zoom in to. A series of preset points
can be grouped as one Tour. Up to 32 preset points can be configured.
To create a preset point, do the following:
1. On Preset , click a icon to start creating a preset point.
2. Under the Name field, type a preset point name.
3. Using the Zoom Control , zoom on the area that you want to set as the preset point.
4. Once done, click the icon again to close and complete the preset point.
5. Repeat the above procedures to create more preset points.
To go to the preset point directly, click .
To delete the preset point, click .
How to Set and Enable Tours
Once a preset point is created, the Touring Control page tab appears. Click the Touring
Control page tab to configure the Preset Tour. A Preset Tour directs the camera to cycle
through a sequence of preset points and how long to stay on each preset point.
17
Page 18

www.acti.com
Firmware User’s Manual V5.12.12
To set or modify a tour, do the following:
1. On Select a Preset Point, select a tour and then click Edit Tour.
2. Select a preset point from the list, set the duration (in seconds) of how long the camera
will stay in that point, and then click .
3. On the Preset Points, the preset points added to the Tour are listed.
To change the sequence of preset points, click the (first / up /
down / last) icons.
To directly go to a preset point, click the icon.
To delete a preset point from the list, click the icon.
4. Repeat the steps 2 and 3 to add more preset points to the tour.
5. On Pan/Tilt Speed, select the pan/tilt speed. The bigger the number the faster the speed
is.
6. Once done, click the Save button on Select a Preset Point.
7. On Touring Control, select the tour name to activate. Once activated, the camera will
start the tour.
18
Page 19

www.acti.com
Firmware User’s Manual V5.12.12
Setup Menu
Click Setup to display the Setup menu on the left side panel.
By default, submenu options are hidden for ease of navigation.
Click the “+” icon to expand the menu.
The fully expanded menu is shown on the right.
Note: Menu items may vary depending on camera model.
19
Page 20
www.acti.com
Firmware User’s Manual V5.12.12
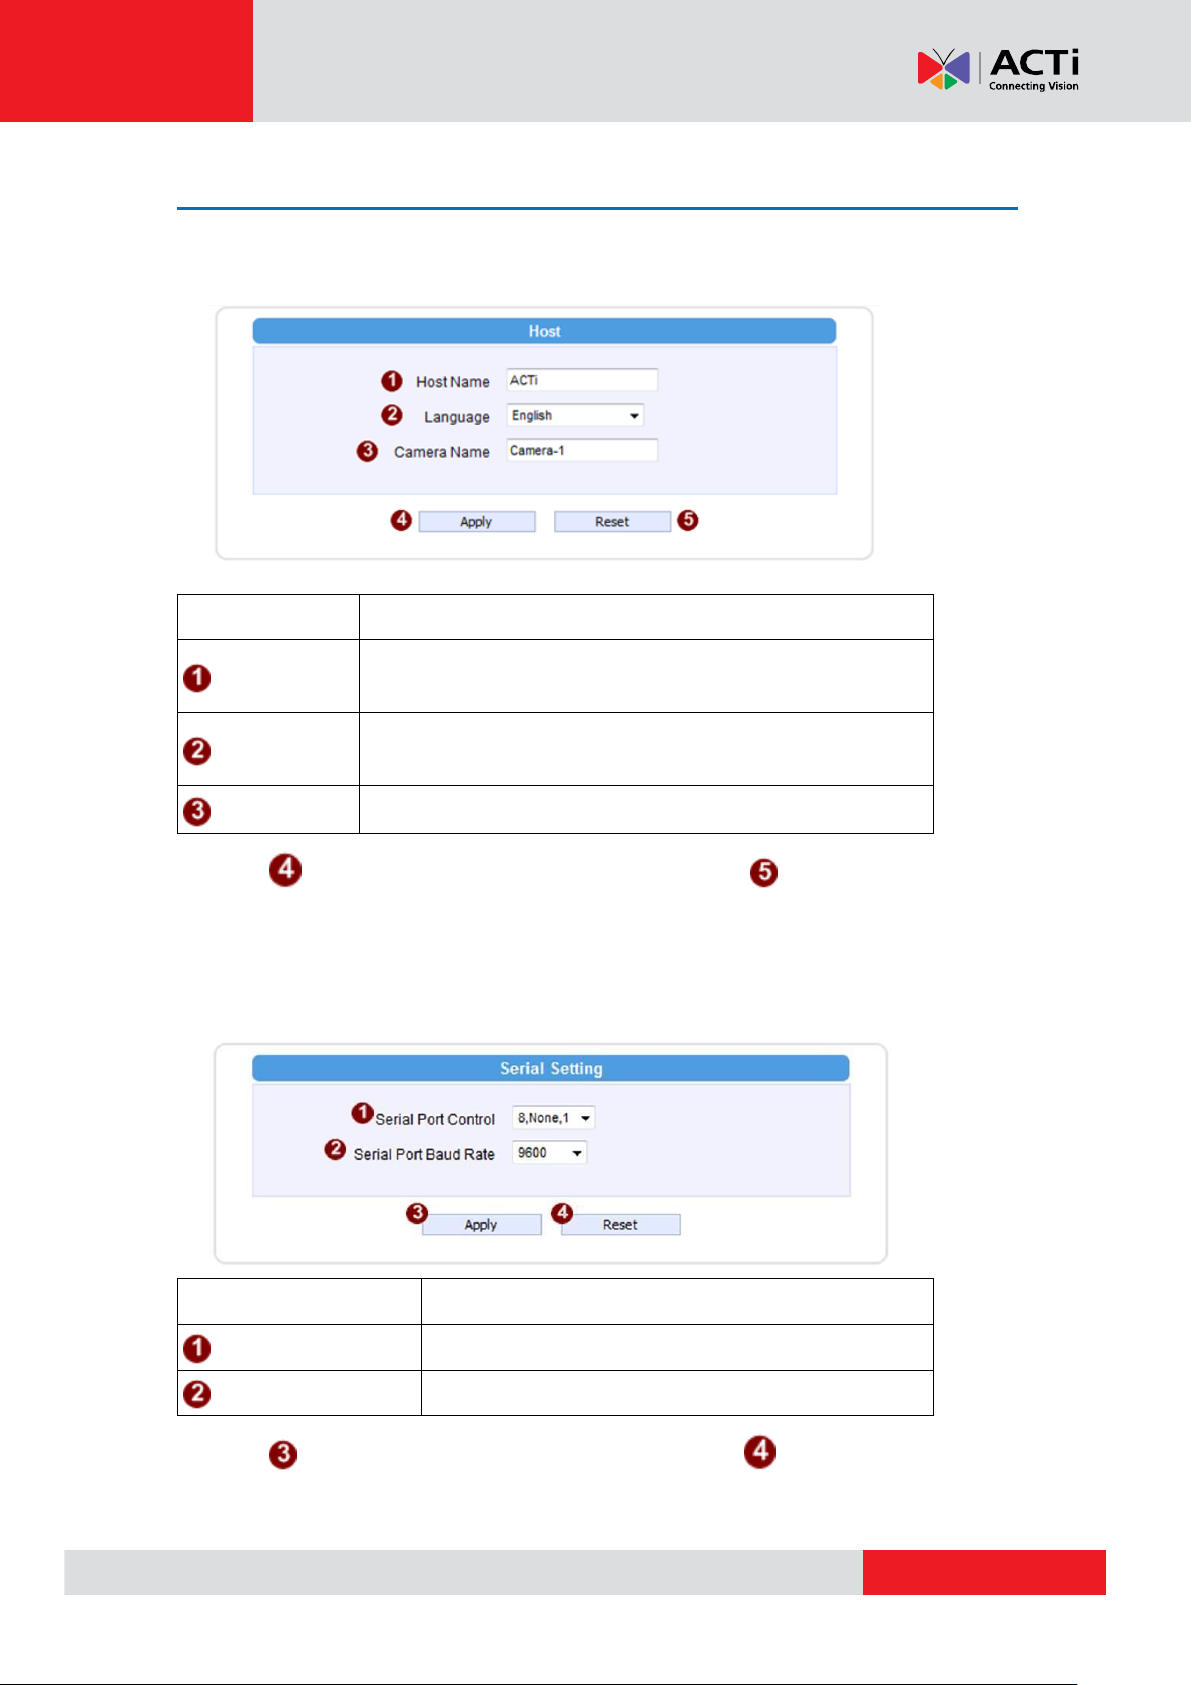
Parameters
Description
Host name
Enter a host name, and this host name will be shown when you
use the IP utility or the SDK to search for the IP device.
Language
Select the language of default user-interface. Each user login
will see the default user-interface first.
Camera name
The camera name is reserved for customer use.
Parameters
Description
Serial Port Control
Select the control value of corresponding serial port.
Serial Port Baud Rate
Select the Baud Rate of serial port.
Host
Click the [Host] to enter Host settings page. Refer to the table below for how to configure each
setting.
Click the [Apply] button to confirm the settings or click the [Reset] button to re-enter
the parameters.
For cameras with serial port interface (like RS-232, RS-485, RS-422), the “Serial Setting” also
appears on the Host page.
Click the [Apply] button to confirm the settings or click the [Reset] button to re-enter
the parameters
20
Page 21
www.acti.com
Date & Time
Firmware User’s Manual V5.12.12
Click the [Date & Time] item under Setup to see Date Setting Page. Refer to the table below for
how to configure each setting. The default method is to set manually.
21
Page 22
www.acti.com
Firmware User’s Manual V5.12.12
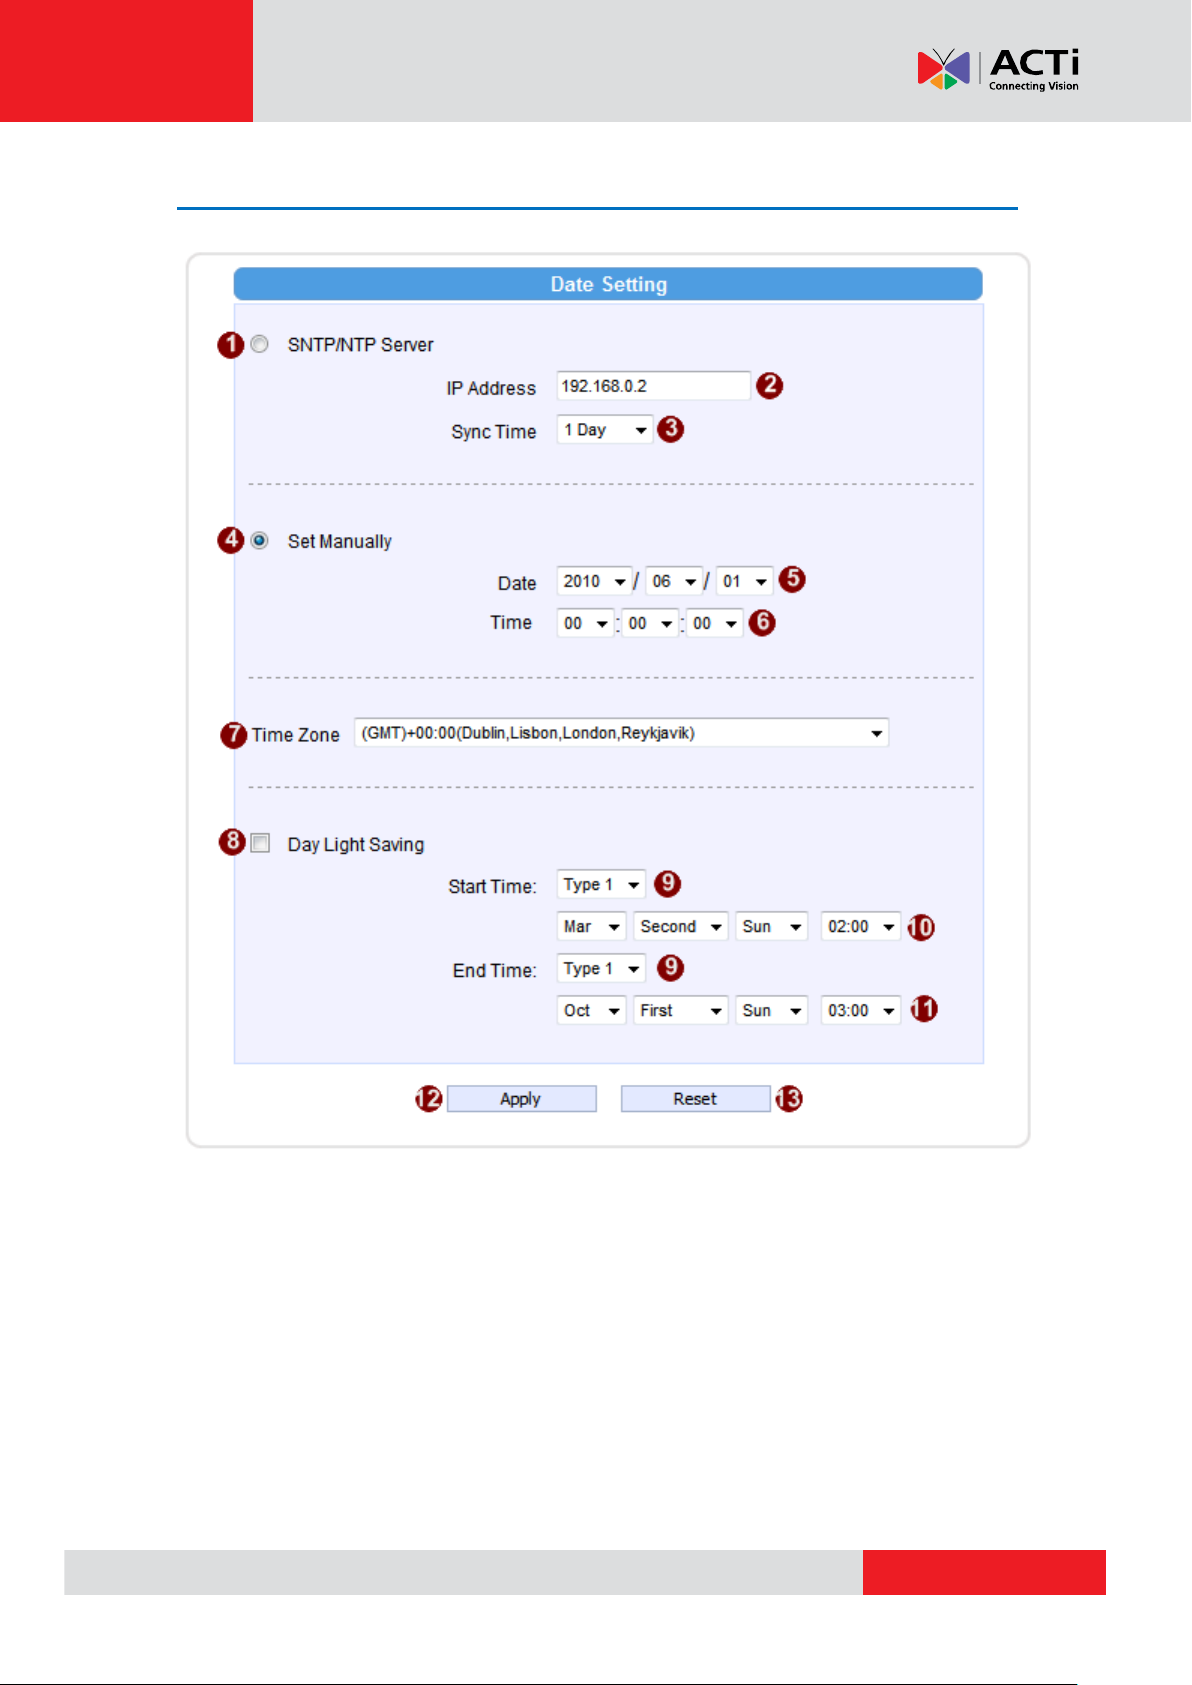
Date Setting
Parameters
Description
SNTP/NTP
server
Click this to enable IP device’s SNTP/NTP function. This enables this IP
device to synchronize its time settings with a SNTP/NTP server. You can
use this function to make sure all your IP devices’ time is the same.
Additionally, with our embedded digital-time-code in the streaming, you
can tell the event sequence accurately.
IP address: Enter the IP address of the SNTP/NTP server.
Sync time: Select the time interval for this IP device to synchronize
its time.
Set manually
Click this to manually setup the date & time.
Date : Select the date
Time: Select the time
Time zone
Select the time zone offset for local settings
Day Light
Saving
Select Type 1 to specify daylight saving time by week number in a
month; select Type 2 to specify daylight saving time by date.
Start Time: Select the daylight savings start time.
End Time: Select the daylight savings end time.
Click the [Apply] button to confirm the settings or click the [Reset] button to re-enter
the parameters.
22
Page 23
www.acti.com
Firmware User’s Manual V5.12.12
WARNING: Please be very careful when using this function, as you may lose access
to your camera if you make mistakes in setup. You may either accidentally deny
yourself access, or forgot to include your own IP address in the allowed address list.
You will need to perform hard reset to be able to access the device again.
Network Section
Click the [Network] item on the “Setup Page”.
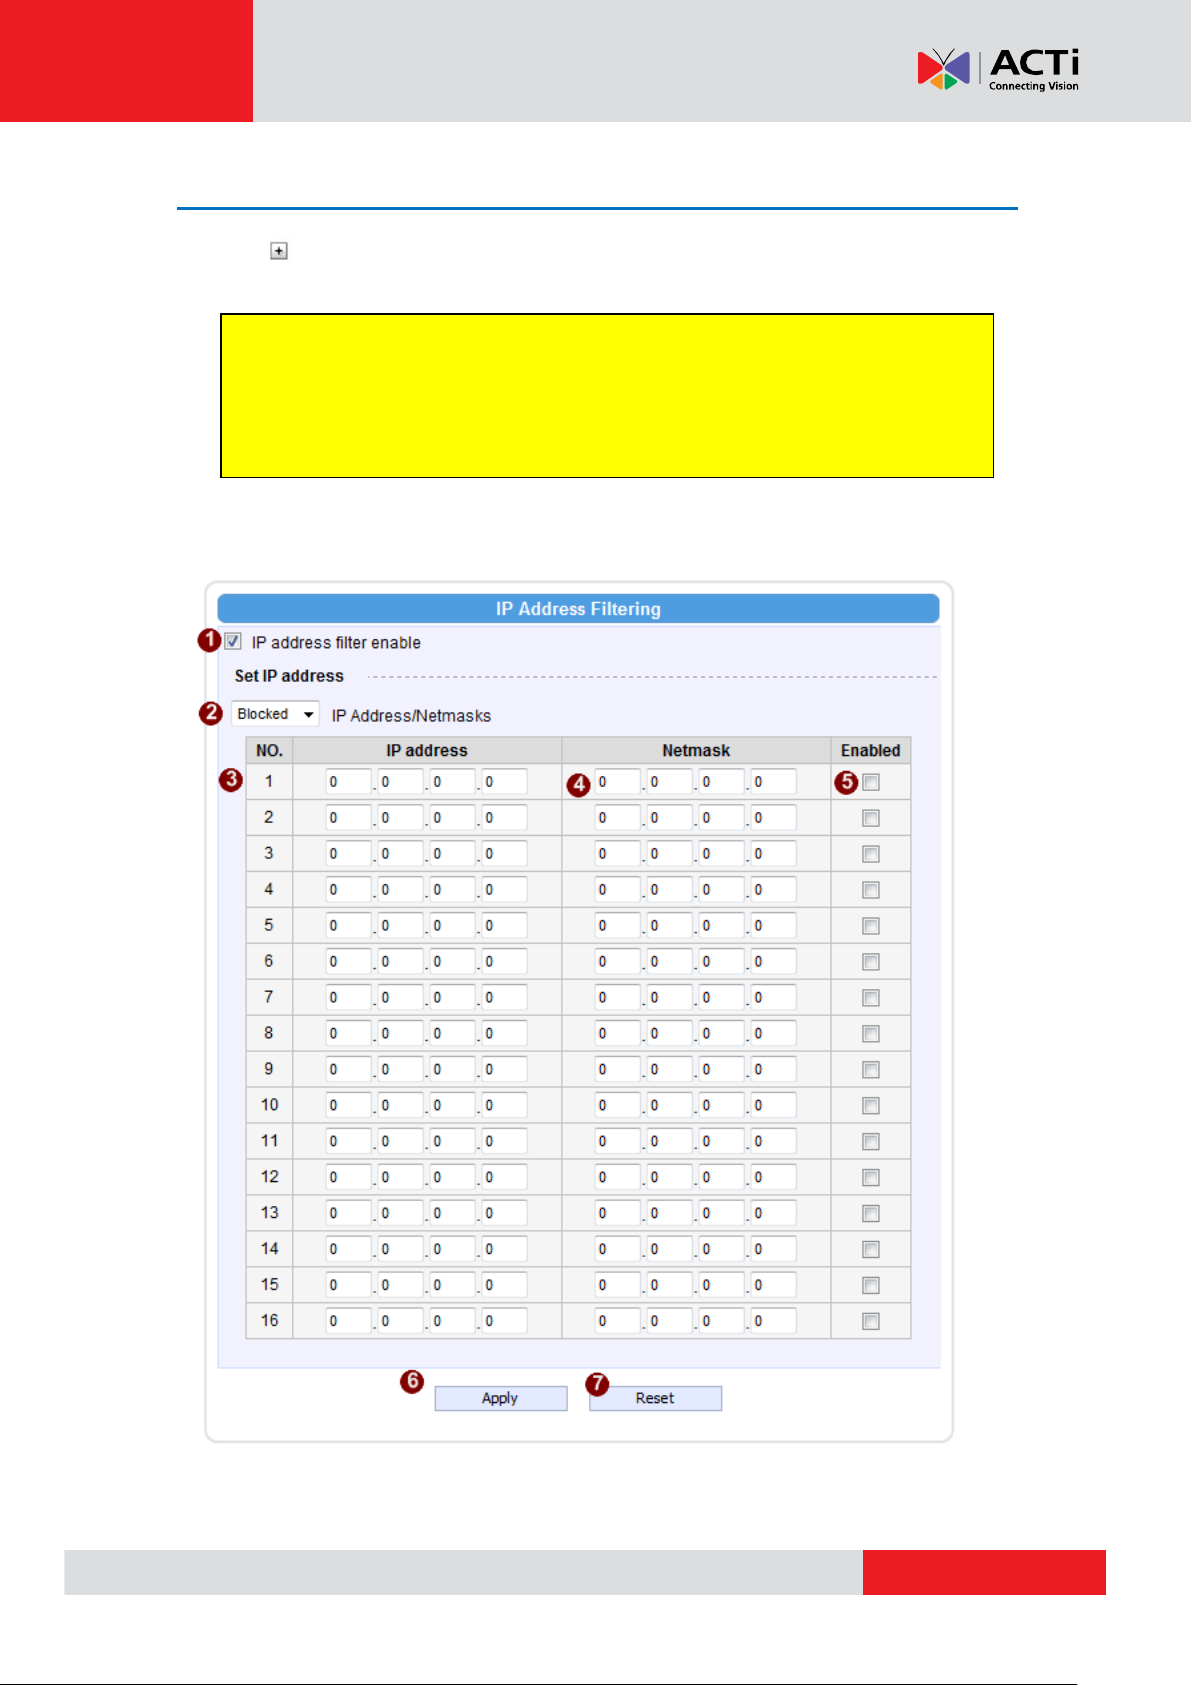
IP Address Filtering
Click the [IP Address Filter] item to display the “IP Address Filtering Page”. Refer to the table
below for how to configure each setting.
23
Page 24

www.acti.com
Firmware User’s Manual V5.12.12
Parameters
Description
IP address
filter enable
Check this box to enable IP Address Filtering.
Filter Method
The filter can be set in either “Allow” mode or “Block” mode.
1. “Allow” mode will refuse access to all IP addresses except the ones
listed below.
2. “Block” mode will accept all incoming access except the IP
addresses listed below.
Make sure you include the Netmask in your consideration.
IP Address
The IP address you wish to allow or block. Please note that the actual
range is modified by the Netmask.
Netmask
Using Netmask allows you to set filtering for a whole range of IP address
at once, without the need to enter all of them individually. If you are not
sure about the function of netmask, then you should use
255.255.255.255, and it will affect only a single IP address per line of
entry, or use 255.255.255.0 to use the same setting for all IP addresses
starting with the same three numbers. .
Enable
For each entry, you must check this box for it to be effective. For an entry
that you no longer need but does not wish to delete, you can uncheck it,
and the system will remember it for future use. If a new entry that has
never been used before does not have Enable checked, then it will not
be stored in memory.
Apply
Click this to use the current displayed info to do IP Address filtering. If
you setup correctly, it will change into a grayed out “Success” in a few
seconds.
Reset
Click this button to re-enter the parameters.
Click the [Apply] button to confirm the settings or click the [Reset] button to re-enter the
parameters.
24
Page 25
www.acti.com
Firmware User’s Manual V5.12.12
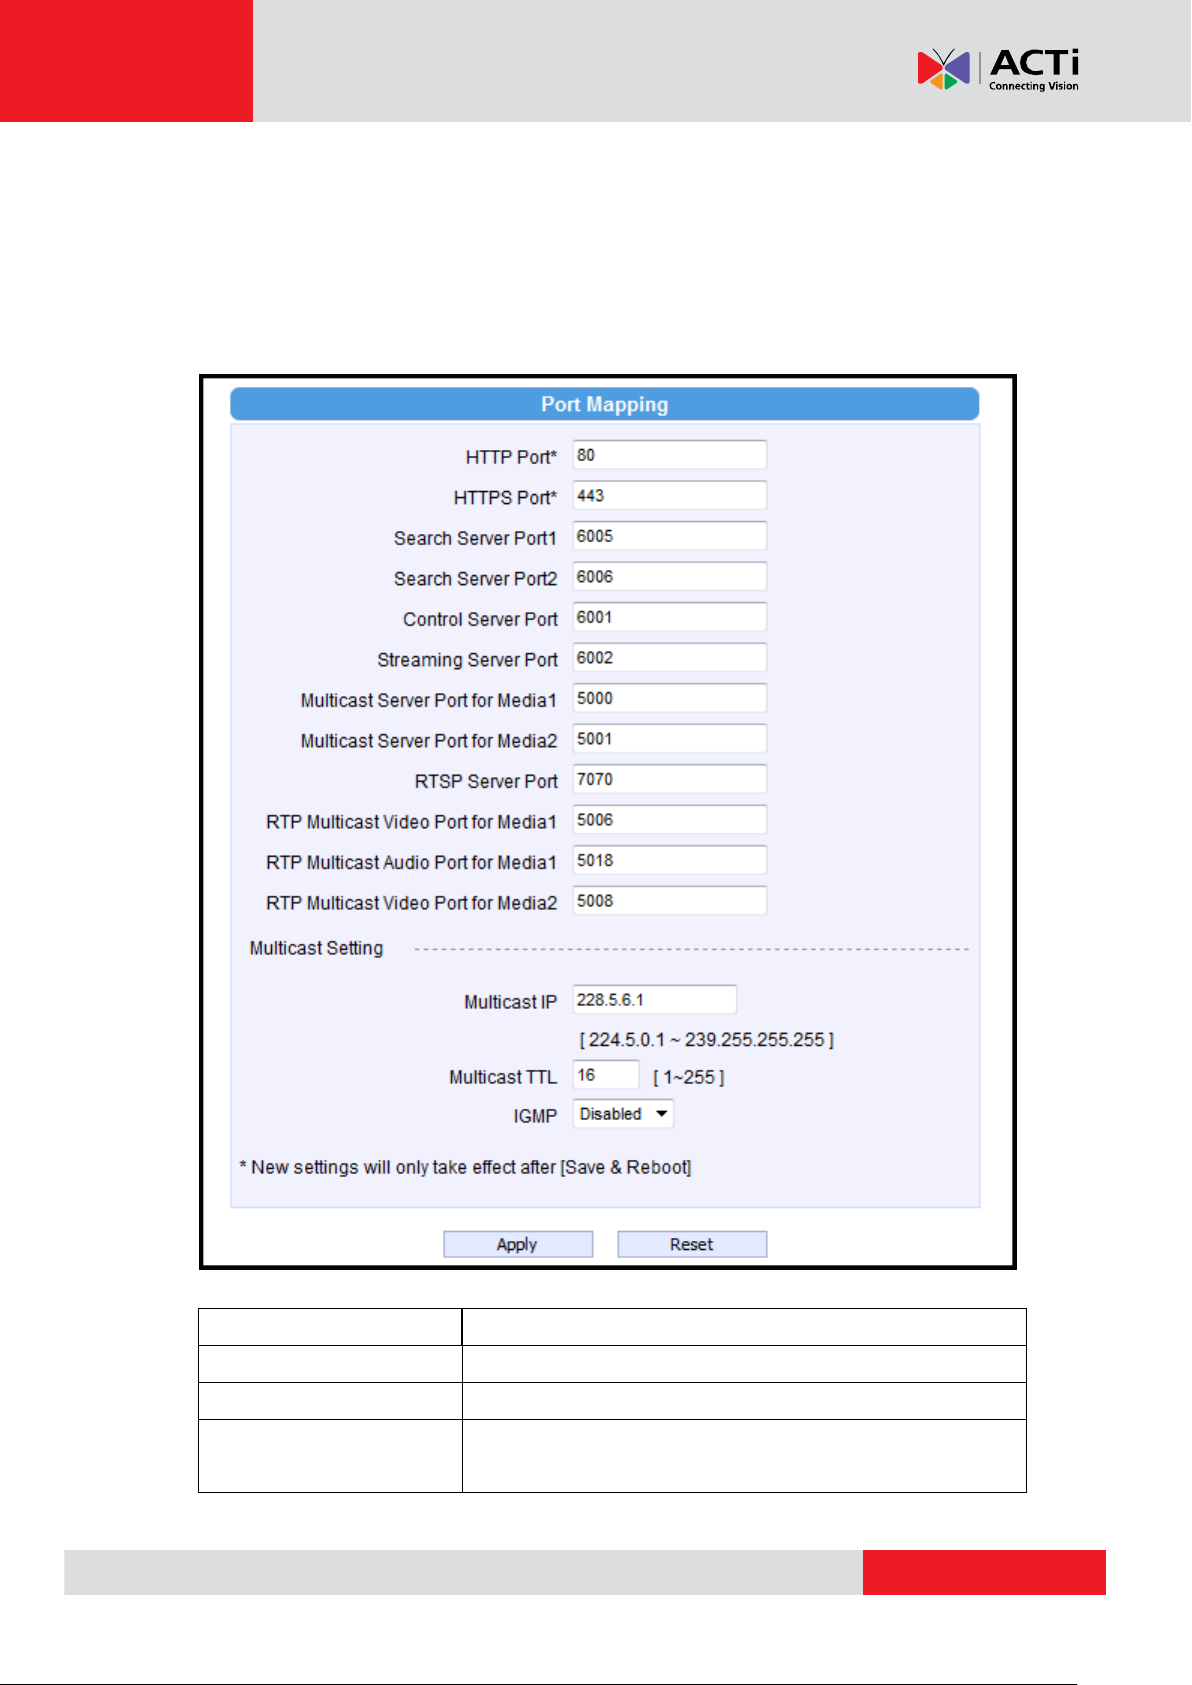
Parameters
Description
HTTP port
Select the port assigned for HTTP protocol access
HTTPS Port
Select the port assigned for HTTPS protocol access
Search server port1
Select the first port used by server search applications to detect
this IP device. (e.g. IP utlity)
Port Mapping
Click the [Port Mapping] item to display the “Port Mapping Page”. Refer to the table below for how
to configure each setting.
25
Page 26

www.acti.com
Firmware User’s Manual V5.12.12
Search server port2
Select the first port used by server search applications to detect
this IP device. (e.g. IP utlity)
Video server port
Select the port used to support video control function by
application programs. (e.g. NVR)
Streaming server port (TCP
Only)
Select the port used by this IP device for Video Streaming.
Multicast Server Port of
Media 1
Select the port for multicast video streaming of stream 1
Multicast Server Port of
Media 2
Select the port for multicast video streaming of stream 2
RTSP port
Select the port assigned for RTSP protocol access
RTP Multicast Video Port
for Media1
Select the port for the multicast video streaming of stream 1 via
RTP protocol
RTP Multicast Audio Port
for Media1
Select the port for the multicast audio streaming of stream 1 via
RTP protocol
RTP Multicast Video Port
for Media2
Select the port for the multicast video streaming of stream 2 via
RTP protocol
Multicast IP
Select the multicast IP. Default settings is 228.5.6.1
Multicast TTL
Select the multicast TTL. Default setting is 255.
IGMP
Select video type connected to the video-in of this IP device. If
you use an incorrect video type, some images might be lost.
Click the [Apply] button to confirm the settings or click the [Reset] button to re-enter the
parameters.
26
Page 27
www.acti.com
Firmware User’s Manual V5.12.12
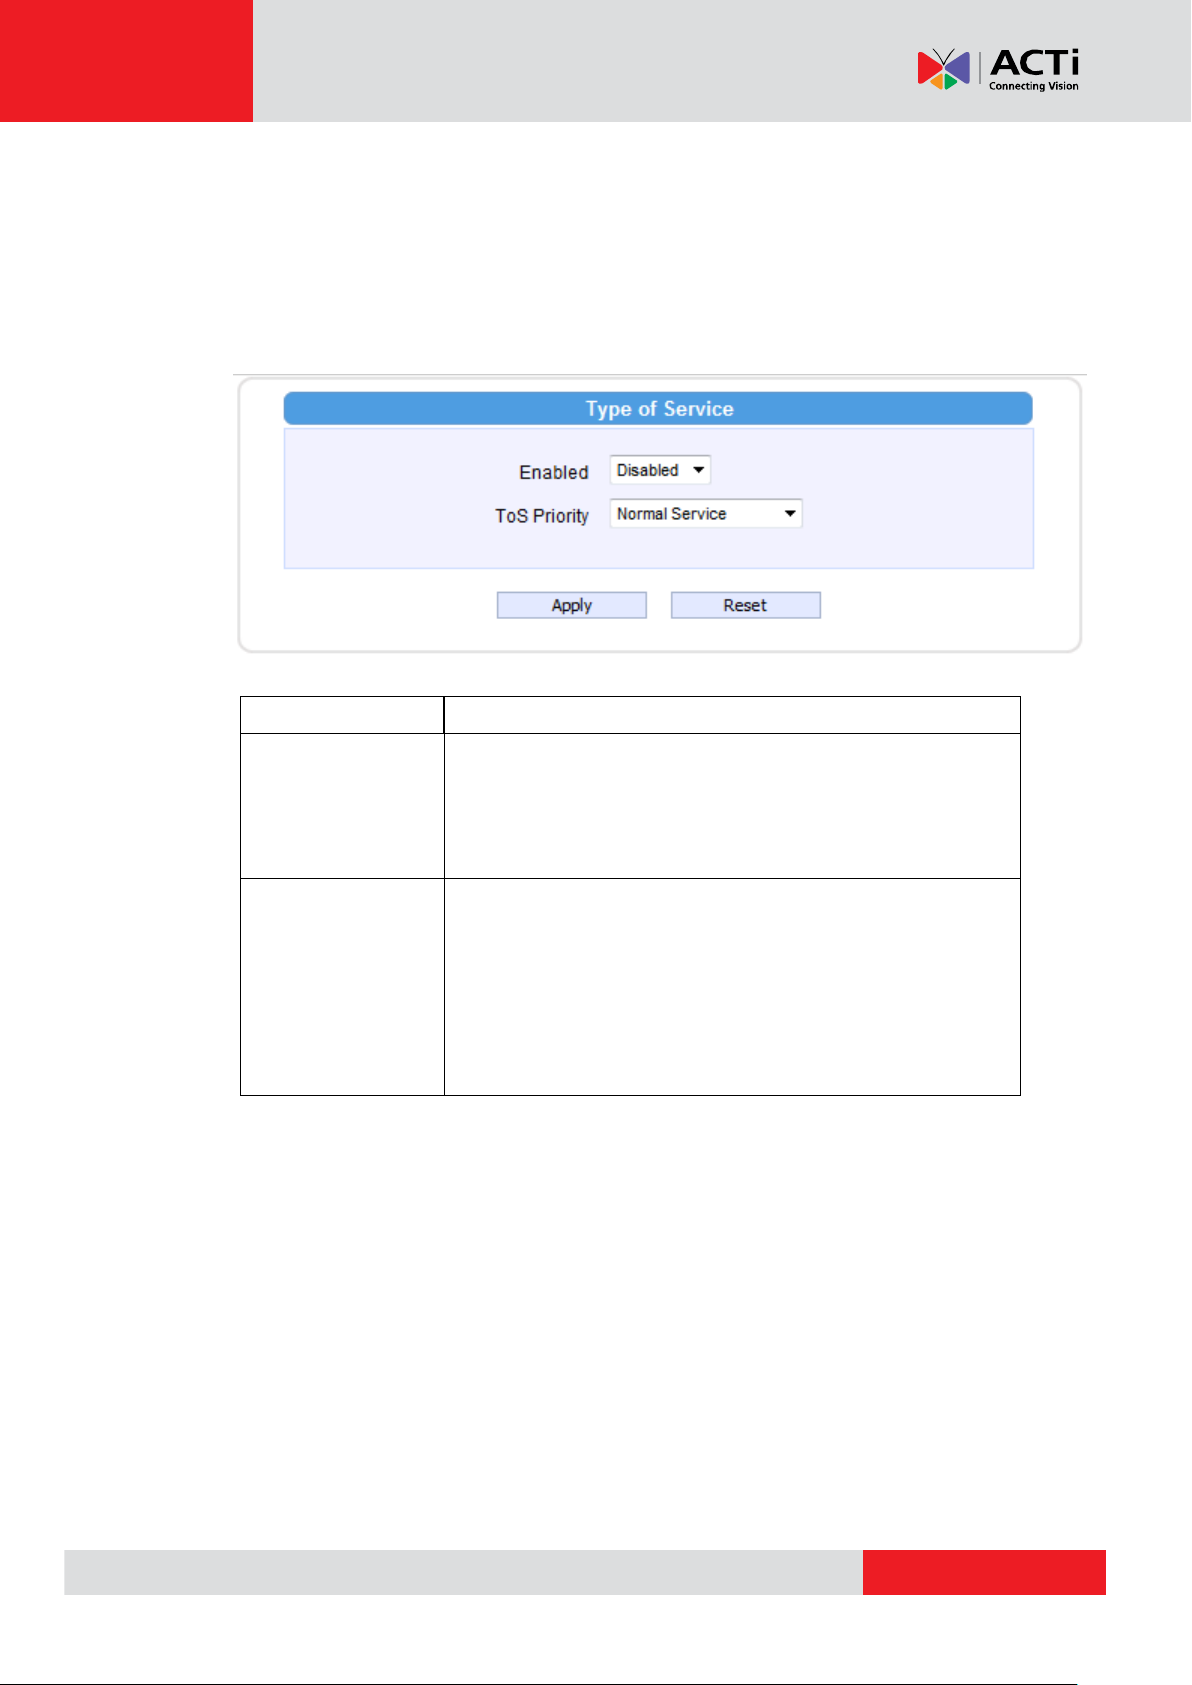
Parameters
Description
Enabled
Select whether to enable or disable the “Type of Service” (ToS)
function. This function defines the priorities of how the data from
the camera is handled by the routers that support the ToS
concept.
ToS Priority
By default, the ToS priority is set as “Normal Service”. Other
priority options are:
1.Minimize Delay
2.Maximize throughout
3.Maximize Reliability
4.Normal Service
ToS
Click the [ToS] (Type of Service) item to display the “Type of Service” page. Refer to the table
below for how to configure each setting.
Click the [Apply] button to confirm the settings or click the [Reset] button to re-enter the
parameters.
27
Page 28
www.acti.com
Firmware User’s Manual V5.12.12
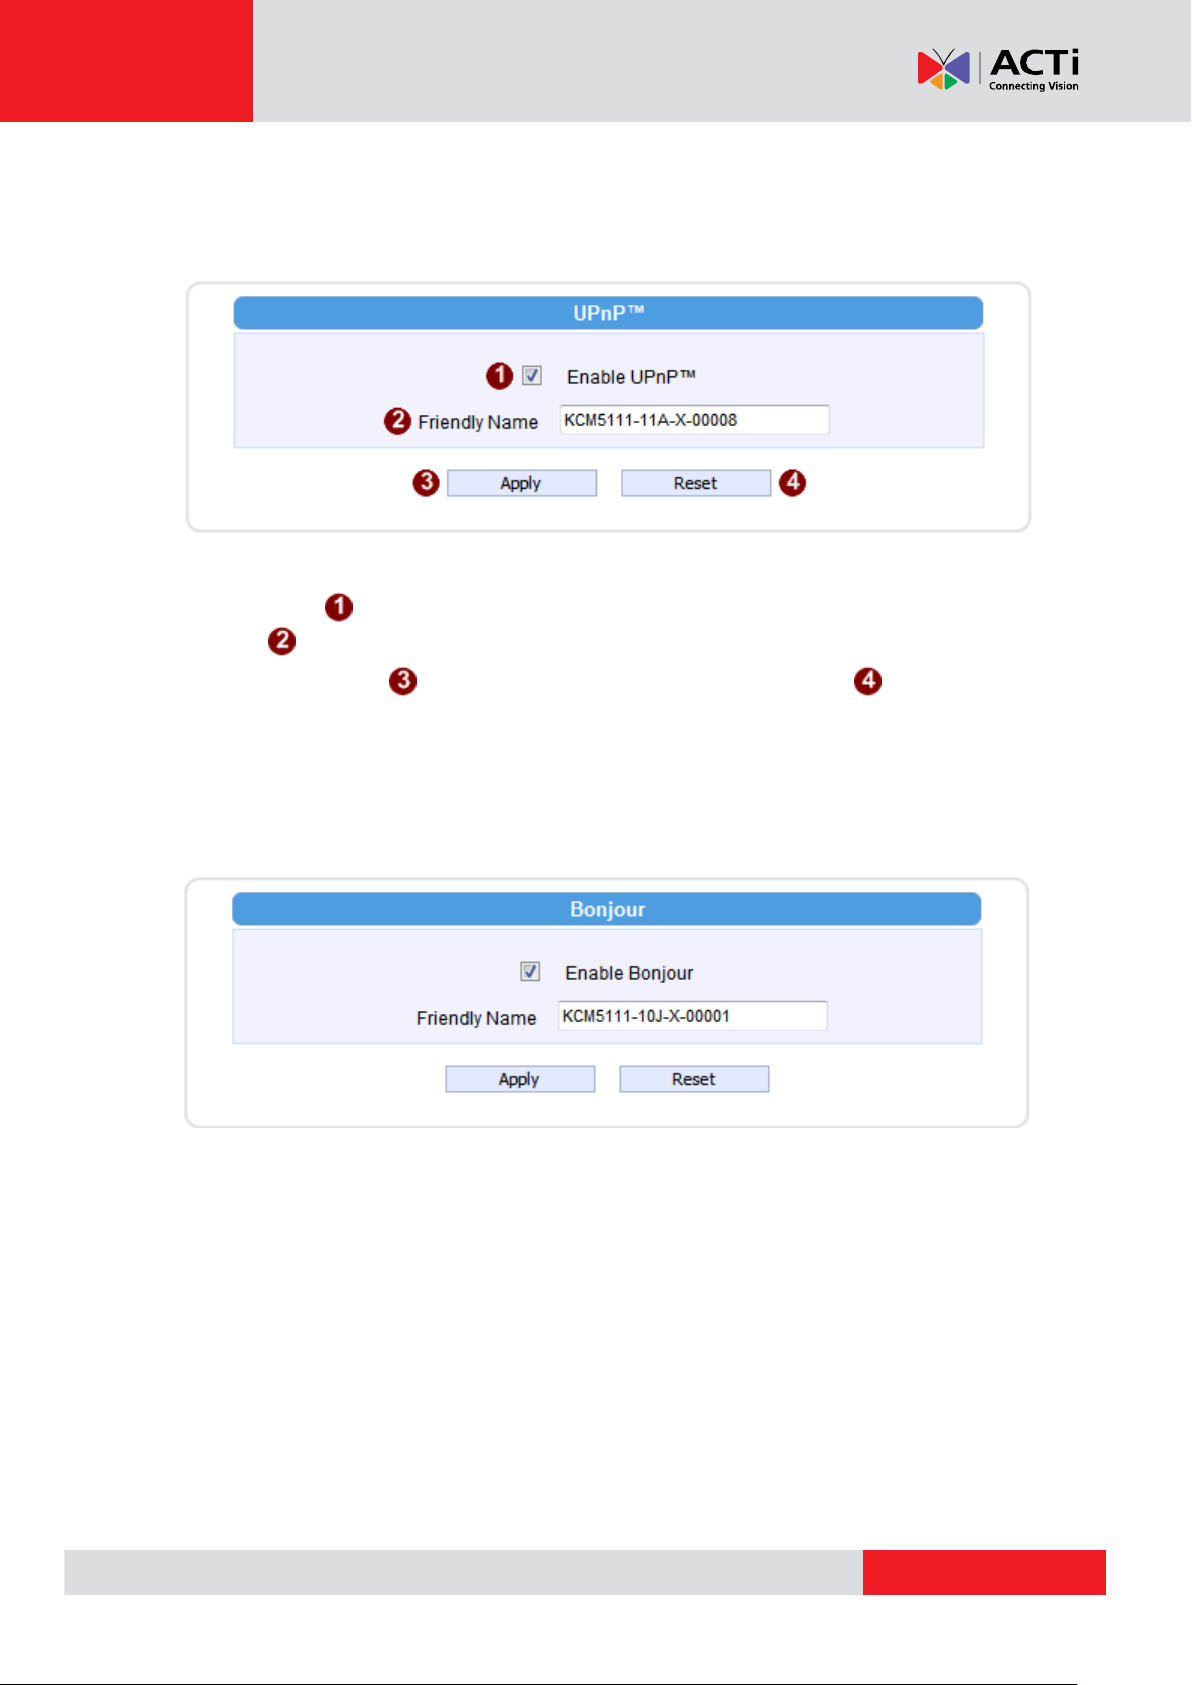
UPnP
Click the [UPnPTM] item to display the “UPnPTM Setting Page”.
Click checkbox to enable or disable the UPnPTM function. Edit the UPnP Friendly Name in
text field.
Click the [Apply] button to confirm the settings or click the [Reset] button to re-enter the
parameters.
TM
Bonjour
Bonjour is a protocol developed by Apple.Inc. This protocol allows for easy searching of devices
on network. You may enable Bonjour and search for this device via its Friendly Name.
28
Page 29

www.acti.com
Firmware User’s Manual V5.12.12
HTTPS
HTTPS is to create a secure channel over an insecure network. There are two methods to create,
Certificate Signing Request (CSR) and Self-Signed Certificate.
Certificate Signing Request (CSR): User uses a signed certificate issued by trusted
Certification Authority (CA).
Self-Signed Certificate: User wants to use the certificate created and issued by user himself.
Press “Create” or “Create Self-Signed Certificate” button and configure settings in the pop-up
screen to install the certificate.
Note that the new setting will only take effect after “Save & Reboot”.
IEEE 802.1X
Please enable IEEE 802.1x and configure settings in the screen below. Note that the new setting
will only take effect after “Save & Reboot”.
29
Page 30
www.acti.com
Firmware User’s Manual V5.12.12
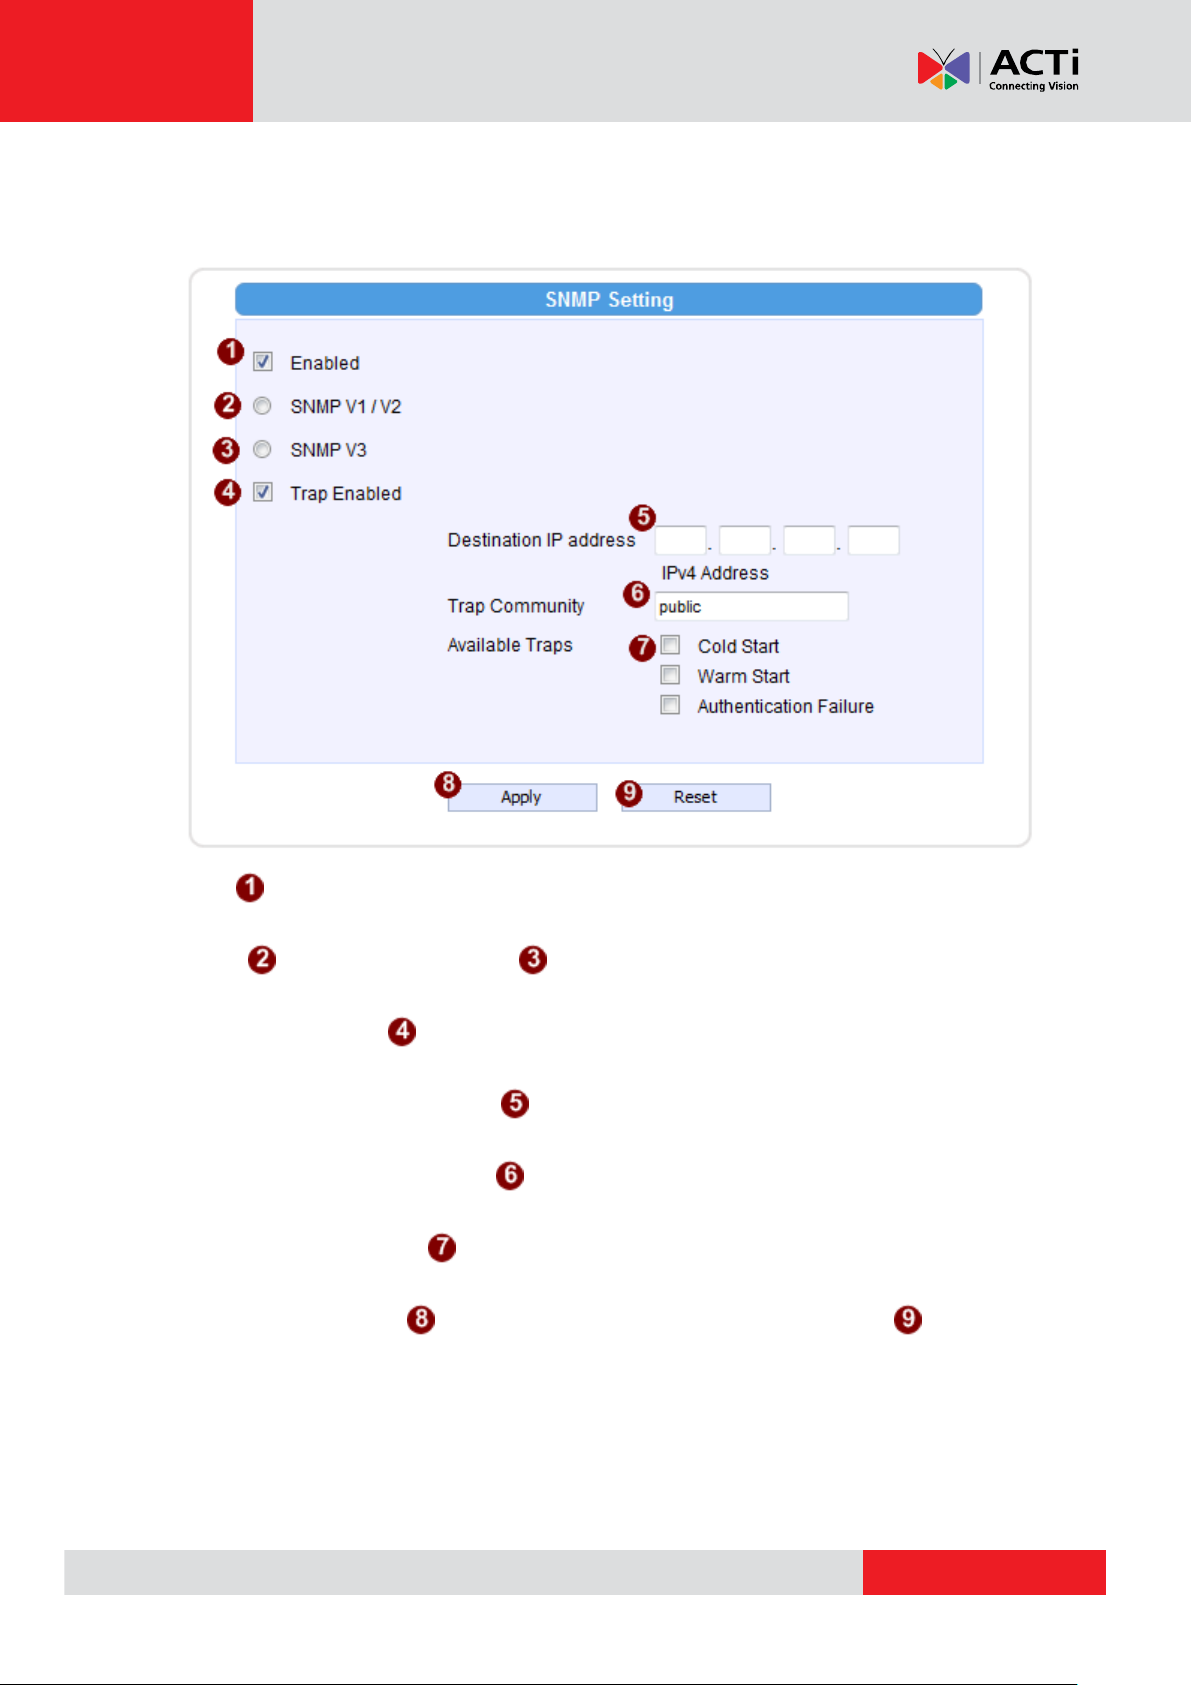
SNMP Setting
Click the SNMP Setting item to display the SNMP setting Page
Click to enable SNMP function.
Select to use SNMP V1/V2 or to use SNMP V3
Check the check box to enable traps
Enter the Destination IP address in
Enter the Trap Community used in
Select the Available trap in
Click the [Apply] button to confirm the settings or click the [Reset] button to
re-enter the parameters.
30
Page 31

www.acti.com
Firmware User’s Manual V5.12.12
RTSP Authen
Enable
Check box to enable RTP streaming’s Account/Password
authentication.
RTP B2 Frame
Enable
Check box to enable the B2 frame in RTP streaming
RTP
Click RTP Item to configure RTP Settings
Click the [Apply] button to confirm the settings or click the [Reset] button to re-enter
the parameters.
31
Page 32

www.acti.com
Firmware User’s Manual V5.12.12
Parameters
Description
Speed & Duplex
This item lets you select the network transmission speed. You
can select from
1. Auto detect (default setting)
2. 100Mbps / Full duplex
3. 100Mbps / Half duplex
4. 10Mbps / Full duplex
5. 10Mbps / Half duplex
Speed & Duplex
Click the [Speed & Duplex] item in the network section to display the ”Speed and Duplex” Page.
Refer to the table below for how to configure each setting.
Click the [Apply] button to confirm the settings or click the [Reset] button to re-enter the
parameters.
32
Page 33

www.acti.com
Firmware User’s Manual V5.12.12
Parameters
Description
Dynamic IP
address
Click this to enable IP device’s DHCP function.
It will acquire its WAN port IP address from a DHCP server within the
same network. (You must have a DHCP server in order to enable this
function.)
Use host
name
Enter the host name to display in utility tools, ex IP Utility.
Static IP
address
Click this to manually enter the IP address.
IP address: Enter the WAN port IP address.
Subnet mask: Enter the subnet mask of WAN port. If IP address
is changed, adjust the subnet mask accordingly.
ISP gateway: Enter the IP address of the gateway (the router).
IP Settings
Connection Type
Click the [Connection Type] item to display the “Connection Type Page”. Refer to the table below
for how to configure each setting.
33
Page 34

www.acti.com
Firmware User’s Manual V5.12.12
PPPoE
Click this when you connect IP device directly to the xDSL modem.
User name: Enter the user name of your xDSL account.
Password: Enter the password of your xDSL account.
Note: You have to click the [Save Reboot] after you click the [Apply
button] to let this IP device start xDSL connections.
Parameters
Description
Primary DNS server
Defines the IP address of the primary DNS server. This is used for
identifying this computer by name instead of IP address.
Secondary DNS server
The IP address of the secondary DNS server. It will be used once
the primary DNS server fails.
Click the [Apply] button to confirm the settings or click the [Reset] button to re-enter
the parameters.
DNS
Click the [DNS] item to display the “DNS Server Settings Page”. Refer to the table below for how
to configure each setting.
Click the [Apply] button to confirm the settings or click the [Reset] button to re-enter
the parameters.
34
Page 35

www.acti.com
Firmware User’s Manual V5.12.12
Parameters
Description
DDNS type
Click this to enable IP device’s DDNS function.
DDNS function enables user to connect to this IP device by domain name
even if its IP address is not static.
Protocol /
Service
Reference
Click one of the DDNS service providers.
You can visit their website to get a DDNS service account for this IP
device.
Host name
Enter the host name of your DDNS service account. (ex: xxxx.dyndns.org)
User name
Enter the user name to login your DDNS service account.
Password
Enter the password to login your DDNS service account.
DDNS
Click the [DDNS] item to display the “DDNS Server Setting Page”. Refer to the table below for
how to configure each setting.
Click the [Apply] button to confirm the settings or click the [Reset] button to re-enter the
parameters.
35
Page 36

www.acti.com
Firmware User’s Manual V5.12.12
Video & Audio
Click the [Video & Audio] item on the “Setup Page”.
Please note that some elements may not appear on all models.
Stream Mode
This section determines how many streams are available from this device. There are three
modes: Single, Dual or 4 Stream. “4 Stream” mode is available only to 4 Megapixel models.
In single stream mode, resolutions available include 4 Megapixel 2032 x 1920 (for some models),
Full HD 1920 x 1080, HD720 1280 x 720 and VGA 640 x 480.
In 4 Stream mode, there is a Standard View and a Positioning View. This image below shows the
Standard View. This display shows where each crop window located is but does not allow you to
change move it. To reposition the crop windows, click “Setup”.
36
Page 37

www.acti.com
Firmware User’s Manual V5.12.12
4 Stream Mode – Standard View
In Standard View you can see where the window for each channel is located. To edit cropping
location, click “Setup”.
37
Page 38

www.acti.com
Firmware User’s Manual V5.12.12
4 Stream Mode – 4 VGA Window Positioning View
In 4 VGA Window Positioning View, you may position each window to where you desire to view.
The current view is the 4M view area to allow you the most flexibility in positioning. Click and drag
the top bar of each window to activate it and drag to place. The currently active window is
highlighted in yellow, while the other windows are shown in red.
38
Page 39

www.acti.com
Firmware User’s Manual V5.12.12
Type
Description
Physical Installation Angle
Not using the 10° Hemispheric Camera Wall Mount
0 degree
With 10° Hemispheric Camera Wall Mount
10 degree
Camera Options
This item is available on hemispheric camera only.
This section determines how many streams are available from this device. There are six modes:
Single, Dual, ePTZ, MD Preset, 6 Stream and Fisheye View.
Single Mode
In single stream mode, there are two options you can choose depend on your device’s mounting
type- Ceiling / Wall. In Single Mode, resolutions available include Full HD 1920 x 1080 and
HD720 1280 x 720.
In Ceiling Mount, you can see the double panorama view in pre-view windows. You can adjust
the viewing angle via typing the rotation degrees.
In Wall Mount, you can see the panorama view in pre-view windows. Adjust the “Physical
Installation Angle” will do proper dewarping based on the newly defined center of the view.
39
Page 40

www.acti.com
Firmware User’s Manual V5.12.12
ePTZ Mode
ePTZ mode of Hemispheric Camera works in similar way as optical PTZ function in Speed
Domes. As the camera receives commands from remote client, it changes the direction of the
view or zooms in or out digitally. The stream coming out from the camera represents current
viewing direction of the camera, not the panoramic view.
The resolutions are available include 4M 2032 x 1920, Full HD 1920 x 1080, HD720 1280 x 720
and 640 x 480.
If you are using hemispheric camera in ePTZ mode,
this screen is available by clicking on PTZ button in the
live view screen. Mouse PTZ is enabled at the same
time.
You can configure up to 32 Zoom presets below. Just
click Set, enter the name and move position to what
you desire, then click set again. You can instantly ask
the camera to go to that zoom and focus position by
clicking on the Goto button.
Click Delete to remove this zoom preset point from
camera memory.
You can use ePTZ in live view by moving the mouse
over video and clicking on the video anywhere you like. Wherever you click, that point will
become new “center” of the view. This is how you “pan” and “tilt”. You also
can rotate the view via PTZ panel if you like.
To zoom in or out under ePTZ mode, use the scroll wheel of the mouse
Preset Tour
After you set the Preset Point, the Tour function will be enabled. Please refer Preset Tour,
Note: Home position has to be set again after changing the installation type, the motion detection
configurations and PTZ configurations like preset points.
40
Page 41

www.acti.com
Firmware User’s Manual V5.12.12
6 Stream Mode
6 Stream mode is very similar to multi-channel video encoder can act as 6 different VGA cameras,
each pointing in different direction
One of the benefits of 6 stream mode is to focus only on regions that are important and discard
the rest of them. It can help save bandwidth and storage space.
Please use the on-video controls (Mouse PTZ) to shift the
VGA region to the desired location.
You also can rotate the view if you like
To setup other stream, please select in “Stream ID” list.
MD Preset Mode
Using MD preset mode, please set preset points in live view page first.
1. Live View PTZ Preset
Please use the live view on-video controls (Mouse PTZ) to shift the region to the desired location
for each preset point.
2. Setup Video & Audio Motion Detection
Set up the detail setting of motion detection.
41
Page 42

www.acti.com
Firmware User’s Manual V5.12.12
3. Motion Detection Setup
Press to edit the settings. There are set six regions on ceiling mounting type
and three regions on wall mounting type.
STEP1: Click the checkbox to enable motion detection for different preset point region.
STEP2: Choose the preset point you want to use.
STEP3: Set the sensitivity of motion detection region.
STEP4: Set the interval time of motion detection. After a motion event is triggered, no more
events will be triggered within this time in the same region
STEP5: Set the trigger threshold of motion detection region. The larger this value, the larger
the object size needed to trigger motion detection.
STEP6: Set the priority of these preset point to trigger the motion detection. The higher
number is the higher priority,
Click the [Apply] button to confirm the settings or click the [Reset] button to re-enter the
parameters.
Fisheye View
In Fisheye View mode, camera will provide the panorama view image, and the available video
resolution is 2032 x 1936.
42
Page 43

www.acti.com
Compression
Parameters
Description
Encoder Type
Select the encoder’s compression type.
MPEG-4 / MJPEG / H.264
Resolution
Select the video resolution of the camera between 4M (2032 x 1920),
2M 1080p (1920 x 1080), 1M 720p (1280 x 720) and VGA (640 x 480)
Frame rate
Select the available frame rate from the drop down menu.
Video Bit Rate
Mode
Constant Bit Rate: The bit rate remains constant at all conditions,
Video quality will be better when image is still. Large amount of motion
or complex scene will degrade quality slightly.
Variable Bit Rate: The video bit rate will vary based upon scene
complexity and amount of movement. The quality will remain the same.
Quality
(Variable Bit
Rate Only)
When encoder type is MPEG4 or H.264, and video bitrate mode is
“Variable Bit Rate” Select the quality value from High / Middle / Low
GOP Length
(Variable Bit
Rate Only)
When encoder type is MPEG4 or H.264. and video bitrate mode is
“Variable Bit Rate”. Select the Interval between two I-frames. This is
also called GOP Length. (Group of Picture). Default value is one I frame
per second. The maximum length of GOP is limited to 60.
Video Max
Bitrate
(Constant
Bitrate only)
This puts a hard cap on the maximum bit rate allowed in any given
second of video streaming. Assigning a limited bit rate may result in a
few dropped frames rate when the stream data overflows the allowed
bit rate. Doing so will also disable Bit Rate setting below.
Video Bitrate
(Constant
Bitrate only)
This is the target bitrate that the camera will attempt to provide when
using Constant Bitrate mode. The actual value will fluctuate slightly
based on scene changes.
Single Stream Mode:
Firmware User’s Manual V5.12.12
43
Page 44

www.acti.com
Dual Steam Mode:
Parameters
Description
Encoder Type
Select the encoder’s compression type.
MPEG-4 / MJPEG / H.264
Resolution
Select the video resolution of the camera between 4M (2032 x 1920),
2M 1080p (1920 x 1080), 1M 720p (1280 x 720) and VGA (640 x 480)
Frame rate
Select the available frame rate from the drop down menu.
Video Bit Rate
Mode
Constant Bit Rate: The bit rate remains constant at all conditions,
Video quality will be better when image is still. Large amount of motion
or complex scene will degrade quality slightly.
Variable Bit Rate: The video bit rate will vary based upon scene
complexity and amount of movement. The quality will remain the same.
Quality
When encoder type is MPEG4 or H.264, and video bitrate mode is
“Variable Bit Rate” Select the quality value from High / Middle / Low
GOP Length
When encoder type is MPEG4 or H.264. and video bitrate mode is
“Variable Bit Rate”. Select the Interval between two I-frames. This is
also called GOP Length. (Group of Picture) . Default value is one I
frame per second. The maximum length of GOP is limited to 60.
Frame rate
Select the available frame rate from the drop down menu.
Firmware User’s Manual V5.12.12
44
Page 45

www.acti.com
Firmware User’s Manual V5.12.12
Video Bit Rate
Mode
Constant Bit Rate: The bit rate remains constant at all conditions,
Video quality will be better when image is still. Large amount of motion
or complex scene will degrade quality slightly.
Variable Bit Rate: The video bit rate will vary based upon scene
complexity and amount of movement. The quality will remain the same.
Video Max
Bitrate
This puts a hard cap on the maximum bit rate allowed in any given
second of video streaming. Assigning a limited bit rate may result in a
few dropped frames rate when the stream data overflows the allowed
bit rate. Doing so will also disable Bit Rate setting below.
Video Bitrate
This is the target bitrate that the camera will attempt to provide when
using Constant Bitrate mode. The actual value will fluctuate slightly
based on scene changes.
Click the [Apply] button to confirm the settings or click the [Reset] button to re-enter
the parameters.
45
Page 46

www.acti.com
Firmware User’s Manual V5.12.12
4 Stream Mode:
Configuring compression settings in 4 stream mode is basically the same as configuring
compression settings in other modes. The setting is the same across all 4 channels, but you may
switch view of the individual channels by selecting the channel on top.
46
Page 47

www.acti.com
Firmware User’s Manual V5.12.12
Motion Detection
The section “Motion Detection” allows the user to configure the video motion detection system of
the camera. Motion detection regions are based on the Stream 1. By default, all the regions are
disabled.
Click on “Setup” and then check “Enabled” to adjust the motion detection regions or its
parameters. Microsoft Internet Explorer browser is required to configure the motion detection
regions.
There are three independently configurable motion detection regions in the camera. Each
motion detection region has 6 configuration parameters:
Enabled or disabled
Location of the region
Size of the region
Sensitivity
Trigger threshold
Trigger interval
47
Page 48

www.acti.com
Firmware User’s Manual V5.12.12
Enabled or disabled
Each of the 3 motion detection regions can be enabled or disabled
individually. Look at the example: Only the region 1 is enabled while
2 and 3 are disabled. The disabled regions disappear from the
video display.
Note that the number of the motion detection region is written in
the upper left corner of the region.
Location of the region
You can move the motion detection region anywhere on the field of
view by dragging the top of the motion detection rectangle as
shown on the image. The motion detection regions may even be
overlapping if you like.
Size of the region
By dragging the lower right corner of the motion detection region
you can change the size of the region. The maximum size of the
region can even be as big as the whole screen.
Sensitivity
Sensitivity is the parameter that helps us distinguish actual moving targets (people, vehicles)
from the slightly moving background, such as leaves of the trees waving in the wind. In order to
avoid false alarms, we might want the camera be able to ignore small motion. The higher is the
sensitivity level of the camera the smaller shift of the object is needed to trigger the alarm. For
example, if the object within motion detection region has moved for about 1-3 pixels during two
video frames, then such small motion will be discarded by camera if the sensitivity is low, and will
still trigger an alarm if the sensitivity is high. In other words, you can think of sensitivity level as a
reversed speed limit – the smaller is the sensitivity, the faster are the objects allowed to move
without being detected.
The biggest challenge of motion detection configuration is to find the settings that do not produce
false alarms and at the same time do not miss any actual intrusions. The rule of thumb is: the
sensitivity should be as high as possible while not producing false alarms. The default
sensitivity level of the cameras is 70 (on a scale of 0-100) and it is a good setting for most
standard cases.
48
Page 49

www.acti.com
Firmware User’s Manual V5.12.12
Trigger threshold
Look at the moving object entering the
area of motion detection: although
moving quite slowly, it caused motion
activity – several pixel regions
reported a motion that was faster than
allowed “speed limit” of sensitivity (70).
The blue graph on the right side of
the image shows how many percent
of pixels within the motion detection
region were considered as “currently in motion”. The activity panel itself is a timeline – for each
moment of time you can see the height of the blue bars. You may notice that at certain moment
the tallest bars in the activity graph reached about 25% (a quarter of the total height in activity
panel) – it means, 25% of this motion detection area were filled with moving pixels at that moment.
By visual observation you can also see that the object standing inside the motion detection region
indeed covers about 25% of its size.
What if the object is really small but moves rather fast (gets triggered by the current sensitivity
level)? For example, we want to detect people but not the cat walking in the room. Although both
people and cat may move with the speed that will trigger motion, they have different size of
triggered pixels. For example, a human passing by the motion detection region will trigger 25% of
pixels in that region while the cat would trigger only 2%. Since we want to have a real alarm in
case of human or vehicle passing by while ignoring birds, cats, butterflies, mice, etc, we need a
filter that can define how many percent of triggered pixels will be considered as a real alarm. This
parameter is called trigger threshold. The default value of trigger threshold is 10%. It means,
only the objects that are bigger than 10% of the motion detection region size and move faster
than allowed by sensitivity level (70) will produce actual alarm.
How to choose the most optimal trigger threshold level? The rule of thumb, keep the trigger
threshold as small as possible while not causing false alarms by the moving objects that
are not humans or vehicles.
You can have different sensitivity level and trigger threshold level for each motion detection
region.
In order to understand all of the above even better, please refer to the table below containing four
possible combinations of settings using sensitivity level and trigger threshold percentage.
49
Page 50

www.acti.com
Firmware User’s Manual V5.12.12
Low threshold (0-5%)
High threshold (5-100%)
Low sensitivity
(0-65)
Big and fast
Small and fast
Big and fast
High sensitivity
(65-100)
Big and fast
Big and slow
Small and fast
Small and slow
Big and fast
Big and slow
The objects listed in each cell will trigger an alarm under given settings:
The camera’s default sensitivity is 70 and threshold is 10%. By these default values, only
the rabbit and the turtle would trigger an alarm while the butterfly and the snail would be
ignored by the motion detection system.
Important: Please remember that changing the size of the motion detection region has an impact
on the threshold – the bigger is the size of the motion detection region the smaller should be the
threshold value if you want the same object size to trigger motion. For example, if you increase
the motion detection region to twice the previous size, please remember to reduce the threshold
to half its original value (from 10% to 5%). On the other hand, changing the location of the motion
detection region has no impact on threshold.
Trigger interval
The last configuration item is the trigger interval. It is the time period from the beginning of the
triggered event during which the all motion activities are ignored by the camera. This is designed
to avoid needless repetitive reporting of the same intrusion. Trigger interval 20 seconds would
mean that when the even happens, camera will take certain one-time actions and ignore the
continuing activity in the motion detection region for 20 seconds. When 20 seconds are over, the
camera will produce a new alarm if there are still action in the motion detection region, and take
actions again.
50
Page 51

www.acti.com
Firmware User’s Manual V5.12.12
There is one more item on the Motion Detection configuration
page which was not explained above – the Profile of Motion
Detection. Think of them as Profile 1 (Runtime MD Profile) and
Profile 2 (Event MD Profile). It means that you can configure
two independent groups of Motion Detection regions with at most 3 regions in each group.
Normally, the Profile 1 (Runtime MD Profile) is used as an active profile of the camera. However,
in some cases it is possible to let the camera switch to Profile 2 by using the Event Handler
system of the camera.
For example, you might want to have different motion detection parameters for day and night time.
Then the two profiles become really handy. In such case, remember to configure the motion
detection parameters for both profiles before moving on to configure the event response system.
After changing any of the items above, press Apply to save the changes. The Reset button
undoes the changes that had just been made but not Applied yet.
51
Page 52

www.acti.com
Firmware User’s Manual V5.12.12
Image
This section concerns the general video settings.
KCM-5111/KCM-5211/KCM-5311/KCM-7111/KCM-7211/KCM-3211 Models
1. Video Flipping: Check this box to flip the video up-down
2. Video Mirror: Check this box to mirror the video left-right
3. Brightness: Select the Brightness value. The higher the value, the brighter the image.
4. Contrast: Select the Contrast value. The higher the value, the sharper the contrast.
5. Digital Noise Reduction: Select ON or OFF to enable or disable this function. Enable this
for smooth and clear image. Disable this if your scene contains many extreme details that
may be smoothed over with DNR.
6. Restore image settings to default: When press this button, it will use the default image
settings.
Click the [Apply] button to confirm the settings or click the [Reset] button to re-enter the
parameters.
52
Page 53

www.acti.com
Other Models
Firmware User’s Manual V5.12.12
1. Video Flipping: Check this box to flip the video up-down.
2. Video Mirror: Check this box to mirror the video left-right.
3. Brightness: Select the Brightness value. The higher the value, the brighter the image.
4. Contrast: Select the Contrast value. The higher the value, the sharper the contrast.
5. Saturation: Select the saturation value. The higher the value, the more saturated the image.
6. Digital Noise Reduction: Select the DNR value. The higher the value, the smoother and
clearer the image.
53
Page 54

www.acti.com
Firmware User’s Manual V5.12.12
7. 3D Noise Reduction: Select ON or OFF to enable or disable this function. Enable this for
smooth and clear image. Disable this if your scene contains many extreme details that may
be smoothed over with 3DNR.
8. Edge Enhancement: Select the Edge Enhancement value. The higher the value, the
sharper the image.
9. Advanced WDR: Select the WDR level. Options are: Disabled, Low, Medium, High, Highest.
NOTE: Advanced WDR is disabled and will not appear on screen if “Exposure Mode” is set to
“Manual”, see Exposure / White balance on page 56.
10. Defogging: Select the Defogging value. The higher the value, the clearer of image in foggy
situation. If you want to disable this function, please choose value 0.
11. Restore image settings to default: When press this button, it will use the default image
settings.
Click the [Apply] button to confirm the settings or click the [Reset] button to re-enter the
parameters.
54
Page 55

www.acti.com
Firmware User’s Manual V5.12.12
Day / Night
This section concerns the day and night switch timing for your camera.
1. Day / Night Mode: The camera will change between day and night modes by default. You
may command camera to stay in day or night mode here, or allow it to change automatically.
2. Switch from Day mode to Night mode: This value controls the level of light where camera
switches into night mode. Increasing it will make camera switch to night mode at a darker
illumination level.
Click the [Apply] button to confirm the settings or click the [Reset] button to re-enter the
parameters.
55
Page 56

www.acti.com
Firmware User’s Manual V5.12.12
Exposure / White balance
Configure Exposure and White Balance and Digital Noise Reduction for best image quality here.
Some options will only appear under certain exposure / White balance modes. We will describe
each in detail below.
Exposure Mode - Auto
In Auto Exposure Mode, you control the image brightness by configuring the AE Reference
Target and Slowest Auto Shutter.
AE Reference Target means the Auto Exposure reference target, which can be considered as
the “Target Brightness on Sensor”. The camera will use several internal parameters to achieve
best quality with reference to this. The higher this value, the brighter the overall scene, and
the more noise at night.
Slowest Auto Shutter means the longest allowed exposure time for each frame. In extreme low
light conditions, the exposure time is automatically increased to get more light into one image. If it
extends beyond the interval between frames, (i.e. 1/30 second), then the frame rate will be
automatically reduced. Longer time in this value gives clearer images at night for slow
moving objects, but more motion blur for fast moving objects.
White balance weights the proportion of color in scene and recreates the most realistic color.
Usually this function is performed seamlessly in the background in auto mode. In some cases you
may want to fix the color proortions of your view. Wait until you like the color on screen. You can
hold a piece of white paper in front of camera for reference, then wait until you like the current
value to click on the “Hold” button to the right. This will lock the current value and enter the
manual white balance mode.
Before Hold
56
Page 57

www.acti.com
Firmware User’s Manual V5.12.12
Entering Manual mode with Hold White Balance
Line Frequency is the power supply frequency. Select the right frequency to avoid image
flickering.
P-IRIS (For Support P-Iris Lens Model)
Enable P-IRIS function using P-Iris Lens. Otherwise, please disable it.
Exposure Mode – Shutter Priority
In Shutter Priority Mode, the shutter speed is locked at the user defined value. Camera will
compensate for different brightness with Iris size or signal enhancements. This is useful when the
target moves very fast and has to be viewed with short exposure shutter time.
57
Page 58

www.acti.com
Firmware User’s Manual V5.12.12
Exposure Mode – Iris Priority
In Iris Priority Mode, Iris size is fixed to ensure sufficient depth of view. Camera varies exposure
time shutter to compensate for brightenss change.
Exposure Mode - Manual
In Manual Exposure mode, you may configure the shutter speed and exposure image gain
yourself for optimum performance.
58
Page 59

www.acti.com
Firmware User’s Manual V5.12.12
Audio
Audio In - Enable or disable Audio In via the check box.
Audio Out Volume – Control the output volume of Audio Out here.
Audio Format – Select the audio’s compression type, PCM / G.711A / G.711U.
Click the [Apply] button to confirm the settings or click the [Reset] button to re-enter the
parameters.
59
Page 60

www.acti.com
Firmware User’s Manual V5.12.12
OSD/Privacy Mask
OSD (On Screen Display) and Privacy masks are configured in this section. There are four
regions available. Each may be used either as a Privacy mask or an OSD text.
Privacy Mask is not available in Dual Stream mode. Please disable Stream 2 if you wish to use
Privacy mask / OSD.
60
Page 61

www.acti.com
Firmware User’s Manual V5.12.12
Parameters
Description
Enable
Check this box to enable each OSD / Privacy mask region
OSD / Privacy
mask
Each region can be in one of two types. OSD (On Screen Display) or
Privacy mask
Color (Privacy
mask)
This determines the color of the Privacy Mask Area. You may choose
between Black, Green, Red and Blue.
Setup
Click this checkbox to enable Privacy mask area setup. Click and drag
the adjust square at the lower right to change dimensions, click and
drag the adjust column at the top to move. (Similar to Motion Detection
Region)
Color(OSD)
This determines the color of the OSD Text. You may choose between
Black, Green, Red and Blue.
Transparent
This number determines the level of transparency for this OSD Text. 1
means that the background between the texts will not be visible, while
100 means the background will show through the OSD text.
Position
Select the location where the text will appear in the image.
String
This is where you enter the user defined string (%U) as described in the
next section. Total length cannot be more than 63 characters
Format
This controls what is shown in the OSD text. You can click the Format
Notice to the corner for a full list of available parameters. The OSD text
is primarily based upon this field.
Format Notice
Click here to see the syntax list of how to configure the OSD text.
Click the [Apply] button to confirm the settings or click the [Reset] button to re-enter
the parameters.
61
Page 62

www.acti.com
Firmware User’s Manual V5.12.12
Event
This section describes how to setup the Event Handler, which deals with how the IP devices
respond to situations. Each IP device can have a maximum of 10 Event Rules. Each rule includes
one single trigger, and one or many responses. Several types of responses are available. And
there are multiple external servers for the device to interact with.
When setting up Event Handler, there are four types of settings. Event Server, Event
Configuration, Event Rules and Manual Event
Click the [Event] item on the “Setup Page”.
Event Server
Event servers define whom the device may interact with. They can be other servers or devices
on the network, or even the camera itself. Event Configuration sets up a list of what to tell the
other party during interaction. Event list lays down the rules and conditions about when to initiate
which responses from which triggers. The options available for Event rules are selected from
the event servers and event configurations.
Event servers are classified as FTP servers, SMTP servers and HTTP servers
62
Page 63

www.acti.com
Firmware User’s Manual V5.12.12
FTP Server
FTP servers can receive snapshot or video uploads that are issued as part of the response from
event handlers. You may setup one FTP server.
To setup FTP servers, make sure to enter the network address, the Network (FTP) port,
the User Name, Password, Connection mode (Passive or Active) and
Connection time before timeout(in milliseconds). Click [Apply] to use these settings or click
[Reset] to clear changes.
SMTP Server
SMTP servers can send email upon request from the IP device. The email can be a simple
subject and text email, or attached with snapshot / video. You may setup two SMTP servers. The
device will first attempt to send the message via the Primary email SMTP server. If the first
attempt fails(after the Max connecting time), then the device will attempt to send via the
secondary SMTP server. If the device sends email successfully via the primary SMTP server,
then it will not use the secondary SMTP server.
63
Page 64

www.acti.com
Firmware User’s Manual V5.12.12
To setup SMTP servers, make sure to enable the SMTP account and choose the
proper Authentication type. There are many types available. The default is Login. We recommend
you to use Auto Detection. Available authentication types include: Auto Detection, None, Login,
Plain, Cram MD5, Digest MD5 and PoP Relay. Please also enter the User Name,
Password, the email address displayed as sender (can be different than the user name),
Network (SMTP server) address, Network (SMTP server) Port number and Max
Connection time before timeout (in seconds). Click [Apply] to use these settings or click
[Reset] to clear changes.
64
Page 65

www.acti.com
Firmware User’s Manual V5.12.12
HTTP Server
HTTP CGI servers are programs that run on web sites or many devices. They can be custom
programmed to perform a large variety of actions based upon the input. You can define which
CGI server to connect to here, and the user / password required to log into the target server. The
actual message / command is setup in the Notification messages / URL commands section. You
may define two separate CGI servers.
IP devices are also CGI servers. This means that IP devices can now issue commands to each
other, which creates endless possibilities for highly coordinated response. The IP device can also
give a loopback command to itself, in effect changing almost all possible settings dynamically. For
detail on the commands used to control the cameras, please contact your customer
representative.
An example will help you gain a better sense of how to utilize this unique function. Camera A is a
fixed camera that looks at a corridor leading to the main hall. It has a motion detection window
located near the point where the corridor arrives at the large hall. Camera B is a PTZ camera
located in the hall, which is usually left on auto-tour patrol. When motion activity in the motion
detection region triggers MD1 in Camera A, this then in turn activates an event rule in Camera A
that gives out a command to Camera B. Camera B would then swivel to the preset point where
the corridor leads into the entrance and switch to higher bit rate to temporarily provide clearer
image. After the event ends, Camera B will go back to its normal routine in lower bit rate.
65
Page 66

www.acti.com
Firmware User’s Manual V5.12.12
To setup HTTP servers, make sure to enable the HTTP server, enter the user name,
the user password, Network (HTTP Server) address, Network (HTTP Server)
port number and Max connection time before timeout ( in seconds). Click [Apply] to use
these settings or click [Reset] to clear changes.
Event Configuration
Event configurations are the responses to be performed when an event is triggered. For most
types of responses, you can create several different preset responses, then mix and match in
event rules. Some responses are not supported in all IP devices (e.g.: DO, PTZ). Event Motion
Detection profile is also a triggerable response, but the parameters are defined through the Video
Adjust page, not in Event page.
The configurable responses are classified as Digital I/O ports, Notification messages, Upload
Image / Snapshot, Send URL Commands and go to PTZ Presets.
Digital I/O ports
Digital I/O ports (selected models only) read and control the voltage difference in the circuit,
and respond to it. They are useful in connecting to a wide variety of devices. D/I is a trigger, while
D/O is a response. Both are setup here. Both have a low voltage state and a high voltage state,
noted as 0 and 1.
66
Page 67

www.acti.com
Firmware User’s Manual V5.12.12
Trigger Interval: How does it work?
When a motion is detected or the device receives a DI trigger, usually users want the camera to stay on
high alert for a minimum duration of time before returning to normal mode. This duration is controlled by
setting the trigger interval value. During this time, the device will NOT respond to a second trigger. The
device will stay in the triggered state for as long as the trigger continues to be effective. So the Trigger
interval only limits the minimum amount of time the device will spend in the triggered state. Below are
sample diagrams on trigger-response mechanism.
Trigger: 20s
Response: 20s
Trigger: 20s
Response: 60s
Trigger: 80s
Response: 80s
Trigger: 20s + 20s
Response: 60s
No minimum interval
Minimum interval 60s
DI: To setup DI, please define the Active level as 0 or 1. If the active level is set as 1, then
camera will consider high voltage difference a trigger, which can be used to initiate other events.
The event will end when the DI voltage goes back to 0. Interval determines the minimum
delay that must pass before the IP device will accept another trigger from DI ( in seconds). 0
means there is no minimum delay limit.
67
Page 68

www.acti.com
Firmware User’s Manual V5.12.12
*Pre-requisites: SMTP server / HTTP CGI server setup.
DO: To setup DI, please define the Active level as 0 or 1. If the active level is set as 1, then
camera will change the output voltage to high when this response is activated by an event rule.
The voltage will go back to low when the event ends. Interval determines the minimum
duration of each DO response( in seconds). DO will remain at the active level during this time,
and if another event triggers DO before the end of the first DO, the second trigger will no take
effect. 0 means there is no minimum duration.
Notification message
Notification messages may be sent to either an email or a HTTP CGI server. If sent to a CGI
server, it works the same as an URL command, but it does not allow a second message at end of
event. You may configure up to three preset massages. You can configure a message, but
disable it. This will allow you to keep the settings without using it, which will be useful in testing
and troubleshooting.
68
Page 69

www.acti.com
Firmware User’s Manual V5.12.12
To setup Notification Messages, make sure to enable the message, then determine what
type of message to send (HTTP CGI or email).
If you are sending to CGI server, you need to enter the CGI path , the URL command itself ,
and an optional message .
If you are sending email , please enter the recipient E-Mail address , the email subject ,
and the body message . Click [Apply] to use these settings or click [Reset] to clear
changes.
69
Page 70

www.acti.com
Firmware User’s Manual V5.12.12
*Pre-requisites: SMTP server / FTP server / HTTP CGI server setup.
Enable
UI
Upload Media Type
Snapshot
Video
Upload Media to
Email
FTP
CGI
FTP
CGI Upload Period
Y Y Y Y Y
Image during
Upload Period
Y Y Y
Pre-Buffer Time
Y Y
Image File Name
Y Y Y Y Y Upload Path
* Y Y Y Y
CGI Path & Program
Y
Y
E-Mail Recipients
Y
Subject
Y
Video Source
Y Y Y Y Y
Upload Video/snapshot
IP devices may send video recording / snapshots to your chosen server upon event. Video will be
in .RAW format, while snapshots will be .JPG files. You can define up to three group of settings to
upload video/snapshot. Snapshots can be sent to FTP / HTTP CGI and via Email, while video can
only be uploaded to FTP or HTTP CGI servers. If Audio in is enabled in device, the uploaded
video will include audio.
The parameters needed to setup this function are different for each task combination (snapshot /
ftp or video / HTTP… etc), and are explained below:
Enable Video/snapshot checkbox: this decides if this rule is in effect, or disabled. Sometimes it
is useful to keep the settings, but not to enable it for troubleshooting purposes.
Upload Media to: these define the task at hand, and change the field that needs to be filled out.
70
Page 71

www.acti.com
Firmware User’s Manual V5.12.12
Upload Period: IP device will provide video/snapshots for the number of seconds here. It will
stop uploading video/snapshot at the end of this period. If you have video management software
recording from this camera at the same time, the normal recording through NVR will not be
affected, and goes on through out the event period and afterwards. But the special upload
session will end as the event ends.
Image during Upload Period: This is used only by snapshots. This tells the camera how many
snapshots it should attempt to capture during the Upload Time. If this value is set to 0, then the IP
device will attempt to capture as many snapshots as possible. Depending upon the device
loading, the number of snapshots taken may not reach the number you specified.
Pre-Buffer Time: This is only used by video. If this is set to more than 0, then the IP device will
start to buffer video in its internal memory. The maximum pre buffer is 3 seconds. When an event
requires video upload, the IP device will first upload the video taken right before the event then
keep uploading until it reaches the upload time.
Image File Name/ Upload Path: You will need to specify rule for file names and upload paths
(upload path is not needed for Email. Just put a slash “/” in the field). The rules contain flexible
parameters. A sample rule and corresponding filename will look like this:
Front_Door_%YYYY_%MM_%DD@%hh%mm%ss
Front_Door_2009_10_12@195037.JPG
Upload Path folders may also be named dynamically. For the IP device to create folders on FTP
and HTTP CGI servers properly, your FTP/CGI account will need to have permission to create
folders. For syntax on auto naming, please see online help or the inset box at the end of this
section.
The symbol “%” cannot be the first character in filename or upload path. Please use either an
alphabet or a number as the starting character. For Upload Path, be sure to start and end eith a
backslash“\”. An example will be : \Backgate%MM%DD\
CGI path & Program: Some CGI servers may require special info and settings. Please refer to
CGI server designer for this section. IP devices do not allow upload of Snapshots / Video into
their embedded CGI servers.
E-Mail Recipient / Subject: When uploading video/ snapshots via email, these information are
required.
71
Page 72

www.acti.com
Firmware User’s Manual V5.12.12
*Pre-requisites: HTTP CGI server setup.
Auto Naming Rules for Files and Folders:
To properly track images and videos, a well thought out naming rule is necessary. There are a number of
automatic variables available to design a proper naming system, which may be used both on files and folders.
Symbol
Description
Example
%YYYY
4 digits for year
2009 for year 2009
%YY
the last 2 digits of 4 digits year
09 for year 2009
%MM
two digits for month. 01~12
01 for January
%DD
two digits for date. 01~31
01 for the 1st day of a month
%hh
two digits for hour. 00~23
%mm
two digits for minute. 00~59
%ss
two digits for second. 00~59
%W
a space character. ' '
' '
%N
camera name
camera-1
%Y
File serial counter. It starts from 1 in every
uploading task. The counter will be
increased by 1 for next uploading file.
1,2,3,4,5,...
Video Source: Choosing the video source from video 1 or video 2.
Send URL commands
72
Page 73

www.acti.com
Firmware User’s Manual V5.12.12
URL commands can be sent to HTTP CGI servers upon event. This provides the possibility of
highly intelligent response upon event. IP devices and many other devices also have embedded
CGI servers that may be controlled.
When Event Handler sends an URL command, it will send one set of command when the event is
trigged, and another as the event becomes inactive. Depending on the CGi design, the URL
commands may be able to be stringed together, and multiple commands may be issued in a
single line.
An example would be when the access control device at the entrance detects an entry, this
device provides a DI signal to the PTZ camera, and triggers an event. This event then sends a
loopback command to the PTZ Camera itself (by setting its own IP as the HTTP CGI server). The
PTZ Camera then moves to a preset location, stays until the event is over, then move back to
another location. At the same time it moves to the preset location, it increases the bitrate from
750k to 3M, and the frame rate from 4 fps to 8 fps. The bitrate / fps changes are reverted at the
end of event.
73
Page 74

www.acti.com
Firmware User’s Manual V5.12.12
Event List
You may define a maximum of 10 Event rules, which will be shown in abbreviated form in the
Event List panel. It will display under each Event ID, the days of the week it will be active, the
start time and duration of the active period, the type of the source of trigger, and the actions used
in the response. If the row is greyed out, this means the rule is currently not enabled and stays
inactive.
There are several parts to the Event rule:
When is it active?
You may choose to enable the rule or not . The settings will be kept in internal memory even if
the event rule is disabled. Select the days in a weekly cycle in which this rule and schedule
is active.
Determine the start time and duration of the active period. For example, a rule that lets
motion detection trigger snapshot uploads to FTP would only take place after 19:00 each day for
12 hours. Outside of this time the rule will not be active.
74
Page 75

www.acti.com
Firmware User’s Manual V5.12.12
How is it triggered?
Events may be triggered by several sources:
You may also ask the event to be repeatedly triggered during this scheduled time. The interval is
determined in minutes. You may use this with email / FTP upload to take snapshots at regular
intervals.
DIs: For selected models only, the IP device may be triggered by Digital Input.
Motion: You may trigger the event if one or many Motion Detection regions encounter a motion
trigger. Trigger from any of them will initiate the event. The duration of event will be the same as
the MD trigger length, or the Trigger interval time, defined in the Motion Detection section on
Video Adjust page.
Video Loss: This is available for video servers only. When the analog video in is lost, the video
state will become “lost”, and return to “normal” only until device receives analog video signal. A
common scenario is for Video Server to send email to administrator when video is lost, and
activate DO signal to alarm that persists until the analog signal is restored.
Switch to Night mode: This is available to selected models only. When camera changes
between day and night modes, the embedded event handler will notice this change, and may act
upon this information.
Potential uses include changing the motion detection profile to another set of Event MD
parameters. By having two sets of parameters each optimized for day and night, this provide
better overall accuracy in both day and night conditions. Some night time only MD regions may
75
Page 76

www.acti.com
Firmware User’s Manual V5.12.12
also be activated this way. The event period will end when the camera returns to day mode,
which will then reset the camera to the original settings.
Device boots completely: This will trigger the event responses once the device boots up. You
can use this to create a notification system that keeps record of when the device has been
rebooted via email.
Reboot device: This triggers the event response when the device is shut down via web UI “Save
and Reboot”. Use this to keep record of when was the device setting edited. Note that this will not
take effect when the device is unplugged, as this is not normal shutdown.
What responses will occur?
Digital Output (selected models only): This is an useful link to other devices. Click to include this
in the response for this rule.
Send notification Message: Select from the three pre-defined messages which you’ve setup in
the Event Configuration section. You may enable multiple messages at the same time. For
sending Email, please limit the recipient to one per event rule. If you need to send email to more
than one recipient, please use separate event rules triggered by the same trigger.
Upload video/snapshots: Select which of the event configurations to include in this response
set. If you are sending email via upload video and sending notification message at the same time,
the system will automatically merge the two emails into one. The subject and image will be based
upon the Upload snapshot Event configuration enabled, but the message in the body text will be
based upon the Notification messages.
In general, please stick to the “one email per event rule” limit for best performance.
Change Motion Detection profile: This will switch the profile of the selected Motion Detection
region from Runtime profile to Event profile. The profile will return to runtime settings at the end of
76
Page 77

www.acti.com
Firmware User’s Manual V5.12.12
this event. You may program one motion detection region to be disabled at runtime, but enable it
with event handler under some circumstances.
Send URL command: Select the URL command to include in the response set. Two different
commands will be sent at the time when the event is triggered and untriggered.
Change to Night Mode (Selected models only): For some models, you may force the Camera
into Night mode. The camera will return to its previous setting (whether auto or forced day/ night)
upon the end of the event.
Go to a preset point: if the device is a PTZ camera, and the Go to Preset point Event
Configuration is setup, then you may include this in the response section of the event rule. The
camera will return to the position right before the event starts when the event is untriggered.
Be sure to do Save and Reboot after you’ve updated the event settings. Only then will the
settings be commited to physical memory. You may lose the settings to power loss or
other situations if you do not do this step.
Manual Event
You may select one event in the Manual Event area below the event list to be triggered via web
UI.
Once selected, the trigger button on the video display screen will show as clickable. Click to
trigger the selected event. This is useful during event rule testing.
77
Page 78

www.acti.com
Firmware User’s Manual V5.12.12
Local Storage Management
The KCM-Series devices that come with built-in local storage capability will have the [Local
Storage] item shown in the “Setup Page” when the mass storage has been inserted into the
storage drive slot of the device.
Under [Local Storage] item it is possible to manage the storage itself and the files that are stored
there. In order to define the schedule or event rules that initiate or stop the recording process
onto local storage, please refer to the chapter “Event Handler with Local Storage” on page 91.
Click the [Local Storage] item on the “Setup Page”. There will be the list of 4 items – Status,
Utilities, Setup and File Management. As long as the inserted mass storage has not been
formatted or mounted yet, the File Management item is grayed out and cannot be accessed.
78
Page 79

www.acti.com
Firmware User’s Manual V5.12.12
Status
When the mass storage has not been formatted or mounted yet, the camera would not know the
status of the storage, and the output would be as follows:
If the mass storage has been formatted or mounted already, the Status page will show the details
of the storage:
In case of IP cameras with MicroSDHC, the Storage Media Type will show “Micro SD”.
In case of video encoder with 2.5” SATA hard disk, the Storage Media Type would show “HDD”.
The capacity of the disk is shown in Gigabytes.
The file system is Linux based EXT3, which is different from Windows based PC file systems. If
you remove the storage from the camera and plug it directly to Windows based PC, it may not be
able to read its content. The chapter File Management explains the correct ways of accessing
files of the local storage.
79
Page 80

www.acti.com
Firmware User’s Manual V5.12.12
Utilities
The “Utilities” are responsible for managing the storage itself rather than the files on the storage.
There are three utilities – Mount, Format and Scan.
Mount
When the Mount storage media button shows “Mount” button then it means that the mass storage
has been inserted to the camera, but the connection between camera and the storage has not
been established yet. By pressing the “Mount” button, the storage becomes active. It is then
possible to check the Status of the disk, write or read data on the disk, remotely access the
storage by Web Configurator or FTP client, etc.
When pressing the “Mount” button, the mounting process will start.
Unmount
Once the drive has been mounted, it can later be unmounted by pressing “Unmount” button, if
necessary.
80
Page 81

www.acti.com
Firmware User’s Manual V5.12.12
That Unmount function is used when the camera is to be shut down for maintenance or when the
mass storage has to be physically removed for some reason. The purpose of unmounting is to
protect the currently processed data on mass storage at the moment of removal of the storage. If
the local storage is being used by camera and some videos or snapshots are being recorded to
the disk, then the sudden shutdown or removal of the disk without unmounting may corrupt the
file that currently being used by the camera. The rest of the files are not influenced in any way.
Please note that “Save&Reboot” function of the camera also does unmounting automatically for
the user.
Mount Failure
If the inserted disk’s file system is not EXT3, then the Mounting would fail, as follows.
81
Page 82

www.acti.com
Firmware User’s Manual V5.12.12
The common reason is that the disk may have previously been used in other file systems, such
as Windows based PC or photo camera. If the disk does not have the right file system, then you
will get the error message, such as above. In that case the disk has to be formatted first. ACTi
camera provides convenient formatting function within Web Configurator.
Format
When the disk is inserted to the camera for the first time, it is recommended to format it, to make
sure the file system of the disk would be compatible with camera.
82
Page 83

www.acti.com
Firmware User’s Manual V5.12.12
Format Failure
If the disk is damaged or it is not within the specifications of the camera, the formatting may fail.
When this happens, there is no way to continue using that disk, and it has to be replaced with
proper one.
Scan
To check the “health” of the disk, it is possible to use the “Scan” function.
83
Page 84

www.acti.com
Firmware User’s Manual V5.12.12
Scan Failure
The scanning would fail if the disk is not recognized by the camera. Make sure that the disk has
been properly formatted and mounted to the camera.
84
Page 85

www.acti.com
Firmware User’s Manual V5.12.12
Setup
The “Setup” function provides the option to manage the file writing behavior of the camera. By
default, the camera is set to “Remove old recordings when ran out of storage space
automatically”. By using this mode, the camera’s recording process will not be interrupted when
the disk becomes full – the oldest files will be overwritten by new recordings.
Please note that under this mode, there is a risk that important evidence may be deleted
automatically over a period of time. Therefore, as long as “recycling” mode is used, the user
should download the critical evidence files from the camera before they are erased by the
camera.
When the “Send a notification when the free storage space is lower than…” option is chosen,
then the existing files would not be overwritten by the camera and the recording process would
stop when the disk is full.
By this option, the possibility of sending notification e-mails automatically has been enabled. The
% refers to the remaining size of available storage at which the camera should send a notification
e-mail, in case such task has been listed in Event Handler of the camera. To actually make the
e-mail notification work, please go to Event Handler (See “Event Handler with Local Storage” on
page 91.) of the camera and set up the event rule where the selected trigger type is “disk space is
low”.
85
Page 86

www.acti.com
Firmware User’s Manual V5.12.12
File Management
The File Management function is available only when the disk has been properly mounted to the
camera. At first, the File Management page would be empty, because there are no files to be
shown:
When clicking on the “?” mark on the upper right corner, the useful help message would appear:
In order to let the camera record files either by event or by schedule, please go to Event Handler
to set it up (“Event Handler with Local Storage” on page 91.). When the camera starts to record
either videos or snapshots, you will be able to manage the files under “File Management” here.
86
Page 87

www.acti.com
Firmware User’s Manual V5.12.12
The largest possible recording file is approximately 30 minutes. You can see the length of each
file in the file list. In case of snapshots, the length is not available.
Under continuous recording mode, the camera will make sure that the file size would not exceed
30-31 minutes – it would start writing a next file when the first file is full. There is also a way to
force the continuous recording files to be with shorter length. It is explained in the Event Handler
section on page 91.
The file that is currently being saved will show the status “Writing”.
Search Recordings by Time
If you are looking for the recordings of specific time period, then you may check the “Search
recordings by time”, and select the starting time of the searchable range as well as the length of
the time period.
With search settings above, only those files will be listed which were recorded between
2012.6.22 7:00 and 2012.6.22 8:00.
87
Page 88

www.acti.com
Firmware User’s Manual V5.12.12
Search Recordings by Triggered Events
Another convenient way of searching specific recording files is to define the events that were
either the triggers of the recordings or occurred during the scheduled recording. Check the
“Search recordings by triggered events” and choose one of the 4 event types – Dis, Motion,
Schedule or Ready for Service. All these events and can be managed under Event Handler
(“Event Handler with Local Storage” on page 91.).
Download Recordings
You can download the files manually to remote PC by clicking on the File Name.
Delete Recordings
You can manually delete the files by filling the checkboxes and then pressing the “Remove”
button.
88
Page 89

www.acti.com
Firmware User’s Manual V5.12.12
Search Snapshots
If the event rule of the Event Handler defines that there should be Snapshots stored on local
storage instead of Video, then the snapshots will appear in File Management’s file list. The
extension of snapshot file is “jpg”.
View and Download Snapshots
By clicking on the snapshot file name in file list it is possible to view the snapshot within Web
Configurator. To download the snapshot, right click on the picture and save it to the computer.
Deleting Snapshots
You can manually delete the snapshots by filling the checkboxes and then pressing the “Remove”
button.
Special Rule!
When the event triggered snapshot happens during the video recording process, then the camera
will not save the snapshot to the local storage, to avoid redundant information and waste of
89
Page 90

www.acti.com
Firmware User’s Manual V5.12.12
storage space, as the snapshot frame can be later extracted from video file instead.
Downloading Files by FTP Client
In addition to Web Configurator’s File Management, it is also possible to use any of the FTP
Clients to list and download the recordings from the local storage thanks to the built-in FTP
Server of the camera. Use the ftp:// followed by camera’s IP and then type the camera’s account
and password (default is Admin, 123456).
Notice! You may download files via FTP for your convenience, but do not delete any of the files
via FTP because it would cause inconsistency between camera’s file database and actual file
availability.
90
Page 91

www.acti.com
Firmware User’s Manual V5.12.12
Event Handler with Local Storage
In order to save video clips or snapshots on a local storage, there has to be a task created under
Event Handler system of the camera that defines what type of files and when are they to be
recorded on local storage.
Event Handler supports following Recording methods:
1. Event triggered video recording or snapshots (recommended solution)
2. Scheduled video recording (including non-stop recording) or snapshots
To set up the event handler rule, you have to configure both “Event
Configuration” and “Event List”.
Event Triggered Video Recording
Under “Event Configuration” you can define the type of media (video, snapshot) and its
properties.
Select “Upload video/snapshot and Audio” to adjust the parameters of media.
91
Page 92

www.acti.com
Firmware User’s Manual V5.12.12
Check the “Upload Video/Snapshot1”. Please note that later on scheduler page this item will be
referred to as “Image 1”. Let’s see the example of video format first – Upload Media Type shall
be Video.
Upload Media To shall be “Local Storage”.
The camera has the capability to buffer up to 3 seconds of video at any time, so that we can
include these 3 seconds of video to the file, to capture the moment right before the event
occurred. With the settings of
Pre-Buffer Time = 3;
Upload Period = 57
the length of the video clip will be 1 minute.
You can freely decide the name of the file. Whatever name you choose, the camera will
automatically append milliseconds in the end. It is recommended to include day code in file name
so that later when the files are downloaded to remote computer, it is easier to pick up the right
video.
For example, you may consider using following file name:
video_%YYYY-%MM-%DD-%hh-%mm-%ss
where %YYYY displays current year, %MM displays current month, %DD displays current day,
%hh displays current hour, %mm displays current minute and %ss displays current second.
Notice! Please note that the camera uses its own date and time settings to write the file
name, so please make sure the camera’s date and time are correct!
Upload Path can be simply “\”, which means that the files will be saved in root folder of the
storage.
The video source can be either “1” or “2”. If you want to have different video parameters for
remote NVR recording and Local Storage recording, then you may consider adjusting camera’s
media 1 and media 2 settings accordingly and then choose the right video source in Event
Handler page.
When done, just press “Apply” and move on to the “Event List”, and pick any of the empty spots in
the list of rules to create a new rule. In our example, we pick the rule 3 for setup.
92
Page 93

www.acti.com
Firmware User’s Manual V5.12.12
Make sure to have the rule “Enabled” by filling the checkbox.
By the example above, the camera will be 24/7 on guard to watch for motion events. When
motion detection region 1 detects intrusion, it will trigger the response of uploading “image 1”
according to the parameters defined under “Event Configuration” earlier. In other words,
whenever motion occurs, the camera will record 3 seconds of video before the moment of motion
detection, and 57 seconds after that. The video file can then be found under “Local Storage” ->
“File Management”.
93
Page 94

www.acti.com
Firmware User’s Manual V5.12.12
Scheduled Video Recording
Although it is not really recommended to have full-time recording for MicroSDHC due to it is not
physically as capable as hard disk, the firmware still allows it to be configured for full-time
recording mode.
Let’s use the same media parameters as in previous example. Since the time unit of event rule is
minute based, we should make sure that the media settings (in seconds) would add up as a
round number in minutes. In this case, 3+57 seconds is exactly 1 minute.
In the event rule page, choose Trigger by “Scheduler” and choose Once Every 1 Minute. The rest
of the items are the same as in previous example.
As a result, the camera will be continuously recording, having each video file with the length of 1
minute.
94
Page 95

www.acti.com
Firmware User’s Manual V5.12.12
Event Triggered Snapshots
Choose the “Upload video/snapshot” item in the “Event Configuration” page and check the
Upload Media Type as “Snapshot” if you want to save images to camera’s local storage.
With the settings above, it would create 1 snapshot within 1 second from the moment of triggered
event using following file name snapshot_%YYYY-%MM-%DD-%hh-%mm-%ss .
The naming rule of the file is similar to the video files. Video Source can be either “1” or “2”,
depending on customer’s requirements. If you want VGA snapshots on local storage while NVR
is getting megapixel video stream, you can configure Media 2 as VGA, and set Video Source as
“2”.
The event rule can be exactly the same as in case of video upload:
95
Page 96

www.acti.com
Scheduled Snapshots
Media configuration:
Schedule configuration:
Firmware User’s Manual V5.12.12
As a result, There will be one snapshot from Media 1 stored on local storage once every minute,
24 hours a day. The snapshots can be accessible from “Local Storage” -> “File Management”
96
Page 97

www.acti.com
Firmware User’s Manual V5.12.12
System
Click the [System] item on the “Setup Page”.
User Account
Click the [User Account Setting] item to display the “User Account Setting Page”.
Setup the account names and their passwords. There are 1 root (administrator) account and
10 common user accounts Administrator account allows the user to watch the live view and
setup everything; but common user account allows user only to watch the live image.
Click the [Apply] button to confirm the settings or click the [Reset] button to re-enter the
parameters.
97
Page 98

www.acti.com
Firmware User’s Manual V5.12.12
System Info
Click the [System Info] item to show details about this IP device including system information,
WAN status and system log. Refer to the table below for how to configure each setting.
View the information at the 3 textboxes. This information is very useful to understand the IP
device status and to resolve any problem that might occur.
98
Page 99

www.acti.com
Firmware User’s Manual V5.12.12
Column
Description
System info
It shows the firmware version, MAC address, production ID, and factory
default type of IP device.
WAN status
It shows the WAN port’s IP address, netmask, gateway, DNS server,
DDNS host and connection status.
System log
It shows the system event. This column is very useful to as a diagnostic
tool. At the bottom of this area is the ISP firmware version, which is an
useful diagnostic parameter.
Click [Parameter List] to see all configurations of the IP device.
Click [Server Report] to export related information while reporting to your support channel.
Factory Default
Click the [Factory Default] item to display the “Factory Default Page”.
If you want to keep network settings and restore other settings to factory default, please select
the first option. If you select the second one instead, all the settings would be removed during
factory default. You will have to use factory default IP setting to connect to this camera. Please
refer to previous login section.
Click the [Apply] button to show a warning dialog that reminds you again before restoring the
device to factory default.
99
Page 100

www.acti.com
Firmware User’s Manual V5.12.12
Firmware Upload
Click the [Firmware Upload] item to display the “Firmware Upgrade Page”. Upgrade the IP
device’s firmware through this page with the following instructions. You may upgrade firmware for
individual cameras with this function. To upgrade camera firmware in batches, please use IP
utility, which can be freely downloaded from website. The firmware file you download from
website will contain one .upg file, and one .md5 file. Uploading firmware through Web
Configurator uses only the .upg file. You will need both files if you are doing multiple upgrades
with IP Utility.
Click the [Apply] button. The ‘’Firmware Upgrade Page-2” will be displayed as below.
Click [Browse] to select the upgrade image file. You can always get the latest version at our
website. Click the [Apply] button to start upgrade.
The upgrade process window will show a progress bar indicating upgrade status.
Once the process is finished, you will get an “OK” message and system will reboot itself.
NOTE: If you cancel the firmware upgrade during upgrade process, the browser window
will be closed
100
 Loading...