

Page 1

Server Application
ACTi NVR
v2.0 SR1
User’s Manual
Page 2

Page 3

ACTi APP-2000
This document is copyrighted, 2003 - 2007 by ACTi Corporation. All rights are reserved. ACTi Corporation reserves the
right to make improvements to the products described in this manual at any time without notice.
No part of this manual may be reproduced, copied, translated or transmitted in any form or by any means without the
prior written permission of the original manufacturer. Information provided in this manual is intended to be accurate and
reliable. However, the original manufacturer assumes no responsibility for its use, or for any infringements upon the
rights of third parties that may result from its use.
All other product names or trademarks are properties of their respective owners.
V2.0 SR1 Edition Apr, 2007
i
Page 4

Table of Contents
1. OVERVIEW 12
Introduction.................................................................................................................12
Application Modules 12
ACTi NVR Server 12
ACTi NVR Workstation 13
ACTi NVR Web Client 13
ACTi Utility Suite 14
Architecture 15
Single Site Deployment 15
Multiple Site Deployment 16
System Requirements................................................................................................17
Supported Operating System and Browser 17
Recommended PC Specification – 16 channels 18
Recommended PC Specification – 32 channels 18
Recommended PC Specification – 48 channels 18
Recommended PC Specification – 64 channels 18
Keyboard Shortcuts....................................................................................................19
Technical Support ......................................................................................................20
What’s New in v2.0.....................................................................................................21
System Enhancements 21
Active Monitor Enhancements 22
PTZ Control Enhancements 24
Event Manager Enhancements 25
Recording Enhancements 26
Active Player Enhancements 27
Active Map Enhancements 29
NVR Web Client Enhancements 30
What’s New in v2.0 SR1.............................................................................................31
System Enhancements 31
User Interface Enhancements 31
Active Monitor Enhancements 31
PTZ Enhancements 31
Active Setup Enhancements 32
Active Player Enhancements 32
NVR Web Client Enhancements 32
2. GETTING STARTED 33
Administrator’s Check List..........................................................................................33
Operator Check List ...................................................................................................35
Start ACTi NVR..........................................................................................................36
Login ACTi NVR.........................................................................................................37
ii
Page 5

Default Administrator Account / Password 37
Change Password 38
Start a Camera Live View.......................................................................................... 39
Select a Camera from Camera Tree 39
Double Click on the Camera 40
Drag-n-Drop a Camera 41
Stop a Camera Live View ..........................................................................................44
Close Camera Live View 44
Start Other Application ............................................................................................... 45
Start Active Player, Active Map and Active Setup 45
Start Utility 46
Quit ACTi NVR........................................................................................................... 47
Check Version ...........................................................................................................48
3. ACTIVE MONITOR 49
Introduction................................................................................................................49
Overview 50
Preview Operation ..................................................................................................... 52
Channel Preview 52
Drag and Drop a Camera to preview 53
Double-click on a Camera to Preview 56
Active Monitor Toolbar 57
Full Screen Mode (F12) 58
Create Snapshot (F7) 60
Disconnect a Channel 61
Disconnect All Channels 62
Trigger DO1 (Toggle) 63
System Monitor 64
System Monitor Listing 64
System Monitor - Recorded 65
System Monitor - Deleted 66
System Monitor - Alarm 67
System Monitor - Motion 68
System Monitor – Network Loss/Recovery 69
System Monitor – Video Loss/Recovery 70
Speak and Broadcast 71
Volume Control 72
Mute On 73
Mute Off 73
Adjust Volume 73
Camera Panel............................................................................................................ 74
Camera List 74
Channel Layout Manager........................................................................................... 75
Window Layout Selection 75
Pre-defined Layout 77
Hot-spot Window 78
Layout Patrol 79
Layout Patrol with Full Screen Mode 80
iii
Page 6

Event List Panel .........................................................................................................81
Event List 81
Check Event Status 82
PTZ Panel ..................................................................................................................84
PTZ Operation 84
OSD Operation 85
Control Panel Support 86
IP Joystick Support 86
Mouse PTZ 87
PTZ Preset Tour and Scan 88
Goto Preset Position 89
Run User-defined PTZ Actions 90
4. ARCHIVE PLAYER 91
Introduction.................................................................................................................91
Overview 92
Playback Operation....................................................................................................94
Archive Player Toolbar 95
Full Screen Mode (F12) 96
Create Snapshot (F7) 98
Disconnect a Channel 99
Disconnect All Channels 100
Search Event 101
Snapshot Viewer 104
Search Snapshot Images 104
Snapshot Preview Mode 105
Volume Control 106
Mute On 107
Mute Off 107
Adjust Volume 107
Playback Control Panel............................................................................................ 108
Playback Operation 108
Play, Play Backward 110
Speed Setting 111
Frame-by-frame Play 112
Jump to a new location in the file 113
Jump to Next / Previous Recorded Archive 114
Record part of the Archive to a new Archive 115
Open Video Archive File 116
Export Video Archive 117
Time-based Search Bar............................................................................................118
Search Archive 118
Search Criteria (Channel, Date, Time, Event) 120
View by Hour 121
View by Day 122
Continuous Recording 123
Schedule Recording 124
Event Recording 125
Navigate Time-based Search Bar 126
Scroll Previous Button 127
iv
Page 7

Scroll Next Button 128
Channel Layout Manager......................................................................................... 129
Window Layout Selection 129
Change Window Layout 130
Single Channel Video Clip Playback of Different Time Frame 132
Synchronous Playback ............................................................................................134
Drag 4 channels first, then Synchronize them with Baseline Time Frame 135
1. Select Channel on Active Window 135
2. Search recording 136
3. Select different recording for different windows 137
4. Show different windows’ information 138
5. Synchronize different windows 139
Playback 4 Different Archives, then Synchronize them to the same time frame 140
1. Select an active window 140
2. Show different windows’ information 141
3. Synchronize different windows 142
Playback Archive First, then Search for other Channels at the same time frame 143
1. Select an active window 143
2. Show different windows’ information 144
3. Synchronize different windows 145
5. ACTIVE MAP 146
Introduction..............................................................................................................146
Overview 147
Active Map Operation .............................................................................................. 148
Archive Player Toolbar 148
Full Screen Mode (F12) 149
Map Tour 151
Preview All Mode 152
Quick Preview Mode................................................................................................153
Mini-Preview 153
Event Management on Map..................................................................................... 155
Motion Detection Event Display on Map 155
6. NVR WEB CLIENT 156
Introduction..............................................................................................................156
Web Server Installation............................................................................................ 157
Pre-requisite for Windows 2000: GdiPlus.dll............................................................ 158
Download GdiPlus.dll Package from ACTi NVR Server 158
Install GdiPlus.dll Package 159
Close ACTi NVR Web Client and Start it Again 159
Microsoft Internet Explorer Security Notice.............................................................. 160
Web Preview............................................................................................................ 162
Web Playback.......................................................................................................... 164
Web Search 165
Web Map .................................................................................................................166
Web Setup...............................................................................................................167
v
Page 8

NVR Web Client Setup v.s. Active Setup 167
Web System Setup 169
Web Camera Setup 170
7. ACTIVE SETUP 171
Introduction...............................................................................................................171
Setup Operation.......................................................................................................172
Setup Overview 173
Active Setup Toolbar 174
System Setup...........................................................................................................175
Camera Group 176
User Group 177
Account 178
Storage Management 180
Joystick 182
View Layout 184
Layout Tour 186
Language 191
Service 192
License 193
Registration By License Key 193
Registration By Activation Key 194
License Registration Messages 196
System 198
Camera Setup..........................................................................................................200
Camera 201
Add camera 201
Manually input 202
Import from search result 204
Setup the video / time settings 208
Connection information 208
Video Setting 209
Frame rate setting 209
Video Adjustment 209
NTP settings 210
Copy settings from another Camera Setting 211
Delete Camera 212
Recording 213
Schedule 215
View By Channel 215
Special Day 217
Alarm 218
Motion 219
PTZ 220
PTZ Preset 222
Preset Tour 224
Event Manager 226
Event type 226
Event Actions 227
Mail Notification Setup 229
vi
Page 9

Map Setup ...............................................................................................................230
Map Manager 230
Add a New Map 230
Add Camera / Delete Camera 231
Add Camera Dialog Box 232
Add MapLink Dialog Box 233
Map Management 234
Map Tour 236
vii
Page 10

Table of Figures
Figure 1-1 Single Site Deployment................................................................................................15
Figure 1-2 Multiple Site Deployment .............................................................................................16
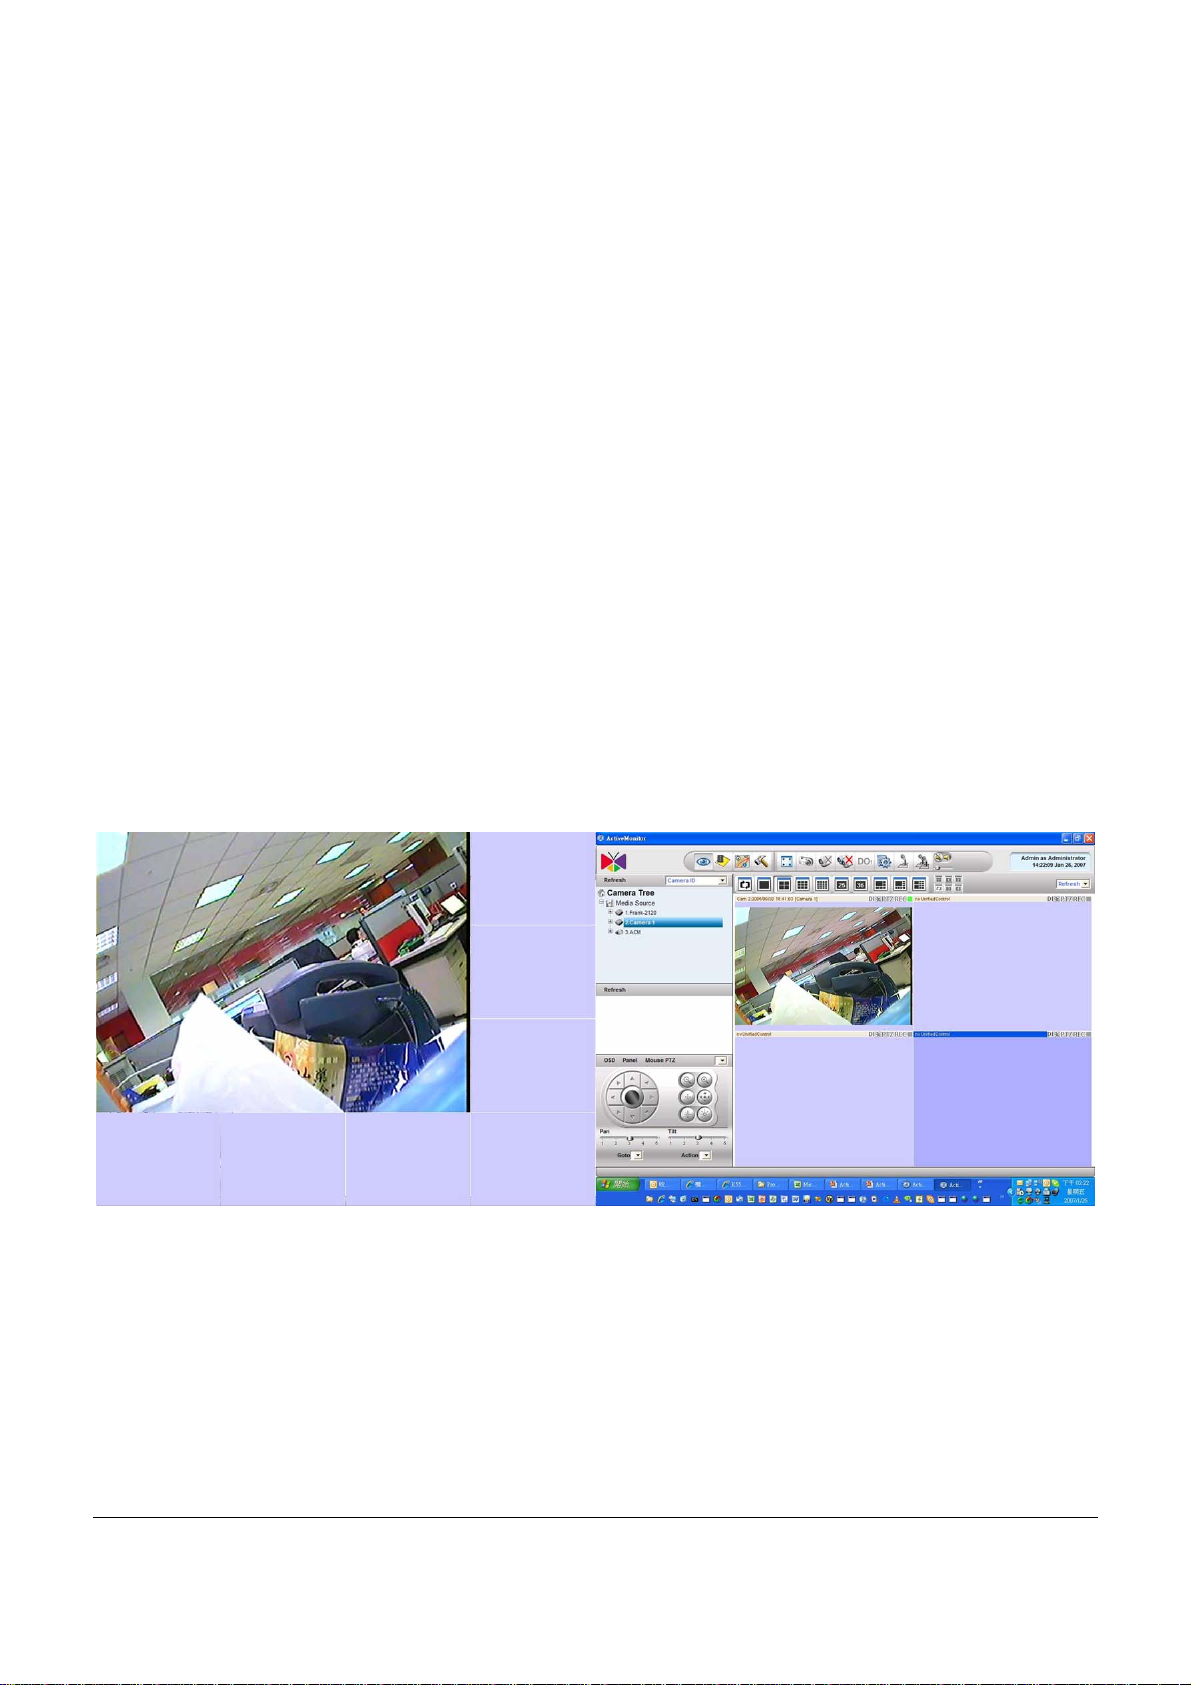
Figure 1-3 Dual Monitor – Live View + Live View..........................................................................22
Figure 1-4 Active Monitor Features...............................................................................................23
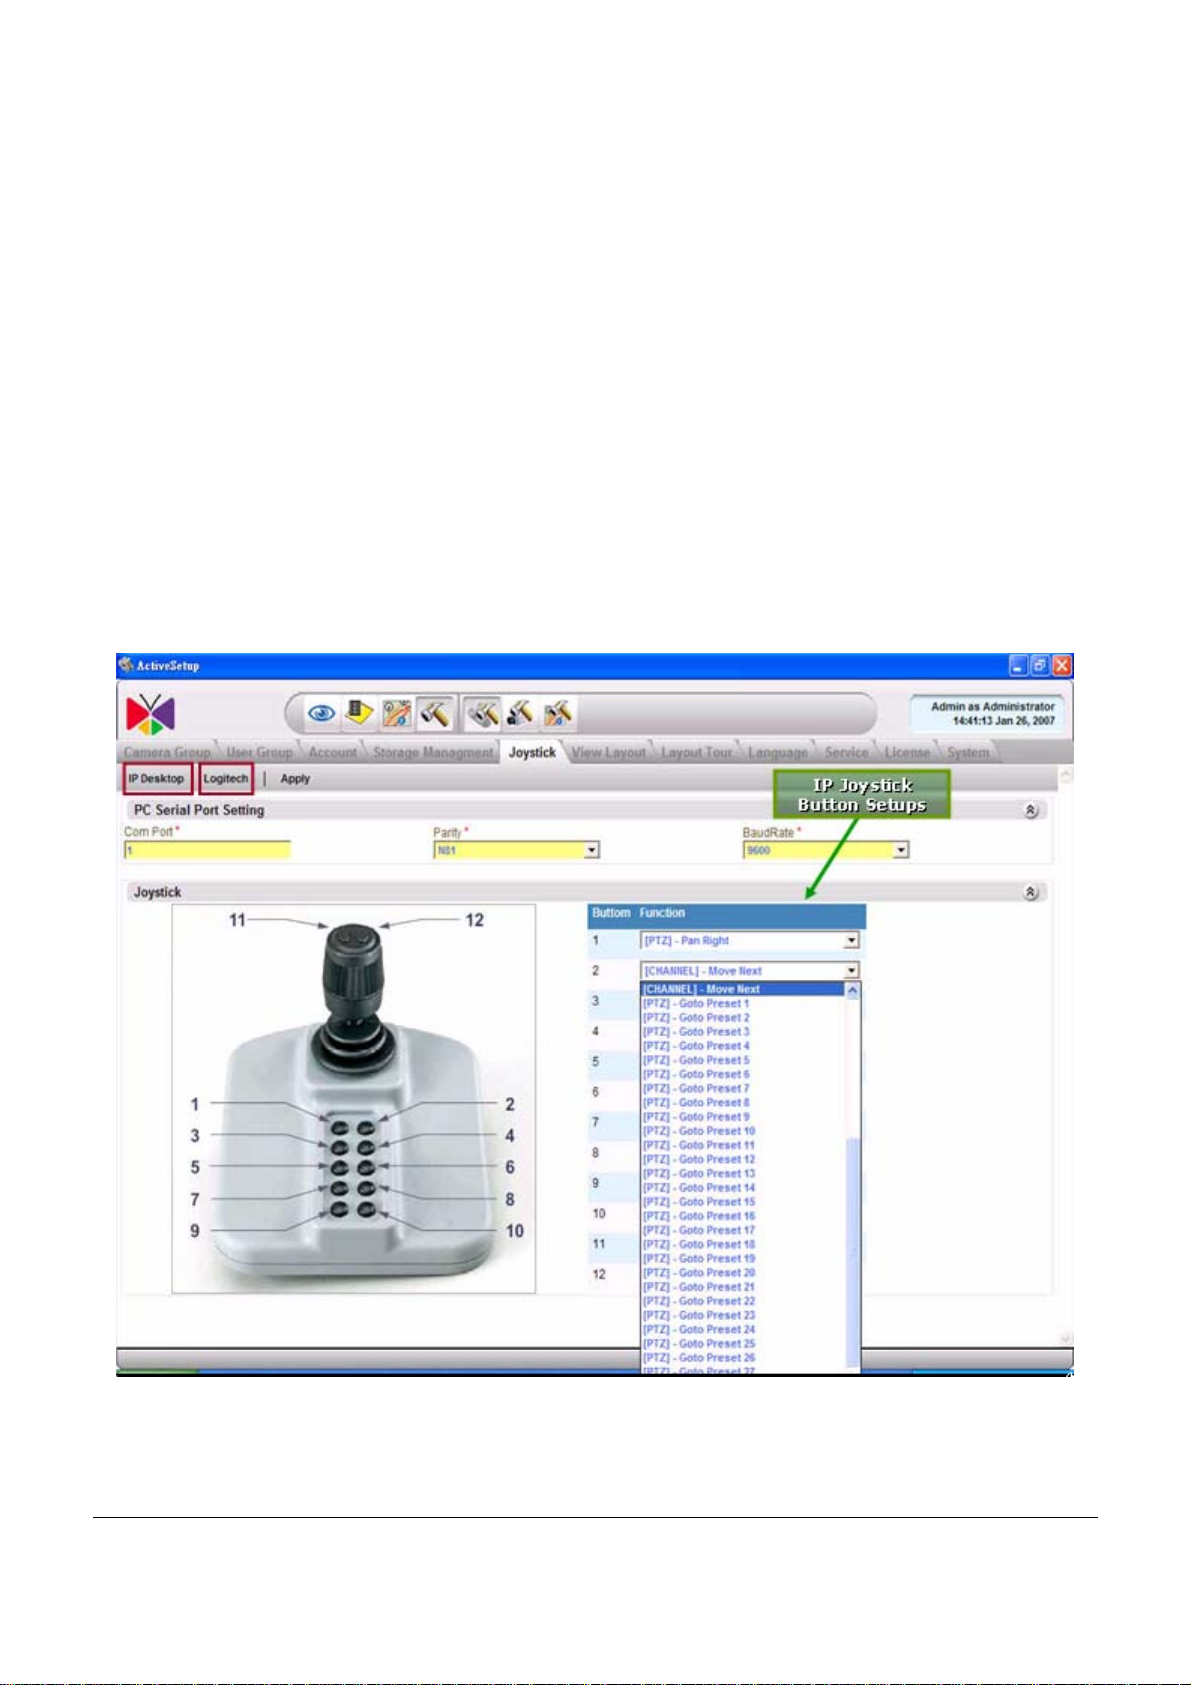
Figure 1-5 USB IP Joystick Support and Customization...............................................................24
Figure 1-6 Active Player Features.................................................................................................28
Figure 1-7 Active Map Features....................................................................................................29
Figure 1-8 NVR Web Client Features............................................................................................30
Figure 2-1 NVR Login....................................................................................................................37
Figure 2-2 Change User’s Password ............................................................................................38
Figure 2-3 Preview Window ..........................................................................................................39
Figure 2-4 Double click on a camera to preview...........................................................................40
Figure 2-5 Drag and Drop a camera .............................................................................................41
Figure 2-6 Move the camera to active window..............................................................................42
Figure 2-7 Preview Camera ..........................................................................................................43
Figure 2-8 Disconnect a Channel..................................................................................................44
Figure 2-9 Active Program Tool Bar..............................................................................................45
Figure 2-10 Exit ACTi NVR ...........................................................................................................47
Figure 2-11 Check Version............................................................................................................48
Figure 3-1 User Interface ..............................................................................................................50
Figure 3-2 Preview Window ..........................................................................................................52
Figure 3-3 Drag and Drop a camera .............................................................................................53
Figure 3-4 Move the camera to active window..............................................................................54
Figure 3-5 Preview Camera ..........................................................................................................55
Figure 3-6 Double click on a camera to preview...........................................................................56
Figure 3-7 Active Monitor Toolbar.................................................................................................57
Figure 3-8 Full screen button ........................................................................................................58
Figure 3-9 Full Screen Mode.........................................................................................................59
Figure 3-10 Create Snapshot........................................................................................................60
Figure 3-11 Disconnect a Channel................................................................................................61
Figure 3-12 Disconnect all Channel ..............................................................................................62
Figure 3-13 Trigger DO1...............................................................................................................63
Figure 3-14 System Monitor Button...............................................................................................64
Figure 3-15 System Monitor - Recorded ....................................................................................... 65
Figure 3-16 System Monitor - Deleted ..........................................................................................66
Figure 3-17 System Monitor - Alarm .............................................................................................67
Figure 3-18 System Monitor - Motion............................................................................................68
Figure 3-19 System Monitor – Network Loss/Recovery................................................................69
Figure 3-20 System Monitor – Video Loss/Recovery....................................................................70
Figure 3-21 Talk and Broadcast button.........................................................................................71
Figure 3-22 Volume Control..........................................................................................................72
Figure 3-23 Mute On.....................................................................................................................73
Figure 3-24 Mute Off.....................................................................................................................73
Figure 3-25 Adjust Volume............................................................................................................73
viii
Page 11

Figure 3-26 Camera List...............................................................................................................74
Figure 3-27 Layout bar..................................................................................................................75
Figure 3-28 Layout Select bar.......................................................................................................75
Figure 3-29 Select Predefined Layout ..........................................................................................77
Figure 3-30 Hot-Spot Window.......................................................................................................78
Figure 3-31 Patrol button..............................................................................................................79
Figure 3-32 Full Screen Mode ......................................................................................................80
Figure 3-33 Event List................................................................................................................... 81
Figure 3-34 Event Status..............................................................................................................82
Figure 3-35 Camera Date/Time Setup..........................................................................................82
Figure 3-36 PTZ Operation........................................................................................................... 84
Figure 3-37 OSD Operation.......................................................................................................... 85
Figure 3-38 Control Panel Operation............................................................................................ 86
Figure 3-39 Mouse PTZ Operation...............................................................................................87
Figure 3-40 PTZ Preset Tour and Scan........................................................................................ 88
Figure 3-41 Goto Preset Position..................................................................................................89
Figure 3-42 Goto Preset Position..................................................................................................90
Figure 4-1 Archive Player Interface .............................................................................................. 92
Figure 4-2 Active Monitor Toolbar.................................................................................................95
Figure 4-3 Fullscreen button.........................................................................................................96
Figure 4-4 Full Screen Window.....................................................................................................97
Figure 4-5 Create Snapshot..........................................................................................................98
Figure 4-6 Disconnect A Channel................................................................................................. 99
Figure 4-7 Disconnect All Channels..............................................................................................100
Figure 4-8 Search Event Listing....................................................................................................101
Figure 4-9 File Information............................................................................................................ 103
Figure 4-10 Snapshot Viewer Search Result................................................................................104
Figure 4-11 Snapshot Viewer with Thumbnail Images ................................................................. 105
Figure 4-12 Volume Control.......................................................................................................... 106
Figure 4-13 Muto On..................................................................................................................... 107
Figure 4-14 Muto Off..................................................................................................................... 107
Figure 4-15 Adjust Volume ...........................................................................................................107
Figure 4-16 Playback Control Panel.............................................................................................108
Figure 4-17 Play and Play Backward............................................................................................110
Figure 4-18 Speed Setting............................................................................................................ 111
Figure 4-19 Frame By Frame Play................................................................................................112
Figure 4-20 Playback Time Bar .................................................................................................... 113
Figure 4-21 Click Time Bar to Playback........................................................................................113
Figure 4-22 Jump to Next or Previous Recorded File...................................................................114
Figure 4-23 Record Part of the Archive to a new Archive.............................................................115
Figure 4-24 Open playback file.....................................................................................................116
Figure 4-25 Export to avi file......................................................................................................... 117
Figure 4-26 Select Channel..........................................................................................................118
Figure 4-27 Time-based search bar..............................................................................................119
Figure 4-28 Search criteria ...........................................................................................................120
Figure 4-29 View by hour..............................................................................................................121
Figure 4-30 View by day...............................................................................................................122
Figure 4-31 Continuous Recording...............................................................................................123
ix
Page 12

Figure 4-32 Schedule Recording...................................................................................................124
Figure 4-33 Event Recording.........................................................................................................125
Figure 4-34 Navigate Time-Based Search Bar..............................................................................126
Figure 4-35 Scroll Previous Button................................................................................................127
Figure 4-36 Scroll Next Button ......................................................................................................128
Figure 4-37 Layout bar..................................................................................................................129
Figure 4-38 4-Channels Window Layout Playback........................................................................130
Figure 4-39 6-Channels Window Layout Playback........................................................................131
Figure 4-40 Different Time To Playback........................................................................................132
Figure 4-41 Check the Date/Time.................................................................................................133
Figure 4-42 Choose 4-channel playback file.................................................................................135
Figure 4-43 Search the Active window playback...........................................................................136
Figure 4-44 Synchronous Playback ..............................................................................................137
Figure 4-45 Synchronous Playback Time......................................................................................138
Figure 4-46 Synchronous Playback Mode 1..................................................................................139
Figure 4-47 Choose 4-channel playback file and set active window.............................................140
Figure 4-48 4-Channel Synchronous Playback Time....................................................................141
Figure 4-49 4-channel Synchronous Playback Mode 2.................................................................142
Figure 4-50 4-channel playback file and set active window..........................................................143
Figure 4-51 4-Channel Synchronous Playback Time....................................................................144
Figure 4-52 4-channel Synchronous Playback Mode 3.................................................................145
Figure 5-1 eMap Page...................................................................................................................147
Figure 5-2 Active eMap Toolbar....................................................................................................148
Figure 5-3 Full Screen Button .......................................................................................................149
Figure 5-4 Full Screen...................................................................................................................150
Figure 5-5 Map Tour......................................................................................................................151
Figure 5-6 Preview All...................................................................................................................152
Figure 5-7 Double-Click Preview Window.....................................................................................153
Figure 5-8 Mini-Preview ................................................................................................................154
Figure 5-9 Event displays on Map.................................................................................................155
Figure 6-1 Link to lead you to download GdiPlus.dll from ACTi NVR Server................................158
Figure 6-2 Click Open to install GdiPlus.dll in C:\Windows...........................................................159
Figure 6-3 Press SPACEBAR or ENTER to activate and use the content....................................160
Figure 6-4 Click to activate and use the content...........................................................................161
Figure 6-5 Web Preview Interface.................................................................................................162
Figure 6-6 Web Playback Interface...............................................................................................164
Figure 6-7 Web Search.................................................................................................................165
Figure 6-8 Web e-Map ..................................................................................................................166
Figure 6-9 Web System Setup ......................................................................................................169
Figure 6-10 Web Camera Setup ...................................................................................................170
Figure 7-1 User Interface ..............................................................................................................173
Figure 7-2 ActiveSetup Tool Bar...................................................................................................174
Figure 7-3 Camera Group Setup................................................................................................... 176
Figure 7-4 User Group Setup........................................................................................................177
Figure 7-5 Account Setup..............................................................................................................178
Figure 7-6 Storage Management ..................................................................................................180
Figure 7-7 Joystick Setup..............................................................................................................182
Figure 7-8 View Layout .................................................................................................................184
x
Page 13

Figure 7-9 Add Layout Tour.......................................................................................................... 186
Figure 7-10 Edit Layout Tour........................................................................................................188
Figure 7-11 Select Layout............................................................................................................. 189
Figure 7-12 Edit Layout Tour........................................................................................................190
Figure 7-13 Language...................................................................................................................191
Figure 7-14 Service.......................................................................................................................192
Figure 7-15 Register by License Key............................................................................................ 193
Figure 7-16 Register by Activation Key.........................................................................................194
Figure 7-17 System Setup............................................................................................................198
Figure 7-18 Camera Setup ........................................................................................................... 202
Figure 7-19 Search Button............................................................................................................ 204
Figure 7-20 Search Camera .........................................................................................................205
Figure 7-21 Apply Button..............................................................................................................206
Figure 7-22 Apply Button..............................................................................................................206
Figure 7-23 Auto Detect................................................................................................................ 208
Figure 7-24 Auto Detect................................................................................................................ 208
Figure 7-25 Copy Setting.............................................................................................................. 211
Figure 7-26 Delete Camera ..........................................................................................................212
Figure 7-27 Recording Setup........................................................................................................ 213
Figure 7-28 Setup by channel....................................................................................................... 215
Figure 7-29 Setup By Special Day................................................................................................ 217
Figure 7-30 Alarm.........................................................................................................................218
Figure 7-31 Motion........................................................................................................................ 219
Figure 7-32 PTZ Setup .................................................................................................................220
Figure 7-33 PTZ Preset ................................................................................................................222
Figure 7-34 Preset Tour................................................................................................................ 224
Figure 7-35 Action Setup..............................................................................................................226
Figure 7-36 Action Setup..............................................................................................................227
Figure 7-37 Mail Notification Setup............................................................................................... 229
Figure 7-38 Add a new Map..........................................................................................................230
Figure 7-39 Add / Delete Camera, Add Map Link.........................................................................231
Figure 7-40 Add / Delete Camera Dialog Box...............................................................................232
Figure 7-41 Add / Delete Camera Dialog Box...............................................................................233
Figure 7-42 Map Management......................................................................................................234
Figure 7-43 Map Tour...................................................................................................................236
xi
Page 14

1. Overview
Introduction
This material covers ACTi NVR overview on the overall framework, architecture, deployment and
functions.
This section introduces ACTi NVR functionalities, architecture and the relationship between modules,
so that user may have better understanding how to fully utilize its functions and deploy with right
solution
Application Modules
ACTi NVR Server is consist of following application modules: ACTi NVR Server, ACTi NVR
Workstation, ACTi Web Client and ACTi Utility suite.
ACTi NVR Server
ACTi NVR Server is consist of Win32 Service, running in the background of the operating system.
ACTi NVR Server’s configuration is done by ACTi NVR Workstation or ACTi NVR Setup.
ACTi NVR Server Components:
Icon Name Description
ActiveEventManager.exe
ActiveScheduleService.exe
ActiveServiceManager.exe
ActiveStorageManager.exe
ActiveStreamingService.exe
Event handling and management, running as
Win32 Service
Scheduler handling system and recording
schedules, running as Win32 Service
Service manager manages ACTi NVR Server’s
services, acting Watch Dog. Service Manager
will starts other Win32 Service if those services are
down. Running as Win32 Service
Storage manager manages many hard-disk
capacities in the system, running as Win32 Service
Streaming engine handles
12
Page 15
ACTi NVR Workstation
ACTi NVR Workstation is consist of ActiveMonitor, ActivePlayer, ActiveMap and ActiveSetup.
ACTi NVR Workstation can be installed in the same machine as ACTi NVR Server or installed and
running on another computer and control different ACTi NVR Server.
ACTi NVR Workstation Components:
Icon Name Description
ActiveMonitor.exe
ActivePalyer.exe
ActiveMap.exe
ActiveSetup.exe
ACTi NVR Web Client
ACTi NVR Web Client is running on web browser and does not have to install any program on local
machine.
ACTi NVR Workstation Components:
Icon Name Description
Live view, PTZ, IP Joystick, system log monitor,
event panel, Pre-defined layout, Tour
Archive player, synchronous playback, snapshot
viewer, file export
Map viewer, tour
System, camera and map setup
Live view, PTZ, IP Joystick, system log monitor,
event panel, Pre-defined layout, Tour
IExplorer.exe
file export
Map viewer
System and camera setup
NOTE: ACTi NVR Web Client only supports Microsoft Internet Explorer v6.0 and v7.0.
13
Archive player, snapshot, synchronous playback,
Page 16
ACTi Utility Suite
ACTi Utility Suite is consist of IP Utility, Streaming Explorer, Archive Player, Backup Wizard,
Media Converter.
ACTi Utility Suite Components:
Icon Name Description
IPUtility.exe
Explorer.htm
Search and manage ACTi devices, firmware
upgrade, configuration backup and restore
Web browser application to configure PTZ
settings.
Standalone archive player, create snapshots,
ArchivePlayer.exe
BackupWizard.exe
MediaConverter.exe
display time code on the video window directly.
Able to play
.RAW and .MP4 format
Backup and restore ACTi NVR v2.0
Converts .RAW data format to .AVI format
MPEG-4 DirectShow filter. This is necessary if
FFDShow.exe
user wants to play
.AVI file with Microsoft
Windows Media Player.
14
Page 17
Architecture
The role of ACTi NVR Server is a non-stop Win32 Service connecting to IP cameras and devices;
while ACTi NVR Workstation and ACTi Web Client connecting to ACTi NVR Server to operate.
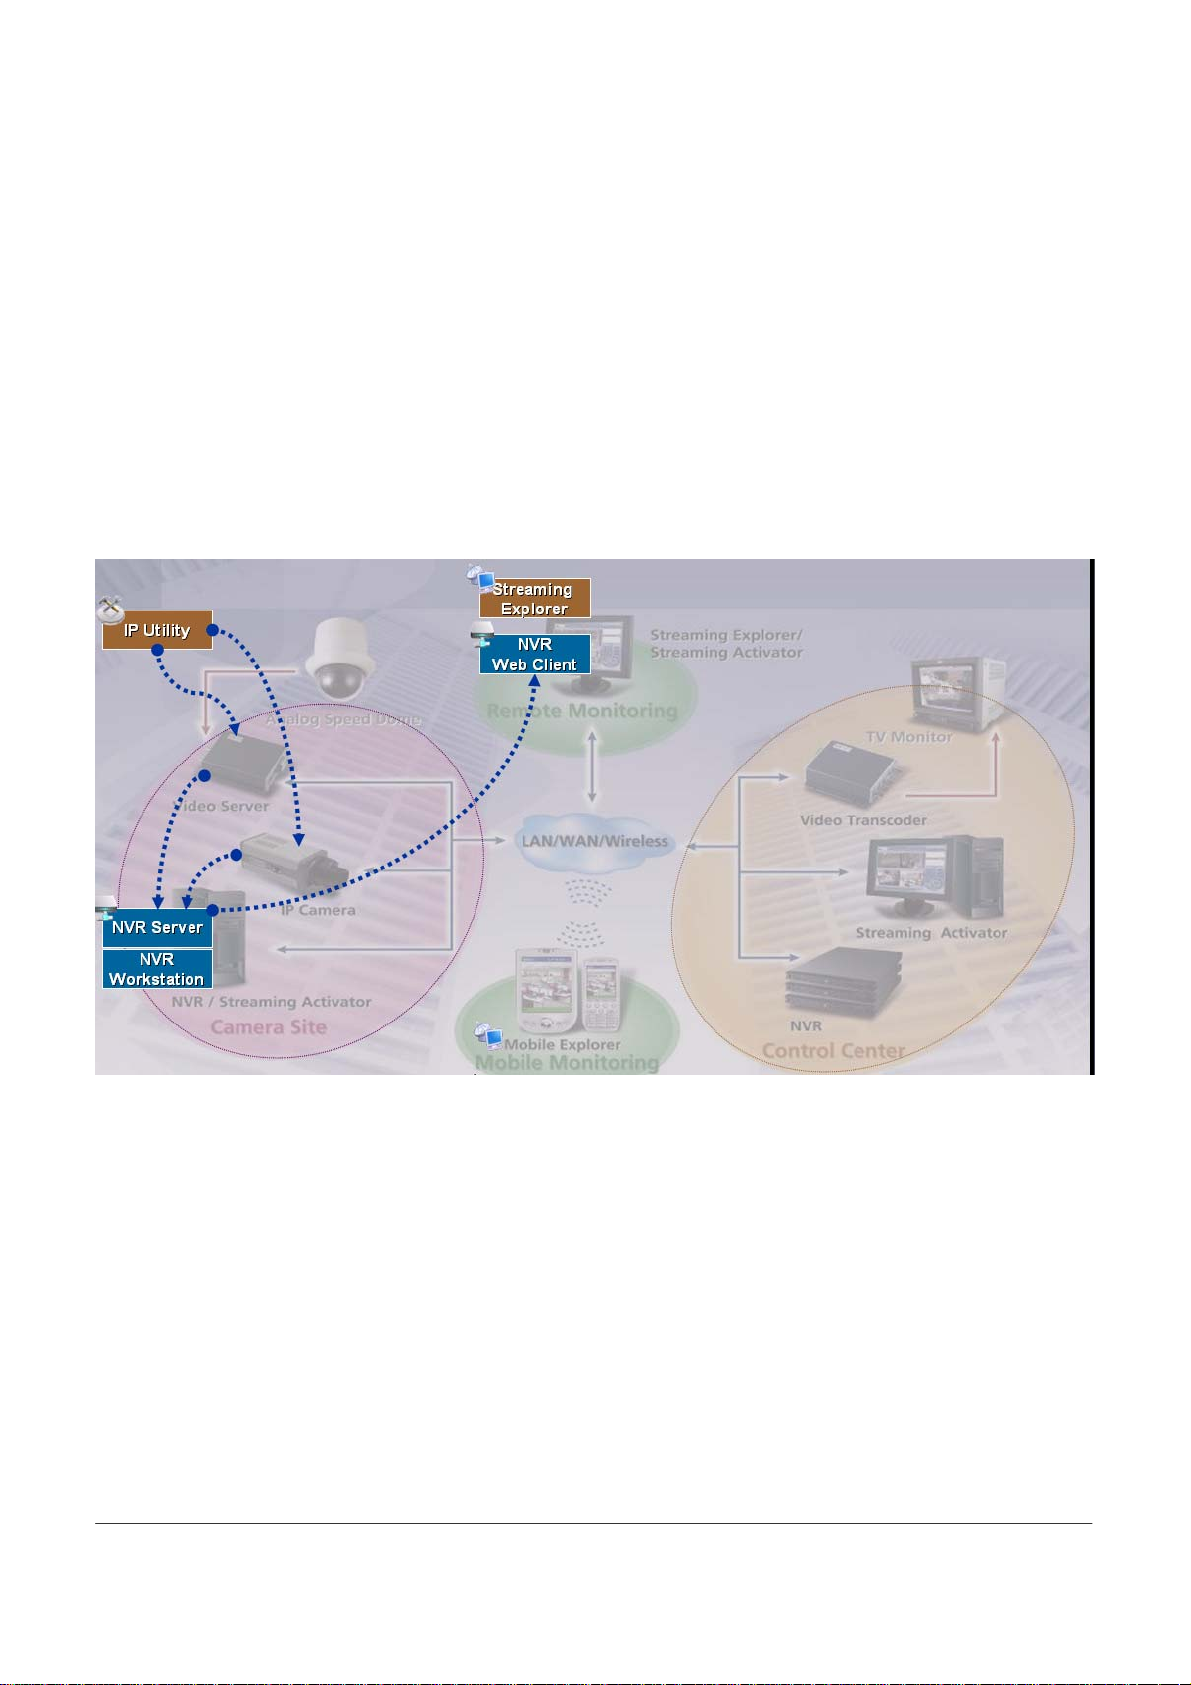
Single Site Deployment
With single site deployment, cameras are all located in one site, NVR Server and NVR Workstation
can be run at the same PC machine as well; NVR Web Client can be executed on any other machines
that may connect to the NVR Server.
Figure 1-1 Single Site Deployment
15
Page 18
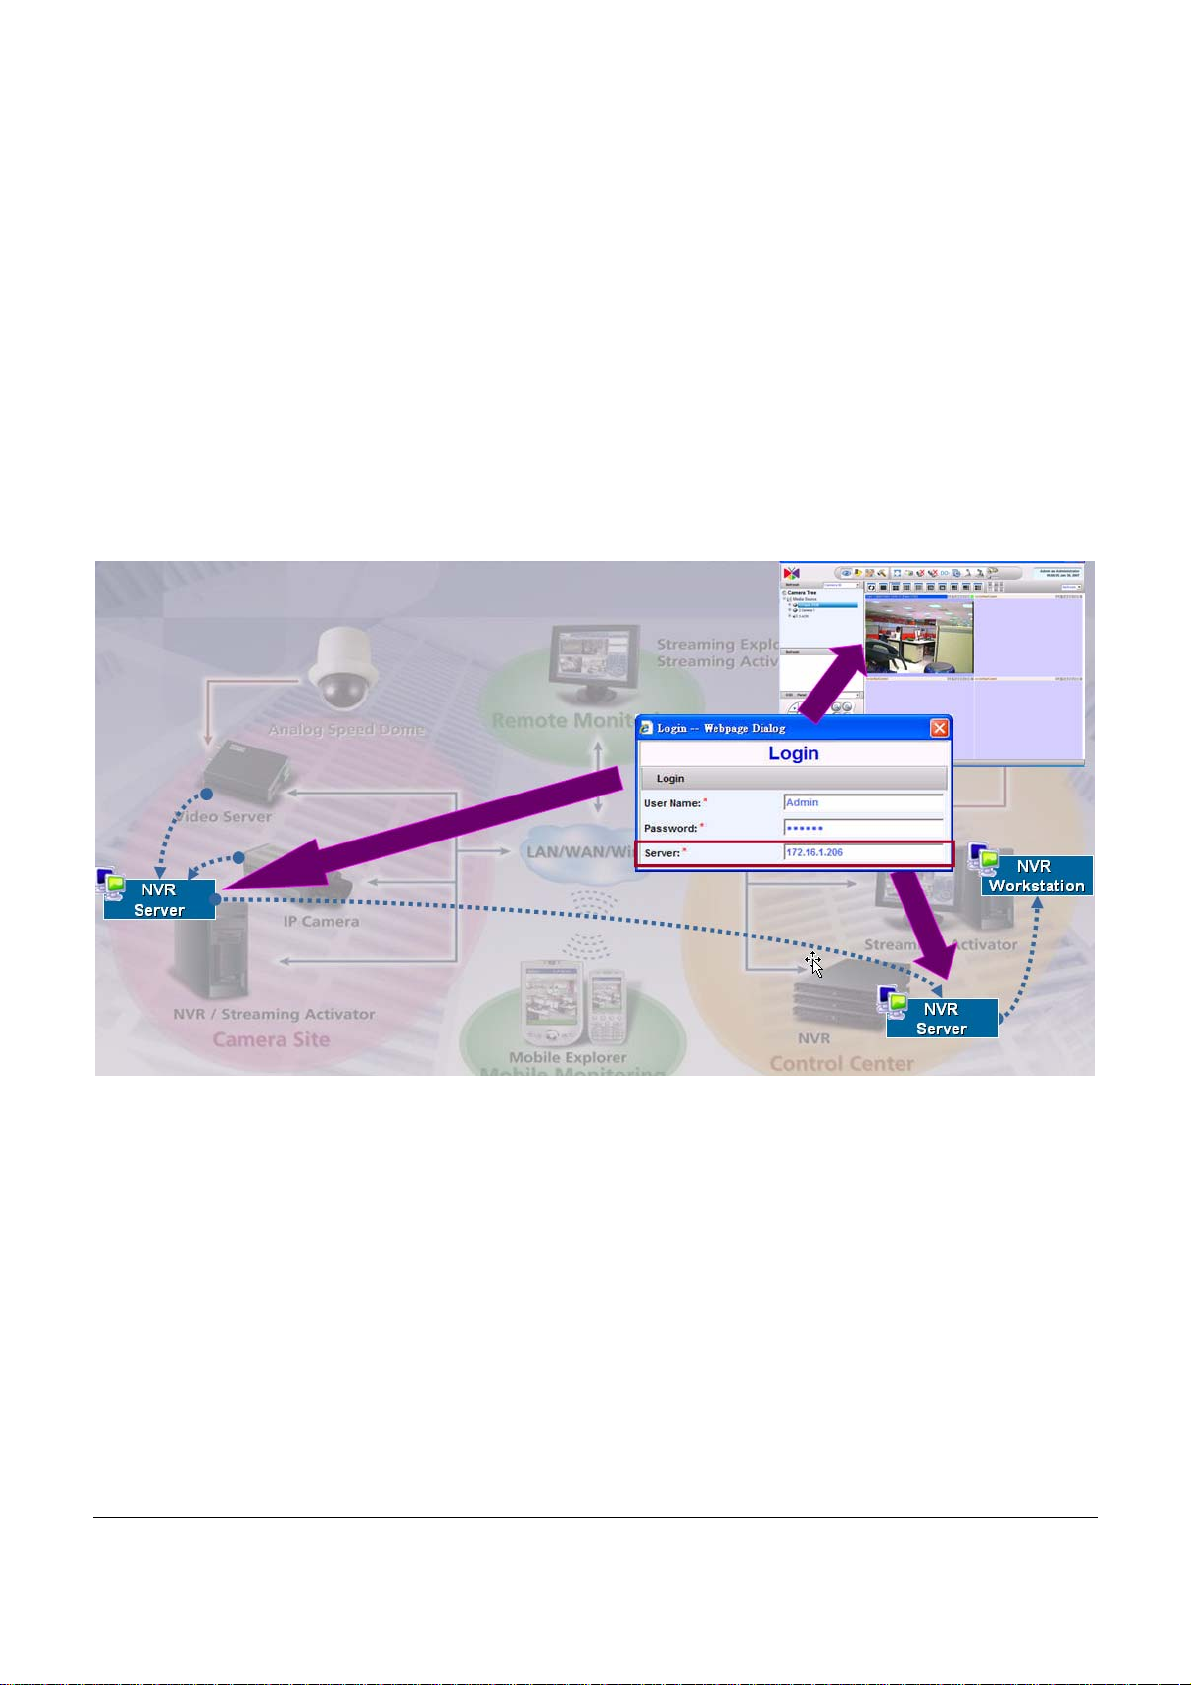
Multiple Site Deployment
When there are multiple sites with camera deployments, and server-to-server backup is requiremed,
then user need to deploy multiple site configuration.
With multiple site configuration, user may setup ACTi NVR Server on the camera sites, and setup
ACTi NVR Server on the Control Center site and connecting to other ACTi NVR Server on the
camera sites; and hence backup cameras from camera sites to the NVR Server in Control Center
site.
ACTi NVR Workstation.may connects to different NVR Server on different site with IP address
specified.
Figure 1-2 Multiple Site Deployment
16
Page 19

System Requirements
Supported Operating System and Browser
Supported Operating System:
Operating System Comments
Windows XP
Windows 2003
Supported Browser:
Windows XP SP2 or most updated patch
Windows 2003 Server, WSS 2003
Operating System Comments
Microsoft Internet Explorer
v6.0
Microsoft Internet Explorer
v7.0
IE 6.0 with most updated service pack
IE 7.0 with most updated service pack
NOTE: Windows 2000 and Windows Vista series are not tested.
17
Page 20

Recommended PC Specification – 16 channels
Supported PC Specification with 16-channel:
Item. Specification
CPU
Memory
HDD
Intel Core 2 Duo 2.4 GHz
1 GB
250 GB
Recommended PC Specification – 32 channels
Supported PC Specification with 32-channel:
Item. Specification
CPU
Memory
HDD
Intel Core 2 Duo 2.66 GHz
2 GB
250 GB
Recommended PC Specification – 48 channels
Supported PC Specification with 48-channel:
Item. Specification
CPU
Memory
HDD
Intel Core 2 Quad 2.66 GHz
4 GB
250 GB
Recommended PC Specification – 64 channels
Supported PC Specification with 64-channel:
Item. Specification
CPU
Memory
HDD
NOTE: AMD chip and X64 series are note tested.
Intel Core 2 Quad 2.66 GHz
4 GB
250 GB
18
Page 21

Keyboard Shortcuts
ACTi NVR v2.0 supports keyboard shortcuts to increase security operator’s productivity. These
keyboard shortcuts apply to all applications, including Active Monitor, Active Player, Active Map
and Active Setup.
Keyboard Shortcut Description
F4
F7
F8
F11
F12
ESC
Hide / show left panel
Create snapshot
Toggle start / stop tour.
Toggle stretch to video window function
Toggle full-screen mode
Cancel full-screen mode; return to normal mode. This function
key only valid under full-screen mode
NOTE: When running ACTi NVR Web Client, some shortcut key does not work.
19
Page 22

Technical Support
Please refer to following mechanism to contact with ACTi:
E-Mail:
MSN Messenger:
When contacting ACTi Technical Support, please provide following information:
1. ACTi NVR version number: Please refer to
2. ACTi Devices Model Number and Firmware Version
3. ACTi NVR log and database information: Please use Backup Wizard to backup the database
customer.service@acti.com
customer.service@acti.com
Check Version section for detail
20
Page 23

What’s New in v2.0
System Enhancements
The following lists the enhancements in current version
1. Supports 64-channel with D1@30 FPS with 3 Mbps
2. Tree directory
3. Client / Server architecture
4. Supports NVR Server, NVR Workstation and Web Client
21
Page 24
Active Monitor Enhancements
The following lists the enhancements in current version
1. Video layout mode supports 1, 4, 6, 8, 9, 10, 16, 25, 36 split window mode
2. Supports full screen mode; the video layout is displayed in full-screen mode
3. Tree Display Panel: the user may use drag-and-drop to drag a video source to the layout
manager for preview
4. Patrol mode: Switches and displays each preview window accordingly. Pre-defined layout can
be set to patrol mode as well
5. 2-Way Audio: Supports 2-way audio. User may have 1-to-1 speak function or 1to many audio
broadcast to multiple devices at the same time
6. Create Snapshots: Create snapshot on the fly and as an event index for search later on
7. Advanced Preview Mode: Maximum 36-channel preview at the same time with different frame
rate adjusted automatically
8. Layout Manager: Setup pre-defined video layout to group certain cameras in the same layout.
Layout manager can be displayed in full-screen mode.
9. Hot-spot Window: The channel with an event will be switched to the hot-spot window.
Figure 1-3 Dual Monitor – Live View + Live View
22
Page 25
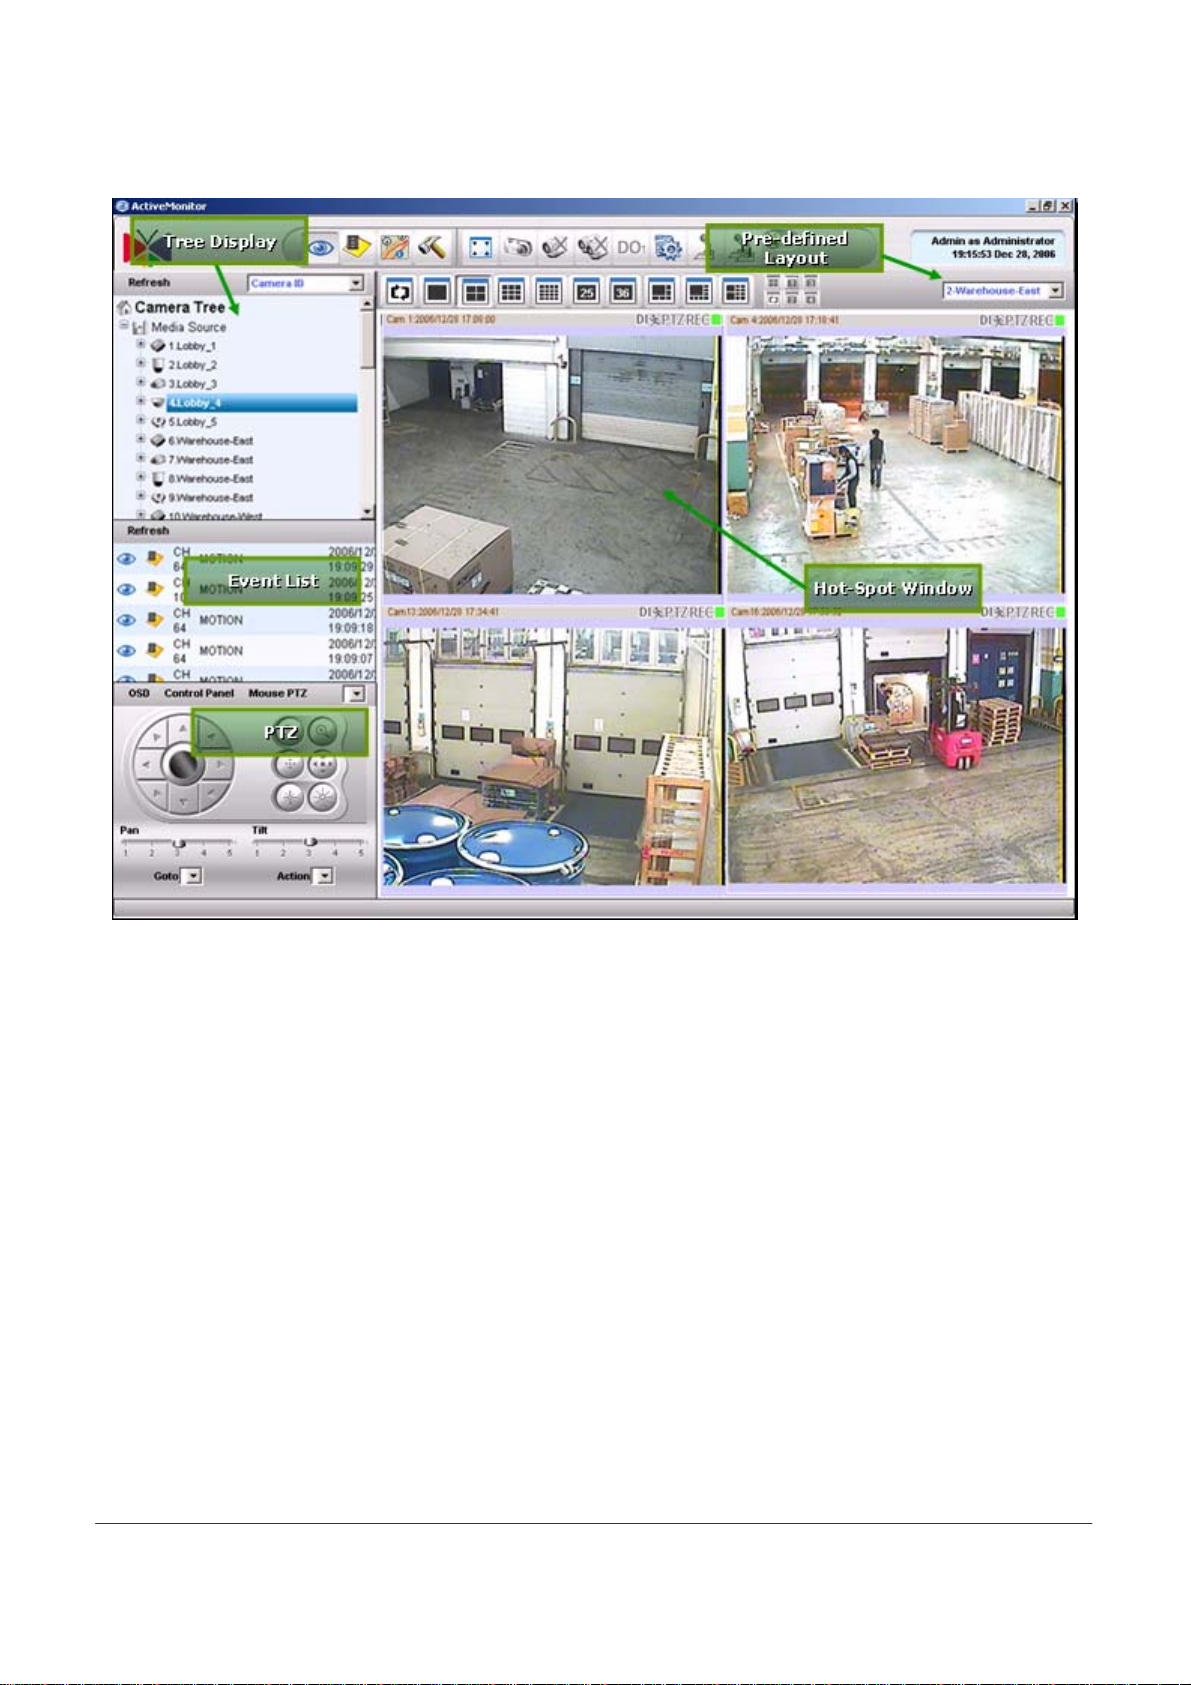
Figure 1-4 Active Monitor Features
23
Page 26
PTZ Control Enhancements
The following lists the enhancements in current version
1. PTZ Control: Manages PAN, Tilt, Zoom operation with speed control
2. Protocols Supported: Pelco-P, Pelco-D, Dynacolor, Messoa, Lilin, Dynacolor, Samsung,
Kampro, Sony Visca, Panasonic protocol supported
3. Preset Position: Maximum 32 preset positions supported
4. PTZ Patrol: Patrol preset positions with user-defined dwell time
5. Expandable PTZ Command: User-defined PTZ command to support additional PTZ protocols
6. Mouse PTZ: On-screen 8-direction PTZ with mouse operation. Full-screen mode supported.
7. IP Joystick on PC: Connects joystick on the PC via USB port to control speed dome directly
8. Control Panel on PC: Connects control panel on the PC via COM port to control speed dome
directly
Figure 1-5 USB IP Joystick Support and Customization
24
Page 27

Event Manager Enhancements
The following lists the enhancements in current version
1. Event Types: Handles motion detection, alarm, video loss, network disconnect events
2. Trigger Digital Output: May trigger digital output when an event occurs
3. Hot-spot Window: Activate and switch the channel with event to the hot-spot window. The
original video in the hot-spot window will then be switched over
4. Pop-up Window: Mini-preview window will be pop-up when event occurs. Pop-up window
will be dismissed when user-defined dwell time elapsed
5. E-Mail Notification: E-Mail notification with snapshot image
6. FTP Notification: FTP captured snapshot to the FTP server
7. Play audio file: Play user-defined audio file or beep on the machine
8. Operate PTZ Control: A triggered event may request another channel to execute a PTZ Goto
Preset position command
9. Execute Command: User-defined execution command will be executed
25
Page 28

Recording Enhancements
The following list the enhancements in current version
1. Format: Supports standard 14496-2 MPEG-4 video+audio format. Compatible with
FFMPEG, XviD, DivX
2. Recording Mode: Supports schedule recording, alarm recording and motion recording
3. Pre-event Recording: User-defined time period to record before a certain event occurs.
Maximum 30 seconds.
4. Post-event Recording: User-defined time period to record after a certain event occurs.
Maximum 2 hours.
5. Number of drives: Supports up to 23 drives in one single machine
6. House Keeping Methods: Supports Keep certain days, recycle recording and Keep Total Space
methods.
26
Page 29

Active Player Enhancements
The following lists the enhancements in current version
1. Time-based Search: Search video clips with date, time, channel
2. Event Search: Search motion detection, digital input, snapshot event with specified date, time
and channel
3. Snapshot Viewer: Preview on snapshot created and link to archive player
4. Status Event Search: Search events on video loss / recovery, network disconnect / reconnect,
user login / logout, database log with specified date, time and channel
5. Archive Player: Stand-alone archive player
6. Player mode: Play, Pause, Stop, Fast Forward, Fast Rewind, Play Backward, Play
frame-by-frame, 1 / 2 / 4 / 8 speed control
7. Create Snapshots: Create snapshot images on-the-fly and can be searched as an event
8. Export Video: Export a MPEG-4 raw data file into a AVI file
9. Record while Playback: Recording to MPEG-4 raw data file while playback a file. This
function is useful to extract part of a video clip to another archive file.
10. Synchronous Playback: 4-channel synchronous playback at the same time
27
Page 30
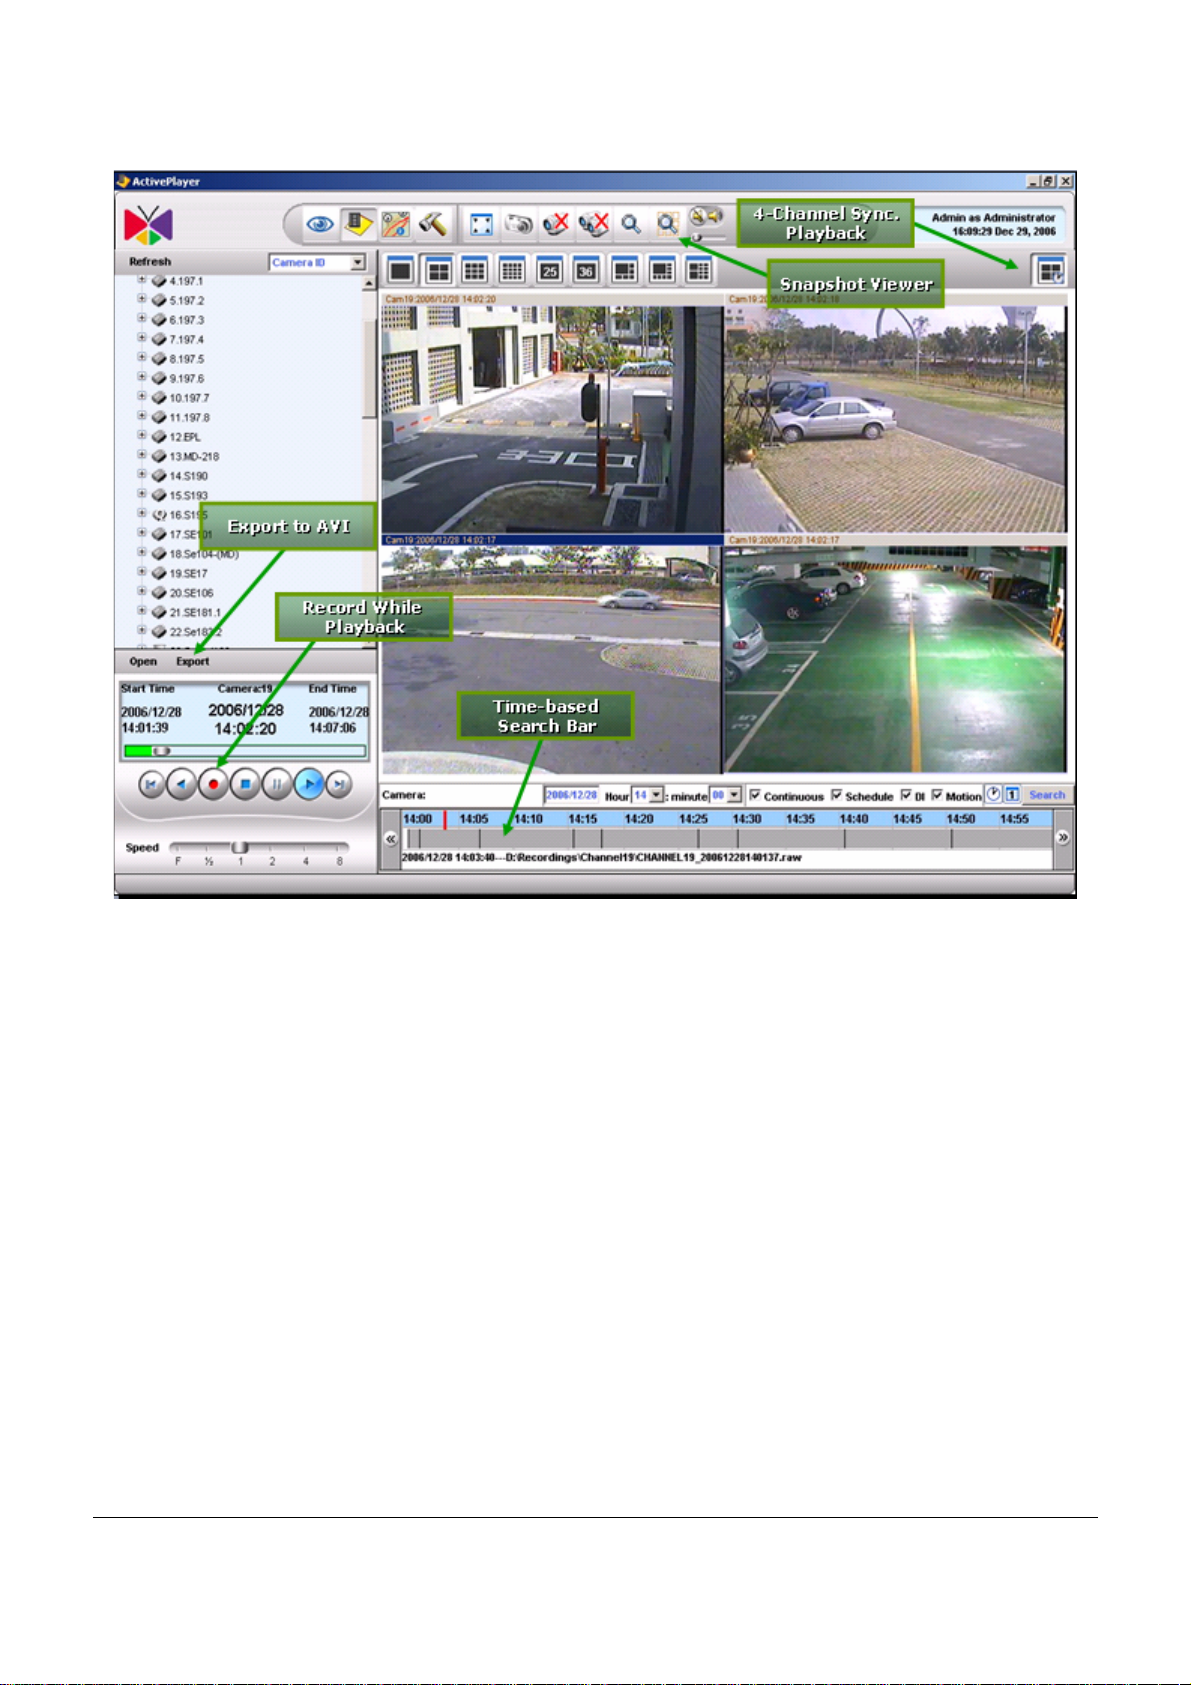
Figure 1-6 Active Player Features
28
Page 31

Active Map Enhancements
The following lists the enhancements in current version
1. Map Manager: Map configuration and management
2. Map Monitor: Creates alarm when an event occurs on a certaion camera in Map
3. Preview-all Mode: With this mode, all cameras in the associated map will be displayed with
QCIF@1FPS preview. When double-click on the preview window, the original video window
will be brought up with its original resolution and frame rate
4. Map Patrol: Maps can be patrolled and displayed one-by-one with user-defined dweel time.
Figure 1-7 Active Map Features
29
Page 32

NVR Web Client Enhancements
The following lists the enhancements in current version
1. Remote Preview: Supports 1, 4, 9-channel preview
2. Remote Playback: Supports 1, 4, 9-channel playback mode and playback operations.
3. Remote Map: Runs map on Web.
4. Remote Setup: Functionalities are the same as ActiveSetup.
Figure 1-8 NVR Web Client Features
30
Page 33

What’s New in v2.0 SR1
System Enhancements
The following lists the enhancements in current version
1. Multicast: Supports multicast connection
2. Fixes VGA resolution issue. When live view on VGA resolution with firmware
A1D-220-V3.03.04-AC, the video image will have wave effect on the video.
3. Fixes different frame rate setting. User may now set different frame rate for live view, record,
event record, and remote connection.
User Interface Enhancements
The following lists the enhancements in current version
1. Tree User Interface: User may click on icon or camera name. When mouse cursor move over
tree icon or camera name, the cursor will change to a click cursor
2. Updated Language: Sweedish, Simplified Chinese, Traditional Chinese, Japanese
Active Monitor Enhancements
The following lists the enhancements in current version
1. Fixes Event Manager issue. DI event triggers pop-up window does not work.
PTZ Enhancements
The following lists the enhancements in current version
1. Fixes control panel via serial port issue. User may connect analog control panel via serial port
(RS-232) and operate correctly
2. Fixes Dynacolor PTZ protocol hangs issue.
3. Fixes CAM-6200 adjust focus issue.
4. Fixes remote mouse PTZ on CIF and QCIF resolution
31
Page 34

Active Setup Enhancements
The following lists the enhancements in current version
Search and Add: When user click Search and Add button, all devices added to NVR
1.
will be executed auto-detect to get correct camera information accordingly
2. Add support to auto detect via Streaming Engine
3. Add wrong camera date/time notification. This is done in camera setup and live view. If the
camera date/time is 10 days older than current PC date/time, then a message will notify user,
and user may click to synchronize the date/time in camera firmware
4. Fixes recording setting issue. When a camera is deleted, the recording setting will not be
removed accordingly
Active Player Enhancements
The following lists the enhancements in current version
1. Fixes Export AVI issue. Export AVI file will fail (100 MB size, slow motion, and fast motion)
under some frame rate mode
2. Fixes Active Player linkage to Active Map issue. When clicking Active Map under Active
Player interface, it does not work
NVR Web Client Enhancements
The following lists the enhancements in current version
1. Add pre-defined layut in NVR Web Client. Only display the pre-defined layout with layout
window smaller than 9 windows
2. Add mouse PTZ in NVR Web Client. PTZ control is also related to permission control setting
3. Imporve the remote playback waiting time from 20 seconds to 5 seconds
4. Add support to Internet firewall deployment in NVR Web Client Login Screen. User has an
option to choose NVR Server IP Address as default Streaming Engine in NVR Web Client login
screen.
32
Page 35

2. Getting Started
Administrator’s Check List
Objective: To guide the administrator through the system setup.
Description: Please go through the checklist below for what items should be set.
NOTE
of the package.
No Status Description Main Category Reference
Pre-install
1
Check PC requirement
□
: You can find the Quick Installation Guide and User Manual in the CD
Quick Installation
To ensure the software running well, please make sure the PC
spec is compatible with the software.
Guide
Ch 1-Administrator’s
Check List
2
Install
1
2
Setup
1
Prepare Software license
□
Install Software
□
Check installation
□
Create Camera Group
□
and add cameras
Our software has 16CH/32CH/48CH/64CH packages. Our
software is free for 16CH. For 32CH/48CH/64CH please refer
to license section for details.
Please follow the installation guide step by step to install the
software.
After installation, please also check the below items before
you move to next step.
1. License input
NVR camera channel management is based on camera groups.
Start by creating camera groups and adding cameras.
Ex: There are 4 floors in this system. You can start by creating
1F, 2F, 3F, 4F, 4 groups. When adding every single camera,
you can select the group which it belongs to.
Quick Installation
Guide
Ch 1-Administrator’s
Check List
Quick Installation
Guide
Ch 2-Installing the
Software
Quick Installation
Guide
Quick Installation
Guide
Ch 3-License
Management
User Manual
Ch 7 ActiveSetup
2
3
Configure Camera Setup Set some camera settings, like PTZ setting, bit rate.
□
Configure Scheduling Set the recording schedule for every single camera.
□
User Manual
Ch 7 ActiveSetup
User Manual
Ch 7 ActiveSetup
33
Page 36

4
5
6
7
8
Configure Event handling Set the action related to different events
□
Configure Storage Set the HD arrangement and recording delete rule for storage
□
Configure Preview layout Set the preview layout during preview
□
Configure E-map
□
(Option)
Configure Accounts Set the you accounts and select authentication level
□
Set the E-map.
User Manual
Ch 7 ActiveSetup
User Manual
Ch 7 ActiveSetup
User Manual
Ch 7 ActiveSetup
User Manual
Ch 7 ActiveSetup
User Manual
Ch 7 ActiveSetup
34
Page 37

Operator Check List
Objective: To guide the operator through the operation.
Description: Please go through the checklist below for what items should operator know.
NOTE: You can find the Quick Installation Guide and Operation Manual in the
package of the CD.
No Status Main Category Description Reference
Setup
1
2
3
4
5
Live Preview
□
PTZ control
□
E-map Preview
□
Search & Playback Set the action related to different events
□
Web-client Access
□
operation
Operator should be able to see the live
preview and to do basic operations.
Operator should be able to control the
PTZ
Operator should be able to launch the
E-map preview and to do basic
operations.
Set the action related to different events
User Manual
Ch 3 Active Monitor
User Manual
Ch 3 Active Setup
User Manual
Ch 5 Active MAP
User Manual
Ch 4 Active Player
User Manual
Ch 6 Web-Client
35
Page 38

Start ACTi NVR
To start ACTi NVR v2.0, simply click on the desktop.
ACTi NVR Workstation Components:
Icon Name Description
ActiveMonitor.exe
ActivePalyer.exe
ActiveMap.exe
ActiveSetup.exe
Live view, PTZ, IP Joystick, system log monitor,
event panel, Pre-defined layout, Tour
Archive player, synchronous playback, snapshot
viewer, file export
Map viewer, tour
System, camera and map setup
36
Page 39

Login ACTi NVR
When starting ACTi NVR, a login message box prompts as follow:
Figure 2-1 NVR Login
Default Administrator Account / Password
Default Administrator Account: Admin
Default Administrator Password: 123456
Default Server: localhost
NOTE: In the Server field, the user may type in different IP addresses or hostname; in
this case, the NVR Workstation will connect to the IP address specified.
37
Page 40

Change Password
Clicking on the profile section brings up the Personal Setting page. The user may easily change the
password and preferred Language. Click Apply to confirm the setting.
Figure 2-2 Change User’s Password
1. Personal Profile: Click on this section brings up Personal Profile setting; user may change
password and select preferred Language.
2. Password Button: Click on this button to change user’s password.
3. Language Button: Click on this button to select preferred Language.
4. Apply Button: Apply this setting.
5. Old Password: Input old password.
6. New Password: Input new password.
7. Re-Type Password: Re-tpye new password.
38
Page 41

Start a Camera Live View
Select a Camera from Camera Tree
Figure 2-3 Preview Window
1. Camera Tree: Choose a Camera from camera tree.
2. Preview Window: Click on any window once to select it and enable functions for this specific
camera (PTZ, snapshot, close camera, etc.)
39
Page 42

Double Click on the Camera
Figure 2-4 Double click on a camera to preview
1. Camera Tree: Double click on the camera icon that user wants to preview.
2. Active Preview window: User can see the video screen on the active preview window.
40
Page 43

Drag-n-Drop a Camera
Figure 2-5 Drag and Drop a camera
1. Camera Icon: Choose the camera icon to be previewed, then click on the left mouse key and
move it until user can see the camera name.
TIP: When you drag the camera icon, a new cursor (with camera name) will be
displayed. The cursor looks like:
41
Page 44

Figure 2-6 Move the camera to active window
2. Active Preview Window: drag the camera icon to an active preview window to reveal the red
frame, then drop the icon to preview that camera.
42
Page 45

Figure 2-7 Preview Camera
3. Preview Window: the user can see the video screen on the active window.
43
Page 46

Stop a Camera Live View
Close Camera Live View
Figure 2-8 Disconnect a Channel
1. Disconnect A Channel: Click once to stop video streaming for the selected window.
44
Page 47

Start Other Application
Start Active Player, Active Map and Active Setup
Figure 2-9 Active Program Tool Bar
1. Active Monitor Button: User can click this button to switch to Active Monitor program.
2. Active Player Button: User can click this button to switch to Active Player program.
3. Active eMap Button: User can click this button to switch to Active eMap program.
4. Active Setup Button: It shows that use rare using ActiveSetup program.
5. System Setup Button: User can click this button to switch to System Setup.
6. Camera Setup Button: User can click this button to switch to Camera Setup.
7. eMAP Setup Button: User can click this button to switch to eMAP Setup.
45
Page 48

Start Utility
You can go to “STARTÎProgram FilesÎACTiÎNVR” to find ACTi’s Utility.
ACTi Utility Suite Components:
Icon Name Description
IPUtility.exe
Explorer.htm
Search and manage ACTi devices, firmware
upgrade, configuration backup and restore
Web browser application to configure PTZ
settings.
Standalone archive player, create snapshots,
ArchivePlayer.exe
BackupWizard.exe
MediaConverter.exe
display time code on the video window directly.
Able to play
.RAW and .MP4 format
Backup and restore ACTi NVR v2.0
Converts .RAW data format to .AVI format
MPEG-4 DirectShow filter. This is necessary if
FFDShow.exe
user wants to play
.AVI file with Microsoft
Windows Media Player.
46
Page 49

Quit ACTi NVR
Simply click on to quit ACTi NVR v2.0.
Figure 2-10 Exit ACTi NVR
47
Page 50

Check Version
Clicking on the logo section will bring the About Us dialog box. The user may easily review the
current software version and system information.
Figure 2-11 Check Version
48
Page 51

3. Active Monitor
Introduction
The Monitor Console (Active Monitor) is the application designed to perform live preview for
installed ACTi devices. It allows for up to 36 concurrent video preview windows, including a
variety of preview modes.
Advanced features of the Monitor Console include event logs, sound broadcast, manual digital output
to device, automatic layout touring, PTZ control, and many more. This section explains the interface
in detail, as well as gives instructions for using these advanced functions.
49
Page 52

Overview
The section describes ACTi NVR Active Monitor functions, including camera preview
Figure 3-1 User Interface
1. Logo: Click on the logo to bring up the About Us dialog box which contains software version,
system version and company information.
2. Active Monitor Toolbar: Contains buttons to operate in Active Monitor application
3. Personal Profile: Click on this section brings up Personal Profile setting; user may change
password and select preferred Language.
4. Camera Panel: Displays camera tree.
5. Event Panel: Displays event generated, including motion detection, alarm input, camera
date/time is not correct and video loss events. User may click on each item to see further
details.
NOTE: In the event panel, a new event called “Camera Date/Time is not correct. Check
Setup icon to setup Camera Date Time”. If this happens, it means that specific camera’s
date/time is not setup correctly, this will affect recording, searching and playback. Please
50
Page 53

click icon to setup camera date/time accordingly.
6. PTZ Panel: PTZ operations
7. Layout Manager: Controls the various window layout
8. Video Window: Each video window displays live view from one video source from camera
panel.
51
Page 54

Preview Operation
Channel Preview
Figure 3-2 Preview Window
1. Camera Panel: Displayed camera information in tree directory.
2. Preview Window: Click on any window once to select it and enable functions for this specific
camera (PTZ, snapshot, close camera, etc.)
TIP: To preview a channel, first click on a video window in layout manager, then
double-click on the camera in the Camera panel, or drag the camera into the video window
in the layout manager.
52
Page 55

Drag and Drop a Camera to preview
Figure 3-3 Drag and Drop a camera
1. Camera Icon: Choose the camera icon to be previewed, then click on the left mouse key and
move it until user can see the camera name.
TIP: When you drag the camera icon, a new cursor (with camera name) will be
displayed. The cursor looks like:
53
Page 56

Figure 3-4 Move the camera to active window
2. Active Preview Window: drag the camera icon to an active preview window to reveal the red
frame, then drop the icon to preview that camera.
54
Page 57

Figure 3-5 Preview Camera
3. Preview Window: the user can see the video screen on the active window.
55
Page 58

Double-click on a Camera to Preview
Figure 3-6 Double click on a camera to preview
1. Camera Tree: Double click on the camera icon that user wants to preview.
2. Active Preview window: User can see the video screen on the active preview window.
56
Page 59

Active Monitor Toolbar
1. Active Monitor: Click on this button to go to the Active Monitor application.
2. Archive Player: Click on this button to go to the Archive Player application.
3. Active E-Map: Click on this button to go to the Active E-Map application.
4. Setup: Setup the System, Camera and E-Map.
Figure 3-7 Active Monitor Toolbar
5. Full Screen: Click to bring the video into full-screen mode. To bring the controls back, press
ESC.
6. Snapshot: Takes a single screenshot at maximum resolution for the selected video only. The
screenshot is saved as an JPG file in the Recording Path defined in the Recording of Camera
Setup. Please refer to the
7. Disconnect A Camera: Click once to stop video streaming for the selected window.
8. Disconnect All Camera: Click once to stop video streaming for all preview windows.
9. Trigger DO1:
10. System Monitor: Click on this button to brings up system log.
11. Speak: Pressing this icon enables audio transmission to the selected video device; un-pressing it
disables the transmission.
12. Broadcast: Pressing this icon enables audio transmission to all video devices that appear in this
layout; un-pressing it disables the transmission.
13. Volume Control: turn on/off and adjust the volume.
Click once to trigger DO1 of the selected camera.
Recording section for details.
NOTE: If no action is visibly performed while pressings buttons 1 through 4, check if
there is already an instance of the application minimized.
57
Page 60

Full Screen Mode (F12)
Figure 3-8 Full screen button
1. Full-screen: Click to bring the video into full-screen mode. To bring the controls back, press
ESC.
NOTE: Full-screen maximizes the entire layout of videos instead of just the selected
window. It will also not expand the video should the size of the window exceeds the
maximum resolution of the video.
TIP: The user can also use F12 to invoke this function. To stretch the video to fit the
window, user can use F11 function key to toggle this function.
58
Page 61

Figure 3-9 Full Screen Mode
59
Page 62

Create Snapshot (F7)
Figure 3-10 Create Snapshot
1. Snapshot: Takes a single screenshot at maximum resolution for the selected video only. The
screenshot is saved as an JPG file in the Recording Path defined in the Recording of Camera
Setup. Please refer to
Recording section for details.
60
Page 63

Disconnect a Channel
Figure 3-11 Disconnect a Channel
2. Disconnect A Channel: Click once to stop video streaming for the selected window.
61
Page 64

Disconnect All Channels
Figure 3-12 Disconnect all Channel
1. Disconnect All Channels: Click once to stop video streaming for all preview windows.
62
Page 65

Trigger DO1 (Toggle)
Figure 3-13 Trigger DO1
1. Trigger DO1: Click once to trigger DO1 of selected camera.
63
Page 66

System Monitor
1. System Log: Clicking on button brings up system log.
System Monitor Listing
System Monitor contains the following information:
Figure 3-14 System Monitor Button
1. Recorded: Recording information
2. Deleted: Deletion information, including database and archive file
3. Alarm: Alarm information, including digital input 1 and 2
4. Motion: Motion detection information
5. Network Loss/Recovery: Network loss or recovery information
6. Video Loss/Recover: Video loss or recovery information
7. User Login/Logout : User login or logout information
64
Page 67

System Monitor - Recorded
Figure 3-15 System Monitor - Recorded
1. Camera: Camera Name
2. Stream: Recording type, including Continuous, Event With Streaming and Schedule
3. File: File location on the disk
4. Start Time: Stat time
5. End Time: End time
6. Duration: Length of the recorded archive
7. Page Indicator: Traverse to first, last, previous or next page
65
Page 68

System Monitor - Deleted
Figure 3-16 System Monitor - Deleted
1. Camera: Camera Name
2. Stream: Recording type, including Continuous, Event With Streaming and Schedule
3. File: File location in the disk
4. Start Time: Stat time
5. End Time: End time
6. Duration: Length of the recorded archive
7. Page Indicator: Traverse to first, last, previous or next page
66
Page 69

System Monitor - Alarm
Figure 3-17 System Monitor - Alarm
1. Camera: Camera Name
2. Event: Alarm type
3. Event Time: The time of the occurrence of the event
4. Page Indicator: Navigate through the record set, including first page, last page, previous page,
next page
67
Page 70

System Monitor - Motion
Figure 3-18 System Monitor - Motion
1. Camera: Camera Name
2. Event: Motion type
3. Event Time: The time of the occurrence of the event
4. Page Indicator: Navigate through the record set, including first page, last page, previous page,
next page
68
Page 71

System Monitor – Network Loss/Recovery
Figure 3-19 System Monitor – Network Loss/Recovery
1. Camera: Camera Name
2. Event: Network status, including Network Loss and Network Recovery
3. Event Time: The time of the occurrence of the event
4. Page Indicator: Navigate through the record set, including first page, last page, previous page,
next page
69
Page 72

System Monitor – Video Loss/Recovery
Figure 3-20 System Monitor – Video Loss/Recovery
1. Camera: Camera Name
2. Event: Network status, including Network Loss and Network Recovery
3. Event Time: The time of the occurrence of the event
4. Page Indicator: Navigate through the record set, including first page, last page, previous page,
next page
70
Page 73

Speak and Broadcast
Figure 3-21 Talk and Broadcast button
1. Speak: Pressing this icon enables audio transmission to the selected video device; un-pressing
it disables the transmission.
2. Broadcast: Pressing this icon enables audio transmission to all video devices that appear in
this layout; un-pressing it disables the transmission.
IMPORTANT: Note that, in order to enable this function, make sure the device is
equipped with 2-way audio function. Speak is a 1-to-1 communication while Broadcast
will transmit the audio to all clients that are connected with live video feed.
71
Page 74

Volume Control
Figure 3-22 Volume Control
1. Volume Control: turn on/off and adjust the volume.
72
Page 75

Mute On
Mute Off
Figure 3-23 Mute On
Figure 3-24 Mute Off
Adjust Volume
Figure 3-25 Adjust Volume
73
Page 76

Camera Panel
Camera List
Figure 3-26 Camera List
1. Refresh button: Pressing this button reveals the newest changes made with Active Setup.
Closing and re-opening the Active Monitor will have the same effect.
2. Sort selection: Sorts the tree in different categories and priorities. User has a choice of
Camera ID, Model Name, Group, Resolution, and IP Address.
3. Camera list: The Camera List serves two functions:
i. Expanding each device shows Camera Information, including Camera ID, Name, Channel
ID, FPS, Resolution and Bit-Rate.
ii. Clicking and dragging the device icon to a video window on the right shows video from
that device.
74
Page 77

Channel Layout Manager
Window Layout Selection
Figure 3-27 Layout bar
1. Layout selection bar: These icons manage how the user would like the different video
channels to be viewed.
Figure 3-28 Layout Select bar
1. Patrol: See Layout Tour for details.
2. 1-Window View: Shows a single channel; video is not expanded if maximum resolution of the
75
Page 78

source video is reached.
3. 4-Window View: Shows a maximum of 2x2 video channels at once.
4. 9-Window View: Shows a maximum of 3x3 video channels at once.
5. 16-Window View: Shows a maximum of 4x4 video channels at once.
6. 25-Window View: Shows a maximum of 5x5 video channels at once.
7. 36-Window View: Shows a maximum of 6x6 video channels at once.
8. 6-Window View: Shows one video channel with a larger view, and 5 others at a lower
resolution.
9. 8-Window View: Shows one video channel with a larger view, and 7 others at a lower
resolution.
10. 10-Window View: Shows two video channels with a larger view, and 8 others at a lower
resolution.
11. Quad setting: Controls layouts within the Quad Video Server if using one such as SED-2310
or SED-2320.
12. Pre-Defined Layout: Choose the layout that user wants to preview.
NOTE: The Quad setting buttons will only become active if the selected channel is
defined as a quad in the camera settings.
76
Page 79

Pre-defined Layout
Figure 3-29 Select Predefined Layout
1. Pre-defined layout options: If User has pre-defined layouts in System Setup (See Layout for
details), user will find them here. Selecting any one of them automatically brings up the
layout as well as all video channels. Selecting “Refresh” will refresh the list should any
layouts has been changed with Active Setup.
77
Page 80

Hot-spot Window
The hot-spot window is designed to alert security officer for certain events. The security officer may
simply double-click on any video window, that window will then be switched over with the one in
hot-spot window. Also, user may setup the action to display video on the hot-spot window when
certain event occurs.
Figure 3-30 Hot-Spot Window
1. Hot-spot Window: The upper left window in the Window Layout Manager is defined as the
Hot-Spot Window.
NOTE: Double-clicking on another video window swaps video between the hot-spot
window and the indicated window.
NOTE: Please refer to [Active Setup] -> [Camera Setup] -> [Event Manager] on how
to setup hot-spot window as the event display video window.
78
Page 81

Layout Patrol
Figure 3-31 Patrol button
1. Patrol: Clicking on this icon runs a pre-defined layout patrol sequence. This setting can be
found in Active Setup. Clicking on the Patrol button once brings up a sub-menu, which
allows user to choose any particular sequence to patrol. Selecting “Cancel” in the sub-menu
stops the patrol.
NOTE: Depending on the power of the computer used, patrolling between each layout
takes a certain amount of time. While the video channels still load, user will not have
access to much of the control, including the ability to Cancel the layout patrol. Please
make sure the period between each layout is sufficient for all channels to complete
loading, especially when the number of channels in a single layout is large.
79
Page 82

Layout Patrol with Full Screen Mode
Figure 3-32 Full Screen Mode
The user may also perform layout patrol while in full screen mode. To do so, the user simply needs
to:
1. Select and run layout patrol by clicking on the patrol button
2. Wait until all channels have completed loading, but before the next layout begins loading
3. Click on the full screen button.
To bring the user interface back out from full screen mode, simply press the ESC key.
80
Page 83

Event List Panel
Event List
The user may find the Event List on the left hand side of the Active Monitor. Events
due to different events are show on that list. Please see Figure 3-32 for example:
Figure 3-33 Event List
NOTE: The Event List is not saved while Active Monitor is not active.
NOTE: In the event panel, a new event called “Camera Date/Time is not correct. Check
Setup icon to setup Camera Date Time”. If this happens, it means that specific camera’s
date/time is not setup correctly, this will affect recording, searching and playback. Please
click icon to setup camera date/time accordingly.
81
Page 84

Check Event Status
Figure 3-34 Event Status
1. Camera Setup Notification: This event is to notify that user need to configure camera
configuration.
Clicking on the
icon to setup camera date/time.
Figure 3-35 Camera Date/Time Setup
82
Page 85

2. Event Status: The events are listed by Channel Number, Type and Time. To view a video
clip related to a particular event, click on the “Eye” icon.
Clicking on the
Clicking on the
has been recorded and saved, the video archive will also be played on a pop-up mini-playback
window.
icon brings up video on a pop-up mini-preview window
icon brings up file information associated with that particular event. If the file
83
Page 86

PTZ Panel
PTZ Operation
PTZ controls can be found on the bottom left hand side of the Active Monitor. Most of functions
seen below are disabled until PTZ control setup for the particular camera or video server is completed
and enabled. Please consult
PTZ for setting up PTZ.
Figure 3-36 PTZ Operation
1. Pan-Tilt Control: Contains 8-way Pan-Tilt operation
2. Zoom Control: Click
3. Focus Control: Click
4. Iris Control: Click
5. PAN Speed: Adjust PAN speed. Rating 1 to 5. Higher numbers indicate faster Pan speed.
The actual angular speed varies from protocol to protocol. Click on a number on the bar to
select the desired speed
6. Tilt Speed: Adjust TILT speed. Rating 1 to 5. Higher numbers indicate faster Tilt speed.
The actual angular speed varies from protocol to protocol. Click on a number on the bar to
select the desired speed
to zoom out. Click to zoom in
to focus near. Click to focus far.
to set open iris. Click to set close iris.
NOTE: Note that, different speed dome protocol may vary on the 8-way Pan-Tilt
operation. CAM-6500’s Dynacolor protocol supports 4-way Pan-Tilt operation
84
Page 87

OSD Operation
Figure 3-37 OSD Operation
1. OSD: Click to enable or disable on-screen menu of the PTZ camera, if applicable. Button
appears pressed when enabled, and appears released when OSD is disabled. Once enabled,
use the arrow keys to operate the menu.
85
Page 88

Control Panel Support
1. Control Panel: Click to enable or disable control panel support. Control panel needs to
connect on the serial port (RS-232) on the computer running ACTi NVR v2.0. Please refer to
Joystick section on Control Panel and Serial Port setup.
IP Joystick Support
ACTi NVR v2.0 also supports IP Joystick connected on the USB port. Please refer to Joystick
section on IP Joystick button setup.
IMPORTANT: Note that the IP Joystick needs to be plugged into the USB port before
ACTi NVR v2.0 starts.
Figure 3-38 Control Panel Operation
86
Page 89

Mouse PTZ
Figure 3-39 Mouse PTZ Operation
1. MousePTZ: Click to enable or disable mouse PTZ for the selected the camera.
Button appears pressed when enabled, and appears released when mouse PTZ is
disabled. Once enabled, use the arrow keys to operate the menu.
TIP: Mouse PTZ works under full-screen mode as well. Press F12 may enable full
screen mode.
87
Page 90

PTZ Preset Tour and Scan
Figure 3-40 PTZ Preset Tour and Scan
1. PTZ Preset Tour: Click to select the PTZ Preset Tour user would like the PTZ to cycle
through. Selecting “STOP” as shown in the dropdown menu stops the tour. Please see
Preset Tour for setting up Preset Tours. Under this selection, user can find Auto Scan on
and off as well.
88
Page 91

Goto Preset Position
Figure 3-41 Goto Preset Position
1. Goto: This moves the PTZ camera to a certain pre-defined point. User may set up the preset
points by going to the PTZ Preset page. See
PTZ Preset for more details.
NOTE: Note that the preset position is listed in the description.
89
Page 92

Run User-defined PTZ Actions
Figure 3-42 Goto Preset Position
1. PTZ Action: Execute user-defined commands. Please refer to PTZ section for user-defined
PTZ command setup.
90
Page 93

4. Archive Player
Introduction
The Archive Player (ActivePlayer) is the application designed to perform video playback for recorded
clips. It allows for up to 36 concurrent, synchronized video preview windows, including a variety of
preview modes.
Advanced features of the Archive Player include time-bar searching, different camera
synchronization methods, event searching, backup playback, and many more. This section
explains the interface in detail, as well as gives instructions for using these advanced
functions.
91
Page 94

Overview
The section describes the mechanism on how to search ACTi’s IP surveillance products on network.
With this mechanism, user can locates the devices on the network, then use URL commands to
operate or manage those devices.
Figure 4-1 Archive Player Interface
1. Logo: Clicking the logo brings up the About Us dialog box which contains software version,
system version and company information.
2. Archive Player Toolbar: Contains the buttons to operate in Archive Player application
3. Personal Profile: Clicking this section brings up Personal Profile setting; user may change
password and select preferred Language.
4. Layout Manager: Control the various window layout
5. Camera Panel: Displays camera tree
6. Open/Export Playback File : Displays the Date and Time.
7. Playback Date/Time Information : Displays the Date and Time.
8. Playback Panel: Playback operations
92
Page 95

9. Video Window: PTZ operations
10. Search Manager: Controls the various window layout
11. Time Bar: Each video window displays live view from one video source from camera panel.
93
Page 96

Playback Operation
Execute “ActivePlayer.exe” or click “Playback” icon from the menu bar above other
applications to bring up the Playback screen.
94
Page 97

Archive Player Toolbar
1. Active Monitor: Click this button to go to the Active Monitor application.
2. Archive Player: Click this button to go to the Archive Player application.
3. Active E-Map: Click this button to go to the Active E-Map application.
4. Setup: Setup the System, Camera and E-Map.
5. Full Screen: Click to bring the video into full-screen mode. To bring the controls back, press
ESC.
6. Snapshot: Takes a single screenshot at maximum resolution for the selected video only. The
screenshot is saved as an JPG file in the Recording Path defined in the Recording of Camera
Setup. Please refer to
7. Disconnect A Camera: Click to stop video playback for the selected window.
8. Disconnect All Camera: Click to stop video playback for all preview windows.
9. Search: Click to search recording files.
10. Snapshot View: Click this button to find out snapshot.
11. Volume Control: turn on/off and adjust the volume.
Figure 4-2 Active Monitor Toolbar
Recording section for details.
95
Page 98

Full Screen Mode (F12)
Figure 4-3 Fullscreen button
1. Full-screen: Click this button to bring the video into full-screen mode. To bring the controls
back, press ESC.
NOTE: Full-screen maximizes the entire layout of videos instead of just the selected
window. It will also not expand the video should the size of the window exceeds the
maximum resolution of the video.
NOTE: User can also use F12 to invoke this function. To stretch the video to fit the
window, user can use F11 function key to toggle this function.
96
Page 99

Figure 4-4 Full Screen Window
97
Page 100

Create Snapshot (F7)
Figure 4-5 Create Snapshot
1. Snapshot: Takes a single screenshot at maximum resolution for the selected video only. The
screenshot is saved as an JPG file in the Recording Path defined in the Recording of Camera
Setup. Please refer to the
Recording section for details.
98
 Loading...