

Page 1

Attention List Server
V2.0.04 User Manual
2019/9/19
1
Page 2
www.acti.com
Chapter
Preface ........................................................................................................................... 3
System Requirements .................................................................................................... 3
Function Overview ......................................................................................................... 4
A. Live View ........................................................................................................ 4
B. Event Management ........................................................................................ 6
C. Note Management ......................................................................................... 7
D. Face Enrollment ............................................................................................. 8
E. Visitor Management .................................................................................... 10
F. Notification .................................................................................................. 10
G. Creating Groups ........................................................................................... 12
H. Creating Location ......................................................................................... 13
I. Reporting ...................................................................................................... 14
J. Report Scheduling ........................................................................................ 15
K. User Permission ........................................................................................... 17
L. Mobile App ................................................................................................... 18
Setting .......................................................................................................................... 19
A. Log-in ............................................................................................................ 19
B. MGB Server Setting ...................................................................................... 19
C. Email Server Setting ..................................................................................... 20
D. Capacity Cleaning ......................................................................................... 20
1
Page 3

www.acti.com
E. Advance ........................................................................................................ 21
2
Page 4

www.acti.com
Preface
Trademark
All product names mentioned in this documentation are registered trademarks of
their respective companies.
Liability
Every reasonable care has been taken during the writing of this manual. Please
inform your local office if you find any inaccuracies or omissions. We cannot be held
responsible for any typographical or technical errors and reserve the right to make
changes to the product and manuals without prior notice.
System Requirements
When using the Attention List Server (ALS) on other computers, take note of the
following minimum system requirements:
CPU Recommendation: Intel Core i5-6500TE, 8GB RAM
Operating System: 32/64 bit Windows 7 Embedded, Windows 8, Windows 10
Network: Ethernet 1000 Base-T recommended
Storage: SSD 128 GB
3
Page 5
www.acti.com
Icon
Description
Select from user defined location
Select from user defined camera
Detection list of unknown face
Detection list of known face (see Pic2)
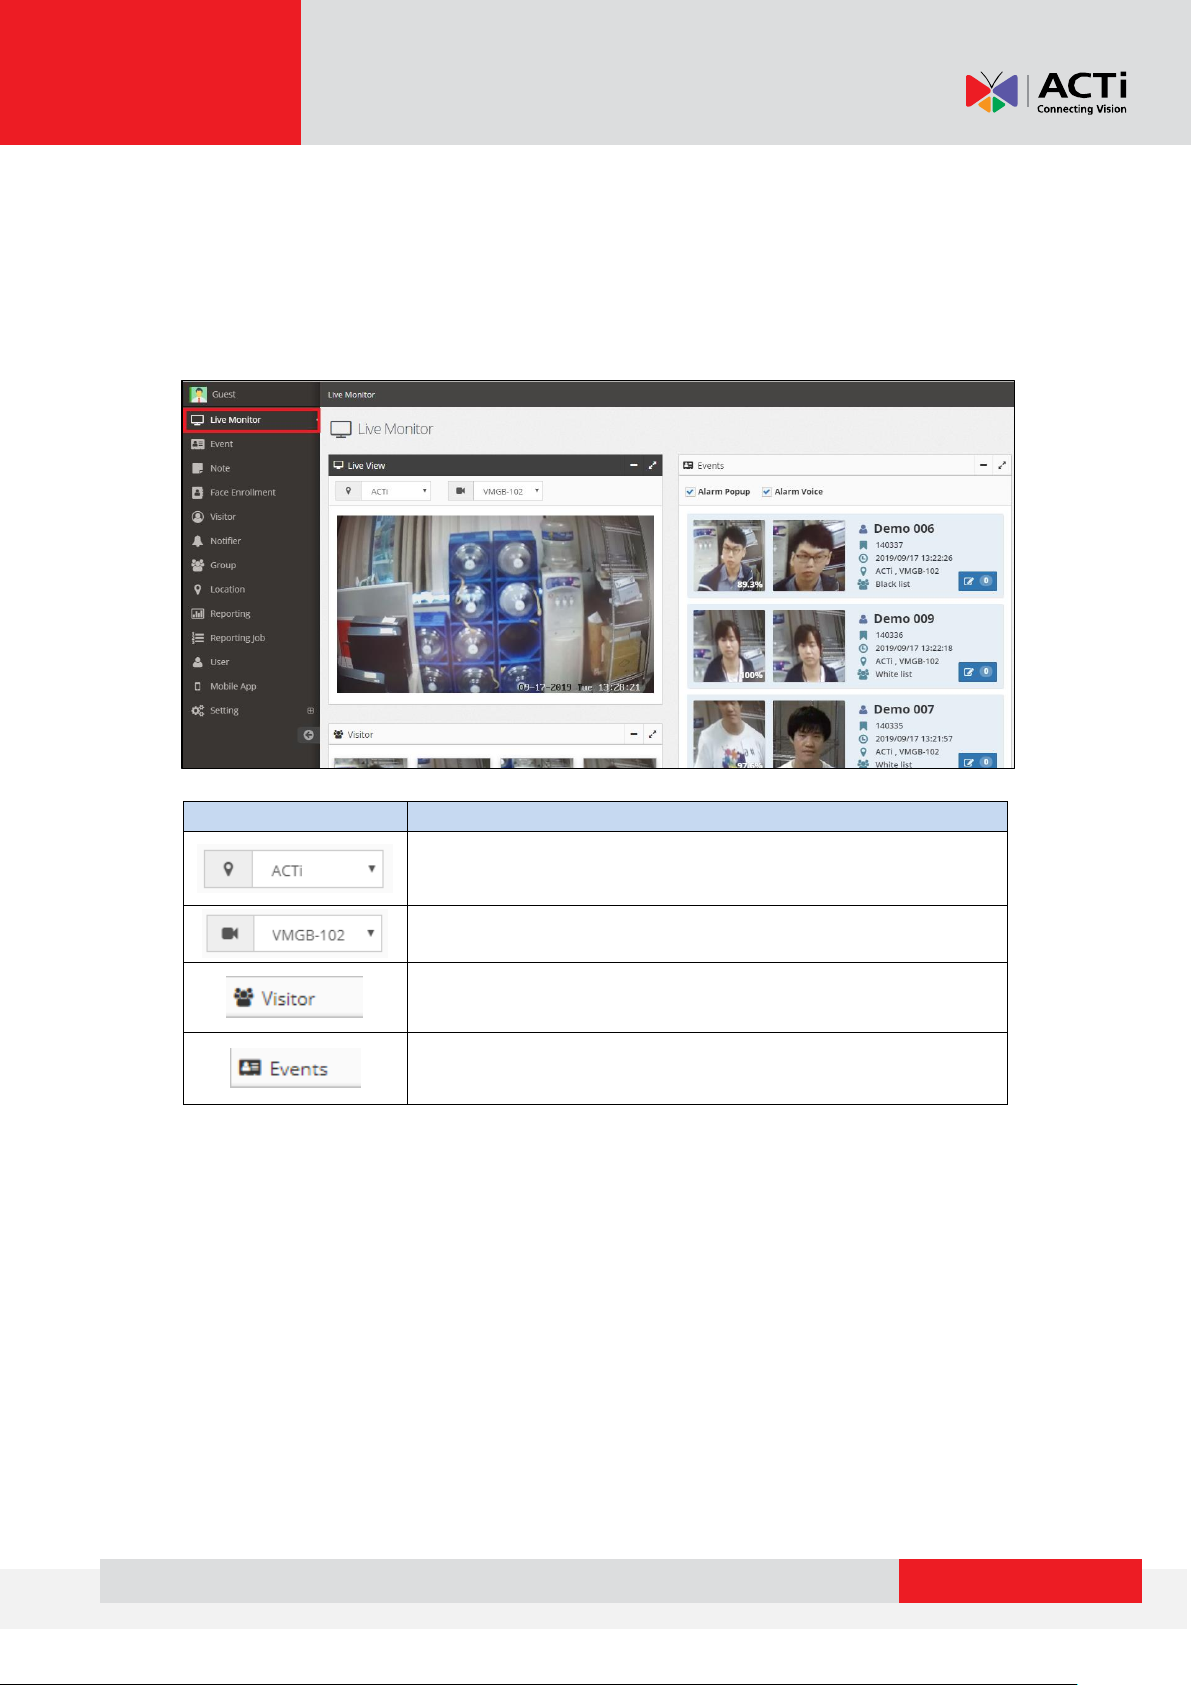
Function Overview
A. Live View
Enter the home page, you can find the function list on the left side and live view is in
the middle of the page.
4
Page 6
www.acti.com
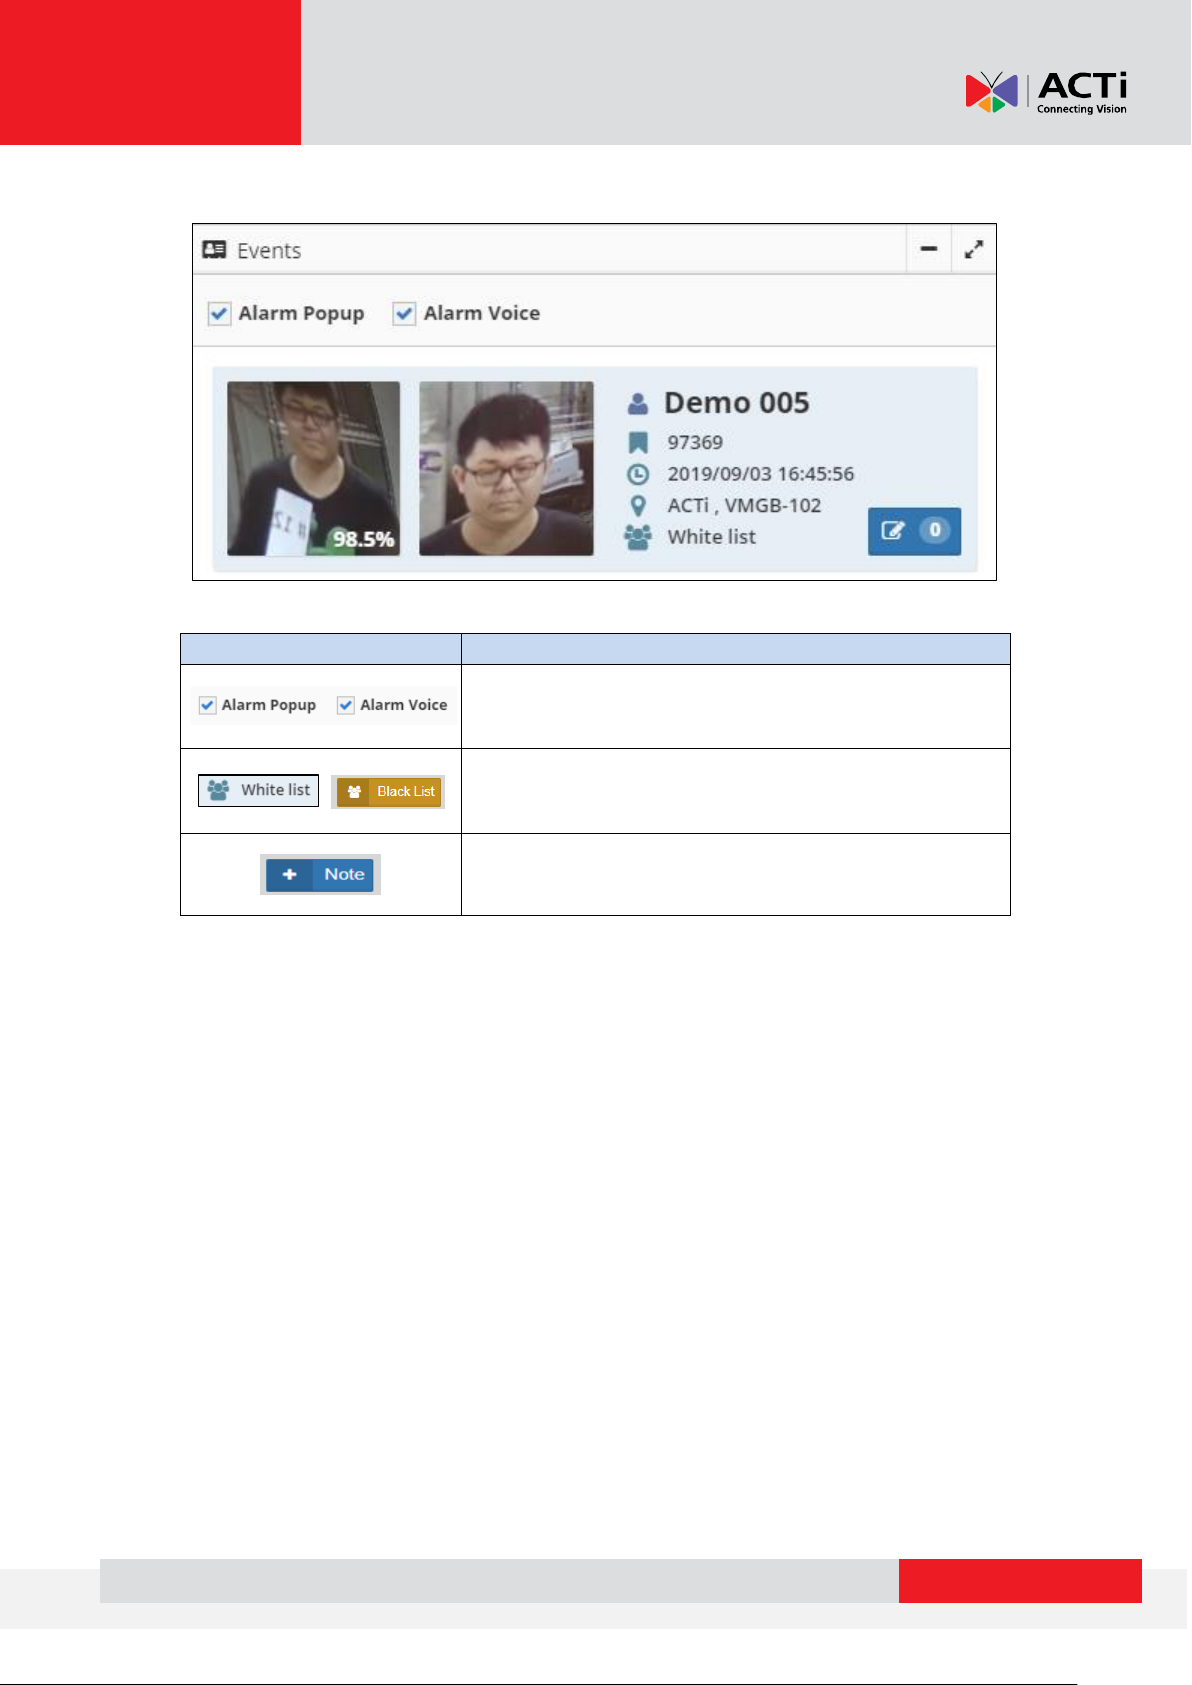
Icon
Description
Click the box to enable push notification and
notification sound.
User can directly identify the face as either White List
or Black List
User can add any note as a notification/ action
required
Sample of event as below.
5
Page 7
www.acti.com
Icon
Description
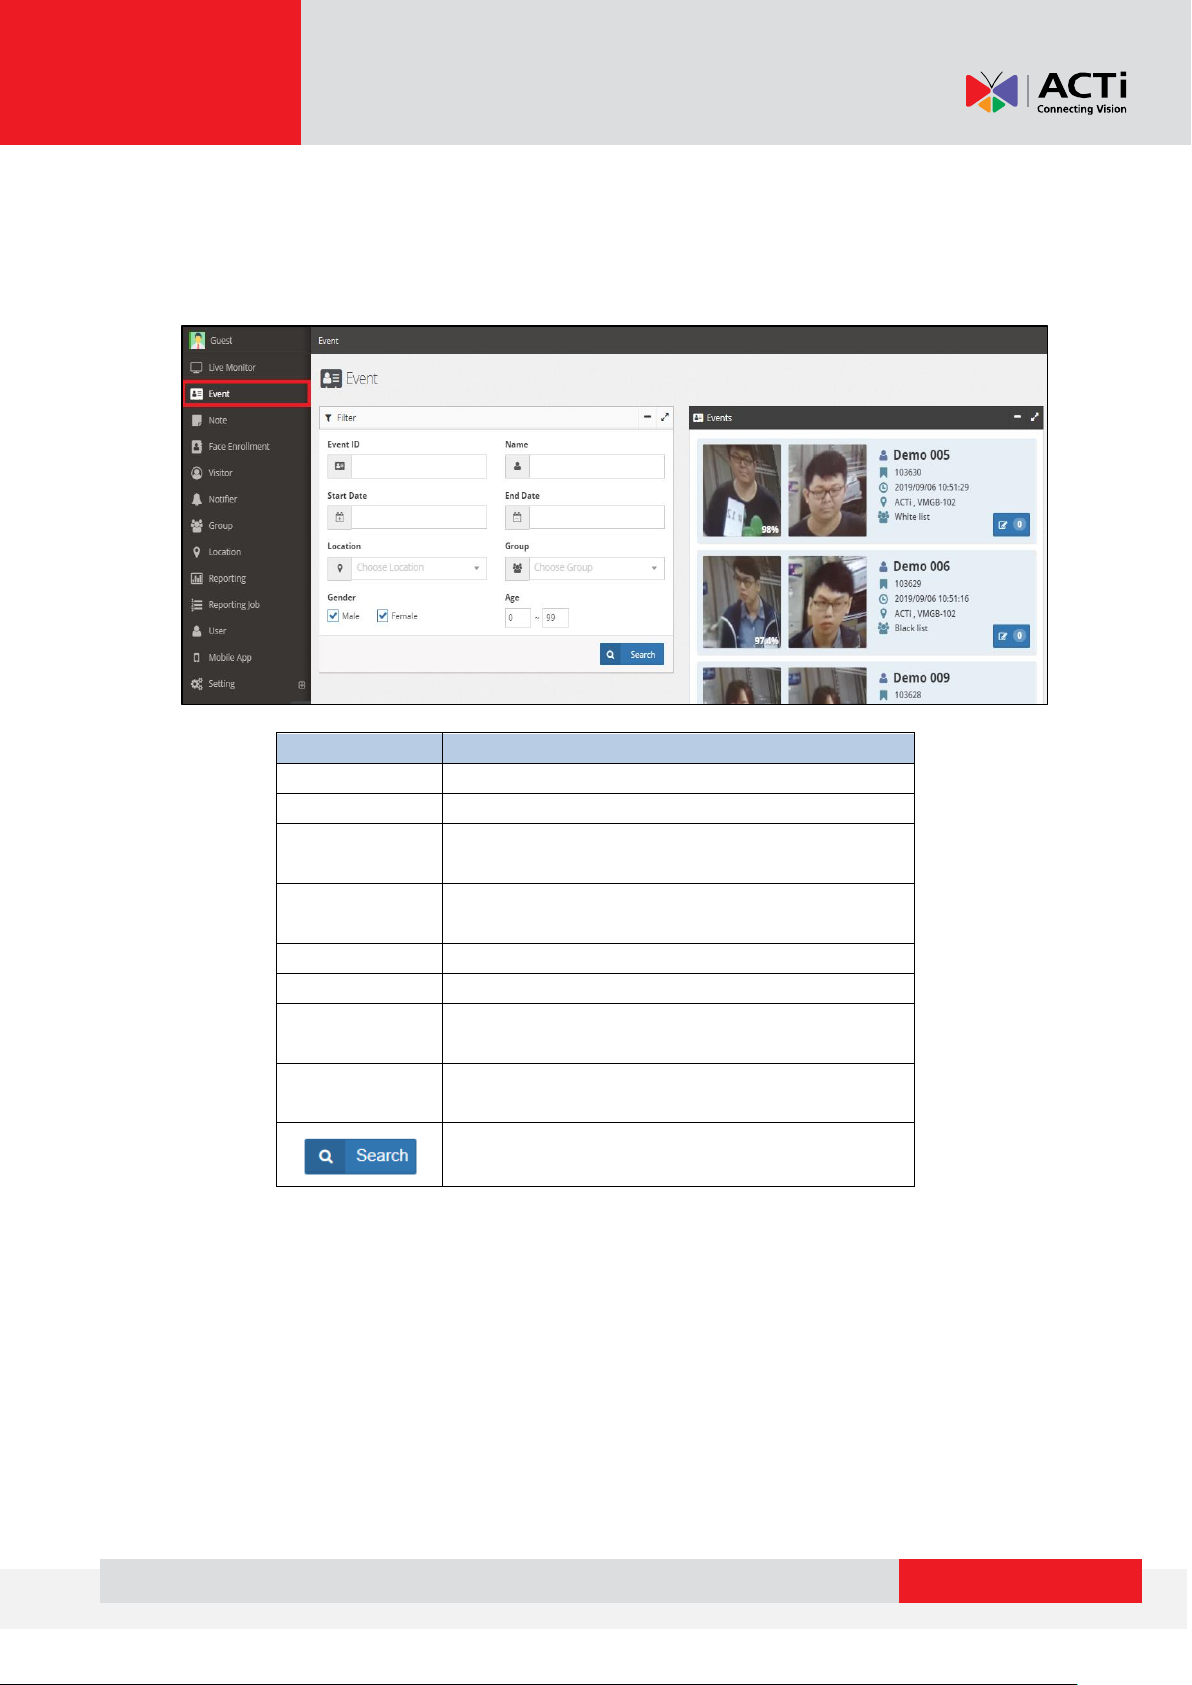
Event ID
Enter the event to search the target
Name
Search the target according to the name
Location
Select the target location from the drop down
menu
Group
Select the target group from the drop down
menu
Start Date
Set the starting date to search
End Date
Set the ending date to search
Gender
If your device has Gender detection function,
you can check the gender preference here.
Age
Range of age can be set when the detection
device has an age recognition function
Click Search to start sorting
B. Event Management
User can easily search the related data by using filter, and output the information
that could smart track the face. Filter functions as below:
6
Page 8

www.acti.com
Icon
Description
Event ID
Enter the target event to search
Name
Enter the target name to search
Location
Select the target location from the drop down
menu
Group
Select the target group from the drop down
menu
Start Date
Set the starting date to search
End Date
Set the ending date to search
Click Search to start sorting
C. Note Management
Enter the correct Event ID or related information of the person in these filters. The
user can easily find the note by each target. Therefore, go through this note for
necessary actions or other request.
7
Page 9

www.acti.com
Icon
Description
Create the face
Enter the name to search the
target.
D. Face Enrollment
In order to recognize the black list or VIP, the user needs to finish Face enrollment
first.
Follow the steps below to do face enrollment:
Click to enter the registration page. You need to type the face
information such as name/ group. There are two ways of adding a face.
1. Click to upload the photo of the target member, and fill out the
member information in order for the system to get the correct data. Then,
follow the progress bar sequentially.
8
Page 10

www.acti.com
2. User can also do face enrollment by selecting from an existing list. Click
to find the face from the detected list and add the unknown
member to the database. Then, follow the progress bar sequentially.
9
Page 11

www.acti.com
E. Visitor Management
Use the filter to get the necessary information from the visitor list. The Manager can
easily track unknown people from time to location.
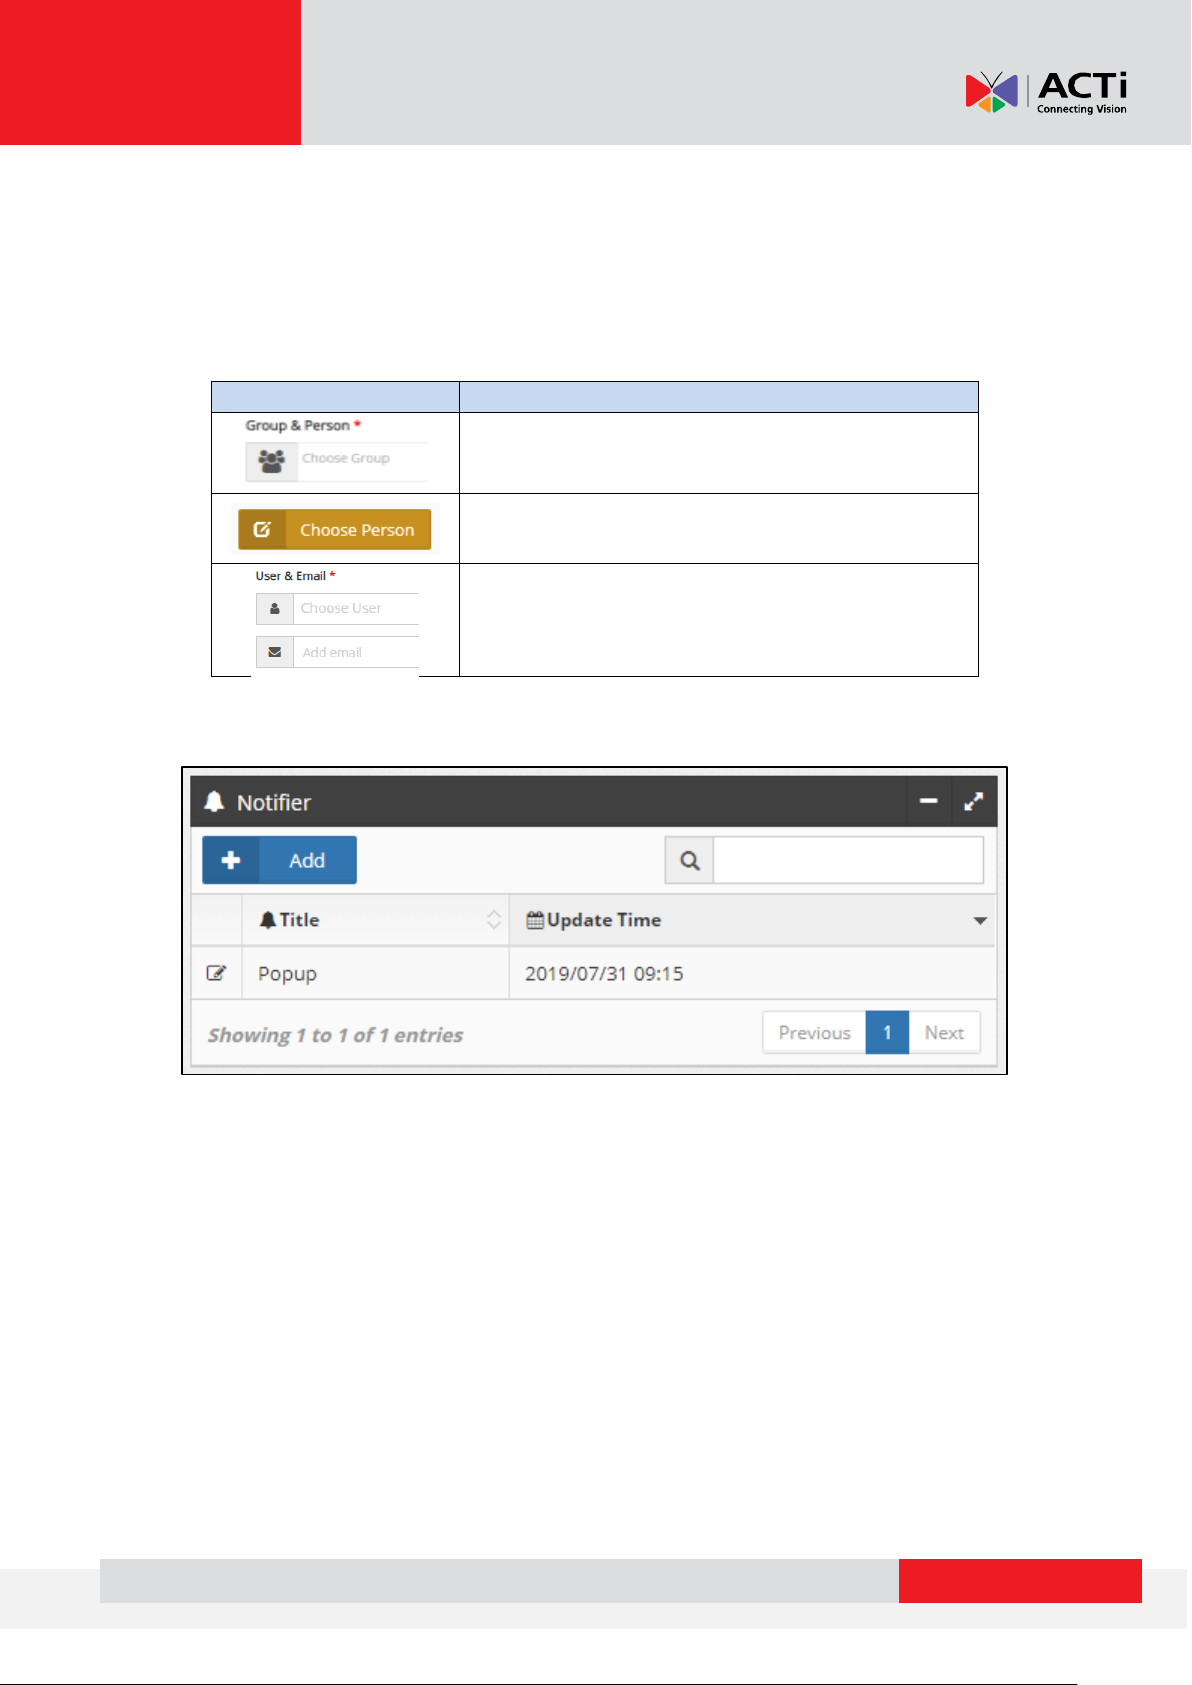
F. Notification
Notification rule can be adjusted from this page. The system provides three
notification methods to notify the manager. Click to start.
10
Page 12
www.acti.com
Icon
Description
Select a defined group from the drop down menu
Choose the face from the known list.
Select the notification recipient from the drop
down menu
The title can be customized. Select the notification mode. The system supports
notification methods by Email, Mobile push, and alarm popup.
Next, choose a specific person or a group that needs to be identified. Thus, the
system will automatically send out a notification once the specific group of people
is recognized.
After finishing the rule setting, it will show the page as below. You can edit it at any
time.
11
Page 13

www.acti.com
G. Creating Groups
Click to define a group. Samples are provided for editing.
12
Page 14

www.acti.com
H. Creating Location
Click to define the group. A sample is provided below. At the time of
writing this documentation, the integration between camera and MGB server is
bundled. This setting method will be introduced in the “Setting” chapter.
13
Page 15

www.acti.com
I. Reporting
Reports can be generated according to different preferences. The relation can be set
as events by group or from a location; it can even be scheduled through time
interval.
Choose the relationship of the parameters which the user needs to know, select from
the drop-down menu.
Based on the following pictures, the user can check the data from a specific interval
and location. Click on “Generate Report” for preview. Then, press “Export” to
download. Currently, the report format can be exported as Excel, CSV.
14
Page 16

www.acti.com
A
J. Report Scheduling
You can also set the report schedule.
(A) Click on “Reportingjob”. Then, click to edit page 1.
(B) Enter the related data which include the title/ location ... Click “Next” to go to
page 2.
15
Page 17

www.acti.com
(C) On page 2, keep typing the requested data such as the receiver who can get
report on a pre-set time especially the sending frequency and exported time.
After the settings are done, click “Create”. The system will automatically send the
report by following the rule.
16
Page 18

www.acti.com
K. User Permission
The user can define the different permissions to different managers.
Click to edit the page, enter the account and password (at least 6
characters) and related information (Pic 16). Follow the progress bar to fill out the
profile. Meanwhile, you can define the permission for each manager you have
previously added, like in Pic 17 which includes “Read”, “Create”, “Edit” and “Delete”.
The access level can be modified by the super admin or who has been permitted.
17
Page 19

www.acti.com
L. Mobile App
According to your mobile device’s operating system, you can click and download the
mobile application (APP). A push notification will be sent to your mobile phone
immediately during personnel entry or exit event.
18
Page 20

www.acti.com
Setting
A. Log-in
Going to Attention List Server webpage (using the domain IP address), enter your
account and password (at least 6 characters).
B. MGB Server Setting
Click “MGB Server” to enter the MGB server setting page. From the time this
documentation is written, there is one default MGB server bundled with ALS-100,
and the settings have already been done before shipping.
If the user needs to add extra MGB servers, just click and fill out the
corresponding IP address and port number for connection.
19
Page 21

www.acti.com
C. Email Server Setting
In order to send Email notification to manager, user has to set the Email server.
Enter this page and fill out the server related information which includes sender
name, SMTP and SMTP port. By default, Gmail has already been added as it is a
common email server being used in general.
D. Capacity Cleaning
Enter this page under “Setting”, you can set a regular time to clean database via rule
setting in order to keep the storage in sufficient capacity.
You can individually select the days according to event or visitor base. If you do not
need this function, set “0” then the notification will be sent until the database is full.
20
Page 22

www.acti.com
E. Advance
Enter the corresponding system domain on this page.
21
 Loading...