

Page 1

ACTi ALPR Server 1
User’s Manual
Version 1.0.1
2014/10/06
o
Page 2

www.acti.com
ACTi ALPR Server 1 User’s Manual
Important Notice
Tip
The content within this box is a tip. A tip gives you an alternative method to easily or quickly
achieve an objective, usually for specific conditions.
The content within this box is an important notice. This notice is important for you to get
certain functions to work properly, or to prevent from certain potential problems that may
damage your system. Make sure you read this notice and follow the instructions.
Note
The content within this box is a note. A note is some necessary information you need to know
about the action you are currently taking, like what will happen after you follow or don’t follow
certain procedure.
About This Manual
Conventions Used in This Manual
The following are typographic conventions used in this manual:
Bold: Bold typeface is used for a keyword, major functions of ACTi ALPR Server 1, or a title
of a section/column.
Italic: Italic typeface is used for a filename or location path.
Underlined: Underlined typeface is used for a document name or hyperlink.
“Bold”: Bold interface enclosed in double quotation marks indicates the name of a button, a
menu or a choice item.
Some notices are placed within the following boxes; each type of the box indicates different
purposes or levels of importance for system:
2
Page 3

www.acti.com
ACTi ALPR Server 1 User’s Manual
Table of Contents
1 About This Manual 2
Conventions Used in This Manual .................................................. 2
2 Legal Notice 5
Disclaimer ......................................................................................... 5
Copyright ........................................................................................... 5
Trademarks ....................................................................................... 5
3 Introduction 6
Product Overview ............................................................................. 6
System Architecture ......................................................................... 6
PC Hardware Requirements ............................................................ 7
4 Getting Started 8
Pre-requisites .................................................................................... 8
Installing the Program ...................................................................... 8
License and Activation ................................................................... 11
Online Activation .......................................................................... 11
Offline Activation .......................................................................... 12
Step-by-step Activation Process .................................................. 12
Online Activation SOP 12
Offline Activation SOP 13
Verify Your License ...................................................................... 14
Camera Installation ......................................................................... 15
5 Setup Analysis Rules 16
Add Video Source ........................................................................... 17
Add Channels .................................................................................. 21
3
Page 4

www.acti.com
ACTi ALPR Server 1 User’s Manual
Create an Analysis Rule ................................................................. 23
Accessing New Analysis Window ................................................. 23
Live View Analysis 23
Playback Analysis 24
New Analysis Window UI Introduction .......................................... 26
License Plate Recognition Algorithm Setup ................................. 26
Stop (Cancel) an Analysis Rule ..................................................... 30
6 Monitoring 31
Display Detection Indicators.......................................................... 31
Display Latest Recognition Results .............................................. 32
7 Analysis Results 33
Search Results by Filters ............................................................... 34
ALPR Results by Time Period ...................................................... 34
ALPR Results by License Plate Number ...................................... 35
ALPR Results by Car Color .......................................................... 35
View Multiple ALPR Analysis Results ........................................... 36
Watch Analysis Playback ............................................................... 37
Player Window Control Buttons ................................................... 38
Export Search Result ..................................................................... 39
Delete an Analysis Rule ................................................................. 40
4
Page 5

www.acti.com
ACTi ALPR Server 1 User’s Manual
Legal Notice
Disclaimer
The information contained in this document is intended for general information purposes.
ACTi Corporation shall not be liable for errors contained herein or for incidental or
consequential damages arising from the furnishing, performance, or use of this manual.
The information contained herein is subject to change without notice.
The English version of this document is the official one for all purpose. All the translated
versions are provided as a convenience. Any discrepancies or differences created in the
translations of any other languages are not legally binding.
Copyright
Copyright ©2014 ACTi Corporation All Rights Reserved.
Trademarks
ACTi Connecting Vision and its logo are registered trademarks of ACTi
Corporation.
Microsoft® and Windows® are registered trademarks of Microsoft Corporation.
All other product or company names mentioned in this document may be trademarks or
registered trademarks of their respective owners.
5
Page 6
www.acti.com
ACTi ALPR Server 1 User’s Manual
Software
NVR Server
Standalone
NVR Server
ALPR Server 1
General
User
Internet
IP Cameras
IP Cameras
IP Cameras
Live View
Playback
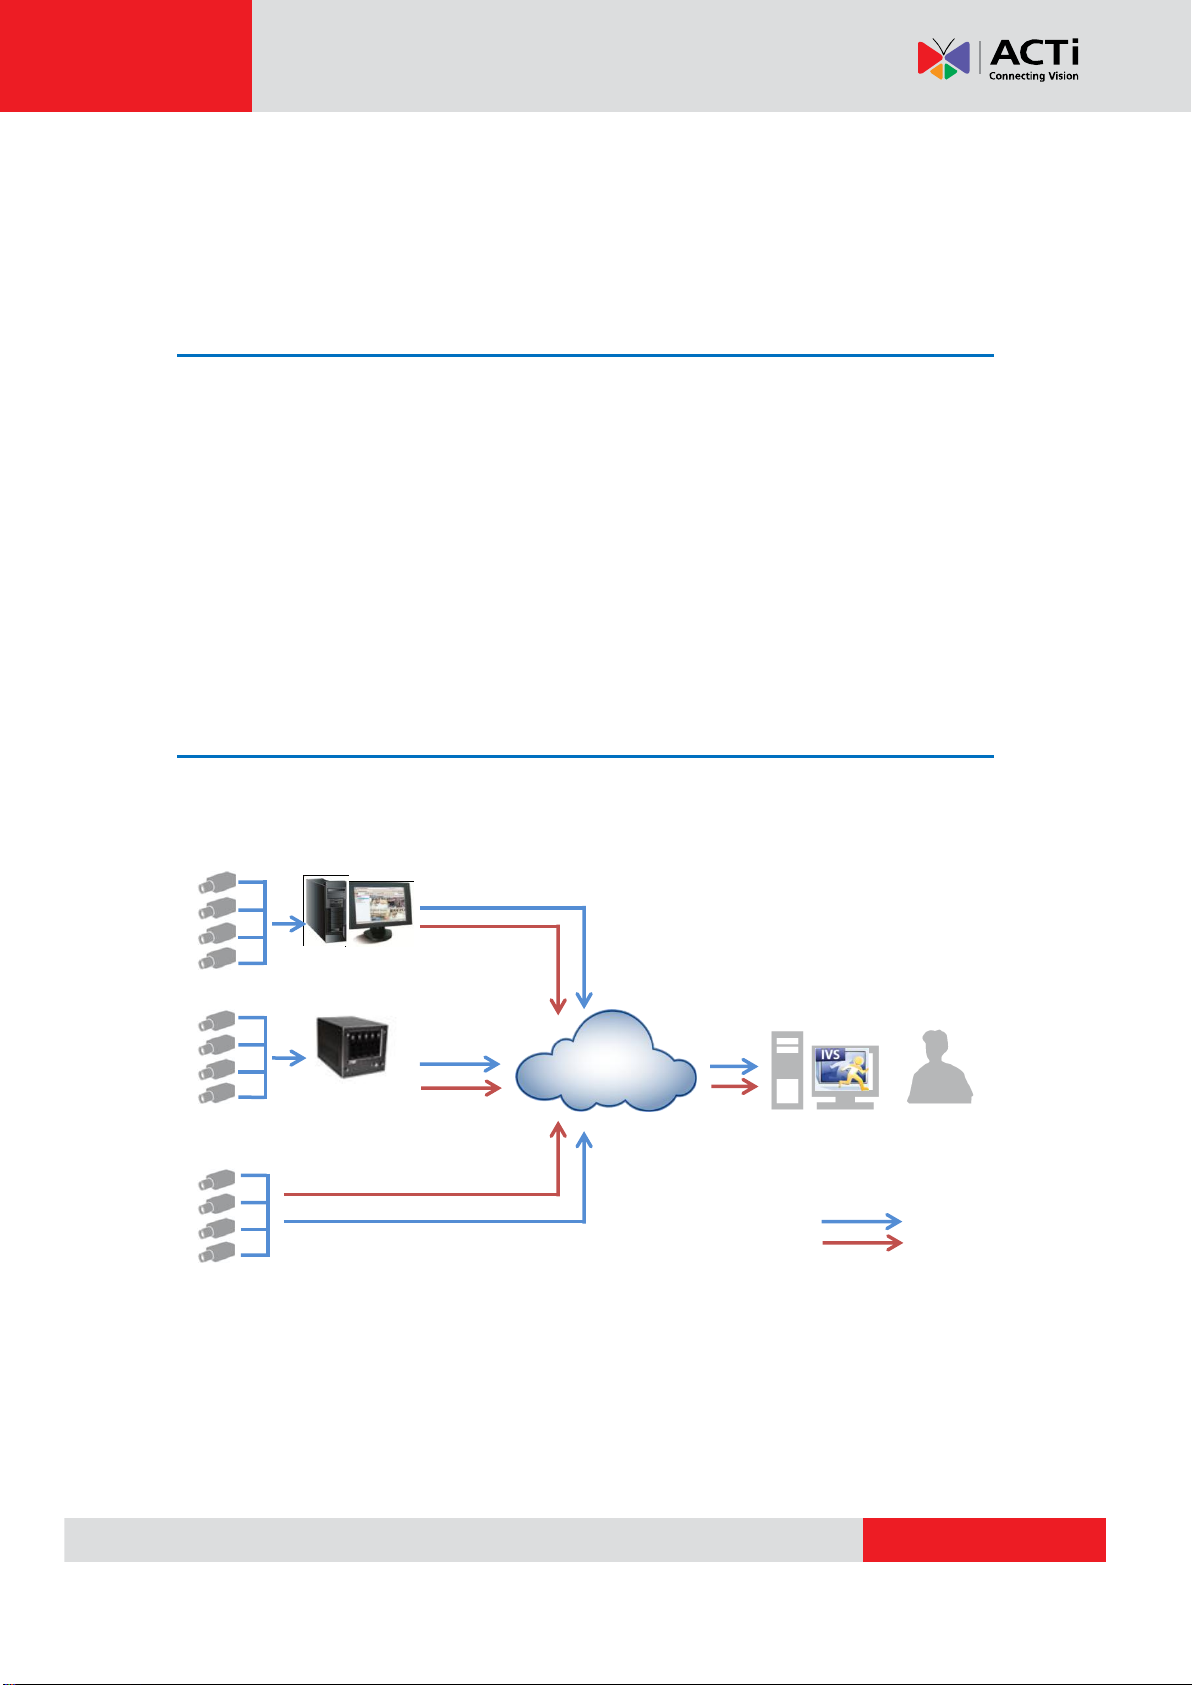
Introduction
Product Overview
Applying Automatic License Plate Recognition (ALPR) technology, ACTi now helps you build a
smarter surveillance system. ACTi ALPR Server 1 is a video analytics software designed to
detect and recognize vehicle license plates. This software is able to automatically locate and
read license plates appearing in a certain area to provide efficiency in parking and traffic
control, as well as law enforcement. Once a license plate is recognized, users can browse
through them to play back footages or export the footages to use as evidence or future
references.
System Architecture
The service architecture is described in the following figure:
6
Page 7

www.acti.com
ACTi ALPR Server 1 User’s Manual
PC Spec
Recommended
CPU
Intel Core i7 Processor
RAM
4GB 1
Operation System
Windows 7, Windows 8 2
Screen Resolution
800x600
Network
Ethernet 1000 Base-T
PC Hardware Requirements
The performance of live display quality is largely determined by the computer hardware
capability and the number of live channels. The table below provides basic guidelines for
selecting proper hardware for the computer that installs ACTi ALPR Server 1.
1
Please use 64-bit system if your computer has more than 4GB RAM. Windows operating
system has limits on memory and address space regardless of the real or virtual memory
available on a particular computer. Take Windows 7 Professional for example, the maximum
physical memory for a 32-bit(X86) system can address is 3.5 GB even though 16 GB of RAM
has been installed on this computer. Therefore, if you consider increasing the computer’s
multi-tasking capability by adding more RAM, you will need a 64-bit version of Windows to take
advantage of it all.
Please visit the link below for more memory limitations on various Windows platforms.
http://msdn.microsoft.com/en-us/library/aa366778%28VS.85%29.aspx#physical_memory_limi
ts_windows_7
Besides the limitation mentioned above, you may find the usable memory of your computer
displayed here: Computer Properties is still less than actual installed memory.
This is a common symptoms of all Windows platforms, please find explanations and solutions
in this Windows official support document http://support.microsoft.com/kb/978610/en-us and
http://windows.microsoft.com/en-us/windows7/taking-the-mystery-out-of-64-bit-windows
2
Please make sure your operation system is fully patched with the latest service packs.
7
Page 8
www.acti.com
ACTi ALPR Server 1 User’s Manual
Getting Started
Pre-requisites
Before installing ACTi ALPR Server 1, please make sure the pre-requisites below are fulfilled:
1. Ensure that your computer meets the minimum system requirements.
2. Ensure that your computer has a C Drive.
3. Ensure that you have enough storage space on your computer to save video
recordings of recognized license plates.
Installing the Program
The program installation can be simple and intuitive by following the installation wizard’s
instructions. The program can be used right after installation is completed, without the need to
restart the computer.
To install the software, follow the steps below:
1. Find the IVS Server 1 compressed file that you downloaded and extract it.
2. Execute the install shield application .
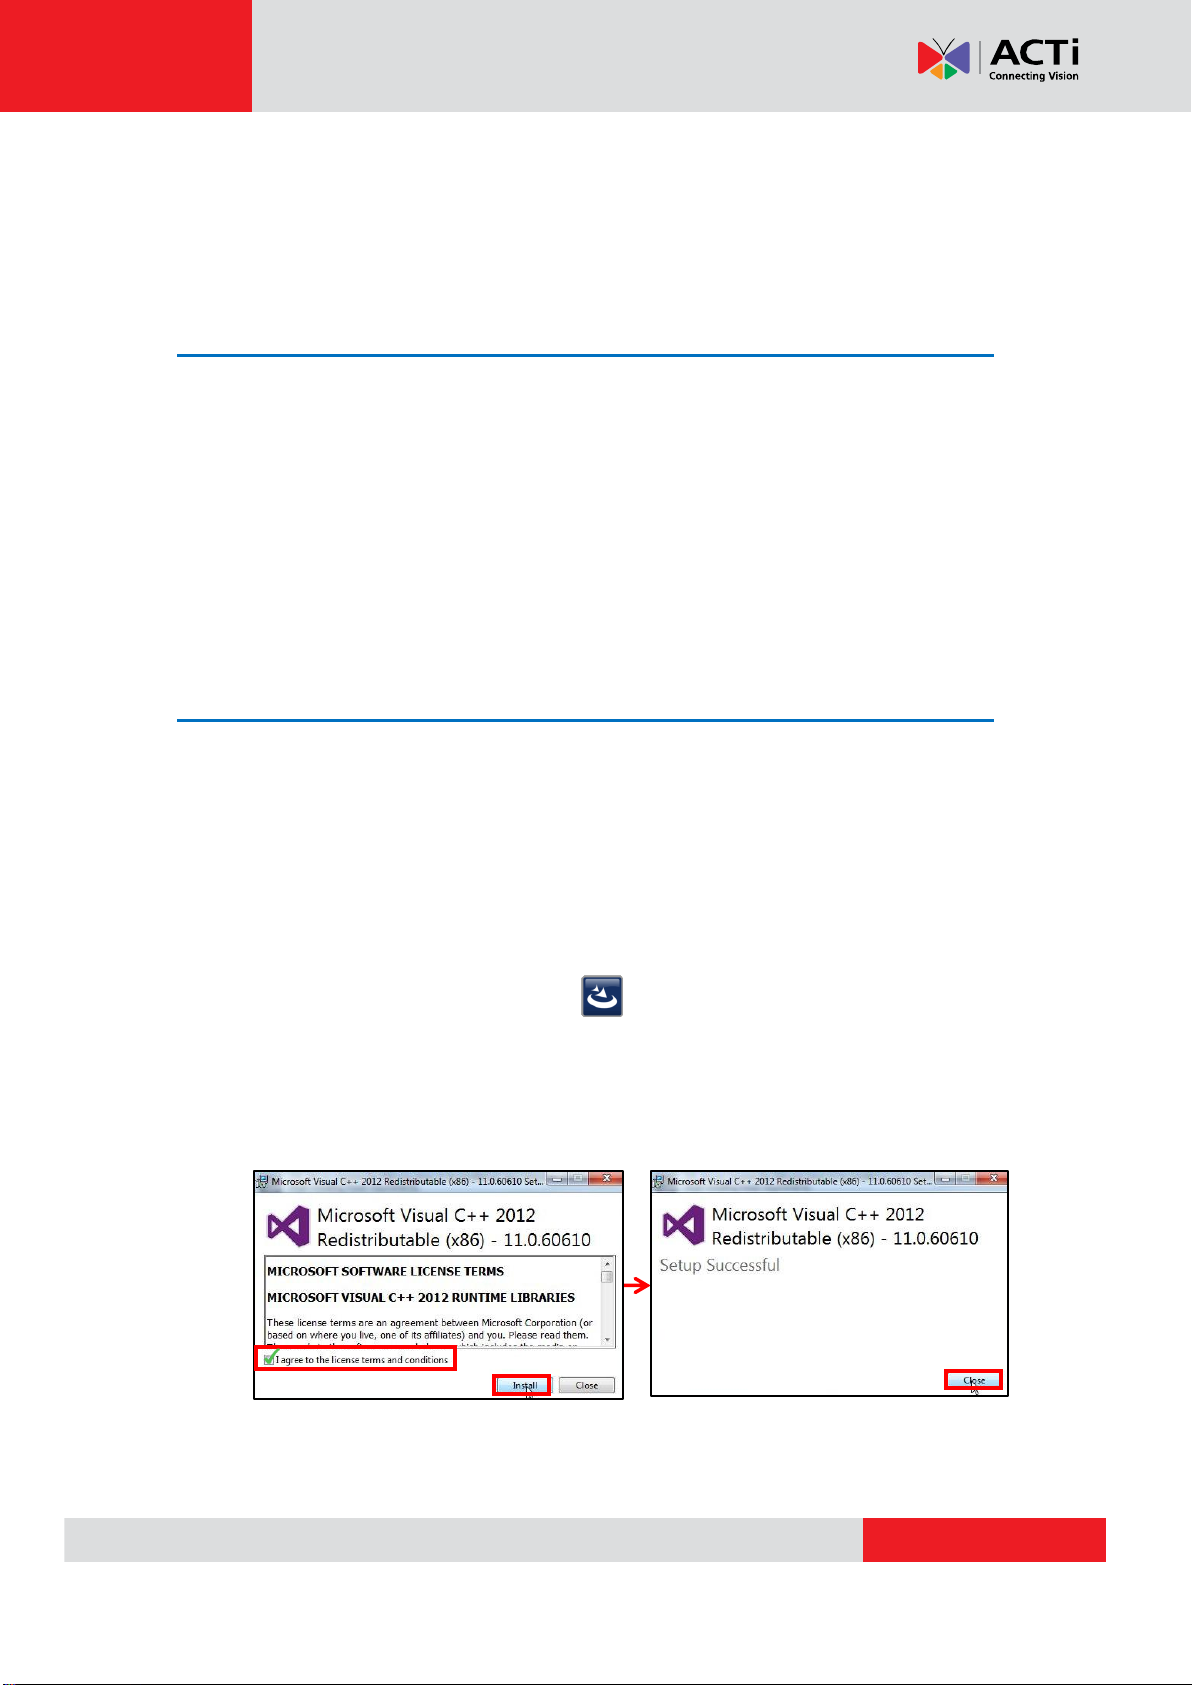
3. If prompted by the InstallShield Wizard to install Microsoft Visual C++ 2012
Redistributable Package, follow the on-screen instructions to do so, as it is crucial
for the proper functioning of the program.
8
Page 9
www.acti.com
ACTi ALPR Server 1 User’s Manual
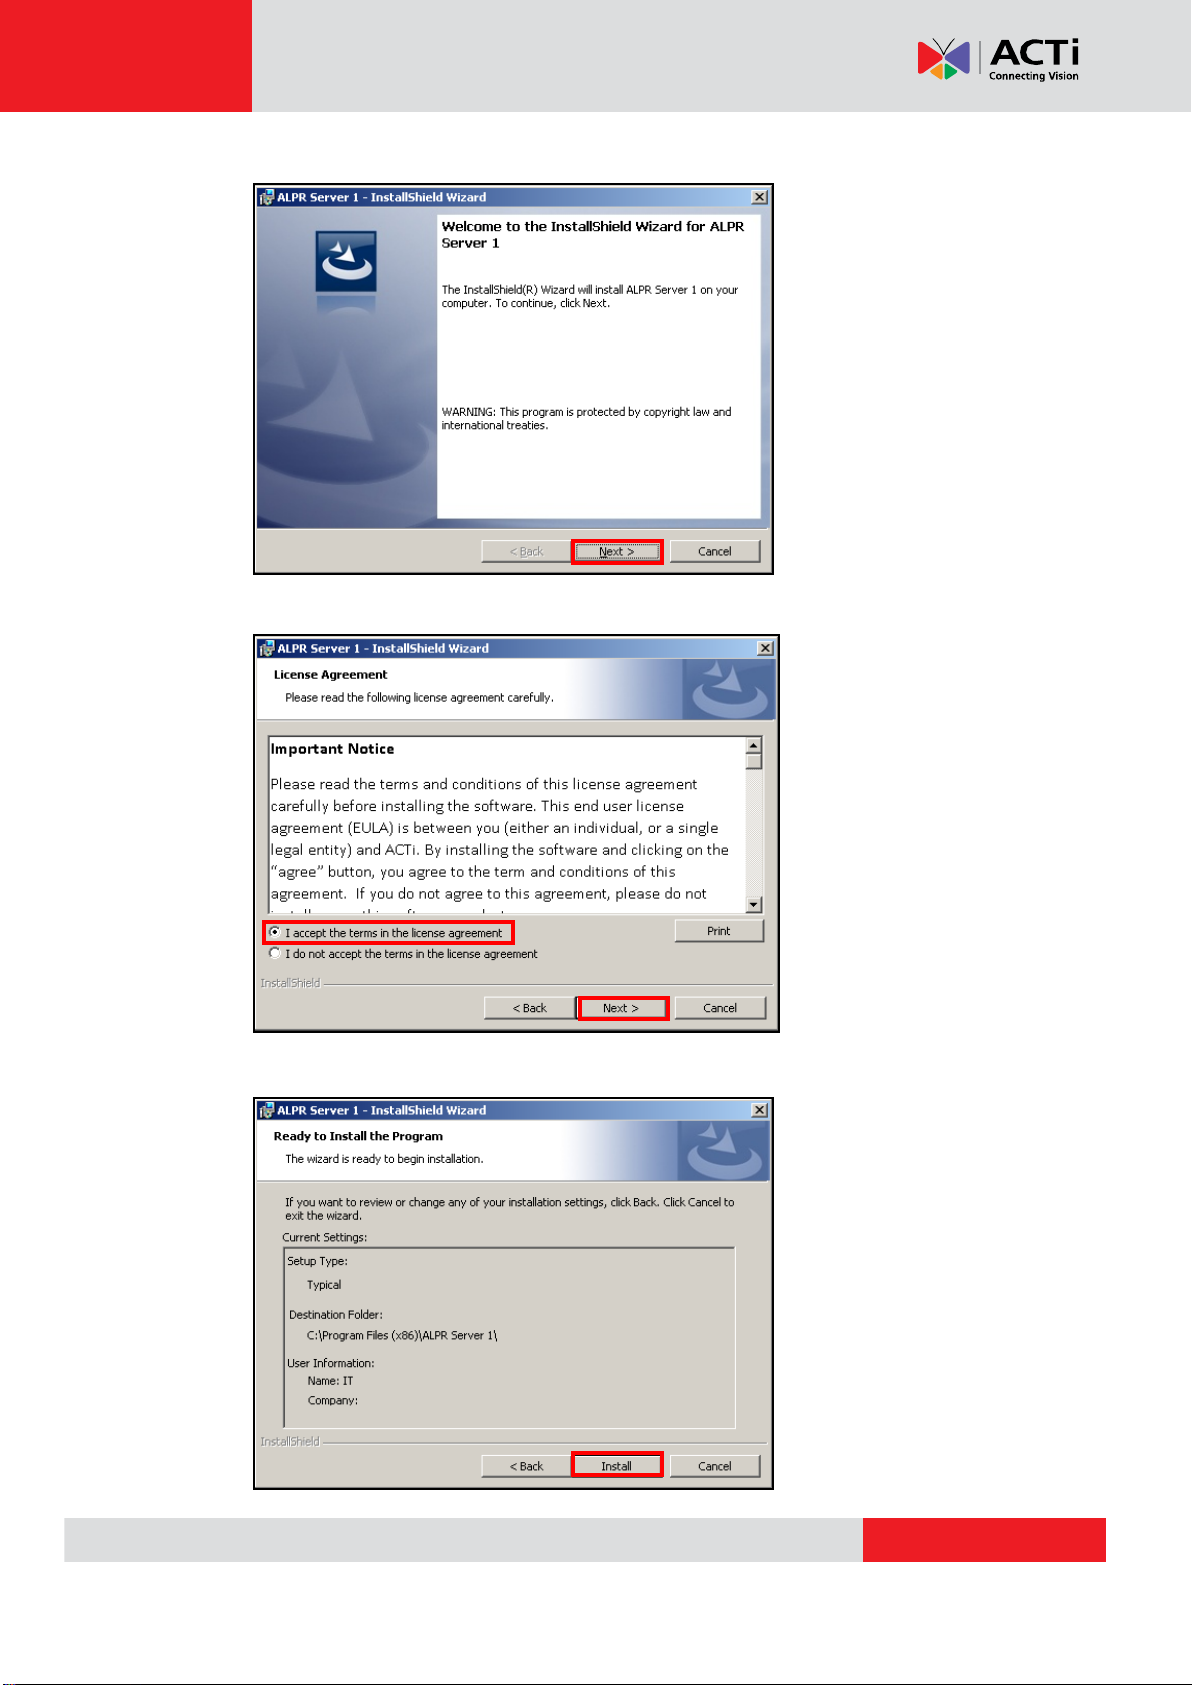
4. Proceed by following the on-screen instructions of the InstallShield Wizard.
5. Proceed by reading and agreeing to the license agreement and click “Next”.
6. Double-check your installation settings, and click “Install”.
9
Page 10
www.acti.com
ACTi ALPR Server 1 User’s Manual
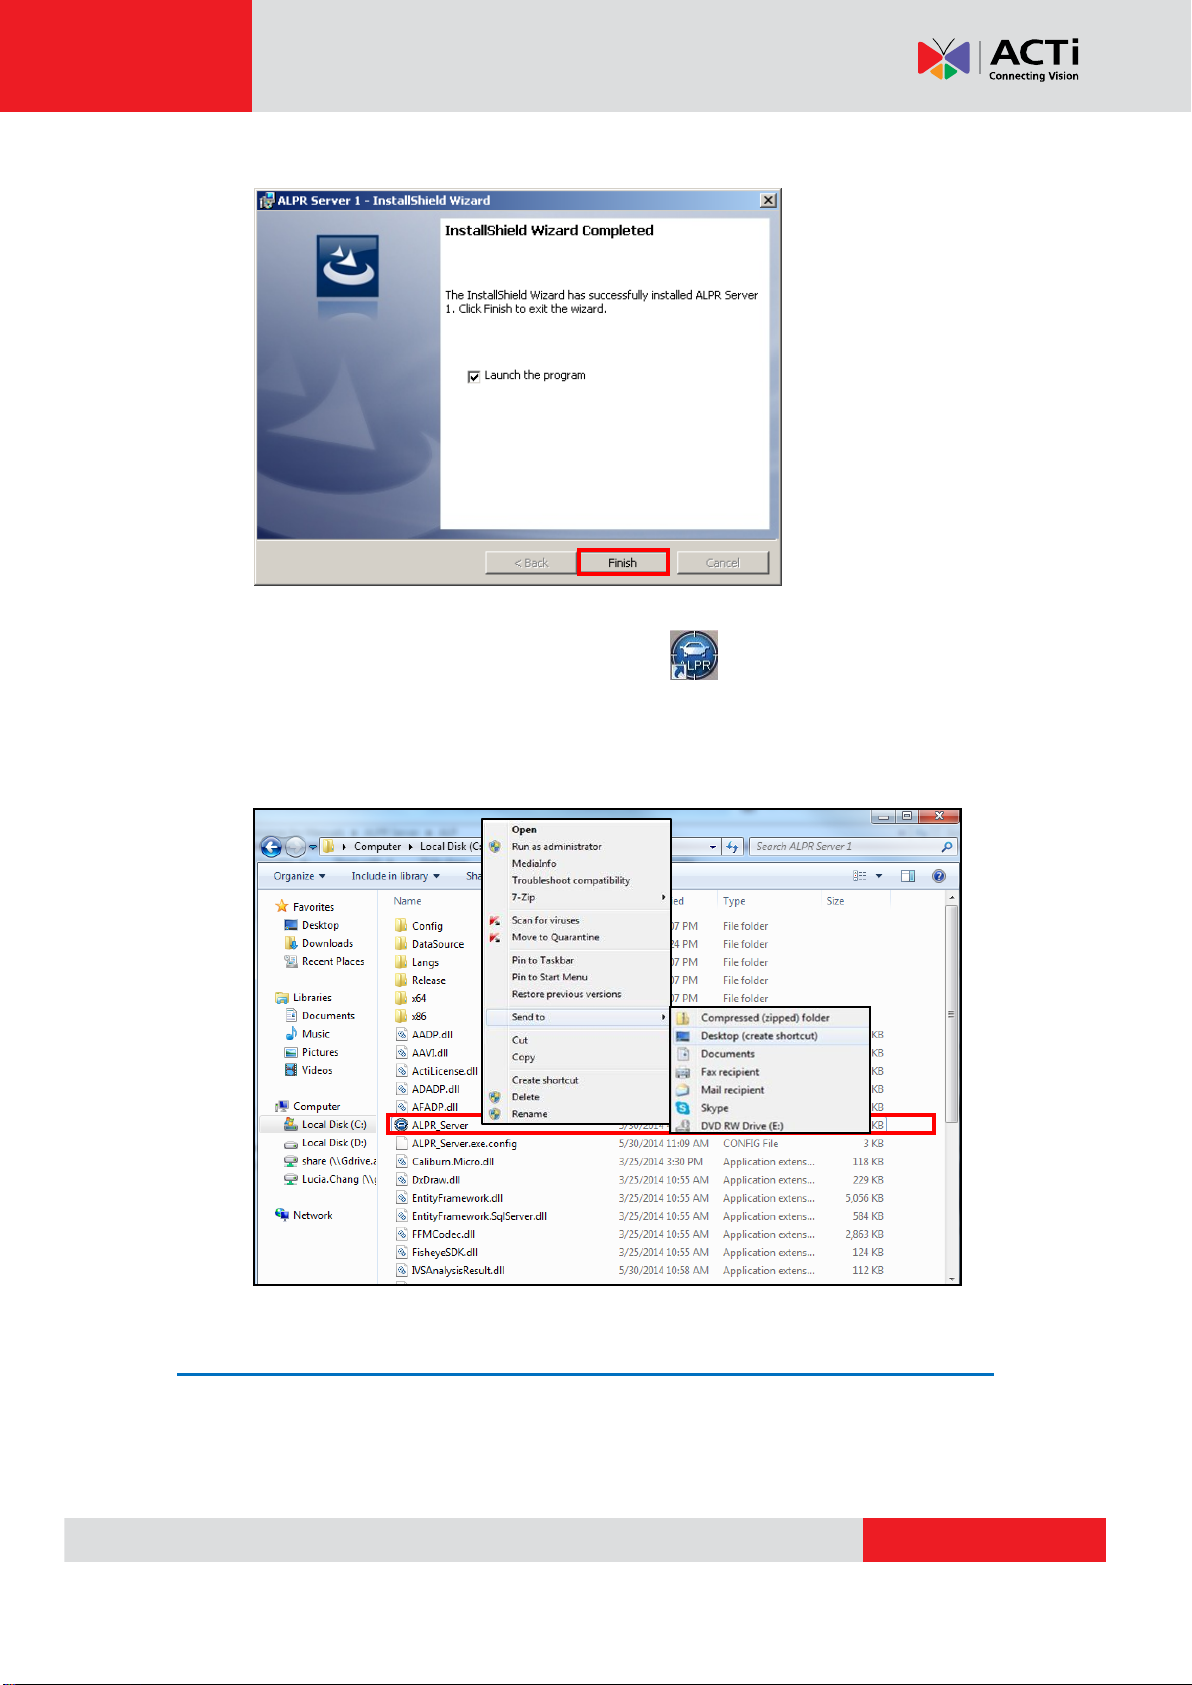
7. The installation process is done. Click “Finish”.
8. Open the file by clicking on the ALPR Server1 shortcut on your desktop. If you
can’t find a shortcut on your desktop, create your own shortcut by finding the
ALPR_Server file under C:\Program Files\ALPR Server 1, right click, select “Send
To”, and select “Desktop (create shortcut)”.
10
Page 11

www.acti.com
ACTi ALPR Server 1 User’s Manual
Purchase licenses
from ACTi, get the
L
L
L
I
I
I
C
C
C
E
E
E
N
N
N
S
S
S
E
E
E
K
K
K
E
E
E
Y
YY
On ALPR Server, input the
L
L
L
I
I
I
C
C
C
E
E
E
N
N
N
S
S
S
E
E
E
K
K
K
E
E
E
Y
Y
Y
to activate the
license directly.
1
2
ALPR server
(Internet access)
License and Activation
In the ALPR Server 1 system, your required number of channels should be licensed and
activated before connecting. License activation is the process of unlocking the channels on
ALPR Server with the received License Key. License Key is a serial number delivered as a
printed card or an E-mail after the purchase is carried out. After the license activation, the
channels on ALPR server will automatically become available.
During license activation, your License Key is matched against the MAC address of the
Network Interface Card (NIC) on NVR server computer. Once this license key is used by the
computer with given MAC, it cannot be activated with another MAC. This matching record will
be stored on the ACTi license data server. If your computer has more than one network cards,
NVR server will detect them and provide you a dropdown list to select from.
Please note:
The license is cumulative and perpetual.
The license is not version-specific, upgrading software version will not influence the
existing license(s) you have.
The maximum number of channels that can be managed by ALPR Server 1 is 4.
There are two ways to activate the licenses depending on your ALPR server network condition:
Online Activation and Offline Activation.
Online Activation
If your ALPR Server 1 computer has available Internet access, choose online activation.
11
Page 12

www.acti.com
ACTi ALPR Server 1 User’s Manual
Purchase licenses
from ACTi, get the
L
L
L
I
I
I
C
C
C
E
E
E
N
N
N
S
S
S
E
E
E
K
K
K
E
E
E
Y
YY
On another computer, access
ACTi website to activate the
licenses using the
L
L
L
I
I
I
C
C
C
E
E
E
N
N
N
S
S
S
E
E
E
K
K
K
E
E
E
Y
Y
Y
1
2
Load the
A
A
A
C
C
C
T
T
T
I
I
I
V
V
V
A
A
A
T
T
T
I
I
I
O
O
O
N
N
N
F
F
F
I
I
I
L
L
L
E
EE
into ALPR server
3
ALPR server
Computer
(Internet access)
Offline Activation
Offline activation does not require Internet access for ALPR server. It is used when ALPR is
located in a network not connected to public Internet (e.g. in a military base). You will need to
get an activation file from another computer and transfer it to the ALPR server computer.
Step-by-step Activation Process
Based on the network conditions of your site, follow Online Activation SOP or Offline Activation
SOP to activate your license.
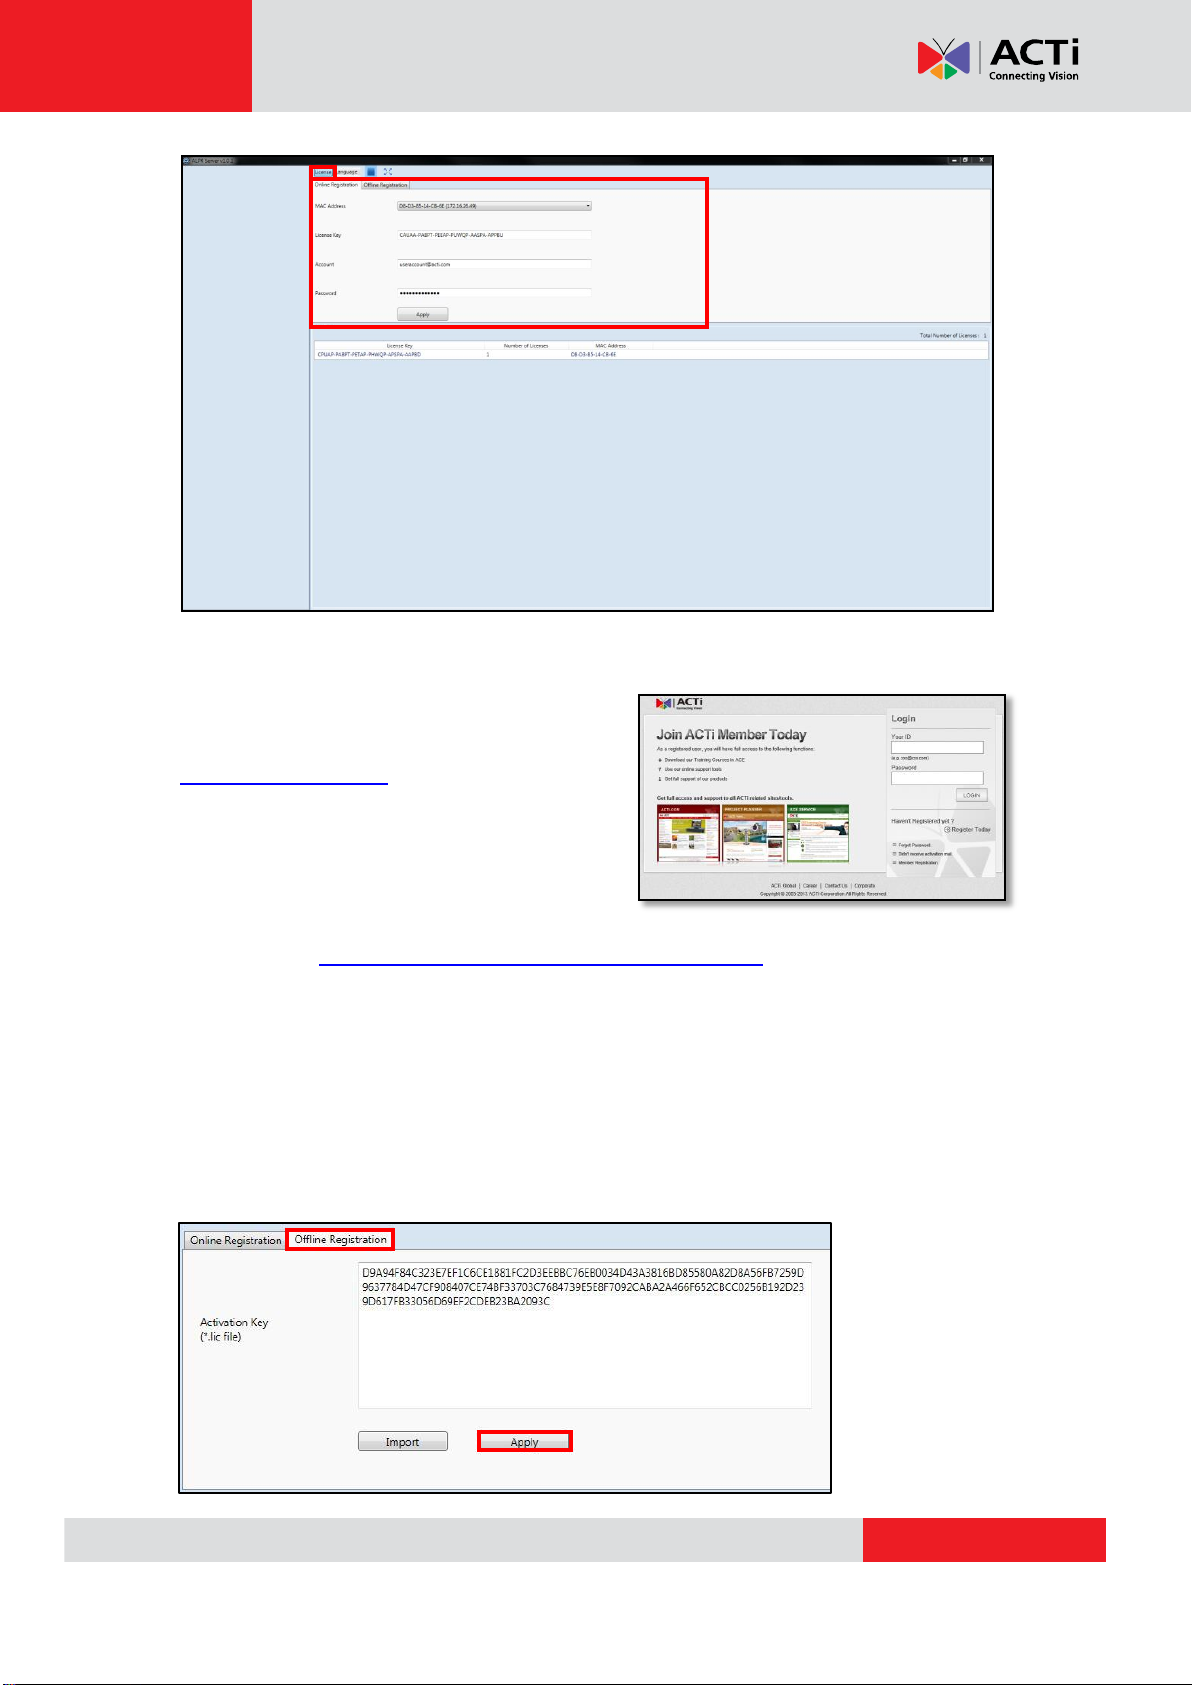
Online Activation SOP
Step 1
: Membership ID in ACTi Member
Center is required for activation. Register
one for free at http://member.acti.com/
Step 2
: Log in to ALPR Server, go to License tabOnline Registration tab. Select the MAC
Address, enter your License Key, ACTi member Account and Password, and then click
“Apply”. ALPR server will connect to the license data server via Internet to register the license
key, and unlock the channels.
12
Page 13
www.acti.com
Offline Activation SOP
ACTi ALPR Server 1 User’s Manual
Step 1
: Membership ID in ACTi Member Center
is required for activation. Register one for free at
http://member.acti.com/
Step 2
: Access http://www.acti.com/support/LicenseMgt/index.asp and select “ALPR
Server”. Enter the License Key and the MAC address of the ALPR Server 1 server
computer, click “Submit”.
An E-mail with activation code file (AUL.lic) will be sent to your registered E-mail account.
Step 3
: Log in IVS server from local or via web client. Go to License tab Offline
Registration tab click “Import” and upload the license file (AUL.lic). Click “Apply” to
activate this license.
13
Page 14

www.acti.com
ACTi ALPR Server 1 User’s Manual
The license data will be erased once ALPR Server 1 is uninstalled. Be sure to retain your license
key information in a safe place because you may need to reinstall the software. After the software is
uninstalled, you should contact ACTi Customer Help Desk http://www.acti.com/CHD to clear the
original registration data in our data server, and then you may activate the license again.
Tip
1. Click Windows Start, in the run box on Start menu, input “cmd”.
2. Execute the cmd program, and input the command “ipconfig /all” or “getmac”
3. The MAC address will be referred to as the Physical Address, made up of 12 characters
e.g. 00-1E-65-FE-8E-98
Important
Verify Your License
Once your license is successfully activated, the license information will be shown on License
page.
14
Page 15

www.acti.com
ACTi ALPR Server 1 User’s Manual
10° to 45°
Camera Installation
The precision of the ALPR Server 1’s recognition depends on many factors, including: the
image quality in the video, the pixels counts shown, user applications, camera installation,
etc… Below are a few guidelines to take into consideration when installing your camera
device:
1) Shooting Angle of the Camera: the shooting angle of the camera to the license
place should be between the ranges of 10° to 45°, as shown in the illustration below:
2) Frame Rate in the Video Stream: Your camera device’s frame rate should be set to
25FPS or 30FPS or higher
3) Shutter Speed: The shutter speed on your camera device should be faster than or
equal to 1/100 or 1/120 seconds
4) Shape of the License Plate: The shape of the license plate captured in your video
should be as similar to a rectangle as possible
5) Height of characters and distance between characters on license plate: When
captured by your camera device, the height of the characters should be taller than 40
pixels, and the distance between characters should be wider than 4 pixels.
6) Image Quality: Image quality is critical for the ALPR Server 1’s recognition function
to work properly. Please make sure the exposure, sharpness, and color presentation
of the image captured by your camera device is adequate.
15
Page 16

www.acti.com
ACTi ALPR Server 1 User’s Manual
Layout Selection Bar
Language Selector
5 4 1
2
Source List Window
Video Analysis Window
Channel
3
Setup Analysis Rules
In order to be able to apply ALPR technology to a video stream, two basic components are
needed: Video Sources and Analysis Rules. This chapter will guide you through everything
you need to know in order to have a video source, set up analysis rules, and apply them to
your video.
When you open your ACTi ALPR Server 1, you will see the following display:
1. Source List Window: All of your video sources are shown here, and can be managed from
here.
2. Video Analysis Window: This area can display your camera views. It can be composed of
1 or more channels.
3. Channel: Each channel displays a camera view.
4. Language Selector: Select the display language.
5. Layout Selection Bar: Choose from 4 layout styles, or expand to full screen.
16
Page 17

www.acti.com
ACTi ALPR Server 1 User’s Manual
Add Video Source
Now that you have your ACTi ALPR Server 1 open, you are ready to add some video sources
so that they can be analyzed!
Before adding a video source, make sure you have a working NVR Server or camera and
confirm its following properties: (1) IP Address, (2) HTTP Port, (3) Account Name and (4)
Password.
To add an NVR server as a video source, follow these steps:
1. Right-click on the Source List Window, and select “Add New NVR”.
2. After selecting “Add New NVR”, a popup window will appear as shown below.
17
Page 18

www.acti.com
Fill in the 4 marked fields that are required to communicate with the NVR Server: IP
Note
Once an NVR Server is added to the Video Source List, all devices that are on the
NVR Server will be added to the Video Source List. Please make sure the camera
view you want to analyze has already been added to the NVR Server.
Address, HTTP Port, Account Name, and Password.
If your NVR server is installed on the same device as your ACTi ALPR Server 1, you
can keep the default “localhost” that has been filled in for the IP Address field, or
use the IP address 127.0.0.1.
3. Click “Add”.
ACTi ALPR Server 1 User’s Manual
To Remove an NVR server from the Video Source List, right-click on the server’s
IP and select “Remove”.
18
Page 19

www.acti.com
ACTi ALPR Server 1 User’s Manual
To add camera as a video source, follow these steps:
1. Right-click on the Source List Window, and select “Add New Camera”.
2. After selecting “Add New Camera”, a popup window will appear as shown below.
Fill in the 5 marked fields that are required to communicate with the camera: IP
Address, HTTP Port, Streaming Port, Account Name, and Password.
You can keep the default “6002” that has been filled in for the Streaming Port field, or
select any port that is not being used.
19
Page 20

www.acti.com
3. Click “Add”.
To Remove an NVR server from the Video Source List, right-click on the device
ACTi ALPR Server 1 User’s Manual
and click on “Remove”.
20
Page 21

www.acti.com
ACTi ALPR Server 1 User’s Manual
Add Channels
In order to see the camera views from the video sources you have added, you need to add
them to one of the channels in the Video Analysis Window.
To add channels, follow these steps:
1. On the Source List Window, find the device for which you would like to see the
camera view.
If you have devices added in your NVR server but cannot see them in your ACTi
ALPR Server 1 Source List Window, click on the collapse icon shown next to
your NVR server in the Source List Window to expand the device list, or
right-click on your NVR server IP address and select “Refresh”.
2. After finding your device, you can see the camera views from the device by dragging it
to one of the channels in the Video Analysis Window. If a new device is dragged to
a channel with an existing camera view, the existing camera view will be replaced.
21
Page 22

www.acti.com
ACTi ALPR Server 1 User’s Manual
To Remove a camera view, right-click on the channel and select “Remove”.
Note that the analysis will stop running if you perform this action.
To renew the connection to a device in, right-click on the channel and select
“Reconnect”. Note that if you have an analysis running, you must stop the
analysis to perform this action.
If you want the program to automatically reconnect when it detects that it has been
disconnected from the device, keep the box for “auto reconnect” marked.
22
Page 23

www.acti.com
ACTi ALPR Server 1 User’s Manual
Create an Analysis Rule
Now that you able to see your camera’s video feeds, you are ready to create your analysis
rules for your camera views! Note that analyses can only be performed when the device has
been dragged into a channel window. One channel can only run 1 analysis at a time, and the
maximum number of channels that can perform analyses simultaneously is 4. Please note
smoothness of performance may depend on your computer’s hardware capacity.
Accessing New Analysis Window
Live View Analysis
To access the function to create a new analysis rule for a live view, follow the steps below:
1. Right-click on the channel window of your video, click on “Create Analysis”, and
select “Live”.
2. In the new pop-up window that appears, input a name for your Analysis Rule and
click “OK”.
23
Page 24

www.acti.com
ACTi ALPR Server 1 User’s Manual
Minimum
Plate Size
Maximum
Plate Size
3. A New Analysis Window will appear, and you are now ready to set up your Analysis
Rules.
Playback Analysis
To access the function to create a new analysis rule for non-live video footage that already
exists for the selected channel, follow the steps below:
1. Right-click on the channel window of your video, click on “Create Analysis”, and
select “Playback”.
2. In the new pop-up window that appears, input a name for your Analysis Rule and
click “OK”.
24
Page 25

www.acti.com
ACTi ALPR Server 1 User’s Manual
Minimum
Plate Size
Maximum
Plate Size
Maximum
Plate Size
Minimum
Plate Size
Maximum
Plate Size
3. A New Analysis Window will appear, in which you can select the time interval you
wish to analyze. To set your time interval, follow the steps below:
1. Set the beginning of the interval by right-clicking on any location on the Time
Bar, and selecting “Set as Begin”.
z
2. Set the end of the interval by right-clicking on any location on the time bar,
and selecting “Set as End”.
3. The selected area should appear highlighted in green. To clear or edit your
selection, right-click and select “Clear” to set a new time interval.
25
Page 26

www.acti.com
ACTi ALPR Server 1 User’s Manual
Minimum
Plate Size
Maximum
Plate Size
Live View Display
Time Bar
Analysis Settings
New Analysis Window UI Introduction
Analysis Settings: Provides for the adjustment of the algorithm’s unique properties.
Live View Display: Provides live camera view of the selected video source.
Time Bar: Shows the time at which the video in Live View Display is taking place (as
determined by user’s PC).
License Plate Recognition Algorithm Setup
In order for the License Place Recognition algorithm to perform optimally, you can adjust LPR
Properties to obtain the best results.
Before adjusting any settings, make sure the camera that the camera is placed correctly, and
that it meets the following criteria:
1. The angle between the camera and the license plate to be recognized lies between
10° and 45°, so that the shape of the license plate is as close to a rectangle as
possible
2. The license plate characters to be recognized in the camera view are at least 40 pixels
in height
3. The camera’s frame rate is at least 25 FPS
4. The camera’s shutter speed is at least 1/100 s.
26
Page 27

www.acti.com
ACTi ALPR Server 1 User’s Manual
Property
Description
Default
Country
Used as reference only. Allows you to choose from a
predetermined list of countries, to increase the accuracy
of recognition results.
Taiwan
Enable
Enables LPR algorithm.
Enabled
Maximum
Car Plate
Height
Set the maximum height (1-120 pixels) of any license
plate to be recognized. Any license plate whose height is
larger than this value will be ignored. The Maximum
Plate Size Reference Frame (found in the bottom left
corner of the Live View Display) provides visual
reference for the value selected. The ratio between
Maximum Car Plate Height and Minimum Car Plate
Height should be as close to 2 as possible.
25
Maximum
Car Plate
Width
Set the maximum width (1-160 pixels) of any license
plate to be recognized. Any license plate whose width is
larger than this value will be ignored. The Maximum
Plate Size Reference Frame (found in the bottom left
corner of the Live View Display) provides visual
reference for the value selected. The ratio between
Maximum Car Plate Width and Minimum Car Plate
Width should be as close to 2 as possible.
50
Minimum
Car Plate
Height
Set the minimum height (1-120 pixels) of any license
plate to be recognized. Any license plate whose height is
smaller than this value will be ignored. The Minimum
Plate Size Reference Frame (found in the bottom left
corner of the Live View Display) provides visual
reference for the value selected. The ratio between
Maximum Car Plate Height and Minimum Car Plate
Height should be as close to 2 as possible.
16
Minimum
Car Plate
Width
Set the minimum width (1-160 pixels) of any license
plate to be recognized. Any license plate whose width is
smaller than this value will be ignored. The Minimum
Plate Size Reference Frame (found in the bottom left
corner of the Live View Display) provides visual
reference for the value selected. The ratio between
Maximum Car Plate Width and Minimum Car Plate
Width should be as close to 2 as possible.
15
Post-buffer
Time
Set the amount of time (in seconds) that video footage
will be recorded after a license plate is recognized.
5
Pre-buffer
Time
Set the amount of time (in seconds) that video footage
will be recorded before a license plate is recognized.
5
To start setting up your License Plate Recognition algorithm, follow the steps below:
1. Adjust the LPR Property Settings to get the most optimal results:
27
Page 28

www.acti.com
ACTi ALPR Server 1 User’s Manual
Minimum
Plate Size
Maximum
Plate Size
x2
2. To narrow down the area in which the algorithm will be actively running, move your
cursor over to the area showing video stream, at which point it will appear as a
drawing pen. To draw the rectangle that will mark the area for detection, click and drag
your cursor to draw a red rectangle.
3. If the area you want to mark does not fit to the form of a rectangle, you may also
choose to draw a polygon by selecting the icon on the upper right corner of your
Live View Display area. To draw the lines for the sides of your polygon, click your
cursor to mark the endpoints of each line. Double-click on the final endpoint of the
final line to confirm and highlight the polygon in light blue, as shown in the illustration
below. Make sure your lines connect (a minimum of 3 lines) to form a closed shape.
4. To adjust the marked area, you can drag the highlighted area to keep its original shape
or right-click on the area, select “remove”, and re-draw. For polygons, you may
toggle the endpoints of the lines that make up the sides of your polygon.
28
Page 29

www.acti.com
ACTi ALPR Server 1 User’s Manual
The precision of your video analysis depends on the video quality and may be
affected by the characteristics of objects in the video stream. To obtain the best
results, test your analysis rules and optimize your settings. For further inquiries,
provide a RAW file of your analysis and contact our Customer Help Desk.
Important Notice
Minimum
Plate Size
Maximum
Plate Size
1 2 3
(Optional)
4
5
Tip
For a better experience, make sure that the height of your detection area is no taller
than 10 times the Maximum Plate Size height, and that the width of your detection
area is no wider than 10 times the Maximum Plate Size width.
5. Click “Start Smart Search” to start running your analysis.
29
Page 30

www.acti.com
ACTi ALPR Server 1 User’s Manual
All analyses will stop running if the ACTi ALPR Server 1 window is closed. To
continue running an analysis, the settings will have to be re-configured in a new
Analysis Rule.
Important Notice
Stop (Cancel) an Analysis Rule
If you are only running your Analysis Rule for a specific time period or you wish to stop
running the Analysis Rule at any point, you can do so by using the “Stop Analysis” function.
To access this function, simply right-click on the channel that you wish to stop the analysis,
and select “Stop Analysis”.
30
Page 31

www.acti.com
ACTi ALPR Server 1 User’s Manual
Analysis is running
Progress Bar
(For Playback Analyses)
License Plate Recognition
Monitoring
Once you have added your video sources and have your analysis rules set up, you are now
ready to monitor your video feeds and watch them in action! Each channel that is running an
analysis will have icons on the upper right corner so that you can know at a quick glance what
algorithms are running.
Display Detection Indicators
To enhance awareness when monitoring your live video feed, it may be helpful to have visual
cues about the analyses that you are running. In order to achieve this, ACTi ALPR Server 1
provides the option to display detection indicators or show the moving objects on the screen.
To access this function, simply right-click on a channel and select “Show Algorithm Regions”
to display detection indicators.
31
Page 32

www.acti.com
ACTi ALPR Server 1 User’s Manual
Display Latest Recognition Results
While monitoring, it may be helpful to see information about the license plates that are being
recognized. In order to achieve this, ACTi ALPR Server 1 provides the option to display
real-time information of the latest recognized license plate.
To access this function, simply double-click the channel for which you would like to see the
results. An information panel will appear on the right side of your screen, showing a snapshot
of the license plate, the result of the recognition, time and date captured, and the confidence
level of the algorithm.
To leave this function, simply double-click on the area showing the camera view.
32
Page 33

www.acti.com
ACTi ALPR Server 1 User’s Manual
Analysis
Result Filter
Analysis
Results
Analysis Results
After running your ALPR algorithm, the next logical step would be to look at what license plates
have been recognized. To browse the results, you can use the Search Analysis Results
function of ACTi ALPR Server 1.
To access this function, right-click on the area of the Video Analysis Window that is running
the analysis rule for which you would like to see the results for and select “Search Analysis
Results”.
A new Analysis Results Window that contains the license plates recognized as a result of
your algorithm will open. For each license plate recognized the recognition result, a snapshot
of the license plate, the confidence level of the algorithm, the color of the car, the time it was
recognized, as well as the channel from which it was recognized will be shown.
33
Page 34

www.acti.com
ACTi ALPR Server 1 User’s Manual
1
3
2
Time Period
License Plate Number
Color
Search Results by Filters
To narrow down the search results that are shown, you can use the options presented in the
Analysis Result Filter area to filter by Time Period, Plate Number, and Car Color. Note that
these filters are used in conjunction with each other.
ALPR Results by Time Period
If the results you wish to see are from a specific time period, you can set this time period by
adjusting the Time Period setting in the Analysis Result Filter area.
1. Select the date and time for the beginning of the time period.
2. Select the date and time for the end of the time period.
3. Click .
vvz
34
Page 35

www.acti.com
ACTi ALPR Server 1 User’s Manual
1 2 1
2
ALPR Results by License Plate Number
If you want to search for a specific License Plate Number, you can do so by typing in the
License Plate Search in the Analysis Result Filter area.
For example, to only show the results for license plate number “7683YQ” follow the steps
below:
1. Type in “7685YQ”, or “685Y”, or “76*Q” in the search box. The * symbols represents
one or more unknown characters that may exist between known characters.
2. Click .
ALPR Results by Car Color
If you want to see results of license plates for cars of a specific color, you can set this by
configuring the Car Color filter in the Analysis Result Filter Area.
For example, to only show cars that are yellow, you would have to:
1. Select the color that you wish to filter with from the drop-down menu.
2. Click .
35
Page 36

www.acti.com
ACTi ALPR Server 1 User’s Manual
1
2
View Multiple ALPR Analysis Results
Once in the Analysis Results Window, you can select to view results for other ALPR
analyses that you may have previously created for the same device.
In order to view the results of multiple analyses in the same device, follow these steps:
1. On the left hand side of your Analysis Results Window, under your selected device,
check the boxes for the analysis rules that you wish to see the results for.
2. Click .
36
Page 37

www.acti.com
ACTi ALPR Server 1 User’s Manual
File
Settings
Play / Pause
Progress Bar
Time Elapsed / Total Time
Recognition Result
Watch Analysis Playback
Now that your ALPR analyses have recognized license plates, you can watch the playback of
when these license plates appeared.
To watch these videos, double-click on a single Analysis Result that you would like to review.
A new Player Window will open, ready to play your event. Please note that for each
recognized license plate, ACTi ALPR Server 1 will also provide video footage of moments
leading up to and after the recognition, as determined by “Pre-buffer Time” and “Post-buffer
Time” properties in the New Analysis Window.
If you cannot see the control buttons located at the bottom of the Player Window, hover your
cursor over the area it should be located, and it will appear.
37
Page 38

www.acti.com
ACTi ALPR Server 1 User’s Manual
Button
Options
Description
File
Open
Allows you to open other files (in RAW format).
Close
Closes the current file that is open.
Setting
Timestamp
After Setting button is clicked, the Timestamp
checkbox will allow you to decide whether or not to
show the time and date of the video. If selected, it will
appear on the upper left corner of the Player
Window.
XML
Analysis
SmartSearch
Properties
After Setting button is clicked and XML Analysis
checkbox is marked, you have the option to configure
the Smartsearch Properties. If selected, you can
decide where or not to display the detection
indicators for the algorithms that were used.
Object Filter
After Setting button is clicked and XML Analysis
checkbox is marked, you have the option to configure
the Object Filter properties. If selected, you can
decide whether or not to display detection indicators
for the events that were captured.
Play / Pause
Allows you to control the playback of the file.
Progress Bar
Shows the progress of the video playback. You can
toggle the blue circle on the progress bar to jump to
different parts of the video.
The options that will be shown when selecting SmartSearch Properties and Object
Filter are dynamic. This means that only algorithms that were used when creating
the Analysis Rule of the video will be available.
Note
Player Window Control Buttons
38
Page 39

www.acti.com
ACTi ALPR Server 1 User’s Manual
Export Search Result
To export the video results of your analysis, right-click on the Analysis Result of the
recognized license plate in your Analysis Results Window, and click “Export Video”.
39
Page 40

www.acti.com
ACTi ALPR Server 1 User’s Manual
2
1
Important Notice
Once an analysis rule is deleted, everything related to it (including events and videos
captured using the analysis rule) will also be deleted.
Delete an Analysis Rule
There may be a time when you wish to delete some of the Analysis Rules that you have
created whether to increase storage space or for aesthetic purposes.
In order to permanently delete analyses, follow these steps:
1. On the left hand side of your Analysis Results Window, under your selected device,
check the boxes for the analysis rules that you wish to delete.
2. Click .
40
 Loading...