

Page 1

Access Control Standard Server
User’s Manual
Version V1.1.10
Page 2

www.acti.com
ACTi Access Control Standard Server User’s Manual
TABLE OF CONTENTS
Preface .................................................................................................. 3
System Requirements .......................................................................... 3
A. Login/ Logout ........................................................................................ 4
B. Permission ............................................................................................ 5
C. Mail Server Setting ............................................................................... 7
D. Tailgating Setting .................................................................................. 8
E. Import .................................................................................................... 9
F. Real-time Access Log ........................................................................ 12
G. Records Search .................................................................................. 15
H. Member Profile .................................................................................... 15
I. Time Zone ............................................................................................ 18
J. Access Management .......................................................................... 19
K. Report Export...................................................................................... 27
L. Report Schedule ................................................................................. 29
M. e-Map ................................................................................................... 32
N. Attendence .......................................................................................... 33
O. Device Setting ..................................................................................... 39
Scan Device ......................................................................................... 42
Device Group ....................................................................................... 44
P. System Information ............................................................................ 46
2
Page 3

www.acti.com
ACTi Access Control Standard Server User’s Manual
Preface
Trademark
All product names mentioned in this documentation are registered trademarks of their
respective companies.
Liability
Every reasonable care has been taken during the writing of this manual. Please inform your
local office if you find any inaccuracies or omissions. We cannot be held responsible for any
typographical or technical errors and reserve the right to make changes to the product and
manuals without prior notice.
System Requirements
When using the Access Control Standard Server (ACSS) on other computers, take note of the
following minimum system requirements:
CPU Recommendation: Intel Core i5-6500TE, 8GB RAM
Operating System: 32/64 bit Windows 7 Embedded, Windows 8, Windows 10
Network: Ethernet 1000 Base-T recommended
Storage: SSD 128 GB
3
Page 4
www.acti.com
ACTi Access Control Standard Server User’s Manual
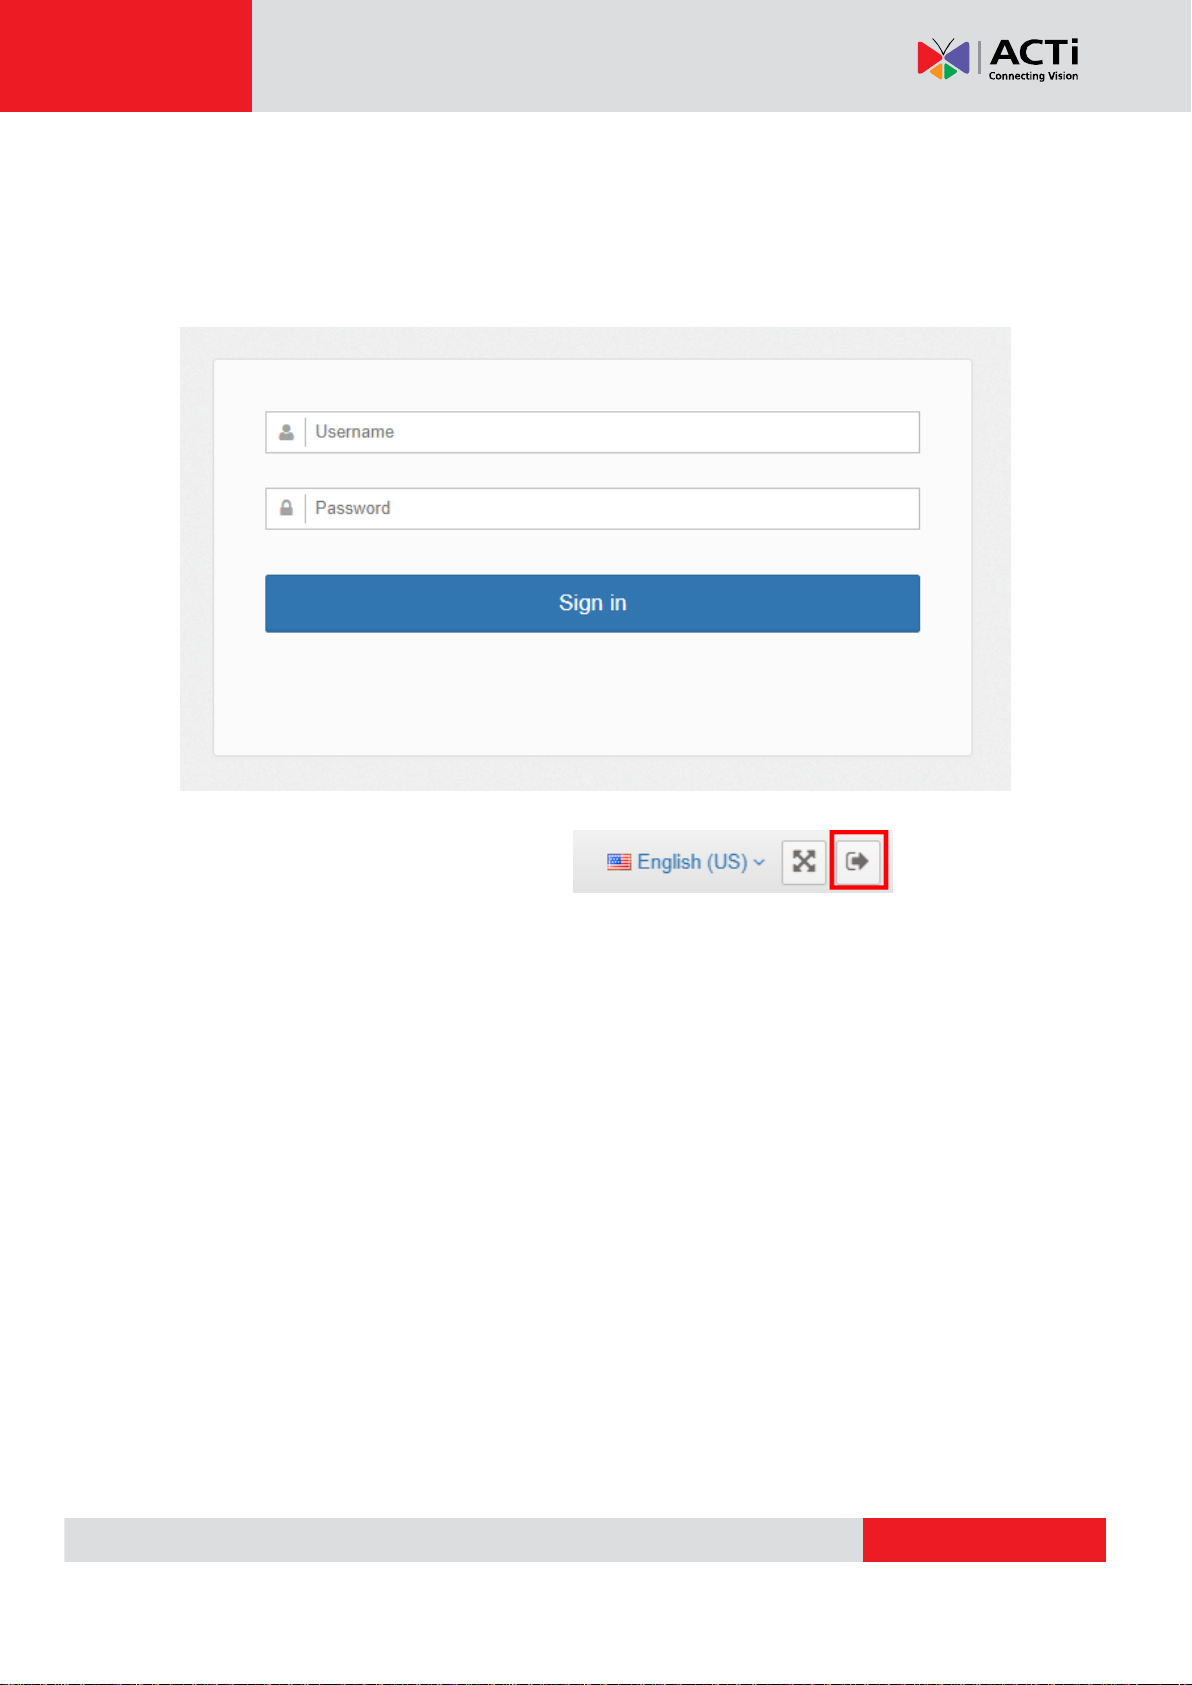
A. Login/ Logout
System Login
Open the page and enter the account and password.
http:// {Server IP} /ACSS/Login/Login.aspx
Default Account and password: admin / 123456
System logout
Click the button on the top right corner
4
Page 5

www.acti.com
ACTi Access Control Standard Server User’s Manual
B. Permission
(A) Click “System Information” from the left menu, then enter the Permission
page.
(B) Click “Add a user” to create a new member profile. On the right panel, fill out
the profile information. Select the permission profile: Admin/ Manager/ User
from “Role”. On the left panel, you can see the added user; to edit the user,
select it from this panel.
5
Page 6
www.acti.com
ACTi Access Control Standard Server User’s Manual
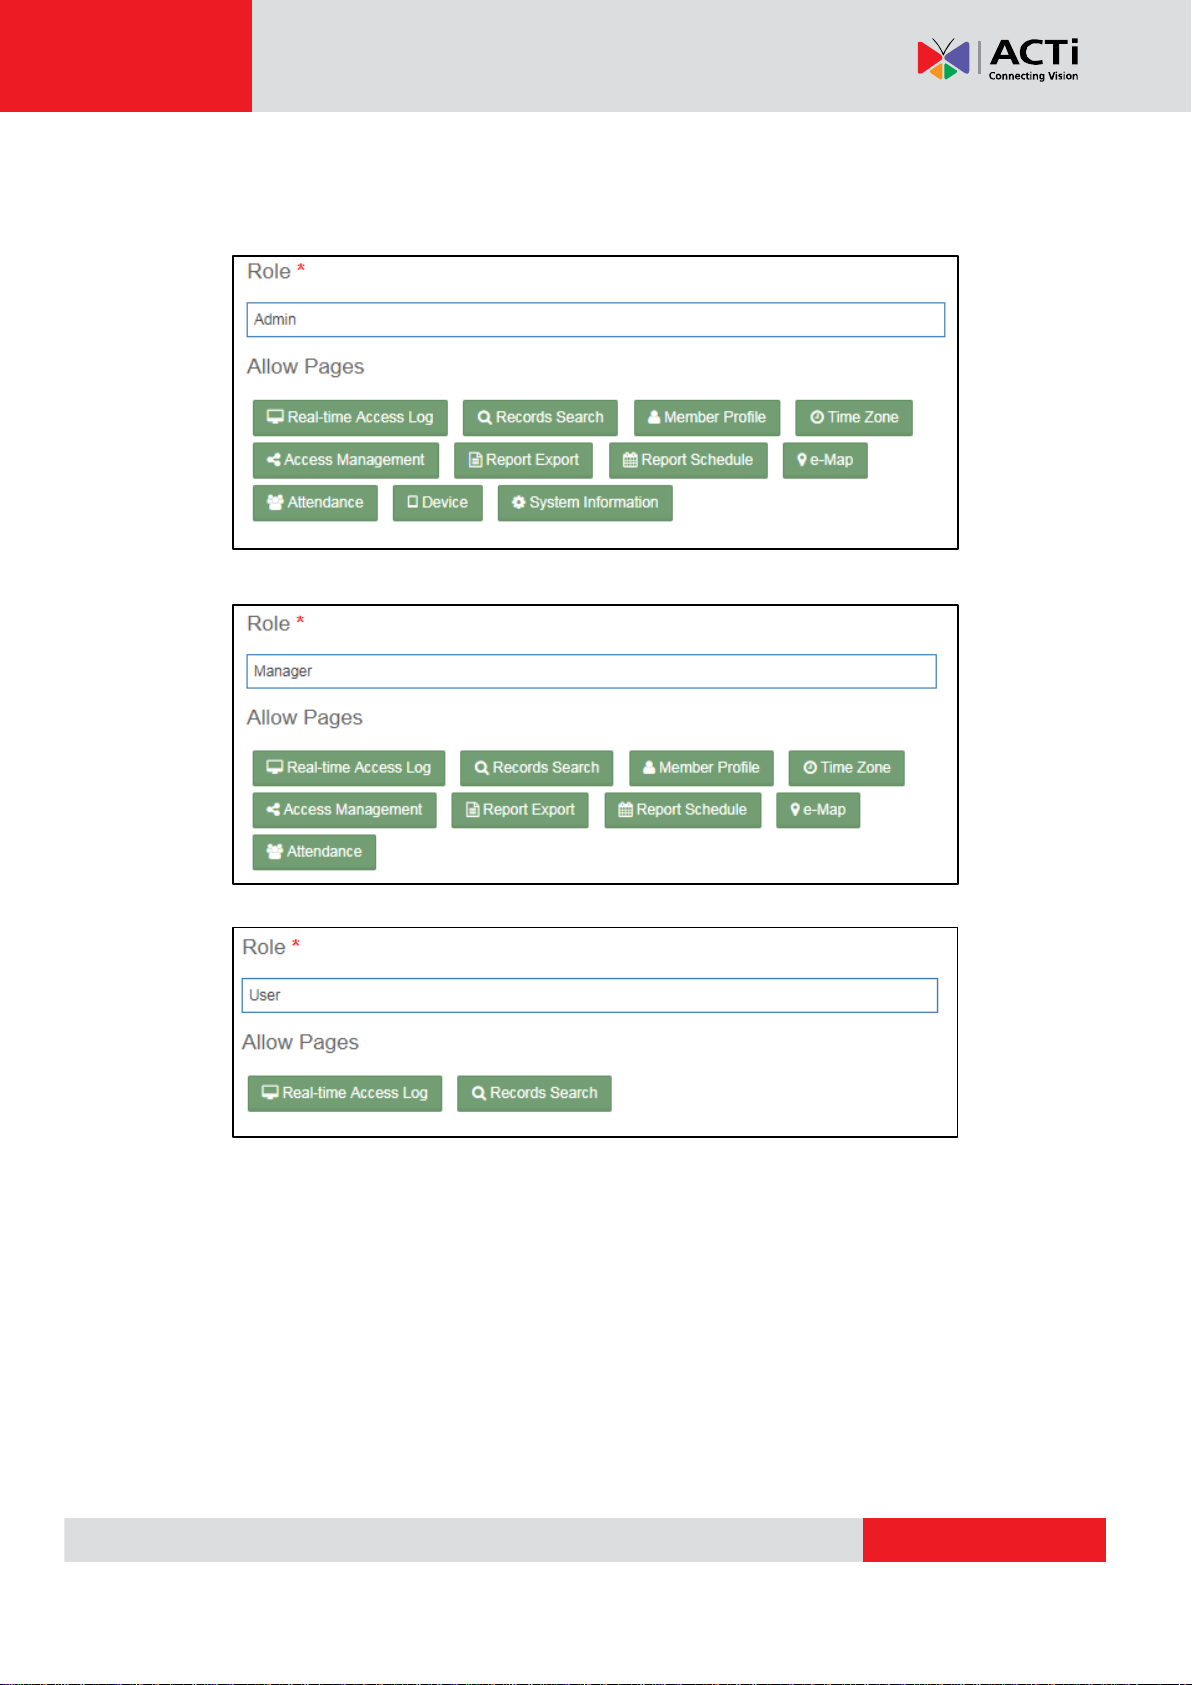
(C) Role definition and permission access
Admin
Manger
User
6
Page 7
www.acti.com
ACTi Access Control Standard Server User’s Manual
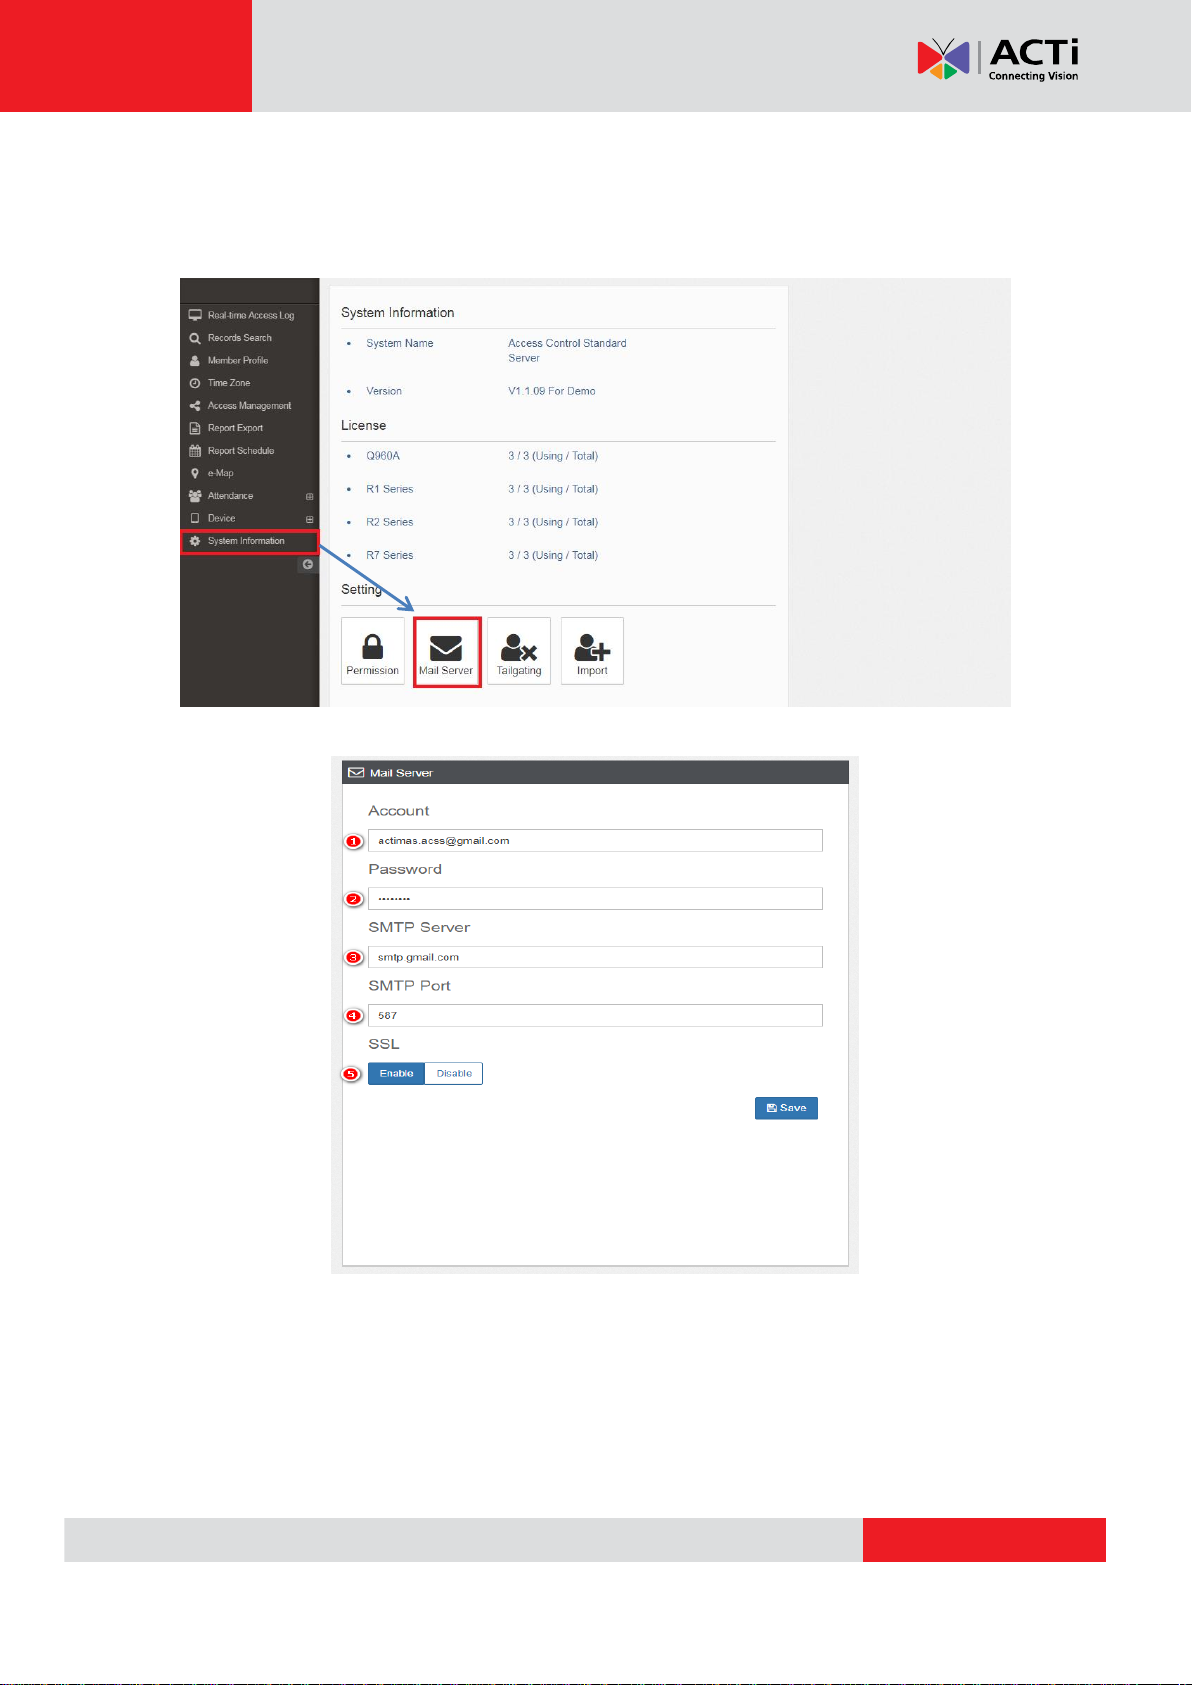
C. Mail Server Setting
(A) Click “System Information” from the left menu, then enter the Mail Server
page.
Fill in the required information as shown below:
1. Account
2. Password
3. SMTP server address, the default is for Gmail
4. SMTP connected port
5. Enable/ Disable SSL
7
Page 8
www.acti.com
ACTi Access Control Standard Server User’s Manual
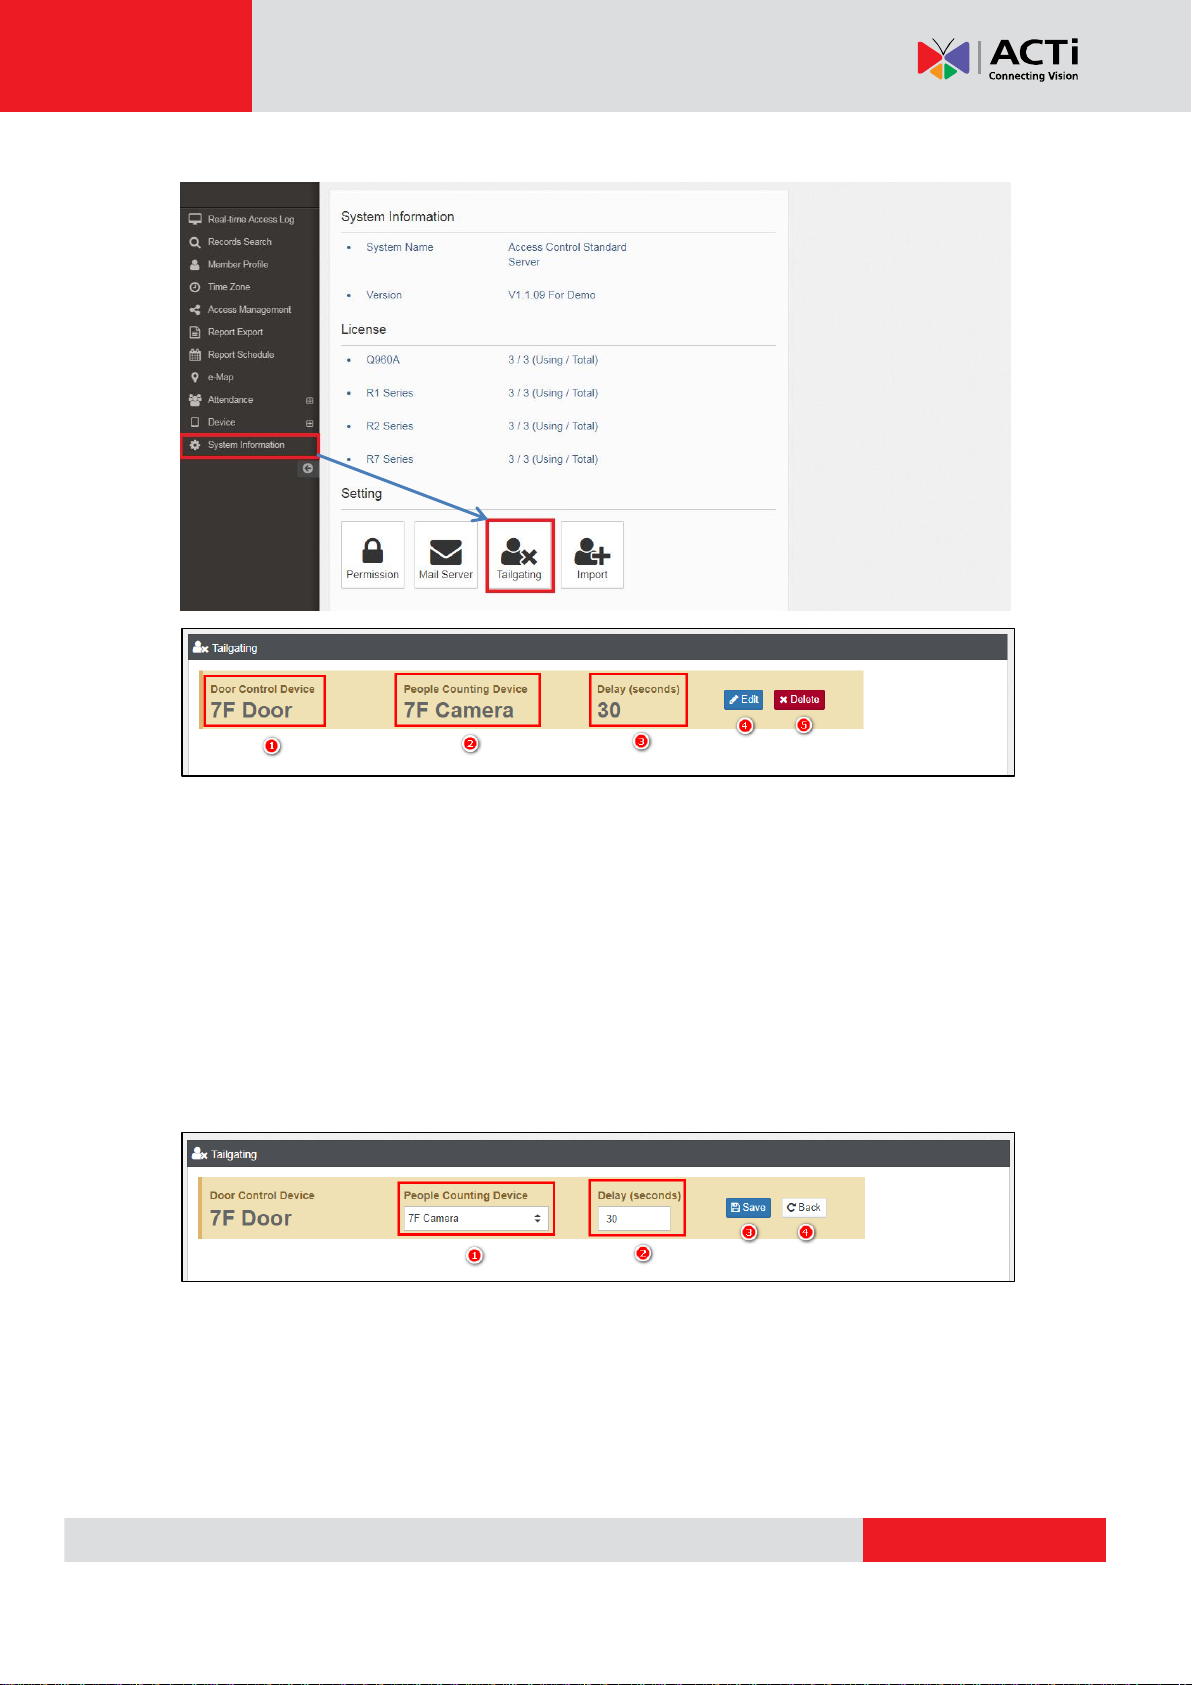
D. Tailgating Setting
1. The Access Control device
2. The device used for foot traffic
3. This will be the tailgating detection criteria. If 2 persons enter the gate within this
delay period, then this is considered as Tailgating.
4. Click the Edit button to modify the settings
5. Click to delete
Edit Function.
Click “Edit”. Note that the Access Control device cannot be modified.
1. Select the people counting device from the drop-down menu.
2. Adjust the delay second
3. Save setting
4. Back to previous page
8
Page 9
www.acti.com
ACTi Access Control Standard Server User’s Manual
1 2 3
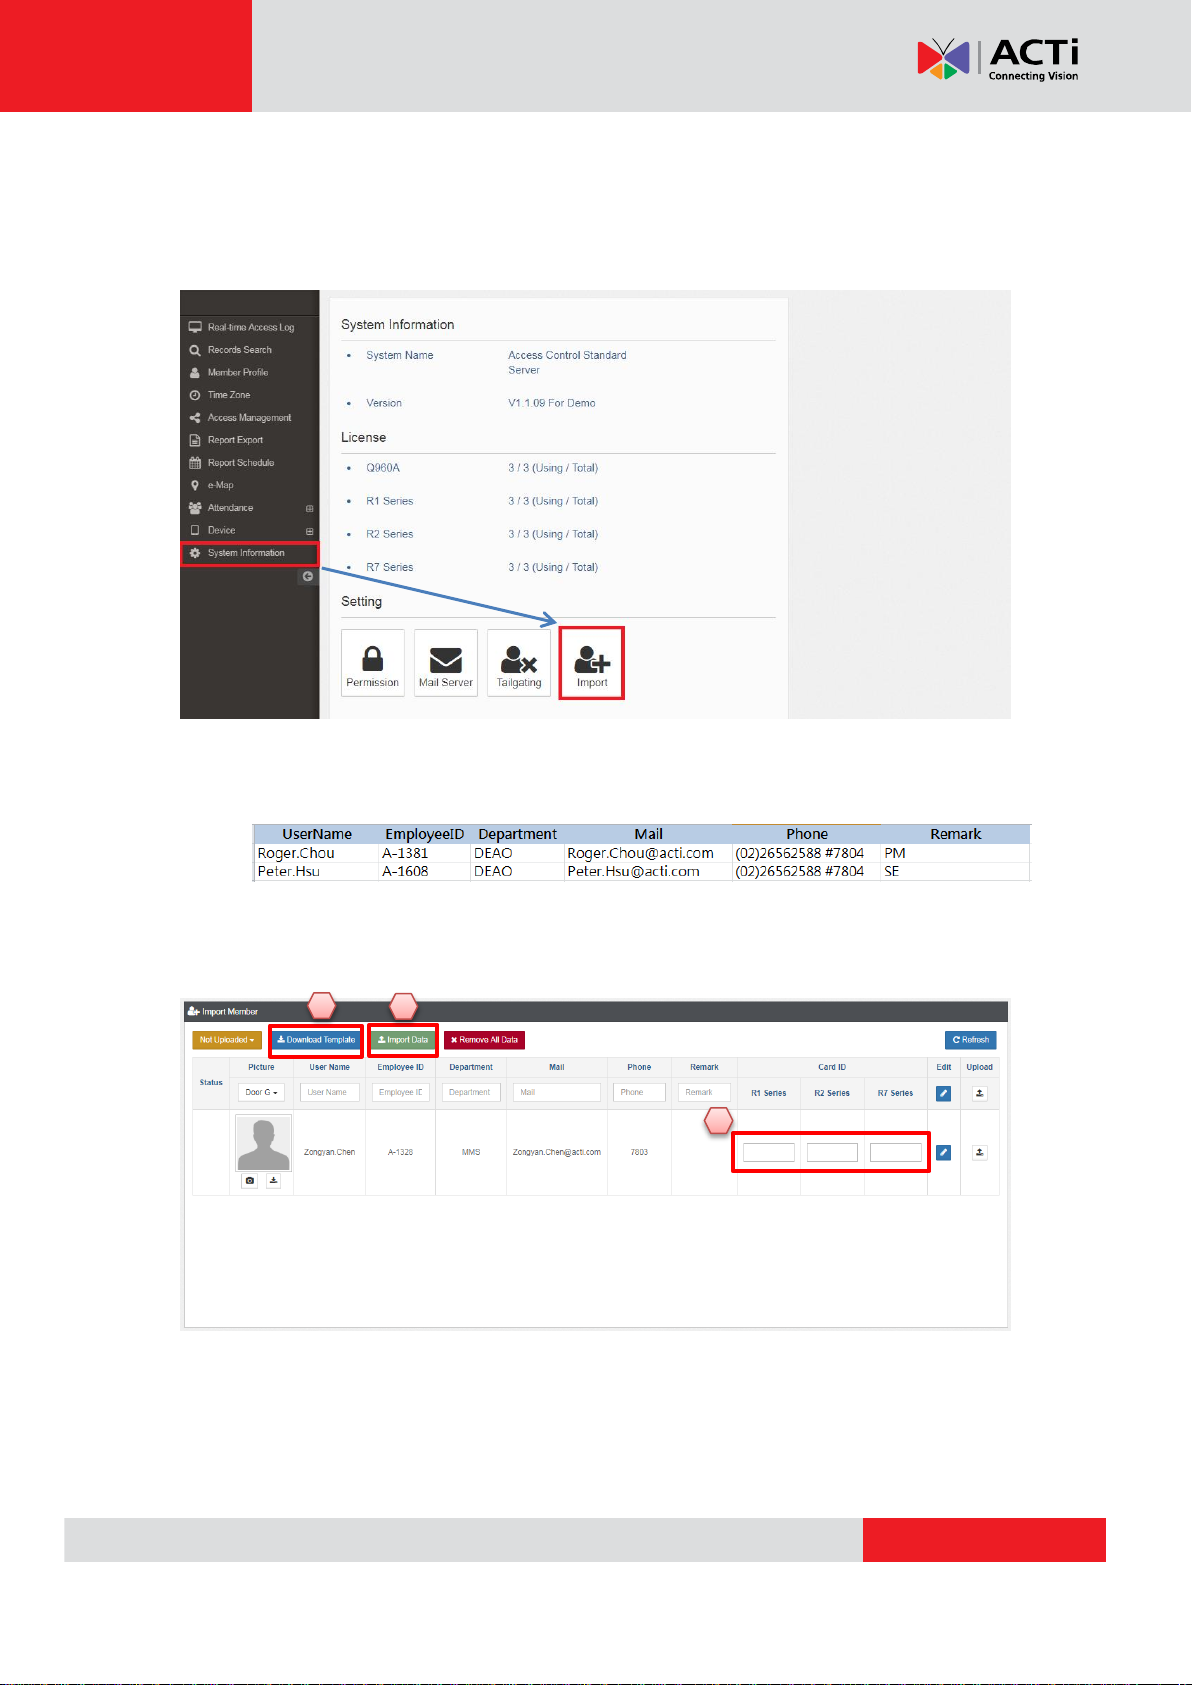
E. Import
This function allows users to import several employee data to the server at one time. This will
save users from filling in employee information one by one.
From the left panel menu, click “System Information” > “Import”.
1. Click “Download Template”. The template is an excel file template. Use this template
to add existing employee data and save the file to your computer. Example below:
2. Once the data is ready, click “Import Data” to import the excel file to the server. The
employee data will be listed on the screen.
3. At this point, you need to register the access card per employee. Take note of the
access control device series model. Mouse over the empty box of the corresponding
access control device then swipe the card on the access control device to register the
Card ID.
9
Page 10
www.acti.com
ACTi Access Control Standard Server User’s Manual
1
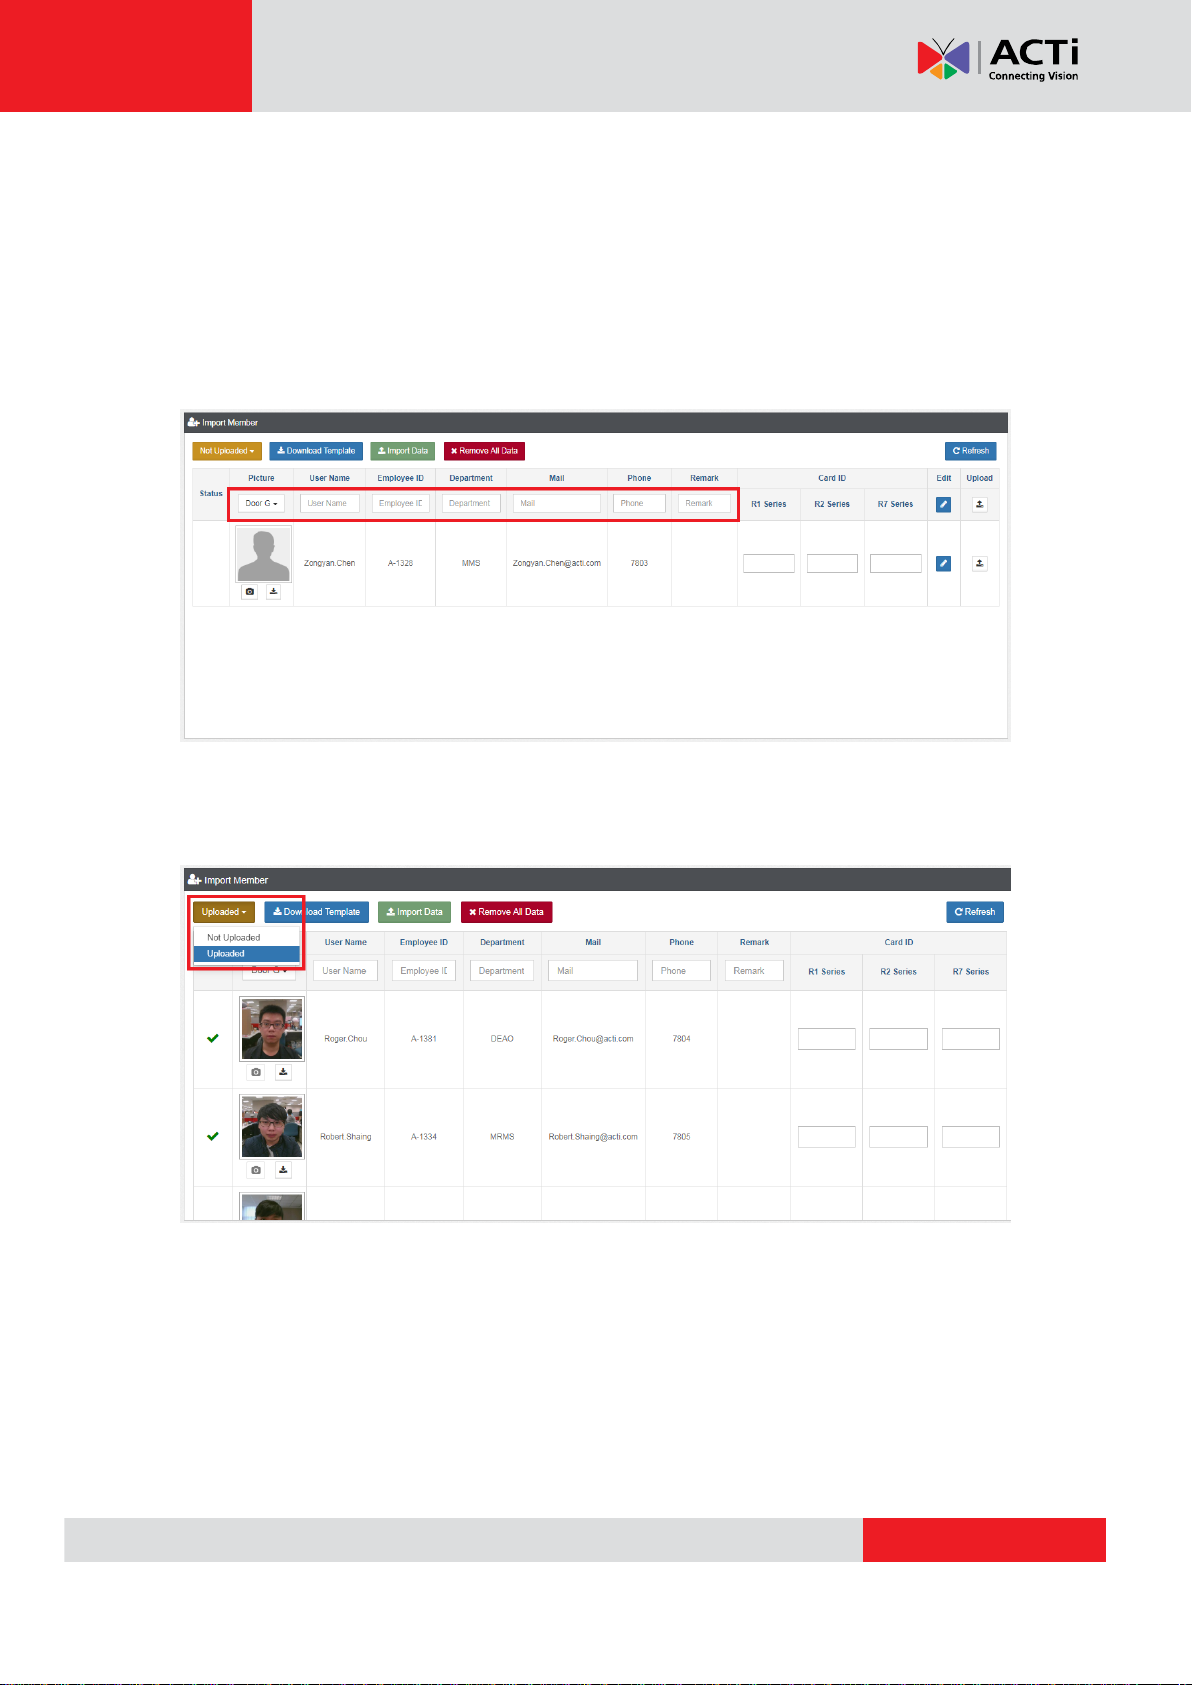
4. Once the Access Control device reads the card, the Card ID number will appear on the
box.
5. Click the “Upload” icon to complete the registration. The employee record will now be
seen through the Member Profile and member import is complete.
For easy management, you can also use the “Status” text boxes to filter the list of the
employees by User Name, Employee ID, Department, etc.
Or, filter the imported employee list by selecting the combo box option based on those which
have been imported but not completely registered and uploaded as “Not Uploaded”; or
“Uploaded”, meaning already added to the Member Profile.
10
Page 11
www.acti.com
ACTi Access Control Standard Server User’s Manual
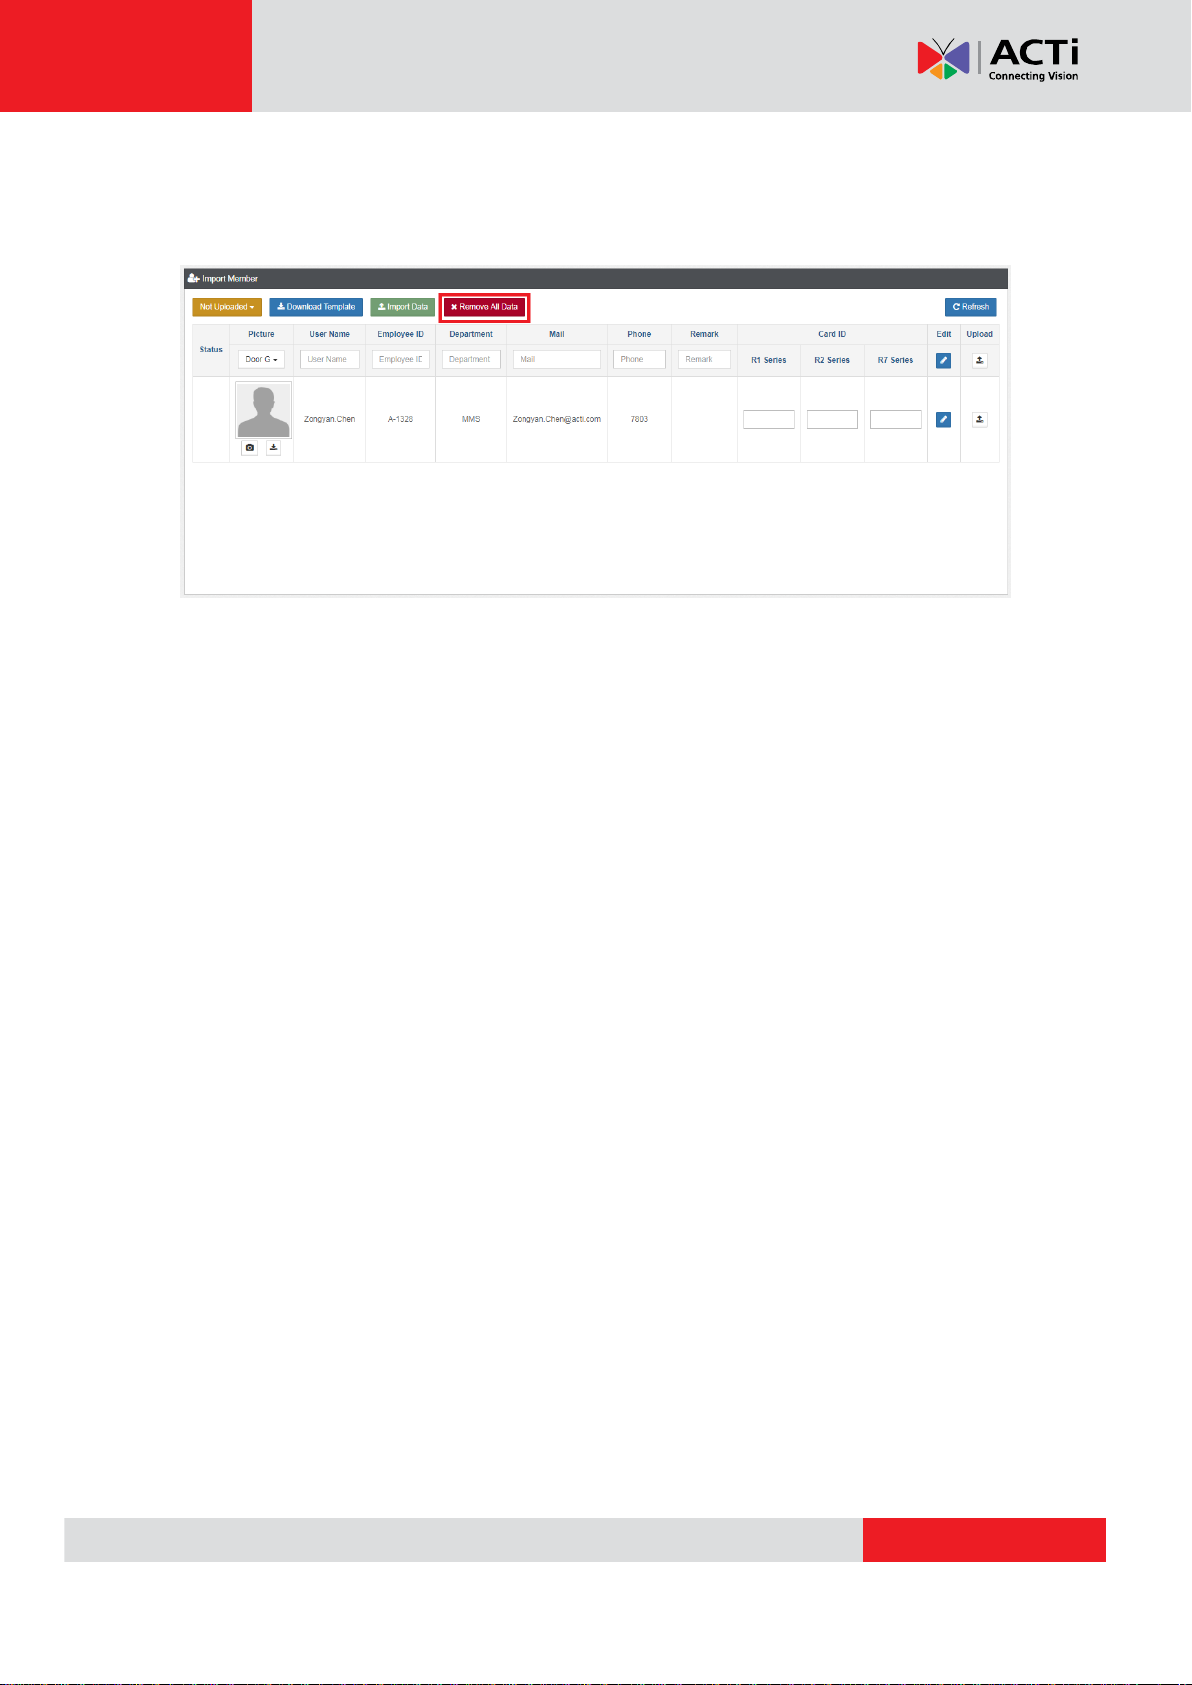
All imported employee data can be deleted from the server with one click. However, to avoid
accidental deletion, IT IS NOT RECOMMENDED TO USE THIS FUNCTION UNLESS
NECESSARY.
11
Page 12
www.acti.com
ACTi Access Control Standard Server User’s Manual
1
23674
5
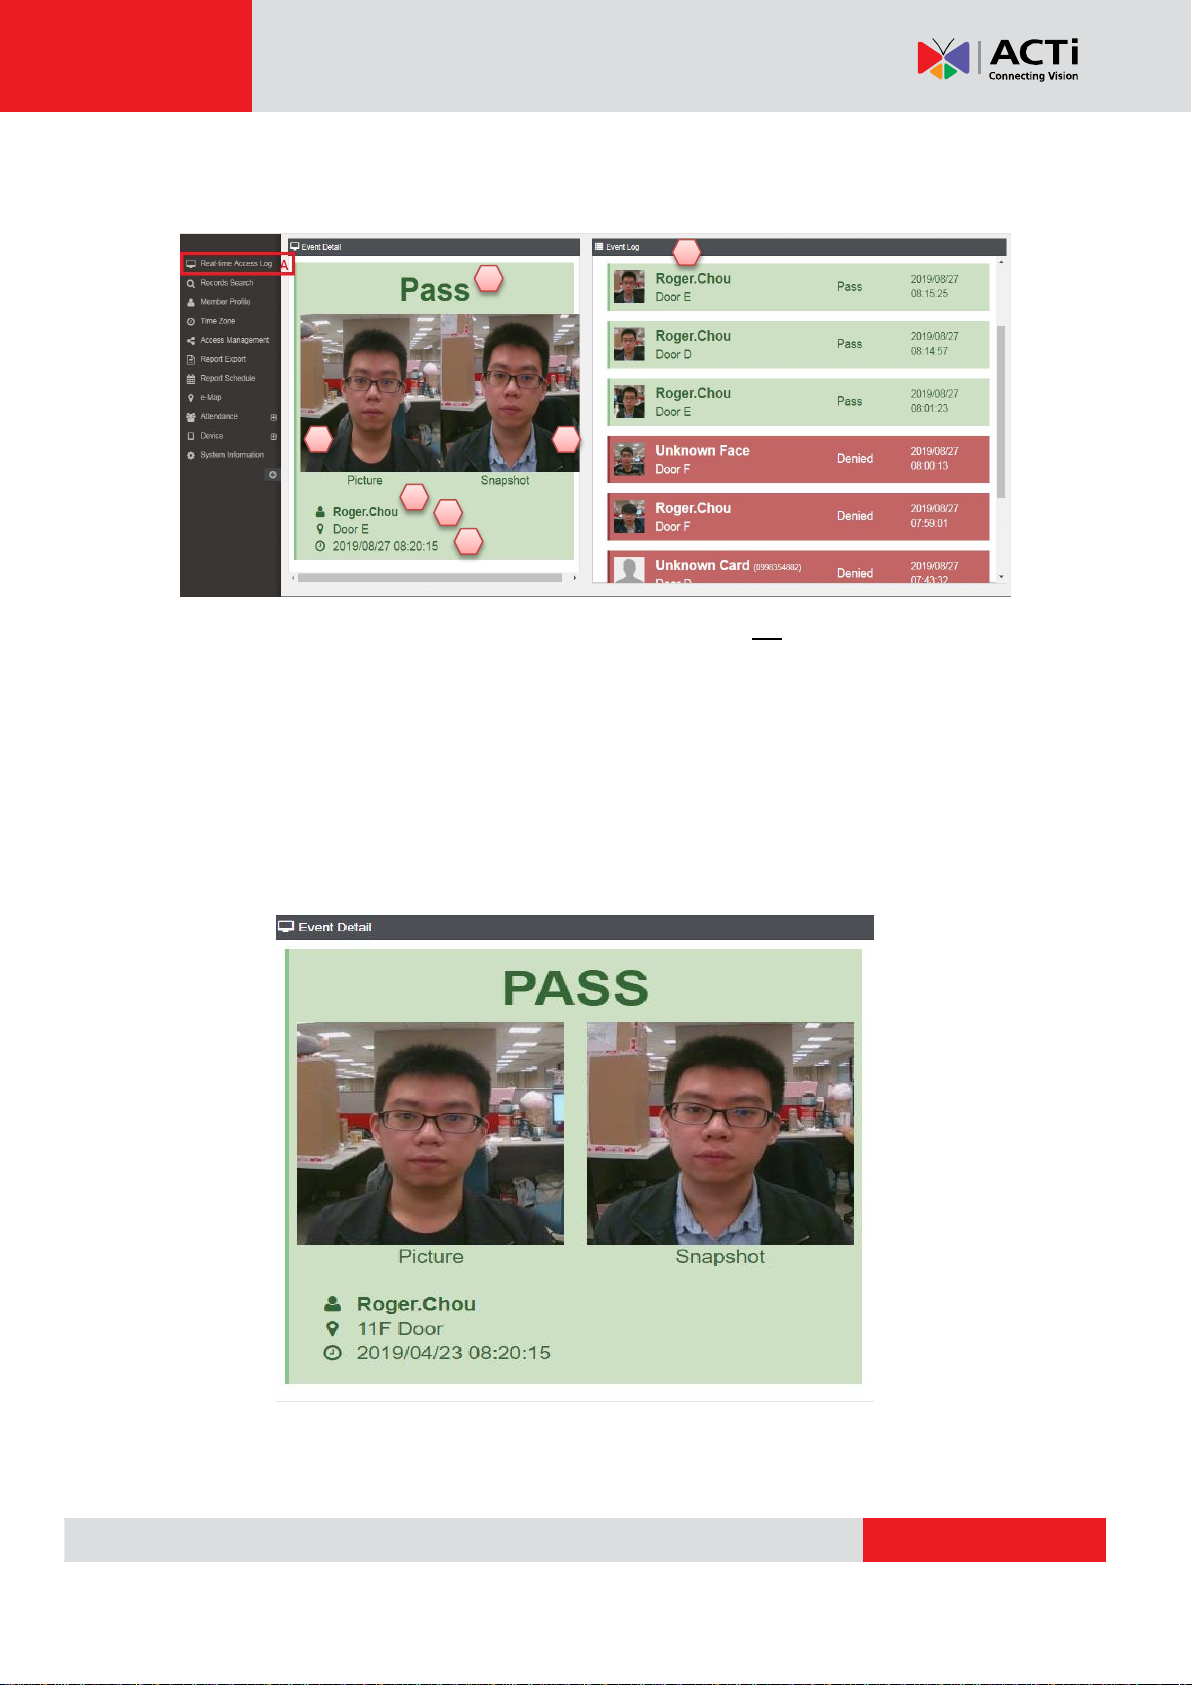
F. Real-time Access Log
On the main page, click “Real-Time Access Log”
1. The validated result, result category lists on F-1
2. The identified person
3. The identification location which includes door number/ floor
4. Identification time
5. Original photo from enrollment
6. Captured photo
7. Identification history
F-1 Validated result
I. Pass
12
Page 13
www.acti.com
ACTi Access Control Standard Server User’s Manual
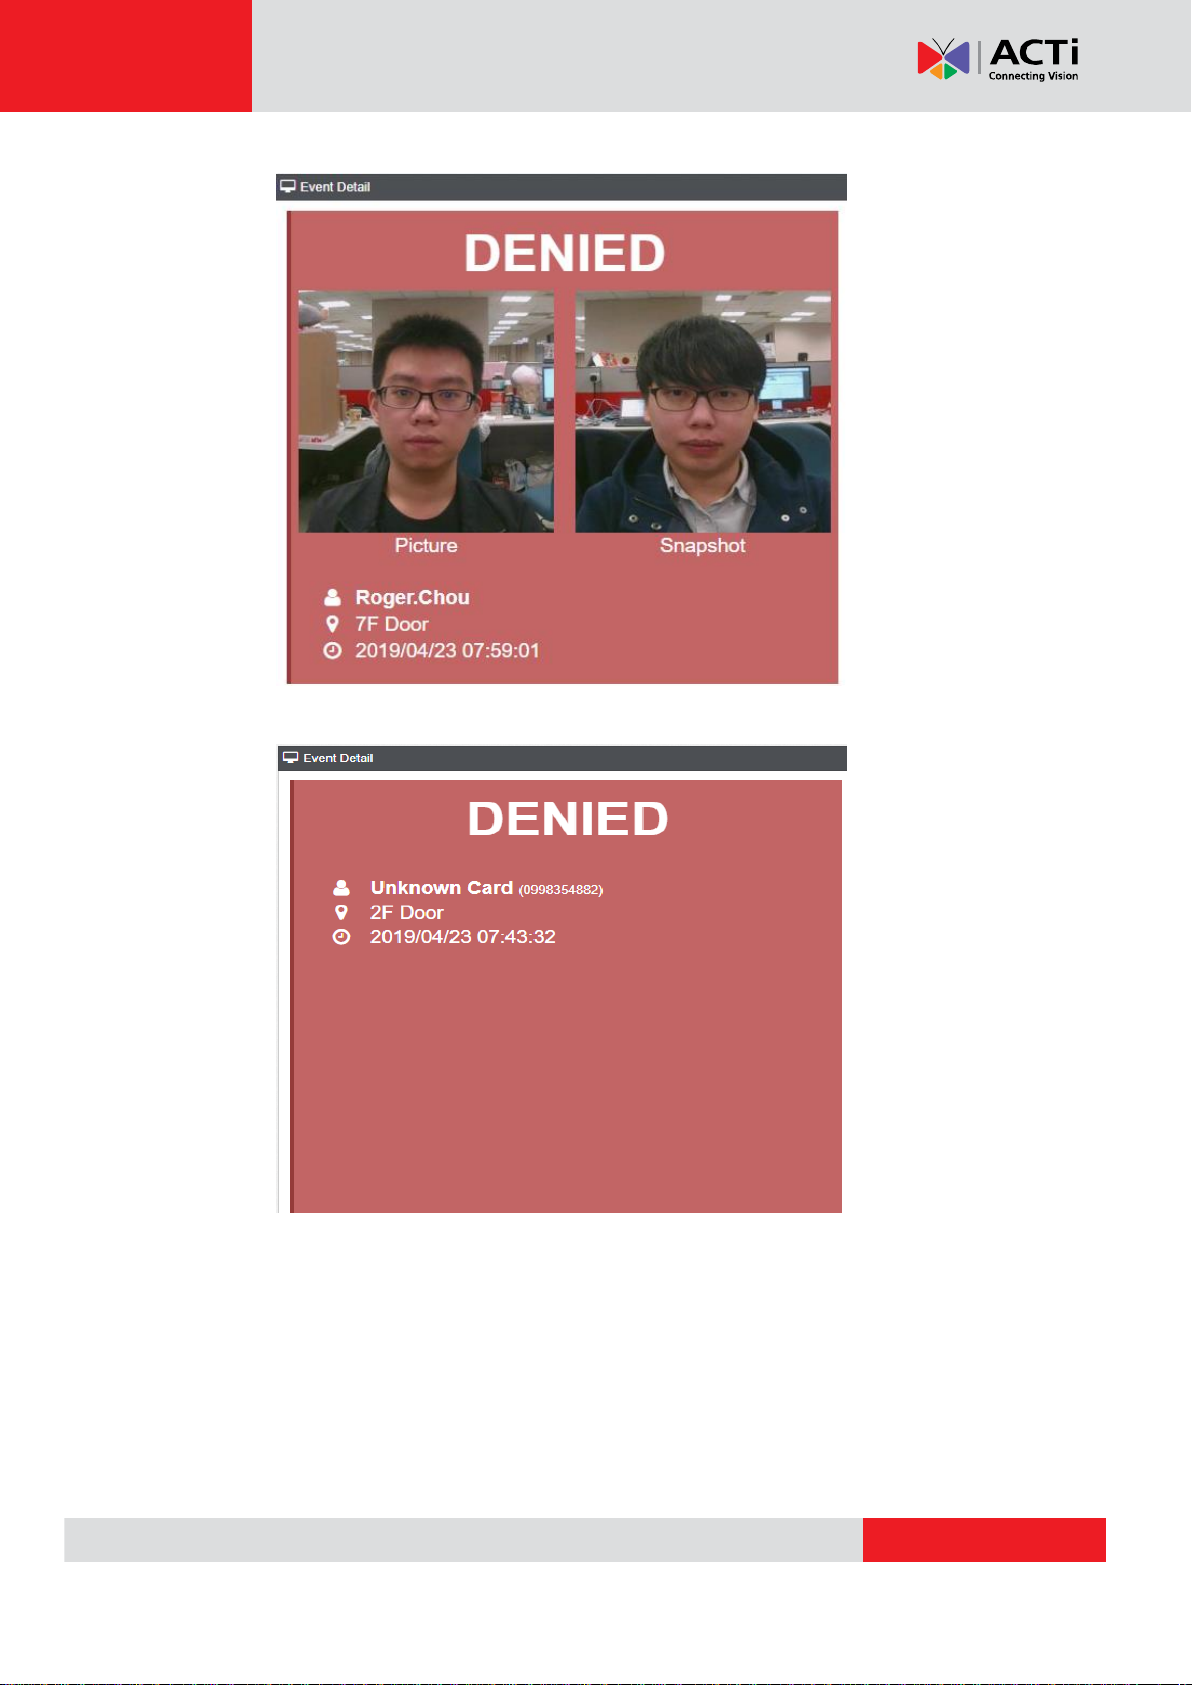
II. Deny (wrong person)
III. Deny (non-registered)
13
Page 14
www.acti.com
ACTi Access Control Standard Server User’s Manual
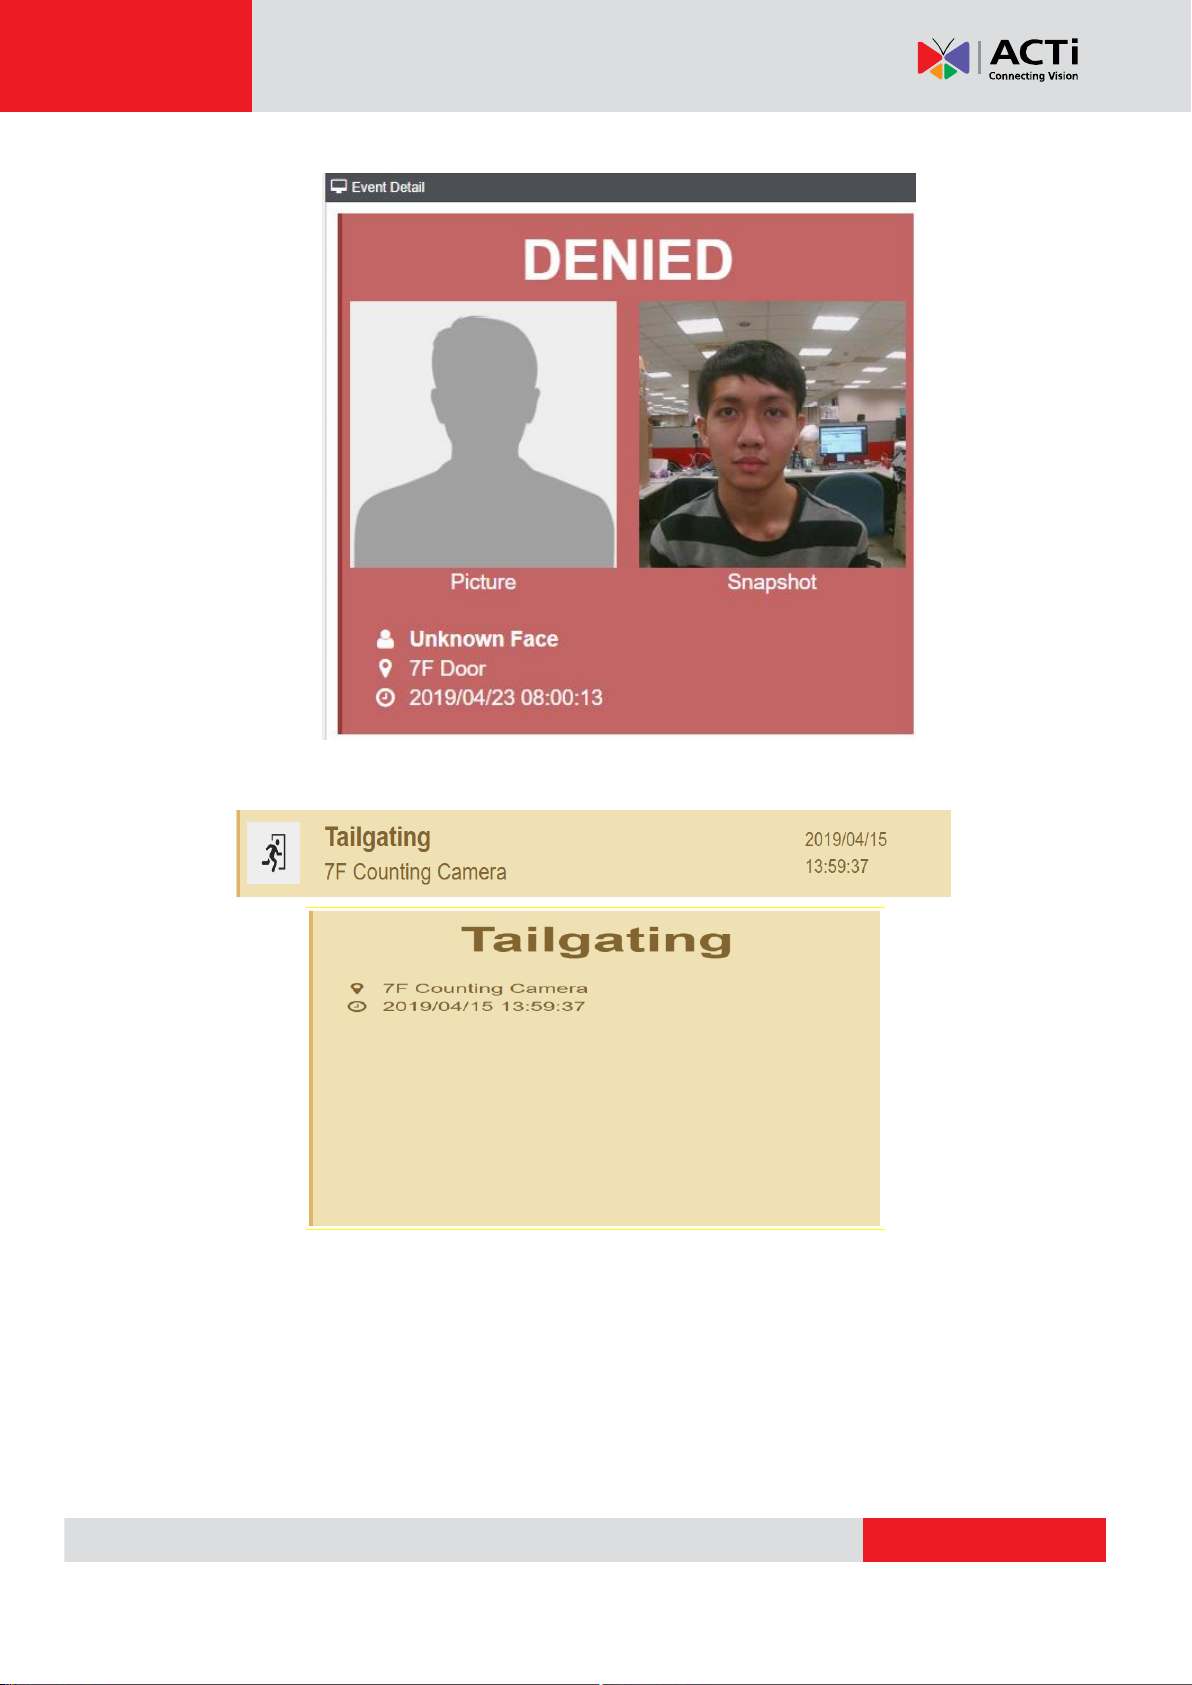
IV. Deny (No face enrollment)
V. Tailgating
14
Page 15

www.acti.com
ACTi Access Control Standard Server User’s Manual
1 2 3
G. Records Search
The related identification history can be searched on this page.
Click “Records Search”. You can filter the data for better search results.
1. Select the time interval
2. Type to filter the search by user name (support fuzzy query)
3. Select to filter the search by identification result (choose "pass",
"forbid" and "tailing", as needed)
H. Member Profile
Click “Member Profile” (A) to enter the page as shown below. This page allows users
to add a new member or employee profile.
Click on (B) to add a new member.
15
Page 16

www.acti.com
ACTi Access Control Standard Server User’s Manual
1
2 3 4 6 5
1. Please fill in the member information. "User Name" is a required field.
2. Swipe the card to be assigned to a member using an Access Control device.
Take note of the Access Control Device model series.
3. There are two ways to assign an access card to the member: Manually type
the card number (if you know the card number and can ensure no mistake
can be done by manually adding it) or use the “Get Card ID” function to
automatically generate the Card ID from an access control device. “Get
Card ID” is the recommended option.
Click the "Get Card ID" button of the corresponding access control device
model series. The list of swiped cards on all the access control device of the
same series will be displayed on the right panel in real time. Click to select
the card to be assigned to the member. The card number will be displayed
on the box.
Tip: For companies with several access control devices, use the Device ID
(in the image above, the device is defined as “Door H”, “Door I”) to identify
which device and the card that it recently read.
16
Page 17

www.acti.com
ACTi Access Control Standard Server User’s Manual
4. You can upload a picture to include in the member’s information. However,
for R2 device series, this photo does not in any way affect or can be used in
facial recognition function.
5. If you have R7 series devices, you can either upload a photo (as stated on
Step 4) or use the device itself to capture a photo of the member. Select
the device that will capture the photo from the list. Then, click the camera
icon to capture the photo of the member. The device will display a
humanoid frame, shown as below.
Since R7 devices use 2D facial recognition, the photo uploaded or taken will
be used for facial recognition functions.
6. Click this icon to download the uploaded or captured photo to your
computer.
Click (A) to edit the profile, as needed. (Note: Card ID cannot be modified)
17
Page 18

www.acti.com
ACTi Access Control Standard Server User’s Manual
1
3
2
4
I. Time Zone
Each company has their own arranged shifts. In order to be flexible for the access
control server or the attendance system, the time zone function is supported.
1. Search by the time zone name
2. Add new time zone
3. Edit the time zone
4. Delete the time zone
Below is the edit page
1. Select the time range. You can click and drag on the time frame directly to select
the time range.
2. Define the name for this time zone
3. Present the result that is from your selection
4. Save
5. Back to the previous page
18
Page 19

www.acti.com
ACTi Access Control Standard Server User’s Manual
3
1 3 2
4
1
2
J. Access Management
Click “Access Management” to below page
1. Click to select the Access Control device series
2. Select the device for operation (Server/ Access Control devices)
3. Select function (Refresh/ Management)
4. List of the registered members from the selected device(s)
Enrollment and synchronized
1. Select the device
2. Click on Enroll
19
Page 20

www.acti.com
ACTi Access Control Standard Server User’s Manual
3. Below are the instructions
Step 1
Select the person that has been registered. Multiple selections are acceptable.
Step 2
Select the access mode. You can change the mode for each member, or change the
mode of all the members at one-time.
Step 3
Validate if the access mode is correct, then click the green check to confirm.
20
Page 21

www.acti.com
ACTi Access Control Standard Server User’s Manual
Step 4 (For R2 series)
If the selected access mode on the previous step is “Face”, then use the Access
Control device to complete face enrollment.
Enter the card ID on the Access Control device.
21
Page 22

www.acti.com
ACTi Access Control Standard Server User’s Manual
(Please refer to the instructions and distance below)
22
Page 23

www.acti.com
ACTi Access Control Standard Server User’s Manual
2 1 3
Download the profile to the ACS-100 server
Check the member you wish to download, then click the Download button.
After the download has completed, the update notification will be shown in the
upper right corner. Click “Refresh” to see the latest update time.
Upload the Profile from the Server to each Access Control Device
Check the member that you wish to upload, and click the Upload button.
23
Page 24

www.acti.com
ACTi Access Control Standard Server User’s Manual
1
2
Modify the Access Permission
To modify the access permission, click the “Server” button then “View”.
The Access Information window appears. The list of permissible access control
devices and time period will be displayed. To modify the permission settings, click
“Edit”.
24
Page 25

www.acti.com
ACTi Access Control Standard Server User’s Manual
I. The left tree diagram shows the members and their department
information. The right tree diagram shows the floors and access control
devices. The checked box indicates the permission given to the selected
member. You can set up individually for different floors. To modify, check or
uncheck the boxes to grant or remove access permission.
You may also copy an access granted to one person to another. To do this,
click the members you want to copy to and from. All the access rights of
the members will be synced and checked on the right tree diagram.
Click the “Next” arrow to continue.
II. An overview will be displayed for you to confirm the selected users, time
zone, devices and whether they can pass or not. Modify, as needed, on this
page. Click the “Next” arrow to continue.
25
Page 26

www.acti.com
ACTi Access Control Standard Server User’s Manual
III. Confirm the data and click the “Next” icon
IV. When the status displays “Waiting”, a final confirmation is required. Click
the “Green Check” icon to confirm and save the changes. The status will
display “Success” after the server and the access control devices are
synchronized.
26
Page 27

www.acti.com
ACTi Access Control Standard Server User’s Manual
1
2
3
4
5
6
7 8 9
10
11
12
K. Report Export
Fill out the required information:
1. Start time for exporting data (MUST)
2. End Time for exporting data (MUST)
3. Search by user
4. Search by department
27
Page 28

www.acti.com
ACTi Access Control Standard Server User’s Manual
5. Search by note
6. Select the record type (All Record is divided into "including pass failure" and
"pass successfully" records)
7. Select the exported format
8. Delimiter (only available under txt file)
9. Select the field format
10. Select the device
11. Show or Hide Column Name
12. Define the YYYY/MM/DD
When you select “According to the work shift” as your record type, the "Status
Format" can be set. Ex: work and off-hours (default is [Time In] and [Time Out])
Punch Status can also be displayed according to the current situation.。(Default: Early
arrival, Normal, Late and Unusual to work)
28
Page 29

www.acti.com
ACTi Access Control Standard Server User’s Manual
L. Report Schedule
Automatically send the report to email by the defined sending schedule.
1. Search by schedule name
2. Search by the description written in schedule
3. Add a new schedule
4. Edit the schedule
5. Delete the schedule
29
Page 30

www.acti.com
ACTi Access Control Standard Server User’s Manual
1 2 3 4 5
6
7
8
9
10
11
12
A. How to add new schedule
Fill out each column
1. Schedule name (MUST)
2. Briefly illustrate the purpose of this schedule
3. File name (YYYYMMDD would be that day)
4. File path
5. Email address (if go through email path)
6. Select the record type
7. Select file format
30
Page 31

www.acti.com
ACTi Access Control Standard Server User’s Manual
8. Select the device
9. Select the txt separator (only available for txt file)
10. Select the field format
11. Show or hide the column name
12. Define the date format
B. Trigger point for each schedule
Below example is based on weekly triggering
1. Define the trigger name
2. Select the Frequency
3. Trigger day
4. Trigger time
31
Page 32

www.acti.com
ACTi Access Control Standard Server User’s Manual
5 7 1
2
3
4
6
5. Define the starting time of the trigger
C. Edit the schedule
After completing the modifications, click Save
M. e-Map
1. Upload eMap
2. Click “Edit Map” to change
3. Delete eMap
4. The device position can be marked on the eMap, drag the mark and move to the
specified position.
5. Lock the mark to prevent accidental movement of the actual position
6. Open the door by single or multiple devices through remote operation. In
special cases, all the access control devices can be opened with one button. For
example, when a terrorist attack occurs, the authority owner can open all the
access control devices with one button to reduce the escape obstacle.
7. Click the device, the mark of the corresponding device will light up.
32
Page 33

www.acti.com
ACTi Access Control Standard Server User’s Manual
1
2
The corresponding card machine device can be dragged to the relative position.
N. Attendence
1. The shift status can be clearly recorded and displayed with the attendance
through the calendar format.
2. Work shift can be classified into different classes according to requirements (ex:
Morning shift, Middle shift, Night shift)
33
Page 34

www.acti.com
ACTi Access Control Standard Server User’s Manual
If there is a substitute situation, you can also click on a single day and mark the leave
and the substitute.
A. Work Shift
34
Page 35

www.acti.com
ACTi Access Control Standard Server User’s Manual
1 2 3
5
6
8
7
Click on “Add” or “Edit” of the work shift,refer to the following steps:
Field description
1. Fill in the name of the work shift
2. Choose if it is an interval shift
3. Fill in the working hours
4. Choose the "late buffer " interval
5. "Allow early arrival" time (in minutes)
6. "Allow overtime" time (in minutes)
7. Early departure time (in minutes)
8. Break time (in minutes)
35
Page 36

www.acti.com
ACTi Access Control Standard Server User’s Manual
B. Work Shift Assignment
Define the employee with corresponding work shift. The operation steps are shown
as below:
36
Page 37

www.acti.com
ACTi Access Control Standard Server User’s Manual
1
2
5
Field description
1. Assignment name
2. Pull down the menu to select the corresponding work shift
3. Select date duration
4. Select the weekdays of the week
5. Detailed description
37
Page 38

www.acti.com
ACTi Access Control Standard Server User’s Manual
Check the group members corresponding to the work shift
After completing the form, confirm then save.
38
Page 39

www.acti.com
ACTi Access Control Standard Server User’s Manual
1
2
3
4
5
6
O. Device Setting
Click “System Information” from the left menu, then enter the Device page.
To add a new device, click “Add Device”. The left panel lists the devices
which are already added. The right panel is used to select the device type. At the
time of writing this document, the following devices are currently supported: R1
Series :R1xCx-3x, R2 Series :R21CF-3x, R7 Series :R7xCx-3x, Q960A
R1 Series
Parameters
1. Select the device type from the drop-down menu
2. Define the device name
3. Device IP setting
4. Device Port, default is 1621
5. Set the node ID, default is 1
6. Define if this access control device will be used as card enrollment
39
Page 40

www.acti.com
ACTi Access Control Standard Server User’s Manual
1 2 3
4 5 6
7
R2 Series
Parameters
1. Select the device type from the drop-down menu
2. Define the device name
3. Device IP setting
4. Device Port, default is 80
5. Type the account name to be used when connecting, default is “user1”
6. Type the password to be used when connecting, default is “123456”
7. Define if this access control device will be used for Face enrollment
40
Page 41

www.acti.com
ACTi Access Control Standard Server User’s Manual
1
2
3
4
5
6
7
R7 Series
Parameters
1. Select the device type from the drop-down menu
2. Define the device name
3. Device IP setting
4. Device Port, default is 80
5. Type the account name to be used when connecting, default is “admin”
6. Type the password to be used when connecting, default is “Aa123456”
7. Define if this access control device will be used for Face enrollment
41
Page 42

www.acti.com
ACTi Access Control Standard Server User’s Manual
1 2 3
4 5 6
7
Q960A
Parameters
1. Select the device type from the drop-down menu
2. Define the device name
3. Set the MAC address
4. Set the device IP
5. Device Port, default is 80
6. Type the account name to be used when connecting, default is “admin”
7. Type the password to be used when connecting, default is “Aa123456”
Scan Device
You can also select “Scan Device” to search for the unregistered device under the
same IP address, select the Device Type to be scanned or click” Scan” directly.
42
Page 43

www.acti.com
ACTi Access Control Standard Server User’s Manual
The Device List will list all the newly added devices. Click “Add” after clicking the
device.
If you want to modify or view for the single device’s information, you can also click to
check.
43
Page 44

www.acti.com
ACTi Access Control Standard Server User’s Manual
Device Group
For easy inspection and management, the equipment can be grouped into levels
(Max level: 5).
To add a new level: Click "+" in the upper right corner of the level
Enter the group name of the next level and click “Save”.
44
Page 45

www.acti.com
ACTi Access Control Standard Server User’s Manual
Click on the device that you would like to add and press "Add".
45
Page 46

www.acti.com
ACTi Access Control Standard Server User’s Manual
1
2
3
P. System Information
1. System information includes the system name and current version
2. Displays the information about the connected devices like the maximum
channels and quantity of license
3. Please refer to sections B, C, D,E for “Setting” information
46
 Loading...