

Page 1

Quickly guider for Ceiling AP
密级
XXX 年
A300Mbps Ceiling APP1105
Quick installation guide
August,2013
Page 2

Quickly guider for Ceiling AP
第1页 共9页
密级
This man u al suit for qu i ck insta llati o n of indoo r 30 0 m 11N wirel ess AP &
High P o wer Ro u ter. This m a nual wi ll ins t ruct you how to con figur e and
manag e thi s indoo r 300m 11N wi r eless AP & Hi g h Powe r Rout e r in ri g ht
ways .
Pleas e c h eck the pack a ge befor e us e .
● Ce iling A P*1
● DC 24 V 1 0 00m A P OE adapte r*1
● au x ilia r y to ols for inst a llat i on*1
● Qu i ck insta l lati o n gu ide manua l*1
● Qu a lity ce r tific a te*1
● Warr a nty Card * 1
Page 3
Quickly guider for Ceiling AP
第2页 共9页
密级
Quick Configuration Guide
1st.Connection and power supply.
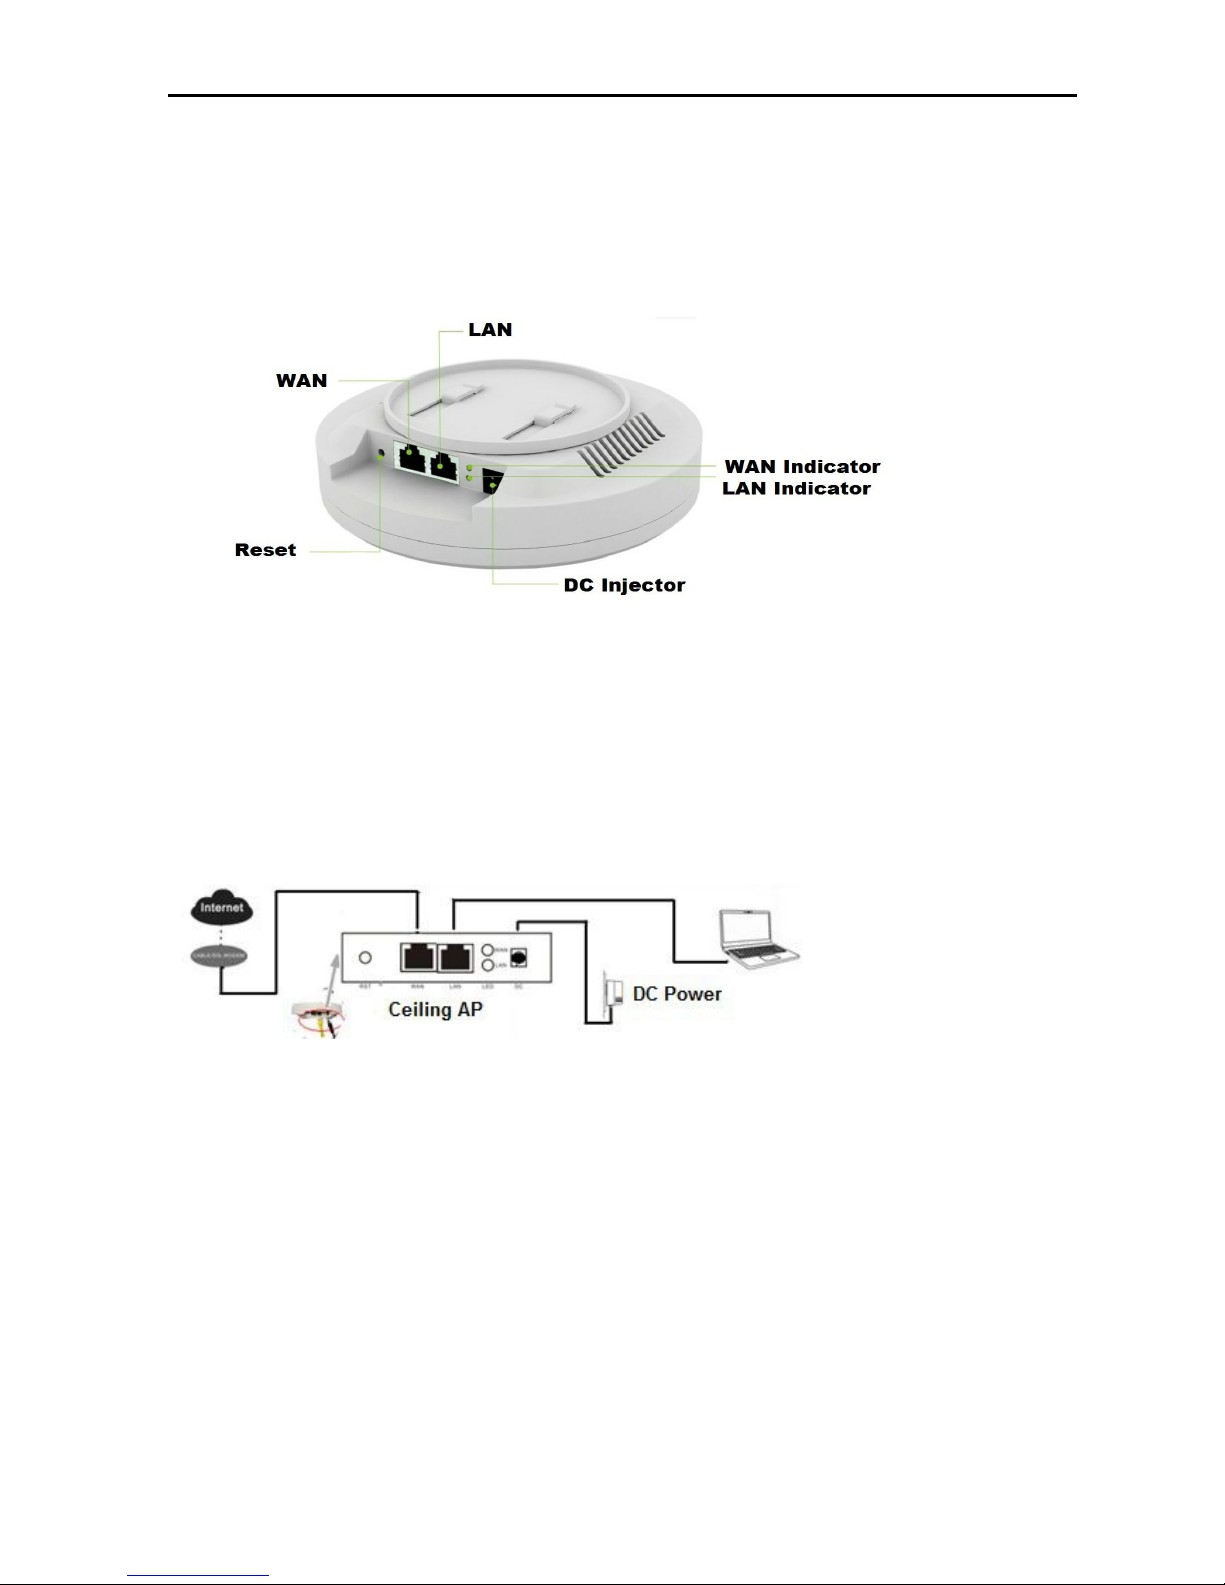
The device’s interface description
P1 XD9500`s Interface
power supply mode
1. DC power supply: the DC’s electronic standard is 12V/1A, connection diagram as
follow:
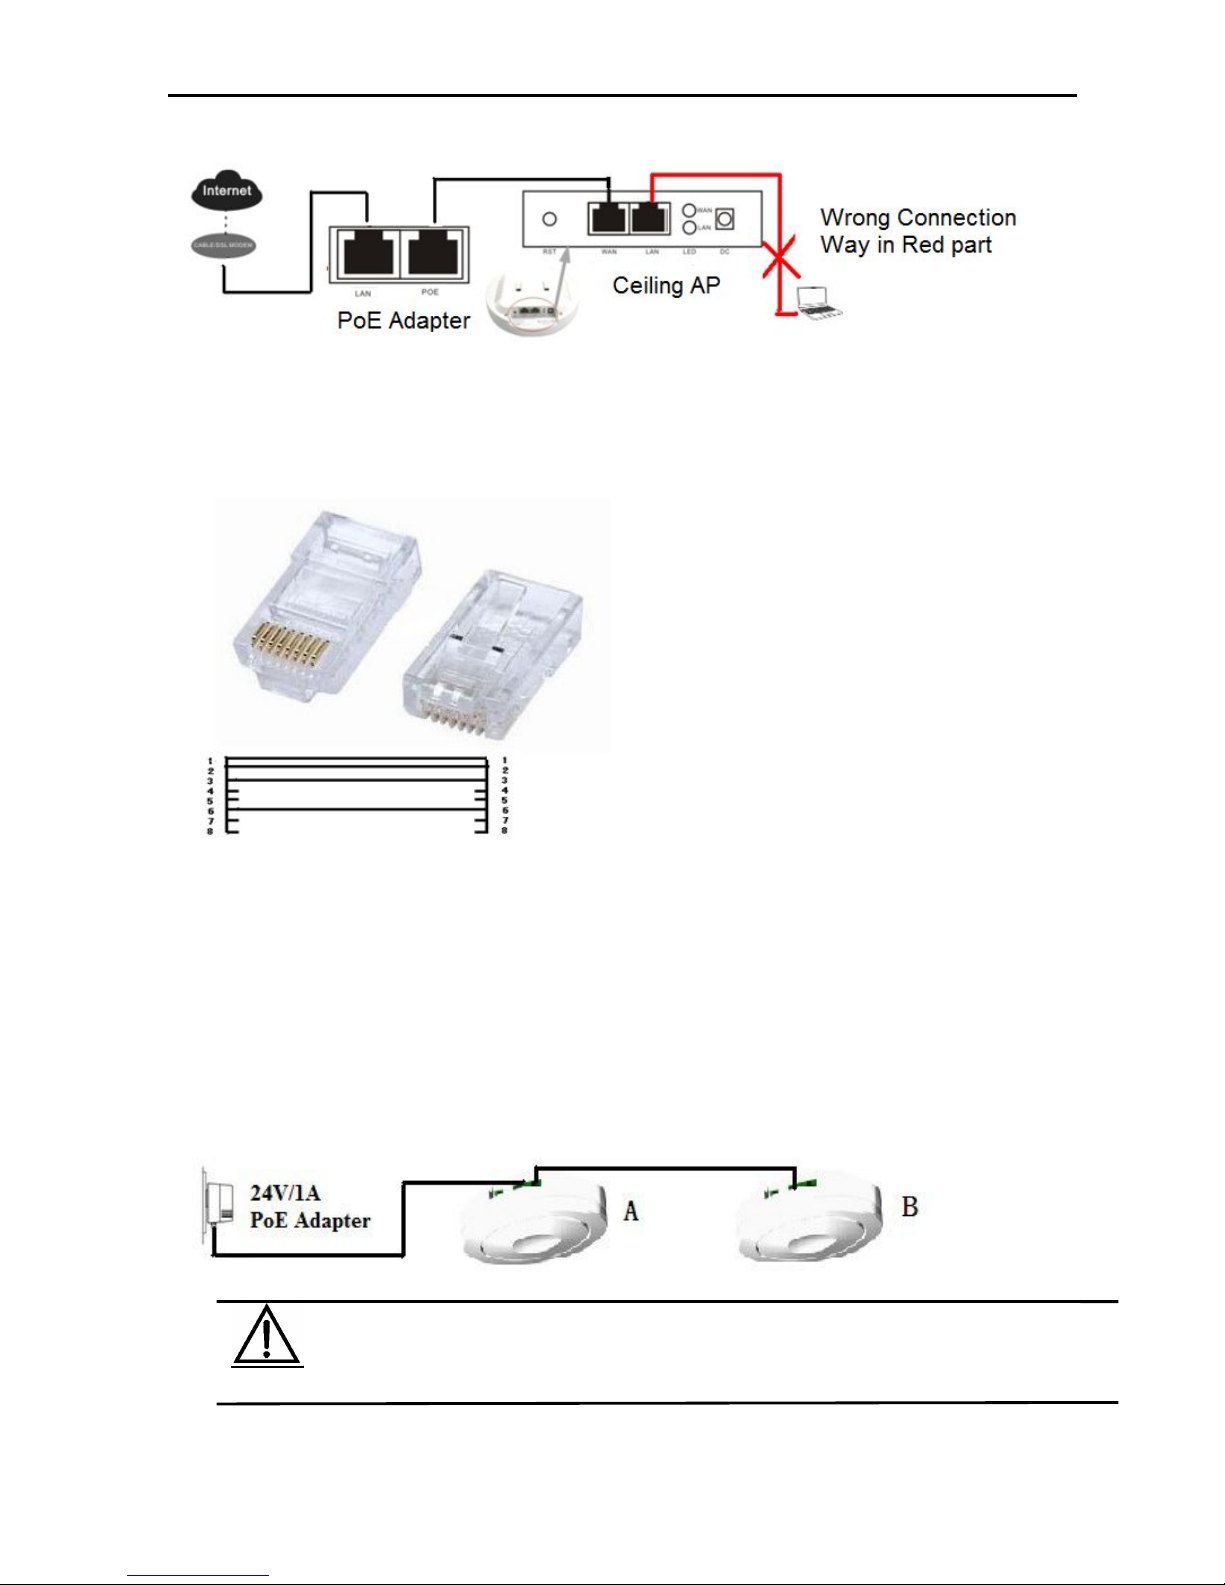
2. Powered over Ethernet: Connect device’s WAN/LAN Port with PoE adapter by LAN
Cable (Both LAN port and WAN port support the 12V/24V PoE.), the right connection
diagram should be as follow:
Page 4
Quickly guider for Ceiling AP
第3页 共9页
密级
If user want access into Ceiling AP from PC, can be Wireless connection; or LAN cable
connection, but the LAN cable should be designed as follow, and our ceiling AP should
be under Gateway (Default Mode) and AP operation mode!
3. When powered by 24V/1A PoE, this ceiling AP can be PoE power supply for another
ceiling AP from Wan port or Lan port
Attention: line 4,5 must be positive electrode, Line 7,8 must be negative electrode in
RJ45 Port.Just as the picture shows below, Device A’s WAN port connect with 24V/1A
PoE Power Adapter, then A’s LAN port supply 12V/1A power for B.
Attent
wrong connection or unauthorized power adapter may damage
the device.
Page 5
Quickly guider for Ceiling AP
第4页 共9页
密级
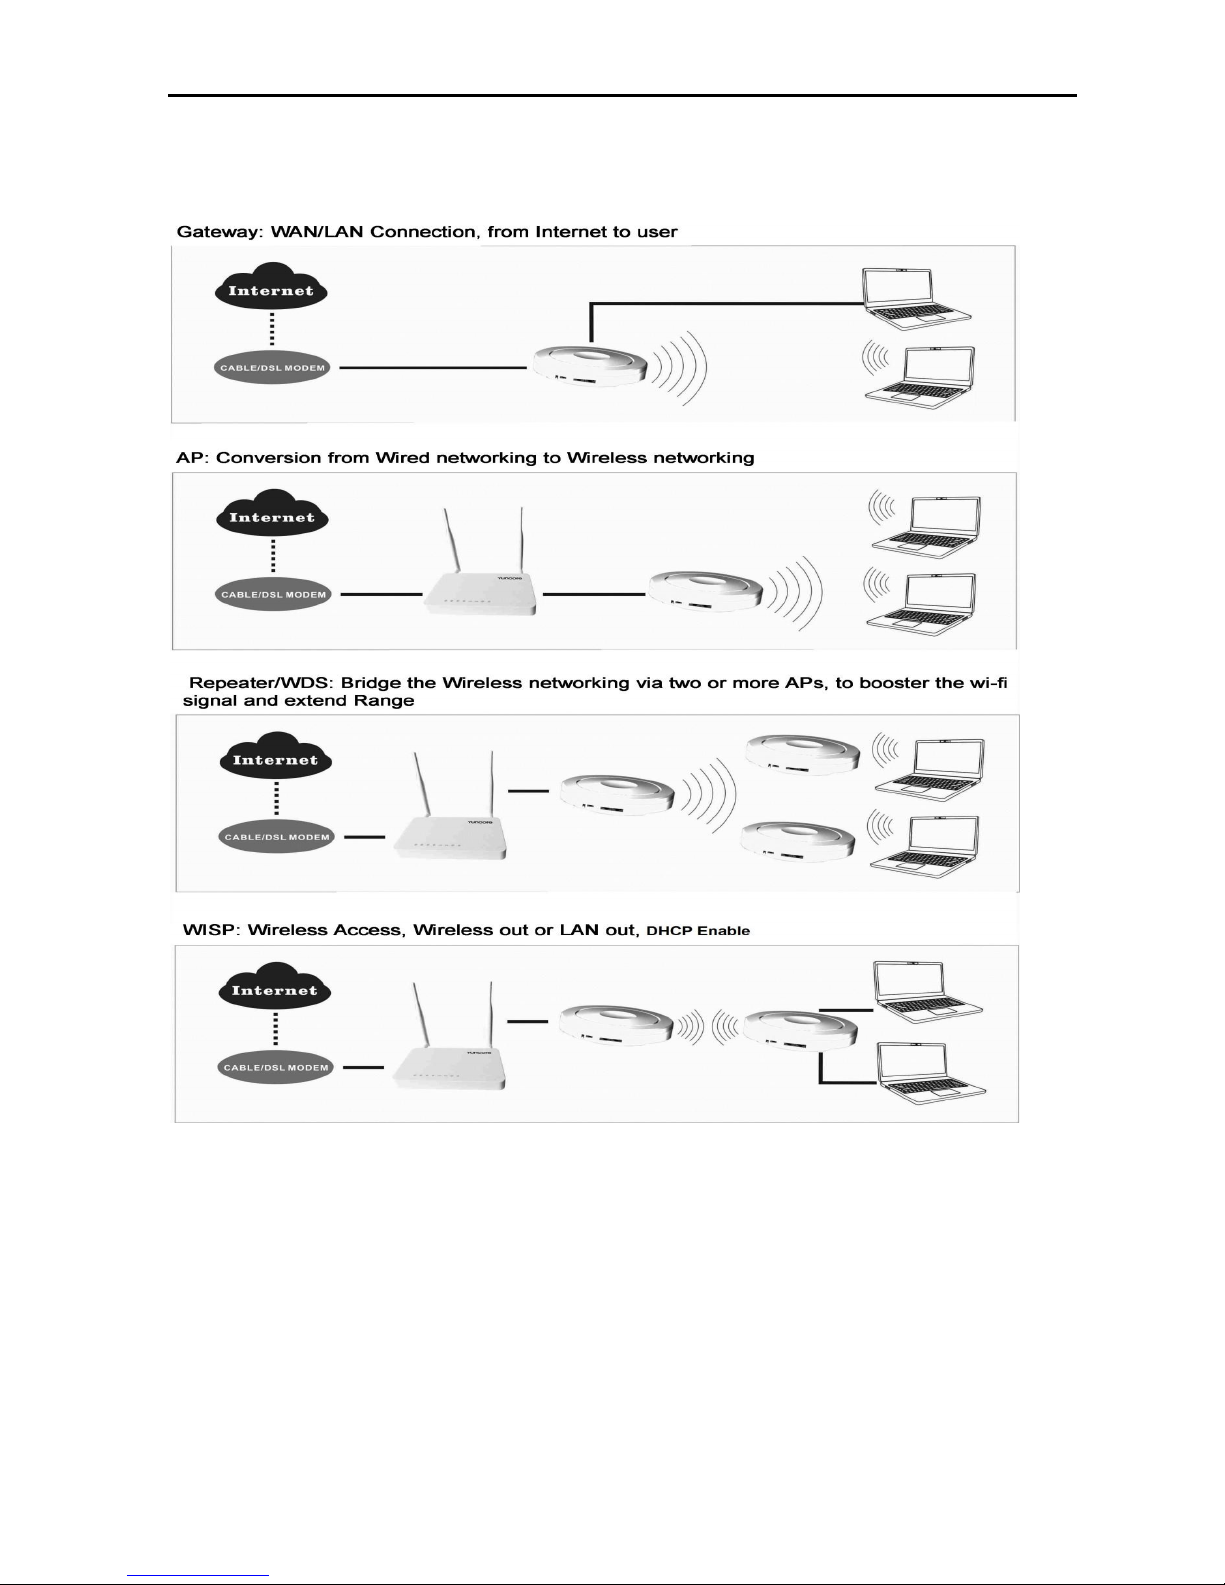
Working mode Description
2
nd.
login and launch
1)connect the ceiling AP with computer by Wired/Wireless
2)Get the IP address automatically or manually configure
Wire connect
A. manually configure
Page 6
Quickly guider for Ceiling AP
第5页 共9页
密级
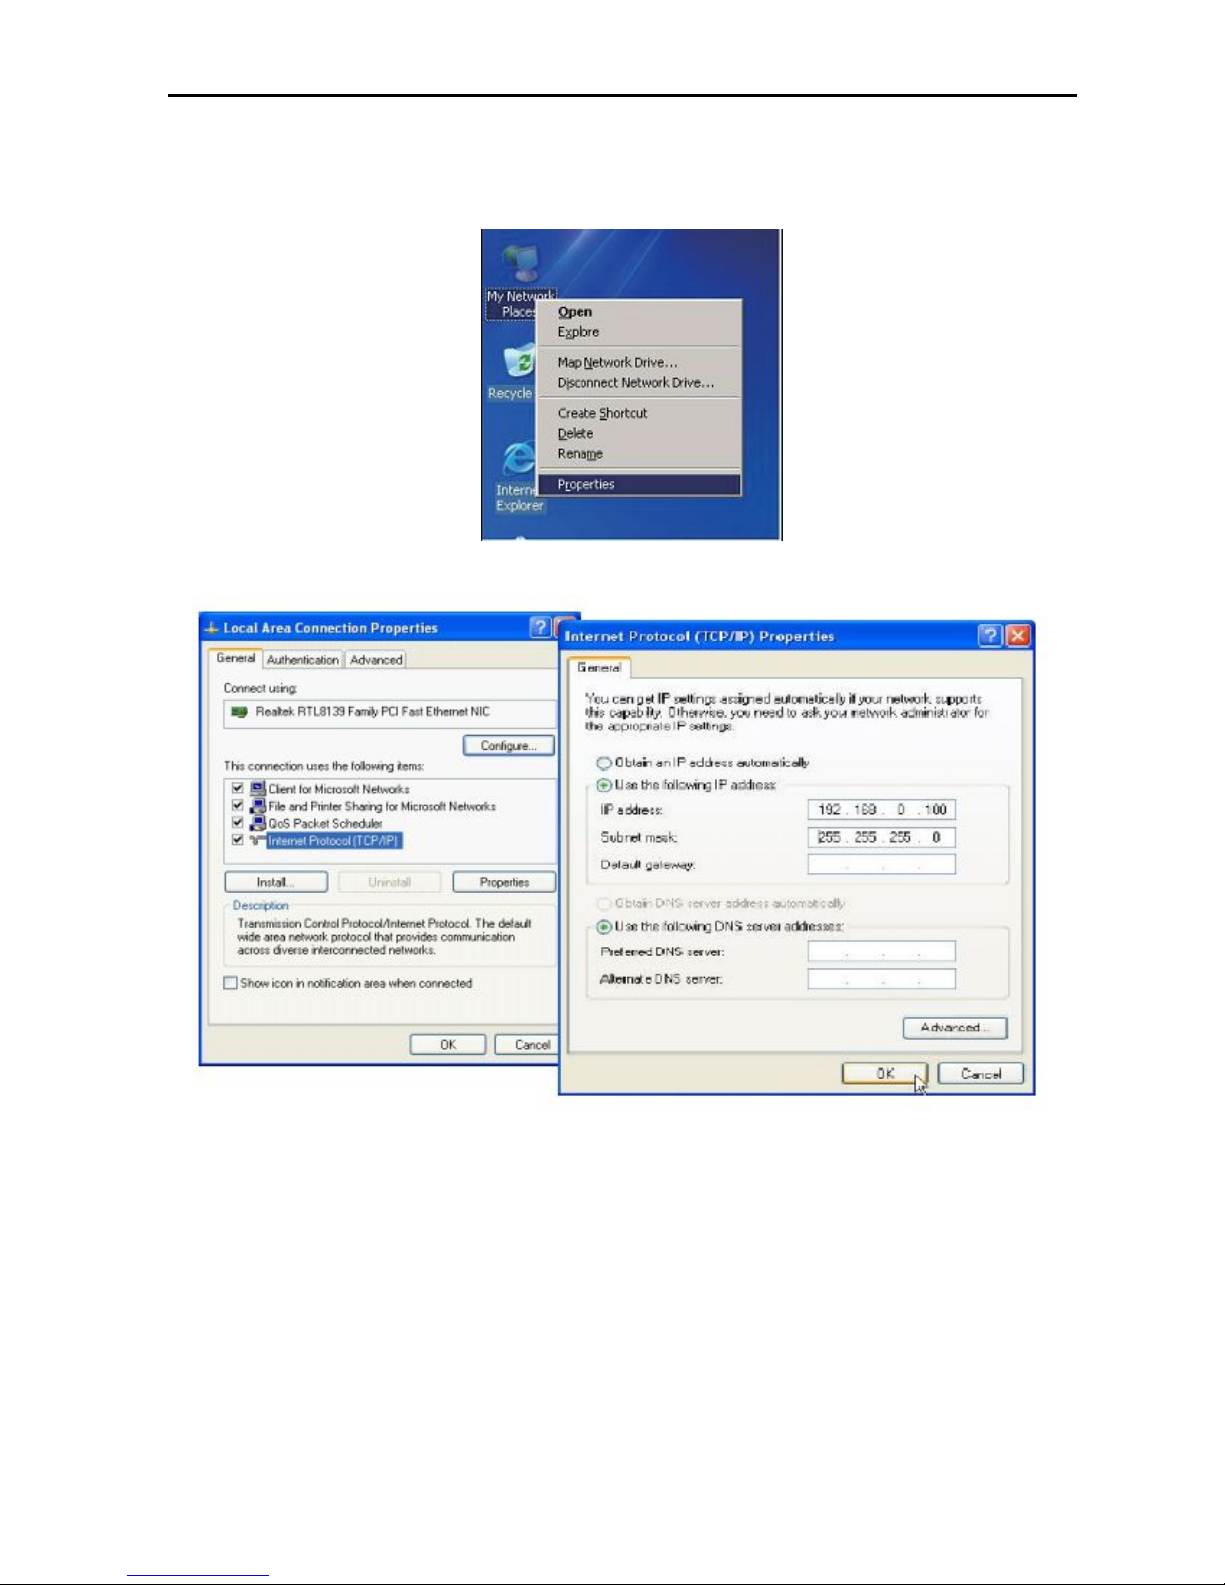
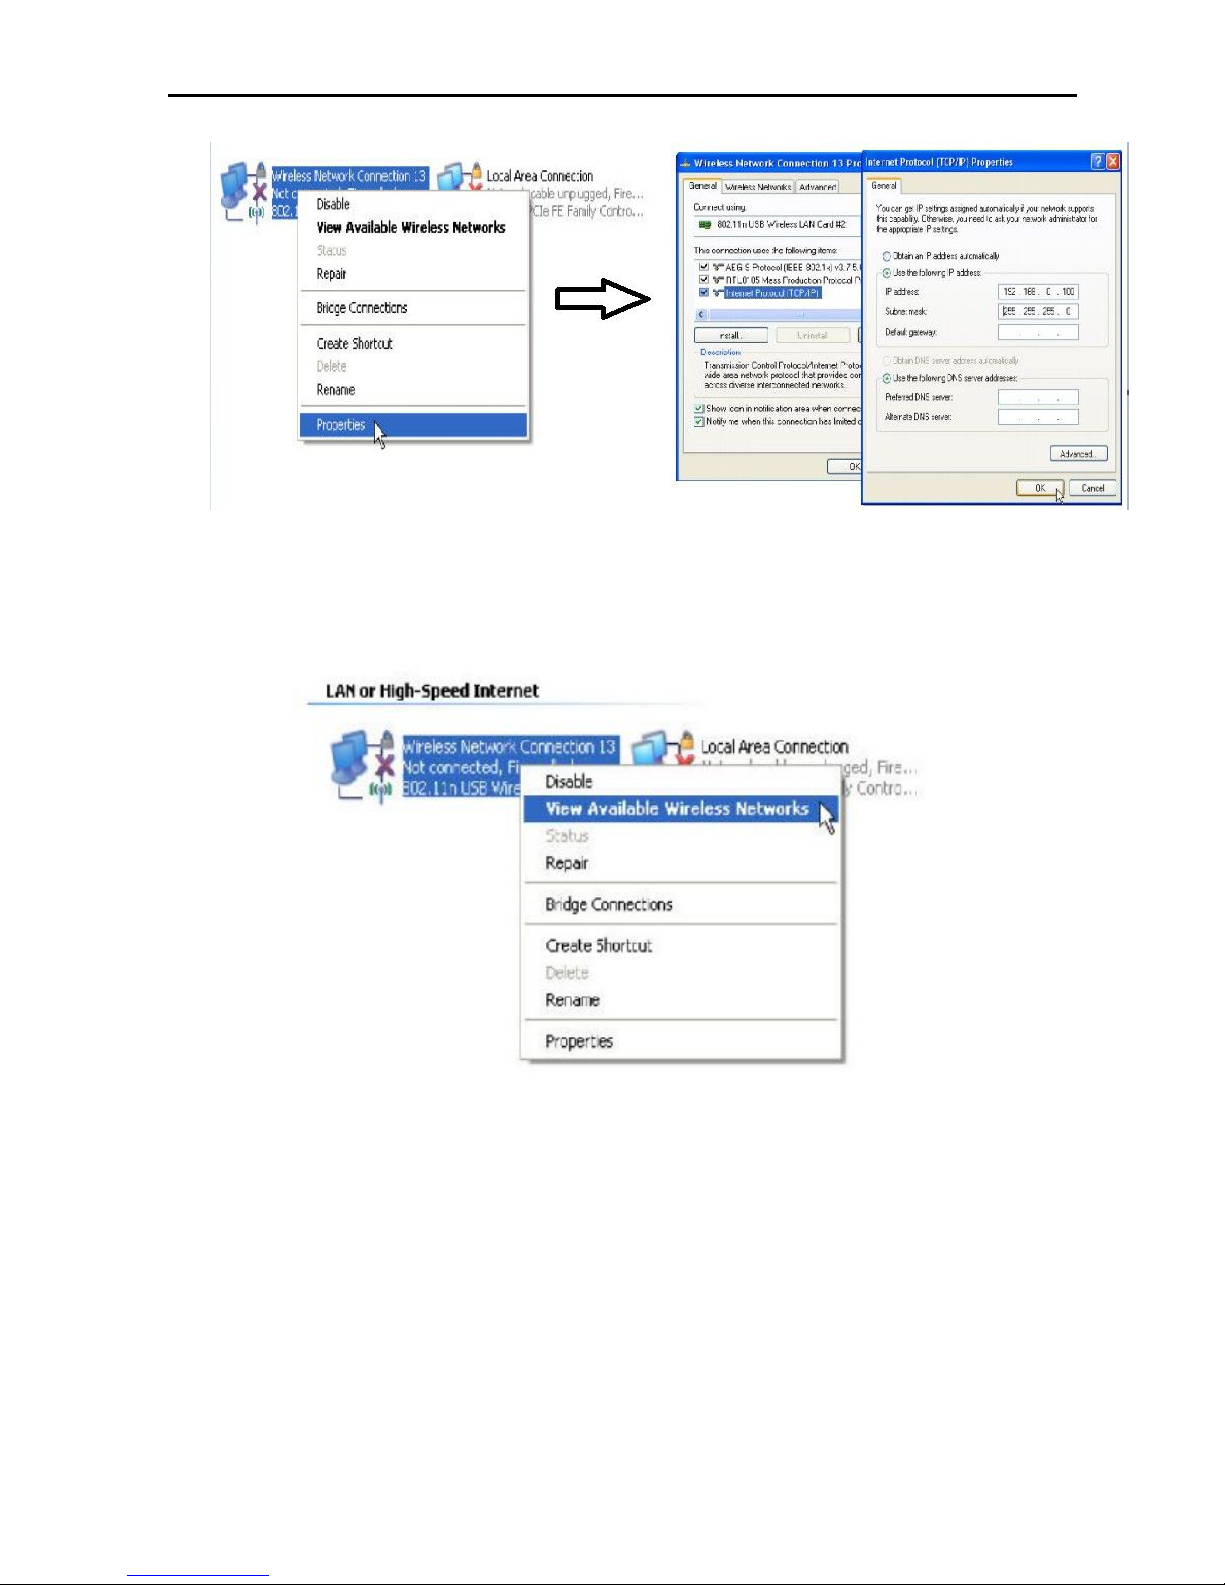
configure local IP address as 192.168.0.x(X can be selected from 2-254) the same
network segment as XD9500,subnet mask 255.255.255.0,As P2 and P3 shows.
P2 IP configuration of computer network
P3 IP configuration of computer network card
wireless connection
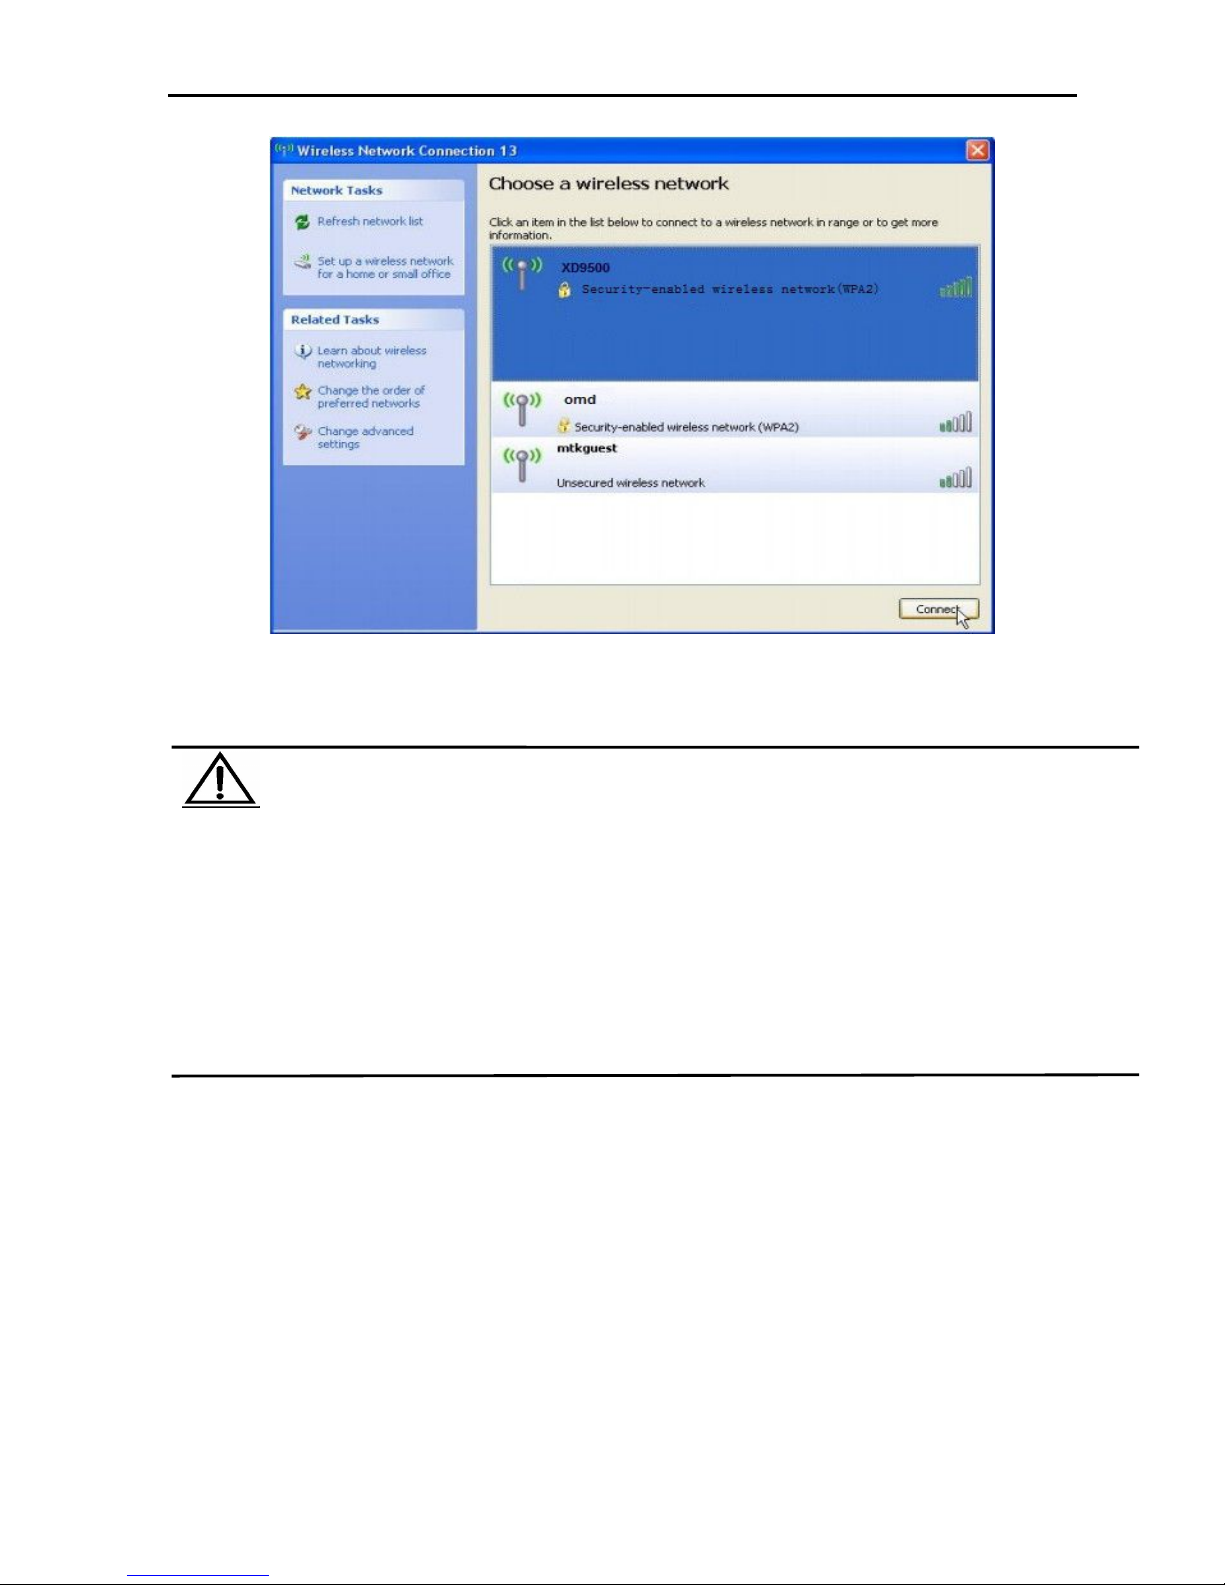
After basic configuration, if you want use wireless internet,you can configure
computer wireless connection as local connection settings mentioned above. Right
click "wireless network configuration",chose "check available wireless
connection",find the connecting name"XD9500",the default Passwords is"666666"
Page 7
Quickly guider for Ceiling AP
第6页 共9页
密级
P4 IP Address setting
Page 8
Quickly guider for Ceiling AP
第7页 共9页
密级
P 5 Wireless Connection
Atten
If you computer include 802.11b/g/n functions but cannot find wireless
connection,please contact the after-sell departement of your computer supplier
when in those situation.
1)Right click“network neighborhood”and chose "attribute" , no wireless
connection exist.
2)Wireless connection existed, Right click it and chose "attribute",there are
"normal" and "advance" in the menu,but no "wireless network configuration"
exist.
3)Other computer or wireless device connection is normal.
Page 9
Quickly guider for Ceiling AP
第8页 共9页
密级
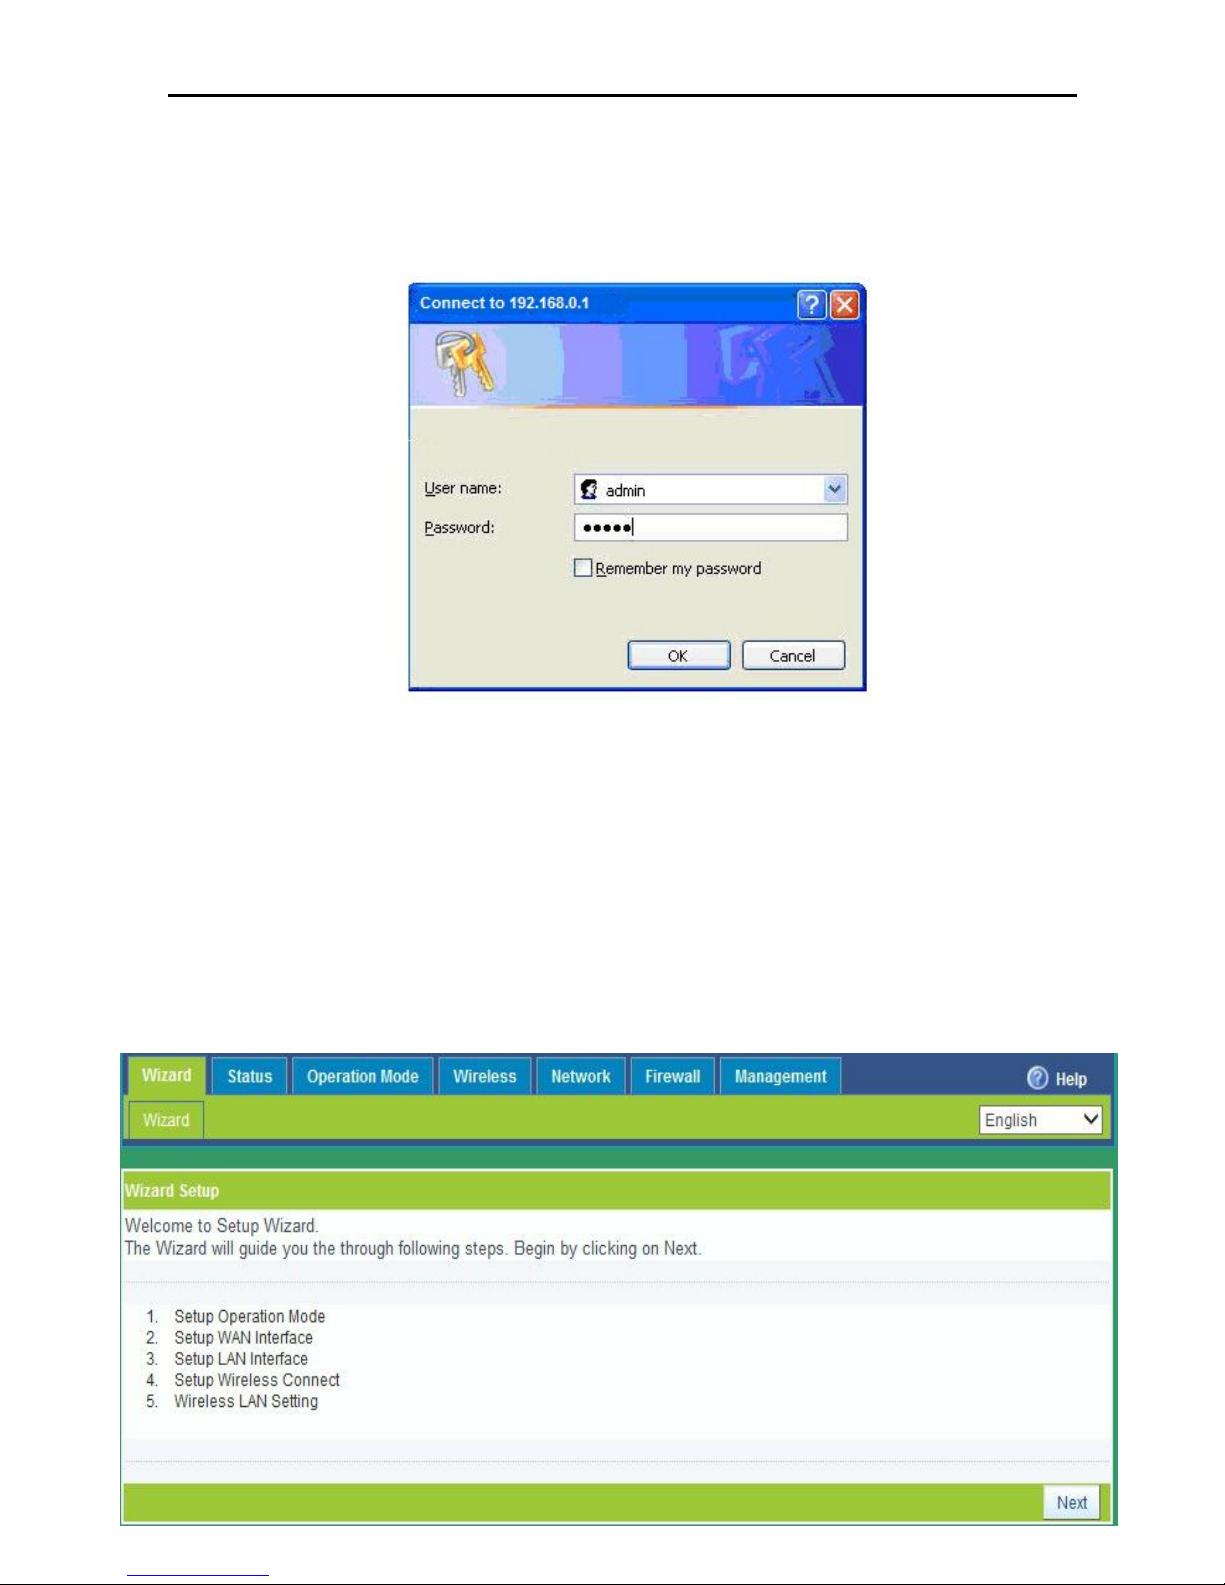
3) Log in the CPE: Open your web browser, type 192.168.0.1 in the address bar,
enter the User name/Passwords: preset as admin/admin, then you can found on the
label attached to the router, click OK
P6 User name and passwords input
3ndsteps: Operat ion mode setting
Enter into the page of WEB software management page, then set the ceiling AP as
requirement. The default working mode is Gateway, but we take Repeater for
example to show how to select the right working mode. Click Wizard, then select the
Operation modem, then next to enter into another page.
Page 10
Quickly guider for Ceiling AP
第9页 共9页
密级
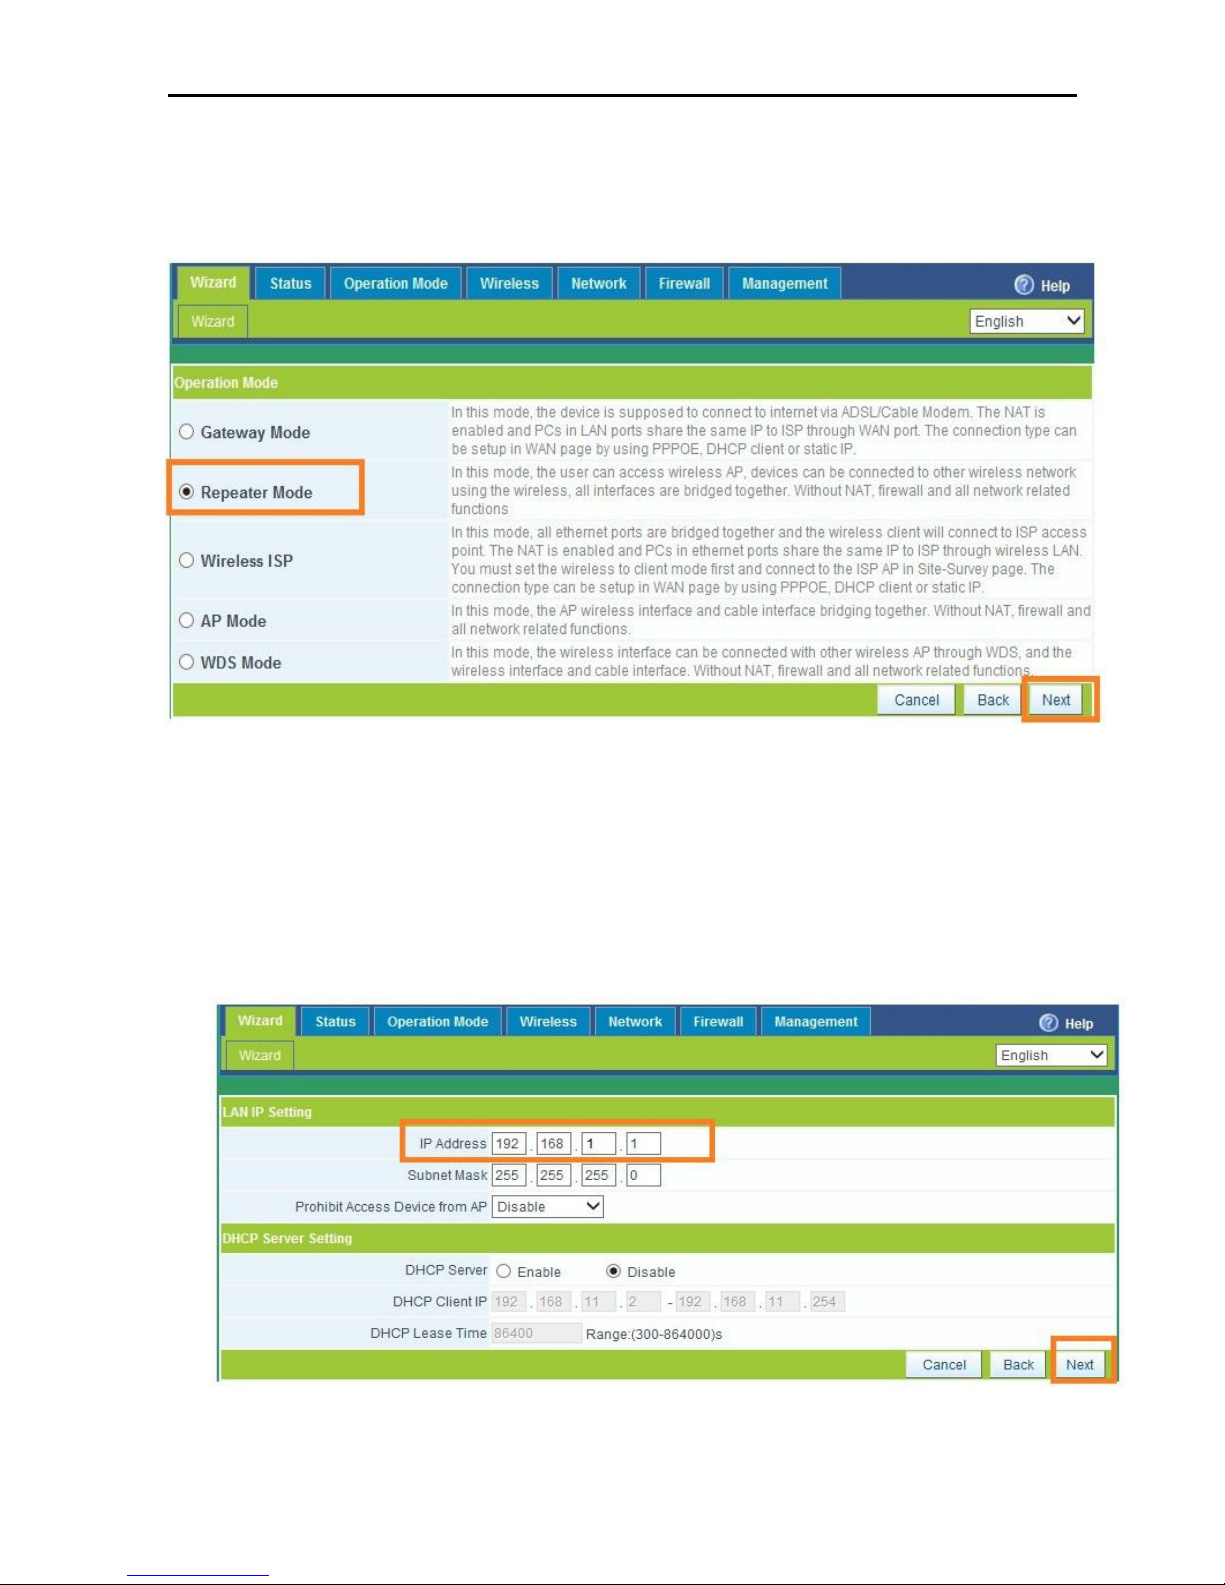
P7 Wizard Page
Set Working Mode: Select Repeater Mode in P8, click Next
P8 Operation mode select
LAN Setting
LAN IP Address Setting: Fill in the IP Address we need, it will show like P9 after
configure
DHCP Server: DHCP Server is unable in default under Repeater mode, click Next to
continue
P9 LAN Setting
Page 11
Quickly guider for Ceiling AP
第10页 共9页
密级
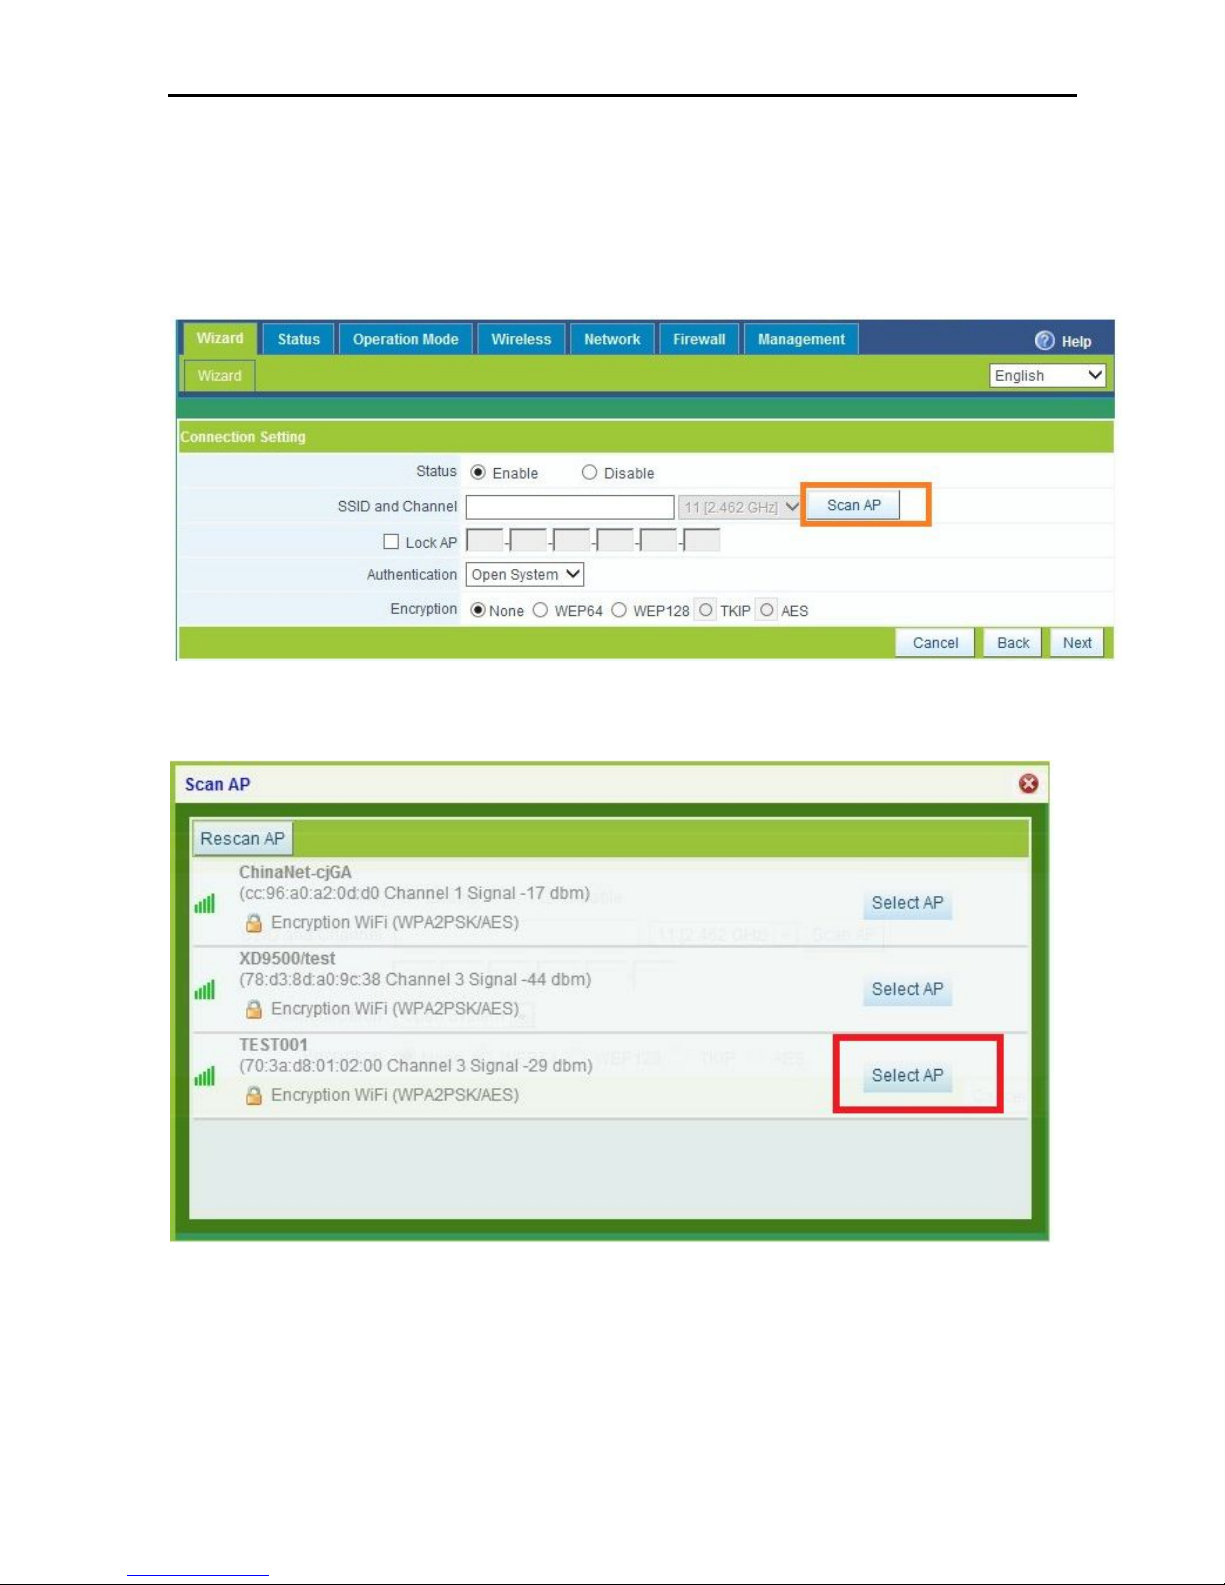
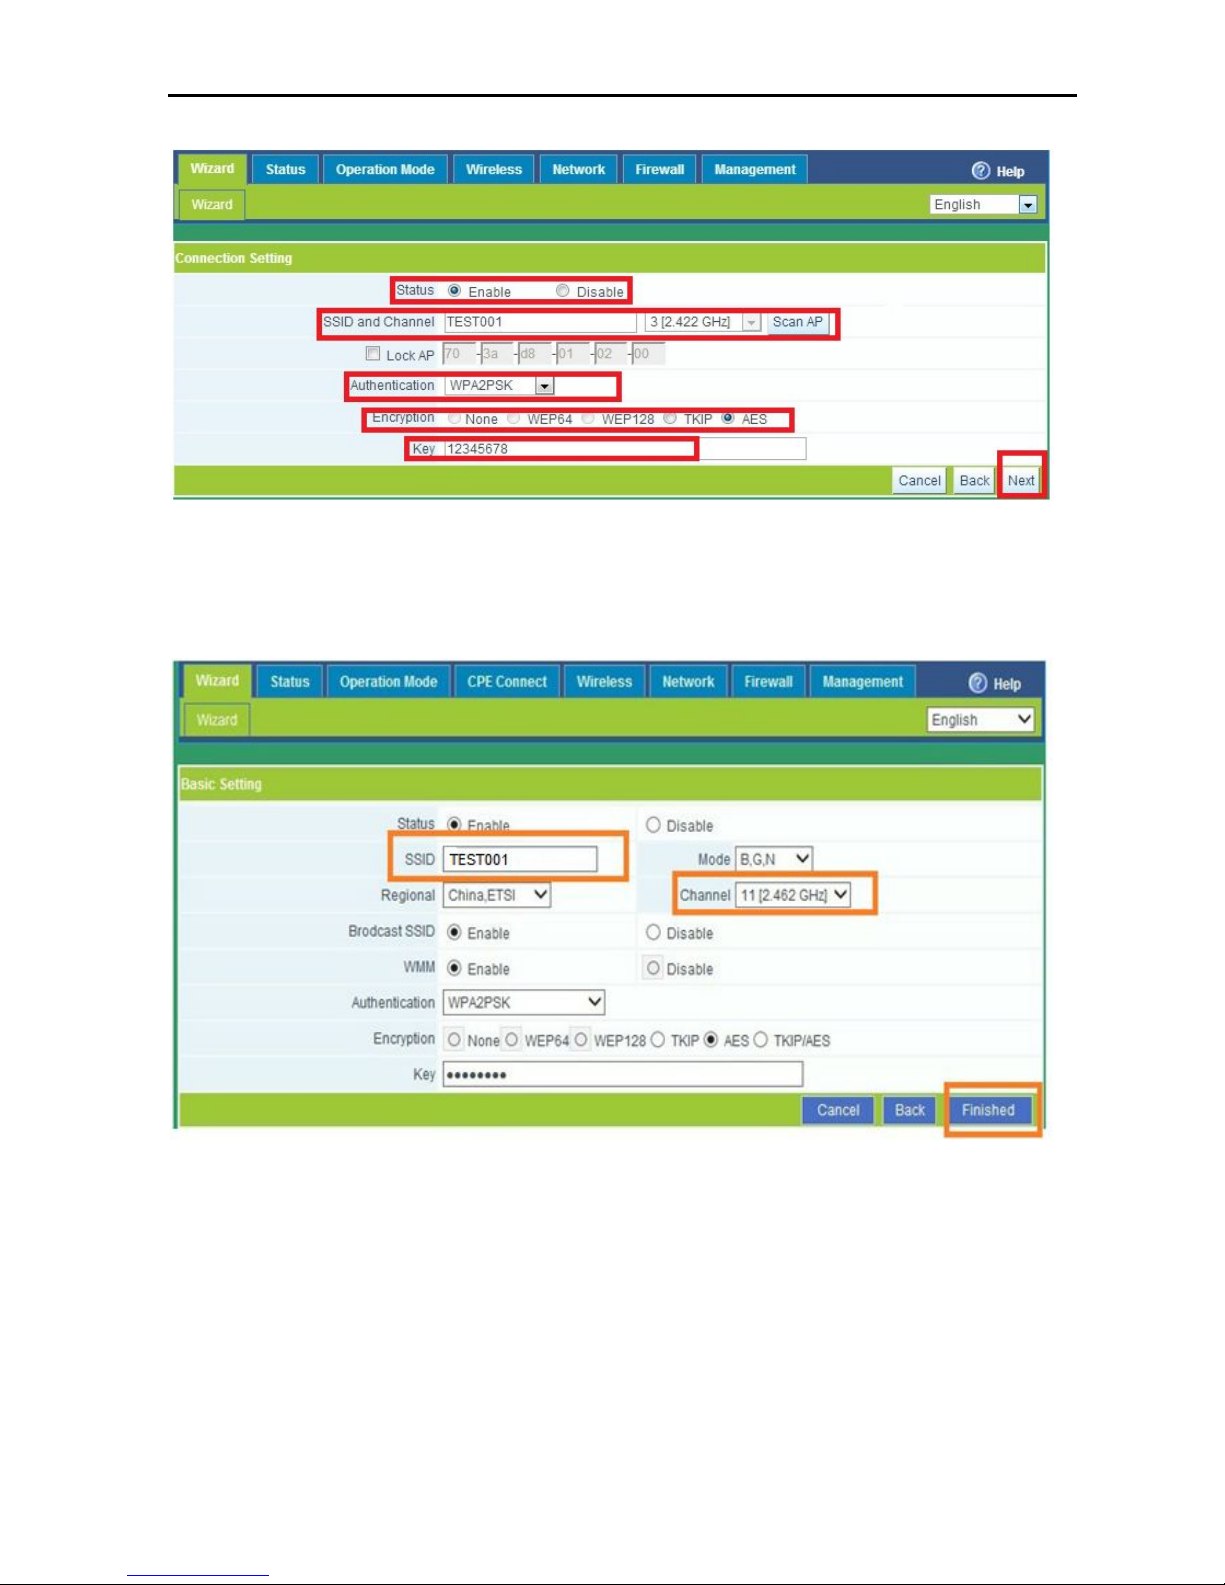
Connect with Wireless AP: Click Search Wireless AP in page P10, then choose
the right wireless AP in P11. Then input the right passwords and click Next to
continue in P12
P10 Scan AP
P11 AP List after scan
Page 12
Quickly guider for Ceiling AP
第11页 共9页
密级
P12 Passwords input
Basic Setting: configure the SSID, Channel, passwords if require, like P13
P13 Basic Setting
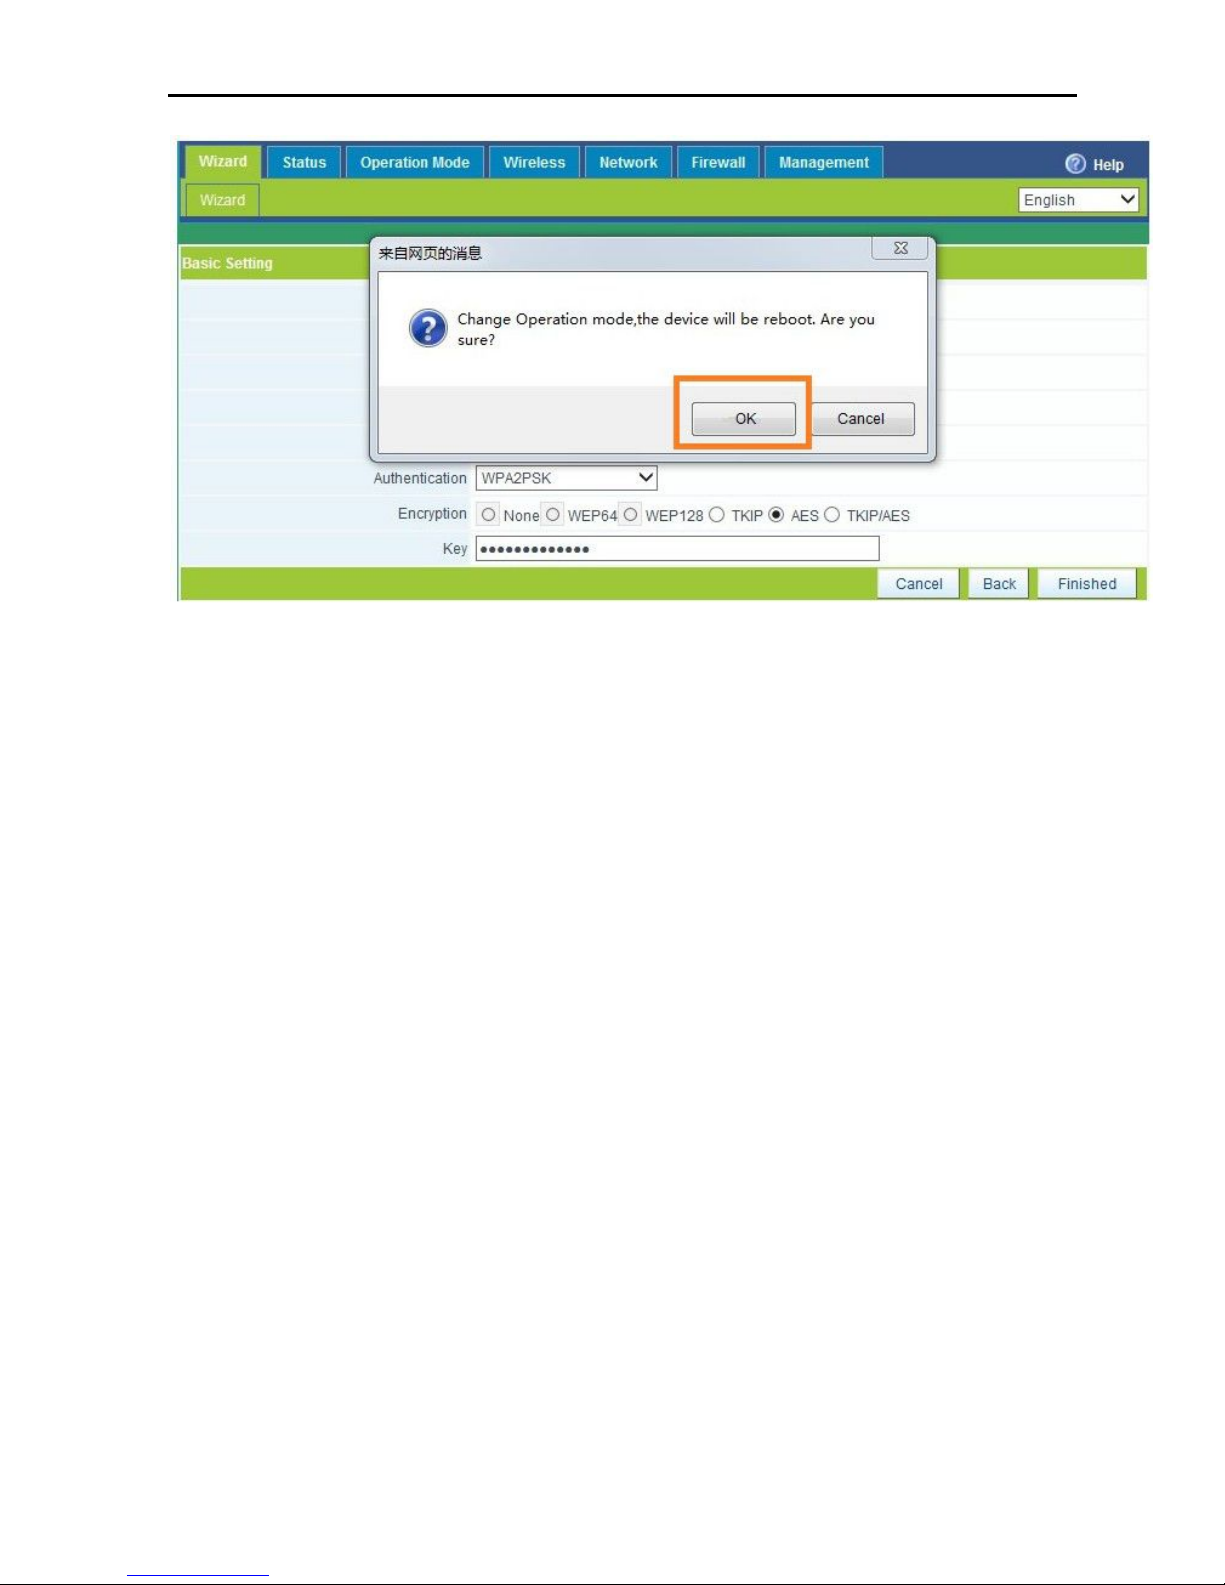
Setting Finish: Click Finish after configure all the data, pop up a window and ask
whether continue to changing even the ceiling AP will reboot. Choose OK to
continue and waiting system reboot.
Page 13
Quickly guider for Ceiling AP
第12页 共9页
密级
P14 Change the working mode
Checking Status: After reboot, the working mode of Ceiling AP is Repeater. Our
PC and other wireless device can access to and get Ethernet from the top end
AP or router by our ceiling AP in Repeater Mode. The user should change PC’s
IP address to one from 192.168.0.2~254, then can access to the ceiling AP and
checking the status.
After checking the status successful, we finished the Repeater working mode
setting.
For other mode, can be configured and setted similiar like WDS.
Page 14
Quickly guider for Ceiling AP
第13页 共9页
密级
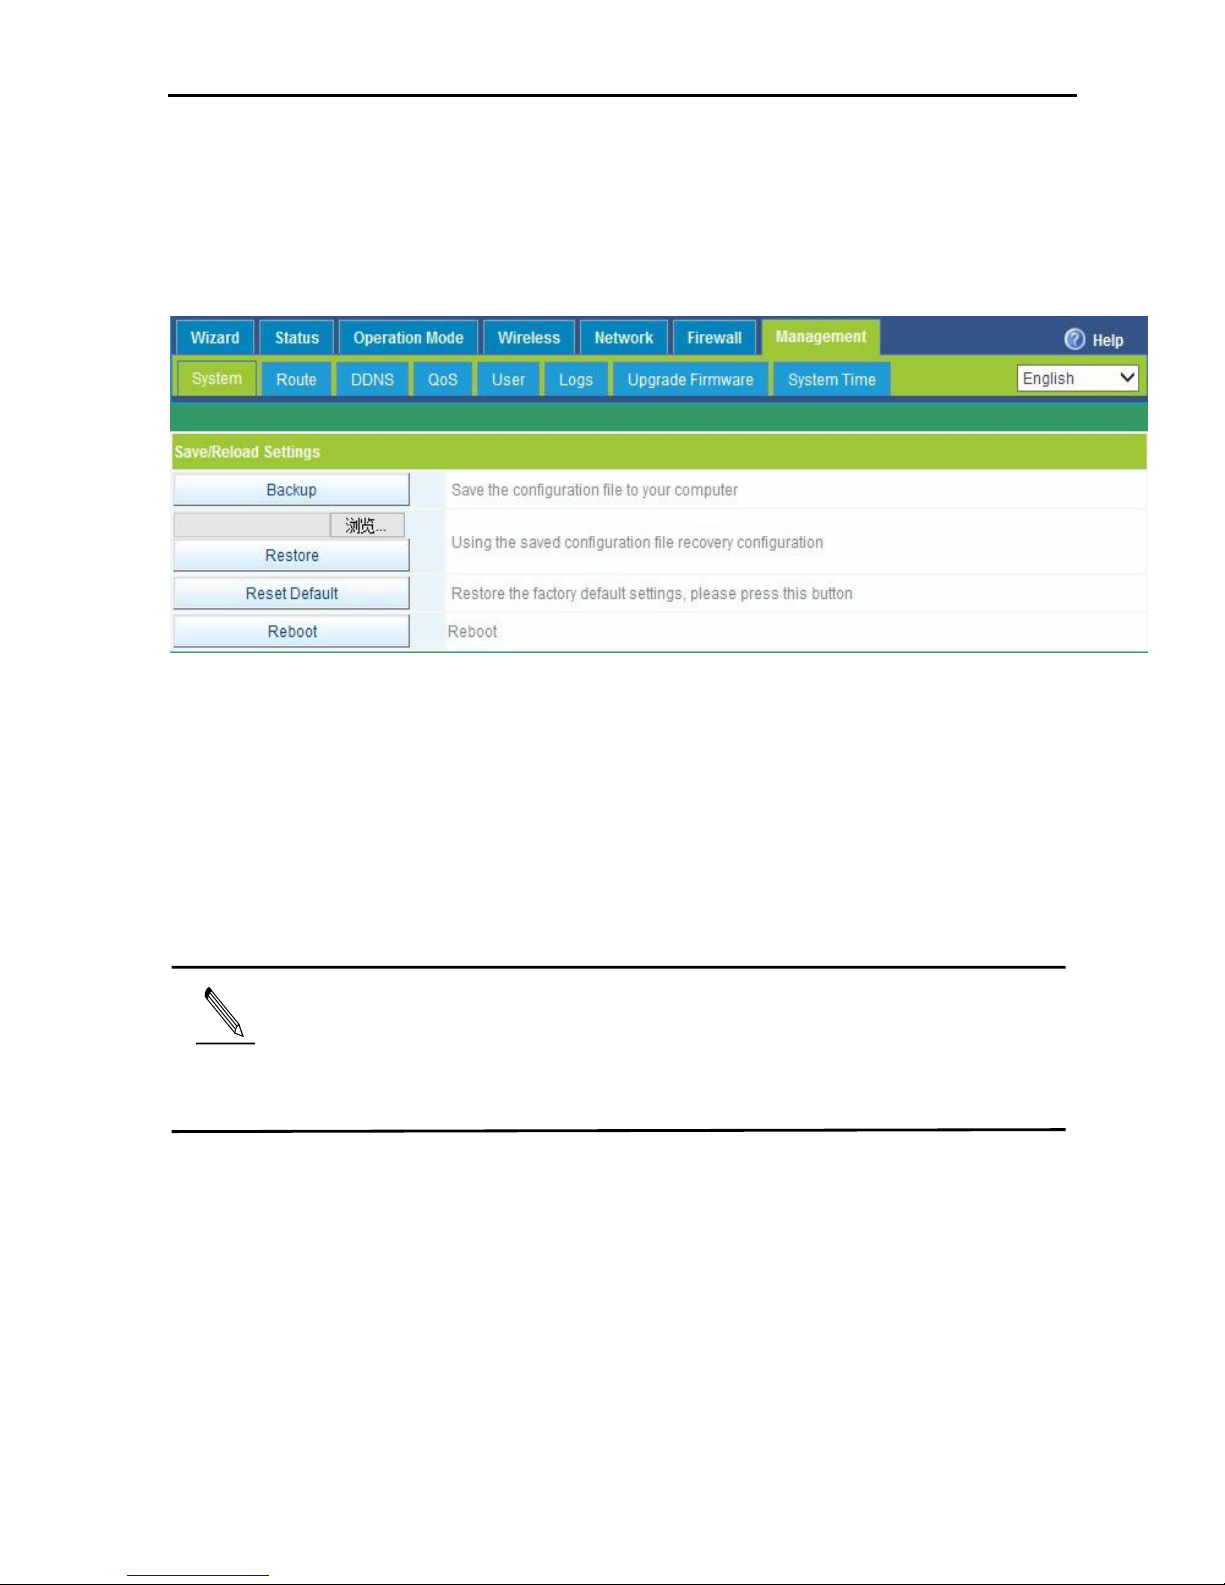
Management
Click Management to enter into the management page as follow P16
P 16 Management Page
System: export the default data, or load the new configure file to restore the AP’s
system, or reboot to default setting.
Manager: set the the manager and passwords for ceiling AP
Log: Log Enable or disable, or view the system log from here
Firmware upgrade: Upgrade new firmware to access stable function
Atten
The XD9500 can restore to factory default by press the Reset button last more than 10
seconds. Then XD9500 will restore to factory default setting after WiFi LED flash off and
System reboot.
Page 15

Quickly guider for Ceiling AP
第14页 共9页
密级
Trouble Shoot ing
Form 1 Symptoms and Treatment
Symptoms Treatment
Forget the login user name and
passwords
Restore to factory default
Can’t login the ceiling AP
through WEB management
1、Pls make sure the PC and ceiling AP’s IP Address
are in same network segment, can be checked
through Ping: PC start--input CMD in Run, then ping
192.168.0.1
2 、 Login after Restore this ceiling AP to factory
default
3 、 Make sure there isn’t any equipment take IP
address of 192.168.0.1 in ceiling AP’s networking
4、Check your computer and network cable to avoid
any problem, recommend to use unshielded twisted
pair 10/100M Ethernet cable.
Forget the AP’s SSID and
passwords
Restore to factory default
Can’t access to AP’s IP address
1. Check the AP’s DHCP and make it enable in Gateway
mode and WISP mode
2. Check the connection between ceiling AP and the top
networking in AP and Repeater mode
No Power indicator
1. If DC Power, check the local power supplier
2. If PoE Power, check the PoE adapter and Internet cable
 Loading...