

Page 1
User Manual
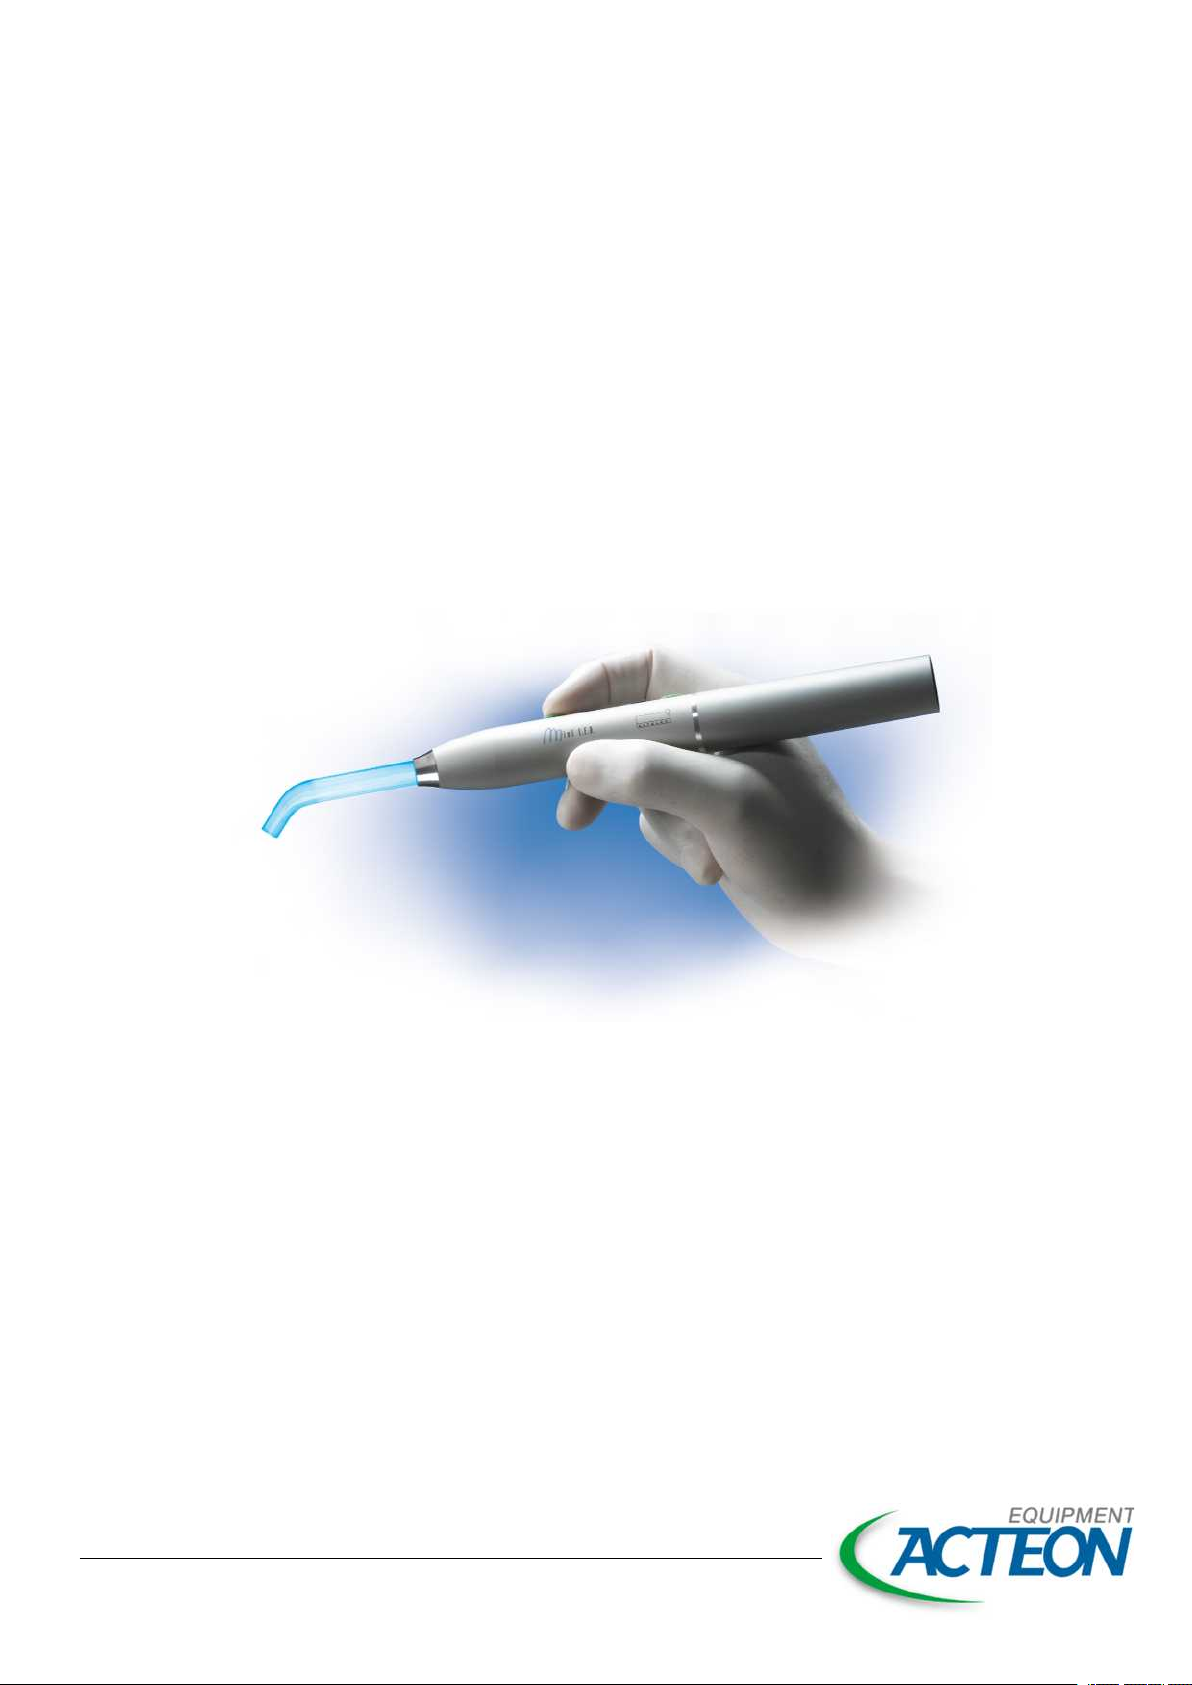
Mini LED™
Page 2

This document is an English translation of the original French version.
Reference J02540 version V5 and drawing number NG13FR010E
Page 3

Contents
1 Documentation 5
1.1 Associated documentation 5
2 Required information 7
2.1 Indication for use 7
2.2 Operating principle 7
2.3 Date of first inclusion of EC marking 7
2.4 Latest document update 7
2.5 Repairing or modifying the medical device 7
2.6 Warranty 7
2.7 Accessory usage conditions 7
3 Removal from packaging, installation, connections 9
3.1 Removing the medical device from its packaging 9
3.2 Installing the medical device 10
3.3 Connecting the medical device to the electrical network 10
3.4 Installing the mains adapter 10
4 Medical device description 11
4.1 First use 11
4.2 Using the Mini LED 11
4.3 Mini LED™ 11
4.4 Connecting and disconnecting accessories during use 12
4.5 Light indicator 12
4.6 Buttons 12
4.7 Base 12
4.8 Mains Adapter 12
4.9 Operating modes 13
4.9.1 Wave peak 13
4.9.2 Waveform in each mode 13
4.10 Switching off the medical device 14
4.11 Disconnecting the medical device 14
5 Cleaning, disinfecting and sterilising 15
5.1 Cleaning and disinfecting the Mini LED 15
5.2 Cleaning, disinfecting and sterilising accessories 15
6 Monitoring and general maintenance of the medical device 17
7 Maintenance 19
7.1 Checking the lamp power level 19
7.2 Identifying incorrect operation 19
7.2.1 Not working 19
7.3 The power of the Mini LED is not as expected 19
7.4 Other malfunctions 20
8 Technical specifications of the medical device 21
Page 4

8.1 Identification 21
8.2 Mains Adapter 21
8.3 Optical Guide 21
8.4 Mini LED handpiece 21
8.5 Technical specifications of the battery 22
8.6 Charging base 22
8.7 Environmental characteristics 22
8.8 Environmental restrictions 22
8.9 Main performance characteristics 22
9 Regulations and standards 23
9.1 Official Texts 23
9.2 Medical class of the device 23
9.3 Symbols 23
9.4 Manufacturer identification 24
9.5 Branch addresses 25
9.6 Disposal and recycling 26
10 Index 27
11 Glossary 29
Page 5

Foreword
The SATELEC®medical device that you are about to install and use in your practice is a
medical device designed for professional use. It is therefore a key tool with which you will
provide treatment within the context of your work.
To ensure optimum safety for yourself and your patients, comfort in your daily practice and
to benefit fully from your medical device's technology, please read the documentation
provided carefully.
Please refer to the instructions for the entire range of SATELEC®Mini LED for information
about the following:
l documentation format;
l documentation archiving period;
l warnings concerning user and patient populations;
l treatment area;
l medical device usage interactions, contraindications and prohibitions;
l electromagnetic compatibility;
l disposal and recycling of the medical device;
l manufacturer responsibility.
Please refer to the cleaning, disinfection and sterilisation instructions for accessories and to
the cleaning, disinfection and sterilisation instructions for Mini LEDs for information about
the following:
l preparation of parts for sterilisation;
l detailed manual and automated instructions;
l information concerning conditioning for sterilisation;
l recommendations for the inspection of parts.
Page 6

Page 7
1 Documentation
This document contains the following information:
l indications for use;
l medical device description;
l medical device installation;
l medical device use;
l preparation prior to cleaning and disinfecting the medical device;
l monitoring and general maintenance of the medical device;
l maintenance to be performed by the user.
1.1 Associated documentation
This document must be used in association with the following documents:
Document title References
Cleaning, disinfection and sterilisation instructions for the SATELEC®Mini LED optical guide
J02941
Cleaning and disinfection instructions for the SATELEC®Mini LED rigid protection shield
General instructions relating to the SATELEC®complete range of table curing lamps
Consulting electronic user instructions J00000
Mini LED™ User Manual J02541
J05541
J02921
User Manual • Mini LED™ • J02541 • V5 • 07 • 01/2015 • NG13EN010E - Page 5/30
Page 8

Page 6/30 - User Manual • Mini LED™ • J02541 • V5 • 07 • 01/2015 • NG13EN010E
Page 9

2 Required information
2.1 Indication for use
This medical device is designed to cure photosensitive reconstruction and bonding materials used in dentistry.
The target clinical uses relate to conservative and restorative dentistry.
This medical device is used with an optical guide and a rigid protection shield.
2.2 Operating principle
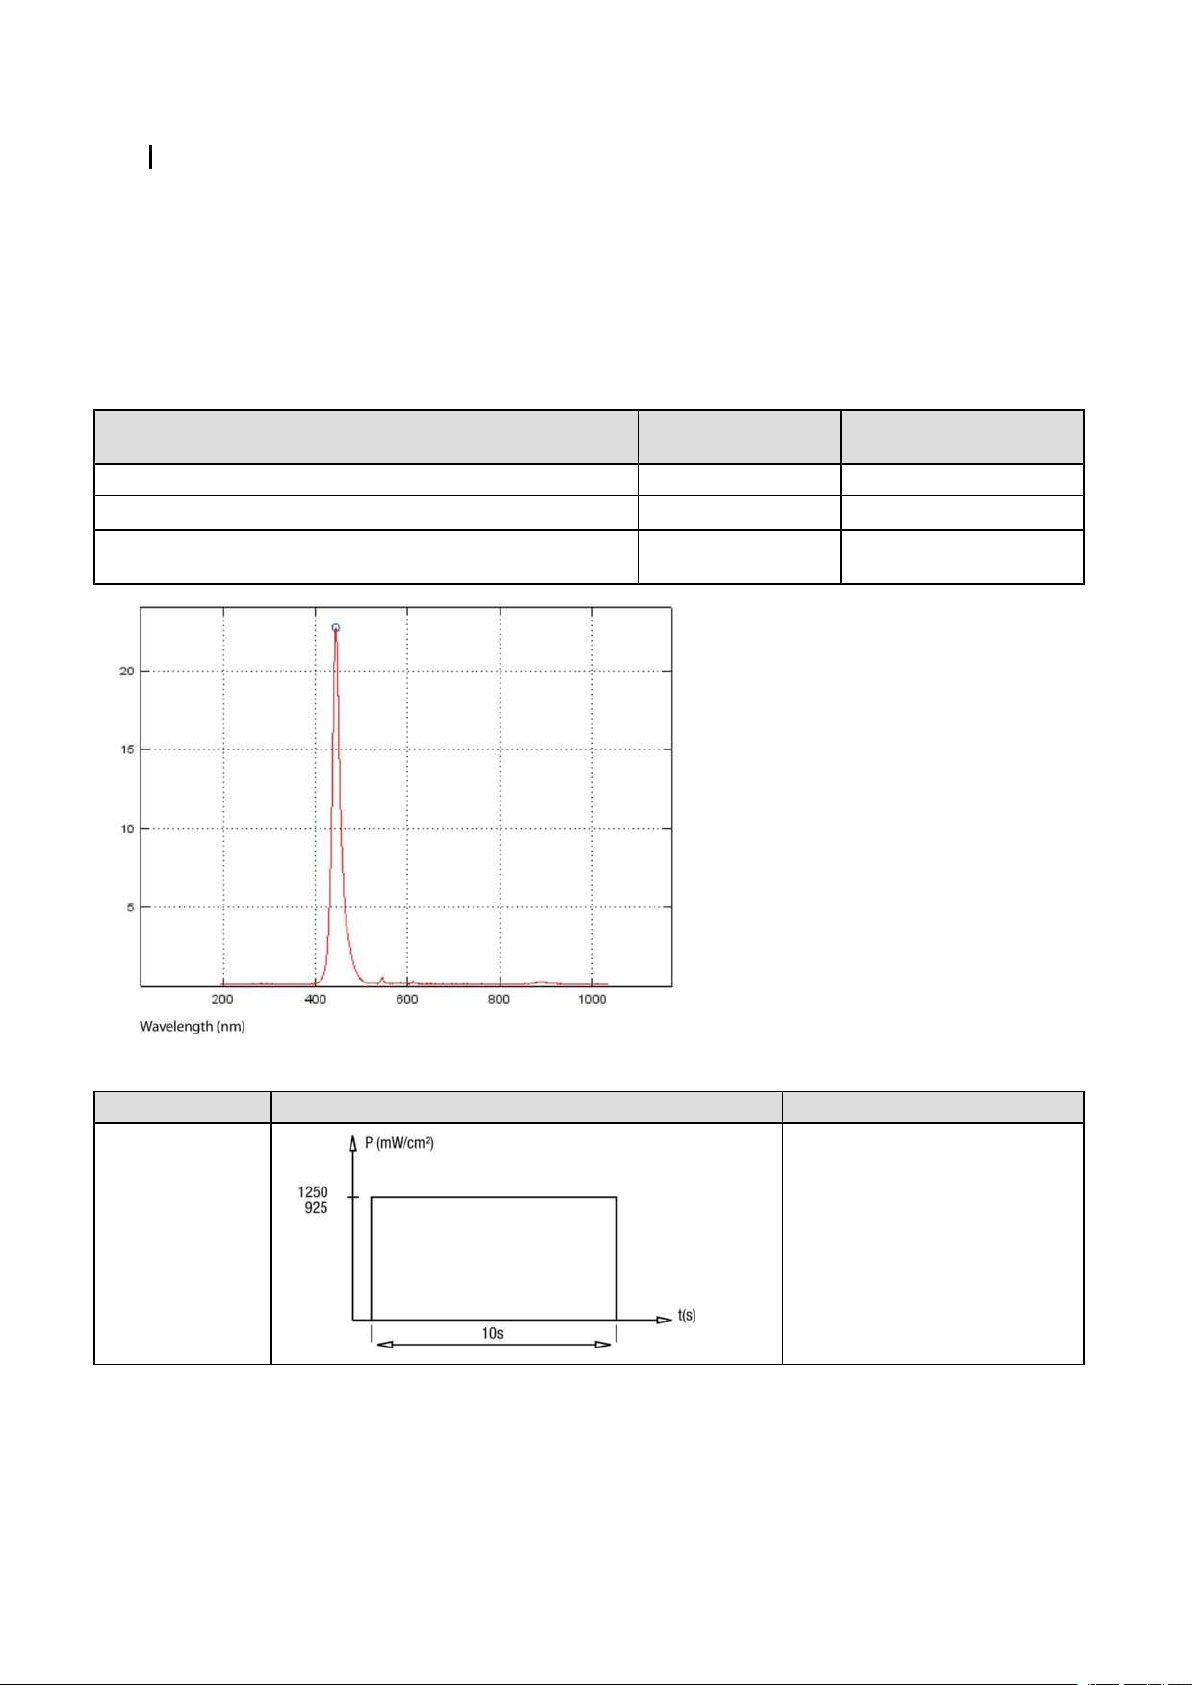
Designed to light-cure dental materials, the Mini LED is fitted with electroluminescent diodes (LED) that emit a
visible blue light in a spectrum of wavelengths between 440 nm - 460 nm. A removable optical guide is
attached to the end of the medical device. The optical guide concentrates and directs the light produced to the
clinical site.
The wavelength of the light source corresponds to that of the photo-initiators used in dental curing materials.
2.3 Date of first inclusion of EC marking
2007
2.4 Latest document update
01/2015
2.5 Repairing or modifying the medical device
Contact the supplier of your device. Using the services of an unapproved repairer could render your device
dangerous for you and your patients.
Do not repair or modify the device without seeking the prior permission of SATELEC®.
If the device is modified or repaired, specific checks and tests must be carried out to ensure that the medical
device is still safe to use.
In the event of doubt, contact an approved dealer or the SATELEC®customer service team:
www.acteongroup.com
SATELEC®at the request of technical personnel working for the network of dealers approved by
SATELEC®, provides all information required to repair the faulty parts on which they may perform
repairs.
2.6 Warranty
The user must not disassemble the base, the battery or the handpiece as this will invalidate the medical
device's warranty.
2.7 Accessory usage conditions
The optical guide must be cleaned and sterilised being being used. The rigid protection shield must be cleaned
before being used.
User Manual • Mini LED™ • J02541 • V5 • 07 • 01/2015 • NG13EN010E - Page 7/30
Page 10

Page 8/30 - User Manual • Mini LED™ • J02541 • V5 • 07 • 01/2015 • NG13EN010E
Page 11
3 Removal from packaging, installation, connections
3.1 Removing the medical device from its packaging
When you receive your medical device, check for any damage that may have occurred during transportation.
If you have received this medical device by mistake, please contact the supplier to arrange for it to be
collected.
If you have any questions or requirements, contact your supplier.
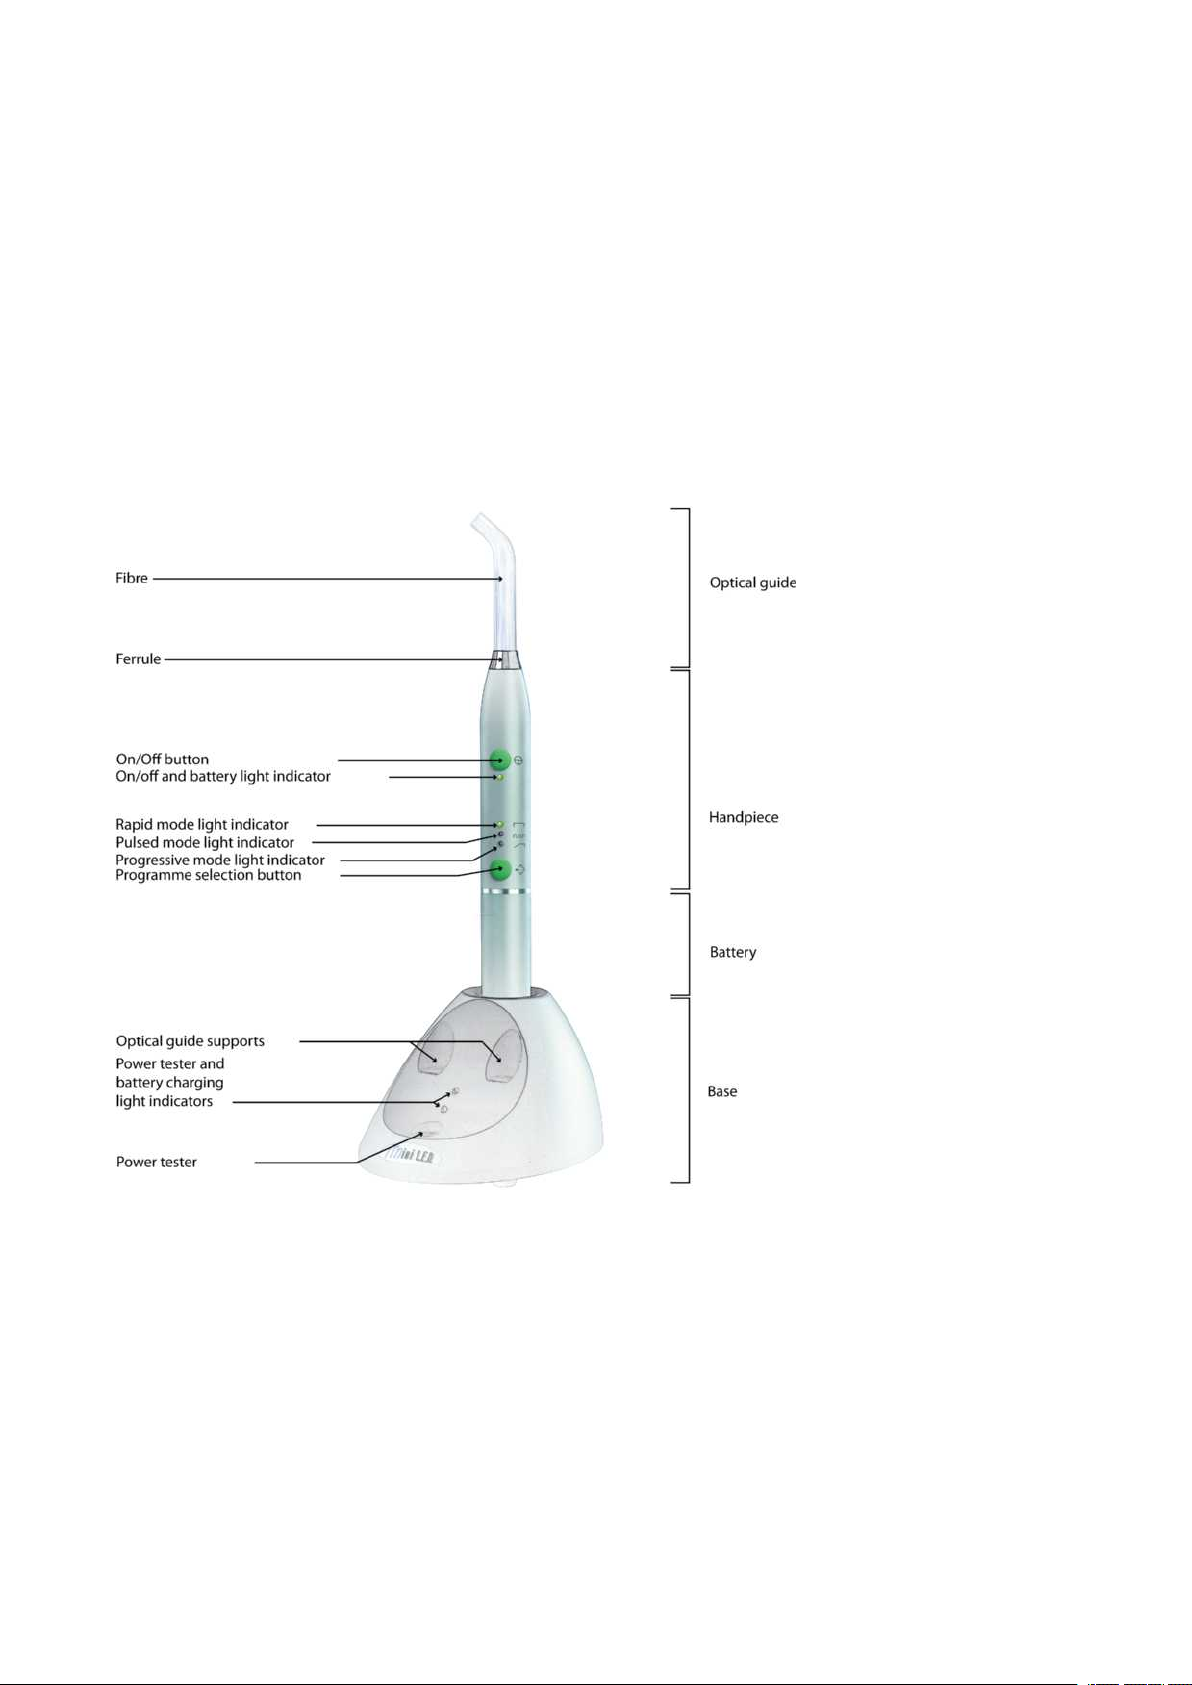
The Mini LED™ includes the following items:
l a 7.5 mm-diameter multi-fibre optical guide with its ferrule;
l depending on the option, a 7.5 mm-diameter, amber-coloured multi-fibre optical guide with its ferrule;
l a Mini LED handpiece;
l two protection plugs for the handpiece;
l a charging base with an integrated power tester;
l a Lithium-ion battery;
l a rigid protection shield;
l a mains adapter.
User Manual • Mini LED™ • J02541 • V5 • 07 • 01/2015 • NG13EN010E - Page 9/30
Page 12

3.2 Installing the medical device
Adjust the position of your medical device to correspond to your angle of vision and the characteristics of your
workstation, e.g. lighting or distance between the user and the medical device. Ensure that your medical
device is readily accessible.
Do not install your medical device near or on another device.
Install the charging base of your Mini LED on a flat surface with a slope of less than 5°.
3.3 Connecting the medical device to the electrical network
Check that the mains voltage is compatible with that indicated on the medical device or its mains adapter.
Next, connect the mains adapter to the wall socket in compliance with the standards in force in the country of
use.
A different voltage would cause damage to the medical device and could injure the patient and/or user. Any
variation in the electrical network voltage or electromagnetic field that is non-compliant with the limits in
force, could interfere with the medical device's operation.
Medical devices equipped with a protective earth must be connected to a supply network equipped with a
protective earth.
Do not plug the medical device into an extension lead and do not put the mains cord in a cable cover or
cable tray.
3.4 Installing the mains adapter
The mains adapter and its cord are only designed to charge the Mini LED.
Check that the cord does not hinder the movement or free circulation of anyone whilst the Mini LED is
charging. Make sure that it is not possible to wheel over or walk on the cord. Plug the mains adapter plug into
the Mini LED.
Page 10/30 - User Manual • Mini LED™ • J02541 • V5 • 07 • 01/2015 • NG13EN010E
Page 13

4 Medical device description
4.1 First use
The Mini LED uses a Lithium-Ion battery. To guarantee optimum use, this battery must be fully charged before
use but must never be flat. To prepare your Mini LED, follow the steps below:
l clean the rigid protection shield with an alcohol wipe;
l clean the handpiece with an alcohol wipe;
l plug the charging base into the mains;
l check that the green indicator light on the base lights up twice and listen out for a beep sound;
l install the battery on the handpiece;
l place the Mini LED on its charging base;
l the Mini LED is correctly installed when two beeps are heard and the green indicator light on the base
starts flashing;
l leave the Mini LED to fully charge;
l the Mini LED is charged when the green indicator light on the base stops flashing and remains on
permanently;
l remove the protection plug from the handpiece nozzle;
l insert the sterilised optical guide into the handpiece nozzle;
l you will hear a click when the optical guide is correctly inserted;
l install the rigid protection shield;
l wear safety goggles and protective gloves;
l provide your patient with safety goggles.
4.2 Using the Mini LED
The Mini LED is normally placed on its base. To use it, remove it from its base.
Prior to the day of use, check that you have enough sterilised optical guides and check the power output as
indicated in the chapter Checking the lamp power level page 19.
The patient and the practitioner must wear class II safety goggles when the Mini LED is in operation.
l Remove the Mini LED from the base;
l Press the on/off button.
l Install the rigid protection shield;
l Programme the Mini LED to select the required mode;
l Position the end of the optical guide as close as possible to the surface of the material to be cured;
Do not allow the optical guide to touch the material to be cured.
l Press the on/off button to trigger the selected mode. A beep sound confirms cycle initiation;
l A second beep sound confirms cycle completion.
You can stop the cure cycle at any time by pressing the on/off button.
After three minutes of inactivity, the Mini LED switches to standby.
Depending on the cure material used, repeat the cure cycle as required.
4.3 Mini LED™
The Mini LED can only be used with the following accessories:
l 7.5 mm opalescent optical guide [F02648]
l 7.5 mm amber-coloured optical guide [F02620]
l Mini LED titanium battery [F02520]
l Mini LED handpiece [F02530]
l Protection plug [F57347]
l Rigid protection shield [F02555]
l Charging base and mains adapter [F02544]
User Manual • Mini LED™ • J02541 • V5 • 07 • 01/2015 • NG13EN010E - Page 11/30
Page 14
The protection plug is designed to prevent any products from infiltrating the handpiece that may damage its
electronics, the connector or the LEDs. The protection plug must be installed when the handpiece is being
cleaned. Another transparent plastic protection plug protects the battery connectors.
4.4 Connecting and disconnecting accessories during use
Never release the battery when the Mini LED is being used. When handling the mains adapter and the
battery disconnected from the handpiece, avoid all contact with the patient or any other party.
Do not disconnect the optical guide or the rigid protection shield when using your Mini LED.
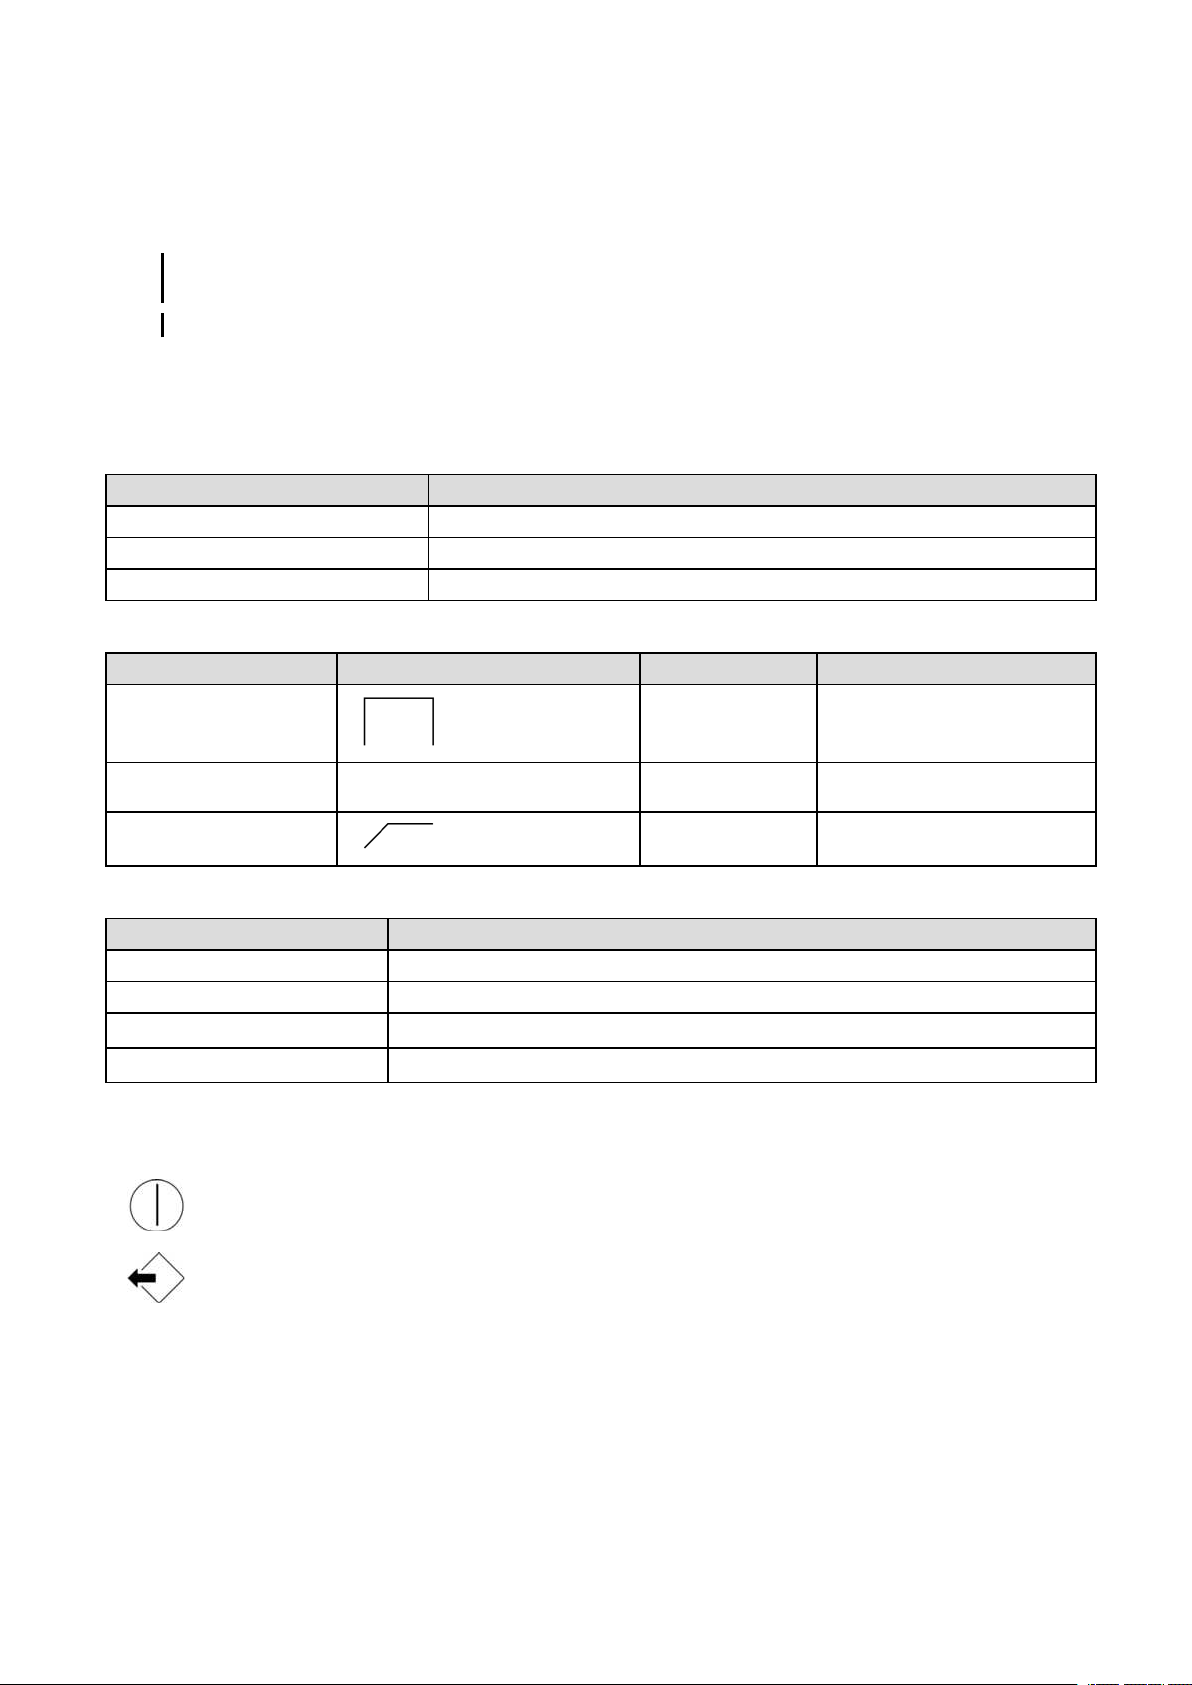
4.5 Light indicator
The light indicators are designed to signal the device's status.
The handpiece has four light indicators in total.
On/off light indicator
Colour Mode
Green Normal mode
Red The battery is flat
Flashing red Thermal cut-out activated
Three operating mode light indicators
Indicator Pictogram Colour Mode
High Green Fast
Medium Green Pulsed
Low Green Progressive
The charging base has two light indicators.
Charging base light indicators
Colour Meaning
Flashing green - upper indicator Charging
Green - upper indicator Charge carried out and finished
Red - lower indicator
Green - lower indicator
Power measured at less than 930 mW/cm2and insufficient for required operation
Power measured equal to or greater than 1100 mW/cm
2
4.6 Buttons
The Mini LED has two buttons.
located near the optical guide used to switch the Mini LED on and off.
used to select the required operating mode.
4.7 Base
The Mini LED charging base comprises a power tester. This is used to test correct operation of the Mini LED.
4.8 Mains Adapter
The mains adapter is part of the medical device and helps to ensure its electrical safety. It must be installed
near the medical device and must be readily accessible.
Page 12/30 - User Manual • Mini LED™ • J02541 • V5 • 07 • 01/2015 • NG13EN010E
Page 15
The mains cord connects the mains adapter to the medical device
Only use the mains adapter supplied with your medical device.
4.9 Operating modes
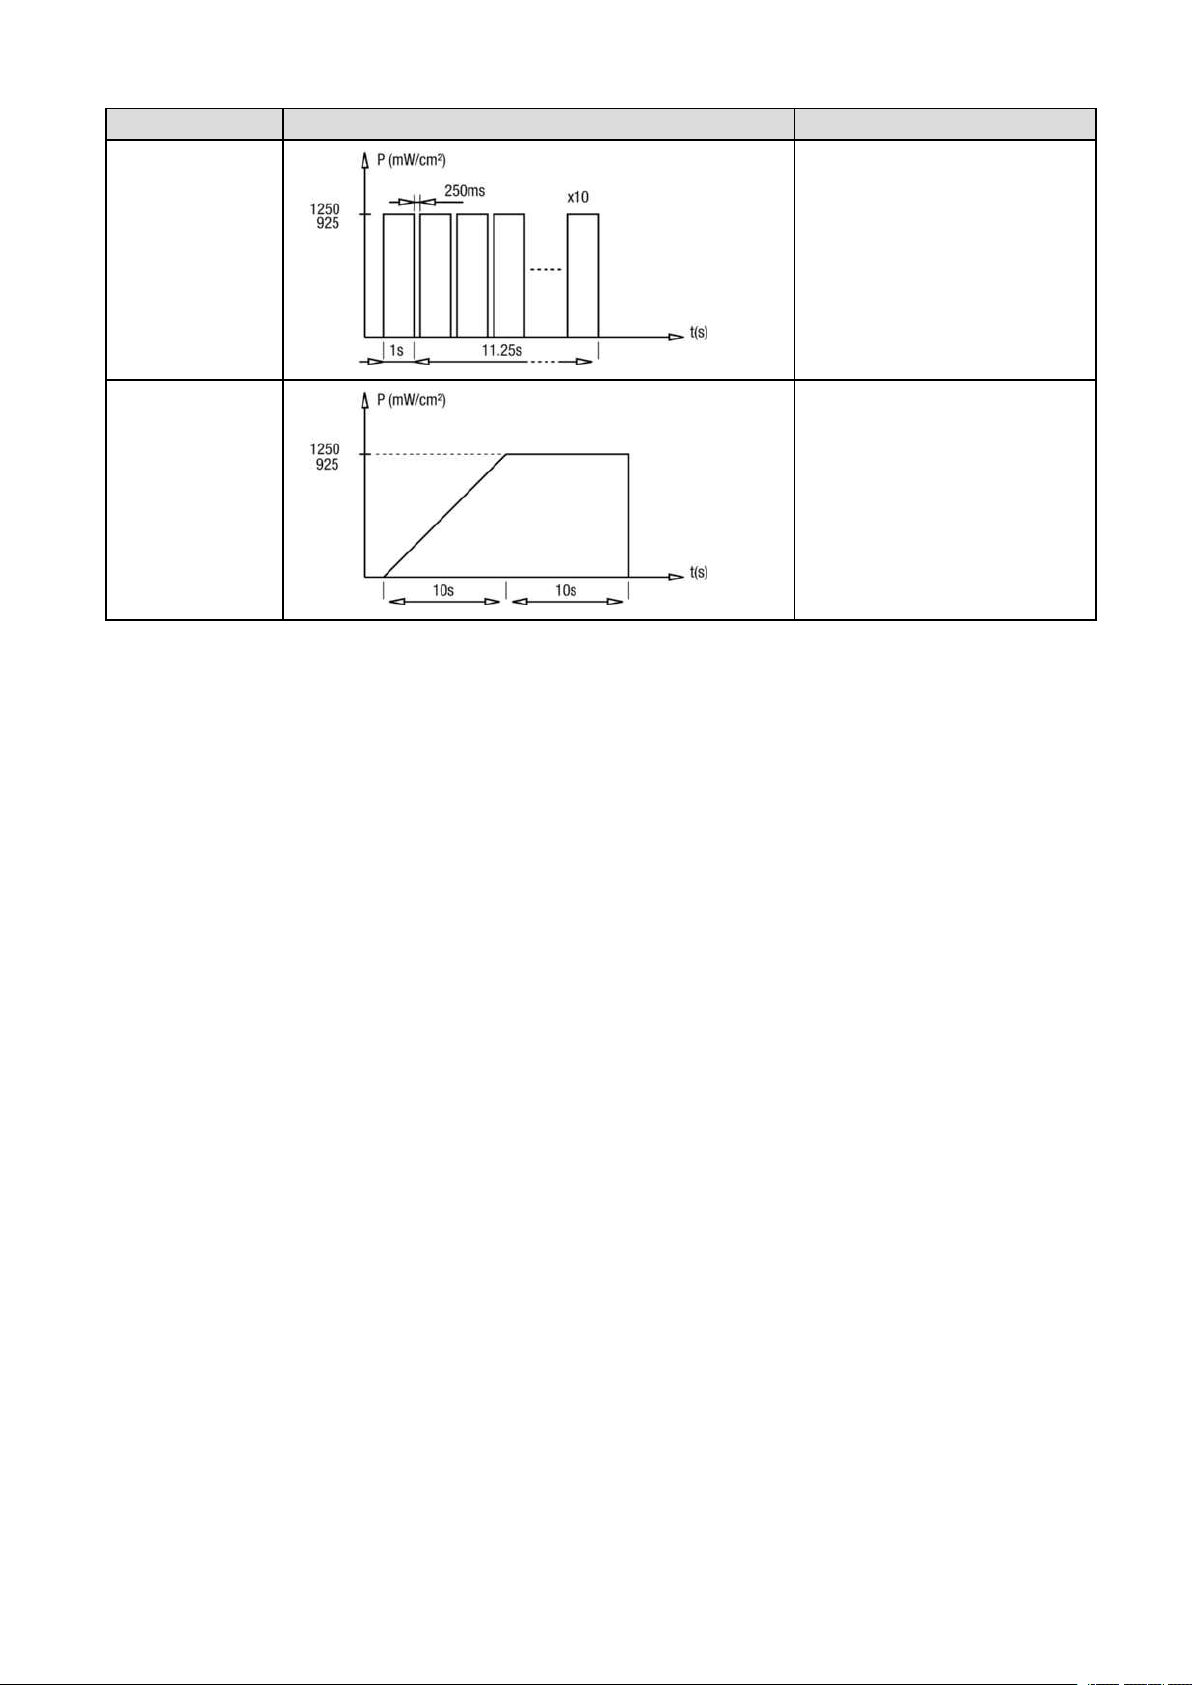
Rapid mode activates maximum power of the Mini LED for ten seconds.
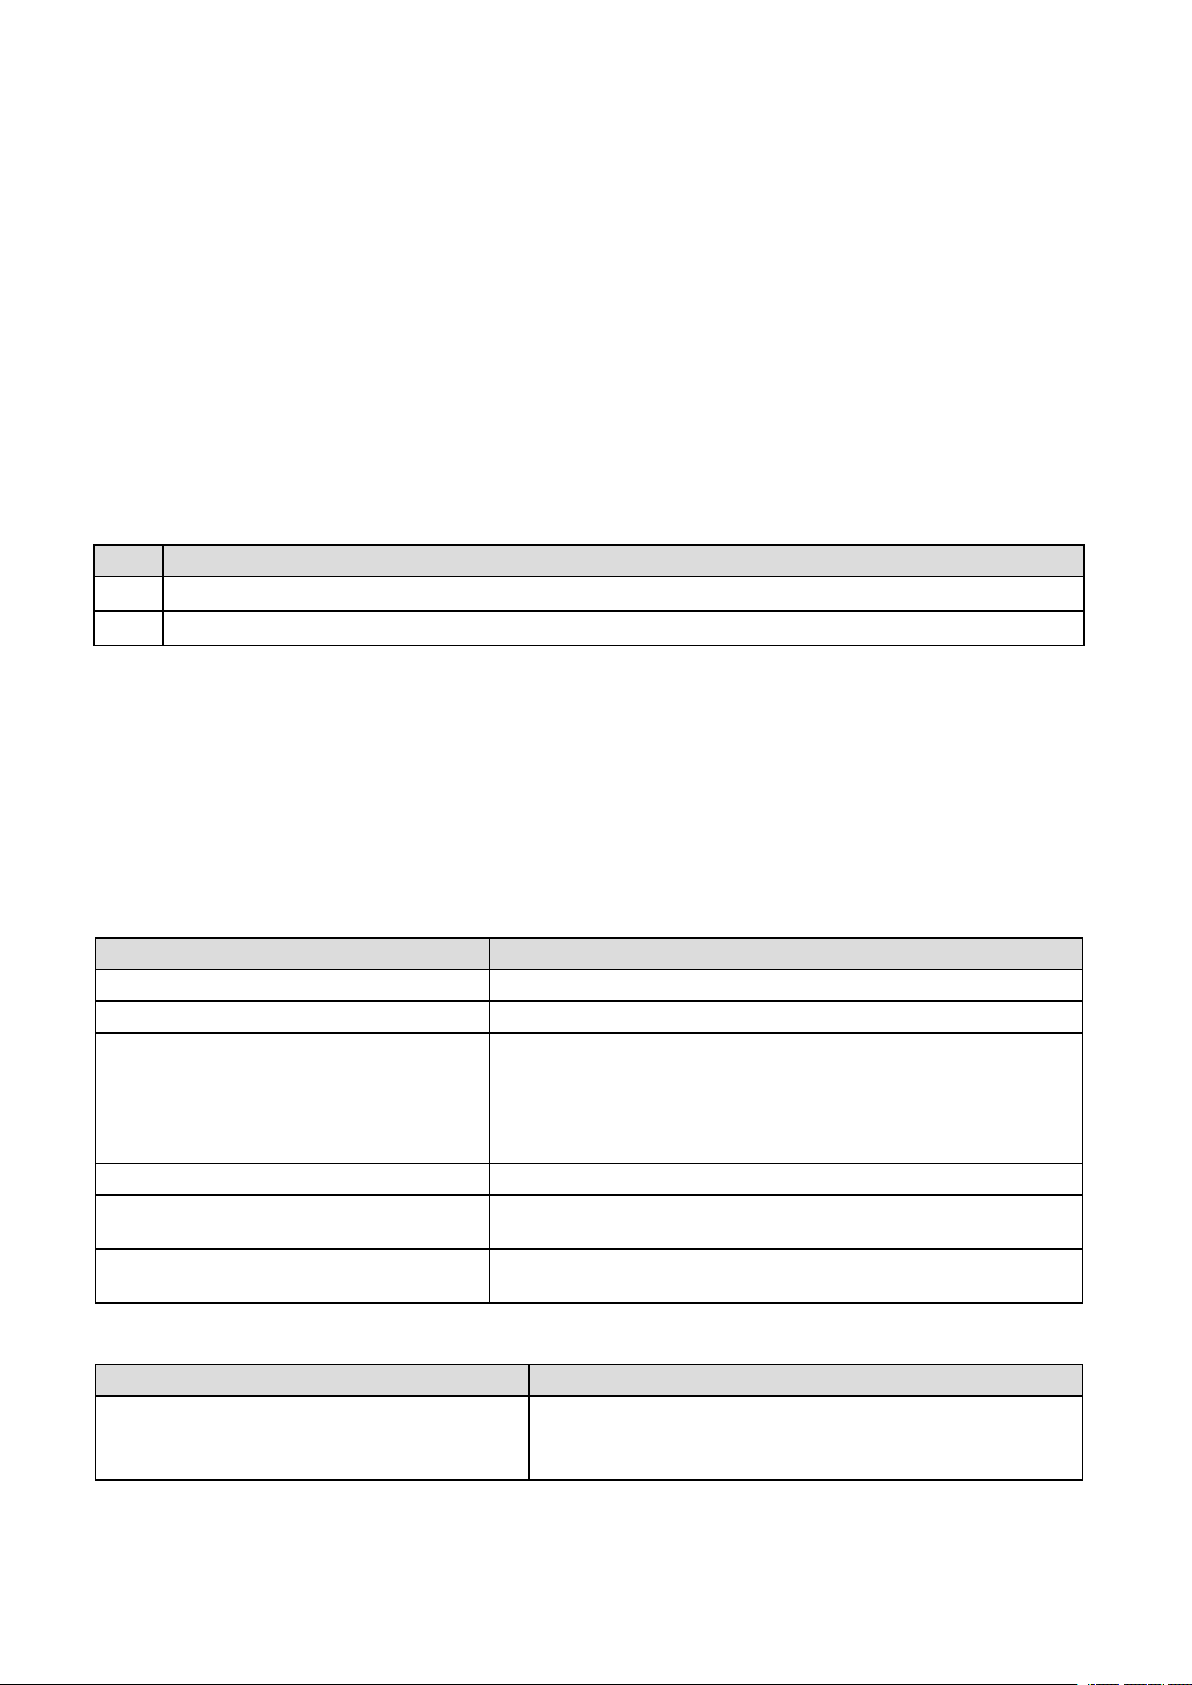
Pulsed mode activates maximum power of the Mini LED in ten successive bursts lasting one second, each
separated by 250 ms.
Progressive mode initiates a gradual rise in power lasting ten seconds followed by ten seconds at full power.
4.9.1 Wave peak
The waveform and its peak are identical in all three operating modes.
Opalescent optical
guide
Wave peak 447.5 nm 447.4 nm
Maximum irradiance at 2 mm
Mean spectral irradiance in relation to the nominal value and
over time
1900 mW / cm
1250 mW / cm
2
2
Amber-coloured optical
guide
1300 mW / cm
925 mW / cm
2
2
4.9.2 Waveform in each mode
Waveform (nominal value, irradiance, duration) Average irradiance over time
Rapid mode
User Manual • Mini LED™ • J02541 • V5 • 07 • 01/2015 • NG13EN010E - Page 13/30
1250 mW / cm
925 mW / cm
2
2
Page 16
Waveform (nominal value, irradiance, duration) Average irradiance over time
2
2
2
2
Pulsed mode
Progressive mode
1020 mW / cm
754 mW / cm
937 mW / cm
693 mW / cm
4.10 Switching off the medical device
Press the ON/OFF button to stop a cure cycle.
The Mini LED switches off after three minutes of inactivity. Press the button to restart.
4.11 Disconnecting the medical device
Before a long absence or when not in use, the medical device must be cleaned, its battery must be removed
and the charging base must be disconnected from the mains power.
Page 14/30 - User Manual • Mini LED™ • J02541 • V5 • 07 • 01/2015 • NG13EN010E
Page 17

5 Cleaning, disinfecting and sterilising
The instructions relating to cleaning, disinfection and sterilisation protocols for the medical device and
accessories provided by SATELEC®have been approved for each medical device and accessory. The applicable
guides are listed in the chapter Associated documentation page 5.
They can be downloaded at the following address: www.satelec.com/documents.
In all cases, the local regulations in force relating to the cleaning, disinfection and sterilisation instructions for
accessories take precedence over the information provided by SATELEC®.
5.1 Cleaning and disinfecting the Mini LED
The Mini LED must be OFF during cleaning and disinfecting procedures. It must also be disconnected from its
electricity supply.
Avoid using cleaning and disinfection products that contain flammable agents. Otherwise, ensure that the
product has completely evaporated or that there is no fuel left on the medical device and its accessories before
switching it on.
Do not use an abrasive product to clean the medical device.
Never apply sprays directly to the medical device to clean it. Always spray the product onto a wipe,
then clean the medical device.
Use alcohol disinfectant wipes.
l Unplug the power cord from the base.
l Remove the rigid protection shield.
l Remove the optical guide.
l Block the Mini LED handpiece nozzle with a protection plug.
l Clean the body of the Mini LED handpiece with an alcohol wipe.
l Clean the Mini LED base with an alcohol wipe.
l Clean the rigid protection shield as indicated in the instructions in the chapter Associated documentation
page 5
l Clean and sterilise the optical guide as indicated in the instructions in the chapter Associated
documentation page 5
5.2 Cleaning, disinfecting and sterilising accessories
The Mini LED accessories include:
l a charging base;
l an optical guide;
l a rigid protection shield.
Refer to the cleaning, disinfection and sterilisation instructions for accessories listed in the chapter Associated
documentation page 5.
User Manual • Mini LED™ • J02541 • V5 • 07 • 01/2015 • NG13EN010E - Page 15/30
Page 18

Page 16/30 - User Manual • Mini LED™ • J02541 • V5 • 07 • 01/2015 • NG13EN010E
Page 19

6 Monitoring and general maintenance of the medical device
Before and after use, check the medical device and its accessories entirely for any problems. This is necessary
to detect any isolation fault or damage. If necessary, replace damaged parts.
Check the cleanliness of the handpiece nozzle. It must be clean, smooth and corrosion-free. The optical guide
must fit easily and firmly inside it.
Check the handpiece electrical connectors. These must be clean, smooth and corrosion-free. The battery must
be able to be screwed in easily.
User Manual • Mini LED™ • J02541 • V5 • 07 • 01/2015 • NG13EN010E - Page 17/30
Page 20

Page 18/30 - User Manual • Mini LED™ • J02541 • V5 • 07 • 01/2015 • NG13EN010E
Page 21
7 Maintenance
The only preventive maintenance the medical device requires is:
l monitoring of accessories;
l everyday cleaning, disinfection and sterilisation;
l cleaning.
7.1 Checking the lamp power level
It is important to regularly check that the lamp is working correctly. To do this, follow the steps below:
l Check that the optical guide is intact and has no composite residues.
l Set the lamp to Rapid mode.
l Insert the optical guide into the power tester.
l Switch on the Mini LED.
l The power tester may give the following results:
Colour Result
Green
The lamp is working correctly and has a power output equal to or more than 1000 mW per cm2
Red
The lamp is not working correctly. Please read the chapter Identifying incorrect operation page 19
7.2 Identifying incorrect operation
In the event of incorrect operation, refer to the tables below to quickly identify and repair the non-complex
parts of the medical device.
If the incorrect operation is not described in the tables below, please contact your supplier or the Customer
Service Team at SATELEC®.
Do not use the medical device if it appears to be damaged or faulty. Isolate the medical device and make sure
that it cannot be used.
7.2.1 Not working
Symptoms: The Mini LED does not switch on and does not emit blue light.
Possible causes Solutions
The on/off button is set to off Press the on/off button to switch on the Mini LED
The battery is flat Charge the battery
l Disconnect the charging base;
The charging base is incorrectly connected to
the mains power preventing the battery from
charging normally
The battery switched itself to safety mode Install another battery
The internal temperature of the Mini LED has
reached the maximum permitted level
The battery charging light is red. The battery
was not fully charged before being switched on
l Check that the socket is not faulty;
l Connect the charging base;
l Check that the charging light comes on;
l Wait for the battery to fully charge.
Allow the Mini LED to cool before using it again
Remove the partly charged battery and install a fully charged battery
7.3 The power of the Mini LED is not as expected
Possible causes Solutions
Cure composite residue remains on the optical
guide
User Manual • Mini LED™ • J02541 • V5 • 07 • 01/2015 • NG13EN010E - Page 19/30
l Remove the residue.
l Check that the surface of the optical guide is intact.
l Change the optical guide if necessary.
Page 22

Possible causes Solutions
The optical guide is damaged or is not clean
The power of the Mini LED has changed Check the power using a purpose-designed tester
Clean the optical guide using the multi-purpose syringe air
function
7.4 Other malfunctions
If the Mini LED™ is not working for any other reason, contact the SATELEC®Customer Services Team.
If you need to return your Mini LED, please ensure the optical guide and battery are packaged to prevent any
impact damage during transportation.
Page 20/30 - User Manual • Mini LED™ • J02541 • V5 • 07 • 01/2015 • NG13EN010E
Page 23
8 Technical specifications of the medical device
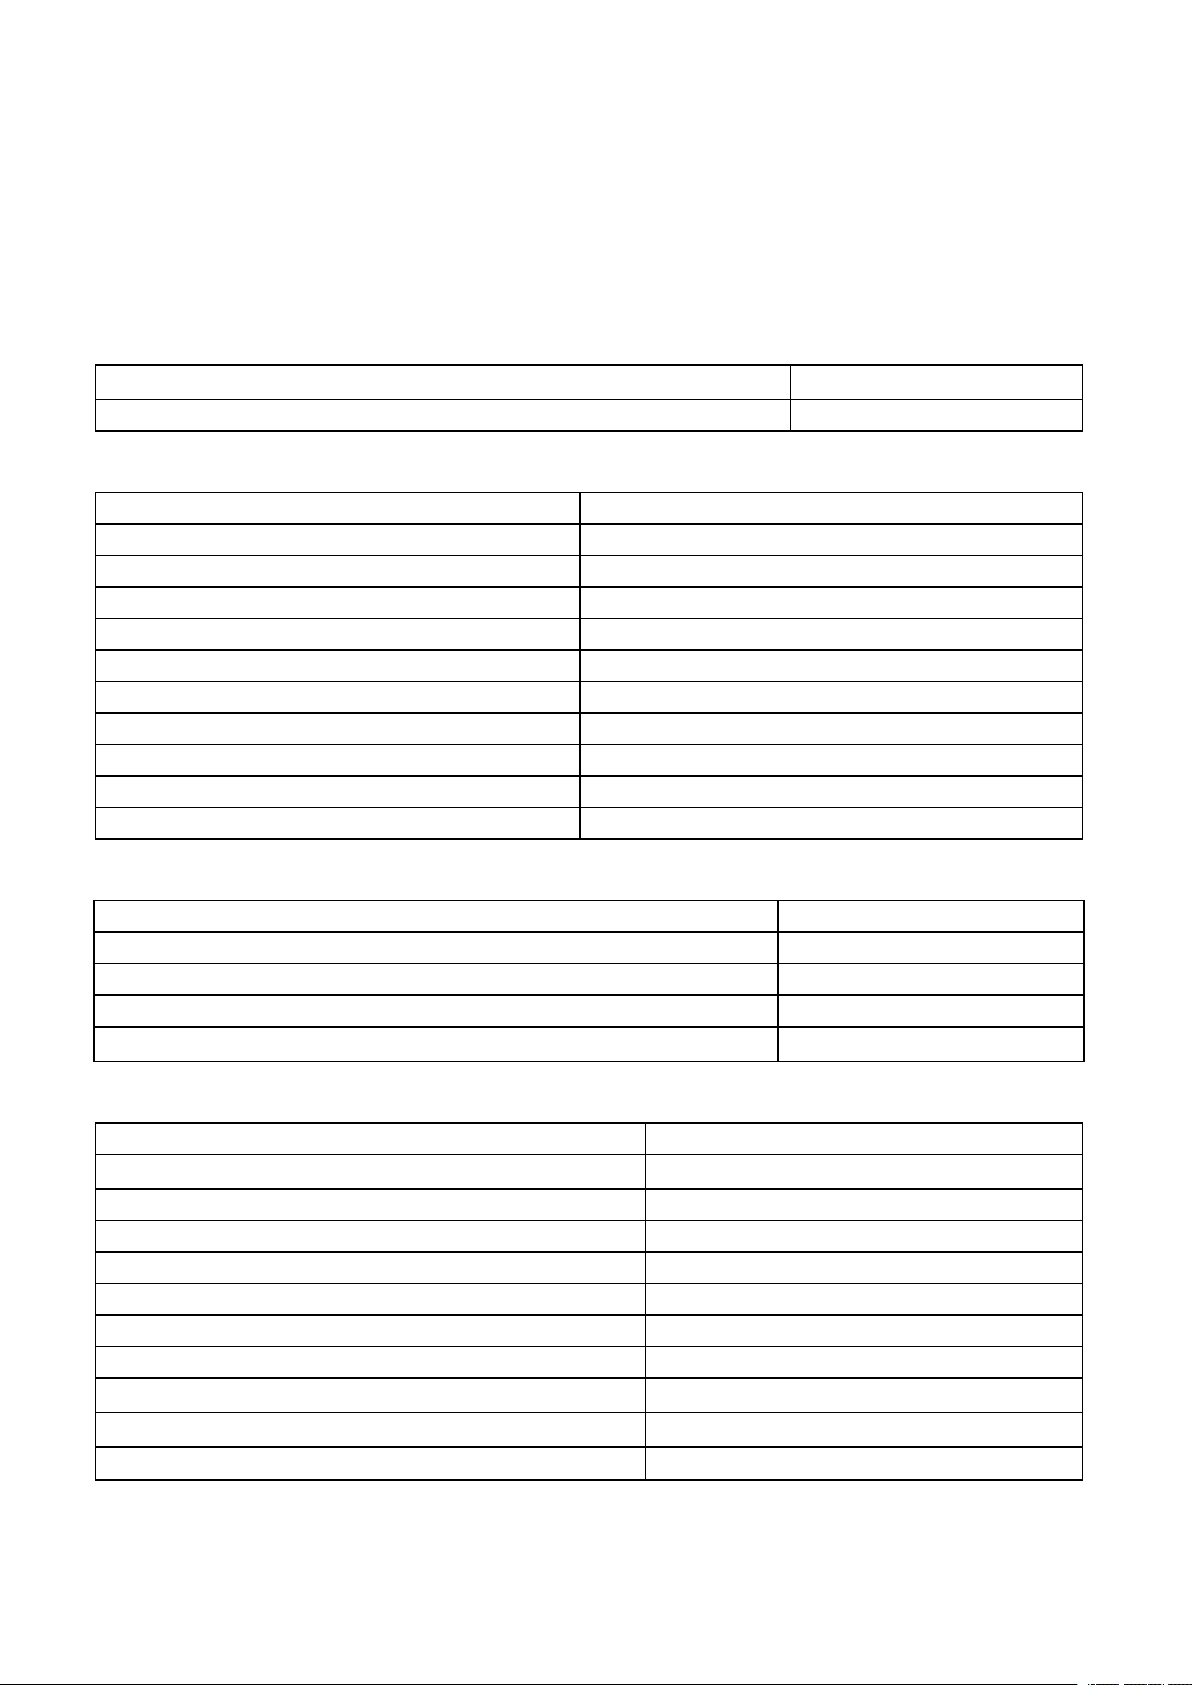
8.1 Identification
Manufacturer
Name of the medical device Mini LED™
SATELEC
8.2 Mains Adapter
Manufacturer Friwo
Supply voltage 100 - 240 VAC
Power supply frequency 50 Hz / 60 Hz
Drawn current 250 mA
Output voltage 12 V
Output current 800 mA
Width 58 mm
Height 66 mm
Depth 35.5 mm without the plug
Weight 151 g
Ingress protection rating IP 40
®
8.3 Optical Guide
Weight 23 g
Length 94 mm
Distal end diameter 7.5 mm
Active diameter 6.8 mm
Optical cross-section
0.36cm
8.4 Mini LED handpiece
Length 112 mm
Maximum outer diameter
Weight 72 g
Ingress protection rating IPX0
Distance with user 0 cm - 70 cm
Number of LED lights 4
Wavelength range 440 nm - 460 nm
Mean wavelength 450 nm
Irradiance with opalescent optical guide
Irradiance with amber-coloured optical guide
Operating mode Continuous
23 mm
1125 mW / cm2- 2400 mW / cm
785 mW / cm2- 1680 mW / cm
2
2
2
User Manual • Mini LED™ • J02541 • V5 • 07 • 01/2015 • NG13EN010E - Page 21/30
Page 24
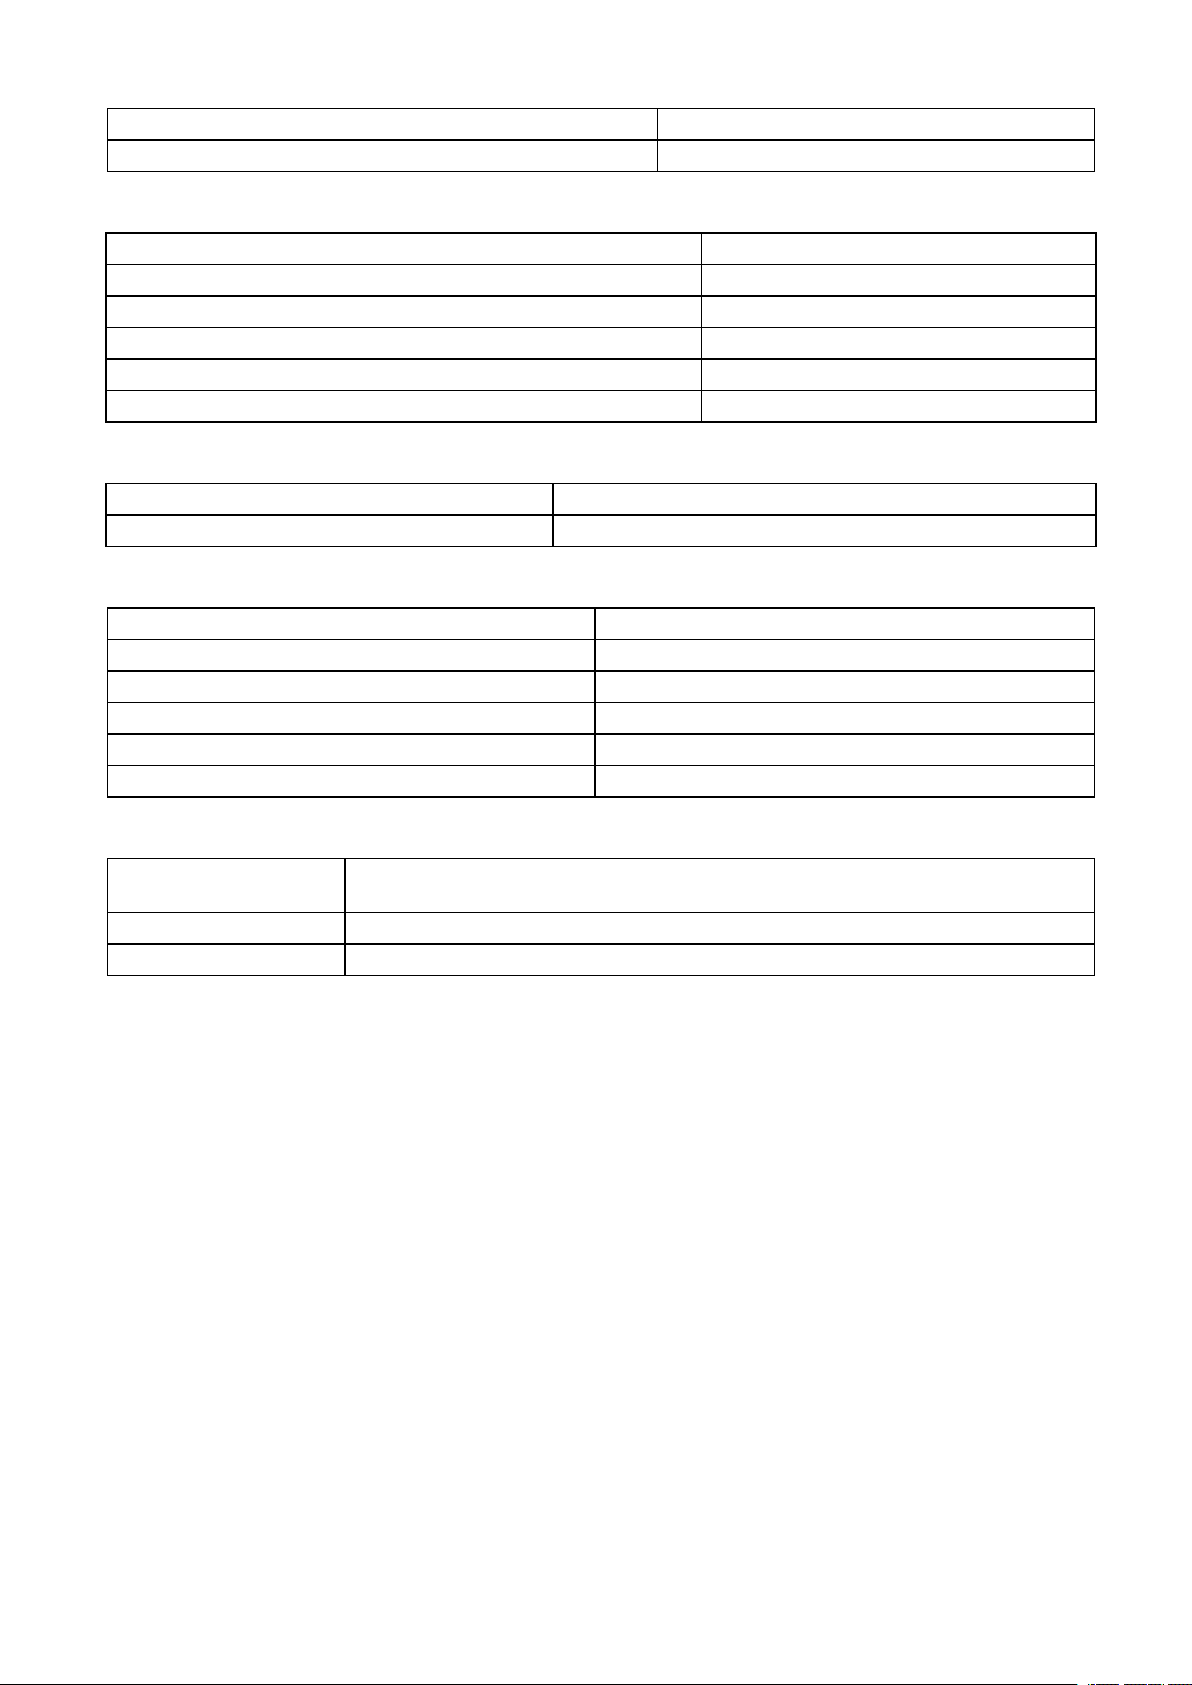
Safety Thermal
Type B
8.5 Technical specifications of the battery
Capacity 2500 mA / hr
Output voltage 3.7 V - 4.2 V
Type Lithium-ion
Maximum diameter 23 mm
Length 99 mm
Weight 74 g
8.6 Charging base
Supply voltage 12 V DC
Protection 3 A / 125 V AC fuse
8.7 Environmental characteristics
Operating temperature +10°C to +30°C
Storage temperature 0°C to +50°C
Operating humidity 30 % to 70 %
Atmospheric storage pressure 500 hPa to 1060 hPa
Atmospheric operating pressure 800 hPa to 1060 hPa
Maximum operating altitude Equal to or less than 2000 metres
8.8 Environmental restrictions
Usage premises
Use in gas-filled atmosphere The Mini LED is not designed to be used in an AP or APG gas-filled atmosphere.
Immersion The Mini LED must not be immersed.
Designed for use in all medical establishments, the medical device cannot be used
outside.
8.9 Main performance characteristics
Wavelength between 440 and 460 nm.
Irradiance of 1125 mW / cm2 to 2400 mW / cm2, calculated based on the active diameter of 6.8 mm with the
opalescent optical guide.
Irradiance of 785 mw / cm2- 1680 mW / cm2, calculated based on the active diameter of 6.8 mm with the
amber-coloured optical guide.
Page 22/30 - User Manual • Mini LED™ • J02541 • V5 • 07 • 01/2015 • NG13EN010E
Page 25
9 Regulations and standards
9.1 Official Texts
This medical device complies with the essential requirements of European Directive 93/42/EEC. It was
designed and manufactured in accordance with an EN ISO 13485-certified quality assurance system.
9.2 Medical class of the device
Class of medical device: I according to 93/42/EEC directive
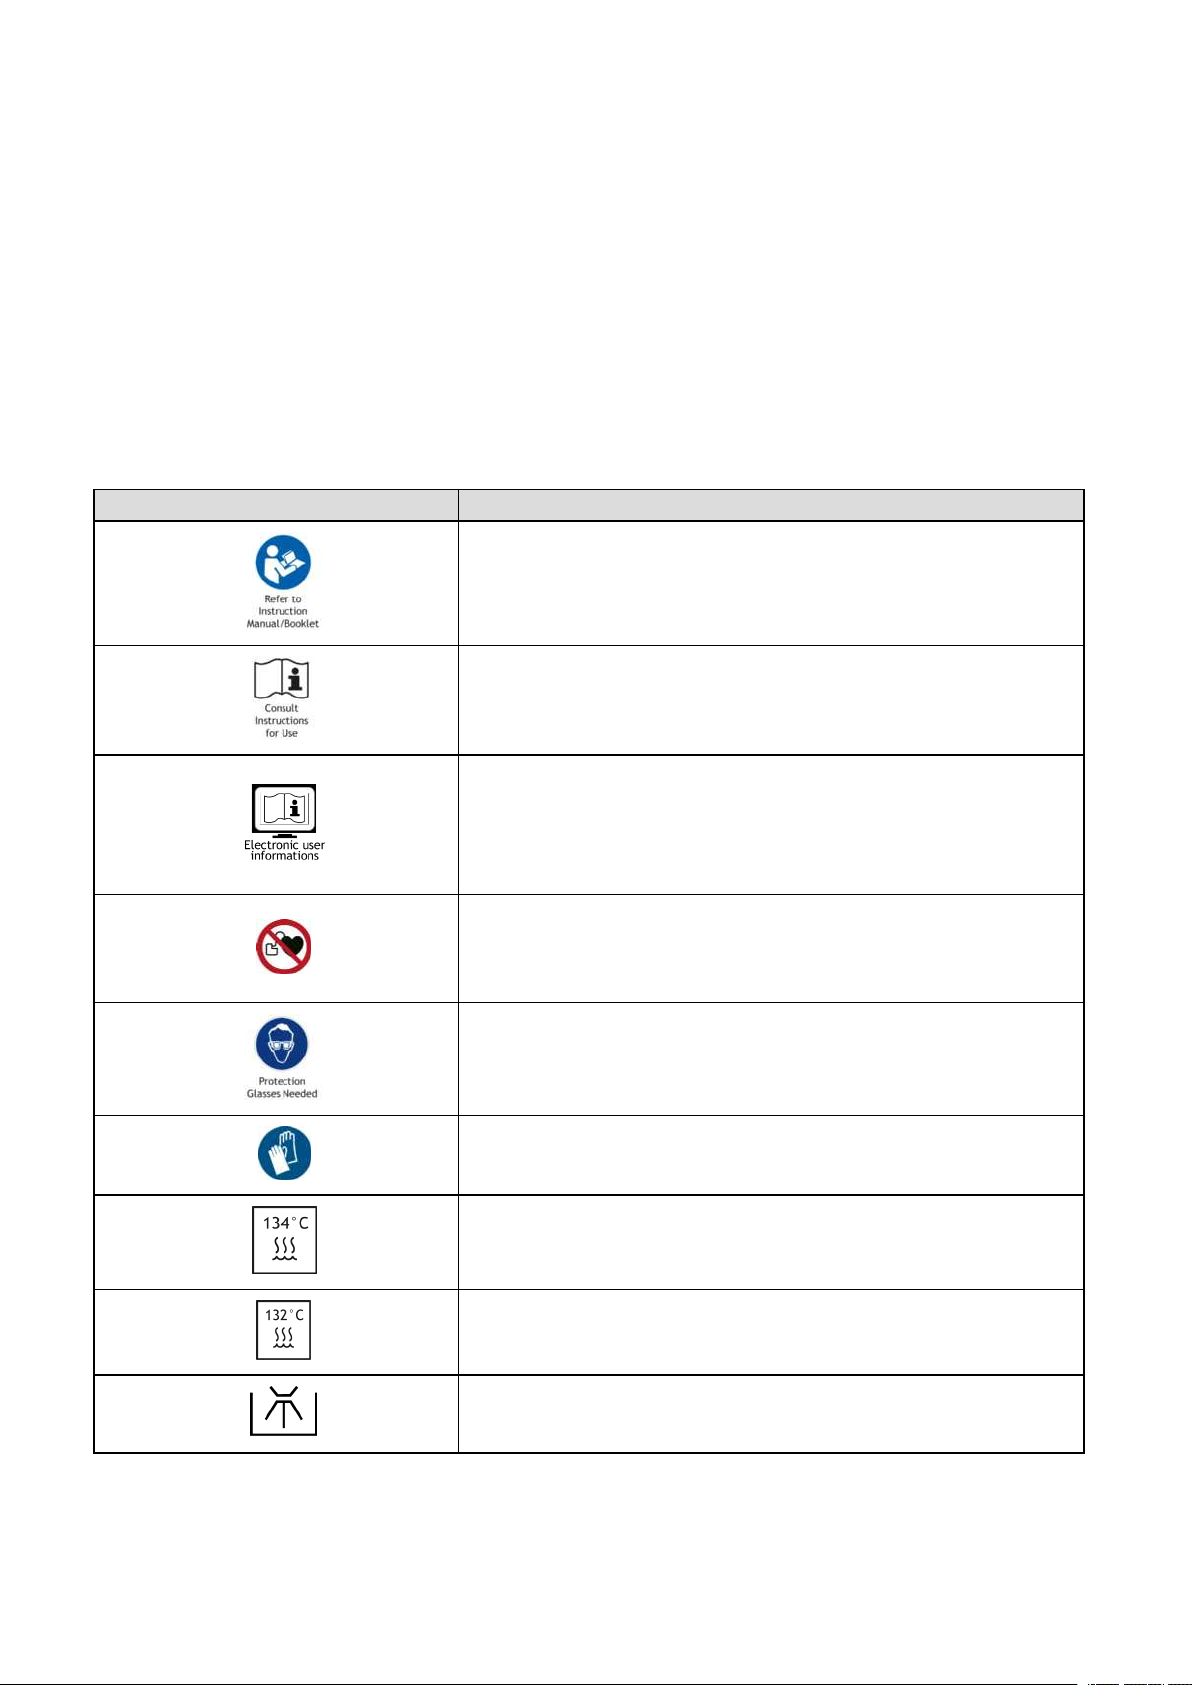
9.3 Symbols
Symbols Meaning
Refer to the accompanying documentation
Consult the User Manual
The accompanying documentation is available in electronic format
Do not use the medical device if the patient or practitioner are fitted
with an implantable device
Always wear safety goggles
Always wear protective gloves
Sterilisation at 134°C in an autoclave
Sterilisation at 132°C in an autoclave
Washer-disinfector for thermal disinfection
User Manual • Mini LED™ • J02541 • V5 • 07 • 01/2015 • NG13EN010E - Page 23/30
Page 26
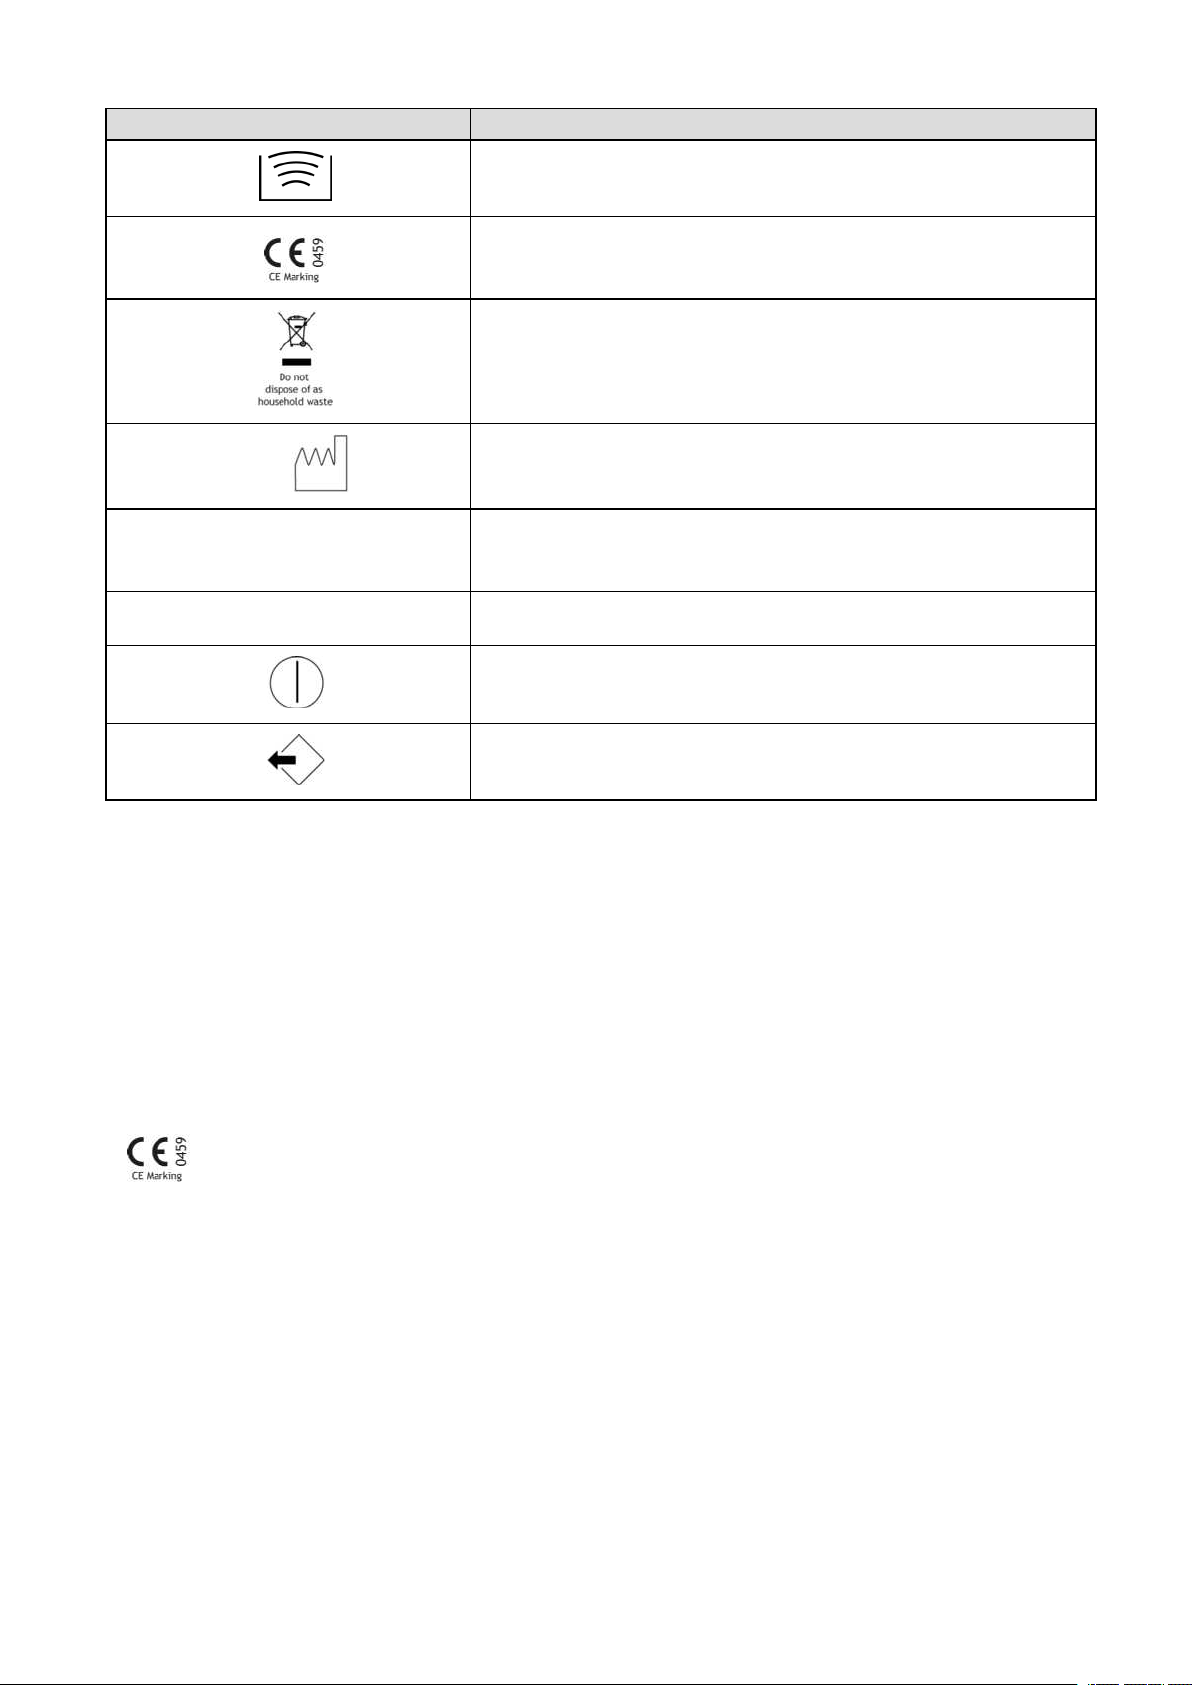
Symbols Meaning
Ultrasonic bath
EC marking
Do not dispose of as household waste
Year of manufacture
YYYY
IP: ingress protection ratings procured by a range
IPX1
Rx only
X: no ingress of protection rating claim against the penetration of solids
1: protects against the vertical falls of drops of water
Under the United States Federal Law, this medical device must only be sold
by or under the orders of a qualified doctor.
On/off button
Programme selection button
9.4 Manufacturer identification
SATELEC
A Company of ACTEON Group
17, avenue Gustave Eiffel
BP 30216
33708 MERIGNAC cedex
FRANCE
Tel. +33 (0) 556.34.06.07
Fax. +33 (0) 556.34.92.92
E.mail: [email protected].
www.acteongroup.com
Page 24/30 - User Manual • Mini LED™ • J02541 • V5 • 07 • 01/2015 • NG13EN010E
Page 27

9.5 Branch addresses
U.S.A. & Canada
ACTEON North America
124 Gaither Drive, Suite 140
Mount Laurel, NJ 08054 - USA
Tel. +1 856 222 9988
Fax. +1 856 222 4726
[email protected]
GERMANY
ACTEON GERMANY GmbH
Industriestrasse 9 – 40822 METTMANN - GERMANY
Tel. +49 21 04 95 65 10
Fax. +49 21 04 95 65 11
[email protected]
SPAIN
ACTEON MEDICO-DENTAL IBERICA, S.A.U.
Avda Principal n°11 H
Poligono Industrial Can Clapers
08181 SENTMENAT (BARCELONA) - SPAIN
Tel. +34 93 715 45 20
Fax. +34 93 715 32 29
[email protected]
Road, Klongton Nua - Wattana, BANGKOK 10110
- THAILAND
Tel. +66 2 714 3295
Fax. +66 2 714 3296
[email protected]
INDIA
ACTEON INDIA
B-94, GIDC Electronic Estate - Sector 25 –
GANDHINAGAR 382028 Gujarat - INDIA
Tel. +91 79 2328 7473
Fax. +91 79 2328 7480
[email protected]
LATIN AMERICA
ACTEON LATINA AMERICA
Bogotà - COLOMBIA
Mobile: +57 312 377 8209
[email protected]
RUSSIA
ACTEON RUSSIA
Valdajski Proezd 16 – office 243
125445 Moscow - RUSSIA
Tel./Fax. +7 499 76 71 316
[email protected]
U.K.
ACTEON UK
Unit 1B - Steel Close – Eaton Socon, St Neots
CAMBS PE19 8TT - UK
Tel. +44 1480 477 307
Fax. +44 1480 477 381
[email protected]
MIDDLE EAST
ACTEON MIDDLE EAST
Numan Center - 2nd Floor N° 205 - Gardens Street
PO Box 5746 - 11953 AMMAN - JORDAN
Tel. +962 6 553 4401
Fax. +962 6 553 7833
[email protected]
CHINA
ACTEON CHINA
Office 401 - 12 Xinyuanxili Zhong Street Chaoyang District - BEIJING 100027 - CHINA
Tel. +86 10 646 570 11/2/3
Fax. +86 10 646 580 15
[email protected]
AUSTRALIA/NEW ZEALAND
ACTEON AUSTRALIA/NEW ZEALAND
Suite 119, 30-40 Harcourt Parade
Rosebery NSW 2018
Australia
Tel. +612 9669 2292
Fax. +612 9669 2204
[email protected]
TAIWAN
ACTEON TAIWAN
11F., No.1, Songzhi Rd.
Xinyi Dist., Taipei City 11047
TAIWAN (R.O.C.)
+ 886 2 8729 2103
[email protected]
THAILAND
ACTEON (THAILAND) LTD
23/45 Sorachai Building 16th floor - Sukumvit 63
User Manual • Mini LED™ • J02541 • V5 • 07 • 01/2015 • NG13EN010E - Page 25/30
Page 28

9.6 Disposal and recycling
As an Electrical and Electronic item of Equipment, the medical device must be disposed of via a specialist
collection, removal, recycling or destruction channel. This applies in particular to the European market, in
reference to Directive2002/96/EC dated 27/01/2003.
When your medical device has reached the end of its service life, contact your nearest dental equipment
dealer, or ACTEON GROUP head office or one of the company branches to find out how to proceed. The
relevant contact details are given in the chapter Branch addresses page 25.
The indication below applies to France only.
In compliance with the provisions of the French Environment Code relating to the disposal of electronic and
electrical equipment waste or DEEE (Decree no. 2012-617 dated 2 May 2012), our Company fulfils its
obligations to reclaim and dispose of its electrical and electronic equipment through the means established by
the approved organisation Recydent (NOR approval: DEVP1229534A).
As a producer, our Company is listed in the National Register of Producers kept by the ADEME (French
Environment and Energy Management Agency). Professionals buying our products directly from the distribution
chain are responsible for passing on this information about our established recycling methods to the end user.
In addition, the buyer agrees to take back our brand's devices at the end of their service life and to transfer
them to one of the collection centres set up by Recydent for recycling (see list of collection centres on the site
Recydent.fr).
If necessary, Recydent can come and collect these devices from you free of charge once the quantity of
devices has reached a certain level in the pallets-containers with which you are provided to store this waste.
Page 26/30 - User Manual • Mini LED™ • J02541 • V5 • 07 • 01/2015 • NG13EN010E
Page 29

10 Index
Index: Altitude – Temperature
I
incorrect operation 19
Altitude 22
approved dealers 7
buttons 12
charging base 12
conservative dentistry 7
cure 7
damage 17
disposal 26
A
B
C
D
E
L
light curing 7
M
mains adapter 12
Manufacturer 21
Medical class 23
O
optical guide 7
P
peak 13
power tester 12
Pressure 22
progressive mode 13
pulsed mode 13
European directive 23
F
fault 17
first inclusion of EC marking 7
G
gas-filled atmosphere 22
general instructions relating to the complete range
of Mini LED 3
User Manual • Mini LED™ • J02541 • V5 • 07 • 01/2015 • NG13EN010E - Page 27/30
R
rapid mode 13
recycling 26
Recydent 26
repair 7
repairer 7
restorative 7
T
Temperature 22
Page 30

Index: update – update
update 7
U
Page 28/30 - User Manual • Mini LED™ • J02541 • V5 • 07 • 01/2015 • NG13EN010E
Page 31

Glossary: Active diameter – Wavelength peak
P
11 Glossary
A
Active diameter
area of the effective optical cross-section of the
LED light beam at the optical guide tip
F
Ferrule
metal ring placed on the end of the optical guide.
Makes it easier to insert the optical guide into the
handpiece nozzle and prevents the optical guide
from rotating. Also known as a collar
Flexible protection shield
available in 5.5 mm-diameter and 7.5 mm-diameter sizes. In contact with the patient, it must
be sterilised after each use. Suitable for autoclaving. Previously called the cup
Protection plug
two plastic plugs used to protect the handpiece
connectors and electronics during cleaning. One
fits on the nozzle and the other fits onto the handpiece's electrical connectors
R
Rigid protection shield
removable oval shield forming an integral part of
the handpiece once in place. Is cleaned with
wipes.Not suitable for autoclaving
W
Wavelength peak
maximum amplitude of a wavelength spectrum
I
Irradiance
term used in radiometry to quantify the power of
an electromagnetic radiation per unit area. It is
expressed in watts per square metre. Often confused with the power of a light source
L
LED
electroluminescent diode, more commonly known
as Led (light-emitting diode), designates an optoelectronic component that allows the emission of
monochromatic light.
O
Optical guide
light conductor fitted to the handpiece nozzle and
transmitting light to the cure site. Is cleaned and
is suitable for autoclaving
User Manual • Mini LED™ • J02541 • V5 • 07 • 01/2015 • NG13EN010E -Page 29/30
Page 32

Ref: J02541 • V5 • 07 • 01/2015 • NG13EN010E
A Company of AC TEON Group • 17 av. Gustave Ei ffel • BP 30216 • 33708 MERIGNAC cedex • France
Tel. +33 (0) 556 34 06 07 • Fax . +33 (0) 556 34 92 92
E-mail: [email protected] • www.acteongroup.com
 Loading...