


OPERATING
OPERATING
MANUAL
MANUAL
TEMP
FAN
MODE
TIMER
SLEEP
SWING
Before using your air conditioner, please read this operating manual carefully and keep
it for future reference.

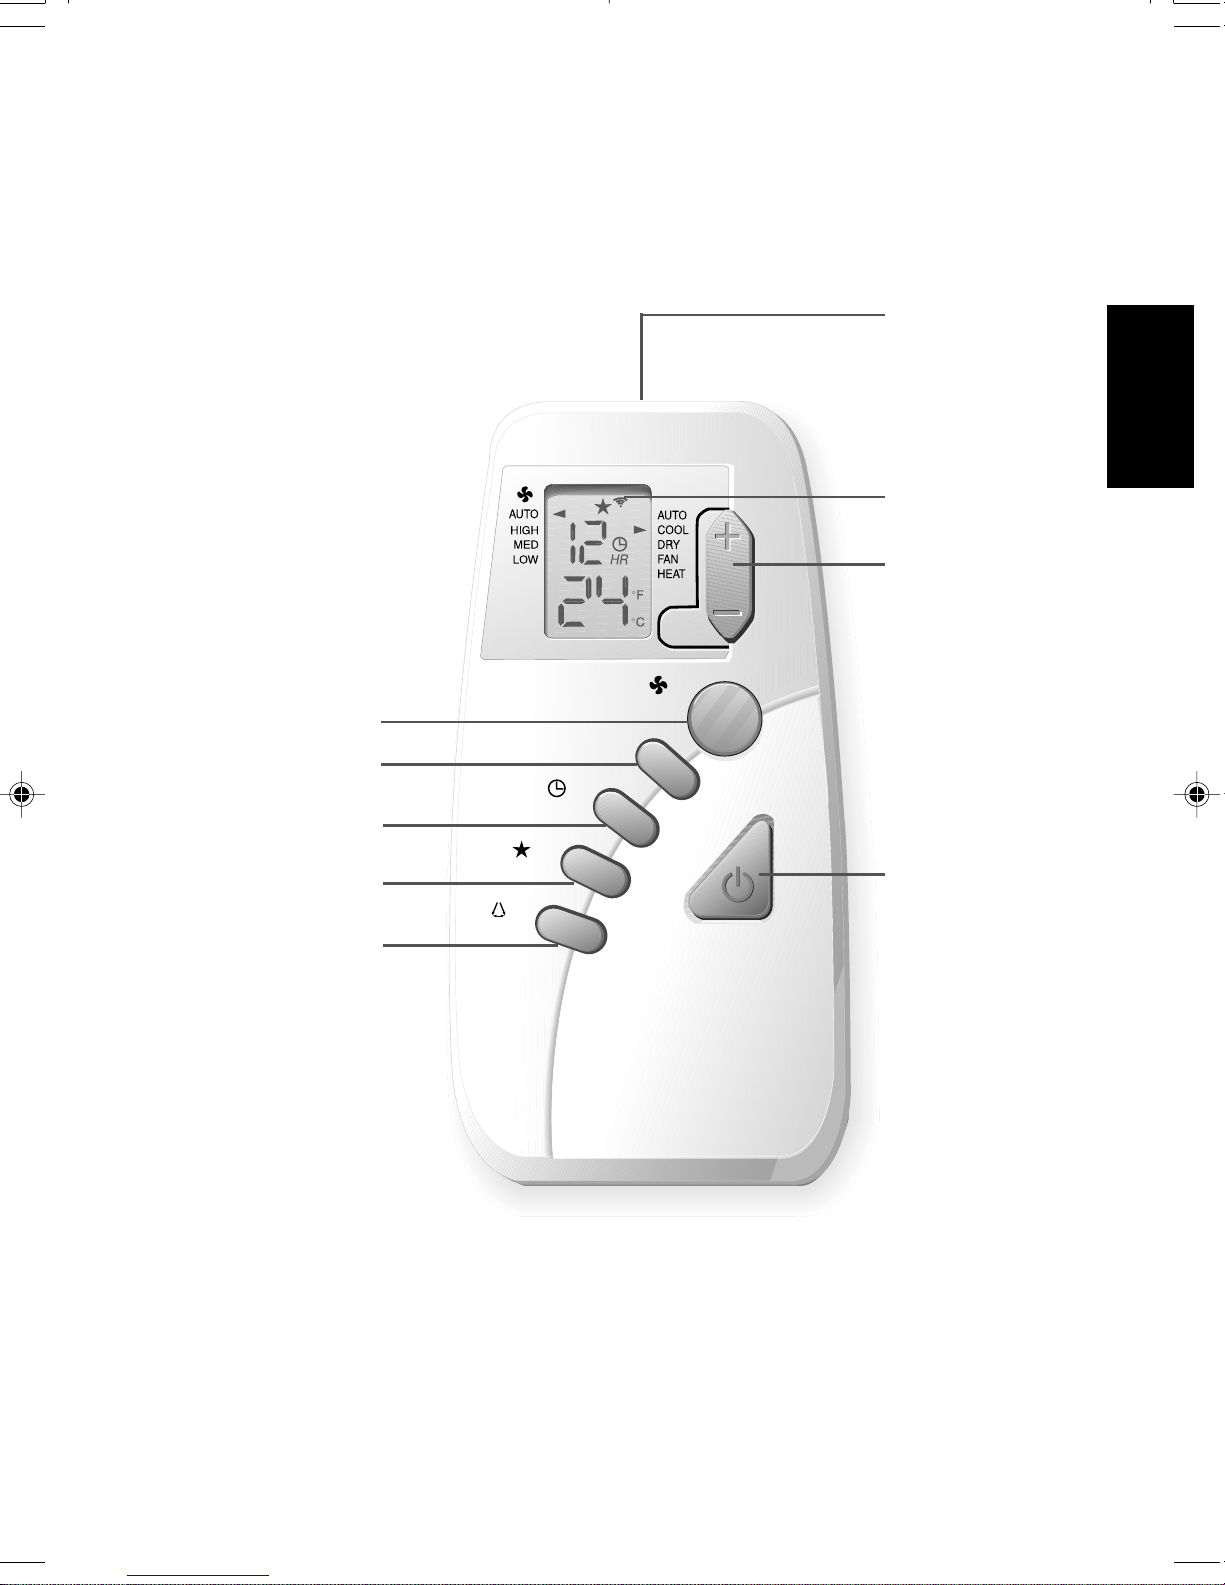
G6 Remote Controller Indication
TEMP
FAN
5
MODE
6
ENGLISH
1
2
3
7
8
9
SLEEP
SWING
TIMER
4
Part No.: 08019010808
1
0M-G6-0200-1

OPERATING GUIDE
1. Transmission source
• The source where the signal will be transmitted.
2. Signal transmission indication
• Blink to confirm that the last setting has been transmitted to the unit.
3. Temperature setting
• To set the desired room temperature, press the TEMP + or TEMP – button to
increase or decrease the set temperature.
• The temperature setting range is from 16°C to 30°C (60°F to 80°F). Optional
setting 20°C to 30°C.
4. “ON/OFF” Button
• Press once to start the air conditioner unit.
• Press again to stop the unit.
5. Fan speed selection
• Press the FAN button continuously will toggle the fan speed in the following order:
Low
–––û
Med
• Stop pressing when the desired fan speed appears on the display screen.
–––û
High
–––û
Auto
6. Operation mode
• Press the MODE button to select the type of operating mode.
• For cooling only unit, the available modes are: COOL, DRY & FAN.
• For heat pump unit, the available modes are: AUTO, COOL, DR Y , F AN & HEAT.
7. Timer setting
• Press the TIMER button will activate the delay timer function.
• The display screen will show the number of hours (1 to 15 hours) after which the
delay timer function will be executed.
• The air conditioner unit will automatically switch on or off after the set time,
depending on its current condition (on or off). For example, if you have set delay
time of 3 hours and the air conditioner unit is currently switched on, it will be
automatically switched off after 3 hours.
• To cancel the delay timer function, press the TIMER button until the number of
hours disappear from the screen.
• In case of someone press the ON/OFF button after a delay timer has been set, the
timer setting will be cleared. To activate the delay timer again, press the TIMER
button once again.
8. Sleep mode setting
• Press the SLEEP button will activate the sleep mode function.
• This is an energy saving option. When the unit is operating under cooling mode, the set
temperature is increased by 0.5°C after the first half an hour, 1°C after the second half
an hour and total of 2°C after the following 1 hour . This function will prevent excessive
cooling during summer season.
2
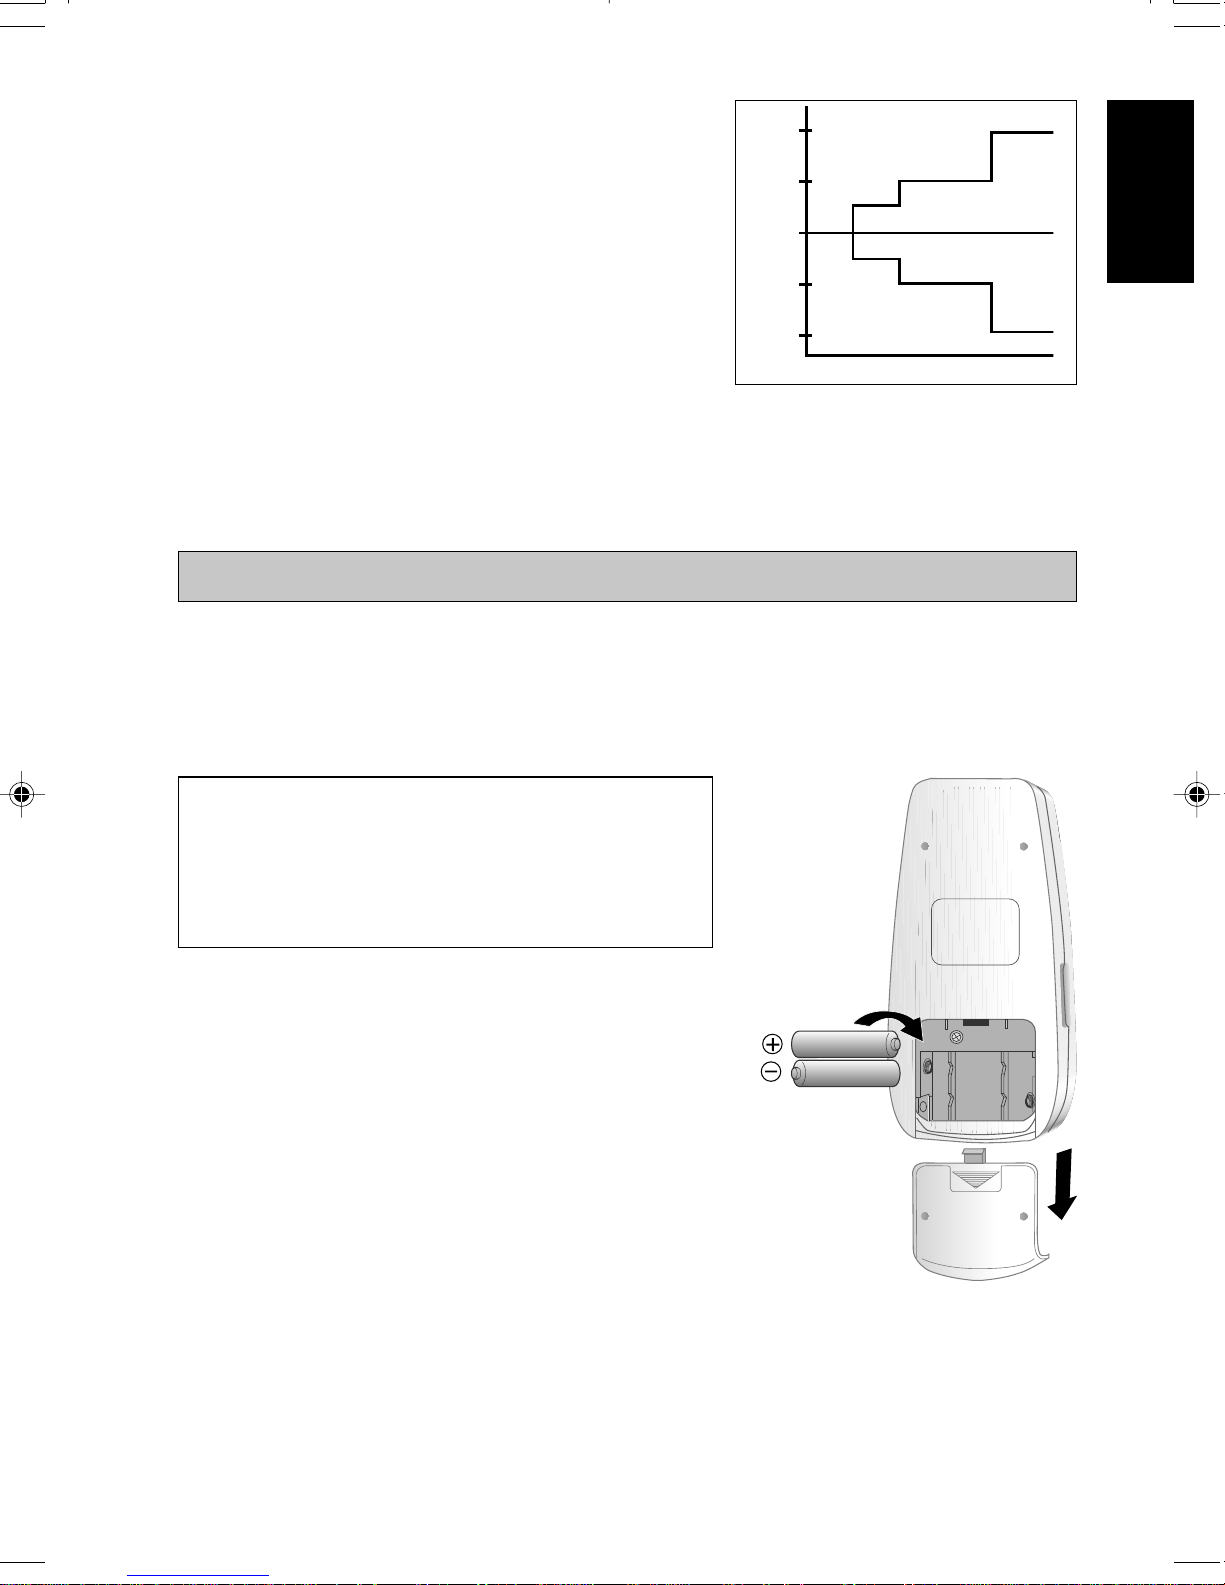
• When the unit is operating under heating mode,
+2°C
+1°C
- 1°C
- 2°C
0 0.5 1 1.5 2
the set temperature is decreased by 1°C after the
first half an hour, 2°C after the second half an
hour and total of 3°C after the following 1 hour.
This function will prevent night sweat during
summer season.
• This function is available under COOL, HEA T
& AUTO mode.
9. Automatic air swing (optional)
• Press the SWING button to activate the automatic air swing function.
• To distribute the air to a specific direction, press the SWING button and wait until
the louver move to the desired direction and press the button once again.
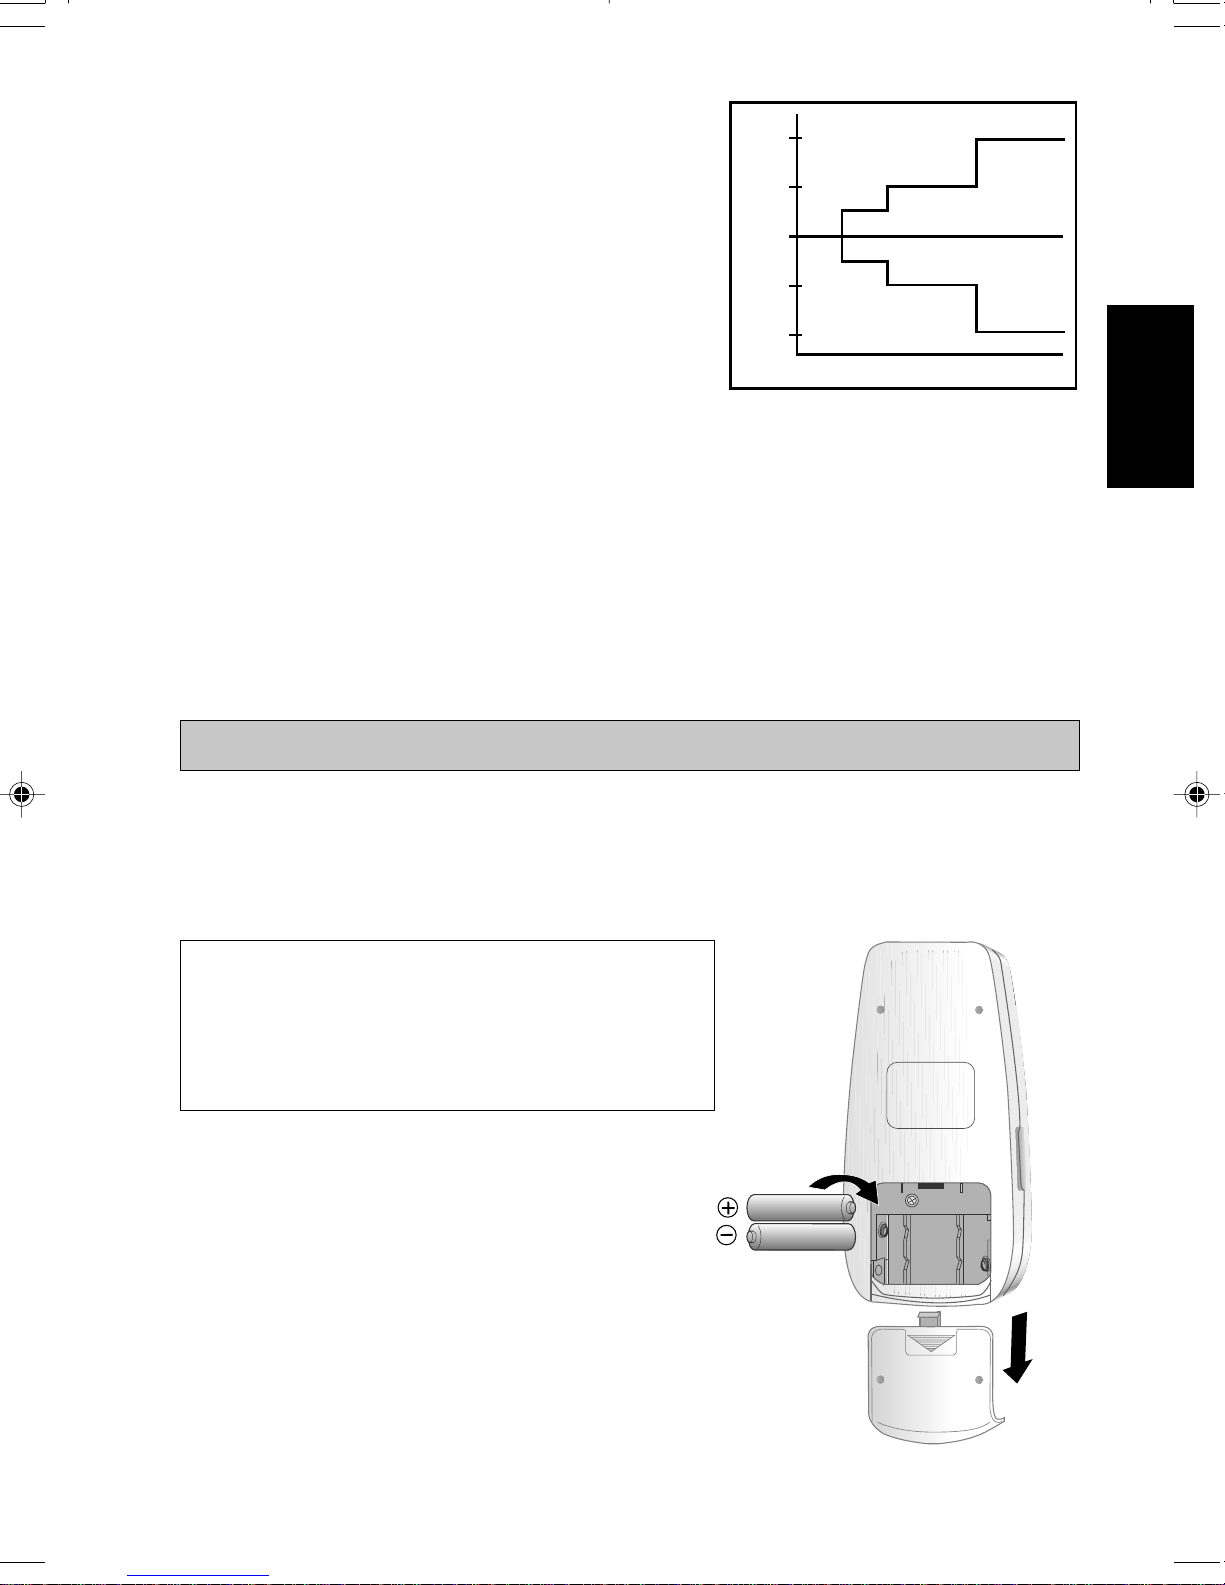
TO INSERT BATTERIES
• Remove the back cover of the remote control following the arrow direction.
• Insert the two batteries. Ensure the + and – directions are correct.
• Fix back the cover and check the display. If there is no display, remove the batteries
and insert them again.
ENGLISH
CAUTION! If the display on the screen is dim
or the transmission cannot be
received by the air conditioner unit,
the batteries need to be changed.
3
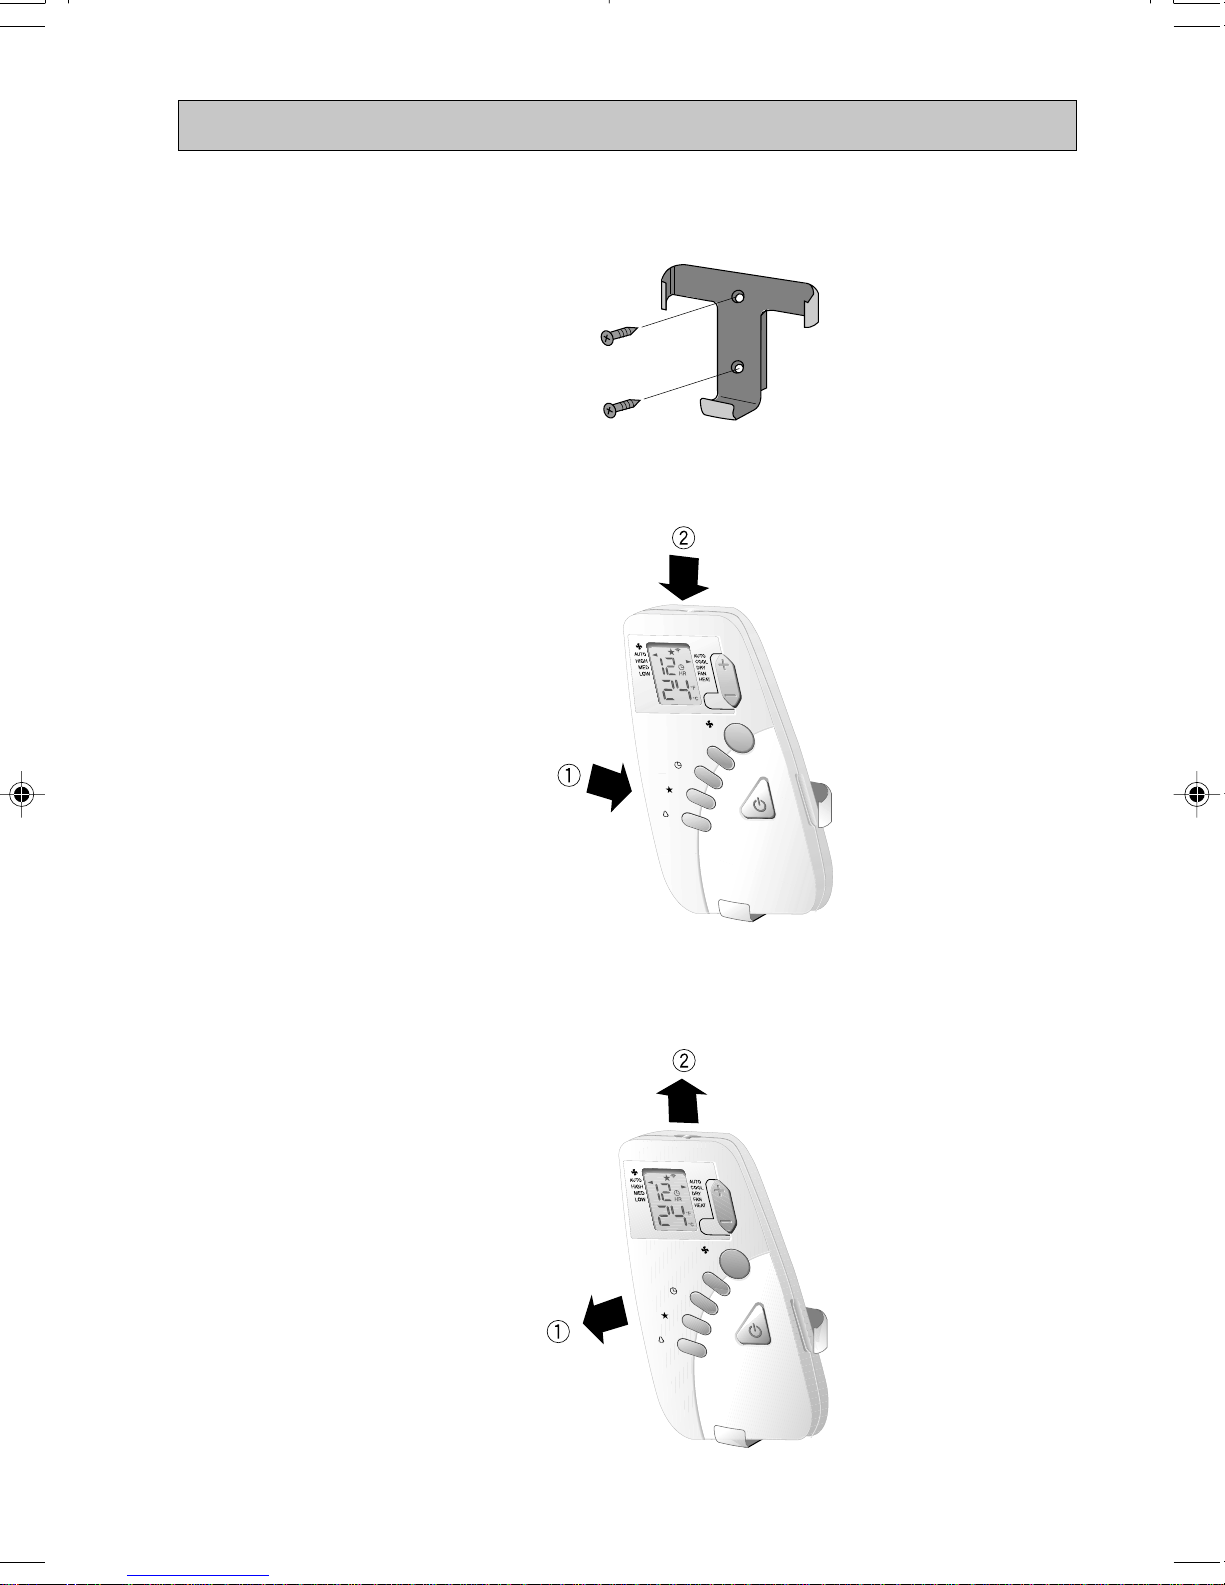
HOW TO MOUNT ONTO THE WALL
T
E
M
P
SLEEP
SWING
FAN
MODE
TIMER
• Affix the holder onto the wall using the screws provided. Ensure that the signal can be
received by the air conditioner unit from that location.
Affix the holder to
the wall using the
screws.
• To attach the remote control to its holder:
i) Slot the remote control into the holder
ii) Press the remote control inwards.
T
E
M
P
Slot the remote
control to its
holder.
SWING
• To remove the remote control from its holder:
i) Pull the remote control outwards.
ii) Remove the remote control.
Remove the
remote control
from its holder.
TIMER
SLEEP
MODE
FAN
4
Indication de télécommande G6
(Refroidissement d’eau)
TEMP
1
FRANÇAIS
2
3
5
6
7
8
9
TIMER
SLEEP
SWING
FAN
MODE
4
Part No.: 08019010808
5
0M-G6-0200-1

MODE D’EMPLOI
1. Source de transmission
• La source d’où le signal sera transmis.
2. Indication de transmission de signal
• Clignotement pour confirmer que le dernier réglage ait été transmis à l’unité.
3. Réglage de la température.
• Pour régler la température au niveau que vous souhaitez, appuyez sur le bouton
TEMP + ou TEMP – pour l’augmenter ou la baisser.
• La température se régle de 16°C à 30°C (60°F à 80°F). Possibilité de régler de 20°C
à 30°C.
4. Bouton “ON/OFF” (MARCHE’ARRÊT).
• Appuyez une fois pour mettre le climatiseur en marche.
• Appuyez de nouveau pour éteindre le climatisateur.
5. Sélection de la vitesse du ventilateur
• Appuyez de façon continue sur le bouton FAN pour transformer successivement la
vitesse du ventilateur comme suit:
–––û
Low
• Cessez d’appuyer lorsque la vitesse désirée apparaît sur l’écran d’affichage.
Med
–––û
High
–––û
Auto (Lent
–––û
Moyen
–––û
Rapide
–––û
Auto)
6. Mode opérationnel
• Appuyez sur le bouton MODE pour sélectionner le type de mode opérationnel.
• Pour l’unité de refroidissement, les modes disponibles comprennent COOL, DRY
& FAN (FROID, SEC & VENTILATION).
• Pour l’unité de thermopompe, les modes disponibles comprennent AUTO, COOL,
DRY, FAN & HEAT (AUTO, FROID, SEC, VENTILATION & CHAUD)
7. Régler la minuterie
• Appuyez sur le bouton TIMER pour activer la fonction de minuterie de retardement.
• V ous pouvez lire sur l’écran d’affichage le nombre d’heures (1 à 15 heures) aprés lesquelles
la minuterie de retardement entrera en fonction.
• Le climatiseur s’allume et s’éteint automatiquement au bout de la durée fixée, en fonction
de son état du moment (on ou off) (marche ou arrêt). Si par exemple vous avez réglé la
minuterie sur 3 heures et que le climatiseur soit alors en marche, il s’éteindra
automatiquement au bout de 3 heures.
• Pour annuler la fonction de minuterie de retardement, appuyez sur le bouton TIMER
jusqu’à ce que l’heure disparaisse de l’écran.
• Au cas où quelqu’un appuie sur le bouton ON/OFF une fois la minuterie réglée, la période
fixée est alors effacée. Pour réactiver la minuterie, appuyez de nouveau sur le bouton
TIMER.
8. Réglage du mode de nuit
• Appuyez sur le bouton SLEEP pour activer la fonction de mode de nuit.
• Ceci est une option anti-gaspillage d’énergie. Lorsque l’unité fonctionne en mode de
6
refroidissement, la température est réglée de sorte
qu’elle monte de 0,5°C au bout d’une demie-heure,
+2°C
de 1°C au bout d’une heure et de 2°C au bout de la
deuxième heure.Cette fonction permet d’éviter un
+1°C
refroidissement trop élevé en été.
• Lorsque l’unité fonctionne en mode de chauffage, la
température est réglée de sorte qu’elle descende de
0,5°C au bout d’une demie-heure, de 1°C au bout
d’une heure et de 2°C au bout de la deuxième heure.
- 1°C
- 2°C
0 0,5 1 1,5 2
Cette fonction permet d’éviter les chaleur nocturnes
excessives en été.
• Cette fonction est disponible en mode COOL, HEAT & AUTO (FROID, CHAUD
& AUTO).
9. Oscillation automatique de la ventilation (facultatif)
• Appuyez sur le bouton SWING pour activer la fonction d’oscillation automatique
de la ventilation.
• Pour orienter la ventilation dans une direction précise, appuyez sur le bouton SWING,
attendez ensuite que le volet de ventilation souffle dans la direction désirée puis
appuyez de nouveau sur le bouton.
FRANÇAIS
INTRODUIRE LES PILES
• Retirez le couvercle au dos de la télecommande suivant la direction de la flèche.
• Introduisez les deux piles. Assurez-vous que les positions + et – soient correctes.
• Replacez le couvercle et vérifiez l’écran. Si l’écran n’affiche rien, retirez les piles et
introduisez-les de nouveau.
AT TEN TI ON:Si l’affichage sur l’écran est faible
ou si le climatiseur ne reçoit pas
les transmissions de la
télécommande, il est nécessaire de
changer les piles.
7
 Loading...