

Page 1
Deluxe RF Laser Mouse
With Office hot key
OWNER'S GUIDE
CAUTION : To use this mouse properly, please read the user's guide before installation
Page 2

Welcome
Your mouse uses a new generation technology – laser module that
replaces the traditional LED mouse and provides amazing tracking
ability. The laser module accurately scans the surface in 30 times
sensitive of LED optical mouse. You can work with your mouse in
most surfaces perfectly.
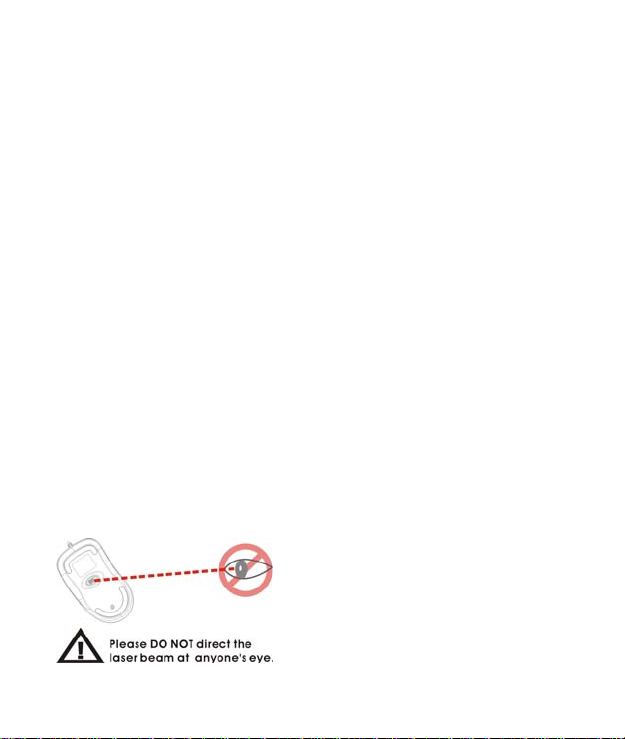
Safety Notice
1. This product complies with IEC 60825-1, class 1 laser
product.
2. Your product complies with FCC and CE rules.
3. This product has no serviceable parts. Use of controls or
adjustments of procedures other than
the user guide may result in dangerous.
CAUTION:
Change or modifications not expressly approved by the
manufacturer responsible for compliance could void the
user's authority to operate the equipment
1
Page 3
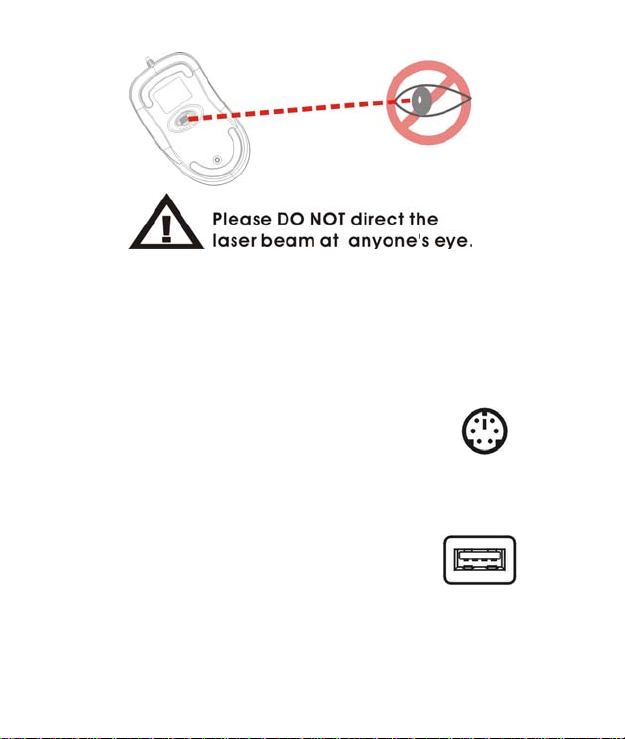
SETUP the Mouse
The Mouse is connected to your computer via a cable. It needs to
plug in your computer by a USB port or a mouse port.
For PS/2 mouse port installation
Please turn off your computer before installing your
mouse. Plugging and unplugging cables to your
computer's mouse port while the computer is running
can damage the mouse port or your Computer.
For USB port installation
Windows 98 (or higher) and Macintosh OS 8.6
(or higher) are required for USB port installation.
Connect the receiver cable to the USB port on
the computer. For Windows, you may be prompted to insert the
Windows software CD. Insert the divers’ CD into the computer's
CD-ROM driver when asked to do so. Follow the instructions steps.
PS2 Mouse Port
USB Port
2
Page 4
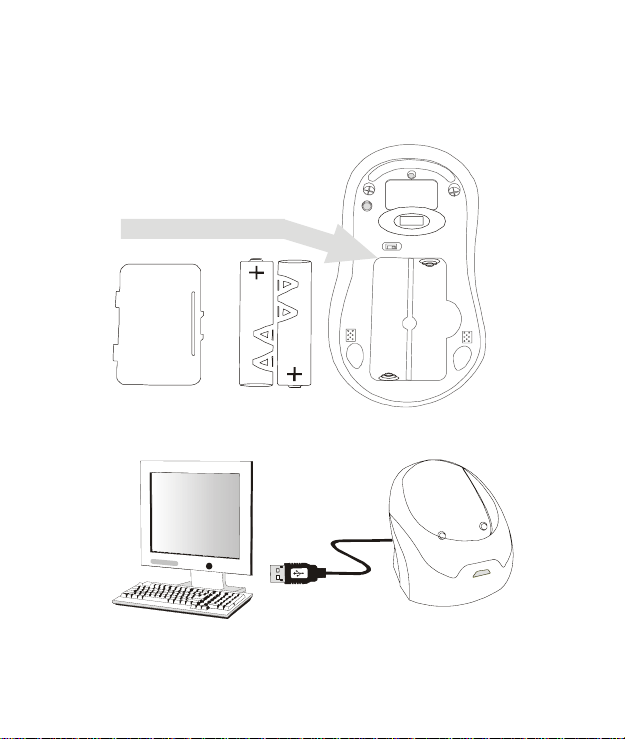
Installing the batteries
Step 1 Press the tag on the battery compartment cover of the mouse
and pull up.
Step 2 Insert the batteries as shown inside the battery compartment.
Step 3 Replace the cover.
Install the Receiver and the recharger
Connect to the USB port of your computer
3
Page 5
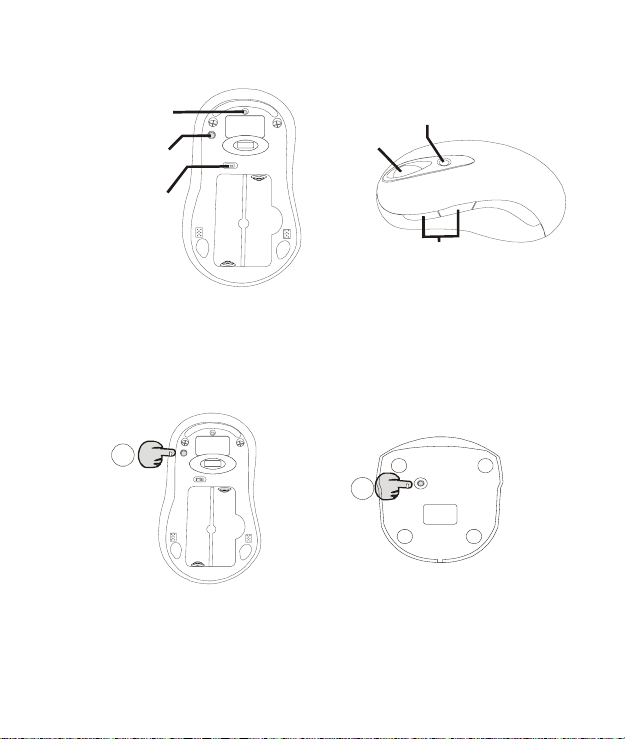
Functional Introduction:
Low pow er LED
Channel reset button
OFF / ON swi tc h
Mouse wheel
Office hot key
Previous / Next pag e
Setup the connection Rf channel between the
Mouse and the Receiver
4
1
Push
2
Push
Push the channel reset button on the mouse Push the channel reset button on the receiver
f the cursor does NOT move after 30 seconds, please re-do the steps above.
I
Page 6

Green LED FLASH 0.5 sec. Regularly
SEAR CHING the chan nel
Green LED FLASH if any action
Channel connected
Green LED ON
No action
Recharging:
Red LED FLASH
Low Power
Red LED off
Normal / No batteries
5
Red LED ON
Recharging
Red LED OFF
Finish ed chargi ng
Page 7

Using your mouse
How to use the wheel
Your mouse has a wheel that functions both as a wheel for Windows
Scrolling and also as a customized button. It can be used as a
standard mouse button, click (press down) the wheel. To Use the
Middle Button, Directly Press down the Wheel. For scrolling the
screen, simply move the wheel.
Software Installation
Please follow the steps below to install your mouse driver:
1. Follow the instruction on screen; system will install the Driver
automatically.
2. Insert your driver disk into the driver.
3. Go to “Start” Menu and select “Run”.
4. Type “A:\Setup”, press the “Enter” button on your keyboard.
5. Reboot your system while completing the installation process.
( “A:” device CD drive or floppy drive)
6
Page 8

Utility & Office hot key:
The Office hot key provides you with easy way to customize your mouse
operations and total control over the screen without using taskbar or
start menu.
You just need to press the Office Selector Key on your mouse then
round shaped quick panel will pop up. You will see eight items on the
Quick Panel providing effective accessibility for most frequently used
Windows applications including Word, Excel and PowerPoint. You just
need to click on the item you want to launch.
Quick Panel
Launch Word
Adjust Volume
Launch Outlook
Open My Document
Launch Excel
Launch PowerPoint
Launch My Computer
Launch IE
(Tips: There are popup tips when you point on the screen icons.)
7
Page 9

Utility Settings
4
Double click the mouse icon on the right bottom corner of the Windows
screen to get into the setting window.
You can add new functions to your Quick Panel for making your own
frequently Command Quick Panel in the Office applications.
Example: Add a “save” functional key in the Quick Panel for the Word
application.
1
3
2
8
Page 10

5
Important Notes:
• Please follow the instructions contained in the instruction
• Do not put the product in water or on any wet surface; if this
• To avoid electrocution, please do not pick up the device when
• Do not put the product near a heat source or put the product in
• This product’s casing has holes for the drive to ventilate. Do
9
manual. Do not try to disassemble or replace parts in the
product.
occurs quickly remove from the computer and take to your
nearest dealer for repair.
your hands are wet.
high temperatures.
not cover the ventilation holes in order to avoid hard drive
damage.
Page 11

Troubleshooting
Mouse does not work upon installation
Try one or more of the following:
z Make sure you have installed the Driver correctly.
z Make sure the receiver cable is plugged into the right mouse port.
z Unplug the Mouse and then plug in the mouse again. Make sure that Mouse had been
detected by the Operating Systems properly.
z Make sure your mouse port has the proper configuration. Refer to your computer
documentation for the correct port configuration.
z You may have other system devices (e.g. a LAN card) that conflict with your mouse.
Check the IRQ/address settings of these devices for conflicts, and change the settings as
required.
N-MP1&MR8-01
10
Page 12

MP1 Work Basis
Mouse (optical):
1. When the mouse was moved, the optical sensor would detect the different
between two points, and then sensor will send the signal to the MP1.
2. The MP1 will encode the signal and modulate the signal that uses FSK
modulation type).
3. Through the 27 MHz RF circuit transmit the modulation signal.
Receiver:
1. When the receiver receives the modulation signal will demodulate signal
through RF circuit. And responds signal to MP1.
2. The MP1 meeting decodes the signal PC acceptable format.
ps. FSK: Frequency Shift Key
MP1: Micro Control Unit
RF: Radio Frequency
Page 13

FCC ID LABEL FORMAT AND LOCATION
Applicant: Acrox Technologies Co., Ltd.
FCC ID: PRDMPO008PXOX
FCC ID: PRDMPO008PXOX
This device complies with part 15 of the FCC Rules.
Operation is subject to the following two conditions:
(1) This device may not cause harmful interference,
and (2) this device must accept any interference
received, including interference that may cause
undesired operation.
FCC ID LABEL AREA
Page 14

Federal Communication Commission Interference Statement
This equipment has been tested and found to comply with the limits for a Class B digital
device, pursuant to Part 15 of the FCC Rules. These limits are designed to provide
reasonable protection against harmful interference in a residential installation. This
equipment generates, uses and can radiate radio frequency energy and, if not installed
and used in accordance with the instructions, may cause harmful interference to radio
communications. However, there is no guarantee that interference will not occur in a
particular installation. If this equipment does cause harmful interference to radio or
television reception, which can be determined by turning the equipment off and on, the
user is encouraged to try to correct the interference by one of the following measures:
- Reorient or relocate the receiving antenna.
- Increase the separation between the equipment and receiver.
- Connect the equipment into an outlet on a circuit different from that
to which the receiver is connected.
- Consult the dealer or an experienced radio/TV technician for help.
FCC Caution: Any changes or modifications not expressly approved by the party
responsible for compliance could void the user's authority to operate this equipment.
This device complies with Part 15 of the FCC Rules. Operation is subject to the following
two conditions: (1) This device may not cause harmful interference, and (2) this device
must accept any interference received, including interference that may cause undesired
operation.
 Loading...