

Page 1
3D Laser Mouse
OWNER'S GUIDE
Ver.1.0
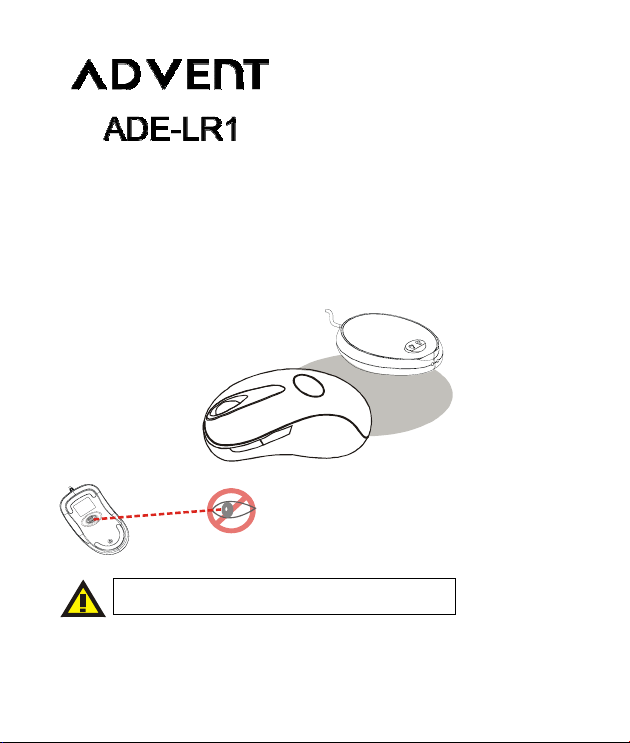
Please DO NOT direct the laser beam at anyone’s eye.
CAUTION: To use this product properly, please read the user's guide before installation
050719LMPN+MRB
Page 2

r
r
Welcome
Your mouse uses a new generation technology laser module that
replaces the traditional LED mouse and provides amazing tracking
ability. The laser module accurately scans the surface with 30 times
more sensitivity of an LED optical mouse. It also uses digital radio
technology and a has rechargeable receiver for your mouse’s batteries.
Safety Notice
1. This product complies with IEC 60825-1, class 1 lase
product.
2. Your product complies with FCC and CE rules.
3. This product has no serviceable parts. Use of controls o
adjustments of procedures other than the user guide may
result in dangerous.
This symbol on the product or in the instructions means that your electrical and
electronic equipment should be disposed at the end of its life separately from your
household waste. There are separate collection systems for recycling in the EU.
For more information, please contact the local authority or your retailer where you
CAUTION:
Change or modifications not expressly approved by the
manufacturer responsible for compliance could void the user's
authority to operate the equipment.
purchased the product.
1
Page 3
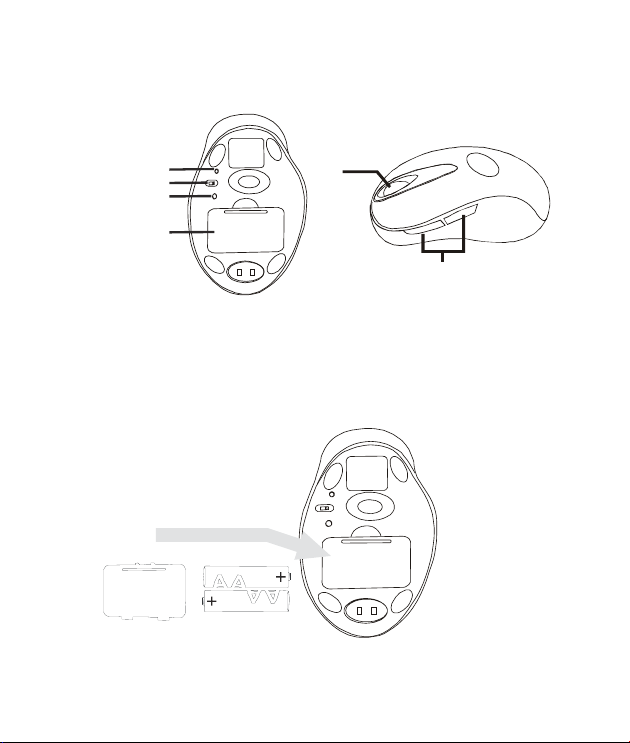
Functional Introduction:
Lo w p o w er LED
OFF/ ON Switc h
Channel reset b utton
Battery cover
Mouse wheel
Previous / Next page
Installing the Batteries
Step 1 Pull up the battery cover of the mouse.
Step 2 Insert the batteries as shown inside the battery compartment.
Step 3 Replace the cover.
2
Page 4

Install the Receiver and the Charger
The receiver (charger) is connected to your computer via a cable. It
needs to plug in your computer by a USB port or a mouse port.
For PS/2 port installation
Connect to the USB or Mouse port of your computer
PS/2 Mouse
Port
Please turn off your computer before plugging in the
receiver cable to the computer’s mouse port. Plugging
and unplugging cables to your computer’s mouse port
while the computer is running can damage the mouse
port or your computer.
For USB port installation
USB Port
Windows 98 (or higher) is required for USB port
installation. Connect the receiver cable to the USB port
on the computer. For Windows, you may be prompted
to insert the Windows software CD. Insert the driver’s
CD into the computer’s CD-ROM driver when ask to do so. Follow the
instructions steps.
3
Page 5

Note: This RF Mouse is a plug-and-play device. Normally, it’s not
necessary to setup the RF Channel. But if some interference happens,
then you must setup the connection RF Channel.
Setup the connection RF Channel between the
Mouse and the Receiver
1
Push the c hanne l reset b utton on the mo use. Push the channel reset button on the receiver
If the cursor does NOT move after 30 seconds, plea se-do the steps above.
2
GREEN LED FLASH (0.5 sec. Regularly)
Searching the channel
GREEN LED FLASH (if any action)
Channel connected
GREEN LED ON
No a ct io n
4
Page 6

Recharging:
RED LED FLASH
Lo w p ow e r
RED LED OFF
Normal / No batteries
5
RE D LE D ON
Recharging
RED LED OFF
Finished c harging
Page 7

Using your Mouse
How to use the wheel
Your mouse has a wheel that functions both as a wheel for Windows
Scrolling and also as a customized button. It can be used as a standard
mouse button, click (press down) the wheel. To Use the Middle Button,
Directly Press down the Wheel. For scrolling across the screen, simply
move the wheel.
Utility
The Mouse Utility provides you an easy way to customize the mouse
operations. It will load into your system automatically after finishing
the driver Installation.
Double click the mouse icon on the right-bottom corner of the
Windows screen for utility setting up.
Wheel Setting:
1. Choose “System Default Mode “to be compatible
with Intelli-Mouse functions.
2. Choose “Enhance Scroll Mode “to support the new
useful functions of 3D Wheel mouse.
Button Setting:
You can set the button 3~5 by selecting the functions you
want in the task. And the functions you can select are
including the system frequently functions and special
powerful functions as below:
6
Page 8

Universal Scroll
Provide the scrolling movement by mouse scroll button. Choose the “Universal Scroll
“to adjust the horizontal and Vertical Movement speed by “Slow-Fast bar “on the
window.
Zoom
It allows you to a certain pan area by input the numbers in “Zoomed Size “from 2 X 2 to
64 X 48. And, enlarge the content of the pan area by inputting the factor number from2 to
8 times to” Zoom Factor “.
Application Switching
Choose this function for easy-to-do application change by clicking scroll button.
Launch Default Browser
Mark this function to get the path to access the IE and Netscape application by pressing
the scroll button.
Launch Default E-Mail
Mark this function to get the path to access the E-Mail application by pressing the scroll
button.
Auto Scroll
Give a fixed movement speed for horizontal and vertical scrolling.
Control (Office Zoom)
As holding the “Ctrl” Key of the keyboard by pressing down the scroll button.
Shift
As holding the “Shift” Key of the keyboard by pressing down the scroll button.
Switch to Horizontal Wheel
Choose to change the Vertical Scrolling wheel mode to Horizontal Scroll mode by each
pressing down the scroll button.
IE Switching
Backward
Choose to replace the “Back “function by each pressing down the scroll button.
Forward
Choose to replace the “Forward “function by each pressing down the scroll button.
K.B. Simulation
Choose to simulate the function key of the keyboard (F1~F10, Esc, Backspace, Enter,
ect.) by each pressing down the scroll button.
7
Page 9

Troubleshooting
A. Mouse does not work upon installation.
Try one or more of the following:
y For optimal performance, adjust the placement of the receiver to find the
best performance.
y Make sure you have installed the batteries correctly.
y Press the “Channel Reset” button on the receiver, and then press the
“Channel Reset” button on the mouse.
B. Mouse not detected.
When using the mouse, it may not be detected by the computer or
receiver. To remedy this problem, try the following
y Make sure the receiver is plugged in the right mouse port or USB port.
y Make sure your mouse port has the proper configuration. Refer to your
computer documentation for the correct port configuration.
y You may re-setup the connection RF Channel between the Mouse and
the Receiver (Please refer the procedure on Page 4), especially, when
you have been changed or recharged your batteries.
C. The Screen Cursors Does Not Move Properly.
y Change the angle of your radio receiver. Try adjusting the receiver and/or
mouse to improve reception.
y Make sure that the battery low indicator is NOT lit on. Replace batteries if
the low battery indicator is lit on.
y You may also need to change the RF Channel for the mouse, Press the
“Channel Reset” button on the receiver, then press the “Channel Reset”
button on the mouse.
8
Page 10

D. Mouse does not work upon installation.
Try one or more of the following:
y Make sure you have installed the Driver correctly.
y Make sure the receiver cable is plugged in the right mouse port or USB
port.
y Unplug the receiver and then plug in the receiver again. Make sure that it
had been detected by the Operating Systems properly.
y Make sure your mouse port has the proper configuration. Refer to your
computer documentation for the correct port configuration.
For advice on getting your product up and running, we offer an installation and
set-up service on our software helpline:
0906 559 7897
PC Helpline:
Calls charged at £1 per minute, maximum call duration - 20 minutes. Open
24/7, 365 days a year. You will not be charged for any queuing time on this line,
you will simply hear the phone ring until one of our advisers is available to deal
Visit Partmaster.co.uk today for the easiest way to buy electrical spares and
With over 50,000 products in stock we can deliver direct to your door the very next
(UK customers only)
with your query.
accessories.
day.
Visit www.partmaster.co.uk
or call
0870 6001 338
(UK customers only)
Calls charged at National Rate.
9
 Loading...