

Acros ACE2737, ACE2868, ACE3527, ACE3657, ACE3757 Owner's Manual
...
INSTRUCTIVO
DE INSTALACIÓN, USO Y MANEJO
No. Parte 98013643
LEA CUIDADOSAMENTE ESTE INSTRUCTIVO ANTES DE
USAR POR PRIMERA VEZ SU ESTUFA
Ampara los
siguientes
Modelos:
ACE2737
ACE2868
ACE3527
ACE3657
ACE3757
ACE3788
ACE3889
Im
preso en M
éxico 2002
SM
98013644 Rev. 0
Part No. 98013643
THIS MANUAL CONTAINS IMPORTANT INFORMATION,
READ IT BEFORE FIRST USE OF YOUR RANGE
ACE2737
ACE2868
ACE3527
ACE3657
ACE3757
ACE3788
ACE3889
INSTALLATION, USE AND CARE
MANUAL
Covers
the following
models:
Printed in M
exico 2002
SM
98013644 Rev. 0
ESTUFAS
RANGES

¡ Felicidades por la compra de su nueva estufa !
2
Índice
Partes y Características
Instalación
Conexión
Funcionamiento
Limpieza
Póliza de Garantía
Formato de Identificación
Centros de Servicio Autorizados
2
4
4
5
13
15
15
16
Acaba de adquirir un producto desarrollado
con las más avanzadas técnicas de diseño
y fabricación.
Le sugerimos que antes de usar su estufa
lea cuidadosamente las instrucciones de
este Manual, consérvelo ya que la
información contenida en el mismo será
importante para el buen funcionamiento de
su estufa durante muchos años.
Partes y Características
Características
Capelo de Cristal
Respaldo Superior
Válvula de Seguridad en Respaldo Superior
Válvula de Seguridad en Capelo
Reloj
Cubierta Superior
Comal Porcelanizado
Comal de Aluminio con Antiadherente
Parrillas Superiores
Quemadores Superiores
Quemador Oval
Duoflama Quemadores Multiposición
Xpress Super Quemador
En Tiempo Quemador Programable
Perillas Super Safe
Frente de Perillas
Termostato de Horno con Piloto
Termostato Bidireccional
Encendido Electrónico de Horno
Encendido Electrónico en Perilla Quemadores Superiores
Encendido Electrónico Independiente Quemadores Superiores
Interruptor Luz de Horno
Interruptor Luz de Horno Integrado
Interruptor Luz de Horno en Perilla
Asador Superior
Asador Inferior
Parrilla de Horno
Ventana de Horno
Modelo
ACE2737 ACE2868 ACE3657 ACE3757 ACE3788 ACE3889
Porcelanizada Porcelanizada
22
4 Aluminio 4 Aluminio 6 Aluminio 6 Aluminio 6 Aluminio 6 Aluminio
Porcelanizado Porcelanizado Porcelanizado
22
Panorámica Panorámica Panorámica Panorámica Panorámica
Semipanorámica
ACE3527
Porcelanizada Porcelanizada Porcelanizada Porcelanizada
Cromada
3
5 Aluminio
Porcelanizado
1
3333
Porcelanizado Porcelanizado
2222
Porcelanizado
con Inserto de
Acero
Inoxidable
Panorámica
Panoramic
Steel Insert
& Stainless
Porcelainized
2222
3333
Semipanoramic
1
5 Aluminium
3
Chromed
ACE3527
your range.
is important for best results in the use of
instructions in this manual, the information
Before you use your range, read the
quality requires maintenance.
it, you have received quality; but remember,
the latest technical expertise. By purchasing
This range was carefully manufactured with
Panoramic Panoramic Panoramic Panoramic Panoramic
22
Porcelainized Porcelainized Porcelainized Porcelainized Porcelainized
Porcelainized
4 Aluminium 4 Aluminium 6 Aluminium 6 Aluminium 6 Aluminium 6 Aluminium
22
Porcelainized Porcelainized Porcelainized Porcelainized Porcelainized Porcelainized
ACE2737 ACE2868 ACE3657 ACE3757 ACE3788 ACE3889
16
15
15
13
5
4
4
2
Model
Oven Window
Oven Rack
Broiler
Waist High Broiler
Oven Light Swith in Knob
Integrated Oven Light Switch
Oven Light Switch
Independent Electronic Ignition for Surface Burners
Integrated Electronic Ignition in Knob for Surface Burners
Oven Electronic Ignition
Bidirectional Thermostat
Oven Thermostat with Pilot
Manifold Panel
Super Safe Knobs
En Tiempo Programmable Burner
Xpress Super Burner
Duoflama Multiposition Burners
Oval Burner
Top Burners
Top Grates
Aluminium Griddle with Antiadherent
Porcelainized Griddle
Cooktop
Clock
Security Control Glass Lid Shut Off Valve
Security Control Backguard Shut Off Valve
Backguard
Glass Lid
Characteristics
Parts and Features
Authorized Service Centers
Identification Format
Warranty
Cleaning and Maintenance
How to Use Your Range
Gas Supply Connection
Installation
Parts and Features
Index
¡ Congratulations !
2
3
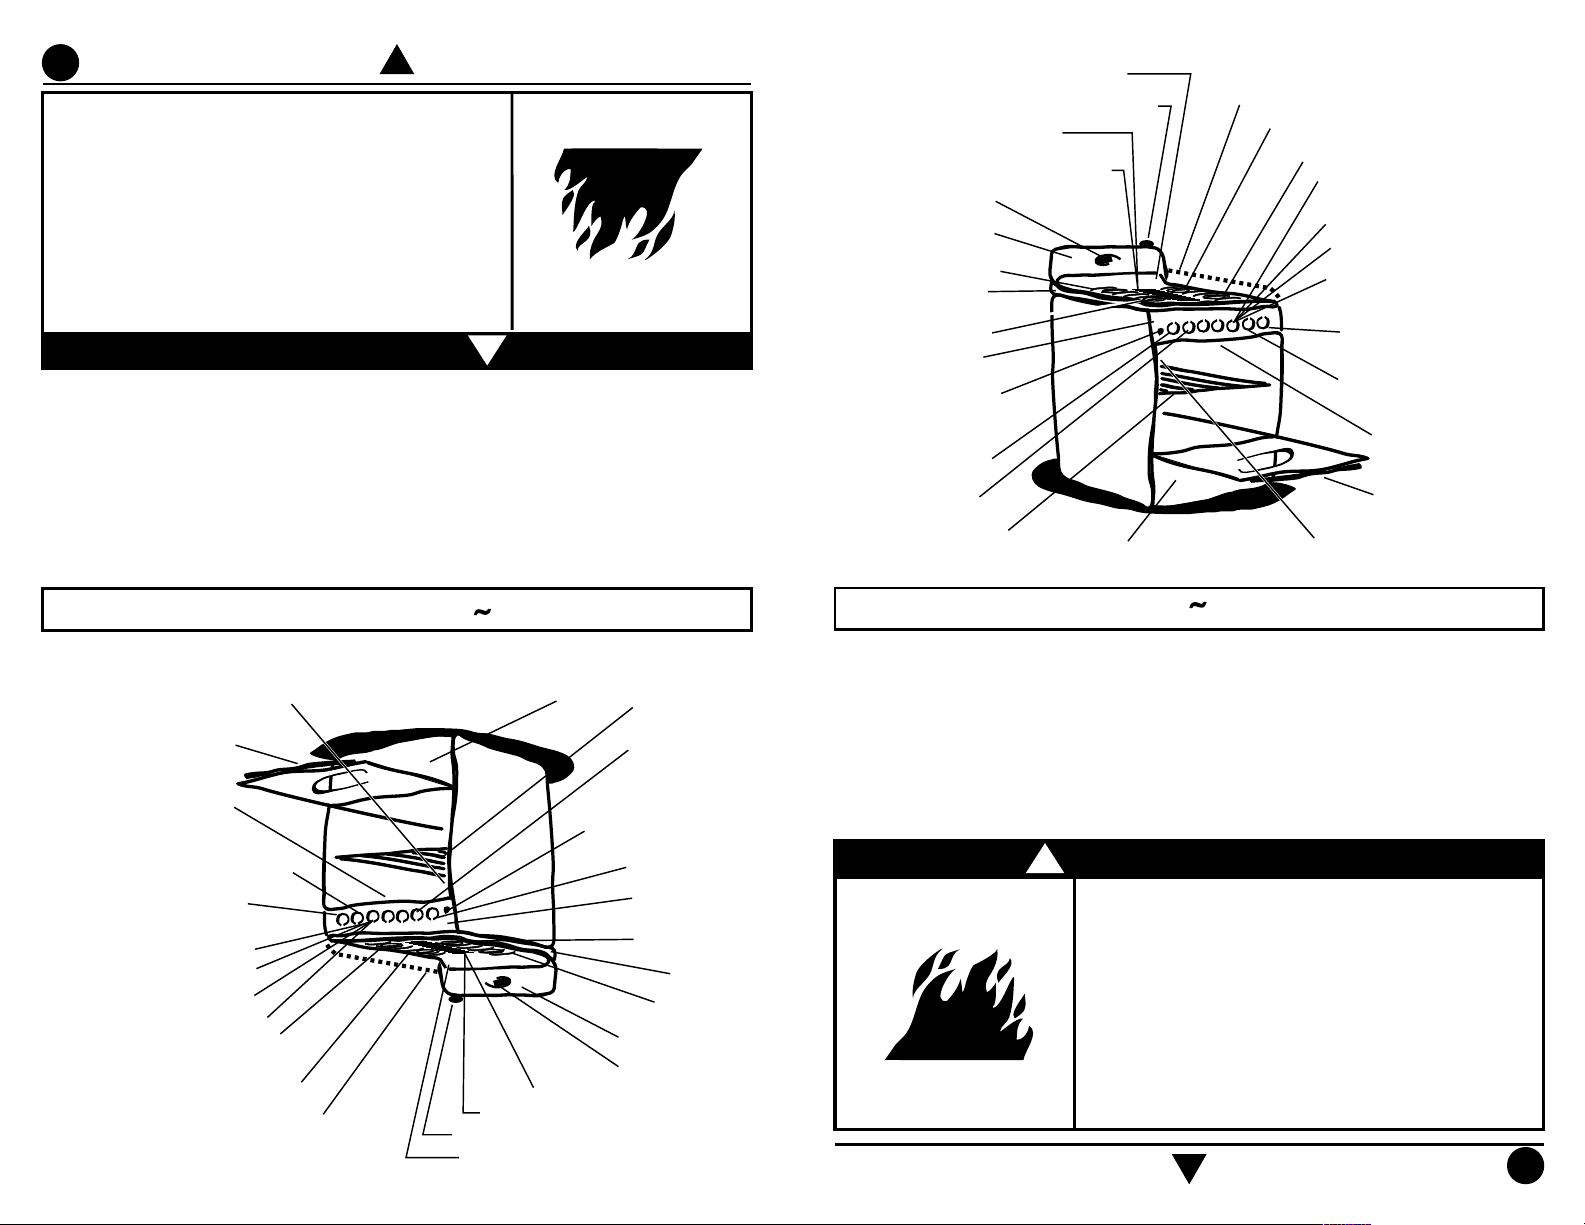
Failure to do so can result in death, fire or explosion.
ignite if contact by open flames.
burners or wear loose clothing; your clothes may
Do not get too close to the flame produced by the
range.
Do not store or use any flammable liquid near your
keep children away while range is in use.
Do not allow children to use or play with the range;
Fire or Explosion Hazard
WARNING
!
Use the range only in home applications. It is not designed for commercial use.
Provide for adequate maintenance.
Do not allow range to be used by children or unqualified adults.
strong enough to sustain its weight.
Install your range in an area that is protected against weather exposure, on a level floor
Security Control
(Válvula de Seguridad en Capelo)
Security Control
(Válvula de Seguridad en Respaldo Superior)
ComalPorcelanizado
Comal de Aluminio con Antiadherente
Reloj
Respaldo Superior
Parrillas Superiores
Cubierta Superior
Xpress
(Super Quemador)
Frente de Perillas
Encendido Electrónico
Independiente para
Quemadores Superiores
e Interruptor Luz de Horno
Perillas Super Safe
Válvulas de
Quemadores
Parrilla de
Horno
Asador Inferior
Capelo de Cristal
Duo Flama
(Quemadores Multiposición)
Quemadores Superiores
Interruptor Luz de Horno
en Perilla
Termostato Bidireccional
Termostato de Horno
con Piloto
Encendido Electrónico
de Horno
En Tiempo
(Quemador Programable)
Encendido Electrónico en
Perilla para Quemadores
Superiores
Interruptor Luz de Horno
Integrado
Asador Superior
Ventana de Horno
Switch
Integrated Oven Light
Oven Window
Waist High Broiler
Ignition in Knob for Surface Burners
Integrated Electronic
(Programmable Burner)
En Tiempo
Oven Electronic Ignition
Oven Thermostat with Pilot
Bidirectional Thermostat
Oven Light Swith in Knob
Top Burners
(Multiposition Burners)
Duo Flama
Glass Lid
127 V ± 10% 50/60 Hz 1,0 A Max.
Broiler
Clock
Porcelainized Griddle
Electric Characteristics:
Oven Rack
Burner Valves
Switch
Burners & Oven Light
Ignition for Surface
Independent Electronic
Super Safe Knob
Manifold Panel
(Super Burner)
Xpress
Cooktop
Top Grates
Backguard
Aluminium Griddle with Antiadherent
Security Control (Backguard Shut Off Valve)
Security Control (Glass Lid Shut Off Valve)
Características eléctricas nominales:
127 V ± 10% 50/60 Hz 1,0 A Max.
Instale su estufa en un lugar protegido de las inclemencias del tiempo y sobre una
superficie plana y resistente para soportar su peso.
No permita que la usen niños o personas que no conozcan su funcionamiento.
Proporciónele el mantenimiento adecuado.
Utilice la estufa solo en labores del hogar. No es un aparato de uso comercial.
!
ADVERTENCIA
Peligro de Incendio y/o Quemaduras
No permita que los niños usen o jueguen con la
estufa; manténgalos alejados mientras está en
uso.
No almacene o use ningún material flamable cerca
de su estufa.
No se acerque demasiado a las flamas de los
quemadores, ni use ropa suelta, ya que se puede
encender y causar quemaduras.
No seguir estas instrucciones puede ocasionar
incendio, quemaduras o la muerte.
3
4
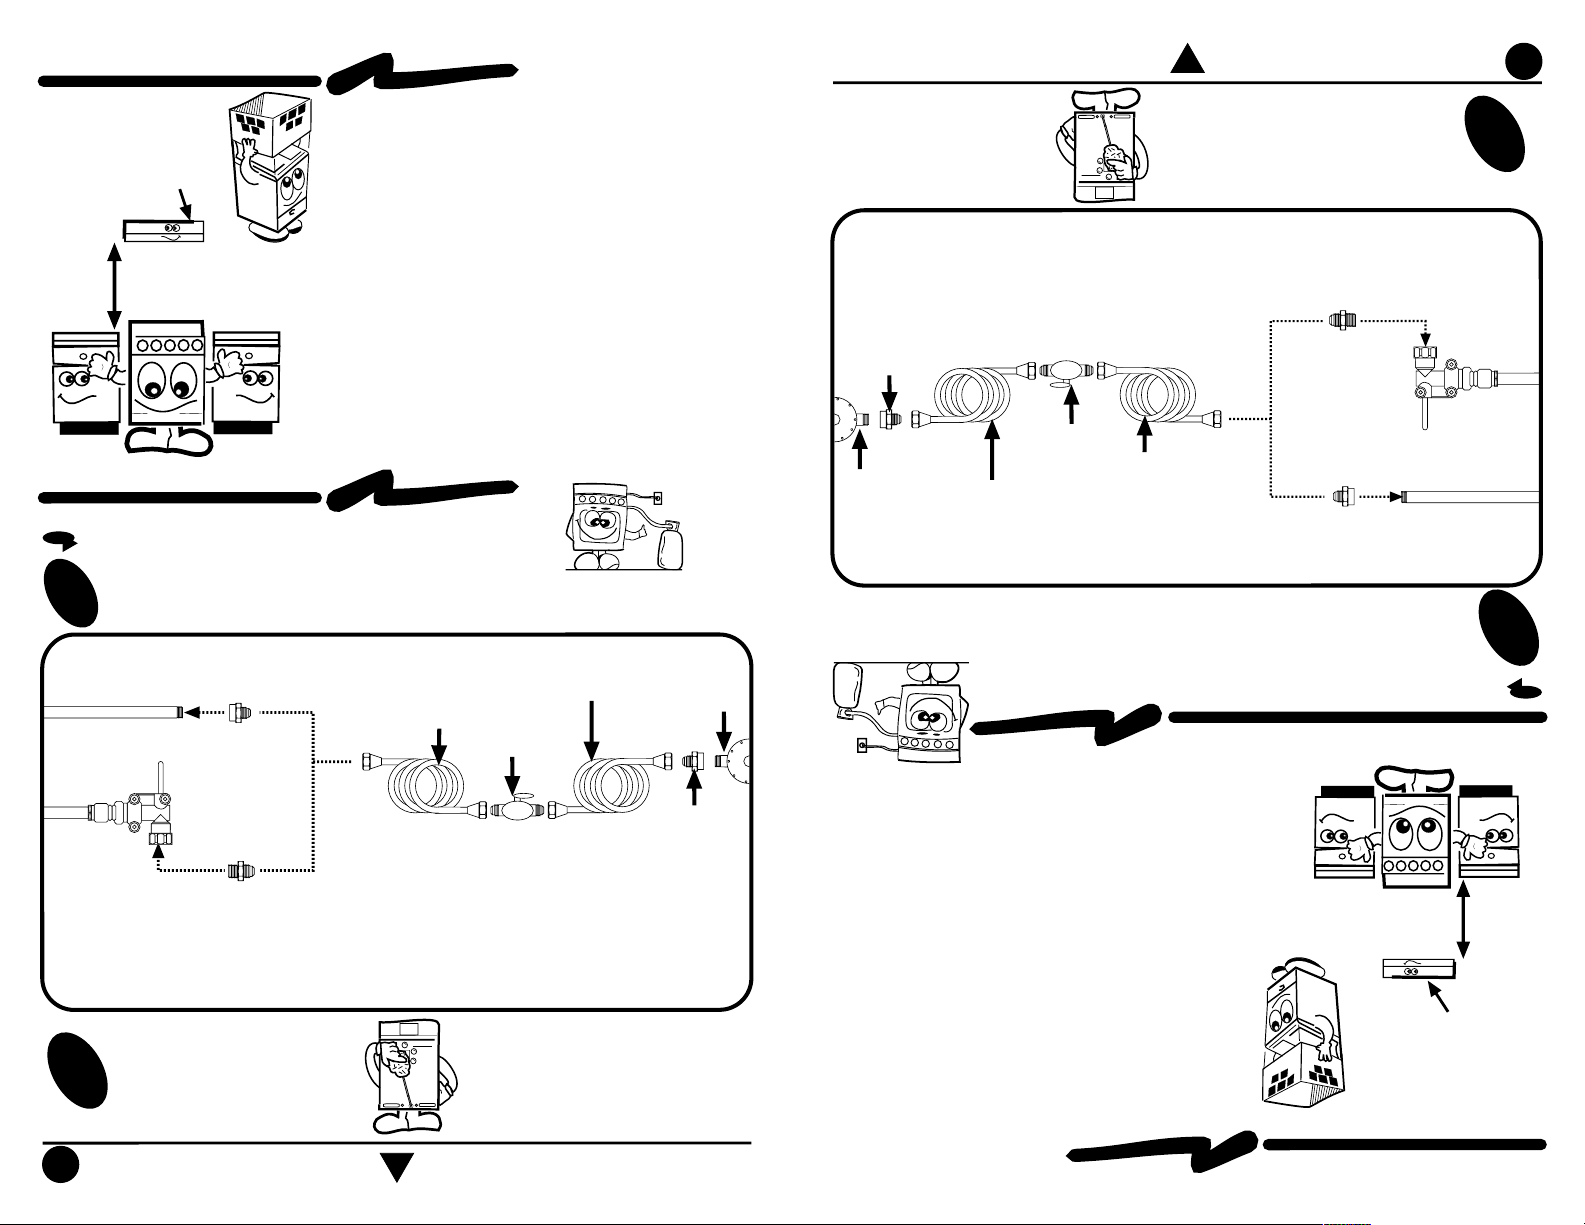
Conexión
4
Gas Supply Connection
GAS SUPPLY CONNECTION
CONEXIÓN DE LA ESTUFA A LA LÍNEA DE GAS
Para conectar su estufa, utilice el material especificado en la figura
de abajo.
1
2
Cheque con agua jabonosa
que no existan fugas.
2
Check with soap solution for leaks.
To connect the range, use the material shown in the bottom figure.
1
Installation
EXHAUST DEVICE
61 cm
m
in.
Proper installation is your responsibility. A qualified
technician or Service technician must install this
range.
Remove all packing material and put the range
accessories in their places.
Select the best location in your kitchen for your
range, protected from wind and with enough space
to open the oven door.
Do not install cabinetry directly above the range.
If you will install an exhaust device, put it at 61 cm
minimum from the range cooktop.
If your range has a power cord, it must be installed
near an electrical wall outlet.
Do not use extension cords or multiple outlets.
Instalación
CAM
PANA EXTRACTO
RA
La instalación apropiada es su responsabilidad.
Un técnico calificado o un técnico de Servicio debe
instalar esta estufa.
Retire los elementos de empaque y coloque los accesorios
de la estufa.
Seleccione la mejor ubicación para su estufa, no debe
quedar expuesta a corrientes de aire y debe tener espacio
suficiente para abrir la puerta del horno.
No instale gabinetes o muebles de cocina encima de la
estufa.
Si instala campana extractora, colóquela a 61 cm como
mínimo, de la cubierta de la estufa.
Si su estufa cuenta con accesorios eléctricos, colóquela
cerca de un tomacorriente de pared.
No use extensiones eléctricas o contactos múltiples.
61 cm
m
ínim
o
NOTA: El m
aterial m
ostrado para instalacion no viene con la estufa.
NOTA: Su estufa puede estar equipada de fábrica con:
1.- Tubo de Alim
entacion ó
2.- Válvula de Corte de Gas.
Tubo de Alim
entación
integrado a la estufa
Llave de paso
de 9,5 m
m
(3/8")
Cople-Niple de 9,5 m
m
(3/8"NPT)
a 9,5 m
m
(3/8")cónica
Tubo de cobre con tuercas
cónicas de 9,5 m
m
(3/8")
Tubo de cobre con tuercas
cónicas de 9,5 m
m
(3/8") de
longitud necesaria para llegar
al gas
Cople-Niple de
9,5 m
m
(3/8"NPT)
Regulador
de gas
Válvula de Corte de
G
as
integrado a la
estufa
Niple de 9,5 m
m
(3/8"NPT)
a (3/8")cónica
NOTE: The m
aterial shown for installation is not provided with the
range.
NOTE: The range could be equipped from the factory with
one of the following accesories:
1.- Gas Inlet Tube Fitting or
2.- Shut Off Gas Valve.
3/8" shut off
valve
G
as Inlet Tube Fitting
integrated to the range
3/8" NPT to 3/8" brass pipe
fitting Hex. adapter
3/8" copper pipe
with 5/8" flared
type nut
G
as
regulator
3/8" copper pipe with
5/8" flared type nut.
Necessary
length to reach the
gas
3/8" brass pipe
fitting
Hex. adapter
Shut O
ff G
as
Valve
integrated to the
range
3/8" NPT to 3/8" brass
pipe fitting Hex. adapter
5
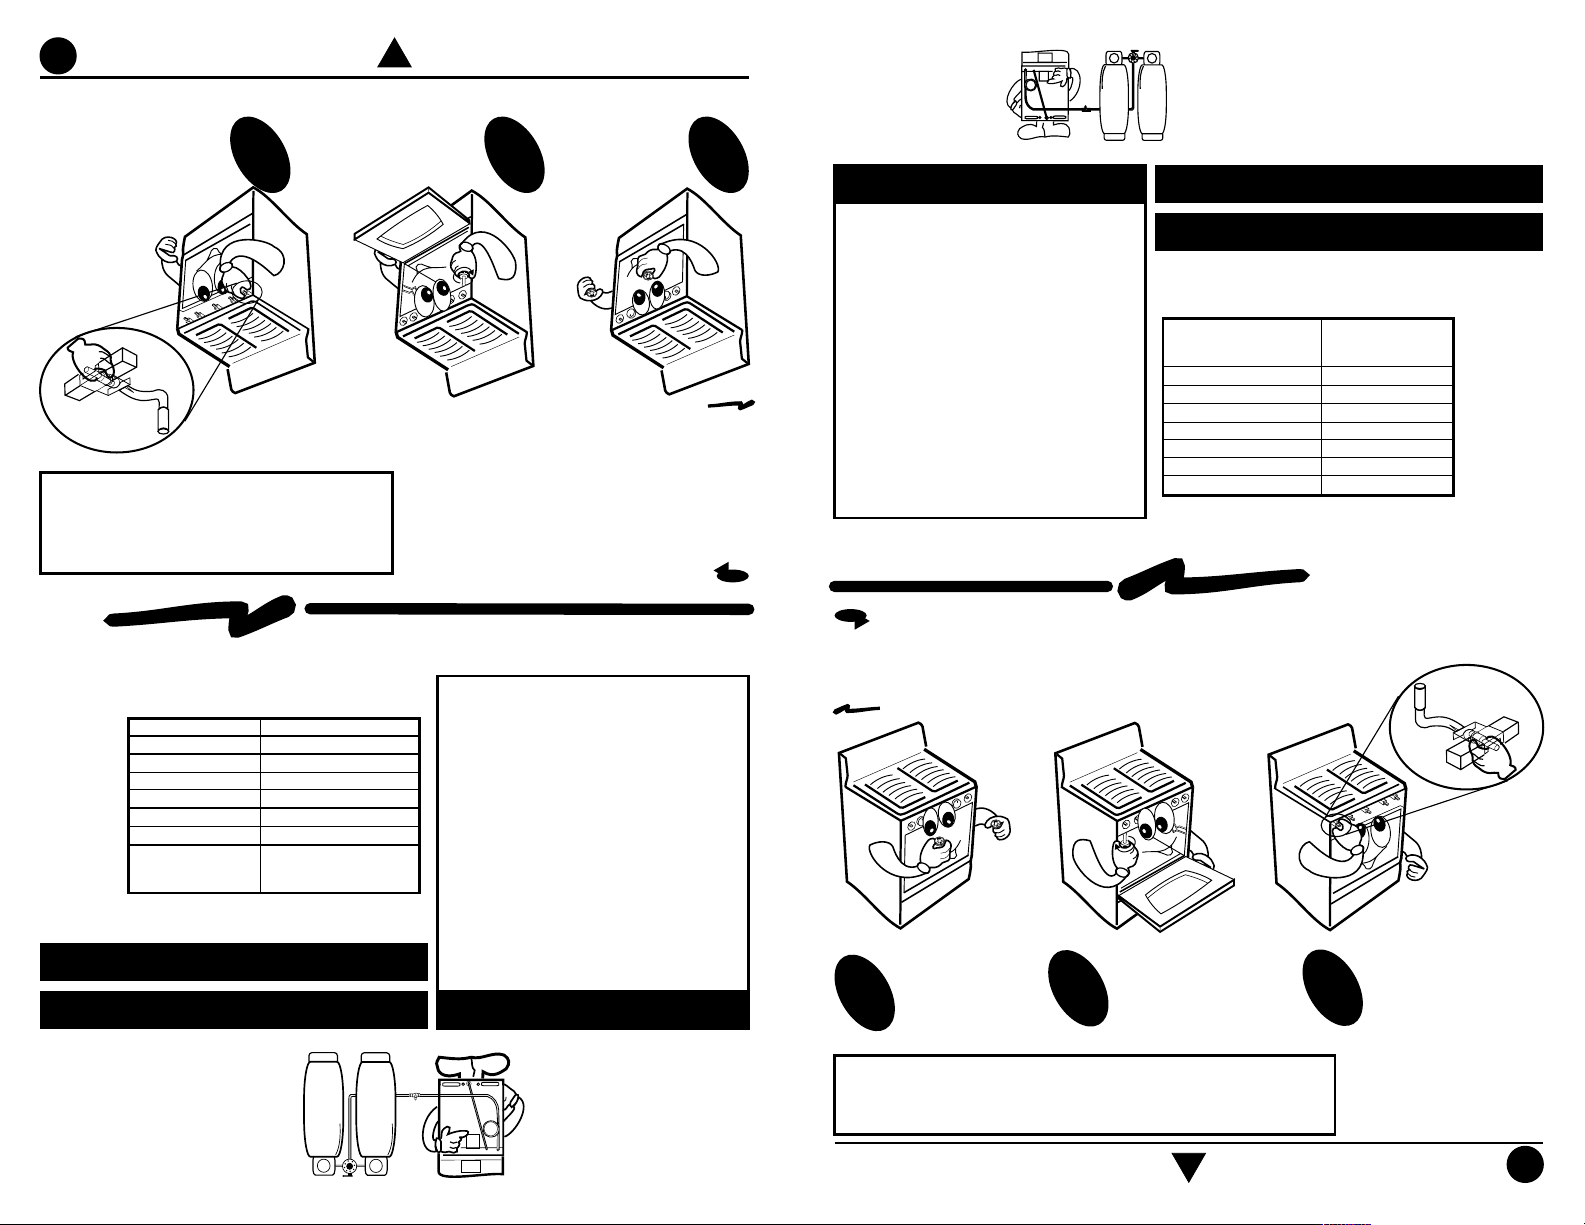
lift or blow off the burner.
not cause the flame to
get a blue flame that will
3
the air shutter until you
burner, then push or pull
individually. Light the
Adjust the air shutters
air-gas mixture and thus a better operation.
to the burners. This will result in a better
you may need to adjust the main air intake
sea level and variations in the supply of gas,
NOTE: Because of different altitudes above
remove it.
2
manifold panel and
of front and below the
Unscrew the screws
1
knobs.
Remove the
How to adjust the air for surface burners:
require adjustment to the air shutters:
If the range has yellow flames, it may
HOW TO ADJUST THE FLAMES
Si la instalación no es
nueva, limpie los tubos
de cobre, para evitar
que se tapen las
espreas y/o pilotos.
IMPORTANTE
Esta estufa está preparada para
funcionar con gas L.P. de tanque
móvil o estacionario.
Para usarse con gas natural ( de
tubería) debe llamar a Servicio Acros
Whirlpool para cambiar las espreas
y hacer los ajustes necesarios, el
número telefónico aparece en la
página 16. El técnico calificado
debe cerciorarse que la conexión
no tiene fugas y que la presión de
gas en la estufa es la que aparece
en las tablas.
Funcionamiento
Con el fin de facilitar el movimiento del aparato,
el instalador debe hacer una espiral con el tubo
flexible de cobre e instalar una llave de paso
en la línea de suministro de gas, esta llave debe
estar fuera de la estufa y accesible a las
personas que la usan.
GAS L.P. PRESIÓN DE OPERACIÓN
2,75 kPa (28 cm Col. agua)
PRESIÓN DE OPERACIÓN PARA
GAS NATURAL
1,76 kPa (18 cm Col. agua)
NOTA: Para operar esta estufa con gas natural,
se requiere el juego de conversión de acuerdo
con la siguiente tabla:
No. de juego
Modelo de estufa de conversión
Modelo ACE2737 98007167
Modelo ACE2868 98005965
Modelo ACE3527 98010689
Modelo ACE3657 98007169
Modelo ACE3757 98005969
Modelo ACE3788 98005970
Modelo ACE3889 98005971
Este juego está disponible con su Centro de
Servicio Autorizado.
Service Center.
This kit is available at your nearest Authorized
Model ACE3889 98005971
Model ACE3788 98005970
Model ACE3757 98005969
Model ACE3657 98007169
Model ACE3527 98010689
Model ACE2868 98005965
Model ACE2737 98007167
Range Model Kit Number
required a kit according to the chart:
NOTE: To operate this range with natural gas, is
7 inches Water Column
PRESSURE
NATURAL GAS OPERATING
11 inches Water Column
GAS L.P. OPERATING PRESSURE
shown in the illustration.
loop the 3/8" copper tubing as
appliance, the installer should
To make it easier to move the
How to Use Your Range
same as shown in the charts.
gas pressure in the range is the
connections have no leaks and the
technician must make sure that the
is shown in the page 16. The
Acros-Whirlpool, the phone number
oven burner orifices, call Servicio
you must replace the surface and
To use this range with natural gas,
for use with L.P. gas.
This range is adjusted at the factory
IMPORTANT
and/or pilots.
obstruction of orifices
it in order to avoid the
new, you should clean
If the installation is not
AJUSTE DE FLAMAS
Si la estufa presenta puntas amarillas en las flamas:
Ajuste del aire de quemadores superiores:
Retire las
perillas.
1
NOTA: Las diferentes altitudes sobre el nivel del mar y las variaciones
en el suministro de gas, hacen necesario regular la entrada de aire
primario a los quemadores para obtener una adecuada mezcla de
aire-gas y así tener un buen funcionamiento en la estufa.
Retire el frente de
perillas quitando
2
los tornillos del
frente y de abajo
que lo sujetan.
Empuje o jale los
reguladores
3
individualmente y
encienda los
quemadores hasta
obtener flamas azules
que no causen que la
flama se desprenda del
quemador.
5
 Loading...