

Page 1
Quick Start Reference Guide
High Speed Commercial Combination Oven
Refer to Product Safety Manual for Safety Statements. Complete Owner’s Manual available online
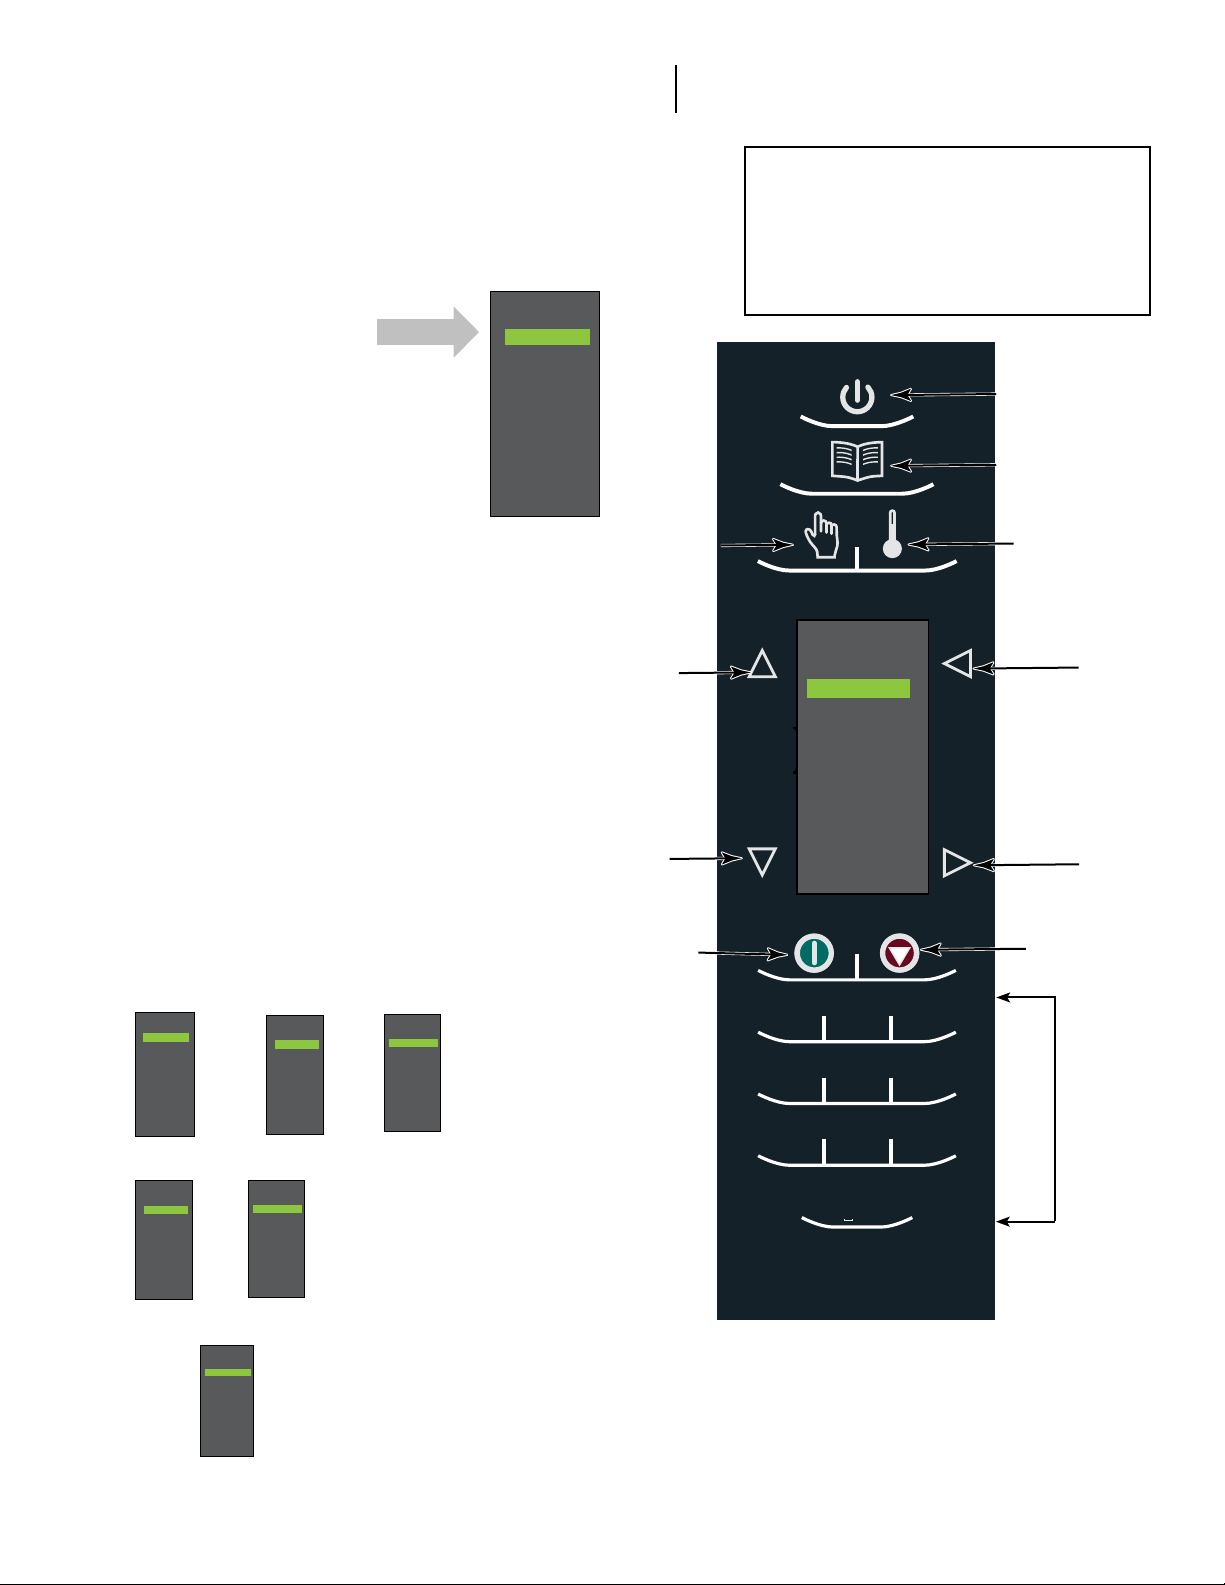
The oven screen displays menu options. The keypad is used to
navigate through onscreen menus.
The icons below will be used throughout this guide to indicate menu
navigation.
Use Scroll Up and
Scroll Down to
highlight food
categories
1 Sandwich
2 Meat
3 Vegetarian
4 Seafood
5 Pasta-Pizza
6 Bake-Dess
7
8
9
0
Attention: Included with the oven is
a “Best Practices” cleaning poster.
Please display the cleaning poster
in a prominent location close to the
oven.
ON / OFF
Program
COOKING MENUS
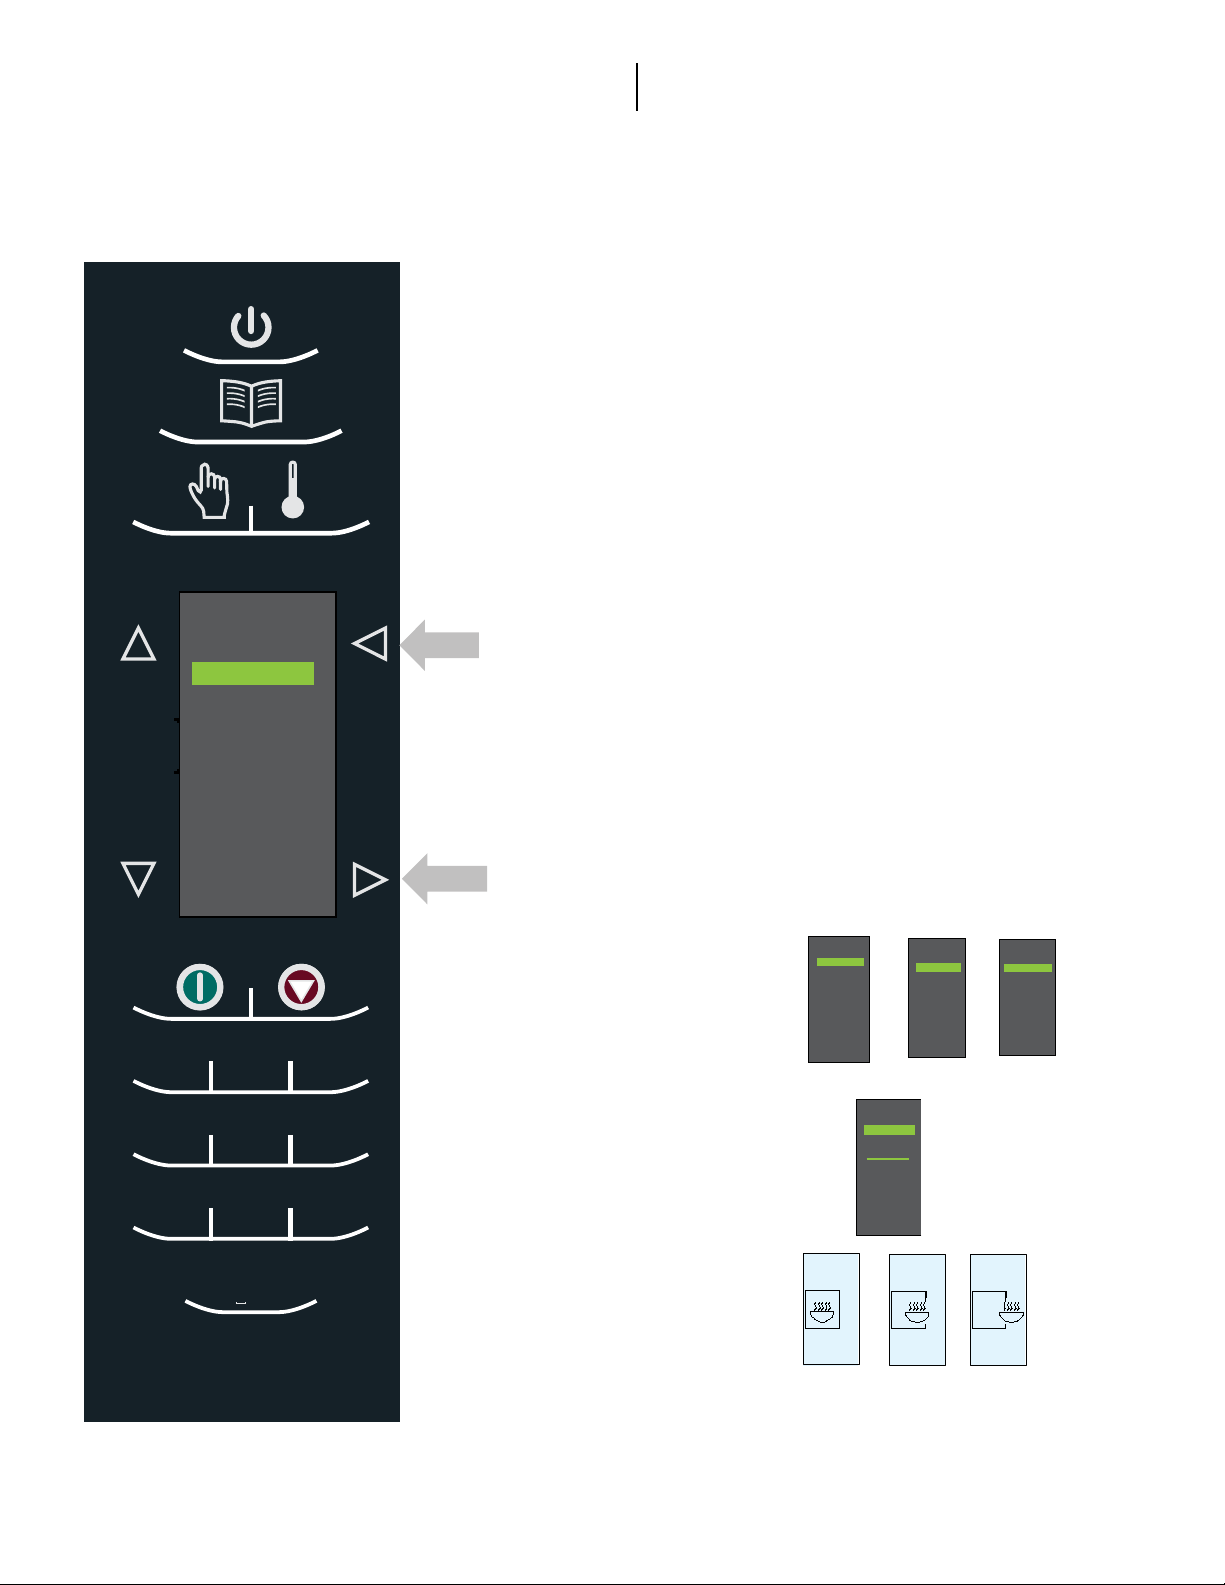
Your ovens ships with the cooking screens set to
three menu levels.
1. The MENU CATEGORIES screen highlights
product categories.
2. The FOOD CATEGORIES screen features
products within the main menu category.
3. The MENU ITEM screen features products
within the food category screen.
NOTE: The oven can be set to operate with 1, 2, or 3
menu levels see user options for more details.
The ITEM MENU breaks the
item group menu down further allowing you to
input quantities, different food types, etc.
THREE MENU LEVELS
Menu Categories
1 Sandwich
2 Meat
3 Vegetarian
4 Seafood
5 Pasta-Pizza
6 Bake-Dess
7
8
9
0
TWO MENU LEVELS
Food Category Menu Item
Sandwich
1 Breakfast
2 Poultry
3 Meat
4 Seafood
5 Vegetarian
6
7
8
9
0
ONE MENU LEVEL
Menu Item
Sandwich
Breakfast
1 Biscuit E.B.C.
2 B. fast Croissant
3 Croissant Sand
4 English Mu san
5 Biscuit S.E.C.
6
7
8
9
0
Food Category
Sandwich
1 Breakfast
2 Poultry
3 Meat
4 Seafood
5 Vegetarian
6
7
8
9
0
Sandwich
Breakfast
1 Biscuit E.B.C.
2 B. fast Croissant
3 Croissant Sand
4 English Mu san
5 Biscuit S.E.C.
6
7
8
9
0
Menu Item
Sandwich
Breakfast
1 Biscuit E.B.C.
2 B. fast Croissant
3 Croissant Sand
4 English Mu san
5 Biscuit S.E.C.
6
7
8
9
0
Manual Cook
Scroll
Up
Scroll
Down
Start
1 Sandwich
2 Meat
3 Vegetarian
4 Seafood
5 Pasta-Pizza
6 Bake-Dess
7
8
9
0
1
. ’ - #
4
2
abc def
5
7 8
0
3
jklghi
tuvpqrs wxyz
6
mno
9
& /
Temperature
Back
Enter
Stop
Number
Pads
2012 ACP, Inc.
Cedar Rapids, IA 52404
For full product documentation visit:
www.acpsolutions.com
Part No. 20076801
Page 2
Quick Start Reference Guide
After the oven has preheated, the menu appears. The oven comes
preprogrammed with several menu items to simplify cooking.
High Speed Commercial Combination Oven
MAIN COOKING MENU
1 Sandwich
2 Meat
3 Vegetarian
4 Seafood
5 Pasta-Pizza
6 Bake-Dess
7
8
9
0
1
. ’ - #
2
abc def
3
Examples of Preprogrammed Menu Items Include:
2. Meat
- Poultry
- Beef
- Pork
-Appetizers
-Breakfast
4. Seafood
-Fish
-Shellsh
-Misc
6. Bakery-Desserts
-Bread
-Desserts
-Snacks
-Breakfast
-Sweet
Back
1. Sandwich
- Breakfast
- Poultry
- Meat
- Seafood
-Vegetarian
3. Vegetarian
-Breakfast
-Lunch
-Vegetables
-Appetizers
-Potatoes
5. Pasta-Pizza
-Small/Large Pizza
-Pasta
-Miscellaneous
Cooking with Preprogrammed Pads
To cook food using preprogrammed menu items
Enter
1. After oven has preheated to the
desired temperature. Scroll or
press number to choose desired
food category from menu.
2. Choose menu item group
and press Enter to select.
1
1 Sandwich
2 Meat
3 Vegetarian
4 Seafood
5 Pasta-Pizza
6 Bake-Dess
7
8
9
0
2
Sandwich
1 Breakfast
2 Poultry
3 Meat
4 Seafood
5 Vegetarian
6
7
8
9
0
3
Sandwich
Breakfast
1 Biscuit E.B.C.
2 B. fast Croissant
3 Croissant Sand
4 English Mu san
5 Biscuit S.E.C.
6
7
8
9
0
4
7 8
5
jklghi
tuvpqrs wxyz
0
& /
6
mno
9
Note: Menu Items may vary by model.
Part No. 20076801
3. Highlight item you wish to cook.
Note: If there is a line through the menu
item, then preheat temperature is
different than menu item preset
temperature. The control will not allow
you to select that item.
4. Open oven door, place
food in oven and close door.
5. Press Enter to start cooking
process.
6. At end of cooking cycle, oven
beeps and displays animation at
right to indicate food can be removed.
For full product documentation visit:
www.acpsolutions.com
1 Sandwich
2 Meat
3 Vegetarian
4 Seafood
5 Pasta-Pizza
6 Bake-Dess
7
8
9
0
2012 ACP, Inc.
Cedar Rapids, IA 52404
Page 3

Quick Start Reference Guide
High Speed Commercial Combination Oven
Using MANUAL COOK (Option 4 has to be set to allow manual cooking. See options section)
Use Manual cooking when a specic time and cooking power levels are desired. It’s very useful when you are
experimenting with new food items. Maximum cook time is 100 minutes. Microwave, Fan and IR can be set in 11 different
power levels between 0-100% at 10% increments.
1. After oven has preheated to desired
temperature (200-520°F / 95-270°C), press
Manual Cook keypad.
2. Use Scroll Up and Scroll Down keypad
to move between cooking elements and time
3. For Stage 1, enter cooking time using the
number pads (up to 100 minutes). Press Scroll
Down keypad to move to the following cooking
element.
4. Enter desired microwave power (press 0 (for
0%), 1 (10%), press 5 (50%)… and press
1 twice for full power (100%). Press Scroll
Down keypad to move to the following cooking
element
5. Input desired fan speed using number keypad.
10. At end of cooking cycle, oven beeps and displays
animation below:
11. Remove food from oven.
Note: To interrupt cooking cycle,
open door. To resume cooking,
close door and press start.
How to Save A Manual Cook
Program to the Menu
If satised with the cooking results
achieved from manual cooking, save the
manual cook item:
1. To save, press Enter
Note: Option 5 must be set to save
after manual cook.
2. Highlight Menu Category by using Scroll Up or
Scroll Down keypad or create new Menu Category
name. Press Enter keypad.
3. Highlight food category by using Scroll Up and
Scroll Down keypad to select open menu location.
4. In the Menu Item screen, highlight the location where
you wish to add the new name.
keypad.
6. Enter desired Infrared (IR) power (press 0 (for
0%), 1 (10%), press 5 (50%)… and press 1
twice for full power (100%).
7. Repeat steps 2-6 for each cooking stage, if
more than one cooking stage is necessary.
8. Place food in oven.
9. Press Start keypad to begin cooking.
The display counts down. The food
category is displayed and the word Manual is
in the display.
2012 ACP, Inc.
Cedar Rapids, IA 52404
5. When new location is highlighted Press Program
keypad.
6. Use Number
KEYPAD
Back
keypad to delete any mistakes. This step
needs to be repeated for each menu level. See user
option 2 for text case options.
Breakfast
1 Biscuit E.B.C.
2 B. fast Croissant
3 Croissant Sand
4 English Mu san
5 Biscuit S.E.C.
6
7
8
9
0
7. Press Enter keypad when nished.
8. To exit Manual Cook mode, press Back
repeatedly to take you to the Main Menu screen.
For full product documentation visit:
www.acpsolutions.com
keypads to enter item name. Use
Sandwich
Breakfast
Bagel & Cheese
Sandwich
Breakfast
1 Biscuit E.B.C.
2 B. fast Croissant
3 Croissant Sand
4 English Mu san
5 Biscuit S.E.C.
6 Bagel & Cheese
7
8
9
0
keypad
Part No. 20076801
Page 4

Quick Start Reference Guide
High Speed Commercial Combination Oven
ACCESSING THE PROGRAM MENU
1. To access the PROGRAM mode, press
the Program
2. Then select Edit
keypad.
with Scroll Up or
Scroll Down from the screen.
3. Press Enter
then select the food
category, food item to be programed using the
PROGRAM MENU OVERVIEW
PROGRAM Add a new menu item
ENTER
BACK
SCROLL UP
To save or go to next screen
Go to previous screen
or SCROLL DOWN
EDIT Change an existing menu item
DELETE
Delete an existing menu item
EDITING OR ADDING MENU PROGRAM
SETTINGS
1. Press the Program keypad.
6. Press the Enter keypad and cook settings will
appear.
7. Use Scroll Up or Scroll Down keypad to
Select Temperature, Time, Microwave %, Fan% and
IR% setting. Use number keypads to enter the time,
temperature or cooking powers. For MW, Fan or IR,
press 0 for 0%, 1 for 10%..... 9 for 90% or 1 twice for
100%.
Microwave Power
Cook Time
Oven Temperature
IR
Fan
8. When cook settings are complete press Enter
keypad.
9. Press Back keypad repeatedly to exit program mode.
2. Highlight Edit with Scroll Up or Scroll Down
keypad.
3. Press the Enter keypad
4. Use the Scroll Up or Scroll Down keypad to
highlight Menu Category and/or Food Category where
menu item to edit is saved. Press Enter keypad.
1 Sandwich
2 Meat
3 Vegetarian
4 Seafood
5 Pasta-Pizza
6 Bake-Dess
7
8
9
0
Sandwich
1 Breakfast
2 Poultry
3 Meat
4 Seafood
5 Vegetarian
6
7
8
9
0
5. At the Menu item screen, use Scroll Up or Scroll
Down keypad to highlight the desired item to edit.
Sandwich
Breakfast
1 Biscuit E.B.C.
2 B. fast Croissant
3 Croissant Sand
4 English Mu san
5 Biscuit S.E.C.
6
7
8
9
0
For full product documentation visit:
Part No. 20076801
www.acpsolutions.com
2012 ACP, Inc.
Cedar Rapids, IA 52404
Page 5

Quick Start Reference Guide
High Speed Commercial Combination Oven
EDITING OR ADDING NEW NAMES FOR
MENU CATEGORY OR FOOD CATEGORY
OR MENU ITEM
1. Press the Program keypad.
2. Highlight Edit
keypad and press Enter
3. Using the Scroll Up
highlight location where new category or item will be placed.
(In order to navigate to the following screen, Scroll Up
and Scroll Down
press Enter
I. Editing Name in Menu Category Screen
A. Highlight Item B. go to Step 4
1 Sandwich
2 Meat
3 Vegetarian
4 Seafood
5 Pasta-Pizza
6 Bake-Dess
7
8
9
0
II. Editing Name in Food Category
A. Highlight desired Menu Category
B. Press Enter
with Scroll Up or Scroll Down
keypad.
or Scroll Down keypad to
keypad to highlight desired menu and
keypad). For example:
III. Editing / Adding Name in Menu Item
In order to add program settings, you must name your item
rst.
A. Highlight desired Menu Category
1 Sandwich
2 Meat
3 Vegetarian
4 Seafood
5 Pasta-Pizza
6 Bake-Dess
7
8
9
0
B. Press Enter
C. Highlight desired Food Category
Sandwich
1 Breakfast
2 Poultry
3 Meat
4 Seafood
5 Vegetarian
6
7
8
9
0
D. Press Enter
E. Highlight desired Menu Item
1 Sandwich
2 Meat
3 Vegetarian
4 Seafood
5 Pasta-Pizza
6 Bake-Dess
7
8
9
0
C. Highlight desired Food Category
Sandwich
1 Breakfast
2 Poultry
3 Meat
4 Seafood
5 Vegetarian
6
7
8
9
0
D. Go to Step 4
Sandwich
Breakfast
1 Biscuit E.B.C.
2 B. fast Croissant
3 Croissant Sand
4 English Mu san
5 Biscuit S.E.C.
6
7
8
9
0
F. Go to Step 4
4. Press the Program
keypad.
2012 ACP, Inc.
Cedar Rapids, IA 52404
For full product documentation visit:
www.acpsolutions.com
Part No. 20076801
Page 6

Quick Start Reference Guide
High Speed Commercial Combination Oven
There are several options you can change to customize the operation of the oven for your business. The table below shows
these options; the factory setting is shown in bold type.
1. Oven must be off. To turn oven off, press ON/OFF
keypad.
2. Press and hold “2” keypad until option screen appears.
3. Choose option by pressing Enter
keypad then use Scroll Up and Scroll Down keypad to select option to highlight
desired option.
4. Press Start
keypad to save and press Stop / Reset to exit options mode.
5. Option 6, if “Password Needed” is highlighted press Program keypad to view or edit password.
Options# Setting Name Options
01 Digit Entry Single digit entry
Double digit entry
02 Text Case Caps
Lower case
Mixed
03 Menu Setting 01=10 Items
02 =100 Items
03 = 360 items
04 (Manual) Cook Manual cooking allowed
Manual cooking not allowed
05
06 Program Password Password needed
07 Door Reset Opening door resets timer
08 Keyboard Activation Off
09
10 Keybeep Volume Low
11 End Of Cycle Beep Three beeps once
12 Preheat Warning Warn if oven not at temp
13 Temperature Scale Temperatures are displayed in °F for 60Hz
14 Clean Filter Reminder Off
15 (Microwave) Only Allow microwave only mode
16 Auto Off Disable
17 Data Transfer Begin Transfer: Card to Oven. Press Program
(Manual) Save
Keybeep
Save after manual cook
Do not save after manual cook
Changes to programs allowed
Opening door pauses cook cycle
30 Seconds
60 Seconds
120 Seconds
On
Off
Medium
High
Three beeps repeating
Continuous until door is opened
Off
models
Temperatures are displayed in °C for 50Hz
models
Displays every 7 days
Displays every 30 days
Displays every 90 days
No microwave only mode
2 Hours
4 Hours
8 Hours
Keypad
Begin Transfer: Oven to Card. Press Program
Keypad
For full product documentation visit:
Part No. 20076801
www.acpsolutions.com
CLEAN FILTER
When this message displays, clean the
air lter thoroughly. Cleaning the air
lter will not shut off the message.
The message will automatically stop
displaying after 24 hours.
Depending on microwave use and
environmental conditions, the lter
may need to be cleaned more or
less frequently. Once the frequency
is determined, set the option for the
appropriate time frame.
Air lter and vents must be cleaned
regularly to prevent overheating of the
oven. Refer to Owner’s Manual for
complete cleaning instructions.
CLEAN
FILTERS
Air Filters
On Sides
2012 ACP, Inc.
Cedar Rapids, IA 52404
 Loading...