

Page 1
MODEL XMC90 OWNER’S MANUAL
AM/FM RADIO WITH XM RADIO,
iPod AND CD PLAYER CAPABILITY
Model XMC90
Owner’s Manual
VERSION V 0.0 Page 1 of 20
Page 2
MODEL XMC90 OWNER’S MANUAL
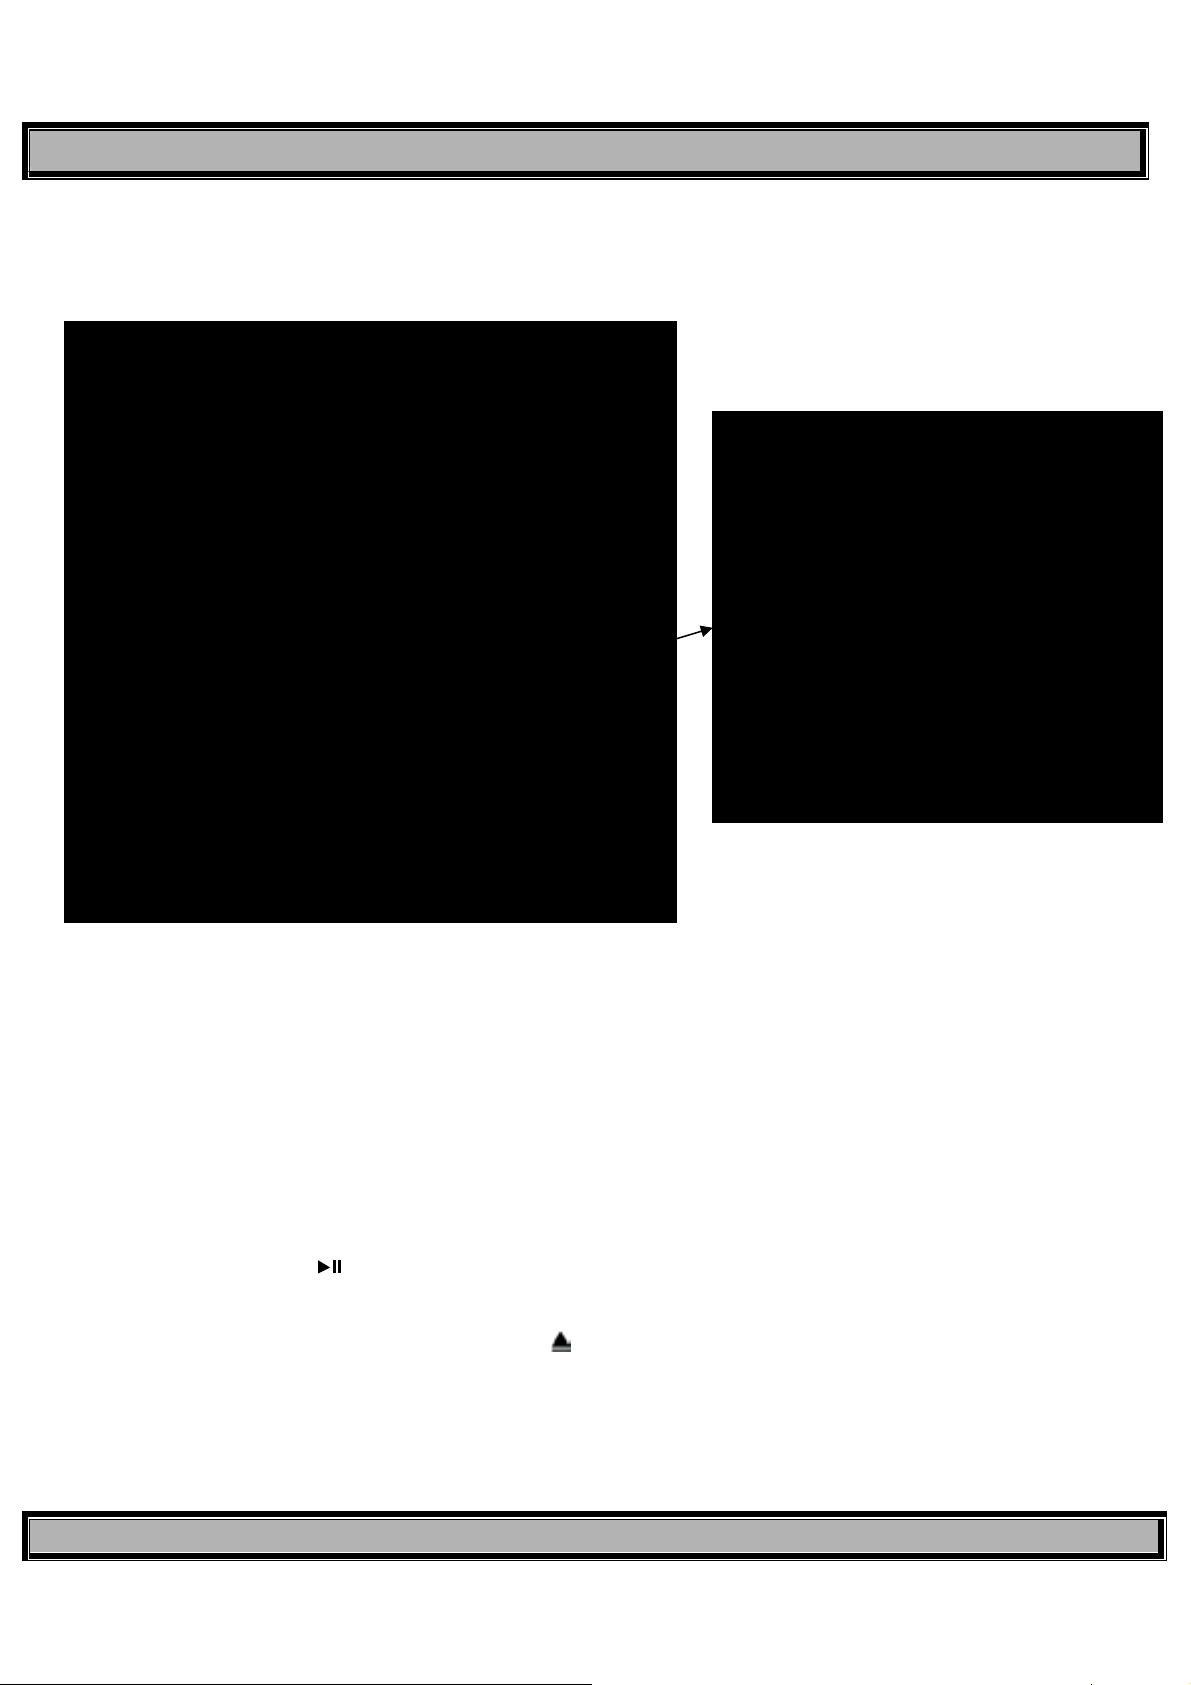
1.0 Function of Controls and Indicators
1. Power On/Off Button (Standby) 11. Integral Scroll Wheel/Volume Control/Select Button
2. DISP Button (Preset) 12. MODE Button
3. DIRECT Button (Direct/Preset A,B,C) 13. Infrared (IR) Receiver Window
4. MENU Button 14. LCD Display
5. XM: Category, AM/FM: Search, CD: Stop (
6. XM: Ch Down, AM/FM: Ch Down, 16. SLEEP Button
■) 15. ALARM 2 Button
CD: Previous Track 17 ALARM 1 Button
7. CD Play/Pause ( ) Button 18. Speaker, 4” Subwoofer
8. XM: Ch Up, AM/FM: Ch Up, CD: Next Track 19. SNOOZE/Mute Button
9. XM: Category, AM/FM: Search, CD: Eject (
10. CD Player Slot (Label Up)
) 20. Number Buttons (1-10)
VERSION V 0.0 Page 2 of 20
Page 3
MODEL XMC90 OWNER’S MANUAL
Unit Description
2.0
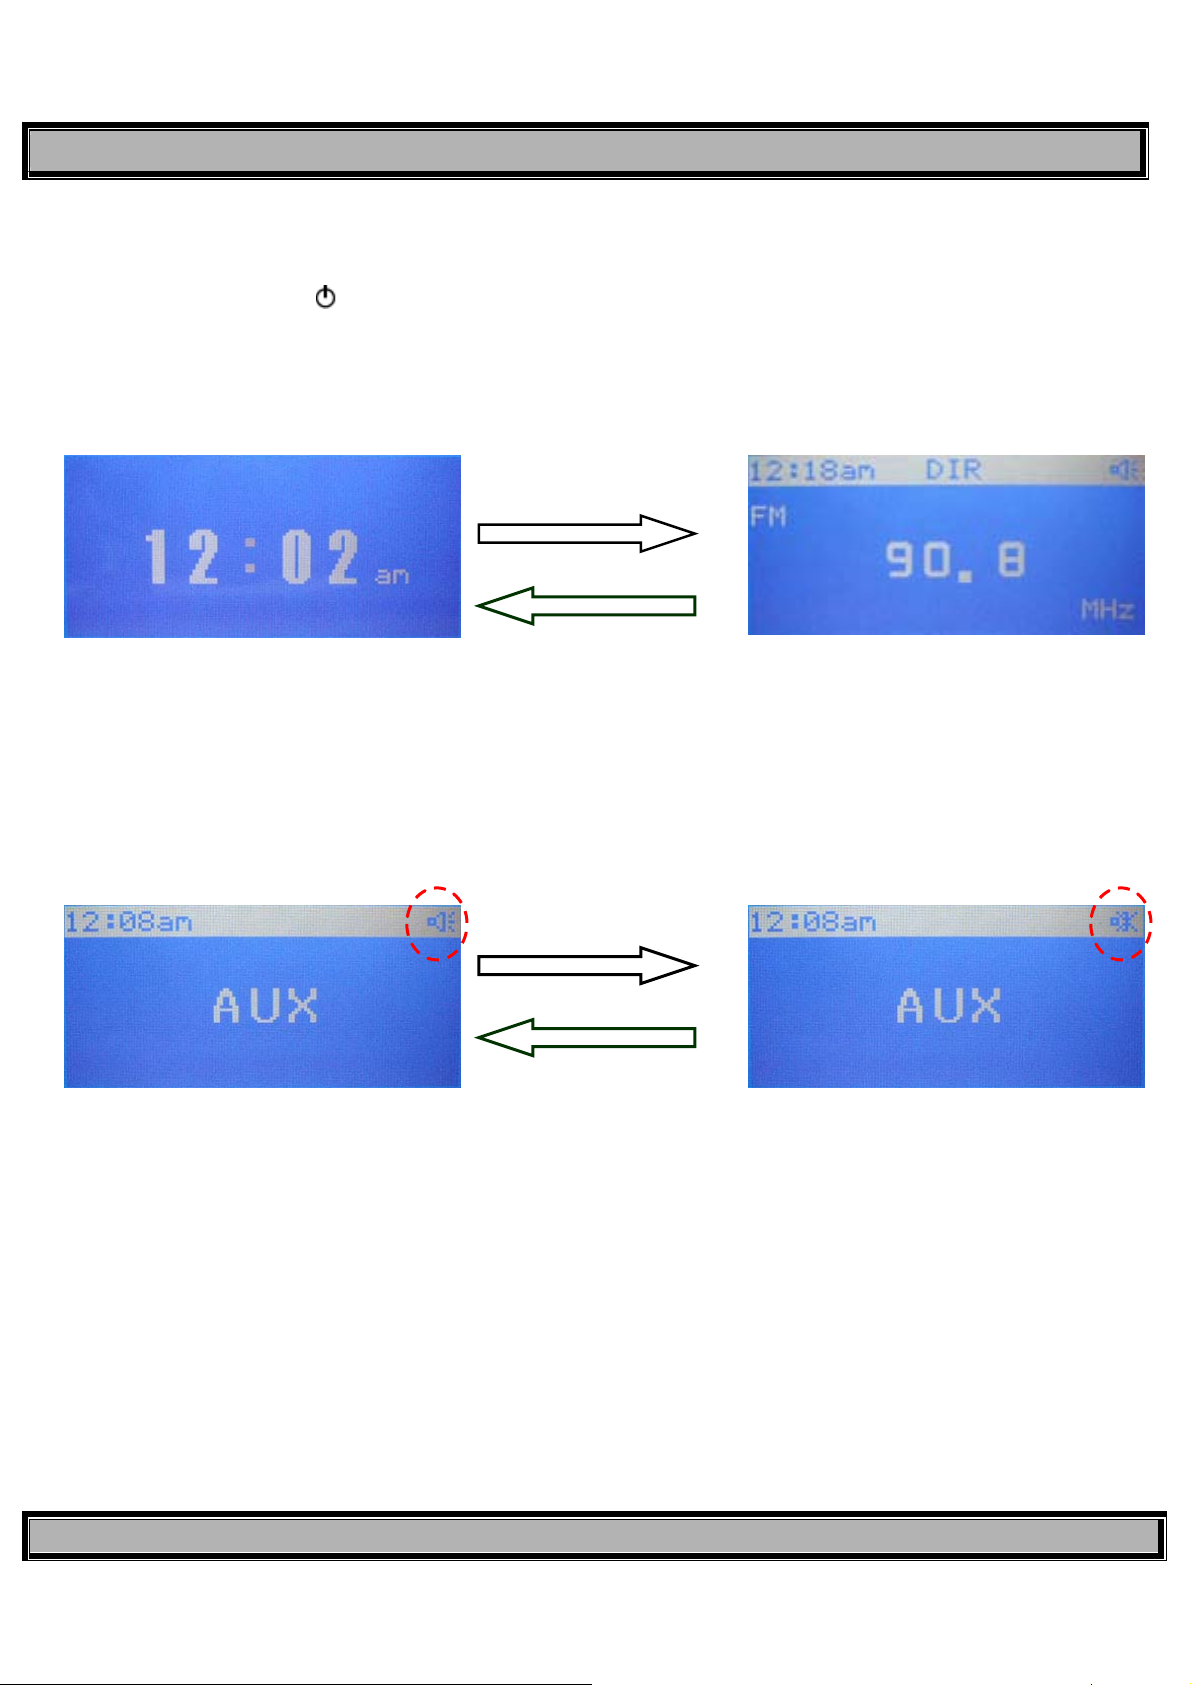
2.1 Power On/Off Button ( )
When this button is pressed, power is applied to the radio circuits from the standby mode, and the unit enters into the
play mode (XM/FM/AM/AUX/iPod). When pressed again during any play mode, power is removed from the radio circuits
and the unit reverts to the standby mode. The default play mode is XM.
(Standby Mode) (Play Mode)
2.2 SNOOZE/Mute Button
When pressed during normal play mode (XM/FM/AM/AUX/iPod), the audio output is muted or disabled as indicated by
the speaker icon in the upper right corner of the display screen. When pressed again, the mute function is cancel ed and
audio is restored. While the alarm is active, press this button to enter the snooze mode.
Press this button to enter into
play mode from standby mode
Press this button to return
to standby mode from any
play mode
Press this button to mute
play mode audio
2.3 DIRECT Button (Preset)
During normal operation, direct selection of the radio frequency in the XM, FM or AM radio modes is possible. To change FM or
AM frequency, use the CH Up/Down buttons or directly enter desired frequency using the number (1-10) buttons. To search radio
frequencies in FM/AM modes, press the CAT Up/Down buttons. In XM mode, the CAT Up/Down buttons provide a jump to the
various broadcast categories or genres. When the DIRECT button is pressed, Direct (DIR) disappears on the display, and is
replaced with preset bank A, B or C. Each bank is capable of storing up to 10 radio frequencies in memory. The frequency is stored
by pressing the corresponding number buttons (1-10) for 3 seconds, thus permitting memory storage of 30 frequencies. When this
button is pressed and held, the list of stored frequencies in the current band can be viewed. Press the CH Up or Down buttons to
scroll through the preset channel list.
Press this button again to
cancel the mute function
VERSION V 0.0 Page 3 of 20
Page 4
MODEL XMC90 OWNER’S MANUAL
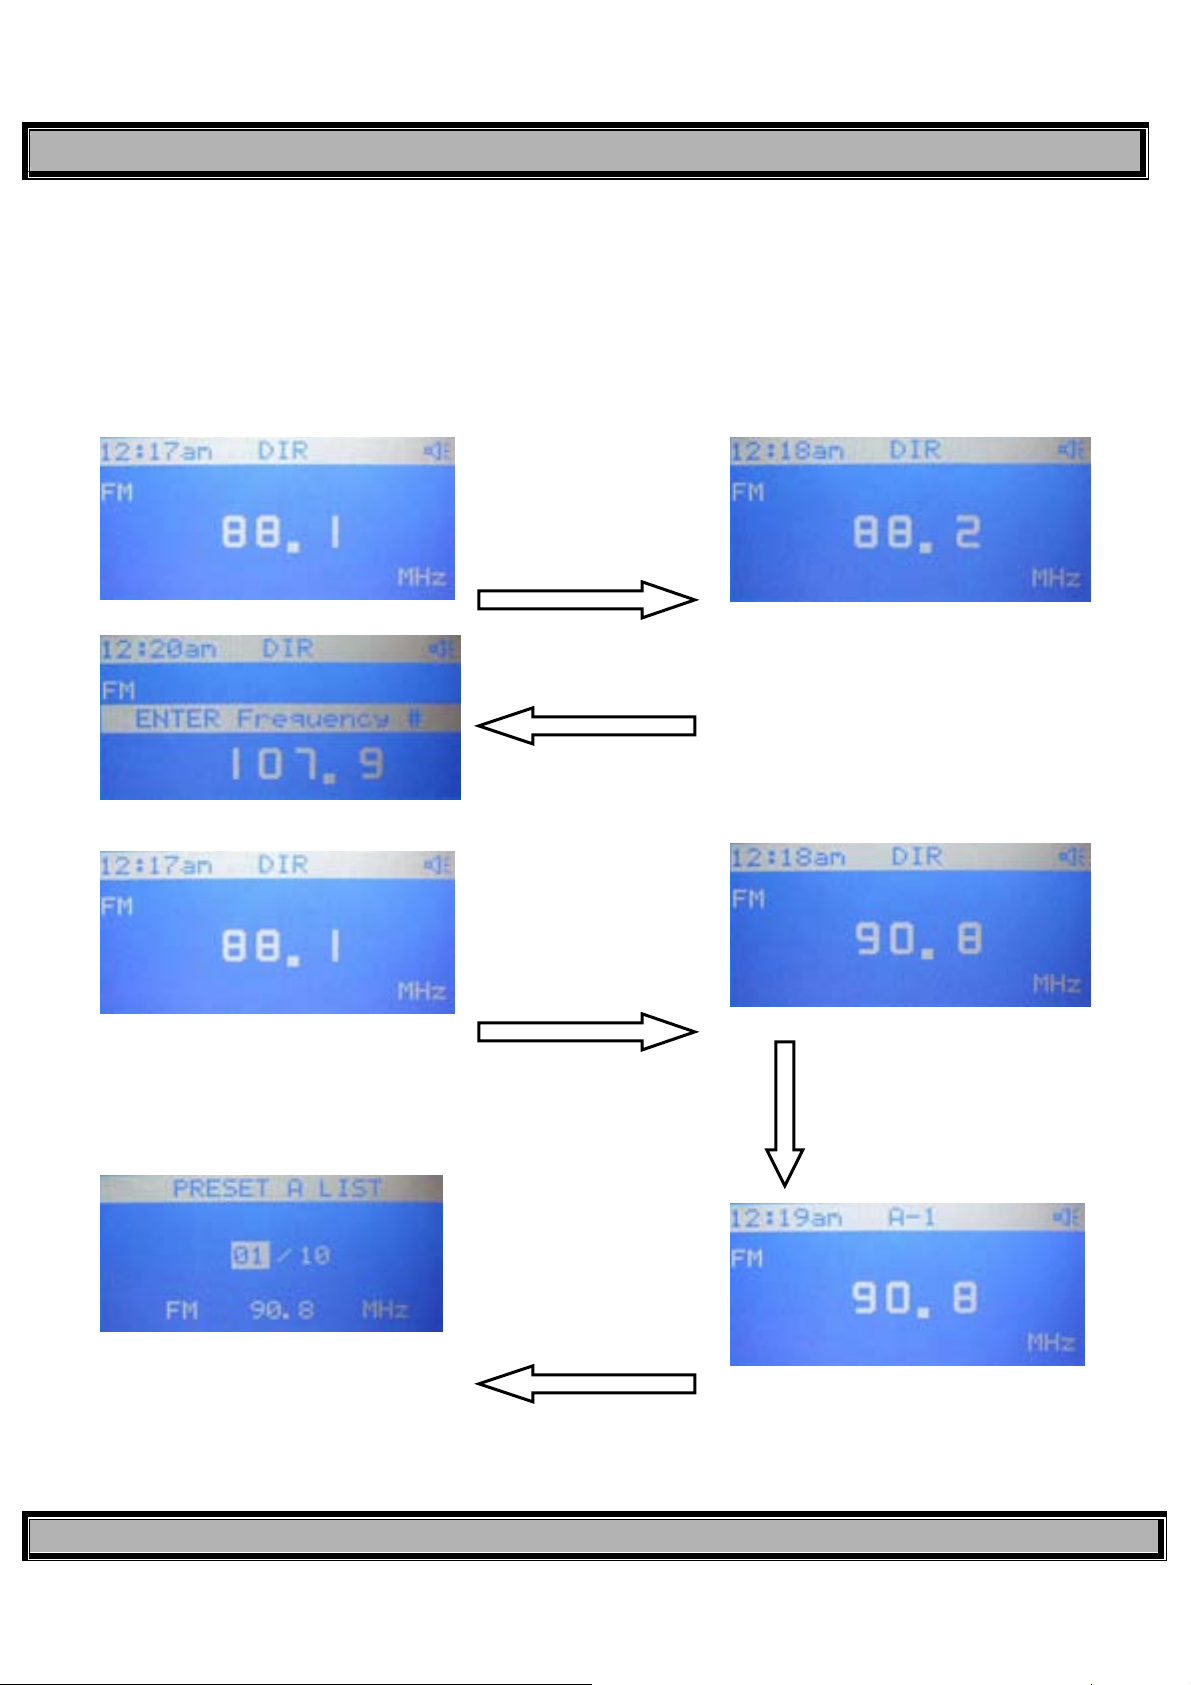
2.3.1 FM/AM Radio Ranges
In DIRECT mode, the FM radio band ranges from 88.1 to 107.9MHz, while the AM band ranges from 530 to
1710kHz.
2.3.2 Changing FM/AM Radio Frequencies
FM and AM radio frequencies can be changed by using the CH Up/Down buttons; each button press changes the
frequency in 100kHz steps (FM). Pressing the CAT Up or Down b utton enters the frequency search mode.
Press the CH +/- buttons to
change FM frequency in
100kHz steps; press select
Press the CAT +/- buttons to
auto search for desired FM or
AM frequency
Press and hold DIRECT button
over 3 seconds to display list of
OR
Press the number buttons to
directly enter frequency; press
select to confirm
Press DIRECT button to preset A,
B, C, and hold number button
(1-10) over 3 seconds to store
station frequency in memory bank
A
stored frequencies in current
bank. Press the CH Up or 7
preset Down buttons to scroll
through selections
VERSION V 0.0 Page 4 of 20
Page 5
MODEL XMC90 OWNER’S MANUAL
2.4 MENU Button
When MENU is pressed, a list of menu items appears on the display. Select the desired item using the Channel Up
(
W CH ) and Channel Down ( CH X ) buttons to highlight the item; then press the SELECT button to enable
adjustment of the selected parameter.
Menu Item: 1-SOFTWARE VERSION
2-FACTORY DEFAULT
3-LCD SETTING
4-AUDIO SETTING
5-XM SETTING
6-CLOCK SETTING
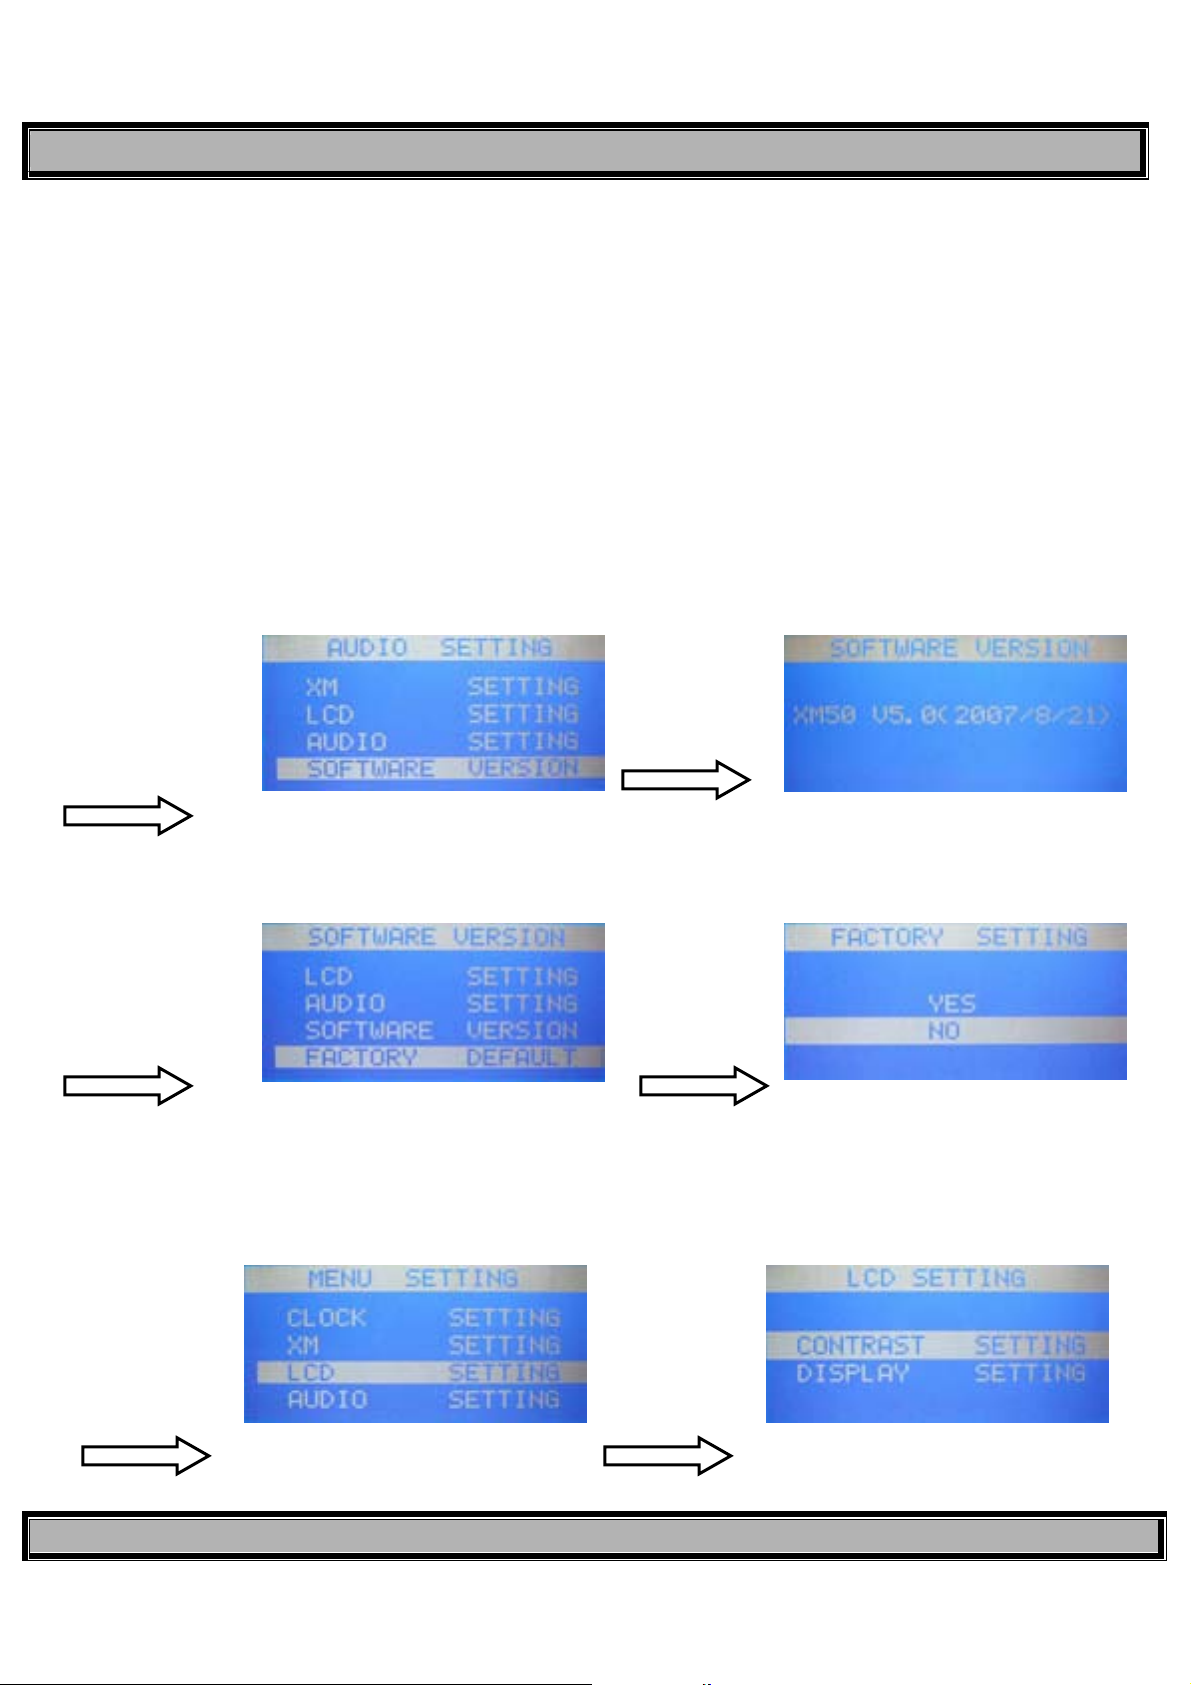
2.4.1 SOFTWARE VERSION: When selected, this item displays the software version and XM version installed in this
unit.
During any play mode,
press the menu button;
then press CH+/- to
highlight this item
Then press
select
2.4.2 FACTORY DEFAULT: When selected, this item returns all user presets to factory default parameters.
During any play mode,
press the menu button;
then press CH+/- to
highlight this item
Press CH+/to highlight
this item; then
press select
Note: All custom settings will be lost, including presets.
2.4.3 LCD DISPLAY SETTING:
2.4.3.1: Contrast Setting: When selected, this item enables adjustment of the display contrast within the range
During any play
mode, press the
menu button; then
press CH+/- to
highlight this item
and press select
0~10. The factory default setting is 3.
Press CH+/- to
highlight this item;
then press select.
Adjust contrast
range using CH+/-
VERSION V 0.0 Page 5 of 20
Page 6
MODEL XMC90 OWNER’S MANUAL
2.4.3.2 Display Setting: Enter this item to switch the LCD screen image from positive to negative.
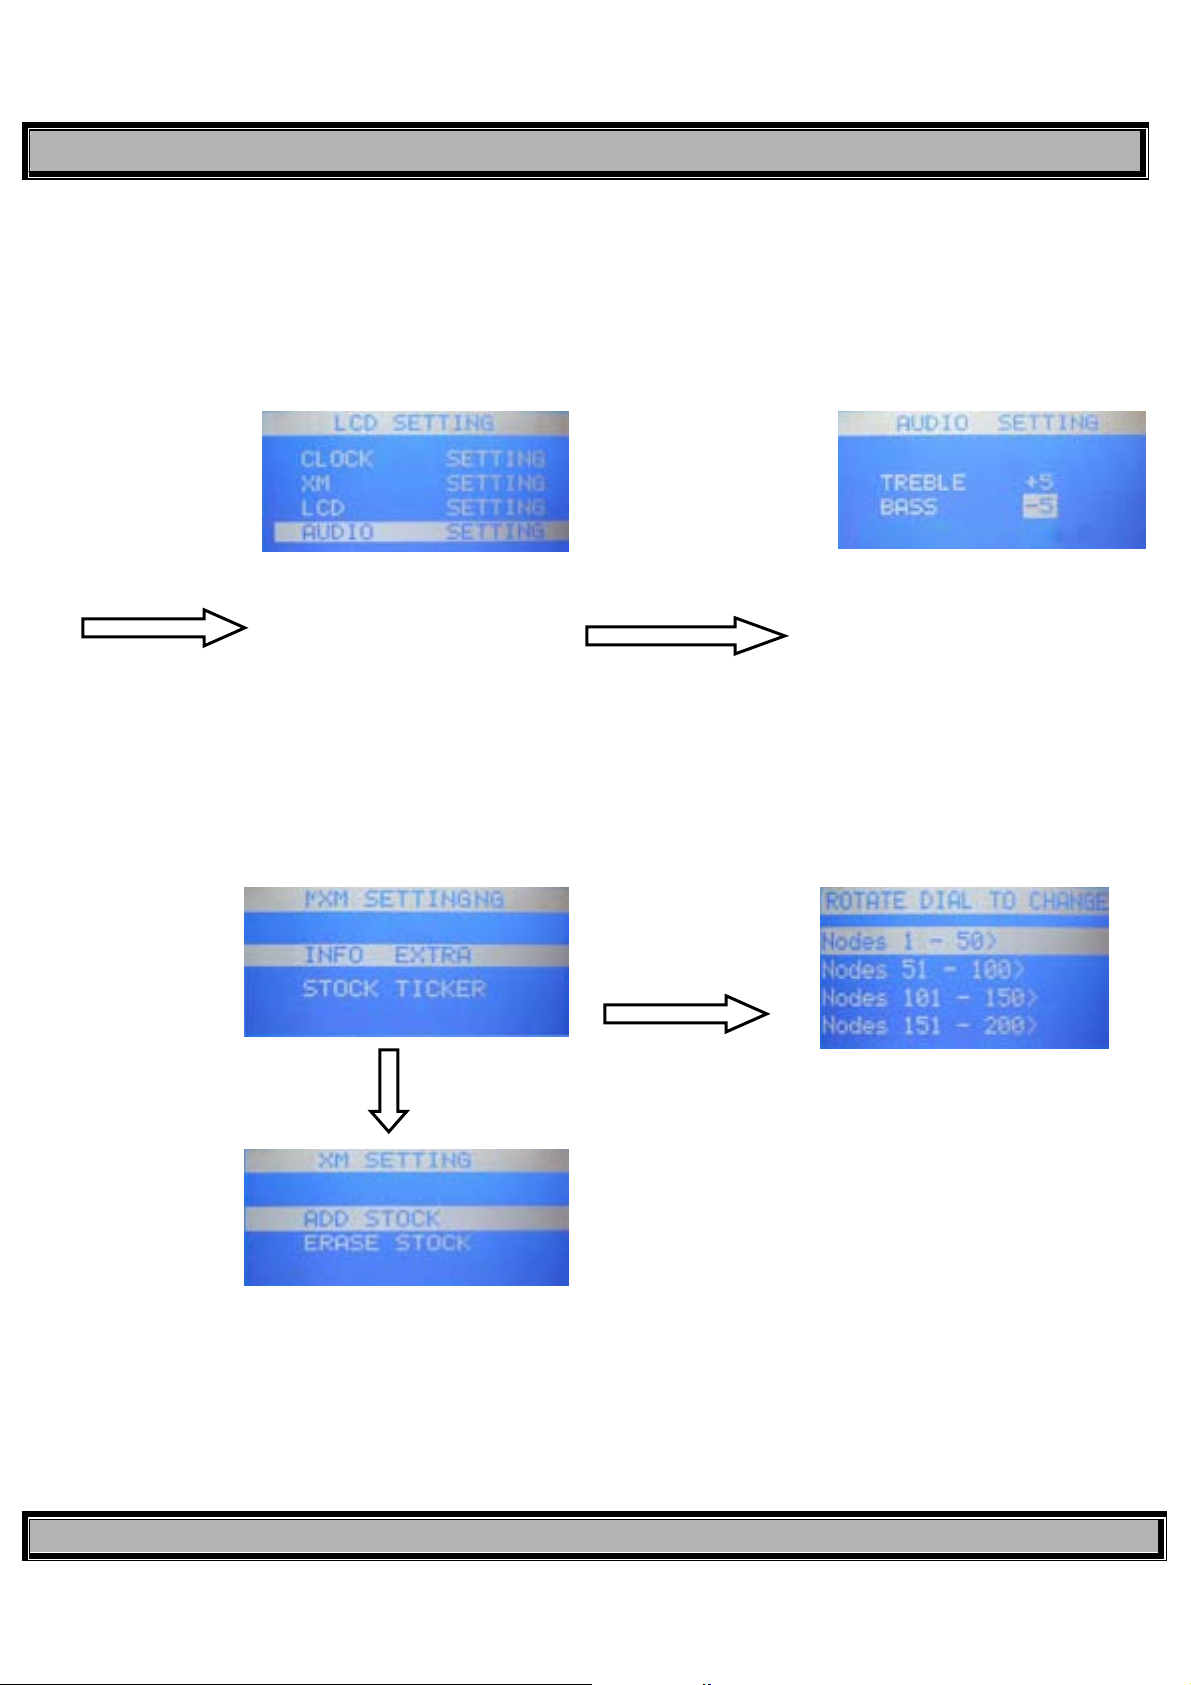
2.4.4 AUDIO SETTING: When selected, this item enables adjustment of the BASS and TREBLE parameters, each
within a range of -5 to +5, and also enables activation of SURROUND sound (ON/OFF).
During any play
mode, press the
menu button;
then press CH+/to highlight this
item
Then press select. Adju st
BASS/TREBLE range
using CH+/- and select
2.4.5 XM SETTING: When selected, this item provides the capability of setting up XM options for display of
information such as sports teams, current scores or stock information. Press MENU to access the menu options
display; scroll up/down to XM SETTING using the CH +\- buttons and press Select.
During any play
mode, press the
menu button;
then press CH+/to highlight this
item
Press select button for
Stock Ticker to add or
erase a stock symbol
Press select
button for Info
Extra
To add a stock symbol, press Ch+/- until the
1
to move to next letter. Once all letters are
entered, press Select to confirm.
st
letter of the symbol is seen. Press Select
VERSION V 0.0 Page 6 of 20
Page 7

MODEL XMC90 OWNER’S MANUAL
2.4.6 CLOCK SETTING: When selected, this item sets the current time in either the 12 or 24 hour system.
During any play
mode, press the
menu button; then
press CH+/- to
highlight this item
Then press select
Select “STOCK TICKER’, then select ‘ADD Stock”. Use the ch+/- to select the first letter in the stock
symbol. Press Select to confirm. Repeat to select other letters in the stock symbol. Press
Select to confirm..
2.5 W CAT/CAT X Buttons
In AM and FM modes, these buttons enable up/down radio station auto-search. In XM Mode CAT buttons skip station
genre by category.
2.6 W CH/CH X Buttons
These buttons enable channel selection up or down in the XM, FM and AM radio modes. In FM and AM mode, each
press of the channel button(s) provides a frequency step of 110kHz radio station frequency, 100/110kHz when in station
preset, provides up or down channel selection.
2.7 Integral Scroll Wheel, Volume Control and Select Button
This integral scroll wheel/volume control and select button provides selection of various menu and submenu items by
rotating the scroll wheel in the XM/FM/AM/AUX/iPod modes. then press in the scroll wheel (Select button) to make or
confirm the selection. During auto-search in the FM and AM modes, pressing this button cancels the search function.
In FM mode, press CH+/- to
change channel frequency in
100kHz steps.
In AM mode, press CH+/- to
change channel frequency in
10kHz steps.
VERSION V 0.0 Page 7 of 20
Page 8

MODEL XMC90 OWNER’S MANUAL
2.8 Volume Control and Select Button
2.8.1 Volume Control
This integral scroll wheel/volume control and select button is also used to adjust the speaker volume (when not scrolling
through menu items for selection or adjustment) in the XM/FM/AM/AUX/iPod modes within the range of 0~30.
2.8.2 Select Button
Momentarily pre ss and release the scroll wheel to act ivate the scrolling function. In XM/iPod mode, press the scroll wheel
twice; a beep will be heard. Then rotate the scroll wheel to browse the XM/iPod menu.
2.9 MODE Button
This button enables selection of one of five play modes in a sequential wrap-around format (XM/FM/AM/AUX/iPod).
Press this button in any
play mode; the current
mode is highlighted
2.10 Infrared (IR) Receiver Window
This window detects the IR signal from the remote control to select operating modes and feature functions.
Rotate the scroll wheel to adjust
the output volume in any mode
Use the scroll wheel to highlight
another selection; press the
select button to select the new
2.11 LCD Display
Displays operating modes, menus and other related information on the LCD screen.
2.12 SLEEP Button
Press this button to set a sleep time of 30, 60 or 90 minutes; use the scroll wheel to scroll through and highlight the
available sleep times, then press select. The radio will turn off automatically when the sleep time has expired.
Press the
sleep button in
any play mode
Highlight the desired
sleep time, then press
select
VERSION V 0.0 Page 8 of 20
Page 9

MODEL XMC90 OWNER’S MANUAL
2.13 Number Buttons 1-10
These buttons are used to directly input radio station frequency/channel number in XM, FM and AM modes. They are
also used to store a desired frequency in preset memory bank A, B, or C when the station preset function is active.
2.15 ALARM1/ALARM2 Buttons
These buttons set the Alarm 1 or Alarm 2 functions.
Press the
Alarm 1 or 2
button in any
play mode
Press select to enter
and confirm selection,
and use the scroll
wheel to move to next
selection. Press menu
to exit alarm mode
(Standby)
2.16 SNOOZE (MUTE) Button
Adjust the Snooze time once in Alarm 1 or Alarm 2 mode. This button sets the Snooze time between 1 and 20 minutes when
the alarm sounds. Rotate the scroll wheel to advance Snooze time in 1-minute increments.
Activate alarm to ON
and observe Bell
icon on display to
confirm alarm is set.
Press the
snooze/mute button
during alarm setting
to access snooze
adjustment mode
3.0 iPod Docking Station
This station provides docking accommodations for an external iPod. When properly installed, iPod operation can be
controlled using the XMC90 controls.
VERSION V 0.0 Page 9 of 20
Page 10

MODEL XMC90 OWNER’S MANUAL
3.1 Using the iPod Dock
1. Swing up the protective cover doo r to access the iPod/XM receiver system connector bay.
2. Choose the compatible adapter/holder for your iPod model and in stall it in the bay.
Note: The XMC90 is supplied with an iPod adapter for installation in the iPod bay. Most iPods come with their own
(original) adapters which can also be used if necessary.
3. Install the iPod carefully onto the iPod connector and press down lightly until the iPod bottoms into the recess. The
iPod will be inclined slightly toward the rear of the XMC90.
4. Press the MODE button to highlight the current mode and rotate the scroll wheel until iPod is highlighted; then press
select and observe the following display screens:
iPod Boot-up Screen iPod With Clock
5. Press Scroll Wheel twice; a beep sounds and the iPod menu can now be accessed using the Scroll Wheel.
P/N: CNP2000
VERSION V 0.0 Page 10 of 20
Page 11

MODEL XMC90 OWNER’S MANUAL
4.0 XM Docking Station
This station provides docking accommodations for an external mini XM receiver. (Refer to previous figure.)
Note: The XM mini receiver and XM antenna are not included with the XMC90.( P/N:CNP2000)
4.1 Using the XM Docking Station
1. Swing up the protective cover door to access the iPod/XM receiver system connect or bay.
2. Install the mini receiver carefully onto the receiver connector and press down lightly until the receiver bottoms into
the recess.
Note: The receiver can be inserted in one way only; the XM logo should face toward the front of the unit.
3. Press the MODE button until XM is highlighted; then press the Scroll Wheel select button.
If a receiver fault occurs
or if the receiver is
improperly installed, the
following message
screen appears:
If the XM antenna is not
connected, or an XM
antenna fault occurs,
the following message
screens may appear:
Use the number (1-10) buttons to directly select a channel
number, or p r ess the select button twice; a beep occurs and the
scroll wheel can be used to browse the channel list
Note: After 20 seconds, channel scroll will time out and the scroll wheel will return to Volume Control.
Select the Category using
the CAT+/- buttons; select
channel within the category
using the CH+/- buttons or
scroll wheel
VERSION V 0.0 Page 11 of 20
Page 12

MODEL XMC90 OWNER’S MANUAL
Set Preset
First set the desired channel number.
Press DIRECT to access
the desired memory bank ;
press and hold the desired
1-10 number using the
number buttons
Press and hold DIRECT to
access preset channel list
in memory bank A; pres s
CH Up or Down to scroll
through selection.
5.0 CD Functions
When playing discs, use the Mode control to select the CD functions.
Press play/pause
button to initiate
CD play mode
During play,
press play/pause
button to pause
CD play
During play, momentarily
press fast forward (
button to advance to next
track; press and hold for
rapid scan
During play, momentarily press fast
reverse (
track; press and hold for rapid reverse
) button to return to previous
During play, press shuffle
(remote only) button to
play songs in a
completely random
manner
During repeat play, press
repeat (remote only) button
again to re-play all songs on
the disc once
)
During play,
press stop
button to halt CD
During play, press repeat
(remote only) button
once to re-play current
song
VERSION V 0.0 Page 12 of 20
Page 13

MODEL XMC90 OWNER’S MANUAL
Other CD Functions
6.0
When playing audio CDs, if the CD function is selected with the MODE button button, and no CD is loaded, the following message
appears on the display:
If a CD is loaded, and the CD mode is selected, the initial display conveys the number of folders on the disc and the total number
of tracks.
7.0 Connector Functions
VERSION V 0.0 Page 13 of 20
Page 14

MODEL XMC90 OWNER’S MANUAL
7.1 Beeper Speaker
This speaker provides beeper tone alarm audio output.
7.2 DC IN Jack
This jack connects to the 15 V DC output of the AC/DC adapter supplied with the radio.
7.3 AUX IN Jack
This RCA (red/white) stereo type jack accepts an external audio input from an optional DVD player, video game
console, etc.
7.4 Headphone Jack
This 3.5mm jack provides an audio output to external stereo headphones.
7.5 XM Antenna Connector
This jack provides input connection for the external SMB type XM antenna which is sold separately.
7.6 AM Antenna Connector
This jack provides input 3.5mm connection for a stereo headphone type AM loop antenna supp lied with the unit.
7.7 FM Antenna Jack
This connector provides input for a 75Ω F-connector type FM antenna supplied with the unit.
7.8 Port Tube
This port on the bottom of the unit provides a heat exhaust for the speaker. DO NOT BLOCK THIS PORT.
VERSION V 0.0 Page 14 of 20
Page 15

MODEL XMC90 OWNER’S MANUAL
Remote Control
8.0
The remote control provides remote commands for both the radio and for an iPod.
VERSION V 0.0 Page 15 of 20
Page 16

MODEL XMC90 OWNER’S MANUAL
1. POWER Button: Places unit in standby or power on condition.
2. SLEEP Button: Enters sleep setting.
3. ALARM Button: Sets alarm time.
4. MUTE Button: Sets audio mute on-off.
5. MODE Button: Switches between play modes (XM/FM/AM/AUX/iPod).
6. SETUP Button: Same function as MENU on radio; display s menu i t ems for parameter setup.
7. DISPLAY Button: In XM mode, seque ntial presses of this button initiate a displ ay of the STOCK ticker info with scrolling
artist/song title, the SPORTS ticker (latest sports info) with scrolling artist/song title, and stationary ARTIST/SONG title
info currently playing.
8. JUMP Button: In XM mode, pressing the JUMP button initiates an immediate return to the previous category, or genre,
without having to press the SELECT button
9. Number (1-10) Buttons: Same function as radio; used to directly input station frequency, and for selecting station
number for memory storage.
10. VOLUME S/T Buttons: Same function as radio; used to control speaker volume.
11. DIRECT Button: Same function as radio; used to directly enter station frequency and to store frequencies in memory
banks A, B or C for later recall by the user.
12. CATW/X Buttons: Same function as radio; used for station auto-search in AM and FM modes; provide category search
in XM mode.
13. SELECT Button: Same function as radio; provides selection of highlighted screen items and also confirms input
selections. In AM and FM modes, during station frequency auto-search, if search doesn’t stop automatically, pressing
SELECT halts the auto-search function.
VERSION V 0.0 Page 16 of 20
Page 17

MODEL XMC90 OWNER’S MANUAL
14. CHS/T Buttons: Used to select radio station frequency in radio mode, and also highlights menu mode items for
adjustment. Also used to control selection of iPod menu items.
15. SHUFFLE Button: Press this button to play iPod songs in a completely random manner.
16. REPEAT Button: When pressed once, current iPod song is repeated; when pressed a second time, current song is
played continuously.
17. Fast Reverse ( ) Button: Press and hold this button to fast reverse through current playing song; press and release
to go to previous track.
18. Play/Pause ( ) Button: This button controls the play and pause functions of the iPod When pressed during play
mode, song play is paused; when pressed again, song play is resumed.
19. Stop (
20. Fast Forward ( ) Button: Press and hold this button to fast forward through the current playing song; press and
release to go to the next track.
21. CD Eject (
■ ) Button: Press this button to stop current song play.
) Button: Press this button to eject the disc from the CD player.
VERSION V 0.0 Page 17 of 20
Page 18

MODEL XMC90 OWNER’S MANUAL
9.0 Initial Use* and Battery Replacement
*When purchased the remote control has a battery inst alled with a plastic insert to prevent battery discharge. Remove
the plastic insert before attempting to use the remote.
1. Remove the battery holder. Refer to the drawing.
2. Insert the battery into the battery holder and insert the battery holder into the remote. Be sure to observe the correct
polarity
3. For best results, aim the remote directly at the remote receiver window within 10 feet, and angles not exceeding 60
degrees.
4. The path between the remote control and remote sensor should be free of obstructions.
5. Under normal use the battery will last for approximately one year.
6. Remove the battery if the remote is not going to be used for a long time or during storage.
VERSION V 0.0 Page 18 of 20
Page 19

MODEL XMC90 OWNER’S MANUAL
NOTES
VERSION V 0.0 Page 19 of 20
Page 20

MODEL XMC90 OWNER’S MANUAL
© 2008 Audiovox Electronics Corporation, 150 Marcus Blvd., Hauppauge, NY 11788
128-8283
VERSION V 0.0 Page 20 of 20
 Loading...