

Page 1

2.4GHZ DIGITAL
WIRELESS STEREO HEADPHONES
OWNER’S MANUAL
AWD205
CASQUE D’ÉCOUTE STÉRÉO
2,4 GHZ NUMÉRIQUE SANS FIL
MANUEL DE L’UTILISATEUR
Page 2

Im p o r t a n t In f o r m a t I o n
CAUTION
RISK OF ELECTRIC SHOCK.
DO NOT OPEN.
WARNING: To reduce the risk of re or
electric shock, do not expose this product to
rain or moisture. The apparatus shall not be
exposed to dripping or splashing. No objects
lled with liquids, such as vases, shall be
placed on the apparatus.
Important Safety Instructions
1. Read these instructions.
2. Keep these instructions.
3. Heed all warnings.
4. Follow all instructions.
5. Do not use this apparatus near water.
6. Clean only with dry cloth.
7. Do not block any ventilation openings.
Install in accordance with the
manufacturer’s instructions.
8. Do not install near any heat sources such
as radiators, heat registers, stoves, or
other apparatus (including ampliers) that
produce heat.
9. Protect the power cord from being walked
on or pinched particularly at plugs,
convenience receptacles, and the point
where they exit from the apparatus.
10.Unplug this apparatus during lightning
storms or when unused for long periods
of time.
11. Refer all servicing to qualied service
personnel. Servicing is required when
the apparatus has been damaged in any
way, such as power-supply cord or plug
is damaged, liquid has been spilled or
objects have fallen into the apparatus, the
apparatus has been exposed to rain or
moisture, does not operate normally, or has
been dropped.
Product Information
Keep your sales receipt to obtain warranty parts and service and for proof of purchase.
Attach it here and record the model number in case you need it. These numbers are
located on the product.
Model No.: _____________________________________________________________________
Purchase Date: _________________________________________________________________
Dealer/Address/Phone: __________________________________________________________
Caution: To reduce the risk of electric shock, do not
remove cover (or back). No user serviceable parts inside.
Refer servicing to qualied service personnel.
FCC Information
FCC Regulations state that unauthorized
changes or modications to this equipment may
void the user’s authority to operate it.
This device complies with Part 15 of the FCC
rules. Operation is subject to the following two
conditions: (1) This device may not cause harmful
interference and (2) this device must accept any
interference received, including interference that
may cause undesired operation.
RF Exposure Warning: This equipment must
be installed and operated in accordance with
provided instructions and the antenna(s) used
for this transmitter must be installed to provide
a separation distance of at least 20 cm from
all persons and must not be co-located or
operating in conjunction with any other antenna
or transmitter. End-users and installers must be
provide with antenna installation instructions
and transmitter operating conditions for
satisfying RF exposure compliance.
Industry Canada Regulatory Information
Operation is subject to the following two
conditions: (1) this device may not cause harmful
interference and (2) this device must accept any
interference received, including interference that
may cause undesired operation.
The user is cautioned that this device should
be used only as specied within this manual
to meet RF exposure requirements. Use of this
device in a manner inconsistent with this manual
could lead to excessive RF exposure conditions.
This Class B digital apparatus complies
with Canadian ICES-003. This Category II
radiocommunication device complies with
Industry Canada Standard RSS-310.
Cet appareil numérique de la classe B est
conforme à la norme NMB-003 du Canada. Ce
dispositif de radiocommunication de catégorie II
respecte la norme CNR-310 d’Industrie Canada.
Page 3

In t r o d u c t I o n
Welcome
Congratulations on your purchase of the 2.4GHz Wireless Stereo
Headphones. The AWD205 headphones use the latest in wireless
transmission, 2.4GHz digital technology, that lets you enjoy crystal
clear, uncompressed digital audio up to 150 feet away from the
transmitter. The headphones also offer a USB audio connection,
letting you enjoy 100% digital sound from your computer. The
headphones' compact design and comfortable ear cups let you enjoy
music and TV sound just about anywhere inside or outside your home.
Easy, push-button pairing makes it simple to get started, wirelessly.
This manual covers various connection options and detailed operating
instructions for setup and use of the AR wireless headphones. If, after
having reviewed the instructions, you have any questions, please call
toll-free 1-800-732-6866 or visit www.araccessories.com.
Features
2.4GHz Digital technology lets you enjoy crystal clear audio wirelessly
up to 150 feet away from the transmitter, with no line-of-sight
limitations*
USB audio connection lets you enjoy 100% digital sound from your PC
Convenient power, volume and tuning controls located on headphones
Easy pairing of transmitter and headphones
*Range may vary according to environment.
3
Page 4
Ge t t I n G St a r t e d
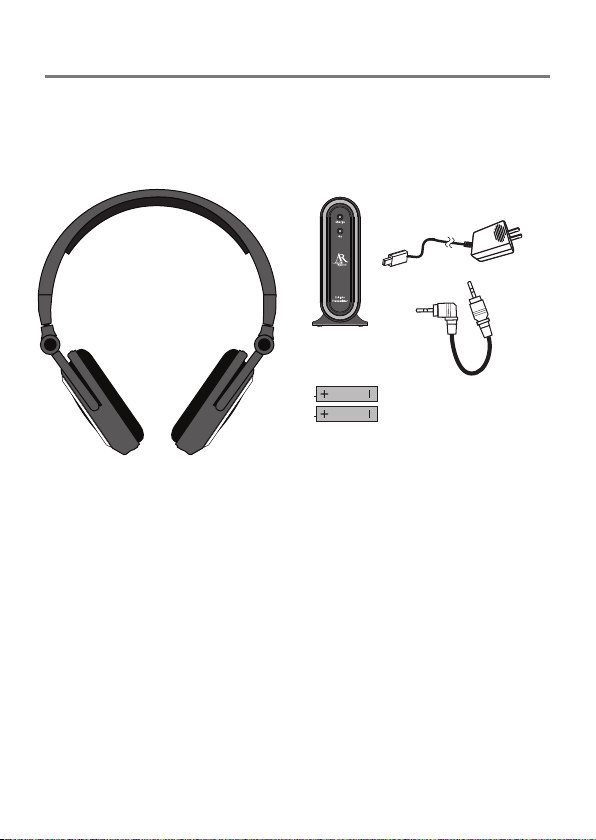
Supplied Accessories
This headphone system includes accessories that enable you to use
your wireless headphone set in a number of ways.
AC power adapter
Wireless headphones
2.4GHz wireless
transmitter
Headphone
charging cable
2 AAA rechargeable batteries
Installing the Headphone Batteries
1. Twist the left headphone’s earpad cover counter-clockwise to
expose the battery compartment.
2. Insert the two (2) rechargeable AAA batteries (included) in the
left headphone, following the polarity (+ and –) diagram inside the
compartment.
3. Place the earpad back on the left headphone and twist it clockwise
to lock it back into place.
Important: DO NOT mix batteries with different chemistry types (for example, a zinc
battery with an alkaline battery). DO NOT mix new and used batteries. DO NOT leave
batteries installed in the product when not in use for long periods. Always remove old,
weak or worn-out batteries promptly and recycle or dispose of them in accordance with
local and national regulations.
Important: If you are using rechargeable batteries NiMH or NiCd (such as the
batteries provided), the batteries will charge when the headphones are connected
to the transmitter using the charging cable. DO NOT connect the headphones to the
transmitter with the charging cable if you installed alkaline or other non-rechargeable
batteries – this could cause the batteries to leak, which would damage the headphones.
4
Page 5
Ge t t I n G St a r t e d
Setting Up the Transmitter
The 2.4GHz wireless transmitter works with a wide variety of audio
sources, from portable MP3 players to A/V receivers to DVD players or
gaming systems. It can even connect to your computer’s USB port to
deliver 100% digital audio. The way you set it up depends on the kind
of output you want to use on your audio source.
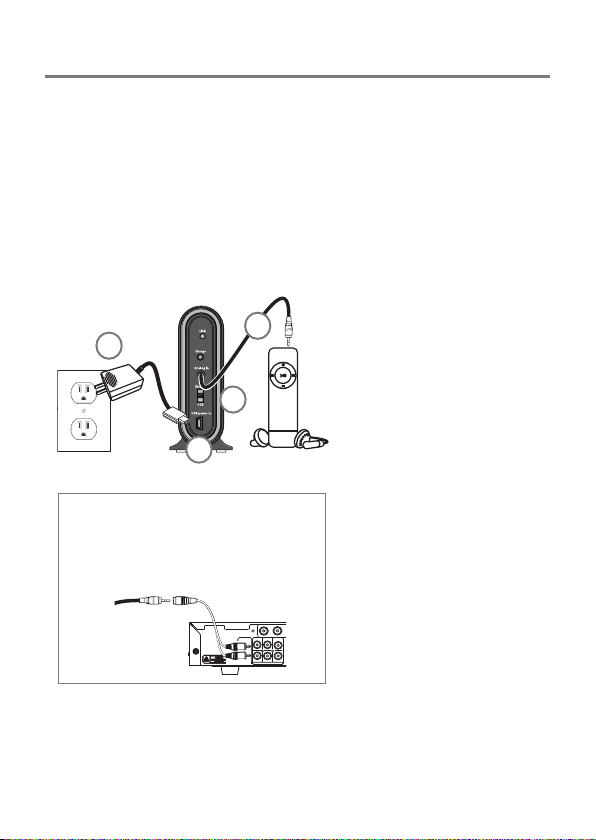
Using the built-in audio cable:
1. Plug the transmitter’s
4
3
Transmitter (back panel)
If your audio source has stereo RCA
outputs: Connect the red and white plugs
of a stereo Y adapter cable (not included) to
the audio source’s line out jacks. Connect the
other end of the stereo Y adapter cable to the
transmitter’s built-in audio cable.
Note: High-output sources, such as DVD players or audio receivers/
ampliers, may cause distortion if used at full volume with the
transmitter. Try setting them at 1/2 or 2/3 volume.
1
2
built-in audio cable into
the headphone jack on
your audio source.
2. Set the ANALOG/
USB switch on the
transmitter’s back panel
to ANALOG.
3. Connect the end of the
AC power adapter with
the USB connector to the
USB Power In jack on the
transmitter’s back panel.
4. Plug the adapter into an
electrical outlet.
Important: This power
unit is intended to be
correctly oriented in a
vertical or oor mount
position.
5
Page 6
Ge t t I n G St a r t e d
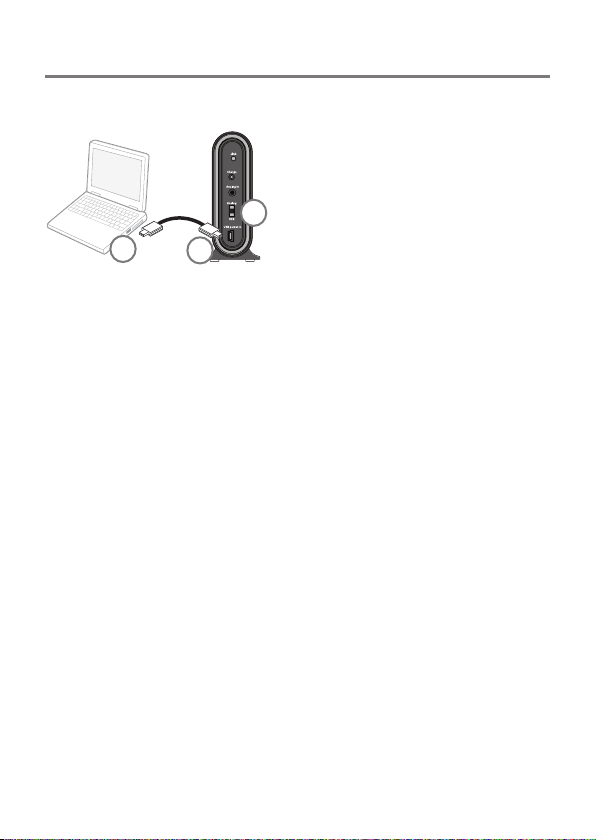
To connect to your computer’s USB port:
1. Connect a USB cable (not
included) to an available USB
port on your computer.
2. Connect the other end of the
3
1
IMPORTANT: If you’re using this USB connection to your computer,
do not connect the built-in 3.5mm audio cable to your computer.
This USB connection to your computer sends power and audio to
the transmitter, so you don’t need to make any other transmitter
connections.
2
Transmitter
(back panel)
USB cable to the transmitter’s
USB Power In jack.
3. Set the ANALOG/USB switch on
the transmitter’s back panel to
USB.
6
Page 7
Ge t t I n G St a r t e d
Using the Wireless Headphones
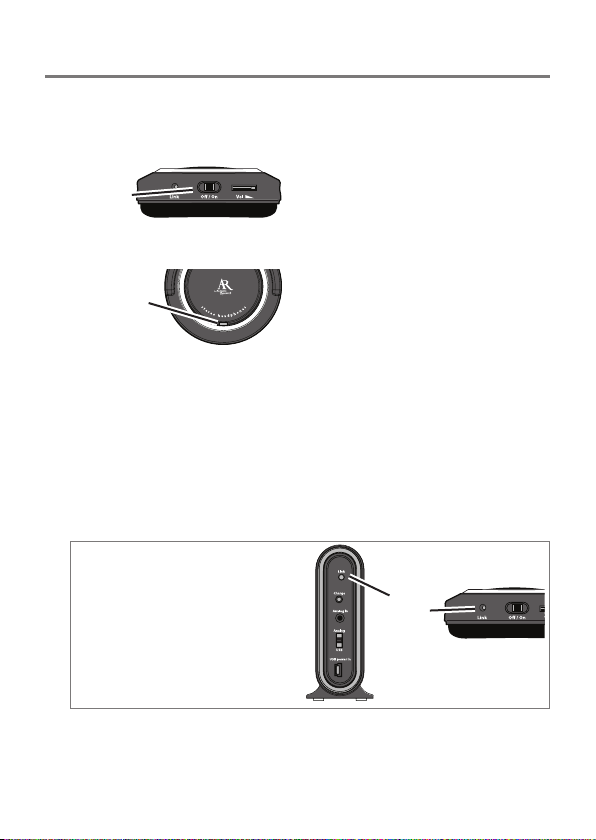
Turning the Headphones On
On/Off switch
(right
headphone,
bottom)
Indicator
(right headphone,
side)
3. Switch on the audio source (TV, DVD, CD player, etc.) the
transmitter is connected to. If your audio source is a DVD or CD
player, start a disc. The On indicator on the transmitter’s front
panel turns green and blinks rapidly, indicating that the transmitter
is trying to link with the headphones.
The headphones and transmitter should link automatically in a
matter of seconds—the transmitter’s On light and the headphone’s
indicator both turn solid green when linked.
If the transmitter and headphones
do NOT link automatically: Press and
hold the Link button on the back of
the transmitter for ve seconds. Then
press and hold the Link button on the
right headphone for 5 seconds. The
headphones and transmitter lock onto
each other for wireless transmission.
The LED on the headphones ashes
while the devices are tuning; it stays
on once the devices are tuned.
1. Make sure the transmitter is
plugged in and connected to an
audio source.
2. Put the On/Off switch on the
right headphone in the On
position. The indicator on the
right headphone lights up green
and blinks slowly to show that
the headphones are on.
Link
buttons
4. If you’re using a variable-level audio output (something you can
set the volume on), adjust the volume on your audio source. Then
adjust the volume using the Volume wheel on the right earphone.
7
Page 8
Bu t t o n S & Ja c k S
Turning the Headphones Off
Put the On/Off switch in the Off position. Don’t forget to unplug the
transmitter too!
Charging the Headset
If you are using rechargeable batteries NiMH or NiCd (such as the
batteries provided), the batteries will charge when the headphones
are connected to the transmitter using the charging cable.
WARNING: To avoid risk of re or injury, DO NOT connect the
headphones to the transmitter with the charging cable if you installed
alkaline or other non-rechargeable batteries – this could cause the
batteries to leak, which would damage the headphones.
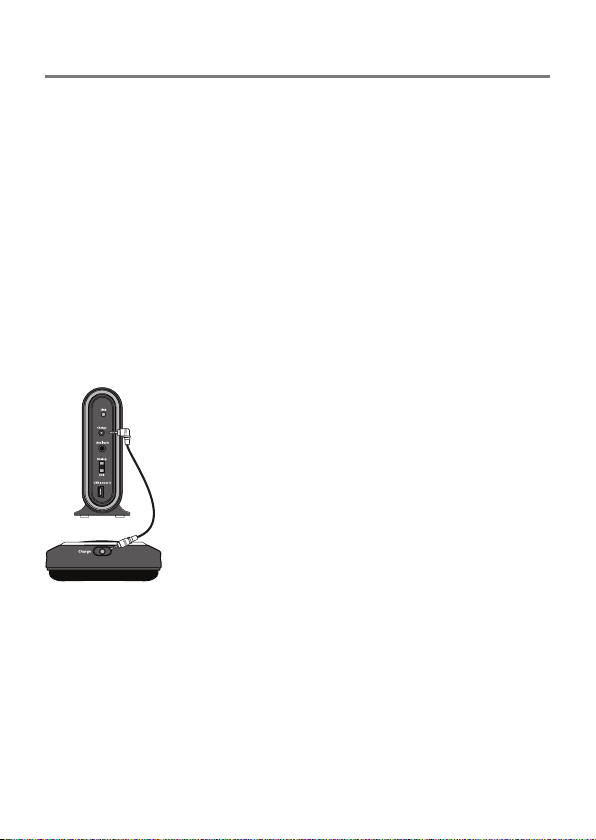
To charge the headset unit:
Transmitter
(back panel)
Charging
cable
Left headphone
Notes about charging:
• When the batteries are charged, remember to unplug the charging
cable from the headphones and transmitter.
• Never leave the batteries charging for more than 48 hours.
• The batteries should be charged for a full 8 hours.
1. Plug one end of the charging cable to
the Charge jack on the transmitter’s
back panel. (Make sure the
transmitter is plugged in!)
2. Plug the other end of the charging
cable into the Charge jack on the left
headphone.
While the headphones are charging, the
Charge indicator on the transmitter’s
front panel remains red. This LED turns
off when the headphones are fully
charged.
8
Page 9
Bu t t o n S & Ja c k S
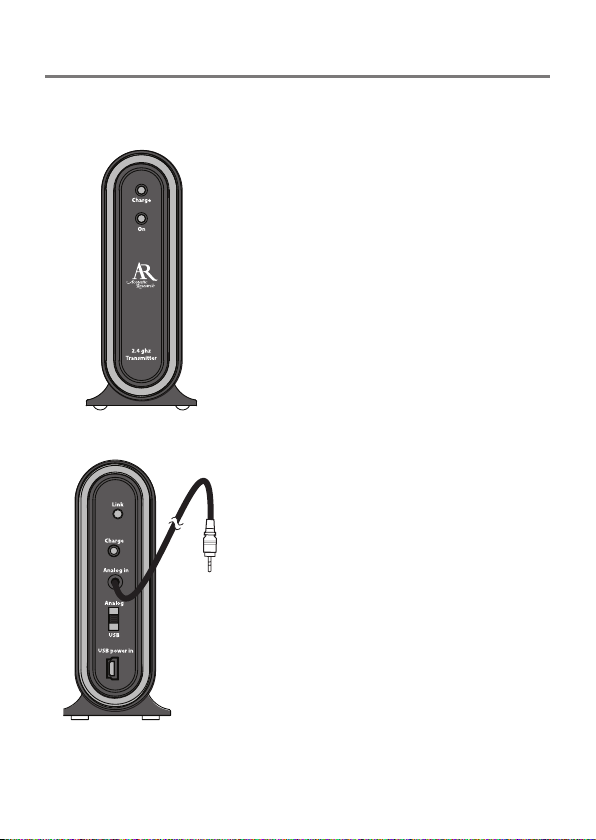
Transmitter (Front and Back)
Charge (red) indicates that your
headphones are charging
On (green) indicates the following status:
Flashing slowly: transmitter is on but
does not have an audio signal from the
input
Flashing quickly: transmitter is on and
ready to link
Solid green: transmitter and
headphones are linked
Front panel
Link button tunes the transmitter and
headphones
Charge jack connects to the left
headphone via the charging cable and
recharges your headphones if you’re using
rechargeable batteries
Analog In cable connects to an analog
audio source (like the headphone jack on
your mp3 player)
Analog/USB switch lets you set the kind
of audio input you’re using: the Analog In
jack or USB (from your computer)
USB power in jack connects to the AC
Back panel
power adapter or to your computer via
USB cable
9
Page 10

uS I n G Yo u r He a d p H o n e S
headphones
Charge jack connects to the
transmitter via the charging
cable and recharges your
headphones if you’re using
rechargeable batteries
Left headphone
Link button tunes the
headphones to the
transmitter
Off/On switch turns the
Right headphone,
bottom
Right headphone,
side
headphones on and off
Vol wheel increases or
decreases the headphone
volume
Link indicator (green) shows
the following status:
Flashing slowly:
headphones are on but
not linked
Flashing quickly:
headphones are ready
to link (headphones emit
audible tone also)
Solid green: headphones
are linked to transmitter
10
Page 11

uS I n G Yo u r He a d p H o n e S
Important Note About Audio Outputs
If possible, use a xed-level (or line-level) audio output from your
audio source. This kind of output provides a consistent level of audio
that doesn’t change when you adjust the source’s volume control.
Fixed-level audio outputs from stereo receivers/amps are typically
designated as tape or VCR audio output connections, sometimes
marked on the component as ‘TAPE OUTPUT,’ ‘TAPE OUT,’ ‘TAPE REC,
or ‘TAPE RECORD or REC OUT.’
Fixed-level outputs from TVs are usually marked as ‘Constant,’ ‘Fixed,’
or ‘Select.’ If they are not marked as such, they are probably variable
outputs (see “About Variable-Level Audio Outputs” below). Outputs
from DVD players are almost always xed.
Important: Jacks labeled CD, DVD/DVR, PHONO, or tape playback
(PB) are INPUTS and will not work with the transmitter.
Variable‑Level Audio Outputs
A variable-level output, such as a headphone jack or certain RCA-type
outputs, provides an audio signal that changes with the volume level
set on the audio source. As the volume of the audio source is adjusted
up and down, so is the audio signal strength sent to the transmitter.
This can affect the quality of sound generated by the headphones, and
may require an adjustment of the volume level of the audio source to
produce a signal strong enough for the transmitter.
Hints:
• On most bookshelf-type or compact stereo systems, inserting a
headphone plug into the headphone jack results in automatic cutoff of
the regular, or hard-wired speakers.
• Most TVs, regardless of age or price, have variable outputs. If you
are unsure which of your TV audio outputs is xed, refer to the TV
instruction manual. Some TVs have outputs that can switch between
variable and xed. When given a choice, xed is always recommended.
11
Page 12

uS I n G Yo u r He a d p H o n e S
Listen safely!
Enjoy your headphones at a safe volume. Avoid or limit the amount of
time you listen at higher volumes—permanent hearing loss may occur if
the headphone is used at too high a volume. If you experience a ringing
in your ears, or your own voice and other sounds seem mufed, stop
using the headphones and consult a hearing professional.
tr o u B l e S H o o t I n G
The following troubleshooting guide takes you through some of the more common
problems associated with the installation and/or operation of a wireless system. If the
problem persists, please call toll-free 1-800-732-6866 or visit www.araccessories.com.
No sound
• Make sure the transmitter’s power adapter is fully inserted into the wall outlet and
the power cord from the AC adapter is rmly connected to the transmitter power
input jack.
• Check that the audio source component (stereo, TV, etc.) is turned on and
transmitting sound as it normally should. If you’re using a PC or DVD player, make
sure you’ve selected the correct audio output and that the sound is not muted.
• Conrm that the headphones are turned on and tuned to the transmitter—the
indicator on right headphone should be solid green. If the indicator on the right
headphone is ashing green, the headphones are not linked to the transmitter.
Press the link key on the headphones and on the transmitter’s back panel to link the
headphones.
• Check that the headphone volume is turned up.
• If you’re using a variable output audio source (like a headphone jack or variable
output on a TV set), make sure the source component’s volume is set high enough
for the transmitter to detect.
• If you are using a Tape 2 Monitor output from your receiver/amp as the audio output,
check that you have pressed the Tape Monitor/Tape 2 button on the front of the
receiver. This will turn on the Tape 2 outputs, which may not have been active.
12
Page 13

tr o u B l e S H o o t I n G
Interrupted sound
• Move closer to the transmitter with the headphones on. Sending the signal
through certain materials, such as glass, tile, and metal, can decrease the effective
transmitting distance of the system.
Distorted sound
• High-output sources, such as DVD players or audio receivers/ampliers, may cause
distortion if used at full volume with the transmitter. Try setting them at 1/2 or 2/3
volume.
Indicators fail to light up
• Make sure the headphones are charged and that the transmitter is properly
connected to the audio source. Move the headphones closer to the transmitter and
turn the headphones off, then back on again.
Headphones shut off automatically
• Check the LED on the right headphone. If it’s blinking, you’ve lost the transmitter’s
signal. Move closer to the transmitter. If you don’t see the LED, the headphones’
rechargeable battery needs to be recharged. Use the AC adapter to recharge the
headphones.
Specifications
Transmitter
Omni-directional digital broadcast (carrier frequency: 2.4GHz)
Effective transmitting range: up to 150ft. (45m)*
RF output: 13dBm~18dBm
Audio inputs: 3.5mm stereo cable, USB jack
Runs on USB AC power adapter
Headphones
Frequency response: 20Hz–20kHz
Signal to Noise ratio: >80dB
Distortion (THD): <1%
Uncompressed CD-quality audio
Battery type: 2 AAA (rechargeable batteries included)
*Maximum range; results may vary according to environment.
13
Page 14

12 Month Limited Warranty
Audiovox Electronics Corporation (the “Company”) warrants to the original retail
purchaser of this product that should this product or any part thereof, under normal use
and conditions, be proven defective in material or workmanship within 12 months from the
date of original purchase, such defect(s) will be repaired or replaced (at the Company’s
option) without charge for parts and repair labor. To obtain repair or replacement within
the terms of this Warranty, the product along with any accessories included in the original
packaging is to be delivered with proof of warranty coverage (e.g. dated bill of sale),
specication of defect(s), transportation prepaid, to the Company at the address shown
below. Do not return this product to the Retailer.
This Warranty is not transferable and does not cover product purchased, serviced or used
outside the United States or Canada. The warranty does not extend to the elimination
of externally generated static or noise, to costs incurred for the installation, removal or
reinstallation of the product. The warranty does not apply to any product or part thereof
which, in the opinion of the company, has suffered or been damaged through alteration,
improper installation, mishandling, misuse, neglect, accident or exposure to moisture.
This warranty does not apply to damage caused by an AC adapter not provided with the
product, or by leaving non-rechargeable batteries in the product while plugged into an
AC outlet.
THE EXTENT OF THE COMPANY’S LIABILITY UNDER THIS WARRANTY IS LIMITED TO THE REPAIR
OR REPLACEMENT PROVIDED ABOVE AND, IN NO EVENT, SHALL THE COMPANY’S LIABILITY
EXCEED THE PURCHASE PRICE PAID BY PURCHASER FOR THE PRODUCT.
This Warranty is in lieu of all other express warranties or liabilities. ANY IMPLIED
WARRANTIES, INCLUDING ANY IMPLIED WARRANTY OF MERCHANTABILITY OR FITNESS FOR
A PARTICULAR PURPOSE, SHALL BE LIMITED TO DURATION OF THIS WARRANTY. ANY ACTION
FOR BREACH OF ANY WARRANTY HEREUNDER, INCLUDING ANY IMPLIED WARRANTY, MUST BE
BROUGHT WITHIN A PERIOD OF 24 MONTHS FROM THE DATE OF ORIGINAL PURCHASE. IN NO
CASE SHALL THE COMPANY BE LIABLE FOR ANY CONSEQUENTIAL OR INCIDENTAL DAMAGES
WHATSOEVER. No person or representative is authorized to assume for the Company any
liability other than expressed herein in connection with the sale of this product. Some
states/provinces do not allow limitations on how long an implied warranty lasts or the
exclusion or limitation of incidental or consequential damage so the above limitations
or exclusions may not apply to you. This Warranty gives you specic legal rights and you
may also have other rights which vary from state/province to state/province.
USA: Audiovox Electronics Corporation, 150 Marcus Blvd., Hauppauge, NY 11788
CANADA: Audiovox Return Center, c/o Genco, 6685 Kennedy Road, Unit 3, Door 16,
Mississauga, Ontario L5T 3A5
Page 15

In f o r m a t I o n S I m p o r t a n t e S
MISE EN GARDE
RISQUE DÉCHARGE
ÉLECTRIQUE.
NE PAS OUVRIR.
AVERTISSEMENT : An de réduire les risques
d’incendie ou de décharges électriques,
ne pas exposer ce produit à la pluie ou à
l’humidité. L’appareil ne doit pas être exposé
à un égouttement ni à des éclaboussures.
Aucun objet rempli de liquide, tel qu’un vase,
ne doit être placé sur l’appareil.
Instructions de sécurité importantes
1. Lire ces instructions.
2. Conserver ces instructions.
3. Tenir compte de tous les avertissements.
4. Suivre toutes les instructions.
5. Ne pas utiliser cet appareil à proximité d’eau.
6. Nettoyer seulement avec un chiffon sec.
7. Ne bloquer aucune ouverture de ventilation.
Installer conformément aux instructions du
fabricant.
8. Ne pas installer à proximité d’une source de
chaleur telle qu’un radiateur, des registres
de chauffage, un four ou d’autres appareils
(y compris les amplicateurs) qui produisent
de la chaleur.
9. Protéger le cordon d’alimentation pour éviter
que l’on ne marche dessus ou qu’il ne soit
pincé, en particulier au niveau des ches,
des prises de courant et à l’endroit où il sort
de l’appareil.
10. Débrancher cet appareil pendant les orages
avec des éclairs ou lorsqu’il n’est pas utilisé
pendant des périodes prolongées.
11. Faire effectuer toute réparation par du
personnel d’entretien qualié. L’appareil doit
être réparé et lorsqu’il a été endommagé
d’une manière quelconque, par exemple,
lorsque le cordon d’alimentation est
endommagé, qu’il a été éclaboussé par du
liquide, que des objets sont tombés dessus,
qu’il a été exposé à la pluie ou à l’humidité,
qu’il ne fonctionne pas normalement ou
qu’on l’a fait tomber.
Information sur le produit
Conserver le reçu de vente pour se procurer des pièces et faire effectuer des réparations
dans le cadre de la garantie, ainsi que comme preuve d’achat. L’attacher ici et noter le
numéro de modèle en cas de besoin. Ces numéros se trouvent sur le produit.
Numéro de modèle : ____________________________________________________________
Date d’achat : __________________________________________________________________
Détaillant/adresse/téléphone : ____________________________________________________
Mise en garde : An de réduire les risques de décharges
électriques, ne pas enlever le couvercle (ou l’arrière). Aucune
pièce réparable par l’utilisateur ne se trouve à l’intérieur. Faire
effectuer toute réparation par du personnel d’entretien qualié.
Informations relatives à la FCC
La réglementation de la FCC stipule que toute
modication non autorisée de ce produit peut
annuler les droits d’utilisation de l’utilisateur.
Cet appareil est conforme à la partie 15 du
règlement applicable de la FCC. Son utilisation
est soumise aux deux conditions suivantes :
Cet appareil (1) ne doit causer aucun parasite
nuisible et (2) doit absorber tout parasite
reçu, y compris ceux qui pourraient causer un
fonctionnement indésirable.
Avertissement relatif à l’expositions aux
radiofréquences : Cet appareil doit être installé
et utilisé conformément aux instructions qui
l’accompagnent et la ou les antennes utilisées
pour cet émetteur doivent être installées de
façon à assurer un espacement d’au moins
20 cm par rapport à toute personne et ne
doivent pas l’être au même endroit qu’un
autre émetteur ou antenne ni fonctionner
conjointement avec un tel dispositif. Les
instructions d’installation de l’antenne et les
conditions de fonctionnement de l’émetteur
qui respectent les exigences d’exposition aux
radiofréquences doivent être communiquées
aux utilisateurs nals et installateurs.
Informations sur la réglementation
d’Industrie Canada
L’utilisation est soumise aux deux conditions
suivantes : Cet appareil (1) ne doit causer aucun
parasite nuisible et (2) doit absorber tout
parasite reçu, y compris ceux qui pourraient
causer un fonctionnement indésirable.
L’utilisateur est averti que ce dispositif doit être
utilisé uniquement de la manière précisée dans
ce manuel an de respecter les spécications
d’exposition aux radiofréquences. L’utilisation
de ce dispositif d’une manière non conforme à
celle indiquée dans ce manuel peut entraîner
des conditions d’exposition excessives aux
radiofréquences.
Cet appareil numérique de la classe B est
conforme à la norme NMB-003 du Canada.
Page 16

In t r o d u c t I o n
Bienvenue
Félicitations pour l’achat du casque d’écoute stéréo 2,4 GHz sans
l. Le casque d’écoute AWD205 utilise la technologie numérique
de transmission sans l de 2,4 GHz la plus récente, qui permet de
proter d’un son numérique non compressé clair comme du cristal
jusqu’à 30 m de l’émetteur. Il offre également une connexion audio
USB permettant de proter d’un son 100 % numérique à partir d’un
ordinateur. La conception compacte des oreillettes du casque d’écoute
permet de proter de la musique ou du son d’un téléviseur presque
partout à l’intérieur ou à l’extérieur de l’habitation. L’appariement
facile à réaliser des boutons-poussoirs simplie la mise en route
sans l. Ce manuel présente plusieurs options de connexion et des
instructions d’utilisation détaillées pour l’installation et l’utilisation
du casque d’écoute AR sans l. Pour toute question une fois les
instructions passées en revue, prière d’appeler sans frais le
1-800-732-6866 ou de visiter notre site Web à www.araccessories.com.
Caractéristiques
La technologie numérique 2,4 GHz permet de proter sans l d’un
son clair comme du cristal jusqu’à une distance de 45 m de l’émetteur,
sans limites de ligne visuelle*
La connexion audio USB permet de proter d’un son 100 %
numérique à partir d’un PC
Commandes de puissance, de volume et de syntonisation pratiques
situées sur le casque d’écoute.
Appariement facile de l’émetteur et du casque d’écoute
*La portée peut varier en fonction de l’ambiance.
16
Page 17

po u r c o m m e n c e r
Accessoires fournis
Ce système de casque d’écoute inclut des accessoires qui permettent
d’utiliser le casque sans l de plusieurs manières.
Adaptateur courant
alternatif
Casque d’écoute sans l
Émetteur sans l 2,4 GHz
Câble de charge de
2 piles AAA rechargeables
Mise en place des piles du casque
d’écoute
1. Tourner le couvercle de l’oreillette gauche du casque dans le sens
inverse des aiguilles d’une montre pour mettre le compartiment de
piles à découvert.
2. Introduire les deux (2) piles AAA rechargeables (fournies) dans
l’écouteur gauche en respectant la polarité (+ et –) indiquée à
l’intérieur du compartiment.
3. Remettre le couvercle de l’oreillette de l’écouteur gauche et
le tourner dans le sens des aiguilles d’une montre pour le
reverrouiller en place.
Important : NE PAS mélanger des piles dont la composition chimique est différente (par
exemple une pile au zinc avec une pile alcaline). NE PAS mélanger des piles neuves et
usagées. NE PAS laisser les piles dans l’appareil lorsque celui-ci n’est pas utilisé pendant
des périodes prolongées. Toujours enlever sans attendre les piles anciennes, faibles ou
usées et les recycler ou les jeter en respectant les réglementations locales et nationales.
Important : si on utilise des piles NiMH ou NiCd (telles que celles qui sont fournies),
elles se rechargent lorsque le casque d’écoute est relié à l’émetteur au moyen du
câble de charge. NE PAS relier le casque d’écoute à l’émetteur au moyen du câble de
charge si on utilise des piles alcalines ou d’autres piles non rechargeables car celles-ci
pourraient fuir, ce qui endommagerait le casque.
casque d’écoute
17
Page 18

po u r c o m m e n c e r
Configuration de l’émetteur
L’émetteur sans l 2,4 GHz fonctionne à partir d’une grande
variété de sources audio, telles que lecteurs MP3 portables, amplissyntoniseurs audio/vidéo, lecteurs de DVD et consoles de jeu. Il peut
même se raccorder à un port USB d’ordinateur pour fournir un son
100 % numérique. Sa conguration dépend du type de sortie utilisée
pour la source audio.
Utilisation du câble audio intégré :
1. Brancher le câble audio
4
3
Émetteur (dos)
Si la source audio est pourvue de sorties RCA :
Raccorder les ches rouge et blanche d’un câble
stéréo à adaptateur en Y (non fourni) aux prises
femelles de sortie de la source audio. Raccorder
l’autre extrémité de ce câble au câble audio intégré
de l’émetteur.
Remarque : les sources à niveau de sortie élevé, telles que les
lecteurs de DVD et les amplis-syntoniseurs audio, peuvent causer une
distorsion si elles sont utilisées au volume maximum avec l’émetteur.
Essayer de les régler à la moitié ou aux 2/3 du volume.
1
2
18
intégré de l’émetteur
dans la prise casque de la
source audio.
2. Placer le commutateur
ANALOG/USB au dos de
l’émetteur en position
ANALOG.
3. Raccorder l’extrémité
de l’adaptateur courant
alternatif où se trouve
le connecteur USB à la
prise femelle Power In
(alimentation) au dos de
l’émetteur.
4. Brancher l’adaptateur
dans une prise électrique.
Important : cet
adaptateur est conçu
pour être orienté en
position verticale ou
installé sur le plancher.
Page 19

po u r c o m m e n c e r
Raccordement à un port USB d’ordinateur :
1. Raccorder un câble USB (non
fourni) à un port USB disponible
de l’ordinateur.
2. Raccorder l’autre extrémité
3
1
IMPORTANT : si on utilise cette connexion USB à l’ordinateur, ne
pas raccorder le câble audio intégré de 3,5 mm à l’ordinateur. Une
telle connexion transmet le courant et le signal audio à l’émetteur,
ce qui évite de devoir effectuer d’autres branchements à l’émetteur.
2
Émetteur (dos)
du câble USB à la prise
femelle d’alimentation USB de
l’émetteur.
3. Placer le commutateur
ANALOG/USB au dos de
l’émetteur en position USB.
19
Page 20

po u r c o m m e n c e r
Mode d’emploi du casque d’écoute
sans fil
Activation du casque d’écoute
Interrupteur
de marche/
arrêt (bas de
l’écouteur
droit)
Témoin (côté de
l’écouteur droit)
3. Activer la source audio (téléviseur, lecteur de DVD ou de CD, etc.)
à laquelle l’émetteur est relié. Si la source audio est un lecteur
de DVD ou de CD, charger un disque. Le témoin de marche qui
se trouve sur le devant de l’émetteur s’allume en vert et clignote
rapidement pour indiquer que l’émetteur est en train d’établir la
liaison avec le casque d’écoute.
Le casque et l’émetteur doivent communiquer automatiquement
en quelques secondes. Le témoin de marche de l’émetteur et celui
du casque restent allumés en vert une fois la liaison établie.
Si l’émetteur et le casque d’écoute ne
communiquent PAS automatiquement :
Appuyer sur le bouton Link (liaison) qui
se trouve au dos de l’émetteur pendant
5 secondes. Appuyer ensuite pendant
5 secondes sur celui qui se trouve sur
l’écouteur droit. Le casque d’écoute et
l’émetteur doivent se synchroniser pour
qu’une transmission sans l s’établisse. La
DÉL du casque d’écoute clignote alors que les
appareils se synchronisent ; elle reste allumée
une fois que la communication est établie.
4. Si on utilise une sortie audio à niveau variable (c’est-à-dire dont on
peut régler le volume), régler le volume de la source audio puis celui du
casque au moyen de la molette Volume qui se trouve sur l’écouteur droit.
20
1. S’assurer que l’émetteur est
branché dans une prise et
raccordé à une source audio.
2. Placer l’interrupteur On/Off
(marche/arrêt) qui se trouve sur
l’écouteur droit en position On
(marche). Le témoin qui se trouve
sur l’écouteur droit s’allume en
vert et clignote lentement pour
indiquer que le casque d’écoute
est sous tension.
Boutons
Link
Page 21

Bo u t o n S e t p r I S e S f e m e l l e S
Arrêt du casque d’écoute
Placer l’interrupteur On/Off en position Off. Ne pas oublier non plus
de débrancher l’émetteur de la prise!
Charge du casque d’écoute
Si on utilise des piles NiMH ou NiCd (telles que celles qui sont
fournies), elles se rechargent lorsque le casque d’écoute est relié à
l’émetteur au moyen du câble de charge.
AVERTISSEMENT : Pour éviter les risques d’incendie ou de
blessures, NE PAS relier le casque d’écoute à l’émetteur au moyen
du câble de charge si on utilise des piles alcalines ou d’autres piles non
rechargeables car celles-ci pourraient fuir, ce qui endommagerait le
casque.
Émetteur
(dos)
Câble de
charge
Écouteur gauche
Pour charger le casque d’écoute :
1. Brancher une extrémité du câble
de charge dans la prise Charge du
panneau arrière de l’émetteur. (Veiller
à ce que l’émetteur soit branché!)
2. Brancher l’autre extrémité du câble
de charge dans la prise Charge de
l’écouteur gauche.
Le témoin Charge reste allumé en rouge
sur le devant de l’émetteur tant que le
casque d’écoute se recharge. Cette DÉL
s’éteint lorsque le casque d’écoute est
complètement chargé.
Remarques concernant la charge :
• Une fois que les piles sont chargées, ne pas oublier de débrancher
le câble de charge du casque d’écoute et de l’émetteur.
• Ne jamais charger les piles pendant plus de 48 heures.
• Charger les piles pendant 8 heures complètes.
21
Page 22

Bo u t o n S e t p r I S e S f e m e l l e S
Émetteur (devant et dos)
Charge (rouge) indique que le casque
d’écoute est en cours de charge
On [marche] (vert) indique ce qui suit :
Clignotement lent : l’émetteur est en
marche mais ne reçoit pas de signal
audio de l’entrée
Clignotement rapide : l’émetteur est en
marche et est prêt à établir la liaison
Allumage constant en vert : l’émetteur
et le casque d’écoute communiquent
22
Devant
Dos
Le bouton Link (liaison) permet de
synchroniser l’émetteur et le casque
d’écoute
La prise Charge se raccorde à l’écouteur
gauche par l’intermédiaire du câble de
charge et recharge le casque d’écoute si
on utilise des piles rechargeables.
Le câble Analog In (entrée analogique) se
raccorde à une source audio (telle que la
prise casque d’un lecteur MP3)
Le commutateur Analog/USB permet de
sélectionner le type d’entrée audio utilisé :
prise Analog In ou USB (d’un ordinateur)
La prise USB power in (alimentation
USB) se raccorde à l’adaptateur courant
alternatif ou à un ordinateur par
l’intermédiaire d’un câble USB
Page 23

ut Il I S at I o n d u c a S q u e d’é c o u t e
Casque D’écoute
La prise Charge se
raccorde à l’émetteur par
l’intermédiaire du câble
de charge et recharge le
casque d’écoute si on utilise
Écouteur gauche
Écouteur droit, bas
Écouteur droit,
côté
des piles rechargeables.
Le bouton Link (liaison)
permet de synchroniser
le casque d’écoute et
l’émetteur
L’interrupteur Off/On
permet de mettre le casque
en marche et de l’arrêter
La molette Vol permet
d’augmenter ou de baisser
le volume du casque
Le témoin Link (vert) indique
ce qui suit
Clignotement lent : le
casque est en marche
mais ne communique pas
Clignotement rapide :
le casque est prêt à
communiquer (il émet un
signal sonore)
Allumage constant
en vert : le casque
d’écoute et l’émetteur
communiquent
23
Page 24

ut Il I S at I o n d u c a S q u e d’é c o u t e
Remarque importante sur les
sorties audio
Si possible, utiliser une sortie audio à niveau xe (ou linéaire) à partir
de la source audio. Ce type de sortie offre un niveau d’audio uniforme
qui ne change pas lorsqu’on règle le volume de la source. Les sorties
audio à niveau xe des amplis-syntoniseurs et amplicateurs stéréo
sont généralement désignées comme connexions de sortie audio pour
lecteurs de cassettes ou magnétoscopes, parfois marquées TAPE
OUTPUT, TAPE OUT, TAPE REC, TAPE RECORD ou REC OUT.
Les sorties à niveau xe d’un téléviseur sont généralement marquées
« Constant », « Fixed » ou « Select ». Si ce n’est pas le cas, ce sont
probablement des sorties à niveau variable (voir ci-dessous « Sorties
audio à niveau variable »). Les sorties des lecteurs DVD sont presque
toujours xes.
Important: les prises marquées CD, DVD/DVR, PHONO ou lecture de
cassette (PB) sont des ENTRÉES et ne fonctionneront pas avec l’émetteur.
Sorties audio à niveau variable
Une sortie à niveau variable, comme celle d’une prise casque ou de
certains types de sorties RCA, fournit un signal audio qui change avec
le niveau de volume sélectionné sur la source audio. La puissance
du signal audio transmis envoyé à l’émetteur varie parallèlement à
l’augmentation ou à la baisse du volume de la source audio. Ceci peut
affecter la qualité du son produit par le casque d’écoute et peut exiger
un réglage du niveau de volume de la source audio an de produire un
signal sufsamment puissant pour l’émetteur.
Conseils :
• Dans la plupart des systèmes stéréo pour étagères ou compacts,
l’insertion d’une che de casque d’écoute dans la prise casque coupe
automatiquement le signal audio transmis aux haut-parleurs câblés
ordinaires.
• La plupart des téléviseurs, quelque soit leur âge ou leur prix, sont dotés
de sorties variables. S’il est difcile d’identier les sorties audio xes du
téléviseur, consulter son manuel d’instructions. Certains téléviseurs sont
dotés de sorties qui peuvent passer de variable à xe et vice versa. Si un
choix est possible, une sortie xe est toujours recommandée.
24
Page 25

ut Il I S at I o n d u c a S q u e d’é c o u t e
Écoute sans risque!
Utiliser le casque d’écoute à un volume raisonnable. Éviter l’écoute à un
volume élevé ou en limiter la durée — une perte permanente de l’ouïe
peut se produire si le casque d’écoute est utilisé à un volume trop élevé.
En cas de bourdonnement dans les oreilles ou si la voix de l’utilisateur
et d’autres sons semblent assourdis, arrêter de se servir du casque
d’écoute et consulter un spécialiste de l’audition.
dé p a n n a G e
Le guide de dépannage ci-dessous passe en revue les problèmes les plus courants
associés à l’installation et/ou à l’utilisation d’un système sans l. Si le problème persiste,
appeler sans frais le 1-800-732-6866 ou visiter le site Web www.araccessories.com.
Aucun son
• S’assurer que l’adaptateur courant alternatif de l’émetteur est bien branché dans la
prise murale et que le cordon d’alimentation de l’adaptateur courant alternatif est
fermement connecté à la prise d’alimentation électrique de l’émetteur.
• Vérier que la source audio (chaîne stéréo, téléviseur, etc.) est allumée et transmet
le son normalement. Si un PC ou lecteur de DVD est utilisé, s’assurer que la bonne
sortie audio a été sélectionnée et que le son n’est pas en sourdine.
• Vérier que le casque d’écoute est sous tension et synchronisé avec l’émetteur. Le
témoin qui se trouve sur l’écouteur droit doit rester allumé en vert. Si ce témoin
clignote en vert, le casque ne communique pas avec l’émetteur. Appuyer sur le
bouton Link (liaison) du casque d’écoute et sur celui au dos de l’émetteur pour
établir la liaison avec le casque.
• Vérier que le volume du casque d’écoute est sufsamment élevé.
• Si une source audio à sortie variable (telle qu’une prise casque ou une sortie
variable sur un téléviseur) est utilisée, s’assurer que le volume de la source est
sufsamment élevé pour être détecté par l’émetteur.
• Si une sortie Tape 2 Monitor est utilisée comme sortie audio sur l’ampli-syntoniseur
ou l’amplicateur, vérier que le bouton Tape Monitor/Tape 2 est enfoncé sur
le devant de l’ampli-syntoniseur. Cette procédure active les sorties Tape 2 qui
pourraient ne pas avoir été activées.
25
Page 26

dé p a n n a G e
Son interrompu
• Se rapprocher de l’émetteur en portant le casque d’écoute. La transmission d’un
signal au travers de certains matériaux tels que le verre, le carrelage et le métal peut
réduire la distance effective d’émission du système.
Son distordu
• Les sources à niveau de sortie élevé, telles que les lecteurs de DVD et les amplissyntoniseurs audio, peuvent causer une distorsion si elles sont utilisées au volume
maximum avec l’émetteur. Essayer de les régler à la moitié ou aux 2/3 du volume.
Les témoins ne s’allument pas
• Vérier que le casque d’écoute est chargé et que l’émetteur est raccordé
correctement à la source audio. Rapprocher le casque de l’émetteur et le mettre en
marche puis l’arrêter.
Le casque d’écoute s’arrête automatiquement
• Observer la DÉL sur l’écouteur droit. Si elle clignote, le signal de l’émetteur est
perdu. Se rapprocher de l’émetteur. Si la DÉL n’est pas allumée, la pile rechargeable
du casque doit être rechargée. Utiliser l’adaptateur à courant alternatif (c.a.) pour
recharger le casque.
Spécifications
Émetteur
Diffusion numérique 2,4 GHz omnidirectionnelle
(fréquence porteuse : 2,4 GHz)
Portée d’émission effective : jusqu’à 45 m (150 pi)*
Sortie haute fréquence : 13 dBm~18 dBm
Entrées audio : câble stéréo de 3,5 mm, prise femelle USB
Fonctionne avec un adaptateur courant alternatif USB
Casque d’écoute
Réponse en fréquence : 20 Hz à 20 kHz
Rapport signal sur bruit : >80dB
Distorsion (THD) : <1 %
Audio de qualité CD non compressée
Type de pile : 2 piles AAA rechargeables (incluses)
*La portée maximale peut varier en fonction de l’ambiance.
26
Page 27

Garantie Limitée de 12 Mois
Audiovox Electronics Corporation (la « Société ») garantit à l’acheteur initial au détail que
ce produit et toutes ses pièces sont exempts de défauts de matière et de fabrication, dans
des conditions d’utilisation normales, pendant 12 mois à compter de la date de l’achat
initial et que le ou les défauts feront l’objet d’une réparation ou d’un remplacement gratuit
pièces et main-d’œuvre (à la discrétion de la Société). Pour obtenir une réparation ou un
remplacement aux termes de cette garantie, le produit, ainsi que tous les accessoires inclus
dans l’emballage d’origine, doit être livré en port payé à la Société accompagné d’une preuve
de couverture de garantie (p. ex. facture) et d’une description précise du ou des défauts à
l’adresse indiquée ci-dessous. Ne pas retourner ce produit chez le détaillant.
Cette garantie ne peut pas être transférée et ne couvre pas les produits achetés, réparés ou
utilisés à l’extérieur des États-Unis ou du Canada. La garantie ne couvre pas l’élimination de
l’électricité statique ou du bruit produit du dehors, ni les frais encourus pour l’installation,
l’enlèvement ou la réinstallation du produit. La garantie ne s’applique pas à tout produit
ou toute pièce du produit qui, de l’avis de la Société, a subi des dommages par suite d’une
modication, d’une installation incorrecte, d’une fausse manœuvre, d’un mauvais usage,
d’une négligence, d’un accident ou d’une exposition à l’humidité. Cette garantie ne s’applique
pas à des dommages causés par un adaptateur courant alternatif qui n’a pas été fourni avec
le produit ou lorsque des piles non rechargeables ont été laissées dans le produit alors qu’il
était branché à une prise secteur.
L’ÉTENDUE DE LA RESPONSABILITÉ DE LA SOCIÉTÉ AUX TERMES DE CETTE GARANTIE EST
LIMITÉE À LA RÉPARATION OU AU REMPLACEMENT INDIQUÉS CI-DESSUS ET NE PEUT EN AUCUN
CAS DÉPASSER LE PRIX PAYÉ PAR L’ACHETEUR POUR LE PRODUIT.
Cette garantie remplace toute autre garantie ou responsabilité explicite. TOUTE GARANTIE
TACITE, Y COMPRIS TOUTE GARANTIE TACITE DE QUALITÉ MARCHANDE OU D’ADAPTATION À
UN USAGE PARTICULIER, EST LIMITÉE À LA DURÉE DE CETTE GARANTIE. TOUTE ACTION POUR
VIOLATION DE TOUTE GARANTIE MENTIONNÉE DANS CE DOCUMENT, Y COMPRIS TOUTE GARANTIE
IMPLICITE, DOIT ÊTRE INTRODUITE DANS LES 24 MOIS QUI SUIVENT LA DATE DE L’ACHAT INITIAL.
LA SOCIÉTÉ NE SERA EN AUCUN CAS RESPONSABLE DE DOMMAGES INDIRECTS OU ACCESSOIRES
QUELS QU’ILS SOIENT. Aucune personne ou aucun représentant n’est autorisé à assumer
pour l’entreprise une quelconque responsabilité liée à la vente de ce produit autre que
celles exprimées dans ce document. Certaines provinces n’autorisent pas de limites quant
à la durée d’une garantie implicite ou quant à l’exclusion ou la limitation de dommages
accessoires ou indirects ; les limitations et exclusions indiquées plus haut pourraient donc
ne pas être opposables. Cette garantie confère des droits légaux spéciques et l’on peut
également jouir d’autres droits qui varient d’une province à l’autre.
États-Unis : Audiovox Electronics Corporation, 150 Marcus Blvd., Hauppauge, New York 11788
USA
CANADA : Audiovox Return Center, c/o Genco, 6685 Kennedy Road, Unit 3, Door 16,
Mississauga, Ontario L5T 3A5
Page 28

© 2009 Audiovox Accessories Corporation
111 Congressional Blvd., Suite 350
Carmel, IN 46032 USA
Audiovox Canada Limited
c/o Genco,
6685 Kennedy Road, Unit 3, Door 16,
Mississauga, Ontario, Canada L5T 3A5
www.araccessories.com
AWD205_NA_IB_02
Trademark(s) Registered
Marque(s) de commerce déposée(s)
All other brands and product names are trademarks
or registered trademarks of their respective owners.
Toutes les autres marques et tous les autres noms
de produits sont des marques de commerce ou des
marques déposées de leurs propriétaires respectifs.
 Loading...