


Portable Wireless
Indoor Speakers
Haut-parleurs
portables sans l
Model AW880 Modèle AW880
Installation and Operation Manual
Manuel d’installation et d’utilisation

CAUTION
RISK OF ELECTRIC SHOCK.
DO NOT OPEN.
Caution: To reduce the risk of electric shock, do not remove cover
(or back). No user serviceable parts inside. Refer servicing to qualied
service personnel.
WARNING: To reduce the risk of re or electric
shock, do not expose this product to rain or
moisture. The apparatus shall not be exposed to
dripping or splashing. No objects lled with liquids,
such as vases, shall be placed on the apparatus.
FCC Statement
This equipment has been tested and found to
comply with the limits for a Class B digital device,
pursuant to part 15 of the FCC Rules. These limits
are designed to provide reasonable protection
against harmful interference in a residential
installation. This equipment generates, uses, and can
radiate radio frequency energy and, if not installed
and used in accordance with the instructions, may
cause harmful interference to radio communication.
However, there is no guarantee that interference
will not occur in a particular installation. If this
equipment does cause harmful interference to radio
or television reception, which can be determined
by turning the equipment off and on, the user is
encouraged to try to correct the interference by
one or more of the following measures: (1) reorient
or relocate the receiving antenna, (2) increase the
separation between the equipment and receiver,
(3) connect the equipment into an outlet on a
circuit different from that to which the receiver is
connected, (4) consult the dealer or an experienced
radio/TV technician for help.
FCC Regulations state that unauthorized changes
or modications to this equipment may void the
user’s authority to operate it. Shielded cables must
be used with this unit to ensure compliance with the
Class B FCC limits.
Industry Canada Regulatory Information
Operation is subject to the following two conditions:
(1) this device may not cause harmful interference
and (2) this device must accept any interference
received, including interference that may cause
undesired operation. The user is cautioned that
this device should be used only as specied within
this manual to meet RF exposure requirements.
Use of this device in a manner inconsistent with
this manual could lead to excessive RF exposure
conditions.
This Class B digital apparatus complies with
Canadian ICES-003.
Important Safety Instructions
1. Read these instructions.
2. Keep these instructions.
3. Heed all warnings.
4. Follow all instructions.
5. Do not use this apparatus near water.
6. Clean only with dry cloth.
7. Do not block any ventilation openings. Install in
accordance with the manufacturer’s instructions.
8. Do not install near any heat sources such
as radiators, heat registers, stoves, or other
apparatus (including ampliers) that produce
heat.
9. Protect the power cord from being walked on
or pinched particularly at plugs, convenience
receptacles, and the point where they exit from
the apparatus.
10. Unplug this apparatus during lightning storms or
when unused for long periods of time.
11. Refer all servicing to qualied service personnel.
Servicing is required when the apparatus has
been damaged in any way, such as power-supply
cord or plug is damaged, liquid has been spilled
or objects have fallen into the apparatus, the
apparatus has been exposed to rain or moisture,
does not operate normally, or has been dropped.
Care and Maintenance
• Always use a soft cloth to clean the speakers and
transmitter. Never use any product containing
alcohol or other solvents as they may damage the
surface.
• Use caution when plugging the power transformers
in an AC outlet to avoid the risk of electric shock.
• Never expose the speakers or transmitter to rain
or moisture as this may cause damage. If the
speakers are used outside on a deck or patio,
make sure you take them indoors in the event of a
rainstorm to prevent possible damage.
• Do not operate or store the system in extreme
temperatures (below 32ºF/0ºC and above
122ºF/50ºC).
Product Information
Keep your sales receipt to obtain warranty parts
and service and for proof of purchase. Attach it
here and record the serial and model numbers in
case you need them. These numbers are located
on the product.
Model No.: ___________________________________
Purchase Date: _______________________________
Dealer/Address/Phone: ________________________

Table of Contents
Introduction ...........................................................................................1
Tour of the Speaker System ..............................................................2
Connecting the Speaker System ......................................................4
Adjusting the Transmitter ..................................................................6
Tuning the Speakers ............................................................................ 7
Turning the Speakers Off ................................................................... 8
More Helpful Information ...................................................................8
Troubleshooting ...................................................................................9
Specications ......................................................................................10
12 Month Limited Warranty...............................................................10
Introduction
AR’s Wireless Stereo Speakers eliminate the hardest part of adding speakers to
your home—running and hiding hundreds of feet of speaker wire. The AR Wireless
Speaker System’s RF signal travels with ease through walls, oors, ceilings and
other obstacles, delivering high-quality sound virtually anywhere inside the house
or out. With drift- and static-free reception along with outstanding range—up
to 150 feet*—the possibilities for enjoying your AR Wireless Speaker System
are nearly unlimited. The AR Wireless Speaker System is compatible with most
audio sources, such as TVs, DVD players, VCRs, A/V receivers/amps, stereos,
computers, and portable devices (CD players, cassette players, MP3s etc.).
This manual covers various connection options and detailed operating
instructions for making the AR Wireless Stereo Speakers a valued part of your
lifestyle. If, after having reviewed the instructions, you have any questions, please
call toll-free 1-800-732-6866 or visit www.araccessories.com.
*Range may vary according to environment.
1
2
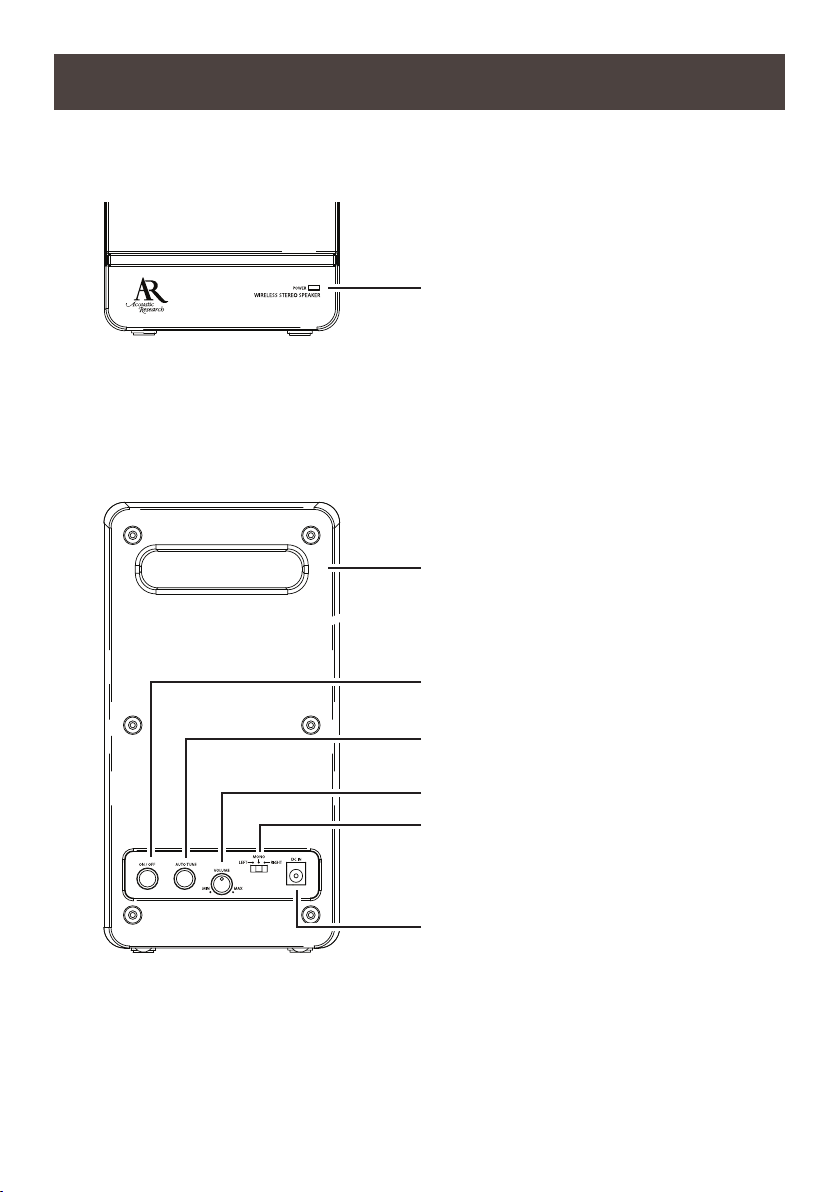
Tour of the Speaker System
Speaker Front View
POWER indicator lights red when the
speaker is rst powered on; it turns
blue when the speaker is tuned to the
transmitter
Speaker Back View
Carrying handle
ON/OFF button turns the speaker on
and off
AUTO TUNE button rescans for the
transmitter’s signal
VOLUME knob adjusts the volume level
LEFT/MONO/RIGHT switch determines
if the speaker plays the left or right
track in a stereo pair, or plays sound in
mono as a stand-alone speaker
DC IN receives the small round end
of one of the included 18V 500mA AC
power adapters
3
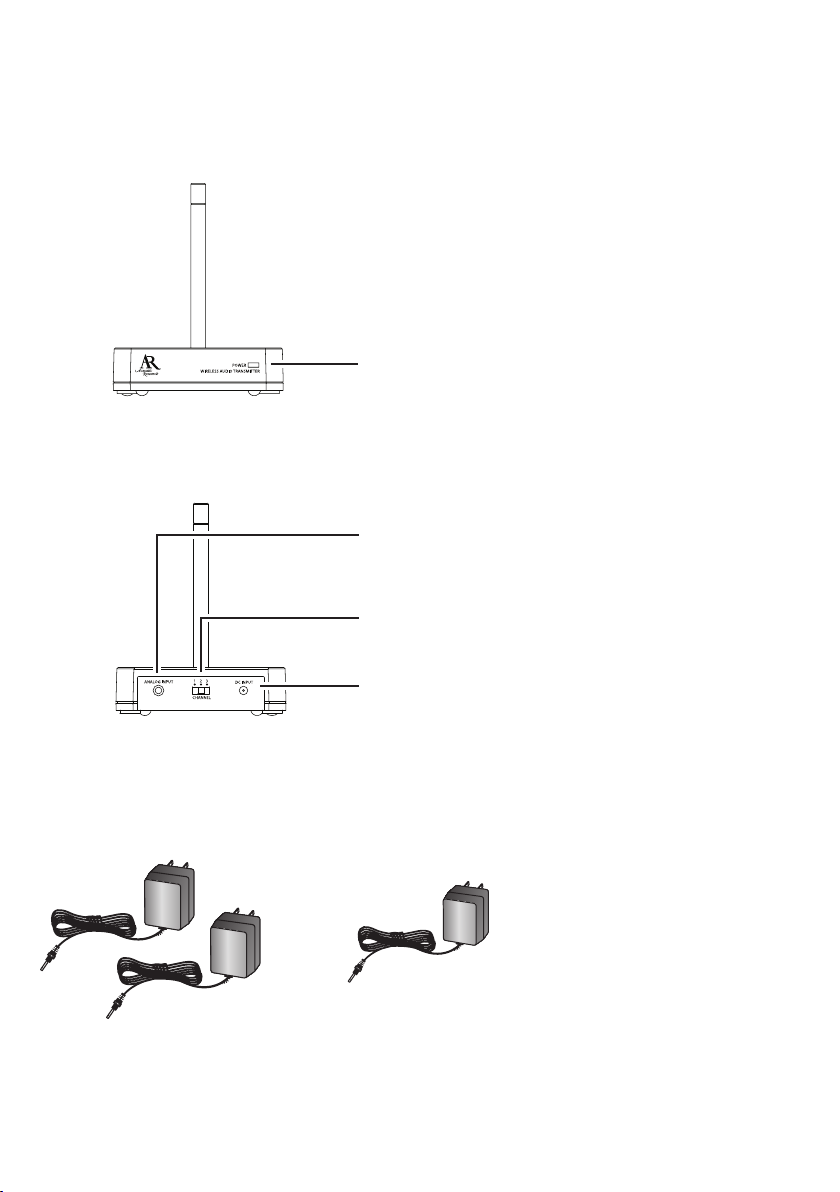
Transmitter AC/DC 12V
100mA adapter
Speaker AC/DC 18V
500mA adapter (x2)
Transmitter Front View
Transmitter Back View
POWER indicator lights blue when audio is
present and the transmitter is broadcasting
Built-in audio input cable connects to your
sound source using one of the connection
options shown on the next pages
CHANNEL select switch lets you nd
the best transmission frequency for your
environment
DC INPUT input jack receives the small
round end of the included 12V 100mA AC
power adapter
Included Accessories
Note: These power units should be plugged in so that they stay vertical or lie at.
4
Connecting the Speaker System
Transmitter
AC Power
Adapter
120V AC
wall outlet
Transmitter
A/V Receiver
Audio Input Cable
“Y” adapter cable
(not included)
Audio Output
Transmitter
Audio
Input Cable
Audio
source
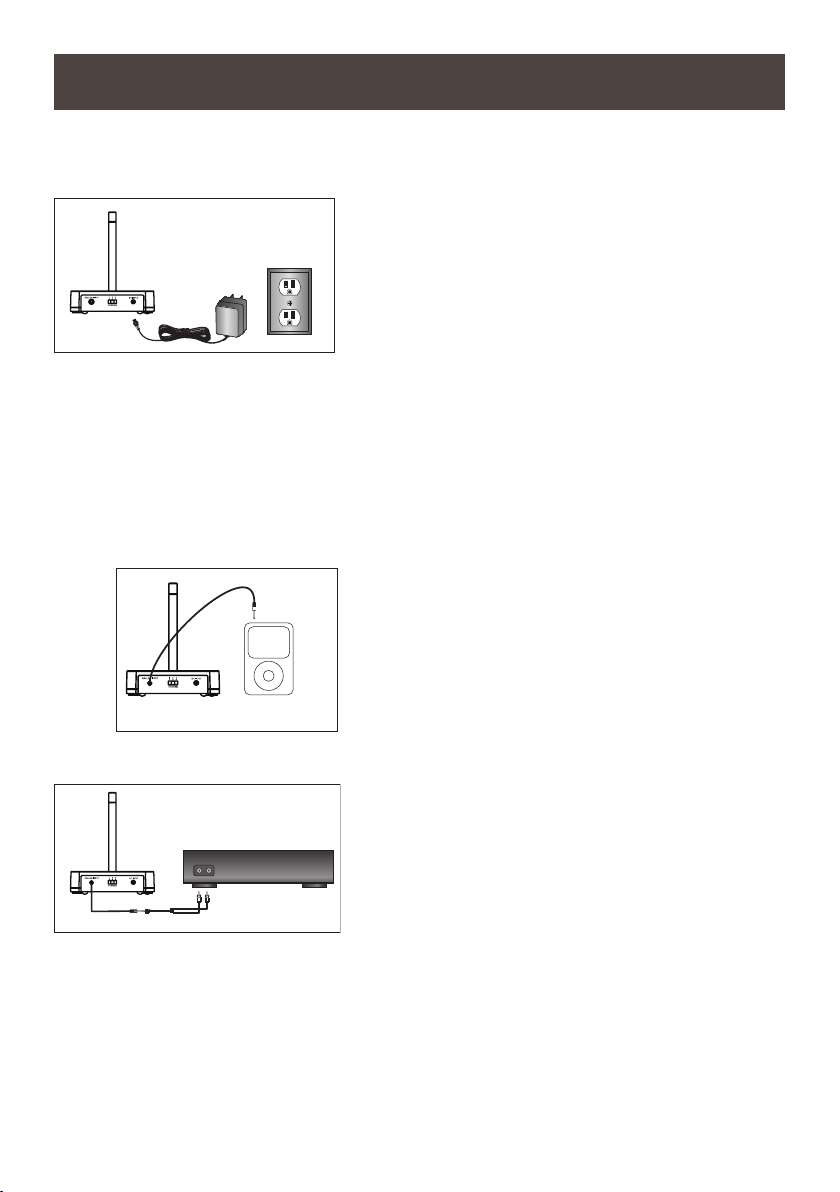
Powering the Transmitter
Connect the small, round plug from the
transmitter AC power adapter to the
transmitter’s power input jack. Plug the other
end of the transmitter AC power adapter into
any standard 120V AC wall outlet.
Note: Be sure to use the AC power adapter rated 12V DC 100 mA.
Note: There is no transmitter ON/OFF switch. The transmitter is designed to be
left plugged in and powered at all times. If you will not be using the AW880 for an
extended period of time, unplug the transmitter AC power adapter.
Connecting to an Audio Source
Connecting to an MP3 player, CD
player, or computer
Plug the cable coming out of the transmitter
into the headphone output of your MP3 player
or CD player (or the audio output jack on your
computer).
Connecting to an A/V Receiver
1. Connect a “Y” adapter cable (not included)
to the 3.5mm mini-plug cable coming out of
the transmitter.
2. Connect the left (white) and right (red)
audio plugs on the ”Y” adapter cable to the
corresponding left and right audio outputs of
your A/V receiver, amp or other audio source.
Warning: This product is designed to work with line level outputs or headphone
outputs only. DO NOT connect it directly to speaker outputs as it will permanently
damage the transmitter.

5
Speaker
120 V AC
Wall Outlet
AC Power adapter
Powering the Speakers
1. Turn the speaker volume down by rotating
2. Insert the small, round plug from the
3. Plug the other end of the speaker AC power
Note: Be sure to use the speaker AC power
adapter rated 18V DC 500 mA.
Warning: This product is not water resistant. To
avoid electrical shock, it should not be used near
water sources if powered with the AC adapter.
Never submerge in water.
the VOLUME control on the back of the
speaker all the way to MIN.
speaker AC power adapter into the speaker
power input jack.
adapter into any standard 120V AC wall
outlet.
6
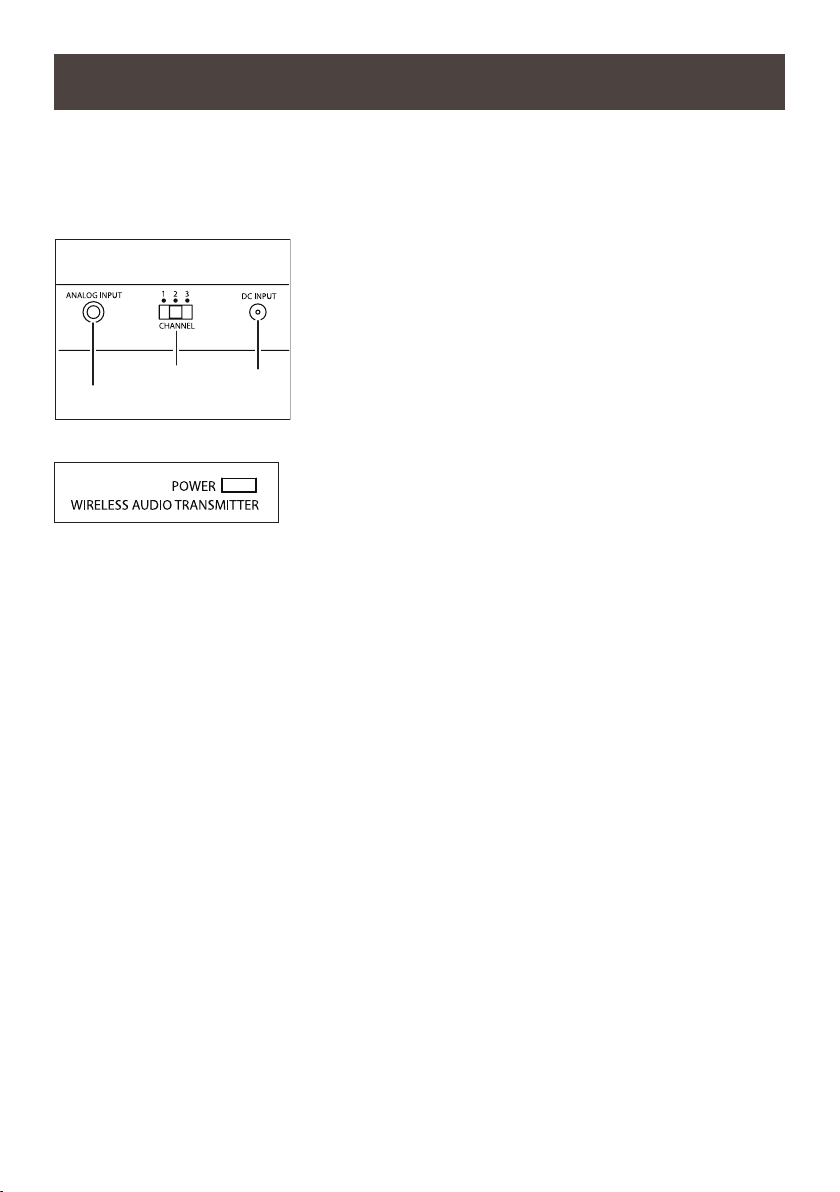
Adjusting the Transmitter
Transmitter
power
input jack
Built-in audio
input cable
CHANNEL
select switch
1. Turn on your audio source (for example, A/V
receiver, TV, stereo, etc.) and play music at a
normal listening volume.
2. Set the CHANNEL select switch on the back of
the transmitter to one of the transmitter’s three
broadcast frequencies: 1, 2 or 3. If you experience
poor reception or interference, try choosing a
different frequency by moving the channel select
switch to another position.
Transmitter Back View
When the transmitter is receiving an audio signal
and is ready, the POWER light on its front turns
Transmitter Front View
steady blue.
Note
If the light on the front of the transmitter keeps
ashing or does not turn on, please check the
following:
- Conrm the transmitter AC power adapter is
securely connected.
- Conrm the cable from the transmitter is
securely connected to the audio source output
(TV, A/V receiver, etc.).