


Acoustic Energy Wi-Fi radio Owners manual

OWNER’S MANUAL
English
Deutsch
Español
Fançais
Русский
汉语
I n t e r n e t R a d i o
English
Radio Controls
Radiokontrollen
Controles de Radio
Commandes par Radio
Radio управление
无线电控制

English
Page Section
1 1 Introduction
1 2 Switching-on and Off and
Adjusting Volume
2 3 Connecting the Radio to a
Wireless Network.
2 4 Selecting Radio Stations
3 5 Saving and Playing Radio
Station Presets
3 6 Listening to On Demand
Content
4 7 Setting the Clock
4 8 Setting the Alarm
4 9 Interrogating the Current
Alarm Setting
5 10 Listening to Windows Media
Player via Radio
6 11 The Radio Configure Menu
7 12 Troubleshooting
7 13 Licence Information and
Warranty
To be able to use the radio a broadband internet
connection and a wireless access point (Wi-Fi)
connected to your broadband internet, preferably
via a router, is required.
Note: If the wireless network is configured to use
Wired Equivalent Privacy (WEP) or Wi-Fi Protected
Access (WPA) data encryption then the WEP or
WPA password will be needed to enable the radio
to communicate with the network.
Before commencing setup make sure that the
wireless access point equipment is switched on and
connected to broadband internet. The instructions
supplied with the wireless access equipment may
be required.
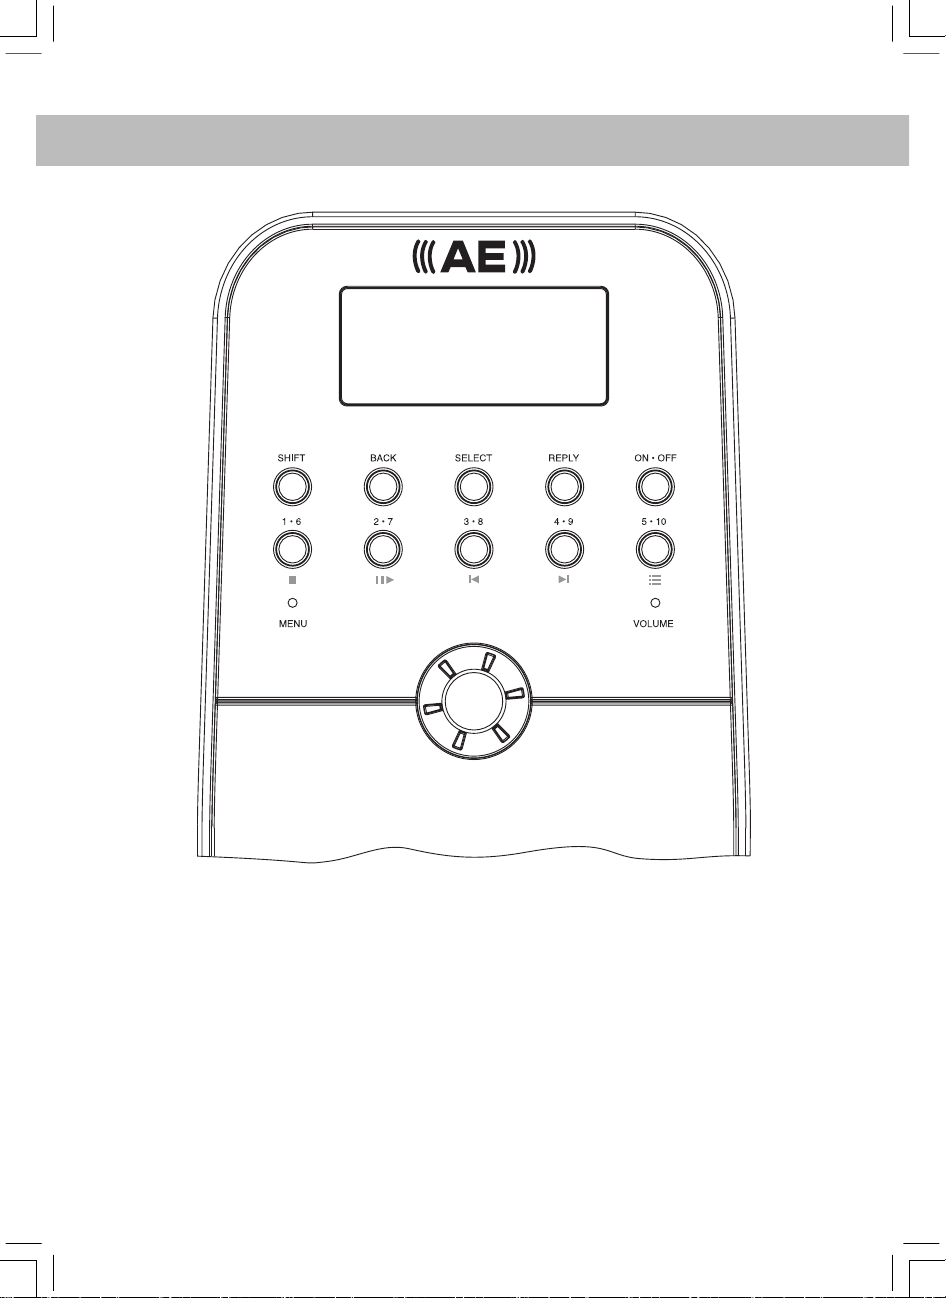
The radio controls referred to in the following
pages are illustrated in the diagram.
1. Introduction
1
2. Switching-on and Off And Adjusting
Volume
First plug the mains adaptor into a wall socket and
its cable into the socket on the radio labeled 7.5V
DC on the back of the radio.
Note: Use only the mains adapter supplied with
the radio. Using a different adaptor may cause
permanent damage to the radio and could be
hazardous.
In use, the radio can be switched on or off with the
standby button. If switched off using the standby
button, the radio will take 10 seconds or so to start
playing when switched on again. If switched off at
the mains, the radio will take up to 60 seconds to
start playing when switched on again. When the
radio is in standby mode it displays the time. See
section 7, “Setting the clock”.
Contents

EnglishEnglish
2
3. Connecting the Radio to a Wireless
Network.
When first switched-on the radio display will
illuminate and show:
Reciva Radio
ARM Powered
After a few seconds, the display will show:
Waiting For
Connection
followed by:
<Select Network>
When the display shows <Select Network>, press
the select button and proceed as follows. Note: If
necessary press the back button to return to the
previous display.
The display on the front of the radio now shows:
<Scan>
Press the select button again and the display will
now show:
Scanning
The radio looks for a connection to a wireless
network. If it can’t find one the display will show:
No Wireless
Networks Found
If no network is found refer to the instructions
supplied with the wireless access equipment and
check that it is operating and setup appropriately.
When the radio finds a wireless network, it displays
the network name (the ESSID) on the display. The
name would have been allocated to the network
access point by the person who set up the network.
For example:
10 Sandwich Gdns
It is possible (and in some locations highly likely)
that the radio will find more than one wireless
access point. Turn the knob on the radio to show
the names for each access point that the radio has
found. When the name for the desired access point
is shown on the display, press the select button.
If the network is not configured to need a WEP
password, the display should show:
Waiting For
Connection
then:
Wireless
Network OK
If the display briefly shows <Enter WEP Key> the
network is using a security encryption system
(either Wired Equivalent Privacy or Wi-Fi Protected
Access) and the correct WEP or WPA password
must be entered to gain access. The password
will be known only to the person who set up the
network in the first place.
The display will automatically enter the password
entry mode. To enter the password, use the
knob to select each character of the code in turn,
pressing the select button after each character.
Note: WEP and WPA passwords are case sensitive
and must be entered correctly. After the final
character, use the knob to select the end character
then press the select button. The radio should now
be able to connect to the network. The display will
show:
Wireless
Network OK
If the display again shows <Enter WEP Key> an
incorrect password has probably been entered.
4. Selecting Radio Stations
Note: If necessary press the back button to return
to the previous display.
4.1 Press the select button. The display will show:
<Stations>
If the display does not show <Stations> turn the
knob until it does.
4.2 Press the select button and turn the knob to
select from <Location> or <Genre>.
<Location> displays a list of continents from which
you can chose the desired country. <Genre>
displays all the available internet radio stations
identified with specific genres (rock, classical,
speech, etc).
Press the select button to select the desired option.

EnglishEnglish
3
4.3 If <Location> is selected turn the knob
to select from <Africa>, <Americas>, <Asia>,
<Europe>, <All Countries> and press the select
button.
Once the location has been selected turn the knob
until the display shows the desired country and
press the select button. Next turn the knob until
the display shows the desired station and press
the select button. After a short while the radio will
connect to the station.
4.4 If <Genre> is selected turn the knob until the
display shows the desired genre and press the
select button. Next turn the knob until the display
shows the desired station and press the select
button. After a short while the radio will connect to
the station.
Note: Some radio stations do not broadcast 24
hours a day, and some stations are not always
on-line. If a particular station that is known to be
broadcasting on-line is not listed as available on
the radio an update request can be made at: http:
//www.reciva.com/ and request it be added.
Note: If the station has on-demand content
(that is, it provides the option of listening to
programmes which have already been broadcast),
it will not begin playing immediately but will
request selection of either <Listen Now> or <Listen
Again>. see Section 6 “Listening to On-demand
Content”.
5. Saving and Playing Radio Station
Presets
5.1 To save a specific radio station as a preset, hold
down one of the preset buttons (1 to 8) while the
station is playing until the display shows:
Assigned to
Preset #
Note: # refers to the preset button number.
5.2 Playing a preset radio station
When a radio station is playing, briefly press the
preset button (1 to 8) for the desired station.
Note: Be careful not to hold the button down
otherwise a desired preset may be overwritten.
6. Listening to On demand Content
Some radio stations provide access to programmes
that have already been broadcast. When such
a station is selected it will not start playing
immediately but instead the display shows:
< Listen Now >
< Listen Again >
Turn the knob to select <Listen Now> or <Listen
Again>, then press the select button. If <Listen
Now> is selected then the radio plays the current
broadcast as normal.
If <Listen Again> is selected more displays
are shown that enable selection of specific
programmes. What is shown will depend on the
station selected - the following steps are guide only.
When <Listen Again> is selected the display shows
a list of programmes available. Turn the knob to
select the programme desired and press the select
button. The radio will now either begin to play or
the display may show a list of specific broadcast
dates to select from. Use the knob to select the
date of the desired programme and press the
select button.
After the date has been selected, a start time may
be selected. Set a desired programme Start Time
(i.e the desired point during the programme) using
the knob and press the select button. Start Time
selection will be different for each station. For
example, on BBC stations Start Times can only be
incremented by 5 minutes at a time.

EnglishEnglish
4
Programmes which allow Start Time selection also
enable fast-forward and rewind while the radio
is playing. Pressing the select button shows the
programme elapsed time. Turn the knob to change
this time, up or down in 1 minute intervals. Press
the select button again to play the programme
from that point.
7. Setting the Clock
The radio incorporates a clock that should be set to
the correct local time. To set the clock first Press the
select button and proceed as follows.
Note: If necessary press the back button to return
to the previous display.
Turn the knob until the display shows:
<Configure>
Press the select button and turn the knob until the
display shows:
<Clock>
Turn the knob until the display shows:
<Set Time>
Press the select button. The display will show the
radio’s current time setting. For example:
Set Time
14:03
Turn the knob to set the hours and press the select
button. Turn the knob again to set the minutes
and again press select. The display will briefly show
(for example:):
Time Set
15:06
8. Setting the Alarm
The radio incorporates an alarm function that
switches the radio on from Standby. The last
selected station will play (assuming it is on-line). If
the station is off-line or the network has a fault then
a buzzer will sound as the alarm. To set the alarm
first Press the select button and proceed as follows.
Note: If necessary press the back button to return
to the previous display.
Turn the knob until the display shows:
<Configure>
Press the select button and turn the knob until the
display shows:
<Clock>
Turn the knob until the display shows:
<Set Alarm>
Press the select button. The display will show the
alarm options.
<Enable Alarm>
Yes/No
Turn the knob to swap between Yes and No and
press the select button. If No is selected the alarm
is disabled. The display will briefly show:
Alarm is Off
If Yes is selected the display will show the radio’s
current time setting. For example:
Set Alarm
14:03
Turn the knob to set the hours and press the select
button. Turn the knob again to set the minutes
and again press select. The display will briefly show
(for example:):
Alarm Set
15:06
9. Interrogating the Current Alarm
Setting
To interrogate the current alarm setting press the
select button and proceed as follows.
Note: If necessary press the back button to return
to the previous display.
Turn the knob until the display shows:
<Configure>
Press the select button and turn the knob until the
display shows:
<Clock>
Turn the knob until the display shows:
<Current Alarm>
Press the select button. The display will briefly show
the radio’s current alarm setting. For example:
Current Alarm
07:45 (On)

EnglishEnglish
5
Windows Media Player enables the playback of
audio files (.MP3,.WMA) and playlists (.M3U)
stored on a networked PC. These files can be
“broadcast” to the internet radio via the wireless
access equipment. It has been verified to work on
Windows 2000 and Windows XP.
10.1 To set up the Windows PC to allow the radio
to replay stored audio files proceed as follows.
Using Windows Explorer, locate the folder where
the audio files are stored. Right click on the folder.
Select “Properties”.
Click on “Sharing”.
Select both “Share this folder on the network”
and “Allow network users to change my files”.
10.2 To locate the PC audio files using the radio
proceed as follows. Switch on the radio and wait for
Stations to be shown or for playback to start. Press
the back button repeatedly until Stations is shown.
Turn the knob until the display shows
<Media Player>
Press the select button. The display will show:
<Search>
Press the select button. The display will show:
<Select Share>
Press the select button. The display will show:
Finding Shares
A rotating bar will be shown while the search is
in progress. When the search is complete a list of
shares will be shown. Turn the knob to highlight
the correct share.
Press the select button. The radio will search for
shared folders. Turn the knob to highlight the
correct folder.
Press the select button. The display will show:
File Scan
Text on the bottom row of the display will change
to indicate that the file scan is in progress. If a large
number of audio files are stored this could take
10. Listening to Windows Media Player
via Radio
several minutes to complete. When the file scan is
complete the display will show:
<Playlists>
Note: The first time the file scan is done a file
called.reciva_media_cache is written to the folder
where the audio files are stored. This is in order to
speed up subsequent file scans.
10.3 To listen to a single track proceed as follows.
Turn the knob until <By Artist> is shown and press
the select button.
Turn the knob until the desired artist is shown and
press the select button.
Turn the knob until the desired album name is
shown and press the select button.
Turn the knob until <Select Tracks> is shown and
press the select button.
Turn the knob until the desired track is shown and
press the select button.
Turn the knob until <Play Now> is shown and
press the select button. The track will begin
playing.
10.4 Further playback and playlist options.
Selecting alternative menu options when <By
Artist> is shown enables playback of complete
albums. Select an album then turn the knob to
select <Replace Queue>. Single tracks may also
be lined-up in a queue while the radio is playing.
Select a specific track then turn the knob until
<Add to Queue> is shown. Selecting <Play Next>
will slot the track into the next play slot ahead of
any track already scheduled to play next. Complete
albums may also be added to a queue. Select the
album and then select <Add to Queue>.
10.5 Controlling Playback
Use the stop button to stop playback.
Use the play/pause button to either pause a
currently playing track or to restart a currently
paused track or to restart a stopped track.
Use the skip to previous track button to start
playback of the previous track in the queue.
Use the skip to next track button to start playback
of the next track in the queue.

EnglishEnglish
10.6 Browsing Tracks
Press the browse button to show the currently
playing track name. Turn the knob to see which
tracks are queued for playback. To jump to a
particular place in the queue press the select
button when the desired track is shown.
10.7 To play tracks randomly proceed as follows.
Select the individual tracks as described previously.
Navigate to top level menu item <Media Player>
using the select and back buttons.
Press the select button and turn the knob until
<Playback Mode> is shown.
Press the select button.
Turn the knob until <Shuffle> is shown and press
the select button.
Turn the knob to select yes/no to confirm that
shuffle mode should be enabled.
10.8 To play tracks in the queue repeatedly
proceed as follows.
Select the individual tracks as described previously.
Navigate to the top level menu item <Media
Player> using the select and back buttons and
press the select button.
Turn the knob until <Playback Mode> is shown
and press the select button.
Turn the knob until <Repeat> is shown and press
the select button.
Turn the knob to select yes/no to confirm that
repeat mode should be enabled.
11. The Radio Configure Menu
The configure menu enables selection of radio
setup items. To choose the desired option proceed
as follows.
Note: If necessary press the back button to return
to the previous display.
Press the select button and turn the knob until the
display shows:
<Configure>
Press the select button and turn the knob until the
display shows the desired option. The following
options are available:
<Load Stations>
<Clock>
<Upgrade SW>
<Factory Reset>
<Network Config>
<Version>
Press the select button to select the desired option.
<Load Stations>
Use this option to download an updated list of
radio stations from the internet.
<Clock>
Use this option to set the time, to set an alarm and
to view the current alarm setting.
<Upgrade Software>
Use this option to download new software for the
radio from the Reciva portal on the internet. This
may take several minutes - do no switch off the
power to the radio until the operation is complete.
<Factory Reset>
Puts all the settings back to their defaults as they
were when they left the factory. Only do this if the
radio display has locked up and will not operate
- all the stored presets and wireless network
connection setup will be lost.
<Network Config>
Enables scanning for connection to another wireless
network, or manually to configure the network
parameters. Use this if the radio is moved to
another building.
<Version>
Displays the versions numbers of the various parts
of software and hardware on the internet radio.
6

EnglishEnglish
please go to our web site on www.acousticenergy.co.uk and follow the links for customer
support.
12. Troubleshooting
If problems occur when connecting the radio to
the wireless network, these steps may help to
resolve them:
12.1 Confirm that a Wi-Fi connected PC can access
the Internet (i.e. can browse the web) using the
same network.
12.2. Check that a DHCP server is available, or that
a static IP address is configured on the radio.
12.3. Check that a firewall is not blocking any
outgoing ports. As a minimum the radio needs
access to UDP and TCP ports 80, 554, 1755, 5000
and 7070.
12.4. Check the access point does not restrict
connections to particular MAC addresses. The
radio’s MAC address can be viewed using the
menu item Configure -> Network Config -> View
Config -> MAC address.
12.5 If the network is encrypted check that the
correct password has been entered into the radio.
Remember that the password is case sensitive.
12.6. If the radio connects to the network
successfully, but is unable to play a particular
station (or stations), this may be due to one or
more of the following:
The station is not broadcasting (remember it may
be located in a different time zone).
The station has reached the maximum allowed
number of simultaneous listeners.
The station is not broadcasting anymore.
The link held by the radio to the station is out of
date.
The Internet connection between the server (often
located in a different country) and the radio is too
slow.
Try using a PC to play the programme via the
station’s web site. If the station plays successfully
use the form at http://www.reciva.com/stations/
add_station.asp to notify us so that we can change
the station data that is used by the radio.
12.7 For further troubleshooting information and
details of more in-depth user functions and settings
13. Licence Information and Warranty
This product contains software licensed under
version 2 of the GNU Public License and version
2.1 of the GNU Lesser Public License, The source
code for this software is available from: http://
www.reciva.com/gpl/
This product includes technology owned by
Microsoft Corporation and under a licence from
Microsoft Licensing GP. Use or distribution of such
technology outside of this product is prohibited
without a license from Microsoft Corporation and/
or Microsoft Licensing, GP as applicable.
Your Acoustic Energy Internet Radio is guaranteed
against original defects in materials, manufacture
and workmanship for one year from the date of
purchase.
Under this warranty Acoustic Energy agrees to
repair any defect or, at the company’s discretion,
replace the faulty component(s) without charge
for parts or labour. This warranty does not imply
any acceptance by Acoustic Energy or its agents
for consequential loss or damage and specifically
excludes fair wear and tear, accident, misuse or
unauthorised modification.
This warranty is applicable in the United Kingdom
only and does not in any way limit the customer’s
legal rights. Claims and enquiries under the
warranty for Acoustic Energy products purchased
outside the UK should be addressed to the local
importers or distributors. If you have reason to
claim under the warranty please contact your
dealer in the first instance.
Please retain all original packaging materials for
possible future use. We suggest that you complete
details of purchase now and keep this information
in a safe place for future reference.
7

DeutschDeutsch
8
Seite Abschnitt
8 1 Einleitung
8 2 Ein- und Ausschalten und
Einstellen der Lautstärke
9 3 Das Radio an ein kabelloses
Netzwerk anschließen
10 4 Radiosender wählen
10 5 Speichern und Abrufen
von vorprogrammierten
Radiosendern
10 6 Abrufen von gewünschten
Programmen
11 7 Uhrzeit einstellen
11 8 Alarm einstellen
12 9 Überprüfen der aktuellen
Alarmeinstellung
12 10 Windows Media Player über
Radio hören
14 11 Das Radio - Einstellungsmenu
14 12 Störungsbehebung
15 13 Software Lizenz -Information
Um dieses Radio benutzen zu können ist ein
Broadband Internet-Anschluss und ein Wireless
Access Point (Wi-Fi) (kabelloser Anschlusspunkt)
erforderlich, der mit Ihrem Broadband Internet vorzugsweise durch einen Router - verbunden ist.
Hinweis: Wenn das Wireless Network so
konfiguriert ist, dass Wired Equivalent Privacy
(WEP) oder Wi-Fi Protected Access (WPA) Daten
Verschlüsselung (Data Encryption) benutzt werden
kann, dann wird das WEP oder WPA - Passwort
benötigt, damit das Radio mit dem Netzwerk
kommunizieren kann.
Vor in Gebrauchnahme muss sichergestellt
werden, dass das Wireless Access Point - Zubehör
eingeschaltet ist und an das Broadband Internet
angeschlossen ist.
Dazu werden eventuell die Instruktionen, die Sie
für das Wireless Access - Zubehör erhalten haben,
benötigt.
Die nachfolgend beschriebenen Radio
Bedienungselemente finden Sie im unten
aufgeführten Diagramm.
Inhalt
1. Einleitung
2. Ein- und Ausschalten und Einstellen
der Lautstärke
Stecken Sie das Netzgerät in eine Wandsteckdose
und das Kabel in die dafür vorgesehene Buchse auf
der Rückseite des Radios, mit 7.5V DC markiert.
Hinweis: Benutzen Sie nur das mit dem Radio
gelieferte Netzgerät. Ein anderer Adaptor kann
dauerhaften Schaden verursachen und gefährlich
sein.
Während des Gebrauchs kann das Radio mit dem
‘Standby’- Knopf an- und aus geschaltet werden.
Wenn es mit dem ‘Standby’- Knopf ausgeschaltet
wurde, wird das Radio nach Wiedereinschalten erst
nach 10 Sekunden spielen.
Wird es am Hauptschalter ausgeschaltet, dauert es
60 Sekunden nach Einschalten, bis das Radio spielt.
Das Radio zeigt im ‘Standby’- Modus die Zeit an.
Siehe Abschnitt 7, Zeit einstellen.

DeutschDeutsch
9
Drehen Sie den Knopf am Radio so, dass jeder der
gefundenen Access Point - Namen angezeigt wird.
Wenn der gewünschte Name erscheint, drücken Sie
den select - Knopf.
Wenn das Netz so konfiguriert ist, dass es kein WEP
- Passwort braucht, zeigt das Display:
Waiting for
Connection
(auf Verbindung warten)
Danach:
Wireless
Network ok
(kabelloses Netz ok)
Wenn das Display kurz anzeigt <Enter WEP key>
benutzt das Netz eine Sicherheitsverschlüsselung
(entweder Wired Equivalent Privacy oder Wi-Fi
Protected Access) und das korrekte WEP or WPA
-Passwort muss eingegeben werden, um Zugang
zum Netz zu erhalten. Das Passwort ist nur der
Person bekannt, die das Netzwerk zum ersten Mal
eingerichtet hat.
Das Display zeigt automatisch die Passwort Eingabe
an. Für das Passwort benutzen sie den Knopf, um
jeden Buchstaben Ihres Codes einzugeben, nach
jedem Buchstaben drücken Sie den select -Knopf.
Hinweis: WEP und WPA - Passwörter sind exakt in
Groß - oder Kleinbuchstaben einzugeben. Nach
dem letzten Schriftzeichen wählen Sie mit dem
Knopf das end - Zeichen und drücken den select
Knopf. Das Radio müsste nun in der Lage sein, eine
Verbindung zum Netz herzustellen. Das Display
zeigt:
Wireless
Network ok
Wenn das Display noch einmal <Enter WEP key>
anzeigt, wurde wahrscheinlich ein inkorrektes
Passwort eingegeben. Wiederholen Sie den
Vorgang noch einmal.
Wenn das Radio das erste Mal eingeschaltet wird,
leuchtet die Anzeige auf und es erscheint:
Reciva Radio
ARM Powered
Nach ein paar Sekunden zeigt die Anzeige:
Waiting for
Connection
(Wartet auf Verbindung)
Und danach:
<Select Network>
(Netz auswählen)
Wenn das Display zeigt <Select Network> , drücken
Sie den select - Knopf und verfahren wie folgt:
Hinweis: Wenn notwendig, drücken Sie den back -
Knopf um zur vorherigen Anzeige zurückzukehren.
Die Leuchtschrift-Anzeige des Radios zeigt jetzt:
<Scan>
Drücken Sie den select - Knopf und die Anzeige
zeigt:
Scanning
Das Radio sucht nach einer Verbindung zu einem
kabellosen Netz. Wenn es keinen findet, erscheint
die Anzeige:
No Wireless
Networks Found
(keine kabellosen Netze gefunden)
Wenn kein Netz gefunden wurde, beziehen Sie sich
bitte auf die Instruktionen, die Sie mit dem Wireless
Access - Zubehör erhalten haben und prüfen Sie,
dass es funktioniert und korrekt installiert wurde.
Wenn das Radio ein kabelloses Netz findet, zeigt es
den Namen des Netzes (ESSID) auf dem Display an.
Der Name für den Network - Access Point wurde
von der Person vergeben, die das Netz eingerichtet
hat. Zum Beispiel:
10 Sandwich Gdns
Es ist möglich (und in einigen Gegenden sehr
wahrscheinlich), dass das Radio mehr als einen
Wireless Access Point (kabellosen Zugang) findet.
3. Das Radio an ein kabelloses Netzwerk
anschließen

DeutschDeutsch
10
Hinweis: Wenn notwendig drücken Sie die Taste
back, um zum vorherigen Display zurückzukehren.
4.1 Drücken Sie den select - Knopf. Auf dem
Display sehen Sie:
<Stations>
Wenn auf dem Display nicht <Stations> erscheint,
drehen Sie den Knopf so lange bis es erscheint.
4.2 Drücken Sie den select - Knopf, drehen ihn
und wählen von <Location> oder <Genre>.
<Location> zeigt eine Liste der Kontinente an,
von denen Sie das gewünschte Land auswählen
können.
<Genre> zeigt alle verfügbaren Radiosender mit
spezifischen Genres (Rockmusik, Klassische Musik ,
Rede, usw. an.)
Drücken Sie den select - Knopf für die gewünschte
Kategorie.
4.3 Wenn <Location> gewählt wurde, drehen Sie
den Knopf, um <Afrika>, <Amerika>, <Asien>,
<Europa>, <Alle Länder> zu wählen und drücken
Sie den select – Knopf.
Wenn Sie <Location> gewählt haben, drehen
Sie den Knopf bis das Display das gewünschte
Land zeigt und drücken Sie den select - Knopf.
Dann drehen Sie den Knopf bis das Display den
gewünschten Sender anzeigt und drücken select.
Nach einer kurzen Weile hat das Radio Verbindung
mit dem Sender hergestellt.
4.4 Wenn <Genre> gewählt wurde, drehen Sie
den Knopf bis das Display das gewünschte Genre
anzeigt und drücken select. Dann drehen Sie
den Knopf bis das Display den gewünschten
Sender anzeigt und drücken select. Nach einer
kurzen Weile hat das Radio Verbindung mit dem
gewünschten Sender hergestellt.
Hinweis: Manche Radiosender senden nicht 24
Stunden pro Tag, und manche sind nicht immer
on-line. Wenn ein bestimmter Sender dafür bekannt
ist, on-line zu senden, jedoch nicht aufgelistet ist,
dann können Sie ihn aktualisieren lassen über:
http//www.reciva.com/ und bitten um Aufnahme
in die Liste.
Hinweis: Wenn der Sender “Programm nach
Wunsch’’ hat (das heißt, es bietet Ihnen an,
die Programme zu hören, die bereits gesendet
wurden), beginnt das Programm nicht sofort,
sondern es erfragt die Wahl <Listen Now> (jetzt
hören) oder <Listen Again> (nochmal hören).
Siehe Kapitel 6 “Nach Wunsch hören “.
4. Radiosender wählen
5. Speichern und Abrufen von
vorprogrammierten Radiosendern
5.1 Um einen spezifischen Radiosender zu
speichern, drücken Sie einen der Preset - (Vorwahl)
Knöpfe (1 - 8 ) während der Sender spielt bis das
Display anzeigt:
Assigned to
Preset #
Hinweis: # bezieht sich auf die Nummer des
Vorwahl- Knopfes.
5.2 Abrufen einer Vorwahlsendung
Wenn ein Radiosender spielt, drücken Sie kurz den
Preset - Knopf (Vorwahlknopf) (1 - 8) für den
jewels gewünschten Sender.
Hinweis: Denken sie daran, den Knopf nicht zu
halten (nur kurz drücken), ansonsten wird die
Vorwahl überschrieben.
6. Abrufen von gewünschten
Programmen
Einige Radiosender bieten Zugang zu Programmen,
die zu einem früheren Zeitpunkt gesendet wurden.
Solch ein Sender wird nicht sofort senden, sondern
das Display zeigt an:
<Listen Now>
<Listen Again>
Drehen Sie den Knopf bis zur Wahl <Listen Now>
oder <Listen Again> und drücken Sie dann den
select - Knopf. Wenn <Listen Now> gewählt
wurde, spielt das Radio ganz normal die derzeit
ausgestrahlte Sendung.
Wenn <Listen Again> gewählt wurde, zeigt das
Display eine Auswahl von spezifischen Programmen
an. Die Anzeige erfolgt je nach dem gewählten
Sender - die folgenden Schritte sind nur als Hinweis
gedacht.

DeutschDeutsch
11
Wenn <Listen Again> gewählt wird, erscheint
auf dem Display eine Auswahl an verfügbaren
Programmen. Drehen Sie den Knopf bis zu ihrem
gewünschten Programm und Drücken Sie select.
Das Radio spielt entweder sofort oder das Display
zeigt eine Liste mit spezifischen Sendedaten zur
Auswahl. Wählen sie das Datum des gewünschten
Programms mit dem Knopf und drücken Sie
select.
Nachdem Sie das Datum gewählt haben, können
Sie die Zeit wählen. Programmieren sie eine
gewünschte Zeit (das heißt, die gewünschte Zeit
innerhalb des Programms) mit dem Knopf und
drücken Sie select. Die Wahl der Sendezeit ist für
jeden Sender anders. Zum Beispiel, die Startzeit
bei BBC kann jeweils nur in 5 Minuten Abständen
erfolgen.
Programme, welche eine Startzeit - Wahl anbieten,
können auch vor- oder zurückgespult werden
während das Radio spielt. Wenn Sie den select
- Knopf drücken, können Sie die abgespielte Zeit
ersehen. Durch Drehen des Knopfes können Sie
diese Zeit im 1-Minuten - Intervall ändern. Drücken
Sie den select - Knopf nochmals, um die Sendung
7. Uhrzeit einstellen
Das Radio hat eine Uhr, welche auf die
entsprechende lokale Uhrzeit eingestellt werden
sollte. Um die Uhr einzustellen, drücken Sie den
select Knopf und verfahren wie folgt.
Hinweis: Wenn notwendig drücken sie den
back Knopf um auf das vorherige Display
zurückzukehren.
Drehen sie den Knopf bis im Display erscheint:
<Configure>
Drücken sie den select Knopf. Drehen sie den
Knopf bis im Display erscheint:
<Clock>
Drücken sie den select Knopf.
Drehen sie den Knopf bis im Display erscheint:
<Set Time>
Drücken sie den select Knopf. Das Display zeigt die
derzeitige Radiozeit an, z.B.
Set Time
14:03
Drehen sie den Knopf und stellen Sie die Stunden
ein und drücken Sie select.
Drehen sie den Knopf wieder und stellen Sie die
Minuten ein, drücken Sie select.
Im Display erscheint (als Beispiel):
Time Set
15:06
8. Alarm einstellen
Das Radio beinhaltet eine Alarmfunktion, die
das Radio auf den zuletzt gewählten Sender
(vorausgesetzt er ist verfügbar) aus dem Standby
einschaltet. Wenn der Sender off-line ist oder es
liegt ein Übermittlungsfehler vor, hören Sie den
Summer des Alarms.
Um den Alarm einzustellen drücken Sie select und
gehen vor wie folgt.
Hinweis: Wenn notwendig drücken Sie den
back Knopf um auf die vorherige Anzeige
zurückzukehren.
Drehen sie den Knopf bis im Display erscheint:
<Configure>
Drücken Sie den select Knopf. Drehen Sie den
Knopf bis das Display anzeigt:
<Clock>
Drehen Sie den Knopf bis das Display anzeigt:
<Set Alarm>
Drücken Sie den select Knopf. Das Display zeigt
die Alarm Optionen.
<Enable Alarm>
Yes/No
Drehen Sie den Knopf auf Yes oder No und
drücken Sie den select Knopf.
Wenn Sie No wählen, ist der Alarm aus und das
Display zeigt an:
Alarm is off
Wenn Sie Yes wählen, zeigt das Display die aktuelle
Zeit an. Zum Beispiel:
Set Alarm
14:03

DeutschDeutsch
12
Drehen Sie den Knopf für die Stunden und drücken
Sie select. Drehen Sie den Knopf wieder, um
die Minuten einzustellen und drücken Sie wieder
select. Das Display zeigt ganz kurz (als Beispiel):
Alarm Set
15:06
9. Überprüfen der aktuellen
Alarmeinstellung
Um die derzeitige Alarmeinstellung zu prüfen
drücken Sie den select Knopf und verfahren wie
folgt.
Hinweis: Wenn notwendig drücken Sie den back
Knopf um auf das vorhergehende Display zu
kommen.
Drehen Sie den Knopf bis das Display anzeigt:
<Configure>
Drücken sie select. Drehen Sie den Knopf bis das
Display anzeigt:
<Clock>
Drehen Sie den Knopf bis das Display anzeigt:
<Current Alarm>
Drücken Sie den select Knopf. Das Display zeigt
kurz die gewählte Alarmzeit an. Zum Beispiel:
Current Alarm
07:45 (On)
10. Windows Media Player über Radio
hören
Windows Media Player ermöglicht das Abspielen
von Audio Files (.MP3,.WMA) und Spiellisten
(.MP3U), die auf einem vernetzten PC gespeichert
sind. Diese Dateien können über das Wireless Access
- Zubehör an das Internet Radio gesendet werden,
wenn Sie Windows 2000 oder Windows XP haben.
10.1 Einrichten Ihres Windows PC, damit das Radio
gespeicherte Audio Dateien spielt:
Gehen Sie zu Windows Explorer, lokalisieren Sie die
gespeicherten Audio Dateien.
Klicken Sie mit der rechten Maus auf die Datai
Wählen Sie “Eigenschaften”
Klicken Sie “Sharing” (Teilen)
Wählen Sie beides, “Share this Folder on the
Network” (Austausch des Ordners im Netzwerk)
und “Freigabe für andere Netzbenutzer, meine
Datai zu ändern”.
10.2 Wenn Sie das Radio benutzen, um die PC
Audio Dateien zu finden, gehen Sie wie folgt vor.
Radio einschalten.
Warten Sie auf Stations (Sender) oder bis Abspielen
beginnt.
Drücken Sie so lange den back – Knopf, bis
Stations erscheint.
Drehen Sie den Knopf bis im Display
<Media Player>
erscheint.
Drücken Sie den select - Knopf. Das Display zeigt
an
<Search>
Drücken Sie den select - Knopf. Das Display zeigt
an
<Select Share>
Drücken Sie den select - Knopf. Das Display zeigt
an
Finding Shares
und ein rotierender Balken ist ersichtlich während
der Suche. Wenn die Suche beendet ist erscheint
eine Liste.
Drehen Sie den Knopf bis der gewünschte Share
erleuchtet ist.
Drücken Sie den select - Knopf. Das Radio sucht
“shared Folders”.
Drehen Sie den Knopf, um den korrekten Ordner
zu markieren.
Drücken sie select.
File Scan
(Datensuche)
erscheint. Der Text am unteren Rand des Displays
ändert sich und zeigt an, dass File Scan in Arbeit
ist. Wenn eine große Anzahl von Audio Files
gespeichert sind, kann dies mehrere Minuten
dauern.

DeutschDeutsch
13
<Playlists>
erscheint, wenn File Scan beendet ist.
Hinweis: Beim ersten File Scan wird eine Akte mit
Namen.reciva_media_cache zu der gespeicherten
Audio File geschrieben, damit nachfolgende File
Scans schneller erfolgen können.
10.3 Um einen einzelnen Titel zu hören fahren Sie
wie folgt fort.
Drehen Sie den Knopf bis <By Artist> erscheint.
Drücken Sie select.
Drehen Sie den Knopf bis der gewünschte
Interpreter erscheint. Drücken Sie select.
Drehen Sie den Knopf bis der gewünschte Titel
erscheint. Drücken Sie select.
Drehen Sie den Knopf bis <Select Tracks>
erscheint. Drücken Sie select.
Drehen Sie den Knopf bis der gewünschte Titel
erscheint. Drücken Sie select.
Drehen Sie den Knopf bis <Play Now> erscheint.
Drücken Sie select. Das Lied beginnt zu spielten.
10.4 Weitere Playback und Playlist Möglichkeiten.
Das Wählen alternativer Menü Optionen, wenn
<By Artist> erscheint, erlaubt das Playback von
kompletten Albums. Wählen Sie ein Album, dann
drehen Sie den Knopf zu select <Replace Queue>.
Einzelne Titel können auch in die Warteliste gesetzt
werden, während das Radio spielt. Wählen Sie
einen spezifischen Titel und drehen Sie den Knopf
bis <Add to Queue> erscheint. Wählen Sie <Play
Next> und dieser Titel wird so eingereiht, dass
er vor dem bereits geplanten Track gespielt wird.
Auch ein ganzes Album kann zu der Wartereihe
hinzugefügt werden. Wählen sie das Album und
dann <Add to Queue>.
10.5 Steuern des Abspielens
Drücken Sie stop um das Abspielen aufzuhalten.
Drücken sie play/pause um einen Titel zu
pausieren oder einen angehaltenen Titel wieder
einzuschalten.
Drücken Sie skip to previous track für das
Abspielen eines vorherigen Titels in der Reihe.
Drücken Sie skip to next track um den nächsten
Titel in der Reihe zu spielen.
10.6 Suchen von Titeln
Drücken Sie browse und der gegenwärtig
spielende Titel wird angezeigt. Drehen Sie den
Knopf und Sie können die Reihenfolge der Titel
sehen. Um auf einen bestimmten Platz in der
Reihefolge zu springen, drücken Sie select wenn
der gewünschte Titel erscheint.
10.7 Um Titel ohne Reihenfolge zu spielen gehen
sie so vor.
Wählen Sie die einzelnen Titel wie bereits
beschrieben. Gehen Sie zur ersten Stelle des Menüs
<Media Player> indem Sie select und back
drücken.
Drücken Sie select. Drehen Sie den Knopf bis
<Playback Mode> ersichtlich ist. Drücken Sie
select.
Drehen Sie den Knopf bis <Shuffle> erscheint.
Drücken Sie select.
Drehen Sie den Knopf auf yes/no und aktivieren
Sie die Mischfunktion.
10.8 Um Titel in der Reihenfolge wiederholt zu
spielen, gehen Sie wie folgt vor.
Wählen sie die individuellen Titel, wie bereits
beschrieben.
Gehen Sie zur obersten Stelle im Menü <Media
Player > mit dem select und back Knopf. Drücken
Sie select.
Drehen sie den Knopf bis <Playback Mode>
erscheint.
Drücken sie select.
Drehen Sie den Knopf bis <Repeat> erscheint.
Drücken Sie select.
Drehen Sie den Knopf auf yes/no und bestätigen
Sie die Wiederholungsfunktion.