

Page 1
AE SUB
OWNER'S MANUAL
for the love of music
Page 2

Introduction
Congratulations on choosing the Acoustic Energy AE SUB - a powerful, active
subwoofer which is capable of outstanding Hi-Fi and Home Cinema performance.
Please take a few moments to read this manual. The advice it contains will enable
you to get the very best performance out of your Acoustic Energy subwoofer.
The AE SUB is capable of handling 250 watts with a clean bass response extending
to 26Hz in the listening environment. Flexibility in its operation and connection
mean the AE SUB will compliment a wide range of high-quality hi- and home
cinema systems.
Correctly installed the sense of power and weight of it’s bass output can add
substantially to the enjoyment of high quality music and prove indispensable for
thrilling and realistic home cinema sound.
Page 3

Safety
Please read all operating and safety instructions before use retaining them for
future reference. Adhere to all warnings on the product or in this manual.
Power Sources
The subwoofer should only be connected to a power supply of the type described
on its rear panel. If you are not sure consult your dealer or a qualied electrician.
Power Cord
Power supply cords should be routed so as not to be walked on or caught under or
against items.
Ventilation
To ensure reliable operation and to prevent the subwoofer from overheating,
ensure good ventilation. Do not cover the subwoofer and do not place closer than
10cm from walls or soft furnishings. Do not use in a built-in installation unless
proper ventilation is provided.
Water and Moisture
The subwoofer should not be used near water, i.e. near a wash-bowl, basin, in a wet
basement or swimming pool area.
Temperature
The subwoofer may not function correctly at extremely low or freezing
temperatures. The Subwoofer should also be kept away from heat sources such
as radiators or other electrical equipment that produces heat, including other
ampliers.
Electric Shock
Care should be taken so that objects are not inserted in connectors or other
apertures and that liquid does not spill into the enclosure. Do not insert objects
into the reex port. Never attempt to dismantle the subwoofer as serious electric
shock might occur if the internal parts are touched.
Cleaning
Unplug the subwoofer from the wall power outlet before cleaning. Use only a clean,
dry cloth. Do not use cleaners, liquids or solvent based preparations to clean the
cabinet.
Smells
If an abnormal smell or smoke is detected, immediately turn the power o and
unplug the subwoofer from the wall power outlet.
Page 4

Operation
1. Crossover Frequency Knob
Adjusts the balance at the crossover point between the bass (low frequencies) from
the AE Sub and the main stereo front speakers.
2. Sub Level Volume Control Knob
Adjusts the volume level output of the subwoofer, allowing you to balance the
volume of the AE Sub to blend in with your main stereo speakers. Turning the knob
clockwise increases the volume level and turning it anti clockwise decreases the
volume level.
3. Auto Power Indicator
The auto function places the subwoofer in ‘standby’ mode (red light). The
subwoofer is automatically turned on when a signal is detected (green light).
4. Phase indicator
The normal setting for the phase switch would be the 0° position. Switching to 180°
will change the subwoofer phase and vary the tonal quality of the bass, which is
also dependent on the location of the AE Sub relative to your main stereo speakers.
5. Input / Line In (RCA)
Used to connect the subwoofer to the pre-out socket on the amplier.
6. LFE In (RCA)
Used to connect the dedicated LFE subwoofer line output on the amplier.
7. High Level Inputs
Used to connect to amplier speaker outputs.
8. Power Input
Connect the cord (supplied) to a 110-120v or 220-240v AC mains power outlet.
9. Power Switch
Use the switch to turn the power on / o.
Page 5
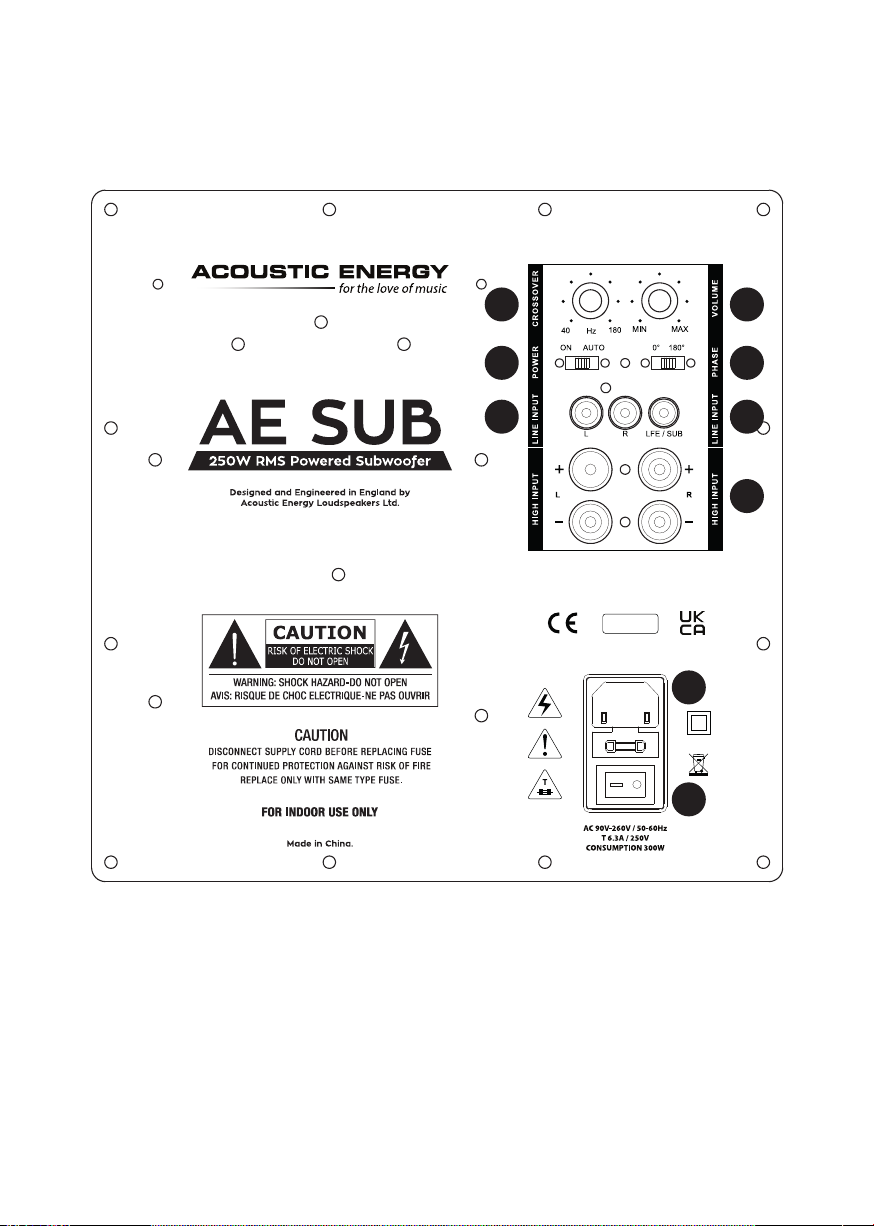
Rear Elevation
1 2
3 4
5
6
7
8
9
Page 6

Positioning
The AE SUB subwoofer is virtually omni-directional, so it can be positioned in
almost any location in the same room. For the best performance in the ideal room
the AE SUB should be positioned in a corner of the room or near a back wall. In
certain circumstances the addition of a second AE SUB located in another position
in the same room helps to achieve a more uniform bass.
The subwoofer should be installed using the four rubber feet or spikes with lock
nuts, both supplied.
Once positioned correctly ensure space is left to the rest of the AE SUB since all
operation switches are on the rear panel.
Page 7

Connections
Check that both your amplier and subwoofer are switched o before connection.
Failure to do so may result in damage to your amplier or subwoofer. It is
sometimes recommended that over-long low cost cables are used initially to
facilitate experimentation with the positioning, and only then purchase and install
using the nal cable choice.
For use with ampliers having a subwoofer output jack
Connect from the dedicated subwoofer line output on the amplier to the line
input(s) on the AE SUB (a single lead to either input or a ‘Y’ connector to both inputs
may be used).
For use with ampliers having a LFE output
Connect from the dedicated LFE subwoofer line output on the amplier to the LFE
input on the AE SUB using a single RCA - RCA cable.
For use with ampliers having Line Level pre-amp jacks
The pre-amp outputs of your amplier can be connected to the line-level inputs on
the AE SUB. The line level outputs on the AE SUB are then connected back to the
power amp (main) inputs on your amplier.
For use with ampliers without a dedicated subwoofer output
Connect the subwoofer via the ‘B’ or second speaker output. Be sure your receiver
can run both ‘A’ and ‘B’ speakers simultaneously.
Page 8

How to use the controls
How to use the SUB VOLUME CONTROL knob, CROSSOVER FREQUENCY knob
and PHASE switch.
The VOLUME CONTROL, FREQUENCY knob and PHASE switch can be adjusted to
match the condition of the listening room and/or the characteristics of the left and
right speakers.
Due to the positioning of the subwoofer in the room and the associated room
boundaries along with the available bass response from the existing speakers, the
actual settings on the subwoofer control panel will vary considerably.
The SUB VOLUME CONTROL and the CROSSOVER FREQUENCY knobs should be
used together when setting the correct bass response required. For example,
raising the volume level will also raise the eective system crossover point, while
reducing the volume has the converse eect of lowering the frequency range of
the subwoofer. This is caused by the way the various responses and outputs blend
together in the listening environment.
Initially set the crossover frequency fairly low, e.g. 50-60Hz, and use the volume
control knob on the sub to set the low bass level required, When the correct
balance is almost achieved, the crossover level and volume level maybe adjusted
together to ne tune the sound and achieve the cleanest, most extended and
suitably powerful bass.
The ideal is for a seamless blend of extended low bass from the subwoofer leaving
the clean upper bass response of the stereo system largely undisturbed.
Typical Control Positions
Front speaker Crossover Phase Sub Level
Large Speaker 40 - 60Hz Normal 0°
Medium Speaker 60 - 80Hz Normal 0°
Small Speaker 80 - 100Hz Normal 0°
Caution
An excessive input level to the subwoofer may impair the sound quality or damage
the unit. Do not increase the output of the amplier to a high level while the lowfrequency level is enhanced by the amplier’s tone control or loudness control.
Page 9

Warranty
Your Acoustic Energy subwoofer is guaranteed against original defects in materials,
manufacture and workmanship for 2 years from the date of purchase. Please retain
all original packaging materials for possible future use.
If you register your Acoustic Energy AE SUB online via our website
(acoustic-energy.co.uk) we will extend your guarantee, free of charge, to three
years. This applies in the United Kingdom only.
We suggest that you complete the details of purchase now and keep this
information in a safe place for future reference.
Under this warranty Acoustic Energy agrees to repair any defect or, at the
company’s discretion, replace the faulty component(s) without charge for parts or
labour.
This warranty does not imply any acceptance by Acoustic Energy Loudspeakers or
its agents for consequential loss or damage and specically excludes fair wear and
tear, accident, misuse or unauthorised modication.
This warranty is applicable in the United Kingdom only and does not in any way
limit the customer’s legal rights. Claims and enquiries under the warranty for AE
products purchased outside the UK should be addressed to the local importers or
distributors.
If you have reason to claim under the warranty please contact your dealer in the
rst instance.
Dealer’s name: ................................................................................................................................
Date of purchase: .........................................................................................................................
Serial number(s): ...........................................................................................................................
Page 10

Acoustic Energy
Units 1 - 3, Trull Farm
Trull, Tetbury
Gloucestershire
United Kingdom
GL8 8SQ
+44 (0) 1285 654432
www.acoustic-energy.co.uk
for the love of music
 Loading...