

Acoustic Energy Aelite sub Owners manual

Owner’s manual

Congratulations on choosing the Acoustic Energy AELITE Sub, a
powerful, active subwoofer loudspeaker which is capable of
outstanding Hi-Fi and home cinema performance.
Please take a few moments to read this manual. The advice it
contains will enable you to get the very best performance out of
your Acoustic Energy loudspeaker.
The AELITE Sub is capable of handling 200 watt RMS with a clean bass
response extending to 25 Hz in the listening environment. Flexibility in its
operation and connection mean the AELITE Sub will complement a wide
range of high quality hi-fi and home theatre systems.
Correctly installed the sense of power and weight of its bass output can add
substantially to the enjoyment of high quality music and prove indispensable
for thrilling and realistic home theatre sound.
Before applying power
The AELITE Sub is available in two main power versions to enable this
product to be used globally, one to operate from 220-240V AC line main
power and one from 110-120V AC line main power. Please ensure you have
the correct version that relates to your country’s main power before use.
NOTES: Our warranty does not cover damage caused by using the incorrect
version relative to the main power supply. The grille is designed to protect the
bass unit from possible damage and should not be removed.
Please read all operating and safety instructions before use retaining them for
future reference. Adhere to all warnings on the product or in this manual.
Power sources - The subwoofer should be connected only to a power supply of the
type described on its rear panel. If you are not sure consult your dealer or a
qualified electrician.
Power cord - Power supply cords should be routed so as not to be walked on or
caught under or against items.
Ventilation - To ensure reliable operation and to prevent the subwoofer from
overheating, ensure good ventilation. Do not cover the subwoofer and do not place
it closer than 10cm from walls or soft furnishing. Do not use in a built-in installation
unless proper ventilation is provided. Consult your dealer.
Water and moisture - The subwoofer should not be used near water, i.e. near a
washbowl, basin, in a wet basement or swimming pool area.
Temperature - The subwoofer may not function correctly at extremely low or
freezing temperature. The subwoofer should also be sited away from heat sources
such as radiators or other electrical equipment that produces heat, including other
amplifiers
Electric shock - Care should be taken so that objects are not inserted into
connectors or other apertures and that liquid does not spill into the enclosure.
Never attempt to dismantle the subwoofer as serious electric shock might occur if
the internal parts are touched.
Cleaning - Unplug the subwoofer from the wall power outlet before cleaning. Use
only a clean, dry cloth. Do not use cleaners, liquids or solvent-based preparations to
clean the cabinet.
Smells - If an abnormal smell or smoke is detected, immediately turn the power off
and unplug the subwoofer from the wall power outlet.
Safety
Introduction
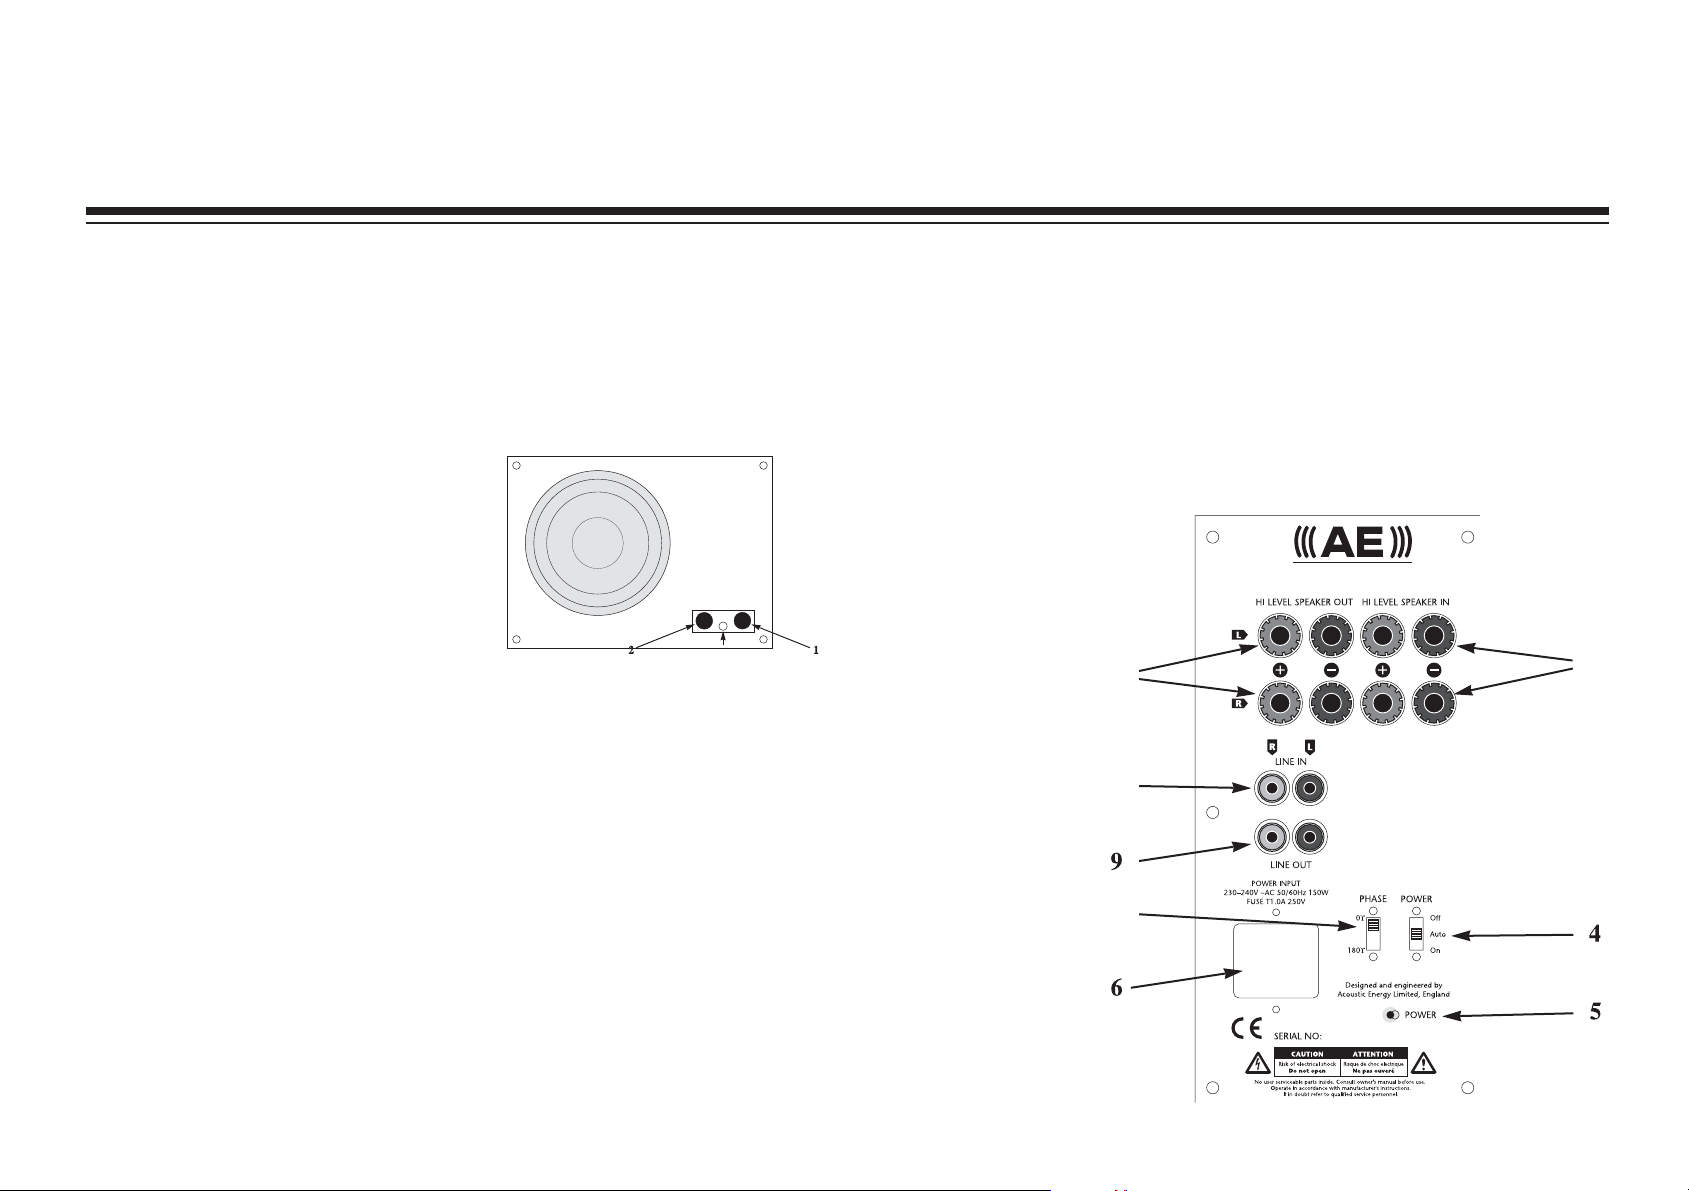
7. Phase switch
The normal setting for the phase is the 0º position. Switching to 180º will
change the subwoofer phase and vary the tonal quality of the bass, which is
also dependant on the location of the AESPRIT Sub relative to your main
stereo speakers
8. Line in jacks (RCA-type pin-plug)
Used to connect the subwoofer to the PRE-OUT jacks of the amplifier.
9. Line out jacks (RCA-type pin-plug)
Used to connect
back to the power
amp inputs on
your amplifier.
10. From
amplifier-Hilevel speaker in
terminals
Used to connect
the FRONT
SPEAKER terminals
of the amplifier to
this unit.
11. To speaker-Hilevel speaker
out terminals
Used to connect
the front speakers
with this unit, via
the 75 Hz 1storder crossover.
FRONT PANEL
1. Crossover frequency knob
Adjusts the balance at the crossover point between the bass
(low frequencies) from the AELITE Sub and the treble (high frequencies)
continuing to the main stereo front speakers.
2. Sub level volume control knob
Adjusts the volume level output of the
subwoofer, allowing you to balance the
volume of the AELITE Sub to blend in
with your main stereo speakers.
Turning the knob clockwise increases
the volume level, and turning the knob
counter clockwise decreases the level.
3. Infrared sensor
The sensor must be kept clear to
ensure proper working of the remote
control.
BACK PANEL
4. Power switch
Switches the power ON and OFF. By switching to AUTO the power is
automatically switched ON when a signal is applied to an input.
5. Power indicator light
This indicator lights green when the power is switched ON, and lights red
when in STANDBY mode.
6. Power cord socket
Connect the cord supplied to a 110-120V or 220-240V AC main power
outlets.
Operation
3
11
8
7
ACO USTIC ENERGY
200W ACTIVE SUBWOOFER
10
 Loading...