

Page 1
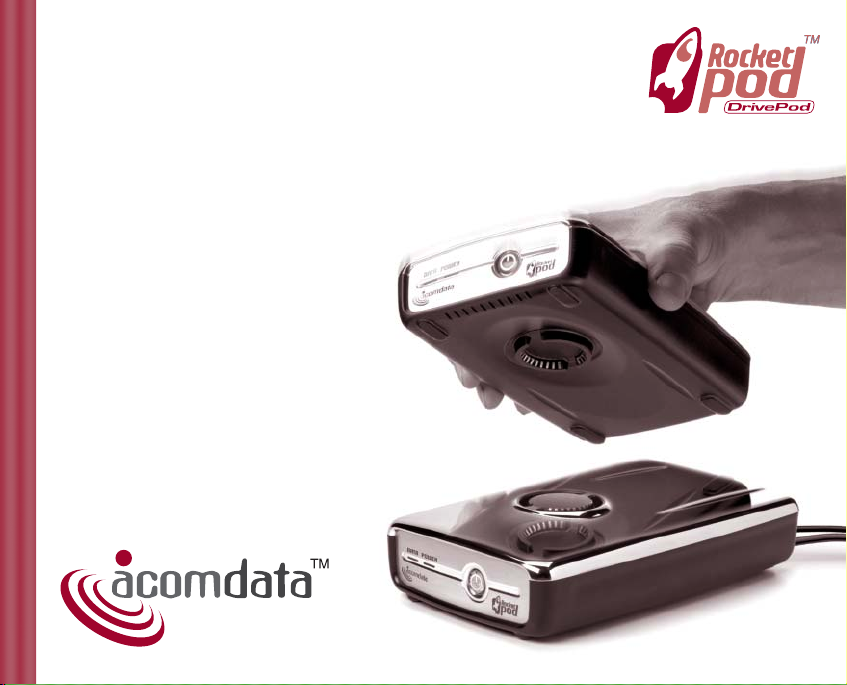
QuickStart
Installation Guide
For the DrivePod
™
External USB 2.0
Hard Drive
Windows & Mac
Please retain this guide.
Page 2

Page 3

WELCOME TO THE
ROCKETP
OD REVOLUTION . . . . . . . . . .2
M
INIMUM SYSTEM
REQUIREMENTS . . . . .5
P
ARTS AND ACCESSORIES LIST . . . . . . .7
D
RIVE
POD AT A GLANCE . . . . . . . . . . .8
I
NSTALLING THE DRIVEPOD . . . . . . . .10
CONNECTING THE
DRIVEPOD
TO
YOUR COMPUTER . . . . . . . . . . .11
INSTALLATION FOR
WINDOWS
98/ME USERS . . . . . . .12
INSTALLATION FOR
WINDOWS 2000/XP USERS . . . . .15
INSTALLATION FOR
MAC OS 9 USERS . . . . . . . . . . . .17
I
NSTALLATION FOR
M
AC OS 10 USERS . . . . . . . . . . .19
I
NSTALLATION FOR MULTIPLE OS/
CROSS-PLATFORM USAGE . . . . . . . . .21
W
INDOWS 98/ME
AND 2000/XP . . . . . . . . . . . .21
W
INDOWS 98/ME AND
MAC OS 9/10 . . . . . . . . . . . .22
WINDOWS 2000/XP AND
MAC OS 9/10 . . . . . . . . . . . .22
H
OW TO SAFELY DISMOUNT AND
TURN
OFF THE DRIVEPOD . . . . . . . . .24
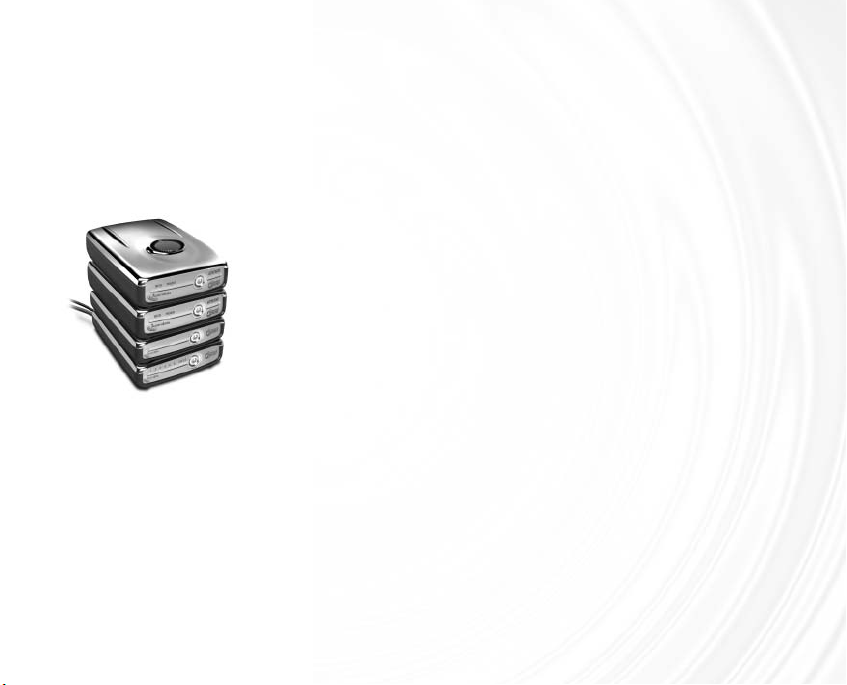
S
TACKING
DRIVEPODS . . . . . . . . . . .26
H
OW TO STACK DRIVEPODS . . . . . . . .27
STACKING THREE OR MORE DRIVEPODS . .28
REMOVING DRIVEPODS FROM A STACK . .30
USING THE CONNECTOR CAP . . . . . . . .32
U
SING YOUR DRIVEPOD . . . . . . . . . .33
T
ROUBLESHOOTING/FREQUENTLY ASKED
QUESTIONS (FAQS) . . . . . . . . . . . .35
G
LOSSARY . . . . . . . . . . . . . . . . . .38
O
NE YEAR LIMITED WARRANTY . . . . . .40
CONTENTS
Page 4
WELCOME TO THE
ROCKETPOD REVOLUTION
R
ocketPod represents nothing less than a revolution in computer peripherals.
With innovative technology, unparalleled ease-of-use, and powerful fea-
tures––not to mention avant-garde styling––RocketPod will change the
world of computer peripherals and vastly expand the “digital domains” of computer users everywhere.
Patented Stack&Play™ System
Every RocketPod peripheral is equipped
with the exclusive, patented Stack&Play
connection system. The Stack&Play system allows users to stack RocketPod
peripherals without the need for additional
data cables or power cords. (See “Stacking
DrivePods” on page 26 for full details.) The
Stack&Play connectors securely and safely
relay data signals and power between stacked
RocketPod peripherals.
All RocketPod peripherals are also equipped with standard data and power
connections. This means that a RocketPod peripheral can function either as a
stand-alone unit or as a module in an integrated RocketPod stack.
2
Stack&Play
Connectors
Page 5
RocketPod Blasts Off!
DrivePod is just the first product in what will be an extensive, growing RocketPod
line. Each new RocketPod peripheral will add another level of hi-performance
functionality to your computer system:
DockPod– Docking Station for RocketPod peripherals.
Most demanding RocketPod users won’t want to be
without it. DockPod offers greater flexibility, versatility
and extra expansion options:
• DockPod supplies enough power for up to five
stacked-on RocketPod modules;
• With DockPod, every one of your RocketPod modules
can operate completely without wires;
• With DockPod, you can combine USB 2.0 and
FireWire RocketPod peripherals in the same stack;
• With DockPod, you can connect a whole host of nonRocketPod devices, such as a printer, digital camera,
and scanner to your computer via DockPod’s built-in
USB 2.0 and FireWire hub.
NASPod (Network Attached Storage) –With NASPod, you can make a
DrivePod accessible over an Ethernet network. Advanced security features will
allow you to assign different levels of user access.
An example of a RocketPod
stack, featuring three
RocketPod modules stacked
onto a DockPod Docking
Station. With DockPod you can
stack on up to 5 modules and
mix USB 2.0 and FireWire
modules in the same stack.
Page 6

A/VPod – Watch digital video and photos stored on your DrivePod directly on
your TV. Connect to your stereo system and play hundreds of CDs worth of
music from a single, portable, purely digital source.
DVDPod – With this sleek, portable DVD-RW drive you can create movies
that you can watch on most home DVD players. Easily share large files with
colleagues. Store sophisticated presentations that you can run on other computers. Backup and archive files on robust optical media.
BluePod – Eliminate the rest of your cables with this Bluetooth receiver for all
of your compatible Bluetooth peripherals.
RocketPod Advantages:
• Create a customized, modular peripherals solution using a variety of inter-
changeable, RocketPod modules;
• Greatly expand the power and functionality of your existing computer system;
• Eliminate the “rats nest” of wires you get with other peripherals, and use up
fewer data ports and electrical outlets;
• The ultra-compact size of RocketPod peripherals and quick connect/discon-
nect capability make RocketPod ideal as a portable storage solution.
Check our web site at www.acomdata.com for information on these and
other exciting up-coming RocketPod peripherals.
4 41
Page 7

Important Note:
The DrivePod External USB 2.0 Hard Drive is compatible with both USB
2.0 and USB 1.x. However, in order to reach USB 2.0 speeds, you must
have a computer or host adapter card that supports USB 2.0. If you do
not have a built-in USB 2.0 port and you do not wish to install a USB 2.0
host adapter card, you can connect the drive to a USB 1.x port; however,
the drive will operate at USB 1.x speeds.
Minimum System Requirements for PC
• Pentium-based PC with 233 MHz or faster CPU
• Windows 98, ME, 2000, or XP
• 32 MB RAM
• Built-in available USB port, or a USB expansion card
Note: Windows 98 First Edition does not support USB 2.0. The DrivePod
will operate at USB 1.x speeds on computers running Windows 98 First
Edition. Windows 98 Second Edition, ME, 2000 and XP support USB 2.0.
MINIMUM
SYSTEM REQUIREMENTS
Page 8

Minimum System Requirements for Mac
• Power Macintosh (G5, G4, Blue & White G3) iBook or iMac
• Mac OS 9.0 or higher
• Built-in available USB port or a USB expansion card
Note: Mac OS 9 does not support USB 2.0. The DrivePod will operate at
USB 1.x speeds on computers running Mac OS 9.
6 39
Page 9

The package should include the following items:
• DrivePod External USB 2.0 Hard Drive
• USB cable
• AC adapter and power cord
• Connector Cap
• USB 2.0 Installation CD (required for Windows 98 and ME)
• QuickStart Installation Guide
• Warranty Registration Card
Important Notes:
• If you are missing any items listed above, please STOP and contact
Customer Service via email at customerservice@acomdata.com or call
1-800-470-4495 or (909) 348-0680.
• Please retain a copy of your receipt. You will need it if warranty repair
service is required in the future.
PARTS AND ACCESSORIES LIST
Page 10
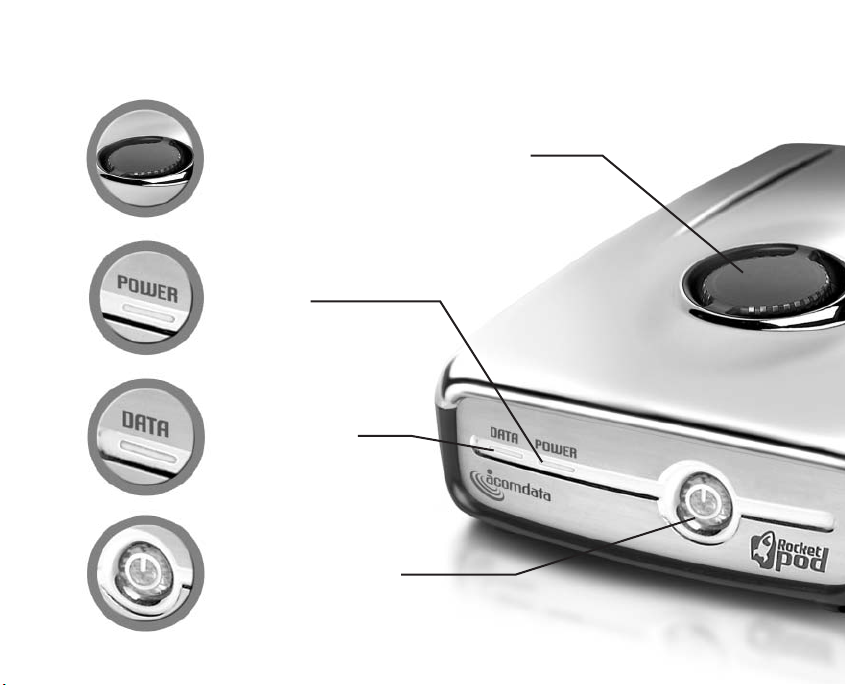
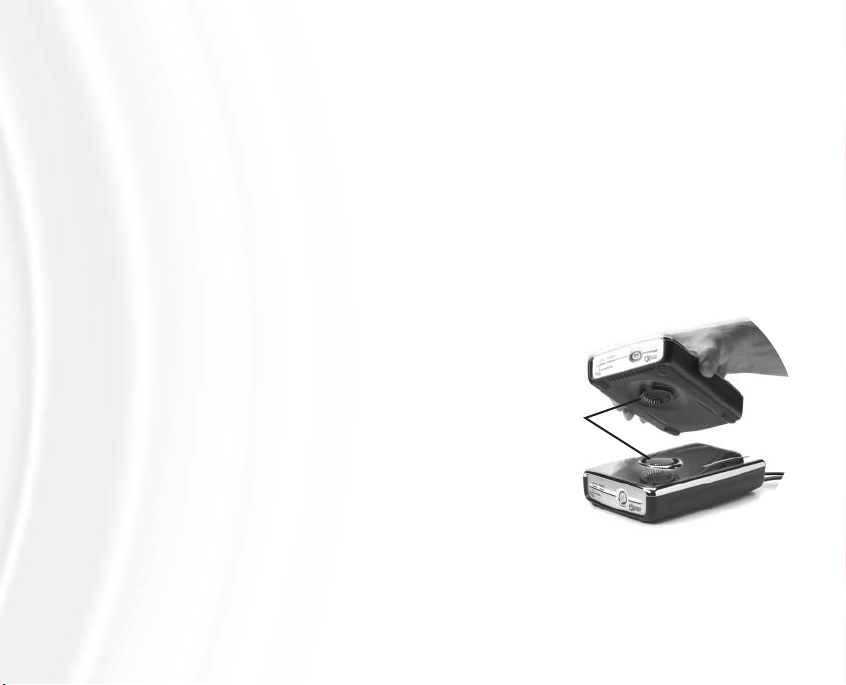
Stack&Play™ Connector
See “Stacking DrivePods” on page 26
for stacking instructions.
Power
Indicator Light
Data Light
Lights up when the drive
is reading or writing data
Power Button
DRIVEPOD AT
Page 11
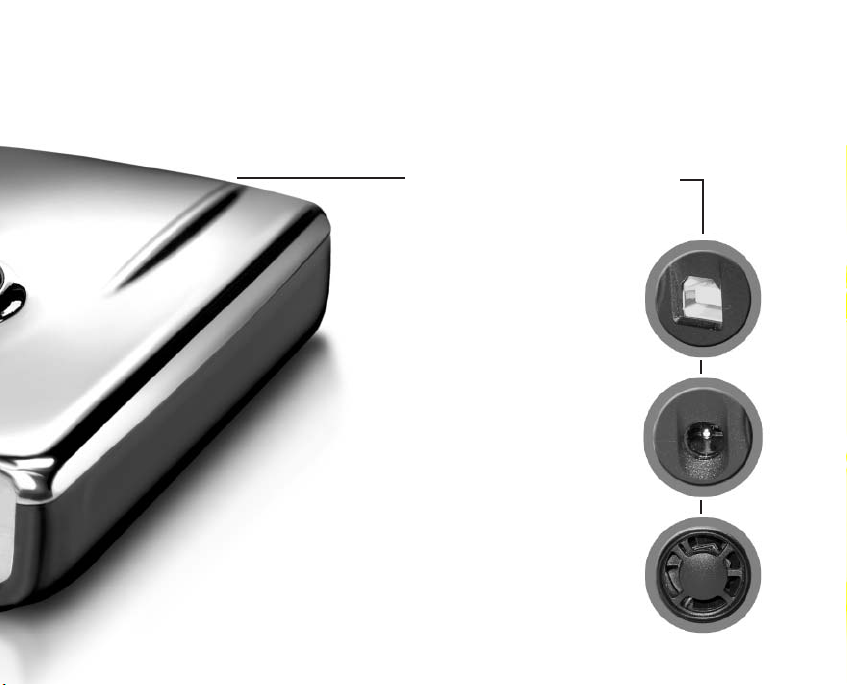
USB Port
Hi-Speed USB 2.0 connection
(Compatible with USB 1.x)
AC Adapter Power Port
Micro Cooling System Fan
A GLANCE
ON THE BACK PANEL
Page 12

INSTALLING THE DRIVEPOD
Important Notes:
• Use of a third-party AC adapter and power cord may damage the drive
and void the warranty.
• It is highly recommended that when you install the DrivePod, you connect it to
a USB port on your computer rather than to a USB hub. Once the installation
has been successfully completed, you can re-connect the drive to a USB hub
if you so choose. We recommend this approach because if you experience a
problem during installation, the problem will be easier to troubleshoot if a
USB hub is not used. Please follow the instructions in the section “How to
Safely Dismount and Turn off the DrivePod” on page 24 before switching the
drive to a USB hub.
• Before you install the DrivePod, we recommend that you either restart
your computer, or shut it down and connect the drive with the computer
turned off. This way you can start with a “clean slate” and avoid potential
problems caused by software conflicts or memory fragmentation.
10 35
Page 13
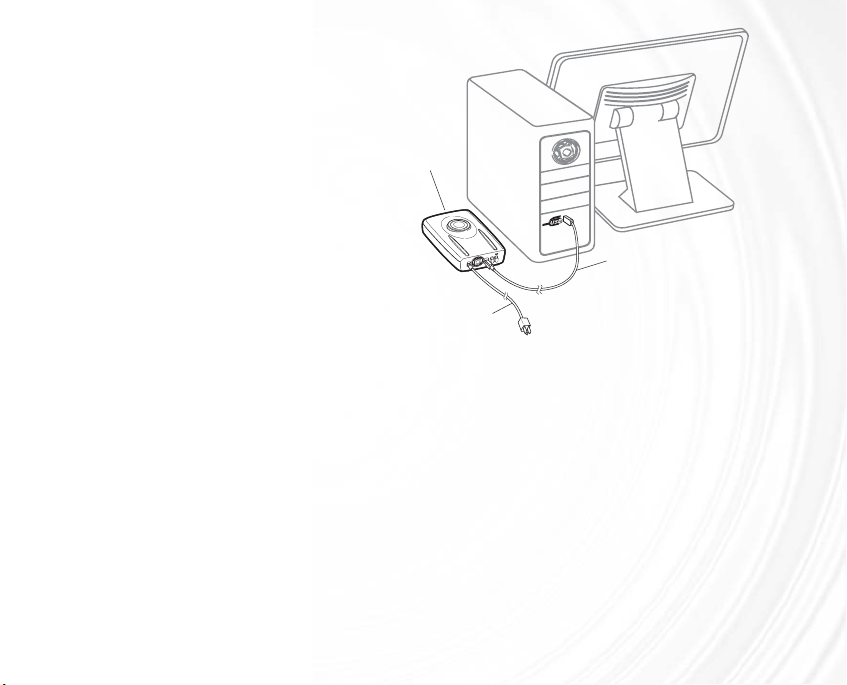
Connecting the DrivePod
to Your Computer
Regardless of which operating system (OS) your computer is running,
follow the connection procedure
below in order to properly connect
the USB cable, and the AC adapter
and power cord. Then proceed to
the correct installation procedure
for your computer.
1. Plug the AC adapter cord into the Power Port on the back of the DrivePod.
Plug the power cord into the recessed cord socket in the AC adapter, and
then plug the other end into a standard outlet.
2. Each end of the USB cable has different shaped plugs. One plug matches
the USB port on your computer; the other plug matches the USB port on the
DrivePod. Plug the correct end of the USB cable into a USB port on the computer; then plug the other end into the USB port on the back of the drive.
Make sure you connect the USB cable correctly, otherwise it may damage
the drive and void the warranty.
3. If you connected the DrivePod with the computer turned off, turn on the
computer. When your computer is completely booted up, press the Power
Button located on the front of the drive to turn it on.
FIGURE 1
11
DrivePod
AC adapter
& power cord
USB cable
Page 14
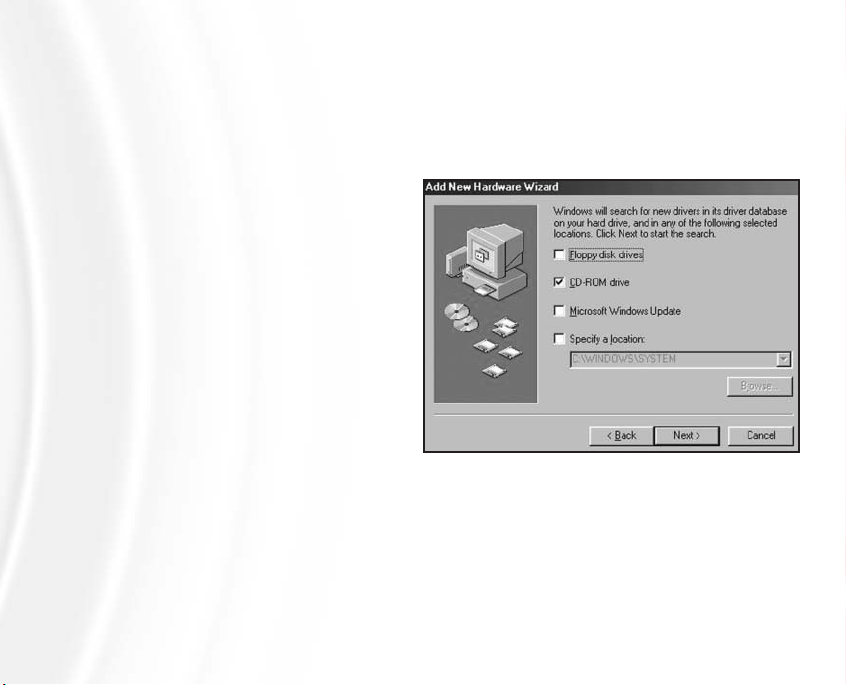
Installation For Windows 98/ME Users
1. Once your DrivePod has been properly connected and powered “on”, the
Add New Hardware Wizard window should appear. Click Next.
2. You will then see the message:
“What do you want Windows to
do?” with two options. Select
“Search for the best driver for
your device (Recommended)”.
Click Next. You will then see the
display shown in Figure 2.
3. Select the CD ROM drive box
and then insert the USB 2.0
Installation CD into your CD drive.
Click Next.
4. You will then see the display
shown in Figure 3. Click Next.
5. When the installation is fin-
ished, you will see the message “Windows has finished installing the software
that your new hardware device requires.” Click Finish; and then eject the CD.
6. You should now see a new icon (a gray box with a green arrow) next to the
time display on your System Tray.
7. Double-click on the My Computer icon. In the My Computer window you
FIGURE 2
12
Page 15

should see a new icon and drive
letter for the DrivePod. (If you are
not sure which icon represents
the DrivePod, turn off the drive
and see which icon disappears.
Then turn the drive back on and
wait for the icon to reappear.)
8. Right-click on the DrivePod icon
and select Format. The Format
window will appear. In the Format
window, verify the drive’s capacity.
It should be close to the stated
capacity of your DrivePod, specified
in Megabytes. (The capacity figure
shown in Figure 4 is just an example and may not reflect the capacity of your DrivePod)
9. Under Format type select Full;
everything else should be left at
the default setting. In the Label
field under Other options you may
assign a name to the DrivePod.
The name you assign is limited to
eight characters and no symbols
FIGURE 3
FIGURE 4
13
Page 16

are allowed. Or you can leave it blank.
10. Click Start. The following warning message will appear: “This device is
either a hard disk or a large removable disk. Formatting it will destroy all files
currently on the drive. Are you sure you want to format this drive?” Click OK.
11. If you see a warning message from an antivirus program, click Exclude.
12. When formatting is complete, you will be asked to run a thorough
Scandisk. It is a good practice to periodically run Scandisk as part of regular
hard drive maintenance. If you do not choose to run Scandisk at this time,
close the Format window.
Your DrivePod is now ready to use.
14 31
Page 17

Installation For Windows 2000/XP Users:
Important Notes:
• If you intend to use the DrivePod on multiple operating systems, STOP.
DO NOT continue with the installation procedure described below. Please
first read the instructions in the "Installation for Multiple OS/CrossPlatform Usage" on page 21. Otherwise, continue with the installation procedure below.
• Windows 2000 and XP do not require the installation of the USB 2.0
Installation CD. The operating system has the necessary drivers built in.
1. Once your DrivePod has been properly connected and powered “on”,
Windows 2000/XP will automatically install the appropriate built-in Microsoft
drivers. It is NOT NECESSARY to install the USB 2.0 Installation CD.
If you are using a USB 1.x connection, your computer will display the message
"HI-SPEED USB Device Plugged into non-HI-SPEED USB Hub". This is ok except
that your DrivePod will run at the slower USB 1.x speed.
2. Double-click on the My Computer/Explorer icon. In the My Computer window, you should see a new icon and drive letter for the DrivePod. If you are
not sure which icon represents the DrivePod, turn off the drive and see which
one of the icons disappears. Then turn on the drive and wait for the icon to
reappear.
Page 18

3. Right-click on the DrivePod icon and select Format. The Format window will
appear.
4. In the Format window, verify the drive capacity. It should be close to the
stated capacity of your DrivePod, measured in Gigabytes. Select NTFS format.
5. The default formatting option is Full format. A Full format will take about
30-90 minutes. A Quick format will take just a few minutes, but will do less
verifying of the drive. Click Start.
When formatting is complete, your DrivePod is ready to use.
16 29
Page 19

Installation For Mac OS 9 Users
Important Notes:
• Mac OS 9 does not support USB 2.0. The DrivePod will operate at USB
1.x speeds on computers running Mac OS 9.
• If you intend to also use the DrivePod on a Windows operating system,
STOP. DO NOT continue with the installation procedure described below.
Please first read the instructions in the "Installation for Multiple OS/CrossPlatform Usage" on page 21. Otherwise, continue with the installation procedure below.
• If using Mac OS 9, it is recommended that you upgrade to the latest OS 9
version to ensure maximum performance. To download the latest OS 9 version
go to: http://docs.info.apple.com/article.html?artnum=75186
• Mac OS 9 requires USB Mass Storage Support version 1.3.5 or later.
You can download the latest update at
http://download.info.apple.com/Apple_Support_Area/Apple_Software_Update
s/English-North_American/Macintosh/USB_Updates/
1. Once your DrivePod has been properly connected and powered “on”, you
may or may not see an alert display with the message “This disk is unreadable
by this Computer. Do you want to initialize this disk?” (See Figure 5, next page)
If you DO NOT receive this alert message, no formatting is required, and an
Page 20

icon for the drive should appear on
your Mac’s Desktop with the name
“Untitled”.
It is recommended that you assign
the drive a unique name. To do this,
simply click on the icon but keep the
mouse button pressed for a second
or two and then release. The name
field under the icon should become
highlighted and you can type in a
new name.
If you DO receive the alert message shown in Figure 5, you must
format the drive; proceed to step 2.
2. In the Name field, type in a name
for your DrivePod.
3. In the Format pop-up menu, select Mac OS Extended.
4. Click Initialize. You should then get the alert message shown in Figure 6.
5. Click Continue. Once your Mac finishes initializing the DrivePod, you should
see the drive mounted on your Desktop with whatever name you assigned.
Your DrivePod is now ready to use.
FIGURE 6
FIGURE 5
USB cable
DrivePod
stack
AC adaptor
& power cord
Page 21

Installation For Mac OS 10 Users
Important Note:
If you intend to also use the DrivePod on a computer running Windows,
STOP. DO NOT continue with the installation procedure described below.
Please first read the instructions in the section "Installation for Multiple
OS/Cross-Platform Usage" on page 21. Otherwise, continue with the hardware installation procedure below.
1. Once your DrivePod has been properly connected and powered “on”, you
may or may not see an alert display with the message “You have inserted a
disk containing no volumes that Mac OS X can read. To us the unreadable volumes, click Initialize. To continue with the disk inserted, click Ignore”.
If you DO NOT receive this alert message, no formatting is required, and an
icon for the drive will appear on your Mac’s Desktop with the name “Untitled”.
To assign your DrivePod a name, click on the icon but keep the mouse button
pressed for a second or two and then release. The name field under the icon
should become highlighted and you can type in a new name.
If you DO receive the alert message, click Initialize. You should then see the
Disk Utility window shown in Figure 7 (next page).
2. You should see the DrivePod listed on the left side as “Untitled” under the
listing with the capacity that matches your DrivePod. (The example shown in
Page 22

Figure 7 may not reflect the actual capacity of your DrivePod.) Click on the drive to
highlight it.
3.Click the Erase tab. You should then see
the display shown in Figure 8.
4. In the Volume Format pop-up menu,
select Mac OS Extended. In the Name field
type in a name for your DrivePod.
5. Click Erase. The following warning will
appear: “Erasing a disk will destroy all
information on all of the volumes of the
disk. Are you sure you wish to erase the
disk....?“
6. Click Erase. Once initializing is complete,
you should see the drive mounted on the
Disk Utility screen with whatever name you
assigned.
7. Close the Disk Utility screen. You should
see the drive on your computer’s Desktop.
Your DrivePod is now ready to use.
20 25
FIGURE 7
FIGURE 8
Page 23

Installation for use on
Windows 98/ME and 2000/XP
1. Install the DrivePod on a computer running Windows 98/ME, according to
the instructions in the section “Installation For Windows 98/ME Users” on
page 12.
2. Disconnect the drive according to the instructions in the section “How to
Safely Dismount and Turn Off the DrivePod” on page 24.
3. Connect the drive to the computer running Windows 2000/XP, following
the proper connection procedure described on page 11.
5. If you connected the DrivePod with the computer turned off, turn on the
computer. When your computer is completely booted up, press the Power
Button located on the front of the drive to turn it on. In the My Computer or
Windows Explorer window you should see a new icon and drive letter for the
DrivePod.
Your DrivePod is now ready to use.
INSTALLATION FOR MULTIPLE OS/
CROSS PLATFORM USAGE
Page 24

Installation for use on
Windows 98/ME and Mac OS 9/10
1. Install the DrivePod on a computer running Windows 98/ME, according to
the instructions in “Installation For Windows 98/ME Users” on page 12.
2. Disconnect the drive according to the instructions in “How to Safely
Dismount and Turn Off the DrivePod” on page 24.
3. Connect the drive to the computer running Mac OS 9 or OS 10, following
the proper connection procedure described on page 11.
4. If you connected the drive with the computer turned off, turn on the com-
puter. When your computer is completely booted up, turn on the drive, and
wait for it to mount to the Desktop. Your DrivePod is now ready to use.
Installation for use on
Windows 2000/XP and Mac OS 9/10
Important Note:
In order to use the DrivePod on both Windows 2000/XP and Mac OS
9/10, you have two options: Option 1 is to format the drive on Windows
98/ME. Option 2 is to format the drive on Mac OS 9 using the DOS format. Formatting the drive in either Windows 2000/XP or Mac OS 10 will
not allow cross-platform usage. This is due to a technical issue with Mac
OS 10, that still exists as of this writing, as well as inherent incompatibilities between Windows 2000/XP and Mac OS 9/10.
22 23
Page 25

Option 1: Format the drive in Windows 98/ME
Follow the instructions in “Connecting the DrivePod to Your Computer” on page
11 and “Installation For Windows 98/ME Users” on page 12. When you then
connect the drive to a computer running Windows 2000/XP or Mac OS
9/10, it should mount automatically.
Option 2: Format the drive in Mac OS 9
1. Follow the instructions in “Connecting the DrivePod to Your Computer” on
page 11. Once your DrivePod has been properly connected and powered “on”,
you may or may not see an alert display with the message “This disk is
unreadable by this Computer. Do you want to initialize this disk?”
If you DO receive this alert message, proceed to step 2.
If you DO NOT receive this alert message, the drive should appear on your
Mac’s Desktop. Single-click on the drive icon to highlight it. Go to the Special
pull-down menu and select Erase. Proceed to step 2.
2. In the Format pop-up menu, select "DOS…". Click Initialize. You should then
get the alert message “Initializing will erase all information on this disk”.
3. Click Continue. When initializing is complete, you should see the drive
mounted on your Desktop. When you then connect the drive to a computer
running Windows 2000/XP or Mac OS 10, it should mount automatically.
Page 26

Important Notes:
• What do “mounting” and “dismounting” mean? When a device, such as a
hard drive, is mounted on a computer, that means the computer “sees” the
device and is able to communicate with it. When you dismount a device the
computer no longer sees it. The device may still be running but the computer cannot access it, as though the device no longer exists.
• Before you turn off a hard drive with the computer running, you must dis-
mount the drive. If you turn off the drive without dismounting it first, data
on the drive may be lost or damaged.
• If you turn off your computer BEFORE you turn off your DrivePod, no dis-
mounting is needed; simply press the Power Button to turn it off.
• Always make sure the drive is turned off before disconnecting the AC
adapter and power cord, or the USB cable.
PC Users
1. Locate the System Tray. The System Tray includes the time display in the
bottom right, and icons to the left of the time display. One of the icons will be
an icon with a green, diagonal arrow on it.
24 21
HOW TO SAFELY DISMOUNT AND
TURN OFF THE DRIVEPOD
Page 27

2. Left-click on this icon.
On Windows 98/ME a rectangle will appear with the name of the drive followed by the drive letter.
On Windows 2000/XP you will receive the alert message "Safely Remove…"
or "Stop…" followed by the drive letter for the device.
3. Left-click on the appropriate device (with the drive letter matching the one
used by the DrivePod). After a few seconds, Windows will give you a message
that it is safe to remove the device.
4. Click OK to this message. The drive will dismount and you can then safely
turn if off (and then the power cord and USB cable can be unplugged if you
want to disconnect the drive).
Mac Users
Drag the icon for the DrivePod to the Trash. The drive will dismount and you
can then safely turn if off (and then the power cord and USB cable can be
unplugged if you want to disconnect the drive).
Page 28

Important Note:
In order to accommodate the different needs of our customers,
AcomData designed the DrivePod
so it can be stacked using one of
three methods:
1. Using only the accessories included
in every DrivePod package. This is the
method described in this guide.
2. Using the optional Heavy-Duty AC Adapter, available as a separate pur-
chase from AcomData. The Heavy-Duty AC Adapter allows you to stack up
to five DrivePods with only one power connection. To purchase the Heavy-
Duty AC Adapter, contact AcomData Customer Service via email at customerservice@acomdata.com.
3. Using the soon-to-be released DockPod. Using the DockPod as your
RocketPod base station will have many advantages (see page 3 for details).
Check our web site, www.acomdata.com, for the latest information on the
DockPod and other up-coming RocketPod peripherals.
26 19
STACKING
DRIVEPODS
Page 29

How to Stack DrivePods
1. Install your first DrivePod, on whichever
OS you have selected, according to the
instructions in this guide.
2. Place another DrivePod onto the first,
making sure the orientation is the same
and the drives are aligned (See Figure 9).
When placed correctly, the connector at
the top of the first drive will mate with the
connector at the bottom of the second
drive, and all four feet of the second drive
should sit firmly on the first drive.
As the connectors mate, you may hear a brief “scratching” sound as the
metal terminals in the connectors make contact. This is normal.
3. Press down gently on the top of the second drive to make sure it is firmly
seated on the drive below.
If the first drive is powered “on”, the second drive will power “on” automatically
and Power Indicator Light will come on after a few seconds. There is no need
to press the Power Button of the 2nd drive.
If the first drive is NOT powered “on”, press the Power Button of the first
drive. After a few seconds, the Power Indicator Light of the 2nd drive should
come on automatically.
2718
USB cable
DrivePod
stack
AC adaptor
& power cord
FIGURE 9
Page 30

Important Notes
• After you add a drive to a stack, and it is powered “on”, it may take 10 –
30 seconds for your computer to recognize it.
• After a new drive is recognized by your computer, you may need to format
the drive. You may assign different format types for each drive in the
stack, but be sure to use format types that will be recognized by your OS.
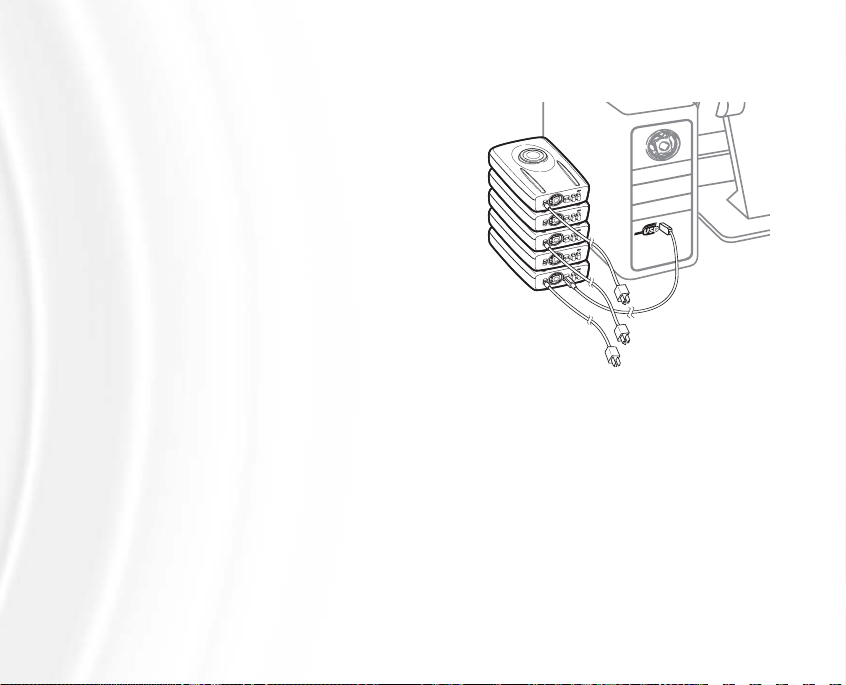
Stacking Three or More Drives
Important Notes
• If you are stacking three or four drives, the 1st and 3rd drives (starting
from the bottom) will each require an AC adapter. If stacking five drives,
the 1st, 3rd and 5th drives will each require an AC adapter.
• If you are using the optional Heavy-Duty AC Adapter, you can stack up to
five DrivePods and only the first drive in a stack needs the AC Adapter
and power cord.
• No matter how many drives you stack (up to a maximum of five) only the
first DrivePod in the stack requires a USB cable.
Adding a 3rd DrivePod to a Stack
1. Place the 3rd drive onto the 2nd drive, following the correct procedure
described on page 27.
28 17
Page 31

2. Connect the supplied AC adapter to
the Power Port on the DrivePod.
3. Connect the power cord to the AC
adapter.
4. Plug the power cord into a standard
outlet. Make sure all connections are
secure.
5. Press the Power Button.
Adding a 4th DrivePod to a Stack
1. Place a 4th drive onto the 3rd drive,
following the correct procedure
described on page 27.
If the 3rd drive is powered “on”, the
Power Indicator Light of the 4th drive will
come on automatically after a few seconds. If the 3rd drive is turned off, press
the Power Button to turn it on; the 4th
drive will power "on" and the Power
Indicator Light will come on automatically
in a few seconds.
FIGURE 10
FIGURE 11
Page 32
Adding a 5th DrivePod to a Stack
1. Place the 5th drive onto the 4th drive,
following the correct procedure described
on page 27.
2. Connect the supplied AC adapter to
the Power Port on the DrivePod.
3. Connect the power cord to the AC
adapter.
4. Plug the power cord into a standard
outlet. Make sure all connections are
secure.
5. Press the Power Button.
Removing DrivePods from a Stack
Important Notes:
• Before you turn off or remove any drive from a stack, regardless if it has
an AC adapter or not, you must dismount the drive first. If a drive is
turned off or removed without first being dismounted, data stored on the
drive may be lost or damaged.
• If the drive you want to remove has an AC adapter connected to it, you
30 15
FIGURE 12
Page 33

must turn off the drive BEFORE removing it from the stack. If the drive
does not have an AC adapter connected to it, you may simply remove the
drive from the stack after it has been dismounted.
• If the drive you wish to remove has one or more drives stacked above it,
you must dismount and remove the upper drives before you can remove
the drive from the stack.
PC Users
1. Locate the System Tray. The System Tray includes the time display in the
bottom right, and icons to the left of the time display.
2. One of the icons will have a green arrow. Left click on this icon. An alert will
appear with the words "Safely remove…" or "Stop…" and the drive letter(s) for
the each drive.
3. Left-click on the appropriate drive icon. After a few seconds, Windows will
give you a message that it is safe to remove the drive.
4. Click OK.
5. If the drive has an AC adapter, turn off the drive. You many then unplug the
USB cable, and the AC adapter and power cord.
Mac Users
1. Drag the appropriate drive icon to the trash. When the drive icon has dis-
Page 34

appeared from the Desktop, the drive has been dismounted. You many then
unplug the USB cable, and the AC adapter and power cord.
Using the Connector Cap
Whether you have one DrivePod or a stack of DrivePods, one drive will always
have an exposed connector. While it is perfectly safe to leave the connector
exposed, you may wish to cover it with the supplied Connector Cap to protect
the connector and block out dust.
To cover the connector, simply place the Connector Cap on the connector so
that the embossed AcomData logo is right-side-up when looking at the drive
from the front. If you place the Connector Cap with the logo up-side-down, it
will not seat properly.
32
Page 35

How to open files and folders stored on the DrivePod on either a
PC or a Mac.
1. Double-click on the DrivePod. A window showing the files and folders stored
on the drive will appear.
2. Double-click on the file or folder that you want to open.
How to copy files/folders to your DrivePod On a PC
1. Single-click the file or folder that you want to copy in order to highlight it.
2. In the Edit pull-down menu select Copy.
3. Double-click the DrivePod to open it.
4. If you want to copy the file or folder to a specific folder on the drive, double-
click that folder to open it.
5. In the Edit pull-down menu select Paste. The file or folder will copy over.
How to copy files/folders to your DrivePod On a Mac
1. HIghlight the file or folder that you want to copy by clicking on it, but do not
release the mouse button.
33
USING YOUR DRIVEPOD
Page 36

2. While keeping the mouse button pressed down, drag the highlighted file or
folder to the DrivePod or to a specific folder on the drive.
3. Release the mouse button. The file or folder will copy over.
34
Page 37

Q: My computer does not recognize the DrivePod.
A: Make sure that all of your connections are secure. Make sure that you are
using the AC adapter that was supplied with the DrivePod.
Q: Does the DrivePod work with Norton Ghost?
A: Yes, but only with Norton Ghost 2003.
Q: Is the DrivePod compatible with Windows NT 4.0?
A: No, it is not.
Q: Can you make a DrivePod bootable?
A: Yes, but this depends on your computer’s BIOS. BIOS is an acronym for
Basic Input/Output System. The BIOS contains code required to control a
number of miscellaneous functions. Please check with your computer manufacturer for BIOS updates to determine if your computer’s BIOS supports this
feature.
Q: How many DrivePods can you stack per computer?
A: You can stack up to 5 (five) DrivePods.
TROUBLESHOOTING/
FREQUENTLY ASKED QUESTIONS (FAQS)
Page 38

Q: When stacking DrivePods, do you need an AC adapter and a USB cable
for each drive?
A: If you are stacking two drives, only the 1st drive requires an AC adapter. If
you are stacking three drives, the 1st and 3rd drives each require an AC
adapter. The same applies if stacking four drives. If you are stacking five
drives, the 1st, 3rd and 5th drives will each require an AC adapter. No mat-
ter how many drives you stack (up to five) only the first drive requires a
USB cable. (See “Stacking DrivePod” on page 26 for full instructions)
Q: When I leave my computer idle for a while and come back, my drive
won’t work properly.
A: The most likely cause is that your computer is going into "Sleep” mode. The
immediate solution is to restart your computer. To prevent this problem from
reoccurring, go into your Power Settings/Energy Saver and set it to where it
never goes into Sleep mode.
Q: How do I purchase additional accessories for my DrivePod?
A: To purchase additional accessories, please contact Customer Service at:
customerservice@acomdata.com. Include your name, phone number, mailing
address, model number, and quantity per item.
36 9
Page 39

For Further Troubleshooting/Frequently Asked Questions:
1. Please register your product on our web site at: www.acomdata.com.
2. Consult the expanded Frequently Asked Questions (FAQs) on our web site,
as they are likely to resolve the issue.
3. If the issue you are having is still not resolved by using our FAQs, please
contact Technical Support via e-mail through the Support section or simply
send an email to techsupport@acomdata.com.
378
Page 40

GLOSSARY
Bit - The smallest unit of digital data. In binary code, a bit is represented logi-
cally as a either 1 or a 0.
Buffer - RAM cache that temporarily stores data so it can be delivered to a
device as it is needed.
Bus - An electronic link that allows the transmission of data between digital
devices, such as computers and computer peripherals.
Byte - A unit of digital information, usually made up of eight bits.
Data Stream - The flow of data between digital devices such as computers
and hard drives.
Driver - Software that enables communication between a computer and a
peripheral.
Gigabyte - 1,024 Megabytes, or approximately one billion bytes. The capacity
of most hard drives is usually measured in Gigabytes.
Hardware - Physical components of a computer system (computer, hard
drives, printers, etc.)
Hub - A device which links peripherals together onto the same bus.
Interface - Junction between two items of hardware or software for the
exchange of data.
38 7
Page 41

Mb (Megabit) - One million bits.
Mbps (Megabits per second) - A data transmission speed of one million bits
per second. Data transmissions are typically measured in bits (kilobits,
megabits etc) per second.
MB (Megabyte) - 1,048,576 bytes.
Operating System (OS) - Software that controls the assignment and use of
hardware and application software resources.
Peripheral - A generic term for hard drives, printers, scanners and other discreet devices that add functionality to a computer.
Port - A connection which enables compatible peripherals to send and receive
data.
Software - A set of instructions that enable the computer to perform re-programmed functions in the order specified by the user.
Storage - Any equipment which stores data, such as hard drives, CDs, and
DVDs.
USB (Universal Serial Bus) - An interface technology for the serial transmission of digital data. The original USB standard (USB 1) could transmit data at
speeds up to 12 Mbps. USB 2.0 has a maximum throughput of 480 Mbps –
40 times faster than USB 1.
Page 42

ONE YEAR LIMITED WARRANTY
AcomData warrants this product (the "Product") against defects in material
or workmanship as follows:
1. LABOR: For a period of one (1) year from the original date of purchase from
AcomData or its local representative supplier, AcomData will repair defective
Product (or, at its option, replace with a new or recertified product) at no
charge. After this 1 year period, you must pay for all labor charges.
2. PARTS: For a period of one (1) year from the original date of purchase from
AcomData or its local representative supplier, AcomData will supply, at no
charge, new or rebuilt replacement parts in exchange for defective parts of this
Product. Any replacement parts will be warranted for the remainder of the
original warranty period or ninety(90) days from installation by AcomData. All
exchanged parts replaced under this warranty will become the property of
AcomData.
This warranty only covers the hardware components packaged with the Product.
This warranty does not cover any software contained in, or included with, the
Product; any such software is provided "AS IS". Please refer to any
documentation included with the software for your rights and obligations with
respect to the software.
This warranty extends only to you, the original purchaser. It is not transferable
40 5
Page 43

to any one who subsequently purchases the Product from you.
Proof of purchase in the form of a bill of sale (which is evidence that the Product
is within the warranty period) must be presented to obtain warranty service.
To obtain warranty service you must take the Product, or deliver the Product
freight prepaid, in either it's original packaging, or in a package that provides the
Product with a degree of protection equivalent to that of the original packaging,
to AcomData. Please contact AcomData at the number listed on the reverse
side for further information.
AcomData is not responsible for any damage to, or loss of, any programs, data,
or other information stored on any media or any part of any Product serviced
hereunder. Be sure to remove all features, parts, options, alterations, and
attachments not under warranty prior to returning the Product to AcomData.
AcomData is not liable for any loss or damage to these items.
This limited warranty does not cover: (1) any consumables (such as batteries)
supplied with this product; cosmetic damages; damage or loss to any software
programs, data or removable storage media; or damage due to the Product
such as but not limited to excessive heat or humidity, or modifications of this
Product; (2) improper installation, operation, testing or maintenance of this
Product; (3) power failure or connection to improper voltage supply; or; (4)
attempted repair by any party other than AcomData. This Warranty does not
apply when the malfunction results from the use of this Product in conjunction
with accessories, products or ancillary or peripheral equipment, or where it is
determined by AcomData that there is no fault with this Product itself.
Page 44

This Limited Warranty is invalid if the factory applied serial number has been
altered or removed from the Product.
REPAIR OR REPLACEMENT AS PROVIDED UNDER THIS WARRANTY IS THE
EXCLUSIVE REMEDY OF THE CONSUMER. ACOMDATA SHALL NOT BE LIABLE
FOR ANY INCIDENTAL OR CONSEQUENTIAL DAMAGES FOR BREACH OF ANY
EXPRESS OR IMPLIED WARRANTY, BREACH OF CONTRACT, NEGLIGENCE,
STRICT LIABILITY OR ANY OTHER LEGAL THEORY RELATED TO THIS PRODUCT.
SUCH DAMAGE INCLUDE, BUT ARE NOT LIMITED TO, LOSS OF PROFITS, LOSS
OF DATA, LOSS OF USE OF THE PRODUCT OR ANY ASSOCIATED EQUIPMENT,
DOWN TIME AND PURCHASER’S TIME. EXCEPT TO THE EXTEND PROHIBITED
BY APPLICABLE LAW, ANY IMPLIED WARRANTY OF MERCHANTABILITY OR
FITNESS FOR A PARTICULAR PURPOSE ON THIS PRODUCT IS LIMITED IN
DURATION OF THIS WARRANTY.
Some states do not allow the exclusion or limitation of incidental or
consequential damages, or allow limitations on how long on implied warranty
lasts, so the above limitation or exclusions may not apply to you. This warranty
gives you specific rights; you may have other rights which vary from state to
state.
42 3
Page 45

©2003 AcomData.
The AcomData name and its logos are registered
trademarks of AcomData. "RocketPod",
“DrivePod”, "Stack & Play" and the RocketPod
logo are trademarks used under license by
AcomData. All other trademarks and logos are
the property of their respective owners.
This product is protected by one or more granted
patents and pending patent applications,
including U.S. Pat. Nos. 6,379,191, D445,800
and D448,031.
Prices and specifications are subject to change
without notice.
For more information about AcomData or
AcomData products, visit us on the web at
www.acomdata.com.
PO BOX 5499
Diamond Bar, California
91765-7499
Page 46

Ultra-Portable External
FireWire Hard Drives
Small enough to fit into your
shirt pocket!
External FireWire
Tape Back-up Drives
Remote Wireless
Presentation Mouse
USB 2.0 Hub
USB 2.0 PCI Adapter Card
FireWire PCI Adapter Card
Multi-FLASH!
Memory Card Reader
External USB device reads and
writes all 6 major flash memory
card formats.
mini-FLASH!
Memory Card Reader
External USB device reads and
writes a single flashcard format
Multi Media Viewer
View digital photos on your TV
directly from your CompactFlash
or Smartmedia card
OTHER AWARD
-WINNING
ACOMDATA PRODUCTS FOR YOUR
WINDOWS PC & MACINTOSH:
 Loading...