

Page 1
USER'S GUIDE
PORTABLE HARD DRIVE
ENCLOSURE
FOR 3.5" IDE ATA HARD DISK DRIVES
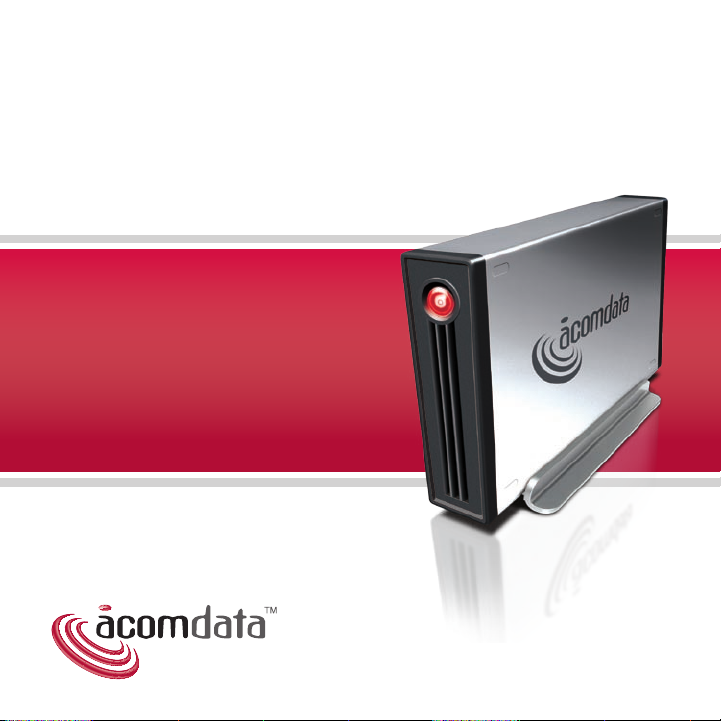
511 Series model shown
Page 2

Contact AcomData
Address: 3410 Pomona Blvd.,
Pomona, CA 91768
Telephone: (909) 348-0680
Fax: (909) 598-8663
Web Site: www.acomdata.com
Customer
Service: customerservice@acomdata.com
Technical
Support: techsupport@acomdata.com
Pre-Sales
Questions: sales@acomdata.com
2
Page 3

Contents
2 Contact AcomData
Getting Started
7 Welcome
9 Precautions
10 Product Registration for Warranty Coverage
11 Package Contents
12 System Requirements for PC
13 System Requirements for Mac
About AcomData 3.5" Hard Drive Enclosures
16 AcomData 3.5" Enclosures at a Glance
18 AcomData 3.5" Enclosures In-Depth
18 Hi-Speed USB 2.0 (USB 2.0 & Combo models
19 FireWire (FireWire & Combo models
20 PushButton™ Backup (511 Series models only
21 Synchronization (Sync) (511 Series models only
21 Fanless Desig
21 Hot-Pluggabl
22 On-Off Switc
n
e
h
3
)
)
)
)
Page 4

22 Mac & PC Ready
23 Understanding "hard drive", "partition" and "volume
25 Technical Specifications
Installation & Setup
27 Installing a 3.5” IDE Hard Disk Drive
27 What you should know before you begin
29 1. Configure Your IDE Drive as a Maste
31 2. Disassemble the Drive Enclosur
33 3
38 4. Re-assemb
39 Setting up the Drive
39 Choosing an Orientation (Vertical or Horizontal
39 Attaching the Stand for Vertical Placemen
40 Affixing the Rubber Feet for Horizontal Placemen
41 Installing the USB 2.0 Driver
42 Connecting the Drive to Your Computer
47 What to do after You Connect the D
48 Verifying that the Drive Mount
50 Re-Naming Your Driv
52 Formatting the Drive
52 About
54 Choosing a file syste
55 Formatting a Drive in Window
. Connect the Drive to the Carrier
le the Drive Enclosure
s
e
Formatting and File Systems
m
s
…
r
e
t
rive
"
)
t
4
Page 5

60 Formatting the Drive in Mac OS X
62 Formatting the Drive
64 Stacking Drives
in Mac OS 9
Drive Use & Maintenance
66 Performing Routine Tasks
67 How to Unmount and Turn Off the Drive
69 Maintaining Your Drive & Safeguarding Your Data
69 Defragmenting and Optimizing a Hard Driv
70 Examining and
71 Protecting Your Data Against Viruse
71 Cleaning the Drive Cas
Repairing a Hard Drive
s
e
Help & Additional Information
73 Frequently Asked Questions (FAQs)
77 Troubleshooting
78 Troubleshooting for Windows User
81 Troubleshooting for Mac User
84 Obtaining Service
85 Purchasing Accessories
86 Glossary of Terms
90 Limited Warranty
92 Notices
5
s
s
e
Page 6

Getting Started
Page 7
Welcome
Welcome, and thank you for
choosing an AcomData 3.5"
Hard Drive Enclosure.
Your AcomData product features
high-quality construction, advanced
engineering, and state-of-the-art
technology, designed to provide years
of reliable performance.
This guide contains important information for the proper installation, use, and care of your AcomData product. Please read this
guide carefully and retain it for future reference.
If your model is equipped with PushButton™ Backup…
If you purchased a 511 Series model, your Enclosure is equipped
with PushButton™ Backup. If you wish to use this feature, first
setup the Drive according to the instructions in this guide. Then
refer to the PushButton™ Backup User's Guide on the included CD.
7
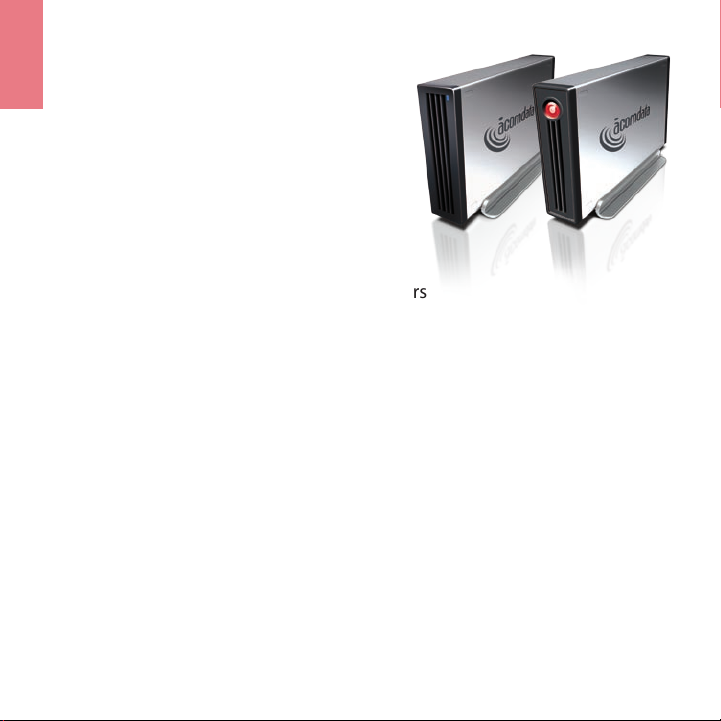
509 series 511 series
w/PushButton™ Backup
Page 8
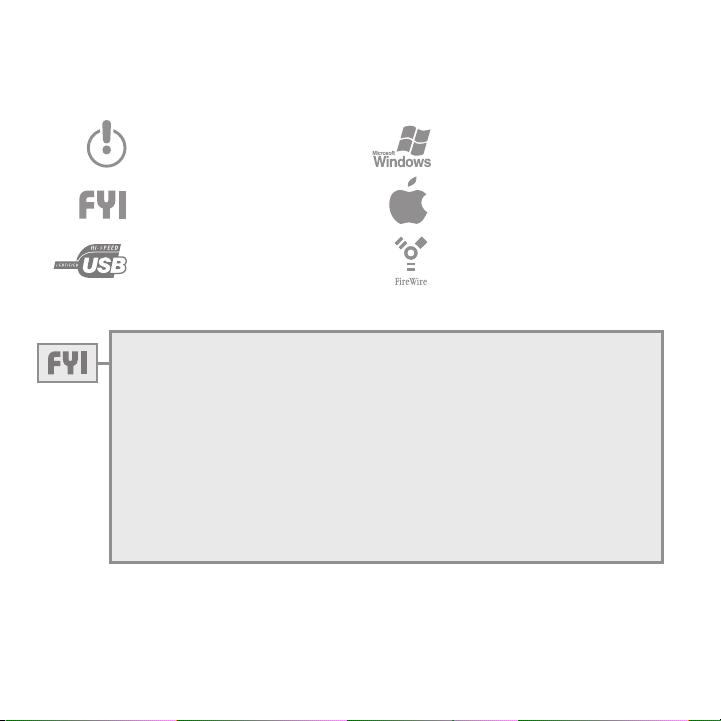
Symbols used in this guide:
This symbol alerTs The reader To a
warning or To some very imporTanT
informaTion.
This symbol alerTs The reader To
helpful Tips and oTher
useful informaTion.
The usb logo alerTs The reader To
imporTanT informaTion specifically
abouT usb.
he windows logo alerTs The
T
reader To imporTanT informaTion
specific To windows users.
The apple logo aler Ts The reader
To imporTanT informaTion specific To
mac users.
The firewire logo alerTs The reader
To imporTanT informaTion specifi-
cally abouT firewire.
"Enclosure" v. "Drive"
In this guide, prior to the installation of an IDE hard disk drive, the product is
referred to as an "Enclosure." An Enclosure with an IDE drive installed is referred
to as a "Drive."
A note about the terms "IDE" and "ATA":
Although the terms "IDE" and "ATA" technically do not mean the same thing, by
industry convention the term "IDE" refers to a hard disk drive that uses an ATA
interface. This guide follows that convention. For definitions of "IDE" and "ATA"
see the Glossary of Terms.
8
Page 9

Precautions
Please follow the precautions below. Failure to do so may result in damage to the
device, loss of data, and voiding of the warranty.
• If using your AcomData product as a general-purpose storage
device (as opposed to a backup device) AcomData strongly recommends that you backup the files stored on the device. AcomData is
not responsible for data loss or corruption; nor will AcomData perform recovery of lost data or files.
• Do not expose the device to damp or wet conditions.
• Never place containers of liquids on the device. This can damage
the device and increase the risk of electric shock, short-circuiting,
fire, or personal injury.
• If the device has a three-prong plug, never plug the device into a
two-prong outlet.
• Do not expose this device to temperatures outside the range of
5°C to 35°C when the device is in operation, and -20ºC to 60ºC
when not in operation.
• Do not use a third-party AC adapter/power cord.
• Do not bump, jar or drop the device.
• Do not try to stand the device in a way not described in this guide.
• Do not disconnect any cables, while the device is powered on,
without first unmounting the device.
9
Page 10

Product Registration for Warranty Coverage
Register your product instantly online at www.acomdata.com.
Once you enter the site, click on the Product Registration button
and follow the instructions on screen.
Advantages of Online Registration:
1. It’s fast, free, and your product is registered immediately;
2. Free unlimited online technical support;
3. You get your own personalized support page:
• download software updates
• access all online support services
• view all of your registered AcomData products
• manage your personal profile;
4. If you need warranty service, arranging product returns is faster
and easier if you registered online.
You may also register via mail by filling out and returning the
Registration Card included in the package.
When registering your AcomData product you will need the model number and
serial number. Both are printed on the product label affixed to the box, and on the
label affixed to the Drive's stand.
10
Page 11
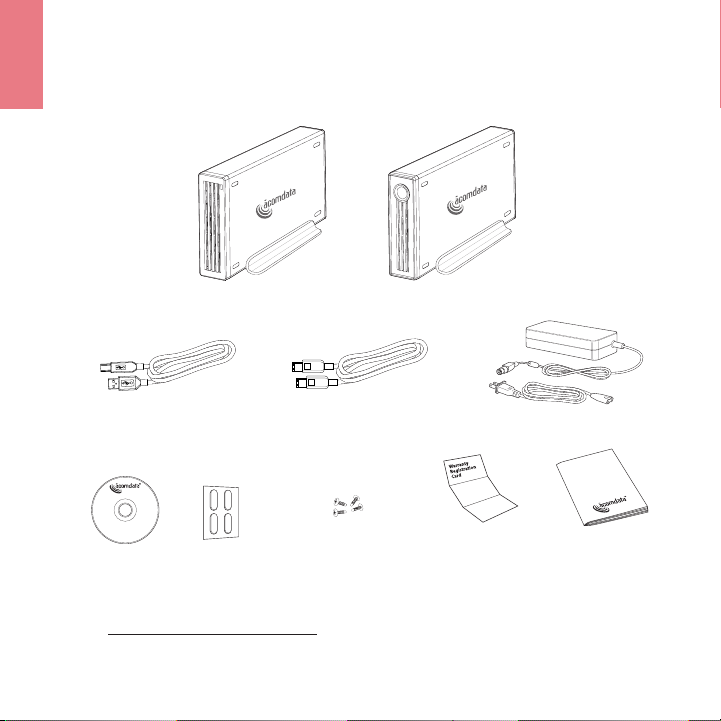
Package Contents
509 Series Enclosure OR 511 Series Enclosure
USB Cable
(USB-equipped models)
CD
FireWire Cable
(FireWire-equipped models)
Hard Disk Drive
Mounting Screws
AC Adapter & Power Cord
Mail-In
Registration CardRubber Feet
If you are missing any item shown above, please contact Customer Service at
customerservice@acomdata.com or call 800-470-4495.
11
Installation
Guide
Page 12

System Requirements for PC
7INDOWS
-ICROSOFT
What you need for the Drive itself:
• Minimum 233 MHz processor (Pentium, Celeron, AMD, etc.)
• Windows XP (Home, Pro, Pro x64, MCE), 2000, Me or 98SE
• Interface connection:
- USB 2.0-equipped models: USB 2.0 or USB 1.1 port
- FireWire-equipped models: 6-pin FireWire port
- Combo models: USB 2.0/1.1 or 6-pin FireWire port
PushButton™ Backup requires:
• 800 MHz or faster processor
• 20 MB of free hard disk space on your computer
IMPORTANT NOTES:
Users of Windows 98SE and Windows 2000 (SP3 or earlier):
You will need to install the supplied USB 2.0 driver. Instructions are provided in "Installing the USB 2.0 Driver."
If using a USB 1.1 connection the device will operate at USB 1.1 speeds
(up to 12 Mbps).
To get Windows updates…
Go to www.microsoft.com and click on the Microsoft Update link.
12
Page 13

System Requirements for Mac
What you need for the Drive itself:
• Mac with a PowerPC or Intel processor
• Mac OS 9 or Mac OS X
• Interface connection:
- USB 2.0-equipped models: USB 2.0 or USB 1.1 port
- FireWire-equipped models: 6-pin FireWire port
- Combo models: USB 2.0/1.1 or 6-pin FireWire port
PushButton™ Backup requires:
• Mac OS 10.3 or later
• 10 MB of free computer hard disk space for the backup software
IMPORTANT NOTES:
If using a USB 1.1 connection the device will operate at USB 1.1 speeds
(up to 12 Mbps).
Mac OS 9 Users:
Mac OS 9 does not support USB 2.0. On Mac OS 9 the Drive will operate at USB 1.1 speeds.
Mac OS 10.2 users with 128 GB or larger hard disk drives:
Mac OS 10.2 will not recognize FAT32/MD-DOS formatted hard disk volumes larger than
13
Page 14

128 GB. This issue only affects Mac OS 10.2. For more information, go to: http://docs.
info.apple.com/article.html?artnum=107483 at the Apple web site.
If you are using Mac OS 10.2 and the IDE hard disk you intend to install in the Enclosure
meets the conditions described above, there are several ways to deal with this issue:
1. If you don’t need Windows compatibility, you can re-format the Drive using the Mac OS
Extended file system. Before you format the Drive, follow the instructions for installing an
IDE hard disk and connecting the Drive to your computer;
2. If you want to maintain Windows compatibility, you can partition the Drive so that no
single partition is larger than 128 GB. Partitioning a hard disk will erase any data stored
on the disk. Go to http://docs.info.apple.com/article.html?artnum=107483 for instructions. Before you partition the Drive, follow the instructions for installing an IDE hard disk
and connecting the Drive to your computer;
3. Before you connect the assembled external Drive to your computer, upgrade to Mac OS
10.3 or later. This option will allow you to maintain Windows compatibility and no partitioning or re-formatting is required.
14
Page 15

About
AcomData
3.5" Hard Drive
Enclosures
Page 16
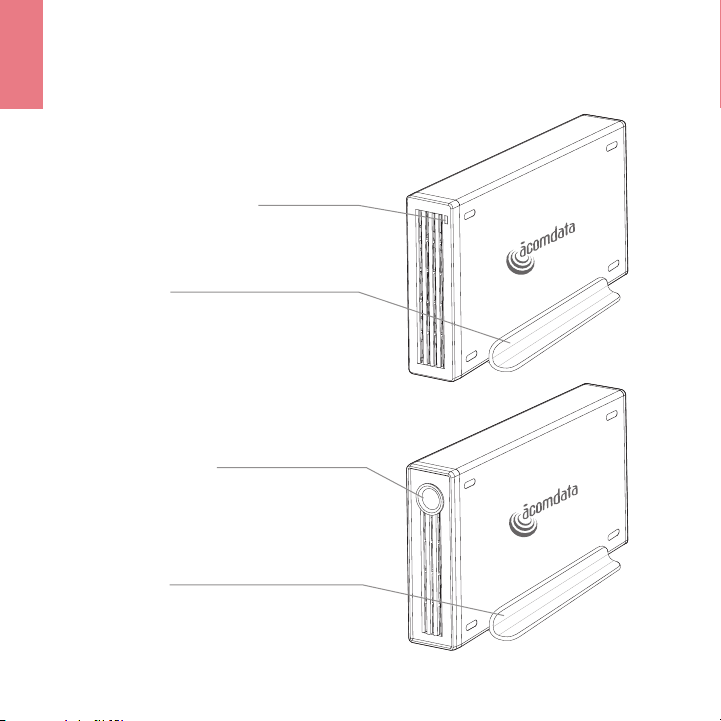
AcomData 3.5" Enclosures at a Glance
509 Series
Power-Data Light
lighTs up solid when The drive is
powered on. flashes when reading
or wriTing daTa.
StanD
can be easily aTTached or removed for
verTical or horizonTal placemenT.
511 Series
PuShButton™
press The pushbuTTon™ To iniTiaTe daTa
backups (requires insTallaTion of The sup-
plied sofTware). The pushbuTTon™ lighTs
up solid when The drive is powered on, and
flashes when reading or wriTing daTa.
StanD
can be easily aTTached or removed for
verTical or horizonTal placemenT.
16
Page 17
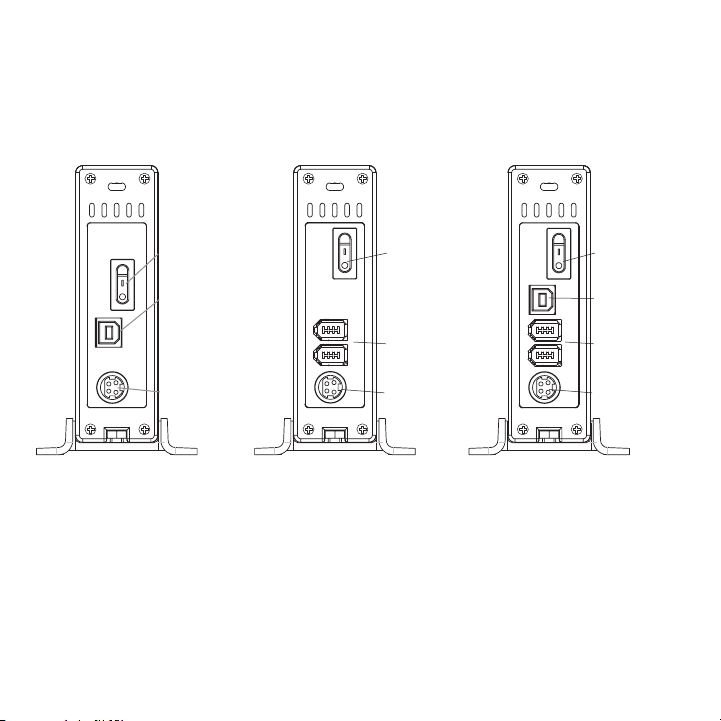
On the back panel:
USB 2.0 Models FireWire Models Combo Models
power swiTch
usb 2.0/1.1 porT
power porT
cTual layouTs may noT be exacTly as shown)
(a
Power Switch
Turn The drive on and off as needed. always
unmounT The drive before Turning iT off. see “how
To unmounT and Turn off The drive” for deTails.
USB 2.0/1.1 Port
usb 2.0-equipped models have a Type b usb 2.0
porT, and your compuTer has a Type a porT, which
correspond To The connecTors of The usb cable.
power swiTch
firewire porTs
power porT
Firewire Por tS
firewire-equipped models have Two firewire porTs
for daisy-chaining wiTh oTher firewire devices.
Power Port
The ac adapTer plugs in here.
17
power swiTch
usb 2.0/1.1 porT
firewire porTs
power porT
Page 18

AcomData 3.5" Enclosures In-Depth
Hi-Speed USB 2.0 (USB 2.0 & Combo models)
USB stands for "Universal Serial Bus." USB 2.0 has a maximum
interface transfer rate (i.e. bandwidth) of 480 Mbps (Megabits per
second). That's 40 times faster than the earlier standard, USB 1.1,
which has a bandwidth of 12 Mbps).
Performance in day-to-day use will depend on many factors,
including: CPU utilization; file system overhead; the number of
active devices on the USB bus; the size, structure and number of
files being transferred, and; the speed at which other devices can
transfer data to/from the Drive. Also, as is the case with any data
I/O (input/output) technology, some bandwidth is taken up by
the protocols that structure and govern data transmissions (this
is called interface overhead). Given these and other factors, in dayto-day use you can expect maximum, sustained transfer rates in the
mid-30s MB/s (Megabytes per second).
Note: The interface transfer rate specification of an I/O technology, such
as USB, is expressed using the bit as the base unit (e.g. Mbps) because this
is the truest way of measuring raw interface performance. However, for
the end user it is more meaningful to express day-to-day transfer rates
using the byte as the base unit (e.g. MB/s) because computer files are
measured in bytes (kilobytes, megabytes, etc.).
18
Page 19

USB 2.0 is backward compatible with USB 1.1. This means you
can connect a USB 1.1 device to a USB 2.0 port, and vice versa.
However, interface transfer rates are limited by the interface with
the lower speed. So, for example, if you plug a USB 2.0 device into
a USB 1.1 port on your computer, data transfer rates will be limited to USB 1.1 speeds.
USB uses a master/slave architecture. This means the computer
(the "master") dictates data flow to, from, and between attached
USB devices (the "slaves"). A single USB bus can support up to 127
USB devices. However, connecting more than a few USB devices to
a computer usually requires the use of one or more USB-equipped
hubs. A typical USB hub can accommodate several USB devices.
FireWire (FireWire & Combo models)
FireWire (IEEE 1394x) can transmit data at up to 400 Mbps.
FireWire supports both isochronous and asynchronous data transfers. Isochronous mode provides guaranteed transmission of data
at defined intervals; it’s used when delayed or out-of-order data
frames are unacceptable, such as for capturing digital video. In
asynchronous mode the intervals between transmissions can vary,
and data can be resent if missed. Asynchronous mode is typically
used for routine data transfers.
FireWire devices can be linked in a daisy-chain, where the devices
19
Page 20

are connected to each other in series. A hub is only required when
a very large number of devices will share the same FireWire bus.
With the use of FireWire hubs, up to 63 devices can be linked on a
single FireWire bus.
Data transmissions between FireWire devices on the same bus
can take place without help from the host computer. This is one of
the reasons FireWire devices are, on average, faster than USB 2.0
devices in routine, day-to-day use, even though FireWire's bandwidth is smaller than USB 2.0's.
Standard FireWire cables use 6-pin connectors at both ends.
Cables with 4-pin connectors are also available for connecting
FireWire devices to laptop computers and to other devices that
have 4-pin ports, such as digital cameras and camcorders.
PushButton™ Backup (511 Series models only)
PushButton™ Backup is a faster, easier way to run routine data
backups. Rather than having to launch a backup utility and set
cumbersome parameters every time you want to backup your
files, all you need to do is press the PushButton™ on your Drive.
Not only does PushButton™ Backup make backups simpler and
more convenient, but since you’re backing up your data to a
high-performance hard drive—as opposed to say, tape or optical
media—backups are also much faster.
20
Page 21

A detailed explanation of the various backup operations available,
as well as full instructions for setting up and using PushButton™
Backup, are provided in the PushButton™ Backup User's Guide,
located on the supplied CD.
Synchronization (Sync) (511 Series models only)
Synchronization, or Sync, is one of the most powerful features
available with your AcomData Drive. While providing the benefits
of data redundancy, the Sync operation synchronizes the data on
two or more hard drives, so you can work from multiple drives without the need to keep track of what files are on which drives.
Sync is one of the operations that can be launched via the
PushButton. A more detailed explanation and instructions are provided in the PushButton Backup User's Guide.
Fanless Design
All hard drives generate heat during normal use. However, the
AcomData 3.5" Enclosure was engineered to dissipate heat so efficiently it doesn’t need a fan. The result is near-silent operation.
Hot-Pluggable
You can turn on/turn off/connect/disconnect the Drive while your
21
Page 22

computer is running. This makes portability much easier, allows
you to use the Drive only when you need it, and saves electricity
too. Always unmount the Drive or turn off your computer before
turning off and disconnecting the Drive. See “How to Unmount
and Turn off the Drive.”
On-Off Switch
The on-off switch allows you to save electricity by turning the
Drive on only when you actually need to use it.
Always unmount the Drive before you turn it off. See “How to Unmount and Turn
off the Drive” for details.
Mac & PC Ready
Your AcomData 3.5" Enclosure is compatible with both Mac and
PC. However the file system used to format your IDE hard disk
drive will affect compatibility. See the chapter "Formatting the
Drive" for more information.
22
Page 23

Understanding "hard drive", "partition" and "volume"
While following the instructions in this guide, you will come across
the terms, "hard drive" (or "hard disk") "partition", and "volume."
These terms can be very confusing because they all seem to refer
to the same thing. While it's true they are closely related, these
terms actually mean different things. The Glossary at the back of
this guide provides definitions of these terms; however, a bit of
explanation is needed in order to truly understand them and how
they relate to each other.
A hard drive (or "hard disk") is a physical device that contains a
set of disks (technically called platters), which store the information saved to the drive. The total amount of usable storage space
available on all of the platters makes up the hard drive's storage
capacity.
A partition is a logically defined amount of storage space on a
hard drive. A hard drive can have one or more partitions. If a hard
drive has only one partition all of the available storage space is
reserved for that partition. If the hard drive has more than one
partition the available storage space is divided among the partitions. Within the limits of the drive's capacity, the user can set the
size of individual partitions.
Partitioning is done when you set up an unformatted hard drive
for the first time. You can also partition a hard drive that contains
data, but the data will be erased.
23
Page 24

Before a computer can utilize a partition on a hard drive, the
partition must be formatted with a file system that the computer
understands. (See "Formatting the Drive" for more information on
file systems.)
A formatted partition is called a volume. When you connect a hard
drive to a computer, the drive icon that you see in My Computer
(Windows) or on the Desktop/Finder (Mac) represents the mounted volume, not the physical hard drive.
If the hard drive has more than one formatted partition, each one
will appear on your computer as a discrete volume—just as if you
had more than one hard drive connected to your computer. The
volumes can even be formatted with different file systems. For
example, if your hard drive has one volume that is formatted with
the Mac OS Extended file system, and one volume that is formatted FAT32, when you connect the drive to a Windows PC, only the
FAT32-formatted volume will mount.
24
Page 25

Technical Specifications
Models: 509 Serie s 511 Series
USB 2.0 ...................................................................................HDEX XU2E3 HDEXXU2PE3
FireWire ..................................................................................HDEXXFE3 HDEX XFPE3
FireWire & USB 2.0 Combo .....................................................HDE XXU2FE3 HDEXXU2FPE3
Dimensions:
(inches) ........................................................................................................4.57 X 1.38 X 8.07
(mm) ................................................................................................................. 116 X 35 x 205
Weight ................................................................................................................. 780 g/1.72 lbs.
Interface transfer rates (max)
USB 2.0 .................................................................................................................... 480 Mbps
FireWire ...................................................................................................................4 00 Mbps
External Power Supply ...................................................................................25 W (UL/CSA/CE)
AC Input ........................................................................................ 10 0–24 0 V, 50/60 Hz, 1.2 A
DC output ........................................................................................12 V @ 1.2 A; 5 V @ 2.0 A
Ambient temp erature
Operating ............................................................................................................... 5ºC – 35ºC
Non-operating ................................................................................................... -20ºC – 60ºC
Relative humidity (non-condensing)
Operating ...................................................................................................... 5% – 95%, 33ºC
Non-operating .............................................................................................. 5% – 95%, 35ºC
25
Page 26

Installation & Setup
Page 27

Installing a 3.5” IDE Hard Disk Drive
What you should know before you begin…
The IDE hard disk that you will be installing in the AcomData
Enclosure is either a legacy drive that was removed from a computer (typically due to an upgrade), or it is a new, raw drive that
you purchased specifically for your AcomData Enclosure. This will
have a bearing on the steps you will need to take in order to prepare the Drive for use on your computer.
Installing a legacy IDE hard disk
If you are installing a legacy IDE hard disk, the disk is already
formatted. If the file system used to format your IDE hard disk is
compatible with your computer's operating system, you will NOT
need to format the assembled external Drive after you connect it
to your computer.
If your IDE hard disk's file system is not compatible with your computer you will need to format the external Drive after you connect
it to your computer. On the other hand, you may simply wish to
re-format the Drive in order to erase all the old data and start
fresh with an empty Drive.
Details on file systems and formatting are provided in the chapter "Formatting the
Drive."
27
Page 28

Installing a new IDE hard disk:
IDE hard disks that are purchased as upgrades are unformatted
(raw). Manufacturers of IDE hard disks furnish partitioning and
formatting software with their drives for this purpose. However,
this software will only work for a drive installed inside a computer;
the software will not work for a drive installed in an external drive
enclosure. Therefore, you will need to partition and format the
assembled external Drive after you connect it to your computer.
Complete formatting instructions are provided in the chapter
"Formatting the Drive."
Regardless of whether you are installing a legacy or raw IDE hard disk, follow the
instructions on the succeeding pages. After the chapter "Connecting the Drive to Your
Computer", you will be guided to the specific instructions that pertain to your situation.
Proceed now to "Step 1: Configure Your IDE Hard Disk as a Master."
28
Page 29

1. Configure Your IDE Drive as a Master
Your IDE drive has a jumper block at the back. It is situated
between the ATA interface connector and the power connector
(see the illustration, next page). The jumper block has an array of
pins. You may need to plug one or more jumpers onto specific
pins in order to configure the drive as a master. Your drive most
likely came with jumpers already attached to the jumper block.
Each IDE drive manufacturer has a different jumper arrangement
for specific drive configurations (master, slave, cable select etc.).
Refer to the instructions that came with your drive and, if necessary, arrange the jumper(s) so that the drive is configured as a
master. You should use small needle-nose pliers or tweezers to
remove/insert jumpers.
If you do not have your drive’s manual, most hard disk drive manufacturers make manuals available for download from their web
sites. Be sure to download the correct manual for your specific
model as jumper configurations can differ from model to model.
29
Page 30

"5"*/5&3'"$&
$0//&$503
+6.1&3
#-0$,
108&3
$0//&$503
+6.1&3
30
Page 31

SCREWS
2. Disassemble the Drive Enclosure
1. Using a Phillips screwdriver, remove
the four screws on the back panel.
2. Remove the back fascia (see illustra-
tion, next page).
3. Grab the front fascia and carefully slide
out the Drive/PCB carrier, which is
attached to the front fascia.
usb 2.0 model shown
31
Page 32

FRONT FASCIA WITH
ATTACHED METAL
DRIVE/PCB CARRIER
BACK FASCIA
When handling the Drive/PCB carrier, never touch the PCB (printed circuit board).
It contains sensitive electronics that can be easily damaged.
32
Page 33

3. Connect the Drive to the Carrier
"5"*/5&3'"$&
$0//&$503
%3*7&1$#
$"33*&3
'30/5
'"4$*"
1$#
108&3
$"#-&
%3*7&.06/5*/(
)0-&4
The Drive/PCB carrier contains the ATA interface connector and
the power cable, which are attached to the PCB (printed circuit
board). The power cable is tethered to the board via flexible wires.
The ATA interface connector is hard-wired (rigidly fixed) to the
PCB (see illustration below).
33
Page 34

1. Place the Drive/PCB carrier flat on a table or desk. Take your IDE
108&3
$0//&$503
drive in one hand and plug the power cable into the drive’s power
connector, making sure to insert it all the way. (The connector is
shaped such that it can only be inserted one way.) Do not let go of
the drive.
34
Page 35

"5"*/5&3'"$&
$0//&$5034
2. With the power cable connected, hold the IDE drive at a slight
angle as shown in the illustration below. Carefully align the drive’s
ATA connector to the ATA connector on the Drive/PCB carrier.
Being to push the drive onto the connector. When the connector
is only partially inserted, gently lower the drive so that it comes to
rest on the carrier.
35
Page 36

"5"*/5&3'"$&
$0//&$5034
3. With the drive resting on the Drive/PCB carrier, slide the drive as
shown below until the ATA connector is fully inserted.
36
Page 37

4. Hold the drive and Drive/PCB carrier firmly together in one hand
IDE HARD DISK DRIVE
and turn the carrier over to view the underside. As shown in the
illustration below the four screw holes in the drive should line up
with four holes on the carrier.
5. While holding the drive firmly against the carrier, screw the drive
to the carrier using the supplied screws. Make sure all screws are
secure and that the drive is firmly mounted to the carrier.
37
Page 38

4. Re-assemble the Drive Enclosure
1. Carefully slide the Drive/PCB carrier back into the Drive Enclosure,
making sure that the fascia is properly seated and pressed tightly
against the enclosure’s edge.
2. Place the back fascia back onto the enclosure, making sure it is
properly seated and pressed tightly against the enclosure’s edge.
3. Screw the back fascia back onto the enclosure.
38
Page 39

Setting up the Drive
Place the Drive on a sturdy, flat surface. Do not place the Drive on an unstable or
makeshift base, such as a stack of books, that may be prone to collapse or toppling.
Choosing an Orientation (Vertical or Horizontal)
The AcomData 3.5" Enclosure can be placed on your desktop in
either the vertical or horizontal position. If you do not plan to stack
on additional AcomData Drives, we recommend the vertical position, as this orientation takes up the minimum amount of desktop
space. Also, the Power-Data Light will be higher up, so there is less
chance it will get obstructed from view by other items on your desk.
Attaching the Stand for Vertical Placement
1. Place the stand on your desk or
tabletop, as shown.
2. Place the Drive in the stand so
that the Drive and the stand are
centered (as shown). Make sure
the Drive is fully inserted.
39
Page 40

Do not discard the stand. Your Drive’s Model and Serial numbers may be printed on
a label affixed to the stand. If this is the case, in the event that you need warranty
service, you will need to send us the stand along with the Drive itself.
Affixing the Rubber Feet for Horizontal Placement
It is highly recommended you use the supplied rubber feet for
horizontal placement and stacking of Drives. The feet help keep
the Drive securely in place, and they also prevent the Drive case
from possibly scuffing your desktop.
1. Decide wether you want the Power-Data Light to be located on
the left or right side when the Drive is in the horizontal position,
and select the appropriate side on which to
affix the feet.
2. Remove one of the rubber feet from
the paper backing and carefully
position the foot inside one of
the four oblong indentations, with the adhesive
side down. Once the foot is
properly positioned, press
down firmly to secure it in
place. Repeat for the other
three feet.
40
Page 41

Installing the USB 2.0 Driver
If you are using Windows 98SE or Windows 2000 (Service Pack 3 or
earlier) and the USB 2.0 interface, you need to install the USB 2.0
driver on the supplied CD before connecting the Drive. Follow the
instructions below. All other users can proceed to "Connecting the
Drive to Your Computer."
1. Insert the CD into your computer's CD/DVD drive.
2. On the splash screen that appears, select "Install USB 2.0 Driver."
3. Follow the instructions in the InstallShield Wizard.
On the final screen of the InstallShield Wizard, you will be given
the option to restart your computer. (You must restart your com-
puter in order to make the software active.) Make sure the "restart"
option is selected and click Finish. Do not remove the CD until
after the computer restarts.
4. After your computer restarts, you can remove the CD.
Proceed to "Connecting the Drive to Your Computer."
41
Page 42

Connecting the Drive to Your Computer
"$POOFDUPS #$POOFDUPS
64#DBCMF
IMPORTANT NOTES FOR USB USERS:
If you plan to connect the Drive to a USB hub…
We recommend that you first connect the Drive directly to your computer. Once the installation has been successfully completed you can then connect the Drive to a USB hub
if you wish. This approach will simplify troubleshooting if you experience a problem.
About the USB cable:
Each end of the USB cable has different connectors called
Type 'A' and Type 'B'. The 'A' connector plugs into your
computer or USB hub. The 'B' connector plugs into the
Drive. Be sure to correctly insert the connectors, or you
may damage the Drive and void the warranty.
IMPORTANT NOTES FOR FIREWIRE USERS:
About the FireWire cable:
The FireWire cable has identical 6-pin connectors at
each end, so it does not matter which end you plug into
your computer and which end you plug into the Drive.
However, the connectors are designed to go in only one
way, so be sure to correctly insert the connectors or you
may damage the Drive and void the warranty.
42
Page 43

If you plan to connect the Drive to a laptop…
If your laptop is equipped with a 4-pin FireWire port, you will need a 6-pin to 4-pin
FireWire cable (sold separately). You can purchase FireWire cables at your local
computer reseller. You can also purchase cables direct from AcomData. See "Purchasing
Accessories" for details.
About daisy-chaining FireWire devices:
FireWire-equipped Enclosures have two FireWire ports for the purpose of daisy-chaining. When you daisy-chain devices, the first device in the chain is connected to the
computer. The other devices in the chain are connected one after the other in series.
If you wish to include the Drive in a FireWire daisy-chain, we recommend that the first
time you connect the Drive you connect it directly to your computer with no other devices
attached to the Drive. Once the installation has been successfully completed, you can
then daisy-chain the Drive if you wish. This approach will simplify troubleshooting if
you experience a problem.
43
Page 44

AC Adapter
USBCable
Power Cord
To AC outlet
(If plug has three
prongs, be sure to
plug into a threeprong outlet.)
USB Type B
Connector
USB 2.0/1.1
Port
Power Port
Power Switch
(Combo model shown)
USB Type A
Connector
Plug into a
USB 2.0 /1.1 port
on your computer
or USB hub
Connecting via USB 2.0/1.1
Refer to the illustration below when following the instructions on page 46.
44
Page 45

Connecting via FireWire
AC Adapter
FireWire Cable
Power Cord
To AC outlet
(If plug has three
prongs, be sure to
plug into a threeprong outlet.)
FireWire
Connector
Plug into a 6-pin
FireWire port on
your computer or
other FireWire device
FireWire
Connector
FireWire
Port
Power Port
Power Switch
(Combo model shown)
Refer to the illustration below when following the instructions on page 46.
45
Page 46

Before you connect the Drive, we recommend you re-start your computer.
1. Plug in the AC adapter and power cord:
1) The pins of the AC adapter connector are arranged
such that the connector can be inserted into the
Drive’s Power Port only one way. Orient the connector correctly and insert it into the Power Port.
It should not require much force to plug in. Do not force
the connector or you may damage it and/or the Drive and
void the warranty. If the connector will not go in, check the orientation
and try again.
2) Plug the power cord into the socket in the AC adapter. Plug the
other end into an AC outlet. If the power cord has three prongs,
be sure to plug the cord into a three-prong (grounded) outlet.
2. Connect the interface cable:
If using a USB interface…
1) Plug the Type A connector of the USB cable into a USB 2.0 or
USB 1.1 port on your computer.
2) Plug the Type B connector into the USB 2.0 port on the Drive.
The connectors can only be plugged in one way, so be sure to orient
them correctly.
If using FireWire…
1) Plug one end of the FireWire cable into a 6-pin FireWire port on
46
Page 47

your computer. The FireWire connectors are identical so it does not
matter which end you plug into your computer.
2) Plug the other end into one of the FireWire ports on the Drive. It
does not matter which port you use.
The connectors can only be plugged in one way, so be sure to orient
them correctly.
4. Turn on the Drive:
Flip the power switch on the back of the Drive to turn it on.
What to do after You Connect the Drive
If you installed a legacy IDE hard disk in the Enclosure…
If the file system used to format your IDE hard disk is compatible with your computer, proceed to the section "Verifying that
the Drive mounts" now. (See the chapter "Formatting the Drive" for
information on file formats and OS compatibility.)
If the file system of your IDE hard disk is not compatible with your
computer, proceed to "Formatting the Drive" now.
If you wish to re-format your Drive, follow the instructions in
"Verifying that the Drive mounts" first, then proceed to the chapter "Formatting the Drive."
47
Page 48

If you installed a raw IDE hard disk in the Enclosure…
The Drive will power on but your computer will not mount
the Drive; it must be formatted first. Proceed to the chapter
"Formatting the Drive" now.
Verifying that the Drive Mounts
Windows XP/2000/Me Users:
Once the Drive is powered on, in a few moments it should mount,
and a new drive icon/letter will appear in My Computer/Windows
Explorer. If your IDE drive has two or more mountable volumes,
each volume will mount with a separate drive icon.
Your Drive is now ready to use as a general-purpose data storage
device. Before using your Drive, we recommend that you explore
the rest of this guide; it contains valuable information that will
help you get the most from your Drive.
If you have a PushButton™ Drive and you wish to use the PushButton™
Backup feature, see the PushButton™ Backup Users' Guide on the CD.
Windows Me users:
If the Drive will not mount you will need to update your Windows Me.
Go to www.microsoft.com and click on the Microsoft Update link.
48
Page 49

Mac Users:
Once the Drive is powered on, in a few moments it should mount,
and a new drive icon will appear on the Desktop and in the Finder.
If your IDE drive has two or more mountable volumes, each volume will mount with a separate drive icon.
Your Drive is now ready to use as a general-purpose data storage
device. Before using your Drive, we recommend that you explore
the rest of this guide; it contains valuable information that will
help you get the most from your Drive.
If you have a PushButton™ Drive and you wish to use the PushButton™
Backup feature, see the PushButton™ Backup Users' Guide on the CD.
49
Page 50

Re-Naming Your Drive
7INDOWS
-ICROSOFT
This section shows you how to change a volume label (name) of an already formatted
volume/Drive. If your IDE hard disk was not already formatted, or if you wish to re-format the Drive go to "Formatting the Drive" now. You will have the opportunity to assign
a volume label during the formatting setup process.
Windows Users:
Option 1:
1. Go to My Computer and click on the icon of your AcomData Drive.
2. With the icon highlighted, go to the File menu and select
Properties.
3. Under the General tab of the Properties window, type a name in
the text field beside the Drive icon. Click Apply and then click OK.
Option 2:
1. Go to My Computer and right-click on the icon of your AcomData
Drive.
2. In the pop-up menu, select Rename.
3. Enter a new name in the icon label and press Return.
50
Page 51

Mac Users:
Option 1:
1. Click on the icon of your AcomData Drive on the Desktop and
press Return to highlight the label.
2. Type in a new name and press Return. You may be required to
enter an administrator password before the change is accepted.
Option 2:
1. Select the icon of your AcomData Drive, either on the Desktop or
in the Finder.
2. In the Finder menu, go to File > Get Info. The Info window will
open.
3. In the "Name & Extension:" field type in the new name and then
close the Info window.
51
Page 52

Formatting the Drive
Follow these instructions if you installed a raw IDE hard disk in the AcomData Enclosure,
or if you wish to re-format the Drive.
Formatting a hard disk erases all data stored on the disk! Before you format or
partition the Drive, be sure to save a copy of any files you wish to keep to another
storage device.
About Formatting and File Systems
Before a hard disk can be used to store data it must contain one
or more partitions, and each partition must be formatted with
a given file system. ("Formatting" is also commonly referred to as
"Initializing" on the Mac OS.)
A file system defines the disk’s directory structure for keeping
track of and accessing files. It also governs other features, such
as the way files are named, the maximum allowable size of a file or
volume, and the disk's allocation unit size (the smallest unit of data
storage on a disk).
52
Page 53

About the most common file systems:
• FAT32 is the standard file system used on Windows 98SE and Me,
and is supported under Windows XP, 2000 and the Mac OS. Think of
FAT32 as the "universal" PC and Mac file system.
• NTFS is the primary file system for Windows XP and 2000. NTFS offers
more advanced features than FAT32, including support for files larger
than 4 GB. NTFS cannot be used on Windows 98SE or Me. NTFS cannot be used on the Mac OS, with the exception that Mac OS 10.3 and
higher can read, but not write to NTFS-formatted volumes.
• Mac OS Extended (HFS Plus) is the most common file system used
on Macs. It is not compatible with Windows. Depending on which
version of the Mac OS you have, you have the option to use journaled
and case-sensitive HFS Plus file systems. For an explanation of journaling, go to http://docs.info.apple.com/article.html?artnum=107249. For
an explanation of the case-sensitive option, go to http://docs.info.
apple.com/article.html?artnum=107863.
• MS-DOS is the Windows/Mac-compatible file system available on
the Mac OS. It is equivalent to FAT32.
53
Page 54

Choosing a file system
If you plan to use the Drive only on Windows XP or 2000, we
recommend formatting the Drive with the NTFS file system.
If you plan to use the Drive only on a Mac, we recommend for-
matting the Drive with the Mac OS Extended file system.
If you need cross-platform compatibility you have two
options:
1. Format the Drive on a Windows PC with the FAT32 file system.
2. Format the Drive on Mac OS 10.3 or later with the MS-DOS file sys-
tem.
54
Page 55

Formatting a Drive in Windows
If you installed a new, raw IDE hard disk in the Enclosure…
Go the section "Formatting a Raw Drive in Windows."
If you installed a legacy IDE hard disk in the Enclosure…
Find the section "Formatting a Legacy Drive in…" that pertains to
your specific Windows operating system.
Formatting a Raw Drive in Windows
When you format a raw hard drive in Windows, the first step is partitioning the drive.
This section provides instructions for creating a primary partition only. For instructions
on creating multiple partitions, consult the Help and Support Center in Windows.
1. Right-click on My Computer and select Manage in the pop-up
menu.
2. In the Computer Management window, expand the Storage folder,
then select Disk Management.
3. The Disk Management window has two sections. The upper sec-
tion lists the volumes currently mounted to your computer. The
lower section shows the disks connected to the computer. In the
lower section, locate for the disk with the capacity closest to your
55
Page 56

AcomData Drive. This will be Disk 1, or Disk 2 etc. Disk 0 is the "C"
drive (your computer's startup disk); leave this alone.
4. Right-click on the right-hand box. In the pop-up menu select
Delete Partition… Under "Disk" it will now say “Online." In the righthand box is will now say “Unallocated.”
5. Right-click on the box and select Create/New Partition… in the
pop-up menu. The Partition Wizard will launch; click Next.
6. In the Select Partition Type screen, select Primary partition and
click Next.
7. In the Specify Partition Size screen specify the amount of disk
space you wish to allocate to this partition. The default setting will
be the maximum. Leave it at this setting and click Next.
8. In the Assign Drive Letter or Path screen, assign a drive letter and
then click Next.
9. In the Format Partition screen, click on the radio button that says
"Format this partition…"
10. In the File system field, select a file system.
11. In the volume label field, type a unique name for your Drive that
will distinguish it from other devices attached to your computer.
Leave the Allocation unit size field at the default setting.
12. If you check Quick Format the formatting process will take just a
56
Page 57

few minutes, but will do less verifying of the Drive. If you leave it
unchecked, a Full format will be performed. This will take about
30-90 minutes.
13. In the Completing the New Partition Wizard screen you will see a
summary of the settings you selected. Click Finish.
14. Once the format is complete, in the Disk Management window,
the right hand box next to the Disk listing will show the name of
your Drive with the drive letter. The status of the Drive should now
be "Online" and "Healthy." The new volume should also appear in
the volume list window.
15. To view the properties of the Disk or volume right-click on the
Disk box or the volume box and select Properties.
Formatting a Legacy Drive in Windows XP or 2000
1. Disable any anti-virus software you may have running.
2. Double-click on My Computer. In the My Computer window you
should see the icon/drive letter for the AcomData Drive.
3. Right-click the AcomData Drive icon and select Format… in the
pop-up menu. The Format dialog box will appear.
4. Under Capacity, verify the Drive capacity. It should be close to the
stated capacity of your Drive in gigabytes.
5. In the File System pop-up menu, select the file system (NTFS is rec-
57
Page 58

ommended for use on Windows XP and 2000).
6. In the Allocation unit size pop up, select “Default allocation size.”
7. In the Volume label field, type in a unique name for the Drive that
will distinguish it from other storage devices.
8. Under Format options you can check Quick Format. If you leave it
unchecked Windows will run a Full format. A Full format will take
about 30-90 minutes. A Quick format will take just a few minutes,
but will do less verifying of the Drive.
9. Click Start. Once the format process is complete, the Drive will be
ready to use.
Formatting a Legacy Drive in Windows 98SE or Me
1. Disable any anti-virus software you may have running.
2. Double-click the My Computer icon. In the My Computer window
you should see an icon/drive letter for the AcomData Drive.
3. Right-click the Drive letter and select Format. In the Format win-
dow, verify the Drive’s capacity; it should be close to the stated
capacity of your Drive in megabytes.
4. Under Format type, select Full; everything else should be left at the
default setting. In the Label field, under Other options, you may
assign a name to the Drive that will allow you to easily distinguish
58
Page 59

it from other storage devices. (Limit 8 characters; no symbols.)
5. Click Start. The following warning will appear: “This device is either
a hard disk or a large removable disk. Formatting it will destroy all
files currently on the drive. Are you sure you want to format this
drive?” If the Drive contains no data or you already backed up the
data you wish to keep, click OK.
6. If you see a warning from an antivirus program, click Exclude.
7. When formatting is complete, you will be asked to run a thorough
Scandisk. (Periodically running Scandisk is a part of regular hard
drive maintenance.) If you do not wish to run Scandisk at this time,
close the Format window.
59
Page 60

Formatting the Drive in Mac OS X
1. If you installed a raw IDE hard disk in your Enclosure…
After you connect the external Drive to your computer you will get
the following alert message: "You have inserted a disk containing
no volumes that Mac OS X can read." Click the Initialize button to
launch the Disk Utility application in Mac OS X, and then proceed
to step 2.
If you installed a legacy IDE hard disk in your Enclosure…
The Drive should have mounted after you connected it to
your computer. Launch Disk Utility in the Applications folder
(Applications > Utilities > Disk Utility), and proceed to step 2.
If your legacy IDE disk was formatted NTFS and you are using
Mac OS 10.2 or earlier…
The computer will not recognize the Drive and you will get the
alert message: "You have inserted a disk containing no volumes
that Mac OS X can read." Click the Initialize button to launch the
Disk Utility application in Mac OS X, and then proceed to step 2.
2. The Disk Utility window will open with a small window at left and
a larger window with a series of tabs at the top. In the small window at the left, click on the drive icon with the capacity that most
closely matches the capacity of your Drive.
60
Page 61

3. Click on the Erase tab. In the Erase window you will see a Volume
Format pop-up menu and a Name field.
4. From the Volume Format pop-up, select Mac OS Extended. (With
Mac OS 10.3 and later, you have the option of selecting Mac OS
Extended (Journaled). We recommend this option, if available. For
information on journaling, go to: http://docs.info.apple.com/article.
html?artnum=107249)
5. In the Name field, type in a unique name for this Drive/volume
that will allow you to easily distinguish it from other storage devices attached to your computer.
6. Click Erase. You should see an alert message: “Erasing a disk will
destroy all information on all of the volumes of the disk…” Click
Erase. Once initializing is complete, you should see the Drive listed
in the Disk Utility window with whatever name you assigned. Quit
Disk Utility. You should now see the Drive icon on the Desktop and
in the Finder.
61
Page 62

Formatting the Drive in Mac OS 9
1. If you installed a raw IDE hard disk in your Enclosure…
After you connect the external Drive to your computer you will get
the following alert message: "This disk is unreadable by this computer.
Do you want to initialize this disk?" Click OK and then skip to step 4.
If you installed a legacy IDE hard disk in your Enclosure…
Proceed to step 2.
2. Insert the Mac OS 9 System Software CD that came with your com-
puter. Restart the computer and hold down the C key while the
computer is starting up.
3. You will see the alert message: “This disk is unreadable by this
computer. Do you want to initialize this disk?” Click OK.
4. In the Name field, type in a unique name for your Drive that will
allow you to easily distinguish it from other storage devices.
5. From the Format menu, select Mac OS Extended.
6. Click Initialize. You should then get the alert message: “Initializing
will erase all information on this disk.” Click Continue. Once initializing is complete, you should see the Drive mounted on your
Desktop with the name you assigned.
7. If you followed steps 2 and 3 above, go to Control Panels-->
Startup Disk and select the computer’s startup disk. Restart the
62
Page 63

computer. If you skipped steps 2 and 3, you do not need to restart
your computer.
63
Page 64

Stacking Drives
We designed AcomData 3.5" Hard Drive Enclosures to be stackable so that you can add even more hi-performance data storage
without taking up any more desktop space.
For this section we assume that you already have an AcomData
Drive installed on your system, and that the Drive is placed in the
horizontal position.
1. Follow the steps in the section “Affixing the Rubber Feet for
Horizontal Placement."
2. Place one Drive onto the other, making sure the feet of the second
drive are properly seated in the foot indentations of the first drive.
3. Follow the instructions in the section “Connecting the Drive to
Your Computer" to connect the new Drive.
64
Page 65

Drive Use & Maintenance
Page 66

Performing Routine Tasks
Opening Files and Folders
1. Double-click on the Drive icon. A window showing the Drive's con-
tents will appear.
2. Double-click on the file or folder that you want to open.
Copying Files and Folders to Your Drive
1. Single-click the file or folder you want to copy in order to highlight
it.
2. Go to “Edit --> Copy.”
3. Double-click the Drive icon to open it. If you want to copy the file
or folder to a specific folder on the Drive, double-click that folder
to open it.
4. Go to “Edit --> Paste.” The file or folder will copy over.
66
Page 67

How to Unmount and Turn Off the Drive
Before a hard drive can be used it must be "mounted" to a computer, which means the operating system has recognized the
drive as a usable volume and established a communications link
with it. (If the drive contains more than one recognizable partition,
each partition will mount as a separate volume.)
Before you turn off or disconnect a hard drive, you must unmount
its mounted volume(s).
Never turn off or disconnect a hard drive without unmounting it first. You may lose
data or damage the drive.
Windows Users
1. In the Taskbar at the bottom of your screen, click the Safely Remove
Hardware icon (the icon with the green arrow). A pop-up message
will appear with a list of devices connected to your computer.
2. Select the AcomData Drive. After a few seconds the Drive will
unmount and Windows will give you a message that it is safe to
remove the device.
3. Click OK. You can then safely turn off and/or disconnect the Drive.
67
Page 68

Mac Users
Option 1: From the Desktop:
Drag the Drive's icon to the Trash. After the icon disappears from
the Desktop you can safely turn off and/or disconnect the Drive.
Option 2: From within the Finder:
Locate the Drive icon in the Sidebar. Click the eject symbol (the
triangle with the bar underneath) next to the icon. After the icon
disappears you can safely turn off and/or disconnect the Drive.
Whether you are using a Mac or a PC…
When you shut down your computer the Drive will unmount automatically. After
the computer has shut down you can safely turn if off and/or disconnect it.
68
Page 69

Maintaining Your Drive & Safeguarding Your Data
A hard drive is a very sophisticated and sensitive device that
requires proper care and maintenance to ensure the longest possible life, reliable operation and—most importantly—the integrity
of your stored data.
Defragmenting and Optimizing a Hard Drive
A hard drive stores data on disks called platters. Each platter surface
is divided into concentric tracks. Each track is divided into sectors.
A group of sectors, called a cluster or allocation unit, is the smallest
unit of data storage space.
When data is saved to a new hard drive, it is written to the disk
contiguously, one cluster after another. As old files are erased,
clusters that were previously occupied become available for new
data. However, there may not be enough space for the drive to
write a new file in a contiguous set of clusters. The drive uses the
clusters it can; if more are needed it searches for empty clusters in
other locations on the disk(s). The result is a fragmented file.
Over time, as old files are erased and new files are written, the
data becomes increasingly fragmented. The more fragmented a
disk becomes, the longer it takes to read and write data because
69
Page 70

the Drive’s read/write mechanism spends more time searching for
fragments or free clusters.
We recommend using defragmentation and optimization software to maximize storage efficiency and optimize performance.
Optimization re-organizes files so that the files you use most often
can be accessed more quickly. Defragmentation (defragging) consolidates file fragments into more efficient contiguous clusters.
Examining and Repairing a Hard Drive
There are a number of reasons why a hard drive may become damaged or the data may become corrupted. Regular examination of a
hard drive with a quality diagnostic and repair utility is the best way
to prevent irreparable disk damage and avoid data loss.
There are several software packages available that offer a suite of
disk management and repair utilities, including defragmentation,
optimization, repair, erased file recovery and more. How often you
should perform maintenance depends on how much you use the
drive. If you use your hard drive on a daily basis, it’s a good idea to
examine it for damage about once a month.
Some maintenance and repair operations can take quite some
time, so it’s wise to perform hard drive maintenance at times when
you don’t need to use your computer. The good news is that, for
the most part, you won’t need to tend to the computer while the
software performs these operations.
70
Page 71

Protecting Your Data Against Viruses
One of the greatest threats to your data comes from viruses, trojan
horses and worms. These are insidious programs created by malefactors. Some are designed to render your computer inoperable;
others will erase data. The worst part is you may not be aware that
your system has been infected until it’s too late.
The most common way computers become infected is by unwittingly downloading and sharing these files via e-mail and other
Internet services. You can protect your data by using ant-virus
software. There are a number of good anti-virus programs on the
market for both PC and Mac.
Cleaning the Drive Case
Always unplug all cables from the Drive before cleaning it. Clean
the Drive using a soft, dry cloth. For tough dirt, dampen a soft
cloth with some neutral detergent diluted in 5 to 6 parts water;
wipe off the dirt, then wipe off the Drive with a dry cloth. Do not
use alcohol, paint thinner, or other chemicals; they may damage
the case materials.
71
Page 72

Help & Additional Information
Page 73

Frequently Asked Questions (FAQs)
Q: Can I use my Drive on two computers at the same time?
A: No. The Drive can only be used with one computer at a time. If
you connect the Drive to two computers at the same time, you
may damage the Drive and the computers.
Q: Do I have to format the Drive prior to using it?
A: If the IDE hard disk drive you installed in the AcomData Enclosure
was already formatted you do not need to format the Drive as long
as the file system used is compatible with your computer's operat-
ing system. If the IDE drive was not formatted, you will need to
format it before your computer will recognize the Drive. See the
chapter "Formatting the Drive" for more information and format-
ting instructions.
Q: Can I use the Drive on multiple operating systems?
A: Yes. Your AcomData Enclosure is compatible with both Mac and
PC. However the file system used to format your IDE hard disk drive
will affect compatibility. See the chapter "Formatting the Drive" for
more information.
Q: What is the difference between FAT32 and NTFS?
A: FAT32 is an older and more compatible file system but it has
certain limitations, such as file size (maximum 4 GB). NTFS is more
73
Page 74

secure and has fewer limitations.
The NTFS file system can only be used on Windows XP and 2000. If
you plan to use your AcomData Drive on Windows 2000 and/or XP
only, consider re-formatting the Drive using the NTFS file system. If
you plan to use the Drive on a Mac OS only, consider re-formatting
the Drive using the Mac OS Extended file system.
Q: Where are the drivers for XP, 2000 and Me?
A: The drivers for Windows XP, 2000 and Me are built into the oper-
ating system. No additional drivers are needed. However, you may
need to upgrade your Windows OS. See “System Requirements” for
more information.
Q: Can I connect the Drive to a USB expansion card?
A: Yes, but you may need to update the software/firmware for the
card. We recommend you check with the card’s manufacturer for
the latest updates.
Q: Is the Drive compatible with Windows 95, 98FE, or NT 4.0?
A: No.
Q: What is the cache (buffer) size on my AcomData Drive?
A: Cache memory resides on the actual IDE hard disk drive you install
in the Enclosure. Most IDE disk drive manufacturers publish cache
sizes on their web sites.
74
Page 75

Q: Can you make the Drive bootable?
A: Windows does not support the use of external hard drives as
startup disks. On a PowerPC-based Mac you can use a FireWire hard
drive as a startup disk. On Intel-based Macs you can also use a USB
hard drive as startup disk.
Q: Why doesn’t the Enclosure have a fan?
A: Heat generation can be an issue with some hard drives, which is
why they often have big, noisy fans. The AcomData Enclosure was
engineered to be so efficient at dissipating heat that it does not
need a fan. The result is near-silent operation.
Q: Why is the capacity of my Drive, as shown in Windows or
Mac OS, lower than the Drive’s stated capacity?
A: The difference is mostly due to the way Windows and Mac oper-
ating systems measure hard disk capacity, as compared to the
method used by hard drive manufacturers. Hard drive manufactur-
ers have always used the decimal (base 10) method, where 1GB =
1,000 MB = 1,000,000 KB = 1,000,000,000 bytes. Windows and Mac
operating systems use the binary (base 2) method, where 1GB =
1,024 MB = 1,048,576 KB = 1,073,741,824 bytes.
For example: 120 GB (decimal) = 111.8 GB (binary). How did we get
that number? Using the decimal method, 120 GB = 120,000,000,000
bytes. To convert that to binary we divide 120,000,000,000 by
1,073,741,824, which equals 111.8. Therefore, a 120 GB hard drive
75
Page 76

partition will mount as approximately a 111.8 GB volume on your
computer's OS. The reason the number will be approximate is
because the actual number of available bytes of storage on a 120
GB hard drive will not be exactly 120,000,000,000. It is actually a
bit more than that. We just round down the figure to 120 GB for
simplicity's sake.
Hard drive manufacturers use the decimal method because it is
simpler and less confusing to consumers who may not be familiar
with the base 2 number system. Manufacturers of operating sys-
tems do not need to concern themselves with this issue, so they
typically use the more traditional binary method.
Q: Can I use my AcomData Drive to copy an operating system
from one computer to another?
A: You cannot transfer an installed operating system to another com-
puter or hard drive simply by copying the operating system’s files.
In order to install an operating system, you’ll need to follow the
manufacturer’s installation procedure. If you wish to transfer the
contents of one startup (boot) disk to another, you will first need
to properly install the operating system on the target disk. You can
then use your AcomData Drive to copy over your files (except the
operating system).
Q: Does AcomData provide data recovery services?
A: AcomData does not provide data recovery services.
76
Page 77

Troubleshooting
If you experience a problem with your AcomData product, you
should take the following actions in the order specified:
1. Make sure you followed the instructions in this guide.
2. Consult the Troubleshooting sections of this guide.
3. If the issue you are having is still not resolved, contact Technical
Support using one of the following options:
a) via the online Technical Support form at www.acomdata.com;
b) via e-mail at techsupport@acomdata.com;
c) by telephone at (909) 348-0680, during business hours (Pacific
Time).
77
Page 78

Troubleshooting for Windows Users
The power will not go on when I turn on the Drive.
A: Make sure your connections are secure.
My computer does not recognize the Drive.
A: Make sure all of your connections are secure. If you have an
add-on card, make sure it is working properly and update the software/firmware. Also, make sure you have the latest updates for
your operating system.
When I leave my computer idle for a while and come back, my
AcomData Drive won’t work properly.
A: The most likely cause is that your computer is going into Sleep
mode. The immediate solution is to restart your computer. To prevent this problem from re-occurring, go into your Power Settings/
Energy Saver and set it to where it never goes into Sleep mode.
The Drive feels quite warm when powered on. Is this dangerous?
A: When in operation, the Drive may feel quite warm to the touch.
This is normal.
The Drive gives me a “Device cannot start. Code (10).”
A: This is a power issue. Make sure your connections are secure.
78
Page 79

The other possibility is that the Drive has malfunctioned and
requires service.
I don’t see my AcomData Drive in My Computer, but it does
appear in Device Manager (Windows XP & 2000 only).
A: Right-click on My Computer. Select Manage in the pop-up
menu. In the Computer Management window, select Storage,
then select Disk Management. In the Disk Management window,
you should see a list of available storage devices. Look for the Disk
that has a capacity closest to your AcomData Drive. Right-click on
the right-hand box; in the pop-up menu select Delete Partition.
Once you do this, it will say “Online” & “Unallocated.” Right-click
on the box and select Create New Partition in the pop-up menu.
When the Partition Wizard appears, select Primary Partition and
click on Next. You will see a default value for the AcomData Drive;
click Next. You will then see a drive letter (you can change this
drive letter if you wish); click Next. You will then be asked to format the AcomData Drive.
When I try to format my Drive in Windows XP or 2000 I get the
message: “Could not complete format.”
A: This problem can occur if you are using an expansion card
to connect the AcomData Drive. Plug the Drive into a data port
on your computer and try the format again. You may also come
across this error if you are using Windows XP or 2000 and you try
79
Page 80

to format the Drive using the FAT32 file system. If reformatting the
Drive and you do not need Mac compatibility, Windows 2000/XP
users should use the NTFS files system.
After I connected the Drive to my PC, I got the following alert
message: “Hi-Speed USB device plugged into non-Hi-Speed
USB Hub.” What does this mean?
A: Windows XP and 2000 users will get this alert message if you
plugged the Drive into a USB port that only supports USB 1.1. This
is fine, except your AcomData Drive will operate USB 1.1 speeds
(up to 12 Mbps).
Performance via USB seems to be slower than 480 Mbps.
A: First, in order to reach USB 2.0 speeds, you need a connection
that supports USB 2.0. If the connection only supports USB 1.1 the
Drive will operate at USB 1.1 speeds (up to 12 Mbps). The Drive
will auto-sense the speed of your USB port and adjust between
USB 1.1 and USB 2.0. Second, 480 Mbps is the maximum speed of
USB 2.0 devices. Actual data transfer rates will vary depending on
a number of factors, including available CPU resources.
80
Page 81

Troubleshooting for Mac Users
The power will not go on when I plug in the Drive.
A: Make sure your connections are secure.
My computer does not recognize the Drive.
A: First, make sure the connections are secure. Second, check if
the Drive is listed in the Apple System Profiler. If the driver listed
is “USB Authoring Support” or “Toast USB Support”, disable this
Extension(s) in the Extensions Manager, as they can cause a conflict with the Drive.
When I leave my computer idle for a while and come back, my
AcomData Drive won’t work properly.
A: The most likely cause is that your computer is going to sleep.
The immediate solution is to restart your computer. To prevent
this problem from recurring, go into your Energy Saver preferences and set it to never go into Sleep mode.
The Drive feels quite warm when powered on. Is this dangerous?
A: When in operation, the Drive may feel quite warm to the touch.
This is normal.
81
Page 82

Performance via USB seems to be slower than 480 Mbps.
A: First, in order to reach USB 2.0 speeds, you must have a computer or host adapter card that supports USB 2.0. If the connection only supports USB 1.1 the Drive will operate at USB 1.1
speeds (up to 12 Mbps). Second, 480 Mbps is the maximum speed
that USB 2.0 devices can reach. Actual data transfer rates will
vary depending on a number of factors, including available CPU
resources.
When I connected the Drive to my computer, I got the following
alert message: “Please insert disk ‘untitled’.”
A: If you get this alert message, your Mac is not recognizing the
Drive and the mouse cursor may actually freeze on screen. If this
happens, hold down the Apple/Control key and press the Period
“.” key. You should regain control of your mouse. Restart your computer and rebuild the Desktop. (Refer to the manual that came
with your Mac for instructions on how to rebuild the Desktop.
It is good practice to periodically rebuilt the Desktop anyway.)
After your Mac reboots, the Drive should mount normally and you
should not have this problem again.
When I upgraded from Mac OS 9 to Mac OS X, my computer
asked me to re-initialize the Drive.
A: If this message appears, you have no choice but to re-initialize
82
Page 83

the Drive in order to use it on Mac OS X. Copy the data stored on
your Drive to another storage device before upgrading to Mac OS X.
After the upgrade is complete, re-initialize the Drive on Mac OS X,
and then copy the data back to it.
Why is my Drive asking me to initialize it? It was already formatted and it contains data.
A: On Mac OS 9, you may need to initialize a hard drive the first
time you connect it to your computer, even though the hard drive
may have already been formatted. Another reason is that the file
system might have become corrupted, in which case it needs to
be repaired. Use disk utility software to repair the disk.
83
Page 84

Obtaining Service
If you experience a problem with your Acomdata product, which
cannot be resolved by Tech Support, your Tech Support Specialist
will assist you in arranging for service.
What you need to obtain warranty service:
1) A copy of the bill of sale for your AcomData product;
2) A Returned Merchandise Authorization (RMA) number that is
assigned to your product by your TSS. An RMA can only be generated if the product has been registered online at www.acomdata.
com. If your AcomData product is not registered at the time you
need service, you must register the product online or your TSS can
register it for you. Your TSS will then walk you through the process
to ensure you receive prompt service.
DO NOT SEND A PRODUCT IN FOR SERVICE WITHOUT FIRST
CONTACTING ACOMDATA TECHNICAL SUPPORT. ACOMDATA
CANNOT ACCEPT RETURNED PRODUCTS THAT HAVE NOT BEEN
ASSIGNED AN RMA NUMBER.
84
Page 85

Purchasing Accessories
You can purchase accessories by contacting Customer Service at
customerservice@acomdata.com.
In your e-mail, please include:
• your name;
• phone number;
• mailing address;
• model number or description of item (e.g. 6-pin to 4-pin FireWire
cable);
• quantity per item.
A Customer Service agent will contact you to complete the transaction.
85
Page 86

Glossary of Terms
ATA – (Advanced Technology Attachment) A disk drive interface standard
based on the IBM PC ISA16-bit bus. The ATA specification deals with the
power and data signal interfaces between the motherboard and the integrated disk controller and drive.
As improvements were made to the ATA interface, new version numbers
were added. ATA-2 (Fast ATA) defined the faster transfer rates used in
Enhanced IDE (EIDE). ATA-3 added interface improvements, including the
ability to report potential problems. Starting with ATA-4, either the word
“Ultra” or the transfer rate was added to the name in various combinations. For example, at 33 MBytes/sec, terms such as Ultra ATA and ATA-33
have been used. In addition, Ultra ATA-33, DMA-33 and Ultra DMA-33 are
also found.
Bit - The smallest unit of digital data, represented logically as a 1 or a 0.
Buffer – See “Cache.”
Bus – An electronic link that can transmit data between digital devices,
such as computers and attached peripherals.
Byte – A unit of digital data, usually made up of eight bits. Storage capacity is measured in bytes.
Cache – A memory buffer that stores frequently used disk data in RAM so
the data can be read at a faster rate than if accessed from the disk.
Capacity – The amount of data that can be stored on a hard drive or
86
Page 87

other storage device.
Device Driver – A software program that enables a computer to commu
nicate with peripheral devices, such as hard drives and CD-ROM drives.
Each type of device requires a different driver.
FAT32 – A file system that organizes files on a disk. This file system is standard for Windows 98SE and Me, and is supported under Windows XP and
2000. A single file is limited in size to 4 GB.
File System – The method for storing and retrieving files on a disk. A file
system defines the directory structure for keeping track of the files and
the path syntax required to access them. It also defines the way files are
named as well as the maximum size of a file or volume. FAT32 and NTFS
are file systems used on PCs; HFS is used on Macs.
Format – Preparing a disk partition for the storage and retrieval of files. A
partition is formatted with a specific file system. Formatting is referred to
as initializing on the Mac.
Gigabyte – 1,024 megabytes (binary); 1,000 megabytes (decimal), or
approximately one billion bytes.
Hot-Pluggable – The ability to connect and disconnect peripheral devices while the computer is running.
Hub – A device which links peripherals together onto the same data bus.
IDE – (Integrated Drive Electronics) A type of hardware interface widely
used to connect hard disks, optical disks and tape drives to a computer.
With IDE, the controller electronics are built into the drive itself, requir-
-
87
Page 88

ing a simple circuit in the computer for connection. The term IDE is often
used interchangeably with the term ATA, to describe hard disk drives that
use the ATA interface, though technically IDE and ATA are not the same
thing.
Interface – Junction between two items of hardware or software for the
exchange of data.
Master-Slave – An ordering of electronic devices in a primary-secondary
sequence. For example, when a pair of ATA (IDE) disk drives are installed
in the same PC, one is configured as master and the other as slave. The
master drive generally appears first when the computer’s bios and/or
operating system enumerates available drives. If there is a single device
on a cable, in most cases it should be configured as master. A drive set
ting called "cable select" was described as optional in ATA-1 and has
come into fairly widespread use with ATA-5 and later. A drive set to cable
select automatically configures itself as master or slave, according to its
position on the cable.
Mbps (Megabits per second) – A data transmission speed of one million
bits per second. For data transmissions, the base unit of data is the bit
rather than the byte. Using bits is a truer measure of raw performance
because it negates the need to differentiate between the part of the data
stream that makes up the file(s) being sent and the accompanying data
protocols that structure and govern data communications.
MB (Megabyte)
– 1,048,576 bytes (binary); 1,000,000 bytes (decimal).
NTFS – The primary file system for Windows XP and 2000. NTFS offers
88
Page 89

improved performance and more advanced security and administrative
features than FAT32.
Partition – A reserved amount of storage space on a hard disk. A disk can
contain one or more partitions. A formatted partition is treated as a sepa
rate volume by the operating system.
Port – A connection which enables compatible devices to send and
receive data. A port can be either hardware-based or software based.
Startup Disk – The disk from which a computer loads its operating sys
tem at startup. Also called a "boot" volume.
Volume – A fixed amount of data storage. The term volume is often used
as a synonym for the drive itself, but it is possible for a single hard drive
to contain more than one volume, or for a single volume to span more
than one hard drive.
-
89
Page 90

Limited Warranty
acomdaTa warranTs This producT (The “producT”) againsT defecTs in maTerial or work-
manship as follows:
1. labor: for a period of one (1) year from The original daTe of purchase from
acomdaTa or iTs local represenTaTive supplier, acomdaTa will repair defecTive producT
(or, aT iTs opTion, replace wiTh a new or recerTified producT) aT no charge. afTer This 1
year period, you musT pay for all labor charges.
2. parTs: for a period of one (1) year from The original daTe of purchase from acomdaTa
or iTs local represenTaTive supplier, acomdaTa will supply, aT no charge, new or rebuilT
replacemenT parTs in exchange for defecTive parTs of This producT. any replacemenT parTs
will be warranTed for The remainder of The original warranTy period or nineTy (90) days
from insTallaTion by acomdaTa. all exchanged parTs replaced under This warranT y will
become The properTy of acomdaTa.
This warranTy only covers The hardware componenTs pack aged wiTh The producT. This
warranTy does noT cover : (1) any sofT ware conTained in, or included wiTh, The producT;
any such sofTware is provided “as is.” please refer To any documenTaTion included wiTh The
sofTware for your righTs and obligaTions wiTh respecT To The sof Tware; (2) any consum-
ables (such as baTTeries) supplied wiTh This producT; (3) cosmeTic damages; (4) damage To
or loss of any sofTware programs, daTa or removable sTorage media; (5) damage due To
The producT such as, buT noT limiTed To, excessive heaT or humidiTy, or modificaTions of
This producT.
This warranTy does noT apply if The malfuncTion resulTs from: (1) The use of This producT
in conjuncTion wiTh accessories, producTs or ancillary or peripheral equipmenT, or where
iT is deTermined by acomdaTa ThaT There is no faulT wiTh This producT iTself; (2) improper
insTallaTion, operaTion, TesTing or mainTenance of This producT; (3) power failure or
connecTion To improper volTage supply ; or; (4) aTTempTed repair by any parTy oTher Than
acomdaTa.
90
Page 91

This limiTed warranTy is invalid if The facTory applied serial number has been alTered or
removed from The producT.
repair or replacemenT, as provided under This warranTy, is The exclusive remedy of The
consumer. acomdaTa shall noT be liable for any incidenTal or consequenTial damages
for breach of any expressed or implied warranTy, breach of conTracT, negligence, sTricT
liabiliTy, or any oTher legal Theory relaTed To This producT. such damages include, buT are
noT limiTed To: loss of profiTs; loss of daTa; loss of use of The producT or any associaTed
equipmenT; down Time and purchaser’s Time.
This warranTy exTends only To you, The original purchaser. iT is noT Transferable To any
one who subsequenTly purchases The producT from you. proof of purchase in The form of
a bill of sale (which is evidence ThaT The producT is wiThin The warranTy period) musT be
presenTed To obTain warranTy service.
when sending an acomdaTa producT in for service you musT Take The producT, or deliver
The producT (freighT prepaid) To acomdaTa, in eiTher iTs original packaging or in a package
ThaT provides The producT wiTh a degree of proTecTion equivalenT To ThaT of The original
packaging. acomdaTa is noT responsible for any damage To, or loss of, any programs, daTa,
or oTher informaTion sTored on any media or any parT of any producT serviced hereunder.
be sure To remove all feaTures, parTs, opTions, alTeraTions, and aTTachmenTs noT under
warranTy prior To reTurning The producT To acomdaTa. acomdaTa is noT liable for any
loss or damage To These iTems.
excepT To The exTend prohibiTed by applicable law, any implied warranTy of merchanTabiliTy or
fiTness for a parTicular purpose on This producT is limiTed in duraTion of This warranTy.
some sTaTes do noT allow The exclusion or limiTaTion of incidenTal or consequenTial dam-
ages, or allow limiTaTions on how long on implied warranTy lasTs, so The above limiTaTion
or exclusions may noT apply To you. This warranTy gives you specific righTs; you may have
oTher righTs which var y from sTaTe To sTaTe.
91
Page 92

Notices
coPyrigh tS
copyrighT © 2006 dura micro, inc. all righTs reser ved. no parT of This publicaTion may be repro-
duced, sTored in a reTrieval sysTem, or TransmiTTed in any form by any means, elecTronic, mechanical
phoTocopying, recording or oTherwise, wiThouT The prior wriTTen consenT of dura micro, inc.
trademarkS
The acomdaTa name and iTs logos are regisTered Trademarks of dura micro, inc. oTher Trade -
marks menTioned or appearing in This documenT are The properTy of Their respecTive owners.
c
hangeS
The maTerial in This documenT is for informaTion only and subjecT To change wiThouT noTice. while
reasonable efforTs have been made in The preparaTion of This documenT To assure iTs accuracy, dura
micro, inc. assumes no liabiliT y resulTing from errors or omissions in This documenT, or from The use
of The informaTion conTained herein. dura micro, inc. reserves The righT To make changes or revi-
sions in The producT design or The producT manual wiThouT reservaTion and wiThouT obligaTion To
noTify any person of such revisions and changes.
Federal co mmUnicationS com miSSion (Fcc)
radio frequency inTerference sTaTemenT
This equipmenT has been TesTed and found To comply wiTh The limiTs for a class b digiTal device,
pursuanT To parT 15 of The fcc rules.
canada compliance sTaTemenT
This class a di giTal apparaTus meeTs all requirem enTs of The canadian inTer ference-causing
equipmenT regul aTions.
92
Page 93

 Loading...