

Page 1
The Maestro
Powered Subwoofer
Owner's Manual
Contents:
Guarantee/Warranty …2
Specifications …4
Setup …5
Placement …7
Hookup: HT …7
Hookup: Stereo …8
Other System Considerations …10
Avoiding Damage …11
Troubleshooting …12
Warranty Registration …13
Audio Concepts, Inc.
901 So. 4th Street
La Crosse, WI 54601
Phone: (608) 784-4570 Fax: (608) 784-6367
URL: http://www.audioc.com Email: service@audioc.com
All Right Reserved 2004
Sound that Satisfies…
Page 2

Audio Concepts, Inc.
Our Guarantee and Warranty
Satisfaction Guaranteed:
We’re sure you’re going to love your new Audio Concepts, Inc. (ACI) products! In the unlikely event that
you are not satisfied, please contact us within 30 days of receipt of your ACI products for a hassle-free
return.
Simply follow these procedures:
1. Return Authorization: Call us at (608) 784-4570 or email service@audioc.com, within 30 days of receipt of your ACI
products for a return authorization number. Boldly mark the return authorization number on the outside of the box. Include
a brief note stating your name, address and daytime telephone number, along with a short description why the products
are being returned.
2. Returning: We request that you return the ACI products to us in their original packaging and include packaging materials,
manuals, etc. Ship by the most economical means (preferably UPS) and insure the products for the invoice purchase
price. The customer is responsible for return shipping. Please note: ACI can not accept C.O.D. returns.
3. Credit: Upon receipt and inspection, we will issue a refund for the invoice purchase price and invoiced UPS Ground
service only. Please note this return policy is in effect only if the ACI products are in new condition, in their original
packaging, without drilled holes, disassembled or any other modifications.
Speaker Manufacture’s Warranty:
2
ACI’s Five Year Standard Warranty and One Year Total Assurance Guarantee
For five years from receipt, Audio Concepts, Inc. will, at its option, repair or replace factory defective
components. This warranty excludes products that have been abused, modified, or disassembled in
any way. This warranty does not apply to products, which have been damaged in shipping. Audio
Concepts, Inc. liability is limited only to the replacement of defective parts. No other liabilities or
obligations are expressed or implied.
For the first year of ownership, ACI also provides a unique Total Assurance Guarantee, (TAG). TAG
from ACI not only covers everything included in our standard five year warranty, but we will also pay for
shipping to ACI and back to your front door. TAG is limited to shipping destinations in the Continental
U.S.
The ACI Five Year Standard Warranty and One Year Total Assurance Guarantee are fully transferable
from the original owner to a secondary owner provided that the original owner notifies ACI, by phone
call or by filling out the on-line form: www.audioc.com/order/warranty_transfer.htm
No warranty will be transferred absent this notification.
Simply follow these procedures:
1. Return Authorization: Call us at (608) 784-4570 or email service@audioc.com for a return authorization number. If the
warranty repair is during the first year of ownership, additional instructions will be given to you at that time. Boldly mark
the return authorization number on the outside of the box. Include a brief note with your name, address and a daytime
telephone number, along with a short description why the products are being returned.
2. Returning: Carefully repack defective ACI merchandise in their original packaging. Ship by the most economical means
(preferably UPS) and insure the products for their full retail value. The customer is responsible for return shipping (unless
the first year TAG applies). Please note: ACI can not accept COD or Freight Collect returns.
3. Replacement: Audio Concepts, Inc. will inspect and determine the cause of failure and will pay return shipping on the
defective goods replaced or repaired.
Please ship any returns to the following address:
Audio Concepts, Inc., 901 So. 4th Street, La Crosse, WI 54601 (608) 784-4570
Page 3

IMPORTANT NOTICE
All new speakers require a minimum of 60 hours break-in-time before they begin to
sound the way they are supposed to. A speaker's performance improves significantly once
broken in. It is critical that you have at least 60 hours on your speakers before you evaluate
them. Don't worry if your speakers do not sound perfect the first time you play them. This is
normal until they are broken in. If you are having difficulty getting enough hours on your
speakers and your 30 day return privilege is getting near, call us. We will work with you.
Please give us the courtesy of breaking the speakers in before you determine they don't sound
right.
Many of our customers break their speakers in by:
3
A) Leaving them on at moderate listening levels when they are not home.
B) Leaving them on at moderate listening levels while they sleep.
C) Running pink noise through them.
These methods are not convenient for everyone and we understand this. But please
know that you are not giving yourself, your speakers or us a fair chance if you do not break
them in before critical evaluation.
THANK YOU!
The Maestro is very heavy. We strongly recommend having two
people available to remove from packaging.
Page 4

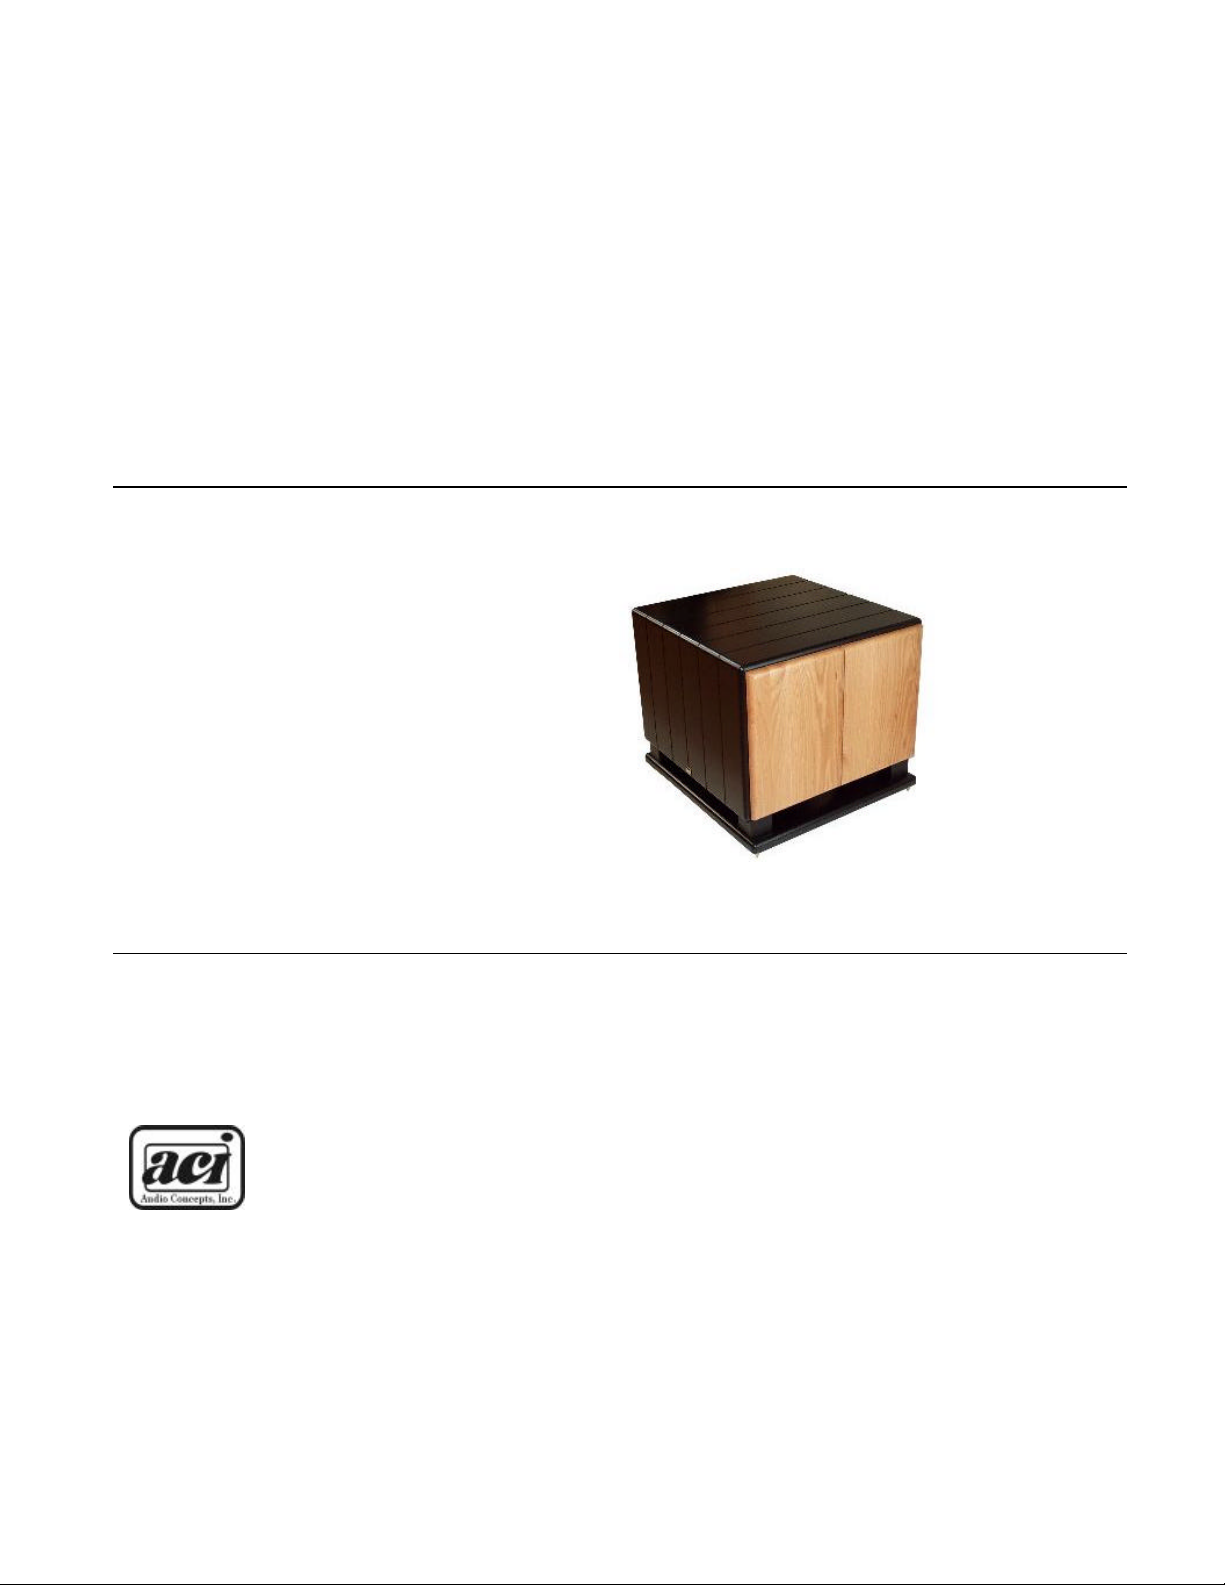
The Maestro Powered Subwoofer
Thank you for your order and congratulations on becoming the owner of an ACI speaker system. The
Maestro powered subwoofer(s) will provide you with many years of listening pleasure!
ACI’s Maestro is an extremely powerful subwoofer. Although relatively large, a conventional subwoofer of
equal performance would have to be twice the size! The Maestro is based on the subwoofer technology of our
legendary Titan series. An extreme excursion 15" driver is powered by our proprietary amplification using special
circuitry to essentially cut the required box volume in half.
Many subwoofers do a respectable job with explosions, shotguns, and crashes. The market is loaded with
black boxes and tubes that beg to be "hidden". The Maestro is different . Reasonably sized and attractively built to
compliment your fine furniture. A number of fine wood finish choices are available. The Maestro goes way loud,
and it goes way deep. Warning: ACI is not responsible for any tickets you may receive for noise violations or
domestic disturbance! More importantly, it will allow a seamless and completely transparent blend with your main
speakers. Your sound stage will be enhanced, not degraded. Instruments like acoustic and electric bass, piano,
and percussion will come through with vivid realism. The Titan and Force have earned a reputation of being some
of the most musical subs available at any price. The Maestro continues this tradition of musical excellence in an
extreme output configuration.
The internal enclosure is constructed of 1” non-resonant high-density fiberboard with extens ive internal
bracing. The mounting for the down-firing woofer is 2" thick for additional resonance control and stability. Solid
hardwood panels coated with multiple layers of clear or black lacquer grace the exterior and add additional
damping.
4
Many subwoofers add unacceptable colorations and actually degrade the performance of otherwise fine
speakers. The Maestro is adaptable for use with virtually any satellite, electrostatic or ribbon speaker. If you are
satisfied with your present speakers but just want more bass power and extension, the Maestro(s) may be the
perfect answer. If you own speakers from manufacturers such as B&W, KEF, Apogee, Quad, Thiel, Magnaplaner,
Spica, Celestion, Acoustat, Acoustic Energy, Martin Logan, Wilson, etc., you’ll find your listening pleasure greatly
enhanced with the Maestro subwoofers.
Specifications
Frequency Response: 19-120Hz, +3db, system Q <.6
Crossover: Dual adjustable Low-Pass: 35-250 12db/octave filters for 24db/octave total
High Pass Outputs: Second order, 12db/octave, filters set at 100Hz for left & right output. Line-level, RCA
outputs
Sensitivity: Adjustable
Dimensions: 19” tall, 24” wide and 22” deep
Weight: 100 lbs (Does not include the separate amplifier.)
Construction: Main cabinet of full 1" MDF with extensive bracing and interlocking joints. The mounting for the
down-firing woofer is 2" thick for additional resonance control and stability. Satin, textured black durable finish.
Optional 3/4" solid hardwood side panels are finished in multiple coats of clear, satin lacquer.
Special Circuitry: Protection Circuitry, Woofer Behavior Control, Theater-Direct Input
Woofer: (downward firing) Proprietary 15”, cast–frame, ultra long throw woofer
Rec. RMS Power: Separate rack-mountable amp delivers 500 watts RMS < .5% THD distortion.
Page 5

Maestro Subwoofer Setup
Integrating a sub is a process that requires following ordered steps. You’ll find it easy in some rooms/systems,
and very time consuming in others. The key is to eliminate each variable one at a time. It really helps to have a
test CD with sinewave or warble tones. That’s why we include just such a disc, free with purchase of our subs.
Use of the setup CD is optional. Please refer to the attached directions for the test CD.
5
The electronics of the Maestro performs the following functions:
Input Level: This controls the volume of the Maestro when using the Right and or Left inputs. The volume needs
to be set at the same volume as your main speakers to get a seamless blend. When using the Theater input, the
volume on the Maestro is bypassed and will be controlled by your processor/receiver.
Lowpass Filters A & B: Each filter has a 12db/oct roll off and is used to set the upper cutoff point of the
subwoofer. Normally, you will set both filters at the same frequency for a 24db/oct roll off. In some systems it may
be advantageous to be able to independently adjust these filters for the optimum blend.
Phase Control: The phase is variable from 0 - 180 degrees. Correct phase is dependent on positioning of the
sub relative to the main and the listening position. The correct phase setting will yield the greatest level of bass.
Left & Right Line Level Inputs: Use either or both of these inputs. You will need to set the Input Level and
Lowpass Filters A & B.
Theater Input: Connect to this input from your sub output on your receiver, preamp or processor. Set Lowpass
Filters A & B to 250Hz. Input Level is bypassed and volume is controlled from your system’s subwoofer volume
control.
Left & Right Line Level Highpass Outputs: Works with the line level inputs, they cut the frequency of your main
speakers off at 100Hz with a 12db roll off. Rarely used, we suggest using the optional passive high-pass filters
instead.
Page 6

Speaker Level Out: To ACI Maestro Subwoofer. Connection to the subwoofer is via a single length of speaker
RCA Female-Female Adapter
cable (see diagram below). Mount the amplifier near your source components for easy access to the front panel
adjustments.
LED Light: It is red for a few seconds as the amp warms up. The light will turn green when the amp is ready,
even if there is no signal going to the amp.
On/Off Switch: Used to turn the amp on and off. Normally amp is left on all the time. When not playing, it draws
about the same amount of power as a nightlight.
Power Cord: The cord is non-detachable and can be plugged into any standard two-prong outlet .
6
Miscellaneous:
• A limiter and current sensing feedback circuitry protect the driver from being overdriven and reduce distortion.
• The discreet outputs of the amplifier deliver over 500watts RMS to the woofer with extremely low distortion.
• A temperature switch monitors the output devices. In the event of excess heat the switch will shut down the
circuitry to prevent damage. Once the heat sinks cool the power will be restored. Because the electronics
have been designed and ”tuned” to the woofer and cabinet, the Maestro offers incredible performance in a
relatively small cabinet.
Speakers Level Adapter
Two of these are supplied with each Maestro subwoofer. The Speaker Level
Adapter converts an amplified, (speaker level), signal to the line level signal required by the subwoofer. Not
required for line-level hookup. The adapters may be installed directly in parallel with your main speakers.
This can be done at the speaker outputs on your receiver or amplifier. Alternately you may put these in
parallel with your speaker at your speakers input terminals. You may attach any type of speaker cables to
the speaker cable end using either electricians twist nuts or a twisted, soldered and wrapped connection. If
running shielded interconnects to sub, you will need to purchase RCA Female - Female adapters.
Y-Adapter
Used to split a line level output into dual outputs. Use with shielded RCA interconnects. For
example; use Y-Adapters at pre-amp outputs to get dual outputs. One set of outputs goes to the subwoofer(s),
one set of outputs goes to the main amplifier inputs.
Used to join two shielded RCA interconnects. May also be used to join the ACI Speaker Level Adapter to any
RCA shielded interconnect.
Page 7

Step One: Initial Placement
Determine initial placement of the sub. This is often a matter of "where it will fit" in the room. You will also need to
plug the Maestro into a 120-volt wall receptacle. The Maestro is supplied with a power cord. If this is not long
enough, you may use an extension cord of at least 16 gauge. Three of the best places to put your Maestro:
1. Place the sub in one of the corners behind the main speakers. A corner placement behind the main
speakers usually yields the deepest, cleanest bass. As long as the subwoofer is correctly adjusted it will
not be boomy or overbearing. The sub doesn’t have to be placed “tightly” in the corner, just as near as
possible.
2. Place the sub near the wall, behind the main speakers. Approximately 1/3 of the width of the room is
often ideal.
3. Place the sub along one of the sidewalls. Approximately 1/3 of the length of the room is often ideal.
If you have the flexibility to try different placements, we’d encourage you to do so. Every room is different.
Experimentation is the best way to find the best placement. One trick is to place your subwoofer in your normal
listening position. Listen or take measurements from your subwoofer placement options to find the ideal position.
For example, if your two options are the left front corner and somewhere along the right sidewall, you’ll listen and
or take measurements at these two positions.
Step Two: Hookup and Adjustment
There are essentially two types of hookup and adjustment:
7
1. Home Theater ( 5.1 - 7.1 systems ) Systems with a subwoofer output on your receiver or processor
OR
2. Stereo (two-channel) Systems without subwoofer output
The following diagrams and descriptions illustrate various hookup options . *Please note, for the sake of clarity
only one channel is show.
Home Theater
You will be using the bass management of your receiver or processor. This approach requires a shielded RCA
cable from the subwoofer output on the rear of the receiver or processor to the theater input on the Maestro. (DH
Labs Subsonic Cable is perfect for this application.) The theater input bypasses the subwoofer volume control.
Your receiver, pre-amp or processor controls subwoofer volume. If you wish to use multiple subs for higher output
levels simply split the signal with a Y-adapter and run separate interconnects to each sub. Set filters A & B to
250Hz. Currently there are many different bass-management schemes depending on brand and model of
receiver, pre-amp or processor. You will most likely set all your main speakers to "small" although it is a good idea
to experiment with these settings.
Page 8

Adjusting the Maestro for Home Theater:
1. Set the crossover frequency dials A & B to 250Hz.
2. Adjust phase to give the highest output level. (Please refer to the test CD procedures for this)
3. Input level is bypassed when using the theater input and your processor controls the volume. (Note, if
you prefer to control the volume on the Maestro, connect from your subwoofer output to either the Left or
Right input on the Maestro instead of the theater input.)
Stereo (Two-Channel)
First you must determine your hookup scheme. Your choice of hookup will be determined by the capabilities of
the rest of your system. The Maestro has RCA, line-level inputs and Speaker Level Converters are also provided
for speaker level connection. Select from the following and then make adjustments:
A) Systems that do NOT have preamp outputs:
1. Hookup with Speaker Cable using Speaker Level Converters
This is sometimes referred to as "bass augmentation". The main speakers are run full-range and the
subwoofer is used to augment or fill in just the lower bass. Connect a second set of speaker cables in parallel
with your existing speaker cables. This set of cables is run to our speaker level converters, which plug into the
subwoofer left and right inputs. (If using stereo subs you will run one cable to each sub). Set filters A & B, the
input level, and phase controls to get a seamless blend with your main speakers.
As an option, you can add a capacitor(s) in series with your main speakers. The capacitor will block some of
the lows that might otherwise overdrive your main speakers. This is a very imprecise method and generally
only used with small speakers with limited low frequency power handling. We recommend trying
approximately 200mfd of capacitance. Polypropylene capacitors are suitable though expensive. Alternately,
non-polarized electrolytic (NPE) capacitor(s) with a minimum 100 volt rating may be used.
8
2. Hookup with Shielded Interconnect using Speaker Level Converters
Connect speaker level converters in parallel with your main speakers. Connect a female to female RCA
adapter to the speaker level converter and use shielded RCA interconnect cables to connect to the
subwoofer. (If using stereo subs you will run one interconnect to each sub). (DH Labs Subsonic Cable is
perfect for this application) Same capacitor option as #1
Page 9

B) Systems that DO have preamp outputs:
1. Processor with Preamp outputs & Main amp inputs
Use Y-Adapters to split the signals from the left and right preamp outputs. Connect one end of each YAdapter to left or right main amp input, (using a short RCA interconnect). Use proper lengths of shielded
interconnects to connect the other ends of the Y-Adapters to the right & left inputs on the sub. (If using stereo
subs you will run one interconnect to each sub). Your main speakers will receive a full range signal. To
reduce low frequency content to your main amp and speakers, use optional High Pass Filters plugged into the
main amp inputs.
9
2. Separate Preamp & Amp
Shown with Y-Adapters. If your preamp has two sets of outputs you will not need the Y-Adapters. Use proper
lengths of shielded interconnects to connect one set of outputs to your main amplifier and one set of outputs
to your sub left and right inputs. (If using stereo subs you will run one interconnect to each sub). Your main
speakers will receive a full range signal. To reduce low frequency content to your main amp and speakers,
use optional High Pass Filters plugged into the main amp inputs.
Page 10

Adjusting the Maestro for Stereo:
1. Set Initial Adjustments: Crossover frequency: 80Hz, Phase: 0, Level: ½ way
2. Set Phase: Adjust volume level so sub is audible with an 80Hz test tone from the included test CD.
Adjust phase for maximum output at the listening position. This is most easily accomplished with an extra
person to work the switch / control. If using an SPL meter such as the Radio Shack, it might be easier to
track the change with the 80Hz Warble tone rather than the 80Hz Sinewave.
3. Set Level: Start with input level all the way down and set both crossover frequency filters to 35Hz. As you
play music with a repetitious bass line, adjust the input level upward until it is just consistently audible.
The low bass should fill in naturally. You are looking for bass that goes deeper, not necessarily louder.
4. Set Crossover Frequency: With the frequency filters at 35Hz, gradually adjust upward until the bass
seems full, without any missing notes , and then back off just a bit. At first, move both filters up an equal
amount. Adjust up or down until the subwoofer best matches the cutoff of your main speakers. It may help
to adjust crossover B higher in frequency than crossover A. The most natural results will be with the
lowest crossover point that doesn’t leave a “gap” in the response. Lower crossovers will allow the
subwoofer to audibly “disappear” and placement is less critical.
5. Fine-tune: Sit back and listen with a variety of music. Make any changes one at a time to fully assess the
effect. Take your time!
Troubleshooting Setup and additional considerations
• If you try to use the sub to adjust for recordings that lack bass you'll go nuts, adjust the sub to well
recorded music and leave it alone. You'll never get it perfect for all music because the music isn't
recorded consistently!
10
• If the music seems to lack warmth, try adjusting the frequency control up just a bit at a time. Too much,
and the sub becomes easily audible by itself.
• If your main speakers have ports (vents) try stuffing them; this sometimes improves the transition
drastically. The ports can easily be stuffed with cloth. Just stuff it so that you no longer get air pressure
coming from the vent when the speaker is playing. Stuffing the port changes the response from fourth
order to second order and yields a more gradual rolloff in the main speakers. It can make all the
difference in the world!
• If you have a problem with hum there are generally three possible causes:
1. Ground loops or power issues are the most common cause of subwoofer hum. Turn everything off
and remove all connections from the Maestro to the rest of the system. Turn the Maestro back on. If
the hum is gone, the problem was probably caused by a ground loop. In this case, you will need to
either use a "cheater" plug on the Maestro power cord, or use a GLE (Ground Loop Eliminator),
available from Radio Shack. If the hum is still there, plug the Maestro into an outlet on a different
house circuit. If the hum is gone, it might be a matter of the subwoofer picking up interference from
something in the house electrical system such as fan speed control or light dimmer. Use a different
outlet. If the hum remains, continue to step #2.
2. Poor connections or RCA interconnects can cause hum. If you move the shielded cable that
connects the Maestro to your system and you hear a change in the hum it is likely you have poor
shielding or a defective RCA plug. Replace the cable.
3. Amplifier damage is the least likely cause of hum. However, if you have ruled out ground loops,
power issues, or a defective connecting cable, it is possible that there is a problem with the amplifier.
Contact ACI service for assistance.
Other System Considerations
If the rest of your system does not work properly or is not correctly connected you will not get the best
performance from your system. To eliminate problems we recommend the following:
I. Use the finest associated components you can afford. Turntable, cartridges, pre-amps,
amplifiers, (receivers) and cables all have profound impact on the sound of your system.
Page 11

Accurate speakers let more detail through. You will hear more of the beauty of the music, but
flaws in your system and/or source material may be more obvious. Any good audio system is
made up of matched components. You wouldn’t use bargain recap tires on a new Ferrari, and
you shouldn’t use inferior components with a high quality speaker. Your ACI Maestro(s) performs
like subwoofers costing far more. Keep this in mind when selecting the rest of your system.
II. Know your source material. People often blame their audio gear for poor recordings. A great
number of popular recordings are of inferior sound quality. Unfortunately this applies to records,
tapes, DVDs and CDs. There are more good quality recordings available now than just a few
years ago, but poor recordings with rolled off low bass, harsh and constricted mids and highs and
little stereo monitor speakers that are grossly inaccurate. Consider that some producers still mix
recordings to sound best on cheap table and car radios! This doesn’t mean you can’t enjoy these
recordings, but you should try a few of the best audiophile recordings just to see how terrific your
system can be when fed a good signal.
Avoiding Damage
Audio Concepts, Inc. speaker systems are designed for the purpose of accurate reproduction of music in
the home. We do our best to make our speakers rugged and reliable. We invested effort in the Maestro to make
it as indestructible as possible. We’re happy to say that after producing and selling the Titan Series for years
we’ve yet to have one blown driver returned! Of course there’s always Murphy’s law! Under certain abusive
conditions it may be possible to overdrive the Maestro. This is possible with your receiver or pre-amp volume
control way up with excessively high distorted signal levels.
11
MORE IMPORTANTLY, as reliable as the Maestro has been designed, you still need to be careful not to
over-drive and damage your main speakers. So please read over the following causes of speaker failure:
Remember, just because you added the power and bass response of the Maestro, your main speakers
won’t handle any more power than before.
You can protect your system by following a couple of very simple guidelines:
A) If it sounds at all distorted, turn it down. Distortion is a warning sign that should not be ignored.
B) Don’t use tone controls or equalizers if possible. IF you must use them, monitor the system carefully.
C) Beware the party damage epidemic. Speakers are more often damaged during parties. All those bodies soak
up sound, requiring more output to sound as loud, bass and treble controls are sometimes cranked up and
nobody is listening for distortion.
In over twenty-six years of daily evaluation of all types of speakers on everything from ten to one
thousand watts with all kinds of music, we have never damaged a driver without hearing audible distortion. If it
sounds bad, turn it down, and you will never damage a speaker.
Speaker Break-in ****Important!!!
Allow at least 60 to 70 hours of playing time before your new ACI Maestro(s) will sound the best. The adhesives
and materials used in manufacturing must stretch and flex properly before a speaker will sound its best. After
break-in the bass will be tighter and go lower.
For quicker break-in:
-Play the Maestro(s) at medium-high volume while away from home. Use music with a lot of low bass
content. A CD player on repeat works fine.
Page 12

Troubleshooting
Occasionally we get a call from someone who feels there is a problem with their ACI speaker. At least a
couple of times a year we will get a call or letter that goes something like this: “Speaker not working properly,
can’t get enough sound even with the volume turned way up.” The problem may be different, but with this little
information to go on it is almost impossible to trouble shoot the problem “long distance”.
The following checklist may help:
1) Are all system hookups properly connected, no partial shorted wires, or reversed connections, etc?
2) Did you try the rest of your system with other speakers to determine if the problem exists with the
speakers?
3) Please be realistic in your expectations. Our speakers offer excellent value, but we can’t beat the
laws of physics. For instance, a medium sized speaker such as the Sapphire sounds excellent but
will not play as loudly as a very large speaker.
IF for any reason you aren’t satisfied with the sound you’re getting from your speakers we want to know
about it. Make sure the speakers have had adequate break-in time. Before you call or write, please try to
narrow down the problem and eliminate other factors. We will need to know:
◊ The size of your room
◊ Where you have the speakers placed
◊ What other equipment is in your system
◊ Have you tried other speakers (which ones, and did they eliminate the problem)
◊ Any other specific symptoms or information you can provide
12
Our Customers are #1 with us, and we want you to be completely happy with your ACI speakers!
The Company
Audio Concepts, Inc. (ACI), has been satisfying discerning music lovers since 1977. Our goal has and
always will be to provide exceptional product and service to music enthusiasts around the world. Audio Concepts
speakers are an expression of dedication to our customers and their desire for accurate musical reproduction.
We believe you must audition speakers in your own home and in your own system. Please see the warranty
statement for details.
After listening, please fill out and return the warranty registration. This warranty registration is important.
It allows us to reach you in the event of future upgrades. The comments you make on the warranty help us to
continually improve our products and customer service. Thank You!
Specifications and design are subject to change without notice due to our continuous research and development program.
Handcrafted with pride in the U.S.A.
Audio Concepts, Inc.
901 South 4th Street
La Crosse, WI 54601
Phone: (608) 784- 4570 Fax: (608) 784-6367
E-mail: service@audioc.com URL: http://www.audioc.com
All rights reserved Audio Concepts, Inc. 2004 02/04
Page 13

Warranty Registration, Please Return
ACI div. Audio Concepts, Inc.
901 S. 4th Street, La Crosse, WI 54601
service@audioc.com (608) 784-4570
Congratulations on becoming an ACI speaker owner. Completing this registration enables us to contact you
regarding future upgrades. Your information helps us provide the best possible products and service. If you need
additional room please continue on the back. You may also register your product electronically at our web site.
http://www.audioc.com
Name:_______________________________________________________________________________________
Address: ____________________________________________________________________________________
Main reasons you purchased from ACI:____________________________________________________________
____________________________________________________________________________________________
Where did you first hear about ACI:_______________________________________________________________
System(s) purchased:___________________________________________________________________________
Date received:_____________________________ Invoice Number:_____________________________________
Condition received in:__________________________________________________________________________
13
Comments or suggestions regarding our staff or service:_______________________________________________
Other audio equipment used: ____________________________________________________________________
____________________________________________________________________________________________
Do you have a home-theater system? ______________________________________________________________
Do you plan to purchase other speakers within the next two years?______ If so, what types of speakers are you interested in
purchasing, (Tower speakers, satellite speakers, subwoofers, wall speakers, outdoor speakers, home-theater speakers, etc.)
____________________________________________________________________________________________
All speakers require at least 60-80 hours of playing time to sound their best. After your speakers have had time to break-in
and you've done some serious listening please tell us:
Features you like most about your ACI speakers: _____________________________________________________
____________________________________________________________________________________________
Areas of performance or appearance you'd like to change: _____________________________________________
____________________________________________________________________________________________
Other comments or suggestions: __________________________________________________________________
____________________________________________________________________________________________
Will you recommend us to others?_________ (Over 1/2 of our customers were recommended to us by testimonials on
computer data bases or referrals from someone they know. We put the money we save on advertising into the highest quality
products at the lowest possible cost to you.)
We would appreciate being able to use your comments in future advertising. Please sign here to allow us that privilege.
Name:_________________________________________ Date: ___________________
Thank you for taking the time to complete and return this registration!
 Loading...