

Page 1

®
4D Insider
Reference
Mac™OS and Windows® Versions
4D Insider
© 1999 ACI SA
Page 2

4D Insider Reference
Version 6.5 for Mac™ OS and Windows
Copyright © 1999 ACI SA/ACI US, Inc.
All rights reserved.
The Software described in this manual is governed by the grant of license in the ACI Product Line
License Agreement provided with the Software in this package. The Software, this manual, and all
documentation included with the Software are copyrighted and may not be reproduced in whole
or in part except for in accordance with the ACI Product Line License Agreement.
4th Dimension, 4D, 4D Insider, the 4D logo, 4D Server, ACI, and the ACI logo are registered
trademarks of ACI SA.
Microsoft and Windows are registered trademarks of Microsoft Corporation.
Apple, Macintosh, Mac, Power Macintosh, LaserWriter, ImageWriter, ResEdit, and QuickTime are
trademarks or registered trademarks of Apple Computer, Inc.
All other referenced trade names are trademarks or registered trademarks of their respective
holders.
®
IMPORTANT LICENSE INFORMATION
Use of this Software is subject to the ACI Product Line License Agreement, which is provided in
electronic form with the Software. Please read the ACI Product Line License Agreement carefully
before completely installing or using the Software.
Page 3

Contents
Preface . . . . . . . . . . . . . . . . . . . . . . . . . . . . . . . . . . . . . . . . . . . . . . . . ix
About this Manual. . . . . . . . . . . . . . . . . . . . . . . . . ix
Cross-Platform Considerations . . . . . . . . . . . . . . . .ix
Chapter Descriptions . . . . . . . . . . . . . . . . . . . . . ix
Hypertext Navigation. . . . . . . . . . . . . . . . . . . . . x
Conventions . . . . . . . . . . . . . . . . . . . . . . . . . xi
Chapter 1 Introduction. . . . . . . . . . . . . . . . . . . 13
Object Relationships. . . . . . . . . . . . . . . . . . . . . . . 13
The Browser Window . . . . . . . . . . . . . . . . . . . . . . 15
Customizing 4D Insider . . . . . . . . . . . . . . . . . . . . . 16
STR# Resources . . . . . . . . . . . . . . . . . . . . . . . . . 16
Chapter 2 Opening a Database . . . . . . . . . . . . . . 17
Running 4D Insider . . . . . . . . . . . . . . . . . . . . . . . 18
Opening Databases . . . . . . . . . . . . . . . . . . . . . . . 18
Memory Management . . . . . . . . . . . . . . . . . . . 20
Opening a Database Locally . . . . . . . . . . . . . . . . 20
Opening a Database on a Server . . . . . . . . . . . . . . 21
Creating a New Database . . . . . . . . . . . . . . . . . . . . 22
Reparsing a Database . . . . . . . . . . . . . . . . . . . . . . 23
Opening Preferred Files (Mac OS only) . . . . . . . . . . . . . 24
Opening Recently Used Files (Windows only) . . . . . . . . . 26
Creating a Database from an SQL Description File . . . . . . . 27
Supported Verbs . . . . . . . . . . . . . . . . . . . . . . 27
Log File . . . . . . . . . . . . . . . . . . . . . . . . . . . 29
General Preferences . . . . . . . . . . . . . . . . . . . . . . . 30
Welcome Window . . . . . . . . . . . . . . . . . . . . . 30
Display Open File Dialog . . . . . . . . . . . . . . . . . . 31
Closing a Database. . . . . . . . . . . . . . . . . . . . . . . . 31
Libraries . . . . . . . . . . . . . . . . . . . . . . . . . . . . . 32
Creating a Library. . . . . . . . . . . . . . . . . . . . . . 32
Saving a Library. . . . . . . . . . . . . . . . . . . . . . . 34
Opening a Library . . . . . . . . . . . . . . . . . . . . . 35
Using Libraries in a Multi-Platform Environment . . . . . 36
4D Insider Reference Manual
iii
Page 4

Contents
Chapter 3 Viewing Database Objects . . . . . . . . . . . 39
Viewing Objects . . . . . . . . . . . . . . . . . . . . . . . . . 40
Selecting an Area within the Browser Window . . . . . . . 41
Types of Objects Displayed . . . . . . . . . . . . . . . . . 41
Viewing Related Objects. . . . . . . . . . . . . . . . . . . 44
Viewing an Object’s Contents . . . . . . . . . . . . . . . . . . 46
Commands . . . . . . . . . . . . . . . . . . . . . . . . . 46
Constants . . . . . . . . . . . . . . . . . . . . . . . . . . 46
Database Methods . . . . . . . . . . . . . . . . . . . . . . 46
Fields and Subfields . . . . . . . . . . . . . . . . . . . . . 47
Forms . . . . . . . . . . . . . . . . . . . . . . . . . . . . 47
Form Methods . . . . . . . . . . . . . . . . . . . . . . . . 51
Formats/Filters. . . . . . . . . . . . . . . . . . . . . . . . 51
Groups . . . . . . . . . . . . . . . . . . . . . . . . . . . . 51
Lists . . . . . . . . . . . . . . . . . . . . . . . . . . . . . 52
Menu Bars . . . . . . . . . . . . . . . . . . . . . . . . . . 52
Menus . . . . . . . . . . . . . . . . . . . . . . . . . . . . 53
Project Methods . . . . . . . . . . . . . . . . . . . . . . . 54
Named Selections . . . . . . . . . . . . . . . . . . . . . . 54
Object Methods . . . . . . . . . . . . . . . . . . . . . . . 54
Picture Libraries . . . . . . . . . . . . . . . . . . . . . . . 54
Plug-ins . . . . . . . . . . . . . . . . . . . . . . . . . . . 54
Semaphores . . . . . . . . . . . . . . . . . . . . . . . . . 55
Sets. . . . . . . . . . . . . . . . . . . . . . . . . . . . . . 55
STR# Resource . . . . . . . . . . . . . . . . . . . . . . . . 55
Style Sheets . . . . . . . . . . . . . . . . . . . . . . . . . 56
Subtables. . . . . . . . . . . . . . . . . . . . . . . . . . . 56
Tables . . . . . . . . . . . . . . . . . . . . . . . . . . . . 56
Tips . . . . . . . . . . . . . . . . . . . . . . . . . . . . . 56
Triggers . . . . . . . . . . . . . . . . . . . . . . . . . . . 56
Variables . . . . . . . . . . . . . . . . . . . . . . . . . . . 56
Using the Lists in the Browser Window . . . . . . . . . . . . . 57
Selecting a List. . . . . . . . . . . . . . . . . . . . . . . . 57
Scrolling Through a List . . . . . . . . . . . . . . . . . . . 57
Typing Characters to Select an Object in a List. . . . . . . 57
Creating a Subset of Selected Objects in a List . . . . . . . 57
Filtering the Objects Displayed in a List . . . . . . . . . . 58
Selecting All the Objects in a List . . . . . . . . . . . . . . 59
Moving the Used By or Uses List to the Main List . . . . . 59
4D Insider Reference Manual
iv
Page 5

Contents
Organizing the Browser Windows. . . . . . . . . . . . . . . . 61
Resizing Browser Window Components . . . . . . . . . . 61
Changing the Location of the Lists. . . . . . . . . . . . . 61
Changing the Default Size of the Browser Window . . . . 62
Displaying ID Numbers of Objects . . . . . . . . . . . . . 63
Organizing Multiple Browser Windows . . . . . . . . . . 65
Chapter 4 Using Filters . . . . . . . . . . . . . . . . . . . 67
Adding and Modifying Filters . . . . . . . . . . . . . . . . . . 68
Saving Filter Definitions . . . . . . . . . . . . . . . . . . 68
Adding a Filter . . . . . . . . . . . . . . . . . . . . . . . 69
Modifying a Filter. . . . . . . . . . . . . . . . . . . . . . 73
Changing the Name of a Filter . . . . . . . . . . . . . . . 74
Deleting a Filter . . . . . . . . . . . . . . . . . . . . . . . 75
Modifying the Filter Pop-up Menus . . . . . . . . . . . . 75
Applying Filters Within the Selection. . . . . . . . . . . . . . 77
Applying Anti-filters . . . . . . . . . . . . . . . . . . . . 77
Examples. . . . . . . . . . . . . . . . . . . . . . . . . . . . . 77
Filter for Unused Objects . . . . . . . . . . . . . . . . . . 77
Filter for Local Variables . . . . . . . . . . . . . . . . . . 79
Filter for All Methods . . . . . . . . . . . . . . . . . . . . 80
Filter for All Menu Methods . . . . . . . . . . . . . . . . 81
Filter for All Process Methods. . . . . . . . . . . . . . . . 82
Chapter 5 Searching and Replacing . . . . . . . . . . . . 83
Searching . . . . . . . . . . . . . . . . . . . . . . . . . . . . 83
Using Multiple Search Criteria . . . . . . . . . . . . . . . 86
Renaming . . . . . . . . . . . . . . . . . . . . . . . . . . . . 87
Renaming a Single Object . . . . . . . . . . . . . . . . . 88
Replacing a String in a Selection of Objects . . . . . . . . 90
Prefixing a Selection of Objects. . . . . . . . . . . . . . . 92
Replacing Text in Forms and Tips . . . . . . . . . . . . . 95
Replacing Commands . . . . . . . . . . . . . . . . . . . 96
4D Insider Reference Manual
v
Page 6

Contents
Chapter 6 Using Groups . . . . . . . . . . . . . . . . . . 99
Creating a Group . . . . . . . . . . . . . . . . . . . . . . . . 100
Opening an Existing Group . . . . . . . . . . . . . . . . . . 101
Moving Objects to a Group . . . . . . . . . . . . . . . . . . 101
Creating a Group From a Selection . . . . . . . . . . . . . . 102
Creating a Group With Dependencies . . . . . . . . . . 103
Removing an Object from a Group . . . . . . . . . . . . . . 104
Performing Operations on Objects in Groups . . . . . . . . . 104
Ungrouping/Deleting a Group . . . . . . . . . . . . . . . . . 105
Chapter 7 Moving Objects . . . . . . . . . . . . . . . . 107
Movable Objects . . . . . . . . . . . . . . . . . . . . . . . . 107
Objects Moved Together . . . . . . . . . . . . . . . . . . . . 108
Moving an Object . . . . . . . . . . . . . . . . . . . . . . . 108
Performing a Move . . . . . . . . . . . . . . . . . . . . 109
Controlling the Questions Generated. . . . . . . . . . . 111
Answering the Questions . . . . . . . . . . . . . . . . . 111
Description of the Possible Responses . . . . . . . . . . 113
Setting Preferences for Moving. . . . . . . . . . . . . . . . . 116
Defining Delimiter Objects . . . . . . . . . . . . . . . . . . 118
By Type of Object . . . . . . . . . . . . . . . . . . . . . 118
By Object . . . . . . . . . . . . . . . . . . . . . . . . . 119
Chapter 8 Documenting Objects . . . . . . . . . . . . . 121
Creating Documentation. . . . . . . . . . . . . . . . . . . . 121
Opening the Documentation Window . . . . . . . . . . 122
Changing Font, Font Size, Style and Color of Text . . . . 123
Setting the Delimiter Object Option . . . . . . . . . . . 123
Viewing the Date of the Last Modification . . . . . . . . 123
Deleting Documentation. . . . . . . . . . . . . . . . . . . . 124
Printing Documentation . . . . . . . . . . . . . . . . . . . . 125
Creating General Documentation . . . . . . . . . . . . . . . 125
Creating Documentation in a Multi-User Environment . . . 126
4D Insider Reference Manual
vi
Page 7

Contents
Chapter 9 Localizing Databases . . . . . . . . . . . . . 127
Using STR# Resources in the 4D Environment . . . . . . . . .128
Localizing Menus and Menu Items. . . . . . . . . . . . . 128
Localizing Buttons . . . . . . . . . . . . . . . . . . . . . 130
Localizing Text Areas . . . . . . . . . . . . . . . . . . . . 131
Using STR# Resources in the 4D Insider Environment . . . . . 132
Converting Text to an STR# Resource . . . . . . . . . . . 132
Editing an STR# Resource. . . . . . . . . . . . . . . . . . 134
Converting an STR# Resource to Text . . . . . . . . . . . 135
Chapter 10 Printing and Exporting . . . . . . . . . . . . 137
Printing . . . . . . . . . . . . . . . . . . . . . . . . . . . . . 137
Exporting . . . . . . . . . . . . . . . . . . . . . . . . . . . . 139
Exporting Objects on the Macintosh. . . . . . . . . . . . 139
Exporting Objects in Windows. . . . . . . . . . . . . . .141
Appendix A Keyboard Shortcuts . . . . . . . . . . . . . . . . . . . . . 143
Appendix B Customizer Plus Utility . . . . . . . . . . . . . . . . . . .145
Customizing 4D Insider . . . . . . . . . . . . . . . . . . . . . 145
Types of Option Settings . . . . . . . . . . . . . . . . . . . . 146
Translation of Commands . . . . . . . . . . . . . . . . .146
Script Manager . . . . . . . . . . . . . . . . . . . . . . . 146
Methods. . . . . . . . . . . . . . . . . . . . . . . . . . . 147
Fonts . . . . . . . . . . . . . . . . . . . . . . . . . . . .147
Conversions. . . . . . . . . . . . . . . . . . . . . . . . . 148
Index. . . . . . . . . . . . . . . . . . . . . . . . . . . . . . . . . . . . . . . . . . . . . . . . .149
4D Insider Reference Manual
vii
Page 8

Contents
4D Insider Reference Manual
viii
Page 9

Preface
4D Insider is a utility for cross-referencing objects in your databases as
well as for copying objects from one database to another. It is one of
several tools that, together with 4th Dimension, comprise the
4th Dimension environment.
About this Manual
Cross-Platform Considerations
Chapter Descriptions
This manual introduces 4D Insider and explains how to use it on both
the Windows® and Mac™ OS (Power Macintosh) platforms. Although
the concepts and functionality of both versions of 4D Insider are nearly
identical, the manual addresses any differences where necessary. Such
differences may include the graphical user interface and keyboard
commands.
The graphics in this manual illustrate 4D Insider in the Windows 95
environment. The two versions of the same screen are only presented
if there are any major differences between them.
This manual is divided into the following chapters:
■
Chapter 1, “Introduction,” provides an overview of 4D Insider.
■
Chapter 2, “Opening a Database,” describes how to run 4D Insider and
open and close databases and libraries.
Chapter 3, “Viewing Database Objects,” discusses how to use
■
4D Insider’s main window to view the cross-references for objects and
to view the objects themselves.
■
Chapter 4, “Using Filters,” explains how to use filters to select which
types of objects you want to view.
4D Insider Reference Manual
ix
Page 10

Preface
■
Chapter 5, “Searching and Replacing,” explains how to search for an
object and how to replace object names throughout a database or
library.
■
Chapter 6, “Using Groups,” describes how to organize objects into
groups.
Chapter 7, “Moving Objects,” explains how you can move objects
■
from one database or library to another.
Chapter 8, “Documenting Objects,” explains how you can add
■
documentation for the objects in your database and for the database
itself.
■
Chapter 9, “Localizing Databases,” explains how to create and edit
STR# resources used in place of static text in your menus, buttons, and
forms when you localize an application for another language.
■
Chapter 10, “Printing and Exporting,” explains how to print or export
information about database objects.
Appendix A, “Keyboard Shortcuts,” lists the keyboard command
■
shortcuts used in 4D Insider.
Hypertext Navigation
■
Appendix B, “Customizer Plus Utility” describes how you can
customize 4D Insider using the Customizer Plus program.
If you are reading this manual in electronic format (Adobe™ Acrobat
PDF), you can take advantage of the hypertext links that it contains.
Each word that appears in blue has a hypertext link. However, this
principle does not apply to the “Table of Contents” and “Index”
because each entry already has a hypertext link.
When you click a hypertext link, you immediately move to the page
that contains more information. To return to your original page, click
the Previous page button .
You can also navigate the document by clicking the bookmarks, which
are located to the left of the window that displays the manual pages.
4D Insider Reference Manual
x
Page 11

About this Manual
Conventions
Note
4D Server
This manual uses certain conventions to help you understand the
material.
The following explanatory notes are used:
Text emphasized like this provides annotations and shortcuts that will
help you use 4
th
Dimension more productively.
Throughout the manual, 4th Dimension and 4D Server/4D Client are
referred to simply as 4th Dimension. Differences between the operation
of the two products are explained in 4D Server notes, which provide
information about using 4D Server/4D Client. This information is
provided only when the operation of 4D Server/4D Client differs from
that of 4th Dimension.
Notes like this alert you to important pieces of information and alert
you to situations where data might be lost.
In addition, all table names are shown in brackets in the text to help
distinguish them from the names of fields, forms, and other items. For
instance, the Companies table is written as the [Companies] table.
4D Insider Reference Manual
xi
Page 12

Preface
4D Insider Reference Manual
xii
Page 13

1
Introduction
4D Insider allows you to cross-reference objects in your databases. You
can select any database object — table, form, method, menu, and so on
— and view its relationship to other objects in the database. You can
also view the objects themselves as well as change their names. You
can also modify STR# resources, by replacing the names of objects and
modifying STR# resources which are collections of text strings that are
used for menus, button text, and static text on forms.
In many cases, you will find that you use the same objects in more
than one database. You can use 4D Insider to move objects from one
database or library to another. A
create within 4D Insider to store elements commonly used in your
databases.
library
is a special file that you can
For new databases, you can accelerate the creation of new databases by
reusing objects that you have created in other databases. You can also
modify the objects in one database and then update all the databases
that use these objects.
Object Relationships
By their nature, objects in a database are interrelated. At the highest
level, a table is related to its fields. A table is also related to at least one
form. In turn, that form is related to the objects that it uses (fields,
scripts, and so on).
4D Insider Reference Manual
13
Page 14

Chapter 1 Introduction
The following figure shows the relationship between a form and the
objects that it uses:
Form method
Field
Form
Object method
Menu bar
This form is also used by other objects. A form is always used by a
table, but it may also be used in procedural statements. For example,
the name of the form may be used in a method as a parameter to the
INPUT FORM
command.
Form method
Table
Project Method
These types of relationships between objects are called
Field
Object method
Menu bar
cross-references
because they show which objects refer to or use each other. You can
view the cross-references in the 4D Insider browser windows.
By default, the lists in the browser show every type of object identified
by 4D Insider. You can also define your own object types.
4D Insider Reference Manual
14
Page 15

The Browser Window
The 4D Insider browser window is divided into three sections. The top
section displays lists of the database objects and their relationships.
The three lists are:
■
Main
: Displays the database object.
The Browser Window
Lists
Information area
Object Contents area
Used by
■
: Displays the objects that use the object selected in the Main
list.
Uses
■
: Displays the objects used by the object selected in the Main list.
The middle section of the screen is the Information area. Information
about the object selected in the Main list is displayed in this section of
the window.
The bottom of the screen is the Object Contents area in which the
contents of an object are displayed.
4D Insider Reference Manual
15
Page 16

Chapter 1 Introduction
Customizing 4D Insider
You can use Customizer Plus to change the Font, Script Manager,
Translation, Methods, and Conversions settings for 4D Insider.
You can change the fonts and font sizes used in the 4D Insider
application itself, in the pop-up menus, and those used for printing.
The Script Manager allows you to disable the styles in the method
editor, and to modify the comparison table used for searching and
sorting.
The Translation resource lets you specify the language used to display
4th Dimension commands in 4D Insider.
The Methods resource allows you to specify the colors in which
different procedural elements are displayed.
The Conversions resource allows you to modify the internal table used
by 4D Insider to convert strings and texts from one platform to
another.
For more information about customizing these resources, refer to
Appendix B of this manual and the
Customizer Plus Reference
.
STR# Resources
4D Insider Reference Manual
16
STR# resources are collections of text strings that are used for menus,
button text, and static text on forms. Instead of hard-coding text for
menus, buttons and forms, you can reference an STR# resource by
number.
Localizing databases is much easier when you use STR# resources.
Instead of modifying each form, menu or button, you just modify the
STR# resource.
You use 4D Insider to create and edit STR# resources on either the
Macintosh or in Windows. You can also use a resource editor, such as
ResEdit™ to edit on the Macintosh.
For information about using, creating, and modifying STR# resources
with 4D Insider, refer to Chapter 9.
Page 17

2 Opening a Database
To examine a database with 4D Insider, you must first open it. If you
open more than one database, you can copy objects between them.
In many cases, you will find that you use the same objects in more
than one database. A library is a special file that you can create within
4D Insider to store elements commonly used in your databases. Using
libraries, you can maintain a copy of a set of objects, which can later be
reused in other databases. When you update objects, you can copy the
updated objects to the library and then use the library to update your
other databases.
This chapter describes how to:
■ Run 4D Insider
■ Open a database
■ Create a new database
■ Reparse a database
■ Maintain a list of preferred databases that can be opened from a menu
■ Create a database from an SQL description file
■ Set a start-up option
■ Close a database
■ Create and save a library
■ Open a library
■ Use libraries in a multi-platform environment
4D Insider Reference Manual
17
Page 18

Chapter 2 Opening a Database
Running 4D Insider
For complete information about how to install 4D Insider, please refer
to the Installation Guide.
Once the 4D Insider installation is complete, the following files will
have been installed onto your hard disk :
Installation Folder Windows\ACI Folder Installation Folder
4Dinsid.exe Insv65Prf.rsr 4D Insider® 6.5
4Dinsid.rsr \Network : contains
Asifont.fon
ASINTPPC.DLL
Asiport.rsr
QTDP32.dll
¨¨
¨¨
To run 4D Insider:
■ Double-click the 4D Insider application icon, or
Drag a database structure file to the 4D Insider application icon.
The 4D Insider Welcome window appears.
Windows MacOS
System Folder:Prefe-
the network components files (required for
the use of 4D Insider
with a 4D Server
Database)
rences:ACI
Insv65Prf
Opening Databases
You can open any uncompiled database created with 4th Dimension or
4D Server v.6.5 or higher with 4D Insider v.6.5. If your database was
created with an earlier version, you must convert the database to either
4th Dimension or 4D Server 6.5, or higher.
Note You cannot open a database that is currently open in another
application such as 4th Dimension or 4D Runtime.
¨¨
¨¨
To open a database:
1 Choose Open from the File menu. On the Macintosh, choose a menu
command from the submenu. In Windows, Open on 4D Server and
Open are separate menu items.
On the Macintosh, the submenu offers you submenu options for
opening a database located on your hard disk (locally) or for opening a
database published on the network by 4D Server (on 4D Server...).
4D Insider Reference Manual
18
Page 19

Opening Databases
MacintoshWindows
2 Follow the steps for “Opening a Database Locally” or “Opening a
Database on the Server.”
After opening the database, 4D Insider builds a cross-reference table of
the objects contained in the database. A window appears, displaying
the operation’s progress.
When 4D Insider has finished cross-referencing the database, it
displays the database objects in a browser window.
You can open as many local databases as your memory permits. Each
database you open will have its own browser windows.
4D Insider Reference Manual
19
Page 20

Chapter 2 Opening a Database
Memory Management
Windows In Windows, 4D Insider manages memory by itself, allocating and
Macintosh
Memory Settings When 4D Insider parses your database, it needs to keep track of all
If the database contains a large number of objects, you may need to
increase the memory allocated to 4D Insider.
purging additional memory as needed.
¨¨
¨¨
To allocate memory on the Macintosh:
1 Quit 4D Insider.
2 Select its application icon at the Finder level.
3 Choose Get Info from the Finder File Menu.
4 Change Memory Requirements at your convenience.
references to and from each object in the database. At times, this can
be a lot of information. In general, memory settings for 4D Insider
should follow this formula:
900K for 4D Insider + (Number of objects * 0.5K) + the size of the largest object
This formula is based on 50 references per object. Also, be aware that if
you intend to open two structure files simultaneously, the formula
applies to each structure. In addition, if you plan to open a structure
and move several or all of the objects to another structure or to a
library, the formula applies to each structure or library.
Opening a Database Locally
Windows
4D Insider Reference Manual
20
If you choose to open a database located on your hard disk, the
standard Open File dialog box appears, allowing you to select a
database.
Macintosh
Page 21

Opening Databases
Select the database that you want to open and click Open. If a
password is required to open the structure of your database, you will be
asked to enter it. Only the Designer is allowed to open the database
using 4D Insider.
Opening a Database on a Server
Windows
TCP/IP connection
dialog box
With 4D Insider you can open one 4D Server database at a time on
both Windows and Macintosh platforms.
4D Insider can connect to 4D Server using one of the following
network protocols: AppleTalk, TCP/IP or IPX (Windows only). To make
a connection, 4D Insider must have the proper network components
installed.
If a password is required to open the structure of your database, you
will be asked to enter it. Only the Designer password will allow you to
open the database using 4D Insider.
If you choose to open a database served on the network with
4D Server, a dialog box similar to the following is displayed.
This dialog box allows you to choose the server to which you want to
connect.
Make sure that the network component corresponding to the network
protocol you want to use is installed in 4D Insider. For example, if you
want to use the TCP/IP network protocol, you need to install the
appropriate network component for your platform. Please refer to the
4D Server Reference as well as the Network Components for 4D Server
documentation for complete information about installing network
components and connecting to a 4D Server database.
4D Insider Reference Manual
21
Page 22

Chapter 2 Opening a Database
.tex and .tes Files When you connect to a 4D Server database with 4D Insider, 4D Insider
copies the structure file’s resources to a database “.tex” file and the
structure objects to a database “.tes” file. These files will contain the
same information that 4D Client stores in its “.res” and “.rex” files.
The reason that 4D Insider must create its own files is to allow you to
connect to a database using 4D Client and, at the same time and from
the same machine, open the structure using 4D Insider.
4D Insider operates like a 4D Client in Read Only access mode.
Consequently, with 4D Insider you cannot modify any object (at the
exception of comments) of a database running on 4D Server.
Creating a New Database
In addition to opening an existing database locally, 4D Insider enables
you to create a new empty database. Once you have created a new
database, you add objects to it by moving objects from other databases
or libraries. Eventually, you can work with this new database using
4th Dimension or 4D Server as if it were originally created by one of
these applications.
4D Insider Reference Manual
22
¨¨
¨¨
To create a new database:
1 Select New Database... in the File menu.
A new, untitled browser window appears.
Page 23

At this point, if you choose Save as... from the File menu, you will be
prompted with the following confirmation dialog box.
The reason for this is that a database needs to contain at least one table
definition in order to be operable with 4th Dimension or 4D Server.
If you click Cancel, nothing happens. If you click OK, the new window
will be saved as a 4D Insider library instead of a 4D database.
2 Move objects from another database or library to the new database.
Once you have moved at least one table from another database or from
a library to the new database, the confirmation dialog is no longer
shown when you save or close the browser window.
Reparsing a Database
Reparsing a Database
If you are using 4D Insider with a database published by 4D Server,
other users may be modifying the structure or the objects in the
database during your work session. In this case, the table of crossreferences constructed by 4D Insider may be obsolete.
On MacOS, if the table of cross-references needs to be updated, the
word “Reparse” flashes in the upper-left portion of the current
window’s title bar.
In order to update the information displayed by 4D Insider, you can
request that 4D Insider analyze the database again.
4D Insider Reference Manual
23
Page 24

Chapter 2 Opening a Database
¨¨
¨¨
To do so:
■ Choose Reparse from the Tools menu.
4D Insider reanalyzes the structure of the database, displaying the
progress of the operation.
Opening Preferred Files (Mac OS only)
If you frequently work on the same database structures or libraries, you
may wish to make them preferred files. The advantage to doing this is
that you can quickly open a preferred file by choosing its name from a
submenu.
Note You can only use this option for local databases. You cannot make a
4D Server database a preferred file.
¨¨
¨¨
To open a preferred file:
■ Choose Preferred Files from the File menu, and then choose a file
name from the submenu.
4D Insider Reference Manual
24
Page 25

Opening Preferred Files (Mac OS only)
Choosing a file from this list automatically opens the corresponding
database.
¨¨
¨¨
To personalize your list of preferred files:
■ Choose Preferred Files from the File menu, and then choose Modify...
from the submenu.
The following dialog box appears:
Files in the directory
Files in the
submenu
The Eject, Desktop, and Open buttons at the center of the window
allow you to locate and select the files to be placed in the submenu.
When you select a structure file from the scrollable list on the left, the
Open button becomes an Add button so that you can add the structure
file to the list of files in the submenu.
4D Insider Reference Manual
25
Page 26

Chapter 2 Opening a Database
¨¨
¨¨
To add a file to the submenu:
■ Select a file and click the Add button.
The file appears in the list on the right and will appear in the submenu
when you click OK to save your changes.
¨¨
¨¨
To remove a database from the submenu:
■ Select the file from the list on the right and click the Remove button.
¨¨
¨¨
To associate a keyboard equivalent with a database:
■ Select the file from the list on the right and type any character (except
for those already used by 4D Insider) in the Command Key area.
You can use this keyboard equivalent as a shortcut for opening the file.
To open the database using the keyboard equivalent, press the q key
and type the previously defined character.
Opening Recently Used Files (Windows only)
In Windows, the five most recently used databases are listed in the File
menu.
4D Insider Reference Manual
26
¨¨
¨¨
To open a previously used database:
■ Select the database from the File menu.
Page 27

Creating a Database from an SQL Description File
Creating a Database from an SQL Description File
4D Insider can parse an SQL description file generated by a case tool
and create a 4D database matching the SQL description. 4D Insider
parses the file, ignoring unsupported verbs, and creates the 4D
structure sequentially. The generated 4D database contains the tables,
typed fields, and manual relations between tables.
If it encounters an SQL syntax error, 4D Insider terminates the parsing.
Supported Verbs 4D supports two SQL verbs, CREATE TABLE and CREATE INDEX:
CREATE TABLE Supported options are:
■ PRIMARY KEY - A Primary key declaration indexes the created field
with a Unique property.
■ FOREIGN KEY () REFERENCES - A foreign key declaration creates a
many-to-one manual relation and indexes the created field.
Supported constraints are:
■ NOT NULL - A NOT NULL constraint will make the field Mandatory.
Supported data types are:
ODBC SQL and SQL92 Data Types 4D Data Types
CHAR, NCHAR Alpha(2)
CHAR(x)*, NCHAR(x)* Alpha(x)
VARCHAR(x) Text
CHAR VARYING, NCHAR VARYING Text
LONG VARCHAR Text
TINYINT, SMALLINT Integer
INT, INTEGER Long Integer
BIGINT, DOUBLE, DOUBLE PRECISION Real
NUMERIC, NUMERIC(x), NUMERIC(x,y) Real
DECIMAL, DECIMAL (x), DECIMAL (x,y) Real
DEC, DEC (x), DEC (x,y), REAL, FLOAT Real
BIT Boolean
BIT(x), BIT VARYING BLOB
BINARY(x), VARBINARY(x) BLOB
LONG VARBINARY BLOB
DATE Date
TIME, TIMESTAMP, TIME WITH TIME ZONE Time
TIMESTAMP WITH TIME ZONE Time
4D Insider Reference Manual
27
Page 28

Chapter 2 Opening a Database
* When the number of characters is greater than 80 (x>80), 4D Insider
truncates the Alpha field to 80 characters.
CREATE INDEX Supported options are:
■ UNIQUE
Creating an index on a column indexes the equivalent 4D field.
Creating a Unique index on a column indexes the equivalent 4D field
with a Unique property
▼ Example:
CREATE TABLE COMPANIES (
REF INTEGER,
NAME CHAR (25) NOT NULL,
ADDRESS VARCHAR (200),
ZIP_CODE CHAR (5),
PHONE CHAR (15),
FAX CHAR (15),
CREDIT_LINE FLOAT,
EXPIRES DATE,
PRIMARY KEY (REF) );
CREATE TABLE CONTACTS (
REF INTEGER,
REF_COMPANY INTEGER NOT NULL,
NAME CHAR (20),
F_NAME CHAR (20),
EXTENSION CHAR (3),
PRIMARY KEY (REF),
FOREIGN KEY (REF_COMPANY) REFERENCES COMPANIES (REF) );
CREATE UNIQUE INDEX COMP_IDX ON COMPANIES (REF);
CREATE INDEX COMPNAME_IDX ON COMPANIES (NAME);
CREATE UNIQUE INDEX CONT_IDX ON CONTACTS (REF);
CREATE INDEX CONTNAME_IDX ON CONTACTS (NAME);
¨¨
¨¨
To create a database from an SQL description file:
1 Select Open SQL File... from the File menu.
A standard Open File dialog box enables you to select the file.
2 Select the SQL file and click Open.
4D Insider Reference Manual
28
Page 29

Creating a Database from an SQL Description File
The main window for the file opens.
The 4D Insider browser window reflects the manual relationships of
the 4D structure file.
Log File When interpreting a SQL text file to create a new database, 4D Insider
creates a log file, in text format, in the database folder. This log file
contains table names and columns in the order in which they were
interpreted by 4D Insider.
4D Insider Reference Manual
29
Page 30

Chapter 2 Opening a Database
If 4D Insider encounters an error, it stops and writes the error in the
log file. Errors that 4D Insider may encounter are:
Duplicate filename
Out of memory
Initialization error
Parsing error
Yacc stack overflow
Syntax error
Unterminated string
General Preferences
Welcome Window When you run 4D Insider, the 4D Insider Welcome window appears by
default.
¨¨
¨¨
To show the Welcome window when you open 4D Insider:
1 Choose Preferences from the File menu, and then choose General...
from the submenu that appears to its right.
4D Insider Reference Manual
30
Page 31
Closing a Database
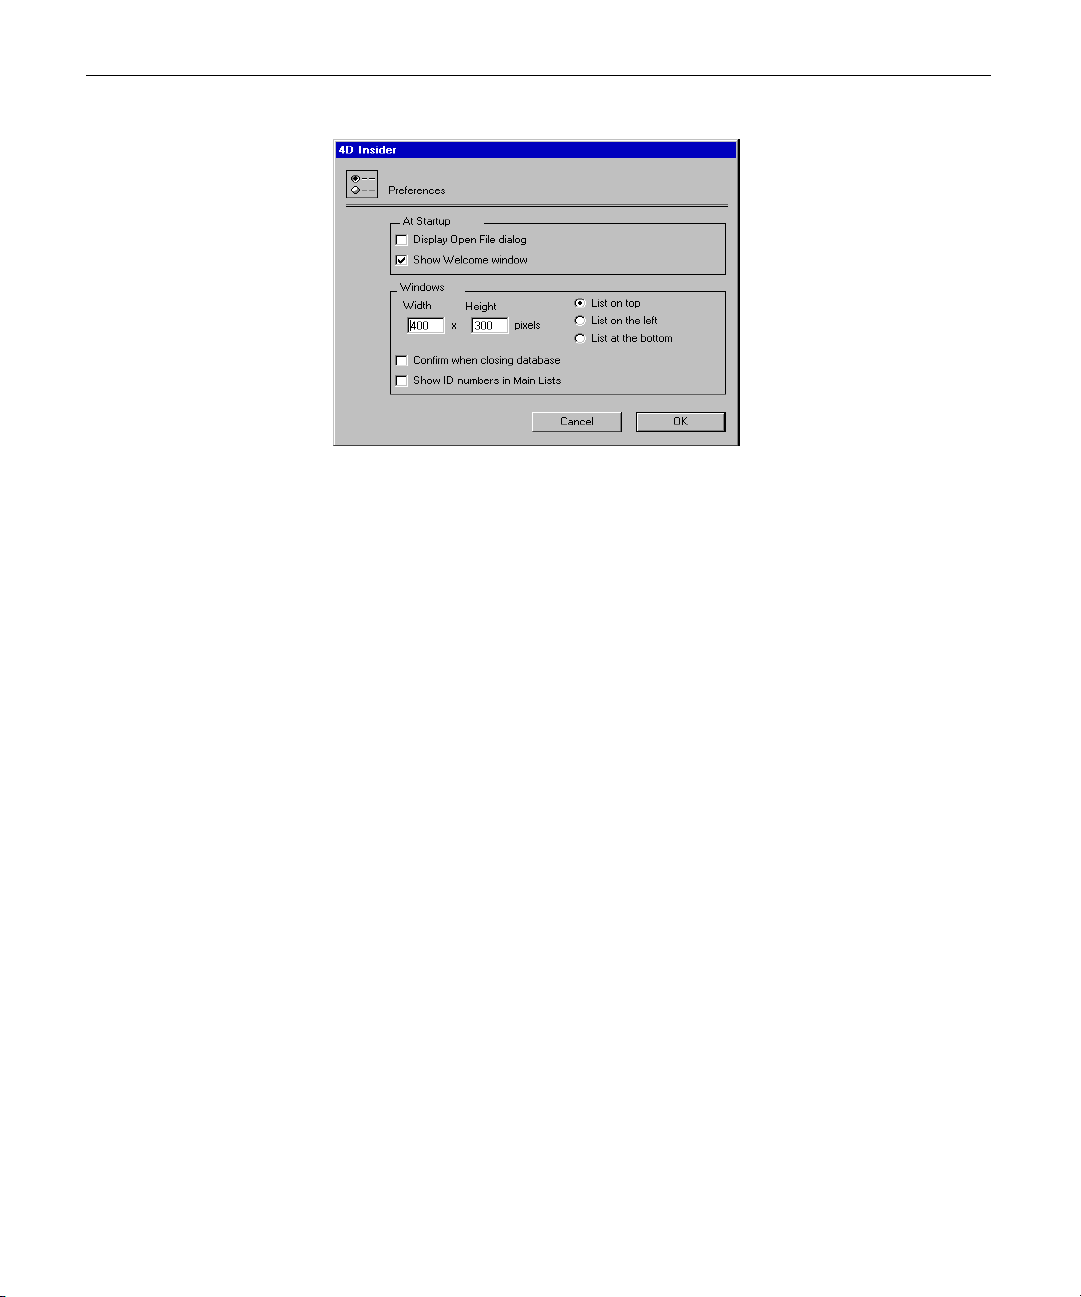
The Preferences dialog box is displayed.
2 Select the Show Welcome Window check box.
You must then choose Open from the File menu to open a database.
Display Open File Dialog
You may want 4D Insider to display the Open File dialog box
automatically at start-up.
¨¨
¨¨
To set this option:
1 Choose Preferences from the File menu, and then choose General...
from the submenu.
The Preferences dialog box is displayed.
2 Select the Display Open File dialog check box.
Closing a Database
You close a database by closing its open windows.
¨¨
¨¨
To close a window:
Choose Close from the File menu, OR
On the Macintosh, click its close box.
On Windows, double-click its Control-menu box.
¨¨
¨¨
To close all open windows:
■ Choose Close All from the File menu, OR
On the Macintosh, Option-click a window’s close box.
In Windows, Alt-click a window’s close box or Control-menu box.
4D Insider Reference Manual
31
Page 32

Chapter 2 Opening a Database
Since objects in a database must be reexamined when the database is
opened, you may want to be warned when you close the last browser
window of a database. If Confirm When Closing Database is selected in
the Preferences dialog box, 4D Insider displays a confirmation dialog
box when you try to close the last browser window.
If you click Cancel, the browser window and database remain open.
If the Confirm When Closing Database check box is not selected in the
Preferences dialog box, 4D Insider automatically closes the last browser
window and the database.
Libraries
Creating a Library
4D Insider Reference Manual
32
A library is a 4D Insider file that contains a set of structure objects.
By copying objects to a library file, you can maintain a set of objects
commonly used in your databases. This library can easily be moved to
other databases, allowing you to reuse the objects in whichever
database or library you want. 4D Insider libraries provide a way to
exchange modular 4D structure components within a work group.
You can create as many library files as you want, organizing objects
into different library files according to their use or functionality.
A library file can be opened locally, only by 4D Insider.
¨¨
¨¨
To create a new library:
1 Choose New Library from the File menu.
Page 33

Libraries
Windows
Macintosh
A new window, called “Untitled library_1”, appears. It resembles the
window opened for a database structure, except that it is empty.
2 Construct your library by moving objects from one or more databases
to the Main list of the library.
4D Insider Reference Manual
33
Page 34

Chapter 2 Opening a Database
When you move an object to a library, 4D Insider also moves the
objects that it uses. For example, if you move a method, 4D Insider
also moves any methods that it calls, as well as the commands,
variables, and other items used in the method.
For more information about moving objects, refer to Chapter 7,
“Moving Objects.”
Saving a Library
¨¨
¨¨
To save a library that you have just created:
■ Choose Save As... from the File menu.
A standard Save File dialog box appears, allowing you to save the
library and choose its location on disk. In Windows, the file name
extension for library files is “.4IL”.
Windows
Macintosh
4D Insider Reference Manual
34
Page 35

If you have not saved your library, 4D Insider asks if you want to do so
when you double-click the window’s Control-menu box (Windows) or
click the close box (Macintosh).
If you click Yes, a standard Save File dialog box appears for you to name
the library and choose its location on disk. If you click No, the library
is not saved, and the library window is closed.
Opening a Library You can only open a library locally.
¨¨
¨¨
To open an existing library:
■ Choose Open from the File menu. On the Macintosh, choose Locally
from the submenu.
Libraries
MacintoshWindows
A standard Open File dialog box appears, allowing you to select the
library to open.
4D Insider Reference Manual
35
Page 36

Chapter 2 Opening a Database
Using Libraries in a Multi-Platform Environment
Moving from Macintosh
to Windows
Since you can only open libraries locally, you must move the files in
order to use them on another platform. Libraries created on the
Macintosh can be used in the Windows environment, and vice versa,
by moving them with 4D Transporter. The 4D Transporter utility is
included with the Macintosh versions of 4th Dimension and 4D Server.
4D Transporter is found in the Utilities folder (in the Programs folder).
¨¨
¨¨
To transport a 4D Insider Library to the Windows environment:
1 Drag and drop the library file onto the 4D Transporter icon. The
following dialog will be displayed.
4D Insider Reference Manual
36
2 Choose the appropriate options, and click the Move button.
When you have completed the move, a new folder named “FolderPC”
will appear in the same folder as your original library file.
Page 37

Moving from Windows
to Macintosh
Libraries
This folder contains two new files that you can move to your Windows
computer and use in the Windows environment.
¨¨
¨¨
To transport a Windows 4D Insider Library to the Macintosh
environment:
1 Move the .4IL and .RSR files to the Macintosh via a network or a disk.
2 Drag and drop the library file (.4IL) onto the 4D Transporter icon.
3 Choose the appropriate options, and click the Move button.
When you have completed the move, a new folder named
“FolderMac” will appear in the same folder as your original library file.
For complete details on using 4D Transporter, refer to the
4D Transporter documentation.
4D Insider Reference Manual
37
Page 38

Chapter 2 Opening a Database
4D Insider Reference Manual
38
Page 39

3 Viewing Database Objects
When you open a database with 4D Insider, the database is first parsed.
During the parsing, 4D Insider identifies the type of each object in the
database, as well as the object’s relationship to other objects in the
database.
The results of the parsing are displayed in the 4D Insider browser
window. Using the browser window, you can view the objects in your
database and their relationships to other objects.
For instance, by selecting an object in the Main list, you can view the
objects related to it in the lists on either side of the Main list.
Selected object
4D Insider Reference Manual
39
Page 40

Chapter 3 Viewing Database Objects
This chapter describes how to use 4D Insider to view database objects.
■ How to view objects and their relationships
■ How to view the contents of an object (for example, the contents of a
method or a form)
■ How to use the lists in the browser window, including how to move
lists and how to filter the objects displayed in the lists
■ How to organize the browser window
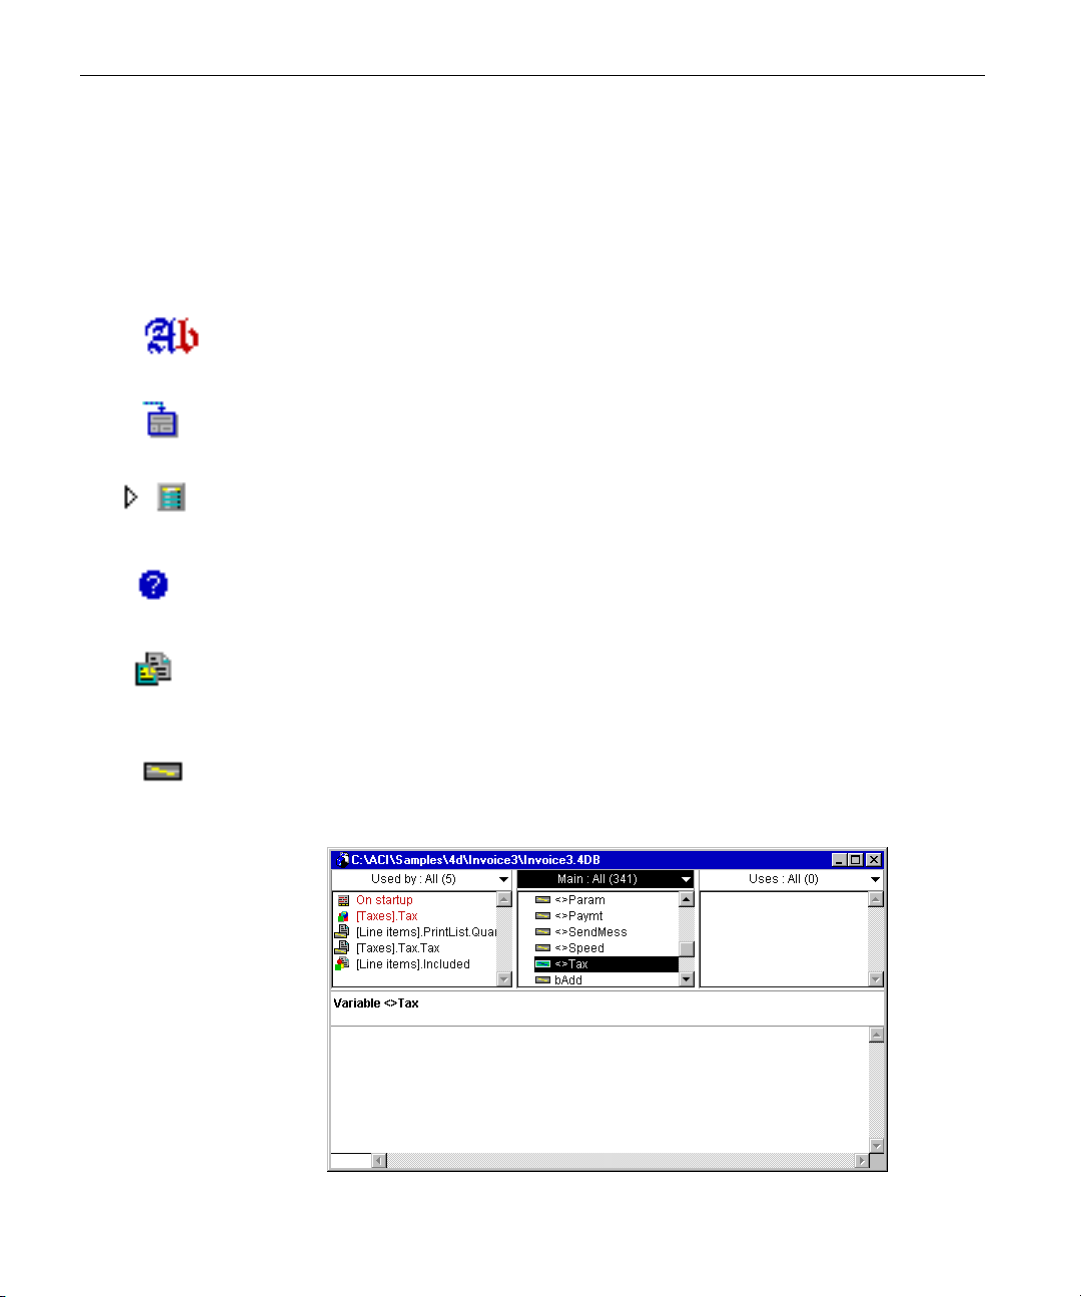
Viewing Objects
After analyzing the objects in your database, 4D Insider displays a
browser window for the database. The browser window contains three
lists: Main, Used by, and Uses. The title bar at the top of each list
displays the name of the list, the type of filter or operation applied to
the list, and the number of objects currently contained in the list.
Below the lists are the Information area, containing information about
a selected object, and the Object Contents area, displaying the
contents of the object.
Main list
4D Insider Reference Manual
40
When you first open a database, the Main list displays the names of all
the database objects, sorted by type. You can later reduce this list to
show only a subset or to show only objects of certain types.
Number of
objects
Information
area
Object
Contents
area
Page 41

Viewing Objects
Selecting an Area within the Browser Window
When a new browser window is open, the Main List is the selected area
in the window, by default.
¨¨
¨¨
To select another area:
■ Click on it or use the Tab key.
The Tab key allows you to cycle within the areas:
The four areas are
■ Used By list
■ Main List
■ Uses List
■ Information and Object Contents area
Types of Objects Displayed
These areas are described throughout this chapter.
By default, the Main list in the browser window displays the names of
all the objects in the database. The Used By and Uses lists display the
names of objects related to the object selected in the Main list.
In each list in the browser window, objects are identified by name and
type. The type of object is indicated by the icon that appears to its left.
4D Insider Reference Manual
41
Page 42

Chapter 3 Viewing Database Objects
The following table displays the icon for each type of object identified
by 4D Insider, in alphabetical order:
Icon Type Icon Type
Commands Picture Libraries
Constants Plug-ins
Database Methods Project Methods
Fields (and subfields) Semaphores
Formats/Filters Sets
Forms STR# Resources
Form Methods Style Sheets
Groups Subtables
Lists Tables
Menu bars Tips
Menus Triggers
Named Selections Variables
Object Methods
Tables and Fields Tables and fields are displayed hierarchically in the lists. To view the
fields contained in a table, click the triangle to the left of its icon:
Click triangle
4D Insider Reference Manual
42
Page 43

Viewing Objects
If the table contains a subtable field, you can click the triangle to the
left of the subtable field to view the fields in the subtable:
Click triangle
Unused Objects Unused objects are objects that are not used by anything in the
database. For example, an unused method is one that is not executed
at start-up or called by another method.
Unused objects appear in red on a color monitor, in grey on a greyscale monitor, and in bold on a black and white monitor.
Objects in Methods When parsing methods, 4D Insider recognizes references to
code-specific objects such as commands and variables, as well as other
database objects. For example, given the following method statement,
4D Insider would conclude that the method uses the INPUT FORM
command and the “Form1” form:
INPUT FORM("Form1")
There are two cases in which 4D Insider does not recognize an object
in a method or object method:
■ Case 1: An object is not recognized if its value depends on method
execution. For example, the following statement uses a different form
depending on the value of the vScreenSize variable:
INPUT FORM (“MyForm”+String(vScreenSize))
■ Case 2: An object is not recognized if it is a parameter to a user-defined
method rather than to a 4th Dimension command or function.
For example, the following statement uses a user-defined method to
center a window on the screen:
CenterWindow (Width; Height; Type;Title; "CLOSE BOX")
4D Insider Reference Manual
43
Page 44

Chapter 3 Viewing Database Objects
The fifth parameter, "CLOSE BOX", is a method that indicates what
should happen when the user double-clicks the window’s Controlmenu box. However, since CenterWindow is a user-defined method,
4D Insider does not recognize CLOSE BOX as a method in this case.
If you want to ensure that 4D Insider recognizes all objects passed to
user-defined methods, you could add code that references the objects.
For example, in the case of the previous statement, you could call the
method in an If statement that is never true:
If (False) `This will never be true
CLOSE BOX `Use the method directly
End if
CenterWindow (Width; Height; Type;Title; "CLOSE BOX")
Viewing Related Objects
Viewing Related Objects
in the Lists
Selected object
is used by these
objects
Selected object
uses these objects
4D Insider allows you to view the relationship between objects in your
database in a number of ways. The lists in the browser window enable
you to:
■ View all objects related to a particular object
■ View the parent of an object
When you select an object in the Main list, the lists on either side of
the Main list display the related objects. The Used By list displays the
names of the objects that use the selected object. The Uses list displays
the names of the objects used by the selected object.
4D Insider Reference Manual
44
Page 45

Viewing Objects
Viewing the Parent of an
Object
¨¨
¨¨
Some types of objects descend directly from another object type,
without which they could not exist. For example, a form cannot exist
without a table; the table is said to be the parent of the form.
The following table lists the types of objects that have parent objects
and provides the parent object types:
Object type Parent object type
Field Table
Form Table
Trigger Table
Object Method Form
Form method Form
To view the parent of an object:
■ On the Macintosh, Control-click the object.
In Windows, click the object with the right mouse button.
A new browser window appears with the parent object selected in the
Main list.
Selected form
New window opens
with the parent table
selected in the Main
list
Note You can select an object in any list. The object does not have to be
displayed in the Main list.
4D Insider Reference Manual
45
Page 46

Chapter 3 Viewing Database Objects
Viewing an Object’s Contents
¨¨
¨¨
To view the contents of any object listed in the browser window.
■ Double-click the object’s name.
OR
On the Macintosh, select the object’s name and press Return or Enter.
In Windows, select the object’s name and press Enter.
The contents of the object are displayed in the Object Contents area.
Other information about the object, such as its size, modification date,
and internal ID reference number, may also be displayed in the
Information bar.
Double-clicking
a form...
shows the form
name in the
Information bar
and the form itself
in Object Contents
area
An object’s appearance depends on its type. By nature, some objects,
such as tables and externals, cannot be displayed at all. The following
sections describe how each type of object is displayed.
Commands 4
th
Dimension commands cannot be displayed. If you double-click a
command name, the Object Contents area remains empty.
Constants Double-clicking on a constant causes its value to be displayed in the
Information and Object Contents area.
Database Methods When you double-click a database method, the Object Contents area
displays the method text as it appears in the 4th Dimension Method
editor. You can select and copy this text. The information bar displays
the name, date of last modification, internal ID reference number, and
size (in bytes) of the database method.
4D Insider Reference Manual
46
Page 47

Viewing an Object’s Contents
Fields and Subfields If you double-click a field or subfield, the Information bar displays its
name, and the Object Contents area displays its type and properties. In
other words, the relation starts from this field (or subfield).
If a field is related to a field in another table, the Object Contents area
specifies the table and field to which it is related (the field to which it
points).
Related field is
displayed
Forms When you double-click a form, the form appears in the Object
Contents area. The size (in bytes) is indicated near the form name.
The pop-up menu located at the top, right-hand corner of the
Information bar allows you to vary the appearance of the form. You
can display the form as it appears:
■ In the Design environment (the default)
■ In the User/Custom Menus environment
■ With variable names showing
4D Insider Reference Manual
47
Page 48

Chapter 3 Viewing Database Objects
When the form is displayed as it appears in the Design environment,
any STR# resources used for text are shown as STR# ID numbers. If the
form does not use any STR# resources, it will display regular text.
If there is more than one page to the form, the arrows in the lower lefthand corner of the window are enabled. Using the arrows, you can
move to the previous or next page in a multi-page form.
Pop-up
menu
4D Insider Reference Manual
48
Double-clicking a field or an object containing an object method
displays the contents of the field or object method in the Object
Contents area. An object with an object method has a triangle in its
top left-hand corner, as shown in the previous graphic.
Note Object methods are denoted by triangles, regardless of the viewing
option chosen from the pop-up menu.
You can view the contents of an object method or field in a new
browser window.
¨¨
¨¨
To open a new browser window:
■ On the Macintosh, Option-click the desired object method or field.
In Windows, Alt-click the desired object method or field.
The Object Contents area of the new browser window displays the
contents of the selected object method or field.
4D Insider displays place holders in place of subforms.
Page 49

Viewing an Object’s Contents
Scaling Forms Like the 4D Form editor, 4D Insider includes a feature for rescaling
form objects. In addition, 4D Insider also lets you rescale multiple
forms, so you can modify a group of forms or make global changes.
When scaling objects using 4D Insider, keep in mind that there is no
Undo function available after implementing a rescaling operation, so
use this feature carefully.
Form objects created on Macintosh will look smaller when viewed on
Windows, and vice versa — even though the objects are actually the
same size. This is because the Windows screen resolution is about 25%
greater than the Macintosh resolution. For example, 12-point text on a
Macintosh will appear as 9-point text on Windows.
If the font size is just large enough on Macintosh, it may be too small
on Windows. Conversely, if a font size on Windows is adequate, it may
be too large on Macintosh.
To compensate for screen resolution differences, you may decide to
rescale objects. You can use the Scale Forms... command in the Tools
menu to proportionally resize all the form objects in one operation.
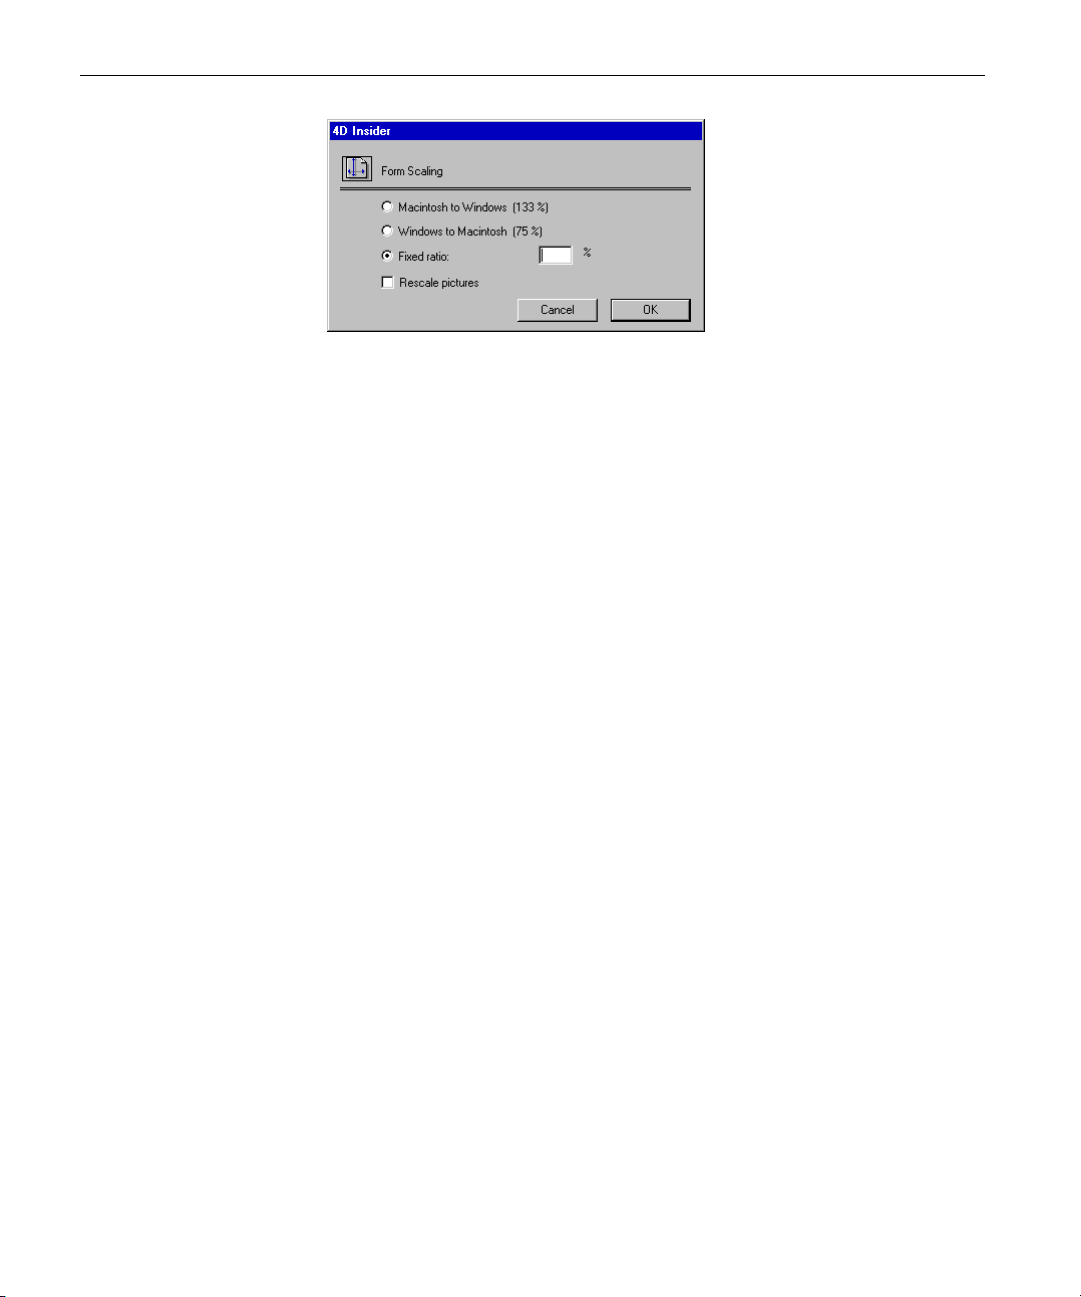
When you choose Scale forms, the Form Scaling dialog box appears.
4D Insider Reference Manual
49
Page 50
Chapter 3 Viewing Database Objects
You can choose among the following options:
■ Macintosh to Windows platform (133%): This is the default option
when you use 4D Insider on Windows. Use it when you want to resize
a form that was created according to Macintosh screen resolution so it
will look like it was created according to Windows screen resolution.
When scaling from Macintosh to Windows, 4D Insider increases the
size of all the form objects by one-third. For example, 9-point text
becomes 12-point text.
■ Windows to Macintosh platform (75%): This is the default option
when you use 4D Insider on Macintosh. Use it when you want to resize
a form that was created according to Windows screen resolution so it
will look like it was created according to Macintosh screen resolution.
When scaling from Windows to Macintosh, 4D Insider decreases the
size of all the form objects by one-quarter. For example, 12-point text
becomes 9-point text.
4D Insider Reference Manual
50
■ Fixed ratio: This option lets you resize a form using the percentage you
type in the “%” enterable area. You can resize a form so it will look
good on any unusual screen resolution you may encounter on either
the Macintosh or Windows platform. You can also use this option to
change the size of all the form’s objects for the platform you are using.
For example, it you want to double the size of all objects, enter 200%;
if you want to halve the size, enter 50%.
■ Rescale pictures: You can select this option in addition to one of the
other settings, but is not required. Usually, decreasing or increasing the
size of bitmapped pictures does not provide good results from a
cosmetic point of view. For this reason, the program does not resize
any static pictures in a form unless you select this option. Instead, it
moves them to their new “center relative” positions. If you know that
rescaling bitmaps will produce pleasing results or if you use nonbitmapped pictures, you might choose to rescale the pictures.
Page 51

Viewing an Object’s Contents
The following figure shows the effect of resizing a bitmapped picture.
Scaling with the Rescale
Pictures option not selected
After you have selected your options, click OK to resize the form;
otherwise click Cancel.
Resizing a form also moves the relative positions of the vertical
headers, detail, breaks, and footer tags of the form. However, the
horizontal label tag remains unchanged.
Note Starting with version 6, you can use Style Sheets to resolve font sizing
issues.
Scaling Multiple Forms You can scale several forms of a database at the same time. When you
select multiple forms in the Main list, the Scale Forms... option in the
Tools menu becomes enabled.
Choose Scale Forms... to display the Form Scaling dialog box. Then
select an option and click OK.
For more information about scaling options, refer to the 4th Dimension
Design Reference.
Scaling with the Rescale
Pictures option selected
Form Methods When you double-click a form method, the Object Contents area
displays the method text as it appears in the 4th Dimension Method
editor. You can select and copy this text.
The Information bar displays the name of the table and form to which
the form method belongs in the format [Tablename].FormName.
Formats/Filters If you double-click a format/filter, the Object Contents area displays
the contents of the format/filter as entered in 4th Dimension.
Groups By their nature, groups cannot be displayed. If you double-click a
group, the Object Contents area remains empty.
4D Insider Reference Manual
51
Page 52

Chapter 3 Viewing Database Objects
In contrast to all the other types of objects, groups are not generated
by 4th Dimension. Instead, the ability to create groups exists as an
organizational tool provided by 4D Insider. Groups can be viewed only
within 4D Insider.
For more information about groups, refer to Chapter 6, “Using
Groups.”
Lists When you double-click a list, the items in the list are displayed in the
Object Contents area.
Menu Bars When you double-click a menu bar, the menu bar appears in the
Object Contents area. The menu bar functions like a standard menu so
that you can click the menu name to display its menu commands.
STR# resource
reference
Pulling down
the menu
4D Insider Reference Manual
52
Pop-up
menu
Page 53

Viewing an Object’s Contents
If you press Option (Macintosh) or Alt (Windows) while choosing a
menu command, 4D Insider opens a new browser window for the
database, then selects and displays the project method associated with
the menu command, if any.
By default, the menu bar is displayed as it appears in the Design
environment. Any STR# resources used for the menu title or menu
commands are displayed as STR# resource reference.
To display the text for the STR# resources, choose User/Custom Menus
from the pop-up menu in the Information bar.
Menus You can use the same menu in several menu bars; 4D Insider allows
you to examine menus separately from menu bars. For more
information about reusing menus, refer to the 4th Dimension Design
Reference.
■ When a menu is displayed, 4D Insider displays the menu commands
and the names of the methods associated with each menu command.
Menu command
Method associated
with the menu
command
The pop-up menu located at the top, right-hand corner of the
Information bar allows you to view the menu as it appears in either
the Design environment (the default) or the User/Custom Menus
environment. In the Design environment, any STR# resources used
in place of text are displayed as STR# resource reference.
Double-clicking a menu command automatically displays the contents
of its method in the Object Contents area. You can also display the
contents of a method in a new browser window:
4D Insider Reference Manual
53
Page 54

Chapter 3 Viewing Database Objects
¨¨
¨¨
To do so:
■ On the Macintosh, Option-click the menu item.
In Windows, Alt-click the menu item.
Project Methods When you double-click a project method, the Object Contents area
displays the project method text as it appears in the 4th Dimension
Method editor. You can select and copy this text.
Name
Project Method
Named Selections If you double-click a named selection, the Object Contents area
remains empty.
Object Methods When you double-click an object method, the Object Contents area
displays the method text as it appears in the 4th Dimension method
editor. You can select and copy this text.
The Information bar displays the name of the object method and
identifies the table and form in which the object method is used.
Picture Libraries If you double-click on a picture from a picture library, the information
bar displays the name, date of creation, picture reference number, and
size (in bytes) of the picture. The picture itself is displayed in the
Object Contents area.
Plug-ins If you double-click a plug-in, the Object Contents area remains empty.
Plug-in Routines 4D Insider allows you to use the plug-in routines and their cross
references in a manner similar to 4th Dimension commands.
4D Insider Reference Manual
54
Page 55

Viewing an Object’s Contents
Semaphores If you double-click a semaphore, the Object Contents area stays empty.
Sets If you double-click a set, the Object Contents area stays empty.
STR# Resource STR# resources contain strings that can be used in place of static text in
menus and forms. For example, a button on a form could be labeled
15000,1 to indicate that the text for the button should be retrieved
from item 1 of STR# resource ID 15000.
When you double-click a STR# resource list, the Object Contents area
displays the string resource numbers and their items. The Information
bar displays the name and ID of the resource.
You can edit the resource by choosing Edit STR#... from the Tools
menu.
4D Insider Reference Manual
55
Page 56
Chapter 3 Viewing Database Objects
4D Insider’s String Resource editor automatically saves your
modifications when you close the window. For more information
about creating and editing STR# resources with 4D Insider, refer to
Chapter 9, “Localizing Databases.” For more information about using
STR# resources in forms and menus, refer to the 4th Dimension Design
Reference.
Style Sheets When you double-click a style sheet, the Object Contents area displays
the font settings for each platform as entered in 4th Dimension.
Subtables When you double-click a subtable, the Object Contents area remains
empty.
Tables When you double-click a table, the Object Contents area remains
empty.
Tips When you double-click a tip, the tip text is displayed in the Object
Contents area.
Triggers When you double-click a trigger, the Object Contents area displays the
trigger text as it appears in the 4th Dimension Method editor. You can
select and copy this text.
Variables If you double-click a variable, the Object Contents area remains empty.
However, if you supply a symbol table from a previous compilation of
the database, 4D Insider can display the variable type and the method
in which the variable is declared.
4D Insider Reference Manual
56
Page 57

Using the Lists in the Browser Window
The symbol table should be placed in the interpreted database’s
directory and should have the same name as the database structure file
with the suffix SYM.
Using the Lists in the Browser Window
This section describes operations that can be performed on a list.
Selecting a List
¨¨
¨¨
To select a list:
■ Click the list’s title bar or press Tab to select the next list.
Scrolling Through a List
Typing Characters to Select an Object in a List
Creating a Subset of Selected Objects in a List
You can scroll through a list using the scroll bar to the right of the list.
You can also scroll to an object in a list by selecting the list and typing
the initial letters of an object named in the list. For example, if you
wanted to locate the Invoices table in the Main list, you would select
the Main list and type “Inv”.
You can select objects in a list and then reduce the contents of the list
to just these objects. This reduced selection is called a subset.
You may want to create a subset of objects before printing or exporting
(described in Chapter 10). This will allow you to print or export only
the objects in the selection. You may also want to create a subselection
before performing a search to limit the search to the objects in the
selection.
¨¨
¨¨
To create a subset:
1 Select one or more objects in a list.
You can create a continuous or discontinuous selection.
A continuous selection is a selection of adjacent objects. To create a
continuous selection:
■ Click the first object in the series and then hold down the Shift key
while you select the last object in the series.
4D Insider Reference Manual
57
Page 58

Chapter 3 Viewing Database Objects
A discontinuous selection is a selection of nonadjacent objects. To create
a discontinuous selection:
■ On the Macintosh, Command-click the objects that you want to
select.
■ In Windows, Ctrl-click the objects that you want to select.
2 Choose Show Subset from the Edit menu.
OR
On the Macintosh, Control-click the title of the list.
In Windows, click the title of the list with the right mouse button.
Filtering the Objects Displayed in a List
By default, the Main list contains all the objects in the database, sorted
by type. For any list in the browser window, you can determine which
types of objects are to be displayed.
Using the pop-up menu at the right of each list’s title bar, you can
choose to display all objects or only objects of a certain type.
4D Insider Reference Manual
58
For information about defining your own object types or modifying
existing types, refer to Chapter 4, “Using Filters.”
Page 59

Selecting All the Objects in a List
Using the Lists in the Browser Window
¨¨
¨¨
To select all the objects currently shown in a list:
1 Select the list.
2 Choose Select All from the Edit menu.
Moving the Used By or Uses List to the Main List
Dragging a List to the
Main List
¨¨
¨¨
Uses: list being
dragged to the
Main list
To analyze the objects in the Used By or Uses list more closely, you can
make either list the new Main list. In this way, you can view the crossreferences for objects currently in the Used By or Uses lists.
To replace the Main list with the contents of the Used By or Uses list,
either drag the Used By or Uses list to the Main list or create another
browser window with a new Main list.
To drag the Used By or Uses list to the Main list:
■ Click the list’s title bar and hold down the mouse button while you
drag the list to the Main list’s title bar.
4D Insider Reference Manual
59
Page 60

Chapter 3 Viewing Database Objects
You can also use keyboard equivalents to move either of the lists to the
Main list.
To Move Windows Macintosh
Uses list to Main list Ctrl-Left Arrow or
Used by list to Main list Ctrl-Right Arrow or
Ctrl-Up Arrow
Ctrl-Down Arrow
Command-Left Arrow or
Command-Up Arrow
Command-Right Arrow or
Command-Down Arrow
Opening Another
Browser Window
Selected in the
first window
Selected in the
Main list of the
new window
If you want to view an object from the Used By or Uses list while
keeping the current browser window intact, you can open another
browser window. The Main list in the new browser window contains
all the database objects, as if you had just opened the database.
¨¨
¨¨
To open another browser window:
■ On the Macintosh, Option-click an object in the Used By or Uses list.
In Windows, Alt-click an object in the Used By or Uses list.
The new browser window is displayed with the object already selected.
The object’s contents are displayed in the window.
4D Insider Reference Manual
60
Page 61

Organizing the Browser Windows
You can control the appearance of browser windows by adjusting the
size of the lists relative to the Object Contents area, changing the
location of the lists, or specifying the default size of browser windows.
Organizing the Browser Windows
Resizing Browser Window Components
Dragging the
separation line
As you work, you may find that you need more room for the lists or for
the Object Contents area.
¨¨
¨¨
To modify the size of the lists relative to the Object Contents area:
1 Place the cursor on the double separation line between the
Information bar and the bottom of the two lists.
The pointer becomes a double arrow .
2 Hold down the mouse button and drag the separation line.
Changing the Location of the Lists
You can change the location of the lists in the browser window using
either the Windows menu or the Preferences dialog box. The
Preferences dialog box appears when you choose Preferences from the
File menu, and then choose General... from the submenu.
In the Windows menu or Preferences dialog box, you can choose:
■ Lists on top (the default)
■ Lists on the left
■ Lists at the bottom
4D Insider Reference Manual
61
Page 62

Chapter 3 Viewing Database Objects
Note Selecting this option only affects browser windows opened afterwards.
Changing the Default Size of the Browser Window
You can specify the default size of browser windows by entering the
height and width (in pixels) in the Preferences dialog box.
¨¨
¨¨
To specify the default size of the browser window:
1 Choose Preferences from the File menu, and then choose General...
from the submenu.
4D Insider Reference Manual
62
Page 63
Organizing the Browser Windows
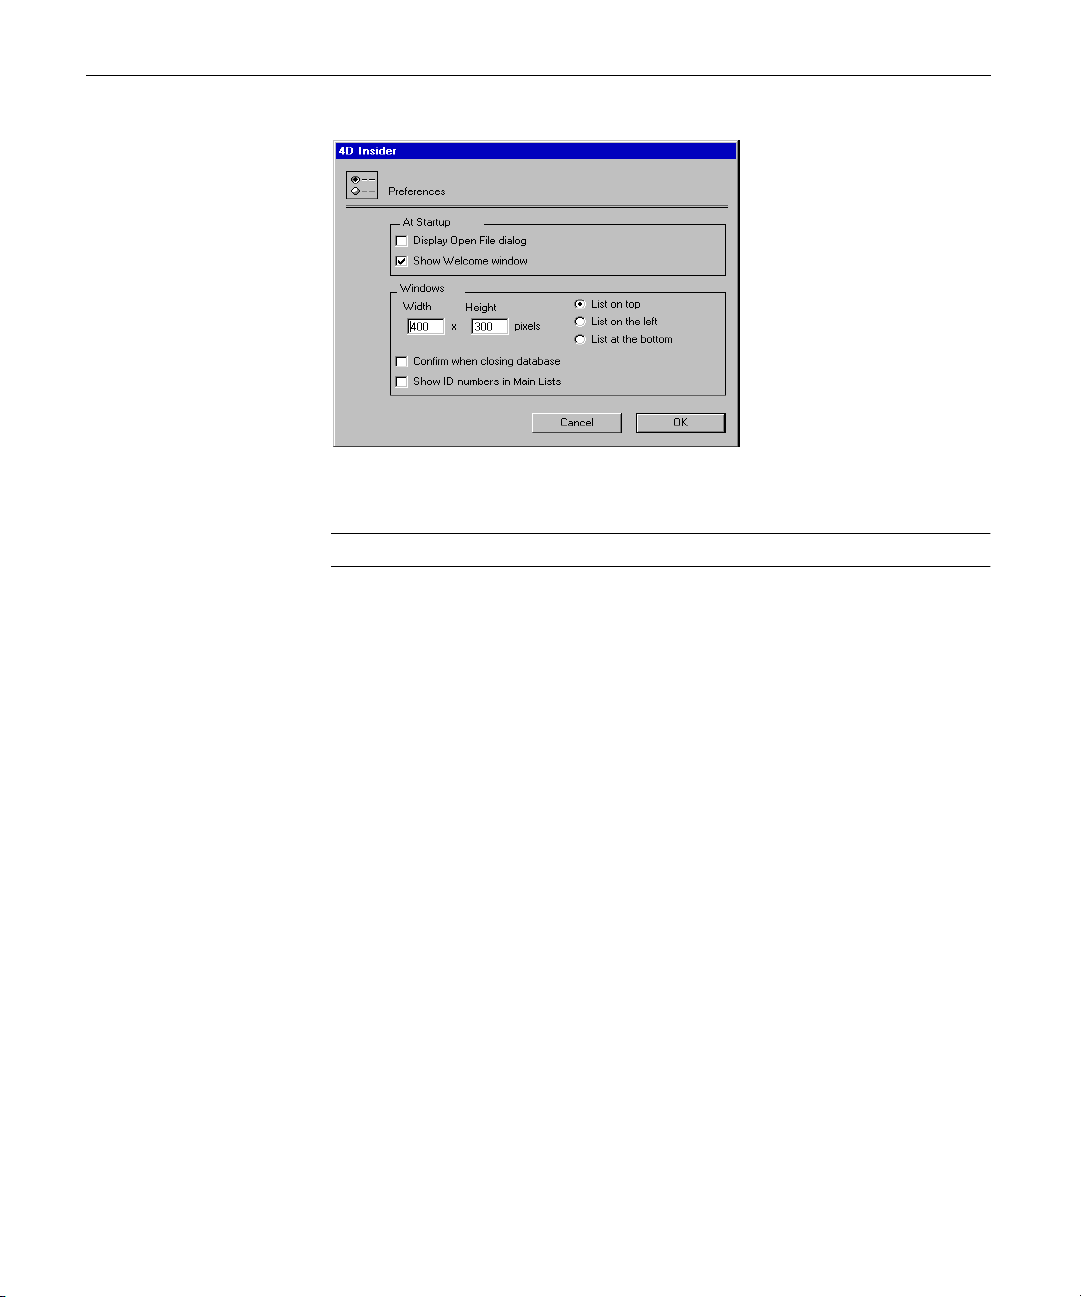
The Preferences dialog box appears.
2 Enter the height and width (in pixels).
3 Click OK.
Note Selecting this option only affects browser windows opened afterwards.
Displaying ID Numbers of Objects
¨¨
¨¨
The internal ID number of an object is a number used by 4D to keep
track of each design object in the structure file of a database. 4D Insider
also uses these numbers to track objects in databases and libraries.
In 4D Insider, you can choose to display the internal ID numbers of
objects in the Main lists of browser windows.
Usually you do not need to know about design object ID numbers.
However, if 4D, 4D Tools or any other 4D program signals an error
with an object, the error window provides you with the ID number of
the object. Copying all the objects, except the damaged ones, from a
damaged database to another, enables you to recover a structure file
manually when you have no backups or other option at your disposal.
In this case, the object ID numbers help to track damaged objects.
To display ID numbers in the Main lists:
1 Choose Preferences from the File menu, and then choose General...
from the submenu.
The Preferences dialog box appears.
4D Insider Reference Manual
63
Page 64

Chapter 3 Viewing Database Objects
2 Select the Show ID numbers in Main Lists check box.
The ID number of each object is displayed, in parentheses, next to the
object name in the Main list of each browser window. The ID numbers
are not displayed in the Used by or Uses lists.
For most objects, the ID number is also displayed in the information
area when you double-click on an object.
4D Insider Reference Manual
64
Page 65
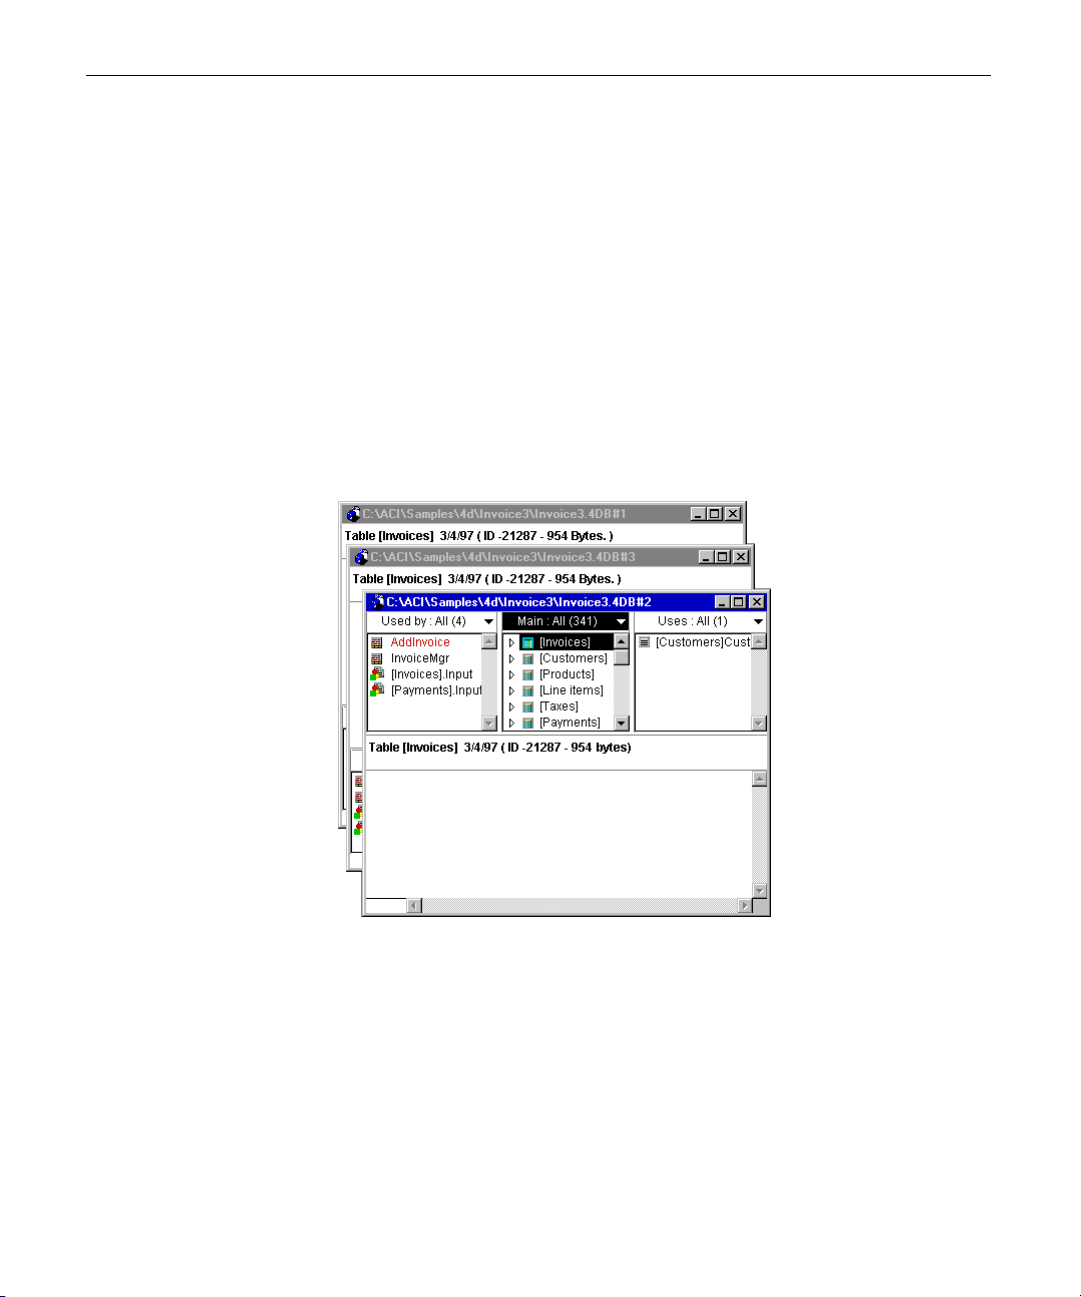
Organizing the Browser Windows
Organizing Multiple Browser Windows
You can display as many browser windows from as many databases or
libraries as you wish. The only limit is the amount of memory available
for 4D Insider.
The Windows menu lists the names of all currently open windows.
When you open additional windows, 4D Insider numbers the windows
consecutively. The window number appears in each window’s title bar
and in the Windows menu. To make a window the frontmost window,
choose it from the Windows menu or click its title bar.
During a work session, you may have many windows on the screen at
the same time. To place them in an organized pattern on screen, you
can choose either Stack or Tile from the Windows menu.
■ Stack offsets each window slightly so you can see the top and left edges
of each window.
4D Insider Reference Manual
65
Page 66

Chapter 3 Viewing Database Objects
■ Tile places each window side-by-side in a tile pattern.
4D Insider Reference Manual
66
Page 67

4 Using Filters
A pop-up menu at the top right corner of each list allows you to choose
the type of object you want to view in each list. For example, you
might want to view methods in the Main list in order to see where
each method is used and what objects each method uses.
The items listed in the pop-up menu are called filters because they filter
out all objects that do not belong to that type.
Filter pop-up menu
Most filters correspond to the types of objects identified by 4D Insider.
However, the Menus filter displays both menus and menu bars, and
the Tables filter displays tables, fields, and subtables.
4D Insider Reference Manual
67
Page 68

Chapter 4 Using Filters
Adding and Modifying Filters
You can add your own filters to find common objects or objects that
are meaningful to your particular database. For example, you may
want to find local and interprocess variables. 4D Insider provides a
filter for finding variables, but you can create additional filters for
finding local variables (beginning with the “$” symbol) or interprocess
variables (beginning with the “◊”or “<>” symbol).
Using filters to find objects meaningful to your database can be a
particularly powerful feature if you use consistent naming
conventions. For example, you might prefix all methods connected to
menus with “M_”. In this case, you could simplify your work with
menus by defining a filter that finds methods beginning with “M_”.
Note 4D Insider’s Replace feature can help you implement a naming
convention in an existing database. For information about finding and
replacing method and variables names, refer to Chapter 5, “Searching
and Replacing.”
In addition to adding new filters to 4D Insider, you can modify the
definitions of the built-in filters and control which filters appear in
each pop-up menu.
Saving Filter
Definitions
4D Insider Reference Manual
68
The filter editor is available even if you have not opened a database.
In Windows, 4D Insider saves all filter definitions in the 4D Insider
Preferences file located in the ACI directory in your system’s active
Windows directory. This file will be used even if you upgrade to a new
version of 4D Insider.
On the Macintosh, 4D Insider saves all filter definitions in the
4D Insider Preferences file located in your system’s ACI Preferences
folder. This file will be used even if you upgrade to a new version of
4D Insider.
Page 69

Adding and Modifying Filters
Adding a Filter The ability to create a filter is useful for cases in which you frequently
need to locate the same objects. If you need to locate the objects only
once, you may want to perform a search instead. For more information
about searching, refer to Chapter 5, “Searching and Replacing.”
¨¨
¨¨
To add a filter:
1 Choose Preferences from the File menu, and then choose Filters...
from the submenu.
The Edit Filters dialog box is displayed.
4D Insider Reference Manual
69
Page 70

Chapter 4 Using Filters
2 Enter the name of the filter in the Filter Name area and click the New...
button.
The following dialog box appears.
3 Choose the types of objects that should be retained by the filter by
selecting them in the Type of Object list.
A check mark appears to the right of each selected object.
You can create a contiguous selection by holding the mouse button
down and dragging over several items in the list.
To create a discontinuous selection, hold down the Shift key while
clicking individual objects.
To select all object types, click the Type of object: title bar.
4D Insider Reference Manual
70
To deselect all object types on the Macintosh, hold down the Option
key while clicking the Type of object: title bar. In Windows, hold down
the Alt key while clicking the Type of object: title bar.
4 Enter the filter criteria, if any.
Using the pop-up menu and text box, you can specify a search criteria.
If you specify a search criteria, 4D Insider will search for objects whose
names match the search criteria. If you select the Search in Contents
check box, 4D Insider will also search in the objects’ contents.
If you do not type anything in the enterable area, the filter returns all
the object types you selected.
Page 71

Adding and Modifying Filters
As with 4th Dimension, you can use the wildcard character @ to replace
one or more missing letters. For example, if you wanted to search for
methods that contain the characters “cr”, any other letters, and then
“w”, you could enter “cr@w” in the enterable area.
Filtering on the name
To filter by name, choose Name in the left pop-up menu, and enter the
name in the enterable area. In the middle pop-up menu, you can
choose whether the object’s name is exactly, contains, does not
contain, begins with, or ends with the string entered.
Filtering on the date
To filter objects by last date of modification, choose Date in the left
pop-up menu, and enter the date in the enterable area. The current
date is entered by default. In the middle pop-up menu, you can choose
whether the object’s date is the exact date, is before, is after, or is not
the date entered:
Filtering on the number of occurrences
To filter objects by the number of times they are used in the database,
choose Occurrences in the left pop-up menu, and enter the number of
occurrences in the enterable area. A “1” is entered by default. In the
middle pop-up menu, you can choose whether the object’s number of
occurrences is the equal to, greater than, less than, or different from
the number entered
4D Insider Reference Manual
71
Page 72

Chapter 4 Using Filters
5 Select the filter options.
The Search in Contents check box lets you execute a search on the
contents of an object as well as on the object’s name. If you select this
option, 4D Insider searches for the string in all methods, forms, lists,
menus, and so on. If this check box is not selected, the filter builds its
selection based on the object names. You can also select whether you
want the filter to include documented, unused, and delimiter objects.
The Documented check box allows you to choose whether to include or
exclude documented objects. For more information about
documenting objects, refer to Chapter 8, “Documenting Objects.”
The Unused check box allows you to choose whether to include or
exclude objects that are not referenced by any other objects in the
database. These objects appear in red on a color monitor, in grey on a
grey-scale monitor, and in bold on a black and white monitor.
The Delimiters check box allows you to choose whether to include or
exclude objects that have been defined as delimiters. For more
information about delimiters, refer to Chapter 7, “Moving Objects.”
The check boxes corresponding to these types of objects can be in one
of three states:
■ Dimmed: In this case, 4D Insider will not take the attribute into
account when searching for objects that match the filter criteria.
■ Checked: In this case, 4D Insider will include only that type of
object.
■ Unchecked: In this case, 4D Insider will exclude objects of that
type.
6 Click OK to save the new filter definition.
The filter appears in the list in the Edit Filters dialog box. By default, it
also appears in the three pop-up menus in the browser windows.
4D Insider Reference Manual
72
Page 73
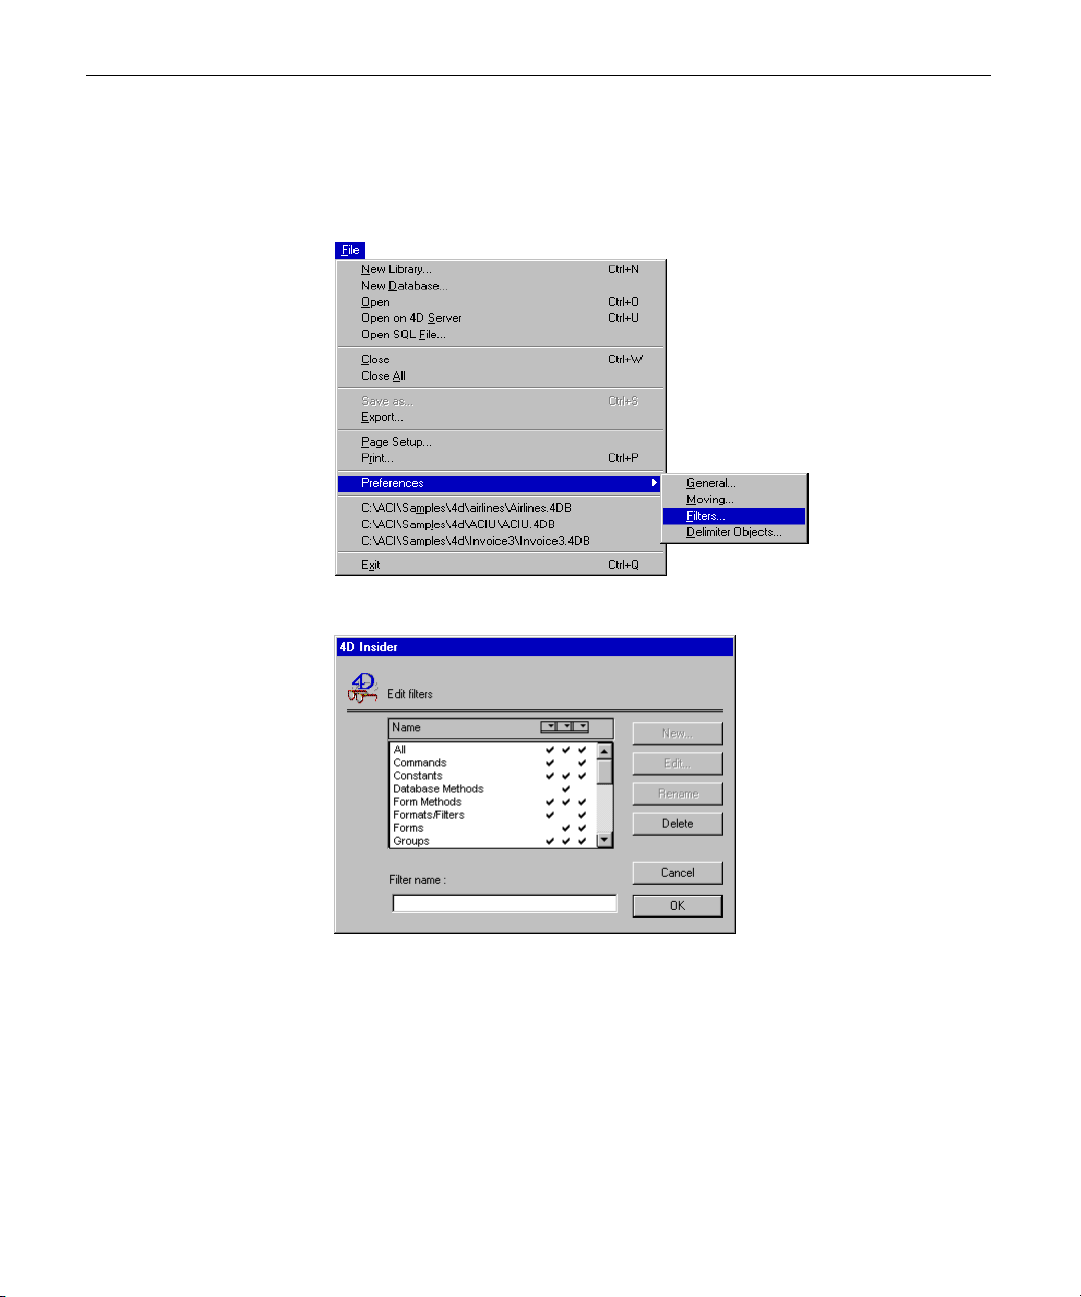
Modifying a Filter
Adding and Modifying Filters
¨¨
¨¨
To modify a filter definition:
1 Choose Preferences from the File menu, and then choose Filters...
from the submenu.
The Edit Filters dialog box appears.
2 Select the name of the filter that you want to edit.
You can edit any filter in the list, including the built-in filters.
3 Click the Edit... button, or double-click a filter name.
The Search dialog box appears.
4D Insider Reference Manual
73
Page 74

Chapter 4 Using Filters
Changing the Name of a Filter
This dialog box allows you to change the criteria used by the filter
when searching for matching objects.
4 Modify the filter definition as if you were creating a new filter.
For more information, refer to the previous section, “Adding a Filter.”
4D Insider Reference Manual
74
¨¨
¨¨
To modify the name of a filter:
1 Choose Preferences from the File menu, and then choose Filters...
from the submenu.
The Edit Filters dialog box is displayed.
2 Select the name of the filter you want to rename.
3 Type its new name in the Filter Name area.
4 Click the Rename button to validate the name change.
Page 75

Deleting a Filter
Adding and Modifying Filters
¨¨
¨¨
To delete a filter:
1 Choose Preferences from the File menu, and then choose Filters...
from the submenu.
The Edit Filters dialog box is displayed.
2 Select the name of the filter that you want to delete.
3 Click the Delete button.
Modifying the Filter Pop-up Menus
¨¨
¨¨
By default, the pop-up menus in the browser windows contain the
names of all the filters. You can add and remove filters to create your
own custom menus. Each pop-up menu may contain a different set of
filters, or all three pop-up menus may contain the same modified filter
list.
The following figure shows the pop-up menu for the Main list. It has
been modified to contain a number of filters for methods, including
two built-in filters and two added filters.
To modify the pop-up menus:
1 Choose Preferences from the File menu, and then choose Filters...
from the submenu.
A dialog box is displayed, listing the names of the filters defined by
4D Insider. Check marks to the right of the filter names correspond to
the three pop-up menus in which the filters can appear.
By default, three check marks appear for each filter, indicating that the
filter will appear in all three pop-up menus. This is true even for
custom filters that you have defined.
4D Insider Reference Manual
75
Page 76

Chapter 4 Using Filters
Used By
Main
Uses
2 Select or deselect check marks to indicate which filters should appear
in each pop-up menu.
4D Insider Reference Manual
76
¨¨
¨¨
To select all filters for a pop-up menu:
■ Click the pop-up menu title bar.
¨¨
¨¨
To deselect all filters for a pop-up menu:
■ On the Macintosh, Option-click the pop-up menu title bar.
In Windows, Alt-click the pop-up menu title bar.
Page 77
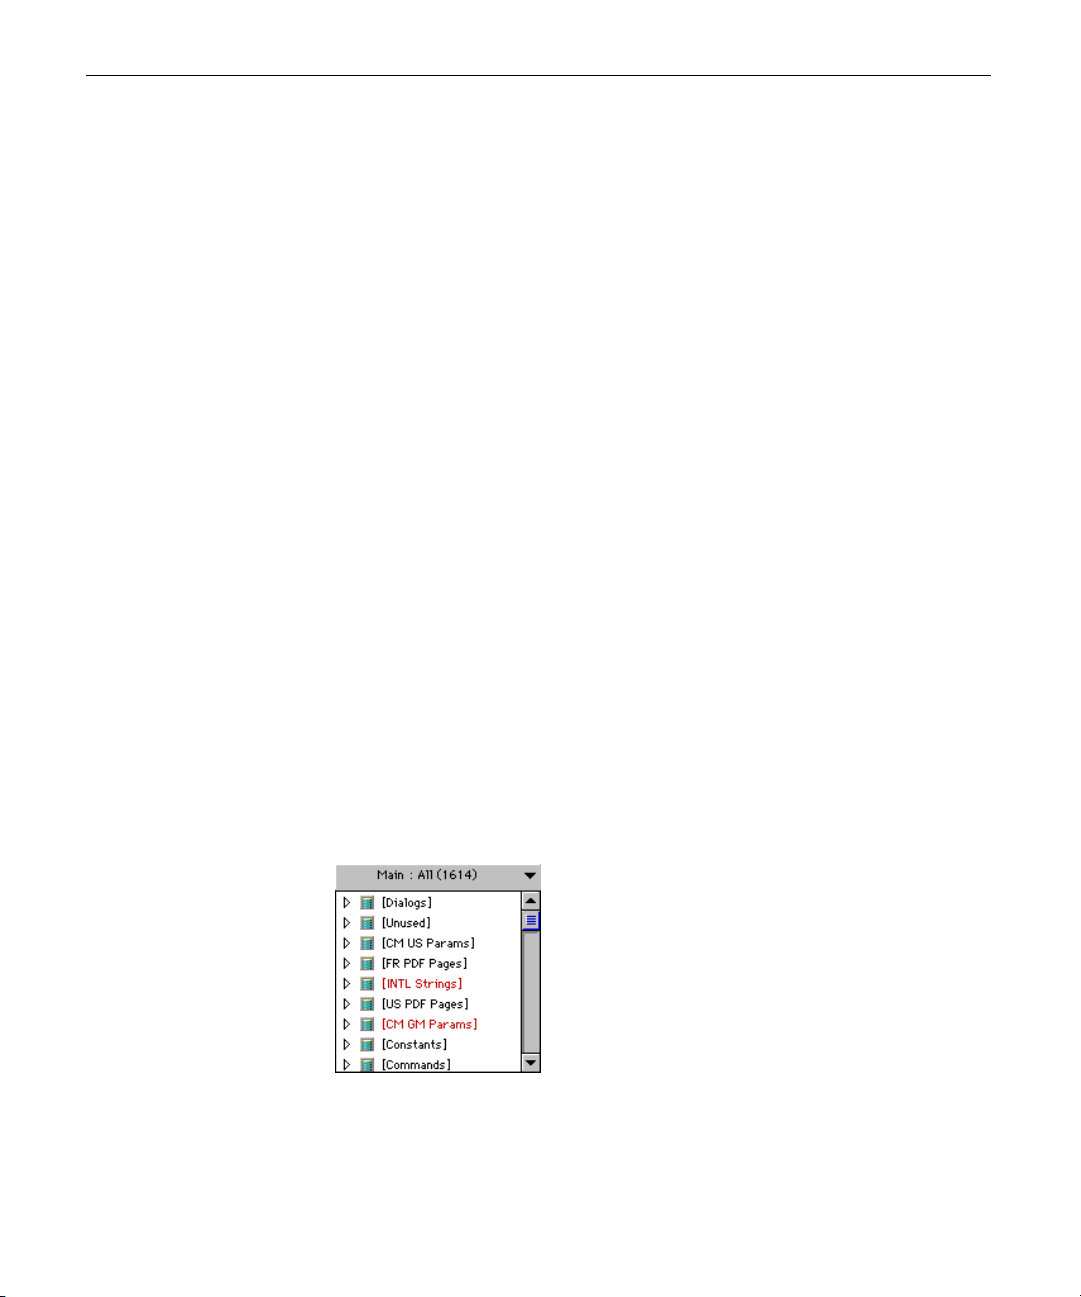
Applying Filters Within the Selection
Applying Filters Within the Selection
When you select a filter for a list, 4D Insider searches the database for
objects that correspond to the filter. When you select another filter,
4D Insider executes a new search to find objects that correspond to the
newly selected filter.
In some cases, it is helpful to keep the selection returned by the first
filter and apply another filter to that same selection.
¨¨
¨¨
To apply another filter to the selection in the Main list:
■ On the Macintosh, press the Option key while you select another filter.
In Windows, press the Alt key while you select another filter.
The Alt or Option key indicates that 4D Insider should search only
within the selection in the Main list.
Applying Anti-filters 4D Insider offers anti-filters. Unlike filters, anti-filters enable you to
remove all objects of a given type from the displayed object list.
To use an anti-filter, choose a filter in the pop-up menu while pressing
the Option-Shift (on Mac OS) or Alt-Shift (on Windows) keys.
Examples
Filter for Unused Objects
▼ This example creates a filter for unused objects. We start with a Main
list displaying all objects for a database containing over 1,500 objects.
1 In the Edit Filters dialog box, enter “Unused Objects” in the Filter
Name enterable area.
2 Click the New... button.
4D Insider Reference Manual
77
Page 78
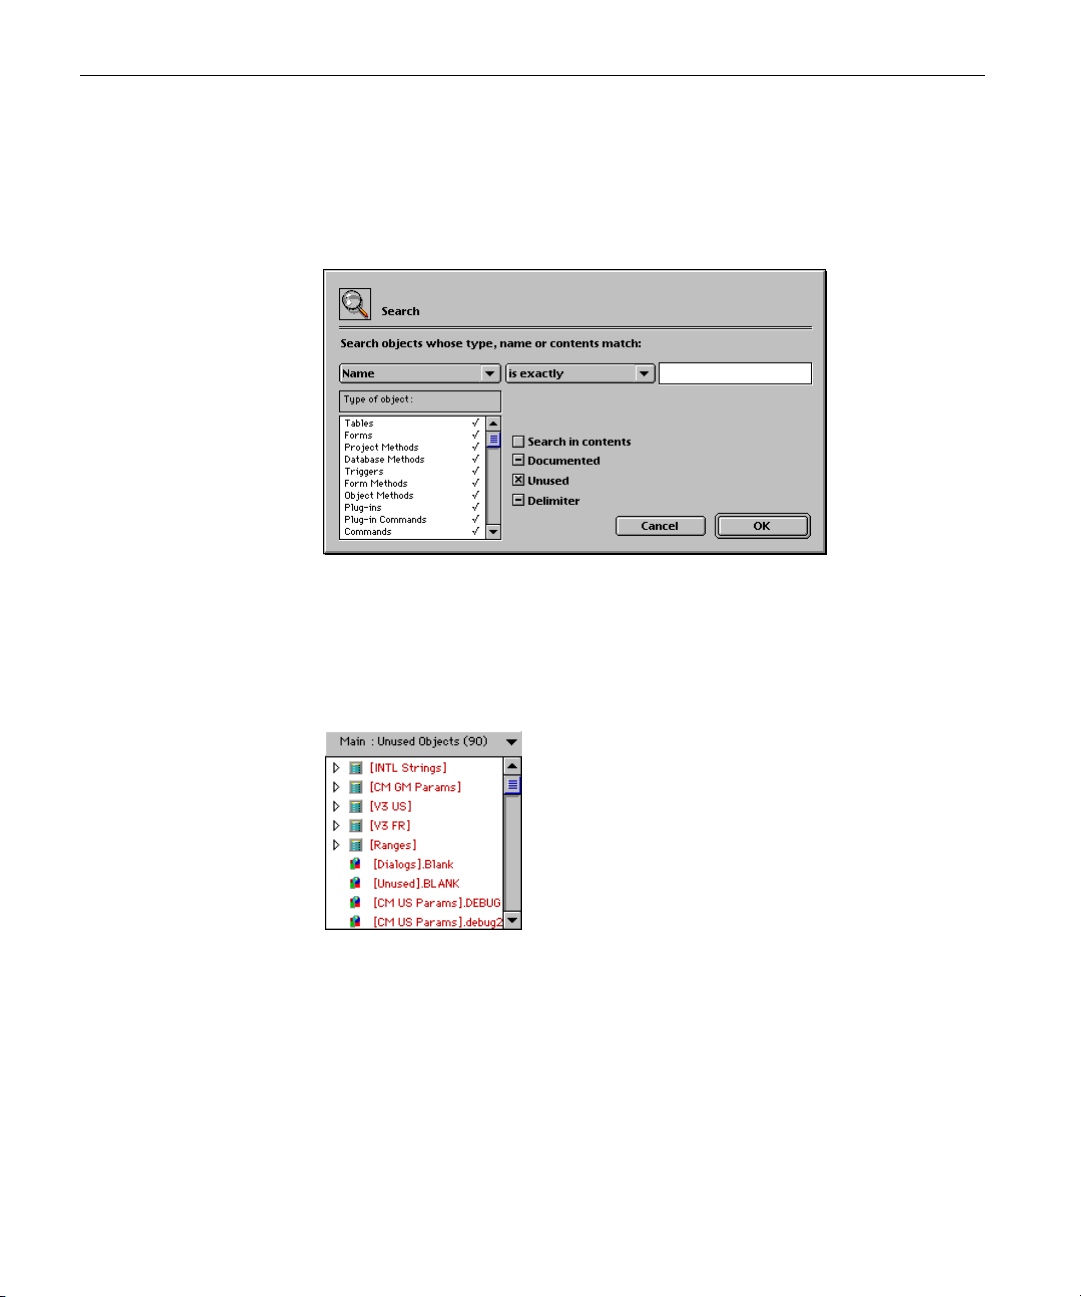
Chapter 4 Using Filters
3 Enter the Search Criteria.
The search criteria are:
■ All objects
■ No filtering on name, date or occurrences.
■ Unused is checked.
4 Validate your choices by clicking OK.
The filter Unused Objects is now present in the Main List’s filter popup menu.
5 Select the Unused Objects filter to obtain the reduced list of the
objects not used in the database.
4D Insider Reference Manual
78
Page 79

Filter for Local Variables
Examples
▼ This example creates a filter for local variables.
1 In the Edit Filters dialog box, enter “Local Variables” in the Filter Name
enterable area.
2 Click the New... button.
3 Enter the Search Criteria.
The search criteria are:
■ Variable objects only
■ The name of the object must begin with “$”
4 Validate your choices by clicking OK.
The filter Local Variables is now present in the Main List’s filter pop-up
menu.
5 Select the Local Variables filter to obtain the reduced list of the local
variables used in the database:
4D Insider Reference Manual
79
Page 80

Chapter 4 Using Filters
Filter for All Methods
▼ This example creates a filter for all types of methods.
1 In the Edit Filters dialog box, enter “All Methods” in the Filter Name
enterable area.
2 Click the New... button.
3 Enter the Search Criteria.
The search criteria are:
■ Select Project Methods, Database Methods, Triggers, Form Methods,
Object Methods
■ No filtering on name, date, or occurrence
4D Insider Reference Manual
80
4 Validate your choices by clicking OK.
The All Methods filter is now present in the Main List’s filter pop-up
menu.
5 Select the All Methods filter to obtain the reduced list of the objects
containing 4D code:
Page 81

Filter for All Menu Methods
Examples
▼ This example creates a filter for all menu methods. A Menu Methods
filter can easily be built, provided that the database uses the following
naming convention: methods associated with menu commands are
named with the prefix “M_”.
1 In the Edit Filters dialog box, enter “Menu Methods” in the Filter
Name enterable area.
2 Click the New... button.
3 Enter the Search Criteria.
The search criteria are:
■ Select Project Methods only
■ Name must begin with “M_”
4 Validate your choices by clicking OK.
The Menu Methods filter is now present in the Main List’s filter pop-up
menu.
5 Select the Menu Methods filter to obtain the reduced list of the
project methods used as menu methods:
4D Insider Reference Manual
81
Page 82

Chapter 4 Using Filters
Filter for All Process Methods
▼ This example creates a filter for all process methods. A Process Methods
filter can easily be built, provided that the database uses the following
naming convention: methods running as process methods have been
named with the prefix “P_”.
1 In the Edit Filters dialog box, enter “Process Methods” in the Filter
Name enterable area.
2 Click the New... button.
3 Enter the Search Criteria.
The search criteria are:
■ Select Project Methods only
■ Name must begin with “P_”
4D Insider Reference Manual
82
4 Validate your choices by clicking OK.
The Process Methods filter is now present in the Main List’s filter popup menu.
5 Select the Process Methods filter to obtain the reduced list of the
project methods used as process methods:
Page 83

5 Searching and Replacing
Searching for objects in a database or library allows you to quickly
locate objects based on certain criteria. Although the results of a search
may be the same as if the operation had been performed with a filter,
searches are performed once and the search criteria are not saved by
4D Insider. If you find yourself executing the same searches frequently,
you may wish to define filters using the same criteria. For more
information about filters, refer to Chapter 4, “Using Filters.”
In addition to searching for objects, you can rename the following
objects throughout a database or library:
Searching
¨¨
¨¨
To search for an object:
1 Choose Search... from the Tools menu.
The Search dialog box appears:
4D Insider Reference Manual
83
Page 84
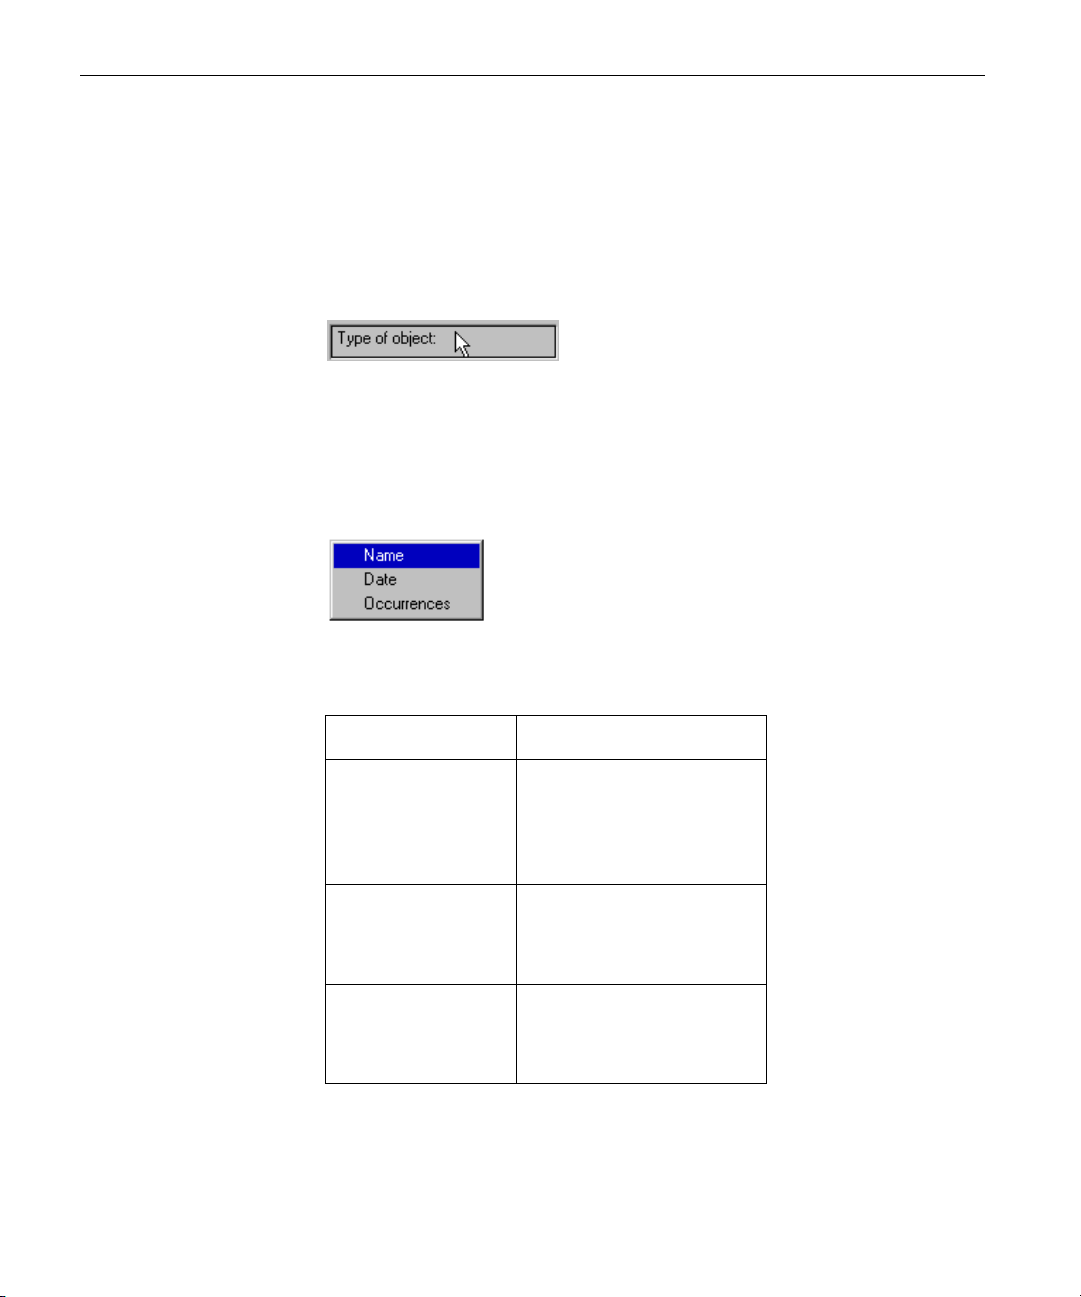
Chapter 5 Searching and Replacing
2 Select the types of objects for which you want to search.
A check mark appears to the right of the selected object types. By
default, all object types are selected.
To deselect all object types on the Macintosh, hold down the Option
key while you click the Type of object: title bar.
To deselect all object types in Windows hold down the Alt key while
you click the Type of object: title bar.
To select all object types again, click the Type of object: title bar.
3 To define a more specific search, enter the search criteria.
Using the leftmost pop-up menu, you can select whether you want to
search for objects based on a name, last modification date, or number
of occurrences.
4D Insider Reference Manual
84
Based on your selection in this pop-up menu, the comparator values in
the pop-up menu to the right will change as follows:
Search Criteria Comparator Choices
Name is exactly
contains
does not contain
begins with
ends with
Date is
is before
is after
is not
Number of
Occurrences
is equal to
is greater than
is less than
is different from
To complete the search criteria, enter a value in the enterable area. If
you do not type anything in the enterable area, the object types you
selected will be located.
Page 85

Searching
As with 4th Dimension, you can use the wildcard character @ to replace
one or more missing letters. For instance, if you wanted to search for
methods that contain the characters “cr”, any other letters, and then
“w”, you could enter “cr@w” in the enterable area.
4 Choose whether 4D Insider should search the entire database or
library, or only the selection of objects in the Main list.
5 If you want 4D Insider to search in the contents of the objects, select
the Search in Contents check box.
The Search in Contents check box allows you to specify whether the
search will include the contents of the objects as well as their names.
If the check box is not selected, the search is based only on the names
of the objects.
6 Select whether you want the search to include documented, unused,
and delimiter objects.
The Documented check box allows you to choose whether to include or
exclude documented objects. For more information about
documenting objects, refer to Chapter 8, “Documenting Objects.”
The Unused check box allows you to choose whether to include or
exclude objects that are not referenced by any other objects. These
objects appear in red on a color monitor, in grey on a grey-scale
monitor, and in bold on a black and white monitor.
The Delimiter check box allows you to choose whether to include or
exclude objects that have been defined as delimiter objects. For more
information about delimiter objects, refer to Chapter 7, “Moving
Objects.”
The check boxes corresponding to these types of objects can be in one
of three states:
■ Dimmed (Windows) or Minused (Macintosh): 4D Insider will
not take the attribute into account when searching for objects that
match the search criteria.
■ Checked: 4D Insider will include only that type of object.
■ Unchecked: 4D Insider will exclude objects of that type.
7 Click the Search button to execute the search.
The objects located by the search are displayed in the Main list.
4D Insider Reference Manual
85
Page 86

Chapter 5 Searching and Replacing
Using Multiple Search Criteria
Using 4D Insider, you can search for objects that match multiple
criteria. For instance, you can search for objects whose names start
with “M” and that contain the string “New Process”. To perform this
kind of multi-criteria search, you can execute one search with the first
search criteria. You can then execute additional searches on the objects
in the selection.
▼ In this example, we want to search for all methods whose names
contain the character string “mess” and that use the word “window”.
To follow this example, use the Invoice3 (Windows) or the 4D Invoices
(Macintosh) example database.
1 Choose Search... from the Tools menu.
2 Define the following search to search for project methods whose
names contain the letters “mess”:
4D Insider Reference Manual
86
3 Click the Search button.
OR
Press the Return key on the Macintosh.
Press the Enter key in Windows.
4D Insider executes the search. The project methods that match the
search criteria appear in the Main list.
4 Choose Search... from the Tools menu again.
5 Define the following search to look in the selection for the project
methods containing the word “window”:
Page 87

6 Click the Search button.
OR
Press the Return key on the Macintosh.
Press the Enter key in Windows.
The Main list now contains all the objects that correspond to all the
search criteria.
Renaming
Renaming
You can use the “Replace” features in the Tools menu to rename
objects in your database or library. To rename objects, you can use one
of several techniques, depending on your needs. You can:
■ Rename an object by substituting another name
■ Replace a character string in the names of any number of objects with
another character string
■ Add a prefix to the names of any number of selected objects
When you rename objects in your database, the objects are renamed
everywhere that they are used. This is true for all renaming operations
except renaming a single language element; in this case, 4D Insider
allows you to choose the objects in which the language element
should be renamed.
Renaming objects can be useful in a number of circumstances. For
example, you can change all process variables into interprocess
variables. To do this, you would find all process variables and then
prefix the symbol for interprocess variables (“◊” on the Macintosh or
“< >” in Windows) to their names.
4D Insider Reference Manual
87
Page 88

Chapter 5 Searching and Replacing
To search for process variables, you can search the database for
variables that do not contain the “$” symbol (the prefix for local
variables) and then search in the selection for variables that do not
contain the “◊” or “< >” symbol.
4D Insider allows you to rename the following types of objects:
Formats/Filters Semaphores
Forms Sets
Groups Style sheets
Lists Tables
Named selections Tips and Balloon Help
Picture Library graphics Variables
Project methods
Renaming a Single Object
Renaming Language
Objects
The process of renaming objects differs slightly, depending on whether
you are renaming language objects or design objects.
Language objects include variables, sets, semaphores and named
selections.
▼ To replace the name of one of these objects:
1 Select the object that you want to rename in the Main list.
2 Choose Replace... from the Tools menu.
4D Insider Reference Manual
88
Page 89

Renaming
The Replace dialog box appears:
3 Enter the new name of the variable.
The text area allows you to specify the new name of the language
element.
4 Select the objects in which the language element should be renamed.
The scrollable area that appears under the text area displays all the
objects that use this language element.
You can request that the name of the element be modified in all the
objects that use it. To do so, select the All objects check box.
To change the name in only some of the objects, select these objects in
the scrollable area. To make a continuous selection, Shift-click the first
and last objects in a series. For a discontinuous selection, Ctrl-click
(Windows) or q-click (Macintosh) on the individual objects.
5 Click the OK button to rename the language element in the selected
objects.
To close the dialog box without renaming the objects, click the Cancel
button instead.
Renaming Design
Objects
Design objects include tables, project methods, groups, tips, forms,
formats/filters, picture library graphics, lists, and style sheets.
¨¨
¨¨
To replace the name of one of these objects:
1 Select the object that you want to rename in the Main list.
2 Choose Replace... from the Tools menu.
4D Insider Reference Manual
89
Page 90

Chapter 5 Searching and Replacing
The Replace dialog box appears:
Note that this dialog box does not contain a list of the objects in which
the project method is used. The name of the project method will be
modified in all the objects in which it is used.
3 Enter the new name of the object.
The OK button is now enabled.
4 Click OK to rename the object.
Replacing a String in a Selection of Objects
4D Insider allows you to rename multiple objects at the same time by
replacing a string of characters in their names with another string of
characters. You specify the objects to be renamed by selecting them in
the Main list. The selection can contain any type of object.
Note The Replace in selection... command allows you to rename a selection
of variables all at once, everywhere in the database. For example, you
can globally transform a group of process variables into interprocess
variables. The Replace command gives you the ability to rename a
given variable in a sub-selection of objects.
¨¨
¨¨
To replace one string with another:
1 Select the objects in which you want to replace the string.
To make a continuous selection, Shift-click the first and last objects in a
series. For a discontinuous selection, Ctrl-click (Windows) or Command-
click (Macintosh) on the individual objects.
To select all the items in a list, choose Select All from the Edit menu.
4D Insider Reference Manual
90
Page 91
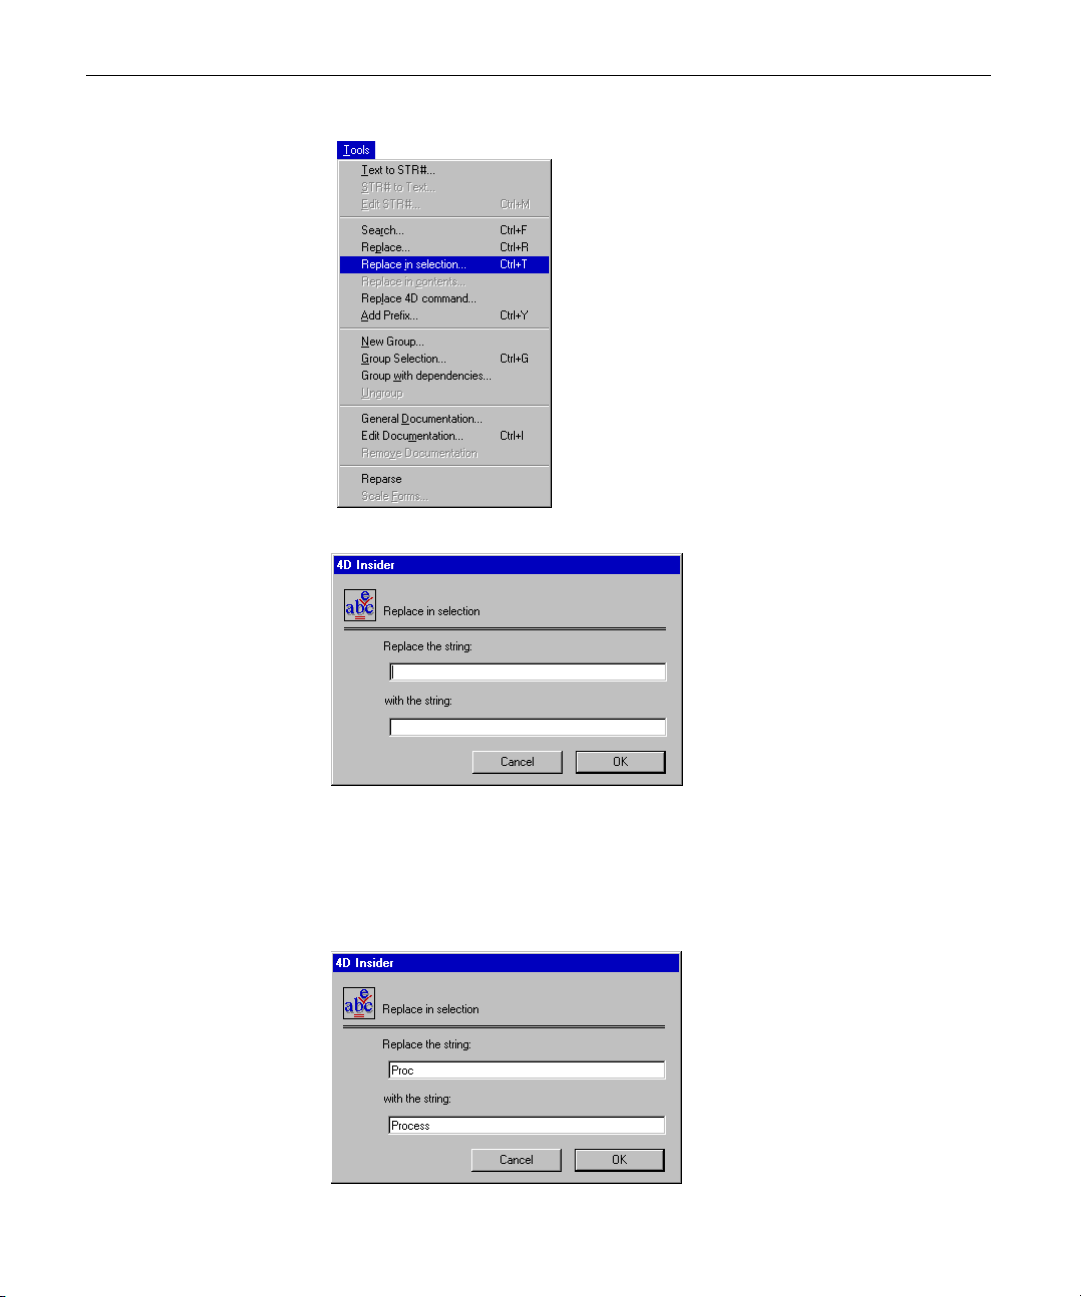
2 Choose Replace in Selection... from the Tools menu.
The Replace in Selection dialog box appears.
Renaming
3 In the “Replace the string:” text box, enter the string of characters
that you want to replace.
4 In the “with the string:” text box, enter the string of characters that
will replace the preceding string.
Here, we replace all occurrences of “Proc” with “Process”.
4D Insider Reference Manual
91
Page 92

Chapter 5 Searching and Replacing
5 Click the OK button to replace the string.
4D Insider replaces the string in each object in the selection that
contains it. The string is also modified in any references to this object.
Note If you replace the name of an object that is referred to by name
between quotation marks in methods, only explicit references to the
objects will be replaced. All references calculated during the execution
of the code will not be replaced. For instance, if the name of a
semaphore is defined as “MySemaphore:=Semaphore(“Proc” +
String(Current process))”, it will not be replaced.
Prefixing a Selection
of Objects
Note The Add Prefix... commands allows you to rename a selection of
You can prefix the names of several objects with a string of characters.
This option allows you to create a more readable structure by giving
objects meaningful prefixes.
Using prefixes also helps you to group related objects together, since
the Main list is sorted by type and then alphabetically. For example, in
a database, all project methods associated with menus could begin
with the characters “M_”; these methods appear together in the Main
list.
variables all at once, everywhere in the database. For example, you can
globally transform a group of process variables into interprocess
variables. The Replace command gives you the ability to rename a
given variable in a sub-selection of objects.
Once you have given a set of objects the same prefix, you can easily
create a custom filter for them. For more information about creating
filters, refer to Chapter 4, “Using Filters.”
¨¨
¨¨
To add a prefix to a selection of objects:
1 Select the objects to which you want to add a prefix.
To create a continuous selection, Shift-click the first and last objects in a
series. To create a discontinuous selection, Ctrl-click (Windows) or
Command-click (Macintosh) on the individual objects.
To select all the items in a list, choose Select All from the Edit menu.
4D Insider Reference Manual
92
Page 93
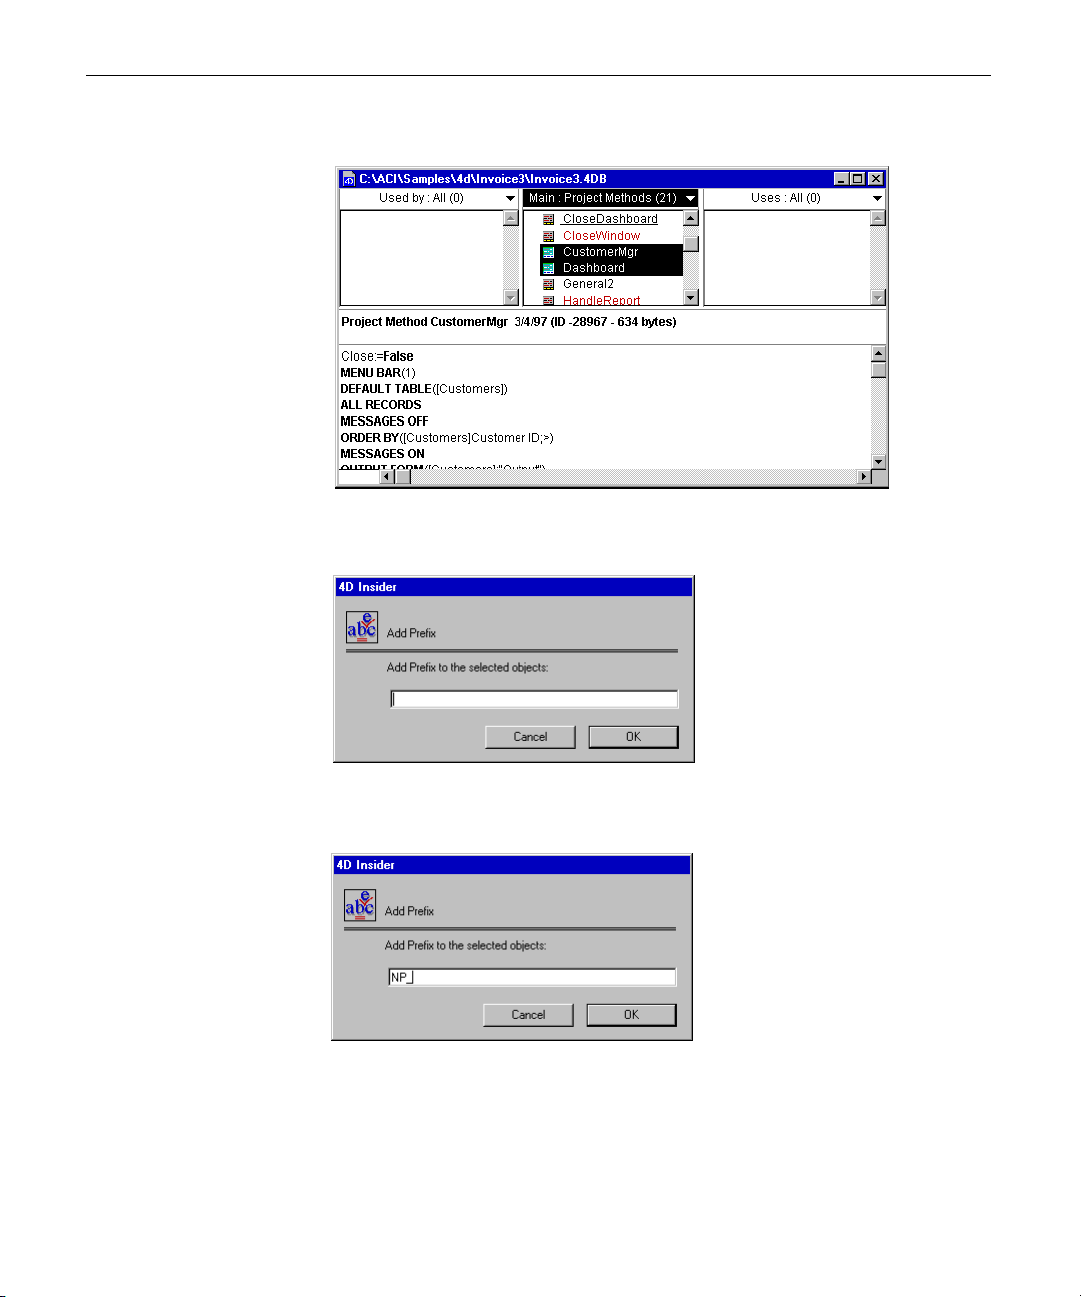
In the example shown, we have found and selected all the project
methods whose contents or name contains the string “New process”:
2 Choose Add a Prefix... from the Tools menu.
The Prefix dialog box appears.
Renaming
3 Enter the prefix that you want to add to the objects.
In this example, we add the prefix “NP_”:
4 Click OK to add the prefix.
If the prefix would make the name of any objects too long, 4D Insider
displays an alert dialog box enabling you to truncate the names.
4D Insider Reference Manual
93
Page 94

Chapter 5 Searching and Replacing
If you click OK, the prefix will be added and the extra letters will be
removed from the end of the object names.
If you click Cancel, the prefix will not be added to any of the selected
objects and you will be returned to the Prefix dialog box.
In our example, if you click OK to truncate the names of the objects,
the letters “NP_” are added to all the objects in the selection.
4D Insider also updates any cross-references to these objects in other
parts of the structure.
4D Insider Reference Manual
94
Note If you prefix the name of an object that is referred to by name between
quotation marks in methods, only explicit references to the objects
will be replaced. All references calculated at runtime will not be
replaced. For instance, if the name of a semaphore is defined as
“MySemaphore:=Semaphore(“Process” + String(Current process))”,
it will not be prefixed.
Page 95

Renaming
Replacing Text in Forms and Tips
You may want to replace static text and button text in forms, or replace
text in tips. You can find and replace text in selected forms and tips,
using the Replace in contents... command in the Tools menu.
¨¨
¨¨
To replace text in a selection of forms or tips:
1 Select the objects in which you want to replace the text.
To create a continuous selection, Shift-click the first and last objects in a
series. To create a discontinuous selection, Ctrl-click (Windows) or
q-click (Macintosh) on the individual objects.
To select all the items in a list, choose Select All from the Edit menu.
2 Choose Replace in contents... from the Tools menu.
The Replace in contents dialog box appears.
3 In the “Replace the string” text box, enter the text string to be
replaced.
4D Insider Reference Manual
95
Page 96

Chapter 5 Searching and Replacing
4 Enter the new text string in the “with the string” text box.
For example, if the tip [Customers]Customer ID contains the text
“Client identification code” and we want the tip to read “Customer
identification code” we would enter the following:
The tip text displayed in the browser window reflects the change.
Replacing Commands
4D Insider Reference Manual
96
You may want to replace a 4D command in a method. You can replace
4D commands in selected methods, using the Replace 4D command...
in the Tools menu. You can replace a command with an existing
project method or with a new project method.
¨¨
¨¨
To replace a 4D command in a selection of methods:
1 Select the objects for which you want to replace a command.
To create a continuous selection, Shift-click the first and last objects in a
series. To create a discontinuous selection, Ctrl-click (Windows) or
q-click (Macintosh) on the individual objects.
To select all the items in a list, choose Select All from the Edit menu.
Page 97

2 Choose Replace 4D command... from the Tools menu.
The Replace 4D command dialog box appears.
Renaming
List of 4D
commands
List of project
methods
3 Select the command to be replaced by clicking its name in the list, or
by typing the first few characters of its name.
The command is selected in the command list, and the command
name appears in the text box below the list.
4D Insider Reference Manual
97
Page 98

Chapter 5 Searching and Replacing
4 Select an existing method by clicking its name in the list, or by typing
the first few characters of its name.
OR
Create a new project method by typing its name in the text box below
the project method list.
The project method name appears in the text box below the project
method list.
5 If you are using an existing project method, click Replace.
If you are creating a new project method, click Create and Replace.
Selecting an existing
project method
4D Insider Reference Manual
98
Creating a new
project method
The command is replaced by the project method. Any new project
method you create appears in the Main list. When you create a new
project method, 4D Insider inserts a comment at the beginning of the
new method, describing the conditions of its creation.
Page 99

6 Using Groups
Developers are interested in creating code that is both reusable and
easily maintainable—in a word, modular. 4D Insider supports the
development of modular code by allowing you to organize design
objects into libraries and groups.
Using groups, you can reorganize objects according to their function.
This reorganization can help simplify structures viewed within
4D Insider.
Groups organize objects within a structure or library based on object
functionality. When you group objects together, they are moved into a
folder whose name is the same as that of the group.
For each database or library, you can create as many groups as you
want. Within groups, you can create as many levels of subgroups as
you want.
4D Insider considers a group to be a type of object. Unlike libraries, the
purpose of a group is not to duplicate objects in your database, but
rather to reorganize objects into folders according to their functions.
You can use groups to:
■ Clarify the organization of a database.
■ Make it easier to move objects associated with a particular aspect of
your database’s functionality.
4D Insider Reference Manual
99
Page 100

Chapter 6 Using Groups
For example, you might place objects concerning an invoicing system
in one group and those concerning an inventory system in another.
You could then create subgroups for the different parts of the invoicing
and inventory systems. To reuse a part of a system, you would simply
move the group from the library or structure into another library or
structure.
For more information about moving objects, refer to Chapter 7,
“Moving Objects.”
Creating a Group
¨¨
¨¨
To create a group:
1 Open a database or library with 4D Insider.
2 Choose New Group from the Tools menu.
4D Insider Reference Manual
100
A dialog box appears, allowing you to enter the name of the group:
 Loading...